1. Introduction
Cloud Spanner is a fully managed horizontally scalable, globally distributed, relational database service that provides ACID transactions and SQL semantics without giving up performance and high availability.
GKE Autopilot is a mode of operation in GKE in which Google manages your cluster configuration, including your nodes, scaling, security, and other preconfigured settings to follow best practices. For instance, GKE Autopilot enables Workload Identity to manage service permissions.
The goal of this lab is to walk you through the process to connect several backend services running on GKE Autopilot to a Cloud Spanner database.
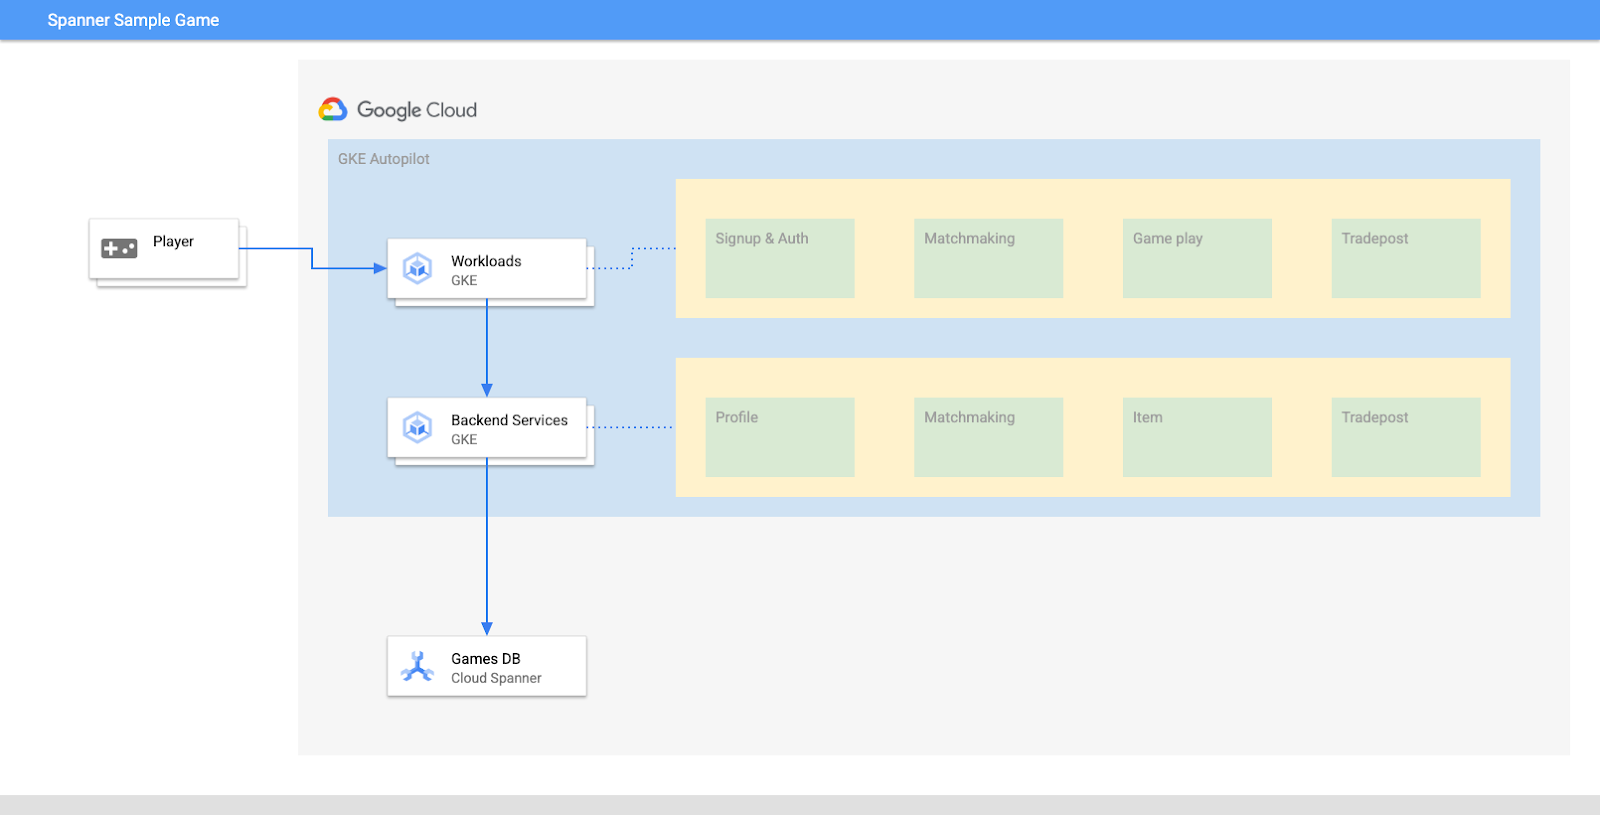
In this lab, you will first set up a project and launch Cloud Shell. Then you will deploy the infrastructure using Terraform.
When that is finished, you will interact with Cloud Build and Cloud Deploy to perform an initial schema migration for the Games database, deploy the backend services and then deploy the workloads.
The services in this codelab are the same from the Cloud Spanner Getting Started with Games Development codelab. Going through that codelab is not a requirement to get the services running on GKE and connecting to Spanner. But if you are interested in more details of the specifics of those services that work on Spanner, check it out.
With the workloads and backend services running, you can begin generating load and observe how the services work together.
Finally, you will clean up the resources that were created in this lab.
What you'll build
As part of this lab, you will:
- Provision the infrastructure using Terraform
- Create the database schema using a Schema Migration process in Cloud Build
- Deploy the four Golang backend services that leverage Workload Identity to connect to Cloud Spanner
- Deploy the four workload services which are used to simulate load for the backend services.
What you'll learn
- How to provision GKE Autopilot, Cloud Spanner, and Cloud Deploy pipelines using Terraform
- How Workload Identity allows services on GKE to impersonate service accounts to access the IAM permissions to work with Cloud Spanner
- How to generate production-like load on GKE and Cloud Spanner using Locust.io
What you'll need
2. Setup and requirements
Create a project
If you don't already have a Google Account (Gmail or Google Apps), you must create one. Sign-in to Google Cloud Platform console ( console.cloud.google.com) and create a new project.
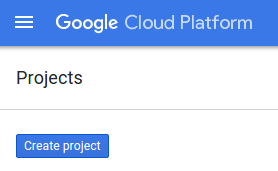
If you already have a project, click on the project selection pull down menu in the upper left of the console:

and click the ‘NEW PROJECT' button in the resulting dialog to create a new project:

If you don't already have a project, you should see a dialog like this to create your first one:
The subsequent project creation dialog allows you to enter the details of your new project:
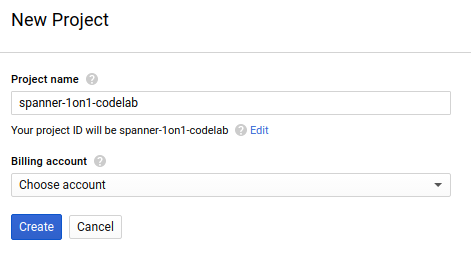
Remember the project ID, which is a unique name across all Google Cloud projects (the name above has already been taken and will not work for you, sorry!). It will be referred to later in this codelab as PROJECT_ID.
Next, if you haven't already done so, you'll need to enable billing in the Developers Console in order to use Google Cloud resources and enable the Cloud Spanner API.
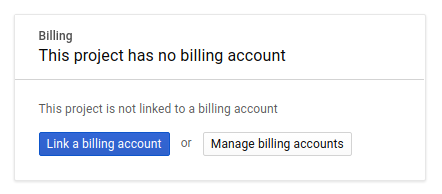
Running through this codelab shouldn't cost you more than a few dollars, but it could be more if you decide to use more resources or if you leave them running (see "cleanup" section at the end of this document). Google Cloud Spanner pricing is documented here, and GKE Autopilot is documented here.
New users of Google Cloud Platform are eligible for a $300 free trial, which should make this codelab entirely free of charge.
Cloud Shell setup
While Google Cloud and Spanner can be operated remotely from your laptop, in this codelab we will be using Google Cloud Shell, a command line environment running in the Cloud.
This Debian-based virtual machine is loaded with all the development tools you'll need. It offers a persistent 5GB home directory and runs in Google Cloud, greatly enhancing network performance and authentication. This means that all you will need for this codelab is a browser (yes, it works on a Chromebook).
- To activate Cloud Shell from the Cloud Console, simply click Activate Cloud Shell
 (it should only take a few moments to provision and connect to the environment).


Once connected to Cloud Shell, you should see that you are already authenticated and that the project is already set to your PROJECT_ID.
gcloud auth list
Command output
Credentialed accounts:
 - <myaccount>@<mydomain>.com (active)
gcloud config list project
Command output
[core]
project = <PROJECT_ID>
If, for some reason, the project is not set, simply issue the following command:
gcloud config set project <PROJECT_ID>
Looking for your PROJECT_ID? Check out what ID you used in the setup steps or look it up in the Cloud Console dashboard:
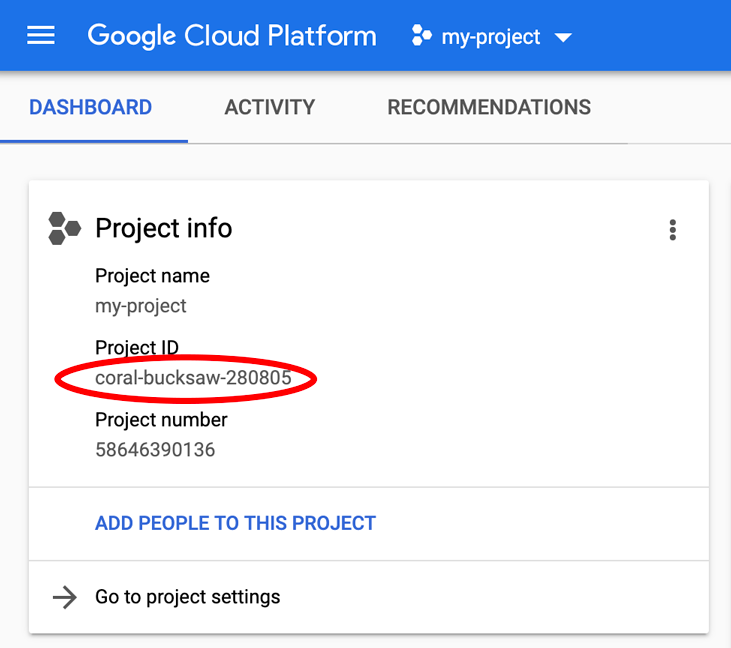
Cloud Shell also sets some environment variables by default, which may be useful as you run future commands.
echo $GOOGLE_CLOUD_PROJECT
Command output
<PROJECT_ID>
Download the code
In Cloud Shell, you can download the code for this lab:
git clone https://github.com/cloudspannerecosystem/spanner-gaming-sample.git
Command output
Cloning into 'spanner-gaming-sample'...
*snip*
This codelab is based on the v0.1.3 release, so check that tag out:
cd spanner-gaming-sample
git fetch --all --tags

# Check out v0.1.3 release
git checkout tags/v0.1.3 -b v0.1.3-branch
Command output
Switched to a new branch 'v0.1.3-branch'
Now, set the current working directory as the DEMO_HOME environment variable. This will allow easier navigating as you work through the different pieces of the codelab.
export DEMO_HOME=$(pwd)
Summary
In this step you have set up a new project, activated cloud shell, and downloaded the code for this lab.
Next up
Next, you will provision the infrastructure using Terraform.
3. Provision infrastructure
Overview
With your project ready, it's time to get the infrastructure running. This includes VPC networking, Cloud Spanner, GKE Autopilot, Artifact Registry to store the images that will run on GKE, the Cloud Deploy pipelines for the backend services and workloads, and finally the service accounts and IAM privileges to be able to use those services.
It's a lot. But luckily, Terraform can simplify getting this set up. Terraform is an "Infrastructure as Code" tool that allows us to specify what we need for this project in a series of ‘.tf' files. This makes provisioning infrastructure simple.
Being familiar with Terraform is not a requirement to complete this codelab. But if you want to see what the next few steps are doing, you can take a look at what all is created in these files located in the infrastructure directory:
- vpc.tf
- backend_gke.tf
- spanner.tf
- artifact_registry.tf
- pipelines.tf
- iam.tf
Configure Terraform
In Cloud Shell, you will change into the infrastructure directory and initialize Terraform:
cd $DEMO_HOME/infrastructure
terraform init
Command output
Initializing the backend...

Initializing provider plugins...
*snip*
Terraform has been successfully initialized!

You may now begin working with Terraform. Try running "terraform plan" to see
any changes that are required for your infrastructure. All Terraform commands
should now work.

If you ever set or change modules or backend configuration for Terraform,
rerun this command to reinitialize your working directory. If you forget, other
commands will detect it and remind you to do so if necessary.
Next, configure Terraform by copying the terraform.tfvars.sample and modifying the project value. The other variables can be changed as well, but the project is the only one that has to be changed to work with your environment.
cp  terraform.tfvars.sample terraform.tfvars
# edit gcp_project using the project environment variable
sed -i "s/PROJECT/$GOOGLE_CLOUD_PROJECT/" terraform.tfvars
Provision the infrastructure
Now it's time to provision the infrastructure!
terraform apply
# review the list of things to be created
# type 'yes' when asked
Command output
Plan: 46 to add, 0 to change, 0 to destroy.

Do you want to perform these actions?
  Terraform will perform the actions described above.
  Only 'yes' will be accepted to approve.

  Enter a value: yes

google_project_service.project["container.googleapis.com"]: Creating...
*snip*
Apply complete! Resources: 46 added, 0 changed, 0 destroyed.
Check what was created
To verify what was created, you want to check the products in Cloud Console.
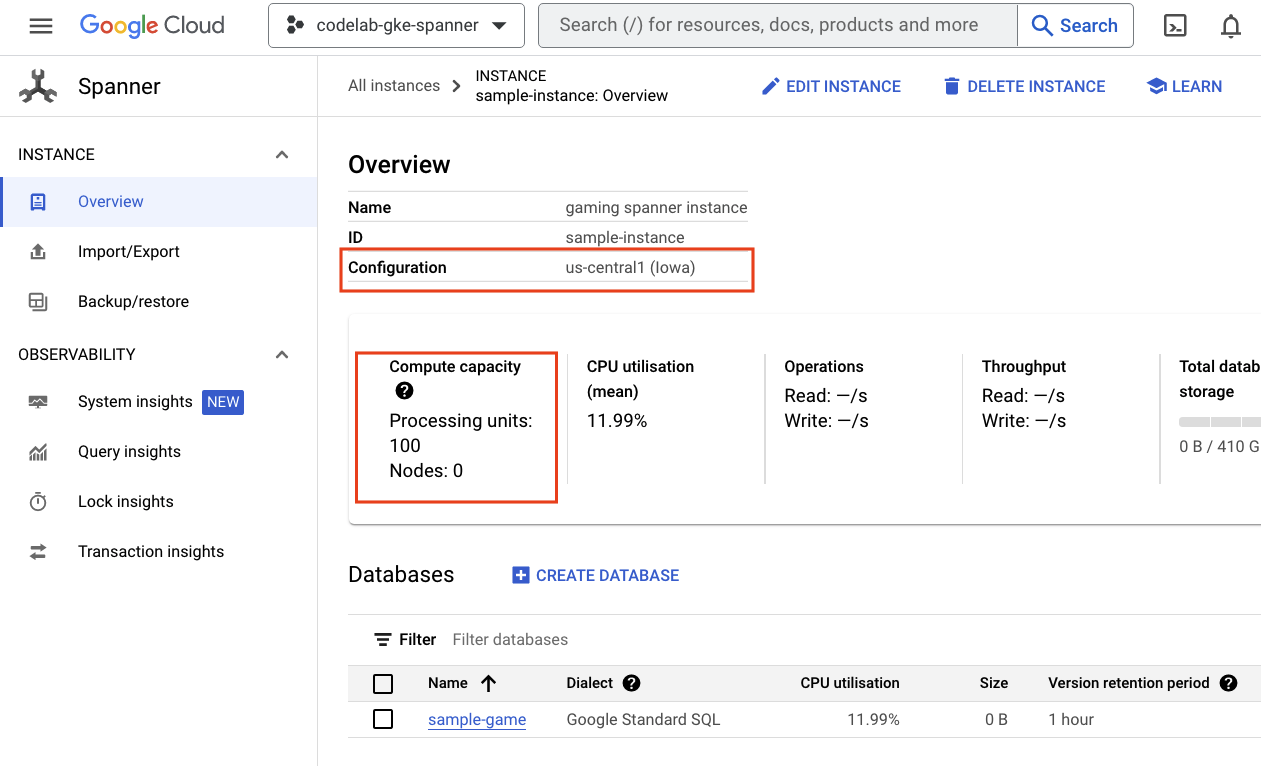
Cloud Spanner
First, check Cloud Spanner by navigating to the hamburger menu and clicking on Spanner. You might have to click ‘View more products' to find it in the list.
This will take you to the list of Spanner instances. Click into the instance and you will see the databases. It should look something like this:
GKE Autopilot
Next, check out GKE by navigating to the hamburger menu and clicking Kubernetes Engine => Clusters. Here you will see the sample-games-gke cluster running in Autopilot mode.

Artifact Registry
Now you'll want to see where the images will be stored. So click the hamburger menu and find Artifact Registry=>Repositories. Artifact Registry is in the CI/CD section of the menu.
Here, you will see a Docker registry named spanner-game-images. This will be empty for now.

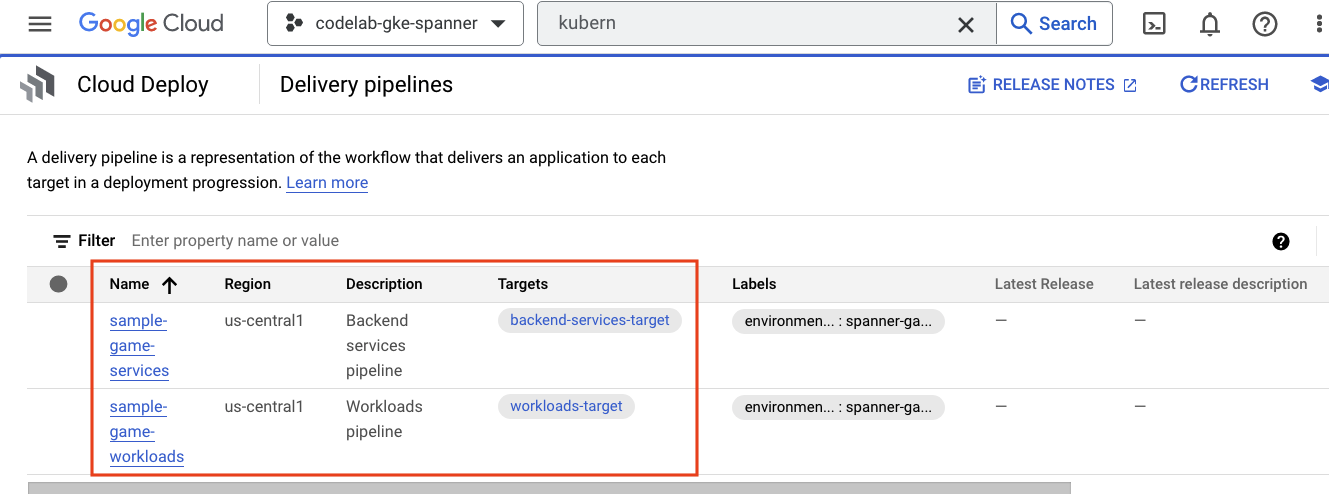
Cloud Deploy
Cloud Deploy is where the pipelines were created so that Cloud Build could provide steps to build the images and then deploy them to our GKE cluster.
Navigate to the hamburger menu and find Cloud Deploy, which is also in the CI/CD section of the menu.
Here you will notice two pipelines: one for backend services, and one for workloads. They both deploy the images to the same GKE cluster, but this allows for separating our deployments.
IAM
Finally, check out the IAM page in Cloud Console to verify the service accounts that were created. Navigate to the hamburger menu and find IAM and Admin=>Service accounts. It should look something like this:
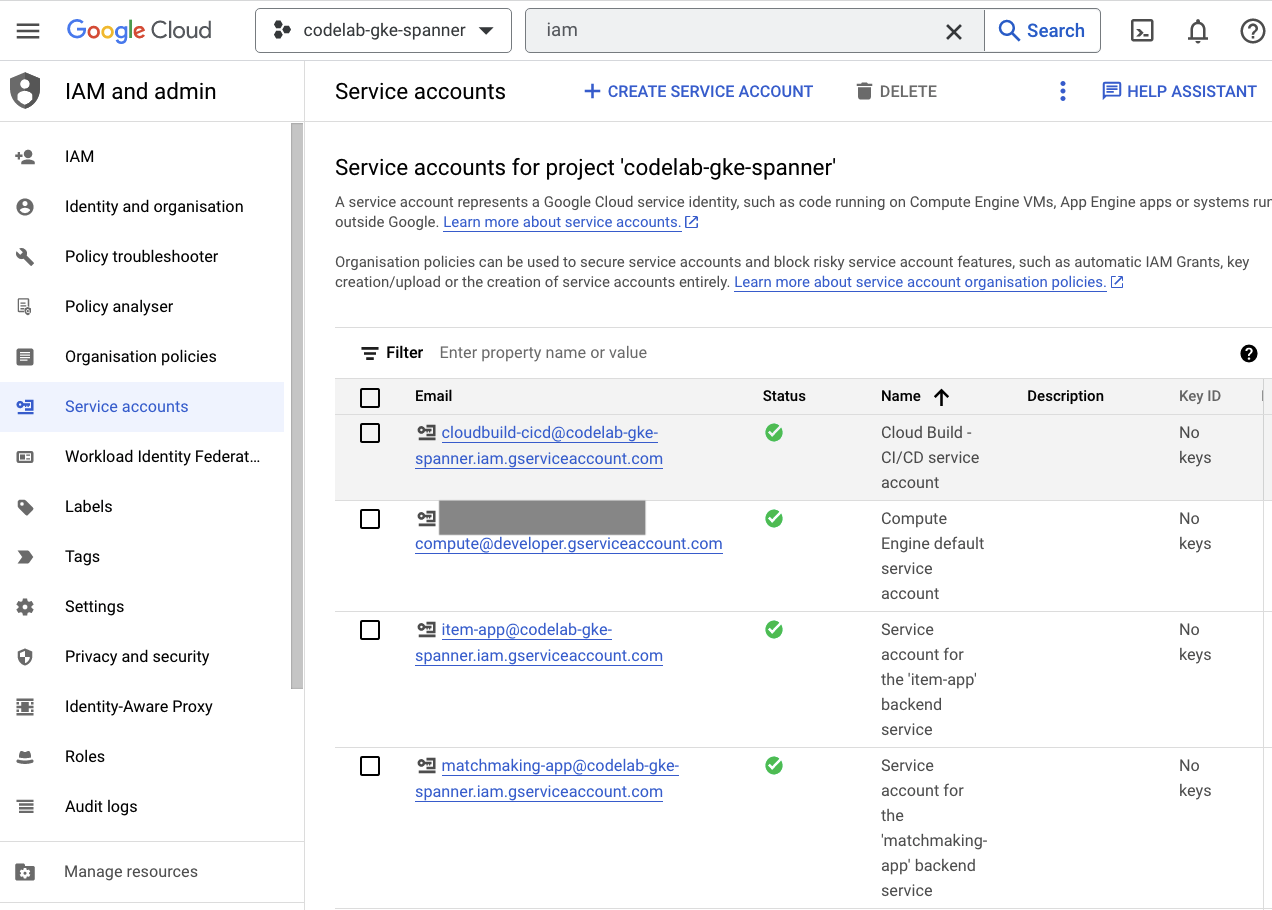
There are six total service accounts that are created by Terraform:
- The default computer service account. This is unused in this codelab.
- The cloudbuild-cicd account is used for the Cloud Build and Cloud Deploy steps.
- Four ‘app' accounts that are used by our backend services to interact with Cloud Spanner.
Next you'll want to configure kubectl to interact with the GKE cluster.
Configure kubectl
# Name of GKE cluster from terraform.tfvars file
export GKE_CLUSTER=sample-game-gke

# get GKE credentials
gcloud container clusters get-credentials $GKE_CLUSTER --region us-central1

# Check that no errors occur
kubectl get serviceaccounts
Command output
#export GKE_CLUSTER=sample-game-gke

# gcloud container clusters get-credentials $GKE_CLUSTER --region us-central1
Fetching cluster endpoint and auth data.
kubeconfig entry generated for sample-game-gke.

# kubectl get serviceaccounts
NAME              SECRETS   AGE
default           0         37m
item-app          0         35m
matchmaking-app   0         35m
profile-app       0         35m
tradepost-app     0         35m
Summary
Great! You were able to provision a Cloud Spanner instance, a GKE Autopilot cluster, all in a VPC for private networking.
Additionally, two Cloud Deploy pipelines were created for the backend services and the workloads, as well as an Artifact Registry repository to store the built images.
And finally, the service accounts were created and configured to work with Workload Identity so the backend services can use Cloud Spanner.
You also have kubectl configured to interact with the GKE cluster in Cloud Shell after you deploy the backend services and workloads.
Next up
Before you can use the services, the database schema needs to be defined. You will set that up next.
4. Create the database schema
Overview
Before you can run the backend services, you need to make sure that the database schema is in place.
If you look at the files in the $DEMO_HOME/schema/migrations directory from the demo repository, you will see a series of .sql files that define our schema. This mimics a development cycle where schema changes are tracked in the repository itself, and can be tied to certain features of the applications.
For this sample environment, wrench is the tool that will apply our schema migrations using Cloud Build.
Cloud Build
The $DEMO_HOME/schema/cloudbuild.yaml file describes what steps are going to be taken:
serviceAccount: projects/${PROJECT_ID}/serviceAccounts/cloudbuild-cicd@${PROJECT_ID}.iam.gserviceaccount.com
steps:
- name: gcr.io/cloud-builders/curl
 id: fetch-wrench
 args: ['-Lo', '/workspace/wrench.tar.gz', 'https://github.com/cloudspannerecosystem/wrench/releases/download/v1.4.1/wrench-1.4.1-linux-amd64.tar.gz' ]

- name: gcr.io/cloud-builders/gcloud
 id: migrate-spanner-schema
 entrypoint: sh
 args:
 - '-xe'
 - '-c'
 - |
   tar -xzvf wrench.tar.gz

   chmod +x /workspace/wrench

   # Assumes only a single spanner instance and database. Fine for this demo in a dedicated project
   export SPANNER_PROJECT_ID=${PROJECT_ID}
   export SPANNER_INSTANCE_ID=$(gcloud spanner instances list | tail -n1 | awk '{print $1}')
   export SPANNER_DATABASE_ID=$(gcloud spanner databases list --instance=$$SPANNER_INSTANCE_ID | tail -n1 | awk '{print $1}')

   if [ -d ./migrations ]; then
     /workspace/wrench migrate up --directory .
   else
     echo "[Error] Missing migrations directory"
   fi
timeout: 600s
There are basically two steps:
- download wrench to the Cloud Build workspace
- run the wrench migration
The Spanner project, instance and database environment variables are needed for wrench to connect to the write endpoint.
Cloud Build is able to make these changes because it is running as the cloudbuild-cicd@${PROJECT_ID}.iam.gserviceaccount.com service account:
serviceAccount: projects/${PROJECT_ID}/serviceAccounts/cloudbuild-cicd@${PROJECT_ID}.iam.gserviceaccount.com
And this service account has the spanner.databaseUser role added by Terraform, which allows the service account to updateDDL.
Schema migrations
There are five migration steps that are performed based on the files in the $DEMO_HOME/schema/migrations directory. Here's an example of the 000001.sql file that creates a players table and indexes:
CREATE TABLE players (
   playerUUID STRING(36) NOT NULL,
   player_name STRING(64) NOT NULL,
   email STRING(MAX) NOT NULL,
   password_hash BYTES(60) NOT NULL,
   created TIMESTAMP,
   updated TIMESTAMP,
   stats JSON,
   account_balance NUMERIC NOT NULL DEFAULT (0.00),
   is_logged_in BOOL,
   last_login TIMESTAMP,
   valid_email BOOL,
   current_game STRING(36)
) PRIMARY KEY (playerUUID);

CREATE UNIQUE INDEX PlayerAuthentication ON players(email) STORING(password_hash);
CREATE UNIQUE INDEX PlayerName ON players(player_name);
CREATE INDEX PlayerGame ON players(current_game);
Submit the schema migration
To submit the build to perform the schema migration, switch to the schema directory and run the following gcloud command:
cd $DEMO_HOME/schema
gcloud builds submit --config=cloudbuild.yaml
Command output
Creating temporary tarball archive of 8 file(s) totalling 11.2 KiB before compression.
Uploading tarball of [.] to [gs://(project)_cloudbuild/source/(snip).tgz]
Created [https://cloudbuild.googleapis.com/v1/projects/(project)/locations/global/builds/7defe982-(snip)].
Logs are available at [ https://console.cloud.google.com/cloud-build/builds/7defe982-(snip)?project=(snip) ].

gcloud builds submit only displays logs from Cloud Storage. To view logs from Cloud Logging, run:
gcloud beta builds submit

ID: 7defe982-(snip)
CREATE_TIME: (created time)
DURATION: 3M11S
SOURCE: gs://(project)_cloudbuild/source/(snip).tgz
IMAGES: -
STATUS: SUCCESS
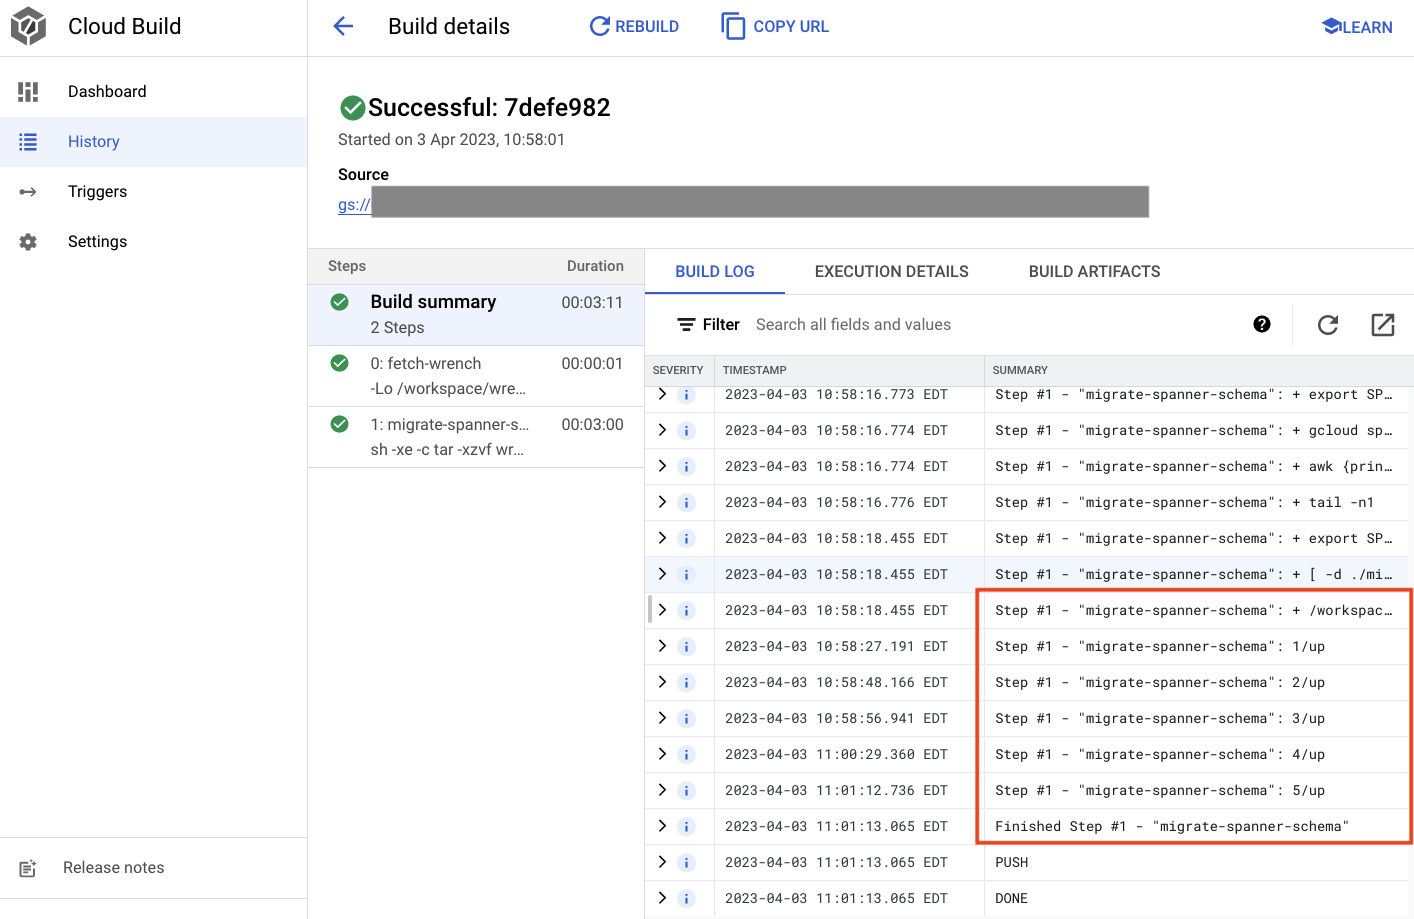
In the output above, you'll notice a link to the Created cloud build process. If you click on that, it will take you to the build in Cloud Console so that you can monitor the progress of the build and see what it is doing.
Summary
In this step, you used Cloud Build to submit the initial schema migration that applied 5 different DDL operations. These operations represent when features were added that needed database schema changes.
In a normal development scenario, you would want to make schema changes backwards compatible with the current application to avoid outages.
For changes that are not backward compatible, you would want to deploy changes to application and schema in stages to ensure no outages.
Next up
With the schema in place, the next step is to deploy the backend services!
5. Deploy the backend services
Overview
The backend services for this codelab are golang REST APIs that represent four different services:
- Profile: provide players the ability to signup and authenticate to our sample "game".
- Matchmaking: interact with player data to help with a matchmaking function, track information about games that are created, and update player stats when games are closed.
- Item: enable players to acquire game items and money through the course of playing a game.
- Tradepost: enable players to buy and sell items on a tradepost

You can learn more about these services in the Cloud Spanner Getting Started with Games Development codelab. For our purposes, we want these services running on our GKE Autopilot cluster.
These services must be able to modify Spanner data. To do that, each service has a service account created that grants them the ‘databaseUser' role.
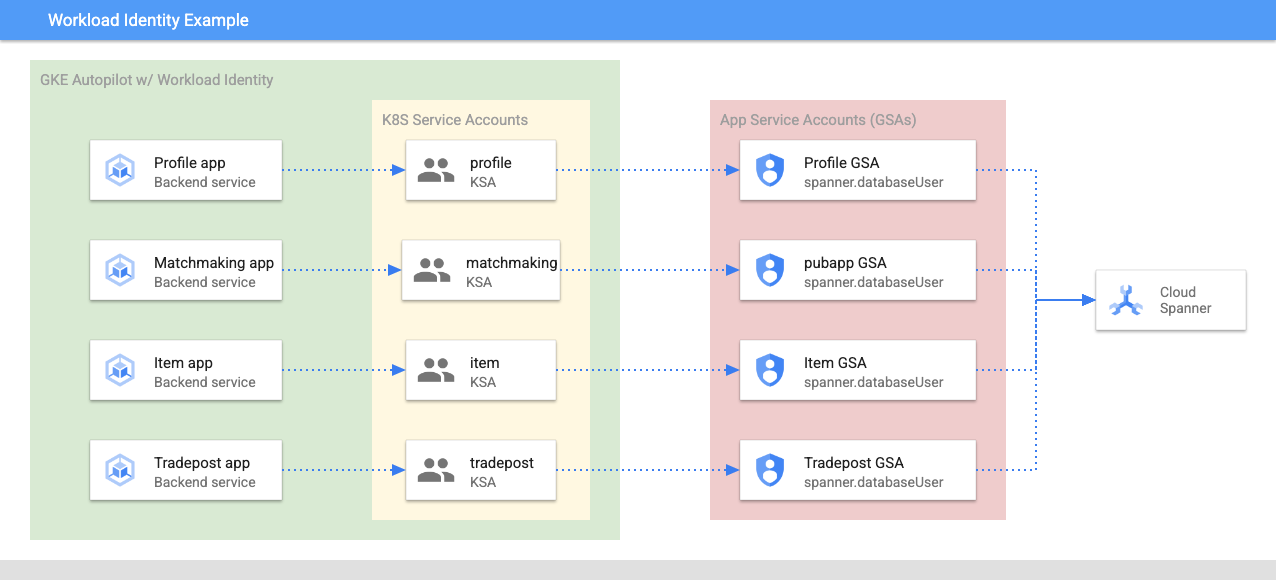
Workload Identity allows a kubernetes service account to impersonate the services' google cloud service account by the following steps in our Terraform:
- Create the service's google cloud service account (
GSA) resource - Assign the databaseUser role to that service account
- Assign the workloadIdentityUser role to that service account
- Create a Kubernetes service account (
KSA) that references the GSA
A rough diagram would look like this:
Terraform created the service accounts and the Kubernetes service accounts for you. And you can check the Kubernetes service accounts using kubectl:
# kubectl get serviceaccounts
NAME              SECRETS   AGE
default           0         37m
item-app          0         35m
matchmaking-app   0         35m
profile-app       0         35m
tradepost-app     0         35m
The way the build works is as follows:
- Terraform generated a
$DEMO_HOME/backend_services/cloudbuild.yamlfile that looks something like this:
serviceAccount: projects/${PROJECT_ID}/serviceAccounts/cloudbuild-cicd@${PROJECT_ID}.iam.gserviceaccount.com
steps:

#
# Building of images
#
 - name: gcr.io/cloud-builders/docker
   id: profile
   args: ["build", ".", "-t", "${_PROFILE_IMAGE}"]
   dir: profile
   waitFor: ['-']
 - name: gcr.io/cloud-builders/docker
   id: matchmaking
   args: ["build", ".", "-t", "${_MATCHMAKING_IMAGE}"]
   dir: matchmaking
   waitFor: ['-']
 - name: gcr.io/cloud-builders/docker
   id: item
   args: ["build", ".", "-t", "${_ITEM_IMAGE}"]
   dir: item
   waitFor: ['-']
 - name: gcr.io/cloud-builders/docker
   id: tradepost
   args: ["build", ".", "-t", "${_TRADEPOST_IMAGE}"]
   dir: tradepost
   waitFor: ['-']

#
# Deployment
#
 - name: gcr.io/google.com/cloudsdktool/cloud-sdk
   id: cloud-deploy-release
   entrypoint: gcloud
   args:
     [
       "deploy", "releases", "create", "${_REL_NAME}",
       "--delivery-pipeline", "sample-game-services",
       "--skaffold-file", "skaffold.yaml",
       "--skaffold-version", "1.39",
       "--images", "profile=${_PROFILE_IMAGE},matchmaking=${_MATCHMAKING_IMAGE},item=${_ITEM_IMAGE},tradepost=${_TRADEPOST_IMAGE}",
       "--region", "us-central1"
     ]

artifacts:
 images:
   - ${_REGISTRY}/profile
   - ${_REGISTRY}/matchmaking
   - ${_REGISTRY}/item
   - ${_REGISTRY}/tradepost

substitutions:
 _PROFILE_IMAGE: ${_REGISTRY}/profile:${BUILD_ID}
 _MATCHMAKING_IMAGE: ${_REGISTRY}/matchmaking:${BUILD_ID}
 _ITEM_IMAGE: ${_REGISTRY}/item:${BUILD_ID}
 _TRADEPOST_IMAGE: ${_REGISTRY}/tradepost:${BUILD_ID}
 _REGISTRY: us-docker.pkg.dev/${PROJECT_ID}/spanner-game-images
 _REL_NAME: rel-${BUILD_ID:0:8}
options:
 dynamic_substitutions: true
 machineType: E2_HIGHCPU_8
 logging: CLOUD_LOGGING_ONLY
- The Cloud Build command reads this file and follows the steps listed. First, it builds the service images. Then, it executes a
gcloud deploy createcommand. This reads the$DEMO_HOME/backend_services/skaffold.yamlfile, which defines where each deployment file is located:
apiVersion: skaffold/v2beta29
kind: Config
deploy:
 kubectl:
   manifests:
     - spanner_config.yaml
     - profile/deployment.yaml
     - matchmaking/deployment.yaml
     - item/deployment.yaml
     - tradepost/deployment.yaml
- Cloud Deploy will follow the definitions of each service's
deployment.yamlfile. The service's deployment file contains the information for creating a service, which in this case is a clusterIP running on port 80.
The " ClusterIP" type prevents the backend service pods from having an external IP so only entities that can connect to the internal GKE network can access the backend services. These services should not be directly accessible to players because they access and modify the Spanner data.
apiVersion: v1
kind: Service
metadata:
 name: profile
spec:
 type: ClusterIP
 selector:
   app: profile
 ports:
 - port: 80
   targetPort: 80
In addition to creating a Kubernetes service, Cloud Deploy also creates a Kubernetes deployment. Let's examine the profile service's deployment section:
---
apiVersion: apps/v1
kind: Deployment
metadata:
 name: profile
spec:
 replicas: 2 # EDIT: Number of instances of deployment
 selector:
   matchLabels:
     app: profile
 template:
   metadata:
     labels:
       app: profile
   spec:
     serviceAccountName: profile-app
     containers:
     - name: profile-service
       image: profile
       ports:
         - containerPort: 80
       envFrom:
         - configMapRef:
             name: spanner-config
       env:
         - name: SERVICE_HOST
           value: "0.0.0.0"
         - name: SERVICE_PORT
           value: "80"
       resources:
         requests:
           cpu: "1"
           memory: "1Gi"
           ephemeral-storage: "100Mi"
         limits:
           cpu: "1"
           memory: "1Gi"
           ephemeral-storage: "100Mi"
The top portion provides some metadata about the service. The most important piece from this is defining how many replicas will be created by this deployment.
replicas: 2 # EDIT: Number of instances of deployment
Next, we see which service account should run the app, and which image it should use. These match up with the Kubernetes service account created from Terraform and the image created during the Cloud Build step.
spec:
  serviceAccountName: profile-app
  containers:
    - name: profile-service
      image: profile
After that, we specify some information about networking and environment variables.
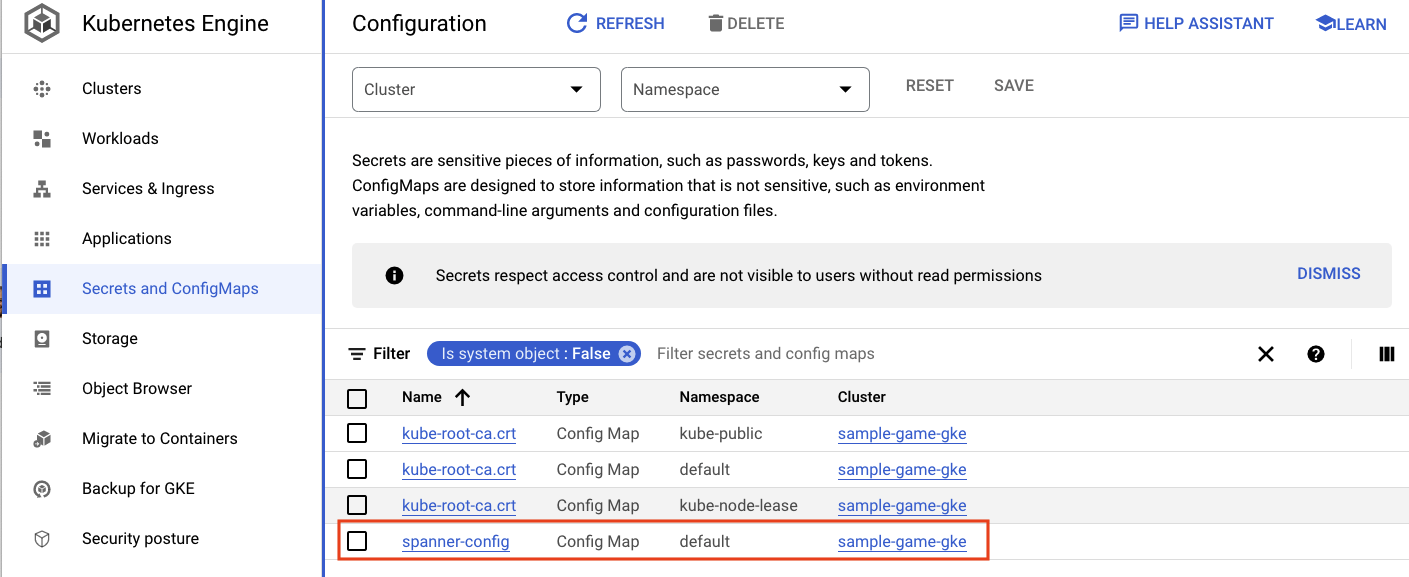
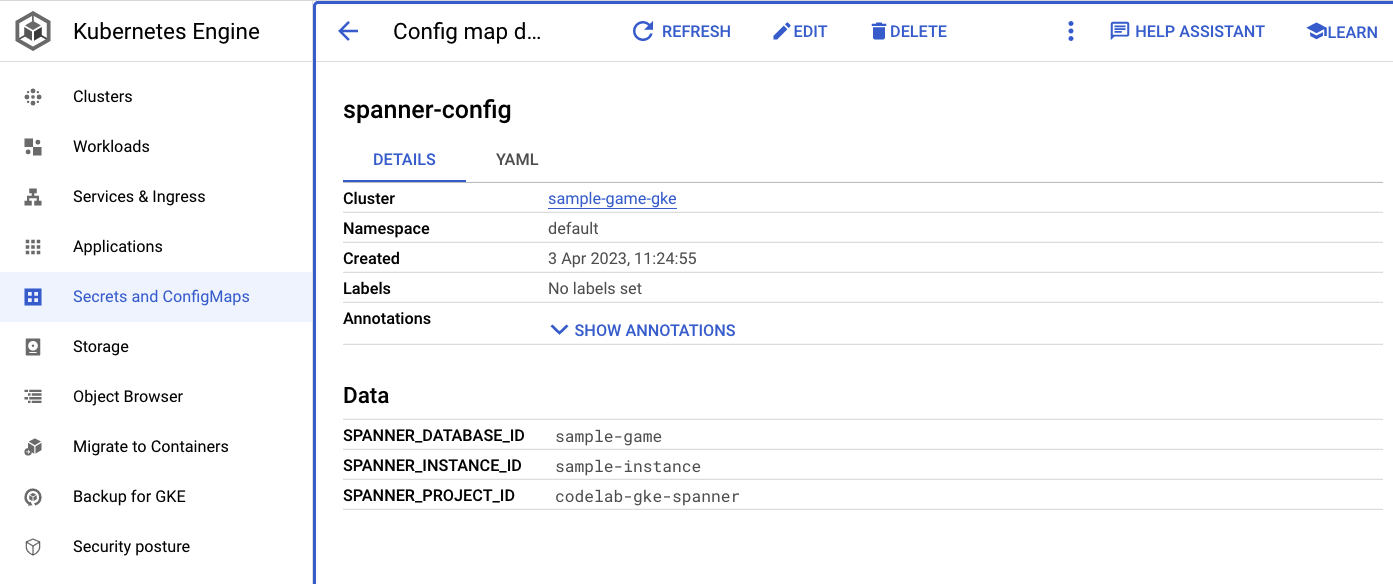
The spanner_config is a Kubernetes ConfigMap that specifies the project, instance and database information needed for the application to connect to Spanner.
apiVersion: v1
kind: ConfigMap
metadata:
  name: spanner-config
data:
  SPANNER_PROJECT_ID: ${project_id}
  SPANNER_INSTANCE_ID: ${instance_id}
  SPANNER_DATABASE_ID: ${database_id}
ports:
  - containerPort: 80
envFrom:
  - configMapRef:
    name: spanner-config
env:
  - name: SERVICE_HOST
    value: "0.0.0.0"
  - name: SERVICE_PORT
    value: "80"
The SERVICE_HOST and SERVICE_PORT are additional environment variables needed by the service to know where to bind on.
The final section tells GKE how many resources to allow for each replica in this deployment. This is also what GKE Autopilot uses to scale the cluster as needed.
resources:
  requests:
    cpu: "1"
    memory: "1Gi"
    ephemeral-storage: "100Mi"
  limits:
    cpu: "1"
    memory: "1Gi"
    ephemeral-storage: "100Mi"
With this information, it's time to deploy the backend services.
Deploy the backend services
As mentioned, deploying the backend services uses Cloud Build. Just like with the schema migrations, you can submit the build request using the gcloud command line:
cd $DEMO_HOME/backend_services
gcloud builds submit --config=cloudbuild.yaml
Command output
Creating temporary tarball archive of 66 file(s) totalling 864.6 KiB before compression.
Uploading tarball of [.] to [gs://(project)_cloudbuild/source/(snip).tgz]
Created [https://cloudbuild.googleapis.com/v1/projects/(project)/locations/global/builds/30207dd1-(snip)].
Logs are available at [ https://console.cloud.google.com/cloud-build/builds/30207dd1-(snip)?project=(snip) ].

gcloud builds submit only displays logs from Cloud Storage. To view logs from Cloud Logging, run:
gcloud beta builds submit

ID: 30207dd1-(snip)
CREATE_TIME: (created time)
DURATION: 3M17S
SOURCE: gs://(project)_cloudbuild/source/(snip).tgz
IMAGES: us-docker.pkg.dev/(project)/spanner-game-images/profile:30207dd1-(snip) (+3 more)
STATUS: SUCCESS
Unlike the output of the schema migration step, the output of this build indicates there were some images created. Those will be stored in your Artifact Registry repository.
The output of the gcloud build step will have a link to Cloud Console. Take a look at those.
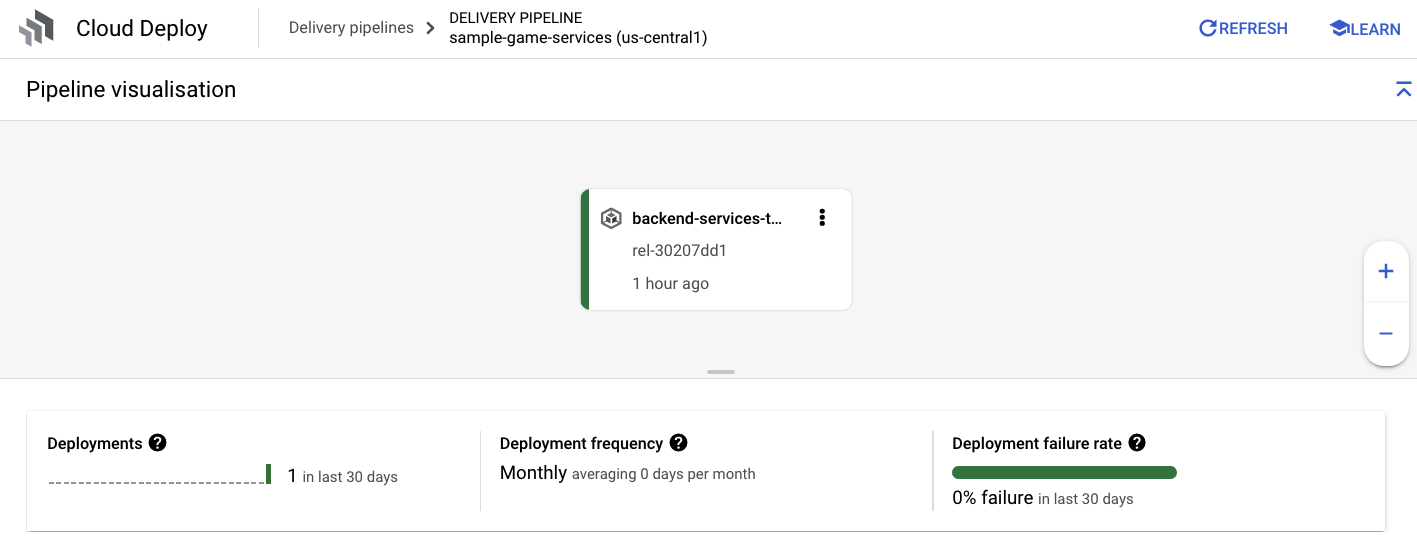
Once you do have the success notification from Cloud Build, navigate to Cloud Deploy and then to the sample-game-services pipeline to monitor the progress of the deployment.
Once the services are deployed, you can check kubectl to see the pods' status:
kubectl get pods
Command output
NAME                           READY   STATUS    RESTARTS   AGE
item-6b9d5f678c-4tbk2          1/1     Running   0          83m
matchmaking-5bcf799b76-lg8zf   1/1     Running   0          80m
profile-565bbf4c65-kphdl       1/1     Running   0          83m
profile-565bbf4c65-xw74j       1/1     Running   0          83m
tradepost-68b87ccd44-gw55r     1/1     Running   0          79m
Then, check the services to see the ClusterIP in action:
kubectl get services
Command output
NAME          TYPE        CLUSTER-IP      EXTERNAL-IP   PORT(S)   AGE
item          ClusterIP   10.172.XXX.XXX   <none>        80/TCP    84m
kubernetes    ClusterIP   10.172.XXX.XXX   <none>        443/TCP   137m
matchmaking   ClusterIP   10.172.XXX.XXX   <none>        80/TCP    84m
profile       ClusterIP   10.172.XXX.XXX   <none>        80/TCP    84m
tradepost     ClusterIP   10.172.XXX.XXX   <none>        80/TCP    84m
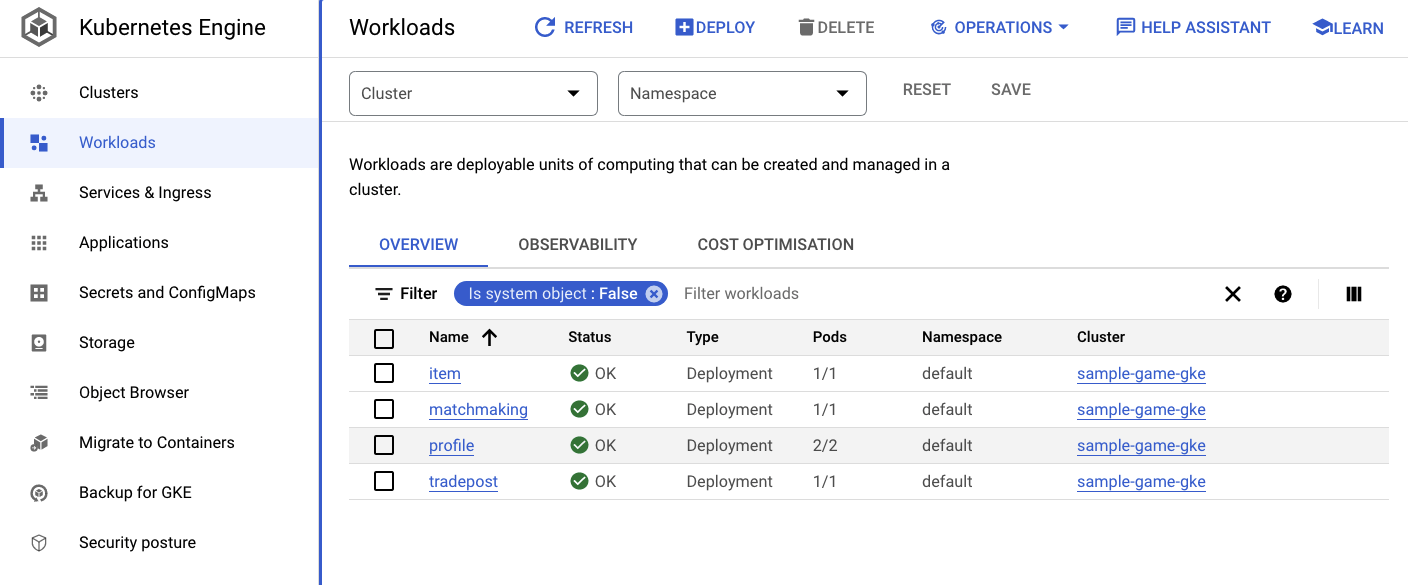
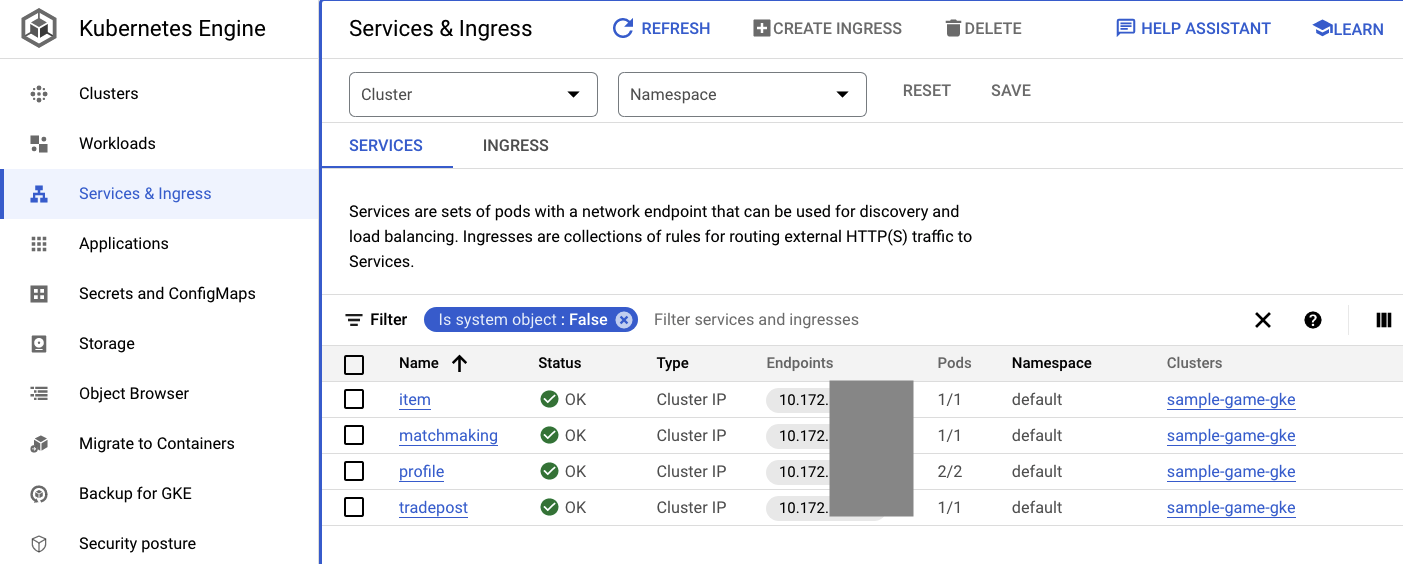
You can also navigate to the GKE UI in Cloud Console to see the Workloads, Services and ConfigMaps.
Workloads
Services
ConfigMaps
Summary
In this step, you deployed the four backend services to GKE Autopilot. You were able to run the Cloud Build step and check the progress in Cloud Deploy and on Kubernetes in Cloud Console.
You also learned how these services utilize Workload Identity to impersonate a service account that has the right permissions to read and write data to the Spanner database.
Next Steps
In the next section, you will deploy the workloads.
6. Deploy the workloads
Overview
Now that the backend services are running on the cluster, you will deploy the workloads.

The workloads are accessible externally, and there is one for each backend service for the purpose of this codelab.
These workloads are Locust–based load generation scripts that mimic real access patterns expected by these sample services.
There are files for the Cloud Build process:
$DEMO_HOME/workloads/cloudbuild.yaml(generated by Terraform)$DEMO_HOME/workloads/skaffold.yaml- a
deployment.yamlfile for each workload
The workload deployment.yaml files look slightly different from the backend service deployment files.
Here's an example from the matchmaking-workload:
apiVersion: v1
kind: Service
metadata:
 name: matchmaking-workload
spec:
 type: LoadBalancer
 selector:
   app: matchmaking-workload
 ports:
 - port: 8089
   targetPort: 8089
---
apiVersion: apps/v1
kind: Deployment
metadata:
 name: matchmaking-workload
spec:
 replicas: 1 # EDIT: Number of instances of deployment
 selector:
   matchLabels:
     app: matchmaking-workload
 template:
   metadata:
     labels:
       app: matchmaking-workload
   spec:
     serviceAccountName: default
     containers:
     - name: matchmaking-workload
       image: matchmaking-workload
       ports:
         - containerPort: 8089
       resources:
         requests:
           cpu: "500m"
           memory: "512Mi"
           ephemeral-storage: "100Mi"
         limits:
           cpu: "500m"
           memory: "512Mi"
           ephemeral-storage: "100Mi"
The top part of the file defines the service. In this case, a LoadBalancer is created, and the workload runs on port 8089.
The LoadBalancer will provide an external IP that can be used to connect to the workload.
apiVersion: v1
kind: Service
metadata:
 name: matchmaking-workload
spec:
 type: LoadBalancer
 selector:
   app: matchmaking-workload
 ports:
 - port: 8089
   targetPort: 8089
The top of the deployment section is the metadata about the workload. In this case, only one replica is being deployed:
replicas: 1
The container spec is different though. For one thing, we're using a default Kubernetes service account. This account doesn't have any special privileges, since the workload doesn't need to connect to any Google Cloud resources except the backend services running on the GKE cluster.
The other difference is that there aren't any environment variables needed for these workloads. The result is a shorter deployment specification.
spec:
  serviceAccountName: default
  containers:
    - name: matchmaking-workload
      image: matchmaking-workload
  ports:
    - containerPort: 8089
The resource settings are similar to the backend services. Remember that this is how GKE Autopilot knows how many resources are needed to satisfy the requests of all pods running on the cluster.
Go ahead and deploy the workloads!
Deploy the workloads
Just like before, you can submit the build request using the gcloud command line:
cd $DEMO_HOME/workloads
gcloud builds submit --config=cloudbuild.yaml
Command output
Creating temporary tarball archive of 18 file(s) totalling 26.2 KiB before compression.
Some files were not included in the source upload.

Check the gcloud log [/tmp/tmp.4Z9EqdPo6d/logs/(snip).log] to see which files and the contents of the
default gcloudignore file used (see `$ gcloud topic gcloudignore` to learn
more).

Uploading tarball of [.] to [gs://(project)_cloudbuild/source/(snip).tgz]
Created [https://cloudbuild.googleapis.com/v1/projects/(project)/locations/global/builds/(snip)].
Logs are available at [ https://console.cloud.google.com/cloud-build/builds/0daf20f6-(snip)?project=(snip) ].

gcloud builds submit only displays logs from Cloud Storage. To view logs from Cloud Logging, run:
gcloud beta builds submit

ID: 0daf20f6-(snip)
CREATE_TIME: (created_time)
DURATION: 1M41S
SOURCE: gs://(project)_cloudbuild/source/(snip).tgz
IMAGES: us-docker.pkg.dev/(project)/spanner-game-images/profile-workload:0daf20f6-(snip) (+4 more)
STATUS: SUCCESS
Be sure to check the Cloud Build logs and the Cloud Deploy pipeline in Cloud Console to check on the status. For the workloads, the Cloud Deploy pipeline is sample-game-workloads:
Once the deploy is done, check the status with kubectl in Cloud Shell:
kubectl get pods
Command output
NAME                                    READY   STATUS    RESTARTS   AGE
game-workload-7ff44cb657-pxxq2          1/1     Running   0          12m
item-6b9d5f678c-cr29w                   1/1     Running   0          9m6s
item-generator-7bb4f57cf8-5r85b         1/1     Running   0          12m
matchmaking-5bcf799b76-lg8zf            1/1     Running   0          117m
matchmaking-workload-76df69dbdf-jds9z   1/1     Running   0          12m
profile-565bbf4c65-kphdl                1/1     Running   0          121m
profile-565bbf4c65-xw74j                1/1     Running   0          121m
profile-workload-76d6db675b-kzwng       1/1     Running   0          12m
tradepost-68b87ccd44-gw55r              1/1     Running   0          116m
tradepost-workload-56c55445b5-b5822     1/1     Running   0          12m
Then, check the workload services to see the LoadBalancer in action:
kubectl get services
Command output
NAME                   TYPE          CLUSTER-IP  EXTERNAL-IP     PORT(S)        AGE
game-workload          LoadBalancer  *snip*      35.XX.XX.XX   8089:32483/TCP   12m
item                   ClusterIP     *snip*      <none>         80/TCP          121m
item-generator         LoadBalancer  *snip*      34.XX.XX.XX   8089:32581/TCP   12m
kubernetes             ClusterIP     *snip*      <none>          443/TCP        174m
matchmaking            ClusterIP     *snip*      <none>          80/TCP         121m
matchmaking-workload   LoadBalancer  *snip*      34.XX.XX.XX   8089:31735/TCP   12m
profile                ClusterIP     *snip*      <none>          80/TCP         121m
profile-workload       LoadBalancer  *snip*      34.XX.XX.XX   8089:32532/TCP   12m
tradepost              ClusterIP     *snip*      <none>          80/TCP         121m
tradepost-workload     LoadBalancer  *snip*      34.XX.XX.XX   8089:30002/TCP   12m
Summary
You've now deployed the workloads to the GKE cluster. These workloads require no additional IAM permissions and are externally accessible on port 8089 using the LoadBalancer service.
Next Steps
With backend services and workloads running, it's time to "play" the game!
7. Start playing the game
Overview
The backend services for your sample "game" are now running, and you also have the means to generate "players" interacting with those services using the workloads.
Each workload uses Locust to simulate actual load against our service APIs. In this step, you will run several of the workloads to generate load on the GKE cluster and on Spanner, as well as storing data on Spanner.
Here's a description of each workload:
- The
item-generatorworkload is a quick workload to generate a list of game_items that players can acquire through the course of "playing" the game. - The
profile-workloadsimulates players signing up and logging in. - The
matchmaking-workloadsimulates players queuing up to be assigned to games. - The
game-workloadsimulates players acquiring game_items and money through the course of playing the game. - The
tradepost-workloadsimulates players being able to sell and buy items on the trading post.
This codelab will highlight specifically running the item-generator and the profile-workload.
Run the item-generator
The item-generator uses the item backend service endpoint to add game_items to Spanner. These items are required for the game-workload and tradepost-workload to function correctly.
The first step is to get the external IP of the item-generator service. In Cloud Shell, run the following:
# The external IP is the 4th column of the output
kubectl get services | grep item-generator | awk '{print $4}'
Command output
{ITEMGENERATOR_EXTERNAL_IP}
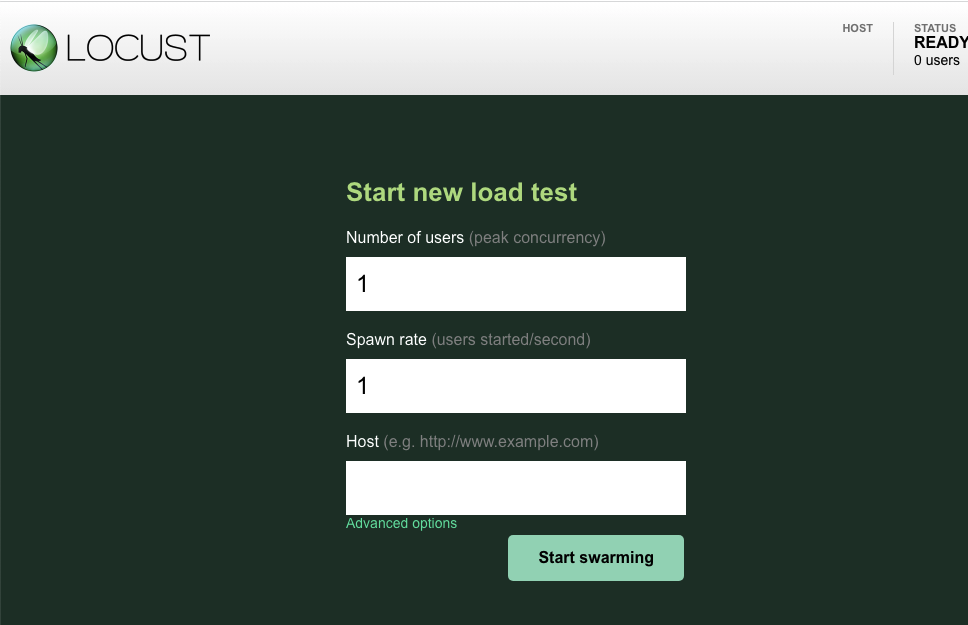
Now, open up a new browser tab and point it to http://{ITEMGENERATOR_EXTERNAL_IP}:8089. You should get an page like this:
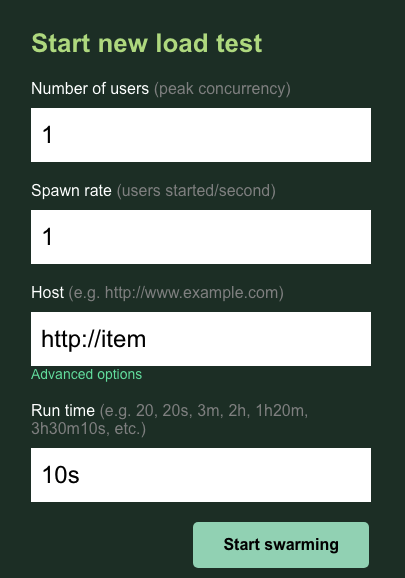
You will leave the users and spawn at the default 1. For the host, enter http://item. Click on the advanced options, and enter 10s for the running time.
Here's what the configuration should look like:
Click ‘Start swarming'!
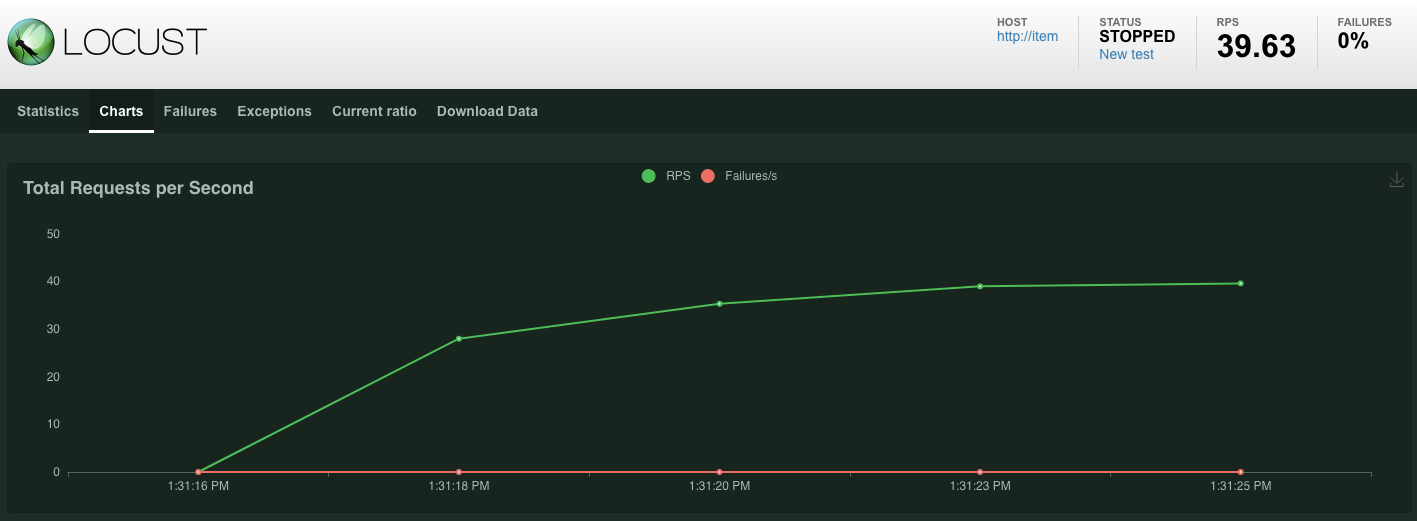
Statistics will start to show up for requests being issued on the POST /items endpoint. After 10 seconds the load will stop.
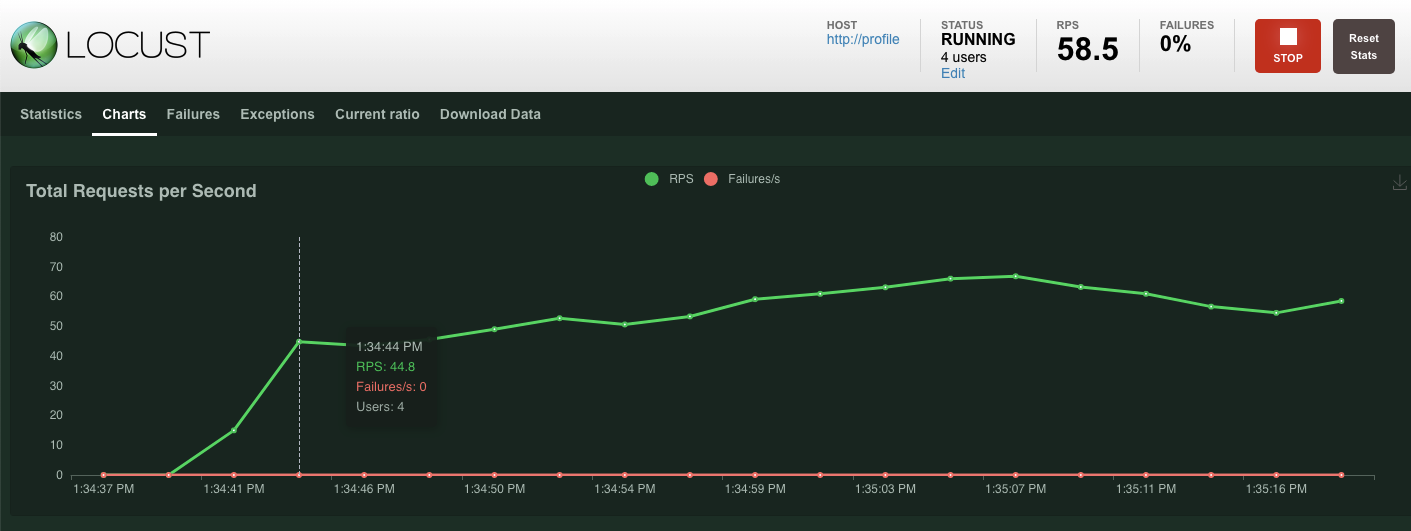
Click over to the Charts and you will see some graphs on the performance of these requests.
Now, you want to check if the data is entered into the Spanner database.
To do that, click on the hamburger menu and navigate to ‘Spanner'. From this page, navigate to the sample-instance and the sample-database. Then click on ‘Query'.
We want to select the number of game_items:
SELECT COUNT(*) FROM game_items;
At the bottom, you will get your result.
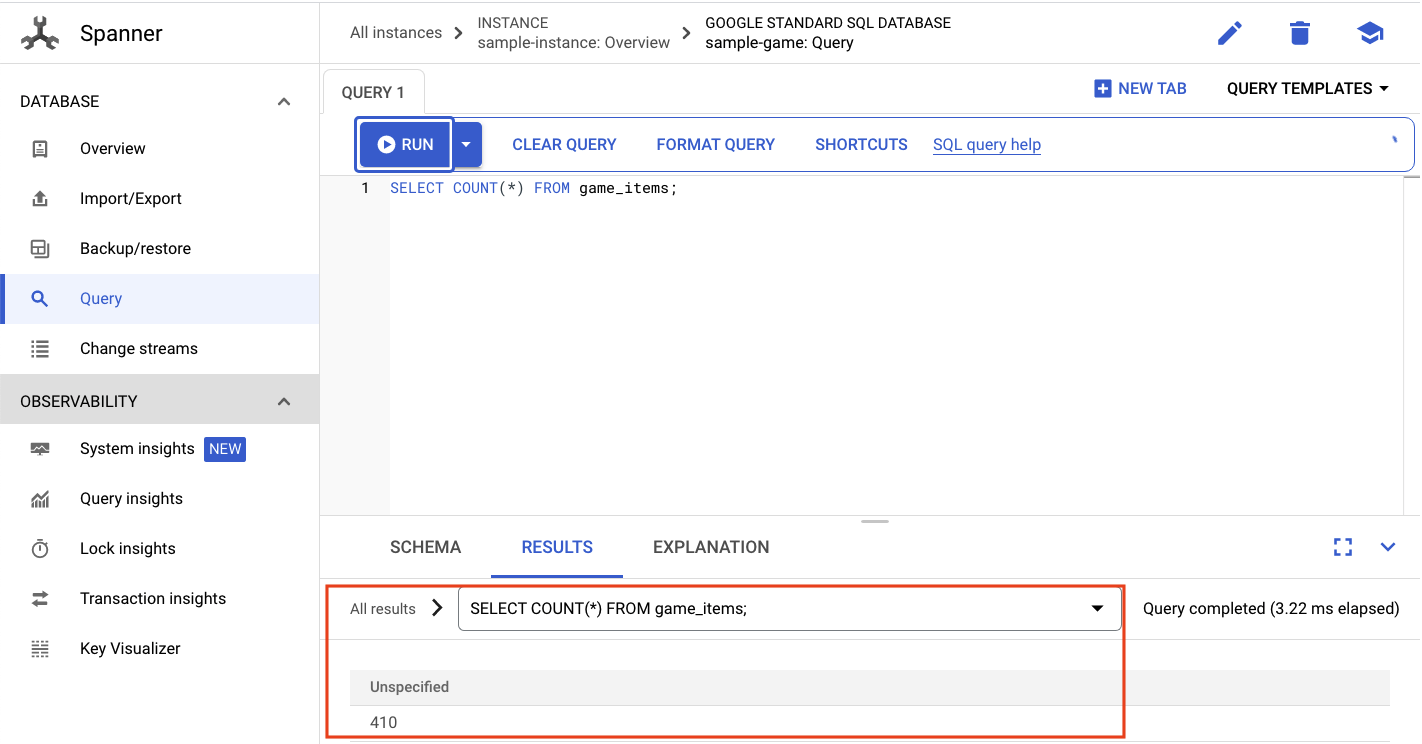
We don't need a lot of game_items seeded. But now they are available for players to acquire!
Run the profile-workload
With your game_items seeded, the next step is to get players signed up to be able to play games.
The profile-workload will use Locust to simulate players creating accounts, logging in, retrieving profile information and logging out. All of these test the endpoints of the profile backend service in a typical production-like workload.
To run this, get the profile-workload external IP:
# The external IP is the 4th column of the output
kubectl get services | grep profile-workload | awk '{print $4}'
Command output
{PROFILEWORKLOAD_EXTERNAL_IP}
Now, open up a new browser tab and point it to http://{PROFILEWORKLOAD_EXTERNAL_IP}:8089. You should get a Locust page similar to the previous one.
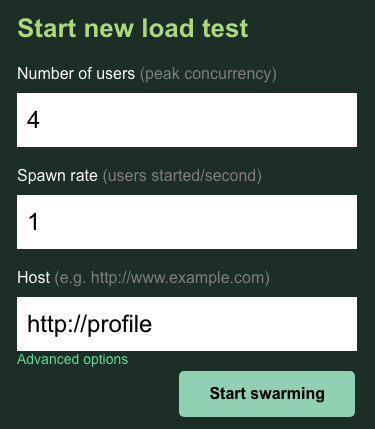
In this case, you will use http://profile for the host. And you won't specify a runtime in the advanced options. Also, specify the users to be 4, which will simulate 4 user requests at a time.
The profile-workload test should look like this:
Click ‘Start swarming'!
Just like before, the statistics for the various profile REST endpoints will start showing up. Click over to charts to see a view of how well everything is performing.
Summary
In this step, you generated some game_items, and then queried the game_items table using the Spanner Query UI in Cloud Console.
You also allowed players to sign up for your game and saw how Locust is able to create production-like workloads against your backend services.
Next Steps
After running the workloads, you will want to check how the GKE cluster and Spanner instance are behaving.
8. Review GKE and Spanner usage
With the profile service running, it's time to take the opportunity to see how your GKE Autopilot cluster and Cloud Spanner is behaving.
Check on the GKE cluster
Navigate to the Kubernetes cluster. Notice that since you've deployed the workloads and services, the cluster now has some details added about the total vCPUs and memory. This information wasn't available when there weren't any workloads on the cluster.

Now, click into the sample-game-gke cluster and switch to the observability tab:
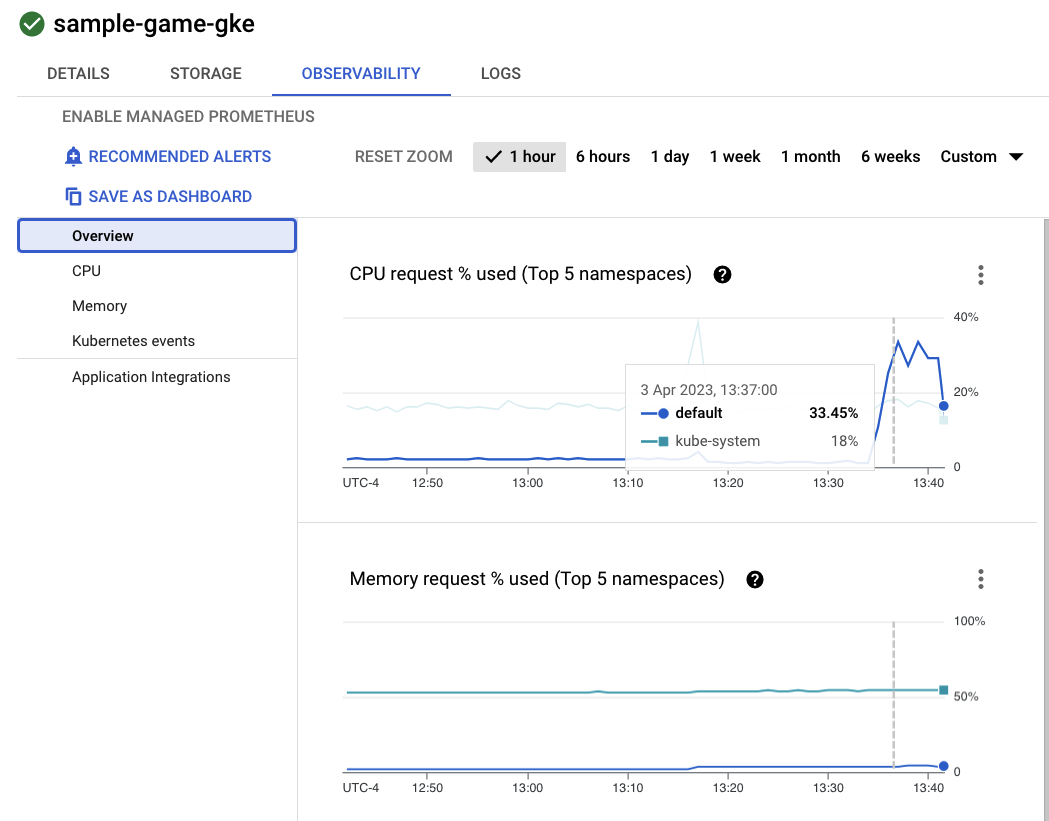
The default kubernetes namespace should have surpassed the kube-system namespace for CPU utilization since our workloads and backend services run on default. If it hasn't, make sure the profile workload is still running and wait a few minutes for the charts to update.
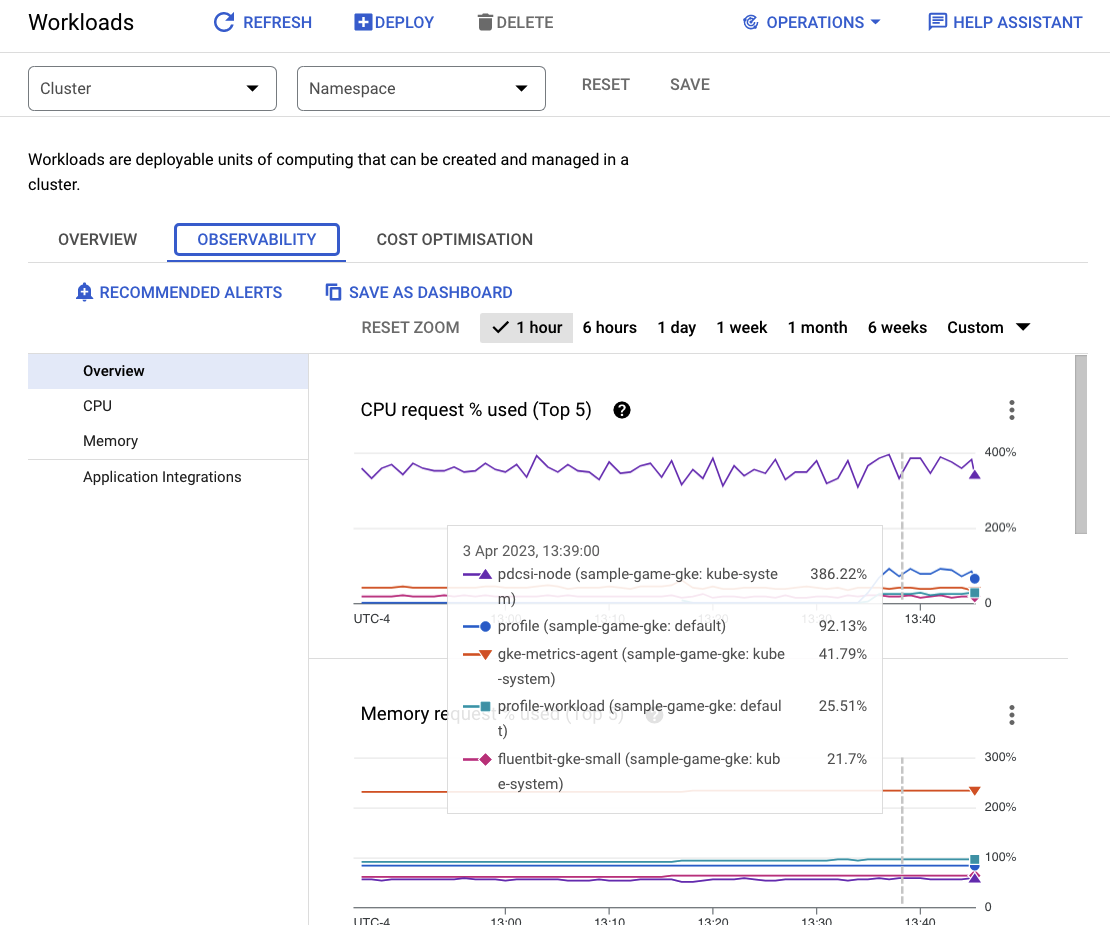
To see what workloads are taking the most resources, go to the Workloads dashboard.
Instead of going into each workload individually, go straight to the dashboard's Observability tab. You should see that profile and profile-workload CPU has increased.
Now, go check on Cloud Spanner.
Check on the Cloud Spanner instance
To check the performance of Cloud Spanner, navigate to Spanner and click into the sample-instance instance and sample-game database.
From there, you will see a System Insights tab on the left menu:
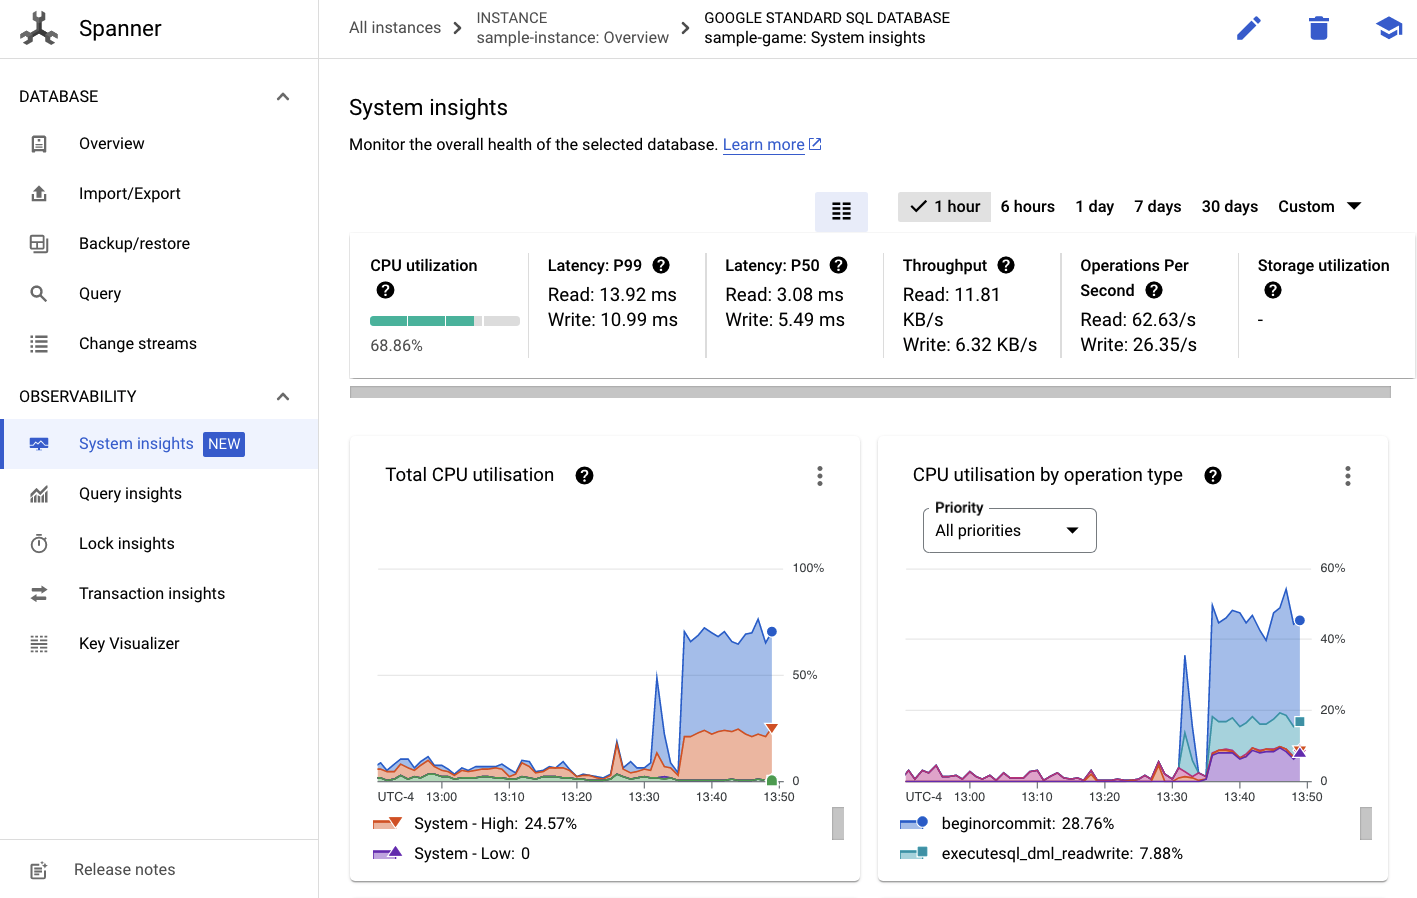
There are many charts here to help you understand the general performance of your Spanner instance including CPU utilization, transaction latency and locking, and query throughput.
In addition to System Insights, you can get more detailed information about query workload by looking through the other links in the Observability section:
- Query insights helps identify the topN queries utilizing resources on Spanner.
- Transaction and Lock insights help identify transactions with high latencies.
- Key Visualizer helps to visualize access patterns and can help track down hotspots in the data.
Summary
In this step, you learned how to check some basic performance metrics for both GKE Autopilot and Spanner.
For instance, with your profile workload running, query the players table to get some more information about the data being stored there.
Next Steps
Next, it's time to clean up!
9. Cleaning up
Before cleaning up, feel free to explore the other workloads that were not covered. Specifically matchmaking-workload, game-workload and tradepost-workload.
When you are done "playing" the game, you can clean up your playground. Luckily this is pretty easy.
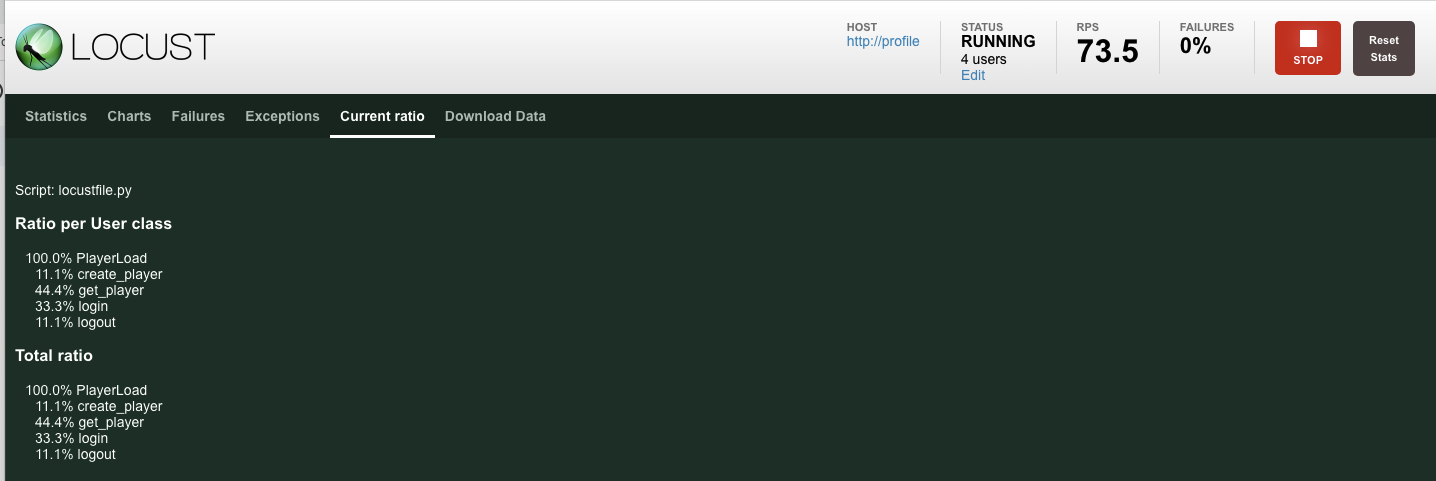
First, if your profile-workload is still running in the browser, go over and stop it:
Do the same for each workload you may have tested out.
Then in Cloud Shell, navigate to the infrastructure folder. You will destroy the infrastructure using terraform:
cd $DEMO_HOME/infrastructure
terraform destroy
# type 'yes' when asked
Command output
Plan: 0 to add, 0 to change, 46 to destroy.

Do you really want to destroy all resources?
  Terraform will destroy all your managed infrastructure, as shown above.
  There is no undo. Only 'yes' will be accepted to confirm.

  Enter a value: yes

*snip*

Destroy complete! Resources: 46 destroyed.
In Cloud Console, navigate to Spanner, Kubernetes Cluster, Artifact Registry, Cloud Deploy, and IAM to validate all the resources are removed.
10. Congratulations!
Congratulations, you have successfully deployed sample golang applications on GKE Autopilot and connected them to Cloud Spanner using Workload Identity!
As a bonus this infrastructure was easily set up and removed in a repeatable manner using Terraform.
You can read more about the Google Cloud services that you interacted with in this codelab:
What's next?
Now that you have a basic understanding of how GKE Autopilot and Cloud Spanner can work together, why not take the next step and start building your own application to work with these services?

