1. Overview
Hibernate has become the de facto standard ORM solution for Java projects. It supports all major relational databases and enables even more powerful ORM tools like Spring Data JPA. In addition, there are many Hibernate-compatible frameworks such as Spring Boot, Microprofile, and Quarkus.
Cloud Spanner Dialect for Hibernate ORM makes it possible to use Hibernate with Cloud Spanner. You get the benefits of Cloud Spanner - scalability and relational semantics - with the idiomatic persistence of Hibernate. This can help you migrate existing applications to the cloud or write new ones leveraging increased developer productivity afforded by Hibernate-based technologies.
What you'll learn
- How to write a simple Hibernate application that connects to Cloud Spanner
- How to create a Cloud Spanner database
- How to use the Cloud Spanner Dialect for Hibernate ORM
- How to implement create-read-update-delete (CRUD) operations with Hibernate
What you'll need
2. Setup and Requirements
Self-paced environment setup
- Sign in to Cloud Console and create a new project or reuse an existing one. (If you don't already have a Gmail or G Suite account, you must create one.)
Remember the project ID, a unique name across all Google Cloud projects (the name above has already been taken and will not work for you, sorry!). It will be referred to later in this codelab as PROJECT_ID.
- Next, you'll need to enable billing in Cloud Console in order to use Google Cloud resources.
Running through this codelab shouldn't cost much, if anything at all. Be sure to to follow any instructions in the "Cleaning up" section which advises you how to shut down resources so you don't incur billing beyond this tutorial. New users of Google Cloud are eligible for the $300USD Free Trial program.
Activate Cloud Shell
- From the Cloud Console, click Activate Cloud Shell
.
If you've never started Cloud Shell before, you'll be presented with an intermediate screen (below the fold) describing what it is. If that's the case, click Continue (and you won't ever see it again). Here's what that one-time screen looks like:
It should only take a few moments to provision and connect to Cloud Shell.
This virtual machine is loaded with all the development tools you'll need. It offers a persistent 5GB home directory and runs in Google Cloud, greatly enhancing network performance and authentication. Much, if not all, of your work in this codelab can be done with simply a browser or your Chromebook.
Once connected to Cloud Shell, you should see that you are already authenticated and that the project is already set to your project ID.
- Run the following command in Cloud Shell to confirm that you are authenticated:
gcloud auth list
Command output
 Credentialed Accounts
ACTIVE  ACCOUNT
*       <my_account>@<my_domain.com>

To set the active account, run:
    $ gcloud config set account `ACCOUNT`
gcloud config list project
Command output
[core]
project = <PROJECT_ID>
If it is not, you can set it with this command:
gcloud config set project <PROJECT_ID>
Command output
Updated property [core/project].
3. Create a database
After the Cloud Shell launches, you can start using gcloud to interact with your GCP project.
First, enable the Cloud Spanner API.
gcloud services enable spanner.googleapis.com
Now, let's create a Cloud Spanner instance called codelab-instance.
gcloud spanner instances create codelab-instance \
 --config=regional-us-central1 \
 --description="Codelab Instance" --nodes=1
Now, we need to add a database to this instance. We'll call it codelab-db.
gcloud spanner databases create codelab-db --instance=codelab-instance
4. Create an empty app
We'll use the Maven Quickstart Archetype to create a simple Java console application.
mvn archetype:generate \
 -DgroupId=codelab \
 -DartifactId=spanner-hibernate-codelab \
 -DarchetypeArtifactId=maven-archetype-quickstart \
 -DarchetypeVersion=1.4 \
 -DinteractiveMode=false
Change to the app directory.
cd spanner-hibernate-codelab
Compile and run the app using Maven.
mvn compile exec:java -Dexec.mainClass=codelab.App
You should see Hello World! printed in the console.
5. Add dependencies
Let's explore source code by opening the Cloud Shell Editor, and browsing inside the spanner-hibernate-codelab directory.

So far, we just have a basic Java console app that prints "Hello World!". However, we really want to write a Java application that uses Hibernate to talk to Cloud Spanner. For that, we'll need the Cloud Spanner Dialect for Hibernate, the Cloud Spanner JDBC driver, and the Hibernate core. So, let's add the following dependencies to the <dependencies> block inside the pom.xml file.
pom.xml
    <!-- Spanner Dialect -->
    <dependency>
      <groupId>com.google.cloud</groupId>
      <artifactId>google-cloud-spanner-hibernate-dialect</artifactId>
      <version>1.5.0</version>
    </dependency>

    <!-- JDBC Driver -->
    <dependency>
      <groupId>com.google.cloud</groupId>
      <artifactId>google-cloud-spanner-jdbc</artifactId>
      <version>2.0.0</version>
    </dependency>

    <!-- Hibernate -->
    <dependency>
      <groupId>org.hibernate</groupId>
      <artifactId>hibernate-core</artifactId>
      <version>5.4.29.Final</version>
    </dependency>
6. Configure Hibernate ORM
Next, we'll create Hibernate configuration files hibernate.cfg.xml and hibernate.properties. Run the following command to create the empty files and then edit them using the Cloud Shell Editor.
mkdir src/main/resources \
 && touch src/main/resources/hibernate.cfg.xml \
 && touch src/main/resources/hibernate.properties
So, let's tell Hibernate about the annotated entity classes we'll be mapping to the database by filling in the hibernate.cfg.xml. (We'll create the entity classes later.)
src/main/resources/hibernate.cfg.xml
<hibernate-configuration>
  <session-factory>
    <!-- Annotated entity classes -->
    <mapping class="codelab.Album"/>
    <mapping class="codelab.Singer"/>
  </session-factory>
</hibernate-configuration>
Hibernate also needs to know how to connect to the Cloud Spanner instance and which dialect to use. So, we'll tell it to use the SpannerDialect for SQL syntax, the Spanner JDBC driver, and the JDBC connection string with the database coordinates. This goes into the hibernate.properties file.
src/main/resources/hibernate.properties
hibernate.dialect=com.google.cloud.spanner.hibernate.SpannerDialect
hibernate.connection.driver_class=com.google.cloud.spanner.jdbc.JdbcDriver
hibernate.connection.url=jdbc:cloudspanner:/projects/{PROJECT_ID}/instances/codelab-instance/databases/codelab-db
# auto-create or update DB schema
hibernate.hbm2ddl.auto=update
hibernate.show_sql=true
Remember to replace {PROJECT_ID} with your project ID, which you can get by running the following command:
gcloud config get-value project
Since we don't have an existing database schema, we added the hibernate.hbm2ddl.auto=update property to let Hibernate create the two tables in Cloud Spanner when we run the app for the first time.
Typically, you would also make sure that the authentication credentials are set up, using either a service account JSON file in the GOOGLE_APPLICATION_CREDENTIALS environment variable or the application default credentials configured using the gcloud auth application-default login command. However, since we're running in Cloud Shell, default project credentials are already set up.
7. Create annotated entity classes
Now we're ready to write some code.
We'll define two plain old Java objects (POJOs) that will map to tables in Cloud Spanner—Singer and Album. The Album will have a @ManyToOne relationship with Singer. We could have also mapped Singers to lists of their Albums with a @OneToMany annotation, but for this example, we don't really want to load all albums every time we need to fetch a singer from the database.
Add the Singer and the Album entity classes.
Create the class files.
touch src/main/java/codelab/Singer.java \
&& touch src/main/java/codelab/Album.java
Paste the contents of the files.
src/main/java/codelab/Singer.java
package codelab;

import java.util.Date;
import java.util.UUID;
import javax.persistence.Entity;
import javax.persistence.GeneratedValue;
import javax.persistence.Id;
import javax.persistence.Temporal;
import javax.persistence.TemporalType;
import org.hibernate.annotations.Type;

@Entity
public class Singer {

  @Id
  @GeneratedValue
  @Type(type = "uuid-char")
  private UUID singerId;

  private String firstName;

  private String lastName;

  @Temporal(TemporalType.DATE)
  private Date birthDate;

  public Singer() {
  }

  public Singer(String firstName, String lastName, Date birthDate) {
    this.firstName = firstName;
    this.lastName = lastName;
    this.birthDate = birthDate;
  }

  public UUID getSingerId() {
    return singerId;
  }

  public void setSingerId(UUID singerId) {
    this.singerId = singerId;
  }

  public String getFirstName() {
    return firstName;
  }

  public void setFirstName(String firstName) {
    this.firstName = firstName;
  }

  public String getLastName() {
    return lastName;
  }

  public void setLastName(String lastName) {
    this.lastName = lastName;
  }

  public Date getBirthDate() {
    return birthDate;
  }

  public void setBirthDate(Date birthDate) {
    this.birthDate = birthDate;
  }

  @Override
  public boolean equals(Object o) {
    if (this == o) {
      return true;
    }
    if (!(o instanceof Singer)) {
      return false;
    }

    Singer singer = (Singer) o;

    if (!firstName.equals(singer.firstName)) {
      return false;
    }
    if (!lastName.equals(singer.lastName)) {
      return false;
    }
    return birthDate.equals(singer.birthDate);
  }

  @Override
  public int hashCode() {
    int result = firstName.hashCode();
    result = 31 * result + lastName.hashCode();
    result = 31 * result + birthDate.hashCode();
    return result;
  }
}
src/main/java/codelab/Album.java
package codelab;

import java.util.UUID;
import javax.persistence.Entity;
import javax.persistence.GeneratedValue;
import javax.persistence.Id;
import javax.persistence.ManyToOne;
import org.hibernate.annotations.Type;

@Entity
public class Album {

  @Id
  @GeneratedValue
  @Type(type = "uuid-char")
  UUID albumId;

  @ManyToOne
  Singer singer;

  String albumTitle;

  public Album() {
  }

  public Album(Singer singer, String albumTitle) {
    this.singer = singer;
    this.albumTitle = albumTitle;
  }

  public UUID getAlbumId() {
    return albumId;
  }

  public void setAlbumId(UUID albumId) {
    this.albumId = albumId;
  }

  public Singer getSinger() {
    return singer;
  }

  public void setSinger(Singer singer) {
    this.singer = singer;
  }

  public String getAlbumTitle() {
    return albumTitle;
  }

  public void setAlbumTitle(String albumTitle) {
    this.albumTitle = albumTitle;
  }

  @Override
  public boolean equals(Object o) {
    if (this == o) {
      return true;
    }
    if (!(o instanceof Album)) {
      return false;
    }

    Album album = (Album) o;

    if (!singer.equals(album.singer)) {
      return false;
    }
    return albumTitle.equals(album.albumTitle);
  }

  @Override
  public int hashCode() {
    int result = singer.hashCode();
    result = 31 * result + albumTitle.hashCode();
    return result;
  }
}
Notice that for this example we're using an auto-generated UUID for the primary key. This is a preferred ID type in Cloud Spanner, because it avoids hotspots as the system divides data among servers by key ranges. A monotonically increasing integer key would also work, but can be less performant.
8. Save and query entities
With everything configured and entity objects defined, we can start writing to the database and querying it. We'll open a Hibernate Session, and then use it to first delete all table rows in the clearData() method, save some entities in the writeData() method, and run some queries using Hibernate query language (HQL) in the readData()method.
Replace the contents of App.java with the following:
src/main/java/codelab/App.java
package codelab;

import java.text.DateFormat;
import java.text.ParseException;
import java.text.SimpleDateFormat;
import java.util.Date;
import java.util.List;
import org.hibernate.Session;
import org.hibernate.SessionFactory;
import org.hibernate.boot.MetadataSources;
import org.hibernate.boot.registry.StandardServiceRegistry;
import org.hibernate.boot.registry.StandardServiceRegistryBuilder;

public class App {

  public final static DateFormat DATE_FORMAT = new SimpleDateFormat("yyyy-MM-dd");

  public static void main(String[] args) {
    // create a Hibernate sessionFactory and session
    StandardServiceRegistry registry = new StandardServiceRegistryBuilder().configure().build();
    SessionFactory sessionFactory = new MetadataSources(registry).buildMetadata()
        .buildSessionFactory();
    Session session = sessionFactory.openSession();

    clearData(session);

    writeData(session);

    readData(session);

    // close Hibernate session and sessionFactory
    session.close();
    sessionFactory.close();
  }

  private static void clearData(Session session) {
    session.beginTransaction();

    session.createQuery("delete from Album where 1=1").executeUpdate();
    session.createQuery("delete from Singer where 1=1").executeUpdate();

    session.getTransaction().commit();
  }

  private static void writeData(Session session) {
    session.beginTransaction();

    Singer singerMelissa = new Singer("Melissa", "Garcia", makeDate("1981-03-19"));
    Album albumGoGoGo = new Album(singerMelissa, "Go, Go, Go");
    session.save(singerMelissa);
    session.save(albumGoGoGo);

    session.save(new Singer("Russell", "Morales", makeDate("1978-12-02")));
    session.save(new Singer("Jacqueline", "Long", makeDate("1990-07-29")));
    session.save(new Singer("Dylan", "Shaw", makeDate("1998-05-02")));

    session.getTransaction().commit();
  }

  private static void readData(Session session) {
    List<Singer> singers = session.createQuery("from Singer where birthDate >= '1990-01-01' order by lastName")
        .list();
    List<Album> albums = session.createQuery("from Album").list();

    System.out.println("Singers who were born in 1990 or later:");
    for (Singer singer : singers) {
      System.out.println(singer.getFirstName() + " " + singer.getLastName() + " born on "
          + DATE_FORMAT.format(singer.getBirthDate()));
    }

    System.out.println("Albums: ");
    for (Album album : albums) {
      System.out
          .println("\"" + album.getAlbumTitle() + "\" by " + album.getSinger().getFirstName() + " "
              + album.getSinger().getLastName());
    }
  }

  private static Date makeDate(String dateString) {
    try {
      return DATE_FORMAT.parse(dateString);
    } catch (ParseException e) {
      e.printStackTrace();
      return null;
    }
  }
}
Now, let's compile and run the code. We'll add the -Dexec.cleanupDaemonThreads=false option to suppress warnings about daemon threads cleanup that Maven will try to do.
mvn compile exec:java -Dexec.mainClass=codelab.App -Dexec.cleanupDaemonThreads=false
In the output you should see something like this:
Singers who were born in 1990 or later:
Jacqueline Long born on 1990-07-29
Dylan Shaw born on 1998-05-02
Albums:
"Go, Go, Go" by Melissa Garcia
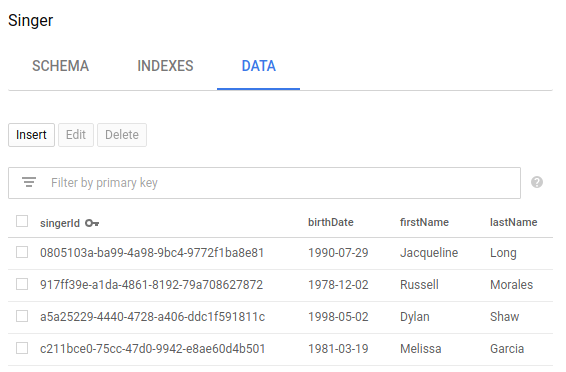
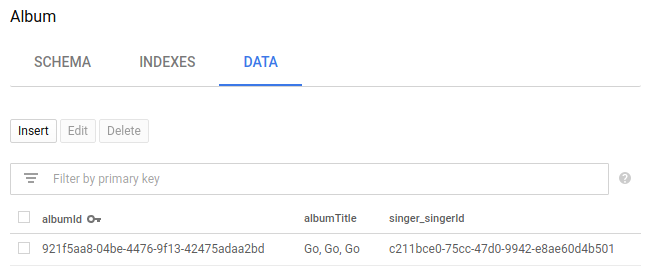
At this point, if you go to the Cloud Spanner console and view the data for the Singer and Album tables in the database, you'll see something like this:


9. Clean up
Let's delete the Cloud Spanner instance we created in the beginning to make sure that it's not using up resources unnecessarily.
gcloud spanner instances delete codelab-instance
10. Congratulations
Congratulations, you've successfully built a Java application that uses Hibernate to persist data in Cloud Spanner.
- You created a Cloud Spanner instance and a database
- You configured the application to use Hibernate
- You created two entities: Artist and Album
- You automatically generated the database schema for your application
- You successfully saved entities to Cloud Spanner and queried them
You now know the key steps required to write a Hibernate application with Cloud Spanner.
