Google Cloud Spanner はフルマネージドで水平スケール可能なグローバルに分散されたリレーショナル データベース サービスで、パフォーマンスと高可用性を損なうことなく ACID トランザクションと SQL セマンティクスを提供します。
このラボでは、Cloud Spanner インスタンスの設定方法について学びます。ゲーム リーダーボードに使用できるデータベースとスキーマを作成する手順について説明します。まず、プレーヤー情報を保存するプレーヤー テーブルと、プレーヤーのスコアを保存する Scores テーブルを作成します。
次に、テーブルにサンプルデータを入力します。つづいて、トップ 10 のサンプルクエリをいくつか実行し、最後にインスタンスを削除してリソースを解放します。
ラボの内容
- Cloud Spanner インスタンスの設定方法。
- データベースとテーブルの作成方法。
- commit タイムスタンプ列の使用方法。
- タイムスタンプを含む Cloud Spanner データベース テーブルにデータを読み込む方法。
- Cloud Spanner データベースにクエリを実行する方法。
- Cloud Spanner インスタンスを削除する方法
必要なもの
このチュートリアルをどのように使用されますか?
Google Cloud Platform の使用経験
セルフペース型の環境設定
Google アカウント(Gmail または Google Apps)をお持ちでない場合は、1 つ作成する必要があります。Google Cloud Platform のコンソール(console.cloud.google.com)にログインし、新しいプロジェクトを作成します。
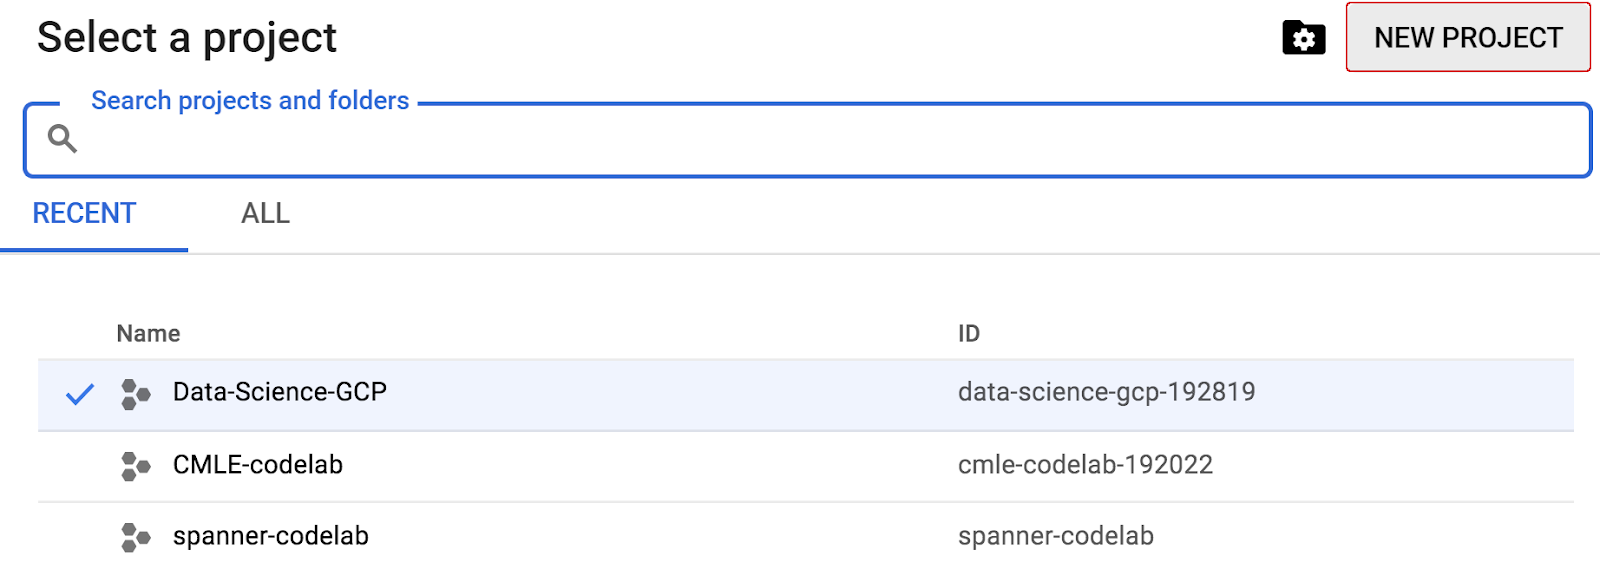
すでにプロジェクトがある場合は、コンソールの左上にあるプロジェクト選択プルダウン メニューをクリックします。

表示されるダイアログで [新しいプロジェクト] ボタンをクリックして新しいプロジェクトを作成します。
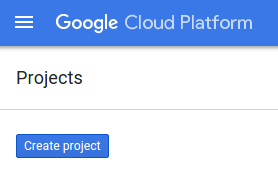
まだプロジェクトがない場合は、次のようなダイアログが表示され、最初のプロジェクトを作成します。
つづいて表示されるプロジェクト作成ダイアログでは、新しいプロジェクトの詳細を入力できます。
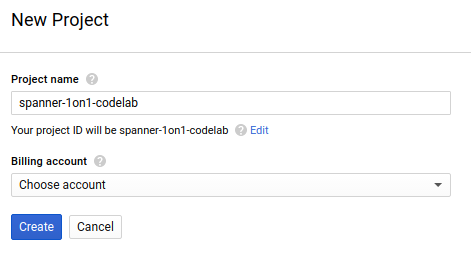
プロジェクト ID を忘れないようにしてください。プロジェクト ID は、すべての Google Cloud プロジェクトを通じて一意の名前にする必要があります(上記の名前はすでに使用されているため使用できません)。以降、この Codelab では PROJECT_ID と表します。
次に、Google Cloud リソースを使用するためと、Cloud Spanner API を有効にするために、Developers Console で課金を有効にします。
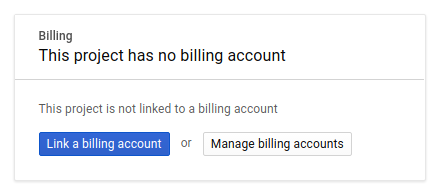
この Codelab の手順をすべて実行しても数百円程度で済みますが、さらにリソースを使用する場合や、実行したまま残しておく場合は、追加の費用がかかる可能性があります(このドキュメントの最後にある「クリーンアップ」セクションをご覧ください)。Google Cloud Spanner の料金については、こちらをご覧ください。
Google Cloud Platform の新規ユーザーは、$300 の無料トライアルをご利用いただけます。その場合、この Codelab は、完全に無料で利用できます。
Google Cloud Shell の設定
Google Cloud と Spanner はノートパソコンからリモートで操作でき、この Codelab では、Google Cloud Shell(Cloud 上で動作するコマンドライン環境)を使用します。
この Debian ベースの仮想マシンには、必要な開発ツールがすべて用意されています。5 GB の永続ホーム ディレクトリが用意されており、Google Cloud で稼働し、ネットワークのパフォーマンスと認証が大幅に強化されています。つまり、この Codelab に必要なものは、ブラウザだけです(Chromebook でも動作します)。
- Cloud Console から Cloud Shell を有効にするには、[Cloud Shell をアクティブにする]
をクリックします(環境のプロビジョニングと接続に少し時間がかかる程度です)。
Cloud Shell に接続すると、すでに認証は完了しており、プロジェクトに各自の PROJECT_ID が設定されていることがわかります。
gcloud auth list
コマンド出力
Credentialed accounts:
 - <myaccount>@<mydomain>.com (active)
gcloud config list project
コマンド出力
[core]
project = <PROJECT_ID>
なんらかの理由でプロジェクトが設定されていない場合は、次のコマンドを実行します。
gcloud config set project <PROJECT_ID>
PROJECT_ID が見つからない場合は、セットアップ手順で使用した ID を確認するか、Cloud Console ダッシュボードで ID を調べます。
また、Cloud Shell では、デフォルトで環境変数もいくつか設定されます。これは、以降コマンドを実行するときに役立つものです。
echo $GOOGLE_CLOUD_PROJECT
コマンド出力
<PROJECT_ID>
- 最後に、デフォルトのゾーンとプロジェクト構成を設定します。
gcloud config set compute/zone us-central1-f
さまざまなゾーンを選択できます。詳細については、リージョンとゾーンをご覧ください。
概要
この手順では、環境の設定を行います。
次の設定
次に、Cloud Spanner インスタンスを設定します。
この手順では、この Codelab 用に Cloud Spanner インスタンスを設定します。左上のハンバーガー メニュー  で Spanner の項目
  を探すか、「/」を押して「Spanner」と入力し Spanner を検索します。
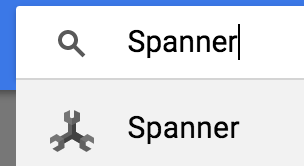
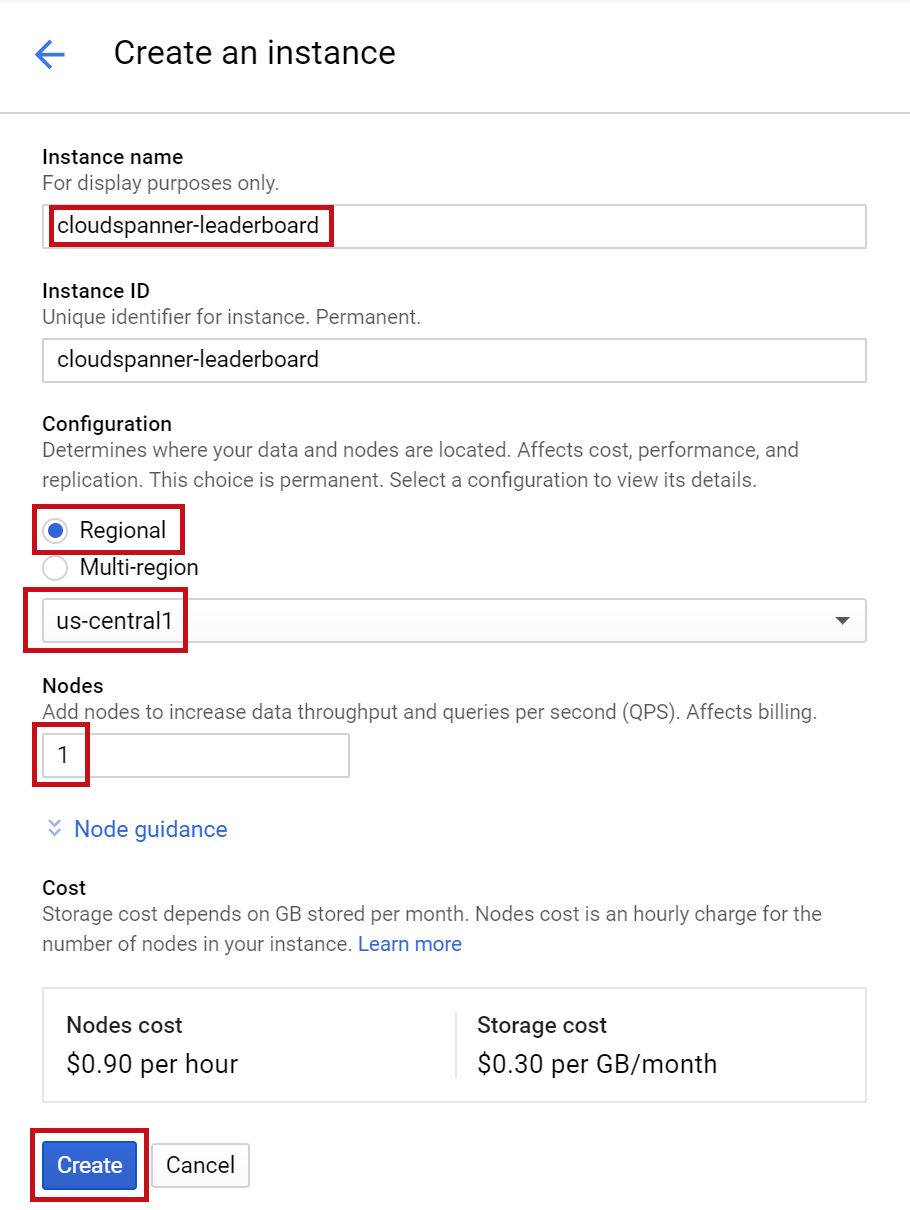
次に、 をクリックして現れたフォームで、インスタンスの [インスタンス名] に cloudspanner-leaderboard を入力し、[構成を選択] では [リージョン] インスタンスの 1 つを選択して、[ノード] 数にこの Codelab で必要な「1」ノードを入力します。本番環境インスタンスの場合に Cloud Spanner SLA の対象となるには、Cloud Spanner インスタンスで 3 つ以上のノードを実行する必要があります。
最後に、重要な [作成] をクリックすると、数秒で指定した Cloud Spanner インスタンスが作成されます。
次の手順では、Go クライアント ライブラリを使用して、新しいインスタンスにデータベースとスキーマを作成します。
この手順では、サンプルのデータベースとスキーマを作成します。
Go クライアント ライブラリを使用して、プレーヤー情報についての Players テーブルと、プレーヤー スコアを格納する Scores テーブルの 2 つのテーブルを作成してみましょう。これを行うために、Cloud Shell で Go コンソール アプリケーションを作成する手順について説明します。
まず、Cloud Shell で次のコマンドを入力して、GitHub にあるこの Codelab 用のサンプルコードのクローンを作成します。
go get -u github.com/GoogleCloudPlatform/golang-samples/spanner/...
次に、アプリケーションを作成する「leaderboard」ディレクトリに移動します。
cd gopath/src/github.com/GoogleCloudPlatform/golang-samples/spanner/spanner_leaderboard
この Codelab に必要なすべてのコードは、既存の golang-samples/spanner/spanner_leaderboard/ ディレクトリ(leaderboard という実行可能な Go アプリケーション)として格納されており、この Codelab を進める際の参考になります。新しいディレクトリを作成し、リーダーボード アプリケーションのコピーを段階的にビルドします。
アプリケーション用に「codelab」という新しいディレクトリを作成し、次のコマンドを使用して作成したディレクトリに移動します。
mkdir codelab && cd $_
次に、Spanner クライアント ライブラリを使用して「Leaderboard」という基本的な Go アプリケーションを作成し、プレーヤーとスコアの 2 つのテーブルから構成されるリーダーボードを作成します。この操作は、Cloud Shell エディタで行えます。
下のハイライト表示されたアイコンをクリックして、Cloud Shell エディタを開きます。
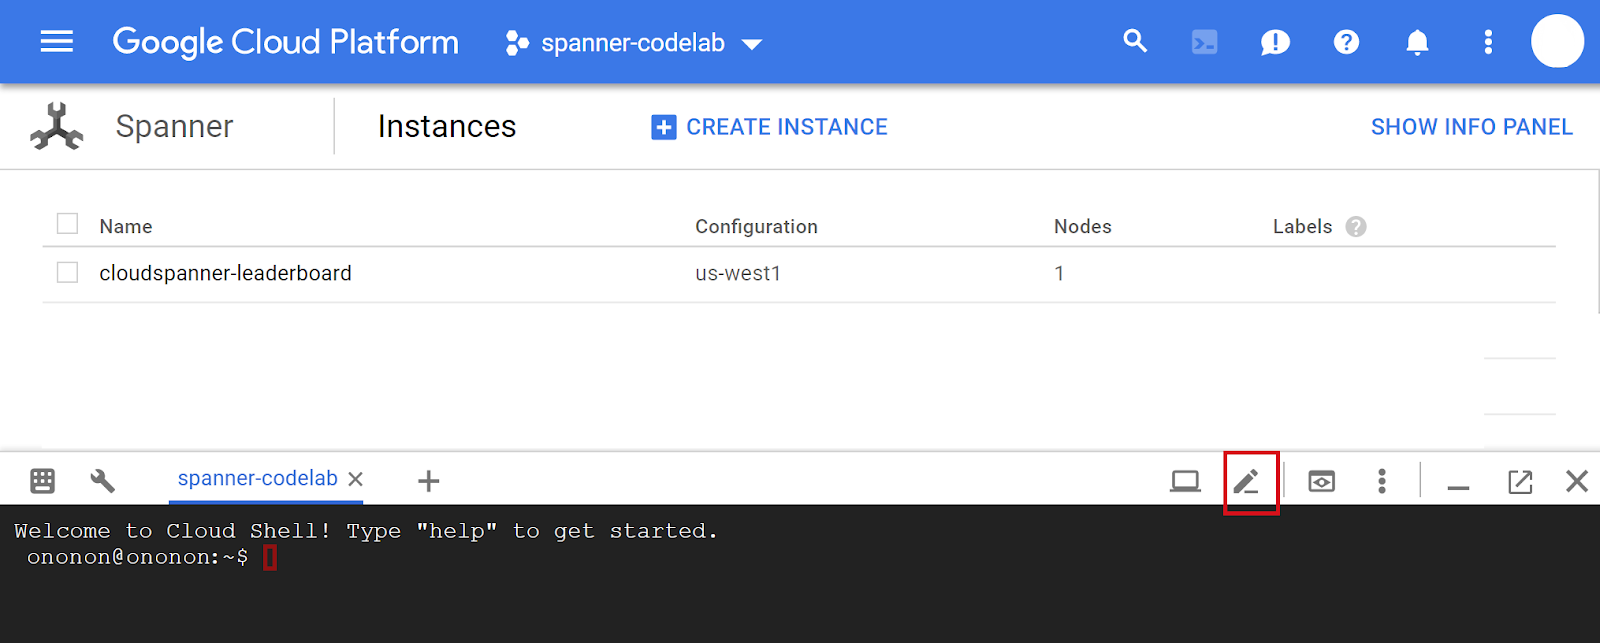
Codelab フォルダの ~/gopath/src/github.com/GoogleCloudPlatform/golang-samples/spanner/ に「leaderboard.go」というファイルを作成します。
- まず、Cloud Shell エディタのフォルダのリストで「codelab」フォルダが選択されていることを確認してください。
- 次に、Cloud Shell エディタの [File] メニューで [New File] を選択します。
- 新しいファイルの名前として「leaderboard.go」と入力します。
これは、アプリケーション コードと参照が記述されるメインファイルで、すべての依存関係を含みます。
leaderboard データベース、Players および Scores テーブルを作成するには、次の Go コードをコピー(Ctrl + P)して leaderboard.go ファイルに貼り付け(Ctrl + V)ます。
package main

import (
        "context"
        "flag"
        "fmt"
        "io"
        "log"
        "os"
        "regexp"
        "time"

        "cloud.google.com/go/spanner"
        database "cloud.google.com/go/spanner/admin/database/apiv1"

        adminpb "google.golang.org/genproto/googleapis/spanner/admin/database/v1"
)

type adminCommand func(ctx context.Context, w io.Writer, adminClient *database.DatabaseAdminClient, database string) error

func createDatabase(ctx context.Context, w io.Writer, adminClient *database.DatabaseAdminClient, db string) error {
        matches := regexp.MustCompile("^(.*)/databases/(.*)$").FindStringSubmatch(db)
        if matches == nil || len(matches) != 3 {
                return fmt.Errorf("Invalid database id %s", db)
        }
        op, err := adminClient.CreateDatabase(ctx, &adminpb.CreateDatabaseRequest{
                Parent:          matches[1],
                CreateStatement: "CREATE DATABASE `" + matches[2] + "`",
                ExtraStatements: []string{
                        `CREATE TABLE Players(
                            PlayerId INT64 NOT NULL,
                            PlayerName STRING(2048) NOT NULL
                        ) PRIMARY KEY(PlayerId)`,
                        `CREATE TABLE Scores(
                            PlayerId INT64 NOT NULL,
                            Score INT64 NOT NULL,
                            Timestamp TIMESTAMP NOT NULL
                            OPTIONS(allow_commit_timestamp=true)
                        ) PRIMARY KEY(PlayerId, Timestamp),
                        INTERLEAVE IN PARENT Players ON DELETE NO ACTION`,
                },
        })
        if err != nil {
                return err
        }
        if _, err := op.Wait(ctx); err != nil {
                return err
        }
        fmt.Fprintf(w, "Created database [%s]\n", db)
        return nil
}

func createClients(ctx context.Context, db string) (*database.DatabaseAdminClient, *spanner.Client) {
        adminClient, err := database.NewDatabaseAdminClient(ctx)
        if err != nil {
                log.Fatal(err)
        }

        dataClient, err := spanner.NewClient(ctx, db)
        if err != nil {
                log.Fatal(err)
        }

        return adminClient, dataClient
}

func run(ctx context.Context, adminClient *database.DatabaseAdminClient, dataClient *spanner.Client, w io.Writer,
        cmd string, db string, timespan int) error {
        // createdatabase command
        if cmd == "createdatabase" {
                err := createDatabase(ctx, w, adminClient, db)
                if err != nil {
                        fmt.Fprintf(w, "%s failed with %v", cmd, err)
                }
                return err
        }
        return nil
}

func main() {
        flag.Usage = func() {
                fmt.Fprintf(os.Stderr, `Usage: leaderboard <command> <database_name> [command_option]

        Command can be one of: createdatabase

Examples:
        leaderboard createdatabase projects/my-project/instances/my-instance/databases/example-db
                - Create a sample Cloud Spanner database along with sample tables in your project.
`)
        }

        flag.Parse()
        flagCount := len(flag.Args())
        if flagCount != 2 {
                flag.Usage()
                os.Exit(2)
        }

        cmd, db := flag.Arg(0), flag.Arg(1)
        // Set timespan to zero, as it's not currently being used
        var timespan int = 0

        ctx, cancel := context.WithTimeout(context.Background(), 1*time.Minute)
        defer cancel()
        adminClient, dataClient := createClients(ctx, db)
        if err := run(ctx, adminClient, dataClient, os.Stdout, cmd, db, timespan); err != nil {
                os.Exit(1)
        }
}
Cloud Shell エディタの [File] メニューで [Save] を選択して、leaderboard.go ファイルに加えた変更を保存します。
golang-samples/spanner/spanner_leaderboard ディレクトリの leaderboard.go ファイルを使用して、createdatabase コマンドを有効にするコードを追加した後の leaderboard.go ファイルの表示例を確認できます。
Cloud Shell でアプリをビルドするには、leaderboard.go ファイルが置かれている codelab ディレクトリで「go build」を実行します。
go build leaderboard.go
アプリケーションが正常にビルドされたら、次のコマンドを入力して、生成されたアプリケーションを Cloud Shell で実行します。
./leaderboard
次のような出力が表示されます。
Usage: leaderboard <command> <database_name> [command_option]

        Command can be one of: createdatabase

Examples:
        leaderboard createdatabase projects/my-project/instances/my-instance/databases/example-db
                - Create a sample Cloud Spanner database along with sample tables in your project.
このレスポンスから、これが Leaderboard アプリケーションであることが確認できます。このアプリケーションには現在、コマンドが 1 つ(createdatabase)設定されています。createdatabase コマンドに必要な引数は、特定のインスタンス ID とデータベース ID を含む文字列であることが確認できます。
そこで、次のコマンドを実行します。必ず、my-project は、この Codelab の最初に作成したプロジェクト ID に置き換えてください。
./leaderboard createdatabase projects/my-project/instances/cloudspanner-leaderboard/databases/leaderboard
数秒後、次のようなレスポンスが表示されます。
Created database [projects/my-project/instances/cloudspanner-leaderboard/databases/leaderboard]
Cloud Console の [Cloud Spanner] セクションで、左側のメニューに新しいデータベースとテーブルが表示されます。
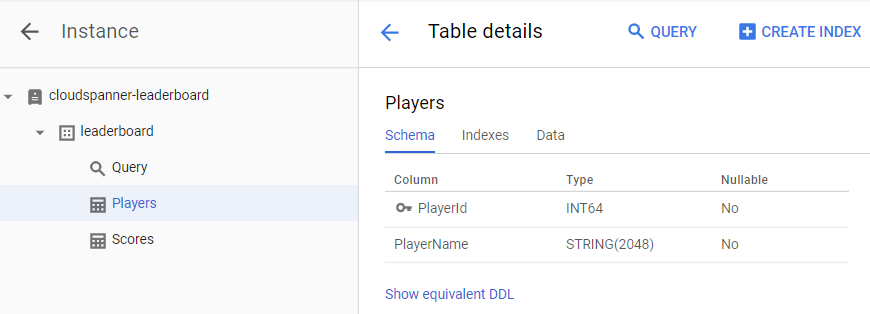
次の手順では、新しいデータベースにデータが読み込まれるようにアプリケーションを更新します。
これで、Players と Scores の 2 つのテーブルを含む leaderboard という名前のデータベースが作成されました。次に、Go クライアント ライブラリを使用して Players テーブルにプレーヤーを、Scores テーブルに各プレーヤーのランダムなスコアを入力してみましょう。
まだ開いていない場合は、下のハイライト表示されたアイコンをクリックして Cloud Shell エディタを開きます。

次に、Cloud Shell エディタで leaderboard.go ファイルを編集して、insertplayers コマンドを追加します。このコマンドを使用すると、100 人のプレーヤーを Players テーブルに挿入できます。また、insertscores コマンドも追加します。これを使用すると、Players テーブルのプレーヤーごとに、ランダムなスコアを 4 つ Scores テーブルに挿入できます。
まず、leaderboard.go ファイルの先頭にある imports セクションを更新して現在の内容を置き換えます。この操作を行うと、次のようになります。
import (
        "context"
        "flag"
        "fmt"
        "io"
        "log"
        "math/rand"
        "os"
        "regexp"
        "time"

        "cloud.google.com/go/spanner"
        database "cloud.google.com/go/spanner/admin/database/apiv1"

        "google.golang.org/api/iterator"
        adminpb "google.golang.org/genproto/googleapis/spanner/admin/database/v1"
)
次に、ファイルの先頭にある「type adminCommand ...」で始まる行の下のコマンドリストに、新しいコマンドタイプを追加します。追加後は次のようになります。
type adminCommand func(ctx context.Context, w io.Writer, adminClient *database.DatabaseAdminClient, database string) error

type command func(ctx context.Context, w io.Writer, client *spanner.Client) error
var (
        commands = map[string]command{
                "insertplayers": insertPlayers,
                "insertscores":  insertScores,
        }
)
次に、既存の createdatabase() 関数の下に、次の insertPlayers 関数と insertScores 関数を追加します。
func insertPlayers(ctx context.Context, w io.Writer, client *spanner.Client) error {
        // Get number of players to use as an incrementing value for each PlayerName to be inserted
        stmt := spanner.Statement{
                SQL: `SELECT Count(PlayerId) as PlayerCount FROM Players`,
        }
        iter := client.Single().Query(ctx, stmt)
        defer iter.Stop()
        row, err := iter.Next()
        if err != nil {
                return err
        }
        var numberOfPlayers int64 = 0
        if err := row.Columns(&numberOfPlayers); err != nil {
                return err
        }
        // Intialize values for random PlayerId
        rand.Seed(time.Now().UnixNano())
        min := 1000000000
        max := 9000000000
        // Insert 100 player records into the Players table
        _, err = client.ReadWriteTransaction(ctx, func(ctx context.Context, txn *spanner.ReadWriteTransaction) error {
                stmts := []spanner.Statement{}
                for i := 1; i <= 100; i++ {
                        numberOfPlayers++
                        playerID := rand.Intn(max-min) + min
                        playerName := fmt.Sprintf("Player %d", numberOfPlayers)
                        stmts = append(stmts, spanner.Statement{
                                SQL: `INSERT INTO Players
                                                (PlayerId, PlayerName)
                                                VALUES (@playerID, @playerName)`,
                                Params: map[string]interface{}{
                                        "playerID":   playerID,
                                        "playerName": playerName,
                                },
                        })
                }
                _, err := txn.BatchUpdate(ctx, stmts)
                if err != nil {
                        return err
                }
                return nil
        })
        fmt.Fprintf(w, "Inserted players \n")
        return nil
}

func insertScores(ctx context.Context, w io.Writer, client *spanner.Client) error {
        playerRecordsFound := false
        // Create slice for insert statements
        stmts := []spanner.Statement{}
        // Select all player records
        stmt := spanner.Statement{SQL: `SELECT PlayerId FROM Players`}
        iter := client.Single().Query(ctx, stmt)
        defer iter.Stop()
        // Insert 4 score records into the Scores table for each player in the Players table
        for {
                row, err := iter.Next()
                if err == iterator.Done {
                        break
                }
                if err != nil {
                        return err
                }
                playerRecordsFound = true
                var playerID int64
                if err := row.ColumnByName("PlayerId", &playerID); err != nil {
                        return err
                }
                // Intialize values for random score and date
                rand.Seed(time.Now().UnixNano())
                min := 1000
                max := 1000000
                for i := 0; i < 4; i++ {
                        // Generate random score between 1,000 and 1,000,000
                        score := rand.Intn(max-min) + min
                        // Generate random day within the past two years
                        now := time.Now()
                        endDate := now.Unix()
                        past := now.AddDate(0, -24, 0)
                        startDate := past.Unix()
                        randomDateInSeconds := rand.Int63n(endDate-startDate) + startDate
                        randomDate := time.Unix(randomDateInSeconds, 0)
                        // Add insert statement to stmts slice
                        stmts = append(stmts, spanner.Statement{
                                SQL: `INSERT INTO Scores
                                                (PlayerId, Score, Timestamp)
                                                VALUES (@playerID, @score, @timestamp)`,
                                Params: map[string]interface{}{
                                        "playerID":  playerID,
                                        "score":     score,
                                        "timestamp": randomDate,
                                },
                        })
                }

        }
        if !playerRecordsFound {
                fmt.Fprintln(w, "No player records currently exist. First insert players then insert scores.")
        } else {
                _, err := client.ReadWriteTransaction(ctx, func(ctx context.Context, txn *spanner.ReadWriteTransaction) error {
                        // Commit insert statements for all scores to be inserted as a single transaction
                        _, err := txn.BatchUpdate(ctx, stmts)
                        return err
                })
                if err != nil {
                        return err
                }
                fmt.Fprintln(w, "Inserted scores")
        }
        return nil
}
つづいて、insert コマンドを実行可能にするため、createdatabase を扱うステートメントの下にあるアプリケーションの「run」関数に次のコードを追加して return nil ステートメントを置き換えます。
        // insert and query commands
        cmdFn := commands[cmd]
        if cmdFn == nil {
                flag.Usage()
                os.Exit(2)
        }
        err := cmdFn(ctx, w, dataClient)
        if err != nil {
                fmt.Fprintf(w, "%s failed with %v", cmd, err)
        }
        return err
これを行うと、run 関数は次のようになります。
func run(ctx context.Context, adminClient *database.DatabaseAdminClient, dataClient *spanner.Client, w io.Writer,
        cmd string, db string, timespan int) error {
        // createdatabase command
        if cmd == "createdatabase" {
                err := createDatabase(ctx, w, adminClient, db)
                if err != nil {
                        fmt.Fprintf(w, "%s failed with %v", cmd, err)
                }
                return err
        }

        // insert and query commands
        cmdFn := commands[cmd]
        if cmdFn == nil {
                flag.Usage()
                os.Exit(2)
        }
        err := cmdFn(ctx, w, dataClient)
        if err != nil {
                fmt.Fprintf(w, "%s failed with %v", cmd, err)
        }
        return err
}
アプリに「挿入」機能を追加する最後の手順は、「insertplayers」コマンドと「insertscores」コマンドのヘルプテキストを flag.Usage() 関数に追加することです。flag.Usage() 関数に次のヘルプテキストを追加して、挿入コマンドのヘルプテキストを組み込みます。
使用可能なコマンドの一覧に 2 つのコマンドを追加します。
Command can be one of: createdatabase, insertplayers, insertscores
さらに、createdatabase コマンドのヘルプテキストの下に、追加のヘルプテキストを加えます。
        leaderboard insertplayers projects/my-project/instances/my-instance/databases/example-db
                - Insert 100 sample Player records into the database.
        leaderboard insertscores projects/my-project/instances/my-instance/databases/example-db
                - Insert sample score data into Scores sample Cloud Spanner database table.
Cloud Shell エディタの [File] メニューで [Save] を選択して、leaderboard.go ファイルに加えた変更を保存します。
insertplayers コマンドと insertscores コマンドを有効にするコードを追加した後の leaderboard.go ファイルの表示のされ方は、golang-samples/spanner/spanner_leaderboard ディレクトリの leaderboard.go ファイルを使用して、確認できます。
次に、アプリケーションをビルドして実行し、新しい insertplayers コマンドと insertscores コマンドがアプリケーションの使用可能なコマンドのリストに含まれていることを確認しましょう。次のコマンドを実行して、アプリケーションをビルドします。
go build leaderboard.go
次のコマンドを入力して、ビルドされたアプリケーションを Cloud Shell で実行します。
./leaderboard
アプリケーションのデフォルトの出力に、insertplayers コマンドと insertscores コマンドが含まれるようになったことが確認できるはずです。
Usage: leaderboard <command> <database_name> [command_option]

        Command can be one of: createdatabase, insertplayers, insertscores

Examples:
        leaderboard createdatabase projects/my-project/instances/my-instance/databases/example-db
                - Create a sample Cloud Spanner database along with sample tables in your project.
        leaderboard insertplayers projects/my-project/instances/my-instance/databases/example-db
                - Insert 100 sample Player records into the database.
        leaderboard insertscores projects/my-project/instances/my-instance/databases/example-db
                - Insert sample score data into Scores sample Cloud Spanner database table.
次に、createdatabase コマンドを呼び出したときと同じ引数を使用して insertplayers コマンドを実行します。必ず、my-project は、この Codelab の最初に作成したプロジェクト ID に置き換えてください。
./leaderboard insertplayers projects/my-project/instances/cloudspanner-leaderboard/databases/leaderboard
数秒後、次のようなレスポンスが表示されます。
Inserted players
次に、Go クライアント ライブラリを使用して、Scores テーブルに、Players テーブルの各プレーヤーのタイムスタンプを含む 4 つのランダムなスコアを入力します。
Scores テーブルの Timestamp 列は、前に create コマンドを実行したときに実行された次の SQL ステートメントを使用して「commit timestamp」列として定義されました。
CREATE TABLE Scores(
  PlayerId INT64 NOT NULL,
  Score INT64 NOT NULL,
  Timestamp TIMESTAMP NOT NULL OPTIONS(allow_commit_timestamp=true)
) PRIMARY KEY(PlayerId, Timestamp),
    INTERLEAVE IN PARENT Players ON DELETE NO ACTION
OPTIONS(allow_commit_timestamp=true) 属性に注意してください。これにより、Timestamp が「commit timestamp」列になり、特定のテーブル行に対する INSERT オペレーションと UPDATE オペレーションの正確なトランザクション タイムスタンプが自動的に入力されます。
また、独自のタイムスタンプ値を「commit timestamp」列に挿入することもでき、この Codelab でもそれを扱います。この場合は、過去の値を持つタイムスタンプを挿入する必要があります。
次に、insertplayers コマンドを呼び出したときと同じ引数を使用して insertscores コマンドを実行します。必ず、my-project は、この Codelab の最初に作成したプロジェクト ID に置き換えてください。
./leaderboard insertscores projects/my-project/instances/cloudspanner-leaderboard/databases/leaderboard
数秒後、次のようなレスポンスが表示されます。
Inserted scores
insertScores 関数を実行すると、次のコード スニペットを使用して、以前に発生した日時からランダムに生成したタイムスタンプを挿入します。
now := time.Now()
endDate := now.Unix()
past := now.AddDate(0, -24, 0)
startDate := past.Unix()
randomDateInSeconds := rand.Int63n(endDate-startDate) + startDate
randomDate := time.Unix(randomDateInSeconds, 0)
stmts = append(stmts, spanner.Statement{
        SQL: `INSERT INTO Scores
              (PlayerId, Score, Timestamp)
                 VALUES (@playerID, @score, @timestamp)`,
        Params: map[string]interface{}{
                "playerID":  playerID,
                "score":     score,
                "timestamp": randomDate,
        },
})
「Insert」トランザクションが行われたときの正確なタイムスタンプで Timestamp 列を自動入力するには、代わりに次のコード スニペットのように Go 定数 spanner.CommitTimestamp を挿入します。
...
stmts = append(stmts, spanner.Statement{
        SQL: `INSERT INTO Scores
              (PlayerId, Score, Timestamp)
                 VALUES (@playerID, @score, @timestamp)`,
        Params: map[string]interface{}{
                "playerID":  playerID,
                "score":     score,
                "timestamp": spanner.CommitTimestamp,
        },
})
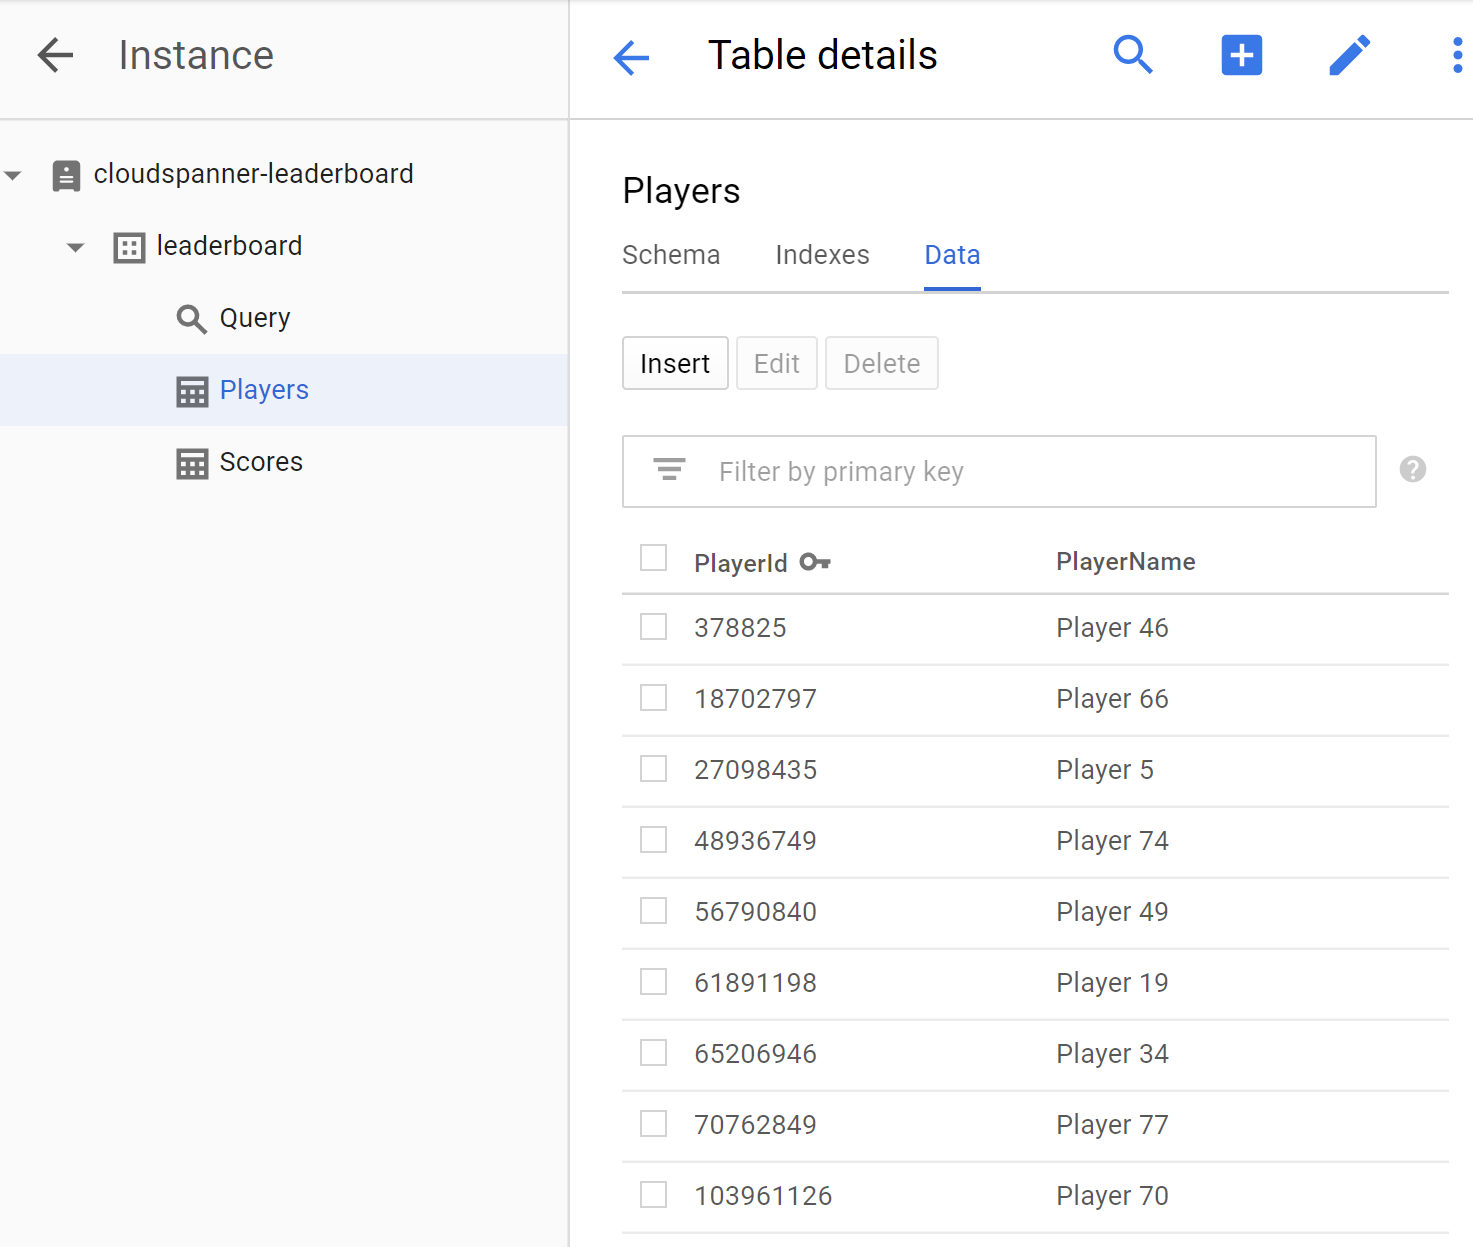
これでデータの読み込みが完了し、次は Cloud Console の Cloud Spanner セクションで新しいテーブルに書き込んだ値を確認します。まず、leaderboard データベースを選択し、次に Players テーブルを選択します。[Data] タブをクリックします。テーブルの [PlayerId] 列と [PlayerName] 列に、データが存在することを確認できます。
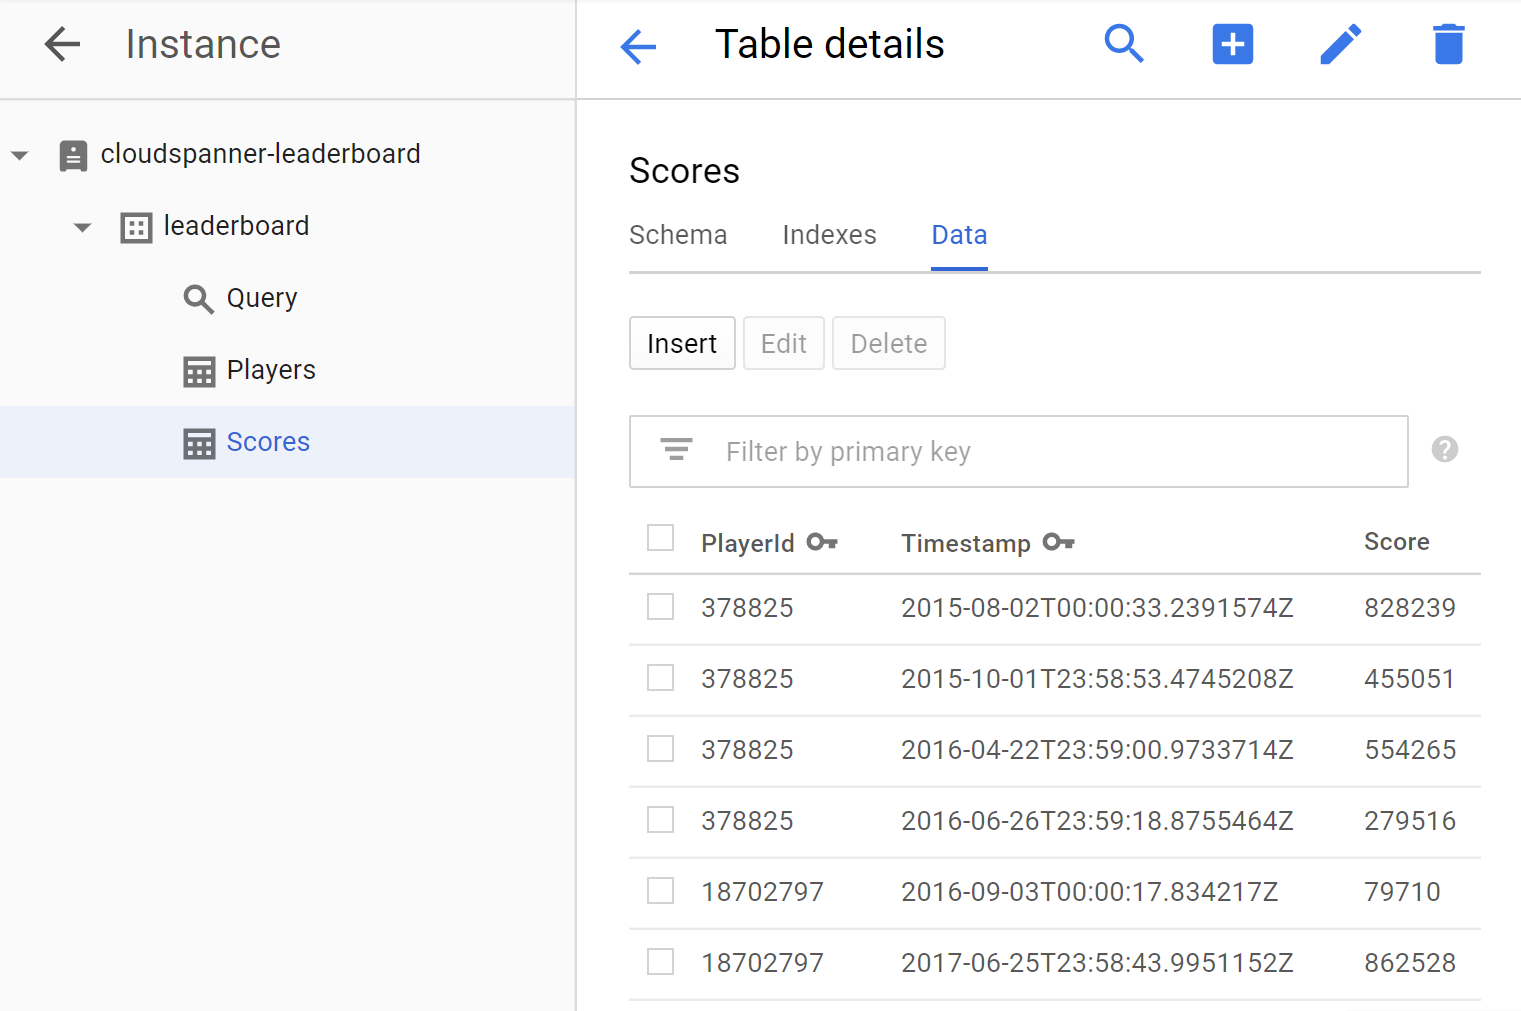
次に、[Scores] テーブルをクリックして [Data] タブを選択し、Scores テーブルにもデータが存在することを確認しましょう。テーブルの PlayerId、Timestamp、Score の各列にデータが存在することを確認できます。
投稿するとゲーム リーダーボードの作成に使用できるクエリを実行するように、アプリを更新しましょう。
データベースを設定して情報をテーブルに読み込んだところで、このデータを使用してリーダーボードを作成してみましょう。そのためには、次の 4 つの質問に答える必要があります。
- 常に「トップテン」入りしているのは、どの選手ですか?
- どの選手が今年の「トップ 10」の選手ですか?
- どの選手が今月のトップ 10 の選手ですか?
- どの選手が今週の「トップ 10」の選手ですか?
これらの質問に答える SQL クエリを実行するようにアプリケーションを更新してみましょう。
query コマンドと queryWithTimespan コマンドを追加します。このコマンドは、質問に答えるクエリを実行してリーダーボードに必要な情報を生成する方法を提供します。
Cloud Shell エディタで leaderboard.go ファイルを編集して、query コマンドと queryWithTimespan コマンドを追加するようにアプリケーションを更新します。また、カンマを使用してスコアを並べるために formatWithCommas ヘルパー関数も追加します。
まず、leaderboard.go ファイルの先頭にある imports セクションを更新して現在の内容を置き換えます。この操作を行うと、次のようになります。
import (
        "bytes"
        "context"
        "flag"
        "fmt"
        "io"
        "log"
        "math/rand"
        "os"
        "regexp"
        "strconv"
        "time"

        "cloud.google.com/go/spanner"
        database "cloud.google.com/go/spanner/admin/database/apiv1"

        "google.golang.org/api/iterator"
        adminpb "google.golang.org/genproto/googleapis/spanner/admin/database/v1"
)
次に、以下の 2 つの関数とヘルパー関数を、既存の insertScores メソッドの下に追加します。
func query(ctx context.Context, w io.Writer, client *spanner.Client) error {
stmt := spanner.Statement{
SQL: `SELECT p.PlayerId, p.PlayerName, s.Score, s.Timestamp
FROM Players p
JOIN Scores s ON p.PlayerId = s.PlayerId
ORDER BY s.Score DESC LIMIT 10`}
iter := client.Single().Query(ctx, stmt)
defer iter.Stop()
for {
row, err := iter.Next()
if err == iterator.Done {
return nil
}
if err != nil {
return err
}
var playerID, score int64
var playerName string
var timestamp time.Time
if err := row.Columns(&playerID, &playerName, &score, ×tamp); err != nil {
return err
}
fmt.Fprintf(w, "PlayerId: %d PlayerName: %s Score: %s Timestamp: %s\n",
playerID, playerName, formatWithCommas(score), timestamp.String()[0:10])
}
}
func queryWithTimespan(ctx context.Context, w io.Writer, client *spanner.Client, timespan int) error {
stmt := spanner.Statement{
SQL: `SELECT p.PlayerId, p.PlayerName, s.Score, s.Timestamp
FROM Players p
JOIN Scores s ON p.PlayerId = s.PlayerId
WHERE s.Timestamp > TIMESTAMP_SUB(CURRENT_TIMESTAMP(), INTERVAL @Timespan HOUR)
ORDER BY s.Score DESC LIMIT 10`,
Params: map[string]interface{}{"Timespan": timespan},
}
iter := client.Single().Query(ctx, stmt)
defer iter.Stop()
for {
row, err := iter.Next()
if err == iterator.Done {
return nil
}
if err != nil {
return err
}
var playerID, score int64
var playerName string
var timestamp time.Time
if err := row.Columns(&playerID, &playerName, &score, ×tamp); err != nil {
return err
}
fmt.Fprintf(w, "PlayerId: %d PlayerName: %s Score: %s Timestamp: %s\n",
playerID, playerName, formatWithCommas(score), timestamp.String()[0:10])
}
}
func formatWithCommas(n int64) string {
numberAsString := strconv.FormatInt(n, 10)
numberLength := len(numberAsString)
if numberLength < 4 {
return numberAsString
}
var buffer bytes.Buffer
comma := []rune(",")
bufferPosition := numberLength % 3
if (bufferPosition) > 0 {
bufferPosition = 3 - bufferPosition
}
for i := 0; i < numberLength; i++ {
if bufferPosition == 3 {
buffer.WriteRune(comma[0])
bufferPosition = 0
}
bufferPosition++
buffer.WriteByte(numberAsString[i])
}
return buffer.String()
}
次に、leaderboard.go ファイルの先頭で、「query」を commands 変数の 1 つのコマンド オプションとして insertscores": insertScores オプションの直下に追加します。そうすると、commands 変数は次のようになります。
var (
        commands = map[string]command{
                "insertplayers": insertPlayers,
                "insertscores":  insertScores,
                "query":         query,
        }
)
次に、「queryWithTimespan」を、run 関数内のコマンド オプションとして、「createdatabase」コマンド セクションと「insert and query」コマンドを扱うセクションの間に追加します。
        // querywithtimespan command
        if cmd == "querywithtimespan" {
                err := queryWithTimespan(ctx, w, dataClient, timespan)
                if err != nil {
                        fmt.Fprintf(w, "%s failed with %v", cmd, err)
                }
                return err
        }
これを行うと、run 関数は次のようになります。
func run(ctx context.Context, adminClient *database.DatabaseAdminClient, dataClient *spanner.Client, w io.Writer,
        cmd string, db string, timespan int) error {
        // createdatabase command
        if cmd == "createdatabase" {
                err := createDatabase(ctx, w, adminClient, db)
                if err != nil {
                        fmt.Fprintf(w, "%s failed with %v", cmd, err)
                }
                return err
        }

        // querywithtimespan command
        if cmd == "querywithtimespan" {
                if timespan == 0 {
                        flag.Usage()
                        os.Exit(2)
                }
                err := queryWithTimespan(ctx, w, dataClient, timespan)
                if err != nil {
                        fmt.Fprintf(w, "%s failed with %v", cmd, err)
                }
                return err
        }

        // insert and query commands
        cmdFn := commands[cmd]
        if cmdFn == nil {
                flag.Usage()
                os.Exit(2)
        }
        err := cmdFn(ctx, w, dataClient)
        if err != nil {
                fmt.Fprintf(w, "%s failed with %v", cmd, err)
        }
        return err
}
つづいて、queryWithTimespan コマンドを実行可能にするため、アプリケーションの main メソッドにある flag.Parse() コードブロックを次のように更新します。
        flag.Parse()
        flagCount := len(flag.Args())
        if flagCount < 2 || flagCount > 3 {
                flag.Usage()
                os.Exit(2)
        }

        cmd, db := flag.Arg(0), flag.Arg(1)
        // If query timespan flag is specified, parse to int
        var timespan int = 0
        if flagCount == 3 {
                parsedTimespan, err := strconv.Atoi(flag.Arg(2))
                if err != nil {
                        fmt.Println(err)
                        os.Exit(2)
                }
                timespan = parsedTimespan
        }

        ctx, cancel := context.WithTimeout(context.Background(), 1*time.Minute)
        defer cancel()
        adminClient, dataClient := createClients(ctx, db)
        if err := run(ctx, adminClient, dataClient, os.Stdout, cmd, db, timespan); err != nil {
                os.Exit(1)
        }
アプリに「query」機能を追加する最後の手順は、「query」コマンドと「querywithtimespan」コマンドのヘルプテキストを flag.Usage() 関数に追加することです。flag.Usage() 関数に次のコード行を追加して query コマンドのヘルプテキストを組み込みます。
使用可能なコマンドのリストに、2 つの「query」コマンドを追加します。
Command can be one of: createdatabase, insertplayers, insertscores, query, querywithtimespan
さらに、insertscores コマンドのヘルプテキストの下に、追加のヘルプテキストを加えます。
        leaderboard query projects/my-project/instances/my-instance/databases/example-db
                - Query players with top ten scores of all time.
        leaderboard querywithtimespan projects/my-project/instances/my-instance/databases/example-db 168
                - Query players with top ten scores within a timespan specified in hours.
Cloud Shell エディタの [File] メニューで [Save] を選択して、leaderboard.go ファイルに加えた変更を保存します。
query コマンドと querywithtimespan コマンドを有効にするコードを追加した後の leaderboard.go ファイルの表示のされ方は、golang-samples/spanner/spanner_leaderboard ディレクトリの leaderboard.go ファイルを使用して、確認できます。
次に、アプリケーションをビルドして実行し、アプリケーションの使用可能なコマンドのリストに、新しい query コマンドと querywithtimespan コマンドが含まれていることを確認します。
Cloud Shell で次のコマンドを実行して、アプリケーションをビルドします。
go build leaderboard.go
次のコマンドを入力して、ビルドされたアプリケーションを Cloud Shell で実行します。
./leaderboard
アプリのデフォルトの出力に新しいコマンド オプションとして、query コマンドと querywithtimespan コマンドが追加されたことを確認できます。
Usage: leaderboard <command> <database_name> [command_option]

        Command can be one of: createdatabase, insertplayers, insertscores, query, querywithtimespan

Examples:
        leaderboard createdatabase projects/my-project/instances/my-instance/databases/example-db
                - Create a sample Cloud Spanner database along with sample tables in your project.
        leaderboard insertplayers projects/my-project/instances/my-instance/databases/example-db
                - Insert 100 sample Player records into the database.
        leaderboard insertscores projects/my-project/instances/my-instance/databases/example-db
                - Insert sample score data into Scores sample Cloud Spanner database table.
        leaderboard query projects/my-project/instances/my-instance/databases/example-db
                - Query players with top ten scores of all time.
        leaderboard querywithtimespan projects/my-project/instances/my-instance/databases/example-db 168
                - Query players with top ten scores within a timespan specified in hours.
query コマンドを使用すると、そのレスポンスで常時「トップテン」のプレーヤーの一覧を確認できます。また、querywithtimespan コマンドを使用すると、Scores テーブルの Timestamp 列の値に基づいてレコードのフィルタリングに使用するタイムスパンを時間単位で指定できることが確認できます。
create コマンドを実行したときと同じ引数の値を使用して query コマンドを実行します。必ず、my-project は、この Codelab の最初に作成したプロジェクト ID に置き換えてください。
./leaderboard query projects/my-project/instances/cloudspanner-leaderboard/databases/leaderboard
次のような常時「トップテン」のプレーヤーを含むレスポンスが表示されます。
PlayerId: 4018687297  PlayerName: Player 83  Score: 999,618  Timestamp: 2017-07-01
PlayerId: 4018687297  PlayerName: Player 83  Score: 998,956  Timestamp: 2017-09-02
PlayerId: 4285713246  PlayerName: Player 51  Score: 998,648  Timestamp: 2017-12-01
PlayerId: 5267931774  PlayerName: Player 49  Score: 997,733  Timestamp: 2017-11-09
PlayerId: 1981654448  PlayerName: Player 35  Score: 997,480  Timestamp: 2018-12-06
PlayerId: 4953940705  PlayerName: Player 87  Score: 995,184  Timestamp: 2018-09-14
PlayerId: 2456736905  PlayerName: Player 84  Score: 992,881  Timestamp: 2017-04-14
PlayerId: 8234617611  PlayerName: Player 19  Score: 992,399  Timestamp: 2017-12-27
PlayerId: 1788051688  PlayerName: Player 76  Score: 992,265  Timestamp: 2018-11-22
PlayerId: 7127686505  PlayerName: Player 97  Score: 992,038  Timestamp: 2017-12-02
次に、querywithtimespan コマンドに必要な引数を指定して実行し、年間の「トップテン」プレーヤーをクエリします。この場合、「timespan」には、1 年に相当する 8,760 時間を指定します。必ず、my-project は、この Codelab の最初に作成したプロジェクト ID に置き換えてください。
./leaderboard querywithtimespan projects/my-project/instances/cloudspanner-leaderboard/databases/leaderboard 8760
次のような年間の「トップテン」プレーヤーを含むレスポンスが表示されます。
PlayerId: 1981654448  PlayerName: Player 35  Score: 997,480  Timestamp: 2018-12-06
PlayerId: 4953940705  PlayerName: Player 87  Score: 995,184  Timestamp: 2018-09-14
PlayerId: 1788051688  PlayerName: Player 76  Score: 992,265  Timestamp: 2018-11-22
PlayerId: 6862349579  PlayerName: Player 30  Score: 990,877  Timestamp: 2018-09-14
PlayerId: 5529627211  PlayerName: Player 16  Score: 989,142  Timestamp: 2018-03-30
PlayerId: 9743904155  PlayerName: Player 1  Score: 988,765  Timestamp: 2018-05-30
PlayerId: 6809119884  PlayerName: Player 7  Score: 986,673  Timestamp: 2018-05-16
PlayerId: 2132710638  PlayerName: Player 54  Score: 983,108  Timestamp: 2018-09-11
PlayerId: 2320093590  PlayerName: Player 79  Score: 981,373  Timestamp: 2018-05-07
PlayerId: 9554181430  PlayerName: Player 80  Score: 981,087  Timestamp: 2018-06-21
次に、1 か月に相当する 730 時間を「timespan」に指定して、querywithtimespan コマンドを実行し、月間の「トップテン」プレーヤーをクエリしてみましょう。必ず、my-project は、この Codelab の最初に作成したプロジェクト ID に置き換えてください。
./leaderboard querywithtimespan projects/my-project/instances/cloudspanner-leaderboard/databases/leaderboard 730
次のような月間の「トップテン」プレーヤーを含むレスポンスが表示されます。
PlayerId: 3869829195  PlayerName: Player 69  Score: 949,686  Timestamp: 2019-02-19
PlayerId: 7448359883  PlayerName: Player 20  Score: 938,998  Timestamp: 2019-02-07
PlayerId: 1981654448  PlayerName: Player 35  Score: 929,003  Timestamp: 2019-02-22
PlayerId: 9336678658  PlayerName: Player 44  Score: 914,106  Timestamp: 2019-01-27
PlayerId: 6968576389  PlayerName: Player 40  Score: 898,041  Timestamp: 2019-02-21
PlayerId: 5529627211  PlayerName: Player 16  Score: 896,433  Timestamp: 2019-01-29
PlayerId: 9395039625  PlayerName: Player 59  Score: 879,495  Timestamp: 2019-02-09
PlayerId: 2094604854  PlayerName: Player 39  Score: 860,434  Timestamp: 2019-02-01
PlayerId: 9395039625  PlayerName: Player 59  Score: 849,955  Timestamp: 2019-02-21
PlayerId: 4285713246  PlayerName: Player 51  Score: 805,654  Timestamp: 2019-02-02
次に、1 週間に相当する 168 時間を「timespan」に指定して、querywithtimespan コマンドを実行し、週間の「トップテン」プレーヤーをクエリしてみましょう。必ず、my-project は、この Codelab の最初に作成したプロジェクト ID に置き換えてください。
./leaderboard querywithtimespan projects/my-project/instances/cloudspanner-leaderboard/databases/leaderboard 168
次のような週間の「トップテン」プレーヤーを含むレスポンスが表示されます。
PlayerId: 3869829195  PlayerName: Player 69  Score: 949,686  Timestamp: 2019-02-19
PlayerId: 1981654448  PlayerName: Player 35  Score: 929,003  Timestamp: 2019-02-22
PlayerId: 6968576389  PlayerName: Player 40  Score: 898,041  Timestamp: 2019-02-21
PlayerId: 9395039625  PlayerName: Player 59  Score: 849,955  Timestamp: 2019-02-21
PlayerId: 5954045812  PlayerName: Player 8  Score: 795,639  Timestamp: 2019-02-22
PlayerId: 3889939638  PlayerName: Player 71  Score: 775,252  Timestamp: 2019-02-21
PlayerId: 5529627211  PlayerName: Player 16  Score: 604,695  Timestamp: 2019-02-19
PlayerId: 9006728426  PlayerName: Player 3  Score: 457,208  Timestamp: 2019-02-22
PlayerId: 8289497066  PlayerName: Player 58  Score: 227,697  Timestamp: 2019-02-20
PlayerId: 8065482904  PlayerName: Player 99  Score: 198,429  Timestamp: 2019-02-24
これで作業はすべて終了しました。
ここでレコードを追加すると、Cloud Spanner はデータベースを必要な大きさにスケールします。データベースがどれほど増加しても、ゲームのリーダーボードは Cloud Spanner とその Truetime テクノロジーにより正確性を維持したままスケールできます。
Spanner の操作を楽しんだ後は、使用した環境をクリーンアップして貴重なリソースと予算を節約する必要があります。この手順は簡単で、Cloud Console の Cloud Spanner セクションに移動して、「Cloud Spanner インスタンスを設定する」という名前の Codelab で作成したインスタンスを削除するだけです。
学習した内容
- リーダーボードの Google Cloud Spanner インスタンス、データベース、テーブル スキーマ
- Go コンソール アプリケーションを作成する方法
- Go クライアント ライブラリを使用して Spanner データベースとテーブルを作成する方法
- Go クライアント ライブラリを使用して Spanner データベースにデータを読み込む方法
- Spanner の commit タイムスタンプと Go クライアント ライブラリを使用してデータから「上位 10 件」の結果をクエリする方法
次のステップ:
- Spanner CAP ホワイトペーパーを確認する
- スキーマ設計とクエリのベスト プラクティスについて確認する
- Cloud Spanner の commit タイムスタンプの詳細を確認する
フィードバックをお寄せください
- 簡単なアンケートにご協力ください
