
1. 總覽
Google Cloud Spanner 是全代管的關聯式資料庫服務,可水平擴充、遍及全球,提供 ACID 交易和 SQL 語意,同時兼顧效能和高可用性。
在本實驗室中,您將學習如何設定 Cloud Spanner 執行個體。您將逐步建立可用於遊戲排行榜的資料庫和結構定義。首先,您要建立「Players」資料表來儲存球員資訊,以及「Scores」資料表來儲存球員得分。
接著,您會將範例資料填入資料表。接著,您將執行一些前十大範例查詢,最後刪除執行個體來釋出資源,完成實驗室。
課程內容
- 如何設定 Cloud Spanner 執行個體。
- 如何建立資料庫和資料表。
- 如何使用修訂時間戳記欄。
- 如何將資料載入 Cloud Spanner 資料庫資料表,並加上時間戳記。
- 如何查詢 Cloud Spanner 資料庫。
- 如何刪除 Cloud Spanner 執行個體。
軟硬體需求
您會如何使用本教學課程?
你對 Google Cloud Platform 的使用體驗滿意嗎?
2. 設定和需求
自修實驗室環境設定
如果您沒有 Google 帳戶 (Gmail 或 Google 應用程式),請先建立帳戶。登入 Google Cloud Platform 主控台 ( console.cloud.google.com),然後建立新專案。
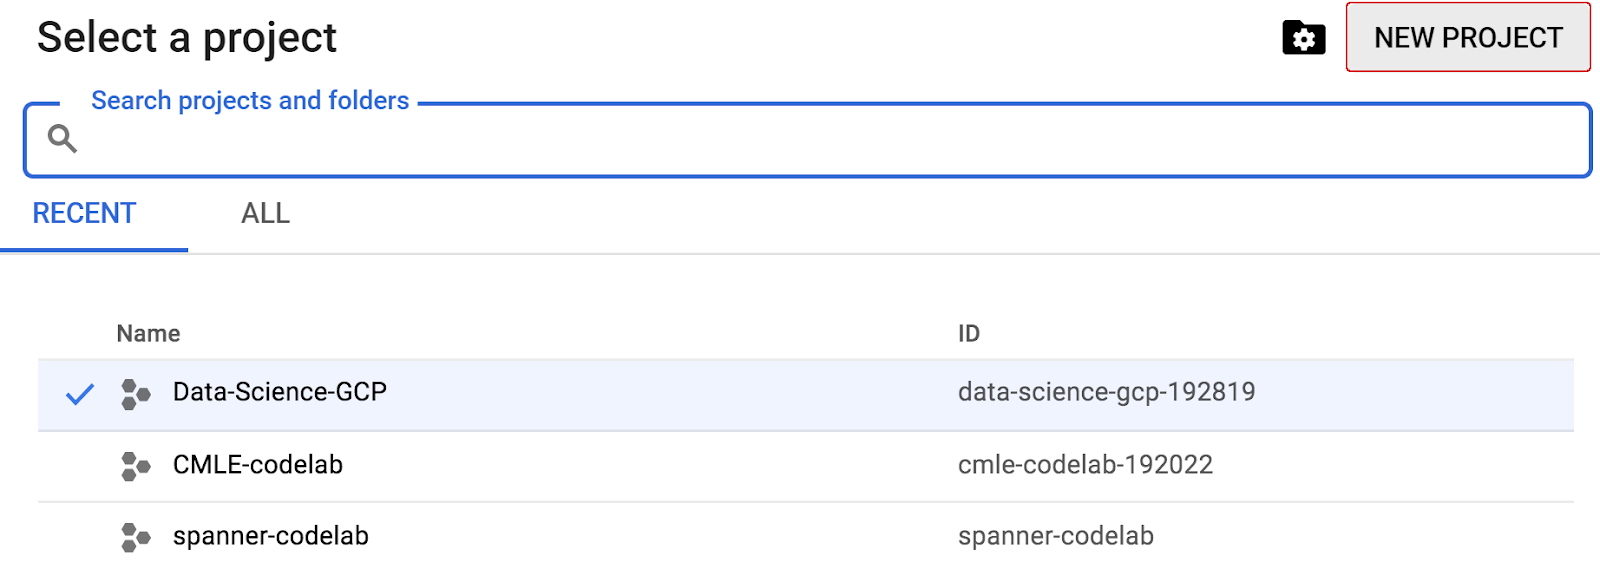
如果您已有專案,請按一下主控台左上方的專案選取下拉式選單:

然後在隨即顯示的對話方塊中,按一下「NEW PROJECT」(新專案) 按鈕,建立新專案:
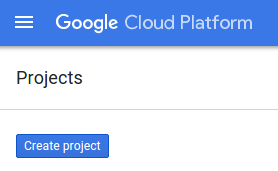
如果您還沒有專案,應該會看到如下對話方塊,請建立第一個專案:
在隨後的專案建立對話方塊中,您可以輸入新專案的詳細資料:
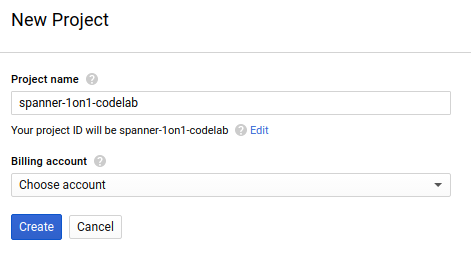
請記住專案 ID,所有 Google Cloud 專案的專案 ID 都是不重複的名稱 (上述名稱已遭占用,因此不適用於您,抱歉!)。本程式碼研究室稍後會將其稱為 PROJECT_ID。
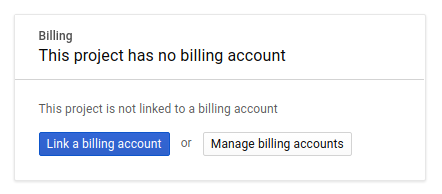
接下來,如果尚未啟用,請在開發人員控制台中啟用帳單,以便使用 Google Cloud 資源,並啟用 Cloud Spanner API。
完成本程式碼研究室的費用不應超過數美元,但如果您決定使用更多資源,或是將資源繼續執行 (請參閱本文件結尾的「清除」一節),則可能會增加費用。Google Cloud Spanner 的定價說明文件請參閱這裡。
Google Cloud Platform 新使用者享有價值 $300 美元的免費試用期,因此本程式碼研究室應完全免費。
Google Cloud Shell 設定
雖然可以透過筆電遠端操作 Google Cloud 和 Spanner,但在本程式碼研究室中,我們將使用 Google Cloud Shell,這是可在雲端執行的指令列環境。
這部以 Debian 為基礎的虛擬機器,搭載各種您需要的開發工具,並提供永久的 5GB 主目錄,而且可在 Google Cloud 運作,大幅提升網路效能並強化驗證功能。也就是說,您只需要瀏覽器 (Chromebook 也可以) 就能完成本程式碼研究室。
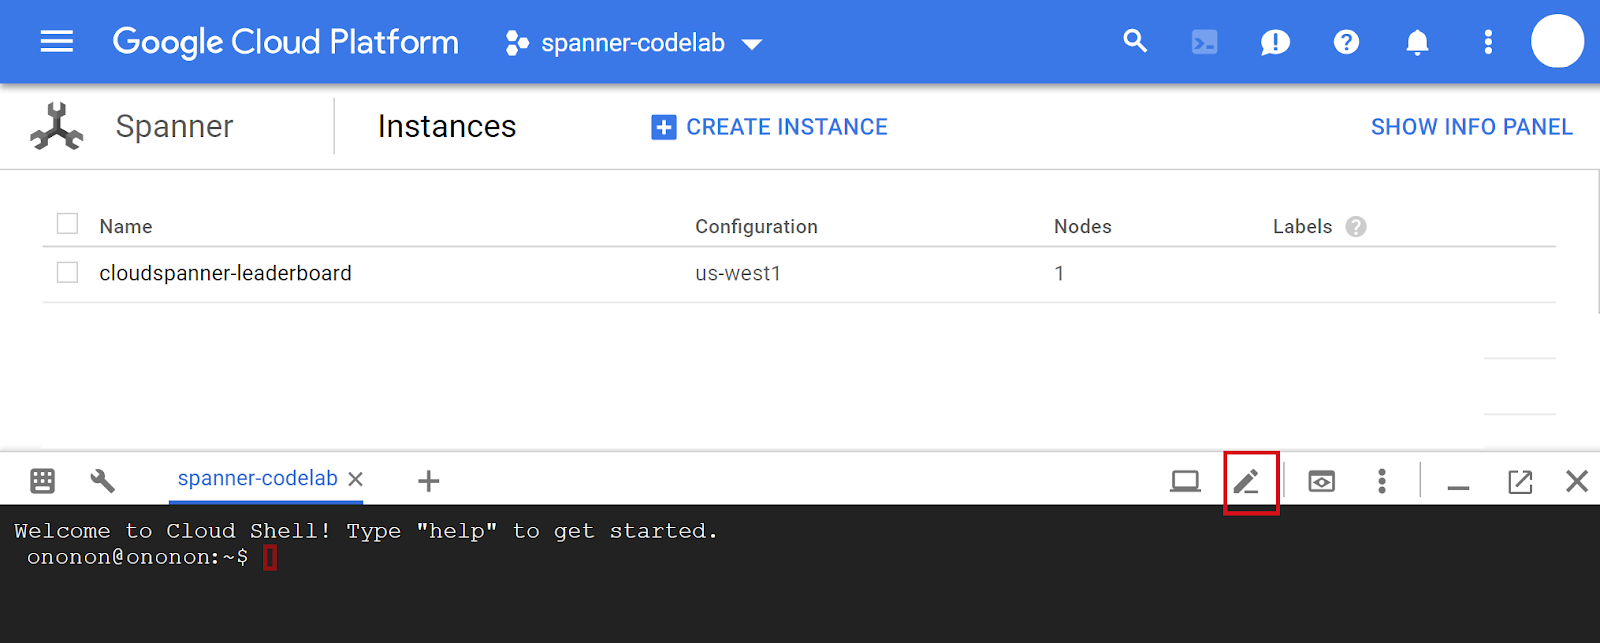
- 如要從 Cloud 控制台啟用 Cloud Shell,只要按一下「啟用 Cloud Shell」
即可 (佈建並連線至環境的作業需要一些時間才能完成)。


連至 Cloud Shell 後,您應該會看到驗證已完成,專案也已設為獲派的專案 ID PROJECT_ID。
gcloud auth list
指令輸出
Credentialed accounts:
 - <myaccount>@<mydomain>.com (active)
gcloud config list project
指令輸出
[core]
project = <PROJECT_ID>
如果專案未設定,請發出下列指令:
gcloud config set project <PROJECT_ID>
在尋找「PROJECT_ID」嗎?請檢查您在設定步驟中使用的 ID,或在 Cloud 控制台資訊主頁中尋找:

Cloud Shell 也會預設設定部分環境變數,這些變數在您執行後續指令時可能很有用。
echo $GOOGLE_CLOUD_PROJECT
指令輸出
<PROJECT_ID>
- 最後,設定預設可用區和專案。
gcloud config set compute/zone us-central1-f
你可以選擇各種不同區域。詳情請參閱「地區和區域」。
摘要
在這個步驟中,您會設定環境。
下一步
接下來,您將設定 Cloud Spanner 執行個體。
3. 設定 Cloud Spanner 執行個體
在本步驟中,我們將為這個程式碼研究室設定 Cloud Spanner 執行個體。在左上方的「漢堡」選單中搜尋 Spanner 項目 
 ,或按下「/」並輸入「Spanner」來搜尋

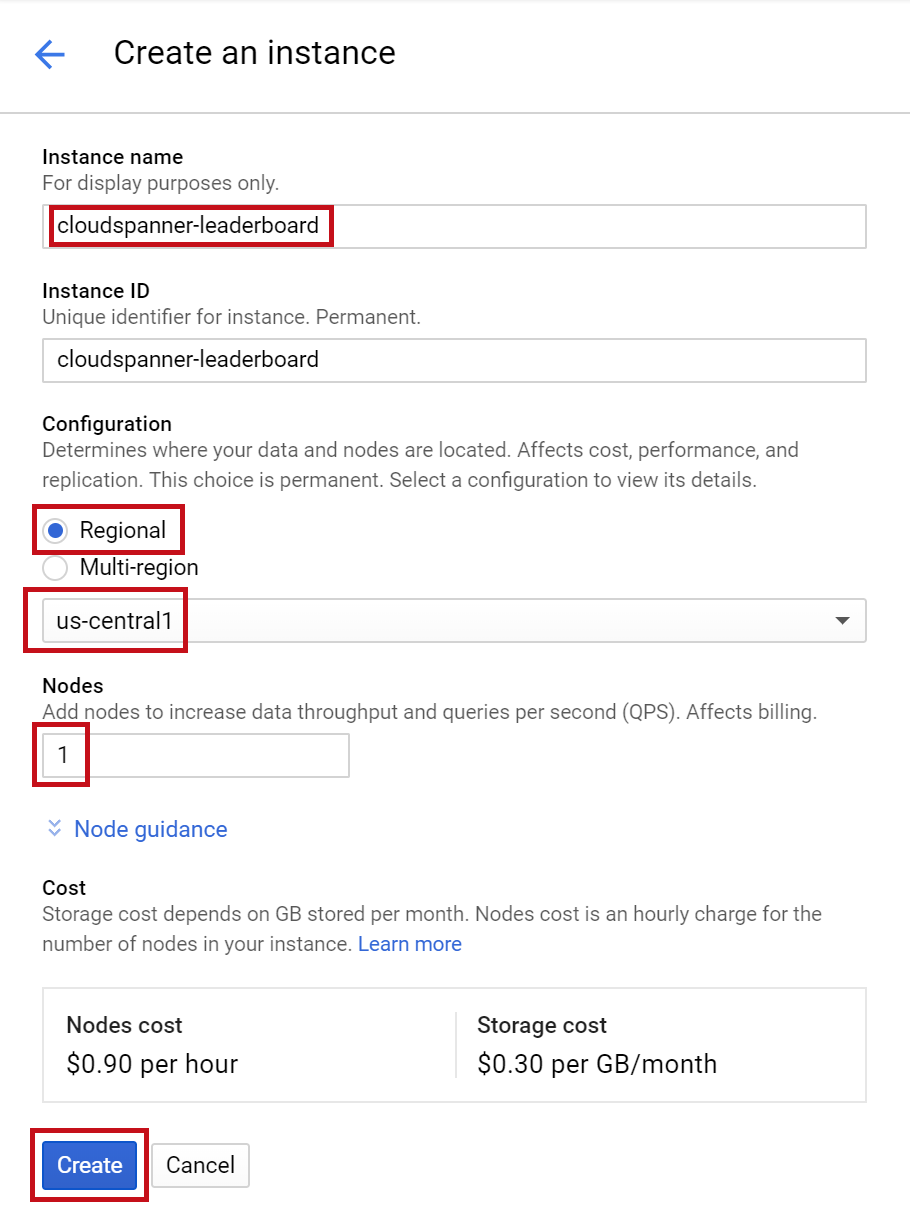
接著,按一下  並填寫表單,輸入執行個體的執行個體名稱 cloudspanner-leaderboard,選擇設定 (選取區域執行個體),並設定節點數量。在本程式碼研究室中,我們只需要 1 個節點。如要使用實際工作環境執行個體,並符合 Cloud Spanner 服務等級協議的資格,您需要在 Cloud Spanner 執行個體中執行 3 個以上的節點。
最後,按一下「建立」,幾秒內您就能使用 Cloud Spanner 執行個體。
在下一個步驟中,我們將使用 Java 用戶端程式庫,在新執行個體中建立資料庫和結構定義。
4. 建立資料庫和結構定義
在這個步驟中,我們要建立資料庫範例和結構定義。
我們將使用 Java 用戶端程式庫建立兩個資料表:一個是 Players 資料表,用於儲存玩家資訊;另一個是 Scores 資料表,用於儲存玩家分數。為此,我們將逐步說明如何在 Cloud Shell 中建立 Java 控制台應用程式。
首先,請在 Cloud Shell 中輸入下列指令,從 GitHub 複製本程式碼研究室的範例程式碼:
git clone https://github.com/GoogleCloudPlatform/java-docs-samples.git
然後將目錄變更為「applications」目錄,您將在其中建立應用程式。
cd java-docs-samples/spanner/leaderboard
本程式碼研究室所需的所有程式碼都位於現有的 java-docs-samples/spanner/leaderboard/complete 目錄中,做為名為 Leaderboard 的可執行 C# 應用程式,供您在完成本程式碼研究室時做為參考。我們會建立新目錄,並分階段建構排行榜應用程式的副本。
建立名為「codelab」的應用程式新目錄,然後使用下列指令將目錄變更為該目錄:
mkdir codelab && cd $_
使用下列 Maven (mvn) 指令,建立名為「Leaderboard」的新基本 Java 應用程式:
mvn -B archetype:generate -DarchetypeGroupId=org.apache.maven.archetypes -DgroupId=com.google.codelabs -DartifactId=leaderboard -DarchetypeVersion=1.4
這個指令會建立簡單的控制台應用程式,其中包含兩個主要檔案:Maven 應用程式設定檔 pom.xml 和 Java 應用程式檔案 App.java。
接著,將目錄變更為剛才建立的排行榜目錄,並列出其內容:
cd leaderboard && ls
畫面上應該會列出 pom.xml 檔案和 src 目錄:
pom.xml src
現在請編輯 App.java,使用 Java Spanner 用戶端程式庫建立包含兩個資料表 (Players 和 Scores) 的排行榜,藉此更新這個控制台應用程式。您可以在 Cloud Shell 編輯器中執行這項操作:
按一下下方標示的圖示,開啟 Cloud Shell 編輯器:
開啟排行榜資料夾下的 pom.xml。開啟 java-docs-samples\ spanner\leaderboard\codelab\leaderboard 資料夾中的 pom.xml 檔案。這個檔案會設定 maven 建構系統,將應用程式建構為 JAR,包括所有依附元件。
在現有的 </properties> 元素下方,新增下列 1 個依附元件管理部分:
<dependencyManagement>
    <dependencies>
      <dependency>
        <groupId>com.google.cloud</groupId>
        <artifactId>google-cloud-bom</artifactId>
        <version>0.83.0-alpha</version>
        <type>pom</type>
        <scope>import</scope>
      </dependency>
    </dependencies>
  </dependencyManagement>
此外,請在現有的 <dependencies> 區段中新增 1 個依附元件,將 Cloud Spanner Java 用戶端程式庫新增至應用程式。
    <dependency>
      <!-- Version auto-managed by BOM -->
      <groupId>com.google.cloud</groupId>
      <artifactId>google-cloud-spanner</artifactId>
    </dependency>
然後將 pom.xml 檔案中現有的 <build> 區段,替換為下列 <build> 區段:
 <build>
    <plugins>
      <plugin>
        <artifactId>maven-assembly-plugin</artifactId>
        <version>2.5.5</version>
        <configuration>
          <finalName>leaderboard</finalName>
          <descriptorRefs>
            <descriptorRef>jar-with-dependencies</descriptorRef>
          </descriptorRefs>
          <archive>
            <manifest>
              <mainClass>com.google.codelabs.App</mainClass>
            </manifest>
          </archive>
          <appendAssemblyId>false</appendAssemblyId>
          <attach>false</attach>
        </configuration>
        <executions>
          <execution>
            <id>make-assembly</id>
            <phase>package</phase>
            <goals>
              <goal>single</goal>
            </goals>
          </execution>
        </executions>
      </plugin>
      <plugin>
        <groupId>org.apache.maven.plugins</groupId>
        <artifactId>maven-failsafe-plugin</artifactId>
        <version>3.0.0-M3</version>
      </plugin>
      <plugin>
        <groupId>org.apache.maven.plugins</groupId>
        <artifactId>maven-surefire-plugin</artifactId>
        <version>3.0.0-M3</version>
        <configuration>
            <useSystemClassLoader>false</useSystemClassLoader>
        </configuration>
      </plugin>
    </plugins>
  </build>
如要儲存對 pom.xml 檔案所做的變更,請選取 Cloud Shell 編輯器「File」選單下方的「Save」,或同時按下「Ctrl」和「S」鍵盤按鍵。
接著,在 src/main/java/com/google/codelabs/ 資料夾中開啟 Cloud Shell 編輯器中的 App.java 檔案。將下列 Java 程式碼貼入 App.java 檔案,取代檔案中的現有程式碼,藉此建立 leaderboard 資料庫和 Players 與 Scores 資料表:
package com.google.codelabs;

import com.google.api.gax.longrunning.OperationFuture;
import com.google.cloud.spanner.Database;
import com.google.cloud.spanner.DatabaseAdminClient;
import com.google.cloud.spanner.DatabaseClient;
import com.google.cloud.spanner.DatabaseId;
import com.google.cloud.spanner.Spanner;
import com.google.cloud.spanner.SpannerException;
import com.google.cloud.spanner.SpannerExceptionFactory;
import com.google.cloud.spanner.SpannerOptions;
import com.google.spanner.admin.database.v1.CreateDatabaseMetadata;
import java.util.Arrays;
import java.util.concurrent.ExecutionException;

/**
 * Example code for using the Cloud Spanner API with the Google Cloud Java client library
 * to create a simple leaderboard.
 *
 * This example demonstrates:
 *
 * <p>
 *
 * <ul>
 *   <li>Creating a Cloud Spanner database.
 * </ul>
 */
public class App {

  static void create(DatabaseAdminClient dbAdminClient, DatabaseId db) {
    OperationFuture<Database, CreateDatabaseMetadata> op =
        dbAdminClient.createDatabase(
            db.getInstanceId().getInstance(),
            db.getDatabase(),
            Arrays.asList(
                "CREATE TABLE Players(\n"
                    + "  PlayerId INT64 NOT NULL,\n"
                    + "  PlayerName STRING(2048) NOT NULL\n"
                    + ") PRIMARY KEY(PlayerId)",
                "CREATE TABLE Scores(\n"
                    + "  PlayerId INT64 NOT NULL,\n"
                    + "  Score INT64 NOT NULL,\n"
                    + "  Timestamp TIMESTAMP NOT NULL\n"
                    + "  OPTIONS(allow_commit_timestamp=true)\n"
                    + ") PRIMARY KEY(PlayerId, Timestamp),\n"
                    + "INTERLEAVE IN PARENT Players ON DELETE NO ACTION"));
    try {
      // Initiate the request which returns an OperationFuture.
      Database dbOperation = op.get();
      System.out.println("Created database [" + dbOperation.getId() + "]");
    } catch (ExecutionException e) {
      // If the operation failed during execution, expose the cause.
      throw (SpannerException) e.getCause();
    } catch (InterruptedException e) {
      // Throw when a thread is waiting, sleeping, or otherwise occupied,
      // and the thread is interrupted, either before or during the activity.
      throw SpannerExceptionFactory.propagateInterrupt(e);
    }
  }

  static void printUsageAndExit() {
    System.out.println("Leaderboard 1.0.0");
    System.out.println("Usage:");
    System.out.println("  java -jar leaderboard.jar "
        + "<command> <instance_id> <database_id> [command_option]");
    System.out.println("");
    System.out.println("Examples:");
    System.out.println("  java -jar leaderboard.jar create my-instance example-db");
    System.out.println("      - Create a sample Cloud Spanner database along with "
        + "sample tables in your project.\n");
    System.exit(1);
  }

  public static void main(String[] args) throws Exception {
    if (!(args.length == 3 || args.length == 4)) {
      printUsageAndExit();
    }
    SpannerOptions options = SpannerOptions.newBuilder().build();
    Spanner spanner = options.getService();
    try {
      String command = args[0];
      DatabaseId db = DatabaseId.of(options.getProjectId(), args[1], args[2]);
      DatabaseClient dbClient = spanner.getDatabaseClient(db);
      DatabaseAdminClient dbAdminClient = spanner.getDatabaseAdminClient();
      switch (command) {
        case "create":
          create(dbAdminClient, db);
          break;
        default:
          printUsageAndExit();
      }
    } finally {
      spanner.close();
    }
    System.out.println("Closed client");
  }
}
在 Cloud Shell 編輯器的「File」(檔案) 選單中選取「Save」(儲存),即可儲存對 App.java 檔案所做的變更。
您可以使用 java-docs-samples/spanner/leaderboard/step4/src 目錄中的 App.java 檔案,查看啟用 create 指令後 App.java 檔案的範例。
如要建構應用程式,請在 pom.xml 所在的目錄中執行 mvn package:
mvn package
成功建構 Java jar 檔案後,請輸入下列指令,在 Cloud Shell 中執行產生的應用程式:
java -jar target/leaderboard.jar
您會看到如下所示的輸出:
Leaderboard 1.0.0
Usage:
  java -jar leaderboard.jar <command> <instance_id> <database_id> [command_option]

Examples:
  java -jar leaderboard.jar create my-instance example-db
      - Create a sample Cloud Spanner database along with sample tables in your project.
從這個回覆中,我們可以看到這是 Leaderboard 應用程式,目前有一個可能的指令:create。我們可以看到 create 指令的預期引數為執行個體 ID 和資料庫 ID。
現在請執行下列指令。
java -jar target/leaderboard.jar create cloudspanner-leaderboard leaderboard
幾秒後,您應該會看到類似以下的回應:
Created database [projects/your-project/instances/cloudspanner-leaderboard/databases/leaderboard]
在 Cloud 控制台的「Cloud Spanner」部分,左側選單應該會顯示新的資料庫和資料表。
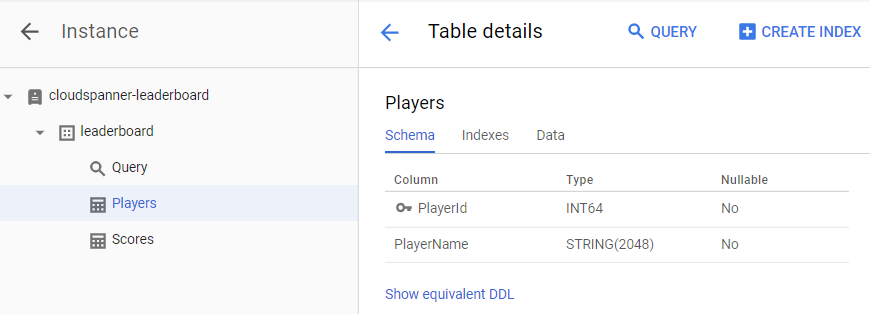
在下一個步驟中,我們會更新應用程式,將一些資料載入新的資料庫。
5. 載入資料
現在我們有一個名為 leaderboard 的資料庫,其中包含兩個資料表:Players 和 Scores。現在,請使用 Java 用戶端程式庫,在 Players 表格中填入玩家,並在 Scores 表格中填入每位玩家的隨機分數。
如果尚未開啟,請點選下方醒目顯示的圖示,開啟 Cloud Shell 編輯器:

接著,在 Cloud Shell 編輯器中編輯 App.java 檔案,加入 insert 指令,將 100 名玩家插入 Players 資料表,或為 Players 資料表中的每位玩家,在 Scores 資料表中插入 4 個隨機分數。
首先,請更新應用程式檔案頂端的 imports 區段,取代目前內容,完成後應如下所示:
package com.google.codelabs;

import static com.google.cloud.spanner.TransactionRunner.TransactionCallable;

import com.google.api.gax.longrunning.OperationFuture;
import com.google.cloud.spanner.Database;
import com.google.cloud.spanner.DatabaseAdminClient;
import com.google.cloud.spanner.DatabaseClient;
import com.google.cloud.spanner.DatabaseId;
import com.google.cloud.spanner.Mutation;
import com.google.cloud.spanner.ResultSet;
import com.google.cloud.spanner.Spanner;
import com.google.cloud.spanner.SpannerException;
import com.google.cloud.spanner.SpannerExceptionFactory;
import com.google.cloud.spanner.SpannerOptions;
import com.google.cloud.spanner.Statement;
import com.google.cloud.spanner.TransactionContext;
import com.google.spanner.admin.database.v1.CreateDatabaseMetadata;
import java.time.Instant;
import java.time.LocalDate;
import java.time.LocalDateTime;
import java.time.LocalTime;
import java.time.ZoneOffset;
import java.util.ArrayList;
import java.util.Arrays;
import java.util.List;
import java.util.Random;
import java.util.concurrent.ExecutionException;
import java.util.concurrent.ThreadLocalRandom;
接著,在現有的 create() 方法下方和現有的 printUsageAndExit() 方法上方,新增下列 insert、insertPlayers 和 insertScores 方法:
  static void insert(DatabaseClient dbClient, String insertType) {
    try {
      insertType = insertType.toLowerCase();
    } catch (Exception e) {
      // Invalid input received, set insertType to empty string.
      insertType = "";
    }
    if (insertType.equals("players")) {
      // Insert players.
      insertPlayers(dbClient);
    } else if (insertType.equals("scores")) {
      // Insert scores.
      insertScores(dbClient);
    } else {
      // Invalid input.
      System.out.println("Invalid value for 'type of insert'. "
          + "Specify a valid value: 'players' or 'scores'.");
      System.exit(1);
    }
  }

  static void insertPlayers(DatabaseClient dbClient) {
    dbClient
        .readWriteTransaction()
        .run(
            new TransactionCallable<Void>() {
              @Override
              public Void run(TransactionContext transaction) throws Exception {
                // Get the number of players.
                String sql = "SELECT Count(PlayerId) as PlayerCount FROM Players";
                ResultSet resultSet = transaction.executeQuery(Statement.of(sql));
                long numberOfPlayers = 0;
                if (resultSet.next()) {
                  numberOfPlayers = resultSet.getLong("PlayerCount");
                }
                // Insert 100 player records into the Players table.
                List<Statement> stmts = new ArrayList<Statement>();
                long randomId;
                for (int x = 1; x <= 100; x++) {
                  numberOfPlayers++;
                  randomId = (long) Math.floor(Math.random() * 9_000_000_000L) + 1_000_000_000L;
                  Statement statement =
                      Statement
                        .newBuilder(
                            "INSERT INTO Players (PlayerId, PlayerName) "
                            + "VALUES (@PlayerId, @PlayerName) ")
                        .bind("PlayerId")
                        .to(randomId)
                        .bind("PlayerName")
                        .to("Player " + numberOfPlayers)
                        .build();
                  stmts.add(statement);
                }
                transaction.batchUpdate(stmts);
                return null;
              }
            });
    System.out.println("Done inserting player records...");
  }

  static void insertScores(DatabaseClient dbClient) {
    boolean playerRecordsFound = false;
    ResultSet resultSet =
        dbClient
            .singleUse()
            .executeQuery(Statement.of("SELECT * FROM Players"));
    while (resultSet.next()) {
      playerRecordsFound = true;
      final long playerId = resultSet.getLong("PlayerId");
      dbClient
          .readWriteTransaction()
          .run(
              new TransactionCallable<Void>() {
                @Override
                public Void run(TransactionContext transaction) throws Exception {
                  // Initialize objects for random Score and random Timestamp.
                  LocalDate endDate = LocalDate.now();
                  long end = endDate.toEpochDay();
                  int startYear = endDate.getYear() - 2;
                  int startMonth = endDate.getMonthValue();
                  int startDay = endDate.getDayOfMonth();
                  LocalDate startDate = LocalDate.of(startYear, startMonth, startDay);
                  long start = startDate.toEpochDay();
                  Random r = new Random();
                  List<Statement> stmts = new ArrayList<Statement>();
                  // Insert 4 score records into the Scores table
                  // for each player in the Players table.
                  for (int x = 1; x <= 4; x++) {
                    // Generate random score between 1,000,000 and 1,000
                    long randomScore = r.nextInt(1000000 - 1000) + 1000;
                    // Get random day within the past two years.
                    long randomDay = ThreadLocalRandom.current().nextLong(start, end);
                    LocalDate randomDayDate = LocalDate.ofEpochDay(randomDay);
                    LocalTime randomTime = LocalTime.of(
                        r.nextInt(23), r.nextInt(59), r.nextInt(59), r.nextInt(9999));
                    LocalDateTime randomDate = LocalDateTime.of(randomDayDate, randomTime);
                    Instant randomInstant = randomDate.toInstant(ZoneOffset.UTC);
                    Statement statement =
                        Statement
                        .newBuilder(
                          "INSERT INTO Scores (PlayerId, Score, Timestamp) "
                          + "VALUES (@PlayerId, @Score, @Timestamp) ")
                        .bind("PlayerId")
                        .to(playerId)
                        .bind("Score")
                        .to(randomScore)
                        .bind("Timestamp")
                        .to(randomInstant.toString())
                        .build();
                    stmts.add(statement);
                  }
                  transaction.batchUpdate(stmts);
                  return null;
                }
              });

    }
    if (!playerRecordsFound) {
      System.out.println("Parameter 'scores' is invalid since "
          + "no player records currently exist. First insert players "
          + "then insert scores.");
      System.exit(1);
    } else {
      System.out.println("Done inserting score records...");
    }
  }
接著,如要讓 insert 指令正常運作,請在 switch (command) 陳述式中,將下列程式碼新增至應用程式的「main」方法:
        case "insert":
          String insertType;
          try {
            insertType = args[3];
          } catch (ArrayIndexOutOfBoundsException exception) {
            insertType = "";
          }
          insert(dbClient, insertType);
          break;
完成後,switch (command) 陳述式應如下所示:
      switch (command) {
        case "create":
          create(dbAdminClient, db);
          break;
        case "insert":
          String insertType;
          try {
            insertType = args[3];
          } catch (ArrayIndexOutOfBoundsException exception) {
            insertType = "";
          }
          insert(dbClient, insertType);
          break;
        default:
          printUsageAndExit();
      }
如要完成在應用程式中新增「插入」功能,最後一個步驟是在 printUsageAndExit() 方法中新增「插入」指令的說明文字。在 printUsageAndExit() 方法中加入下列程式碼行,納入插入指令的說明文字:
    System.out.println("  java -jar leaderboard.jar insert my-instance example-db players");
    System.out.println("      - Insert 100 sample Player records into the database.\n");
    System.out.println("  java -jar leaderboard.jar insert my-instance example-db scores");
    System.out.println("      - Insert sample score data into Scores sample Cloud Spanner "
        + "database table.\n");
在 Cloud Shell 編輯器的「File」(檔案) 選單中選取「Save」(儲存),即可儲存對 App.java 檔案所做的變更。
您可以使用 java-docs-samples/spanner/leaderboard/step5/src 目錄中的 App.java 檔案,查看啟用 insert 指令後 App.java 檔案的範例。
現在請重建並執行應用程式,確認新的 insert 指令已納入應用程式的可能指令清單。
如要建構應用程式,請在 pom.xml 所在的目錄中執行 mvn package:
mvn package
成功建構 Java JAR 檔案後,請執行下列指令:
java -jar target/leaderboard.jar
您現在應該會在應用程式的預設輸出內容中看到 insert 指令:
Leaderboard 1.0.0
Usage:
  java -jar leaderboard.jar <command> <instance_id> <database_id> [command_option]

Examples:
  java -jar leaderboard.jar create my-instance example-db
      - Create a sample Cloud Spanner database along with sample tables in your project.

  java -jar leaderboard.jar insert my-instance example-db players
      - Insert 100 sample Player records into the database.

  java -jar leaderboard.jar insert my-instance example-db scores
      - Insert sample score data into Scores sample Cloud Spanner database table.
從回應中可以看出,除了執行個體 ID 和資料庫 ID 之外,還有另一個引數的值可以是「players」或「scores」。
現在,請使用呼叫 create 指令時使用的相同引數值,執行 insert 指令,並新增「players」做為額外的「插入類型」引數。
java -jar target/leaderboard.jar insert cloudspanner-leaderboard leaderboard players
幾秒後,您應該會看到類似以下的回應:
Done inserting player records...
現在讓我們使用 Java 用戶端程式庫,在 Scores 資料表中填入四個隨機分數,以及 Players 資料表中每位玩家的時間戳記。
先前執行 create 指令時,我們透過下列 SQL 陳述式將 Scores 資料表的 Timestamp 資料欄定義為「提交時間戳記」資料欄:
CREATE TABLE Scores(
  PlayerId INT64 NOT NULL,
  Score INT64 NOT NULL,
  Timestamp TIMESTAMP NOT NULL OPTIONS(allow_commit_timestamp=true)
) PRIMARY KEY(PlayerId, Timestamp),
    INTERLEAVE IN PARENT Players ON DELETE NO ACTION
請注意 OPTIONS(allow_commit_timestamp=true) 屬性。這會將 Timestamp 設為「修訂時間戳記」資料欄,並在特定資料表列上執行 INSERT 和 UPDATE 作業時,自動填入確切的交易時間戳記。
您也可以將自己的時間戳記值插入「修訂時間戳記」欄,只要插入的值是過去的時間戳記即可。在本程式碼研究室中,我們將這麼做。
現在,請使用呼叫 create 指令時使用的相同引數值,執行 insert 指令,並將「scores」新增為額外的「插入類型」引數。
java -jar target/leaderboard.jar insert cloudspanner-leaderboard leaderboard scores
幾秒後,您應該會看到類似以下的回應:
Done inserting score records...
執行 insert 時,如果「插入類型」指定為 scores,系統會呼叫 insertScores 方法,並使用下列程式碼片段插入隨機產生的時間戳記,以及過去發生的日期時間:
          LocalDate endDate = LocalDate.now();
          long end = endDate.toEpochDay();
          int startYear = endDate.getYear() - 2;
          int startMonth = endDate.getMonthValue();
          int startDay = endDate.getDayOfMonth();
          LocalDate startDate = LocalDate.of(startYear, startMonth, startDay);
          long start = startDate.toEpochDay();
...
            long randomDay = ThreadLocalRandom.current().nextLong(start, end);
            LocalDate randomDayDate = LocalDate.ofEpochDay(randomDay);
            LocalTime randomTime = LocalTime.of(
                        r.nextInt(23), r.nextInt(59), r.nextInt(59), r.nextInt(9999));
            LocalDateTime randomDate = LocalDateTime.of(randomDayDate, randomTime);
            Instant randomInstant = randomDate.toInstant(ZoneOffset.UTC);

...
               .bind("Timestamp")
               .to(randomInstant.toString())
如要自動在 Timestamp 欄中填入「插入」交易發生的確切時間戳記,可以改為插入 Java 常數 Value.COMMIT_TIMESTAMP,如下列程式碼片段所示:
               .bind("Timestamp")
               .to(Value.COMMIT_TIMESTAMP)
資料載入完成後,請驗證我們剛才寫入新資料表的值。首先選取「leaderboard」資料庫,然後選取「Players」資料表。按一下「Data」分頁標籤。您應該會看到資料表 PlayerId 和 PlayerName 欄中的資料。
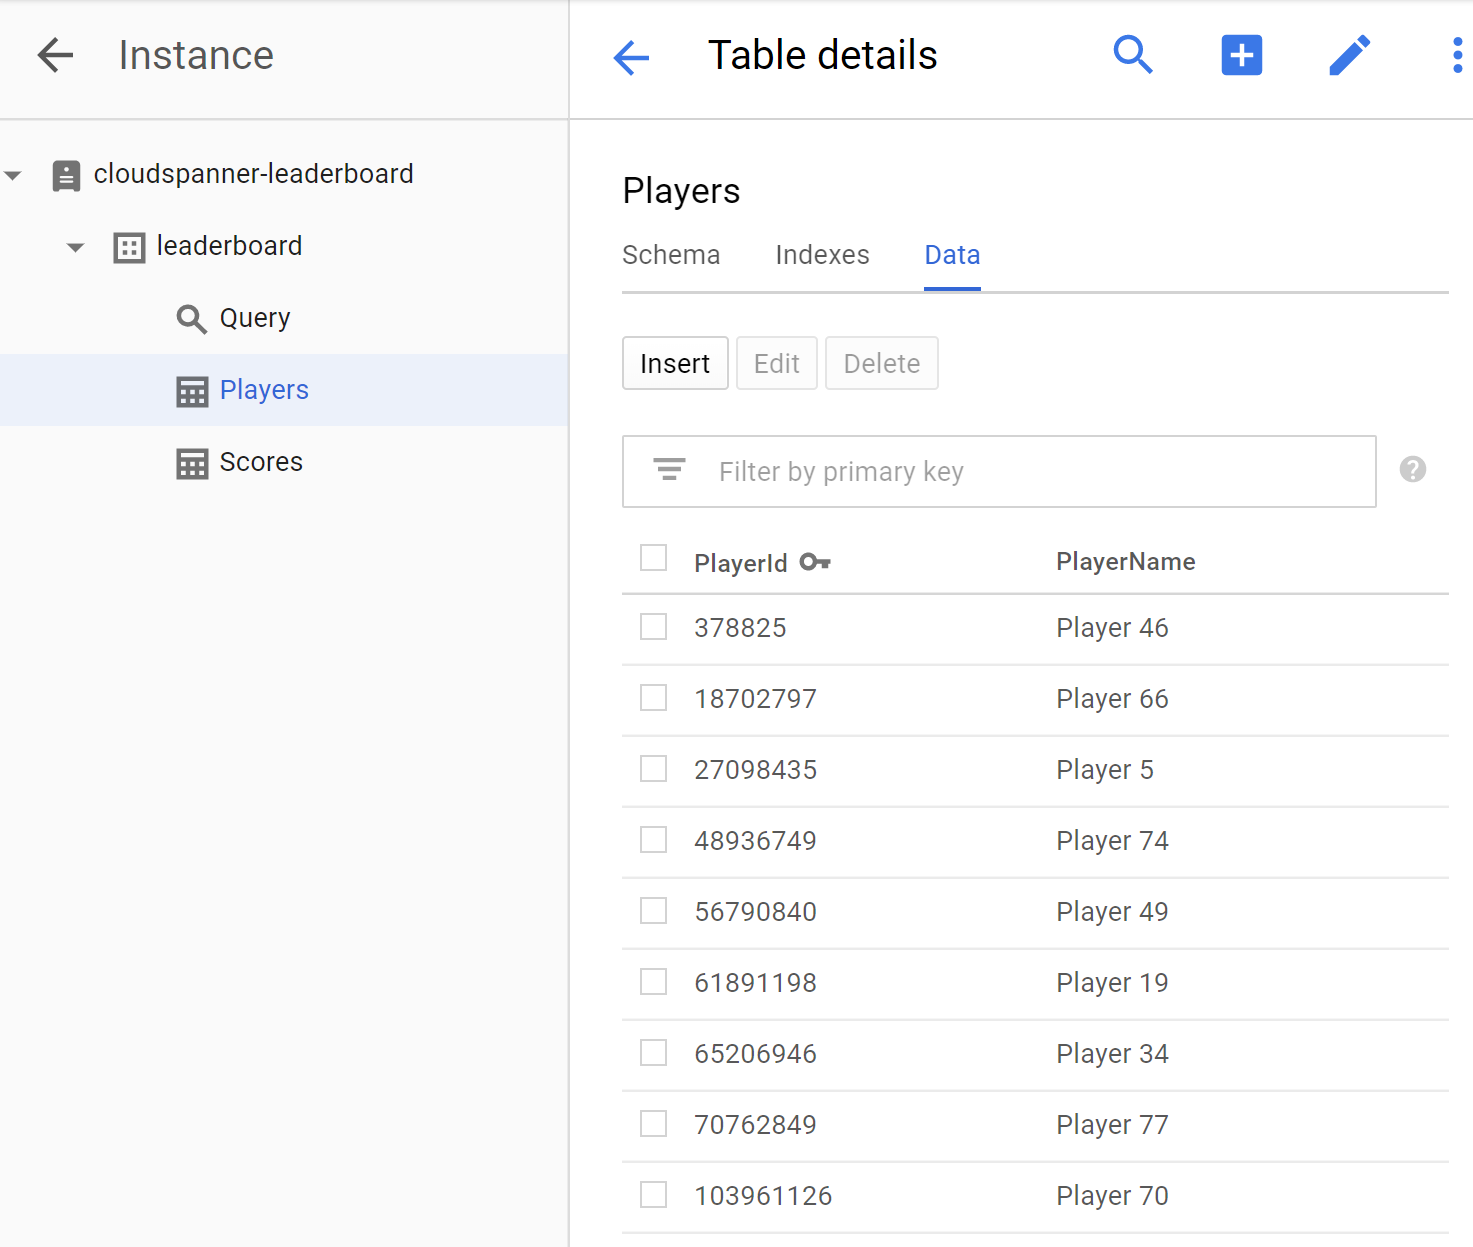
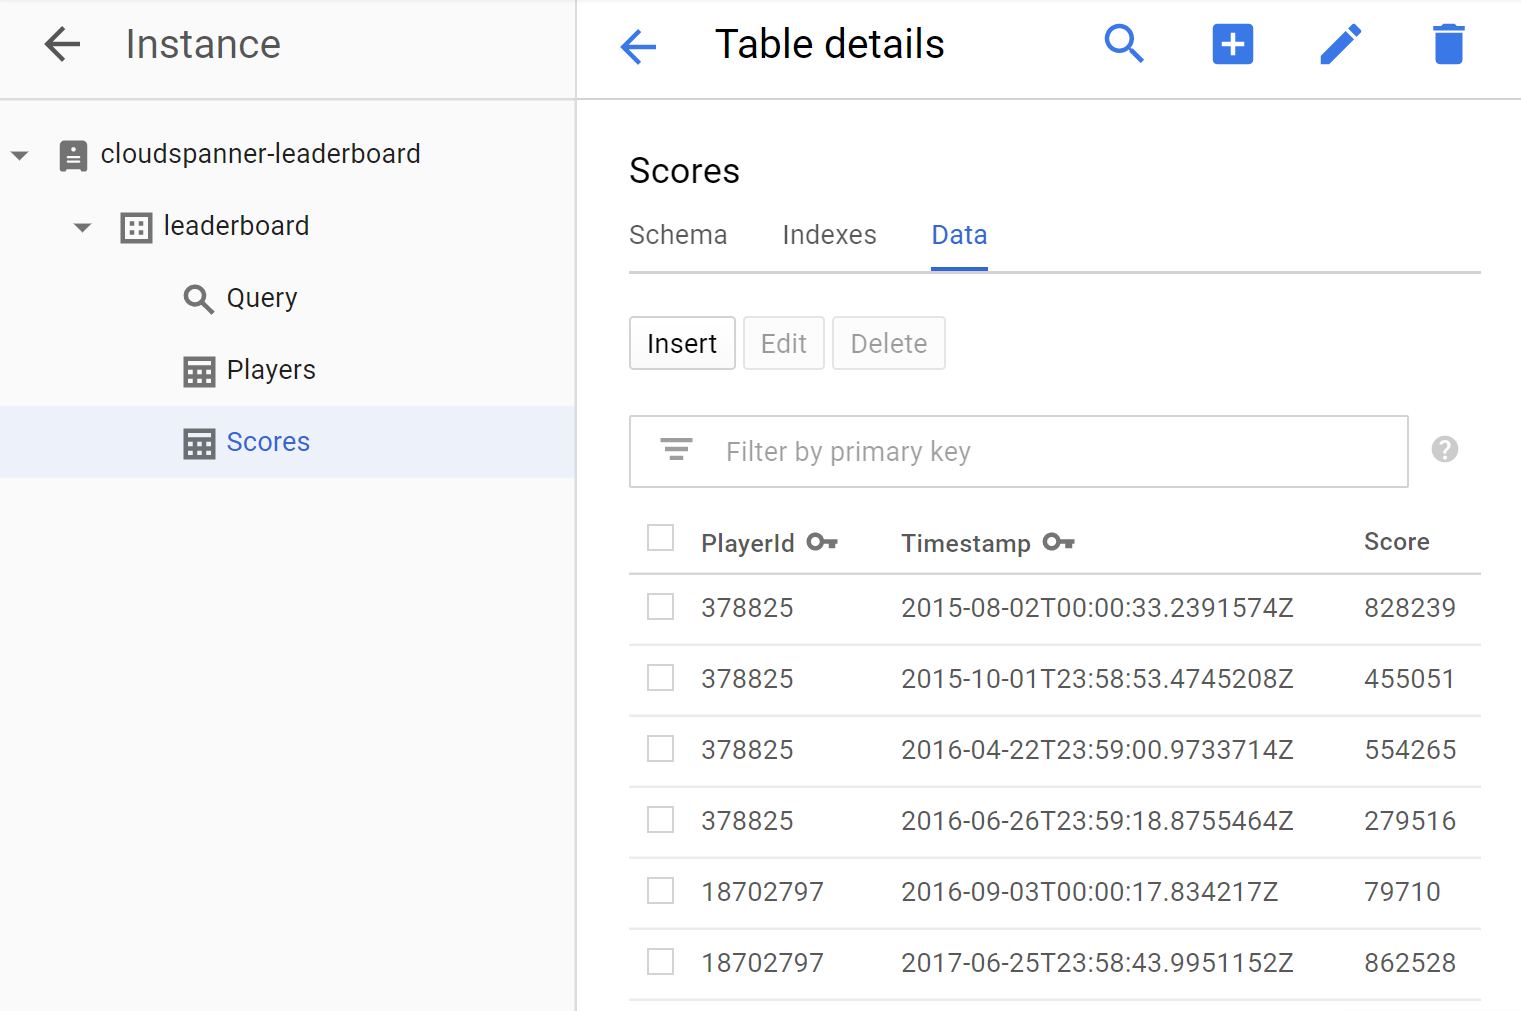
接著,按一下「Scores」資料表並選取「Data」分頁標籤,確認「Scores」資料表也有資料。您應該會看到資料表中的 PlayerId、Timestamp 和 Score 欄位有資料。
非常好!現在來更新應用程式,執行一些可用於建立遊戲排行榜的查詢。
6. 執行排行榜查詢
我們已設定資料庫並將資訊載入資料表,現在要使用這些資料建立排行榜。為此,我們需要回答下列四個問題:
- 哪幾位球員是史上「前十名」?
- 哪些球員是年度「十大」球員?
- 哪些玩家是當月的「前十名」?
- 本週「前十名」的播放器是哪些?
現在來更新應用程式,執行可回答這些問題的 SQL 查詢。
我們會新增 query 指令,方便您執行查詢來回答問題,並產生排行榜所需的資訊。
在 Cloud Shell 編輯器中編輯 App.java 檔案,更新應用程式以新增 query 指令。query 指令包含兩種 query 方法,其中一種只接受 DatabaseClient 引數,另一種則接受額外的 timespan 引數,方便您依小時指定的時間範圍篩選結果。
在現有的 insertScores() 方法下方和現有的 printUsageAndExit() 方法上方,新增下列兩個 query 方法:
  static void query(DatabaseClient dbClient) {
    String scoreDate;
    String score;
    ResultSet resultSet =
        dbClient
            .singleUse()
            .executeQuery(
                Statement.of(
                    "SELECT p.PlayerId, p.PlayerName, s.Score, s.Timestamp "
                        + "FROM Players p "
                        + "JOIN Scores s ON p.PlayerId = s.PlayerId "
                        + "ORDER BY s.Score DESC LIMIT 10"));
    while (resultSet.next()) {
      scoreDate = String.valueOf(resultSet.getTimestamp("Timestamp"));
      score = String.format("%,d", resultSet.getLong("Score"));
      System.out.printf(
          "PlayerId: %d  PlayerName: %s  Score: %s  Timestamp: %s\n",
          resultSet.getLong("PlayerId"), resultSet.getString("PlayerName"), score,
          scoreDate.substring(0,10));
    }
  }

  static void query(DatabaseClient dbClient, int timespan) {
    String scoreDate;
    String score;
    Statement statement =
        Statement
            .newBuilder(
              "SELECT p.PlayerId, p.PlayerName, s.Score, s.Timestamp "
              + "FROM Players p "
              + "JOIN Scores s ON p.PlayerId = s.PlayerId "
              + "WHERE s.Timestamp > "
              + "TIMESTAMP_SUB(CURRENT_TIMESTAMP(), "
              + "    INTERVAL @Timespan HOUR) "
              + "ORDER BY s.Score DESC LIMIT 10")
            .bind("Timespan")
            .to(timespan)
            .build();
    ResultSet resultSet =
        dbClient
            .singleUse()
            .executeQuery(statement);
    while (resultSet.next()) {
      scoreDate = String.valueOf(resultSet.getTimestamp("Timestamp"));
      score = String.format("%,d", resultSet.getLong("Score"));
      System.out.printf(
          "PlayerId: %d  PlayerName: %s  Score: %s  Timestamp: %s\n",
          resultSet.getLong("PlayerId"), resultSet.getString("PlayerName"), score,
          scoreDate.substring(0,10));
    }
  }
接著,如要讓 query 指令發揮作用,請在應用程式「main」方法的 switch(command) 陳述式中加入下列程式碼:
        case "query":
          if (args.length == 4) {
            int timespan = 0;
            try {
              timespan = Integer.parseInt(args[3]);
            } catch (NumberFormatException e) {
              System.err.println("query command's 'timespan' parameter must be a valid integer.");
              System.exit(1);
            }
            query(dbClient, timespan);
          } else {
            query(dbClient);
          }
          break;
如要完成在應用程式中新增「查詢」功能的最後一個步驟,請在 printUsageAndExit() 方法中新增「查詢」指令的說明文字。在 printUsageAndExit() 方法中加入下列程式碼行,為「query」指令加入說明文字:
    System.out.println("  java -jar leaderboard.jar query my-instance example-db");
    System.out.println("      - Query players with top ten scores of all time.\n");
    System.out.println("  java -jar leaderboard.jar query my-instance example-db 168");
    System.out.println("      - Query players with top ten scores within a timespan "
        + "specified in hours.\n");
在 Cloud Shell 編輯器的「File」(檔案) 選單中選取「Save」(儲存),即可儲存對 App.java 檔案所做的變更。
您可以使用 dotnet-docs-samples/applications/leaderboard/step6/src 目錄中的 App.java 檔案,查看啟用 query 指令後 App.java 檔案的範例。
如要建構應用程式,請在 pom.xml 所在的目錄中執行 mvn package:
mvn package
現在執行應用程式,確認新的 query 指令已納入應用程式的可能指令清單。執行下列指令:
java -jar target/leaderboard.jar
您現在應該會在應用程式的預設輸出中看到 query 指令,做為新的指令選項:
Leaderboard 1.0.0
Usage:
  java -jar leaderboard.jar <command> <instance_id> <database_id> [command_option]

Examples:
  java -jar leaderboard.jar create my-instance example-db
      - Create a sample Cloud Spanner database along with sample tables in your project.

  java -jar leaderboard.jar insert my-instance example-db players
      - Insert 100 sample Player records into the database.

  java -jar leaderboard.jar insert my-instance example-db scores
      - Insert sample score data into Scores sample Cloud Spanner database table.

  java -jar leaderboard.jar query my-instance example-db
      - Query players with top ten scores of all time.

  java -jar leaderboard.jar query my-instance example-db 168
      - Query players with top ten scores within a timespan specified in hours.
從回應中可以看出,除了執行個體 ID 和資料庫 ID 引數之外,query 指令還允許我們以時數指定選用的時間範圍,根據 Scores 表格 Timestamp 欄中的值篩選記錄。由於時間範圍引數為選用引數,因此如果未納入時間範圍引數,系統就不會依時間戳記篩選記錄。因此,我們可以使用 query 指令,而不必提供「時間範圍」值,即可取得歷來「前十名」玩家的清單。
讓我們執行 query 指令,但不指定「時間範圍」,並使用執行 create 指令時所用的相同引數值。
java -jar target/leaderboard.jar query cloudspanner-leaderboard leaderboard
畫面會顯示類似以下的回應,列出歷來排名前十的球員:
PlayerId: 4018687297  PlayerName: Player 83  Score: 999,618  Timestamp: 2017-07-01
PlayerId: 4018687297  PlayerName: Player 83  Score: 998,956  Timestamp: 2017-09-02
PlayerId: 4285713246  PlayerName: Player 51  Score: 998,648  Timestamp: 2017-12-01
PlayerId: 5267931774  PlayerName: Player 49  Score: 997,733  Timestamp: 2017-11-09
PlayerId: 1981654448  PlayerName: Player 35  Score: 997,480  Timestamp: 2018-12-06
PlayerId: 4953940705  PlayerName: Player 87  Score: 995,184  Timestamp: 2018-09-14
PlayerId: 2456736905  PlayerName: Player 84  Score: 992,881  Timestamp: 2017-04-14
PlayerId: 8234617611  PlayerName: Player 19  Score: 992,399  Timestamp: 2017-12-27
PlayerId: 1788051688  PlayerName: Player 76  Score: 992,265  Timestamp: 2018-11-22
PlayerId: 7127686505  PlayerName: Player 97  Score: 992,038  Timestamp: 2017-12-02
現在,請使用必要引數執行 query 指令,指定「timespan」等於一年內的時數 (8760),查詢該年度的「前十名」玩家。
java -jar target/leaderboard.jar query cloudspanner-leaderboard leaderboard 8760
畫面會顯示類似以下的回應,其中包含年度「前十名」玩家:
PlayerId: 1981654448  PlayerName: Player 35  Score: 997,480  Timestamp: 2018-12-06
PlayerId: 4953940705  PlayerName: Player 87  Score: 995,184  Timestamp: 2018-09-14
PlayerId: 1788051688  PlayerName: Player 76  Score: 992,265  Timestamp: 2018-11-22
PlayerId: 6862349579  PlayerName: Player 30  Score: 990,877  Timestamp: 2018-09-14
PlayerId: 5529627211  PlayerName: Player 16  Score: 989,142  Timestamp: 2018-03-30
PlayerId: 9743904155  PlayerName: Player 1  Score: 988,765  Timestamp: 2018-05-30
PlayerId: 6809119884  PlayerName: Player 7  Score: 986,673  Timestamp: 2018-05-16
PlayerId: 2132710638  PlayerName: Player 54  Score: 983,108  Timestamp: 2018-09-11
PlayerId: 2320093590  PlayerName: Player 79  Score: 981,373  Timestamp: 2018-05-07
PlayerId: 9554181430  PlayerName: Player 80  Score: 981,087  Timestamp: 2018-06-21
現在執行 query 指令,指定「timespan」等於一個月的小時數 (730),查詢當月「前十名」玩家。
java -jar target/leaderboard.jar query cloudspanner-leaderboard leaderboard 730
畫面會顯示當月「前十名」玩家,如下所示:
PlayerId: 3869829195  PlayerName: Player 69  Score: 949,686  Timestamp: 2019-02-19
PlayerId: 7448359883  PlayerName: Player 20  Score: 938,998  Timestamp: 2019-02-07
PlayerId: 1981654448  PlayerName: Player 35  Score: 929,003  Timestamp: 2019-02-22
PlayerId: 9336678658  PlayerName: Player 44  Score: 914,106  Timestamp: 2019-01-27
PlayerId: 6968576389  PlayerName: Player 40  Score: 898,041  Timestamp: 2019-02-21
PlayerId: 5529627211  PlayerName: Player 16  Score: 896,433  Timestamp: 2019-01-29
PlayerId: 9395039625  PlayerName: Player 59  Score: 879,495  Timestamp: 2019-02-09
PlayerId: 2094604854  PlayerName: Player 39  Score: 860,434  Timestamp: 2019-02-01
PlayerId: 9395039625  PlayerName: Player 59  Score: 849,955  Timestamp: 2019-02-21
PlayerId: 4285713246  PlayerName: Player 51  Score: 805,654  Timestamp: 2019-02-02
現在,請執行 query 指令,指定「timespan」等於一週的小時數 (168),查詢當週「前十名」玩家。
java -jar target/leaderboard.jar query cloudspanner-leaderboard leaderboard 168
畫面會顯示本週「前十名」玩家,如下所示:
PlayerId: 3869829195  PlayerName: Player 69  Score: 949,686  Timestamp: 2019-02-19
PlayerId: 1981654448  PlayerName: Player 35  Score: 929,003  Timestamp: 2019-02-22
PlayerId: 6968576389  PlayerName: Player 40  Score: 898,041  Timestamp: 2019-02-21
PlayerId: 9395039625  PlayerName: Player 59  Score: 849,955  Timestamp: 2019-02-21
PlayerId: 5954045812  PlayerName: Player 8  Score: 795,639  Timestamp: 2019-02-22
PlayerId: 3889939638  PlayerName: Player 71  Score: 775,252  Timestamp: 2019-02-21
PlayerId: 5529627211  PlayerName: Player 16  Score: 604,695  Timestamp: 2019-02-19
PlayerId: 9006728426  PlayerName: Player 3  Score: 457,208  Timestamp: 2019-02-22
PlayerId: 8289497066  PlayerName: Player 58  Score: 227,697  Timestamp: 2019-02-20
PlayerId: 8065482904  PlayerName: Player 99  Score: 198,429  Timestamp: 2019-02-24
太棒了!
現在新增記錄時,Cloud Spanner 會將資料庫擴充至所需大小。無論資料庫成長多少,遊戲排行榜都能透過 Cloud Spanner 及其 Truetime 技術,持續準確地擴充。
7. 清除
盡情體驗 Spanner 的樂趣後,我們需要清理遊樂場,節省寶貴的資源和金錢。幸好這個步驟很簡單,只要前往 Cloud 控制台的「Cloud Spanner」專區,然後刪除在 Codelab 步驟「設定 Cloud Spanner 執行個體」中建立的執行個體即可。
8. 恭喜!
涵蓋內容:
- 排行榜的 Google Cloud Spanner 執行個體、資料庫和資料表結構
- 如何建立 Java 控制台應用程式
- 如何使用 Java 用戶端程式庫建立 Spanner 資料庫和資料表
- 如何使用 Java 用戶端程式庫將資料載入 Spanner 資料庫
- 如何使用 Spanner 認可時間戳記和 Java 用戶端程式庫,從資料中查詢「前十名」結果
後續步驟:
- 閱讀 Spanner CAP 白皮書
- 瞭解結構定義設計和查詢最佳做法
- 進一步瞭解 Cloud Spanner 提交時間戳記
提供意見
- 請花點時間填寫這份簡短的問卷調查