1. Overview
Google Cloud Spanner is a fully managed horizontally scalable, globally distributed, relational database service that provides ACID transactions and SQL semantics without giving up performance and high availability.
In this lab, you will learn how to setup a Cloud Spanner instance. You will go through the steps of creating a database and schema that can be used for a gaming leaderboard. You'll start by creating a Players table for storing player information and a Scores table to store player scores.
Next you'll populate the tables with sample data. Then you'll conclude the lab by running some Top Ten sample queries and finally deleting the instance to free up resources.
What you'll learn
- How to setup a Cloud Spanner instance.
- How to create a database and tables.
- How to use a commit timestamp column.
- How to load data into your Cloud Spanner database table with timestamps.
- How to query your Cloud Spanner database.
- How to delete your Cloud Spanner instance.
What you'll need
How will you use this tutorial?
How would you rate your experience with Google Cloud Platform?
2. Setup and Requirements
Self-paced environment setup
If you don't already have a Google Account (Gmail or Google Apps), you must create one. Sign-in to Google Cloud Platform console ( console.cloud.google.com) and create a new project.
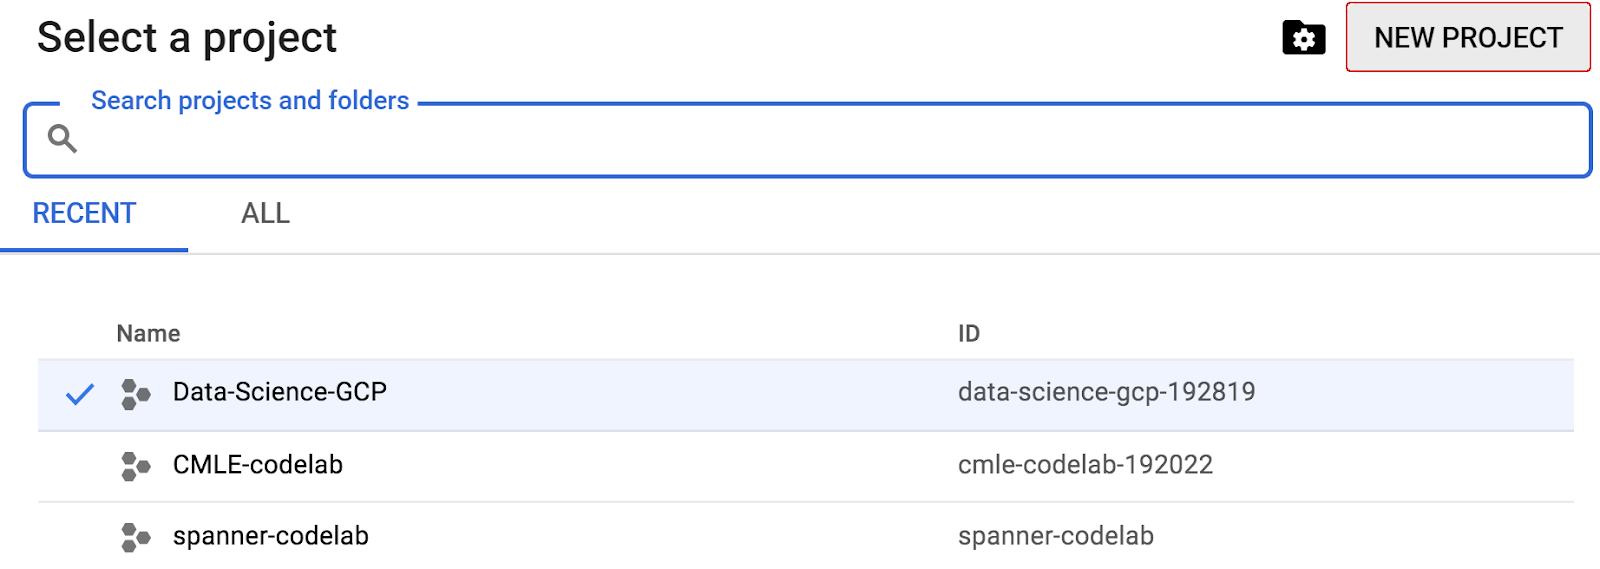
If you already have a project, click on the project selection pull down menu in the upper left of the console:

and click the ‘NEW PROJECT' button in the resulting dialog to create a new project:
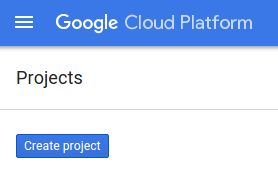
If you don't already have a project, you should see a dialog like this to create your first one:
The subsequent project creation dialog allows you to enter the details of your new project:
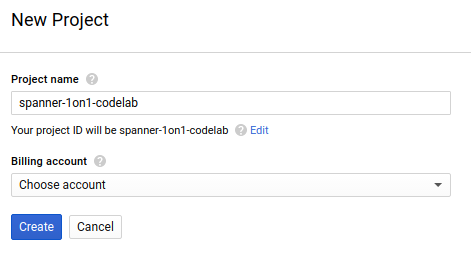
Remember the project ID, which is a unique name across all Google Cloud projects (the name above has already been taken and will not work for you, sorry!). It will be referred to later in this codelab as PROJECT_ID.
Next, if you haven't already done so, you'll need to enable billing in the Developers Console in order to use Google Cloud resources and enable the Cloud Spanner API.
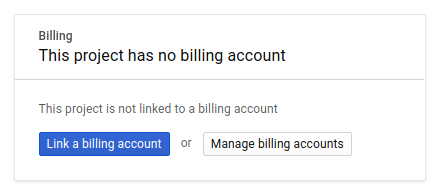
Running through this codelab shouldn't cost you more than a few dollars, but it could be more if you decide to use more resources or if you leave them running (see "cleanup" section at the end of this document). Google Cloud Spanner pricing is documented here.
New users of Google Cloud Platform are eligible for a $300 free trial, which should make this codelab entirely free of charge.
Google Cloud Shell Setup
While Google Cloud and Spanner can be operated remotely from your laptop, in this codelab we will be using Google Cloud Shell, a command line environment running in the Cloud.
This Debian-based virtual machine is loaded with all the development tools you'll need. It offers a persistent 5GB home directory and runs in Google Cloud, greatly enhancing network performance and authentication. This means that all you will need for this codelab is a browser (yes, it works on a Chromebook).
- To activate Cloud Shell from the Cloud Console, simply click Activate Cloud Shell
(it should only take a few moments to provision and connect to the environment).
Once connected to Cloud Shell, you should see that you are already authenticated and that the project is already set to your PROJECT_ID.
gcloud auth list
Command output
Credentialed accounts:
 - <myaccount>@<mydomain>.com (active)
gcloud config list project
Command output
[core]
project = <PROJECT_ID>
If, for some reason, the project is not set, simply issue the following command:
gcloud config set project <PROJECT_ID>
Looking for your PROJECT_ID? Check out what ID you used in the setup steps or look it up in the Cloud Console dashboard:
Cloud Shell also sets some environment variables by default, which may be useful as you run future commands.
echo $GOOGLE_CLOUD_PROJECT
Command output
<PROJECT_ID>
- Finally, set the default zone and project configuration.
gcloud config set compute/zone us-central1-f
You can choose a variety of different zones. For more information, see Regions & Zones.
Summary
In this step, you setup your environment.
Next up
Next, you will setup a Cloud Spanner Instance.
3. Setup a Cloud Spanner Instance
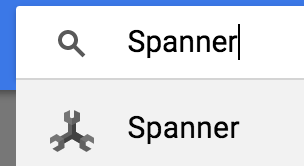
In this step we setup our Cloud Spanner Instance for this codelab. Search for the Spanner entry  in the left top Hamburger Menu
  or search for Spanner by pressing "/" and type "Spanner"
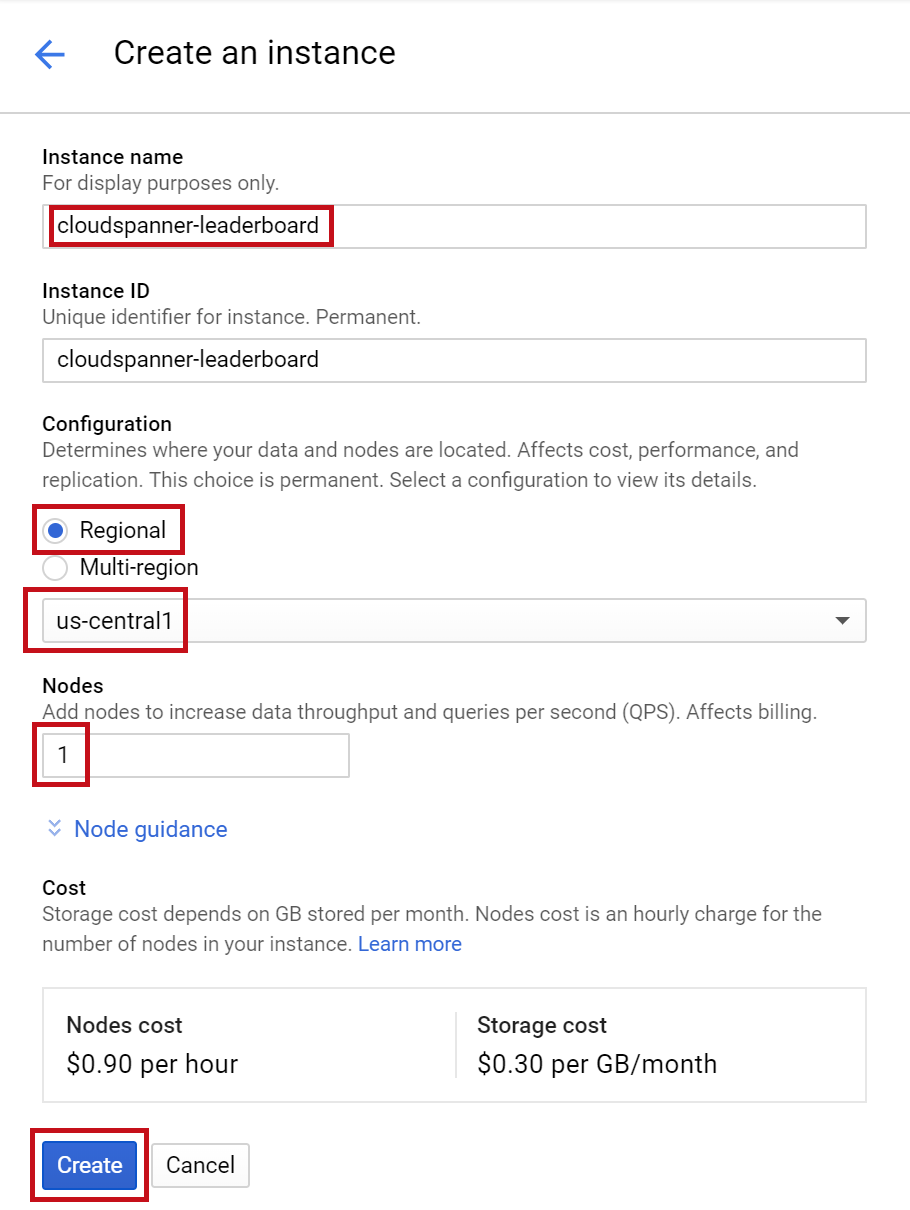
Next, click on  and fill out the form by entering the instance name cloudspanner-leaderboard for your instance, choosing a configuration (select a regional instance), and set the number of nodes, for this codelab we will only need 1 node. For production instances and to qualify for the Cloud Spanner SLA you will need to run 3 or more nodes in your Cloud Spanner instance.
Last, but not least, click on "Create" and within seconds you have a Cloud Spanner instance at your disposal.
In the next step we are going use the C# client library to create a database and schema in our new instance.
4. Create a database and schema
In this step we're going to create our sample database and schema.
Let's use the C# client library to create two tables; a Players table for player info and a Scores table for storing player scores. To do this we'll walk through the steps of creating a C# console application in Cloud Shell.
First clone the sample code for this codelab from Github by typing the following command in Cloud Shell:
git clone https://github.com/GoogleCloudPlatform/dotnet-docs-samples.git
Then change directory to the "applications" directory where you will create your application.
cd dotnet-docs-samples/applications/
All the code required for this codelab is located in the existing dotnet-docs-samples/applications/leaderboard directory as a runnable C# application named Leaderboard to serve as reference as you progress through the codelab. We'll create a new directory and build a copy of the Leaderboard application in stages.
Create a new directory named "codelab" for the application and change directory into it with the following command:
mkdir codelab && cd $_
Create a new .NET C# console application named "Leaderboard" using the following command:
dotnet new console -n Leaderboard
This command creates a simple console application consisting of two files primary files, the project file Leaderboard.csproj and the program file Program.cs.
Let's run it. Change directory into the newly created Leaderboard directory where the application resides:
cd Leaderboard
Then enter the following command to run it.
dotnet run
You should see the application output "Hello World!".
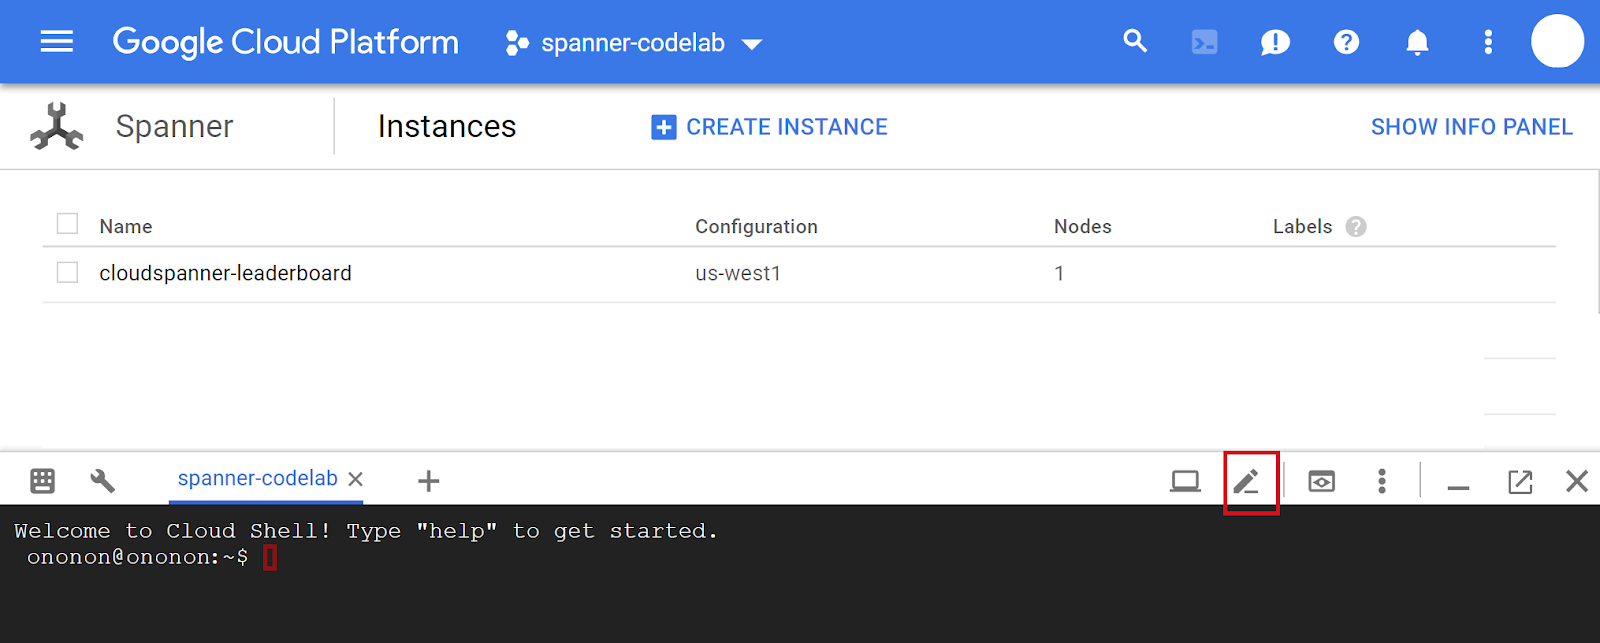
Now let's update our console app by editing Program.cs to use the C# Spanner client library to create a leaderboard consisting of two tables Players and Scores. You can do that right in the Cloud Shell Editor:
Open the Cloud Shell Editor, by clicking on the icon highlighted below:
Next, open the Program.cs file in the Cloud Shell Editor and replace the file's existing code with the code required to create the leaderboard database and the Players and Scores tables by pasting the following C# application code into the Program.cs file:
using System;
using System.Threading.Tasks;
using Google.Cloud.Spanner.Data;
using CommandLine;

namespace GoogleCloudSamples.Leaderboard
{
    [Verb("create", HelpText = "Create a sample Cloud Spanner database "
        + "along with sample 'Players' and 'Scores' tables in your project.")]
    class CreateOptions
    {
        [Value(0, HelpText = "The project ID of the project to use "
            + "when creating Cloud Spanner resources.", Required = true)]
        public string projectId { get; set; }
        [Value(1, HelpText = "The ID of the instance where the sample database "
            + "will be created.", Required = true)]
        public string instanceId { get; set; }
        [Value(2, HelpText = "The ID of the sample database to create.",
            Required = true)]
        public string databaseId { get; set; }
    }

    public class Program
    {
        enum ExitCode : int
        {
            Success = 0,
            InvalidParameter = 1,
        }

        public static object Create(string projectId,
            string instanceId, string databaseId)
        {
            var response =
                CreateAsync(projectId, instanceId, databaseId);
            Console.WriteLine("Waiting for operation to complete...");
            response.Wait();
            Console.WriteLine($"Operation status: {response.Status}");
            Console.WriteLine($"Created sample database {databaseId} on "
                + $"instance {instanceId}");
            return ExitCode.Success;
        }

        public static async Task CreateAsync(
            string projectId, string instanceId, string databaseId)
        {
            // Initialize request connection string for database creation.
            string connectionString =
                $"Data Source=projects/{projectId}/instances/{instanceId}";
            using (var connection = new SpannerConnection(connectionString))
            {
                string createStatement = $"CREATE DATABASE `{databaseId}`";
                string[] createTableStatements = new string[] {
                  // Define create table statement for Players table.
                  @"CREATE TABLE Players(
                    PlayerId INT64 NOT NULL,
                    PlayerName STRING(2048) NOT NULL
                  ) PRIMARY KEY(PlayerId)",
                  // Define create table statement for Scores table.
                  @"CREATE TABLE Scores(
                    PlayerId INT64 NOT NULL,
                    Score INT64 NOT NULL,
                    Timestamp TIMESTAMP NOT NULL OPTIONS(allow_commit_timestamp=true)
                  ) PRIMARY KEY(PlayerId, Timestamp),
                      INTERLEAVE IN PARENT Players ON DELETE NO ACTION" };
                // Make the request.
                var cmd = connection.CreateDdlCommand(
                    createStatement, createTableStatements);
                try
                {
                    await cmd.ExecuteNonQueryAsync();
                }
                catch (SpannerException e) when
                    (e.ErrorCode == ErrorCode.AlreadyExists)
                {
                    // OK.
                }
            }
        }

        public static int Main(string[] args)
        {
            var verbMap = new VerbMap<object>();
            verbMap
                .Add((CreateOptions opts) => Create(
                    opts.projectId, opts.instanceId, opts.databaseId))
                .NotParsedFunc = (err) => 1;
            return (int)verbMap.Run(args);
        }
    }
}
To provide a clearer picture of the Program code, here's a diagram of the Program with its major components labeled:
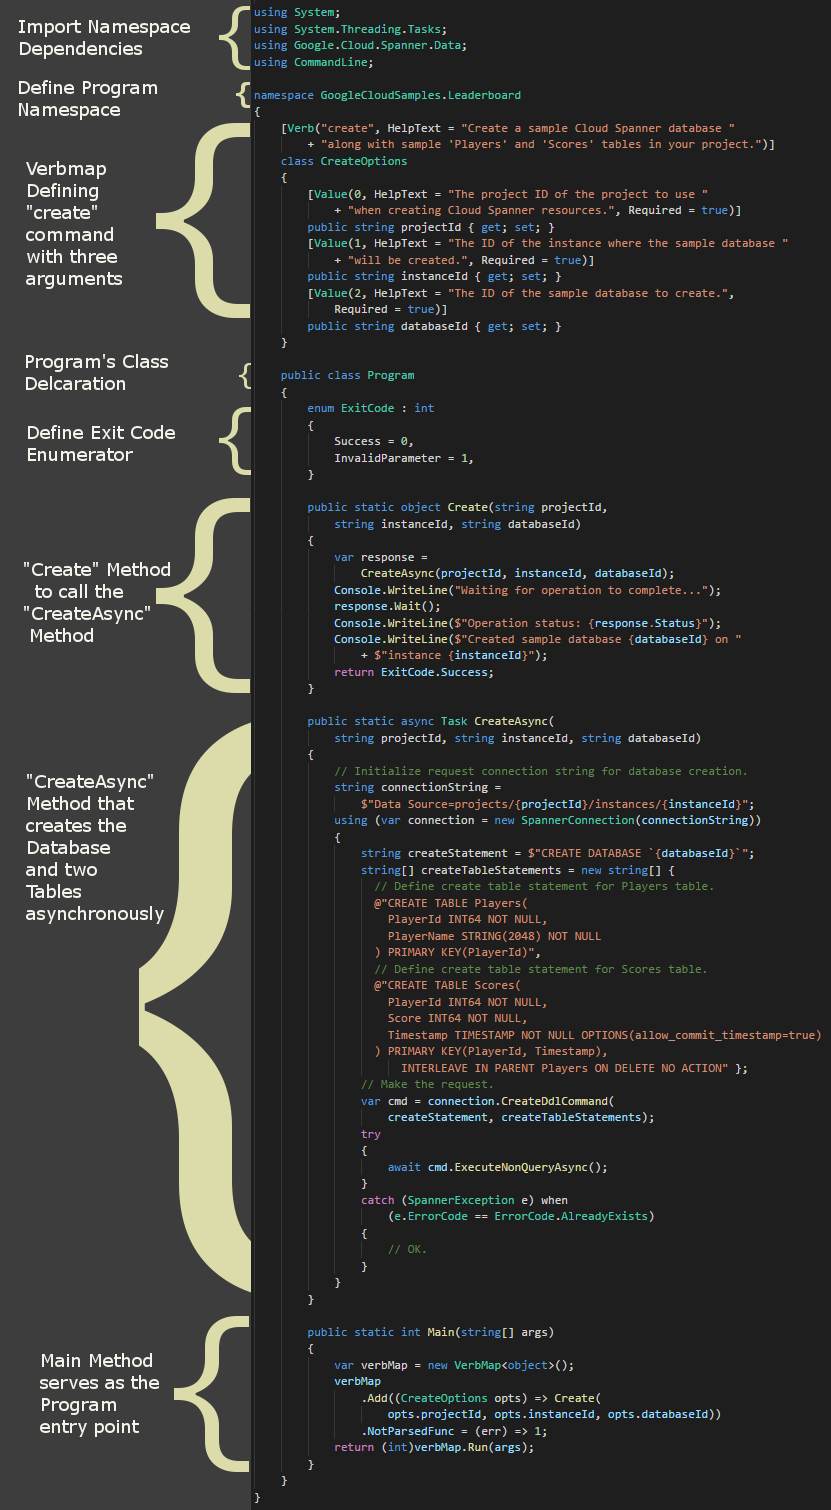
You can use the Program.cs file in the dotnet-docs-samples/applications/leaderboard/step4 directory to see an example of how your Program.cs file should look after you've added the code to enable the create command.
Next use the Cloud Shell Editor to open and edit the Program's project file Leaderboard.csproj, updating it to look like the following code. Make sure you save all your changes using the "File" menu of the Cloud Shell Editor.
<Project Sdk="Microsoft.NET.Sdk">

  <PropertyGroup>
    <OutputType>Exe</OutputType>
    <TargetFramework>netcoreapp3.1</TargetFramework>
  </PropertyGroup>

  <ItemGroup>
    <PackageReference Include="Google.Cloud.Spanner.Data" Version="3.3.0" />
  </ItemGroup>

  <ItemGroup>
    <ProjectReference Include="..\..\..\commandlineutil\Lib\CommandLineUtil.csproj" />
  </ItemGroup>

</Project>
This change added a reference to the C# Spanner Nuget package Google.Cloud.Spanner.Data that we need to interact with the Cloud Spanner API. This change also adds a reference to the CommandLineUtil project which is part of the dotnet-doc-samples Github repository and provides a useful "verbmap" extension to the open source CommandLineParser; a handy library for handling command line input for console applications.
You can use the Leaderboard.csproj file in the dotnet-docs-samples/applications/leaderboard/step4 directory to see an example of how your Leaderboard.csproj file should look after you've added the code to enable the create command.
Now you're ready to run your updated sample. Type the following to see the default response of your updated application:
dotnet run
You should see output like the following:
Leaderboard 1.0.0
Copyright (C) 2018 Leaderboard

ERROR(S):
  No verb selected.

  create     Create a sample Cloud Spanner database along with sample 'Players' and 'Scores' tables in your project.

  help       Display more information on a specific command.

  version    Display version information.
From this response we can see that this is the Leaderboard application which can be run with one of three possible commands: create, help, and version.
Let's try out the create command to create a Spanner database and tables. Run the command without arguments to see the command's expected arguments.
dotnet run create
You should see a response like the following:
Leaderboard 1.0.0
Copyright (C) 2018 Leaderboard

ERROR(S):
  A required value not bound to option name is missing.

  --help          Display this help screen.

  --version       Display version information.

  value pos. 0    Required. The project ID of the project to use when creating Cloud Spanner resources.

  value pos. 1    Required. The ID of the instance where the sample database will be created.

  value pos. 2    Required. The ID of the sample database to create.
Here we can see that the create command's expected arguments are Project ID, Instance ID, and Database ID.
Now run the following command. Make sure you replace PROJECT_ID with the Project ID you created at the beginning of this codelab.
dotnet run create PROJECT_ID cloudspanner-leaderboard leaderboard
After a couple seconds you should see a response like the following:
Waiting for operation to complete...
Operation status: RanToCompletion
Created sample database leaderboard on instance cloudspanner-leaderboard
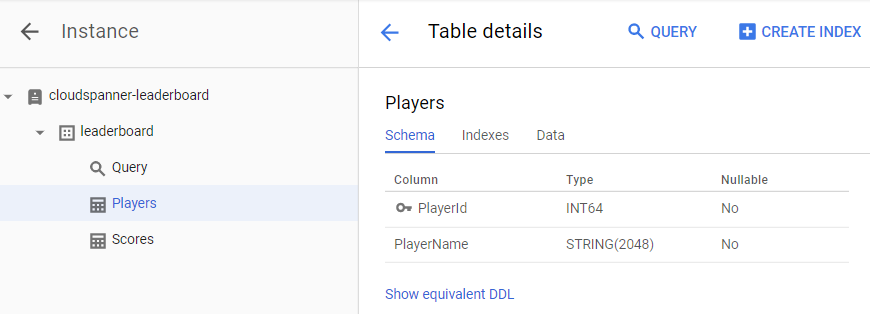
In the Cloud Spanner section of the Cloud Console you should see your new database and tables coming up in the left hand-side menu.
In the next step we will update our application to load some data into your new database.
5. Load Data
We now have a database called leaderboard containing two tables; Players and Scores. Now let's use the C# client library to populate our Players table with players and our Scores table with random scores for each player.
Open the Cloud Shell Editor, by clicking on the icon highlighted below:
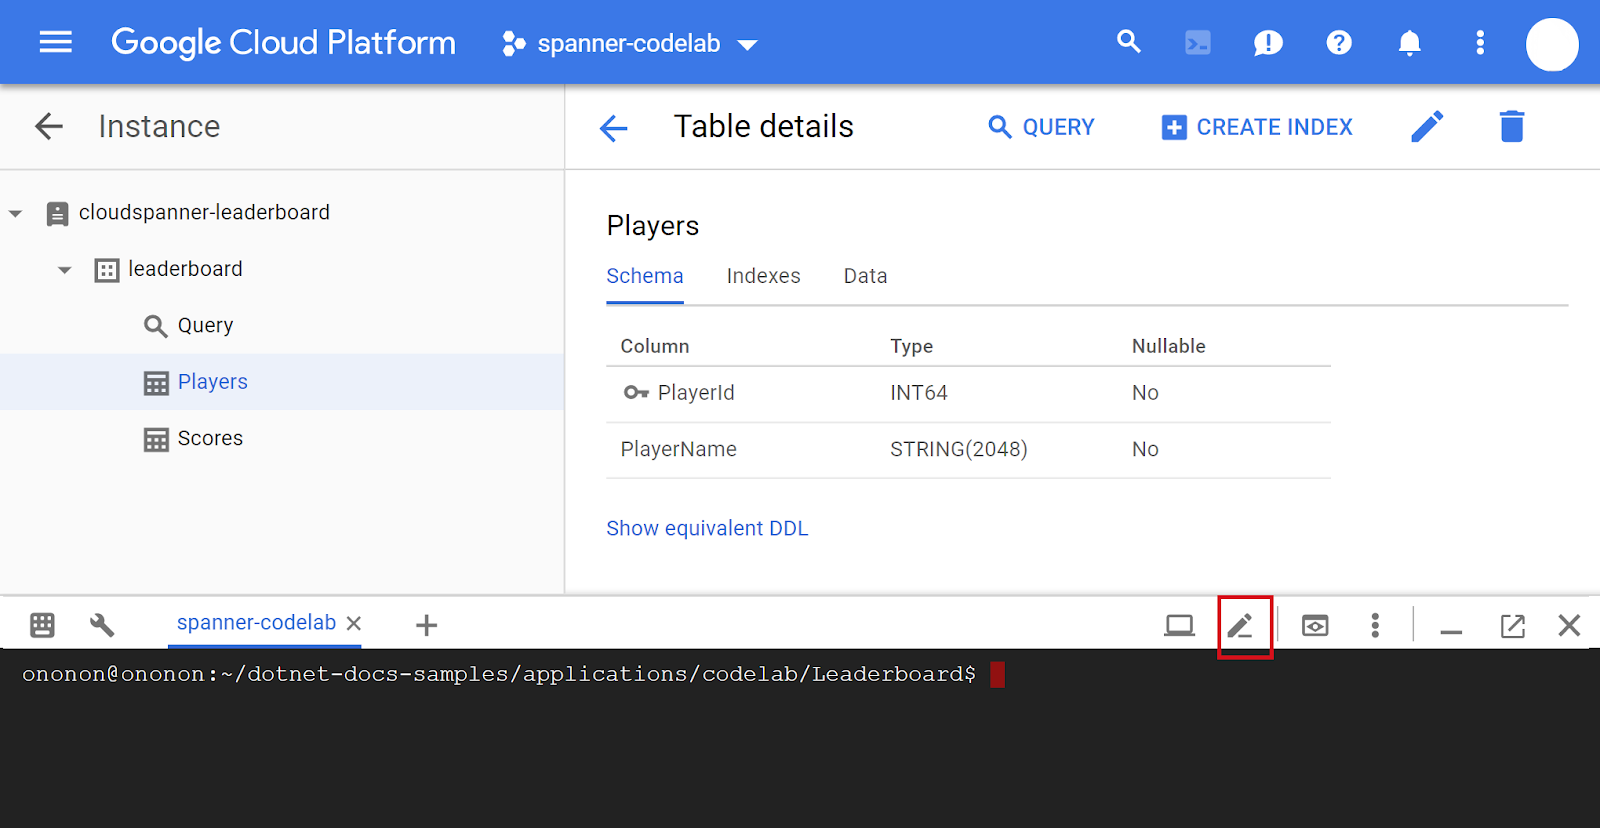
Next, edit the Program.cs file in the Cloud Shell Editor to add an insert command that can be used to insert 100 players into the Players table or it can be used to insert 4 random scores in the Scores table for each player in the Players table.
First add a new insert command block in the "Verbmap" at the top of the Program below the existing create command block:
[Verb("insert", HelpText = "Insert sample 'players' records or 'scores' records "
        + "into the database.")]
    class InsertOptions
    {
        [Value(0, HelpText = "The project ID of the project to use "
            + "when managing Cloud Spanner resources.", Required = true)]
        public string projectId { get; set; }
        [Value(1, HelpText = "The ID of the instance where the sample database resides.",
            Required = true)]
        public string instanceId { get; set; }
        [Value(2, HelpText = "The ID of the database where the sample database resides.",
            Required = true)]
        public string databaseId { get; set; }
        [Value(3, HelpText = "The type of insert to perform, 'players' or 'scores'.",
            Required = true)]
        public string insertType { get; set; }
    }
Next add the following Insert, InsertPlayersAsync, and InsertScoresAsync methods below the existing CreateAsync method:
        public static object Insert(string projectId,
            string instanceId, string databaseId, string insertType)
        {
            if (insertType.ToLower() == "players")
            {
                var responseTask =
                    InsertPlayersAsync(projectId, instanceId, databaseId);
                Console.WriteLine("Waiting for insert players operation to complete...");
                responseTask.Wait();
                Console.WriteLine($"Operation status: {responseTask.Status}");
            }
            else if (insertType.ToLower() == "scores")
            {
                var responseTask =
                    InsertScoresAsync(projectId, instanceId, databaseId);
                Console.WriteLine("Waiting for insert scores operation to complete...");
                responseTask.Wait();
                Console.WriteLine($"Operation status: {responseTask.Status}");
            }
            else
            {
                Console.WriteLine("Invalid value for 'type of insert'. "
                    + "Specify 'players' or 'scores'.");
                return ExitCode.InvalidParameter;
            }
            Console.WriteLine($"Inserted {insertType} into sample database "
                + $"{databaseId} on instance {instanceId}");
            return ExitCode.Success;
        }

       public static async Task InsertPlayersAsync(string projectId,
            string instanceId, string databaseId)
        {
            string connectionString =
                $"Data Source=projects/{projectId}/instances/{instanceId}"
                + $"/databases/{databaseId}";

            long numberOfPlayers = 0;
            using (var connection = new SpannerConnection(connectionString))
            {
                await connection.OpenAsync();
                await connection.RunWithRetriableTransactionAsync(async (transaction) =>
                {
                    // Execute a SQL statement to get current number of records
                    // in the Players table to use as an incrementing value
                    // for each PlayerName to be inserted.
                    var cmd = connection.CreateSelectCommand(
                        @"SELECT Count(PlayerId) as PlayerCount FROM Players");
                    numberOfPlayers = await cmd.ExecuteScalarAsync<long>();
                    // Insert 100 player records into the Players table.
                    SpannerBatchCommand cmdBatch = connection.CreateBatchDmlCommand();
                    for (int i = 0; i < 100; i++)
                    {
                        numberOfPlayers++;
                        SpannerCommand cmdInsert = connection.CreateDmlCommand(
                            "INSERT INTO Players "
                            + "(PlayerId, PlayerName) "
                            + "VALUES (@PlayerId, @PlayerName)",
                                new SpannerParameterCollection {
                                    {"PlayerId", SpannerDbType.Int64},
                                    {"PlayerName", SpannerDbType.String}});
                        cmdInsert.Parameters["PlayerId"].Value =
                            Math.Abs(Guid.NewGuid().GetHashCode());
                        cmdInsert.Parameters["PlayerName"].Value =
                            $"Player {numberOfPlayers}";
                        cmdBatch.Add(cmdInsert);
                    }
                    await cmdBatch.ExecuteNonQueryAsync();
                });
            }
            Console.WriteLine("Done inserting player records...");
        }

        public static async Task InsertScoresAsync(
            string projectId, string instanceId, string databaseId)
        {
            string connectionString =
            $"Data Source=projects/{projectId}/instances/{instanceId}"
            + $"/databases/{databaseId}";

            // Insert 4 score records into the Scores table for each player
            // in the Players table.
            using (var connection = new SpannerConnection(connectionString))
            {
                await connection.OpenAsync();
                await connection.RunWithRetriableTransactionAsync(async (transaction) =>
                {
                    Random r = new Random();
                    bool playerRecordsFound = false;
                    SpannerBatchCommand cmdBatch =
                                connection.CreateBatchDmlCommand();
                    var cmdLookup =
                    connection.CreateSelectCommand("SELECT * FROM Players");
                    using (var reader = await cmdLookup.ExecuteReaderAsync())
                    {
                        while (await reader.ReadAsync())
                        {
                            playerRecordsFound = true;
                            for (int i = 0; i < 4; i++)
                            {
                                DateTime randomTimestamp = DateTime.Now
                                        .AddYears(r.Next(-2, 1))
                                        .AddMonths(r.Next(-12, 1))
                                        .AddDays(r.Next(-28, 0))
                                        .AddHours(r.Next(-24, 0))
                                        .AddSeconds(r.Next(-60, 0))
                                        .AddMilliseconds(r.Next(-100000, 0));
                                SpannerCommand cmdInsert =
                                connection.CreateDmlCommand(
                                    "INSERT INTO Scores "
                                    + "(PlayerId, Score, Timestamp) "
                                    + "VALUES (@PlayerId, @Score, @Timestamp)",
                                    new SpannerParameterCollection {
                                        {"PlayerId", SpannerDbType.Int64},
                                        {"Score", SpannerDbType.Int64},
                                        {"Timestamp",
                                            SpannerDbType.Timestamp}});
                                cmdInsert.Parameters["PlayerId"].Value =
                                    reader.GetFieldValue<int>("PlayerId");
                                cmdInsert.Parameters["Score"].Value =
                                    r.Next(1000, 1000001);
                                cmdInsert.Parameters["Timestamp"].Value =
                                    randomTimestamp.ToString("o");
                                cmdBatch.Add(cmdInsert);
                            }
                        }
                        if (!playerRecordsFound)
                        {
                            Console.WriteLine("Parameter 'scores' is invalid "
                            + "since no player records currently exist. First "
                            + "insert players then insert scores.");
                            Environment.Exit((int)ExitCode.InvalidParameter);
                        }
                        else
                        {
                            await cmdBatch.ExecuteNonQueryAsync();
                            Console.WriteLine(
                                "Done inserting score records..."
                            );
                        }
                    }
                });
            }
        }
Then, to make the insert command functional, add the following code to your Program's "Main" method:
                .Add((InsertOptions opts) => Insert(
                    opts.projectId, opts.instanceId, opts.databaseId, opts.insertType))
You can use the Program.cs file in the dotnet-docs-samples/applications/leaderboard/step5 directory to see an example of how your Program.cs file should look after you've added the code to enable the insert command.
Now let's run the program to confirm that the new insert command is included in the program's list of possible commands. Run the following command:
dotnet run
You should see the insert command now included in the program's default output:
Leaderboard 1.0.0
Copyright (C) 2018 Leaderboard

ERROR(S):
  No verb selected.

  create     Create a sample Cloud Spanner database along with sample 'Players' and 'Scores' tables in your project.

  insert     Insert sample 'players' records or 'scores' records into the database.

  help       Display more information on a specific command.

  version    Display version information.
Now let's run the insert command to see its input arguments. Enter the following command.
dotnet run insert
This should return the following response:
Leaderboard 1.0.0
Copyright (C) 2018 Leaderboard

ERROR(S):
  A required value not bound to option name is missing.

  --help          Display this help screen.

  --version       Display version information.

  value pos. 0    Required. The project ID of the project to use when managing Cloud Spanner resources.

  value pos. 1    Required. The ID of the instance where the sample database resides.

  value pos. 2    Required. The ID of the database where the sample database resides.

  value pos. 3    Required. The type of insert to perform, 'players' or 'scores'.
You can see from the response that in addition to the Project ID, Instance ID, and Database ID there's another argument value pos. 3 expected which is the "type of insert" to perform. This argument can have a value of ‘players' or ‘scores'.
Now let's run the insert command with the same argument values we used when we called the create command, adding "players" as the additional "type of insert" argument. Make sure you replace PROJECT_ID with the Project ID you created at the beginning of this codelab.
dotnet run insert PROJECT_ID cloudspanner-leaderboard leaderboard players
After a couple seconds you should see a response like the following:
Waiting for insert players operation to complete...
Done inserting player records...
Operation status: RanToCompletion
Inserted players into sample database leaderboard on instance cloudspanner-leaderboard
Now let's use the C# client library to populate our Scores table with four random scores along with timestamps for each player in the Players table.
The Scores table's Timestamp column was defined as a "commit timestamp" column via the following SQL statement that was executed when we previously ran the create command:
CREATE TABLE Scores(
  PlayerId INT64 NOT NULL,
  Score INT64 NOT NULL,
  Timestamp TIMESTAMP NOT NULL OPTIONS(allow_commit_timestamp=true)
) PRIMARY KEY(PlayerId, Timestamp),
    INTERLEAVE IN PARENT Players ON DELETE NO ACTION
Notice the OPTIONS(allow_commit_timestamp=true) attribute. This makes Timestamp a "commit timestamp" column and enables it to be auto-populated with the exact transaction timestamp for INSERT and UPDATE operations on a given table row.
You can also insert your own timestamp values into a "commit timestamp" column as long you insert a timestamp with a value that is in the past, which is what we will do for the purpose of this codelab.
Now let's run the insert command with the same argument values we used when we called the create command adding "scores" as the additional "type of insert" argument. Make sure you replace PROJECT_ID with the Project ID you created at the beginning of this codelab.
dotnet run insert PROJECT_ID cloudspanner-leaderboard leaderboard scores
After a couple seconds you should see a response like the following:
Waiting for insert players operation to complete...
Done inserting player records...
Operation status: RanToCompletion
Inserted players into sample database leaderboard on instance cloudspanner-leaderboard
Running insert with the "type of insert" specified as scores calls the InsertScoresAsync method which uses the following code snippets to insert a randomly generated timestamp with a date-time occurring in the past:
DateTime randomTimestamp = DateTime.Now
    .AddYears(r.Next(-2, 1))
    .AddMonths(r.Next(-12, 1))
    .AddDays(r.Next(-28, 0))
    .AddHours(r.Next(-24, 0))
    .AddSeconds(r.Next(-60, 0))
    .AddMilliseconds(r.Next(-100000, 0));
...
 cmdInsert.Parameters["Timestamp"].Value = randomTimestamp.ToString("o");
To auto-populate the Timestamp column with the timestamp of exactly when the "Insert" transaction takes place, you can instead insert the C# constant SpannerParameter.CommitTimestamp like in the following code snippet:
cmd.Parameters["Timestamp"].Value = SpannerParameter.CommitTimestamp;
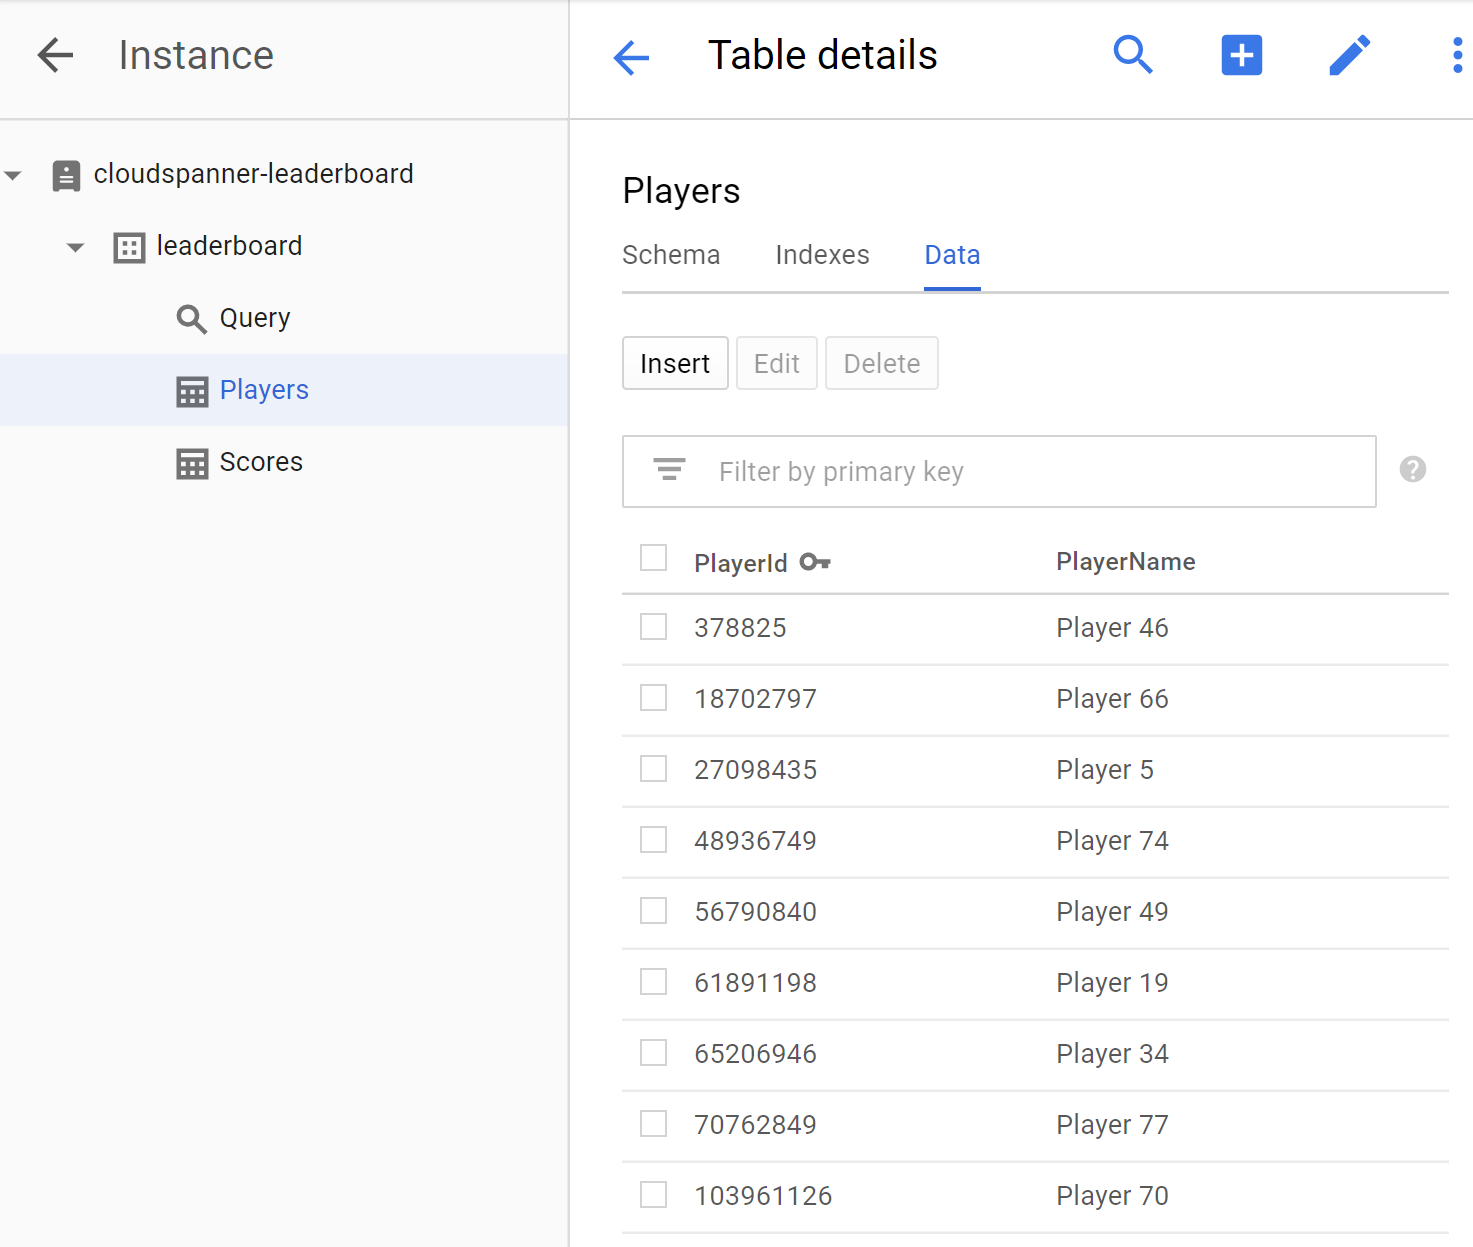
Now that we've completed data loading, let's verify the values we just wrote to our new tables. First select the leaderboard database and then select the Players table. Click the Data tab. You should see that you have data in the table's PlayerId and PlayerName columns.
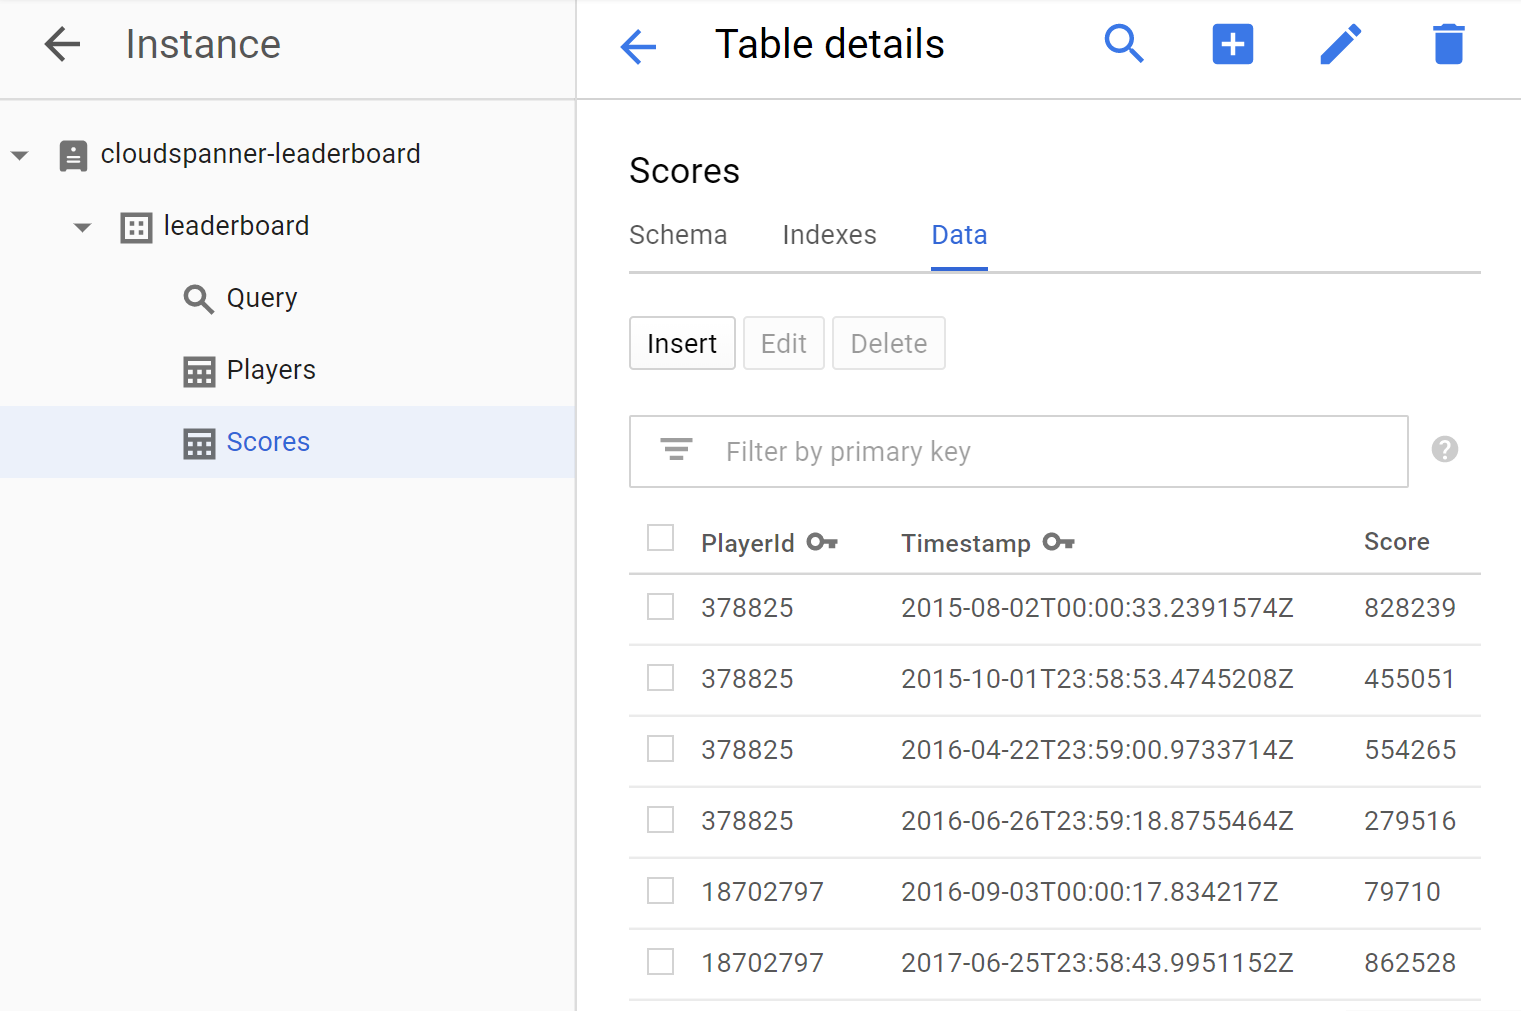
Next let's verify the Scores table also has data by clicking the Scores table and selecting the Data tab. You should see that you have data in the table's PlayerId, Timestamp, and Score columns.
Well done! Let's update our Program to run some queries that we can use to create a gaming leaderboard.
6. Run leaderboard queries
Now that we've set up our database and loaded information into our tables, let's create a leaderboard using this data. To do so we need to answer the following four questions:
- Which Players are the "Top Ten" of all time?
- Which Players are the "Top Ten" of the year?
- Which Players are the "Top Ten" of the month?
- Which Players are the "Top Ten" of the week?
Let's update our Program to run the SQL queries that will answer these questions.
We'll add a query command that will provide a way to run the queries to answer the questions that will produce the information required for our leaderboard.
Edit the Program.cs file in the Cloud Shell Editor to update the Program to add a query command.
First add a new query command block in the "Verbmap" at the top of the Program below the existing insert command block:
    [Verb("query", HelpText = "Query players with 'Top Ten' scores within a specific timespan "
        + "from sample Cloud Spanner database table.")]
    class QueryOptions
    {
        [Value(0, HelpText = "The project ID of the project to use "
            + "when managing Cloud Spanner resources.", Required = true)]
        public string projectId { get; set; }
        [Value(1, HelpText = "The ID of the instance where the sample data resides.",
            Required = true)]
        public string instanceId { get; set; }
        [Value(2, HelpText = "The ID of the database where the sample data resides.",
            Required = true)]
        public string databaseId { get; set; }
        [Value(3, Default = 0, HelpText = "The timespan in hours that will be used to filter the "
            + "results based on a record's timestamp. The default will return the "
            + "'Top Ten' scores of all time.")]
        public int timespan { get; set; }
    }
Next add the following Query and QueryAsync methods below the existing InsertScoresAsync method:
public static object Query(string projectId,
            string instanceId, string databaseId, int timespan)
        {
            var response = QueryAsync(
                projectId, instanceId, databaseId, timespan);
            response.Wait();
            return ExitCode.Success;
        }

public static async Task QueryAsync(
            string projectId, string instanceId, string databaseId, int timespan)
        {
            string connectionString =
            $"Data Source=projects/{projectId}/instances/"
            + $"{instanceId}/databases/{databaseId}";
            // Create connection to Cloud Spanner.
            using (var connection = new SpannerConnection(connectionString))
            {
                string sqlCommand;
                if (timespan == 0)
                {
                    // No timespan specified. Query Top Ten scores of all time.
                    sqlCommand =
                        @"SELECT p.PlayerId, p.PlayerName, s.Score, s.Timestamp
                            FROM Players p
                            JOIN Scores s ON p.PlayerId = s.PlayerId
                            ORDER BY s.Score DESC LIMIT 10";
                }
                else
                {
                    // Query Top Ten scores filtered by the timepan specified.
                    sqlCommand =
                        $@"SELECT p.PlayerId, p.PlayerName, s.Score, s.Timestamp
                            FROM Players p
                            JOIN Scores s ON p.PlayerId = s.PlayerId
                            WHERE s.Timestamp >
                            TIMESTAMP_SUB(CURRENT_TIMESTAMP(),
                                INTERVAL {timespan.ToString()} HOUR)
                            ORDER BY s.Score DESC LIMIT 10";
                }
                var cmd = connection.CreateSelectCommand(sqlCommand);
                using (var reader = await cmd.ExecuteReaderAsync())
                {
                    while (await reader.ReadAsync())
                    {
                        Console.WriteLine("PlayerId : "
                          + reader.GetFieldValue<string>("PlayerId")
                          + " PlayerName : "
                          + reader.GetFieldValue<string>("PlayerName")
                          + " Score : "
                          + string.Format("{0:n0}",
                            Int64.Parse(reader.GetFieldValue<string>("Score")))
                          + " Timestamp : "
                          + reader.GetFieldValue<string>("Timestamp").Substring(0, 10));
                    }
                }
            }
        }
Then, to make the query command functional, add the following code to your Program's "Main" method:
                .Add((QueryOptions opts) => Query(
                    opts.projectId, opts.instanceId, opts.databaseId, opts.timespan))
You can use the Program.cs file in the dotnet-docs-samples/applications/leaderboard/step6 directory to see an example of how your Program.cs file should look after you've added the code to enable the query command.
Now let's run the program to confirm that the new query command is included in the program's list of possible commands. Run the following command:
dotnet run
You should see the query command now included in the program's default output as a new command option:
Leaderboard 1.0.0
Copyright (C) 2018 Leaderboard

ERROR(S):
  No verb selected.

  create     Create a sample Cloud Spanner database along with sample 'Players' and 'Scores' tables in your project.

  insert     Insert sample 'players' records or 'scores' records into the database.

  query      Query players with 'Top Ten' scores within a specific timespan from sample Cloud Spanner database table.

  help       Display more information on a specific command.

  version    Display version information.
Now let's run the query command to see its input arguments. Enter the following command:
dotnet run query
This will return the following response:
Leaderboard 1.0.0
Copyright (C) 2018 Leaderboard

ERROR(S):
  A required value not bound to option name is missing.

  --help          Display this help screen.

  --version       Display version information.

  value pos. 0    Required. The project ID of the project to use when managing Cloud Spanner resources.

  value pos. 1    Required. The ID of the instance where the sample data resides.

  value pos. 2    Required. The ID of the database where the sample data resides.

  value pos. 3    (Default: 0) The timespan in hours that will be used to filter the results based on a record's timestamp. The default will return the 'Top Ten' scores of all time.
You can see from the response that in addition to the Project ID, Instance ID, and Database ID there's another argument value pos. 3 expected which allows us to specify a timespan in number of hours to use for filtering records based on their value in the Scores table's Timestamp column. This argument has a default value of 0 which means no records will be filtered by timestamps. So we can use the query command without a "timespan" value to get a list of our "Top Ten" players of all time.
Let's run the query command without specifying a "timespan", using the same argument values we used when we ran the create command. Make sure you replace PROJECT_ID with the Project ID you created at the beginning of this codelab.
dotnet run query PROJECT_ID cloudspanner-leaderboard leaderboard
You should see a response that includes the "Top Ten" players of all time like the following:
PlayerId : 1843159180 PlayerName : Player 87 Score : 998,955 Timestamp : 2016-03-23
PlayerId : 61891198 PlayerName : Player 19 Score : 998,720 Timestamp : 2016-03-26
PlayerId : 340906298 PlayerName : Player 48 Score : 993,302 Timestamp : 2015-08-27
PlayerId : 541473117 PlayerName : Player 22 Score : 991,368 Timestamp : 2018-04-30
PlayerId : 857460496 PlayerName : Player 68 Score : 988,010 Timestamp : 2015-05-25
PlayerId : 1826646419 PlayerName : Player 91 Score : 984,022 Timestamp : 2016-11-26
PlayerId : 1002199735 PlayerName : Player 35 Score : 982,933 Timestamp : 2015-09-26
PlayerId : 2002563755 PlayerName : Player 23 Score : 979,041 Timestamp : 2016-10-25
PlayerId : 1377548191 PlayerName : Player 2 Score : 978,632 Timestamp : 2016-05-02
PlayerId : 1358098565 PlayerName : Player 65 Score : 973,257 Timestamp : 2016-10-30
Now let's run the query command with the necessary arguments to query the "Top Ten" players of the year by specifying a "timespan" equal to the number of hours in a year which is 8760. Make sure you replace PROJECT_ID with the Project ID you created at the beginning of this codelab.
dotnet run query PROJECT_ID cloudspanner-leaderboard leaderboard 8760
You should see a response that includes the "Top Ten" players of the year like the following:
PlayerId : 541473117 PlayerName : Player 22 Score : 991,368 Timestamp : 2018-04-30
PlayerId : 228469898 PlayerName : Player 82 Score : 967,177 Timestamp : 2018-01-26
PlayerId : 1131343000 PlayerName : Player 26 Score : 944,725 Timestamp : 2017-05-26
PlayerId : 396780730 PlayerName : Player 41 Score : 929,455 Timestamp : 2017-09-26
PlayerId : 61891198 PlayerName : Player 19 Score : 921,251 Timestamp : 2018-05-01
PlayerId : 634269851 PlayerName : Player 54 Score : 909,379 Timestamp : 2017-07-24
PlayerId : 821111159 PlayerName : Player 55 Score : 908,402 Timestamp : 2017-05-25
PlayerId : 228469898 PlayerName : Player 82 Score : 889,040 Timestamp : 2017-12-26
PlayerId : 1408782275 PlayerName : Player 27 Score : 874,124 Timestamp : 2017-09-24
PlayerId : 1002199735 PlayerName : Player 35 Score : 864,758 Timestamp : 2018-04-24
Now let's run the query command to query the "Top Ten" players of the month by specifying a "timespan" equal to the number of hours in a month which is 730. Make sure you replace PROJECT_ID with the Project ID you created at the beginning of this codelab.
dotnet run query PROJECT_ID cloudspanner-leaderboard leaderboard 730
You should see a response that includes the "Top Ten" players of the month like the following:
PlayerId : 541473117 PlayerName : Player 22 Score : 991,368 Timestamp : 2018-04-30
PlayerId : 61891198 PlayerName : Player 19 Score : 921,251 Timestamp : 2018-05-01
PlayerId : 1002199735 PlayerName : Player 35 Score : 864,758 Timestamp : 2018-04-24
PlayerId : 1228490432 PlayerName : Player 11 Score : 682,033 Timestamp : 2018-04-26
PlayerId : 648239230 PlayerName : Player 92 Score : 653,895 Timestamp : 2018-05-02
PlayerId : 70762849 PlayerName : Player 77 Score : 598,074 Timestamp : 2018-04-22
PlayerId : 1671215342 PlayerName : Player 62 Score : 506,770 Timestamp : 2018-04-28
PlayerId : 1208850523 PlayerName : Player 21 Score : 216,008 Timestamp : 2018-04-30
PlayerId : 1587692674 PlayerName : Player 63 Score : 188,157 Timestamp : 2018-04-25
PlayerId : 992391797 PlayerName : Player 37 Score : 167,175 Timestamp : 2018-04-30
Now let's run the query command to query the "Top Ten" players of the week by specifying a "timespan" equal to the number of hours in a week which is 168. Make sure you replace PROJECT_ID with the Project ID you created at the beginning of this codelab.
dotnet run query PROJECT_ID cloudspanner-leaderboard leaderboard 168
You should see a response that includes the "Top Ten" players of the week like the following:
PlayerId : 541473117 PlayerName : Player 22 Score : 991,368 Timestamp : 2018-04-30
PlayerId : 61891198 PlayerName : Player 19 Score : 921,251 Timestamp : 2018-05-01
PlayerId : 228469898 PlayerName : Player 82 Score : 853,602 Timestamp : 2018-04-28
PlayerId : 1131343000 PlayerName : Player 26 Score : 695,318 Timestamp : 2018-04-30
PlayerId : 1228490432 PlayerName : Player 11 Score : 682,033 Timestamp : 2018-04-26
PlayerId : 1408782275 PlayerName : Player 27 Score : 671,827 Timestamp : 2018-04-27
PlayerId : 648239230 PlayerName : Player 92 Score : 653,895 Timestamp : 2018-05-02
PlayerId : 816861444 PlayerName : Player 83 Score : 622,277 Timestamp : 2018-04-27
PlayerId : 162043954 PlayerName : Player 75 Score : 572,634 Timestamp : 2018-05-02
PlayerId : 1671215342 PlayerName : Player 62 Score : 506,770 Timestamp : 2018-04-28
Excellent work!
Now as you add records Spanner will scale your database to however large you need it to be.
No matter how much your database grows, your game's leaderboard can continue to scale with accuracy with Spanner and its Truetime technology.
7. Cleanup
After all the fun playing with Spanner we need to cleanup our playground, saving precious resources and money. Luckily this is an easy step, just go into the developer Console and delete the instance we created in the codelab step named "Setup a Cloud Spanner Instance".
8. Congratulations!
What we've covered:
- Google Cloud Spanner Instances, Databases and Table Schema for a leaderboard
- How to create .NET Core C# console application
- How to create a Spanner Database and Tables using the C# client library
- How to load data into a Spanner Database using the C# client library
- How to query "Top Ten" results from your data using Spanner commit timestamps and the C# client library
Next Steps:
- Read the Spanner CAP Whitepaper
- Learn about Schema Design and Query best practices
- Learn more about Cloud Spanner commit timestamps
Give us your feedback
- Please take a moment to complete our very short survey
