
1. 소개
Spring Framework 5.0에는 전용 Kotlin 지원이 추가되어 Kotlin 개발자가 Spring을 쉽게 사용할 수 있습니다. 따라서 이러한 변경사항으로 인해 Spring Cloud GCP에서 제공하는 Google Cloud 통합도 Kotlin에서 원활하게 작동합니다. 이 Codelab에서는 Kotlin 애플리케이션에서 Google Cloud 서비스를 얼마나 쉽게 사용할 수 있는지 알아봅니다.
이 Codelab에서는 Cloud Pub/Sub, Cloud SQL 등 GCP 서비스를 사용하는 방법을 보여주는 간단한 등록 애플리케이션을 Kotlin으로 설정하는 방법을 안내합니다.
빌드할 항목
이 Codelab에서는 등록자 정보를 수락하고, 이를 Cloud Pub/Sub 주제에 게시하고, Cloud MySQL 데이터베이스에 유지하는 Kotlin Spring Boot 애플리케이션을 설정합니다.
학습할 내용
Kotlin Spring 애플리케이션에서 Google Cloud 서비스와 통합하는 방법
필요한 항목
- Google Cloud Platform 프로젝트
- 브라우저(Chrome, Firefox 등)
이 튜토리얼을 어떻게 사용하실 계획인가요?
HTML/CSS 웹 앱 빌드 경험을 평가해 주세요.
귀하의 Google Cloud Platform 서비스 사용 경험을 평가해 주세요.
2. 설정 및 요구사항
자습형 환경 설정
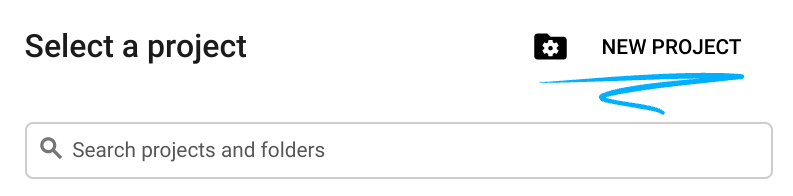
- Cloud Console에 로그인하고 새 프로젝트를 만들거나 기존 프로젝트를 다시 사용합니다. (Gmail 또는 G Suite 계정이 없으면 만들어야 합니다.)

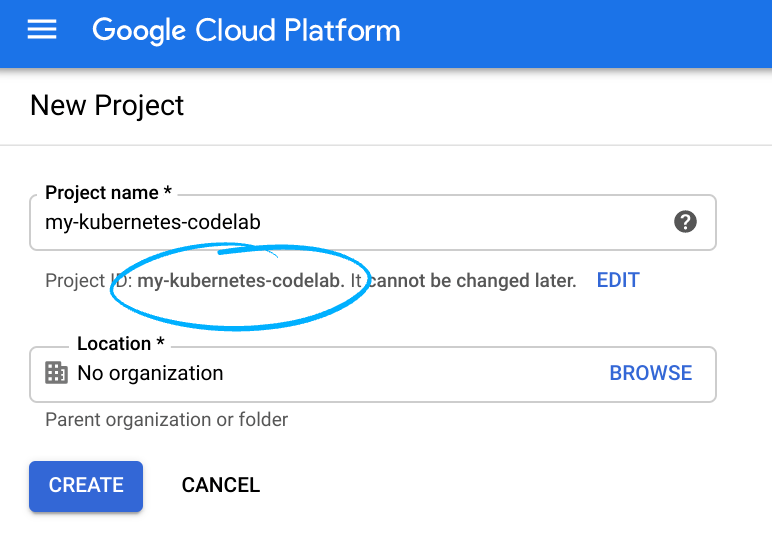
모든 Google Cloud 프로젝트에서 고유한 이름인 프로젝트 ID를 기억하세요(위의 이름은 이미 사용되었으므로 사용할 수 없습니다). 이 ID는 나중에 이 Codelab에서 PROJECT_ID라고 부릅니다.
- 그런 후 Google Cloud 리소스를 사용할 수 있도록 Cloud Console에서 결제를 사용 설정해야 합니다.
이 Codelab 실행에는 많은 비용이 들지 않습니다. 이 가이드를 마친 후 비용이 결제되지 않도록 리소스 종료 방법을 알려주는 '삭제' 섹션의 안내를 따르세요. Google Cloud 새 사용자에게는 미화 $300 상당의 무료 체험판 프로그램에 참여할 수 있는 자격이 부여됩니다.
Google Cloud Shell
Google Cloud를 노트북에서 원격으로 실행할 수 있지만, 이 Codelab에서는 Cloud에서 실행되는 명령줄 환경인 Google Cloud Shell을 사용합니다.
Cloud Shell 활성화
- Cloud Console에서 Cloud Shell 활성화
를 클릭합니다.

이전에 Cloud Shell을 시작하지 않았으면 설명이 포함된 중간 화면(스크롤해야 볼 수 있는 부분)이 제공됩니다. 이 경우 계속을 클릭합니다(이후 다시 표시되지 않음). 이 일회성 화면은 다음과 같습니다.

Cloud Shell을 프로비저닝하고 연결하는 데 몇 분 정도만 걸립니다.

가상 머신은 필요한 모든 개발 도구와 함께 로드됩니다. 영구적인 5GB 홈 디렉터리를 제공하고 Google Cloud에서 실행되므로 네트워크 성능과 인증이 크게 개선됩니다. 이 Codelab에서 대부분의 작업은 브라우저나 Chromebook만 사용하여 수행할 수 있습니다.
Cloud Shell에 연결되면 인증이 완료되었고 프로젝트가 해당 프로젝트 ID로 이미 설정된 것을 볼 수 있습니다.
- Cloud Shell에서 다음 명령어를 실행하여 인증되었는지 확인합니다.
gcloud auth list
명령어 결과
 Credentialed Accounts
ACTIVE  ACCOUNT
*       <my_account>@<my_domain.com>

To set the active account, run:
    $ gcloud config set account `ACCOUNT`
gcloud config list project
명령어 결과
[core]
project = <PROJECT_ID>
또는 다음 명령어로 설정할 수 있습니다.
gcloud config set project <PROJECT_ID>
명령어 결과
Updated property [core/project].
3. Pub/Sub 리소스 프로비저닝
먼저 Cloud Pub/Sub 주제와 구독을 설정해야 합니다. 이 애플리케이션에서는 등록 정보를 Pub/Sub 주제에 게시합니다. 그러면 이 주제에서 정보를 읽어 데이터베이스에 유지합니다.
이 튜토리얼에서는 Cloud Shell을 사용하여 리소스를 프로비저닝합니다. Google Cloud 콘솔의 Cloud Pub/Sub 섹션을 통해 Pub/Sub 리소스를 구성할 수도 있습니다.
Cloud Shell 터미널에서 먼저 Pub/Sub API를 사용 설정합니다.
$ gcloud services enable pubsub.googleapis.com
다음으로 이 애플리케이션의 registrations라는 Pub/Sub 주제를 만듭니다. 애플리케이션을 통해 제출된 등록 정보가 이 주제에 게시됩니다.
$ gcloud pubsub topics create registrations
마지막으로 주제에 대한 구독을 만듭니다. Pub/Sub 구독을 사용하면 주제에서 메시지를 수신할 수 있습니다.
$ gcloud pubsub subscriptions create registrations-sub --topic=registrations
이제 애플리케이션의 Cloud Pub/Sub 주제와 구독을 만들었습니다.
4. Cloud SQL (MySQL) 인스턴스 및 데이터베이스 만들기
샘플 애플리케이션의 경우 등록자 정보를 저장할 데이터베이스 인스턴스도 설정해야 합니다. 이 단계에서는 Cloud Shell 터미널을 사용하여 Cloud SQL 리소스를 프로비저닝합니다. Google Cloud 콘솔을 통해 Cloud SQL 인스턴스를 확인하고 구성할 수도 있습니다.
먼저 Cloud SQL Admin API를 사용 설정합니다.
$ gcloud services enable sqladmin.googleapis.com
다음으로 Cloud SQL (MySQL) 인스턴스를 프로비저닝합니다. 이 명령은 다소 시간이 걸릴 수 있습니다.
$ gcloud sql instances create codelab-instance --region=us-east1
Cloud SQL 인스턴스를 성공적으로 만든 후 인스턴스에서 registrants라는 새 데이터베이스를 만듭니다.
$ gcloud sql databases create registrants --instance codelab-instance
이제 애플리케이션의 Cloud SQL 인스턴스 및 데이터베이스 설정이 완료되었습니다.
5. Spring Boot 애플리케이션 초기화
이제 애플리케이션을 작성할 준비가 되었습니다. 다음 단계에서는 설정 단계에서 설명한 Cloud Shell을 계속 사용합니다.
먼저 Initializr를 사용하여 프로젝트의 스캐폴딩 코드를 생성합니다. Cloud Shell 창에서 다음을 실행합니다.
$ cd ~
$ curl https://start.spring.io/starter.tgz \
  -d language=kotlin \
  -d bootVersion=2.4.0 \
  -d dependencies=web,data-jpa,integration,cloud-gcp-pubsub,thymeleaf \
  -d baseDir=registrations-codelab | tar -xzvf -
$ cd registrations-codelab
이 명령어는 registrations-codelab/ 디렉터리에 초기 Maven 프로젝트 설정과 애플리케이션의 스캐폴딩 코드를 생성합니다. 다음 섹션에서는 작동하는 애플리케이션을 생성하는 데 필요한 코드 수정사항을 설명합니다.
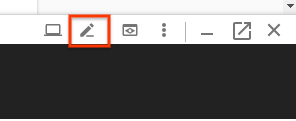
Cloud Shell 코드 편집기
Cloud Shell 환경에서 코드를 수정하고 보는 가장 쉬운 방법은 기본 제공 Cloud Shell 코드 편집기를 사용하는 것입니다.
Cloud Shell 인스턴스를 연 후 연필 아이콘을 클릭하여 코드 편집기를 엽니다. 편집기를 사용하면 Initialzr에서 생성된 프로젝트 파일을 직접 수정할 수 있어야 합니다.
6. 데이터베이스 구성
먼저 설정한 Cloud MySQL 데이터베이스에 연결할 수 있도록 애플리케이션을 구성합니다. Spring Cloud GCP 라이브러리는 Cloud MySQL 인스턴스에 연결하는 데 필요한 종속 항목을 제공하는 Cloud MySQL 스타터를 제공합니다.
프로젝트 pom.xml에 spring-cloud-gcp-starter-sql-mysql 종속 항목을 추가합니다.
registrations-codelab/pom.xml
...
<dependencies>

  ... Other dependencies above ...

  <!-- Add the MySQL starter to the list of dependencies -->
  <dependency>
    <groupId>com.google.cloud</groupId>
    <artifactId>spring-cloud-gcp-starter-sql-mysql</artifactId>
  </dependency>
</dependencies>
또한 application.properties 구성 파일을 수정하여 데이터베이스 구성을 설명해야 합니다. 다음 속성을 application.properties 파일에 복사합니다.
데이터베이스의 인스턴스 연결 이름을 찾습니다.
$ gcloud sql instances describe codelab-instance \
  --format 'value(connectionName)'
이 출력은 application.properties 파일에서 연결 정보를 구성하는 데 사용됩니다.
src/main/resources/application.properties
# Modify this property using the output from the previous command line.
spring.cloud.gcp.sql.instance-connection-name=INSTANCE_CONNECTION_NAME

# Your database name
spring.cloud.gcp.sql.database-name=registrants

# So app starts despite "table already exists" errors.
spring.datasource.continue-on-error=true

# Enforces database initialization
spring.datasource.initialization-mode=always

# Cloud SQL (MySQL) only supports InnoDB, not MyISAM
spring.jpa.database-platform=org.hibernate.dialect.MySQL55Dialect
spring.jpa.hibernate.ddl-auto=create-drop

# This is used if you want to connect to a different database instance
# user other than root; not used in codelab.
# spring.datasource.username=root

# This is used to specify the password of the database user;
# not used in codelab.
# spring.datasource.password=password
수정해야 하는 속성은 인스턴스 연결 이름뿐입니다. 이 값은 YOUR_GCP_PROJECT_ID:REGION:DATABASE_INSTANCE_NAME 형식의 콜론으로 구분된 값으로 지정해야 합니다.
7. 정적 콘텐츠 만들기
먼저 애플리케이션의 프런트엔드를 만듭니다. 애플리케이션에는 사용자가 개인을 등록할 수 있는 양식과 등록에 성공한 모든 사용자를 표시하는 뷰가 있어야 합니다.
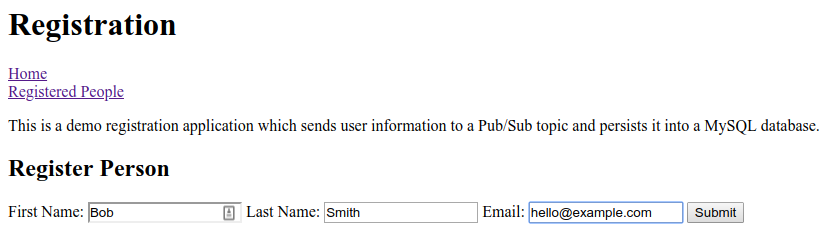
홈페이지의 경우 등록 양식이 포함된 index.html를 만듭니다.
src/main/resources/static/index.html
<!DOCTYPE html>
<html lang="en">
<head>
  <meta charset="UTF-8">
  <title>Registration Sample Application</title>
</head>
<body>

<h1>Registration</h1>

<div>
  <nav>
    <a href="/">Home</a><br>
    <a href="/registrants">Registered People</a><br>
  </nav>

  <p>
    This is a demo registration application which sends user information to a Pub/Sub topic and
    persists it into a MySQL database.
  </p>

  <h2>Register Person</h2>
  <div>
    <form action="/registerPerson" method="post">
      First Name: <input type="text" name="firstName" />
      Last Name: <input type="text" name="lastName" />
      Email: <input type="text" name="email" />
      <input type="submit" value="Submit"/>
    </form>
  </div>
</div>

</body>
</html>
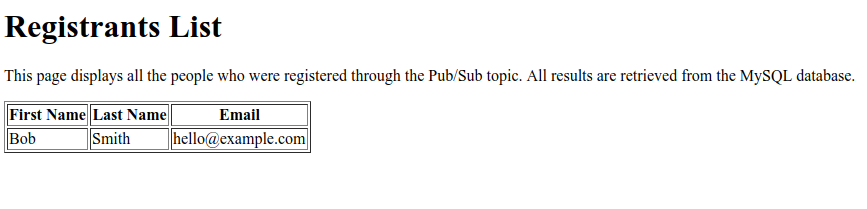
다음으로 등록된 사용자를 표시하기 위해 registrants.html라는 Thymeleaf 템플릿을 만듭니다. Thymeleaf는 동적으로 생성된 HTML을 구성하고 제공하는 데 사용되는 템플릿 프레임워크입니다. 템플릿은 HTML과 유사하지만 동적 콘텐츠를 처리하기 위한 추가 마크다운 요소가 있습니다. 이 템플릿은 애플리케이션을 통해 등록된 모든 등록자가 포함된 personsList라는 단일 매개변수를 허용합니다.
src/main/resources/templates/registrants.html
<!DOCTYPE HTML>
<html xmlns:th="http://www.thymeleaf.org">
<head>
  <title>Registrants List</title>
  <meta http-equiv="Content-Type" content="text/html; charset=UTF-8"/>
</head>
<body>
<h1>Registrants List</h1>
<p>
  This page displays all the people who were registered through the Pub/Sub topic.
  All results are retrieved from the MySQL database.
</p>
<table border="1">
  <tr>
    <th>First Name</th>
    <th>Last Name</th>
    <th>Email</th>
  </tr>
  <tr th:each="person : ${personsList}">
    <td>[[${person.firstName}]]</td>
    <td>[[${person.lastName}]]</td>
    <td>[[${person.email}]]</td>
  </tr>
</table>

</body>
</html>
이 시점에서 정적 콘텐츠가 제공되고 있는지 확인할 수 있습니다.
Maven을 사용하여 앱을 빌드하고 실행합니다.
$ ./mvnw spring-boot:run
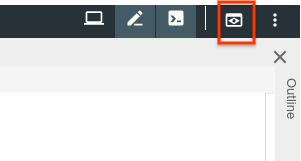
Cloud Shell 창에서 미리보기 버튼을 클릭하고 홈페이지가 렌더링되는지 확인합니다. 웹 컨트롤러가 누락되어 UI의 기능은 작동하지 않습니다. 이 내용은 다음 단계에서 추가됩니다.
애플리케이션을 미리 본 후 CTRL+C를 눌러 애플리케이션을 종료합니다.
8. 등록자를 Pub/Sub 주제로 전송
이 단계에서는 웹 양식을 통해 제출된 등록자가 Cloud Pub/Sub 주제에 게시되는 기능을 구현합니다.
데이터 클래스 추가
먼저 Kotlin 데이터 클래스를 만듭니다. 이는 JPA 항목이 되며 양식을 통해 제출된 등록자의 중간 표현으로도 작동합니다.
데모 패키지에 Person 클래스와 Spring Data PersonRepository라는 두 개의 새 파일을 추가합니다. 이 두 클래스를 사용하면 Spring Data JPA를 사용하여 MySQL 데이터베이스에서 등록 항목을 쉽게 저장하고 검색할 수 있습니다.
src/main/kotlin/com/example/demo/Person.kt
package com.example.demo

import javax.persistence.Entity
import javax.persistence.GeneratedValue
import javax.persistence.Id

@Entity
data class Person(
    val firstName: String,
    val lastName: String,
    val email: String,
    @Id @GeneratedValue
    var id: Long? = 0)
src/main/kotlin/com/example/demo/PersonRepository.kt
package com.example.demo

import org.springframework.data.repository.CrudRepository

interface PersonRepository : CrudRepository<Person, Long>
웹 컨트롤러 추가
다음으로 양식의 등록자를 처리하고 이전에 만든 Cloud Pub/Sub 주제에 정보를 전송하는 컨트롤러 클래스를 만듭니다. 이 컨트롤러는 다음 두 엔드포인트를 만듭니다.
/registerPerson: 등록자 정보가 제출된 후 Pub/Sub 주제로 전송되는 POST 엔드포인트입니다.registerPerson(..)함수에서 등록자 정보는 Cloud Pub/Sub와의 상호작용을 시작하는 데 필요한 상용구 코드를 최소화하는 Spring Cloud GCP Pub/Sub 통합의 편의 클래스인PubSubTemplate를 사용하여 Pub/Sub 주제로 전송됩니다./registrants: 데이터베이스에 등록된 모든 등록자를 표시합니다. 이 정보는 이전 단계에서 만든 Spring Data 저장소를 사용하여 MySQL 인스턴스에서 가져옵니다.
데모 패키지에 다음 컨트롤러 클래스를 만듭니다.
src/main/kotlin/com/example/demo/Controller.kt
package com.example.demo

import com.google.cloud.spring.pubsub.core.PubSubTemplate
import org.springframework.web.bind.annotation.GetMapping
import org.springframework.web.bind.annotation.PostMapping
import org.springframework.web.bind.annotation.RequestParam
import org.springframework.web.bind.annotation.RestController
import org.springframework.web.servlet.ModelAndView
import org.springframework.web.servlet.view.RedirectView

@RestController
class Controller(val pubSubTemplate: PubSubTemplate, val personRepository: PersonRepository) {

  // The Pub/Sub topic name created earlier.
  val REGISTRATION_TOPIC = "registrations"

  @PostMapping("/registerPerson")
  fun registerPerson(
    @RequestParam("firstName") firstName: String,
    @RequestParam("lastName") lastName: String,
    @RequestParam("email") email: String): RedirectView {

    pubSubTemplate.publish(
        REGISTRATION_TOPIC,
        Person(firstName, lastName, email))
    return RedirectView("/")
  }

  @GetMapping("/registrants")
  fun getRegistrants(): ModelAndView {
    val personsList = personRepository.findAll().toList()
    return ModelAndView("registrants", mapOf("personsList" to personsList))
  }
}
컨트롤러는 웹 양식을 통해 제출된 등록자 정보를 읽은 다음 정보를 Pub/Sub 주제에 게시합니다.
JSON 객체 매퍼 Bean 추가
컨트롤러에서 문자열이 아닌 Person 객체를 Pub/Sub 주제에 게시하는 것을 확인했을 것입니다. 이는 주제로 전송되는 맞춤 JSON 페이로드에 대한 Spring Cloud GCP 지원을 활용하기 때문에 가능합니다. 라이브러리를 사용하면 객체를 JSON으로 직렬화하고, 주제로 JSON 페이로드를 전송하고, 페이로드가 수신될 때 페이로드를 역직렬화할 수 있습니다.
이 기능을 활용하려면 애플리케이션 컨텍스트에 ObjectMapper 빈을 추가해야 합니다. 이 ObjectMapper 빈은 애플리케이션이 메시지를 보내고 받을 때 객체를 JSON으로 직렬화하거나 JSON에서 객체로 직렬화하는 데 사용됩니다. DemoApplication.kt 클래스에서 JacksonPubSubMessageConverter Spring bean을 추가합니다.
src/main/kotlin/com/example/demo/DemoApplication.kt
package com.example.demo

import org.springframework.boot.autoconfigure.SpringBootApplication
import org.springframework.boot.runApplication

// new imports to add
import org.springframework.context.annotation.Bean
import com.fasterxml.jackson.databind.ObjectMapper
import com.google.cloud.spring.pubsub.support.converter.JacksonPubSubMessageConverter

@SpringBootApplication
class DemoApplication {
  // This bean enables serialization/deserialization of
  // Java objects to JSON for Pub/Sub payloads
  @Bean
  fun jacksonPubSubMessageConverter(objectMapper: ObjectMapper) =
      JacksonPubSubMessageConverter(objectMapper)
}

fun main(args: Array<String>) {
        runApplication<DemoApplication>(*args)
}
이 시점에서 다음을 실행하여 애플리케이션을 다시 실행해 볼 수 있습니다.
$ ./mvnw spring-boot:run
이제 애플리케이션이 기본 페이지의 웹 양식에서 사용자가 만든 Pub/Sub 주제로 정보를 전송합니다. 하지만 아직 Pub/Sub 주제에서 읽어야 하므로 유용한 작업을 수행하지는 않습니다. 이 작업은 다음 단계에서 수행합니다.
9. Pub/Sub 주제에서 등록자 읽기
마지막 단계에서는 Pub/Sub 주제에서 등록자 정보를 처리하고 정보를 Cloud MySQL 데이터베이스에 유지합니다. 이렇게 하면 애플리케이션이 완료되어 양식을 통해 신규 등록자를 제출하고 /registrants 엔드포인트를 통해 등록된 모든 사용자를 볼 수 있습니다.
이 애플리케이션은 메시징을 처리하기 위한 편리한 추상화를 많이 제공하는 Spring Integration을 활용합니다. Pub/Sub 주제에서 메시지를 읽고 추가 처리를 위해 pubsubInputChannel에 넣을 수 있도록 PubSubInboundChannelAdapter를 추가합니다. 그런 다음 @ServiceActivator을 사용하여 pubsubInputChannel에 도착하는 메시지로 호출되도록 messageReceiver 함수를 구성합니다.
src/main/kotlin/com/example/demo/DemoApplication.kt
package com.example.demo

import org.springframework.boot.autoconfigure.SpringBootApplication
import org.springframework.boot.runApplication

import org.springframework.context.annotation.Bean
import com.fasterxml.jackson.databind.ObjectMapper
import org.springframework.cloud.gcp.pubsub.support.converter.JacksonPubSubMessageConverter

// new imports to add
import com.google.cloud.spring.pubsub.core.PubSubTemplate
import com.google.cloud.spring.pubsub.integration.AckMode
import com.google.cloud.spring.pubsub.integration.inbound.PubSubInboundChannelAdapter
import com.google.cloud.spring.pubsub.support.BasicAcknowledgeablePubsubMessage
import com.google.cloud.spring.pubsub.support.GcpPubSubHeaders
import org.springframework.beans.factory.annotation.Autowired
import org.springframework.beans.factory.annotation.Qualifier
import org.springframework.integration.annotation.ServiceActivator
import org.springframework.integration.channel.DirectChannel
import org.springframework.messaging.MessageChannel
import org.springframework.messaging.handler.annotation.Header

@SpringBootApplication
class DemoApplication {

  private val REGISTRANT_SUBSCRIPTION = "registrations-sub"

  @Autowired
  private lateinit var personRepository: PersonRepository

  // New Spring Beans to add
  @Bean
  fun pubsubInputChannel() = DirectChannel()

  @Bean
  fun messageChannelAdapter(
      @Qualifier("pubsubInputChannel") inputChannel: MessageChannel,
      pubSubTemplate: PubSubTemplate): PubSubInboundChannelAdapter {

    val adapter = PubSubInboundChannelAdapter(
        pubSubTemplate, REGISTRANT_SUBSCRIPTION)
    adapter.outputChannel = inputChannel
    adapter.ackMode = AckMode.MANUAL
    adapter.payloadType = Person::class.java
    return adapter
  }

  @ServiceActivator(inputChannel = "pubsubInputChannel")
  fun messageReceiver(
      payload: Person,
      @Header(GcpPubSubHeaders.ORIGINAL_MESSAGE) message: BasicAcknowledgeablePubsubMessage) {
    personRepository.save(payload)
    print("Message arrived! Payload: $payload")
    message.ack()
  }

  // ObjectMapper bean from previous step
  @Bean
  fun jacksonPubSubMessageConverter(objectMapper: ObjectMapper) = JacksonPubSubMessageConverter(objectMapper)
}

fun main(args: Array<String>) {
        runApplication<DemoApplication>(*args)
}
이 시점에서 애플리케이션 설정이 완료되었습니다. 앱이 제대로 작동하는지 확인하려면 다음을 실행하세요.
$ ./mvnw spring-boot:run
미리보기 버튼을 다시 클릭하고 양식을 작성하여 제출하여 사용자를 등록해 보세요.
등록된 사용자 링크를 클릭하여 새 등록자가 표에 표시되는지 확인합니다.
축하합니다. 이제 완료되었습니다. 터미널 창에서 CTRL+C를 눌러 애플리케이션을 종료합니다.
10. 삭제
환경을 정리하려면 만든 Pub/Sub 주제와 Cloud MySQL 인스턴스를 삭제해야 합니다.
Cloud MySQL 인스턴스 삭제
$ gcloud sql instances delete codelab-instance
Pub/Sub 리소스 삭제
$ gcloud pubsub subscriptions delete registrations-sub
$ gcloud pubsub topics delete registrations
11. 축하합니다.
이제 Cloud Pub/Sub 및 Cloud SQL (MySQL)과 통합되는 Spring Kotlin 애플리케이션 작성을 완료했습니다.
자세히 알아보기
- GCP의 Spring 프로젝트: http://cloud.spring.io/spring-cloud-gcp/
- GCP의 Spring GitHub 저장소: https://github.com/GoogleCloudPlatform/spring-cloud-gcp
- Google Cloud Platform의 Java: https://cloud.google.com/java/
- GCP를 사용하는 샘플 Kotlin 애플리케이션: https://github.com/GoogleCloudPlatform/spring-cloud-gcp/tree/master/spring-cloud-gcp-kotlin-samples
라이선스
이 작업물은 Creative Commons Attribution 2.0 일반 라이선스에 따라 사용이 허가되었습니다.