
1. 簡介與設定
歡迎使用
嗨!歡迎使用 Coding Jam。在接下來的 75 分鐘內,您將建構可實際運作的 AI 網頁應用程式。
請參閱這裡的網站:Coding Jam 網站
建構項目
根據本週的專案簡報,打造 AI 輔助網頁應用程式。在瀏覽器中執行。使用 Google 的 Gemini AI。課程結束時,你就能完全掌握。
安裝 Antigravity
Antigravity 是我們將用於所有用途的 AI 助理。這款應用程式會安裝在電腦上。
步驟 1:下載
👉 在瀏覽器中前往 https://antigravity.google/download。
👉 點選 Antigravity 2.0 頁面上的下載按鈕,下載適用於您作業系統 (Mac、Windows 或 Linux) 的版本。
👉 執行下載的安裝程式。預設設定沒有問題,請按一下繼續。
步驟 2:啟動及登入
👉 從「應用程式」資料夾 (Mac) 或「開始」選單 (Windows) 啟動 Antigravity。
👉 系統提示時,請按一下「登入」。
👉 使用 Google 帳戶。
步驟 3:驗證歡迎畫面
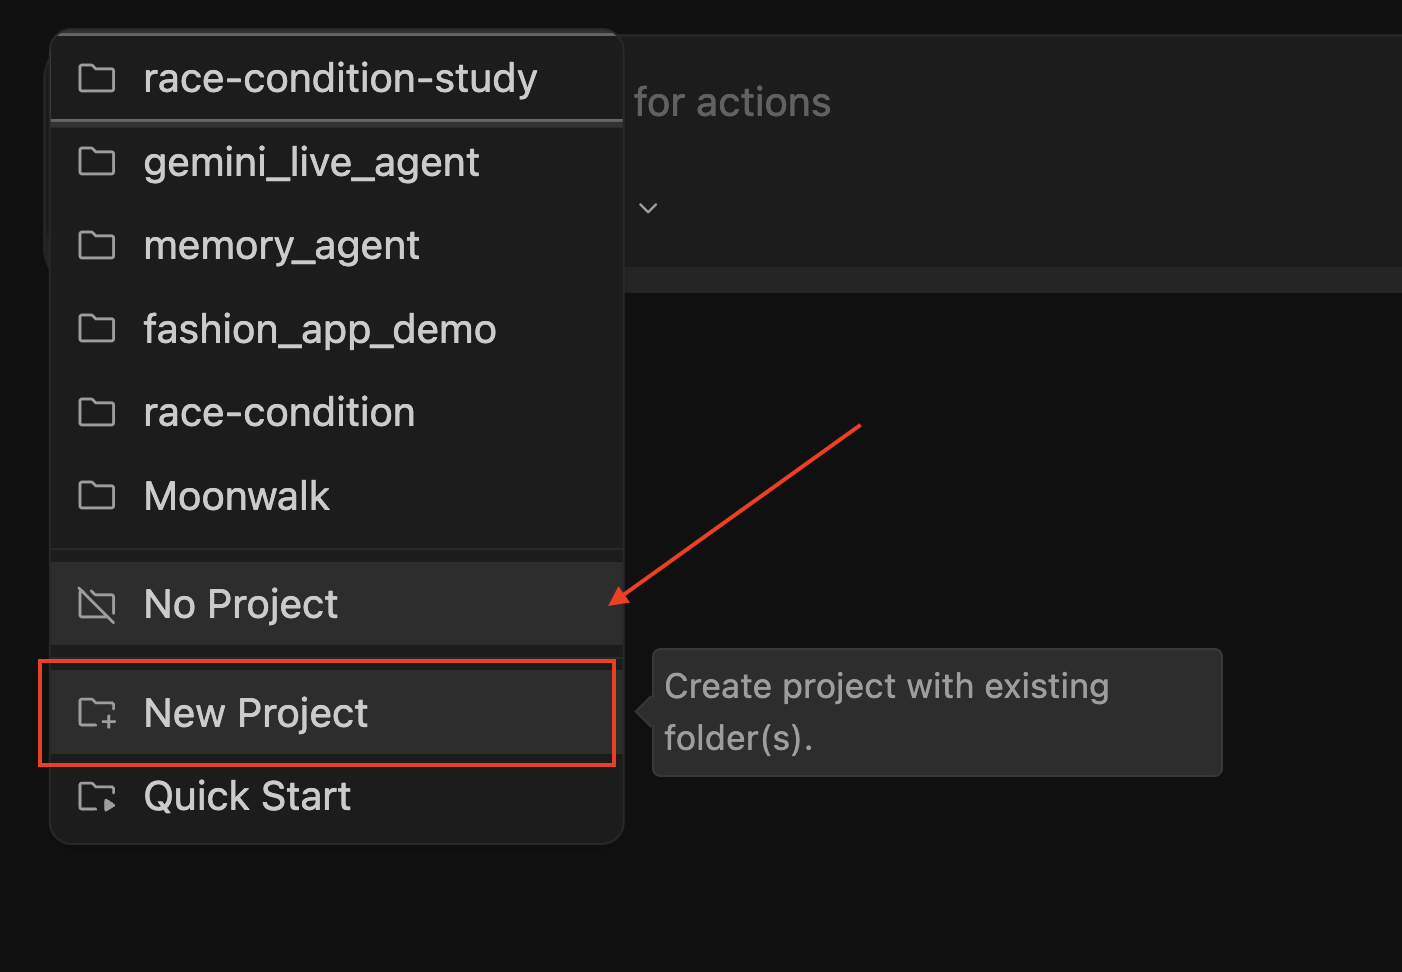
您應該會看到 Antigravity 的歡迎畫面,其中有三個大按鈕:
- 「開啟資料夾」:以工作區形式開啟現有資料夾
- 複製存放區:從 GitHub 下載專案 (我們會在第 3A 節使用這項功能)
如要深入瞭解,請參閱 https://antigravity.google/ 上的更多說明文件。
✅ 檢查點:您已安裝 Antigravity、登入帳戶,並看到含有三個按鈕的歡迎畫面。
2. 安裝必要工具 (透過 Antigravity)
電腦上必須安裝兩個輔助工具,才能使用 Antigravity:
工具 | 說明 (簡單易懂的英文) |
uv | 管理 Python,也就是應用程式後端使用的語言 |
git | 從網際網路下載專案檔案 (Antigravity 會使用這項功能進行複製) |
您不必自行輸入安裝指令,你只要用英文提問,Antigravity 就會完成其餘工作。
步驟 1:開啟臨時工作區
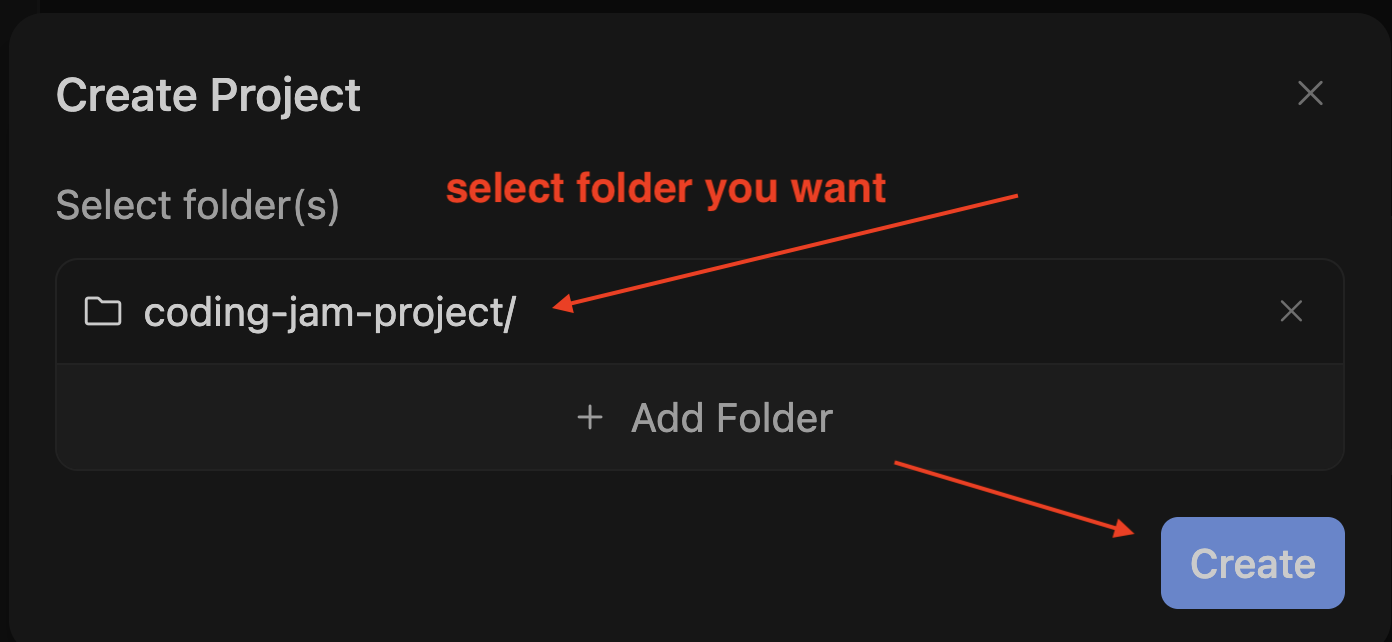
Antigravity 必須開啟資料夾才能進行即時通訊。(如果沒有資料夾,就不會有對話。)
👉 在歡迎畫面中,按一下「Open Folder」。
👉 建立或選取任何空白資料夾。建議:在方便的位置 (例如桌面) 建立名為 coding-jam-setup 的新資料夾。
👉 按一下「開啟」 (或「選取資料夾」)。
系統會開啟 Agent Manager 檢視畫面,並選取新的 (空白) 工作區。
步驟 2:請 Antigravity 檢查及安裝工具
👉 按下 Cmd+L 鍵 (Mac) 或 Ctrl+L 鍵 (Windows/Linux),將焦點移至對話輸入框。
👉 確認底部的模型挑選器顯示「Gemini 3 Flash」 (預設值,適用於此)。
📝 最簡單的提示詞:將這段文字貼到對話中:
Install uv and git on my computer if they're not already there.
Don't install Node.js. Ask permission before each install command.
📝 更詳細的版本 (如有需要):
Check whether uv and git are installed by running their --version commands.
For any tool that's missing, install it using the best method for my OS:
- Mac: prefer `brew install` (install Homebrew first if missing)
- Windows: prefer `winget install`
- Linux: prefer `apt install` or `dnf install`
Ask permission before each install command.
Do NOT install Node.js — we'll install it later only if needed.
When done, give me a summary of what's installed.
👉 按下 Enter 鍵即可傳送。
🤖 觀看代理程式運作,按一下彈出式視窗中的「允許」
步驟 3:閱讀摘要
代理程式完成後,您會看到類似下方的內容:
✅ Setup complete:
- uv 0.4.18 ✅ (installed)
- git 2.42.0 ✅ (already had it)
- Node.js: skipped (will install later if needed)
如果發生錯誤
✅ 檢查點:代理程式確認已安裝 uv 和 git。總時間:約 3 到 5 分鐘 (如果必須先在 Mac 上安裝 Homebrew,則約 7 分鐘)。
複製專案
步驟 1:選取本週專案
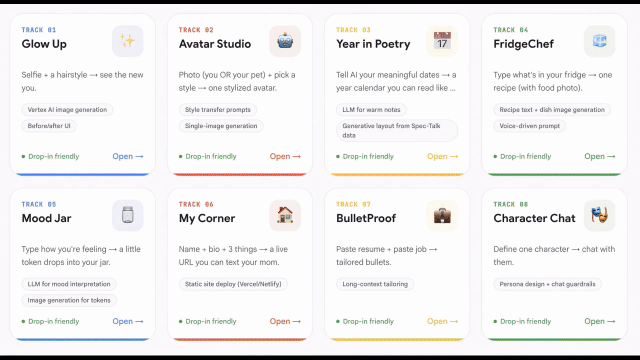
Coding Jam 是為期 8 週的計畫,每週都會有不同的小型專案。引導員會告訴您今天進行的是哪一週的練習。找出該列並複製網址。
週 | 專案 | 存放區網址 |
1 | AI 髮型試穿/試妝 |
|
2 | AI 虛擬化身生成器 |
|
3 | 我的特別年曆 |
|
4 | 冰箱到食譜 |
|
5 | AI 情緒瓶 |
|
6 | 單頁式作品集 |
|
7 | 履歷表客製化工具 |
|
8 | AI 角色對話 |
|
步驟 2:透過 Antigravity 複製
我們需要返回啟動畫面,才能使用「Clone Repository」按鈕。
👉 在 Antigravity 中,複製您選擇的專案。複製第 1 週的範例,但您需要輸入正確的存放區
📝 參考提示
Git clone ⚠️ PASTE_YOUR_PROJECT and save to my local folder: ⚠️ PASTE_YOUR_LOCATION
步驟 3 - 瀏覽專案
查看檔案清單。如下所示:
檔案 / 資料夾 | 簡介 |
BRIEF.md | 產品概念:我們將建構的內容 (以簡單的英文說明) |
reference/ | 內含可運作的範例應用程式的資料夾。AI 會在撰寫程式碼時讀取這個資料夾,確保應用程式符合模式。 |
.gitignore | Git 應忽略的檔案清單 (技術性,請忽略) |
👉 點擊
BRIEF.md 開啟專案,以下是專案構想。
✅ 檢查點:您已複製專案、以工作區形式開啟專案,並讀取 BRIEF.md。
3. 安裝 Workshop Skills
「技能」是儲存在 GitHub 的一組指令,可提供給 AI。
步驟 1:要求 Antigravity 安裝技能
📝 在對話中貼上這段提示:
Please install the workshop skills into this workspace's .agent/skills/
folder. Run these two git clones from the project root:

1. git clone https://github.com/gca-americas/skills-garden .agent/skills/skills-garden
2. git clone https://github.com/google-gemini/gemini-skills .agent/skills/gemini-skills

When Antigravity asks permission to run each command, I'll click Allow.

When done, list the skills that are now available in this workspace.
步驟 2:在兩個彈出式視窗中按一下「允許」
🤖 您應該會看到類似下列的內容:
I'll create the .agent/skills/ folder and clone both repos into it.

Running: git clone https://github.com/gca-americas/skills-garden .agent/skills/skills-garden
如果代理程式提示,請允許執行任何動作。
👉 查看檔案清單。這時應該會看到新的「.agent/」資料夾。按一下展開,確認這個資料夾中有多項技能,例如 skills-garden 和 gemini-skills。
各項技能的功能 (僅供參考,不需採取任何行動)
Skill | 用途 |
| 撰寫產品設計文件 |
| 撰寫使用者體驗設計文件 |
| 撰寫工程設計文件 (含測試策略部分) |
| 編寫測試、執行測試、自動修正失敗的測試 (最多嘗試 3 次) |
| Google 官方技能:如何正確使用 Gemini API |
| 如果官方技能無法使用,可改用較簡單的備份方式 |
| 視覺風格參考資料 |
舉例來說,在 MVP(步驟 9) 之後,您可以使用 y2k-dreamcore 等技能,潤飾使用者體驗,如下所示:
✅ 檢查點:檔案清單會顯示新的 .agent/skills/ 資料夾,其中包含 skills-garden/ 和 gemini-skills/。
4. 規格講座
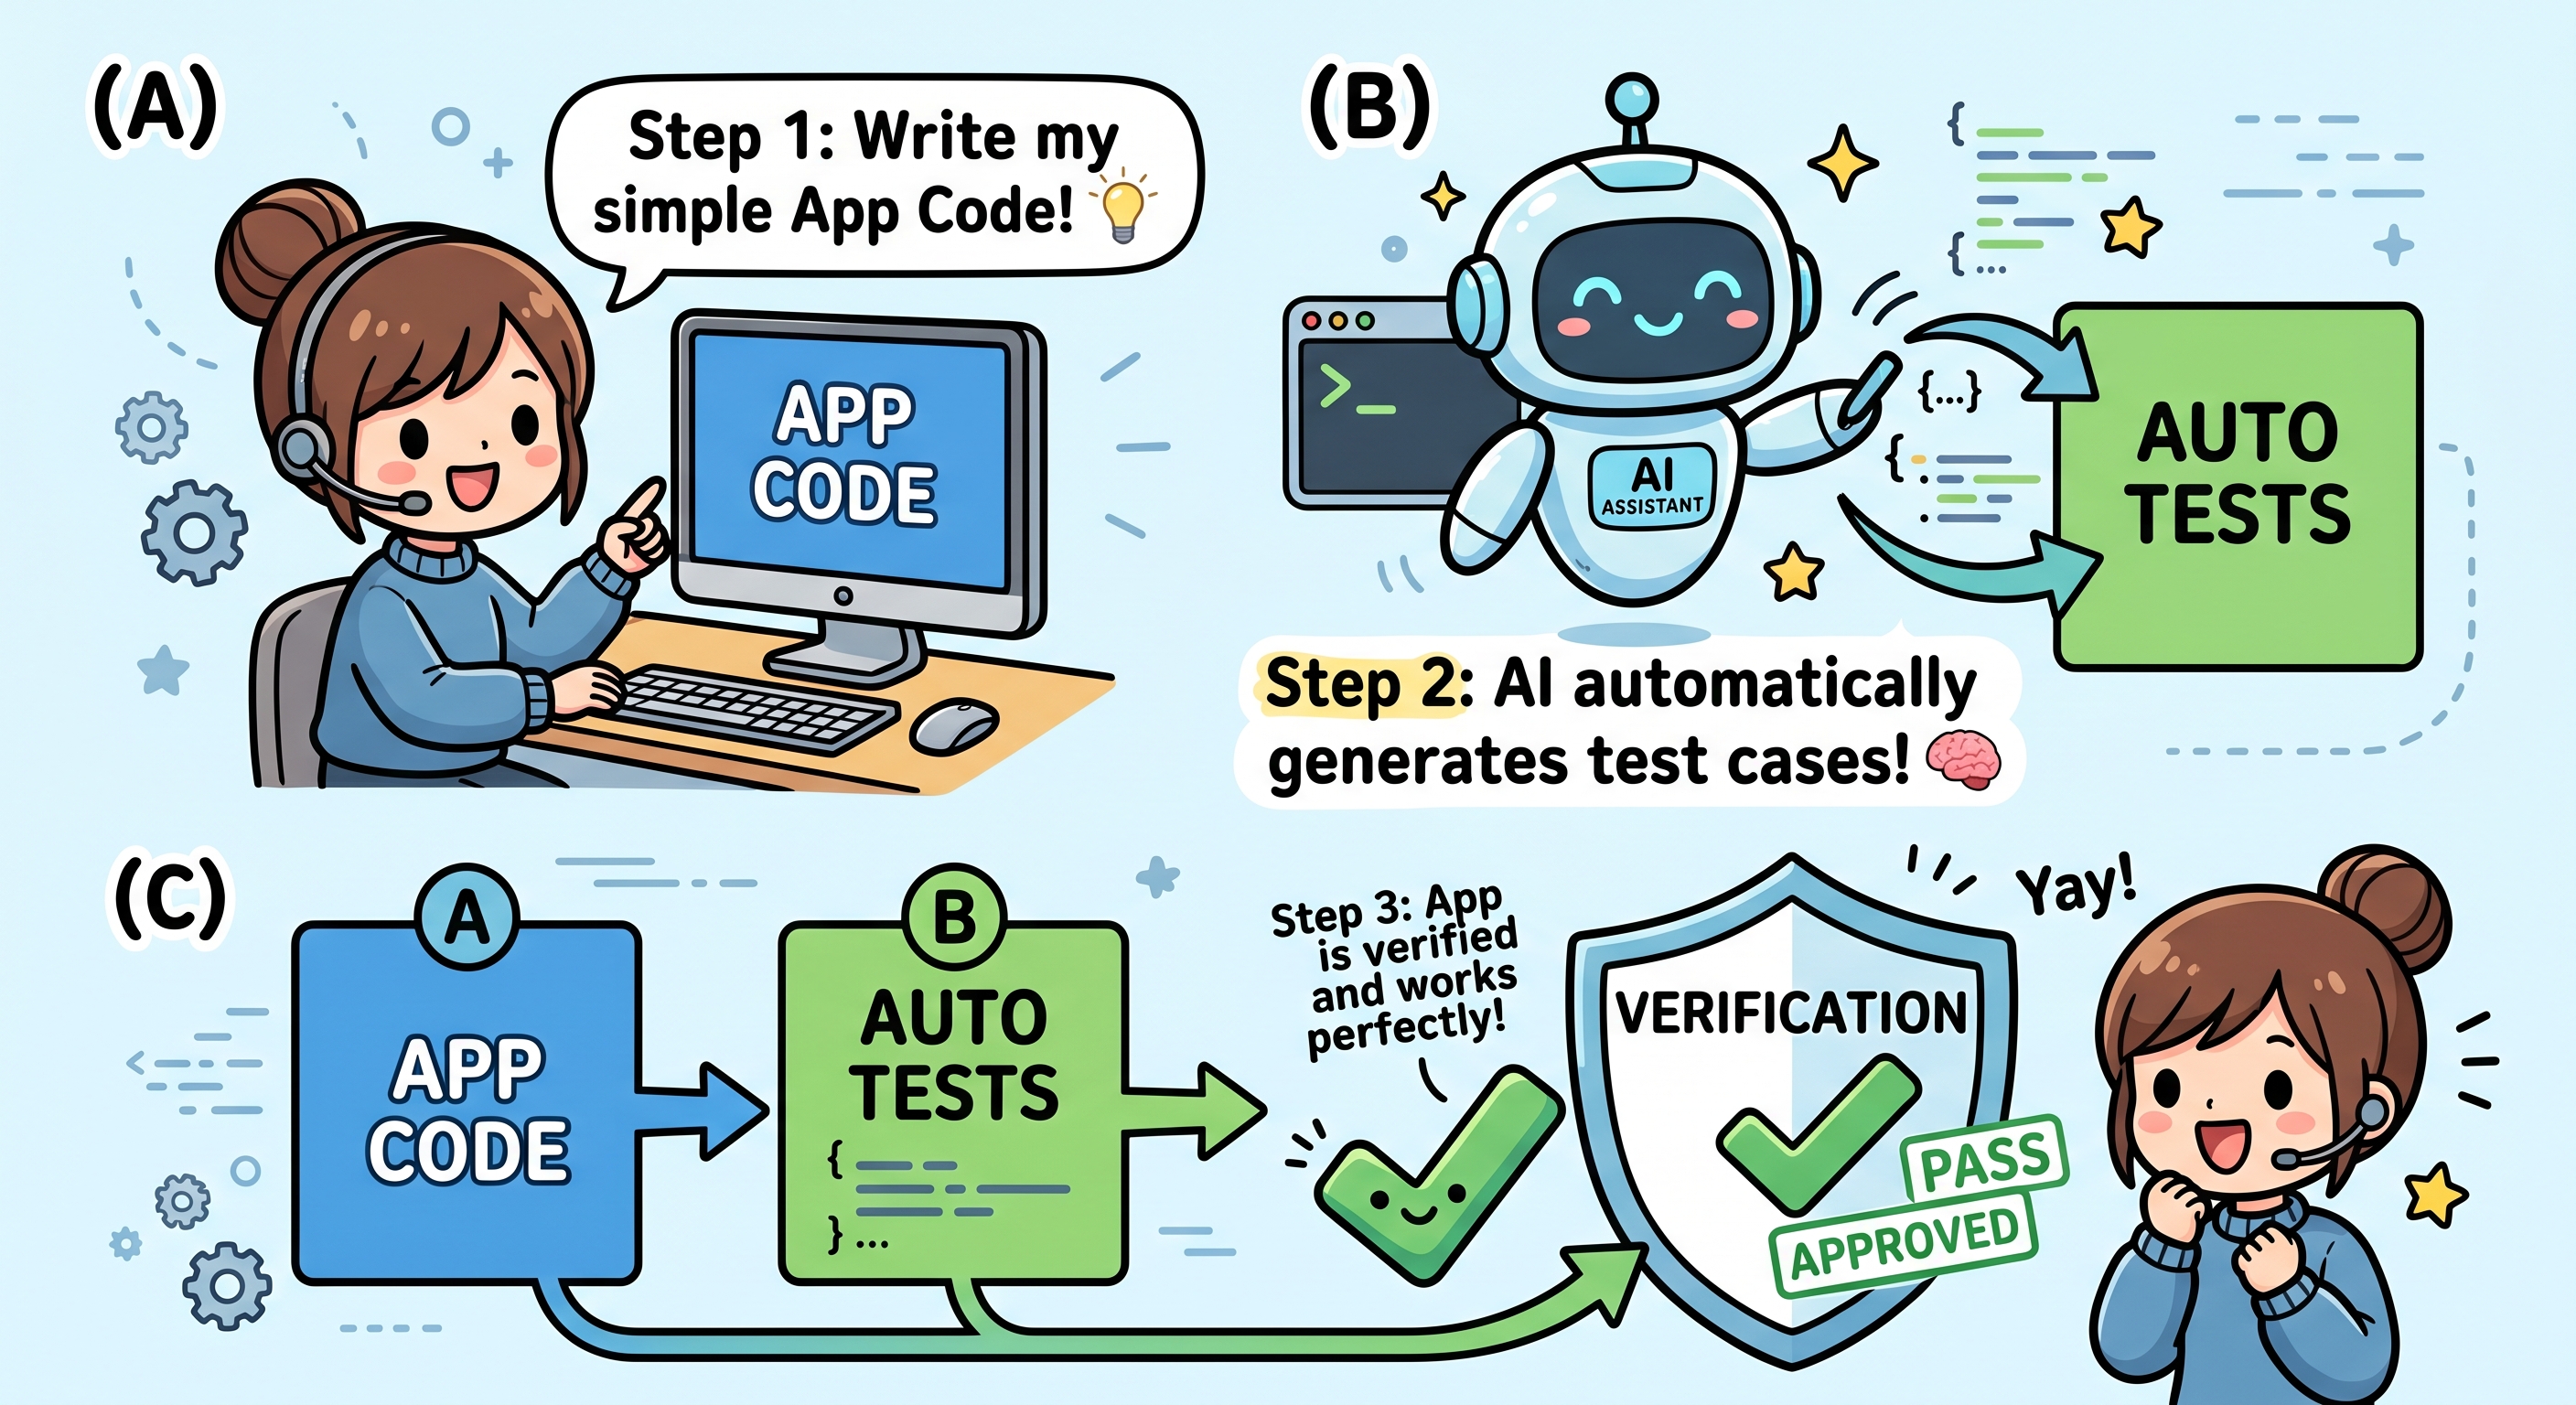
規格對話:在 2 分鐘的對話中,告訴 AI 你想建構的內容。沒有程式碼、沒有文件,目前還沒有任何建構內容。我們只是討論一下。
一個必填問題
AI 最需要知道的事項:
「輸入內容是什麼?輸出內容是什麼?」
🎯 模型:Gemini 3 Flash (預設) - 簡單的問答。
📝 貼上以下內容:
Here's what's in @BRIEF.md. Before we lock the spec, ask me 3 short
questions to refine it:
1. What's the one input I want the user to provide?
2. What's the magical moment for the user?
3. What are we deliberately NOT building (to keep scope tight)?

DO NOT generate any plans, docs, or code yet. Just ask me the questions
and wait for my answers.

DO NOT NEED TO WRITE implementation plan.
🤖 與 AI 對話並調整行程
還不要生成文件
在 Spec Talk 結束時,代理程式不應產生任何檔案。如果看到 product.md 或其他新檔案,請告知代理程式:「停止,刪除你剛建立的所有文件。我們仍處於規格討論階段。」
提示
✅ 檢查點:你已與 Antigravity 簡短對話,討論產品構想,且 Antigravity 瞭解輸入內容和輸出內容。尚未產生任何檔案。
5. 生成 3 份設計文件
現在,AI 會先在紙上寫下三種方案,再開始編寫程式碼。我們會在一個提示中完成這三項作業,依序使用三項設計文件技能。

3 份文件
檔案 | 內容 | 使用的技能 |
product.md | 使用者是誰、我們要解決的問題、需要哪些功能 |
|
ui.md | 畫面外觀、顏色、字型、版面配置 |
|
engineering.md | 技術堆疊、檔案結構、+ 測試策略部分 |
|
步驟 1:一次生成所有三份文件
🤖 切換至 Gemini 3.1 Pro (低思考量) (建議)
📝 貼上這個提示,一次完成三項作業:
Apply all three design-doc skills in this order:

1. pm-design-doc from .agent/skills/skills-garden/design-doc-skills/pm-design-doc/
   → Generates product.md

2. ux-design-doc from .agent/skills/skills-garden/design-doc-skills/ux-design-doc/
   → Generates ui.md (based on the product.md you just created)

3. eng-design-doc from .agent/skills/skills-garden/design-doc-skills/eng-design-doc/
   → Generates engineering.md (based on product.md, ui.md, and @BRIEF.md)
   → MUST include a "Testing strategy" section with real content
     (specific functions to unit-test, one integration test per major flow,
     and what's deliberately NOT being tested)

Use the patterns in @reference/ as guidance for the engineering doc
(but vary if the brief justifies it).

Save all three files in the project root. After each one is saved,
briefly confirm what you saved before moving to the next.

When all three are done, give me a final summary listing the section
titles in each file.

DO NOT NEED TO WRITE implementation plan. ONLY show me all three generated files and a final summary
步驟 2:確認檔案已儲存
👉 查看檔案清單。現在您應該會看到 (除了先前的內容外):
codingjam-week-1/
├── product.md          ← NEW
├── ui.md               ← NEW
├── engineering.md      ← NEW
├── BRIEF.md
├── reference/
└── .agent/
步驟 3 - 檢查及反覆調整
您是老闆,AI 撰寫了這份計畫。現在請閱讀並要求變更。
最重要的習慣
如要變更,請變更 DOC,而非程式碼。請以該文件為準。
🤖 閱讀並審查所有三份文件
👉 在檔案清單 (左側面板) 中,按一下檔案名稱 (product.md)。
右側面板會顯示文件預覽畫面。
步驟 2 - 閱讀及加上註解 (Google 文件風格)
👉 預覽每份文件時,請從上到下閱讀,並問自己:
product.md- 這是否符合我的需求?ui.md- 螢幕和外觀是否正確?engineering.md- Does the Testing strategy make sense? (您不需要瞭解技術,只要確認有計畫即可)。
🤖 代理程式套用註解並正確讀取文件後,請前往下一節。
6. 導入 + 測試
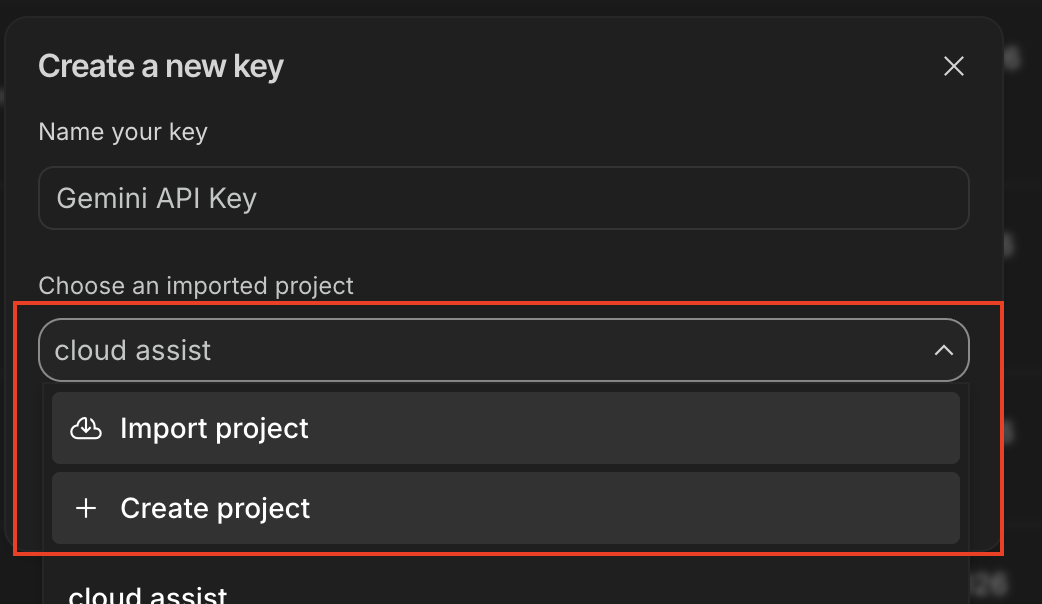
本程式碼研究室的最大部分。AI 會採用這三份文件並建構應用程式,一次完成程式碼和測試。本節結束時,您將擁有可運作的程式碼集,並通過自己的測試。
為何要同時提供程式碼和測試?
您的 engineering.md 已指定應進行哪些測試 (「測試策略」一節)。通過這些測試後,才算完成導入。因此我們在一個階段中完成這兩項作業。
🤖 切換至 Gemini 3.1 Pro With High Thinking (建議)
步驟 1:要求 AI 建構程式碼和測試
📝 貼上以下內容:
You're going to do two things in one shot.

PART 1 — IMPLEMENT THE APP CODE
- Build it according to @engineering.md (stack, file structure)
- Match the UI described in @ui.md
- Use the patterns in @reference/ as guidance for code style
- Backend: use Python with `uv` for dependency management
- If your chosen stack requires Node.js and it isn't installed on my
  system, install it via Antigravity (use brew/winget/apt) — ask
  permission first
- DO NOT start any dev servers — that's a later section

PART 2 — APPLY THE TEST-GATE SKILL
After the code is written, apply the test-driven-dev skill from
.agent/skills/skills-garden/eng-skills/test-driven-dev.md.

Use the "Testing strategy" section in @engineering.md as the test plan.

IMPORTANT: Mock the Gemini API calls in tests — use a stub that returns
fake response data. The real API key isn't set up yet, and tests should
be deterministic and free anyway (best practice).

The skill should:
1. Write the tests described in the Testing strategy
2. Run them (use pytest for Python, Vitest or Jest for JS)
3. If any fail, fix the CODE (not the tests) and re-run
4. Up to 3 retry attempts max
5. If still failing after 3 tries, STOP and tell me what's broken

When Antigravity asks permission to run commands (uv sync, uv pip
install, pytest, etc.), click Allow.

Report results when both parts are done.
🤖 按一下「允許彈出式視窗」(多次)
步驟 2:閱讀最終報告
完成後,請檢查以下項目:
- ✅ 含有程式碼的
backend/資料夾 - ✅ 含有程式碼的
frontend/資料夾 - ✅ 存在含有測試檔案的
tests/資料夾 - ✅ 摘要顯示「所有測試皆通過」(而非「3 次重試後失敗」)
- ✅ 代理程式「未」啟動任何伺服器
如果 3 次測試重試都失敗,該怎麼辦?
極少發生,但有可能。這通常表示工程文件的測試策略不切實際,無法用於建構的內容。
📝 貼上以下內容:
The auto-fix loop hit the 3-try cap. Pull up @engineering.md and look
at the Testing strategy section. Is the strategy realistic for what
got built? Suggest updates to the doc so the tests align with reality.
Don't change the code yet — update the doc, then re-apply the
test-driven-dev skill.
如果內容看起來不太對勁?
👉 如果 AI 建立的內容與文件不符,請返回文件,不要單獨要求 AI「修正程式碼」。
範例:
I see you built the chat as a popup, but @ui.md says it should be a
full page. Either update ui.md if a popup is actually better, OR
rebuild the chat as a full page to match the current ui.md.
請務必以文件為準。
✅ 檢查點:程式碼存在、測試存在、測試通過。準備設定 API 金鑰。
7. 設定 Google Cloud + API 金鑰
步驟 1:從 AI Studio 取得 Gemini API 金鑰 (1 分鐘)
- 在新瀏覽器分頁中開啟 https://aistudio.google.com/app/apikey。
- 使用同一個 Google 帳戶登入。
- 按一下右上方的「Create API key」(建立 API 金鑰)。
- 對話方塊隨即開啟,並顯示專案下拉式選單:
- 如果您先前已建立 Google 專案,可以選取該專案,然後按一下「在現有專案中建立 API 金鑰」
- 如果不在清單中:按一下「建立專案」。
- 複製顯示的 API 金鑰。開頭為
AIza...,最多 40 個字元。
✏️ 將這段文字貼到安全的地方,稍後會提供給 Antigravity。
步驟 2 - 告訴 Antigravity 設定 .env (30 秒)
返回 Antigravity,開啟對話。
📝 提示貼上 (取代
⚠️ PASTE_...
標記!
Apply the gemini-api-dev skill from .agent/skills/gemini-skills/skills/gemini-api-dev/.
(If that skill isn't found, fall back to .agent/skills/skills-garden/eng-skills/gemini-api.md)

Create a .env file in the backend folder with these settings:
- GEMINI_API_KEY= ⚠️ PASTE_YOUR_API_KEY_HERE
- Any other env vars the app needs based on @engineering.md

Also verify:
- .env is in .gitignore so the key never gets committed
- The backend code reads GEMINI_API_KEY at startup
- The Gemini SDK is initialized correctly (use google-genai for Python)

When Antigravity asks permission to install Python packages, click Allow.
When done, show me the .env contents with the KEY redacted (just first 6 chars + ...).
🤖 預期行為:代理建立 .env、安裝 google-genai (您按一下「允許」),並使用經過編輯的金鑰確認:
✅ .env created at backend/.env
GEMINI_API_KEY=AIzaSy... (40 chars, redacted)

.env is already in .gitignore ✓
Backend reads GEMINI_API_KEY via os.getenv() ✓
Gemini client initialized ✓
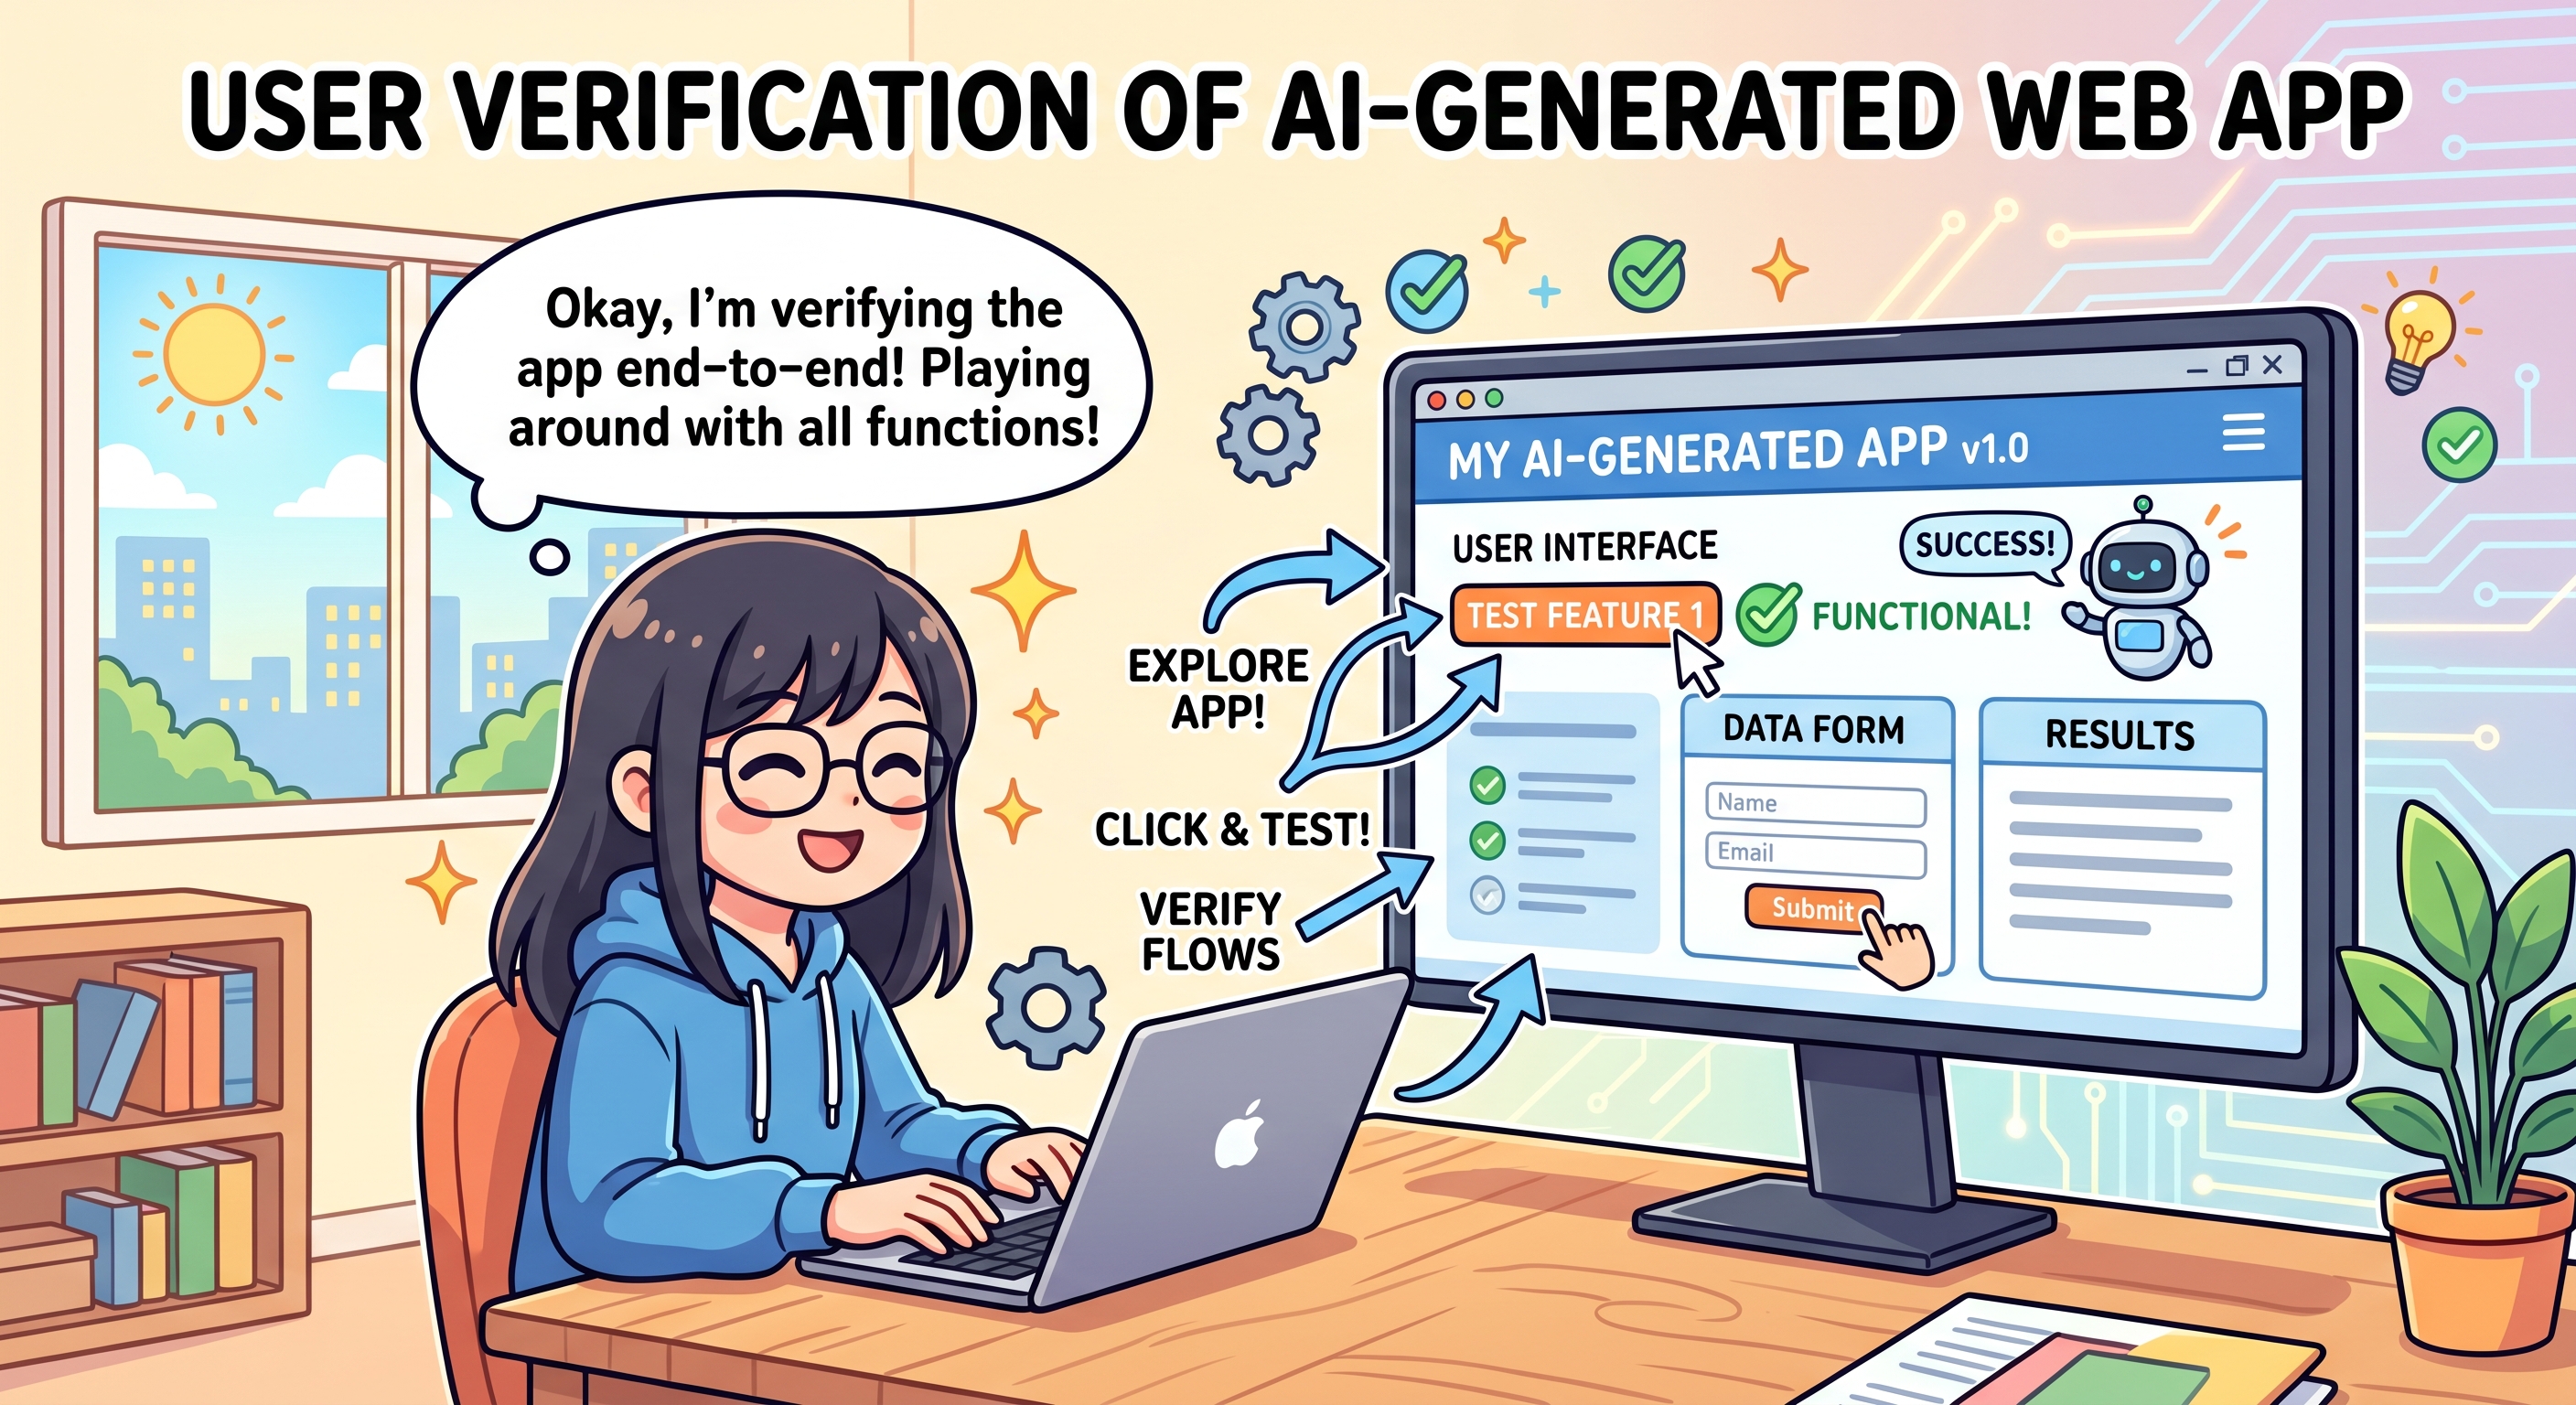
8. 預覽及驗證
建構程式碼。測試通過。已設定 API 金鑰,現在開啟應用程式並隨意點選。
人類發現的內容 (測試未偵測到)
測試捕捉 | Humans Catch |
傳回值錯誤 | 難看的顏色 |
函式呼叫錯誤 | 令人困惑的文案 |
缺少匯入項目 | 按鈕出現在奇怪的位置 |
差一錯誤 | 動畫感覺不流暢 |
邏輯錯誤 | 音樂風格已關閉 |
步驟 1:要求 Antigravity 啟動開發伺服器
🎯 模型:預設 (Flash) 即可。
📝 貼上以下內容:
Please start the dev server(s) so I can preview the app in my browser.
Tell me the URL when it's ready. When Antigravity asks permission to
run the server command, I'll click Allow.
🔔 彈出式視窗:uv run uvicorn main:app --reload (或類似圖示) → 按一下「允許」
步驟 2:開啟預覽網址
🤖 服務專員回報:
Backend running at: http://localhost:8000
Frontend served at: http://localhost:8000 (backend serves it)
網址通常是 http://localhost:8000 或 http://localhost:5173。
👉 點選即時通訊中的網址,或複製並貼到新的瀏覽器分頁。
步驟 3:隨處點選
像一般使用者一樣使用:
- 按一下每個按鈕
- 輸入內容
- 將游標懸停在項目上
- 從頭到尾測試主要流程
如果一切看起來和感覺都沒問題,請跳至
步驟 4:撰寫 README
下方。否則,請先點選各處,並向 Antigravity 回報任何問題,再撰寫 README。
步驟 4:撰寫 README
應用程式運作正常後,請鎖定:
📝 貼上以下內容:
The app works! Please create a README.md in the project root that explains:
- What this app does (in plain English)
- How to install it on a new machine (uv sync, etc.)
- How to run the dev server(s)
- The 3 design docs (@product.md, @ui.md, @engineering.md) are the
  source of truth — anyone can read them to understand the system

Save it as README.md.
🤖 預期: 檔案清單中會顯示 README.md。
README 的重要性
✅ 檢查點:您已點選應用程式各處,修正所有問題 (如有),並儲存 README。
9. 🎉 您已推出 MVP!
您做到了!
您建構的內容
- ✅ AI 輔助網頁應用程式
- ✅ 三份設計文件 (
product.md、ui.md、engineering.md) - ✅ 每次變更程式碼時執行的實際測試套件
- ✅
README.md,方便你隨時返回這個頁面 - ✅ 連結至 Google 的 Gemini AI
您從構想階段一路走到可運作的應用程式,完全不必自己編寫任何程式碼。太厲害了。
您學到的內容
Skill | 重要性 |
規格 → 程式碼 + 測試 → 驗證 | 先規劃。共同建構程式碼和測試。點選最後一輪。順序一律如此。 |
修正文件,而非程式碼 | 如果某個項目不符合需求,請變更計畫並重新建構。不要修補。 |
測試是安全閘道 | 內建於實作程序中,AI 會在您發現之前,先找出愚蠢的錯誤。 |
迴歸規則 | 每個人為發現的錯誤都會成為一項測試。這個錯誤絕不會再發生。 |
以文件為基礎的樞紐分析表 | 方向改變時,只要變更文件,AI 就會處理其餘事項。 |
Antigravity 3 層流程 | 以英文輸入指令 → 代理程式選取指令 → 你核准。 |
下週會回來嗎?
- 從 8 週表格中選取其他列
- 透過 Antigravity 的「Clone Repository」按鈕,複製當週的存放區
- 技能會為每個工作區重新安裝 (工作區範圍 = 無剩餘狀態)
- 您可以重複使用同一個 Google Cloud 專案
- 其他部分則與您剛學到的工作流程相同
後續步驟
- 發布專案:在 Coding Jam 網站發布專案!
- 在家中建構:這三份文件可攜帶,在任何 AI 工具中開啟,繼續建構
- 帶一位朋友:透過這個程式碼研究室與新朋友配對。教學是學習最快的方法