
1. 總覽
開始之前,雖然不是完全必要,但瞭解下列功能和概念,對本程式碼研究室很有幫助。
課程內容
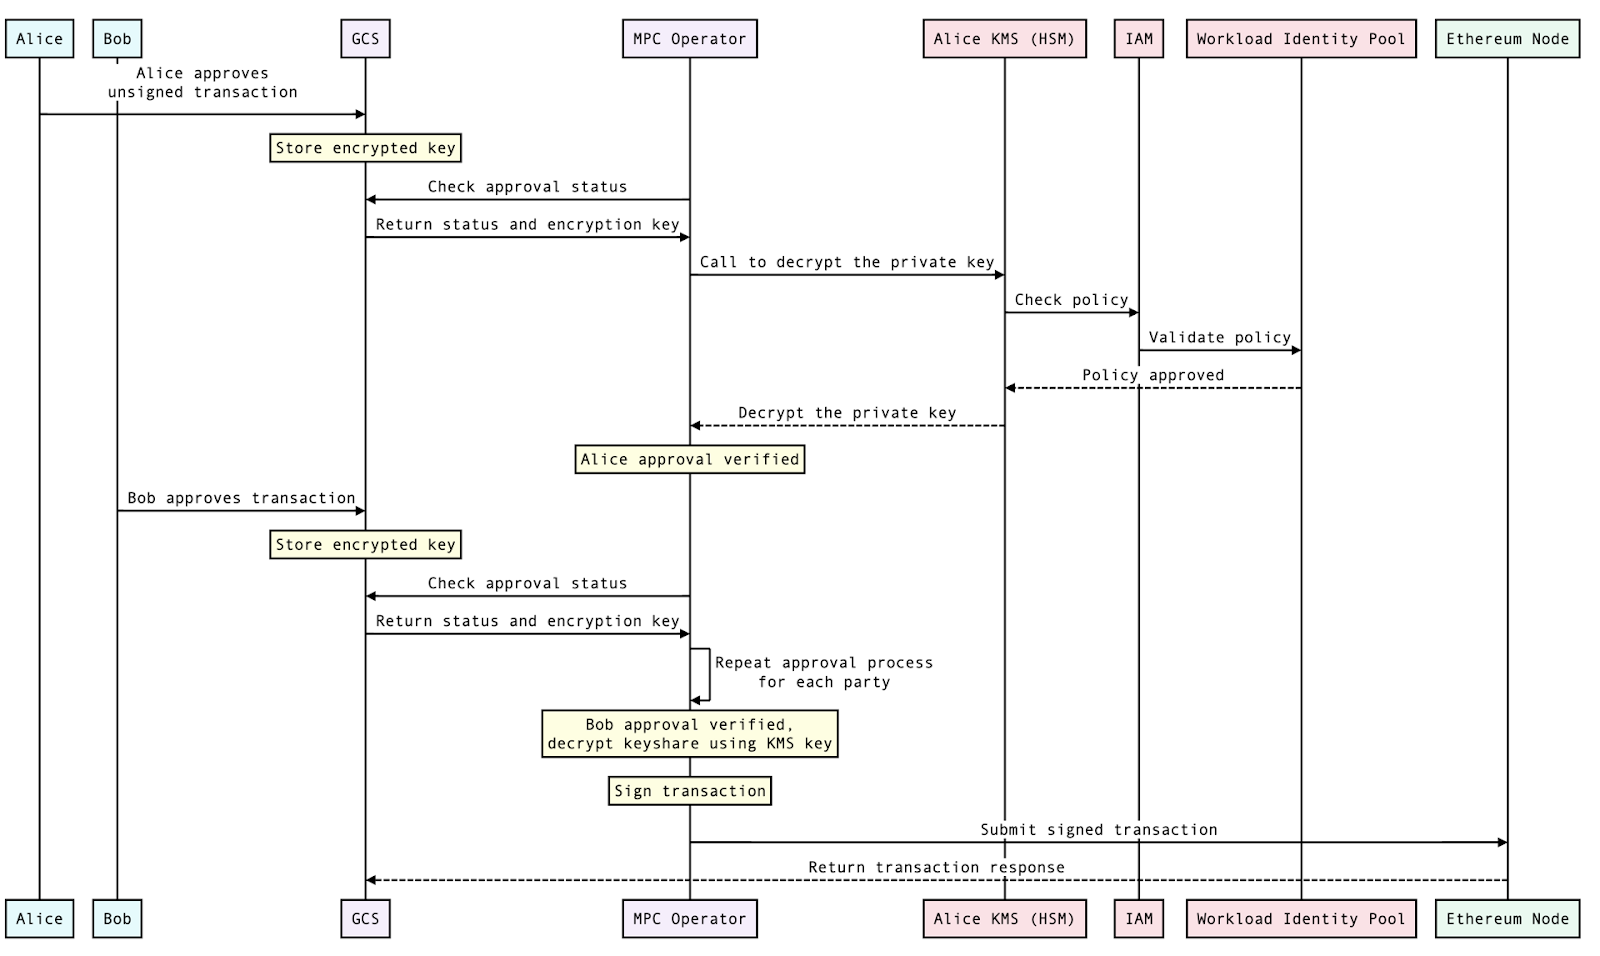
本實驗室提供參考實作項目,說明如何使用 Confidential Space 執行符合 MPC 規範的區塊鏈簽署作業。為說明這些概念,我們將逐步介紹一個情境:Primus 公司想要將數位資產轉移給 Secundus 公司。在這個情境中,Primus 公司使用符合 MPC 規定的模型,也就是使用分散式金鑰共用,而非個別私密金鑰。這些金鑰共用資訊由多方持有,在本例中為 Alice 和 Bob。這種做法可為 Primus 公司帶來多項優勢,包括簡化使用者體驗、提高作業效率,以及控管私密金鑰。
為說明這項程序的基本層面,我們將詳細介紹技術設定,並逐步說明核准和簽署程序,啟動從 Primus 公司到 Secundus 公司的數位資產轉移作業。請注意,Bob 和 Alice 都是 Primus 公司的員工,因此必須核准這筆交易。
雖然這個參考實作項目會示範簽章作業,但不會涵蓋 MPC 金鑰管理的所有層面。舉例來說,我們不會討論金鑰產生作業。此外,還有其他替代和互補方法,例如使用非 Google Cloud 服務產生共同簽署,或讓共同簽署者在自己的環境中建構區塊鏈簽章,這是一種更分散式的架構。我們希望這個實驗室能激發您在 Google Cloud 上採用不同的 MPC 方法。
您將使用簡單的工作負載,透過共同簽署者金鑰材料在 Confidential Space 中簽署乙太坊交易。以太坊交易簽署程序是指使用者授權以太坊區塊鏈交易的程序。如要傳送乙太幣交易,必須使用私密金鑰簽署交易。證明您是帳戶擁有者,並授權進行交易。簽署程序如下:
- 傳送者會建立交易物件,指定收件者地址、要傳送的 ETH 數量,以及任何其他相關資料。
- 傳送者的私密金鑰用於雜湊處理交易資料。
- 然後使用私密金鑰簽署雜湊值。
- 簽章會附加至交易物件。
- 交易會向以太坊網路廣播。
當網路上的節點收到交易時,會驗證簽章,確保交易是由帳戶擁有者簽署。如果簽章有效,節點就會將交易新增至區塊鏈。
首先,請設定必要的 Cloud 資源。接著,您會在 Confidential Space 中執行工作負載。本程式碼研究室會逐步引導您完成下列高階步驟:
- 如何設定執行 Confidential Space 時所需的 Cloud 資源
- 如何根據下列屬性授權存取受保護的資源:
- 內容:工作負載容器
- 位置:Confidential Space 環境 (機密 VM 上的 Confidential Space 映像檔)
- 對象:執行工作負載的帳戶
- 如何在執行 Confidential Space VM 映像檔的機密 VM 中執行工作負載
必要 API
您必須在指定專案中啟用下列 API,才能完成本指南。
API 名稱 | API 標題 |
cloudkms.googleapis.com | Cloud KMS |
compute.googleapis.com | Compute Engine |
confidentialcomputing.googleapis.com | 機密運算 |
iamcredentials.googleapis.com | IAM |
artifactregistry.googleapis.com | Artifact Registry |
2. 設定雲端資源
事前準備
- 使用下列指令複製 這個存放區,取得本程式碼研究室所需的指令碼。
git clone https://github.com/GoogleCloudPlatform/confidential-space.git
- 變更本程式碼研究室的目錄。
cd confidential-space/codelabs/digital_asset_transaction_codelab/scripts
- 請確認您已設定必要的專案環境變數,如下所示。如要進一步瞭解如何設定 GCP 專案,請參閱 這個程式碼研究室。如要瞭解如何擷取專案 ID,以及專案 ID 與專案名稱和專案編號有何不同,請參閱這篇文章。。
export PRIMUS_PROJECT_ID=<GCP project id>
- 為專案啟用帳單。
- 為兩個專案啟用 Confidential Computing API 和下列 API。
gcloud services enable \
   cloudapis.googleapis.com \
    cloudkms.googleapis.com \
    cloudresourcemanager.googleapis.com \
    cloudshell.googleapis.com \
    container.googleapis.com \
    containerregistry.googleapis.com \
    iam.googleapis.com \
    confidentialcomputing.googleapis.com
- 如要設定資源名稱的變數,可以使用下列指令。請注意,這會覆寫公司 A 的 GCP 專案專屬資源名稱,例如
export PRIMUS_INPUT_STORAGE_BUCKET='primus-input-bucket' - 您可以在 A 公司中為 GCP 專案設定下列變數:
$PRIMUS_INPUT_STORAGE_BUCKET | 儲存加密金鑰的 bucket。 |
$PRIMUS_RESULT_STORAGE_BUCKET | 儲存 MPC 交易結果的 bucket。 |
$PRIMUS_KEY | 用於加密 Primus Bank 的 $PRIMUS_INPUT_STORAGE_BUCKET 中所儲存資料的 KMS 金鑰。 |
$PRIMUS_KEYRING | 這個 KMS 金鑰環將用於為 Primus Bank 建立加密金鑰 $PRIMUS_KEY。 |
$PRIMUS_WIP_PROVIDER | Workload Identity Pool 提供者,其中包含用於 MPC 工作負載服務簽署權杖的屬性條件。 |
$PRIMUS_SERVICEACCOUNT | $PRIMUS_WORKLOAD_IDENTITY_POOL 用來存取受保護資源的服務帳戶。這個服務帳戶將有權查看儲存在 $PRIMUS_INPUT_STORAGE_BUCKET 值區中的加密金鑰。 |
$PRIMUS_ARTIFACT_REPOSITORY | 用於儲存工作負載容器映像檔的構件存放區。 |
$WORKLOAD_SERVICEACCOUNT | 有權存取執行工作負載的 Confidential VM 的服務帳戶。 |
$WORKLOAD_CONTAINER | 執行工作負載的 Docker 容器。 |
$WORKLOAD_IMAGE_NAME | 工作負載容器映像檔的名稱。 |
$WORKLOAD_IMAGE_TAG | 工作負載容器映像檔的標記。 |
- 執行下列指令碼,根據資源名稱的專案 ID,將其餘變數名稱設為值。
source config_env.sh
設定 Cloud 資源
在這個步驟中,您將設定多方運算所需的雲端資源。在本實驗室中,您將使用下列私密金鑰:0000000000000000000000000000000000000000000000000000000000000001
在正式環境中,您將自行產生私密金鑰。不過,在本實驗室中,我們會將這個私密金鑰分成兩份,並分別加密。在實際工作環境中,絕不應將金鑰儲存在純文字檔案中。私密金鑰可以改為在 Google Cloud 外部產生 (或完全略過,並替換為自訂 MPC 金鑰分片建立作業),然後加密,確保無人能存取私密金鑰或金鑰分片。在本實驗室中,我們將使用 Gcloud CLI。
執行下列指令碼,設定必要的雲端資源。在這些步驟中,系統會建立下列資源:
- Cloud Storage bucket (
$PRIMUS_INPUT_STORAGE_BUCKET),用於儲存加密的私密金鑰共用內容。 - Cloud Storage bucket (
$PRIMUS_RESULT_STORAGE_BUCKET),用於儲存數位資產交易結果。 - KMS 中的加密金鑰 (
$PRIMUS_KEY) 和金鑰環 ($PRIMUS_KEYRING),用於加密私密金鑰共用內容。 - Workload identity pool (
$PRIMUS_WORKLOAD_IDENTITY_POOL):根據提供者設定的屬性條件驗證聲明。 - 附加至上述 workload identity pool (
$PRIMUS_WORKLOAD_IDENTITY_POOL) 的服務帳戶 ($PRIMUS_SERVICEACCOUNT),並具備下列 IAM 存取權: roles/cloudkms.cryptoKeyDecrypter,使用 KMS 金鑰解密資料。objectViewer,從 Cloud Storage 值區讀取資料。roles/iam.workloadIdentityUser,將這個服務帳戶連結至工作負載身分集區。
./setup_resources.sh
3. 建立工作負載
建立工作負載服務帳戶
現在要為工作負載建立具備必要角色和權限的服務帳戶。如要這麼做,請執行下列指令碼,為 A 公司建立工作負載服務帳戶。執行工作負載的 VM 會使用這個服務帳戶。
工作負載服務帳戶 ($WORKLOAD_SERVICEACCOUNT) 將具備下列角色:
confidentialcomputing.workloadUser取得認證權杖logging.logWriter,將記錄檔寫入 Cloud Logging。objectViewer,從$PRIMUS_INPUT_STORAGE_BUCKETCloud Storage 值區讀取資料。objectUser,將工作負載結果寫入$PRIMUS_RESULT_STORAGE_BUCKETCloud Storage bucket。
./create_workload_service_account.sh
建立工作負載
這個步驟包括建立工作負載 Docker 映像檔。本程式碼研究室中的工作負載是簡單的 Node.js MPC 應用程式,可使用加密的私密金鑰共用內容,簽署資產轉移的數位交易。這裡是工作負載專案程式碼。工作負載專案包含下列檔案。
package.json:這個檔案包含應為工作負載 MPC 應用程式使用的套件清單。在本例中,我們使用 @google-cloud/kms、@google-cloud/storage、ethers 和 fast-crc32c 程式庫。這裡是我們在本程式碼研究室中使用的 package.json 檔案。
index.js:這是工作負載應用程式的進入點,可指定工作負載容器啟動時應執行的指令。此外,我們也提供未簽署的交易範例,這類交易通常是由要求使用者簽署的不受信任應用程式提供。這個 index.js 檔案也會從 mpc.js 匯入函式,我們接下來會建立這個檔案。以下是 index.js 檔案的內容,您也可以在這裡找到。
import {signTransaction, submitTransaction, uploadFromMemory} from './mpc.js';

const signAndSubmitTransaction = async () => {
  try {
    // Create the unsigned transaction object
    const unsignedTransaction = {
      nonce: 0,
      gasLimit: 21000,
      gasPrice: '0x09184e72a000',
      to: '0x0000000000000000000000000000000000000000',
      value: '0x00',
      data: '0x',
    };

    // Sign the transaction
    const signedTransaction = await signTransaction(unsignedTransaction);

    // Submit the transaction to Ganache
    const transaction = await submitTransaction(signedTransaction);

    // Write the transaction receipt
    uploadFromMemory(transaction);

    return transaction;
  } catch (e) {
    console.log(e);
    uploadFromMemory(e);
  }
};

await signAndSubmitTransaction();
mpc.js:交易簽署程序會在此進行。這個檔案會從 kms-decrypt 和 credential-config 匯入函式,我們會在下一個步驟中說明。以下是 mpc.js 檔案的內容,您也可以在這裡找到。
import {Storage} from '@google-cloud/storage';
import {ethers} from 'ethers';

import {credentialConfig} from './credential-config.js';
import {decryptSymmetric} from './kms-decrypt.js';

const providers = ethers.providers;
const Wallet = ethers.Wallet;

// The ID of the GCS bucket holding the encrypted keys
const bucketName = process.env.KEY_BUCKET;

// Name of the encrypted key files.
const encryptedKeyFile1 = 'alice_encrypted_key_share';
const encryptedKeyFile2 = 'bob_encrypted_key_share';

// Create a new storage client with the credentials
const storageWithCreds = new Storage({
  credentials: credentialConfig,
});

// Create a new storage client without the credentials
const storage = new Storage();

const downloadIntoMemory = async (keyFile) => {
  // Downloads the file into a buffer in memory.
  const contents =
      await storageWithCreds.bucket(bucketName).file(keyFile).download();

  return contents;
};

const provider =
    new providers.JsonRpcProvider(`http://${process.env.NODE_URL}:80`);

export const signTransaction = async (unsignedTransaction) => {
  /* Check if Alice and Bob have both approved the transaction
  For this example, we're checking if their encrypted keys are available. */
  const encryptedKey1 =
      await downloadIntoMemory(encryptedKeyFile1).catch(console.error);
  const encryptedKey2 =
      await downloadIntoMemory(encryptedKeyFile2).catch(console.error);

  // For each key share, make a call to KMS to decrypt the key
  const privateKeyshare1 = await decryptSymmetric(encryptedKey1[0]);
  const privateKeyshare2 = await decryptSymmetric(encryptedKey2[0]);

  /* Perform the MPC calculations
  In this example, we're combining the private key shares
  Alternatively, you could import your mpc calculations here */
  const wallet = new Wallet(privateKeyshare1 + privateKeyshare2);

  // Sign the transaction
  const signedTransaction = await wallet.signTransaction(unsignedTransaction);

  return signedTransaction;
};

export const submitTransaction = async (signedTransaction) => {
  // This can now be sent to Ganache
  const hash = await provider.sendTransaction(signedTransaction);
  return hash;
};

export const uploadFromMemory = async (contents) => {
  // Upload the results to the bucket without service account impersonation
  await storage.bucket(process.env.RESULTS_BUCKET)
      .file('transaction_receipt_' + Date.now())
      .save(JSON.stringify(contents));
};
kms-decrypt.js:這個檔案包含使用 KMS 管理的金鑰進行解密的程式碼。以下是 kms-decrypt.js 檔案的內容,您也可以按這裡查看。
import {KeyManagementServiceClient} from '@google-cloud/kms';
import crc32c from 'fast-crc32c';

import {credentialConfig} from './credential-config.js';

const projectId = process.env.PRIMUS_PROJECT_ID;
const locationId = process.env.PRIMUS_LOCATION;
const keyRingId = process.env.PRIMUS_ENC_KEYRING;
const keyId = process.env.PRIMUS_ENC_KEY;

// Instantiates a client
const client = new KeyManagementServiceClient({
  credentials: credentialConfig,
});

// Build the key name
const keyName = client.cryptoKeyPath(projectId, locationId, keyRingId, keyId);

export const decryptSymmetric = async (ciphertext) => {
  const ciphertextCrc32c = crc32c.calculate(ciphertext);
  const [decryptResponse] = await client.decrypt({
    name: keyName,
    ciphertext,
    ciphertextCrc32c: {
      value: ciphertextCrc32c,
    },
  });

  // Optional, but recommended: perform integrity verification on
  // decryptResponse. For more details on ensuring E2E in-transit integrity to
  // and from Cloud KMS visit:
  // https://cloud.google.com/kms/docs/data-integrity-guidelines
  if (crc32c.calculate(decryptResponse.plaintext) !==
      Number(decryptResponse.plaintextCrc32c.value)) {
    throw new Error('Decrypt: response corrupted in-transit');
  }

  const plaintext = decryptResponse.plaintext.toString();

  return plaintext;
};
credential-config.js:這個檔案會儲存工作負載身分池路徑,以及服務帳戶模擬的詳細資料。這裡是我們將在本程式碼研究室中使用的 credential-config.js 檔案。
Dockerfile:最後,我們會建立 Dockerfile,用於建構工作負載 Docker 映像檔。定義 Dockerfile,如這裡所述。
FROM node:16.18.0

ENV NODE_ENV=production

WORKDIR /app

COPY ["package.json", "package-lock.json*", "./"]

RUN npm install --production

COPY . .

LABEL "tee.launch_policy.allow_cmd_override"="true"
LABEL "tee.launch_policy.allow_env_override"="NODE_URL,RESULTS_BUCKET,KEY_BUCKET,PRIMUS_PROJECT_NUMBER,PRIMUS_PROJECT_ID,PRIMUS_WORKLOAD_IDENTITY_POOL,PRIMUS_WIP_PROVIDER,PRIMUS_SERVICEACCOUNT,PRIMUS_ENC_KEYRING,PRIMUS_ENC_KEY"

CMD [ "node", "index.js" ]
注意:Dockerfile 中的 LABEL "tee.launch_policy.allow_cmd_override"="true" 是映像檔作者設定的啟動政策。這項功能可讓運算子在執行工作負載時覆寫 CMD。根據預設,allow_cmd_override 會設為 false。「tee.launch_policy.allow_env_override」標籤會告知 Confidential Space,映像檔使用者可使用的環境變數。
執行下列指令碼,建立工作負載,其中會執行下列步驟:
- 建立 Artifact Registry(
$PRIMUS_ARTIFACT_REPOSITORY),用於儲存工作負載 Docker 映像檔。 - 使用必要資源名稱更新工作負載程式碼。這裡是本程式碼研究室使用的工作負載程式碼。
- 建立 Dockerfile,用於建構工作負載程式碼的 Docker 映像檔。您可以在這裡找到 Dockerfile。
- 建構 Docker 映像檔,並發布至上一步建立的 Artifact Registry (
$PRIMUS_ARTIFACT_REPOSITORY)。 - 授予
$WORKLOAD_SERVICEACCOUNT的讀取權限給$PRIMUS_ARTIFACT_REPOSITORY。這是必要步驟,工作負載容器才能從 Artifact Registry 提取工作負載 Docker 映像檔。
./create_workload.sh
建立區塊鏈節點
Ganache 以太坊節點
授權工作負載前,我們需要建立 Ethereum Ganache 執行個體。簽署的交易會提交至這個 Ganache 執行個體。請記下這個執行個體的 IP 位址。執行下列指令後,您可能需要輸入 y 來啟用 API。
gcloud compute instances create-with-container ${ETHEREUM_NODE} \
  --zone=${PRIMUS_PROJECT_ZONE} \
  --tags=http-server \
  --project=${PRIMUS_PROJECT_ID} \
  --shielded-secure-boot \
  --shielded-vtpm \
  --shielded-integrity-monitoring \
  --container-image=docker.io/trufflesuite/ganache:v7.7.3 \
--container-arg=--wallet.accounts=\"0x0000000000000000000000000000000000000000000000000000000000000001,0x21E19E0C9BAB2400000\" \
  --container-arg=--port=80
4. 授權並執行工作負載
授權工作負載
在這個步驟中,我們會在 workload identity pool ($PRIMUS_WORKLOAD_IDENTITY_POOL) 下方設定 workload identity pool 提供者。如下所示,系統會為 workload identity 設定屬性條件。其中一項條件是驗證工作負載映像檔是否從預期的構件存放區提取。
gcloud config set project $PRIMUS_PROJECT_ID
gcloud iam workload-identity-pools providers create-oidc ${PRIMUS_WIP_PROVIDER} \
 --location="${PRIMUS_PROJECT_LOCATION}" \
 --workload-identity-pool="$PRIMUS_WORKLOAD_IDENTITY_POOL" \
 --issuer-uri="https://confidentialcomputing.googleapis.com/" \
 --allowed-audiences="https://sts.googleapis.com" \
 --attribute-mapping="google.subject='assertion.sub'" \
 --attribute-condition="assertion.swname == 'CONFIDENTIAL_SPACE' && 'STABLE' in assertion.submods.confidential_space.support_attributes && assertion.submods.container.image_reference == '${PRIMUS_PROJECT_REPOSITORY_REGION}-docker.pkg.dev/$PRIMUS_PROJECT_ID/$PRIMUS_ARTIFACT_REPOSITORY/$WORKLOAD_IMAGE_NAME:$WORKLOAD_IMAGE_TAG' && '$WORKLOAD_SERVICEACCOUNT@$PRIMUS_PROJECT_ID.iam.gserviceaccount.com' in assertion.google_service_accounts"
執行工作負載
本節說明如何在機密 VM 上執行工作負載。為此,我們會使用中繼資料標記傳遞必要的 TEE 引數。此外,我們將使用「tee-env-*」旗標,為工作負載容器設定環境變數。圖片包含下列變數:
NODE_URL:將處理已簽署交易的乙太坊節點網址。RESULTS_BUCKET:儲存 MPC 交易結果的 bucket。KEY_BUCKET:儲存 MPC 加密金鑰的 bucket。PRIMUS_PROJECT_NUMBER:用於憑證設定檔的專案編號。PRIMUS_PROJECT_ID:用於憑證設定檔的專案 ID。工作負載執行結果會發布至$PRIMUS_RESULT_STORAGE_BUCKET。PRIMUS_WORKLOAD_IDENTITY_POOL:用於驗證聲明的 Workload Identity Pool。PRIMUS_WIP_POROVIDER:Workload Identity Pool 提供者,其中包含用於驗證 workload 提供的權杖的屬性條件。WORKLOAD_SERVICEACCOUNT:工作負載的服務帳戶。
gcloud compute instances create $WORKLOAD_VM \
 --confidential-compute-type=SEV \
 --shielded-secure-boot \
 --maintenance-policy=TERMINATE \
 --scopes=cloud-platform \
 --zone=${PRIMUS_PROJECT_ZONE} \
 --project=${PRIMUS_PROJECT_ID} \
 --image-project=confidential-space-images \
 --image-family=confidential-space \
 --service-account=$WORKLOAD_SERVICEACCOUNT@$PRIMUS_PROJECT_ID.iam.gserviceaccount.com \
 --metadata "^~^tee-image-reference=${PRIMUS_PROJECT_REPOSITORY_REGION}-docker.pkg.dev/$PRIMUS_PROJECT_ID/$PRIMUS_ARTIFACT_REPOSITORY/$WORKLOAD_IMAGE_NAME:$WORKLOAD_IMAGE_TAG~tee-restart-policy=Never~tee-env-NODE_URL=$(gcloud compute instances describe ${ETHEREUM_NODE} --format='get(networkInterfaces[0].networkIP)' --zone=${PRIMUS_PROJECT_ZONE})~tee-env-RESULTS_BUCKET=$PRIMUS_RESULT_STORAGE_BUCKET~tee-env-KEY_BUCKET=$PRIMUS_INPUT_STORAGE_BUCKET~tee-env-PRIMUS_PROJECT_ID=$PRIMUS_PROJECT_ID~tee-env-PRIMUS_PROJECT_NUMBER=$(gcloud projects describe $PRIMUS_PROJECT_ID --format="value(projectNumber)")~tee-env-PRIMUS_WORKLOAD_IDENTITY_POOL=$PRIMUS_WORKLOAD_IDENTITY_POOL~tee-env-PRIMUS_PROJECT_LOCATION=${PRIMUS_PROJECT_LOCATION}~tee-env-PRIMUS_WIP_PROVIDER=$PRIMUS_WIP_PROVIDER~tee-env-PRIMUS_SERVICEACCOUNT=$PRIMUS_SERVICEACCOUNT~tee-env-PRIMUS_KEY=${PRIMUS_KEY}~tee-env-PRIMUS_KEYRING=${PRIMUS_KEYRING}"
查看 Cloud Storage 結果
您可以在 Cloud Storage 中查看交易收據。機密空間可能需要幾分鐘才能啟動並顯示結果。如果 VM 處於停止狀態,表示容器已完成。
- 前往「Cloud Storage Browser」(Cloud Storage 瀏覽器) 頁面。
- 按一下「
$PRIMUS_RESULT_STORAGE_BUCKET」。 - 按一下
transaction_receipt檔案。 - 按一下「下載」,即可下載及查看交易回應。
或者,您也可以執行下列指令來查看結果。
gcloud config set project $PRIMUS_PROJECT_ID
gsutil cat gs://$PRIMUS_RESULT_STORAGE_BUCKET/transaction_receipt
注意:如果沒有顯示結果,請前往 Compute Engine Cloud Console 頁面中的 $WORKLOAD_VM,然後按一下「Serial port 1 (console)」(序列埠 1 (控制台)) 查看記錄。
檢查 Ganache 區塊鏈交易
您也可以在區塊鏈記錄中查看交易。
- 前往 Cloud Compute Engine 頁面。
- 按一下
${ETHEREUM_NODE}VM。 - 按一下
SSH開啟「透過瀏覽器進行 SSH 連線」視窗。 - 在 SSH 視窗中輸入
sudo docker ps,即可查看執行中的 Ganache 容器。 - 找出
trufflesuite/ganache:v7.7.3的容器 ID - 輸入
sudo docker logs CONTAINER_ID,並將 CONTAINER_ID 換成trufflesuite/ganache:v7.7.3的 ID。 - 查看 Ganache 的記錄,確認記錄中列出交易。
5. 清理
這個指令碼可用於清除在本程式碼研究室中建立的資源。在這次清理作業中,系統會刪除下列資源:
- 輸入用於儲存加密金鑰共用內容的儲存空間 bucket (
$PRIMUS_INPUT_STORAGE_BUCKET). - 加密金鑰 (
$PRIMUS_KEY)。 - 用於存取受保護資源的服務帳戶 (
$PRIMUS_SERVICEACCOUNT)。 - Workload Identity Pool (
$PRIMUS_WORKLOAD_IDENTITY_POOL)。 - 工作負載服務帳戶 (
$WORKLOAD_SERVICEACCOUNT)。 - 工作負載運算執行個體 (
$WORKLOAD_VM和$ETHEREUM_NODE)。 - 用於儲存交易結果的結果儲存空間 bucket。(
$PRIMUS_RESULT_STORAGE_BUCKET)。 - 用於儲存工作負載映像檔的 Artifact Registry (
$PRIMUS_ARTIFACT_REPOSITORY)。
./cleanup.sh
探索完畢後,請考慮刪除專案。
- 前往 Cloud Platform Console。
- 選取要關閉的專案,然後按一下頂端的「刪除」。系統會排定刪除專案的時間。
後續步驟
查看一些類似的程式碼研究室…