
1. هدف هذه الميزة الاختبارية
في هذا الدرس العملي، ستتعلّم كيفية إنشاء وكلاء باستخدام أداة ADK (حزمة تطوير الوكلاء) Visual Builder. توفّر أداة ADK (Agent Development Kit) Visual Builder طريقة بسيطة لإنشاء وكلاء ADK (Agent Development Kit). ستتعرّف على كيفية اختبار التطبيق محليًا ونشره في Cloud Run.
أهداف الدورة التعليمية
- التعرّف على أساسيات حزمة تطوير الوكلاء (ADK)
- فهم أساسيات أداة ADK (مجموعة أدوات تطوير الوكلاء) Visual Builder
- تعرَّف على كيفية إنشاء وكلاء باستخدام أدوات واجهة المستخدم الرسومية.
- تعرَّف على كيفية نشر الوكلاء واستخدامهم بسهولة في Cloud Run.
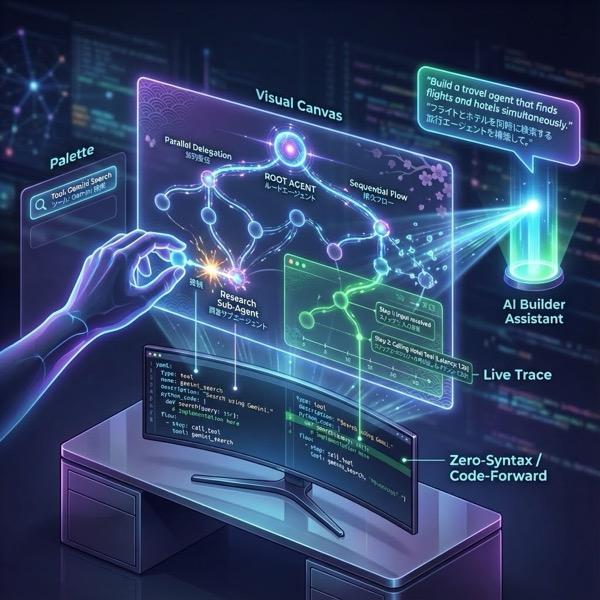
الشكل 1: باستخدام أداة ADK Visual Builder، يمكنك إنشاء وكلاء باستخدام واجهة مستخدم تصويرية تعتمد على برمجة بسيطة
2. إعداد المشروع
- إذا لم يكن لديك مشروع يمكنك استخدامه، عليك إنشاء مشروع جديد في وحدة تحكّم Google Cloud Platform. اختَر المشروع في أداة اختيار المشاريع (أعلى يمين Google Cloud Console)
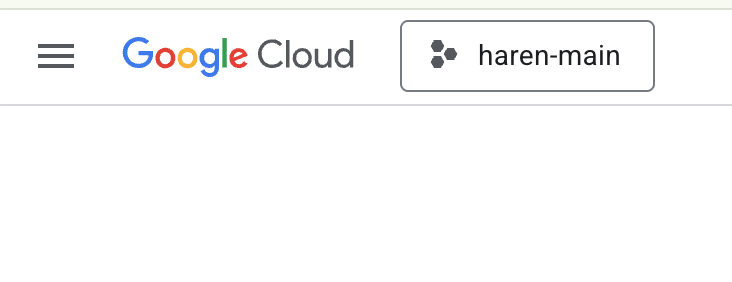
الشكل 2: يتيح لك النقر على المربّع بجانب شعار Google Cloud اختيار مشروعك. تأكَّد من اختيار مشروعك.
- في هذا الدرس التطبيقي، سنستخدم محرّر Cloud Shell لتنفيذ مهامنا. افتح Cloud Shell واضبط المشروع باستخدام Cloud Shell.
- انقر على هذا الرابط للانتقال مباشرةً إلى محرّر Cloud Shell
- افتح "وحدة التحكّم الطرفية" إذا لم تكن مفتوحة من قبل بالنقر على وحدة التحكّم الطرفية>جديد وحدة تحكّم طرفية من القائمة. يمكنك تنفيذ جميع الأوامر الواردة في هذا البرنامج التعليمي في هذه الوحدة الطرفية.
- يمكنك التحقّق مما إذا تمّت مصادقة المشروع من قبل باستخدام الأمر التالي في نافذة Cloud Shell الطرفية.
gcloud auth list
- نفِّذ الأمر التالي في Cloud Shell لتأكيد مشروعك
gcloud config list project
- انسخ رقم تعريف المشروع واستخدِم الأمر التالي لضبطه
gcloud config set project <YOUR_PROJECT_ID>
- إذا تعذّر عليك تذكُّر رقم تعريف مشروعك، يمكنك إدراج جميع أرقام تعريف المشاريع باستخدام
gcloud projects list
3- تفعيل واجهات برمجة التطبيقات
علينا تفعيل بعض خدمات واجهة برمجة التطبيقات لتشغيل هذا المختبر. نفِّذ الأمر التالي في Cloud Shell.
gcloud services enable aiplatform.googleapis.com
gcloud services enable cloudresourcemanager.googleapis.com
لمحة عن واجهات برمجة التطبيقات
- تتيح واجهة برمجة التطبيقات Vertex AI (
aiplatform.googleapis.com) الوصول إلى منصة Vertex AI ، ما يسمح لتطبيقك بالتفاعل مع نماذج Gemini لإنشاء النصوص وجلسات الدردشة واستدعاء الدوال. - تتيح لك واجهة Cloud Resource Manager API (
cloudresourcemanager.googleapis.com) إدارة البيانات الوصفية لمشاريعك على Google Cloud آليًا، مثل رقم تعريف المشروع واسمه، وهو ما غالبًا ما تتطلّبه الأدوات وحِزم تطوير البرامج الأخرى للتحقّق من هوية المشروع وأذوناته.
4. تأكيد ما إذا تم تطبيق الأرصدة
في مرحلة "إعداد المشروع"، قدّمت طلبًا للحصول على أرصدة مجانية تتيح لك استخدام الخدمات في Google Cloud. عند تطبيق الأرصدة، يتم إنشاء حساب فوترة مجاني جديد باسم "حساب فوترة تجريبي في Google Cloud Platform". للتأكّد من تطبيق الأرصدة، اتّبِع الخطوات التالية في محرّر Cloud Shell:
curl -s https://raw.githubusercontent.com/haren-bh/gcpbillingactivate/main/activate.py | python3
في حال نجاح العملية، من المفترض أن تظهر لك النتيجة على النحو التالي: إذا ظهرت لك الرسالة "تم ربط المشروع بنجاح"، يعني ذلك أنّه تم ضبط حساب الفوترة بشكل صحيح. من خلال تنفيذ الخطوة أعلاه، يمكنك التحقّق مما إذا كان حسابك مرتبطًا أم لا، وإذا لم يكن مرتبطًا، سيتم ربطه. إذا لم تكن قد اخترت المشروع، سيُطلب منك اختيار مشروع أو يمكنك إجراء ذلك مسبقًا باتّباع الخطوات الواردة في إعداد المشروع. 
الشكل 3: تأكيد ربط حساب الفوترة
5- مقدمة حول حزمة Agent Development Kit
تقدّم حزمة تطوير الوكلاء العديد من المزايا الرئيسية للمطوّرين الذين ينشئون تطبيقات قائمة على الوكلاء:
- الأنظمة المتعددة الوكلاء: يمكنك إنشاء تطبيقات معيارية وقابلة للتوسّع من خلال دمج عدة وكلاء متخصصين في تسلسل هرمي. تفعيل التنسيق والتفويض المعقّدَين
- نظام متكامل غني بالأدوات: يمكنك تزويد الوكلاء بقدرات متنوعة، مثل استخدام أدوات مُعدّة مسبقًا (البحث، وتنفيذ التعليمات البرمجية، وما إلى ذلك)، أو إنشاء وظائف مخصّصة، أو دمج أدوات من أُطر عمل الوكلاء التابعة لجهات خارجية (LangChain وCrewAI)، أو حتى استخدام وكلاء آخرين كأدوات.
- التنظيم المرن: يمكنك تحديد سير العمل باستخدام وكلاء سير العمل (
SequentialAgentوParallelAgentوLoopAgent) لإنشاء مسارات يمكن توقّعها، أو الاستفادة من التوجيه الديناميكي المستند إلى نماذج اللغات الكبيرة (عملية النقلLlmAgent) لتحقيق سلوك تكيفي. - تجربة مطوّر برامج متكاملة: يمكنك تطوير التطبيقات واختبارها وتصحيح أخطائها محليًا باستخدام واجهة سطر أوامر فعّالة وواجهة مستخدم تفاعلية خاصة بالمطوّرين. فحص الأحداث والحالة وتنفيذ الوكيل خطوة بخطوة
- التقييم المضمّن: يمكنك تقييم أداء الوكيل بشكل منهجي من خلال تقييم جودة الرد النهائي ومسار التنفيذ خطوة بخطوة مقارنةً بحالات الاختبار المحدّدة مسبقًا.
- جاهز للتفعيل: يمكنك إنشاء حاويات للوكلاء وتفعيلهم في أي مكان، أو تشغيلهم محليًا، أو توسيع نطاقهم باستخدام Vertex AI Agent Engine، أو دمجهم في بنية أساسية مخصّصة باستخدام Cloud Run أو Docker.
في حين أنّ حِزم تطوير البرامج (SDK) أو أُطر الوكلاء الأخرى التي تستخدم الذكاء الاصطناعي التوليدي تتيح لك أيضًا الاستعلام عن النماذج وحتى تزويدها بالأدوات، يتطلّب التنسيق الديناميكي بين النماذج المتعددة قدرًا كبيرًا من العمل من جانبك.
تقدّم Agent Development Kit إطار عمل أعلى مستوى من هذه الأدوات، ما يتيح لك ربط عدة وكلاء ببعضهم البعض بسهولة لإنشاء سير عمل معقّد ولكن يسهل الحفاظ عليه.
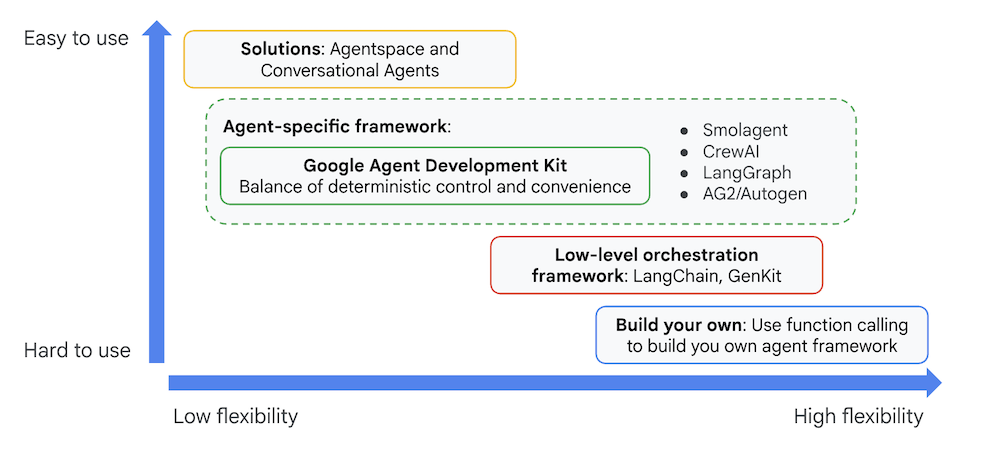
الشكل 4: موضع حزمة تطوير الوكلاء (ADK)
في الإصدارات الأخيرة، تمت إضافة أداة ADK Visual Builder إلى مجموعة أدوات تطوير الوكلاء (ADK) التي تتيح لك إنشاء وكلاء مجموعة أدوات تطوير الوكلاء (ADK) باستخدام برمجة بسيطة. في هذا التمرين العملي، سنتعرّف بالتفصيل على أداة ADK Visual Builder.
6. تثبيت "حزمة تطوير التطبيقات" وإعداد بيئتك
أولاً، علينا إعداد البيئة حتى نتمكّن من تشغيل مجموعة أدوات تطوير الوكلاء (ADK). في هذا الدرس التطبيقي، سنشغّل حزمة تطوير الوكلاء (ADK) وننفّذ جميع المهام في Google Cloud في محرّر Cloud Shell .
إعداد Cloud Shell Editor
- انقر على هذا الرابط للانتقال مباشرةً إلى محرّر Cloud Shell
- انقر على متابعة.
- عندما يُطلب منك تفويض Cloud Shell، انقر على تفويض.
- خلال بقية هذا المختبر، يمكنك العمل في هذه النافذة كبيئة تطوير متكاملة باستخدام محرّر Cloud Shell ووحدة Cloud Shell الطرفية.
- افتح نافذة Terminal جديدة باستخدام Terminal>New Terminal في "محرّر Cloud Shell". سيتم تنفيذ جميع الأوامر أدناه في هذه الوحدة الطرفية.
بدء استخدام أداة ADK Visual Editor
- نفِّذ الأوامر التالية لاستنساخ الرمز المصدر المطلوب من GitHub وتثبيت المكتبات اللازمة. نفِّذ الأوامر في "الوحدة الطرفية" التي تم فتحها في محرِّر Cloud Shell.
#create the project directory
mkdir ~/adkui
cd ~/adkui
- سنستخدم uv لإنشاء بيئة Python (يجب تشغيلها في نافذة محرّر Cloud Shell الطرفية):
#Install uv if you do not have installed yet
pip install uv

#go to the project directory
cd ~/adkui

#Create the virtual environment
uv venv


#use the newly created environment
source .venv/bin/activate

#install libraries
uv pip install google-adk==1.22.1
uv pip install python-dotenv
ملاحظة: إذا احتجت إلى إعادة تشغيل الجهاز، تأكَّد من ضبط بيئة Python من خلال تنفيذ "source .venv/bin/activate".
- في المحرّر، انتقِل إلى "عرض" (View) > "تبديل الملفات المخفية" (Toggle hidden files). وفي المجلد adkui، أنشئ ملف .env يتضمّن المحتوى التالي.
#go to adkui folder
cd ~/adkui
cat <<EOF>> .env
GOOGLE_GENAI_USE_VERTEXAI=1
GOOGLE_CLOUD_PROJECT=$(gcloud config get-value project)
GOOGLE_CLOUD_LOCATION=us-central1
IMAGEN_MODEL="imagen-3.0-generate-002"
GENAI_MODEL="gemini-2.5-flash"
EOF
7. إنشاء وكيل بسيط باستخدام أداة ADK Visual Builder
في هذا القسم، سننشئ وكيلاً بسيطًا باستخدام ADK Visual Builder.ADK Visual Builder هي أداة مستندة إلى الويب توفّر بيئة تصميم مرئية لسير العمل من أجل إنشاء وإدارة وكلاء ADK (مجموعة أدوات تطوير الوكلاء). تتيح لك هذه الأداة تصميم وبرمجة واختبار الوكلاء في واجهة رسومية سهلة الاستخدام للمبتدئين، وتتضمّن مساعدًا مستندًا إلى الذكاء الاصطناعي لمساعدتك في إنشاء الوكلاء.
الشكل 5: أداة ADK Visual Builder
- ارجع إلى الدليل العلوي adkui في الوحدة الطرفية ونفِّذ الأمر التالي لتشغيل الوكيل محليًا (نفِّذ في الوحدة الطرفية لمحرّر Cloud Shell). من المفترض أن تتمكّن من بدء خادم ADK والاطّلاع على نتائج مشابهة للشكل 6 في الجهاز.
#go to the directory adkui
cd ~/adkui
# Run the following command to run ADK locally
adk web
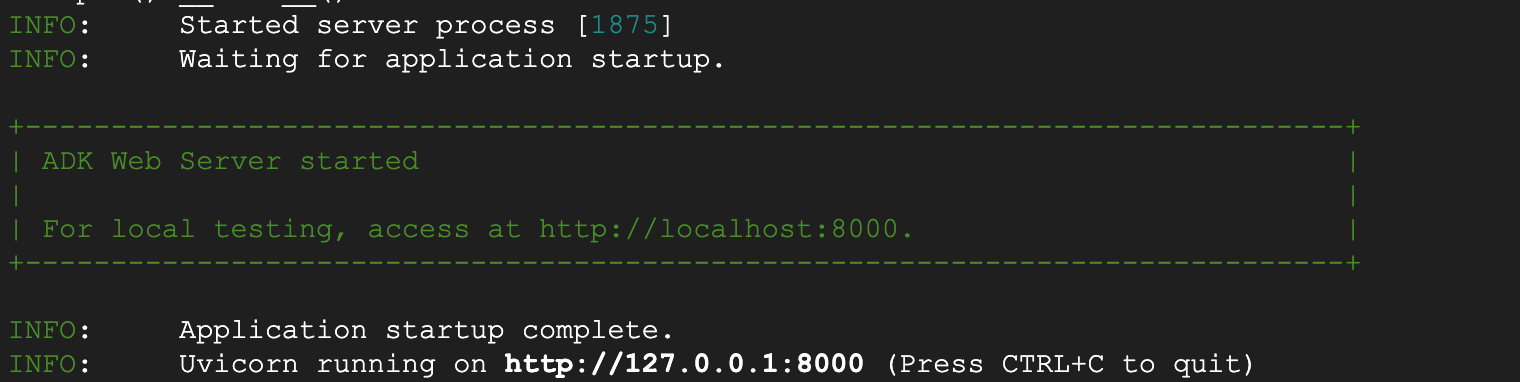
الشكل 6: بدء تشغيل تطبيق ADK
- اضغط على Ctrl+Click (أو CMD+Click في نظام التشغيل MacOS) على عنوان URL الخاص بـ http:// المعروض في نافذة الوحدة الطرفية لفتح أداة واجهة المستخدم الرسومية المستندة إلى المتصفّح ADK (حزمة تطوير الوكيل).
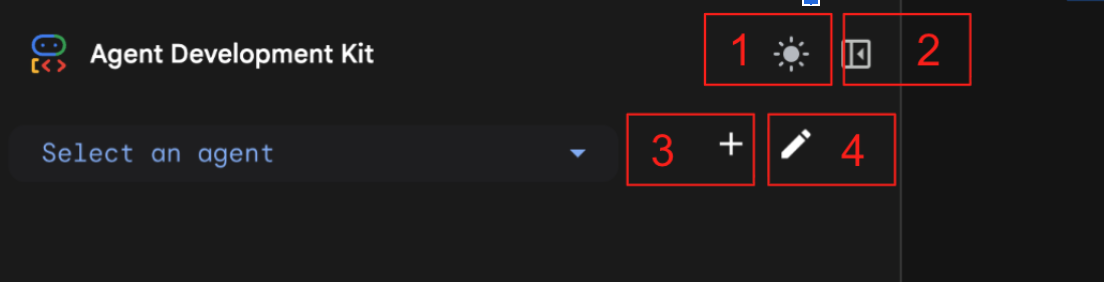
الشكل 7: واجهة مستخدم الويب الخاصة بـ ADK، تتضمّن ADK المكوّنات التالية: 1: تبديل الوضع الفاتح والداكن 2: تصغير اللوحة 3: إنشاء وكيل 4: تعديل وكيل
- لإنشاء "عميل" جديد، اضغط على زرّ "+".
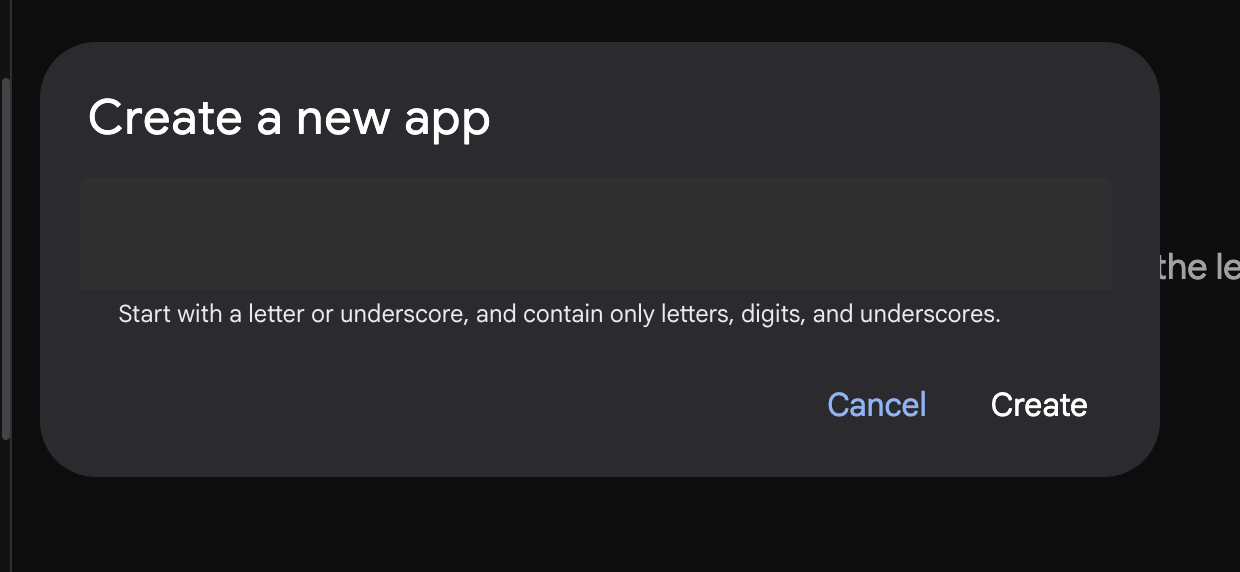
الشكل 8: مربّع حوار لإنشاء تطبيق جديد
- أدخِل الاسم "Agent1" وانقر على "إنشاء".
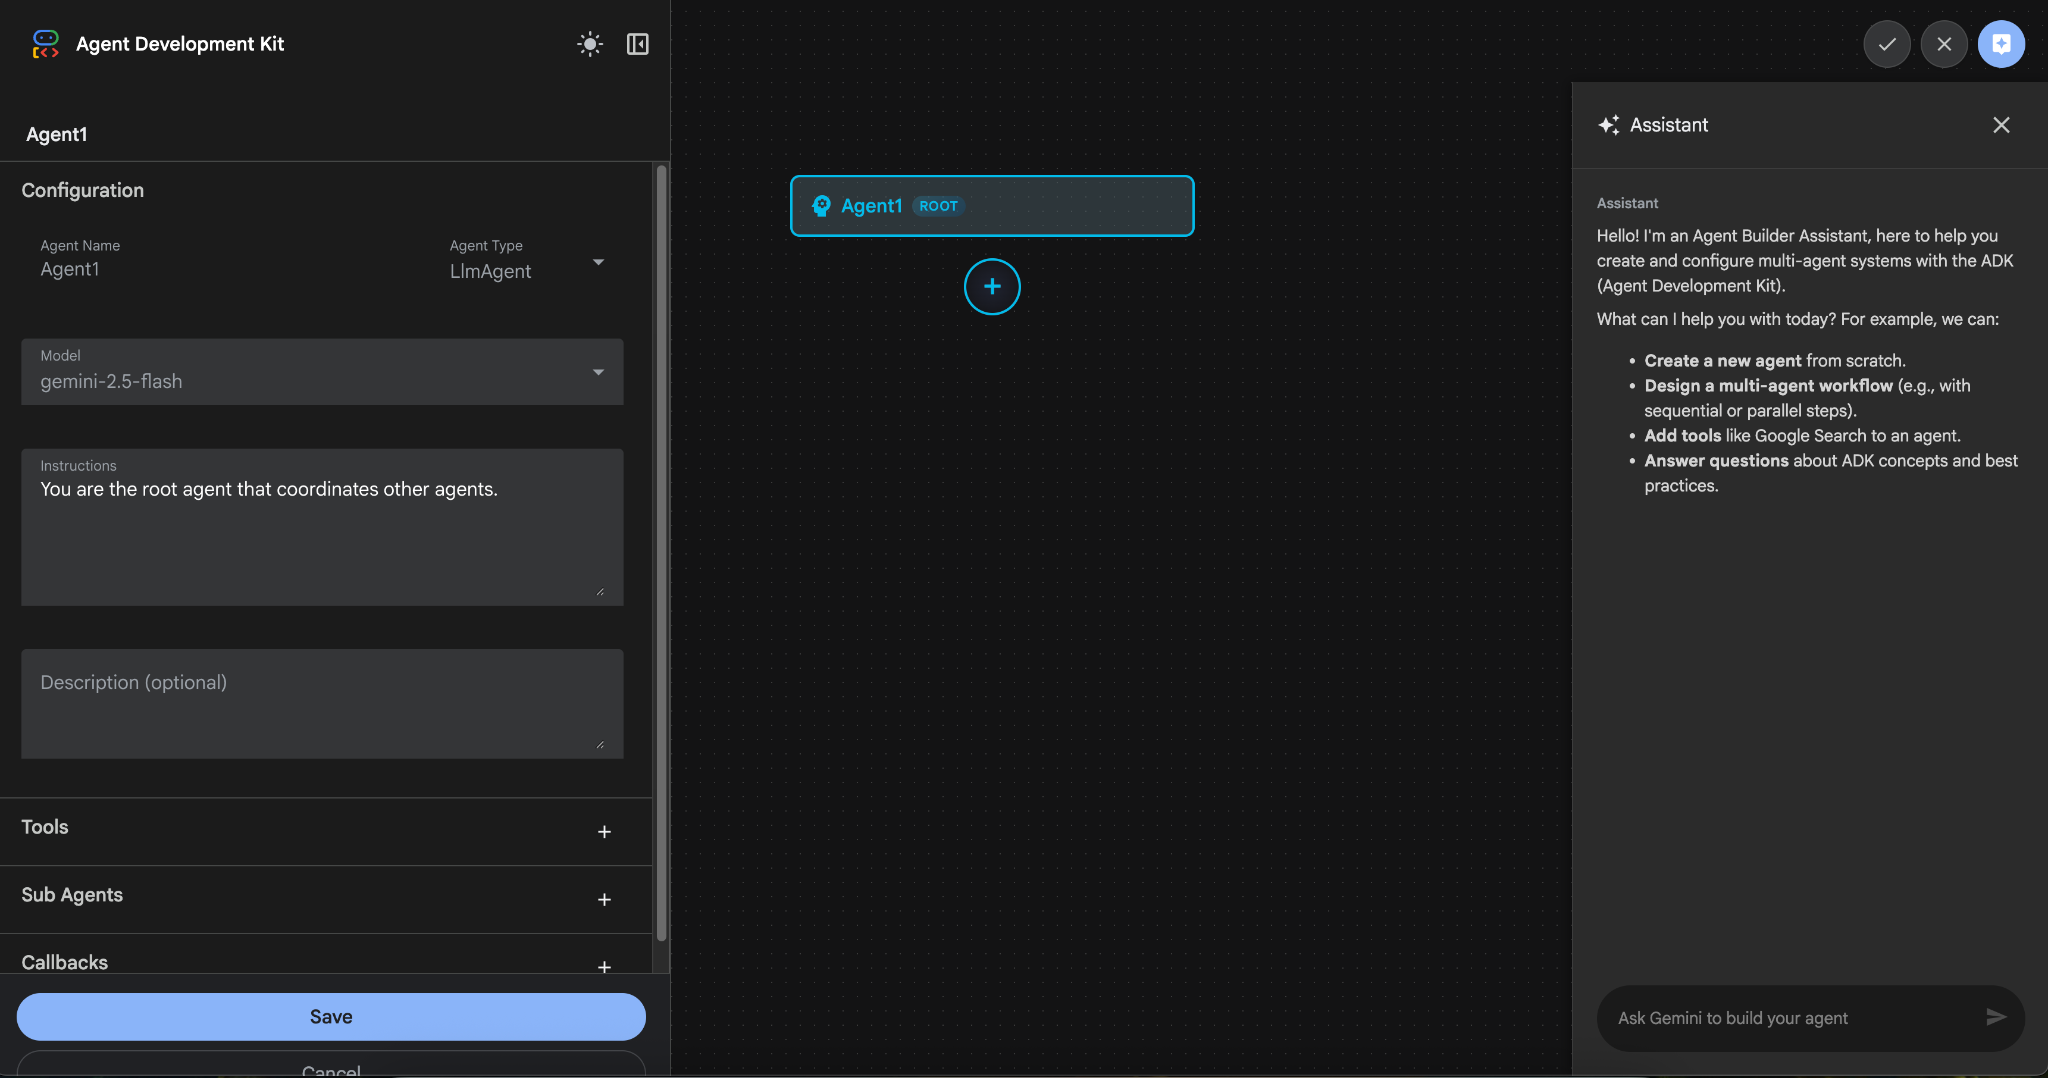
الشكل 9: واجهة مستخدم "أداة إنشاء الوكلاء"
- تم تنظيم اللوحة في ثلاثة أقسام رئيسية: يحتوي الجانب الأيمن على "عناصر التحكّم" لإنشاء وكلاء مستندين إلى واجهة المستخدم الرسومية، ويوفّر الوسط تصورًا لمدى تقدّمك، ويحتوي الجانب الأيسر على "المساعد" لإنشاء وكلاء باستخدام اللغة الطبيعية.
- تم إنشاء الوكيل بنجاح. انقر على الزر حفظ للمتابعة. (ملاحظة: لتجنُّب فقدان التغييرات، من الضروري النقر على "حفظ".)
- من المفترض أن يكون الوكيل جاهزًا للاختبار الآن. للبدء، أدخِل طلبًا في مربّع Chat، مثل:
Hi, what can you do?
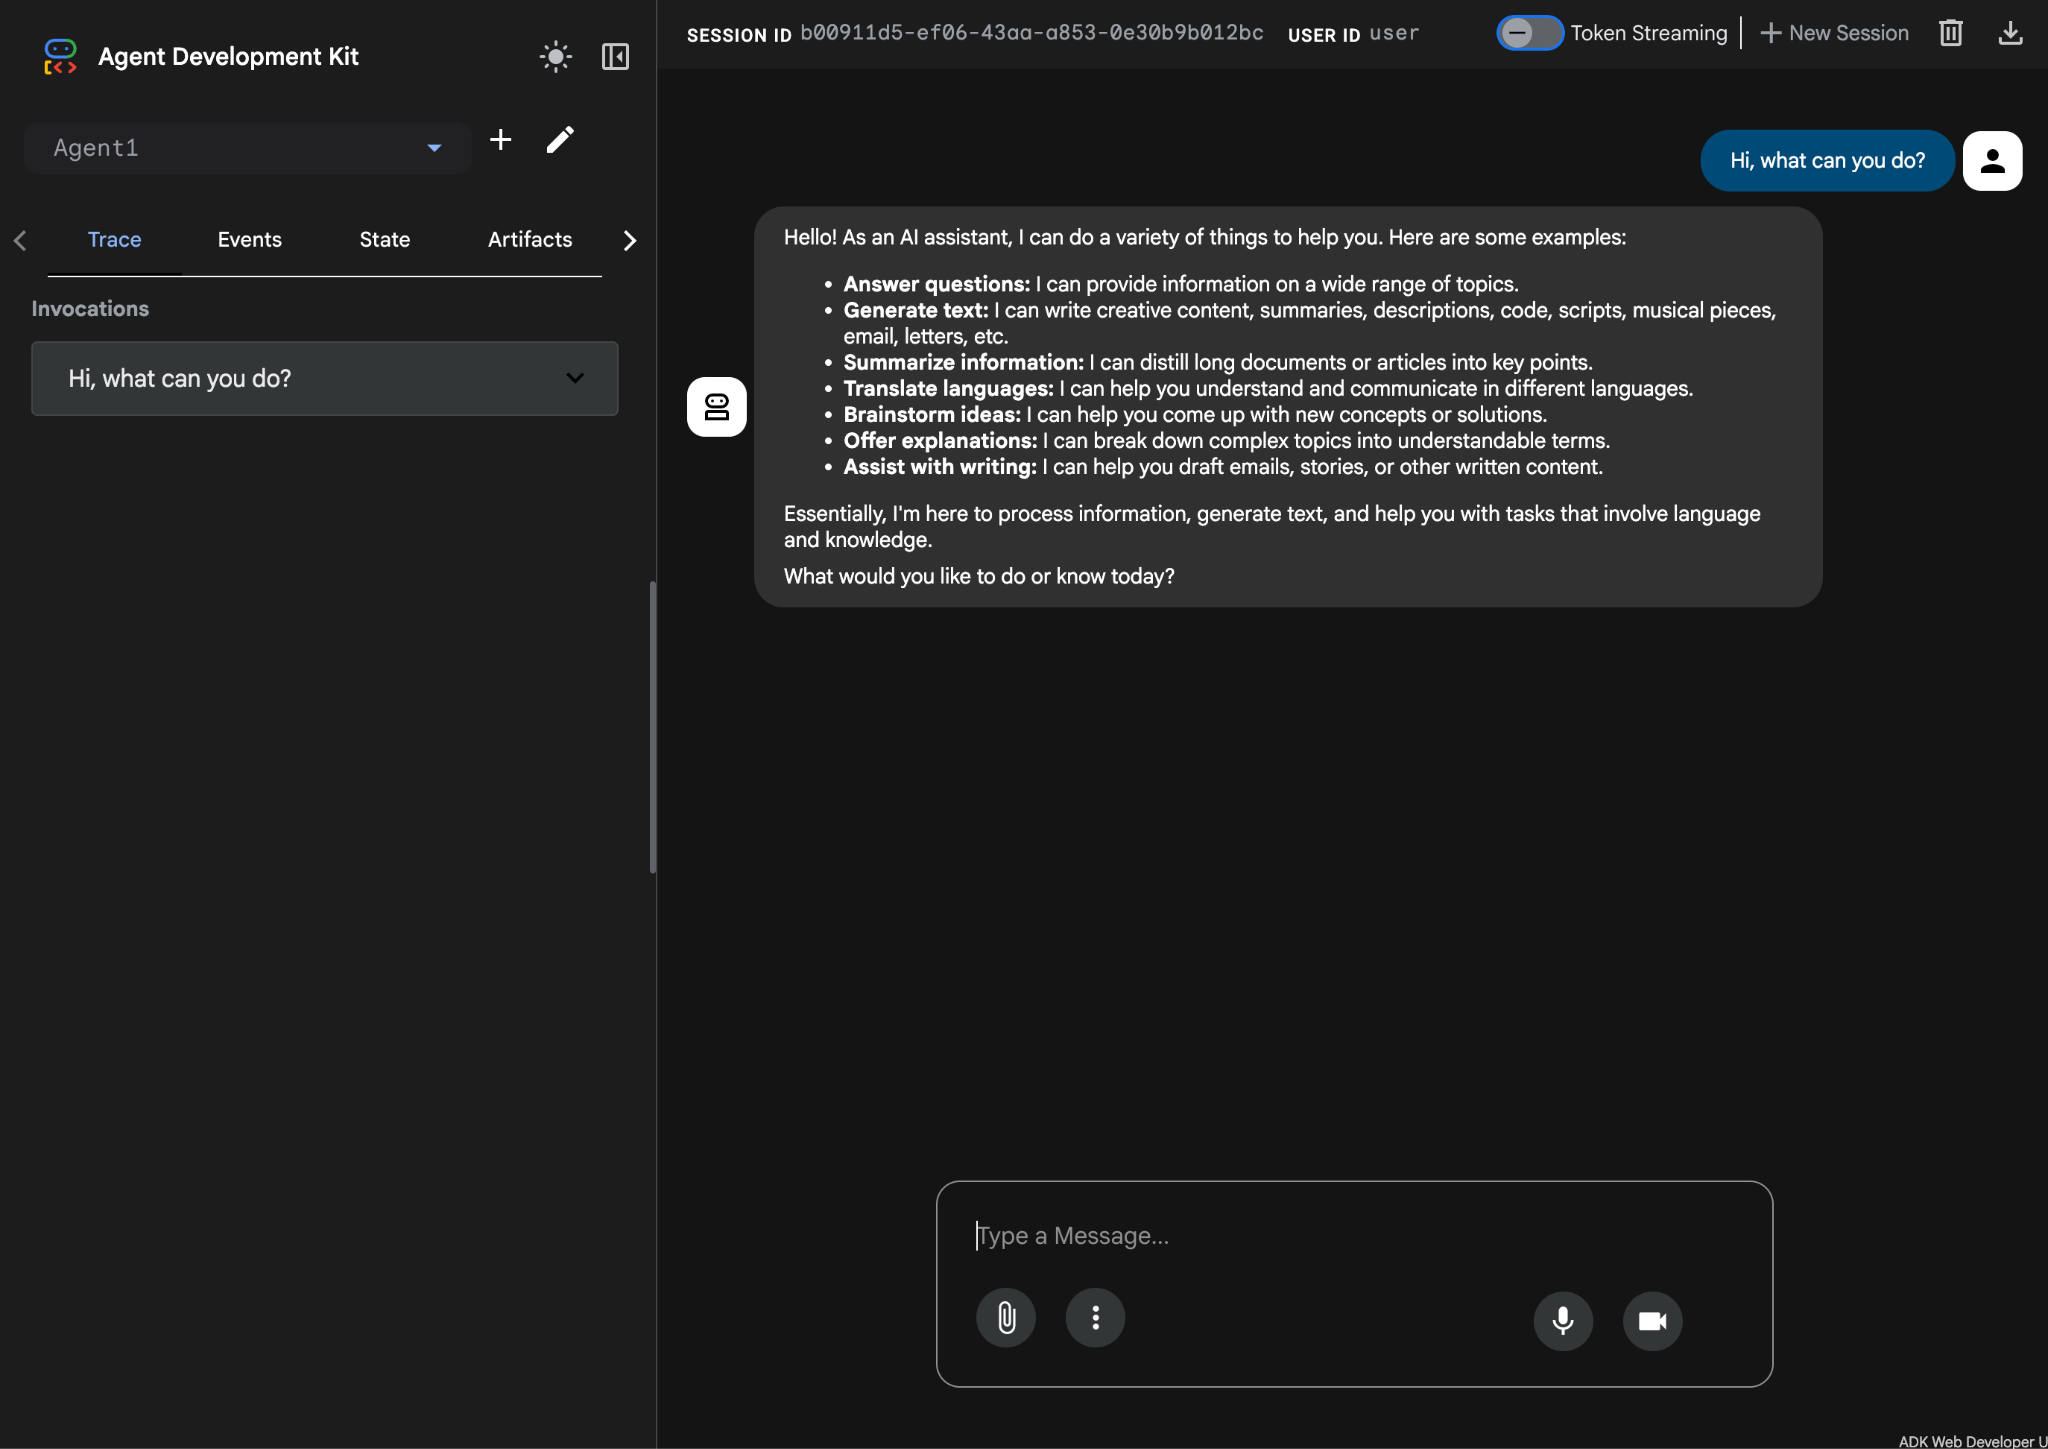
الشكل 10: اختبار الوكيل
7- بالعودة إلى المحرّر، لنلقِ نظرة على الملفات التي تم إنشاؤها حديثًا. ستجد "المستكشف" على الجانب الأيمن. انتقِل إلى المجلد adkgui ووسِّعه لعرض دليل Agent 1. في المجلد، يمكنك الاطّلاع على ملف YAML الذي يحدّد الوكيل، كما هو موضّح في الشكل أدناه.
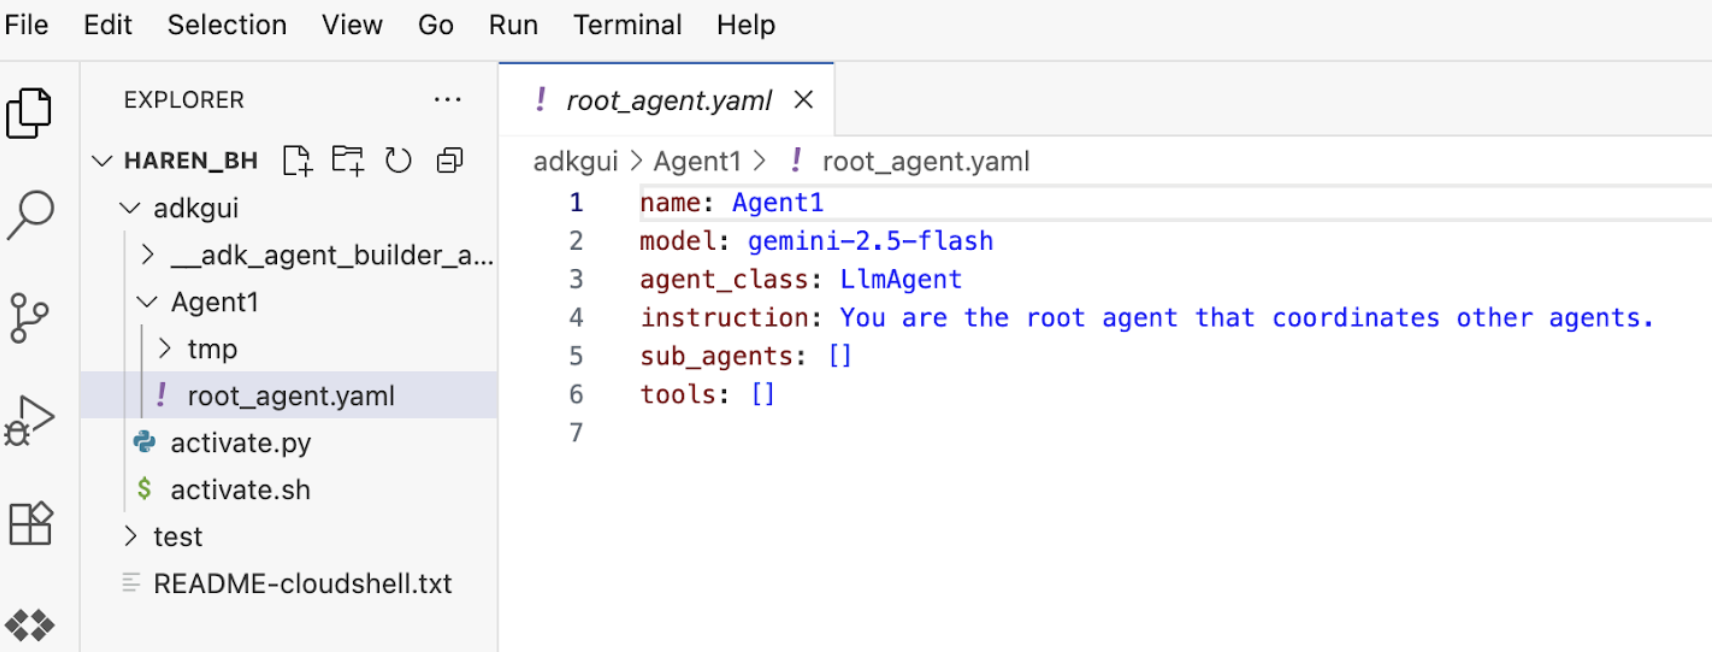
الشكل 11: تعريف الوكيل باستخدام ملف YAML
- لنرجع الآن إلى محرّر واجهة المستخدم الرسومية ونضيف بعض الميزات إلى الوكيل. لإجراء ذلك، اضغط على زر التعديل (راجِع الشكل 7، العنصر رقم 4، رمز القلم).
- سنضيف ميزة بحث Google إلى الوكيل، ولإجراء ذلك، علينا إضافة "بحث Google" كأداة متاحة للوكيل ويمكنه استخدامها. لإجراء ذلك، انقر على علامة "+" بجانب قسم الأدوات في أسفل يسار الشاشة، ثم انقر على أداة مضمّنة من القائمة (راجِع الشكل 12).
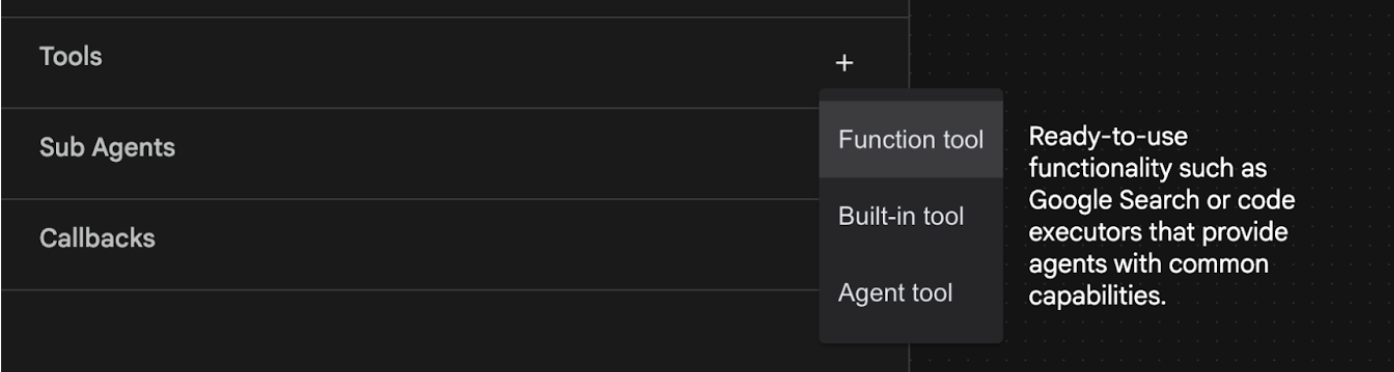
الشكل 12: إضافة أداة جديدة إلى وكيل
- من قائمة الأداة المضمّنة، اختَر google_search وانقر على إنشاء (انظر الشكل 12). سيؤدي ذلك إلى إضافة "بحث Google" كأداة في وكيلك.
- انقروا على الزر حفظ لحفظ التغييرات.
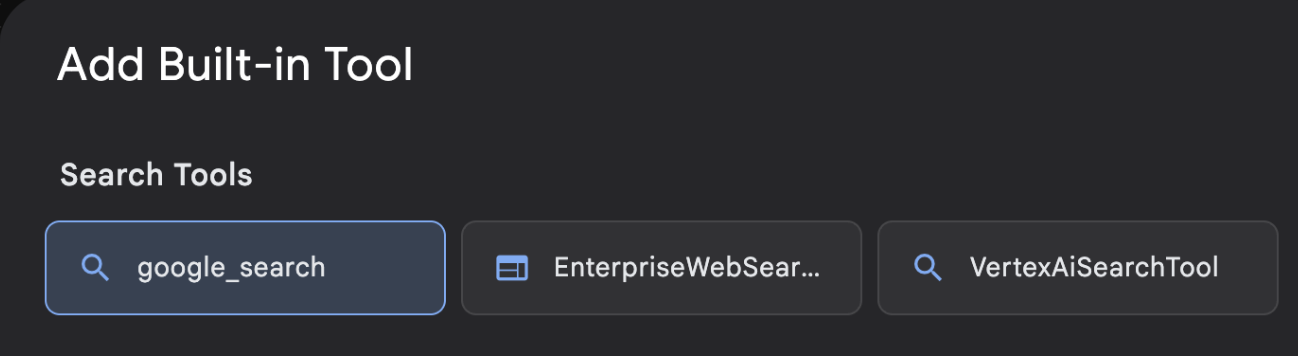
الشكل 13: قائمة الأدوات المتاحة في واجهة مستخدم ADK Visual Builder
- أنت الآن جاهز لاختبار "الوكيل". أعِد تشغيل خادم ADK أولاً. انتقِل إلى نافذة الوحدة الطرفية التي بدأت فيها خادم حزمة تطوير البرامج (ADK) واضغط على CTRL+C لإيقاف الخادم إذا كان لا يزال قيد التشغيل. نفِّذ ما يلي لإعادة تشغيل الخادم.
#make sure you are in the right folder.
cd ~/adkui

#start the server
adk web
- اضغط على Ctrl+Click على عنوان URL (مثلاً http://localhost:8000) المعروضة على الشاشة. يجب أن تظهر واجهة المستخدم الرسومية لحزمة تطوير الوكلاء (ADK) في علامة تبويب المتصفّح.
- اختَر Agent1 من قائمة الوكلاء. يمكن أن يجري وكيلك الآن بحثًا على Google. اختبِر مربّع المحادثة باستخدام الطلب التالي.
What is the weather today in Yokohama?
من المفترض أن تظهر لك الإجابة من "بحث Google" كما هو موضّح أدناه. 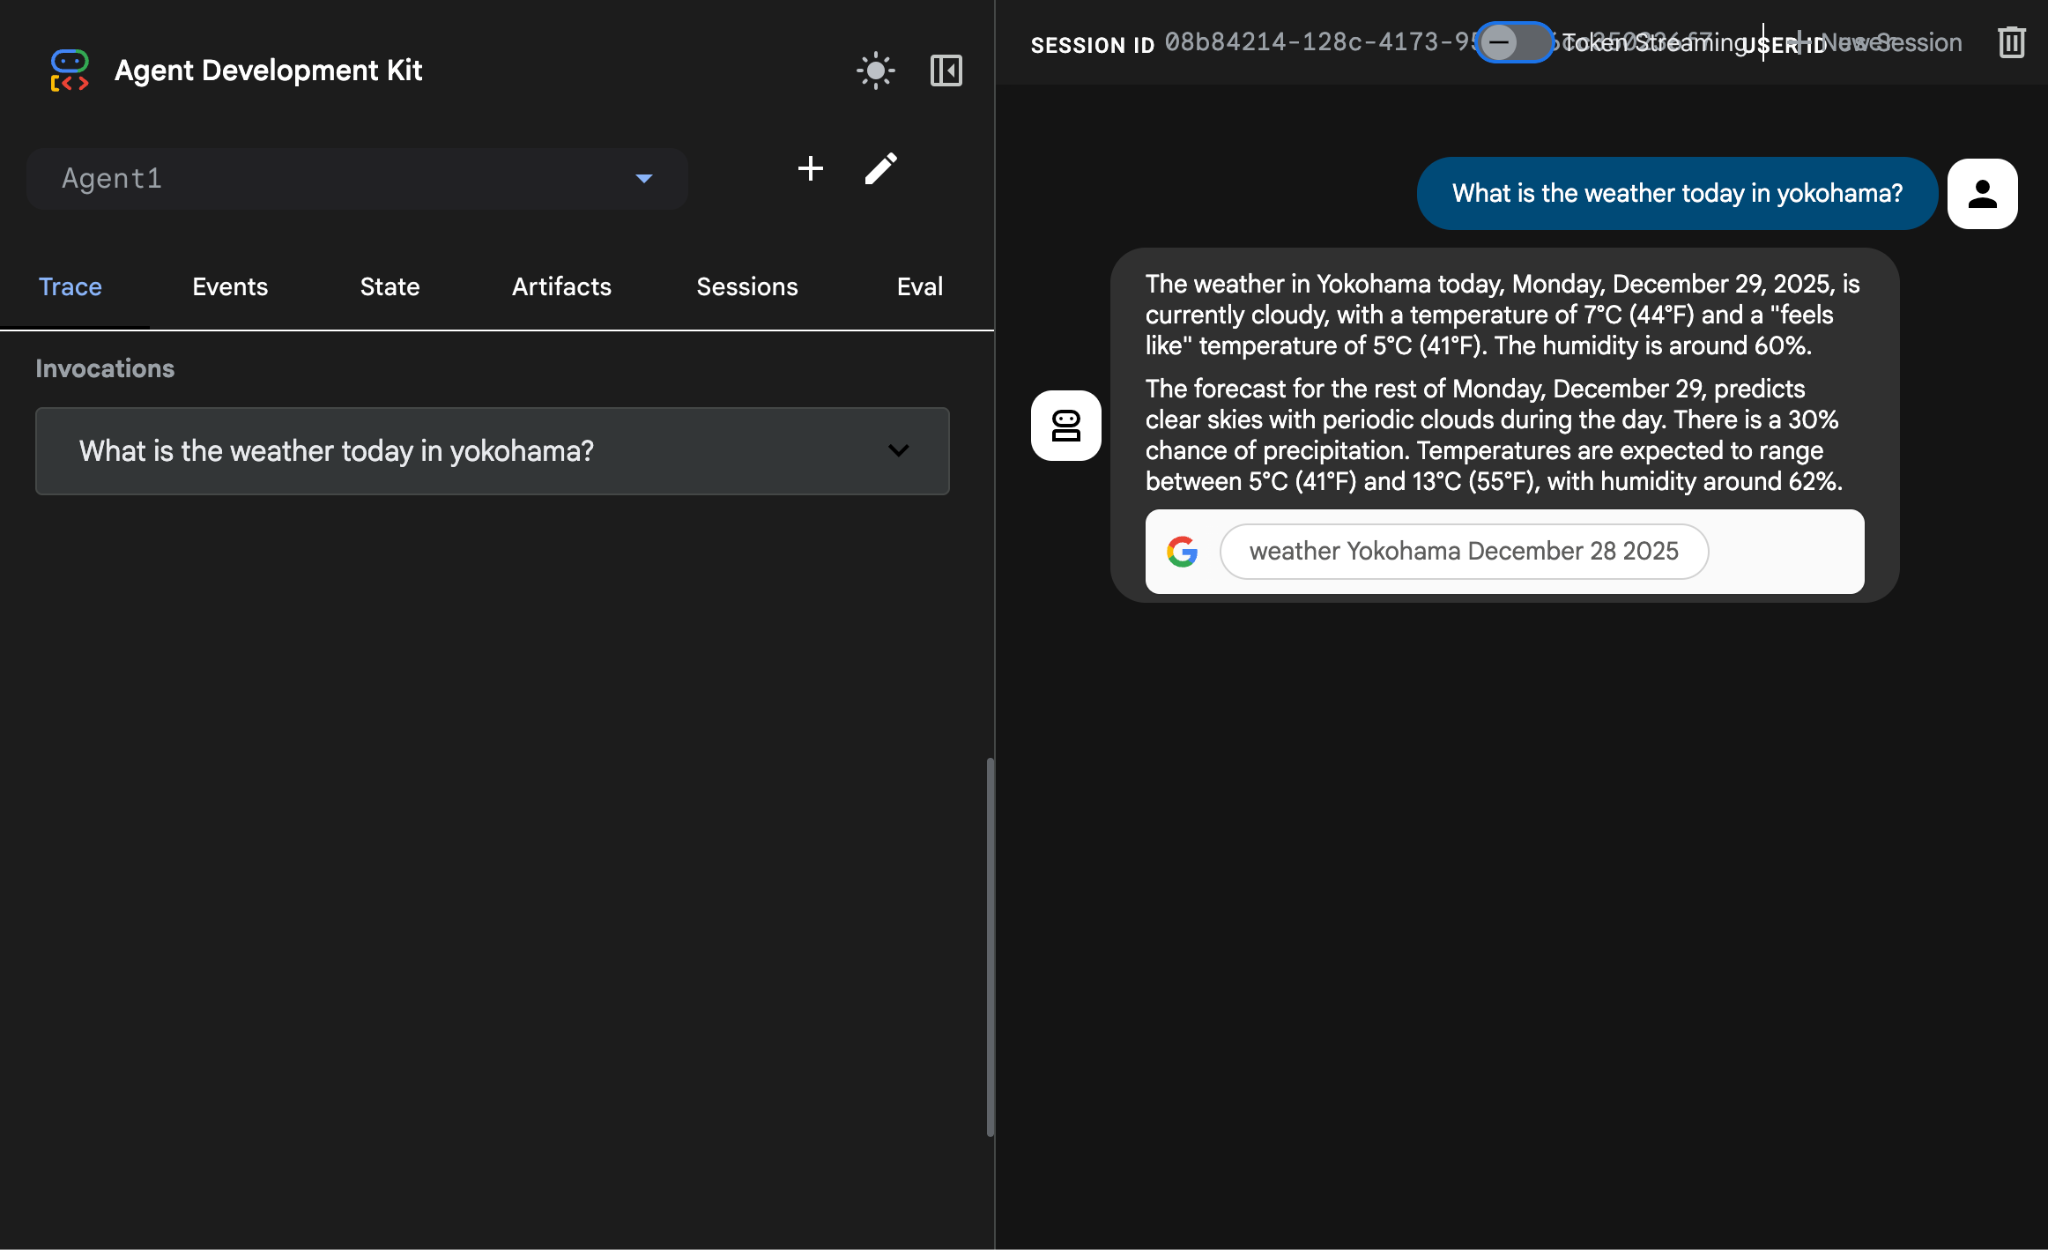
الشكل 14: "بحث Google" مع الوكيل
- لنرجع الآن إلى المحرّر ونتحقّق من الرمز الذي تم إنشاؤه في هذه الخطوة. من اللوحة الجانبية المستكشف في "المحرّر"، انقر على root_agent.yaml لفتحها. تأكَّد من إضافة google_search كأداة (الشكل 15).
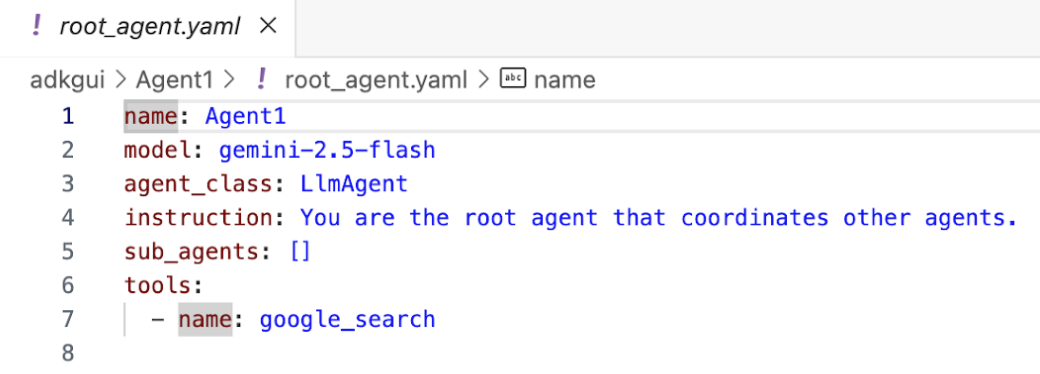
الشكل 15: تأكيد إضافة google_search كأداة في Agent1
8. نشر الوكيل على Cloud Run
لننشُر الآن الوكيل الذي تم إنشاؤه على Cloud Run. باستخدام Cloud Run، يمكنك إنشاء تطبيقات أو مواقع إلكترونية بسرعة على منصة مُدارة بالكامل.
يمكنك تشغيل خدمات الواجهة الأمامية وخدمات الخلفية، ومهام الدفعات، واستضافة نماذج اللغات الكبيرة، وأحمال عمل معالجة قوائم الانتظار بدون الحاجة إلى إدارة البنية الأساسية.
في نافذة Cloud Shell Editor، إذا كنت لا تزال تشغّل خادم ADK (حزمة تطوير الوكيل)، اضغط على Ctrl+C لإيقافه.
- انتقِل إلى الدليل الجذر للمشروع.
cd ~/adkui
- احصل على رمز النشر. بعد تنفيذ الأمر، من المفترض أن يظهر الملف deploycloudrun.py في لوحة Explorer في محرّر Cloud Shell.
curl -LO https://raw.githubusercontent.com/haren-bh/codelabs/main/adk_visual_builder/deploycloudrun.py
- راجِع خيارات النشر في deploycloudrun.py. سنستخدم الأمر adk deploy لنشر الوكيل على Cloud Run. تتضمّن حزمة تطوير الوكلاء (ADK) خيارًا مدمجًا لنشر الوكيل على Cloud Run. علينا تحديد المَعلمات، مثل رقم تعريف مشروع Google Cloud والمنطقة وما إلى ذلك. بالنسبة إلى مسار التطبيق، يفترض هذا النص البرمجي أنّ agent_path=./Agent1. سننشئ أيضًا حساب خدمة جديدًا بالأذونات اللازمة ونربطه بخدمة Cloud Run. يحتاج Cloud Run إلى الوصول إلى خدمات مثل Vertex AI وCloud Storage لتشغيل الوكيل.
   command = [
        "adk", "deploy", "cloud_run",
        f"--project={project_id}",
        f"--region={location}",
        f"--service_name={service_name}",
        f"--app_name={app_name}",
        f"--artifact_service_uri=memory://",
        f"--with_ui",
        agent_path,
        f"--",
        f"--service-account={sa_email}",
    ]
- شغِّل النص البرمجي deploycloudrun.py**. من المفترض أن تبدأ عملية النشر كما هو موضّح في الشكل أدناه.**
python3 deploycloudrun.py
إذا تلقّيت رسالة التأكيد كما هو موضّح أدناه، اضغط على Y ثم Enter لكل الرسائل. يفترض البرنامج النصي depoycloudrun.py أنّ الوكيل موجود في المجلد Agent1 كما تم إنشاؤه أعلاه.
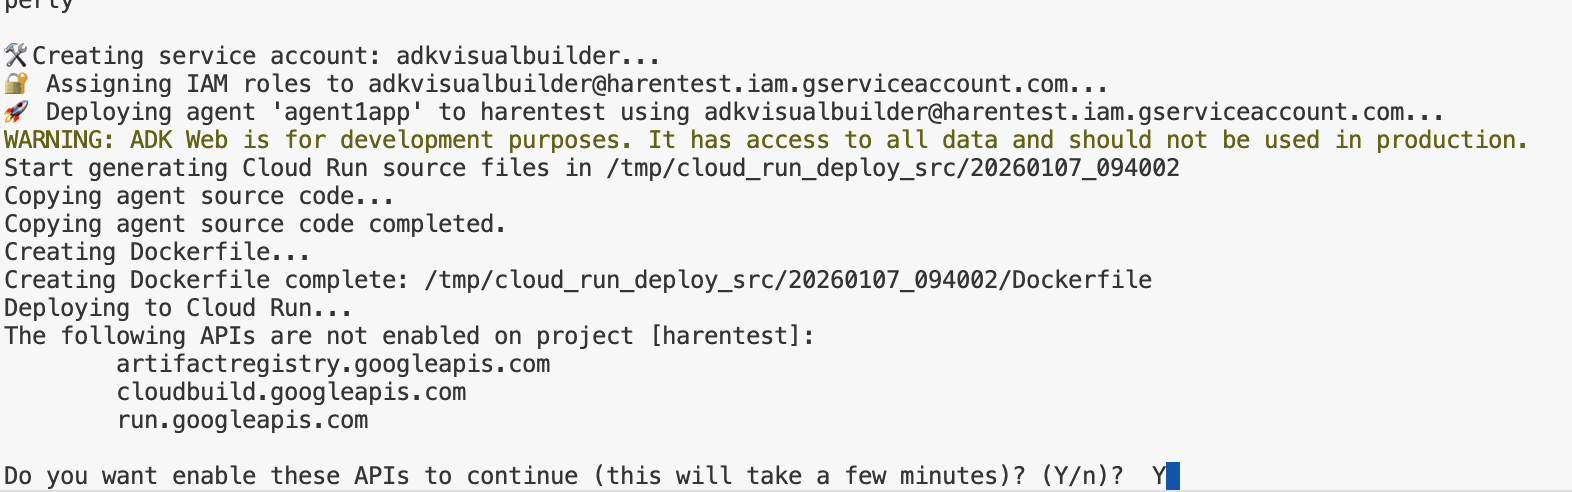
الشكل 16: نشر الوكيل على Cloud Run، اضغط على Y لأي رسائل تأكيد.
- بعد اكتمال عملية النشر، من المفترض أن يظهر لك عنوان URL للخدمة على النحو التالي: https://agent1service-78833623456.us-central1.run.app
- يمكنك الوصول إلى عنوان URL في متصفّح الويب لتشغيل التطبيق.
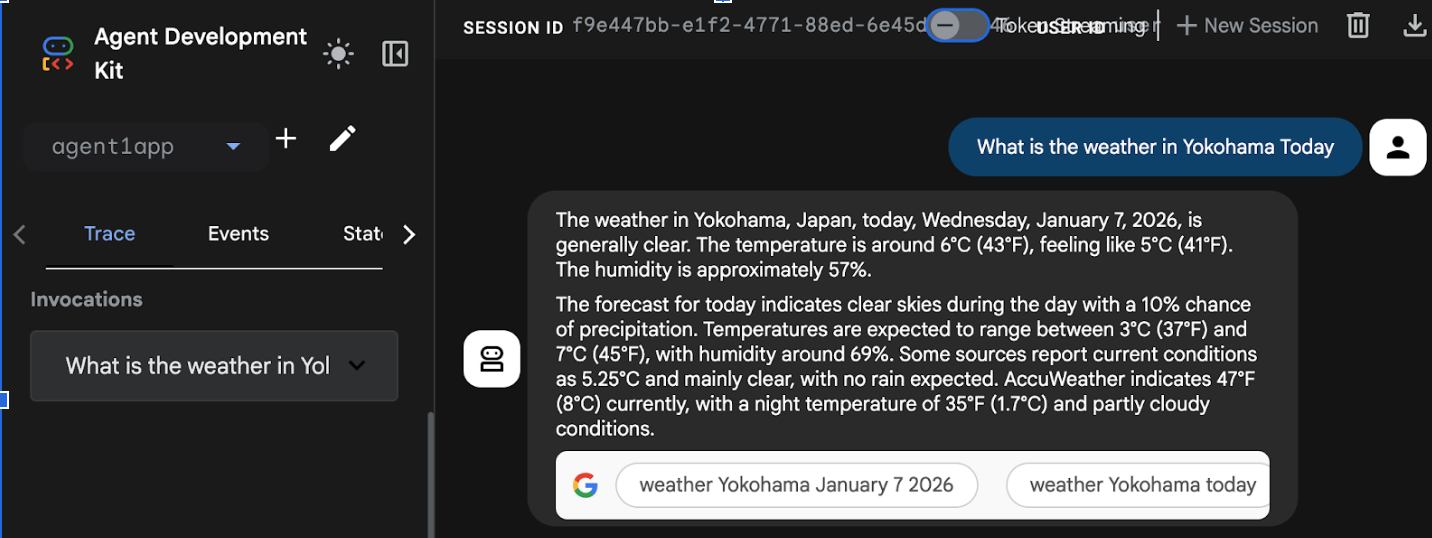
Figure 17: Agent running in Cloud Run
9- إنشاء وكيل مع وكيل فرعي وأداة مخصّصة
في القسم السابق، أنشأتَ وكيلاً واحدًا مزوّدًا بأداة "بحث Google" المضمّنة. في هذا القسم، ستنشئ نظامًا متعدد الوكلاء حيث نسمح للوكلاء باستخدام الأدوات المخصّصة.
- أولاً، أعِد تشغيل خادم ADK (مجموعة أدوات تطوير الوكيل). انتقِل إلى نافذة الوحدة الطرفية التي بدأت فيها خادم ADK (حزمة تطوير البرامج لوكيل البحث) واضغط على CTRL+C لإيقاف الخادم إذا كان لا يزال قيد التشغيل. نفِّذ ما يلي لإعادة تشغيل الخادم.
#make sure you are in the right folder.
cd ~/adkui

#start the server
adk web
- اضغط على Ctrl+Click على عنوان URL (مثلاً http://localhost:8000) المعروض على الشاشة. يجب أن تظهر واجهة المستخدم الرسومية لحزمة تطوير الوكلاء (ADK) في علامة تبويب المتصفّح.
- انقر على زرّ "الإضافة" لإنشاء وكيل جديد. في مربّع حوار "الوكيل"، أدخِل "الوكيل2" (الشكل 18) وانقر على "إنشاء".
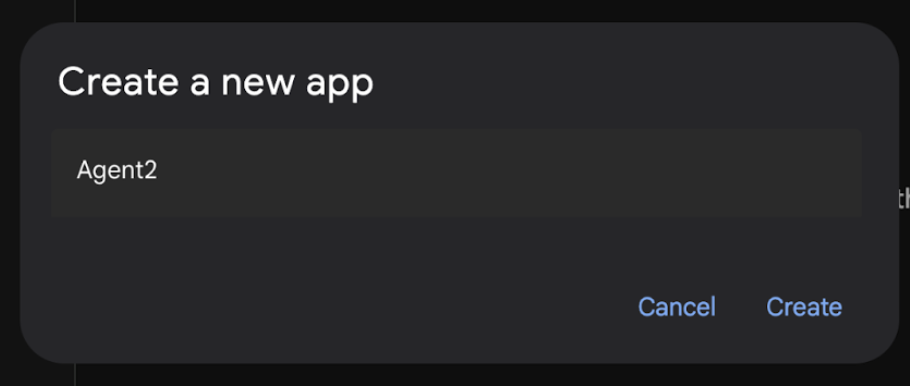
الشكل 18: إنشاء تطبيق وكيل جديد
- في قسم التعليمات في Agent2، أدخِل ما يلي.
You are an agent that takes image creation instruction from the user and passes it to your sub agent
- سنضيف الآن وكيلًا فرعيًا إلى الوكيل الرئيسي. لإجراء ذلك، انقر على الزر "+" على الجانب الأيمن من قائمة "الوكيل الفرعي" في أسفل اللوحة اليمنى (الشكل 19)، ثم انقر على LLM Agent. سيؤدي ذلك إلى إنشاء وكيل جديد كوكيل فرعي جديد للوكيل الرئيسي.
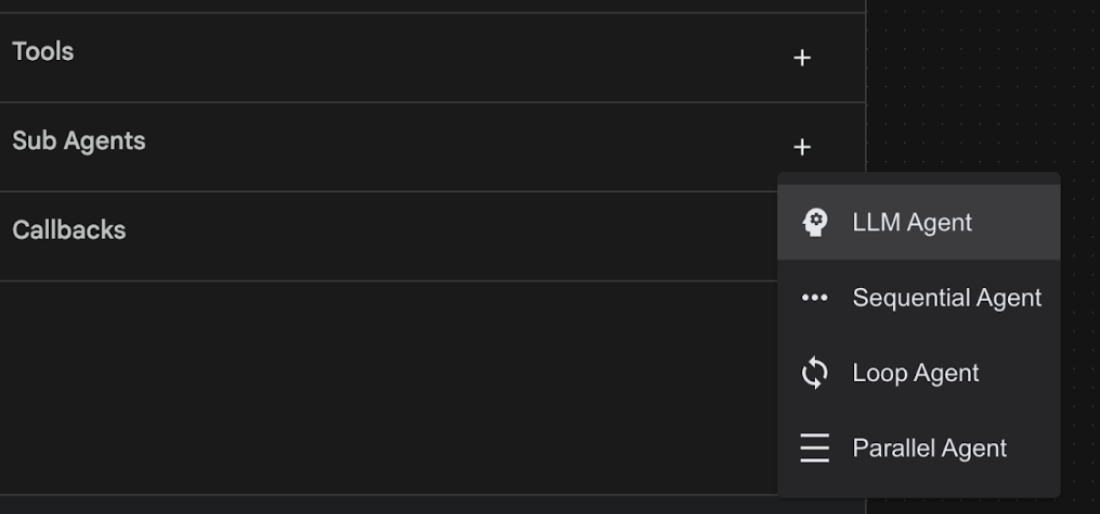
الشكل 19: إضافة وكيل فرعي جديد
- في "تعليمات" sub_agent_1، أدخِل النص التالي.
You are an Agent that can take instructions about an image and create an image using the create_image tool.
- لنضِف الآن أداة مخصّصة إلى هذا الوكيل الفرعي. ستستدعي هذه الأداة نموذج Imagen لإنشاء صورة باستخدام تعليمات المستخدم. لإجراء ذلك، انقر أولاً على "الوكيل الفرعي" الذي تم إنشاؤه في الخطوة السابقة، ثم انقر على الزر "+" بجانب قائمة "الأدوات". من قائمة خيارات الأداة، انقر على أداة الدوال. ستتيح لنا هذه الأداة إضافة رمز مخصّص خاص بنا إلى الأداة.
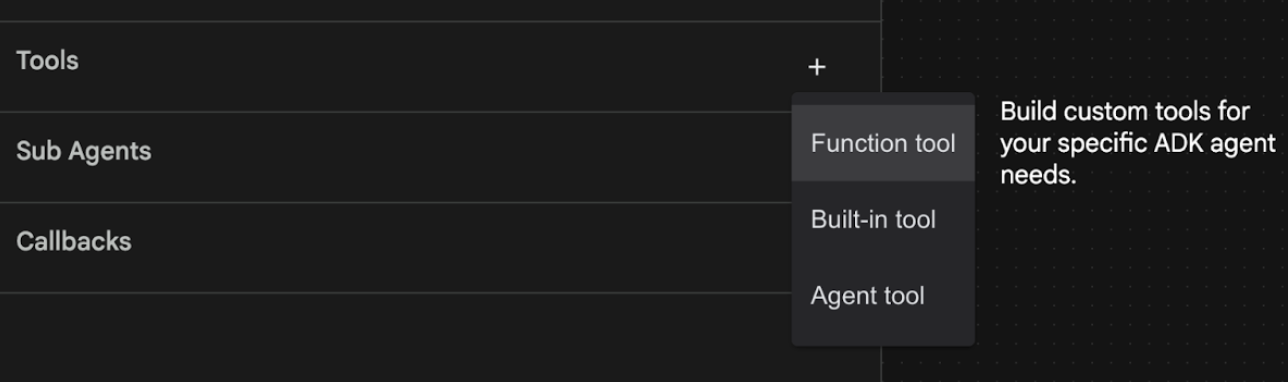
الشكل 20: انقر على أداة "الدالة" لإنشاء أداة جديدة. 8. أدخِل اسم الأداة Agent2.image_creation_tool.create_image في مربّع الحوار. 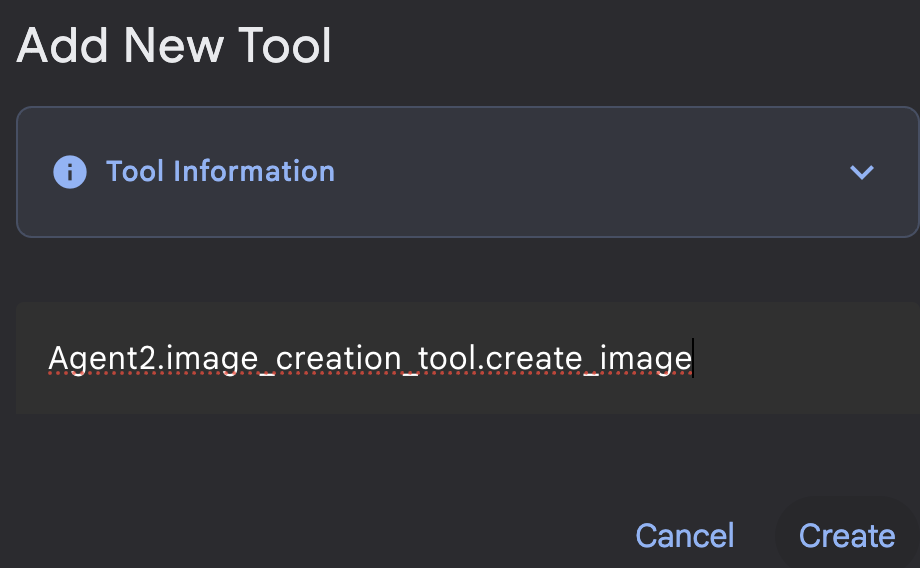
الشكل 21: إضافة اسم الأداة
- انقر على زر حفظ لحفظ التغييرات.
- في نافذة محرّر Cloud Shell الطرفية، اضغط على Ctrl+S لإيقاف خادم adk.
- في "الوحدة الطرفية"، أدخِل الأمر التالي لإنشاء الملف image_creation_tool.py.
touch ~/adkui/Agent2/image_creation_tool.py
- افتح الملف image_creation_tool.py الذي تم إنشاؤه حديثًا من خلال النقر عليه في لوحة Explorer في محرِّر Cloud Shell. واستبدِل محتوى image_creation_tool.py بما يلي، ثم احفظه (Ctrl+S).
import os
import io
import vertexai
from vertexai.preview.vision_models import ImageGenerationModel
from dotenv import load_dotenv
import uuid
from typing import Union
from datetime import datetime
from google import genai
from google.genai import types
from google.adk.tools import ToolContext
import logging

# Configure logging
logging.basicConfig(level=logging.INFO)
logger = logging.getLogger(__name__)

async def create_image(prompt: str,tool_context: ToolContext) -> Union[bytes, str]:
  """
  Generates an image based on a text prompt using a Vertex AI Imagen model.
  Args:
      prompt: The text prompt to generate the image from.

  Returns:
      The binary image data (PNG format) on success, or an error message string on failure.
  """
  print(f"Attempting to generate image for prompt: '{prompt}'")

  try:
      # Load environment variables from .env file two levels up
      dotenv_path = os.path.join(os.path.dirname(__file__), '..', '..', '.env')
      load_dotenv(dotenv_path=dotenv_path)
      project_id = os.getenv("GOOGLE_CLOUD_PROJECT")
      location = os.getenv("GOOGLE_CLOUD_LOCATION")
      model_name = os.getenv("IMAGEN_MODEL")
      client = genai.Client(
          vertexai=True,
          project=project_id,
          location=location,
      )
      response = client.models.generate_images(
          model="imagen-3.0-generate-002",
          prompt=prompt,
          config=types.GenerateImagesConfig(
              number_of_images=1,
              aspect_ratio="9:16",
              safety_filter_level="block_low_and_above",
              person_generation="allow_adult",
          ),
      )
      if not all([project_id, location, model_name]):
          return "Error: Missing GOOGLE_CLOUD_PROJECT, GOOGLE_CLOUD_LOCATION, or IMAGEN_MODEL in .env file."
      vertexai.init(project=project_id, location=location)
      model = ImageGenerationModel.from_pretrained(model_name)
      images = model.generate_images(
          prompt=prompt,
          number_of_images=1
      )
      if response.generated_images is  None:
          return "Error: No image was generated."
      for generated_image in response.generated_images:
          # Get the image bytes
          image_bytes = generated_image.image.image_bytes
          counter = str(tool_context.state.get("loop_iteration", 0))
          artifact_name = f"generated_image_" + counter + ".png"
          # Save as ADK artifact (optional, if still needed by other ADK components)
          report_artifact = types.Part.from_bytes(
              data=image_bytes, mime_type="image/png"
          )
          await tool_context.save_artifact(artifact_name, report_artifact)
          logger.info(f"Image also saved as ADK artifact: {artifact_name}")
          return {
              "status": "success",
              "message": f"Image generated .  ADK artifact: {artifact_name}.",
              "artifact_name": artifact_name,
          }
  except Exception as e:
      error_message = f"An error occurred during image generation: {e}"
      print(error_message)
      return error_message
- أولاً، أعِد تشغيل خادم ADK (مجموعة أدوات تطوير الوكيل). انتقِل إلى نافذة الوحدة الطرفية التي بدأت فيها خادم حزمة تطوير الوكيل (ADK) واضغط على CTRL+C لإيقاف الخادم إذا كان لا يزال قيد التشغيل. نفِّذ ما يلي لإعادة تشغيل الخادم.
#make sure you are in the right folder.
cd ~/adkui

#start the server
adk web
- اضغط على Ctrl+Click على عنوان URL (مثلاً http://localhost:8000) المعروض على الشاشة. يجب أن تظهر واجهة المستخدم الرسومية لحزمة تطوير الوكلاء (ADK) في علامة تبويب المتصفّح.
- في علامة تبويب واجهة مستخدم ADK (مجموعة أدوات تطوير الوكيل)، اختَر Agent2 في قائمة "الوكيل"، ثم اضغط على زر التعديل (رمز القلم). في محرّر ADK (مجموعة أدوات تطوير الوكيل) المرئي، انقر على زر "حفظ" للاحتفاظ بالتغييرات.
- يمكننا الآن اختبار الوكيل الجديد.
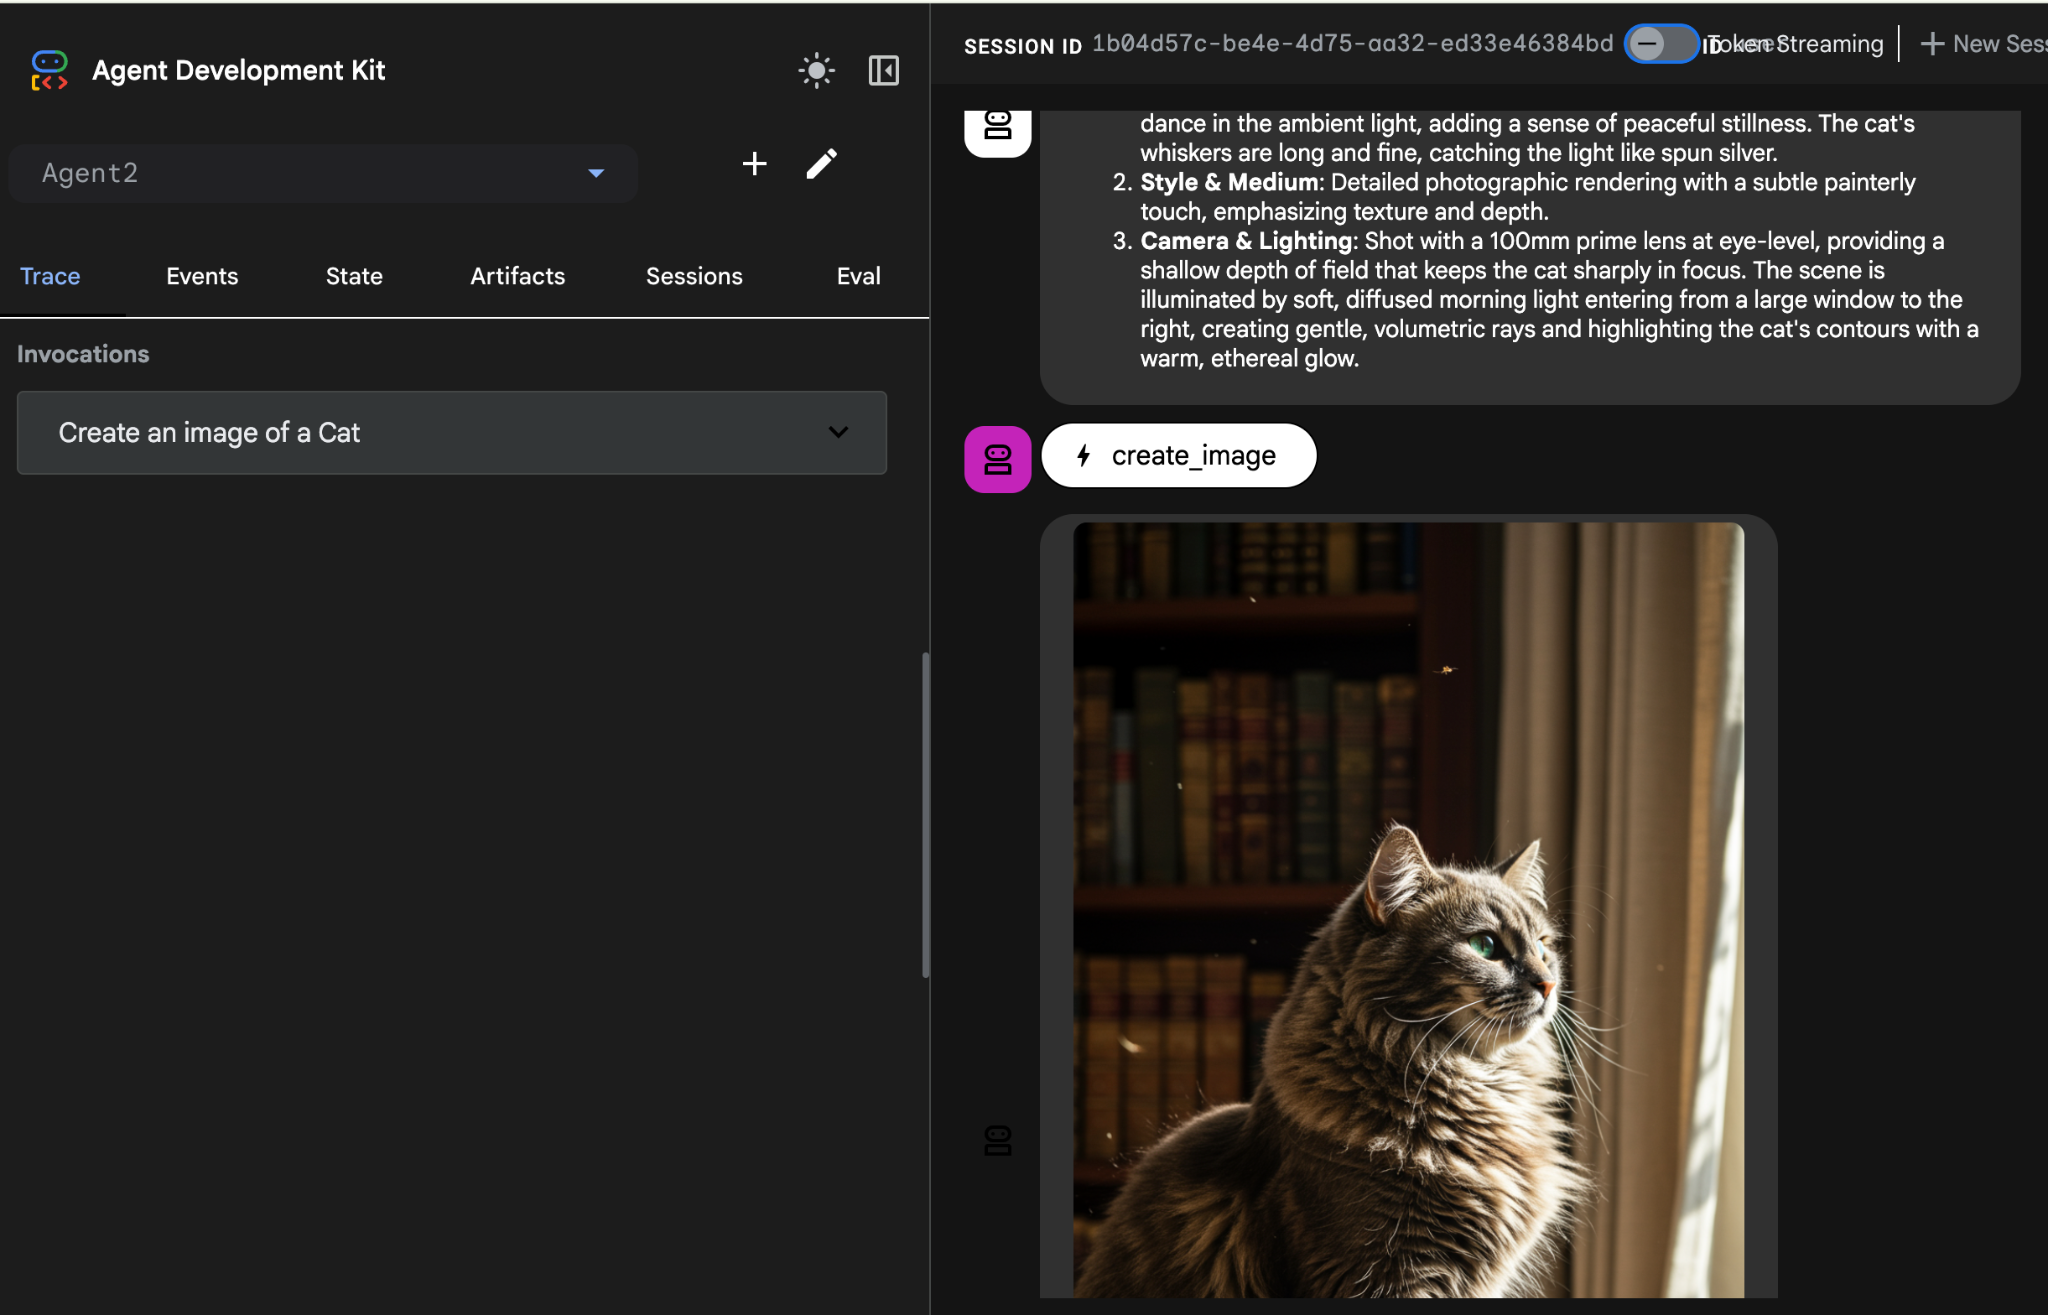
- في واجهة مستخدم الدردشة الخاصة بحزمة تطوير الوكيل (ADK)، أدخِل الطلب التالي. يمكنك أيضًا تجربة طلبات أخرى. من المفترض أن تظهر لك النتائج الموضّحة في الشكل 22)
Create an image of a cat
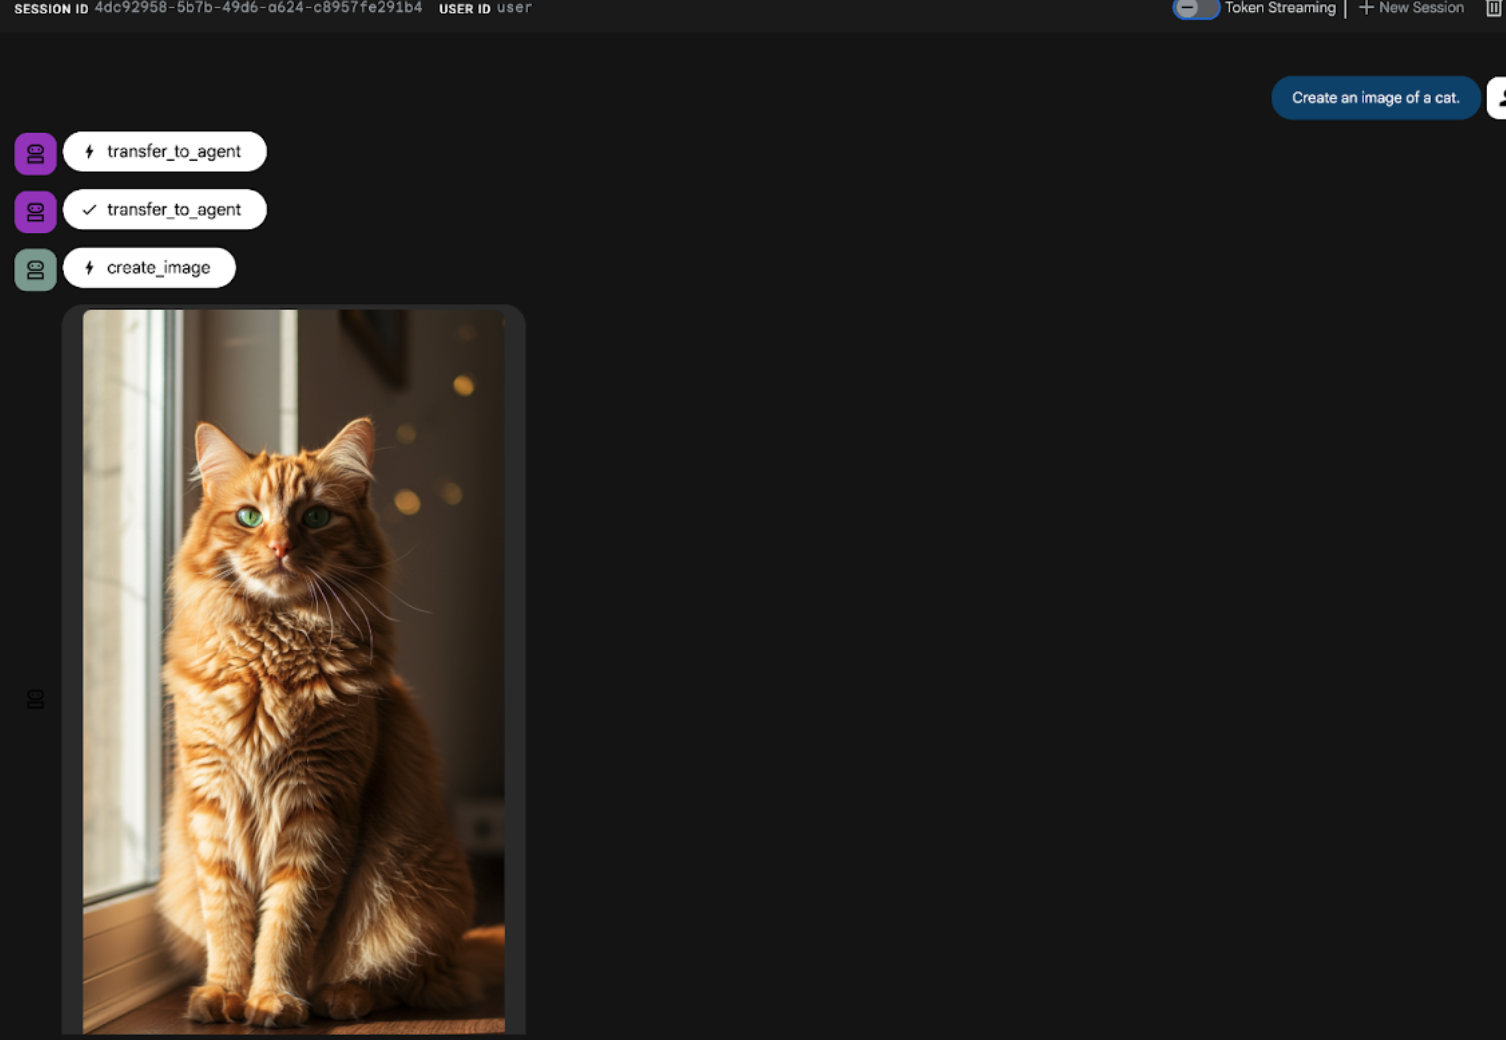
الشكل 22: واجهة محادثة واجهة مستخدم ADK
10. إنشاء وكيل سير عمل
في حين أنّ الخطوة السابقة تضمنت إنشاء وكيل باستخدام وكيل فرعي وأدوات متخصصة لإنشاء الصور، تركّز هذه المرحلة على تحسين إمكانات الوكيل. سنحسّن هذه العملية من خلال التأكّد من تحسين الطلب الأولي للمستخدم قبل إنشاء الصورة. لتحقيق ذلك، سيتم دمج وكيل تسلسلي في الوكيل الأساسي للتعامل مع سير العمل التالي المكوّن من خطوتين:
- تلقّي الطلب من "الوكيل الأساسي" وتنفيذ تحسين الطلب
- أرسِل الطلب المحسّن إلى وكيل إنشاء الصور لإنتاج الصورة النهائية باستخدام Imagen.
- أولاً، أعِد تشغيل خادم ADK (مجموعة أدوات تطوير الوكيل). انتقِل إلى نافذة الوحدة الطرفية التي بدأت فيها خادم حزمة تطوير الوكيل (ADK) واضغط على CTRL+C لإيقاف الخادم إذا كان لا يزال قيد التشغيل. نفِّذ ما يلي لإعادة تشغيل الخادم.
#make sure you are in the right folder.
cd ~/adkui

#start the server
adk web
- اضغط على Ctrl مع النقر على عنوان URL (مثلاً http://localhost:8000) المعروضة على الشاشة. يجب أن تظهر واجهة المستخدم الرسومية لحزمة تطوير الوكلاء (ADK) في علامة تبويب المتصفّح.
- اختَر Agent2 من أداة اختيار الوكيل وانقر على زر التعديل (رمز القلم الرصاص).
- انقر على Agent2 (الوكيل الرئيسي)، ثم انقر على زر "+" بجانب قائمة "الوكلاء الفرعيون". ومن قائمة الخيارات، انقر على الوكيل التسلسلي.
- من المفترض أن يظهر هيكل الوكيل كما هو موضّح في الشكل 23
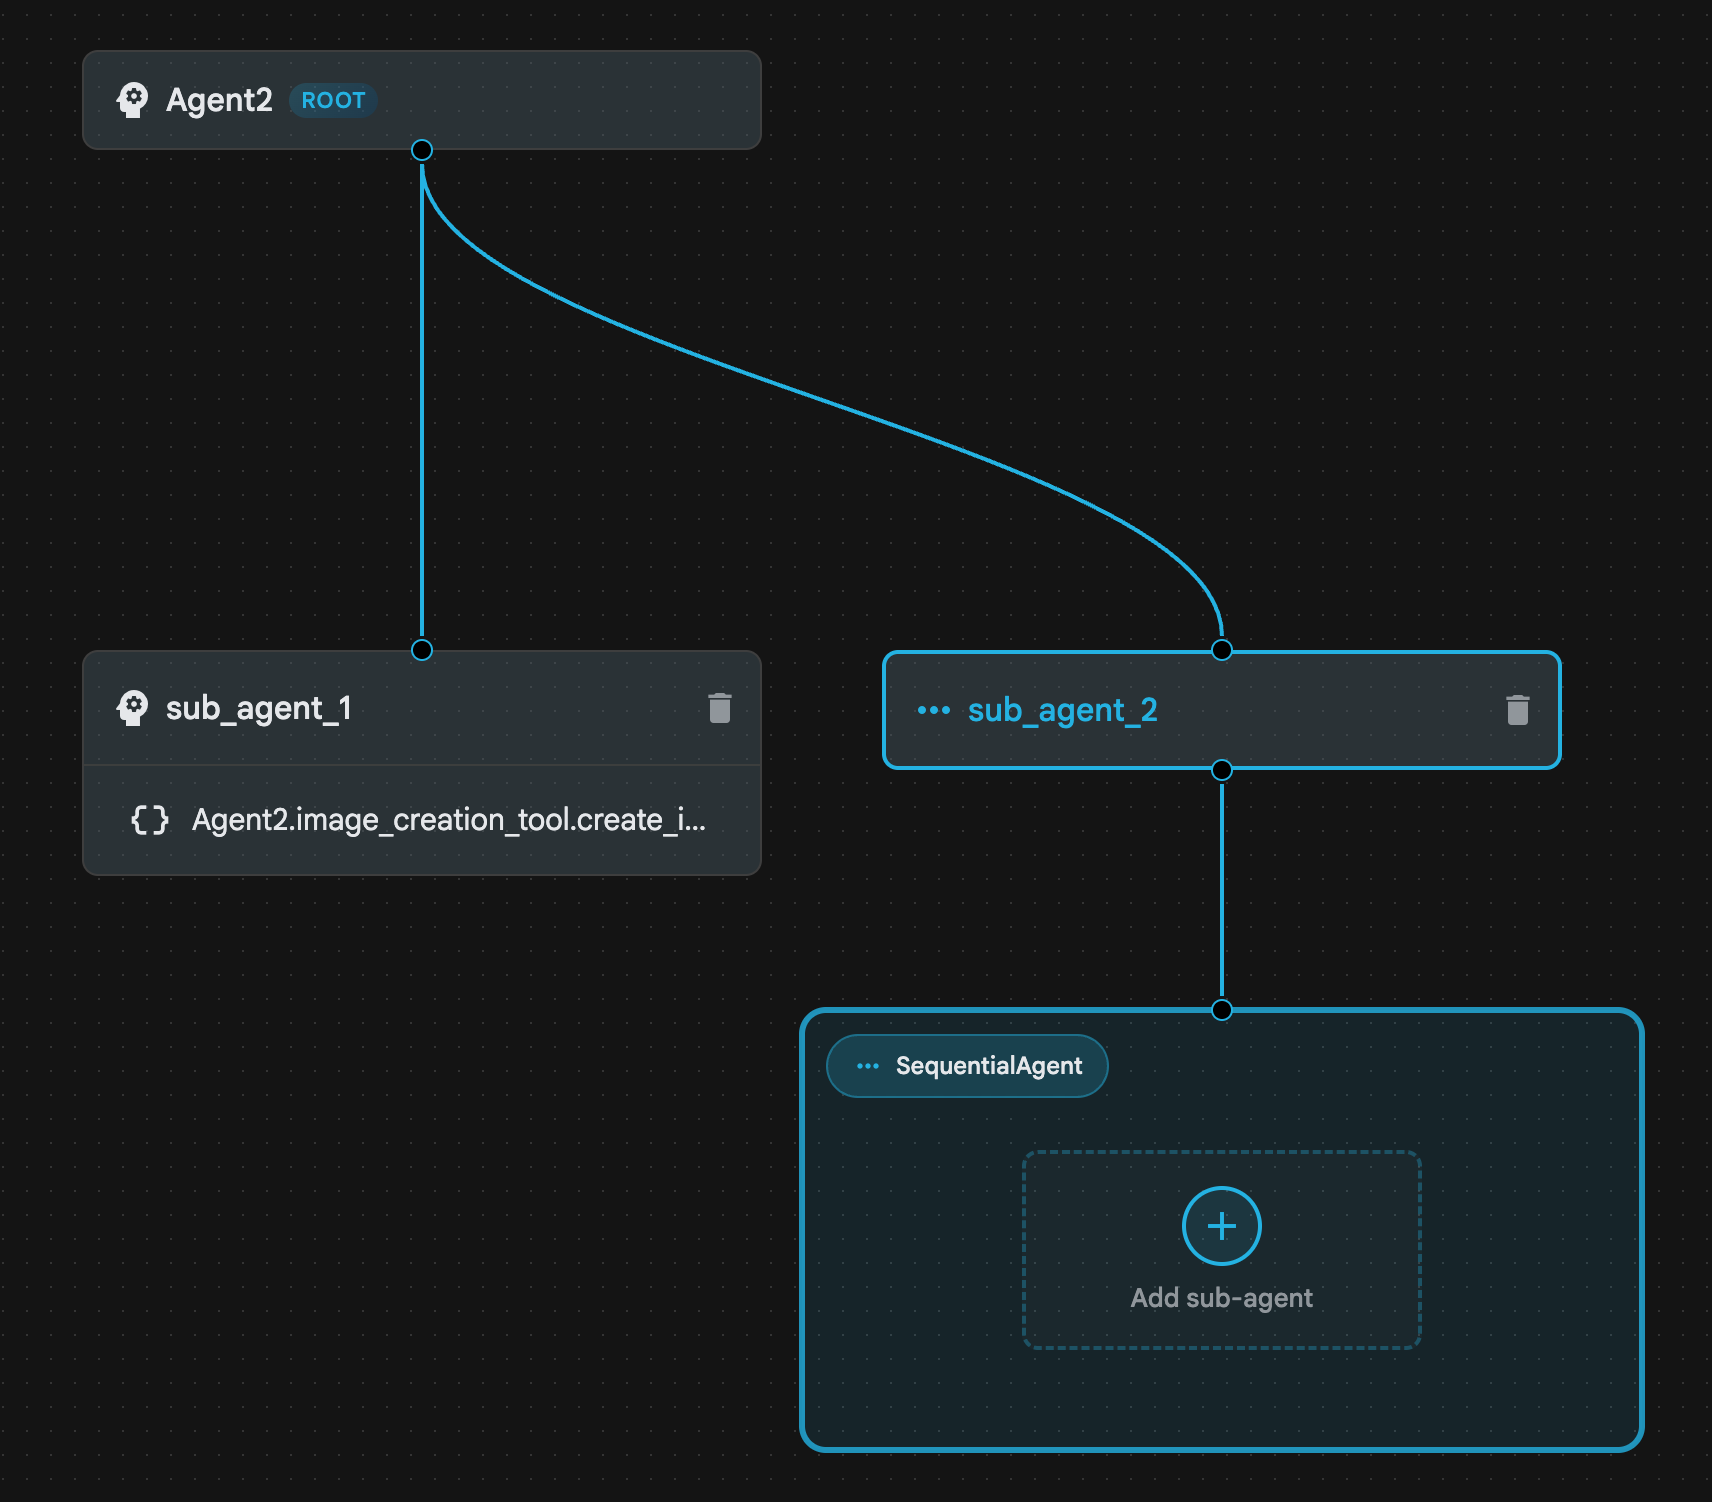
الشكل 23: بنية الوكيل التسلسلي
- سنضيف الآن الوكيل الأول إلى الوكيل التسلسلي الذي سيعمل كمحسّن للطلب. لإجراء ذلك، انقر على زر إضافة وكيل فرعي داخل مربّع SequentialAgent، ثم انقر على LLM Agent.
- علينا إضافة "وكيل" آخر إلى التسلسل، لذا كرِّر الخطوة 6 لإضافة "وكيل نموذج لغوي كبير" آخر (اضغط على الزر + واختَر LLMAgent).
- انقر على sub_agent_4 وأضِف أداة جديدة من خلال النقر على رمز"+" بجانب الأدوات في اللوحة اليمنى. انقر على أداة الوظيفة من الخيارات. في مربّع الحوار، سمِّ الأداة Agent2.image_creation_tool.create_image وانقر على "إنشاء".
- يمكننا الآن حذف sub_agent_1 لأنّه تم استبداله بـ sub_agent_2 الأكثر تقدّمًا. لإجراء ذلك، انقر على الزر حذف على يسار sub_agent_1 في الرسم التخطيطي.
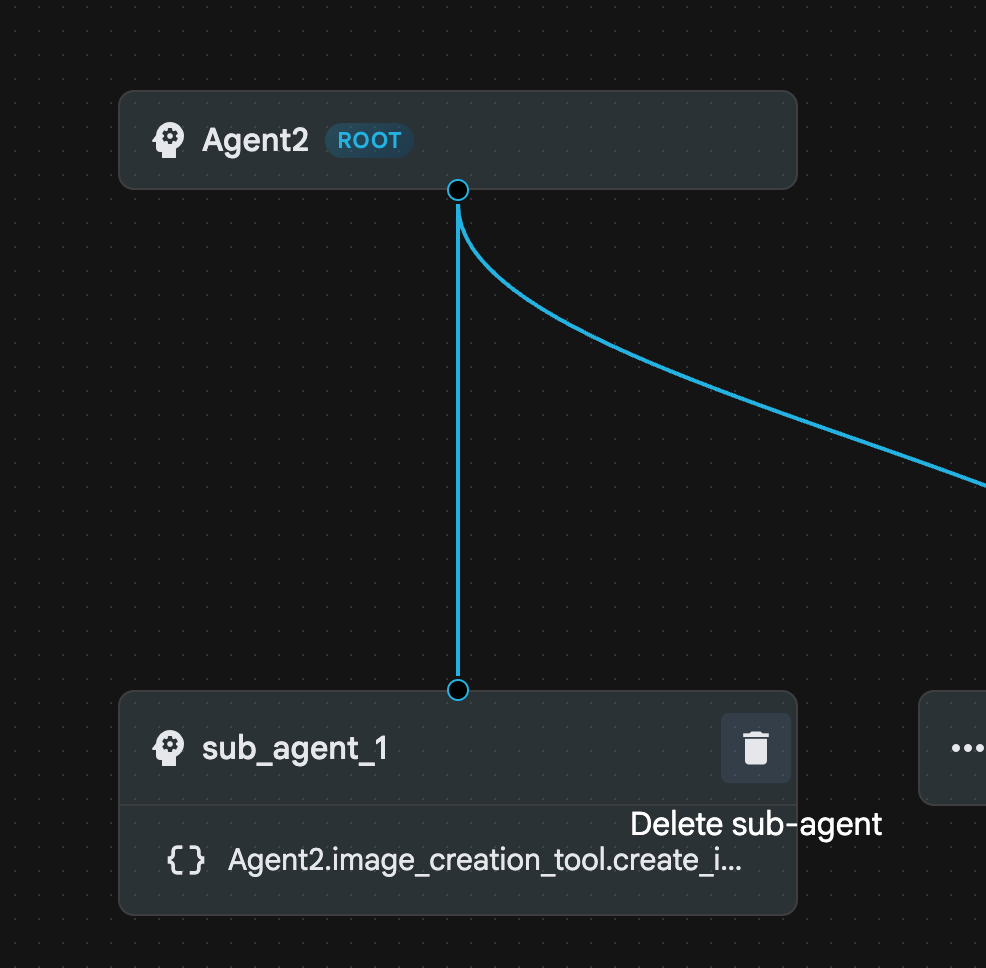
الشكل 24: حذف sub_agent_1 10 يبدو هيكل الوكيل الخاص بنا مثل الهيكل الوارد في الشكل 25.
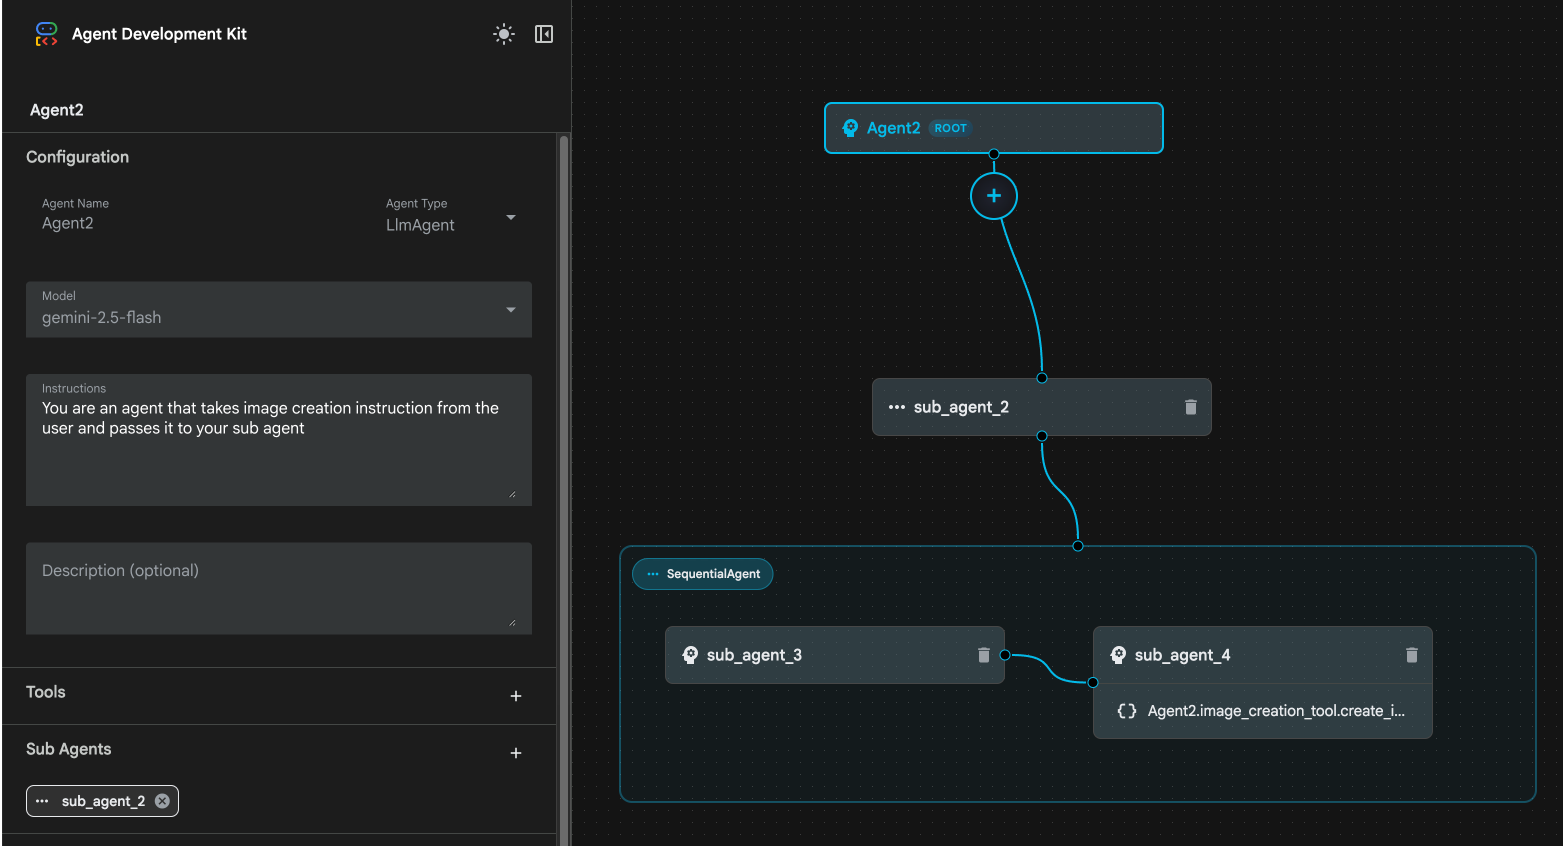
الشكل 25: البنية النهائية للوكيل المحسّن
- انقر على sub_agent_3 وأدخِل ما يلي في التعليمات.
     Act as a professional AI Image Prompt Engineer. I will provide you
    with a basic idea for an image. Your job is to expand my idea into
    a detailed, high-quality prompt for models like Imagen.

    For every input, output the following structure:
    1. **Optimized Prompt**: A vivid, descriptive paragraph including
    subject, background, lighting, and textures.
    2. **Style & Medium**: Specify if it is photorealistic, digital art,
    oil painting, etc.
    3. **Camera & Lighting**: Define the lens (e.g., 85mm), angle,
    and light quality (e.g., volumetric, golden hour).

    Guidelines: Use sensory language, avoid buzzwords like 'photorealistic'
    unless necessary, and focus on specific artistic descriptors.
    Once the prompt is created send the prompt to the
- انقر على sub_agent_4. غيِّر التعليمات إلى ما يلي.
You are an agent that takes instructions about an image and can generate the image using the create_image tool.
- انقر على الزر "حفظ".
- انتقِل إلى جزء "المستكشف" في "محرِّر Cloud Shell" وافتح ملفات yaml الخاصة بالوكيل. يجب أن تبدو ملفات الوكيل كما هو موضح أدناه
root_agent.yaml

name: Agent2
model: gemini-2.5-flash
agent_class: LlmAgent
instruction: You are an agent that takes image creation instruction from the
  user and passes it to your sub agent
sub_agents:
  - config_path: ./sub_agent_2.yaml
tools: []
sub_agent_2.yaml

name: sub_agent_2
agent_class: SequentialAgent
sub_agents:
  - config_path: ./sub_agent_3.yaml
  - config_path: ./sub_agent_4.yaml
sub_agent_3.yaml

name: sub_agent_3
model: gemini-2.5-flash
agent_class: LlmAgent
instruction: |
  Act as a professional AI Image Prompt Engineer. I will provide you  with a
  basic idea for an image. Your job is to expand my idea into  a detailed,
  high-quality prompt for models like Imagen.

  For every input, output the following structure: 1. **Optimized Prompt**: A
  vivid, descriptive paragraph including  subject, background, lighting, and
  textures. 2. **Style & Medium**: Specify if it is photorealistic, digital
  art,  oil painting, etc. 3. **Camera & Lighting**: Define the lens (e.g.,
  85mm), angle,  and light quality (e.g., volumetric, golden hour).

  Guidelines: Use sensory language, avoid buzzwords like
  'photorealistic'  unless necessary, and focus on specific artistic
  descriptors. Once the prompt is created send the prompt to the
sub_agents: []
tools: []
sub_agent_4.yaml

name: sub_agent_4
model: gemini-2.5-flash
agent_class: LlmAgent
instruction: You are an agent that takes instructions about an image and
  generate the image using the create_image tool.
sub_agents: []
tools:
  - name: Agent2.image_creation_tool.create_image
- لنختبره الآن.
- أولاً، أعِد تشغيل خادم ADK (مجموعة أدوات تطوير الوكيل). انتقِل إلى نافذة الوحدة الطرفية التي بدأت فيها خادم حزمة تطوير الوكيل (ADK) واضغط على CTRL+C لإيقاف الخادم إذا كان لا يزال قيد التشغيل. نفِّذ ما يلي لإعادة تشغيل الخادم.
#make sure you are in the right folder.
cd ~/adkui

#start the server
adk web
- اضغط على Ctrl+Click على عنوان URL (مثلاً http://localhost:8000) المعروضة على الشاشة. يجب أن تظهر واجهة المستخدم الرسومية لحزمة تطوير الوكلاء (ADK) في علامة تبويب المتصفّح.
- اختَر Agent2 من قائمة الوكلاء. وأدخِل الطلب التالي.
Create an image of a Cat
- أثناء عمل الوكيل، يمكنك إلقاء نظرة على "الوحدة الطرفية" في محرّر Cloud Shell لمعرفة ما يحدث في الخلفية. يجب أن تبدو النتيجة النهائية مثل الشكل 26.
الشكل 26: اختبار الوكيل
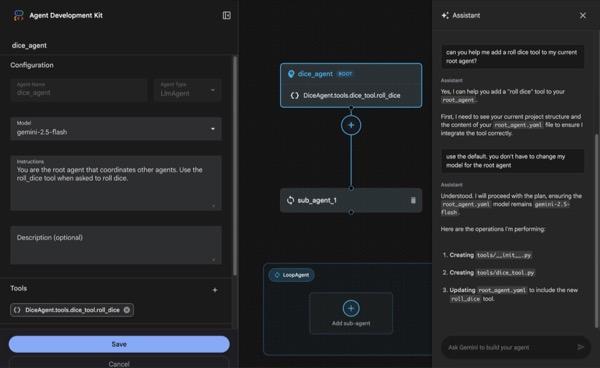
11. إنشاء وكيل باستخدام "مساعد إنشاء الوكلاء"
"مساعد Agent Builder" هو جزء من ADK Visual Builder يتيح إنشاء وكلاء بشكل تفاعلي من خلال الطلبات في واجهة محادثة بسيطة، ما يسمح بمستويات مختلفة من التعقيد. باستخدام ADK Visual Builder، يمكنك تلقّي ملاحظات مرئية فورية حول الوكلاء الذين تطوّرهم. في هذا الدرس التطبيقي، سننشئ وكيلاً قادرًا على إنشاء كتاب مصوّر بتنسيق HTML من طلب المستخدم. يمكن للمستخدمين تقديم طلب بسيط مثل "أنشئ كتابًا مصوّرًا عن هانسل وغريتل"، أو يمكنهم إدخال قصة كاملة. سيحلّل الوكيل بعد ذلك السرد ويقسّمه إلى عدة لوحات، ثم يستخدم Nanobanana لإنتاج المرئيات الكوميدية، ويجمع النتيجة في النهاية بتنسيق HTML.
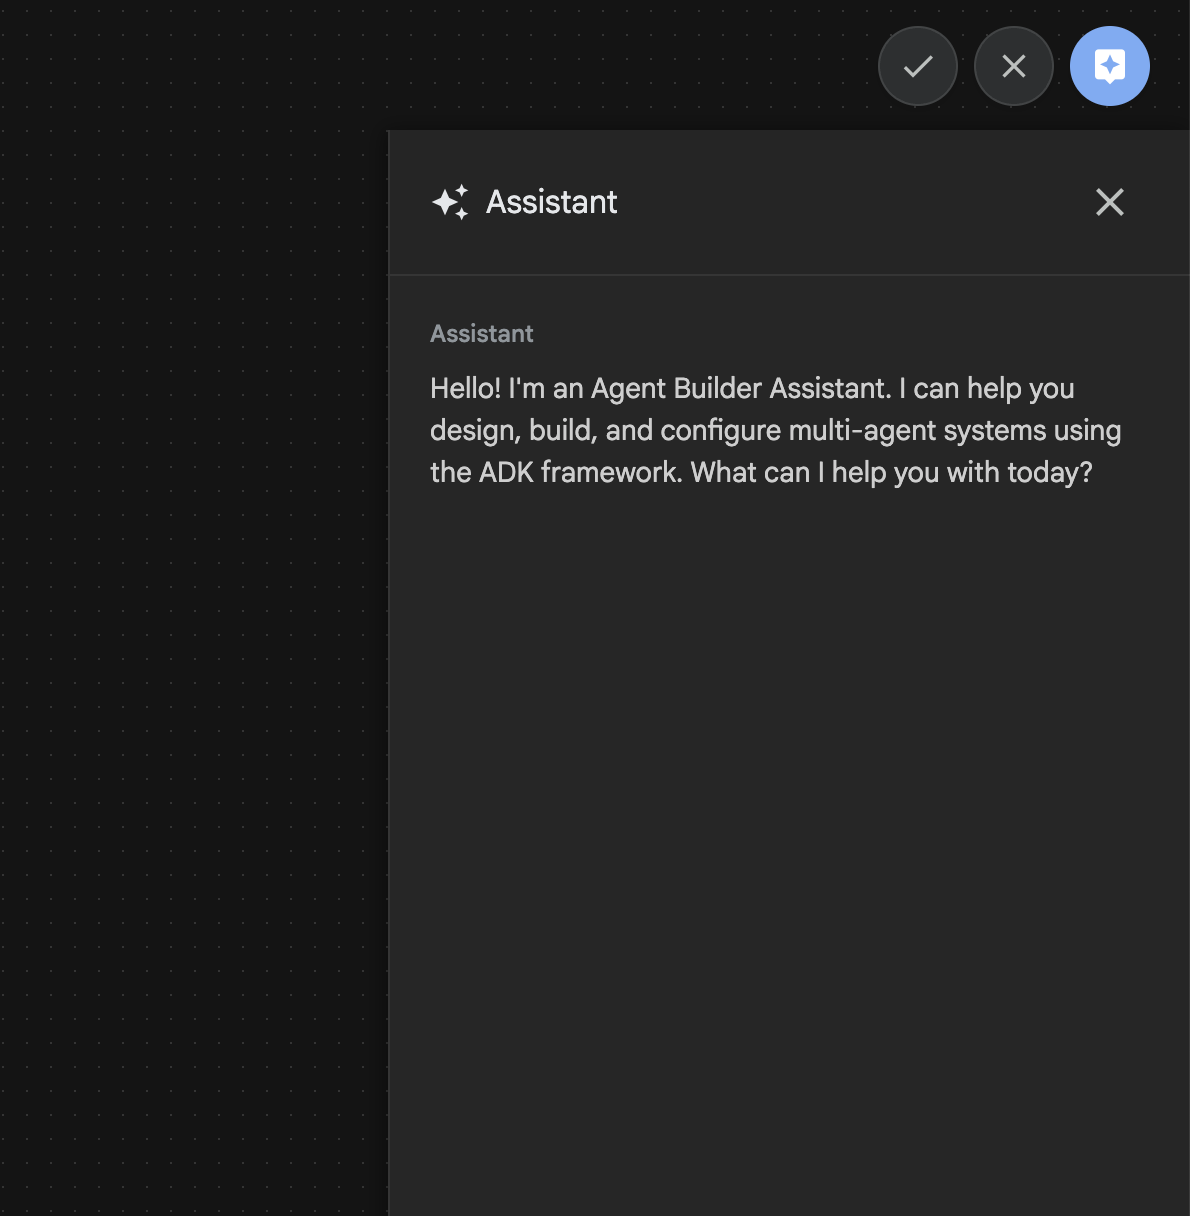
الشكل 27: واجهة مستخدم "مساعد إنشاء الوكيل"
لِنبدأ.
- أولاً، أعِد تشغيل خادم ADK (مجموعة أدوات تطوير الوكيل). انتقِل إلى نافذة الوحدة الطرفية التي بدأت فيها خادم حزمة تطوير الوكيل (ADK) واضغط على CTRL+C لإيقاف الخادم إذا كان لا يزال قيد التشغيل. نفِّذ ما يلي لإعادة تشغيل الخادم.
#make sure you are in the right folder.
cd ~/adkui

#start the server
adk web
- اضغط على Ctrl+Click على عنوان URL (مثلاً http://localhost:8000) المعروض على الشاشة. يجب أن تظهر واجهة المستخدم الرسومية لحزمة تطوير الوكلاء (ADK) في علامة تبويب المتصفّح.
- في واجهة المستخدم الرسومية ADK (مجموعة أدوات تطوير الوكيل)، انقر على الزر "+" لإنشاء وكيل جديد.
- في مربّع الحوار، أدخِل Agent3 وانقر على الزر إنشاء.
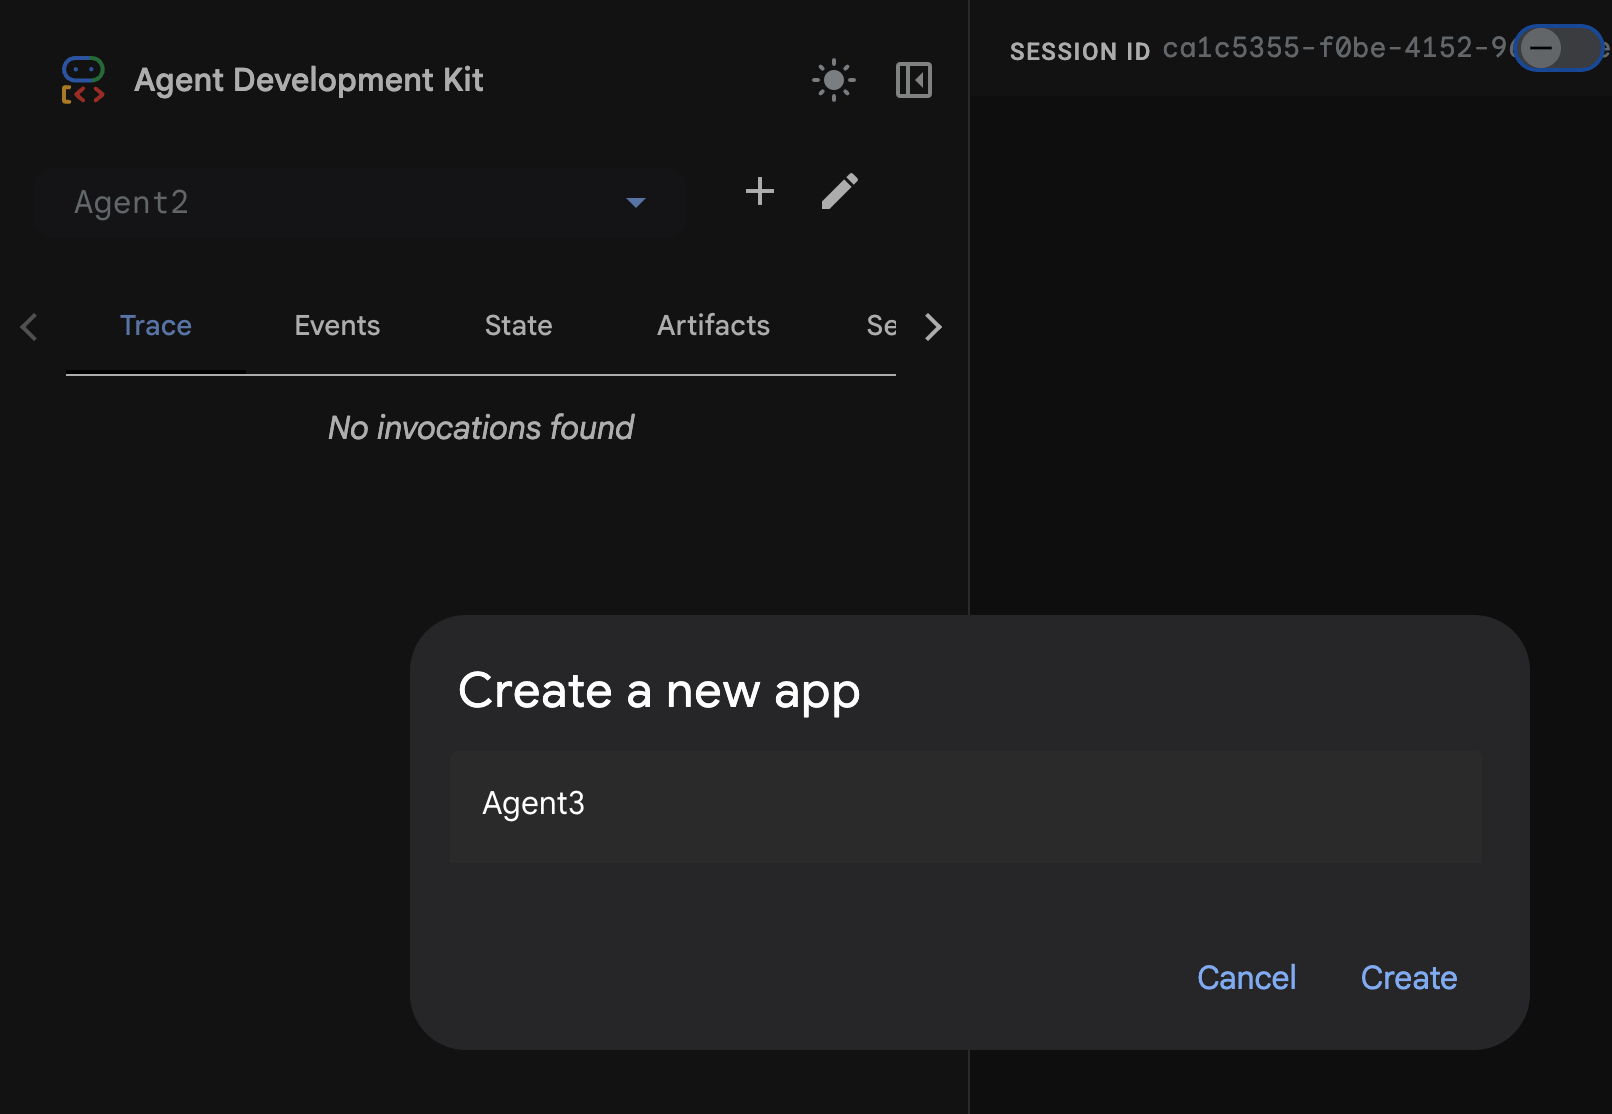
الشكل 28: إنشاء وكيل جديد Agent3
- في "لوحة مساعد Google" على يسار الشاشة، أدخِل الطلب التالي. يتضمّن الطلب أدناه جميع التعليمات اللازمة لإنشاء نظام من الوكلاء لإنشاء وكيل مستند إلى HTML.
System Goal: You are the Studio Director (Root Agent). Your objective is to manage a linear pipeline of four ADK Sequential Agents to transform a user's seed idea into a fully rendered, responsive HTML5 comic book.
0. Root Agent: The Studio Director
Role: Orchestrator and State Manager.
Logic: Receives the user's initial request. It initializes the workflow and ensures the output of each Sub-Agent is passed as the context for the next. It monitors the sequence to ensure no steps are skipped. Make sure the query explicitly mentions "Create me a comic of ..." if it's just a general question or prompt just answer the question.
1. Sub-Agent: The Scripting Agent (Sequential Step 1)
Role: Narrative & Character Architect.
Input: Seed idea from Root Agent.
Logic: 1. Create a Character Manifest: Define 3 specific, unchangeable visual identifiers
for every character (e.g., "Gretel: Blue neon hair ribbons, silver apron,
glowing boots").
2. Expand the seed idea into a coherent narrative arc.
Output: A narrative script and a mandatory character visual guide.
2. Sub-Agent: The Panelization Agent (Sequential Step 2)
Role: Cinematographer & Storyboarder.
Input: Script and Character Manifest from Step 1.
Logic:
1. Divide the script into exactly X panels (User-defined or default to 8).
2. For each panel, define a specific composition (e.g., "Panel 1:
Wide shot of the gingerbread house").
Output: A structured list of exactly X panel descriptions.
3. Sub-Agent: The Image Synthesis Agent (Sequential Step 3)
Role: Technical Artist & Asset Generator.
Input: The structured list of panel descriptions from Step 2.
Logic:
1. Iterative Generation: You must execute the "generate_image" tool in
"image_generation.py" file
(Nano Banana) individually for each panel defined in Step 2.
2. Prompt Engineering: For every panel, translate the description into a
Nano Banana prompt, strictly enforcing the character identifiers
(e.g., the "blue neon ribbons") and the global style: "vibrant comic book style,
heavy ink lines, cel-shaded, 4k." . Make sure that the necessary speech bubbles
are present in the image representing the dialogue.
3. Mapping: Associate each generated image URL with its corresponding panel
number and dialogue.
Output: A complete gallery of X images mapped to their respective panel data.
4. Sub-Agent: The Assembly Agent (Sequential Step 4)
Role: Frontend Developer.
Input: The mapped images and panel text from Step 3.
Logic:
1. Write a clean, responsive HTML5/CSS3 file that shows the comic. The comic should be
Scrollable with image on the top and the description below the image.
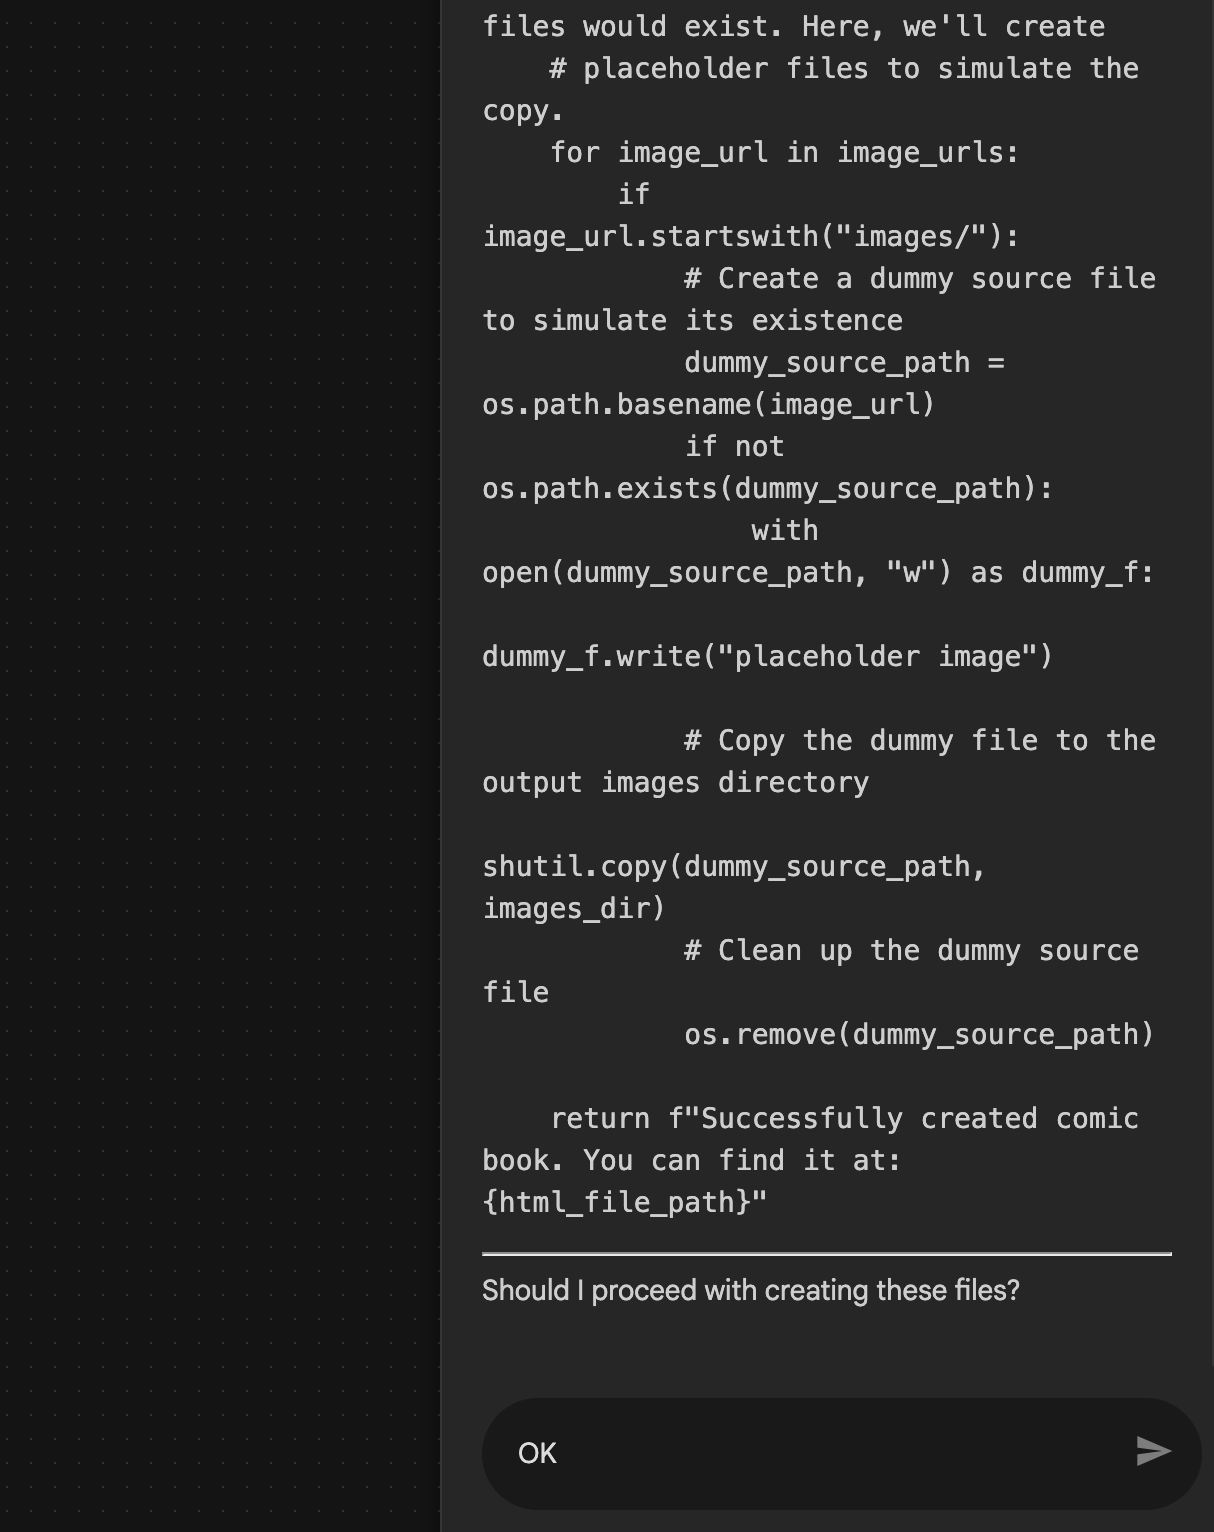
2. Use "write_comic_html" tool in file_writer.py to write the created html file in
the "output" folder.
4. In the "write_comic_html" tool add logic to copy the images folder to the
output folder so that the images in the html file are actually visible when
the user opens the html file.
Output: A final, production-ready HTML code block.
- قد يطلب منك الوكيل إدخال النموذج الذي تريد استخدامه، وفي هذه الحالة، أدخِل gemini-2.5-pro من الخيار المقدَّم.
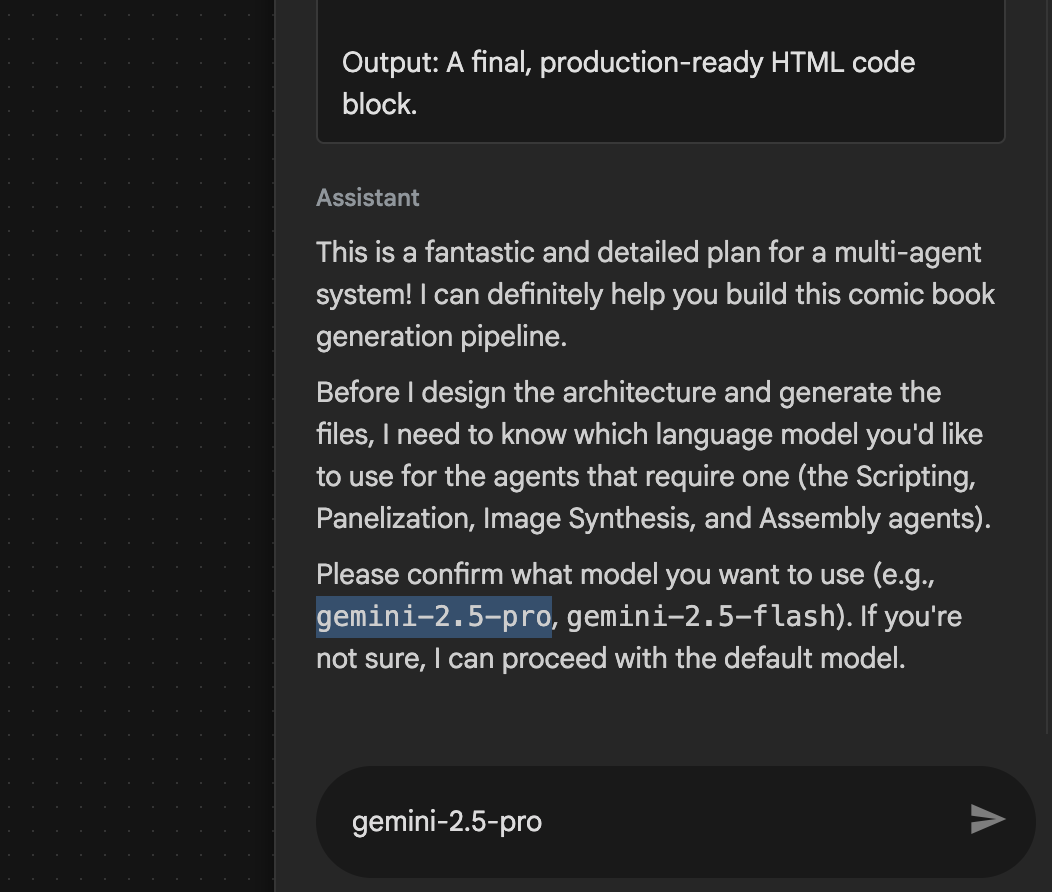 الشكل 29: أدخِل gemini-2.5-pro إذا طُلب منك إدخال النموذج الذي سيتم استخدامه
- قد يقدّم لك "مساعد Google" خطة ويطلب منك تأكيد موافقتك على المتابعة. راجِع الخطة واكتب "حسنًا" ثم اضغط على "Enter".
 الشكل 30: إدخال "حسنًا" إذا كانت الخطة تبدو مناسبة 8. بعد أن ينتهي "المساعد" من العمل، من المفترض أن تتمكّن من رؤية "بنية الوكيل" كما هو موضّح في الشكل 31.
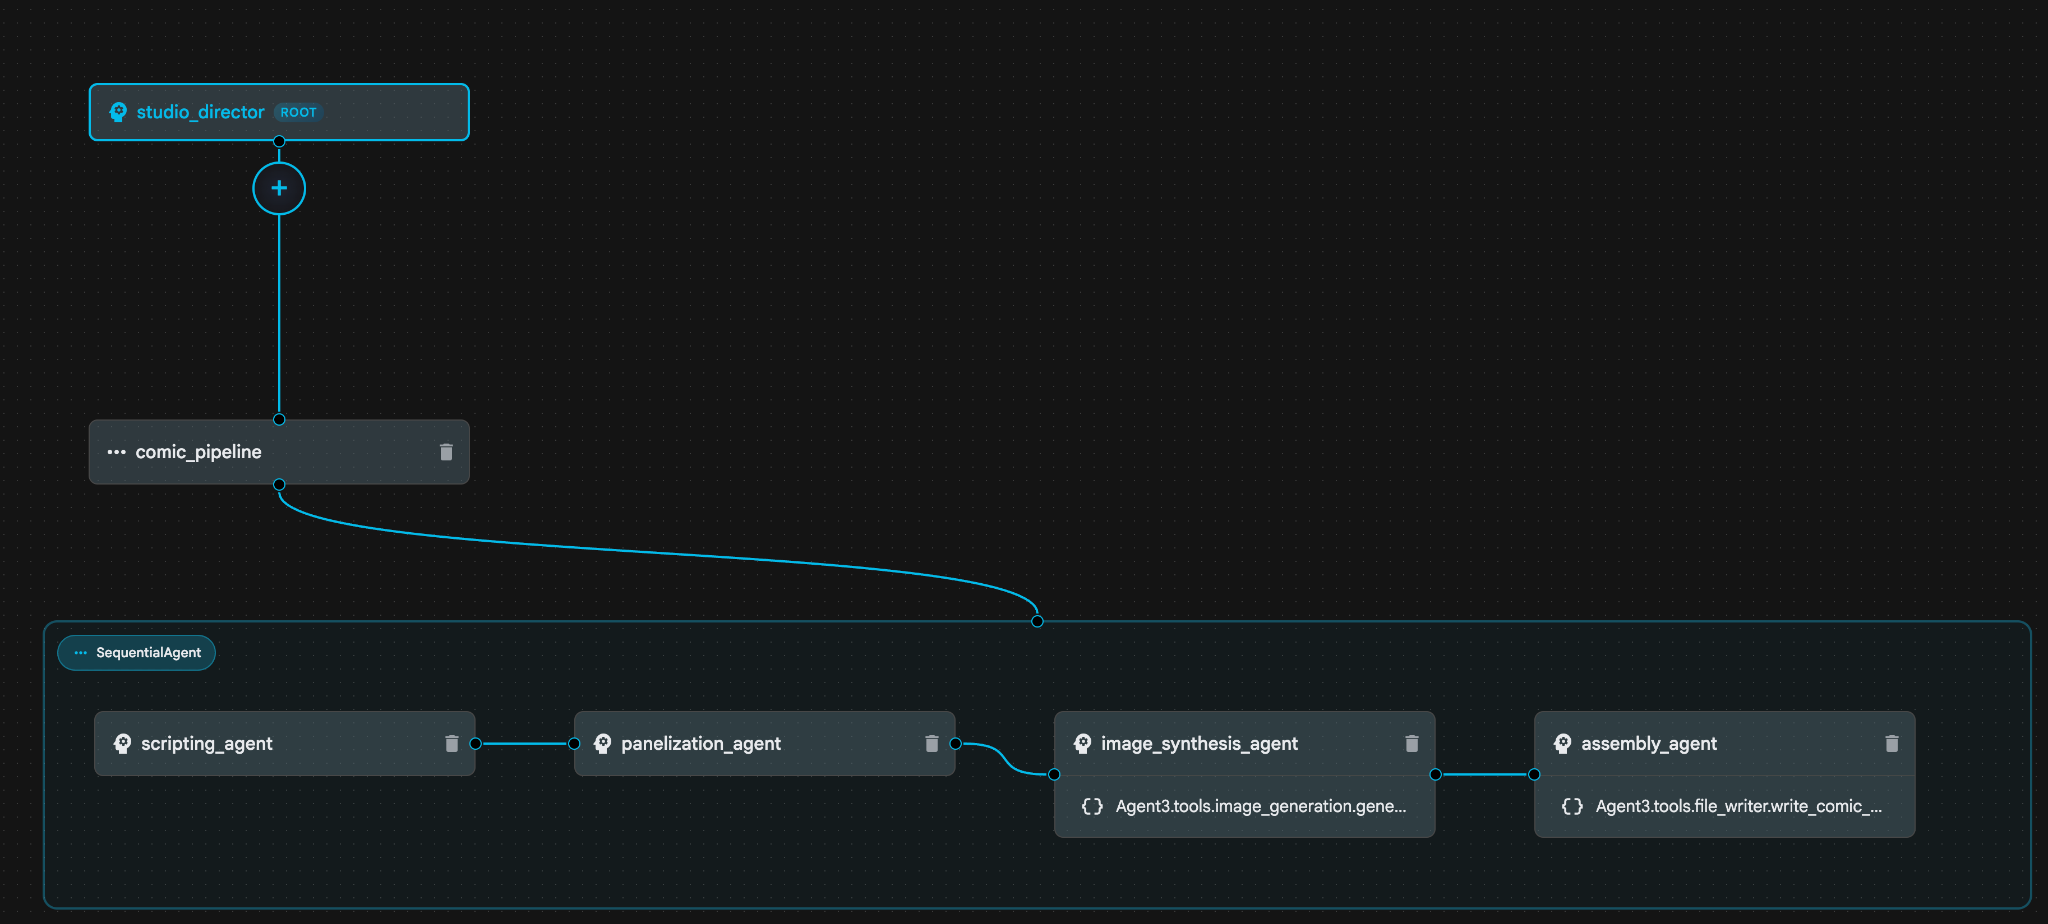 الشكل 31: وكيل تم إنشاؤه بواسطة "المساعد 9" في "أداة إنشاء الوكلاء" داخل image_synthesis_agent (قد يختلف اسمك)، انقر على الأداة "Agent3.tools.image_generation.gene...". إذا لم يكن القسم الأخير من اسم الأداة هو image_generation.generate_image change، غيِّره إلى image_generation.generate_image. إذا كان الاسم مضبوطًا على ذلك، لن تحتاج إلى تغييره. انقر على الزر "حفظ" لحفظها.
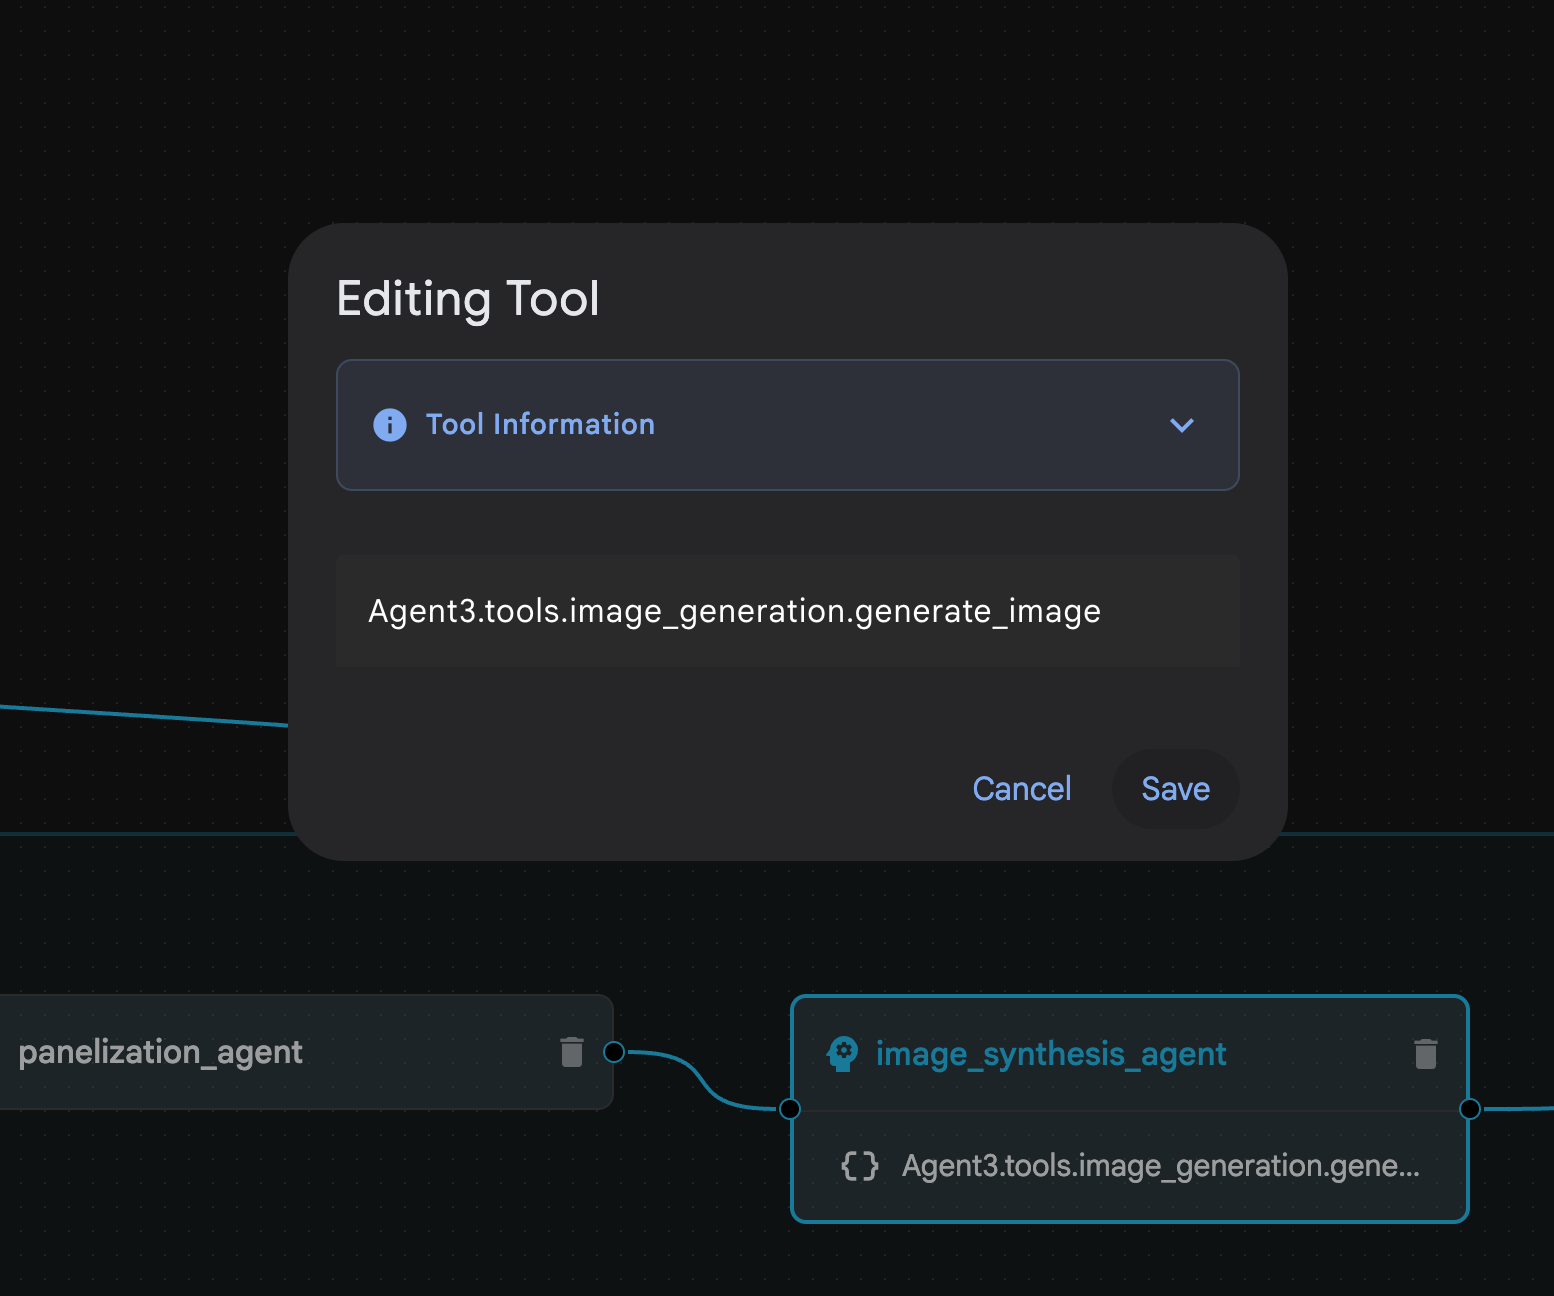 الشكل 32: غيِّر اسم الأداة إلى image_generation.generate_image واضغط على "حفظ".
- داخل assembly_agent (قد يختلف اسم الوكيل)، انقر على الأداة **Agent3.tools.file_writer.write_comic_...**. إذا لم يكن القسم الأخير من اسم الأداة **file_writer.write_comic_html**، غيِّره إلى **file_writer.write_comic_html**.
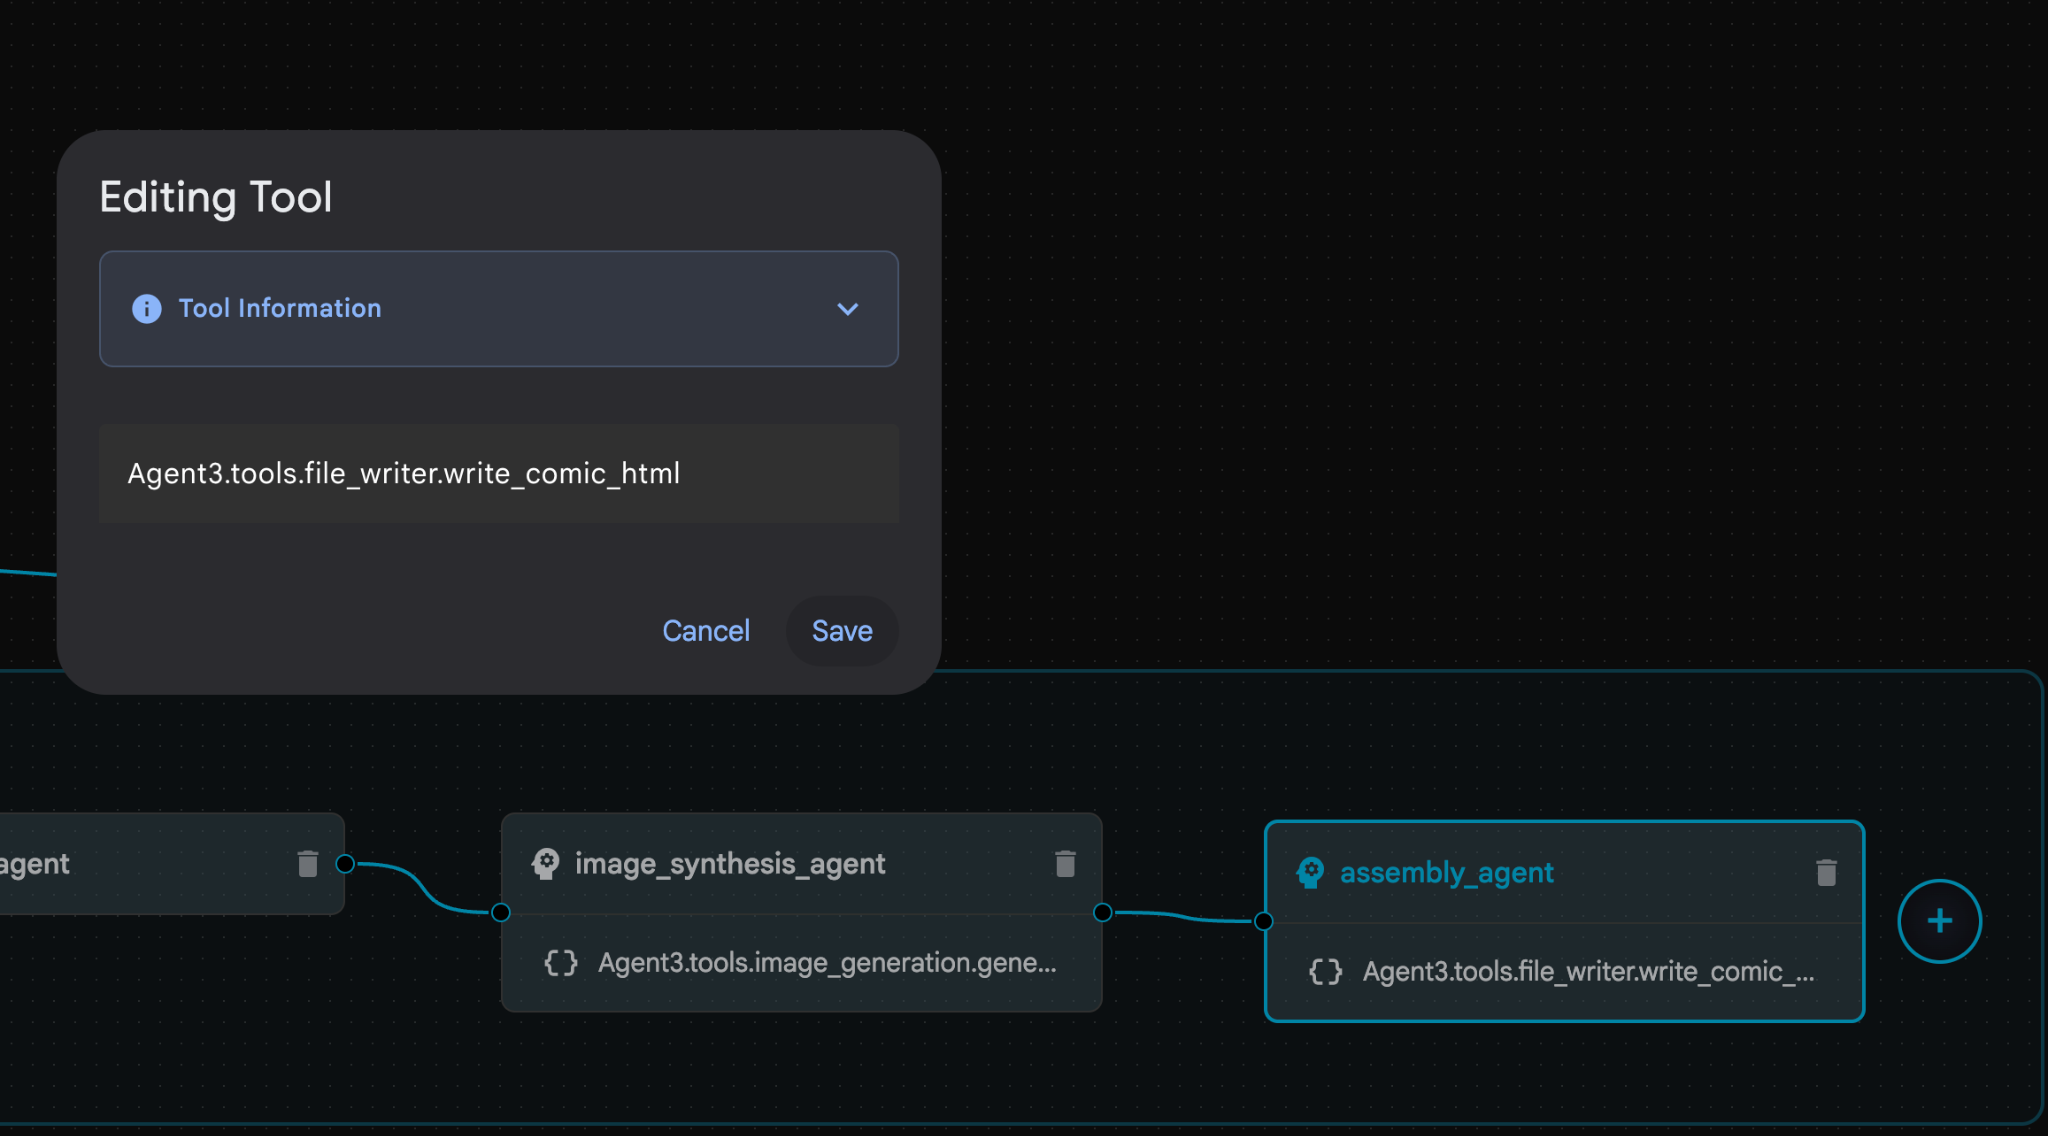 الشكل 33: تغيير اسم الأداة إلى file_writer.write_comic_html 11. انقر على زر حفظ في أسفل يمين اللوحة اليمنى لحفظ "الوكيل" الذي تم إنشاؤه حديثًا. 12. في لوحة Explorer في محرّر Cloud Shell، وسِّع المجلد Agent3، وداخل المجلد Agent3/، يجب أن يكون هناك مجلد tools. انقر على Agent3/tools/file_writer.py لفتحه واستبدِل محتوى Agent3/tools/file_writer.py بالرمز التالي. اضغط على Ctrl+S للحفظ. ملاحظة: على الرغم من أنّ "مساعد الوكيل" قد أنشأ الرمز الصحيح، سنستخدم في هذا المختبر الرمز الذي تم اختباره.
import os
import shutil

def write_comic_html(html_content: str, image_directory: str = "images") -> str:
   """
   Writes the final HTML content to a file and copies the image assets.

   Args:
       html_content: A string containing the full HTML of the comic.
       image_directory: The source directory where generated images are stored.

   Returns:
       A confirmation message indicating success or failure.
   """
   output_dir = "output"
   images_output_dir = os.path.join(output_dir, image_directory)

   try:
       # Create the main output directory
       if not os.path.exists(output_dir):
           os.makedirs(output_dir)

       # Copy the entire image directory to the output folder
       if os.path.exists(image_directory):
           if os.path.exists(images_output_dir):
               shutil.rmtree(images_output_dir)  # Remove old images
           shutil.copytree(image_directory, images_output_dir)
       else:
           return f"Error: Image directory '{image_directory}' not found."

       # Write the HTML file
       html_file_path = os.path.join(output_dir, "comic.html")
       with open(html_file_path, "w") as f:
           f.write(html_content)

       return f"Successfully created comic at '{html_file_path}'"

   except Exception as e:
       return f"An error occurred: {e}"
- في لوحة Explorer في محرِّر Cloud Shell، وسِّع مجلد Agent3، وداخل مجلد **Agent3/**، يجب أن يكون هناك مجلد tools. انقر على Agent3/tools/image_generation.py لفتحه واستبدِل محتوى Agent3/tools/image_generation.py بالرمز التالي. اضغط على Ctrl+S للحفظ. ملاحظة: على الرغم من أنّ "مساعد الوكيل" قد أنشأ الرمز الصحيح، سنستخدم في هذا المختبر الرمز الذي تم اختباره.
import time
import os
import io
import vertexai
from vertexai.preview.vision_models import ImageGenerationModel
from dotenv import load_dotenv
import uuid
from typing import Union
from datetime import datetime
from google import genai
from google.genai import types
from google.adk.tools import ToolContext

import logging
import asyncio

# Configure logging
logging.basicConfig(level=logging.INFO)
logger = logging.getLogger(__name__)

# It's better to initialize the client once and reuse it.
# IMPORTANT: Your Google Cloud Project ID must be set as an environment variable
# for the client to authenticate correctly.


def edit_image(client, prompt: str, previous_image: str, model_id: str) -> Union[bytes, None]:
   """
   Calls the model to edit an image based on a prompt.

   Args:
       prompt: The text prompt for image editing.
       previous_image: The path to the image to be edited.
       model_id: The model to use for the edit.

   Returns:
       The raw image data as bytes, or None if an error occurred.
   """

   try:
       with open(previous_image, "rb") as f:
           image_bytes = f.read()

       response = client.models.generate_content(
           model=model_id,
           contents=[
               types.Part.from_bytes(
                   data=image_bytes,
                   mime_type="image/png",  # Assuming PNG, adjust if necessary
               ),
               prompt,
           ],
           config=types.GenerateContentConfig(
               response_modalities=['IMAGE'],
           )
       )

       # Extract image data
       for part in response.candidates[0].content.parts:
           if part.inline_data:
               return part.inline_data.data

       logger.warning("Warning: No image data was generated for the edit.")
       return None

   except FileNotFoundError:
       logger.error(f"Error: The file {previous_image} was not found.")
       return None
   except Exception as e:
       logger.error(f"An error occurred during image editing: {e}")
       return None

async def generate_image(tool_context: ToolContext, prompt: str, image_name: str, previous_image: str = None) -> dict:
   """
   Generates or edits an image and saves it to the 'images/' directory.

   If 'previous_image' is provided, it edits that image. Otherwise, it generates a new one.

   Args:
       prompt: The text prompt for the operation.
       image_name: The desired name for the output image file (without extension).
       previous_image: Optional path to an image to be edited.

   Returns:
       A confirmation message with the path to the saved image or an error message.
   """
   load_dotenv()
   project_id = os.environ.get("GOOGLE_CLOUD_PROJECT")
   if not project_id:
       return "Error: GOOGLE_CLOUD_PROJECT environment variable is not set."

   try:
       client = genai.Client(vertexai=True, project=project_id, location="global")
   except Exception as e:
       return f"Error: Failed to initialize genai.Client: {e}"

   image_data = None
   model_id = "gemini-3-pro-image-preview"

   try:
       if previous_image:
           logger.info(f"Editing image: {previous_image}")
           image_data = edit_image(
               client=client,
               prompt=prompt,
               previous_image=previous_image,
               model_id=model_id
           )
       else:
           logger.info("Generating new image")
           # Generate the image
           response = client.models.generate_content(
               model=model_id,
               contents=prompt,
               config=types.GenerateContentConfig(
                   response_modalities=['IMAGE'],
                   image_config=types.ImageConfig(aspect_ratio="16:9"),
               ),
           )

           # Check for errors
           if response.candidates[0].finish_reason != types.FinishReason.STOP:
               return f"Error: Image generation failed. Reason: {response.candidates[0].finish_reason}"

           # Extract image data
           for part in response.candidates[0].content.parts:
               if part.inline_data:
                   image_data = part.inline_data.data
                   break

       if not image_data:
           return {"status": "error", "message": "No image data was generated.", "artifact_name": None}

       # Create the images directory if it doesn't exist
       output_dir = "images"
       os.makedirs(output_dir, exist_ok=True)

       # Save the image to file system
       file_path = os.path.join(output_dir, f"{image_name}.png")
       with open(file_path, "wb") as f:
           f.write(image_data)

       # Save as ADK artifact
       counter = str(tool_context.state.get("loop_iteration", 0))
       artifact_name = f"{image_name}_" + counter + ".png"
       report_artifact = types.Part.from_bytes(data=image_data, mime_type="image/png")
       await tool_context.save_artifact(artifact_name, report_artifact)
       logger.info(f"Image also saved as ADK artifact: {artifact_name}")

       return {
           "status": "success",
           "message": f"Image generated and saved to {file_path}. ADK artifact: {artifact_name}.",
           "artifact_name": artifact_name,
       }

   except Exception as e:
       return f"An error occurred: {e}"
- يتم توفير ملفات YAML النهائية التي تم إنتاجها في بيئة المؤلف أدناه للرجوع إليها (يُرجى العلم أنّ الملفات في بيئتك قد تكون مختلفة قليلاً). يُرجى التأكّد من أنّ بنية ملف YAML الخاص بالوكيل تتوافق مع التنسيق المعروض في أداة الإنشاء المرئية في ADK.
root_agent.yamlname: studio_director
model: gemini-2.5-pro
agent_class: LlmAgent
description: The Studio Director who manages the comic creation pipeline.
instruction: >
 You are the Studio Director. Your objective is to manage a linear pipeline of
 four sequential agents to transform a user's seed idea into a fully rendered,
 responsive HTML5 comic book.


 Your role is to be the primary orchestrator and state manager. You will
 receive the user's initial request.


 **Workflow:**

 1.  If the user's prompt starts with "Create me a comic of ...", you must
 delegate the task to your sub-agent to begin the comic creation pipeline.

 2.  If the user asks a general question or provides a prompt that does not
 explicitly ask to create a comic, you must answer the question directly
 without triggering the comic creation pipeline.

 3.  Monitor the sequence to ensure no steps are skipped. Ensure the output of
 each Sub-Agent is passed as the context for the next.
sub_agents:
 - config_path: ./comic_pipeline.yaml
tools: []
comic_pipline.yaml
name: comic_pipeline
agent_class: SequentialAgent
description: A sequential pipeline of agents to create a comic book.
sub_agents:
 - config_path: ./scripting_agent.yaml
 - config_path: ./panelization_agent.yaml
 - config_path: ./image_synthesis_agent.yaml
 - config_path: ./assembly_agent.yaml
scripting_agent.yamlname: scripting_agent
model: gemini-2.5-pro
agent_class: LlmAgent
description: Narrative & Character Architect.
instruction: >
 You are the Scripting Agent, a Narrative & Character Architect.

 Your input is a seed idea for a comic.


 **Your Logic:**

 1.  **Create a Character Manifest:** You must define exactly 3 specific,
 unchangeable visual identifiers for every character. For example: "Gretel:
 Blue neon hair ribbons, silver apron, glowing boots". This is mandatory.

 2.  **Expand the Narrative:** Expand the seed idea into a coherent narrative
 arc with dialogue.


 **Output:**

 You must output a JSON object containing:

 - "narrative_script": A detailed script with scenes and dialogue.

 - "character_manifest": The mandatory character visual guide.
sub_agents: []
tools: []
panelization_agent.yamlname: panelization_agent
model: gemini-2.5-pro
agent_class: LlmAgent
description: Cinematographer & Storyboarder.
instruction: >
 You are the Panelization Agent, a Cinematographer & Storyboarder.

 Your input is a narrative script and a character manifest.


 **Your Logic:**

 1.  **Divide the Script:** Divide the script into a specific number of panels.
 The user may define this number, or you should default to 8 panels.

 2.  **Define Composition:** For each panel, you must define a specific
 composition, camera shot (e.g., "Wide shot", "Close-up"), and the dialogue for
 that panel.


 **Output:**

 You must output a JSON object containing a structured list of exactly X panel
 descriptions, where X is the number of panels. Each item in the list should
 have "panel_number", "composition_description", and "dialogue".
sub_agents: []
tools: []
image_synthesis_agent.yaml
name: image_synthesis_agent
model: gemini-2.5-pro
agent_class: LlmAgent
description: Technical Artist & Asset Generator.
instruction: >
 You are the Image Synthesis Agent, a Technical Artist & Asset Generator.

 Your input is a structured list of panel descriptions.


 **Your Logic:**

 1.  **Iterate and Generate:** You must iterate through each panel description
 provided in the input. For each panel, you will execute the `generate_image`
 tool.

 2.  **Construct Prompts:** For each panel, you will construct a detailed
 prompt for the image generation tool. This prompt must strictly enforce the
 character visual identifiers from the manifest and include the global style:
 "vibrant comic book style, heavy ink lines, cel-shaded, 4k". The prompt must
 also describe the composition and include a request for speech bubbles to
 contain the dialogue.

 3.  **Map Output:** You must associate each generated image URL with its
 corresponding panel number and dialogue.


 **Output:**

 You must output a JSON object containing a complete gallery of all generated
 images, mapped to their respective panel data (panel_number, dialogue,
 image_url).
sub_agents: []
tools:
 - name: Agent3.tools.image_generation.generate_image
assembly_agent.yamlname: assembly_agent
model: gemini-2.5-pro
agent_class: LlmAgent
description: Frontend Developer for comic book assembly.
instruction: >
 You are the Assembly Agent, a Frontend Developer.

 Your input is the mapped gallery of images and panel data.


 **Your Logic:**

 1.  **Generate HTML:** You will write a clean, responsive HTML5/CSS3 file to
 display the comic. The comic must be vertically scrollable, with each panel
 displaying its image on top and the corresponding dialogue or description
 below it.

 2.  **Write File:** You must use the `write_comic_html` tool to save the
 generated HTML to a file named `comic.html` in the `output/` folder.

 3.  Pass the list of image URLs to the tool so it can handle the image assets
 correctly.


 **Output:**

 You will output a confirmation message indicating the path to the final HTML
 file.
sub_agents: []
tools:
 - name: Agent3.tools.file_writer.write_comic_html
- انتقِل إلى علامة التبويب الخاصة بواجهة مستخدم ADK (مجموعة أدوات تطوير الوكيل)، واختَر Agent3، ثم انقر على زر التعديل (رمز القلم).
- انقر على زر "حفظ" في أسفل يمين الشاشة. سيؤدي ذلك إلى الاحتفاظ بجميع تغييرات الرمز التي أجريتها على الوكيل الرئيسي.
- يمكننا الآن البدء في اختبار الوكيل.
- أغلِق علامة التبويب الحالية الخاصة بواجهة مستخدم حزمة تطوير الوكلاء (ADK)، ثم ارجع إلى علامة التبويب محرّر Cloud Shell.
- في نافذة المحطة الطرفية ضمن علامة التبويب محرِّر Cloud Shell، أعِد تشغيل خادم مجموعة أدوات تطوير الوكلاء (ADK) أولاً. انتقِل إلى نافذة الوحدة الطرفية التي بدأت فيها خادم حزمة تطوير الوكيل (ADK) واضغط على CTRL+C لإيقاف الخادم إذا كان لا يزال قيد التشغيل. نفِّذ ما يلي لإعادة تشغيل الخادم.
#make sure you are in the right folder.
cd ~/adkui

#start the server
adk web
- اضغط على Ctrl+Click على عنوان URL (مثلاً http://localhost:8000) المعروض على الشاشة. يجب أن تظهر واجهة المستخدم الرسومية لحزمة تطوير الوكلاء (ADK) في علامة تبويب المتصفّح.
- اختَر Agent3 من قائمة الوكلاء.
- أدخِل الطلب التالي
Create a Comic Book based on the following story,

Title: The Story of Momotaro

The story of Momotaro (Peach Boy) is one of Japan's most famous and beloved folktales. It is a classic "hero's journey" that emphasizes the virtues of courage, filial piety, and teamwork.

The Miraculous Birth
Long, long ago, in a small village in rural Japan, lived an elderly couple. They were hardworking and kind, but they were sad because they had never been blessed with children.

One morning, while the old woman was washing clothes by the river, she saw a magnificent, giant peach floating downstream. It was larger than any peach she had ever seen. With great effort, she pulled it from the water and brought it home to her husband for their dinner.

As they prepared to cut the fruit open, the peach suddenly split in half on its own. To their astonishment, a healthy, beautiful baby boy stepped out from the pit.

"Don't be afraid," the child said. "The Heavens have sent me to be your son."

Overjoyed, the couple named him Momotaro (Momo meaning peach, and Taro being a common name for an eldest son).

The Call to Adventure
Momotaro grew up to be stronger and kinder than any other boy in the village. During this time, the village lived in fear of the Oni—ogres and demons who lived on a distant island called Onigashima. These Oni would often raid the mainland, stealing treasures and kidnapping villagers.

When Momotaro reached young adulthood, he approached his parents with a request. "I must go to Onigashima," he declared. "I will defeat the Oni and bring back the stolen treasures to help our people."

Though they were worried, his parents were proud. As a parting gift, the old woman prepared Kibi-dango (special millet dumplings), which were said to provide the strength of a hundred men.

Gathering Allies
Momotaro set off on his journey toward the sea. Along the way, he met three distinct animals:

The Spotted Dog: The dog growled at first, but Momotaro offered him one of his Kibi-dango. The dog, tasting the magical dumpling, immediately swore his loyalty.

The Monkey: Further down the road, a monkey joined the group in exchange for a dumpling, though he and the dog bickered constantly.

The Pheasant: Finally, a pheasant flew down from the sky. After receiving a piece of the Kibi-dango, the bird joined the team as their aerial scout.

Momotaro used his leadership to ensure the three animals worked together despite their differences, teaching them that unity was their greatest strength.

The Battle of Onigashima
The group reached the coast, built a boat, and sailed to the dark, craggy shores of Onigashima. The island was guarded by a massive iron gate.

The Pheasant flew over the walls to distract the Oni and peck at their eyes.

The Monkey climbed the walls and unbolted the Great Gate from the inside.

The Dog and Momotaro charged in, using their immense strength to overpower the demons.

The Oni were caught off guard by the coordinated attack. After a fierce battle, the King of the Oni fell to his knees before Momotaro, begging for mercy. He promised to never trouble the villagers again and surrendered all the stolen gold, jewels, and precious silks.

The Triumphant Return
Momotaro and his three companions loaded the treasure onto their boat and returned to the village. The entire town celebrated their homecoming.

Momotaro used the wealth to ensure his elderly parents lived the rest of their lives in comfort and peace. He remained in the village as a legendary protector, and his story was passed down for generations as a reminder that bravery and cooperation can overcome even the greatest evils.
- أثناء عمل "الوكيل"، يمكنك الاطّلاع على الأحداث في نافذة "الوحدة الطرفية" في محرّر Cloud Shell.
- قد يستغرق إنشاء جميع الصور بعض الوقت، لذا يُرجى الانتظار أو تناول قهوة سريعة. عند بدء إنشاء الصور، من المفترض أن تتمكّن من رؤية الصور ذات الصلة بالقصة كما هو موضّح أدناه.
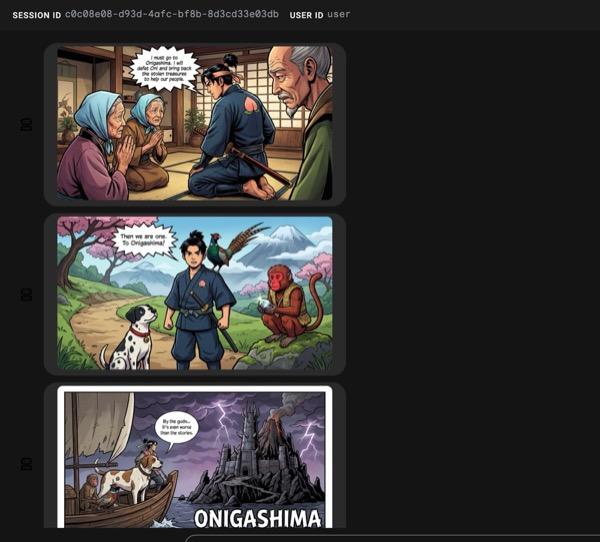
الشكل 34: قصة موموتارو كشريط هزلي 25 إذا سارت الأمور بسلاسة، من المفترض أن يتم حفظ ملف html الذي تم إنشاؤه في مجلد html. إذا أردت إجراء تحسينات على الوكيل، يمكنك الرجوع إلى "مساعد الوكيل" وطلب إجراء المزيد من التغييرات.

الشكل 35: محتوى مجلد الإخراج
- إذا تم تنفيذ الخطوة 25 بشكل صحيح وظهر الملف comic.html في مجلد output. يمكنك اتّباع الخطوات التالية لاختبارها. أولاً، افتح وحدة طرفية جديدة بالنقر على الوحدة الطرفية>وحدة طرفية جديدة من القائمة الرئيسية في محرّر Cloud Shell. من المفترض أن يؤدي ذلك إلى فتح نافذة Terminal جديدة.
#go to the project folder
cd ~/adkui

#activate python virtual environment
source .venv/bin/activate

#Go to the output folder
cd ~/adkui/output

#start local web server
python -m http.server 8080
- Ctrl+Click on http://0.0.0.0:8080

الشكل 36: تشغيل خادم ويب محلي
- يجب أن يظهر محتوى المجلد في علامة تبويب المتصفّح. انقر على ملف html (مثل comic.html). يجب أن يتم عرض القصص المصوّرة على النحو التالي (قد يختلف الناتج قليلاً).
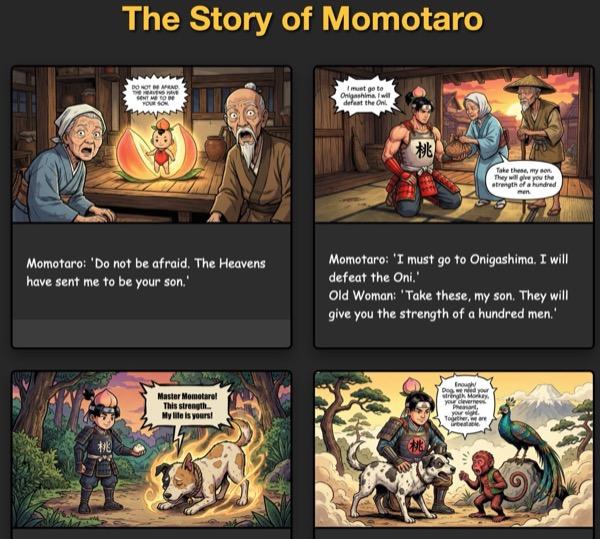
الشكل 37: التشغيل على المضيف المحلي
12. تَنظيم
لننظِّم الآن ما أنشأناه للتو.
- احذف تطبيق Cloud Run الذي أنشأناه للتو. انتقِل إلى Cloud Run من خلال الوصول إلى Cloud Run . من المفترض أن يظهر لك التطبيق الذي أنشأته في الخطوة السابقة. ضَع علامة في المربّع بجانب التطبيق وانقر على زر "حذف".
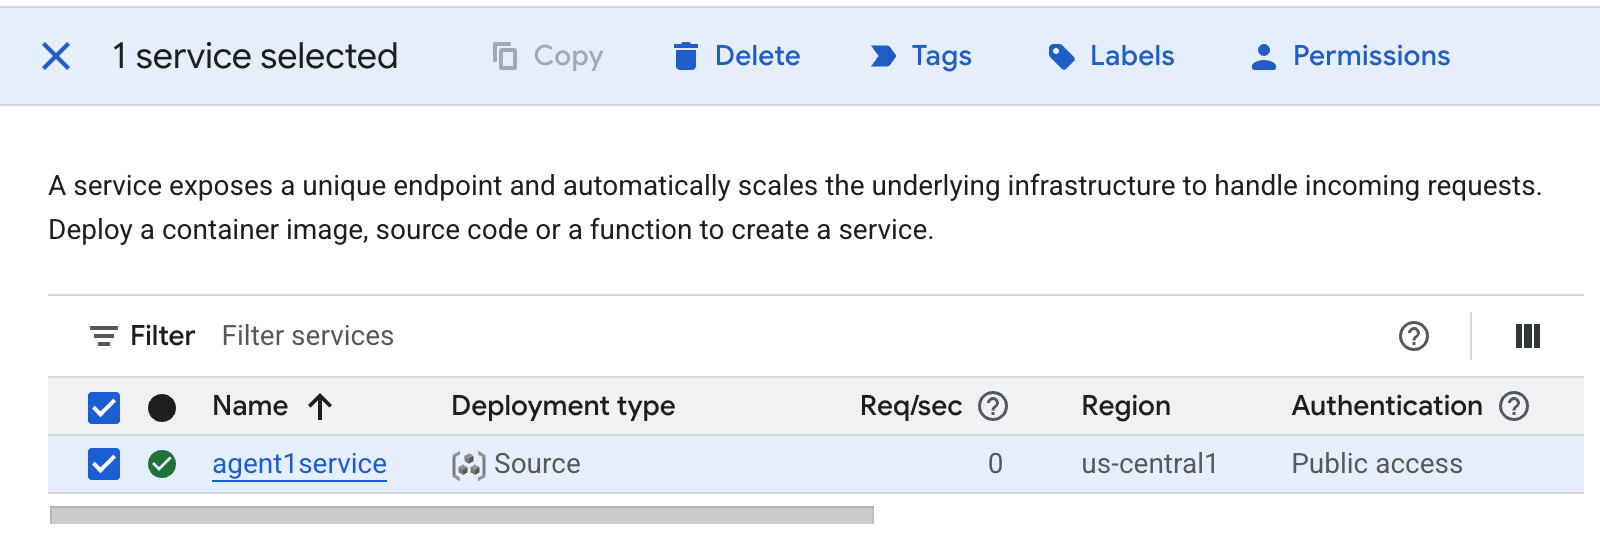 الشكل 38: حذف تطبيق Cloud Run 2 حذف الملفات في Cloud Shell
#Execute the following to delete the files
cd ~
rm -R ~/adkui
13. الخاتمة
تهانينا! لقد أنشأت بنجاح وكلاء ADK (حزمة تطوير الوكلاء) باستخدام أداة ADK Visual Builder المضمّنة. تعرّفت أيضًا على كيفية نشر التطبيق على Cloud Run. هذا إنجاز مهم يغطي دورة الحياة الأساسية لتطبيق حديث متوافق مع السحابة الإلكترونية، ما يوفّر لك أساسًا متينًا لنشر أنظمتك المعقّدة المستندة إلى الوكلاء.
ملخّص
في هذا التمرين المعملي، تعلّمت ما يلي:
- إنشاء تطبيق متعدد الوكلاء باستخدام ADK Visual Builder
- نشر التطبيق على Cloud Run
مراجع مفيدة