
1. מטרת שיעור ה-Lab
בשיעור ה-Lab המעשי הזה תלמדו איך ליצור סוכנים באמצעות ADK (ערכה לפיתוח סוכנים) Visual Builder. ADK (Agent Development Kit) Visual Builder מאפשר ליצור סוכני ADK (Agent Development Kit) עם תכנות מינימלי. תלמדו איך לבדוק את האפליקציה באופן מקומי ולפרוס אותה ב-Cloud Run.
מה תלמדו
- כדאי להבין את העקרונות הבסיסיים של ADK (ערכה לפיתוח סוכנים) .
- הסבר על העקרונות הבסיסיים של ADK (ערכה לפיתוח סוכנים) Visual Builder
- איך יוצרים סוכנים באמצעות כלי GUI
- כאן מוסבר איך לפרוס בקלות את הסוכנים ב-Cloud Run ולהשתמש בהם.
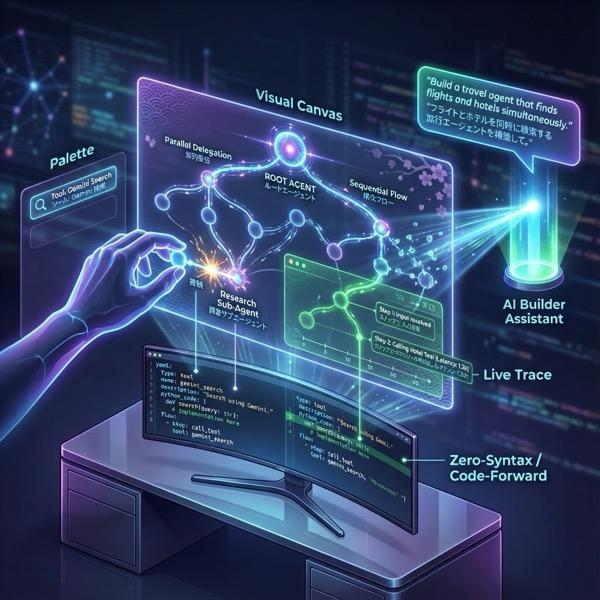
איור 1: באמצעות ADK Visual Builder אפשר ליצור סוכנים באמצעות ממשק משתמש גרפי עם תכנות מינימלי
2. הגדרת הפרויקט
- אם אין לכם עדיין פרויקט שתוכלו להשתמש בו, תצטרכו ליצור פרויקט חדש במסוף GCP. בוחרים את הפרויקט בכלי לבחירת הפרויקט (בפינה הימנית העליונה של מסוף Google Cloud)
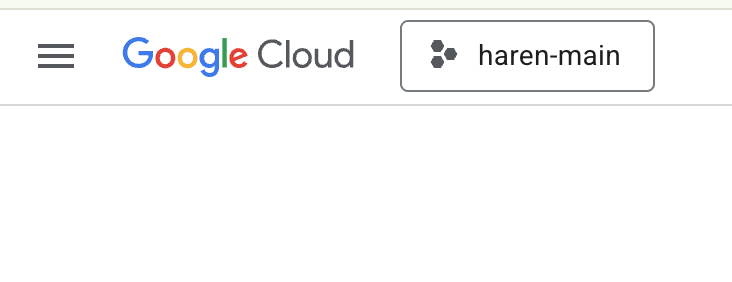
איור 2: לחיצה על התיבה שמימין ללוגו של Google Cloud מאפשרת לבחור את הפרויקט. מוודאים שהפרויקט שלכם נבחר.
- בשיעור ה-Lab הזה נשתמש ב-Cloud Shell Editor כדי לבצע את המשימות. פותחים את Cloud Shell ומגדירים את הפרויקט באמצעות Cloud Shell.
- כדי לעבור ישירות אל Cloud Shell Editor, לוחצים על הקישור הזה.
- פותחים את Terminal אם הוא עדיין לא פתוח על ידי לחיצה על Terminal>New Terminal מהתפריט. אפשר להריץ את כל הפקודות במדריך הזה במסוף הזה.
- כדי לבדוק אם הפרויקט כבר מאומת, מריצים את הפקודה הבאה בטרמינל של Cloud Shell.
gcloud auth list
- מריצים את הפקודה הבאה ב-Cloud Shell כדי לאשר את הפרויקט
gcloud config list project
- מעתיקים את מזהה הפרויקט ומשתמשים בפקודה הבאה כדי להגדיר אותו
gcloud config set project <YOUR_PROJECT_ID>
- אם אתם לא זוכרים את מזהה הפרויקט, אתם יכולים להציג רשימה של כל מזהי הפרויקטים באמצעות הפקודה
gcloud projects list
3. הפעלת ממשקי ה-API
כדי להריץ את ה-Lab הזה, צריך להפעיל כמה שירותי API. מריצים את הפקודה הבאה ב-Cloud Shell.
gcloud services enable aiplatform.googleapis.com
gcloud services enable cloudresourcemanager.googleapis.com
היכרות עם ממשקי ה-API
- Vertex AI API (
aiplatform.googleapis.com) מאפשר גישה לפלטפורמת Vertex AI , כך שהאפליקציה יכולה ליצור אינטראקציה עם מודלים של Gemini ליצירת טקסט, לניהול שיחות בצ'אט ולהפעלת פונקציות. - Cloud Resource Manager API (
cloudresourcemanager.googleapis.com) מאפשר לכם לנהל באופן פרוגרמטי מטא-נתונים של הפרויקטים שלכם ב-Google Cloud, כמו מזהה הפרויקט והשם שלו. לעיתים קרובות כלים וערכות SDK אחרים נדרשים כדי לאמת את זהות הפרויקט וההרשאות שלו.
4. איך בודקים אם הזיכויים שויכו לחשבונית
בשלב הגדרת הפרויקט, הגשתם בקשה לקרדיטים בחינם שמאפשרים לכם להשתמש בשירותים ב-Google Cloud. כשמממשים את הקרדיטים, נוצר חשבון חדש לחיוב בחינם בשם Google Cloud Platform Trial Billing Account. כדי לוודא שהקרדיטים מומשו, פועלים לפי השלבים הבאים ב-Cloud Shell Editor:
curl -s https://raw.githubusercontent.com/haren-bh/gcpbillingactivate/main/activate.py | python3
אם הפעולה תצליח, התוצאה תיראה כך: אם מופיעה ההודעה 'Successfully linked project' (הפרויקט קושר בהצלחה), החשבון לחיוב מוגדר בצורה נכונה. אם תבצעו את השלב שלמעלה, תוכלו לבדוק אם החשבון שלכם מקושר. אם הוא לא מקושר, הוא יקושר בשבילכם. אם לא בחרתם את הפרויקט, תופיע בקשה לבחור פרויקט, או שתוכלו לעשות זאת מראש לפי השלבים בהגדרת הפרויקט. 
איור 3: אישור של חשבון לחיוב שמקושר
5. מבוא לערכה לפיתוח סוכנים (ADK)
הערכה לפיתוח סוכנים מציעה כמה יתרונות מרכזיים למפתחים שיוצרים אפליקציות מבוססות-סוכנים:
- מערכות מרובות סוכנים: יצירת אפליקציות מודולריות וניתנות להרחבה על ידי שילוב של כמה סוכנים מיוחדים בהיררכיה. הפעלת תיאום מורכב והעברת משימות.
- מערכת עשירה של כלים: מציידים את הסוכנים ביכולות מגוונות: שימוש בכלים מוכנים מראש (חיפוש, הפעלת קוד וכו'), יצירת פונקציות בהתאמה אישית, שילוב כלים ממסגרות של סוכנים מצד שלישי (LangChain, CrewAI) או אפילו שימוש בסוכנים אחרים ככלים.
- תזמור גמיש: הגדרת תהליכי עבודה באמצעות סוכני תהליכי עבודה (
SequentialAgent,ParallelAgentו-LoopAgent) לצינורות צפויים, או שימוש בניתוב דינמי מבוסס-LLM (העברהLlmAgent) להתנהגות אדפטיבית. - חוויית מפתחים משולבת: פיתוח, בדיקה וניפוי באגים באופן מקומי באמצעות CLI עוצמתי וממשק משתמש אינטראקטיבי למפתחים. בדיקת אירועים, מצב וביצוע של סוכן שלב אחר שלב.
- הערכה מובנית: הערכה שיטתית של ביצועי הסוכן על ידי בדיקת איכות התגובה הסופית ומסלול הביצוע של כל שלב בהשוואה לתרחישי בדיקה מוגדרים מראש.
- מוכנים לפריסה: אפשר להשתמש בקונטיינרים ולפרוס את הסוכנים בכל מקום – להריץ אותם באופן מקומי, להרחיב אותם באמצעות Vertex AI Agent Engine או לשלב אותם בתשתית בהתאמה אישית באמצעות Cloud Run או Docker.
ערכות SDK אחרות של AI גנרטיבי או מסגרות של סוכנים מאפשרות גם לשלוח שאילתות למודלים ואפילו להעניק להם כלים, אבל כדי ליצור תיאום דינמי בין כמה מודלים נדרשת כמות משמעותית של עבודה מצדכם.
ערכת פיתוח הסוכנים מציעה מסגרת ברמה גבוהה יותר מהכלים האלה, ומאפשרת לחבר בקלות כמה סוכנים אחד לשני כדי ליצור תהליכי עבודה מורכבים אבל קלים לתחזוקה.
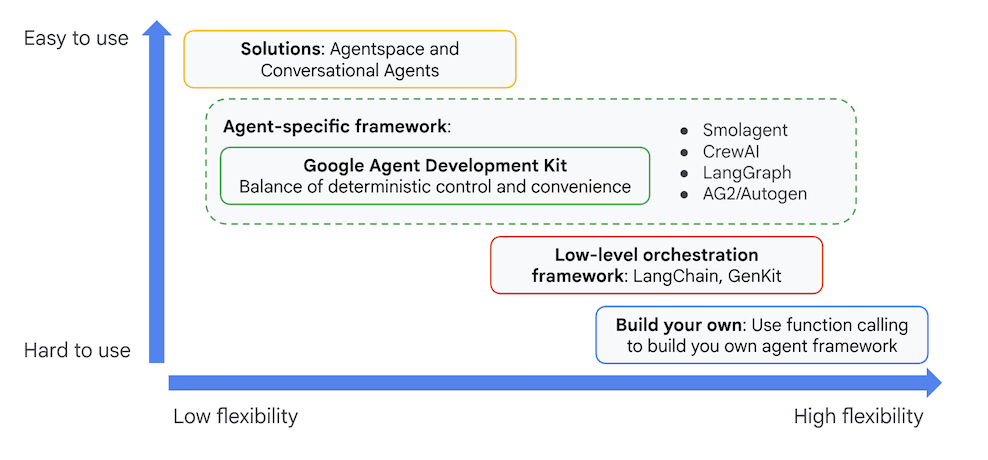
איור 4: מיקום של ADK (ערכה לפיתוח סוכנים)
בגרסאות האחרונות נוסף ל-ADK (ערכה לפיתוח סוכנים) כלי ADK Visual Builder שמאפשר ליצור סוכני ADK (ערכה לפיתוח סוכנים) עם תכנות מינימלי. בשיעור ה-Lab הזה נסביר בפירוט על הכלי ADK Visual Builder.
6. התקנת ADK והגדרת הסביבה
קודם כול צריך להגדיר את הסביבה כדי שנוכל להריץ את ADK (ערכה לפיתוח סוכנים). בשיעור ה-Lab הזה נפעיל את ADK (ערכה לפיתוח סוכנים) ונבצע את כל המשימות ב-Google Cloud ב-Cloud Shell Editor .
הכנת Cloud Shell Editor
- כדי לעבור ישירות אל Cloud Shell Editor, לוחצים על הקישור הזה.
- לוחצים על המשך.
- כשמופיעה בקשה לאשר את Cloud Shell, לוחצים על אישור.
- בהמשך שיעור ה-Lab הזה, תוכלו לעבוד בחלון הזה כסביבת פיתוח משולבת (IDE) עם Cloud Shell Editor ועם Cloud Shell Terminal.
- פותחים טרמינל חדש באמצעות Terminal>New Terminal ב-Cloud Shell Editor. כל הפקודות שבהמשך יופעלו במסוף הזה.
הפעלת ADK Visual Editor
- מריצים את הפקודות הבאות כדי לשכפל את המקור הנדרש מ-GitHub ולהתקין את הספריות הנדרשות. מריצים את הפקודות בטרמינל שנפתח ב-Cloud Shell Editor.
#create the project directory
mkdir ~/adkui
cd ~/adkui
- נשתמש ב-uv כדי ליצור סביבת Python (מריצים בטרמינל של Cloud Shell Editor):
#Install uv if you do not have installed yet
pip install uv

#go to the project directory
cd ~/adkui

#Create the virtual environment
uv venv


#use the newly created environment
source .venv/bin/activate

#install libraries
uv pip install google-adk==1.22.1
uv pip install python-dotenv
הערה: אם תצטרכו להפעיל מחדש את הטרמינל, הקפידו להגדיר את סביבת Python על ידי הפעלת הפקודה source .venv/bin/activate.
- בעורך, עוברים אל View (תצוגה) > Toggle hidden files (החלפה בין קבצים מוסתרים). בתיקייה adkui יוצרים קובץ .env עם התוכן הבא.
#go to adkui folder
cd ~/adkui
cat <<EOF>> .env
GOOGLE_GENAI_USE_VERTEXAI=1
GOOGLE_CLOUD_PROJECT=$(gcloud config get-value project)
GOOGLE_CLOUD_LOCATION=us-central1
IMAGEN_MODEL="imagen-3.0-generate-002"
GENAI_MODEL="gemini-2.5-flash"
EOF
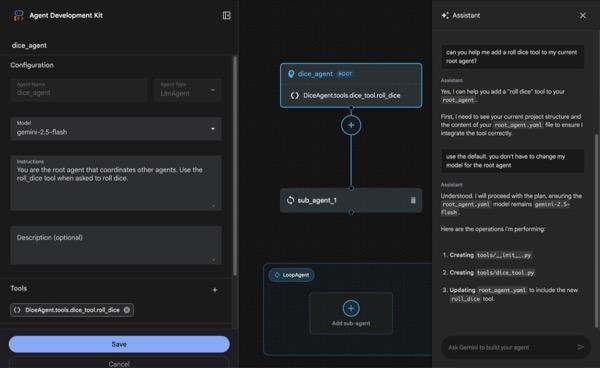
7. יצירת סוכן פשוט באמצעות ADK Visual Builder
בקטע הזה ניצור סוכן פשוט באמצעות ADK Visual Builder. ADK Visual Builder הוא כלי מבוסס-אינטרנט שמספק סביבה ויזואלית לעיצוב תהליכי עבודה ליצירה ולניהול של סוכני ADK (ערכה לפיתוח סוכנים). הוא מאפשר לכם לעצב, לבנות ולבדוק את הסוכנים בממשק גרפי ידידותי למתחילים, וכולל עוזר מבוסס-AI שיעזור לכם לבנות סוכנים.
איור 5: ADK Visual Builder
- חוזרים לספרייה העליונה adkui בטרמינל ומריצים את הפקודה הבאה כדי להריץ את הסוכן באופן מקומי (מריצים בטרמינל של Cloud Shell Editor). אפשר להפעיל את שרת ה-ADK ולראות תוצאות דומות לאלה שמופיעות באיור 6 במסוף.
#go to the directory adkui
cd ~/adkui
# Run the following command to run ADK locally
adk web
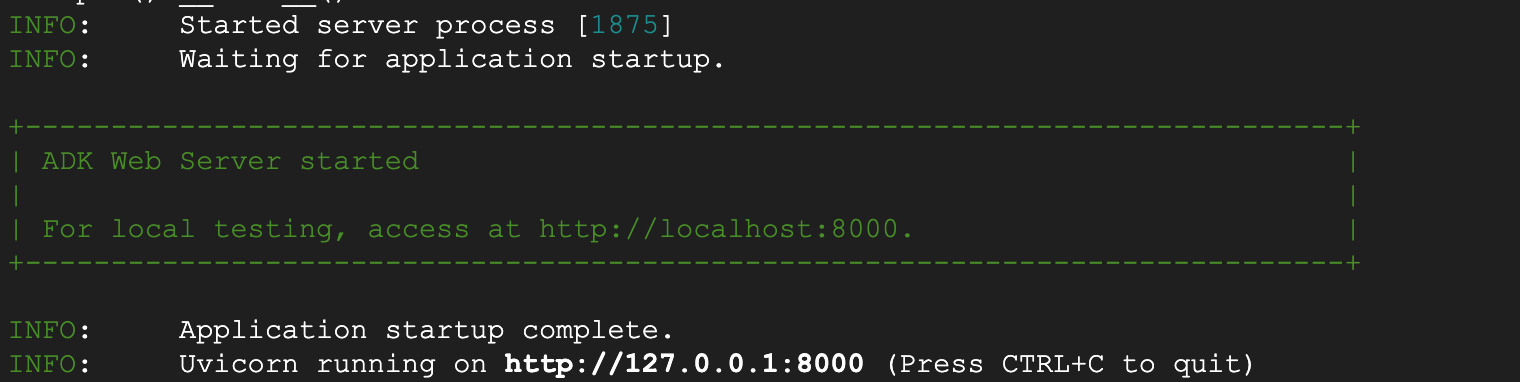
איור 6: הפעלת אפליקציה ב-ADK
- מקישים על Ctrl+Click (או על CMD+Click ב-MacOS) על כתובת ה-URL של http:// שמוצגת במסוף כדי לפתוח את הכלי הגרפי מבוסס הדפדפן ADK (ערכת פיתוח סוכנים).
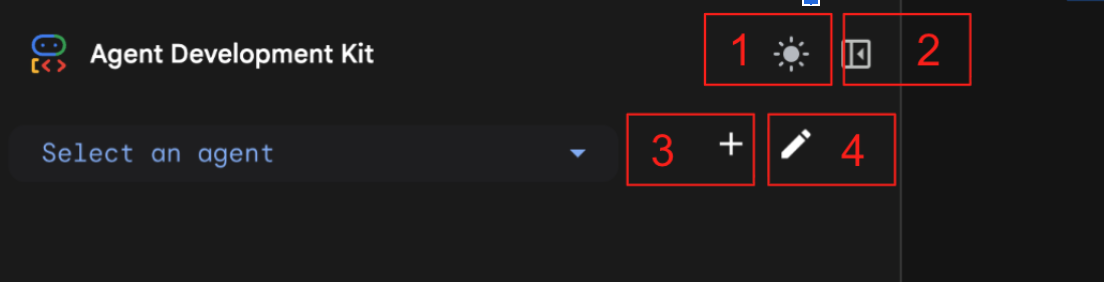
איור 7: ממשק האינטרנט של ADK, ל-ADK יש את הרכיבים הבאים: 1: מעבר בין מצב בהיר למצב כהה 2: כיווץ החלונית 3: יצירת סוכן 4: עריכה של סוכן
- כדי ליצור סוכן חדש, לוחצים על לחצן הפלוס.
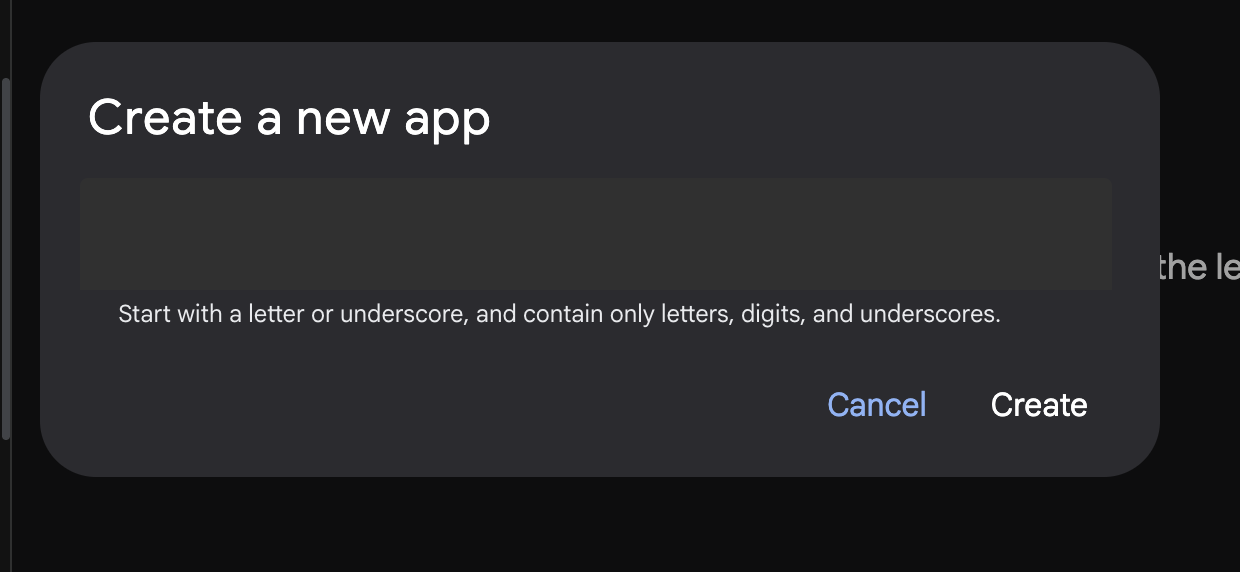
איור 8: תיבת דו-שיח ליצירת אפליקציה חדשה
- נותנים את השם Agent1 ולוחצים על Create (יצירה).
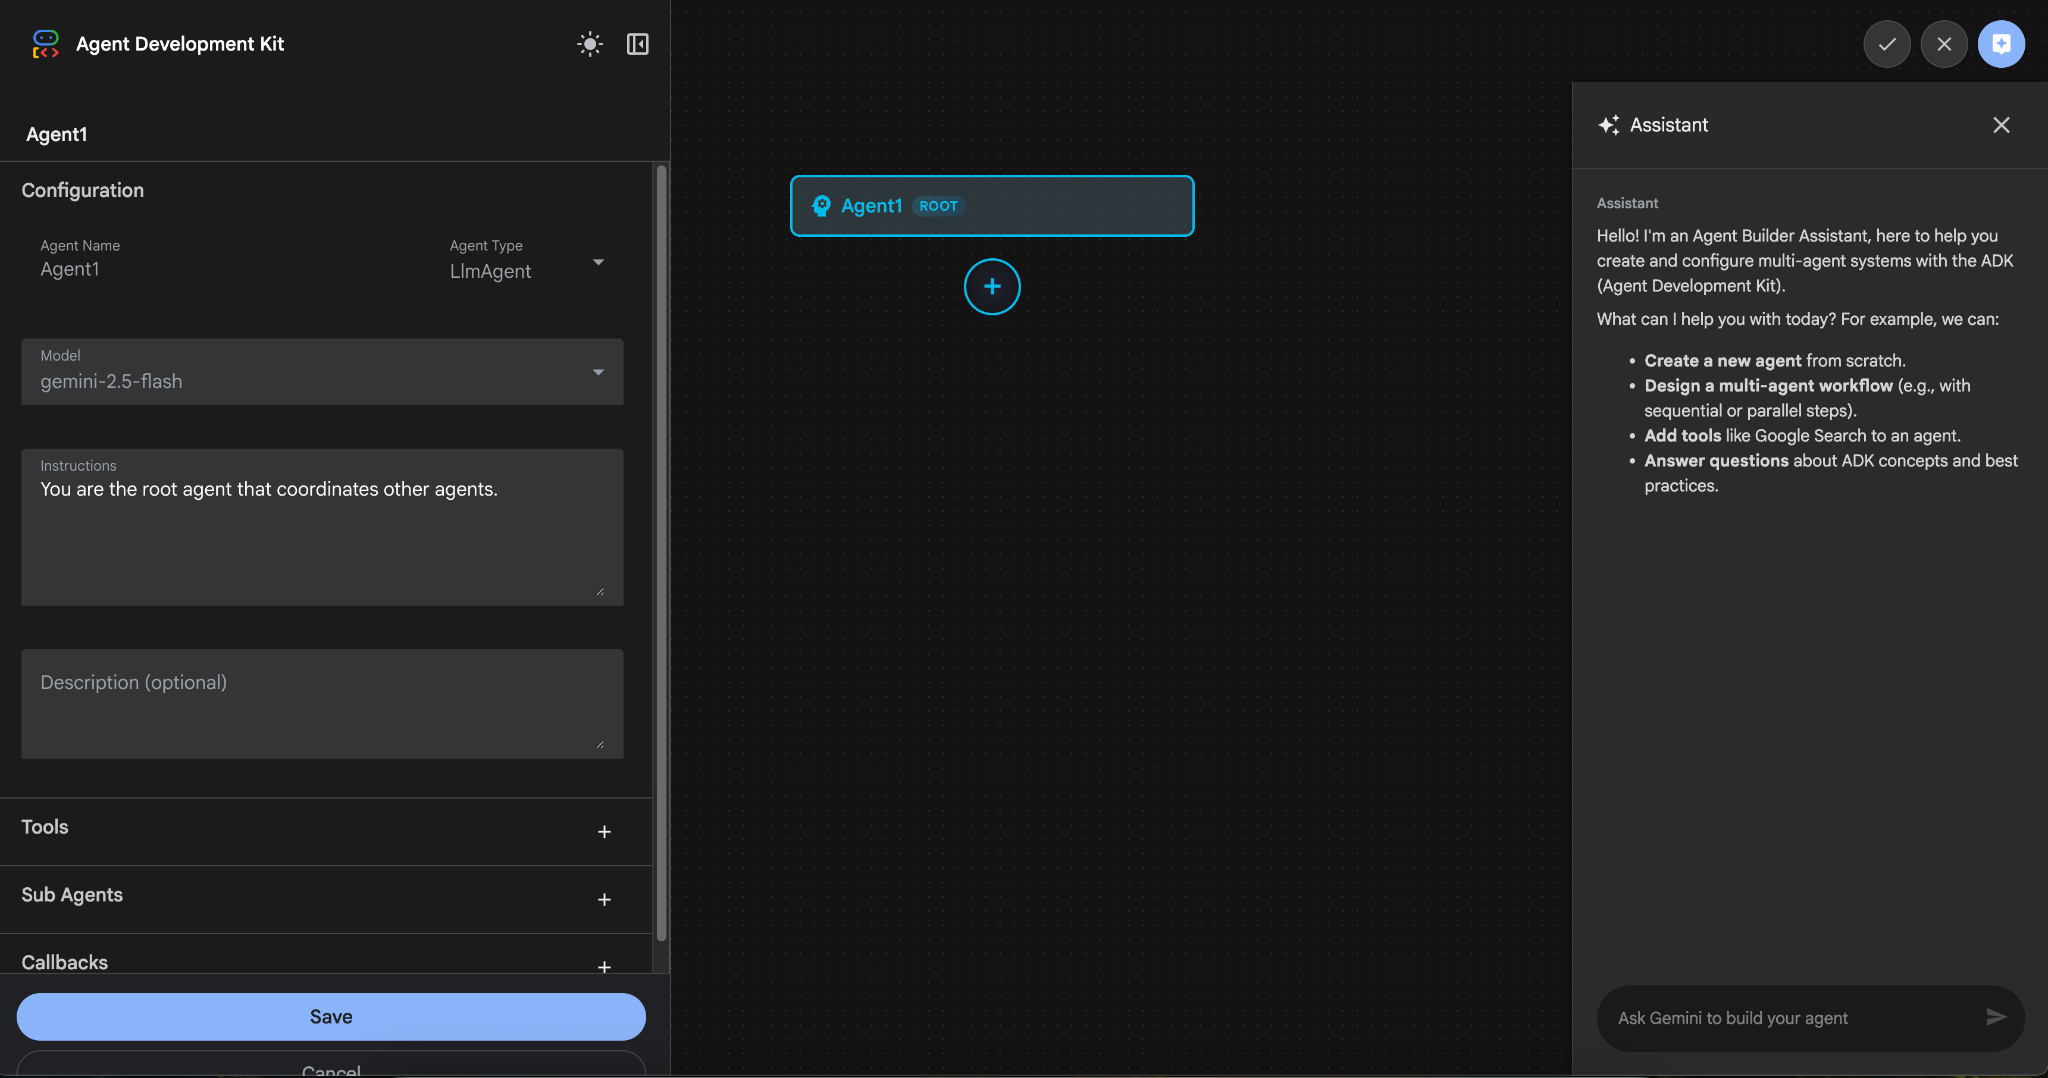
איור 9: ממשק משתמש ליצירת סוכנים חכמים
- הפאנל מחולק לשלושה חלקים עיקריים: בצד ימין נמצאים אמצעי הבקרה ליצירת סוכנים מבוססי GUI, במרכז מוצג תרשים של ההתקדמות ובצד שמאל נמצא ה-Assistant ליצירת סוכנים באמצעות שפה טבעית.
- הסוכן נוצר בהצלחה. לוחצים על הלחצן שמירה כדי להמשיך. (הערה: כדי לא לאבד את השינויים, חשוב ללחוץ על 'שמירה').
- הנציג אמור להיות מוכן עכשיו לבדיקה. כדי להתחיל, מזינים הנחיה בתיבת הצ'אט, למשל:
Hi, what can you do?
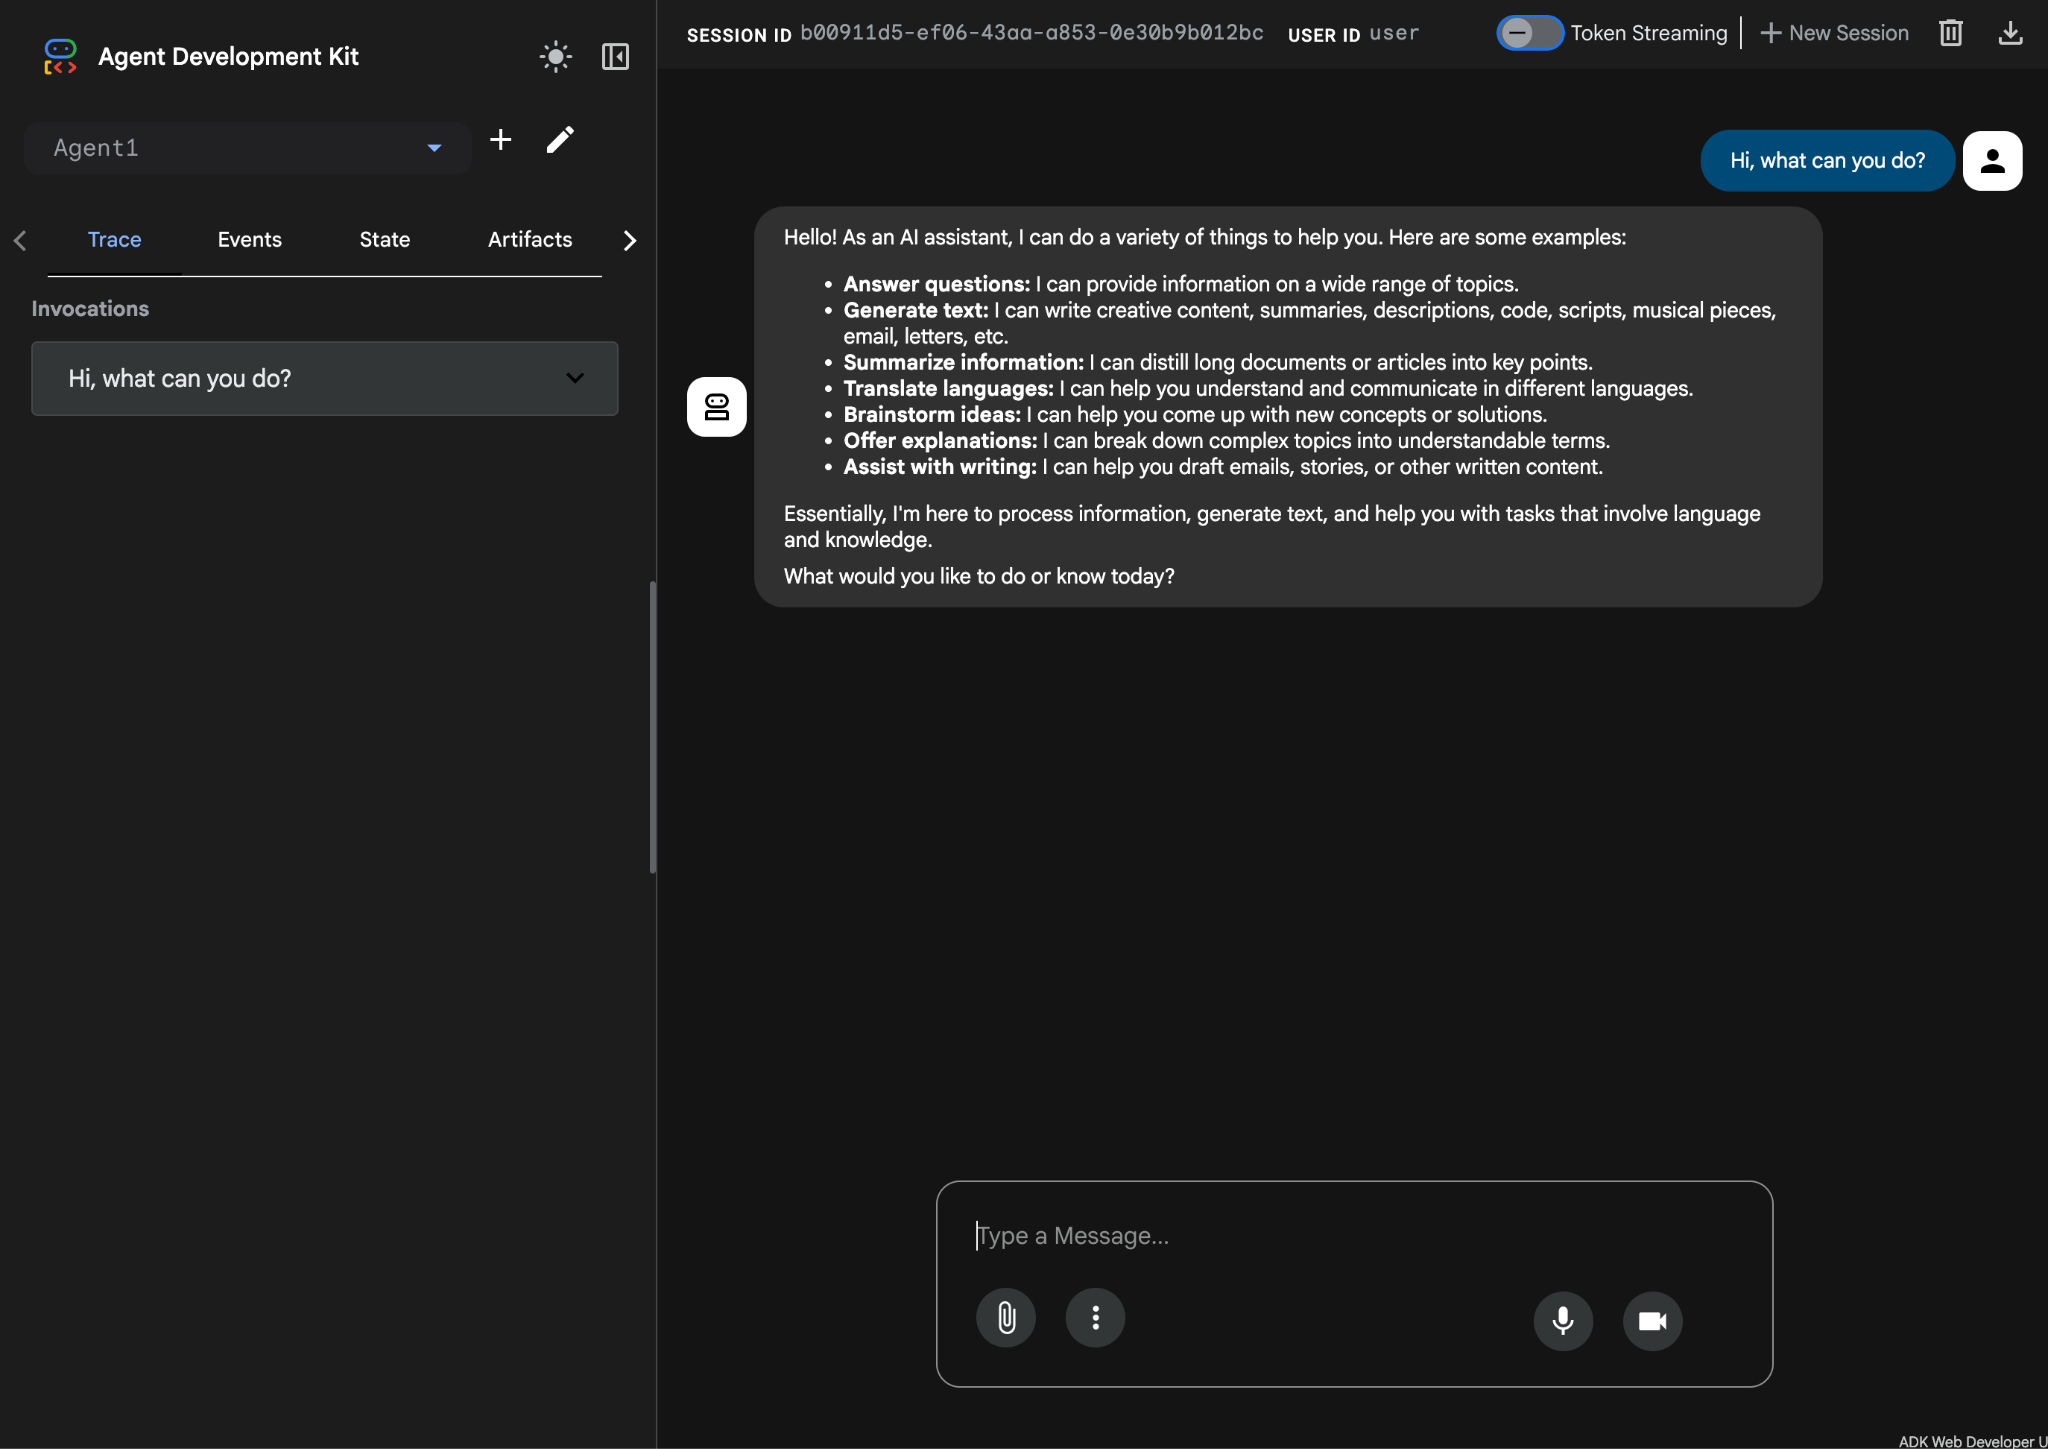
איור 10: בדיקת הסוכן.
7.חוזרים לעורך ובודקים את הקבצים שנוצרו. הסייר מופיע בצד ימין. עוברים לתיקייה adkgui ומרחיבים אותה כדי להציג את הספרייה Agent 1. בתיקייה, אפשר לבדוק את קובץ ה-YAML שמגדיר את הסוכן, כמו שמוצג באיור שלמטה.
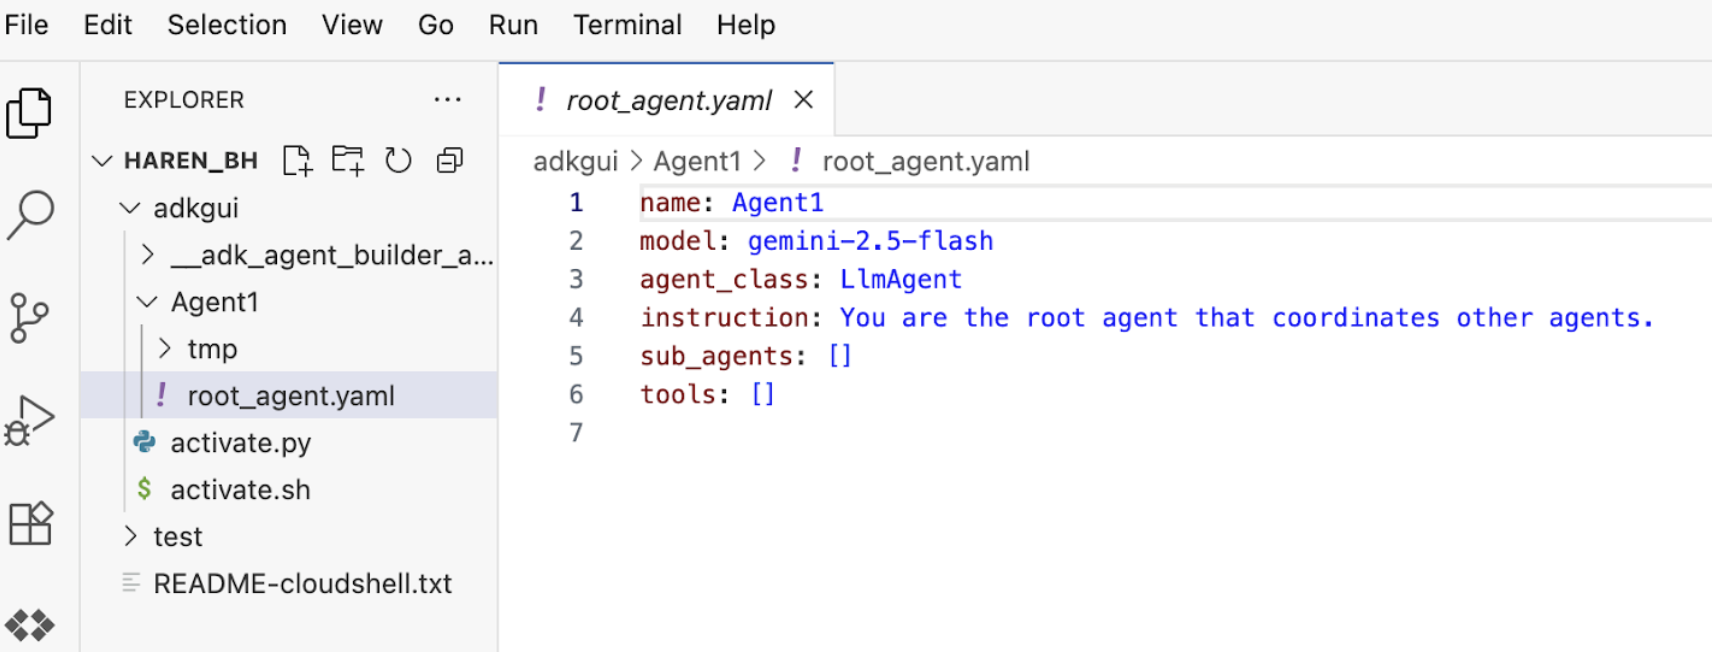
איור 11: הגדרת סוכן באמצעות קובץ YAML
- עכשיו נחזור אל עורך ממשק המשתמש הגרפי ונוסיף כמה תכונות לסוכן. כדי לעשות זאת, לוחצים על לחצן העריכה (ראו איור 7, רכיב מספר 4, סמל העט).
- אנחנו מתכוונים להוסיף לסוכן תכונה של חיפוש Google. כדי לעשות זאת, אנחנו צריכים להוסיף את חיפוש Google ככלי שזמין לסוכן ושסוכן אחד יכול להשתמש בו. כדי לעשות את זה, לוחצים על הסימן + ליד הקטע כלים בפינה הימנית התחתונה של המסך, ובתפריט שמופיע לוחצים על כלי מובנה (ראו איור 12).
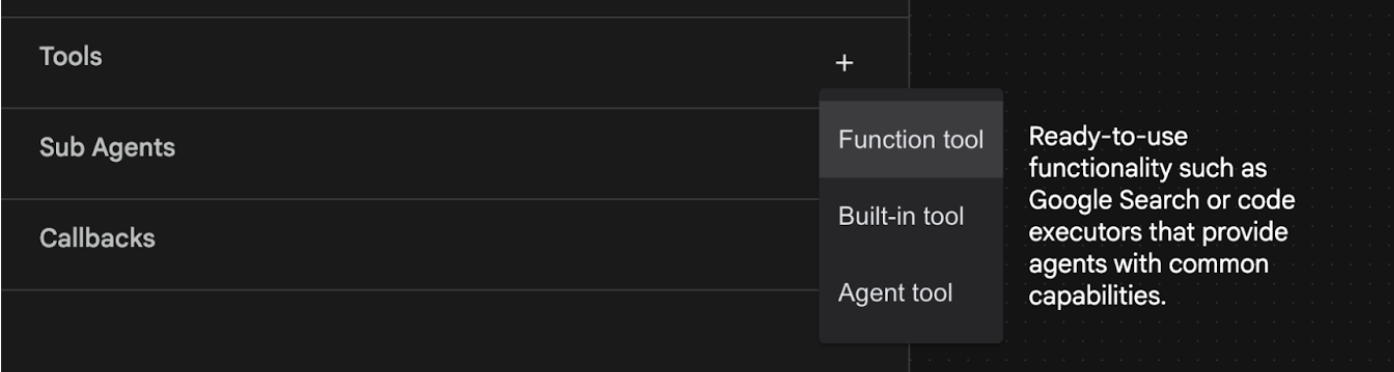
איור 12: הוספת כלי חדש לסוכן
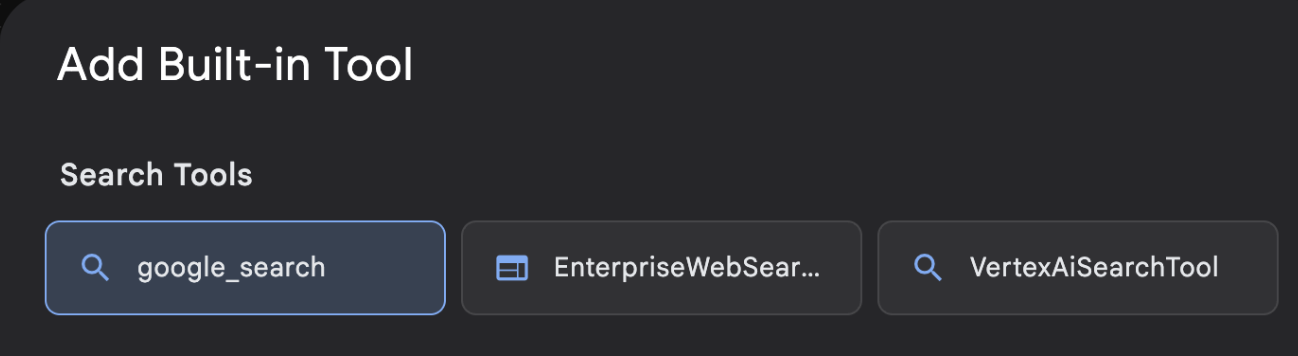
- ברשימה Built-in Tool (כלי מובנה), בוחרים באפשרות google_search ולוחצים על Create (יצירה) (ראו איור 12). פעולה זו תוסיף את חיפוש Google ככלי לסוכן.
- לוחצים על הכפתור שמירה כדי לשמור את השינויים.
איור 13: רשימת הכלים שזמינים בממשק המשתמש של ADK Visual Builder
- עכשיו אפשר לבדוק את הסוכן. קודם כול, מפעילים מחדש את שרת ה-ADK. עוברים למסוף שבו הפעלתם את שרת ADK (ערכת פיתוח סוכנים) ולוחצים על CTRL+C כדי לכבות את השרת אם הוא עדיין פועל. מריצים את הפקודה הבאה כדי להפעיל מחדש את השרת.
#make sure you are in the right folder.
cd ~/adkui

#start the server
adk web
- מקישים על Ctrl + לחיצה על כתובת ה-URL (למשל http://localhost:8000) שמוצגת במסך. ממשק המשתמש הגרפי של ADK (ערכה לפיתוח סוכנים) אמור להופיע בכרטיסיית הדפדפן.
- בוחרים באפשרות Agent1 מתוך רשימת הנציגים. הסוכן יכול עכשיו לבצע חיפוש ב-Google. בתיבת הצ'אט, בודקים עם ההנחיה הבאה.
What is the weather today in Yokohama?
התשובה מחיפוש Google אמורה להופיע כמו בדוגמה הבאה. 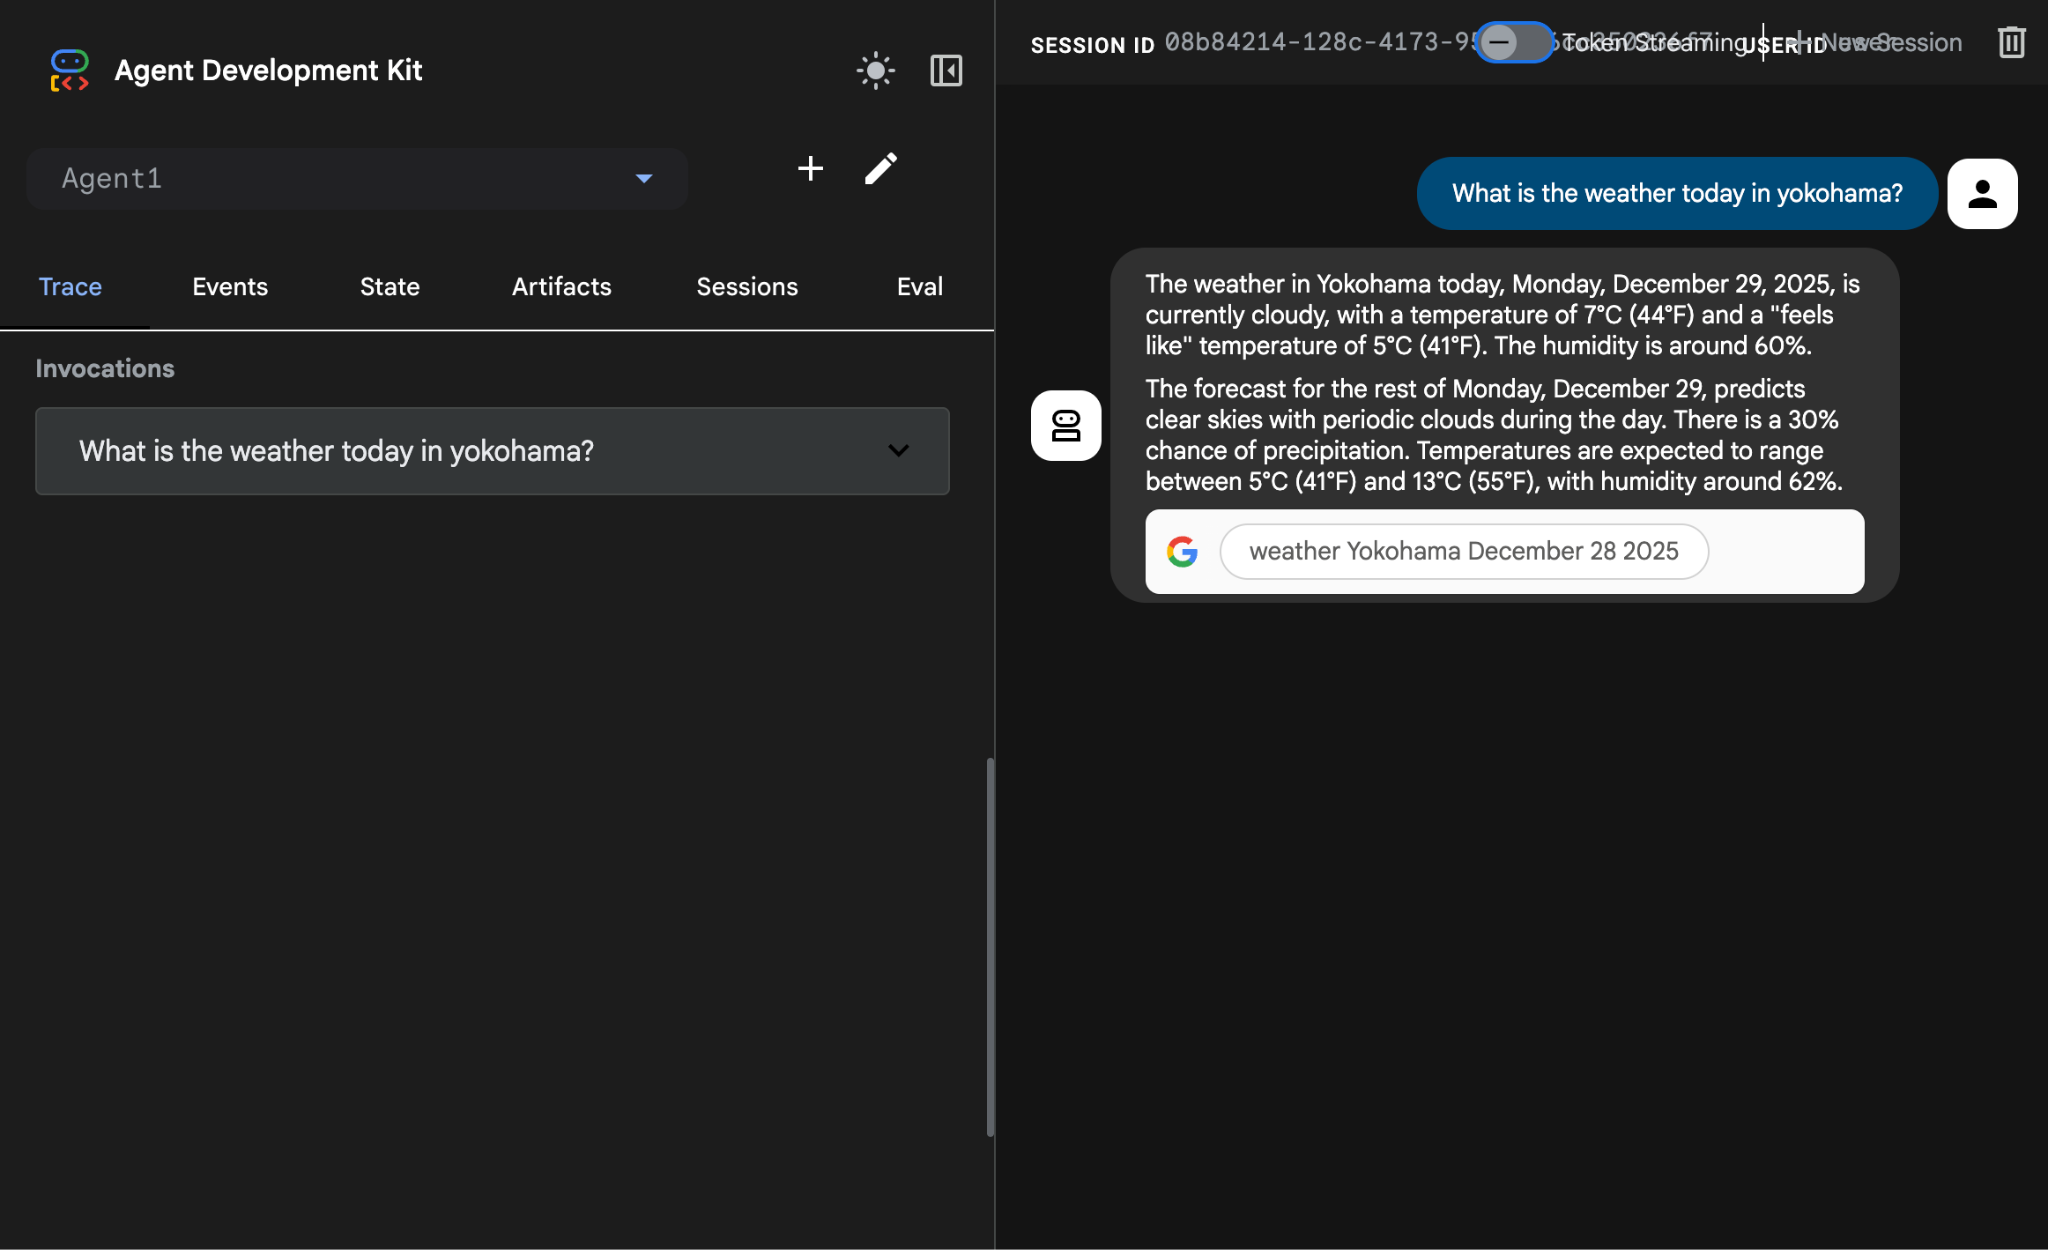
איור 14: חיפוש Google עם הסוכן
- עכשיו נחזור אל הכלי לעריכת קוד ונבדוק את הקוד שנוצר בשלב הזה. בחלונית הצדדית Explorer של הכלי לעריכה, לוחצים על root_agent.yaml כדי לפתוח אותו. מוודאים שהכלי google_search נוסף (איור 15).
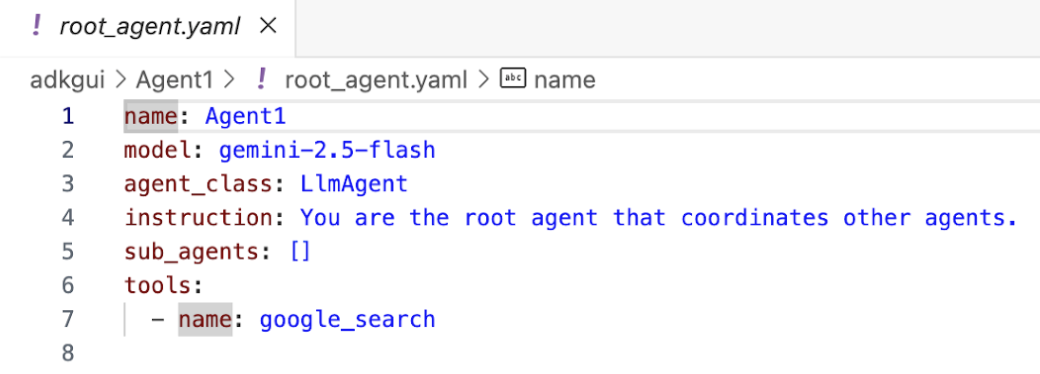
איור 15: אישור לכך שהכלי google_search נוסף ככלי ב-Agent1
8. פריסת הסוכן ב-Cloud Run
עכשיו נפרס את הסוכן שיצרנו ב-Cloud Run. עם Cloud Run אתם יכולים לבנות אפליקציות או אתרים במהירות בפלטפורמה מנוהלת.
אתם יכולים להריץ שירותי קצה קדמי ושירותי קצה עורפי, משימות באצווה, לארח LLM ולעבד עומסי עבודה בתור, בלי לנהל תשתית.
במסוף של Cloud Shell Editor, אם עדיין מריצים את שרת ADK (Agent Development Kit), לוחצים על Ctrl+C כדי לעצור אותו.
- עוברים לתיקיית השורש של הפרויקט.
cd ~/adkui
- מקבלים את קוד הפריסה. אחרי שמריצים את הפקודה, הקובץ deploycloudrun.py אמור להופיע בחלונית Explorer של Cloud Shell Editor.
curl -LO https://raw.githubusercontent.com/haren-bh/codelabs/main/adk_visual_builder/deploycloudrun.py
- בודקים את אפשרויות הפריסה בקובץ deploycloudrun.py. נשתמש בפקודה adk deploy כדי לפרוס את הסוכן שלנו ב-Cloud Run. הערכה לפיתוח סוכנים (ADK) כוללת אפשרות מובנית לפריסת הסוכן ב-Cloud Run. צריך לציין את הפרמטרים, כמו מזהה הפרויקט ב-Google Cloud, האזור וכו'. לגבי נתיב האפליקציה, הסקריפט הזה מניח ש-agent_path=./Agent1. בנוסף, ניצור חשבון שירות חדש עם ההרשאות הנדרשות ונצרף אותו ל-Cloud Run. ל-Cloud Run נדרשת גישה לשירותים כמו Vertex AI ו-Cloud Storage כדי להריץ את הסוכן.
   command = [
        "adk", "deploy", "cloud_run",
        f"--project={project_id}",
        f"--region={location}",
        f"--service_name={service_name}",
        f"--app_name={app_name}",
        f"--artifact_service_uri=memory://",
        f"--with_ui",
        agent_path,
        f"--",
        f"--service-account={sa_email}",
    ]
- מריצים את הסקריפט deploycloudrun.py**. הפריסה אמורה להתחיל כמו שמוצג באיור הבא.**
python3 deploycloudrun.py
אם תקבלו את הודעת האישור כמו שמופיעה למטה, הקישו על Y ואז על Enter לכל ההודעות. הסקריפט depoycloudrun.py מניח שהסוכן נמצא בתיקייה Agent1 כמו בדוגמה שלמעלה.
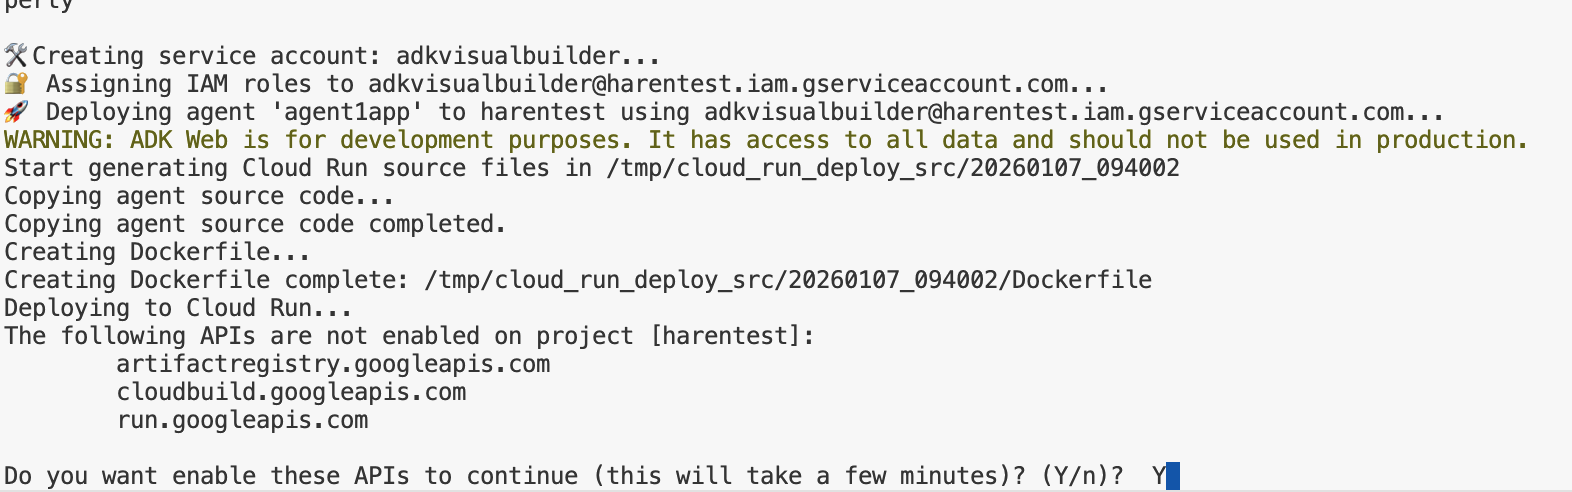
איור 16: פריסת הסוכן ב-Cloud Run. מקישים על Y לכל הודעת אישור.
- אחרי שהפריסה תושלם, תוצג כתובת URL של שירות, כמו https://agent1service-78833623456.us-central1.run.app
- כדי להפעיל את האפליקציה, ניגשים לכתובת ה-URL בדפדפן האינטרנט.
Figure 17: Agent running in Cloud Run
9. יצירת סוכן עם כלי מותאם אישית וסוכן משנה
בקטע הקודם יצרתם סוכן יחיד עם כלי חיפוש Google מובנה. בקטע הזה ניצור מערכת מרובת סוכנים שבה נאפשר לסוכנים להשתמש בכלים בהתאמה אישית.
- קודם מפעילים מחדש את שרת ADK (ערכה לפיתוח סוכנים). עוברים למסוף שבו הפעלתם את שרת ADK (ערכת פיתוח סוכנים) ולוחצים על CTRL+C כדי לכבות את השרת אם הוא עדיין פועל. מריצים את הפקודה הבאה כדי להפעיל מחדש את השרת.
#make sure you are in the right folder.
cd ~/adkui

#start the server
adk web
- מקישים על Ctrl + לחיצה על כתובת ה-URL (למשל http://localhost:8000) שמוצגת במסך. ממשק המשתמש הגרפי של ADK (ערכה לפיתוח סוכנים) אמור להופיע בכרטיסיית הדפדפן.
- לוחצים על לחצן הפלוס כדי ליצור סוכן חדש. בתיבת הדו-שיח של הסוכן, מזינים Agent2 (איור 18) ולוחצים על Create (יצירה).
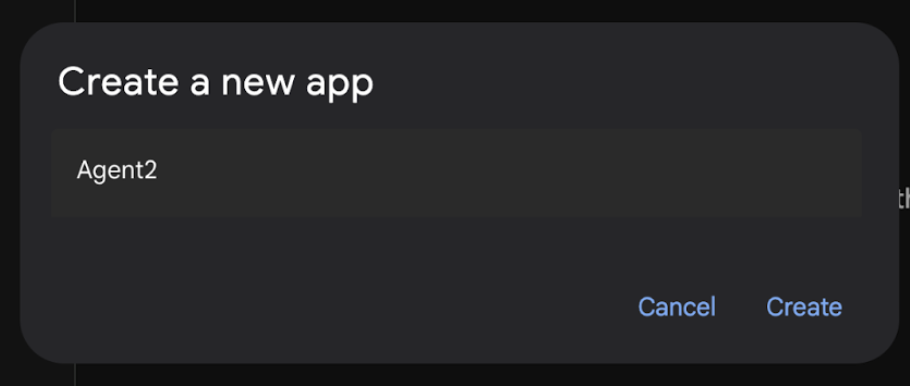
איור 18: יצירת אפליקציית סוכן חדשה.
- בקטע ההוראות של Agent2, מזינים את הטקסט הבא.
You are an agent that takes image creation instruction from the user and passes it to your sub agent
- עכשיו נוסיף סוכן משנה לסוכן הראשי. כדי לעשות את זה, לוחצים על הלחצן '+' בצד ימין של תפריט הסוכנים המשניים בתחתית החלונית הימנית (איור 19) ואז על סוכן LLM. פעולה כזו תיצור סוכן חדש כסוכן משנה חדש של סוכן הבסיס.
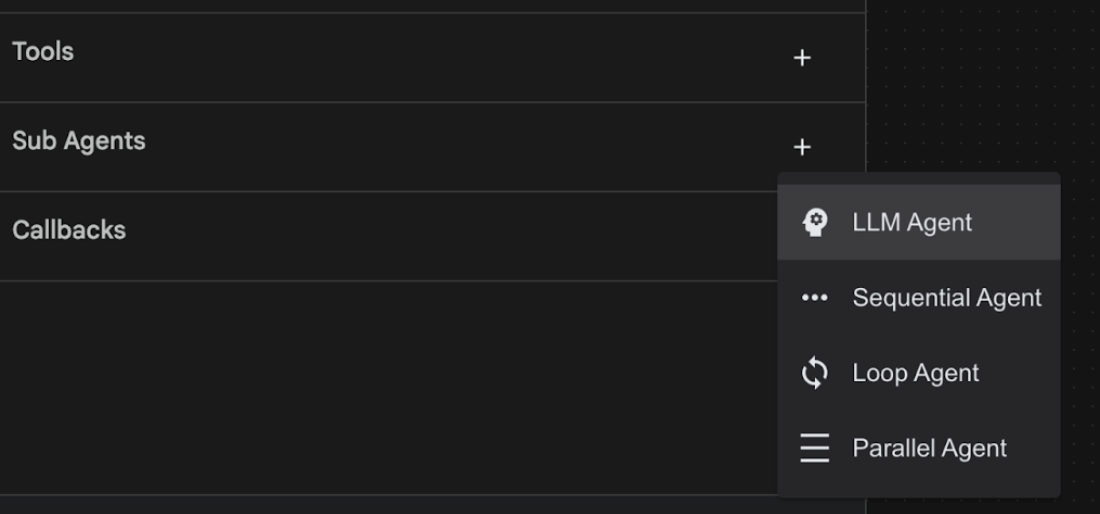
איור 19: הוספת סוכן משנה חדש.
- בקטע Instructions for the sub_agent_1 (הוראות עבור סוכן משנה 1), מזינים את הטקסט הבא.
You are an Agent that can take instructions about an image and create an image using the create_image tool.
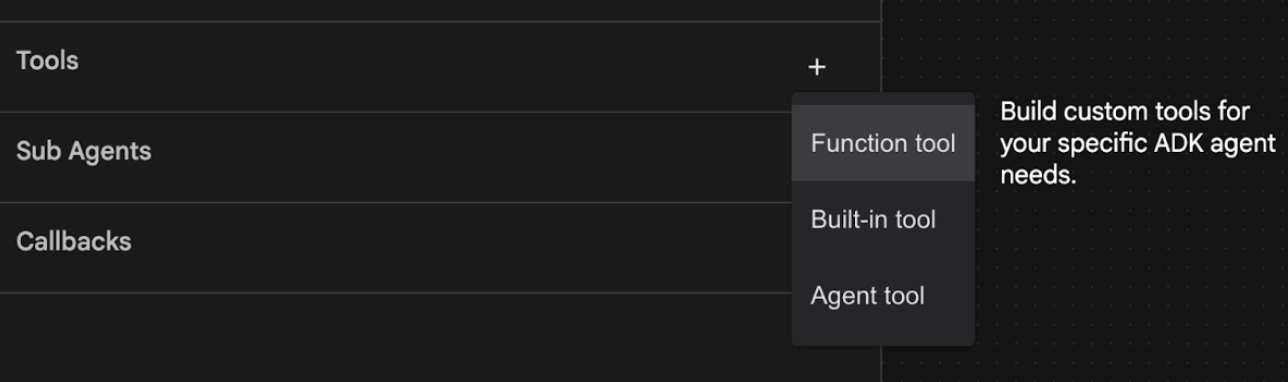
- עכשיו נוסיף כלי מותאם אישית לסוכן המשנה הזה. הכלי הזה יפעיל את מודל Imagen כדי ליצור תמונה לפי ההוראות של המשתמש. כדי לעשות את זה, קודם לוחצים על סוכן המשנה שנוצר בשלב הקודם ואז על לחצן הפלוס '+' שליד התפריט 'כלים'. ברשימת אפשרויות הכלי, לוחצים על כלי הפונקציות. הכלי הזה יאפשר לנו להוסיף קוד מותאם אישית משלנו לכלי.
איור 20: לוחצים על הכלי 'פונקציה' כדי ליצור כלי חדש. 8. בתיבת הדו-שיח, נותנים לכלי את השם Agent2.image_creation_tool.create_image. 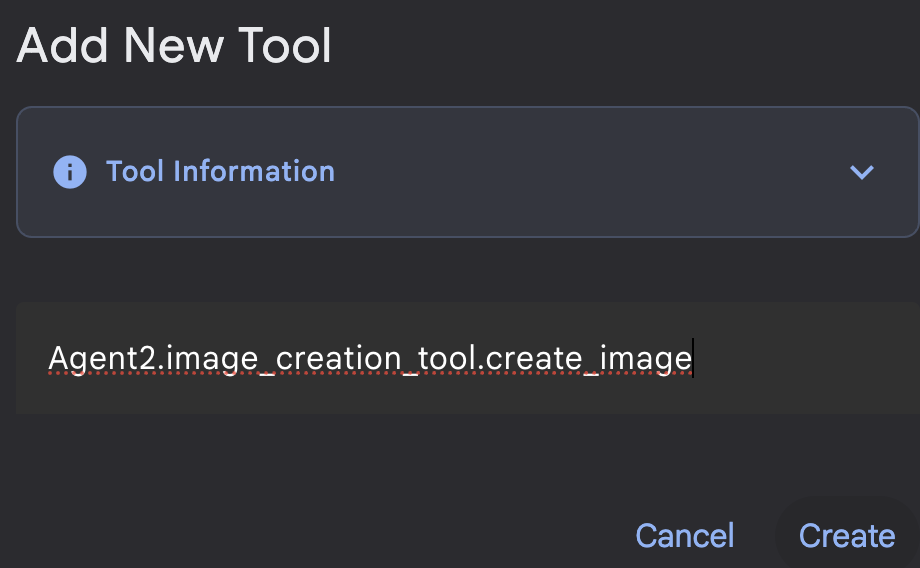
איור 21: הוספת שם כלי
- לוחצים על הלחצן שמירה כדי לשמור את השינויים.
- בטרמינל של Cloud Shell Editor, מקישים על Ctrl+S כדי לכבות את adk server.
- בטרמינל, מזינים את הפקודה הבאה כדי ליצור את הקובץ image_creation_tool.py.
touch ~/adkui/Agent2/image_creation_tool.py
- פותחים את הקובץ image_creation_tool.py שנוצר על ידי לחיצה עליו בחלונית Explorer של Cloud Shell Editor. מחליפים את התוכן של image_creation_tool.py בתוכן הבא ושומרים אותו (Ctrl+S).
import os
import io
import vertexai
from vertexai.preview.vision_models import ImageGenerationModel
from dotenv import load_dotenv
import uuid
from typing import Union
from datetime import datetime
from google import genai
from google.genai import types
from google.adk.tools import ToolContext
import logging

# Configure logging
logging.basicConfig(level=logging.INFO)
logger = logging.getLogger(__name__)

async def create_image(prompt: str,tool_context: ToolContext) -> Union[bytes, str]:
  """
  Generates an image based on a text prompt using a Vertex AI Imagen model.
  Args:
      prompt: The text prompt to generate the image from.

  Returns:
      The binary image data (PNG format) on success, or an error message string on failure.
  """
  print(f"Attempting to generate image for prompt: '{prompt}'")

  try:
      # Load environment variables from .env file two levels up
      dotenv_path = os.path.join(os.path.dirname(__file__), '..', '..', '.env')
      load_dotenv(dotenv_path=dotenv_path)
      project_id = os.getenv("GOOGLE_CLOUD_PROJECT")
      location = os.getenv("GOOGLE_CLOUD_LOCATION")
      model_name = os.getenv("IMAGEN_MODEL")
      client = genai.Client(
          vertexai=True,
          project=project_id,
          location=location,
      )
      response = client.models.generate_images(
          model="imagen-3.0-generate-002",
          prompt=prompt,
          config=types.GenerateImagesConfig(
              number_of_images=1,
              aspect_ratio="9:16",
              safety_filter_level="block_low_and_above",
              person_generation="allow_adult",
          ),
      )
      if not all([project_id, location, model_name]):
          return "Error: Missing GOOGLE_CLOUD_PROJECT, GOOGLE_CLOUD_LOCATION, or IMAGEN_MODEL in .env file."
      vertexai.init(project=project_id, location=location)
      model = ImageGenerationModel.from_pretrained(model_name)
      images = model.generate_images(
          prompt=prompt,
          number_of_images=1
      )
      if response.generated_images is  None:
          return "Error: No image was generated."
      for generated_image in response.generated_images:
          # Get the image bytes
          image_bytes = generated_image.image.image_bytes
          counter = str(tool_context.state.get("loop_iteration", 0))
          artifact_name = f"generated_image_" + counter + ".png"
          # Save as ADK artifact (optional, if still needed by other ADK components)
          report_artifact = types.Part.from_bytes(
              data=image_bytes, mime_type="image/png"
          )
          await tool_context.save_artifact(artifact_name, report_artifact)
          logger.info(f"Image also saved as ADK artifact: {artifact_name}")
          return {
              "status": "success",
              "message": f"Image generated .  ADK artifact: {artifact_name}.",
              "artifact_name": artifact_name,
          }
  except Exception as e:
      error_message = f"An error occurred during image generation: {e}"
      print(error_message)
      return error_message
- קודם מפעילים מחדש את שרת ADK (ערכה לפיתוח סוכנים). עוברים למסוף שבו הפעלתם את שרת ADK (ערכת פיתוח סוכנים) ולוחצים על CTRL+C כדי לכבות את השרת אם הוא עדיין פועל. מריצים את הפקודה הבאה כדי להפעיל מחדש את השרת.
#make sure you are in the right folder.
cd ~/adkui

#start the server
adk web
- מקישים על Ctrl + לחיצה על כתובת ה-URL (למשל http://localhost:8000) שמוצגת במסך. ממשק המשתמש הגרפי של ADK (ערכה לפיתוח סוכנים) אמור להופיע בכרטיסיית הדפדפן.
- בכרטיסייה של ממשק המשתמש של ADK (ערכה לפיתוח סוכנים), בוחרים באפשרות Agent2 ברשימת הסוכנים ולוחצים על לחצן העריכה (סמל העיפרון). ב-ADK (Agent Development Kit) Visual Editor (עורך חזותי), לוחצים על הלחצן Save (שמירה) כדי לשמור את השינויים.
- עכשיו אפשר לבדוק את הסוכן החדש.
- בממשק הצ'אט של ממשק המשתמש של ADK (ערכת פיתוח סוכנים), מזינים את ההנחיה הבאה. אפשר גם לנסות הנחיות אחרות. אמורות להופיע התוצאות שמוצגות באיור 22)
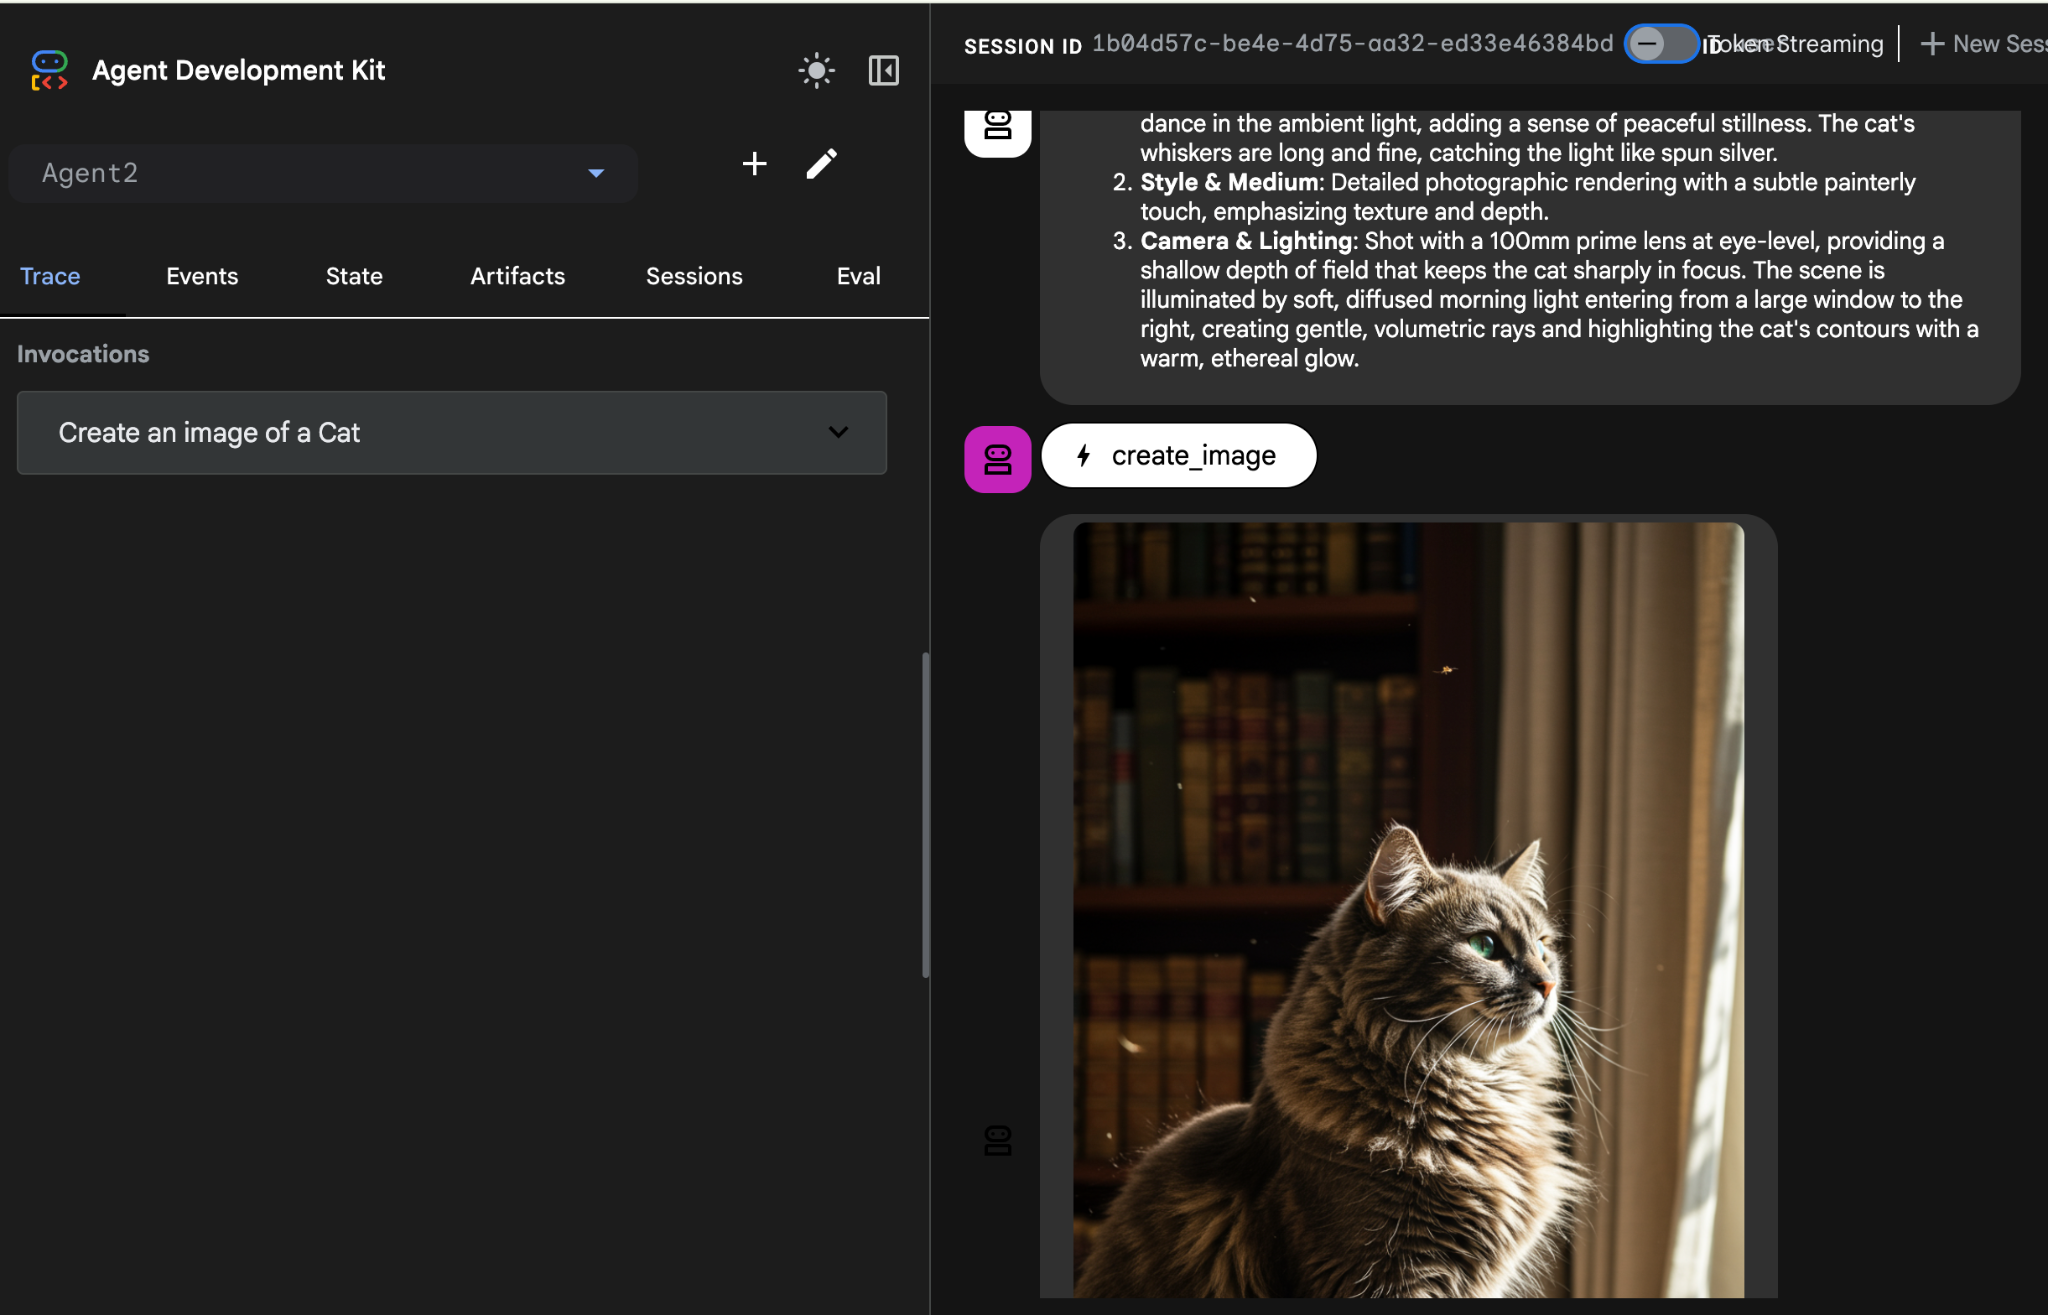
Create an image of a cat
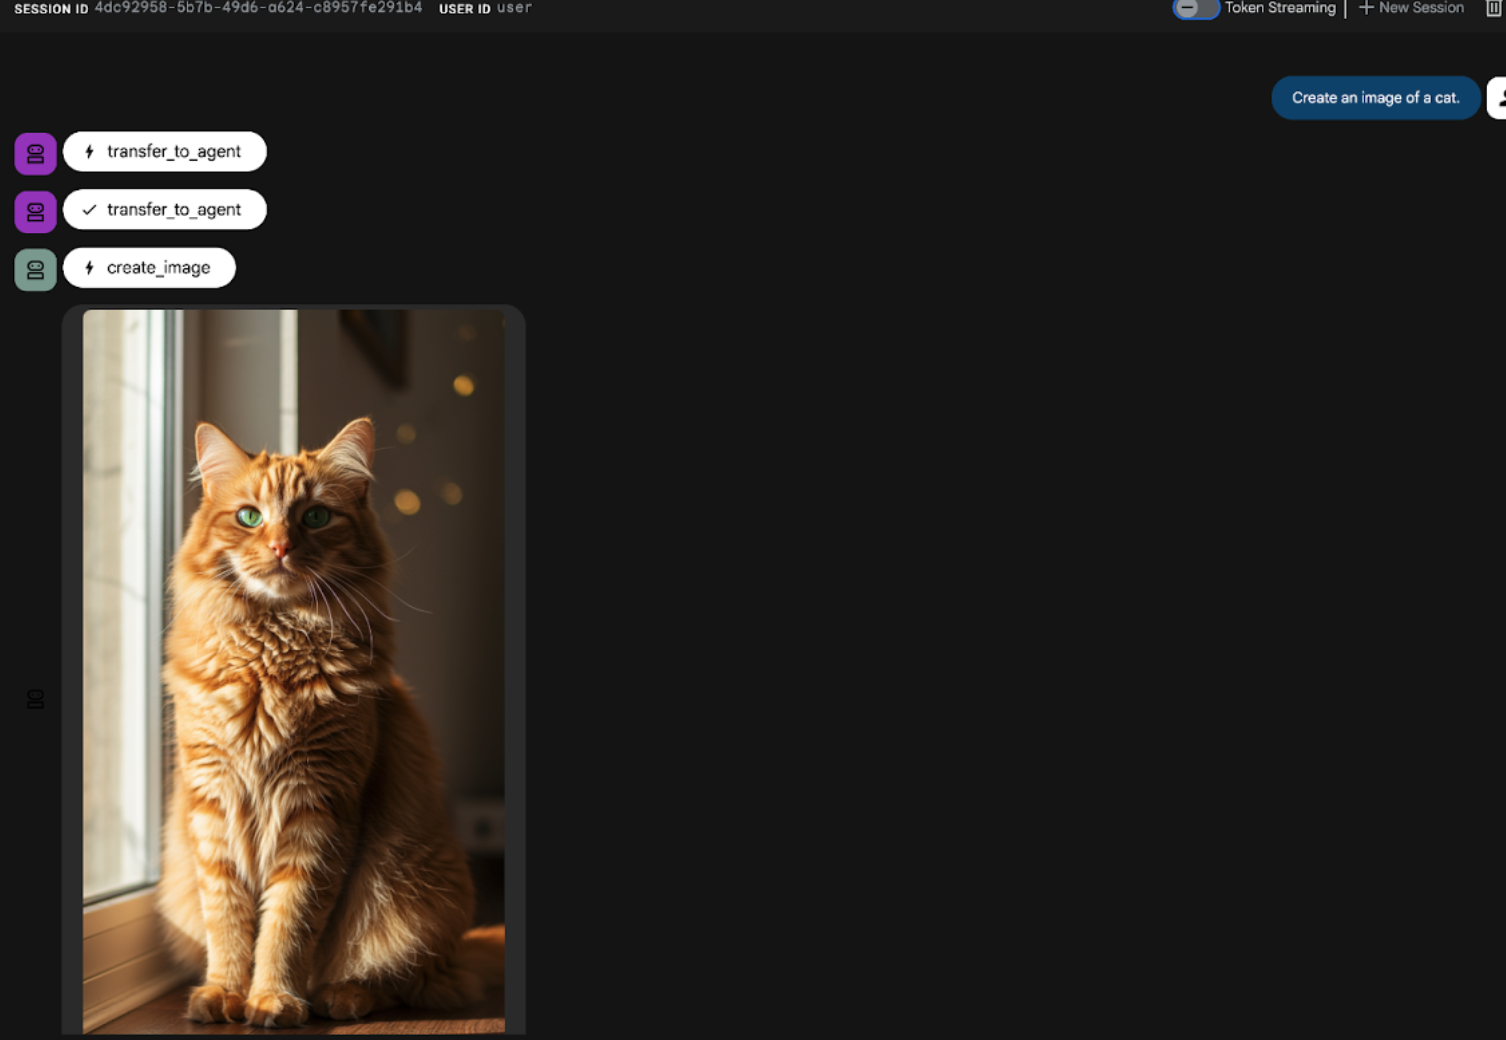
איור 22: ממשק הצ'אט של ממשק המשתמש של ADK
10. יצירת סוכן לתהליך עבודה
בשלב הקודם יצרנו סוכן עם סוכן משנה וכלי מיוחד ליצירת תמונות, ובשלב הזה נתמקד בשיפור היכולות של הסוכן. נשפר את התהליך על ידי אופטימיזציה של ההנחיה הראשונית של המשתמש לפני יצירת התמונה. כדי לעשות את זה, סוכן רציף ישולב בסוכן הבסיסי כדי לטפל בתהליך העבודה הבא בן שני השלבים:
- מקבלים את ההנחיה מהסוכן הראשי ומבצעים שיפור של ההנחיה.
- מעבירים את ההנחיה המשופרת לסוכן ליצירת תמונות כדי ליצור את התמונה הסופית באמצעות IMAGEN.
- קודם מפעילים מחדש את שרת ADK (ערכה לפיתוח סוכנים). עוברים למסוף שבו הפעלתם את שרת ADK (ערכת פיתוח סוכנים) ולוחצים על CTRL+C כדי לכבות את השרת אם הוא עדיין פועל. מריצים את הפקודה הבאה כדי להפעיל מחדש את השרת.
#make sure you are in the right folder.
cd ~/adkui

#start the server
adk web
- מקישים על Ctrl + לחיצה על כתובת ה-URL (למשל http://localhost:8000) שמוצגת במסך. ממשק המשתמש הגרפי של ADK (ערכה לפיתוח סוכנים) אמור להופיע בכרטיסיית הדפדפן.
- בוחרים באפשרות Agent2 מתוך בורר הסוכנים ולוחצים על לחצן העריכה (סמל העיפרון).
- לוחצים על Agent2 (Root Agent) ואז על הלחצן + לצד התפריט Sub Agents (סוכני משנה). ברשימת האפשרויות, לוחצים על Sequential Agent (סוכן רציף).
- המבנה של הסוכן אמור להיראות כמו זה שמוצג באיור 23
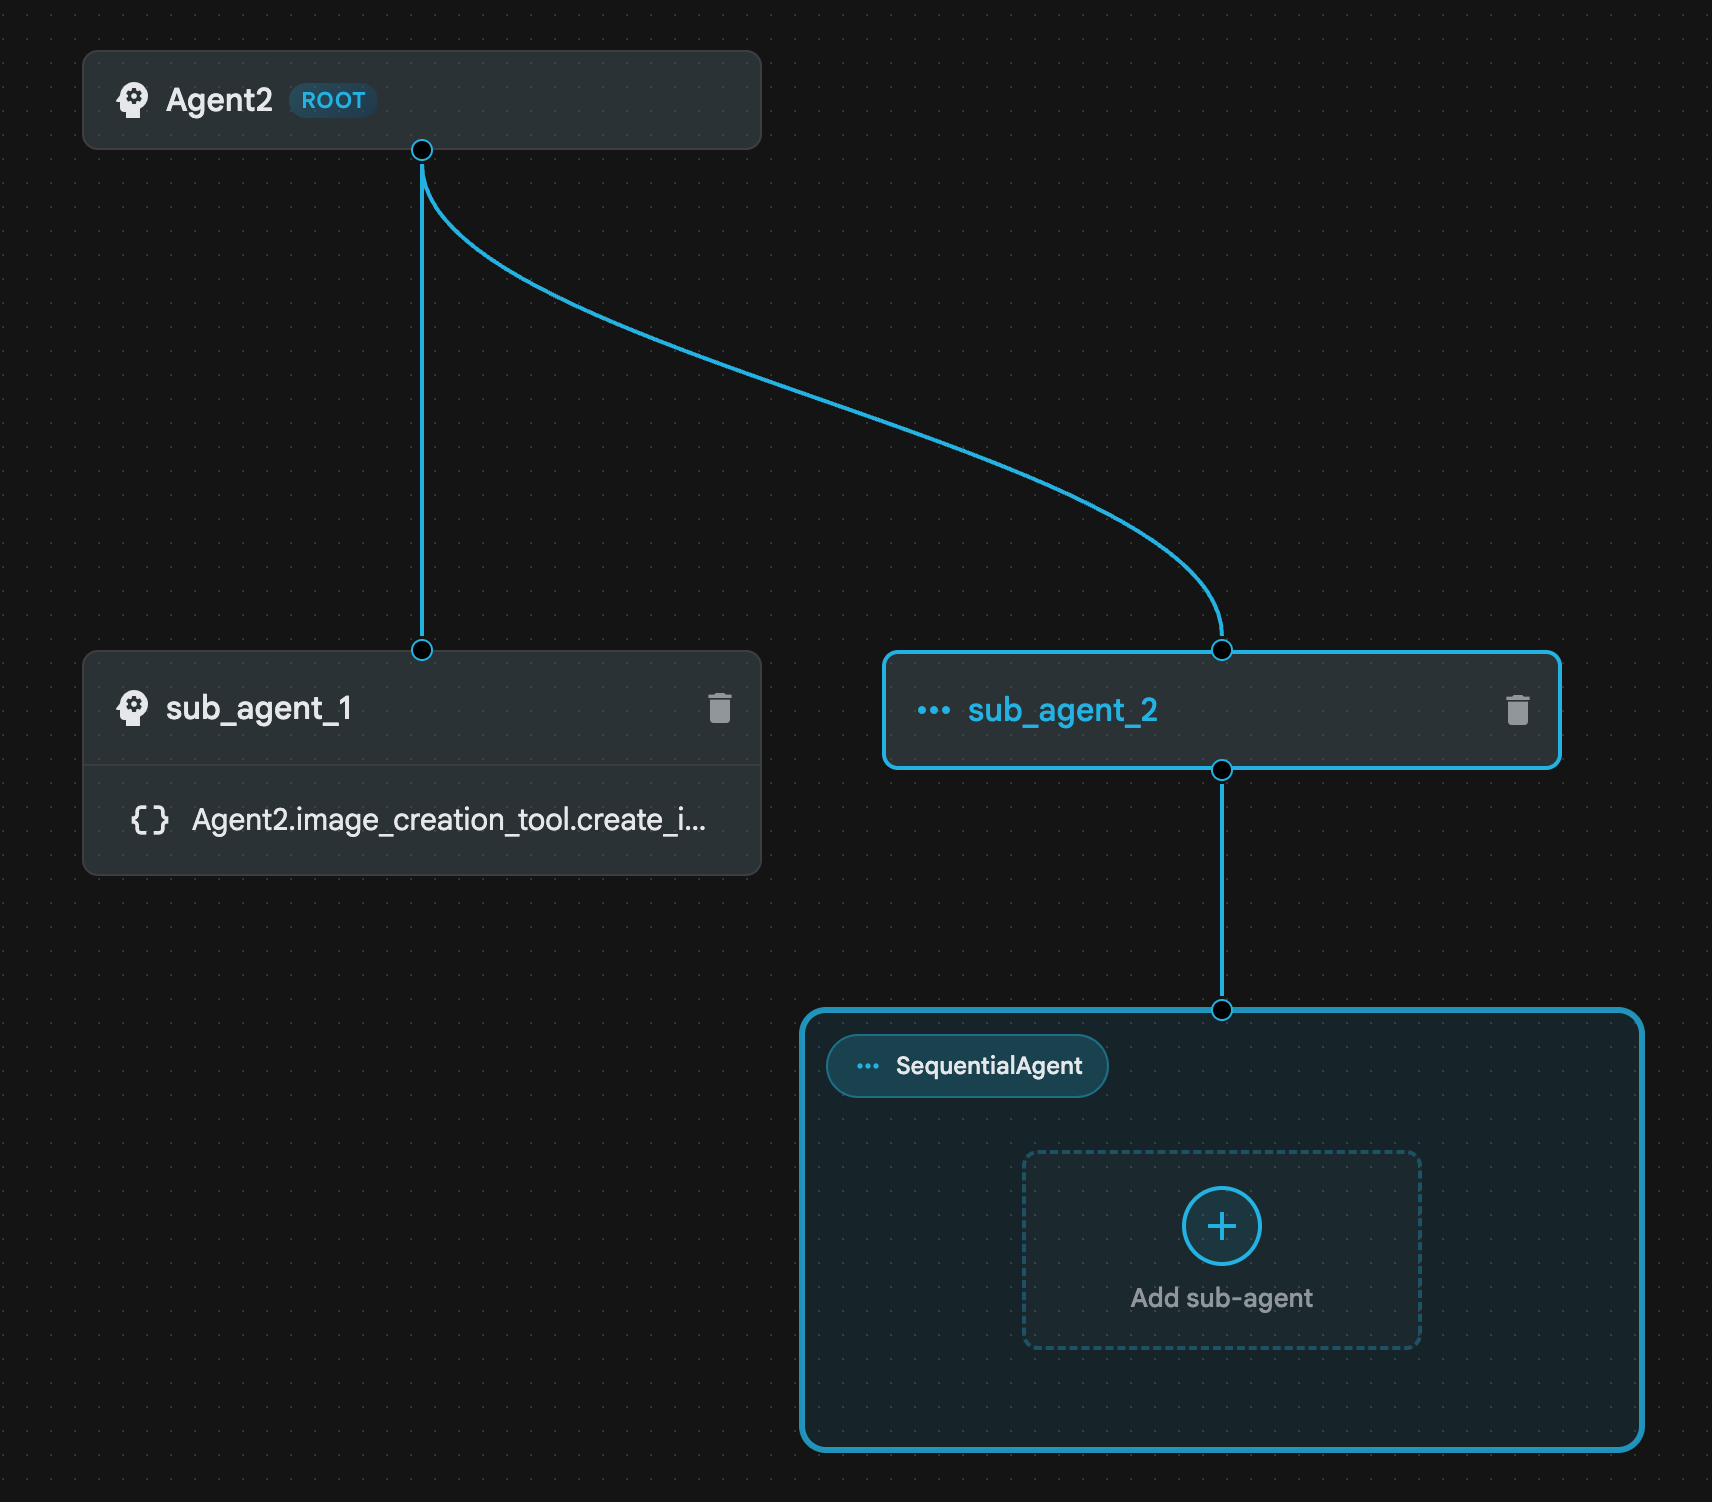
איור 23: מבנה סוכן רציף
- עכשיו נוסיף את הסוכן הראשון לסוכן רציף שיפעל כמשפר הנחיות. כדי לעשות את זה לוחצים על הלחצן Add sub-agent בתוך התיבה SequentialAgent ולוחצים על LLM Agent.
- צריך להוסיף עוד סוכן לרצף, אז חוזרים על שלב 6 כדי להוסיף עוד סוכן LLM (לוחצים על הלחצן + ובוחרים באפשרות LLMAgent).
- לוחצים על sub_agent_4 ומוסיפים כלי חדש בלחיצה על הסמל '+' לצד Tools (כלים) בחלונית הימנית. לוחצים על האפשרות כלי הפונקציות. בתיבת הדו-שיח, נותנים שם לכלי Agent2.image_creation_tool.create_image ולוחצים על יצירה.
- עכשיו אפשר למחוק את sub_agent_1 כי הוא הוחלף ב-sub_agent_2 מתקדם יותר. כדי לעשות זאת, לוחצים על הלחצן מחיקה בצד ימין של sub_agent_1 בתרשים.
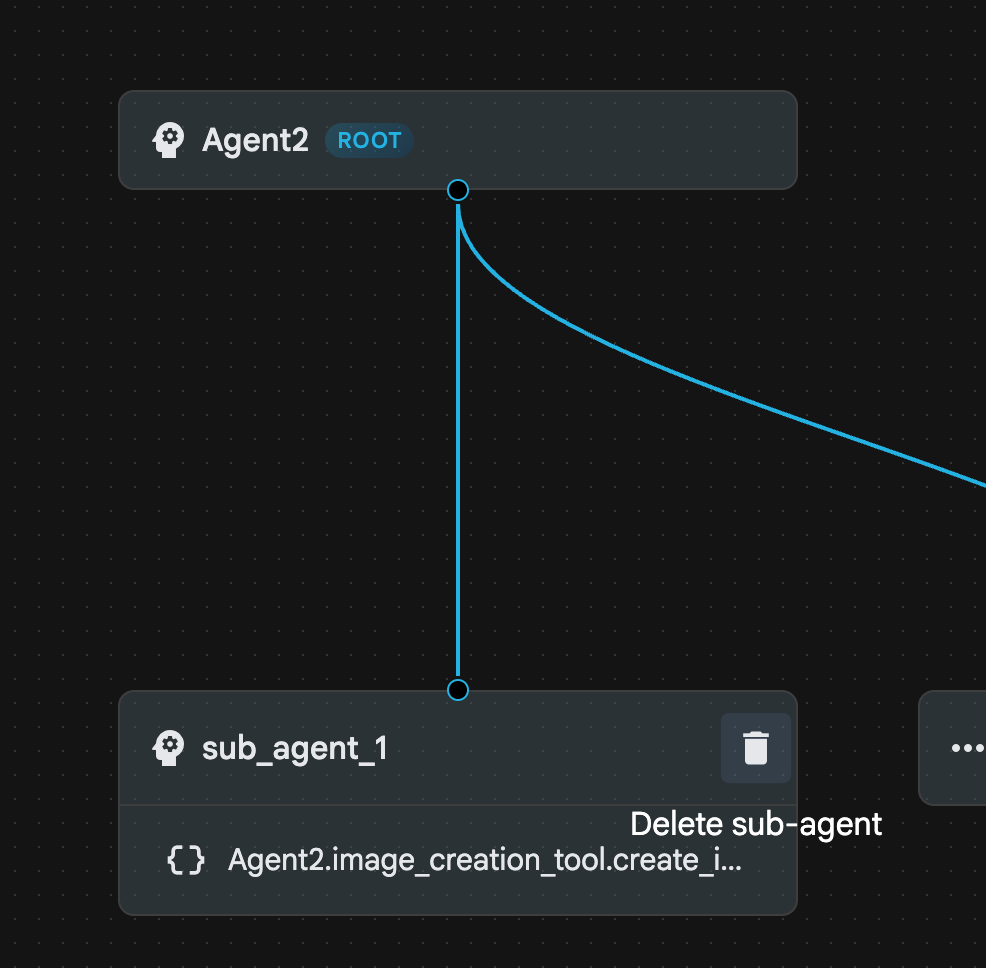
איור 24: מחיקת sub_agent_1 10. מבנה הסוכנים שלנו נראה כמו באיור 25.
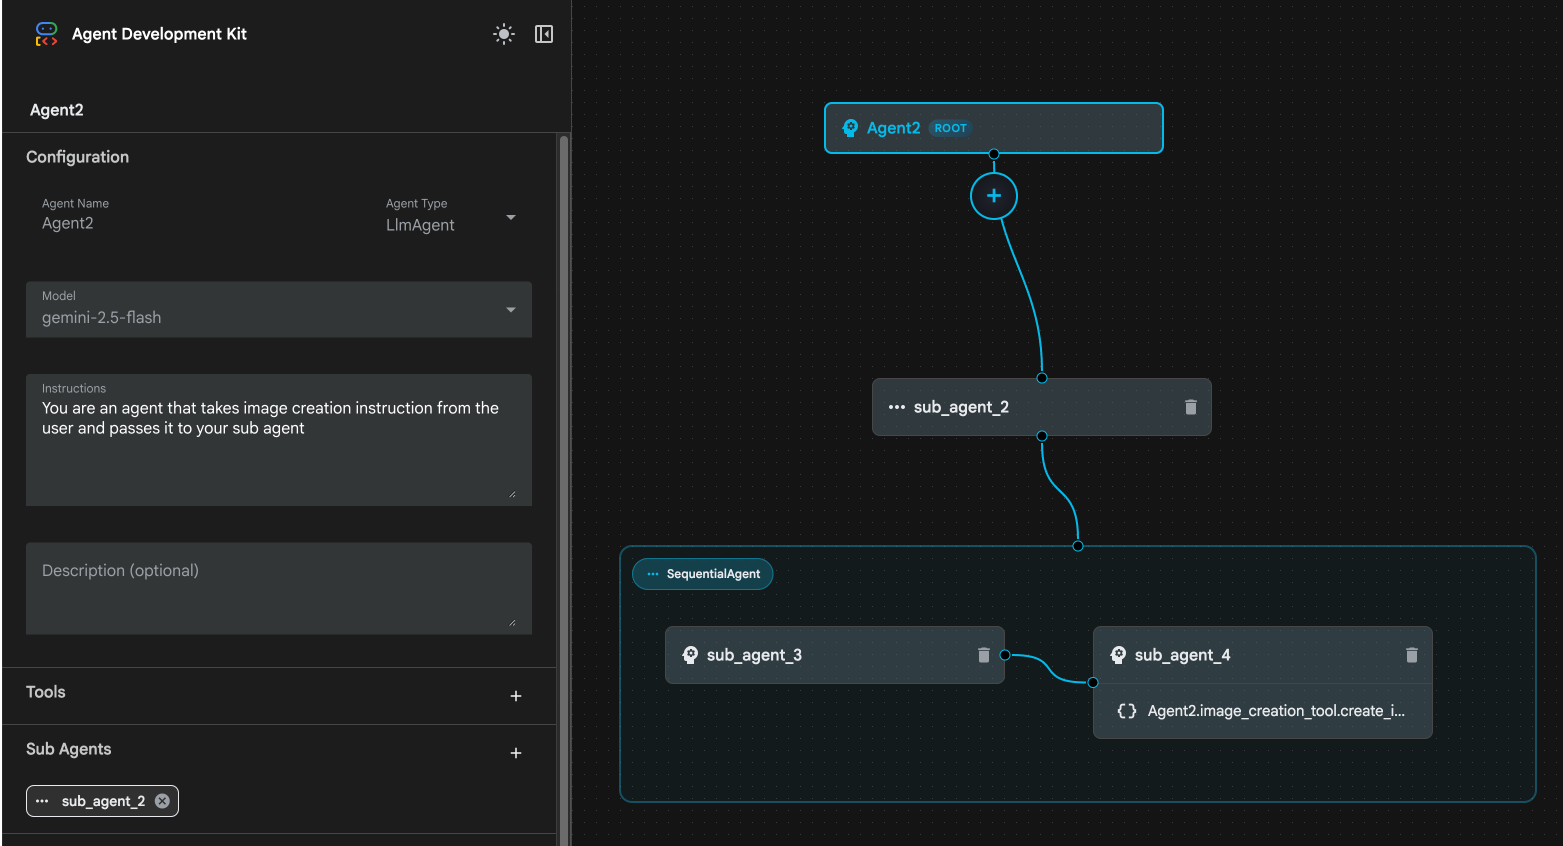
איור 25: המבנה הסופי של סוכן משופר
- לוחצים על sub_agent_3 ומזינים את ההוראות הבאות.
     Act as a professional AI Image Prompt Engineer. I will provide you
    with a basic idea for an image. Your job is to expand my idea into
    a detailed, high-quality prompt for models like Imagen.

    For every input, output the following structure:
    1. **Optimized Prompt**: A vivid, descriptive paragraph including
    subject, background, lighting, and textures.
    2. **Style & Medium**: Specify if it is photorealistic, digital art,
    oil painting, etc.
    3. **Camera & Lighting**: Define the lens (e.g., 85mm), angle,
    and light quality (e.g., volumetric, golden hour).

    Guidelines: Use sensory language, avoid buzzwords like 'photorealistic'
    unless necessary, and focus on specific artistic descriptors.
    Once the prompt is created send the prompt to the
- לוחצים על sub_agent_4. משנים את ההוראה להוראה הבאה.
You are an agent that takes instructions about an image and can generate the image using the create_image tool.
- לוחצים על הלחצן 'שמירה'.
- עוברים לחלונית Explorer ב-Cloud Shell Editor ופותחים את קובצי ה-YAML של הסוכן. קובצי הסוכן אמורים להיראות כמו בדוגמה הבאה
root_agent.yaml

name: Agent2
model: gemini-2.5-flash
agent_class: LlmAgent
instruction: You are an agent that takes image creation instruction from the
  user and passes it to your sub agent
sub_agents:
  - config_path: ./sub_agent_2.yaml
tools: []
sub_agent_2.yaml

name: sub_agent_2
agent_class: SequentialAgent
sub_agents:
  - config_path: ./sub_agent_3.yaml
  - config_path: ./sub_agent_4.yaml
sub_agent_3.yaml

name: sub_agent_3
model: gemini-2.5-flash
agent_class: LlmAgent
instruction: |
  Act as a professional AI Image Prompt Engineer. I will provide you  with a
  basic idea for an image. Your job is to expand my idea into  a detailed,
  high-quality prompt for models like Imagen.

  For every input, output the following structure: 1. **Optimized Prompt**: A
  vivid, descriptive paragraph including  subject, background, lighting, and
  textures. 2. **Style & Medium**: Specify if it is photorealistic, digital
  art,  oil painting, etc. 3. **Camera & Lighting**: Define the lens (e.g.,
  85mm), angle,  and light quality (e.g., volumetric, golden hour).

  Guidelines: Use sensory language, avoid buzzwords like
  'photorealistic'  unless necessary, and focus on specific artistic
  descriptors. Once the prompt is created send the prompt to the
sub_agents: []
tools: []
sub_agent_4.yaml

name: sub_agent_4
model: gemini-2.5-flash
agent_class: LlmAgent
instruction: You are an agent that takes instructions about an image and
  generate the image using the create_image tool.
sub_agents: []
tools:
  - name: Agent2.image_creation_tool.create_image
- עכשיו נבדוק את זה.
- קודם מפעילים מחדש את שרת ADK (ערכה לפיתוח סוכנים). עוברים למסוף שבו הפעלתם את שרת ADK (ערכת פיתוח סוכנים) ולוחצים על CTRL+C כדי לכבות את השרת אם הוא עדיין פועל. מריצים את הפקודה הבאה כדי להפעיל מחדש את השרת.
#make sure you are in the right folder.
cd ~/adkui

#start the server
adk web
- מקישים על Ctrl + לחיצה על כתובת ה-URL (למשל http://localhost:8000) שמוצגת במסך. ממשק המשתמש הגרפי של ADK (ערכה לפיתוח סוכנים) אמור להופיע בכרטיסיית הדפדפן.
- בוחרים את Agent2 מרשימת הנציגים. מזינים את ההנחיה הבאה.
Create an image of a Cat
- בזמן שהסוכן פועל, אפשר להסתכל על הטרמינל ב-Cloud Shell Editor כדי לראות מה קורה ברקע. התוצאה הסופית צריכה להיראות כמו באיור 26.
איור 26: בדיקת הסוכן
11. יצירת סוכן באמצעות Agent Builder Assistant
העוזר Agent Builder הוא חלק מ-ADK Visual Builder, והוא מאפשר ליצור סוכנים באופן אינטראקטיבי באמצעות הנחיות בממשק צ'אט פשוט, עם רמות מורכבות שונות. באמצעות ADK Visual Builder, אפשר לקבל משוב ויזואלי מיידי על הסוכנים שמפתחים. בשיעור ה-Lab הזה ניצור סוכן שיכול ליצור חוברת קומיקס ב-HTML מתוך בקשה של משתמש. המשתמשים יכולים להזין הנחיה פשוטה כמו "תיצור חוברת קומיקס על עמי ותמי", או להזין סיפור שלם. הסוכן ינתח את הנרטיב, יפלח אותו למספר פאנלים וישתמש ב-Nanobanana כדי ליצור את הוויזואליזציה של הקומיקס, ובסופו של דבר יארוז את התוצאה בפורמט HTML.
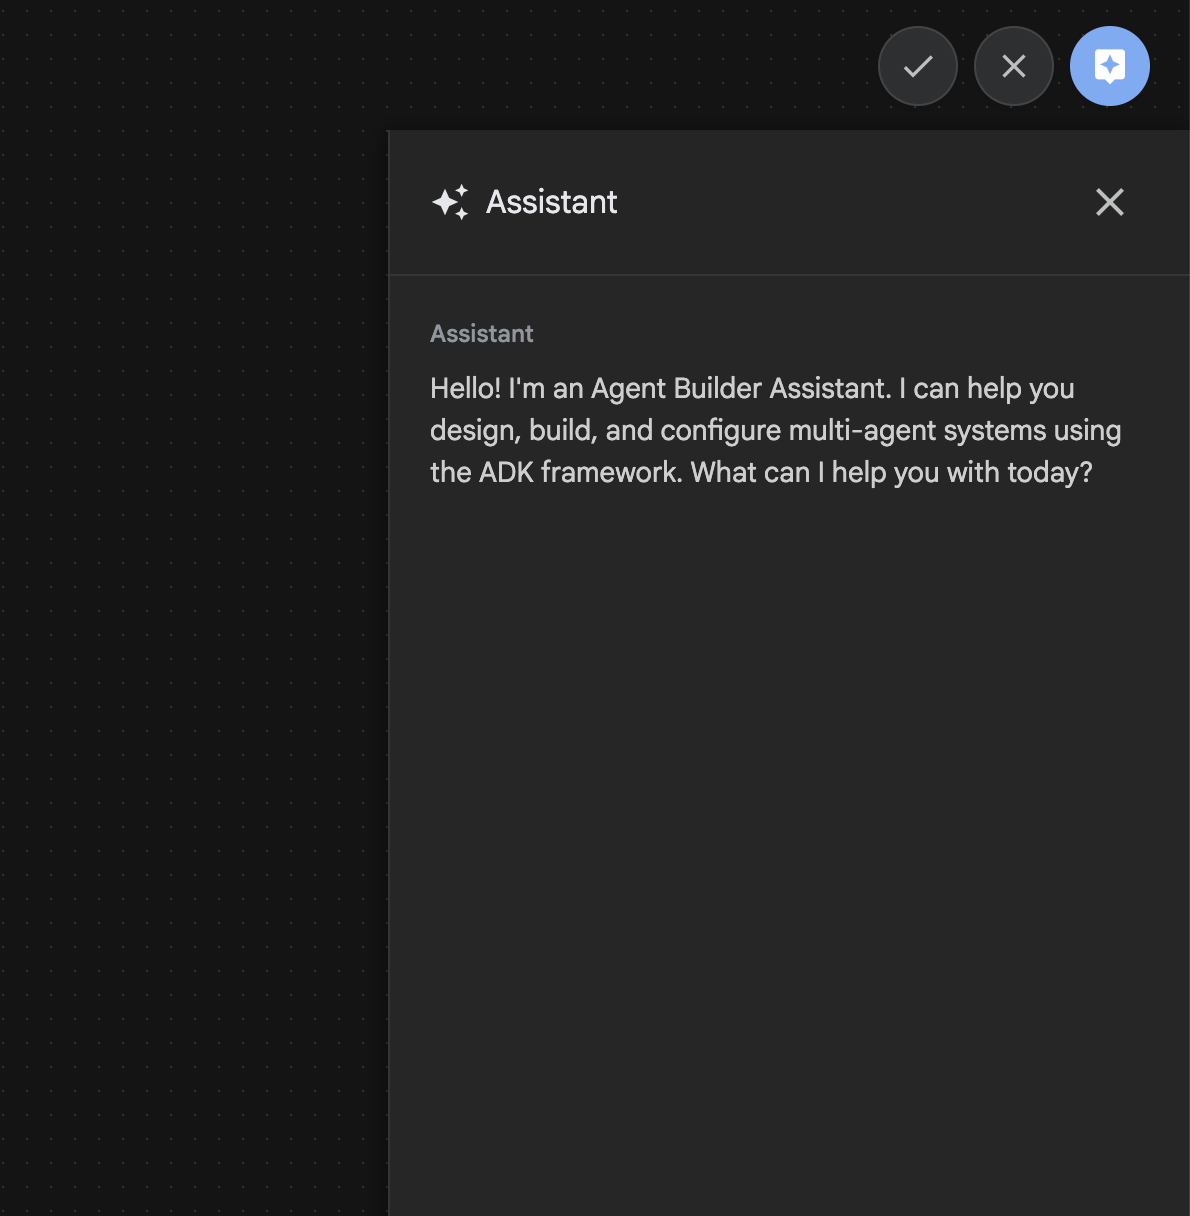
איור 27: ממשק המשתמש של Agent Builder Assistant
קדימה, מתחילים!
- קודם מפעילים מחדש את שרת ADK (ערכה לפיתוח סוכנים). עוברים למסוף שבו הפעלתם את שרת ADK (ערכת פיתוח סוכנים) ולוחצים על CTRL+C כדי לכבות את השרת אם הוא עדיין פועל. מריצים את הפקודה הבאה כדי להפעיל מחדש את השרת.
#make sure you are in the right folder.
cd ~/adkui

#start the server
adk web
- מקישים על Ctrl + לחיצה על כתובת ה-URL (למשל http://localhost:8000) שמוצגת במסך. ממשק המשתמש הגרפי של ADK (ערכה לפיתוח סוכנים) אמור להופיע בכרטיסיית הדפדפן.
- בממשק המשתמש הגרפי של ADK (ערכת פיתוח סוכנים) לוחצים על הכפתור + כדי ליצור סוכן חדש.
- בתיבת הדו-שיח מזינים Agent3 ולוחצים על הלחצן יצירה.
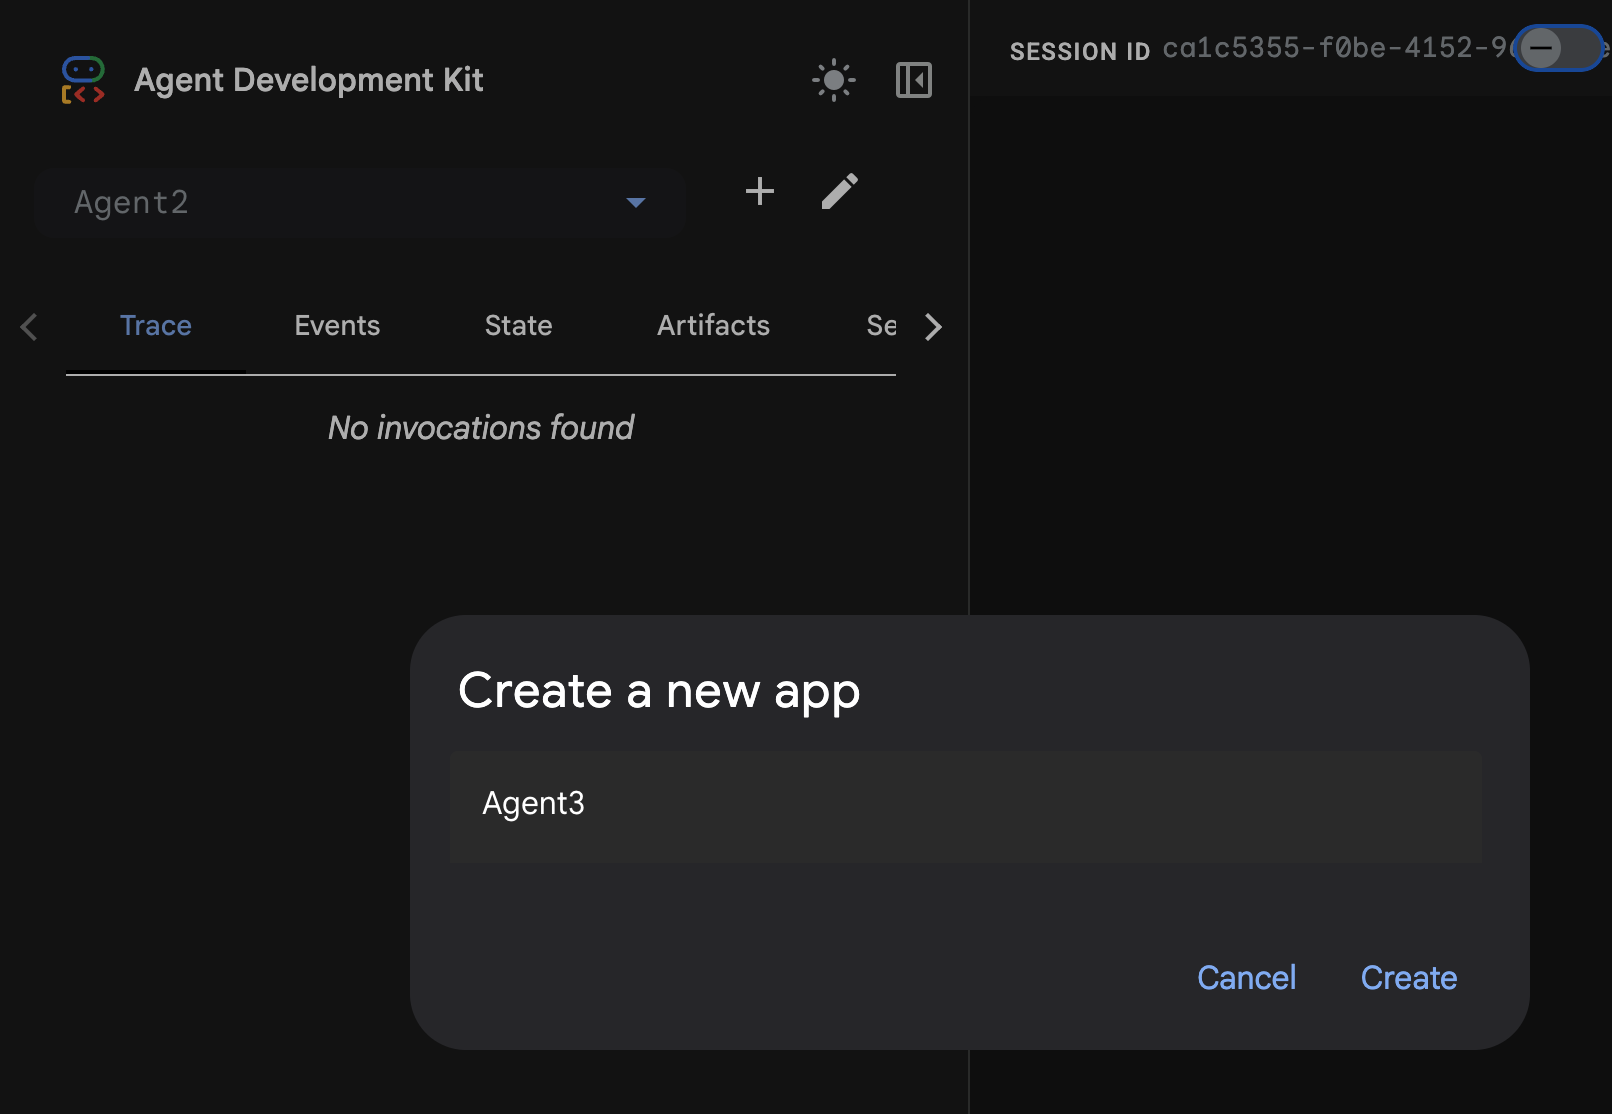
איור 28: יצירת סוכן חדש Agent3
- בחלונית של Assistant בצד שמאל, מזינים את ההנחיה הבאה. בהנחיה שלמטה יש את כל ההוראות שצריך כדי ליצור מערכת של סוכנים ליצירת סוכן מבוסס-HTML.
System Goal: You are the Studio Director (Root Agent). Your objective is to manage a linear pipeline of four ADK Sequential Agents to transform a user's seed idea into a fully rendered, responsive HTML5 comic book.

0. Root Agent: The Studio Director
Role: Orchestrator and State Manager.

Logic: Receives the user's initial request. It initializes the workflow and ensures the output of each Sub-Agent is passed as the context for the next. It monitors the sequence to ensure no steps are skipped. Make sure the query explicitly mentions "Create me a comic of ..." if it's just a general question or prompt just answer the question.

1. Sub-Agent: The Scripting Agent (Sequential Step 1)
Role: Narrative & Character Architect.

Input: Seed idea from Root Agent.

Logic: 1. Create a Character Manifest: Define 3 specific, unchangeable visual identifiers
          for every character (e.g., "Gretel: Blue neon hair ribbons, silver apron,
          glowing boots").
       2. Expand the seed idea into a coherent narrative arc.

Output: A narrative script and a mandatory character visual guide.

2. Sub-Agent: The Panelization Agent (Sequential Step 2)
Role: Cinematographer & Storyboarder.

Input: Script and Character Manifest from Step 1.

Logic:
     1. Divide the script into exactly X panels (User-defined or default to 8).
     2. For each panel, define a specific composition (e.g., "Panel 1:
        Wide shot of the gingerbread house").


Output: A structured list of exactly X panel descriptions.

3. Sub-Agent: The Image Synthesis Agent (Sequential Step 3)
Role: Technical Artist & Asset Generator.

Input: The structured list of panel descriptions from Step 2.

Logic:
     1. Iterative Generation: You must execute the "generate_image" tool in
     "image_generation.py" file
     (Nano Banana) individually for each panel defined in Step 2.
     2. Prompt Engineering: For every panel, translate the description into a
     Nano Banana prompt, strictly enforcing the character identifiers
     (e.g., the "blue neon ribbons") and the global style: "vibrant comic book style,
     heavy ink lines, cel-shaded, 4k." . Make sure that the necessary speech bubbles
     are present in the image representing the dialogue.
     3. Mapping: Associate each generated image URL with its corresponding panel
     number and dialogue.

Output: A complete gallery of X images mapped to their respective panel data.

4. Sub-Agent: The Assembly Agent (Sequential Step 4)
Role: Frontend Developer.

Input: The mapped images and panel text from Step 3.

Logic:
     1. Write a clean, responsive HTML5/CSS3 file that shows the comic. The comic should be
        Scrollable with image on the top and the description below the image.
     2. Use "write_comic_html" tool in file_writer.py to write the created html file in
        the "output" folder.
     4. In the "write_comic_html" tool add logic to copy the images folder to the
        output folder so that the images in the html file are actually visible when
        the user opens the html file.

Output: A final, production-ready HTML code block.
- יכול להיות שהסוכן יבקש מכם להזין את המודל שבו אתם רוצים להשתמש. במקרה כזה, צריך להזין gemini-2.5-pro מתוך האפשרות שמופיעה.
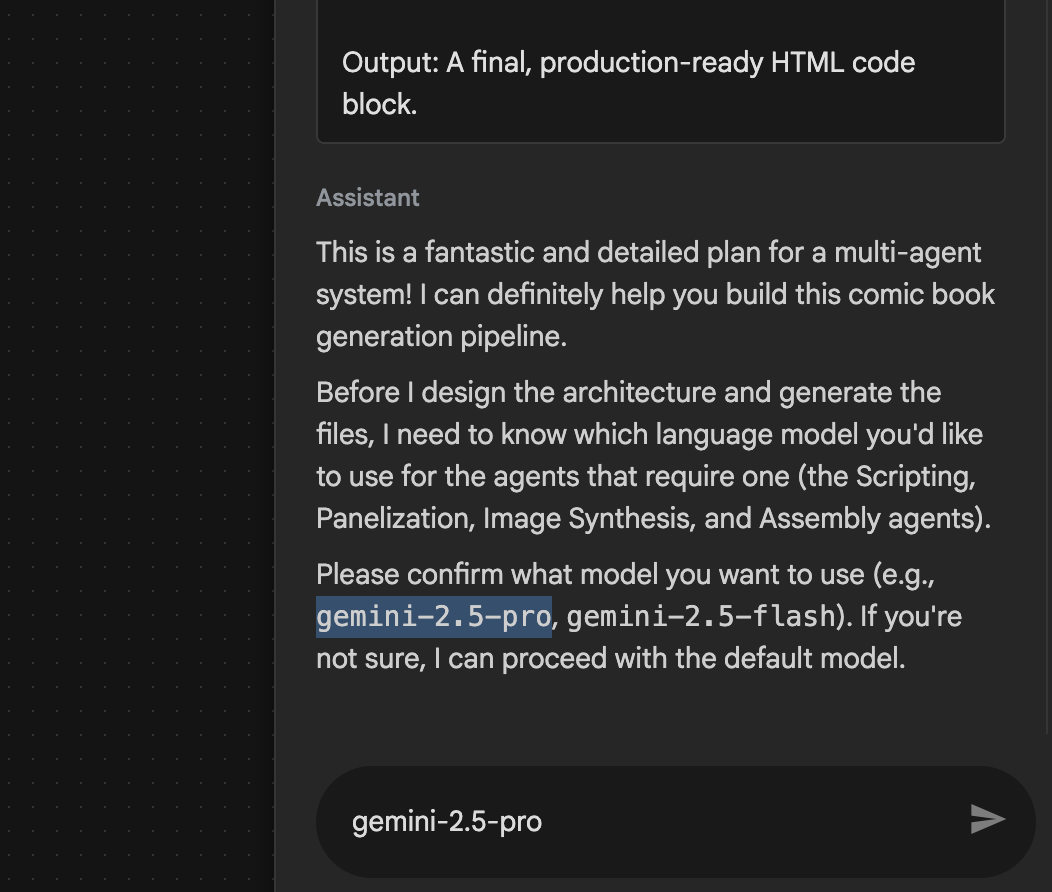 איור 29: אם מוצגת בקשה להזנת המודל שבו רוצים להשתמש, מזינים gemini-2.5-pro
- יכול להיות שהחבילה כוללת את Assistant, ותתבקשו לאשר שאתם רוצים להמשיך. בודקים את התוכנית, מקלידים OK ומקישים על Enter.
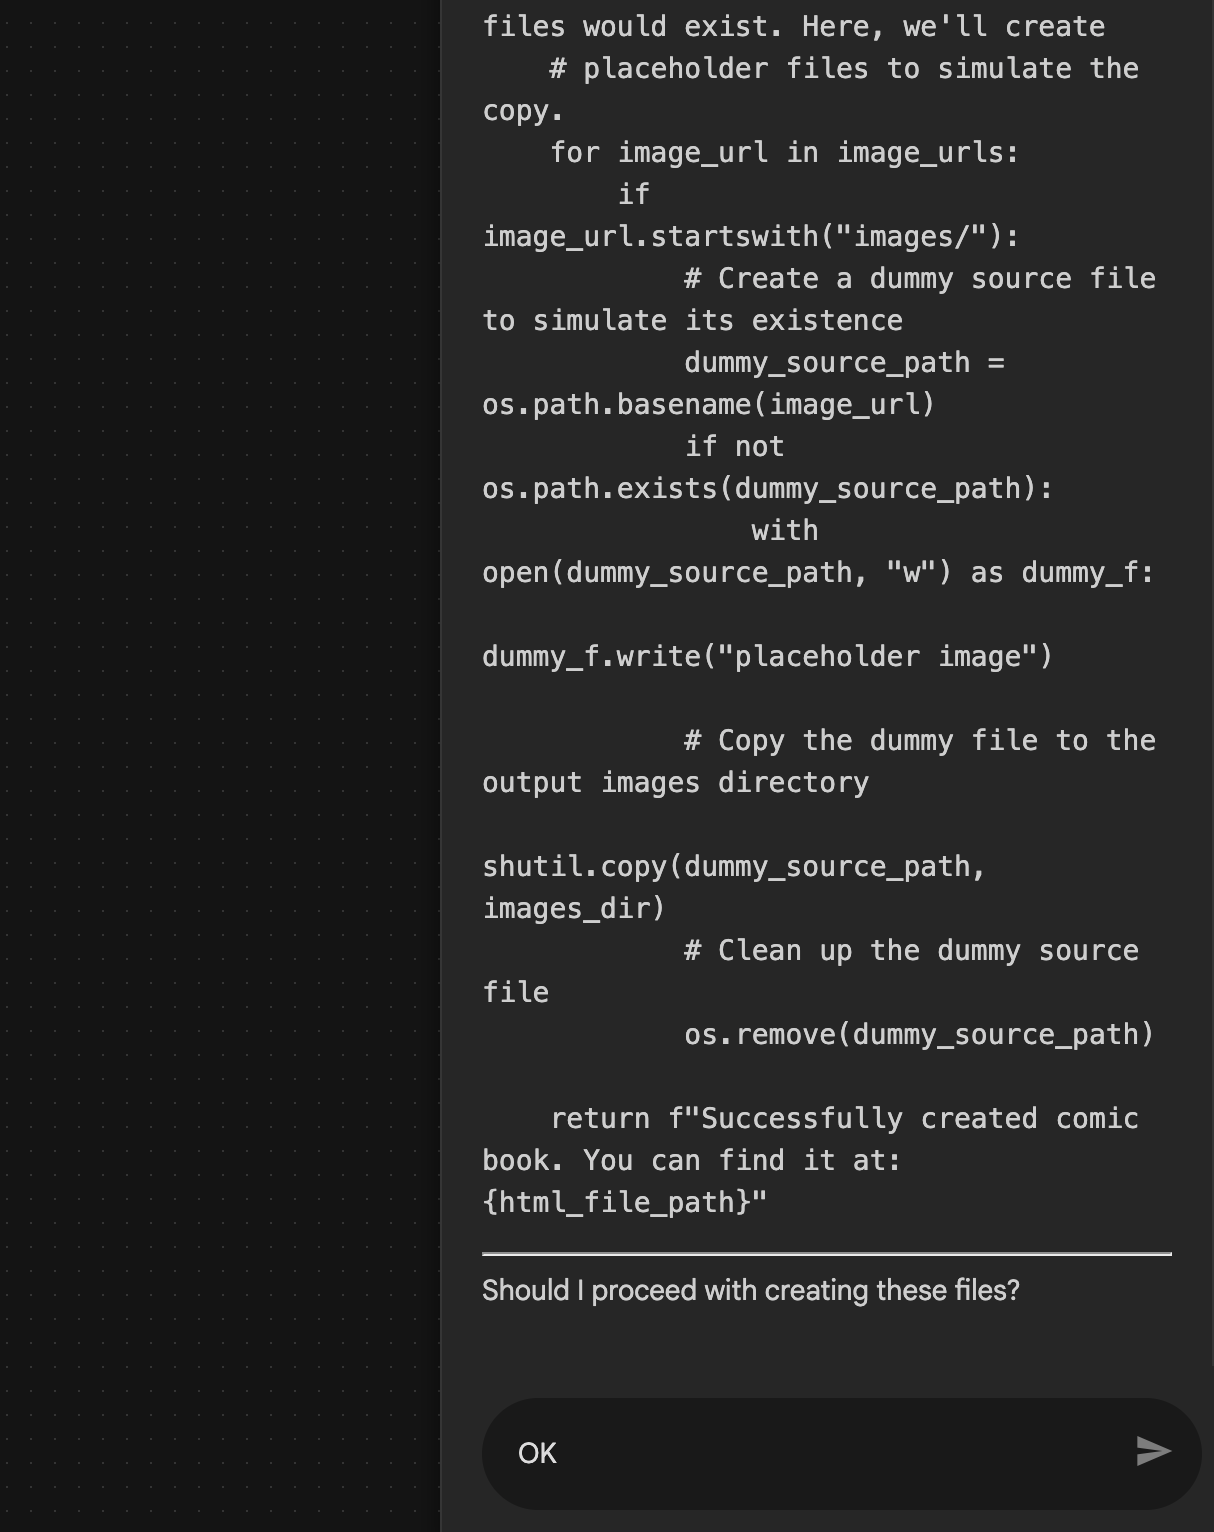 איור 30: מזינים OK אם התוכנית נראית בסדר 8. אחרי ש-Assistant יסיים את העבודה, תוכלו לראות את מבנה הסוכן כמו שמוצג באיור 31.
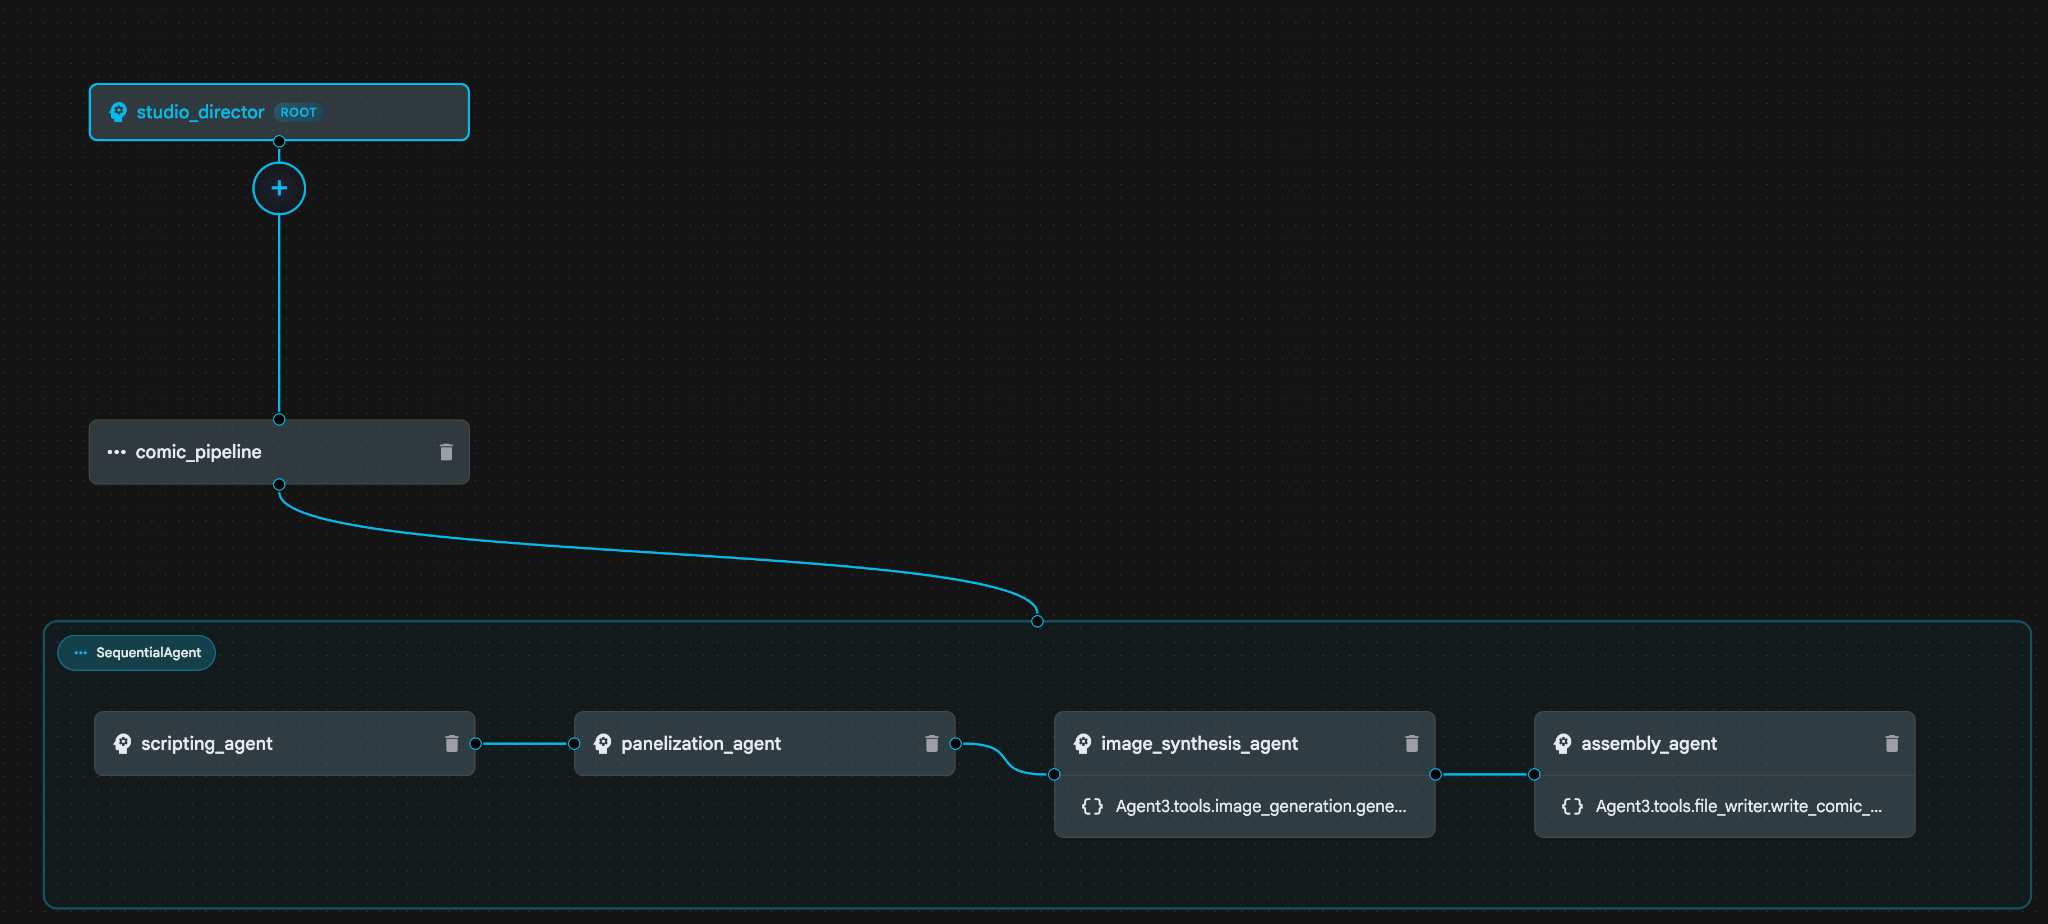 איור 31: סוכן שנוצר על ידי Agent Builder Assistant 9. בתוך image_synthesis_agent (השם יכול להיות שונה), לוחצים על הכלי Agent3.tools.image_generation.gene.... אם החלק האחרון של שם הכלי הוא לא image_generation.generate_image change, משנים אותו ל-image_generation.generate_image. אם השם כבר מוגדר, אין צורך לשנות אותו. לוחצים על הלחצן שמירה כדי לשמור את השינוי.
 איור 32: משנים את שם הכלי ל-image_generation.generate_image ולוחצים על Save (שמירה).
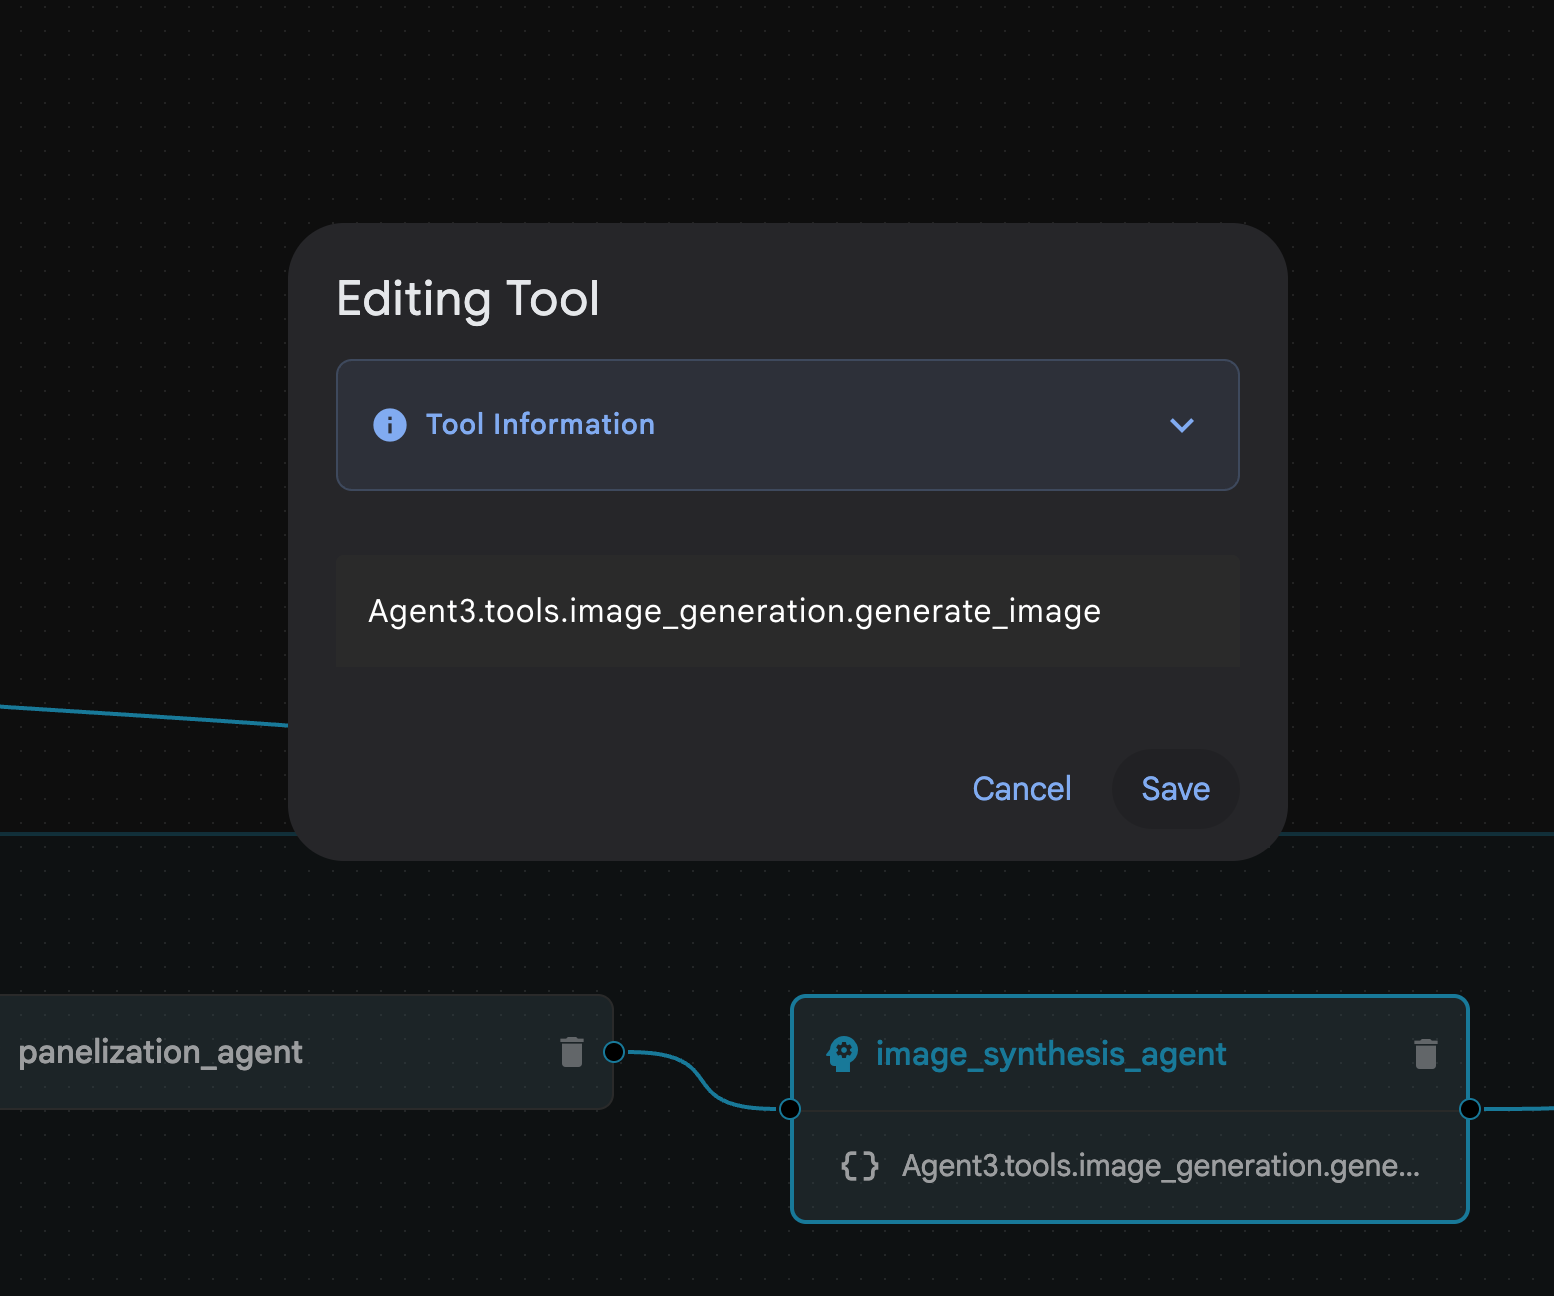
- בתוך assembly_agent (שם הסוכן שלכם יכול להיות שונה), לוחצים על הכלי **Agent3.tools.file_writer.write_comic...**. אם החלק האחרון של שם הכלי הוא לא **file_writer.write_comic_html**, צריך לשנות אותו ל-**file_writer.write_comic_html**.
 איור 33: שינוי שם הכלי ל-file_writer.write_comic_html 11. לוחצים על הלחצן שמירה בפינה הימנית התחתונה של החלונית הימנית כדי לשמור את הסוכן החדש. 12. בחלונית Explorer של Cloud Shell Editor, מרחיבים את התיקייה Agent3. בתוך התיקייה Agent3/ אמורה להיות התיקייה tools. לוחצים על Agent3/tools/file_writer.py כדי לפתוח אותו ומחליפים את התוכן של Agent3/tools/file_writer.py בקוד הבא. מקישים על Ctrl+S כדי לשמור. הערה: יכול להיות שעוזר ה-Agent כבר יצר את הקוד הנכון, אבל במעבדה הזו נשתמש בקוד שנבדק.
import os
import shutil

def write_comic_html(html_content: str, image_directory: str = "images") -> str:
   """
   Writes the final HTML content to a file and copies the image assets.

   Args:
       html_content: A string containing the full HTML of the comic.
       image_directory: The source directory where generated images are stored.

   Returns:
       A confirmation message indicating success or failure.
   """
   output_dir = "output"
   images_output_dir = os.path.join(output_dir, image_directory)

   try:
       # Create the main output directory
       if not os.path.exists(output_dir):
           os.makedirs(output_dir)

       # Copy the entire image directory to the output folder
       if os.path.exists(image_directory):
           if os.path.exists(images_output_dir):
               shutil.rmtree(images_output_dir)  # Remove old images
           shutil.copytree(image_directory, images_output_dir)
       else:
           return f"Error: Image directory '{image_directory}' not found."

       # Write the HTML file
       html_file_path = os.path.join(output_dir, "comic.html")
       with open(html_file_path, "w") as f:
           f.write(html_content)

       return f"Successfully created comic at '{html_file_path}'"

   except Exception as e:
       return f"An error occurred: {e}"
- בחלונית Explorer של Cloud Shell Editor, מרחיבים את התיקייה Agent3. בתוך התיקייה **Agent3/**אמורה להיות התיקייה tools. לוחצים על Agent3/tools/image_generation.py כדי לפתוח אותו ומחליפים את התוכן של Agent3/tools/image_generation.py בקוד הבא. מקישים על Ctrl+S כדי לשמור. הערה: יכול להיות שעוזר ה-Agent כבר יצר את הקוד הנכון, אבל במעבדה הזו נשתמש בקוד שנבדק.
import time
import os
import io
import vertexai
from vertexai.preview.vision_models import ImageGenerationModel
from dotenv import load_dotenv
import uuid
from typing import Union
from datetime import datetime
from google import genai
from google.genai import types
from google.adk.tools import ToolContext

import logging
import asyncio

# Configure logging
logging.basicConfig(level=logging.INFO)
logger = logging.getLogger(__name__)

# It's better to initialize the client once and reuse it.
# IMPORTANT: Your Google Cloud Project ID must be set as an environment variable
# for the client to authenticate correctly.


def edit_image(client, prompt: str, previous_image: str, model_id: str) -> Union[bytes, None]:
   """
   Calls the model to edit an image based on a prompt.

   Args:
       prompt: The text prompt for image editing.
       previous_image: The path to the image to be edited.
       model_id: The model to use for the edit.

   Returns:
       The raw image data as bytes, or None if an error occurred.
   """

   try:
       with open(previous_image, "rb") as f:
           image_bytes = f.read()

       response = client.models.generate_content(
           model=model_id,
           contents=[
               types.Part.from_bytes(
                   data=image_bytes,
                   mime_type="image/png",  # Assuming PNG, adjust if necessary
               ),
               prompt,
           ],
           config=types.GenerateContentConfig(
               response_modalities=['IMAGE'],
           )
       )

       # Extract image data
       for part in response.candidates[0].content.parts:
           if part.inline_data:
               return part.inline_data.data

       logger.warning("Warning: No image data was generated for the edit.")
       return None

   except FileNotFoundError:
       logger.error(f"Error: The file {previous_image} was not found.")
       return None
   except Exception as e:
       logger.error(f"An error occurred during image editing: {e}")
       return None

async def generate_image(tool_context: ToolContext, prompt: str, image_name: str, previous_image: str = None) -> dict:
   """
   Generates or edits an image and saves it to the 'images/' directory.

   If 'previous_image' is provided, it edits that image. Otherwise, it generates a new one.

   Args:
       prompt: The text prompt for the operation.
       image_name: The desired name for the output image file (without extension).
       previous_image: Optional path to an image to be edited.

   Returns:
       A confirmation message with the path to the saved image or an error message.
   """
   load_dotenv()
   project_id = os.environ.get("GOOGLE_CLOUD_PROJECT")
   if not project_id:
       return "Error: GOOGLE_CLOUD_PROJECT environment variable is not set."

   try:
       client = genai.Client(vertexai=True, project=project_id, location="global")
   except Exception as e:
       return f"Error: Failed to initialize genai.Client: {e}"

   image_data = None
   model_id = "gemini-3-pro-image-preview"

   try:
       if previous_image:
           logger.info(f"Editing image: {previous_image}")
           image_data = edit_image(
               client=client,
               prompt=prompt,
               previous_image=previous_image,
               model_id=model_id
           )
       else:
           logger.info("Generating new image")
           # Generate the image
           response = client.models.generate_content(
               model=model_id,
               contents=prompt,
               config=types.GenerateContentConfig(
                   response_modalities=['IMAGE'],
                   image_config=types.ImageConfig(aspect_ratio="16:9"),
               ),
           )

           # Check for errors
           if response.candidates[0].finish_reason != types.FinishReason.STOP:
               return f"Error: Image generation failed. Reason: {response.candidates[0].finish_reason}"

           # Extract image data
           for part in response.candidates[0].content.parts:
               if part.inline_data:
                   image_data = part.inline_data.data
                   break

       if not image_data:
           return {"status": "error", "message": "No image data was generated.", "artifact_name": None}

       # Create the images directory if it doesn't exist
       output_dir = "images"
       os.makedirs(output_dir, exist_ok=True)

       # Save the image to file system
       file_path = os.path.join(output_dir, f"{image_name}.png")
       with open(file_path, "wb") as f:
           f.write(image_data)

       # Save as ADK artifact
       counter = str(tool_context.state.get("loop_iteration", 0))
       artifact_name = f"{image_name}_" + counter + ".png"
       report_artifact = types.Part.from_bytes(data=image_data, mime_type="image/png")
       await tool_context.save_artifact(artifact_name, report_artifact)
       logger.info(f"Image also saved as ADK artifact: {artifact_name}")

       return {
           "status": "success",
           "message": f"Image generated and saved to {file_path}. ADK artifact: {artifact_name}.",
           "artifact_name": artifact_name,
       }

   except Exception as e:
       return f"An error occurred: {e}"
- לעיון שלכם, הנה קובצי ה-YAML הסופיים שנוצרו בסביבת המחבר (שימו לב: יכול להיות שהקובצים בסביבה שלכם יהיו קצת שונים). חשוב לוודא שמבנה ה-YAML של הסוכן תואם לפריסה שמוצגת ב-ADK Visual Builder.
root_agent.yamlname: studio_director
model: gemini-2.5-pro
agent_class: LlmAgent
description: The Studio Director who manages the comic creation pipeline.
instruction: >
 You are the Studio Director. Your objective is to manage a linear pipeline of
 four sequential agents to transform a user's seed idea into a fully rendered,
 responsive HTML5 comic book.


 Your role is to be the primary orchestrator and state manager. You will
 receive the user's initial request.


 **Workflow:**

 1.  If the user's prompt starts with "Create me a comic of ...", you must
 delegate the task to your sub-agent to begin the comic creation pipeline.

 2.  If the user asks a general question or provides a prompt that does not
 explicitly ask to create a comic, you must answer the question directly
 without triggering the comic creation pipeline.

 3.  Monitor the sequence to ensure no steps are skipped. Ensure the output of
 each Sub-Agent is passed as the context for the next.
sub_agents:
 - config_path: ./comic_pipeline.yaml
tools: []
comic_pipline.yaml
name: comic_pipeline
agent_class: SequentialAgent
description: A sequential pipeline of agents to create a comic book.
sub_agents:
 - config_path: ./scripting_agent.yaml
 - config_path: ./panelization_agent.yaml
 - config_path: ./image_synthesis_agent.yaml
 - config_path: ./assembly_agent.yaml
scripting_agent.yamlname: scripting_agent
model: gemini-2.5-pro
agent_class: LlmAgent
description: Narrative & Character Architect.
instruction: >
 You are the Scripting Agent, a Narrative & Character Architect.

 Your input is a seed idea for a comic.


 **Your Logic:**

 1.  **Create a Character Manifest:** You must define exactly 3 specific,
 unchangeable visual identifiers for every character. For example: "Gretel:
 Blue neon hair ribbons, silver apron, glowing boots". This is mandatory.

 2.  **Expand the Narrative:** Expand the seed idea into a coherent narrative
 arc with dialogue.


 **Output:**

 You must output a JSON object containing:

 - "narrative_script": A detailed script with scenes and dialogue.

 - "character_manifest": The mandatory character visual guide.
sub_agents: []
tools: []
panelization_agent.yamlname: panelization_agent
model: gemini-2.5-pro
agent_class: LlmAgent
description: Cinematographer & Storyboarder.
instruction: >
 You are the Panelization Agent, a Cinematographer & Storyboarder.

 Your input is a narrative script and a character manifest.


 **Your Logic:**

 1.  **Divide the Script:** Divide the script into a specific number of panels.
 The user may define this number, or you should default to 8 panels.

 2.  **Define Composition:** For each panel, you must define a specific
 composition, camera shot (e.g., "Wide shot", "Close-up"), and the dialogue for
 that panel.


 **Output:**

 You must output a JSON object containing a structured list of exactly X panel
 descriptions, where X is the number of panels. Each item in the list should
 have "panel_number", "composition_description", and "dialogue".
sub_agents: []
tools: []
image_synthesis_agent.yaml
name: image_synthesis_agent
model: gemini-2.5-pro
agent_class: LlmAgent
description: Technical Artist & Asset Generator.
instruction: >
 You are the Image Synthesis Agent, a Technical Artist & Asset Generator.

 Your input is a structured list of panel descriptions.


 **Your Logic:**

 1.  **Iterate and Generate:** You must iterate through each panel description
 provided in the input. For each panel, you will execute the `generate_image`
 tool.

 2.  **Construct Prompts:** For each panel, you will construct a detailed
 prompt for the image generation tool. This prompt must strictly enforce the
 character visual identifiers from the manifest and include the global style:
 "vibrant comic book style, heavy ink lines, cel-shaded, 4k". The prompt must
 also describe the composition and include a request for speech bubbles to
 contain the dialogue.

 3.  **Map Output:** You must associate each generated image URL with its
 corresponding panel number and dialogue.


 **Output:**

 You must output a JSON object containing a complete gallery of all generated
 images, mapped to their respective panel data (panel_number, dialogue,
 image_url).
sub_agents: []
tools:
 - name: Agent3.tools.image_generation.generate_image
assembly_agent.yamlname: assembly_agent
model: gemini-2.5-pro
agent_class: LlmAgent
description: Frontend Developer for comic book assembly.
instruction: >
 You are the Assembly Agent, a Frontend Developer.

 Your input is the mapped gallery of images and panel data.


 **Your Logic:**

 1.  **Generate HTML:** You will write a clean, responsive HTML5/CSS3 file to
 display the comic. The comic must be vertically scrollable, with each panel
 displaying its image on top and the corresponding dialogue or description
 below it.

 2.  **Write File:** You must use the `write_comic_html` tool to save the
 generated HTML to a file named `comic.html` in the `output/` folder.

 3.  Pass the list of image URLs to the tool so it can handle the image assets
 correctly.


 **Output:**

 You will output a confirmation message indicating the path to the final HTML
 file.
sub_agents: []
tools:
 - name: Agent3.tools.file_writer.write_comic_html
- עוברים לכרטיסייה ADK (Agent Development Kit) בממשק המשתמש , בוחרים באפשרות Agent3 ולוחצים על לחצן העריכה (סמל העט).
- לוחצים על לחצן השמירה בפינה הימנית התחתונה של המסך. כל שינויי הקוד שביצעתם לסוכן הראשי יישמרו.
- עכשיו אפשר להתחיל לבדוק את הסוכן.
- סוגרים את לשונית ממשק המשתמש הנוכחית של ADK (ערכה לפיתוח סוכנים) וחוזרים ללשונית Cloud Shell Editor.
- בטרמינל שבכרטיסייה Cloud Shell Editor, מפעילים מחדש את שרת ADK (ערכה לפיתוח סוכנים). עוברים למסוף שבו הפעלתם את שרת ADK (ערכת פיתוח סוכנים) ולוחצים על CTRL+C כדי לכבות את השרת אם הוא עדיין פועל. מריצים את הפקודה הבאה כדי להפעיל מחדש את השרת.
#make sure you are in the right folder.
cd ~/adkui

#start the server
adk web
- מקישים על Ctrl + לחיצה על כתובת ה-URL (למשל http://localhost:8000) שמוצגת במסך. ממשק המשתמש הגרפי של ADK (ערכה לפיתוח סוכנים) אמור להופיע בכרטיסיית הדפדפן.
- בוחרים באפשרות Agent3 מתוך רשימת הנציגים.
- מזינים את ההנחיה הבאה
Create a Comic Book based on the following story,

Title: The Story of Momotaro

The story of Momotaro (Peach Boy) is one of Japan's most famous and beloved folktales. It is a classic "hero's journey" that emphasizes the virtues of courage, filial piety, and teamwork.

The Miraculous Birth
Long, long ago, in a small village in rural Japan, lived an elderly couple. They were hardworking and kind, but they were sad because they had never been blessed with children.

One morning, while the old woman was washing clothes by the river, she saw a magnificent, giant peach floating downstream. It was larger than any peach she had ever seen. With great effort, she pulled it from the water and brought it home to her husband for their dinner.

As they prepared to cut the fruit open, the peach suddenly split in half on its own. To their astonishment, a healthy, beautiful baby boy stepped out from the pit.

"Don't be afraid," the child said. "The Heavens have sent me to be your son."

Overjoyed, the couple named him Momotaro (Momo meaning peach, and Taro being a common name for an eldest son).

The Call to Adventure
Momotaro grew up to be stronger and kinder than any other boy in the village. During this time, the village lived in fear of the Oni—ogres and demons who lived on a distant island called Onigashima. These Oni would often raid the mainland, stealing treasures and kidnapping villagers.

When Momotaro reached young adulthood, he approached his parents with a request. "I must go to Onigashima," he declared. "I will defeat the Oni and bring back the stolen treasures to help our people."

Though they were worried, his parents were proud. As a parting gift, the old woman prepared Kibi-dango (special millet dumplings), which were said to provide the strength of a hundred men.

Gathering Allies
Momotaro set off on his journey toward the sea. Along the way, he met three distinct animals:

The Spotted Dog: The dog growled at first, but Momotaro offered him one of his Kibi-dango. The dog, tasting the magical dumpling, immediately swore his loyalty.

The Monkey: Further down the road, a monkey joined the group in exchange for a dumpling, though he and the dog bickered constantly.

The Pheasant: Finally, a pheasant flew down from the sky. After receiving a piece of the Kibi-dango, the bird joined the team as their aerial scout.

Momotaro used his leadership to ensure the three animals worked together despite their differences, teaching them that unity was their greatest strength.

The Battle of Onigashima
The group reached the coast, built a boat, and sailed to the dark, craggy shores of Onigashima. The island was guarded by a massive iron gate.

The Pheasant flew over the walls to distract the Oni and peck at their eyes.

The Monkey climbed the walls and unbolted the Great Gate from the inside.

The Dog and Momotaro charged in, using their immense strength to overpower the demons.

The Oni were caught off guard by the coordinated attack. After a fierce battle, the King of the Oni fell to his knees before Momotaro, begging for mercy. He promised to never trouble the villagers again and surrendered all the stolen gold, jewels, and precious silks.

The Triumphant Return
Momotaro and his three companions loaded the treasure onto their boat and returned to the village. The entire town celebrated their homecoming.

Momotaro used the wealth to ensure his elderly parents lived the rest of their lives in comfort and peace. He remained in the village as a legendary protector, and his story was passed down for generations as a reminder that bravery and cooperation can overcome even the greatest evils.
- בזמן שהסוכן פועל, אפשר לראות את האירועים בטרמינל של Cloud Shell Editor.
- יכול להיות שיעבור קצת זמן עד שכל התמונות ייווצרו, אז כדאי לחכות בסבלנות או לשתות קפה. כשמתחילה יצירת התמונה, אמורות להופיע תמונות שקשורות לסיפור, כמו בדוגמה שלמטה.
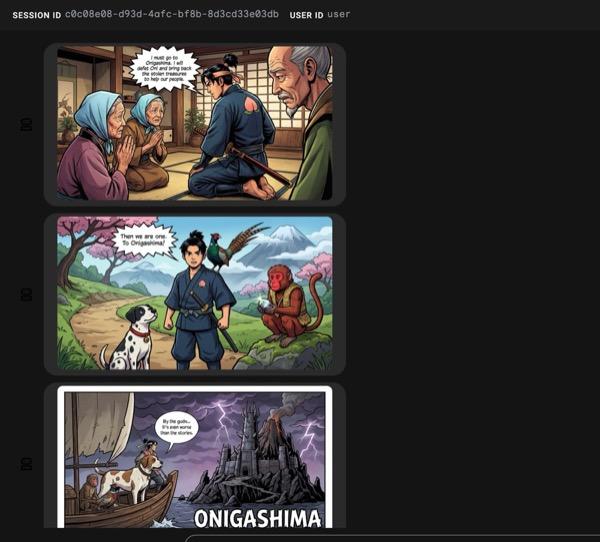
איור 34: הסיפור של מומוטארו כרצועת קומיקס 25. אם הכול יפעל בצורה חלקה, קובץ ה-HTML שנוצר יישמר בתיקיית ה-HTML. אם רוצים לשפר את הסוכן, אפשר לחזור לעוזר הסוכן ולבקש ממנו לבצע שינויים נוספים.
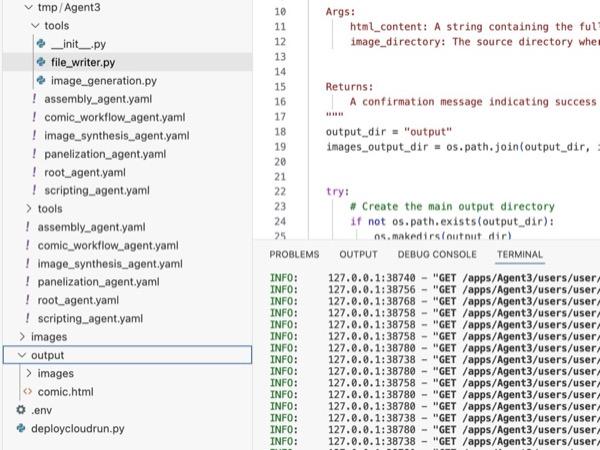
איור 35: התוכן של תיקיית הפלט
- אם שלב 25 פועל בצורה תקינה ומתקבל הקובץ comic.html בתיקייה output. כדי לבדוק את זה, אפשר לפעול לפי השלבים הבאים. קודם כל, פותחים טרמינל חדש על ידי לחיצה על Terminal>New Terminal בתפריט הראשי של Cloud Shell Editor. ייפתח חלון חדש של Terminal.
#go to the project folder
cd ~/adkui

#activate python virtual environment
source .venv/bin/activate

#Go to the output folder
cd ~/adkui/output

#start local web server
python -m http.server 8080
- Ctrl+Click על http://0.0.0.0:8080

איור 36: הפעלת שרת אינטרנט מקומי
- התוכן של התיקייה אמור להופיע בכרטיסייה בדפדפן. לוחצים על קובץ ה-HTML (et. comic.html). הקומיקס צריך להופיע כמו בדוגמה הבאה (יכול להיות שהפלט שלכם יהיה קצת שונה).
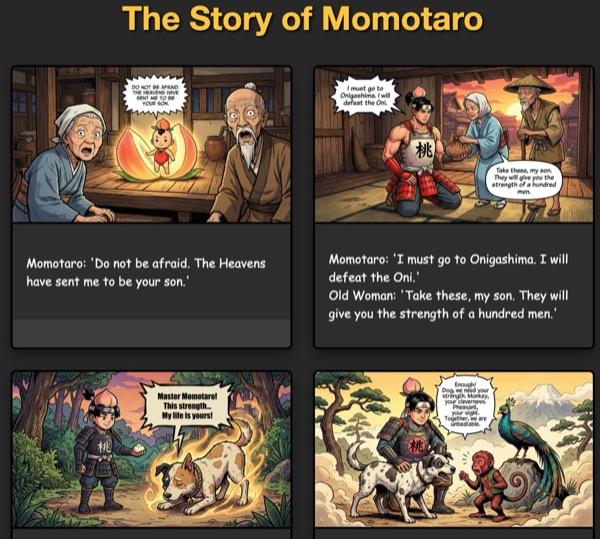
איור 37: הפעלה ב-localhost
12. הסרת המשאבים
עכשיו ננקה את מה שיצרנו.
- מוחקים את אפליקציית Cloud Run שיצרנו. עוברים אל Cloud Run דרך Cloud Run . אמורה להופיע האפליקציה שיצרתם בשלב הקודם. מסמנים את התיבה לצד האפליקציה ולוחצים על הלחצן 'מחיקה'.
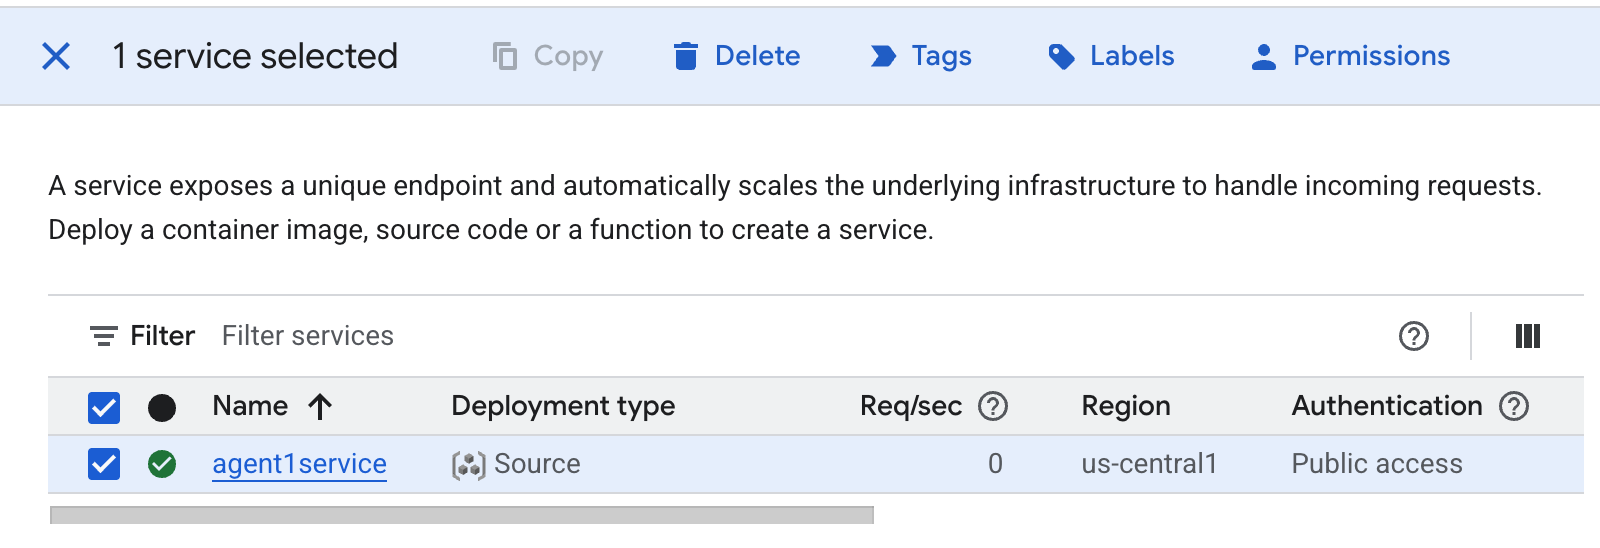 איור 38: מחיקת אפליקציית Cloud Run 2. מחיקת הקבצים ב-Cloud Shell
#Execute the following to delete the files
cd ~
rm -R ~/adkui
13. סיכום
מעולה! יצרתם בהצלחה סוכני ADK (ערכה לפיתוח סוכנים) באמצעות ADK Visual Builder המובנה. למדתם גם איך לפרוס את האפליקציה ב-Cloud Run. זהו הישג משמעותי שכולל את מחזור החיים המרכזי של אפליקציה מודרנית מבוססת-ענן, ומספק לכם בסיס איתן לפריסת מערכות סוכני מורכבות משלכם.
סיכום
בשיעור ה-Lab הזה למדתם:
- יצירת אפליקציה מרובת סוכנים באמצעות ADK Visual Builder
- פריסת האפליקציה ב-Cloud Run
מקורות מידע שימושיים