
1. इस लैब का मकसद
इस हैंड्स-ऑन लैब में, ADK (एजेंट डेवलपमेंट किट) विज़ुअल बिल्डर का इस्तेमाल करके एजेंट बनाने का तरीका बताया गया है. ADK (Agent Development Kit) विज़ुअल बिल्डर, ADK (Agent Development Kit) एजेंट बनाने के लिए, कम कोड वाला तरीका उपलब्ध कराता है. आपको ऐप्लिकेशन को स्थानीय तौर पर टेस्ट करने और Cloud Run में डिप्लॉय करने का तरीका बताया जाएगा.
आपको क्या सीखने को मिलेगा
- ADK (Agent Development Kit) के बारे में बुनियादी बातें समझें.
- ADK (एजेंट डेवलपमेंट किट) विज़ुअल बिल्डर के बारे में बुनियादी जानकारी
- GUI टूल का इस्तेमाल करके एजेंट बनाने का तरीका जानें.
- Cloud Run में एजेंटों को आसानी से डिप्लॉय और इस्तेमाल करने का तरीका जानें.

पहली इमेज: ADK विज़ुअल बिल्डर की मदद से, कम कोड वाले एजेंट बनाए जा सकते हैं. इसके लिए, जीयूआई का इस्तेमाल किया जाता है
2. प्रोजेक्ट सेटअप करना
- नीचे दिए गए लिंक GCP कंसोल पर क्लिक करके, GCP कंसोल पर जाएं.
- अगर आपके पास पहले से कोई ऐसा प्रोजेक्ट नहीं है जिसका इस्तेमाल किया जा सके, तो आपको GCP Console में एक नया प्रोजेक्ट बनाना होगा. प्रोजेक्ट चुनने वाले टूल (Google Cloud Console में सबसे ऊपर बाईं ओर) से वह प्रोजेक्ट चुनें जिसका इस्तेमाल करना है. अगर आपके पास पहले से कोई प्रोजेक्ट नहीं है, तो नया प्रोजेक्ट बनाने के लिए कृपया यह तरीका अपनाएं. नया प्रोजेक्ट बनाने के बाद, कृपया अपना प्रोजेक्ट चुनें.

दूसरी इमेज: Google Cloud के लोगो के ठीक बगल में मौजूद बॉक्स पर क्लिक करके, अपना प्रोजेक्ट चुना जा सकता है. पक्का करें कि आपका प्रोजेक्ट चुना गया हो.
- इस लैब में, हम अपने टास्क पूरे करने के लिए Cloud Shell Editor का इस्तेमाल करेंगे. Cloud Shell खोलें और Cloud Shell का इस्तेमाल करके प्रोजेक्ट सेट करें.
- सीधे Cloud Shell Editor पर जाने के लिए, इस लिंक पर क्लिक करें
- Cloud Shell Editor के साइड बार में, Open Folder बटन पर क्लिक करें.
- आपका होम फ़ोल्डर पहले से ही चुना हुआ होना चाहिए. बस ठीक है दबाएं. इसके बाद, आपका होम फ़ोल्डर इस टास्क के लिए रूट फ़ोल्डर होगा.

- अगर टर्मिनल पहले से खुला नहीं है, तो मेन्यू में जाकर टर्मिनल>नया टर्मिनल पर क्लिक करके उसे खोलें. इस ट्यूटोरियल में दिए गए सभी निर्देशों को इस टर्मिनल में चलाया जा सकता है.
- Cloud Shell टर्मिनल में, यहां दी गई कमांड का इस्तेमाल करके यह देखा जा सकता है कि प्रोजेक्ट की पुष्टि पहले ही हो चुकी है या नहीं.
gcloud auth list
- अगर आपको अपना प्रोजेक्ट आईडी याद नहीं है, तो
gcloud projects list
- प्रोजेक्ट आईडी कॉपी करें और इसे सेट करने के लिए, इस निर्देश का इस्तेमाल करें
gcloud config set project <YOUR_PROJECT_ID>
- अपने प्रोजेक्ट की पुष्टि करने के लिए, Cloud Shell में यह कमांड चलाएं
gcloud config list project
3. एपीआई चालू करें
इस लैब को चलाने के लिए, हमें कुछ एपीआई सेवाएं चालू करनी होंगी. Cloud Shell में यह कमांड चलाएं.
gcloud services enable aiplatform.googleapis.com
gcloud services enable cloudresourcemanager.googleapis.com
पेश है एपीआई
- Vertex AI API (
aiplatform.googleapis.com) की मदद से, Vertex AI प्लैटफ़ॉर्म को ऐक्सेस किया जा सकता है. इससे आपका ऐप्लिकेशन, Gemini मॉडल के साथ इंटरैक्ट कर सकता है. जैसे, टेक्स्ट जनरेट करना, चैट सेशन, और फ़ंक्शन कॉल करना. - Cloud Resource Manager API (
cloudresourcemanager.googleapis.com) की मदद से, अपने Google Cloud प्रोजेक्ट के मेटाडेटा को प्रोग्राम के हिसाब से मैनेज किया जा सकता है. जैसे, प्रोजेक्ट आईडी और नाम. प्रोजेक्ट की पहचान और अनुमतियों की पुष्टि करने के लिए, अक्सर अन्य टूल और एसडीके को इसकी ज़रूरत होती है.
4. एजेंट डेवलपमेंट किट के बारे में जानकारी
Agent Development Kit की मदद से, एजेंट वाले ऐप्लिकेशन बनाने वाले डेवलपर को कई अहम फ़ायदे मिलते हैं:
- मल्टी-एजेंट सिस्टम: हैरारकी में कई विशेषज्ञ एजेंटों को कंपोज़ करके, मॉड्यूलर और स्केलेबल ऐप्लिकेशन बनाएं. जटिल कामों को आसानी से पूरा करने और उन्हें सौंपने की सुविधा चालू करें.
- टूल का बेहतर इकोसिस्टम: एजेंट को अलग-अलग सुविधाएं दें: पहले से बने टूल (खोज, कोड एक्ज़ीक्यूट करना वगैरह) का इस्तेमाल करें, कस्टम फ़ंक्शन बनाएं, तीसरे पक्ष के एजेंट फ़्रेमवर्क (LangChain, CrewAI) से टूल इंटिग्रेट करें या अन्य एजेंट को टूल के तौर पर इस्तेमाल करें.
- फ़्लेक्सिबल ऑर्केस्ट्रेशन: अनुमानित पाइपलाइन के लिए, वर्कफ़्लो एजेंट (
SequentialAgent,ParallelAgent, औरLoopAgent) का इस्तेमाल करके वर्कफ़्लो तय करें. इसके अलावा, अडैप्टिव व्यवहार के लिए, एलएलएम पर आधारित डाइनैमिक राउटिंग (LlmAgentट्रांसफ़र) का फ़ायदा लें. - डेवलपर के लिए बेहतर अनुभव: शक्तिशाली सीएलआई और इंटरैक्टिव डेवलपर यूज़र इंटरफ़ेस (यूआई) की मदद से, स्थानीय तौर पर डेवलप, टेस्ट, और डीबग करें. इवेंट, स्थिति, और एजेंट के एक्ज़ीक्यूशन की सिलसिलेवार तरीके से जांच करें.
- पहले से मौजूद आकलन की सुविधा: पहले से तय किए गए टेस्ट केस के आधार पर, एजेंट की परफ़ॉर्मेंस का आकलन किया जाता है. इसके लिए, जवाब की क्वालिटी और चरण-दर-चरण निर्देशों के पालन की जांच की जाती है.
- डिप्लॉय करने के लिए तैयार: अपने एजेंट को कंटेनर में बदलें और उन्हें कहीं भी डिप्लॉय करें. उन्हें स्थानीय तौर पर चलाएं, Vertex AI Agent Engine के साथ स्केल करें या Cloud Run या Docker का इस्तेमाल करके, कस्टम इन्फ़्रास्ट्रक्चर में इंटिग्रेट करें.
अन्य जनरेटिव एआई एसडीके या एजेंट फ़्रेमवर्क भी आपको मॉडल से क्वेरी करने और उन्हें टूल इस्तेमाल करने की अनुमति देते हैं. हालांकि, एक से ज़्यादा मॉडल के बीच डाइनैमिक कोऑर्डिनेशन के लिए, आपको काफ़ी काम करना पड़ता है.
एजेंट डेवलपमेंट किट, इन टूल की तुलना में ज़्यादा बेहतर फ़्रेमवर्क उपलब्ध कराती है. इसकी मदद से, एक-दूसरे से कई एजेंट आसानी से कनेक्ट किए जा सकते हैं. इससे मुश्किल वर्कफ़्लो को आसानी से मैनेज किया जा सकता है.
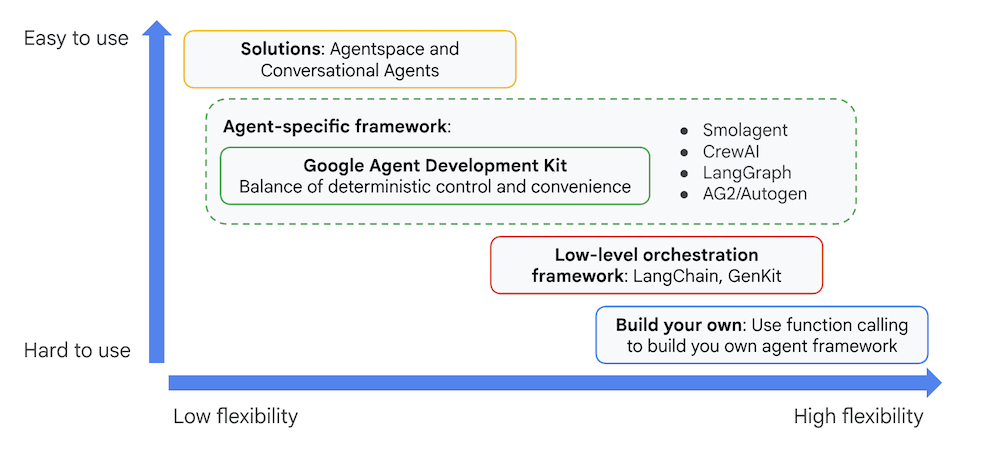
तीसरी इमेज: ADK (Agent Development Kit) की पोज़िशन
हाल ही के वर्शन में, ADK (एजेंट डेवलपमेंट किट) में ADK विज़ुअल बिल्डर टूल जोड़ा गया है. इसकी मदद से, कम कोड का इस्तेमाल करके ADK (एजेंट डेवलपमेंट किट) एजेंट बनाए जा सकते हैं. इस लैब में, हम ADK विज़ुअल बिल्डर टूल के बारे में विस्तार से जानेंगे.
5. ADK इंस्टॉल करना और अपना एनवायरमेंट सेट अप करना
सबसे पहले, हमें एनवायरमेंट सेट करना होगा, ताकि हम ADK (एजेंट डेवलपमेंट किट) को चला सकें. इस लैब में, हम एडीके (एजेंट डेवलपमेंट किट) को चलाएंगे और Google Cloud में Cloud Shell Editor का इस्तेमाल करके सभी टास्क पूरे करेंगे .
Cloud Shell Editor तैयार करना
- अगर Cloud Shell Editor पहले से ही खुला है, तो इन चरणों को छोड़कर अगले सेक्शन "ADK Visual Editor शुरू करें" पर जाएं.
- अगर आप पहले से Cloud Shell Editor पर नहीं हैं, तो प्रोजेक्ट सेटअप करने के लिए यह तरीका अपनाएं.
- इस लैब में, हम अपने टास्क पूरे करने के लिए Cloud Shell Editor का इस्तेमाल करेंगे. Cloud Shell खोलें और Cloud Shell का इस्तेमाल करके प्रोजेक्ट सेट करें.
- सीधे Cloud Shell Editor पर जाने के लिए, इस लिंक पर क्लिक करें
- Cloud Shell Editor के साइड बार में, Open Folder बटन पर क्लिक करें.
- आपका होम फ़ोल्डर पहले से ही चुना हुआ होना चाहिए. बस ठीक है दबाएं. इसके बाद, आपका होम फ़ोल्डर इस टास्क के लिए रूट फ़ोल्डर होगा.
- अगर टर्मिनल पहले से खुला नहीं है, तो मेन्यू में जाकर टर्मिनल>नया टर्मिनल पर क्लिक करके उसे खोलें. इस ट्यूटोरियल में दिए गए सभी निर्देशों को इस टर्मिनल में चलाया जा सकता है.
- Cloud Shell टर्मिनल में, यहां दी गई कमांड का इस्तेमाल करके यह देखा जा सकता है कि प्रोजेक्ट की पुष्टि पहले ही हो चुकी है या नहीं.
gcloud auth list
- अगर आपको अपना प्रोजेक्ट आईडी याद नहीं है, तो
gcloud projects list
- प्रोजेक्ट आईडी कॉपी करें और इसे सेट करने के लिए, इस निर्देश का इस्तेमाल करें
gcloud config set project <YOUR_PROJECT_ID>
- अपने प्रोजेक्ट की पुष्टि करने के लिए, Cloud Shell में यह कमांड चलाएं
gcloud config list project
ADK विज़ुअल एडिटर शुरू करना
- github से ज़रूरी सोर्स को क्लोन करने और ज़रूरी लाइब्रेरी इंस्टॉल करने के लिए, यहां दी गई कमांड चलाएं. Cloud Shell Editor में खोले गए टर्मिनल में, ये कमांड चलाएं.
#create the project directory
mkdir ~/adkui
cd ~/adkui
- हम Python एनवायरमेंट बनाने के लिए, uv का इस्तेमाल करेंगे. इसे Cloud Shell Editor टर्मिनल में चलाएं:
#Install uv if you do not have installed yet
pip install uv

#go to the project directory
cd ~/adkui

#Create the virtual environment
uv venv


#use the newly created environment
source .venv/bin/activate

#install libraries
uv pip install google-adk==2.3.0
uv pip install python-dotenv
ध्यान दें: अगर आपको कभी टर्मिनल को रीस्टार्ट करना पड़े, तो पक्का करें कि आपने "source .venv/bin/activate" को एक्ज़ीक्यूट करके, अपना Python एनवायरमेंट सेट कर लिया हो
- एडिटर में, View->Toggle hidden files पर जाएं. इसके बाद, adkui फ़ोल्डर में .env फ़ाइल बनाएं और उसमें यह कॉन्टेंट शामिल करें.
#go to adkui folder
cd ~/adkui
cat <<EOF>> .env
GOOGLE_GENAI_USE_VERTEXAI=1
GOOGLE_CLOUD_PROJECT=$(gcloud config get-value project)
GOOGLE_CLOUD_LOCATION=us-central1
IMAGEN_MODEL="imagen-3.0-generate-002"
GENAI_MODEL="gemini-3.5-flash"
EOF
6. ADK विज़ुअल बिल्डर की मदद से, एक आसान एजेंट बनाना
इस सेक्शन में, हम ADK विज़ुअल बिल्डर का इस्तेमाल करके एक सामान्य एजेंट बनाएंगे. ADK विज़ुअल बिल्डर एक वेब-आधारित टूल है. यह ADK (एजेंट डेवलपमेंट किट) एजेंट बनाने और मैनेज करने के लिए, विज़ुअल वर्कफ़्लो डिज़ाइन एनवायरमेंट उपलब्ध कराता है. इसकी मदद से, शुरुआती लेवल के डेवलपर भी आसानी से एजेंट डिज़ाइन, बिल्ड, और टेस्ट कर सकते हैं. इसमें एआई की मदद से काम करने वाला एक असिस्टेंट भी शामिल है, जो एजेंट बनाने में आपकी मदद करता है.
इमेज 4: ADK विज़ुअल बिल्डर
- टर्मिनल में सबसे ऊपर मौजूद डायरेक्ट्री adkui पर वापस जाएं. इसके बाद, एजेंट को स्थानीय तौर पर चलाने के लिए यह कमांड चलाएं (Cloud Shell Editor टर्मिनल में चलाएं). आपको ADK सर्वर शुरू करने और टर्मिनल में, इमेज 5 जैसे नतीजे देखने का विकल्प मिलेगा.
#go to the directory adkui
cd ~/adkui
# Run the following command to run ADK locally
adk web --host 0.0.0.0 --port 8080 --allow_origins "regex:https://.*8080-.*\.cloudshell\.dev"
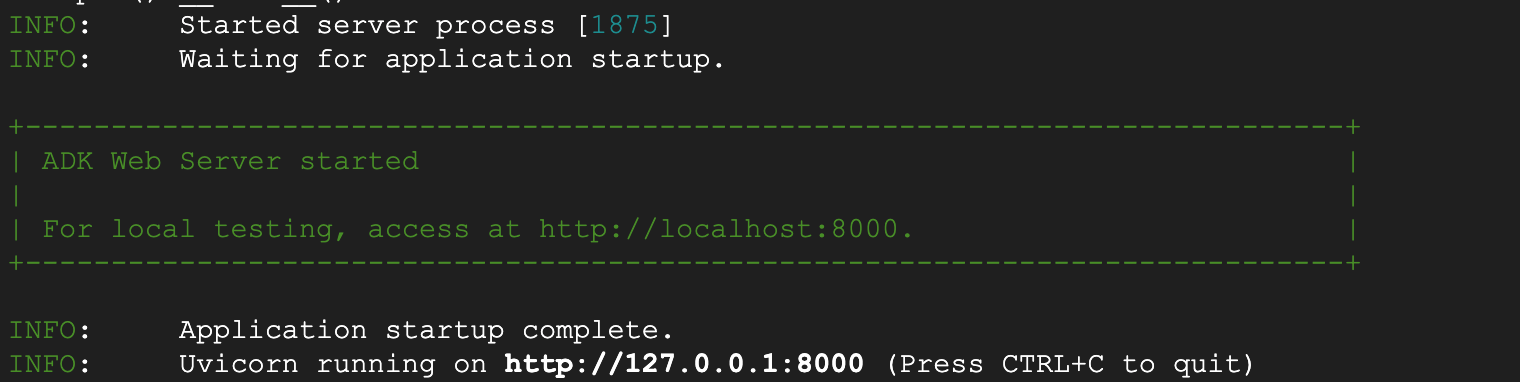
- इमेज 5: ADK ऐप्लिकेशन स्टार्टअप
- टर्मिनल पर दिखाए गए http:// यूआरएल पर Ctrl+क्लिक करें (MacOS के लिए CMD+क्लिक करें). इससे ADK (Agent Development Kit) का ब्राउज़र पर आधारित GUI टूल खुल जाएगा.

इमेज 6: ADK का वेब यूज़र इंटरफ़ेस (यूआई). ADK में ये कॉम्पोनेंट होते हैं
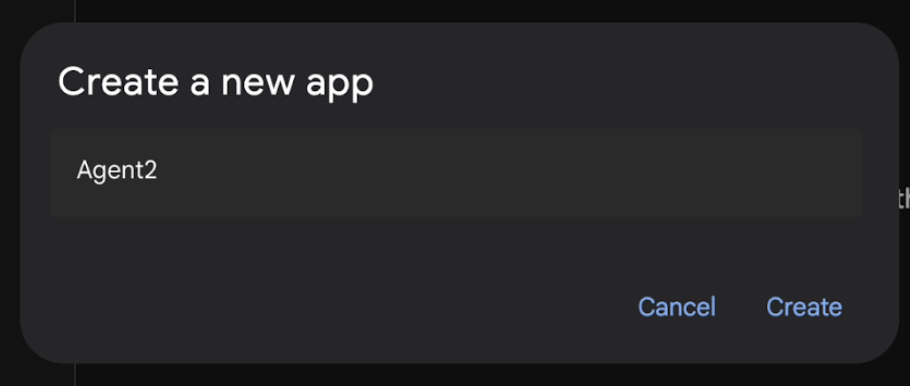
- नया एजेंट बनाने के लिए, कोई ऐप्लिकेशन चुनें ड्रॉपडाउन पर क्लिक करें और "+" बटन दबाएं.
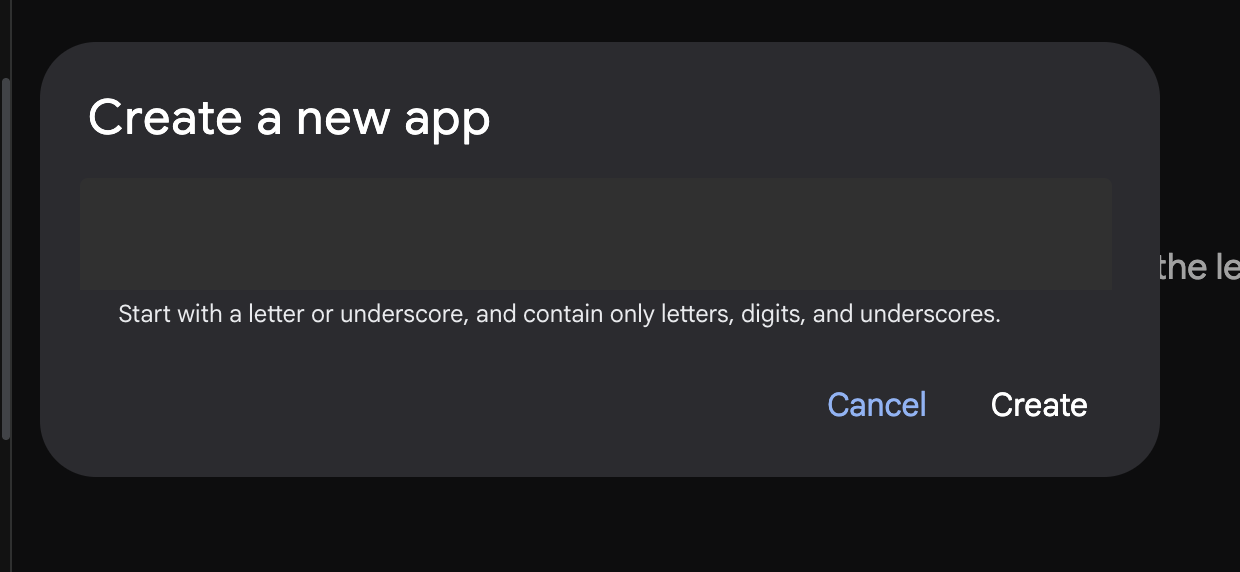
सातवीं इमेज: नया ऐप्लिकेशन बनाने के लिए डायलॉग बॉक्स
- "Agent1" नाम दें और बनाएं.
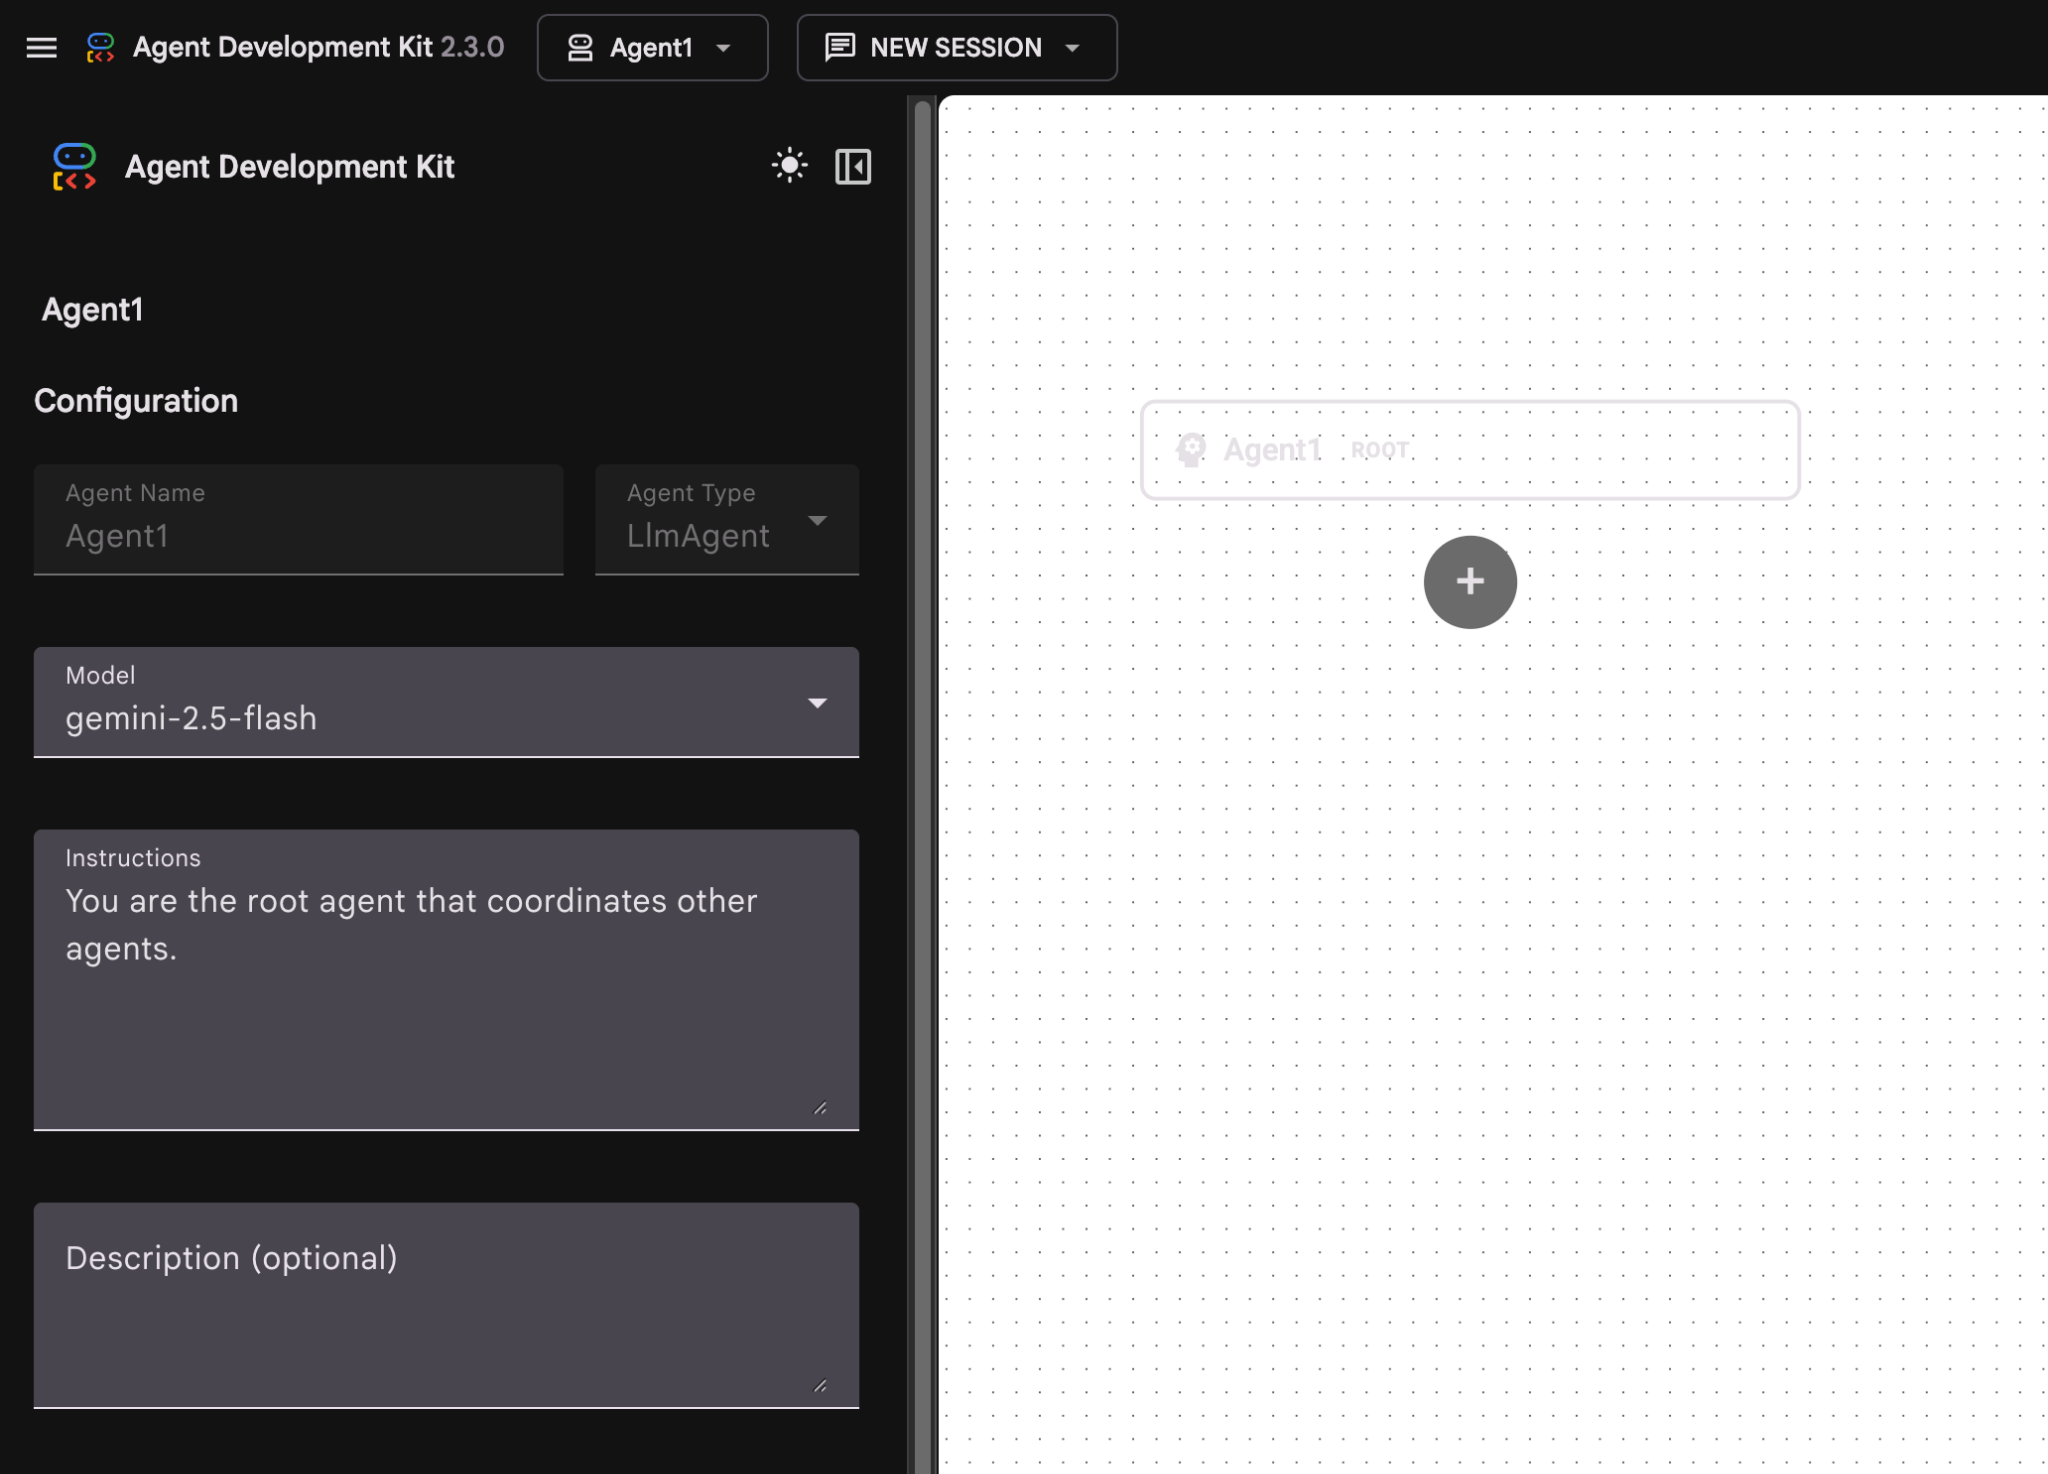
आकृति 8: एजेंट बिल्डर का यूज़र इंटरफ़ेस
- पैनल को तीन मुख्य सेक्शन में बांटा गया है: बाईं ओर, GUI पर आधारित एजेंट बनाने के कंट्रोल मौजूद हैं. बीच में, आपकी प्रोग्रेस का विज़ुअलाइज़ेशन दिखता है. वहीं, दाईं ओर, नैचुरल लैंग्वेज का इस्तेमाल करके एजेंट बनाने के लिए Assistant मौजूद है.
- आपका एजेंट बन गया है. आगे बढ़ने के लिए, सेव करें बटन पर क्लिक करें. (ध्यान दें: बदलावों को सेव करने के लिए, 'सेव करें' बटन दबाना ज़रूरी है.)
- अब एजेंट की जांच की जा सकती है. शुरू करने के लिए, चैट बॉक्स में कोई प्रॉम्प्ट डालें. जैसे:
Hi, what can you do?
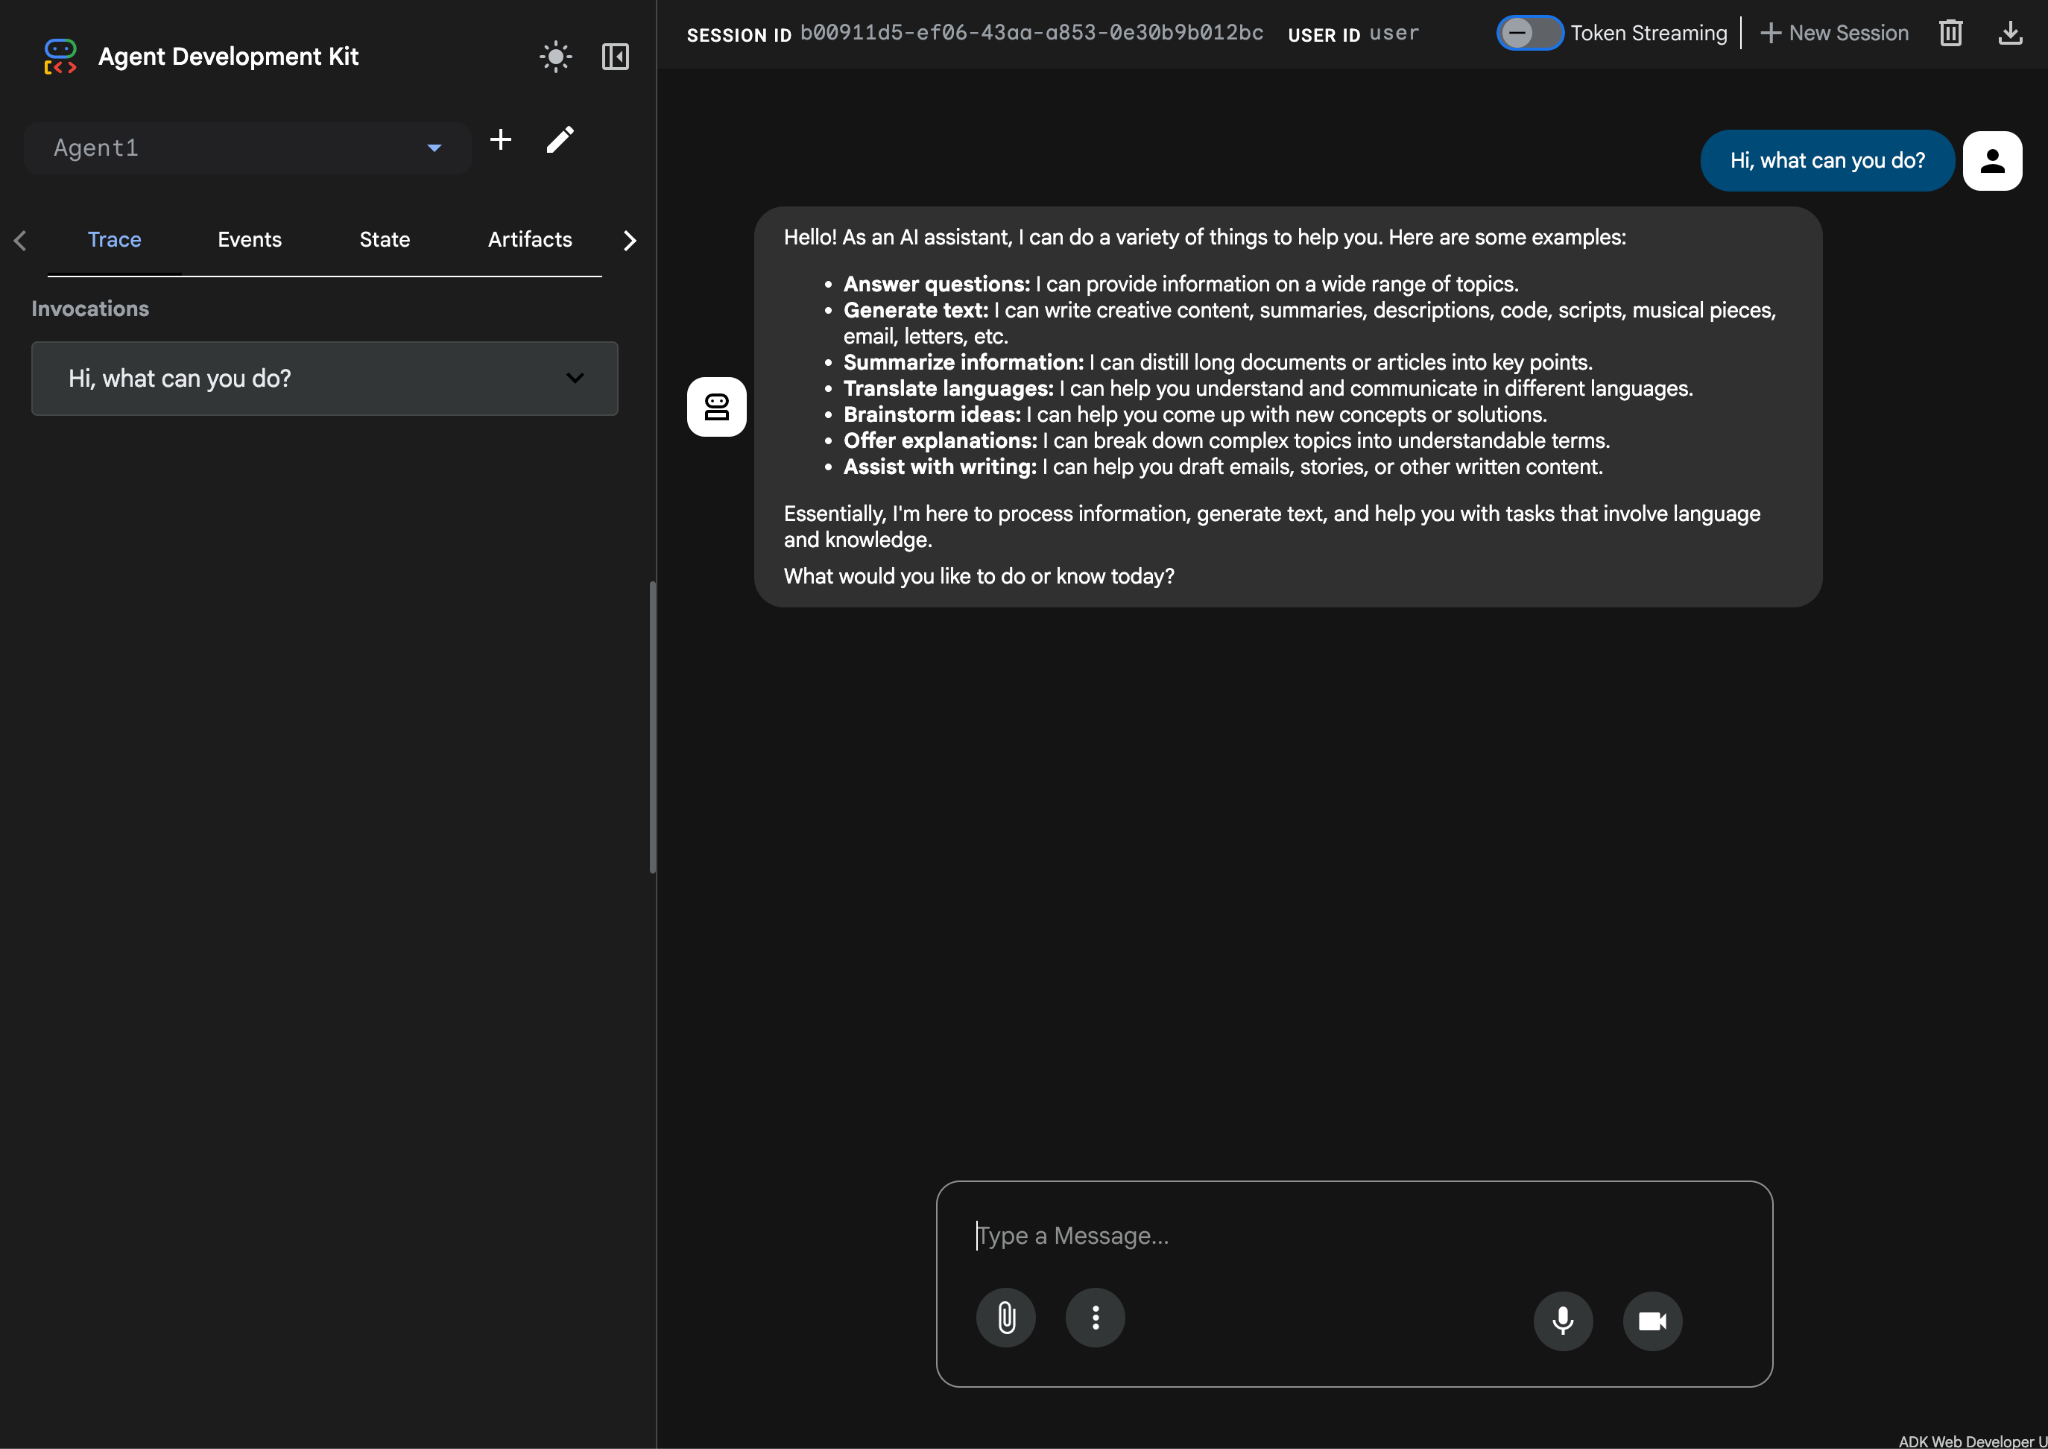
इमेज 9: एजेंट की टेस्टिंग करना.
7.एडिटर पर वापस जाकर, जनरेट की गई नई फ़ाइलों की जांच करें. आपको एक्सप्लोरर बाईं ओर दिखेगा. adkgui फ़ोल्डर पर जाएं और उसे बड़ा करें, ताकि Agent 1 डायरेक्ट्री दिख सके. फ़ोल्डर में, एजेंट की जानकारी देने वाली YAML फ़ाइल देखी जा सकती है. इसके बारे में यहां दी गई इमेज में बताया गया है.
दसवां फ़िगर: YAML फ़ाइल का इस्तेमाल करके एजेंट की परिभाषा
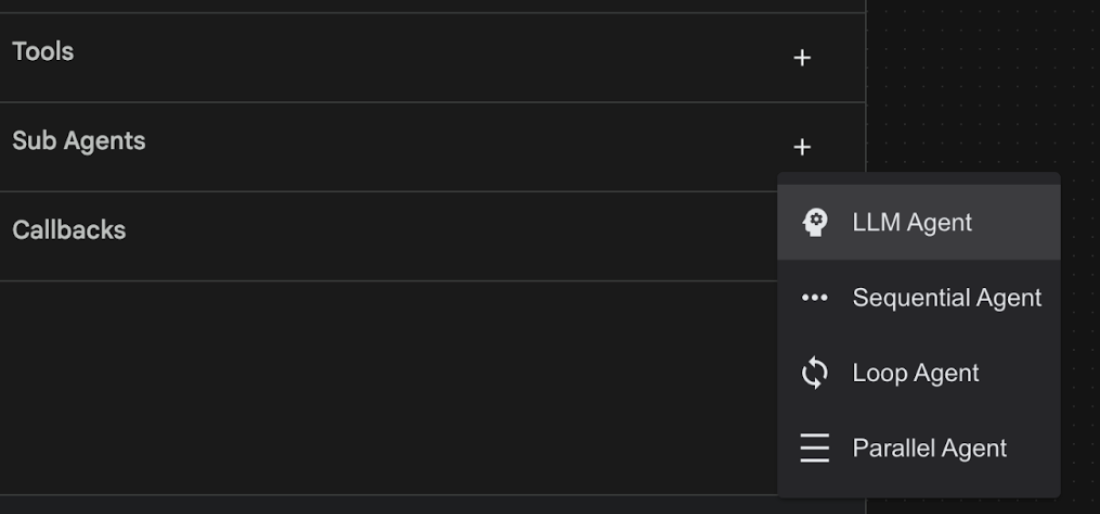
- अब GUI एडिटर पर वापस जाएं और एजेंट में कुछ सुविधाएं जोड़ें. इसके लिए, बदलाव करें बटन (पेन आइकॉन) दबाएं.
- हम एजेंट में Google Search की सुविधा जोड़ने जा रहे हैं. इसके लिए, हमें Google Search को एक ऐसे टूल के तौर पर जोड़ना होगा जो एजेंट के लिए उपलब्ध हो और जिसका इस्तेमाल एजेंट कर सके. इसके लिए, स्क्रीन पर सबसे नीचे बाईं ओर मौजूद टूल सेक्शन के बगल में मौजूद "+" चिह्न पर क्लिक करें. इसके बाद, मेन्यू में जाकर बिल्ट-इन टूल पर क्लिक करें (चित्र 11 देखें).
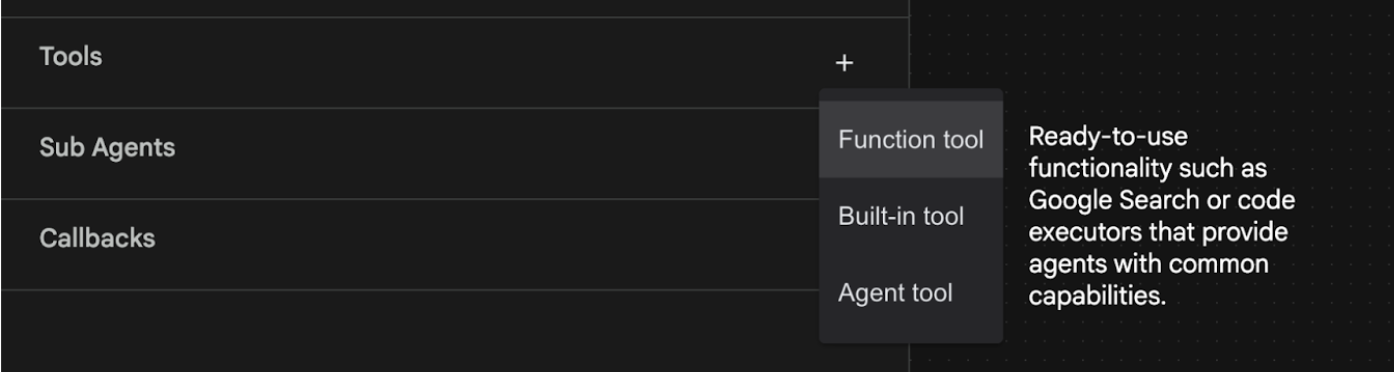
ग्यारहवीं इमेज: किसी एजेंट में नया टूल जोड़ना
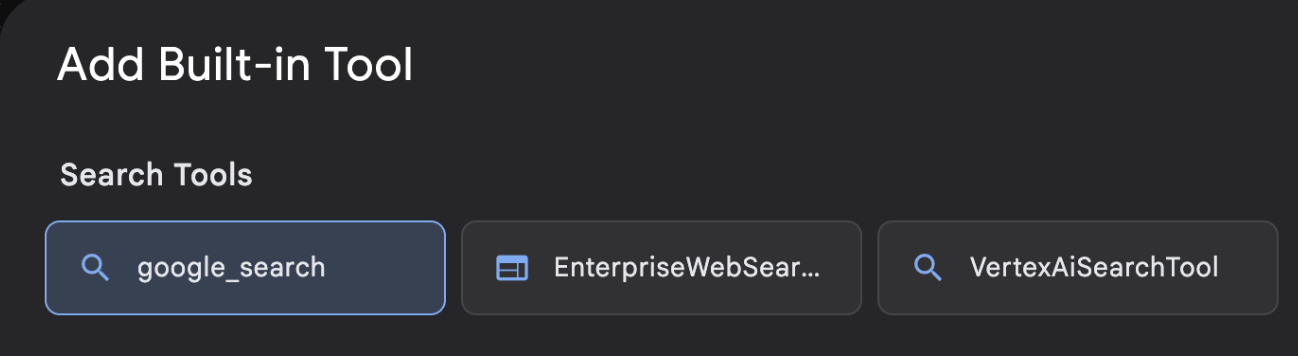
- पहले से मौजूद टूल की सूची में से, google_search को चुनें. इसके बाद, बनाएं (आंकड़ा 11 देखें) पर क्लिक करें. इससे Google Search को आपके एजेंट में एक टूल के तौर पर जोड़ दिया जाएगा.
- बदलावों को सेव करने के लिए, सेव करें बटन दबाएं.
बारहवीं इमेज: ADK विज़ुअल बिल्डर के यूज़र इंटरफ़ेस (यूआई) में उपलब्ध टूल की सूची
- अब एजेंट की जांच की जा सकती है. सबसे पहले, ADK सर्वर को रीस्टार्ट करें. उस टर्मिनल पर जाएं जहां आपने ADK (Agent Development Kit) सर्वर शुरू किया था. इसके बाद, सर्वर को बंद करने के लिए CTRL+C दबाएं
CTRL+C (Windows), CMD+C (MAC)
- सर्वर को फिर से शुरू करने के लिए, यहां दिया गया कोड डालें.
#make sure you are in the right folder.
cd ~/adkui

#start the server
adk web --host 0.0.0.0 --port 8080 --allow_origins "regex:https://.*8080-.*\.cloudshell\.dev"
- यूआरएल पर Ctrl+क्लिक करें (जैसे, http://localhost:8000) दिखता है. ब्राउज़र टैब पर ADK (एजेंट डेवलपमेंट किट) का जीयूआई दिखना चाहिए.
- एजेंट की सूची में से Agent1 को चुनें. अब आपका एजेंट, Google पर खोज कर सकता है. चैट बॉक्स में, इस प्रॉम्प्ट का इस्तेमाल करके टेस्ट करें.
What is the weather today in Yokohama?
आपको Google Search से मिला जवाब, यहां दिए गए उदाहरण की तरह दिखेगा. 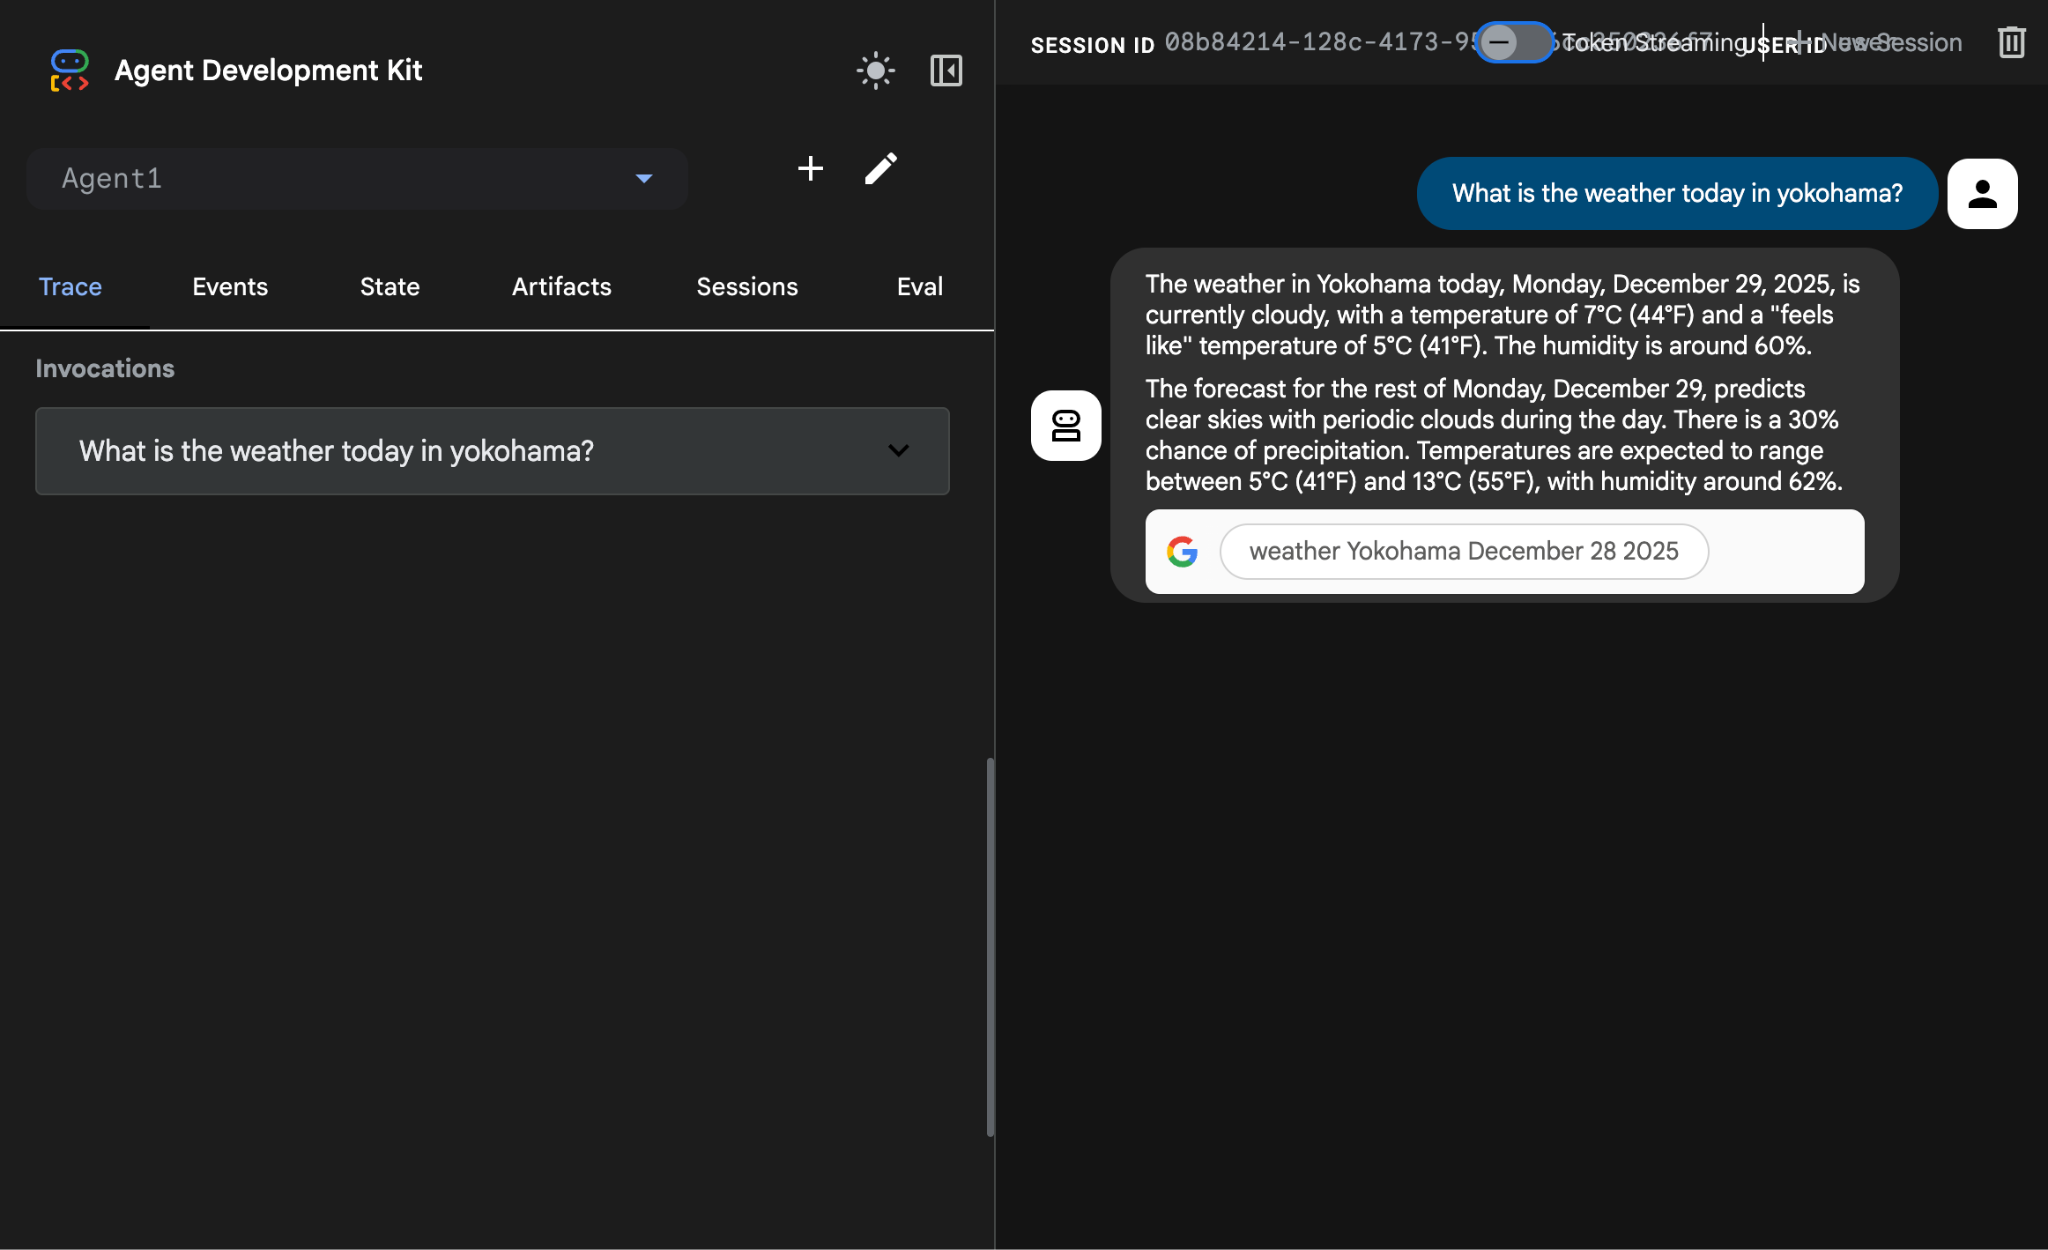
इमेज 13: एजेंट के साथ Google Search
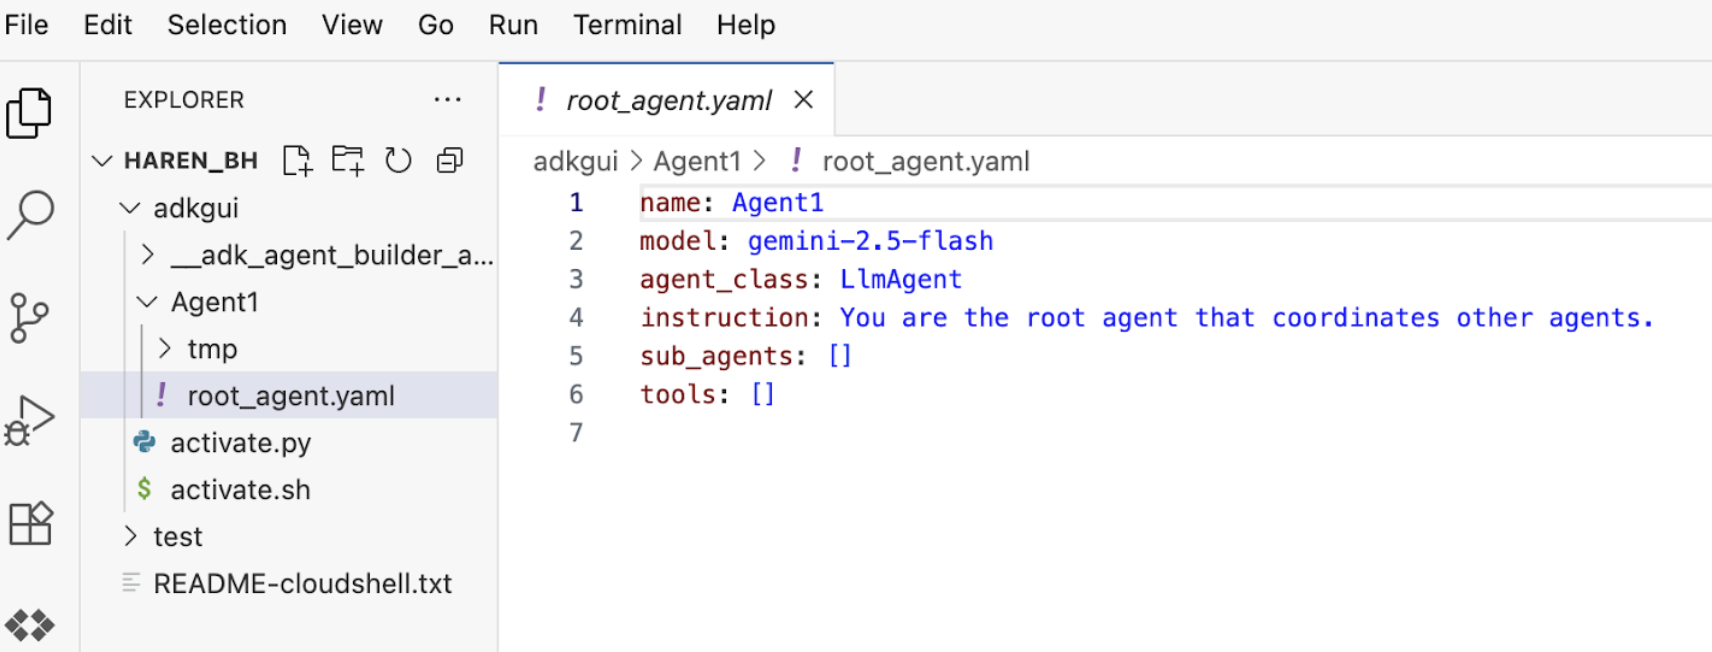
- अब एडिटर पर वापस जाएं और इस चरण में बनाए गए कोड की जांच करें. एडिटर एक्सप्लोरर साइड पैनल में, root_agent.yaml पर क्लिक करके इसे खोलें. पुष्टि करें कि google_search को टूल के तौर पर जोड़ा गया हो (आकृति 15).
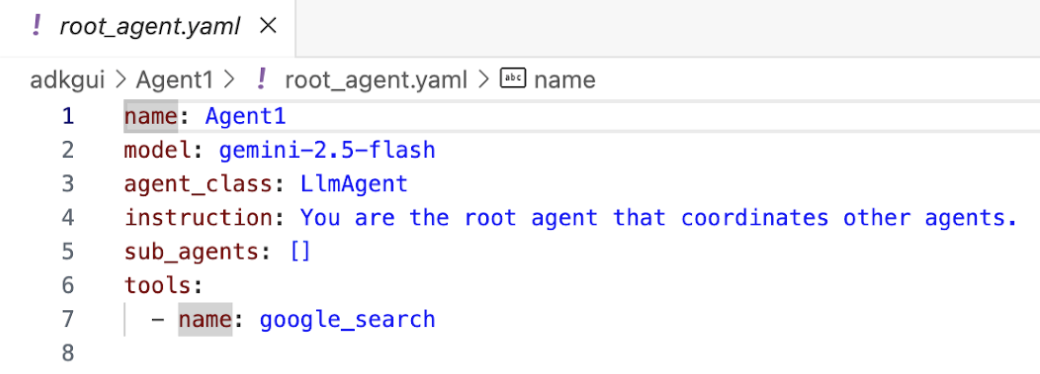
चौथी इमेज: पुष्टि की गई है कि google_search को Agent1 में टूल के तौर पर जोड़ा गया है
7. एजेंट को Cloud Run पर डिप्लॉय करना
अब बनाए गए एजेंट को Cloud Run पर डिप्लॉय करते हैं! Cloud Run की मदद से, पूरी तरह से मैनेज किए गए प्लैटफ़ॉर्म पर ऐप्लिकेशन या वेबसाइटें तेज़ी से बनाई जा सकती हैं.
आपको इंफ़्रास्ट्रक्चर को मैनेज करने की ज़रूरत नहीं होती. इसके बिना भी, फ़्रंटएंड और बैकएंड सेवाओं, बैच जॉब, एलएलएम को होस्ट करने, और प्रोसेसिंग वर्कलोड को कतार में लगाने की सुविधा का इस्तेमाल किया जा सकता है.
- अगर Cloud Shell Editor टर्मिनल में, ADK (Agent Development Kit) सर्वर अब भी चल रहा है, तो इसे रोकने के लिए Ctrl+C दबाएं.
CTRL+C (Windows), CMD+C (MAC)
- प्रोजेक्ट की रूट डायरेक्ट्री पर जाएं.
cd ~/adkui
- डिप्लॉय कोड पाएं. कमांड चलाने के बाद, आपको Cloud Shell Editor के एक्सप्लोरर पैन में deploycloudrun.py फ़ाइल दिखेगी
curl -LO https://raw.githubusercontent.com/haren-bh/codelabs/main/adk_visual_builder/deploycloudrun.py
- deploycloudrun.py में डिप्लॉय करने के विकल्प देखें. हम अपने एजेंट को Cloud Run पर डिप्लॉय करने के लिए, adk deploy कमांड का इस्तेमाल करेंगे. ADK (एजेंट डेवलपमेंट किट) में, एजेंट को Cloud Run पर डिप्लॉय करने का विकल्प पहले से मौजूद होता है. हमें Google Cloud प्रोजेक्ट आईडी, क्षेत्र वगैरह जैसे पैरामीटर तय करने होंगे. ऐप्लिकेशन के पाथ के लिए, यह स्क्रिप्ट मानती है कि agent_path=./Agent1. हम ज़रूरी अनुमतियों के साथ एक नया सेवा खाता भी बनाएंगे और उसे Cloud Run से जोड़ देंगे. एजेंट को चलाने के लिए, Cloud Run को Vertex AI और Cloud Storage जैसी सेवाओं का ऐक्सेस चाहिए.
- deploycloudrun.py स्क्रिप्ट** चलाएं. डिप्लॉयमेंट, नीचे दी गई इमेज में दिखाए गए तरीके से शुरू होना चाहिए.**
python3 deploycloudrun.py
अगर आपको नीचे दिए गए जैसा पुष्टि करने वाला मैसेज मिलता है, तो सभी मैसेज के लिए Y दबाएं और Enter करें. depoycloudrun.py यह मानता है कि आपका एजेंट, ऊपर बताए गए तरीके से बनाए गए Agent1 फ़ोल्डर में है.
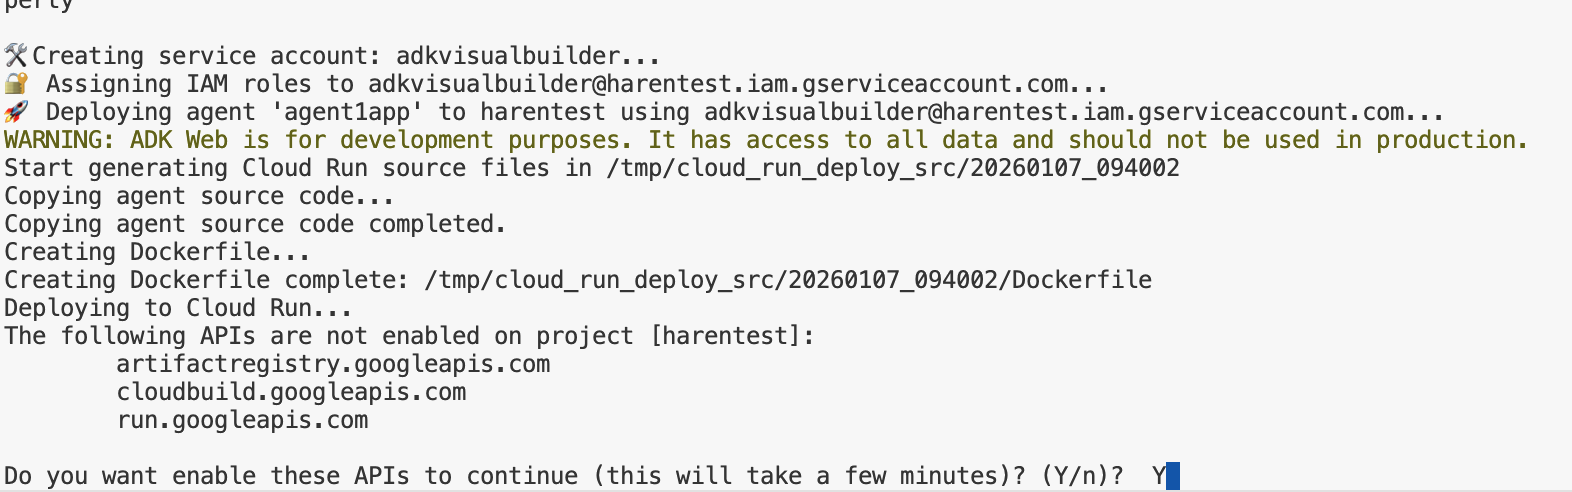
15वीं इमेज: Cloud Run पर एजेंट डिप्लॉय करना. पुष्टि करने वाले किसी भी मैसेज के लिए, Y दबाएं.
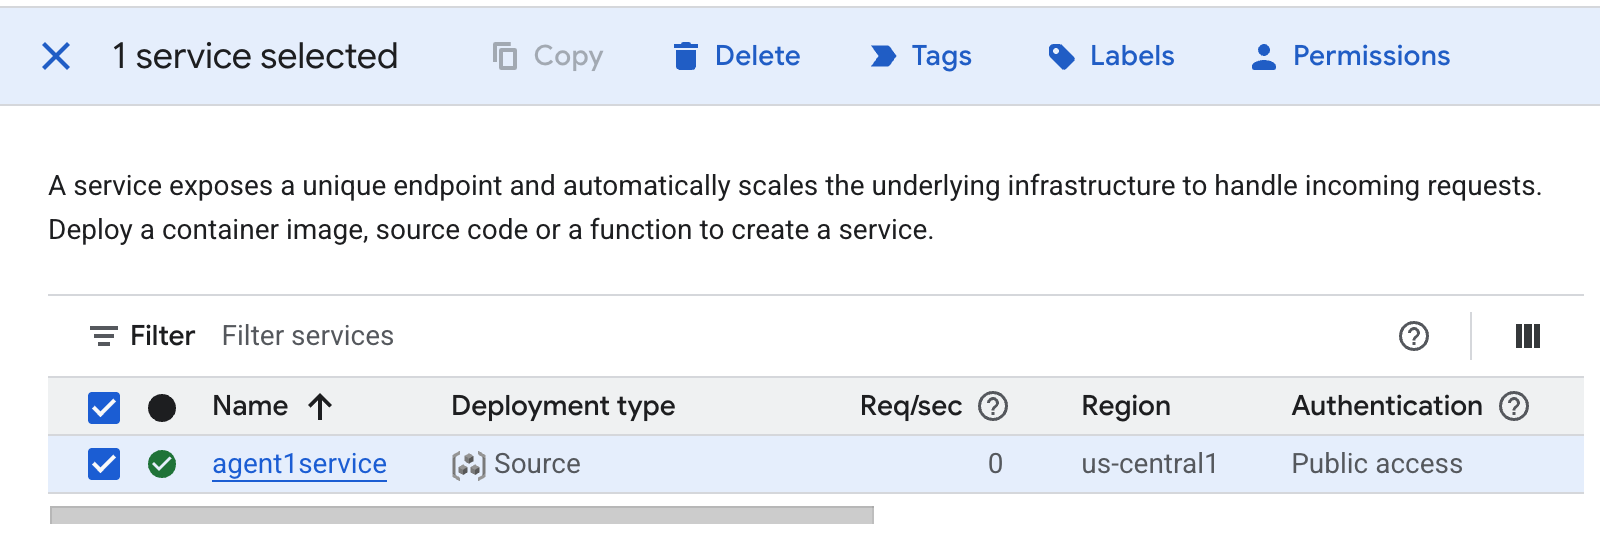
- डप्लॉयमेंट पूरा होने के बाद, आपको सेवा का यूआरएल दिखेगा. जैसे, https://agent1service-78833623456.us-central1.run.app
- ऐप्लिकेशन लॉन्च करने के लिए, अपने वेब ब्राउज़र में यूआरएल ऐक्सेस करें.
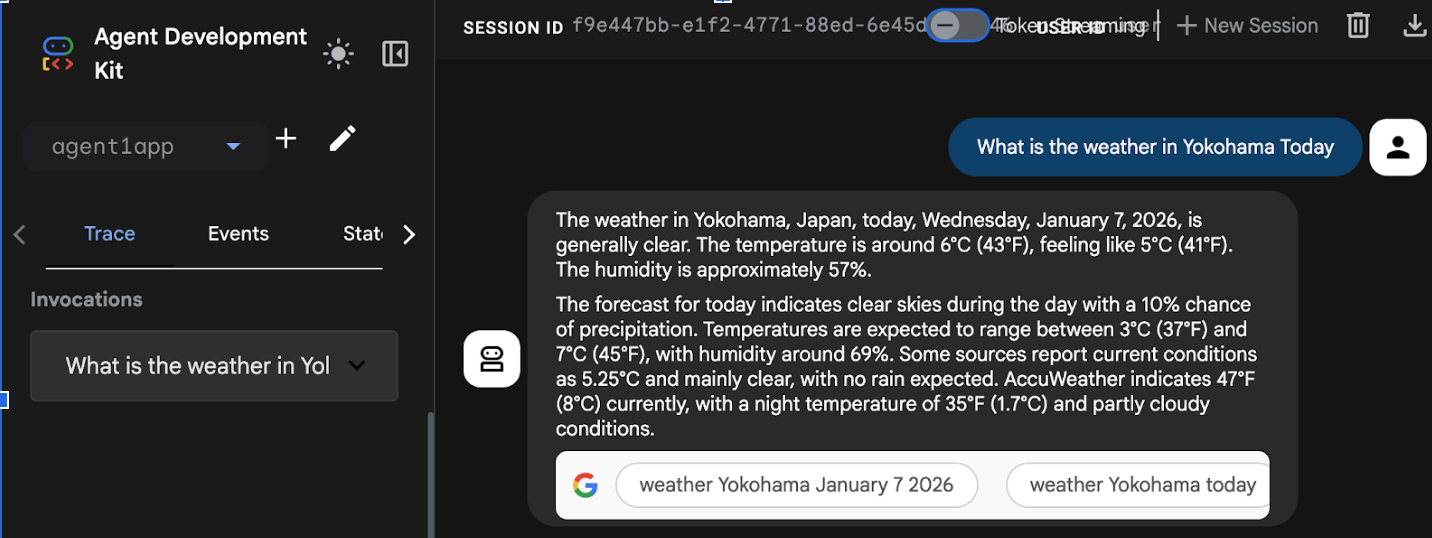
Figure 16: Agent running in Cloud Run
8. सब-एजेंट और कस्टम टूल की मदद से एजेंट बनाना
पिछले सेक्शन में, आपने Google Search टूल के साथ एक एजेंट बनाया था. इस सेक्शन में, आपको एक मल्टी एजेंट सिस्टम बनाना होगा. इसमें एजेंटों को कस्टम टूल इस्तेमाल करने की अनुमति दी जाती है.
- सबसे पहले, ADK (Agent Development Kit) सर्वर को रीस्टार्ट करें. उस टर्मिनल पर जाएं जहां आपने ADK (Agent Development Kit) सर्वर शुरू किया था. अगर सर्वर अब भी चल रहा है, तो उसे बंद करने के लिए CTRL+C दबाएं. सर्वर को फिर से शुरू करने के लिए, यहां दिया गया कोड डालें.
#make sure you are in the right folder.
cd ~/adkui

#start the server
adk web --host 0.0.0.0 --port 8080 --allow_origins "regex:https://.*8080-.*\.cloudshell\.dev"
- यूआरएल पर Ctrl+क्लिक करें (जैसे, http://localhost:8000) दिखता है. ब्राउज़र टैब पर ADK (एजेंट डेवलपमेंट किट) का जीयूआई दिखना चाहिए.
- नया एजेंट बनाने के लिए, "+" बटन पर क्लिक करें. एजेंट डायलॉग बॉक्स में "Agent2" डालें (आकृति 18) और "बनाएं" पर क्लिक करें.
आकृति 17: नया एजेंट ऐप्लिकेशन बनाना.
- Agent2 के निर्देश सेक्शन में, यह जानकारी डालें.
You are an agent that takes image creation instruction from the user and passes it to your sub agent
- अब हम रूट एजेंट में एक सब-एजेंट जोड़ेंगे. इसके लिए, बाईं ओर मौजूद पैनल में सबसे नीचे, सब-एजेंट मेन्यू के बाईं ओर मौजूद "+" बटन (आकृति 19) पर क्लिक करें. इसके बाद, "एलएलएम एजेंट" पर क्लिक करें. इससे, रूट एजेंट के नए सब-एजेंट के तौर पर एक नया एजेंट बन जाएगा.
आंकड़ा 18: नया सब-एजेंट जोड़ें.
- sub_agent_1 के लिए दिए गए निर्देशों में, यह टेक्स्ट डालें.
You are an Agent that can take instructions about an image and create an image using the create_image tool.
- अब इस सब-एजेंट में कस्टम टूल जोड़ते हैं. यह टूल, उपयोगकर्ता के निर्देशों का इस्तेमाल करके इमेज जनरेट करने के लिए, Imagen मॉडल को कॉल करेगा. इसके लिए, पहले पिछले चरण में बनाए गए सब-एजेंट पर क्लिक करें. इसके बाद, टूल मेन्यू के बगल में मौजूद "+" बटन पर क्लिक करें. टूल के विकल्पों की सूची में जाकर, "फ़ंक्शन टूल" पर क्लिक करें. इस टूल की मदद से, हम टूल में अपना कस्टम कोड जोड़ पाएंगे.
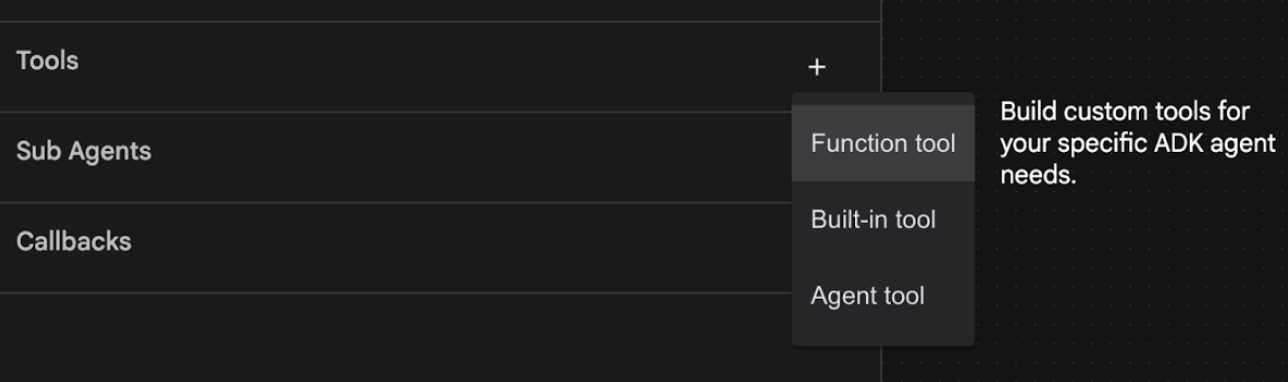
आंकड़ा 19: नया टूल बनाने के लिए, फ़ंक्शन टूल पर क्लिक करें. 8. डायलॉग बॉक्स में टूल का नाम Agent2.image_creation_tool.create_image रखें. 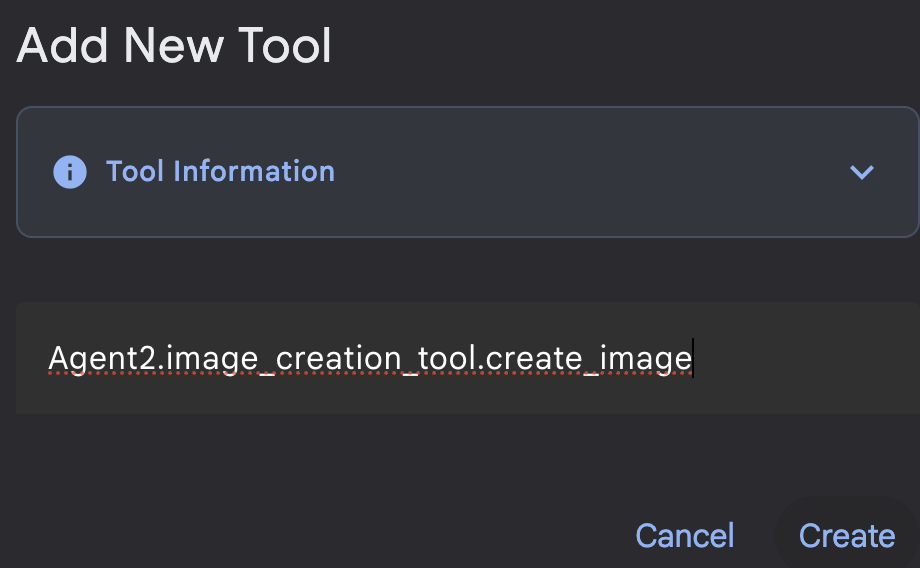
20वीं इमेज: टूल का नाम जोड़ना
- बदलावों को सेव करने के लिए, सेव करें बटन पर क्लिक करें.
- Cloud Shell Editor टर्मिनल में, adk server को बंद करने के लिए Ctrl+S दबाएं.
- image_creation_tool.py फ़ाइल बनाने के लिए, टर्मिनल में यह कमांड डालें.
touch ~/adkui/Agent2/image_creation_tool.py
- Cloud Shell Editor के एक्सप्लोरर पैनल में जाकर, नई बनाई गई image_creation_tool.py फ़ाइल पर क्लिक करके उसे खोलें. इसके बाद, image_creation_tool.py फ़ाइल के कॉन्टेंट को यहां दिए गए कॉन्टेंट से बदलें. इसके बाद, इसे सेव करें (Ctrl+S).
import os
import io
import vertexai
from vertexai.preview.vision_models import ImageGenerationModel
from dotenv import load_dotenv
import uuid
from typing import Union
from datetime import datetime
from google import genai
from google.genai import types
from google.adk.tools import ToolContext
import logging

# Configure logging
logging.basicConfig(level=logging.INFO)
logger = logging.getLogger(__name__)

async def create_image(prompt: str,tool_context: ToolContext) -> Union[bytes, str]:
  """
  Generates an image based on a text prompt using a Vertex AI Imagen model.
  Args:
      prompt: The text prompt to generate the image from.

  Returns:
      The binary image data (PNG format) on success, or an error message string on failure.
  """
  print(f"Attempting to generate image for prompt: '{prompt}'")

  try:
      # Load environment variables from .env file two levels up
      dotenv_path = os.path.join(os.path.dirname(__file__), '..', '..', '.env')
      load_dotenv(dotenv_path=dotenv_path)
      project_id = os.getenv("GOOGLE_CLOUD_PROJECT")
      location = os.getenv("GOOGLE_CLOUD_LOCATION")
      model_name = os.getenv("IMAGEN_MODEL")
      client = genai.Client(
          vertexai=True,
          project=project_id,
          location=location,
      )
      response = client.models.generate_images(
          model="imagen-3.0-generate-002",
          prompt=prompt,
          config=types.GenerateImagesConfig(
              number_of_images=1,
              aspect_ratio="9:16",
              safety_filter_level="block_low_and_above",
              person_generation="allow_adult",
          ),
      )
      if not all([project_id, location, model_name]):
          return "Error: Missing GOOGLE_CLOUD_PROJECT, GOOGLE_CLOUD_LOCATION, or IMAGEN_MODEL in .env file."
      vertexai.init(project=project_id, location=location)
      model = ImageGenerationModel.from_pretrained(model_name)
      images = model.generate_images(
          prompt=prompt,
          number_of_images=1
      )
      if response.generated_images is  None:
          return "Error: No image was generated."
      for generated_image in response.generated_images:
          # Get the image bytes
          image_bytes = generated_image.image.image_bytes
          counter = str(tool_context.state.get("loop_iteration", 0))
          artifact_name = f"generated_image_" + counter + ".png"
          # Save as ADK artifact (optional, if still needed by other ADK components)
          report_artifact = types.Part.from_bytes(
              data=image_bytes, mime_type="image/png"
          )
          await tool_context.save_artifact(artifact_name, report_artifact)
          logger.info(f"Image also saved as ADK artifact: {artifact_name}")
          return {
              "status": "success",
              "message": f"Image generated .  ADK artifact: {artifact_name}.",
              "artifact_name": artifact_name,
          }
  except Exception as e:
      error_message = f"An error occurred during image generation: {e}"
      print(error_message)
      return error_message
- सबसे पहले, ADK (Agent Development Kit) सर्वर को रीस्टार्ट करें. उस टर्मिनल पर जाएं जहां आपने ADK (Agent Development Kit) सर्वर शुरू किया था. अगर सर्वर अब भी चल रहा है, तो उसे बंद करने के लिए CTRL+C दबाएं. सर्वर को फिर से शुरू करने के लिए, यहां दिया गया कोड डालें.
#make sure you are in the right folder.
cd ~/adkui

#start the server
adk web --host 0.0.0.0 --port 8080 --allow_origins "regex:https://.*8080-.*\.cloudshell\.dev"
- यूआरएल पर Ctrl+क्लिक करें (जैसे, http://localhost:8000) दिखता है. ब्राउज़र टैब पर ADK (एजेंट डेवलपमेंट किट) का जीयूआई दिखना चाहिए.
- ADK (Agent Development Kit) यूज़र इंटरफ़ेस (यूआई) टैब में, एजेंट की सूची में जाकर Agent2 को चुनें. इसके बाद, बदलाव करें बटन (पेन आइकॉन) दबाएं. बदलावों को लागू करने के लिए, ADK (Agent Development Kit) के विज़ुअल एडिटर में मौजूद, सेव करें बटन पर क्लिक करें.
- अब हम नए एजेंट को टेस्ट कर सकते हैं.
- एजेंट डेवलपमेंट किट (एडीके) के यूज़र इंटरफ़ेस (यूआई) में मौजूद चैट इंटरफ़ेस में, यह प्रॉम्प्ट डालें. आपके पास अन्य प्रॉम्प्ट आज़माने का विकल्प भी है. आपको नतीजे, इमेज 21 में दिखाए गए नतीजों की तरह दिखने चाहिए)
Create an image of a cat
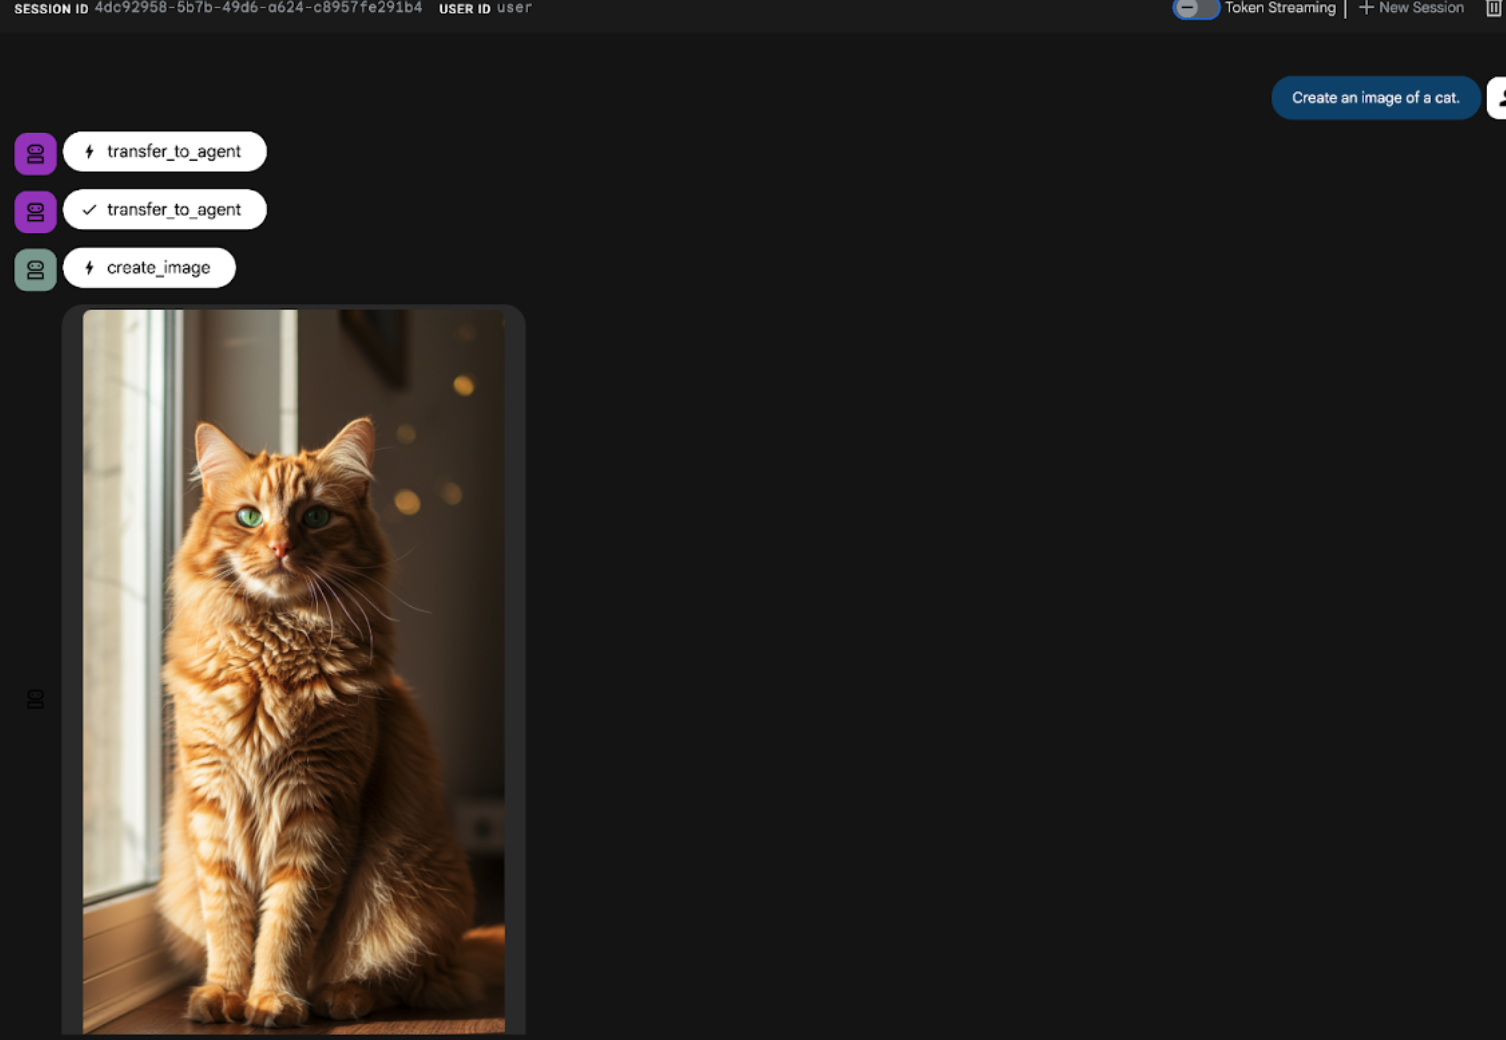
इमेज 21: ADK के यूज़र इंटरफ़ेस का चैट इंटरफ़ेस
9. वर्कफ़्लो एजेंट बनाना
पिछले चरण में, सब-एजेंट और इमेज बनाने वाले खास टूल की मदद से एजेंट बनाया गया था. इस चरण में, एजेंट की क्षमताओं को बेहतर बनाने पर फ़ोकस किया जाता है. हम इस प्रोसेस को बेहतर बनाएंगे. इसके लिए, हम यह पक्का करेंगे कि इमेज जनरेट होने से पहले, उपयोगकर्ता के शुरुआती प्रॉम्प्ट को ऑप्टिमाइज़ किया गया हो. इसके लिए, एक सीक्वेंशियल एजेंट को रूट एजेंट में इंटिग्रेट किया जाएगा. इससे दो चरणों वाले इस वर्कफ़्लो को मैनेज किया जा सकेगा:
- रूट एजेंट से प्रॉम्प्ट पाएं और उसे बेहतर बनाएं.
- बेहतर बनाए गए प्रॉम्प्ट को इमेज बनाने वाले एजेंट को फ़ॉरवर्ड करें, ताकि वह IMAGEN का इस्तेमाल करके फ़ाइनल इमेज बना सके.
- सबसे पहले, ADK (Agent Development Kit) सर्वर को रीस्टार्ट करें. उस टर्मिनल पर जाएं जहां आपने ADK (Agent Development Kit) सर्वर शुरू किया था. अगर सर्वर अब भी चल रहा है, तो उसे बंद करने के लिए CTRL+C दबाएं. सर्वर को फिर से शुरू करने के लिए, यहां दिया गया कोड डालें.
#make sure you are in the right folder.
cd ~/adkui

#start the server
adk web --host 0.0.0.0 --port 8080 --allow_origins "regex:https://.*8080-.*\.cloudshell\.dev"
- यूआरएल पर Ctrl+क्लिक करें (जैसे, http://localhost:8000) दिखता है. ब्राउज़र टैब पर ADK (एजेंट डेवलपमेंट किट) का जीयूआई दिखना चाहिए.
- एजेंट चुनने वाले टूल से Agent2 को चुनें. इसके बाद, बदलाव करें बटन (पेन आइकॉन) पर क्लिक करें.
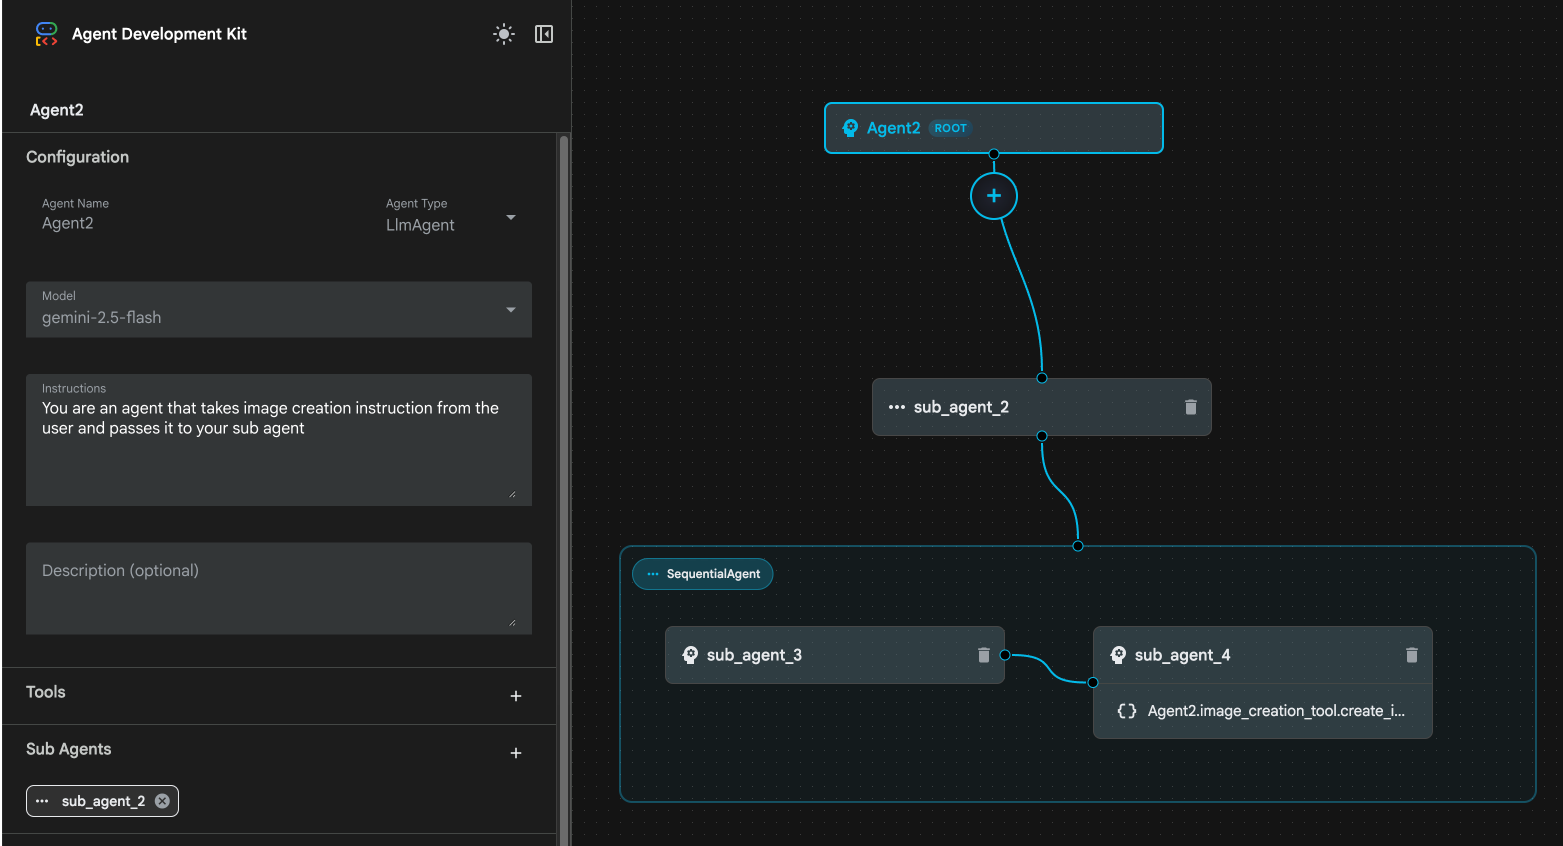
- Agent2 (रूट एजेंट) पर क्लिक करें. इसके बाद, सब-एजेंट मेन्यू के बगल में मौजूद "+" बटन पर क्लिक करें. इसके बाद, विकल्पों की सूची में जाकर सीक्वेंशियल एजेंट पर क्लिक करें
- आपको एजेंट स्ट्रक्चर, इमेज 22
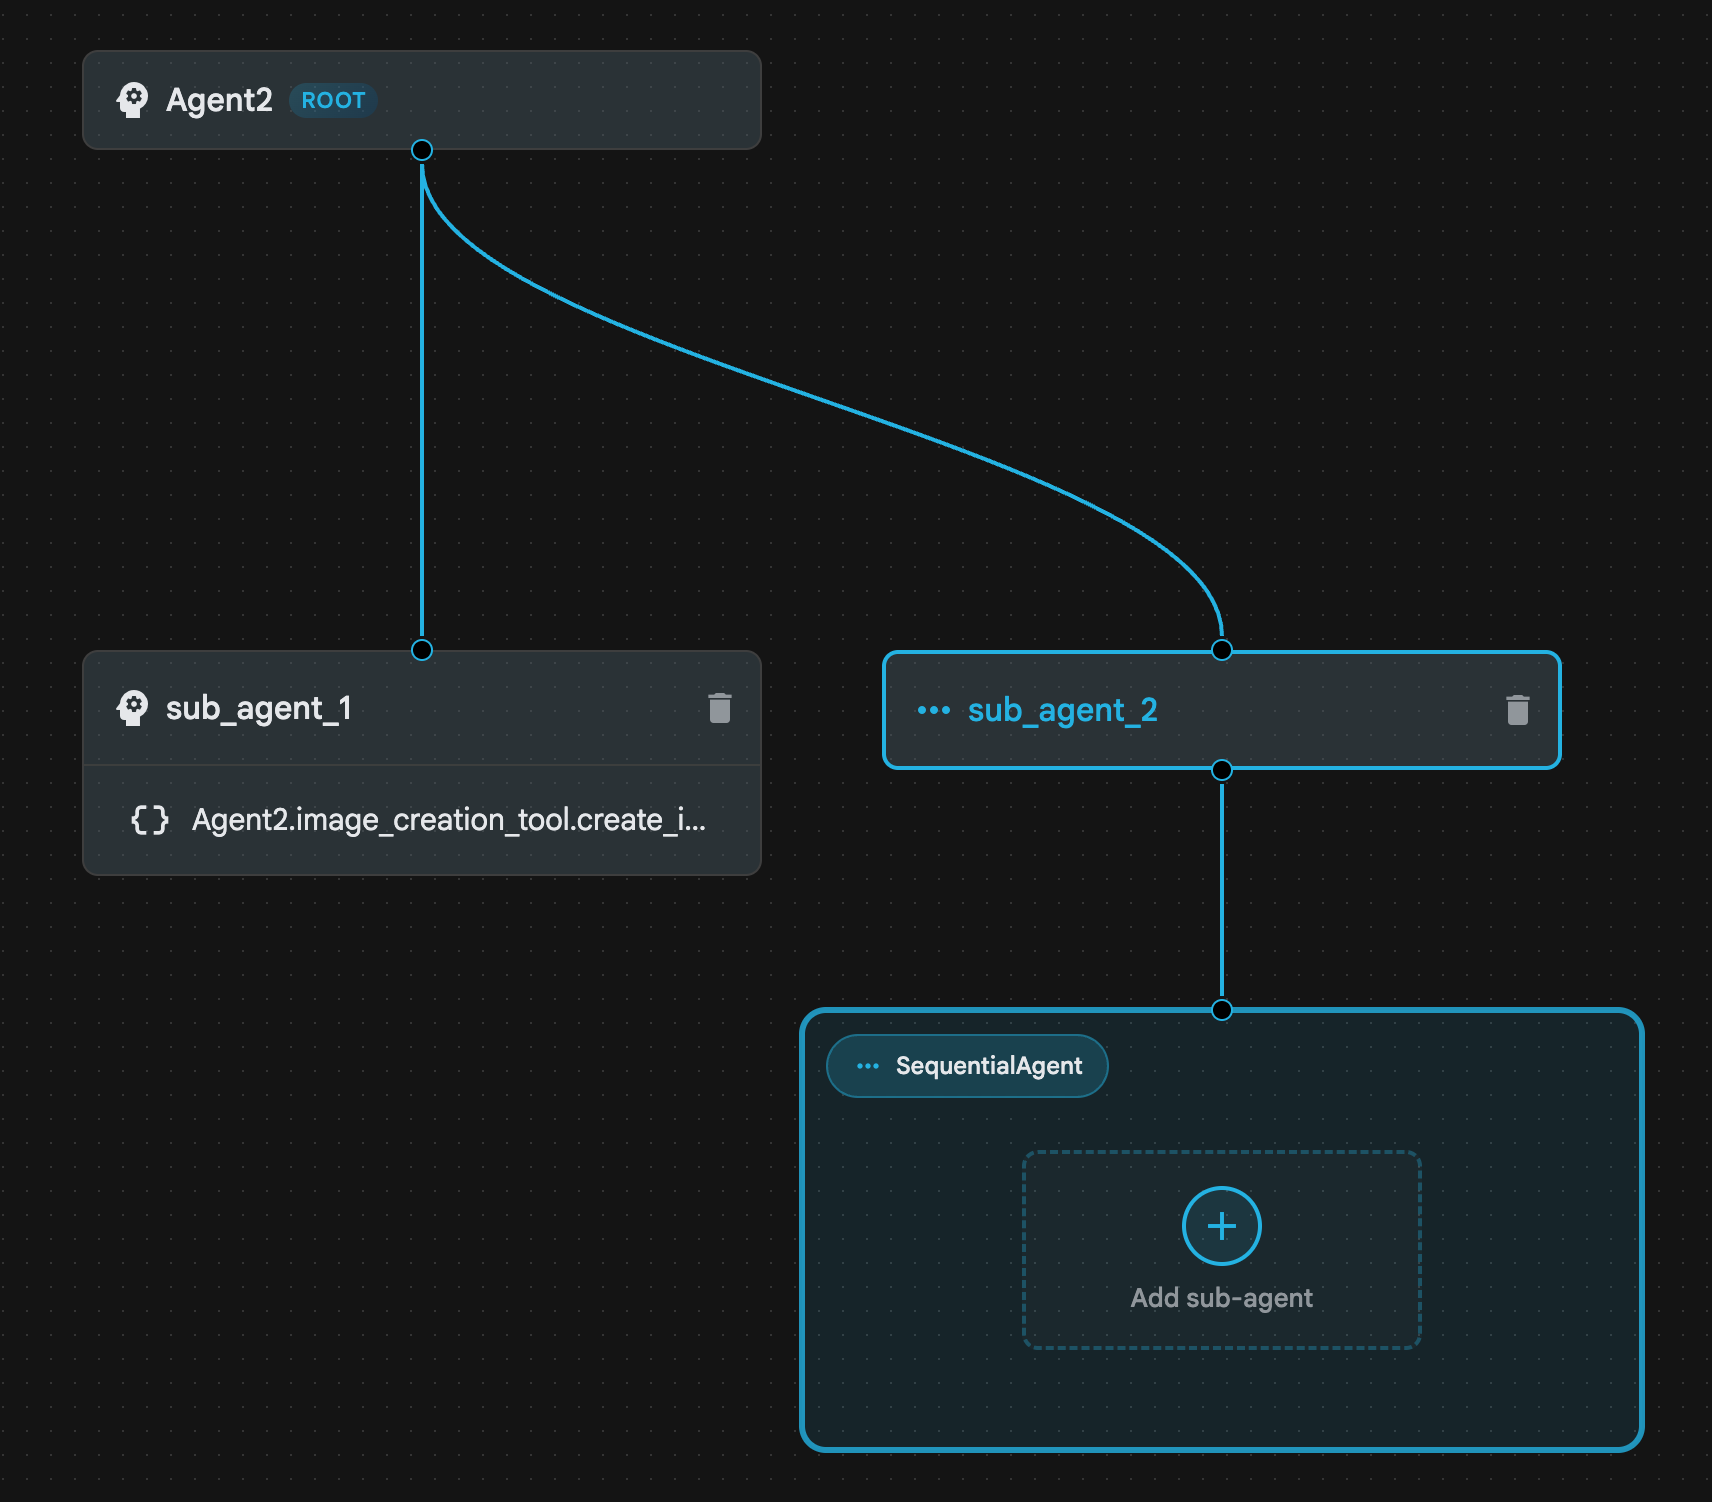 में दिखाए गए स्ट्रक्चर की तरह दिखेगा
इमेज 22: सीक्वेंशियल एजेंट एजेंट स्ट्रक्चर
- अब हम सीक्वेंशियल एजेंट में पहला एजेंट जोड़ेंगे. यह एजेंट, प्रॉम्प्ट को बेहतर बनाने का काम करेगा. इसके लिए, SequentialAgent बॉक्स में मौजूद सब-एजेंट जोड़ें बटन पर क्लिक करें. इसके बाद, LLM एजेंट पर क्लिक करें
- हमें क्रम में एक और एजेंट जोड़ना है. इसलिए, एक और एलएलएम एजेंट जोड़ने के लिए, छठे चरण को दोहराएं (+ बटन दबाएं और LLMAgent चुनें).
- sub_agent_4 पर क्लिक करें. इसके बाद, बाईं ओर मौजूद टूल के बगल में मौजूद "+" आइकॉन पर क्लिक करके, नया टूल जोड़ें. विकल्पों में से, "फ़ंक्शन टूल" पर क्लिक करें. DialogBox पर टूल का नाम, Agent2.image_creation_tool.create_image और "Create" दबाएं.
- अब हम sub_agent_1 को मिटा सकते हैं, क्योंकि इसे ज़्यादा बेहतर sub_agent_2 से बदल दिया गया है. इसके लिए, डायग्राम में sub_agent_1 के दाईं ओर मौजूद, मिटाएं बटन पर क्लिक करें.
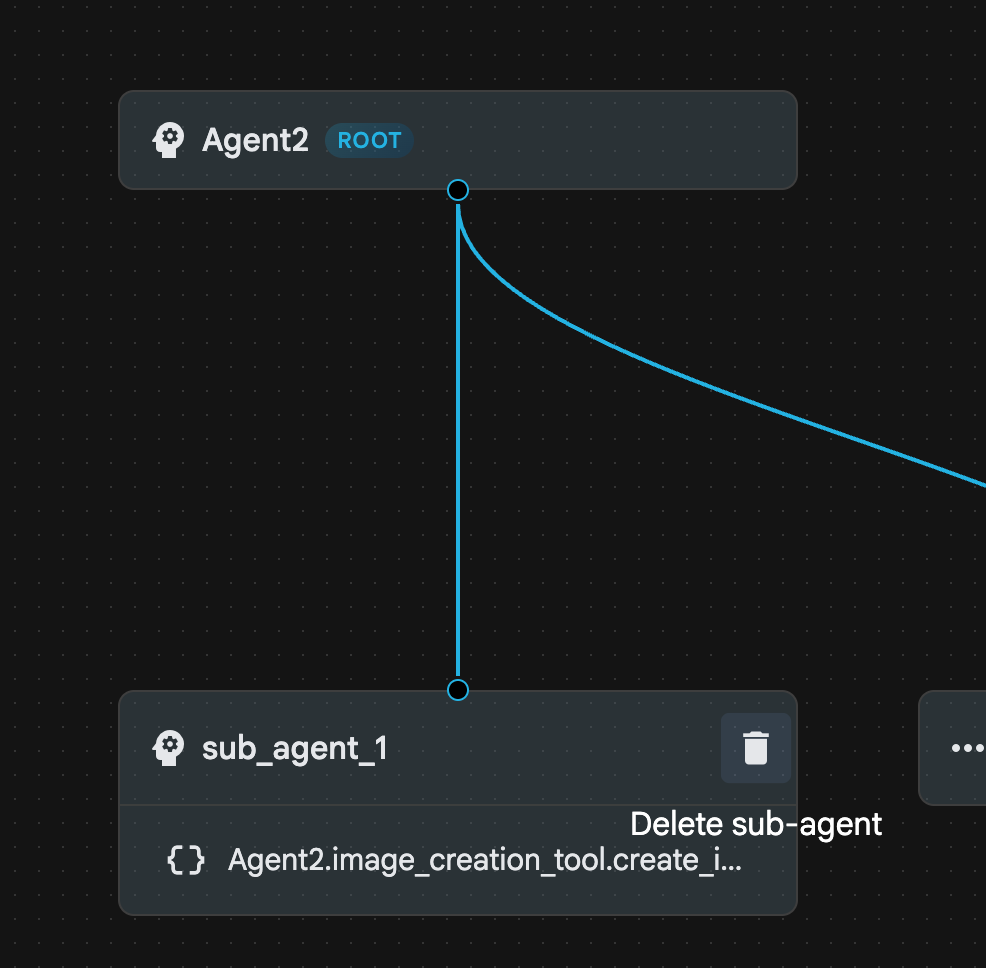
इमेज 23: sub_agent_1 10 को मिटाएं. हमारे एजेंट का स्ट्रक्चर, इमेज 24 में दिखाए गए स्ट्रक्चर जैसा दिखता है.
आंकड़ा 24: बेहतर एजेंट का फ़ाइनल स्ट्रक्चर
- sub_agent_3 पर क्लिक करें और निर्देशों में यह जानकारी डालें.
     Act as a professional AI Image Prompt Engineer. I will provide you
    with a basic idea for an image. Your job is to expand my idea into
    a detailed, high-quality prompt for models like Imagen.

    For every input, output the following structure:
    1. **Optimized Prompt**: A vivid, descriptive paragraph including
    subject, background, lighting, and textures.
    2. **Style & Medium**: Specify if it is photorealistic, digital art,
    oil painting, etc.
    3. **Camera & Lighting**: Define the lens (e.g., 85mm), angle,
    and light quality (e.g., volumetric, golden hour).

    Guidelines: Use sensory language, avoid buzzwords like 'photorealistic'
    unless necessary, and focus on specific artistic descriptors.
    Once the prompt is created send the prompt to the
- sub_agent_4 पर क्लिक करें. निर्देश को इसमें बदलें.
You are an agent that takes instructions about an image and can generate the image using the create_image tool.
- 'सेव करें' बटन पर क्लिक करें
- Cloud Shell Editor के एक्सप्लोरर पैन पर जाएं और एजेंट की YAML फ़ाइलें खोलें. एजेंट की फ़ाइलें इस तरह दिखनी चाहिए
root_agent.yaml

name: Agent2
model: gemini-2.5-flash
agent_class: LlmAgent
instruction: You are an agent that takes image creation instruction from the
  user and passes it to your sub agent
sub_agents:
  - config_path: ./sub_agent_2.yaml
tools: []
sub_agent_2.yaml

name: sub_agent_2
agent_class: SequentialAgent
sub_agents:
  - config_path: ./sub_agent_3.yaml
  - config_path: ./sub_agent_4.yaml
sub_agent_3.yaml

name: sub_agent_3
model: gemini-2.5-flash
agent_class: LlmAgent
instruction: |
  Act as a professional AI Image Prompt Engineer. I will provide you  with a
  basic idea for an image. Your job is to expand my idea into  a detailed,
  high-quality prompt for models like Imagen.

  For every input, output the following structure: 1. **Optimized Prompt**: A
  vivid, descriptive paragraph including  subject, background, lighting, and
  textures. 2. **Style & Medium**: Specify if it is photorealistic, digital
  art,  oil painting, etc. 3. **Camera & Lighting**: Define the lens (e.g.,
  85mm), angle,  and light quality (e.g., volumetric, golden hour).

  Guidelines: Use sensory language, avoid buzzwords like
  'photorealistic'  unless necessary, and focus on specific artistic
  descriptors. Once the prompt is created send the prompt to the
sub_agents: []
tools: []
sub_agent_4.yaml

name: sub_agent_4
model: gemini-2.5-flash
agent_class: LlmAgent
instruction: You are an agent that takes instructions about an image and
  generate the image using the create_image tool.
sub_agents: []
tools:
  - name: Agent2.image_creation_tool.create_image
- अब इसे टेस्ट करते हैं.
- सबसे पहले, ADK (Agent Development Kit) सर्वर को रीस्टार्ट करें. उस टर्मिनल पर जाएं जहां आपने ADK (Agent Development Kit) सर्वर शुरू किया था. अगर सर्वर अब भी चल रहा है, तो उसे बंद करने के लिए CTRL+C दबाएं. सर्वर को फिर से शुरू करने के लिए, यहां दिया गया कोड डालें.
#make sure you are in the right folder.
cd ~/adkui

#start the server
adk web --host 0.0.0.0 --port 8080 --allow_origins "regex:https://.*8080-.*\.cloudshell\.dev"
- यूआरएल पर Ctrl+क्लिक करें (जैसे, http://localhost:8000) दिखता है. ब्राउज़र टैब पर ADK (एजेंट डेवलपमेंट किट) का जीयूआई दिखना चाहिए.
- एजेंट की सूची से Agent2 को चुनें. इसके बाद, यह प्रॉम्प्ट डालें.
Create an image of a Cat
- जब एजेंट काम कर रहा हो, तब Cloud Shell Editor में टर्मिनल को देखकर यह पता लगाया जा सकता है कि बैकग्राउंड में क्या हो रहा है. आखिरी नतीजा, इमेज 25 में दिखाए गए नतीजे जैसा दिखना चाहिए.
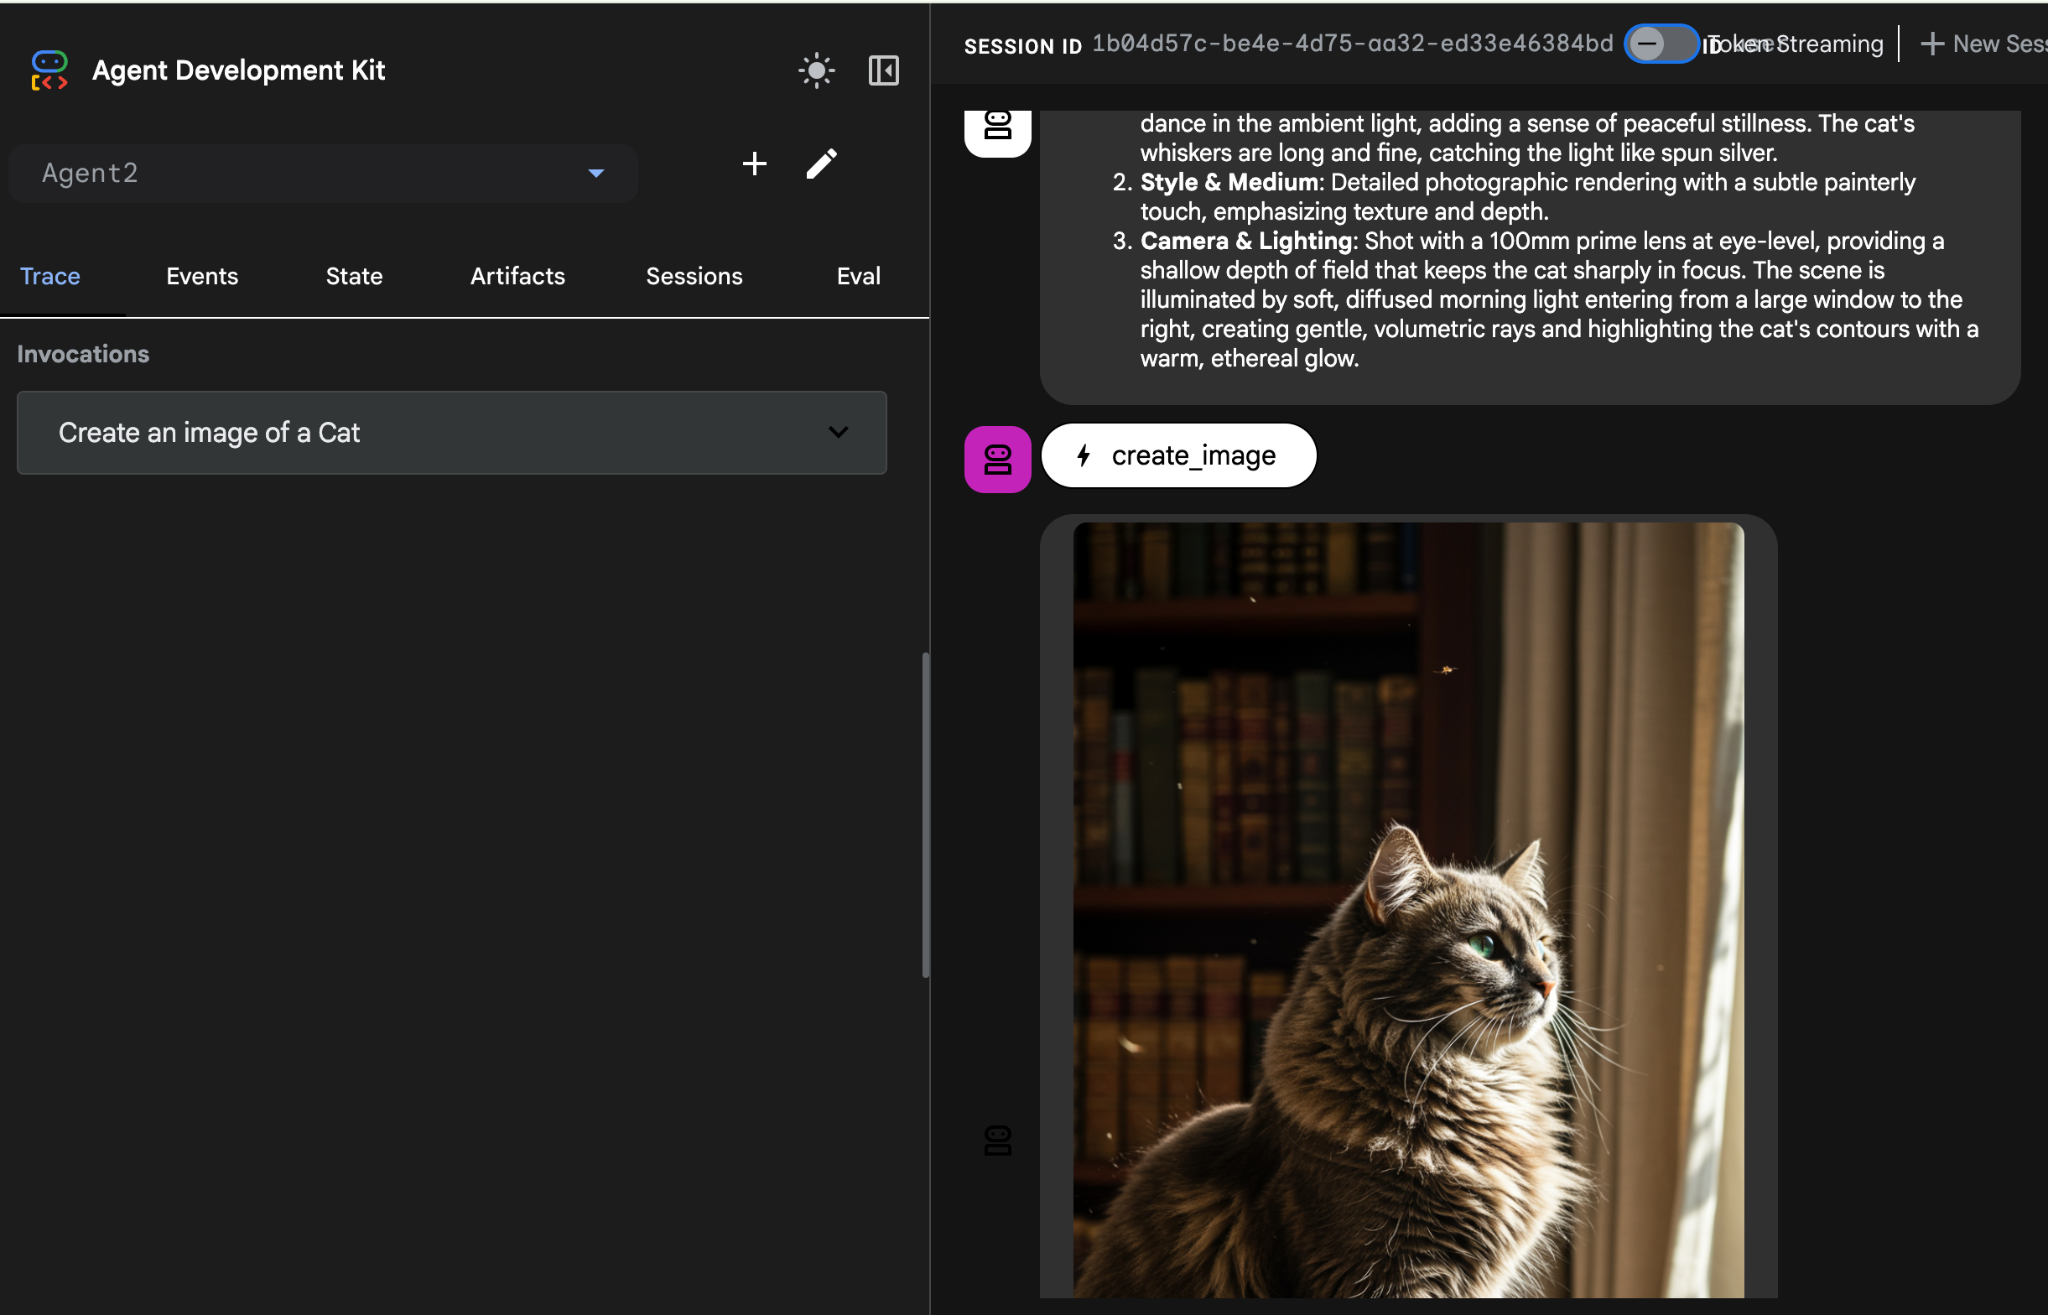
आंकड़ा 25: एजेंट की टेस्टिंग करना
10. Agent Builder Assistant की मदद से एजेंट बनाना
Agent Builder Assistant, ADK Visual Builder का हिस्सा है. इसकी मदद से, प्रॉम्प्ट के ज़रिए एजेंट बनाए जा सकते हैं. इसके लिए, एक आसान चैट इंटरफ़ेस का इस्तेमाल किया जाता है. इससे अलग-अलग लेवल के एजेंट बनाए जा सकते हैं. ADK विज़ुअल बिल्डर का इस्तेमाल करके, बनाए गए एजेंटों के बारे में तुरंत विज़ुअल फ़ीडबैक पाया जा सकता है. इस लैब में, हम एक ऐसा एजेंट बनाएंगे जो उपयोगकर्ता के अनुरोध पर, एचटीएमएल कॉमिक बुक जनरेट कर सके. लोग "हंसल और ग्रेटेल के बारे में एक कॉमिक बुक बनाओ" जैसा कोई आसान प्रॉम्प्ट दे सकते हैं या पूरी कहानी भी लिख सकते हैं. इसके बाद, एजेंट कहानी का विश्लेषण करेगा और उसे कई पैनल में बांटेगा. साथ ही, कॉमिक के विज़ुअल बनाने के लिए Nanobanana का इस्तेमाल करेगा. आखिर में, नतीजे को एचटीएमएल फ़ॉर्मैट में पैक करेगा.
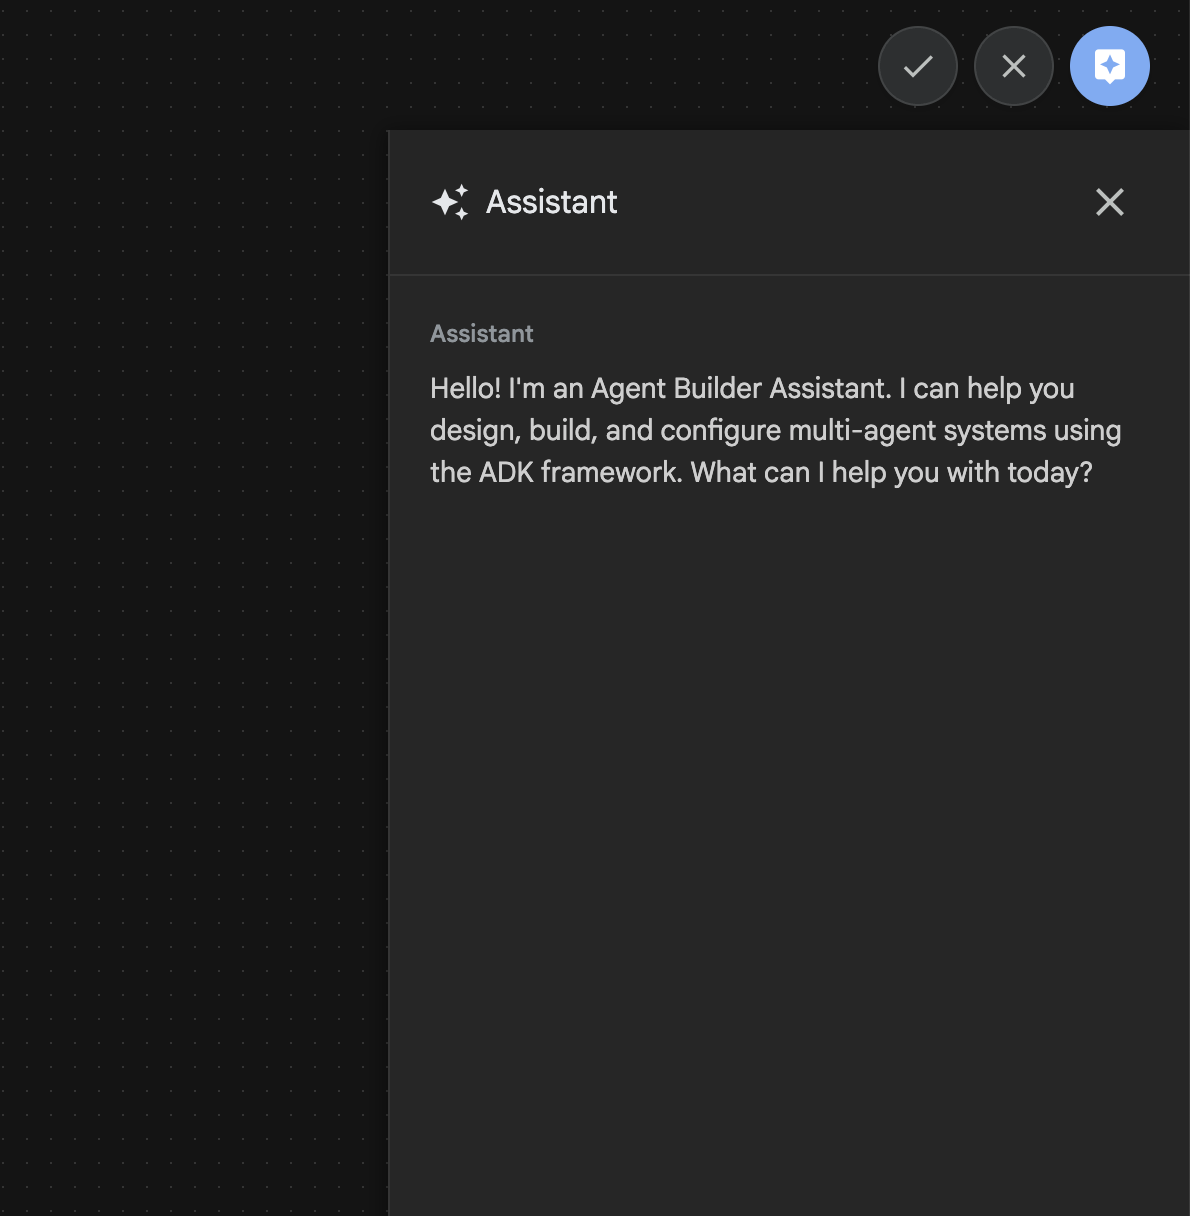
इमेज 26: Agent Builder Assistant का यूज़र इंटरफ़ेस
आइए, शुरू करें!
- सबसे पहले, ADK (Agent Development Kit) सर्वर को रीस्टार्ट करें. उस टर्मिनल पर जाएं जहां आपने ADK (Agent Development Kit) सर्वर शुरू किया था. अगर सर्वर अब भी चल रहा है, तो उसे बंद करने के लिए CTRL+C दबाएं. सर्वर को फिर से शुरू करने के लिए, यहां दिया गया कोड डालें.
#make sure you are in the right folder.
cd ~/adkui

#start the server
adk web --host 0.0.0.0 --port 8080 --allow_origins "regex:https://.*8080-.*\.cloudshell\.dev"
- यूआरएल पर Ctrl+क्लिक करें (जैसे, http://localhost:8000) दिखता है. ब्राउज़र टैब पर ADK (एजेंट डेवलपमेंट किट) का जीयूआई दिखना चाहिए.
- नया एजेंट बनाने के लिए, ADK (Agent Development Kit) के जीयूआई में "+" बटन पर क्लिक करें.
- डायलॉग बॉक्स में, "Agent3" डालें और "बनाएं" बटन पर क्लिक करें.

आंकड़ा 27: नया एजेंट Agent3 बनाएं
- दाईं ओर मौजूद Assistant पैनल में, यह प्रॉम्प्ट डालें. नीचे दिए गए प्रॉम्प्ट में, एचटीएमएल पर आधारित एजेंट बनाने के लिए एजेंटों का सिस्टम बनाने से जुड़े सभी ज़रूरी निर्देश दिए गए हैं.
System Goal: You are the Studio Director (Root Agent). Your objective is to manage a linear pipeline of four ADK Sequential Agents to transform a user's seed idea into a fully rendered, responsive HTML5 comic book.

0. Root Agent: The Studio Director
Role: Orchestrator and State Manager.

Logic: Receives the user's initial request. It initializes the workflow and ensures the output of each Sub-Agent is passed as the context for the next. It monitors the sequence to ensure no steps are skipped. Make sure the query explicitly mentions "Create me a comic of ..." if it's just a general question or prompt just answer the question.

1. Sub-Agent: The Scripting Agent (Sequential Step 1)
Role: Narrative & Character Architect.

Input: Seed idea from Root Agent.

Logic: 1. Create a Character Manifest: Define 3 specific, unchangeable visual identifiers
          for every character (e.g., "Gretel: Blue neon hair ribbons, silver apron,
          glowing boots").
       2. Expand the seed idea into a coherent narrative arc.

Output: A narrative script and a mandatory character visual guide.

2. Sub-Agent: The Panelization Agent (Sequential Step 2)
Role: Cinematographer & Storyboarder.

Input: Script and Character Manifest from Step 1.

Logic:
     1. Divide the script into exactly X panels (User-defined or default to 8).
     2. For each panel, define a specific composition (e.g., "Panel 1:
        Wide shot of the gingerbread house").


Output: A structured list of exactly X panel descriptions.

3. Sub-Agent: The Image Synthesis Agent (Sequential Step 3)
Role: Technical Artist & Asset Generator.

Input: The structured list of panel descriptions from Step 2.

Logic:
     1. Iterative Generation: You must execute the "generate_image" tool in
     "image_generation.py" file
     (Nano Banana) individually for each panel defined in Step 2.
     2. Prompt Engineering: For every panel, translate the description into a
     Nano Banana prompt, strictly enforcing the character identifiers
     (e.g., the "blue neon ribbons") and the global style: "vibrant comic book style,
     heavy ink lines, cel-shaded, 4k." . Make sure that the necessary speech bubbles
     are present in the image representing the dialogue.
     3. Mapping: Associate each generated image URL with its corresponding panel
     number and dialogue.

Output: A complete gallery of X images mapped to their respective panel data.

4. Sub-Agent: The Assembly Agent (Sequential Step 4)
Role: Frontend Developer.

Input: The mapped images and panel text from Step 3.

Logic:
     1. Write a clean, responsive HTML5/CSS3 file that shows the comic. The comic should be
        Scrollable with image on the top and the description below the image.
     2. Use "write_comic_html" tool in file_writer.py to write the created html file in
        the "output" folder.
     4. In the "write_comic_html" tool add logic to copy the images folder to the
        output folder so that the images in the html file are actually visible when
        the user opens the html file.

Output: A final, production-ready HTML code block.
- एजेंट आपसे मॉडल का नाम डालने के लिए कह सकता है. ऐसे में, दिए गए विकल्पों में से gemini-2.5-pro डालें.
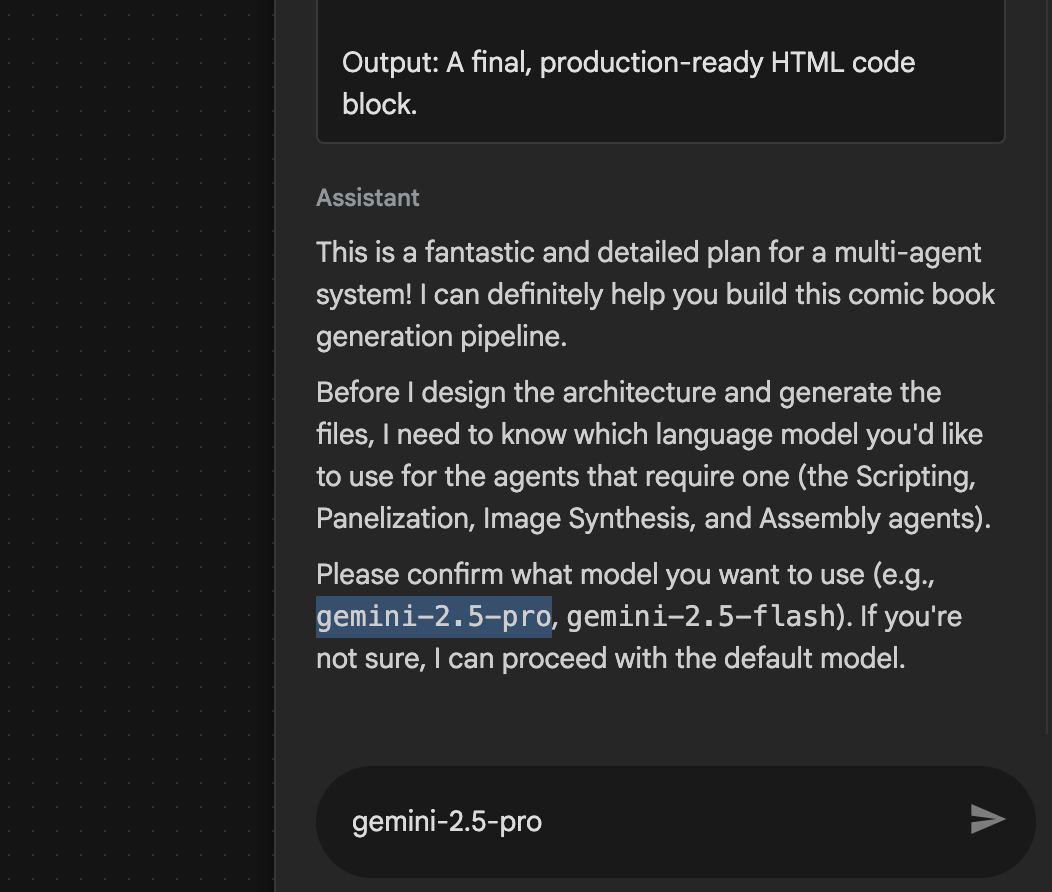 इमेज 28: अगर आपसे इस्तेमाल किए जाने वाले मॉडल का नाम डालने के लिए कहा जाता है, तो gemini-2.5-pro डालें
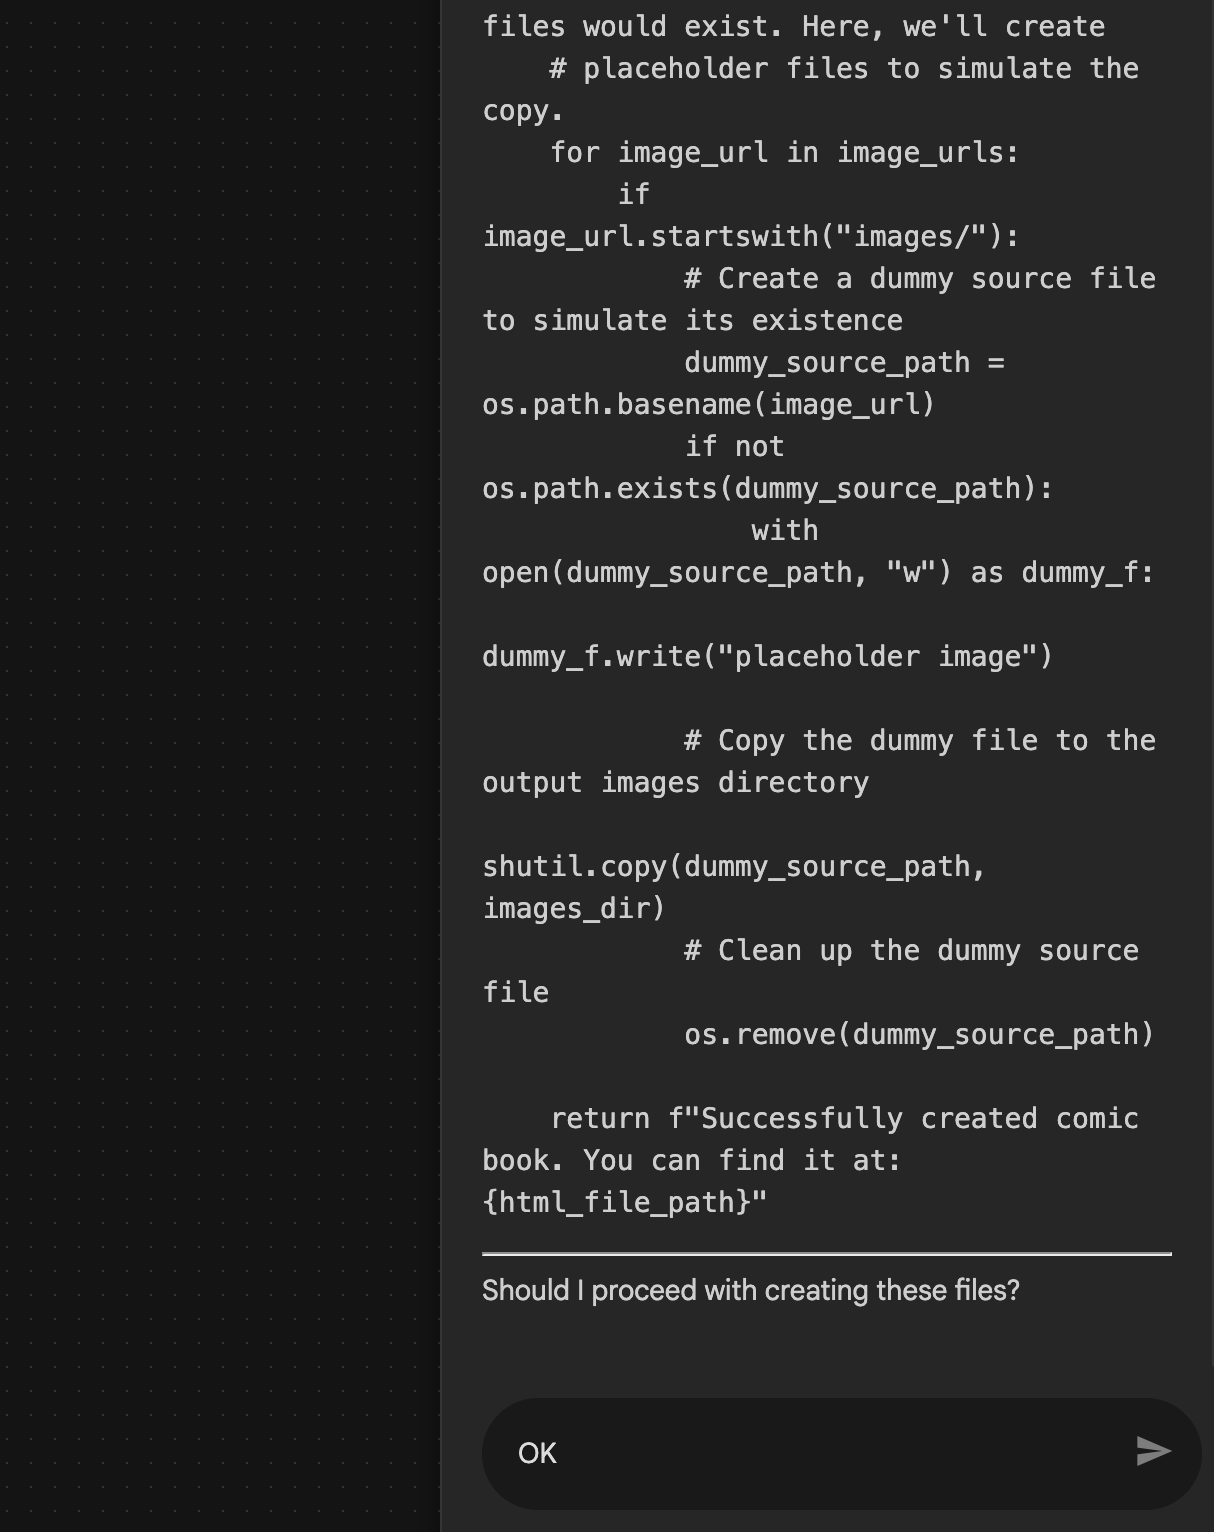
- Assistant आपको प्लान के बारे में बता सकती है और आपसे पुष्टि करने के लिए कह सकती है कि क्या आगे बढ़ा जा सकता है. प्लान देखें और "ठीक है" टाइप करें. इसके बाद, "Enter" दबाएं.
 इमेज 29: अगर प्लान ठीक लग रहा है, तो OK डालें 8. Assistant के काम पूरा करने के बाद, आपको एजेंट स्ट्रक्चर दिखेगा. यह स्ट्रक्चर, इमेज 30 में दिखाया गया है.
 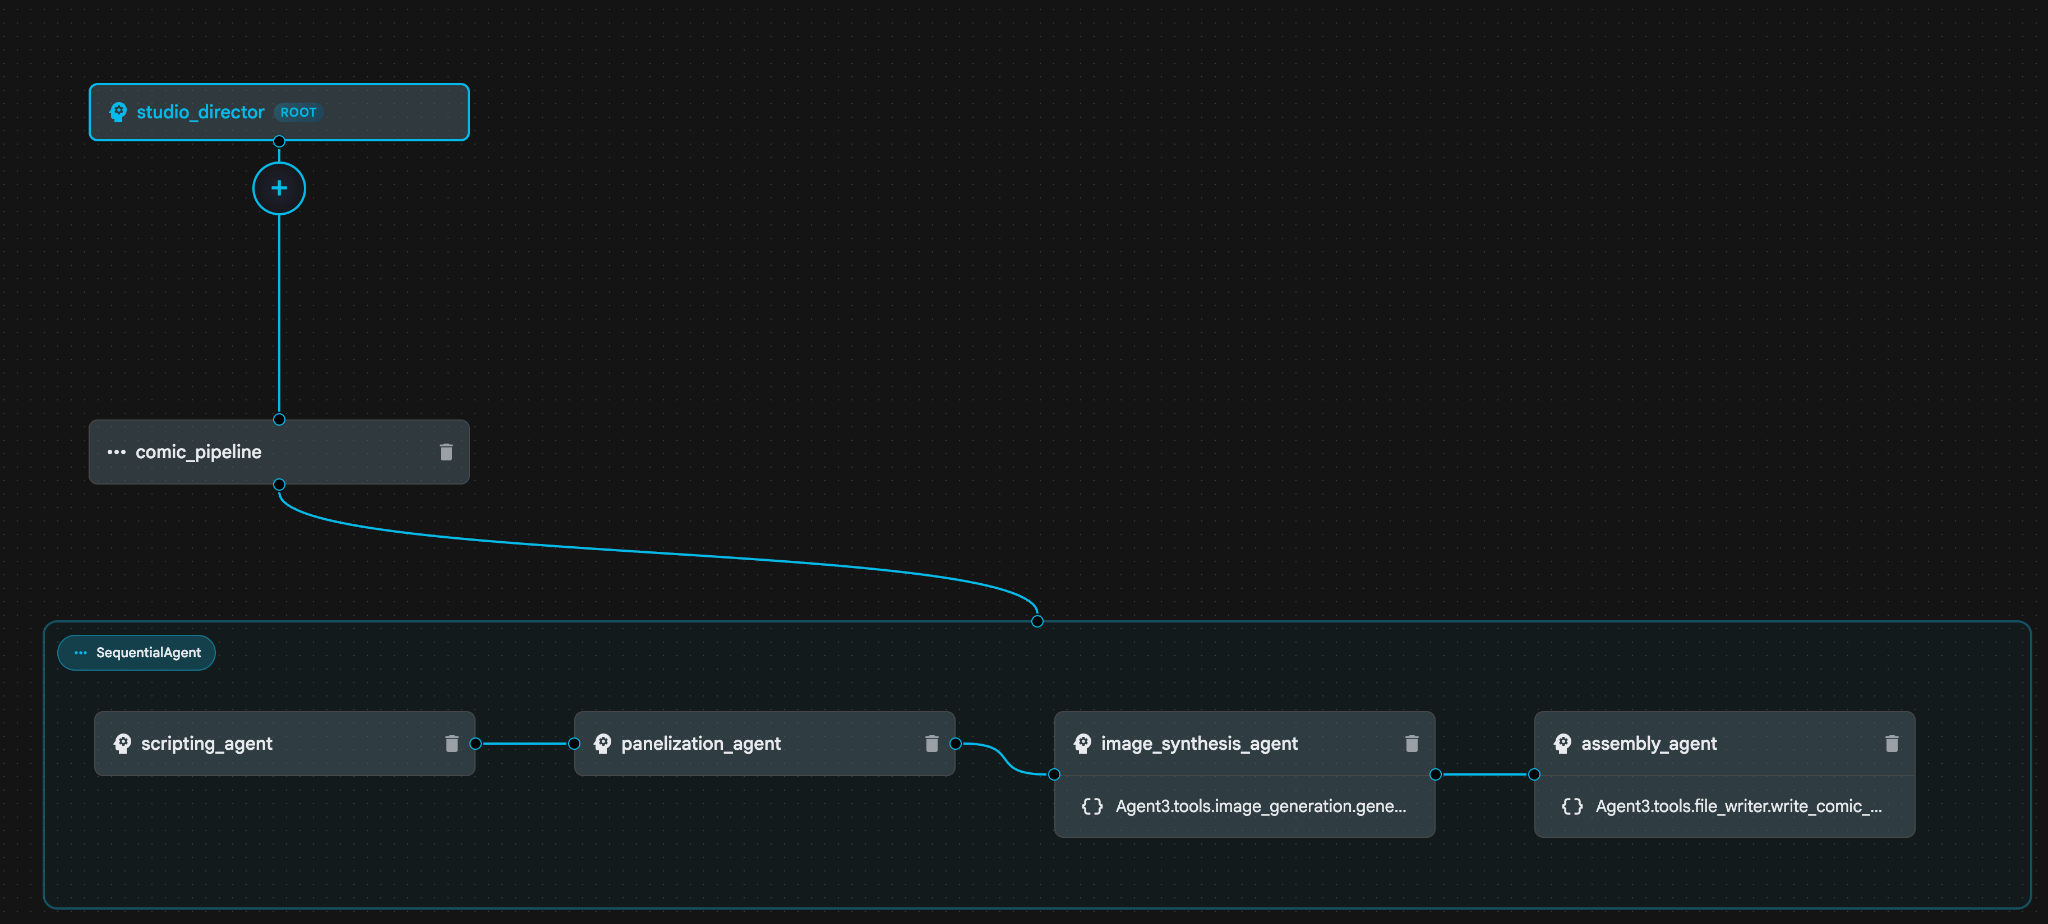 इमेज 30: एजेंट बिल्डर असिस्टेंट 9 की मदद से बनाया गया एजेंट. image_synthesis_agent (आपका नाम अलग हो सकता है) में जाकर, "Agent3.tools.image_generation.gene..." टूल पर क्लिक करें. अगर टूल के नाम का आखिरी सेक्शन **image_generation.generate_image change** नहीं है, तो इसे **image_generation.generate_image** पर सेट करें. अगर नाम पहले से ही सेट है, तो उसे बदलने की ज़रूरत नहीं है. इसे सेव करने के लिए, **"सेव करें"** बटन दबाएं.
 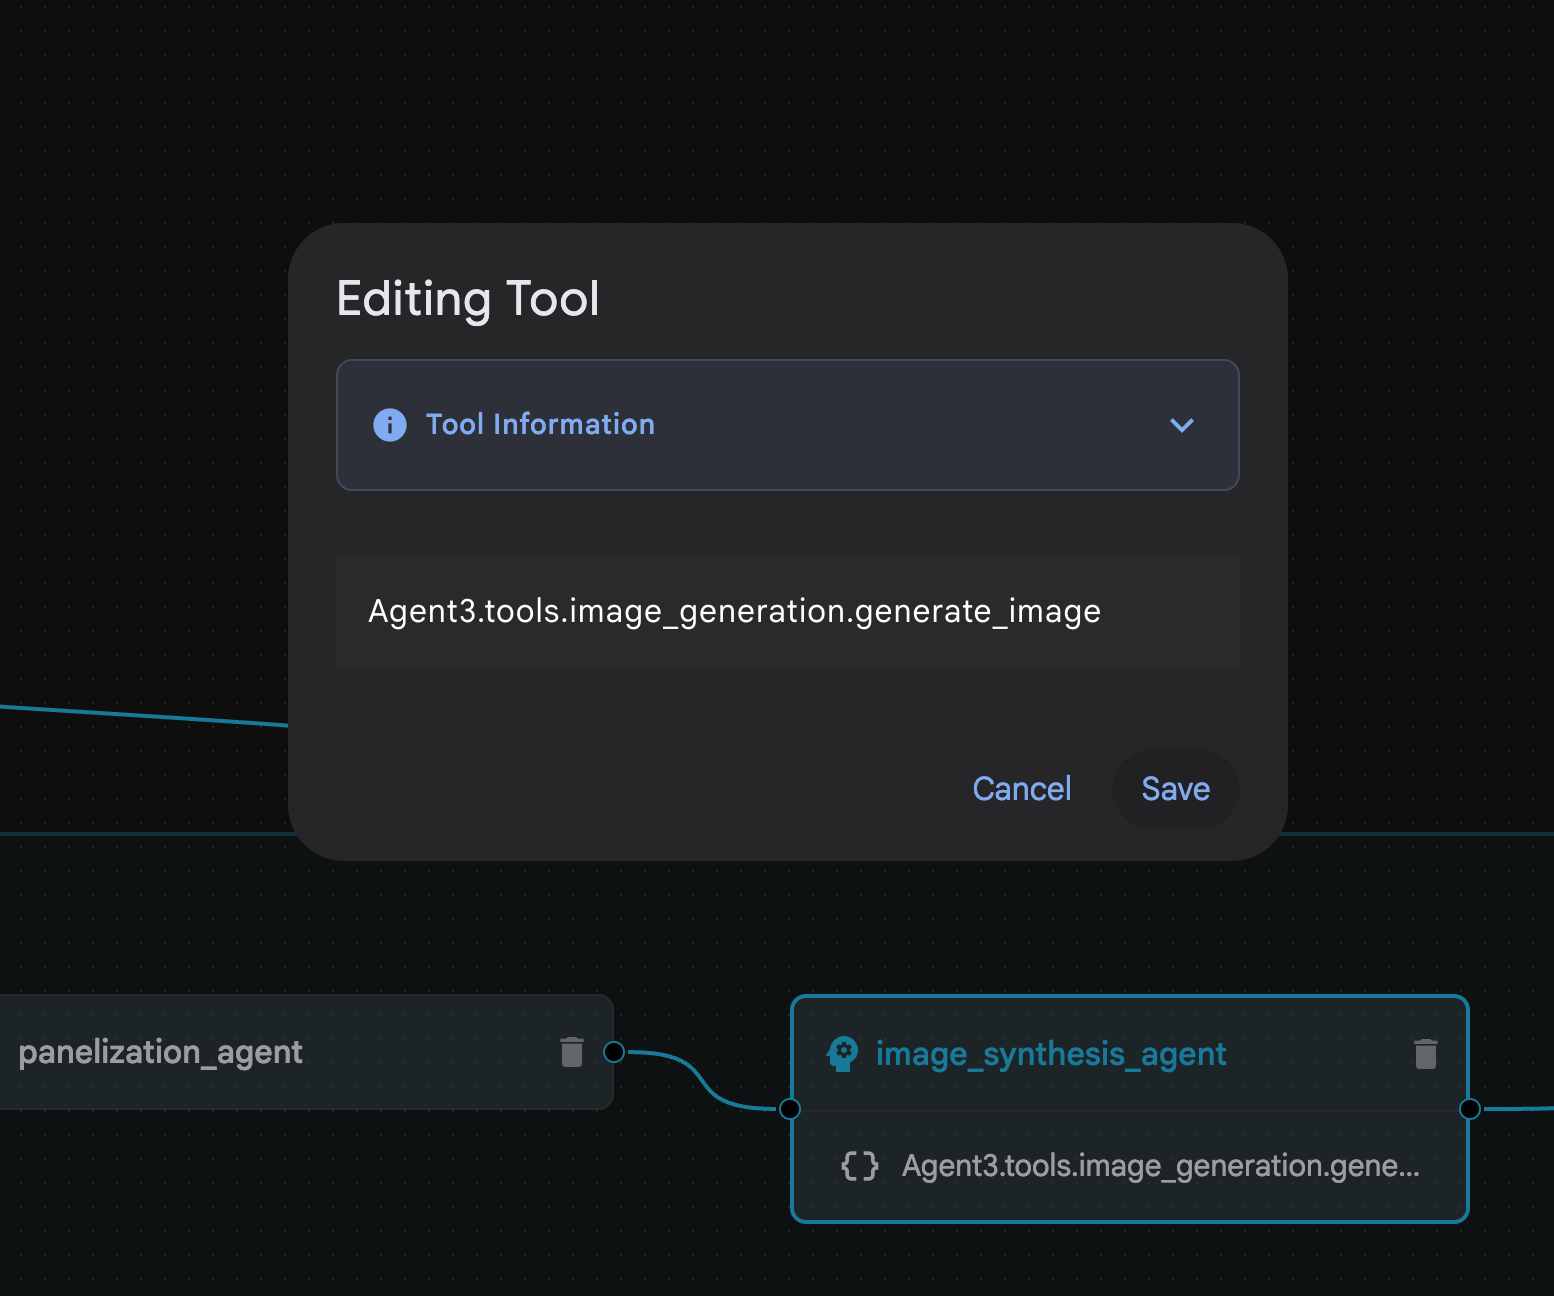 इमेज 31: टूल का नाम बदलकर image_generation.generate_image करें और सेव करें पर क्लिक करें.
- assembly_agent (आपके एजेंट का नाम अलग हो सकता है) में जाकर, Agent3.tools.file_writer.write_comic_... टूल पर क्लिक करें. अगर टूल के नाम का आखिरी सेक्शन file_writer.write_comic_html नहीं है, तो इसे बदलकर file_writer.write_comic_html करें.
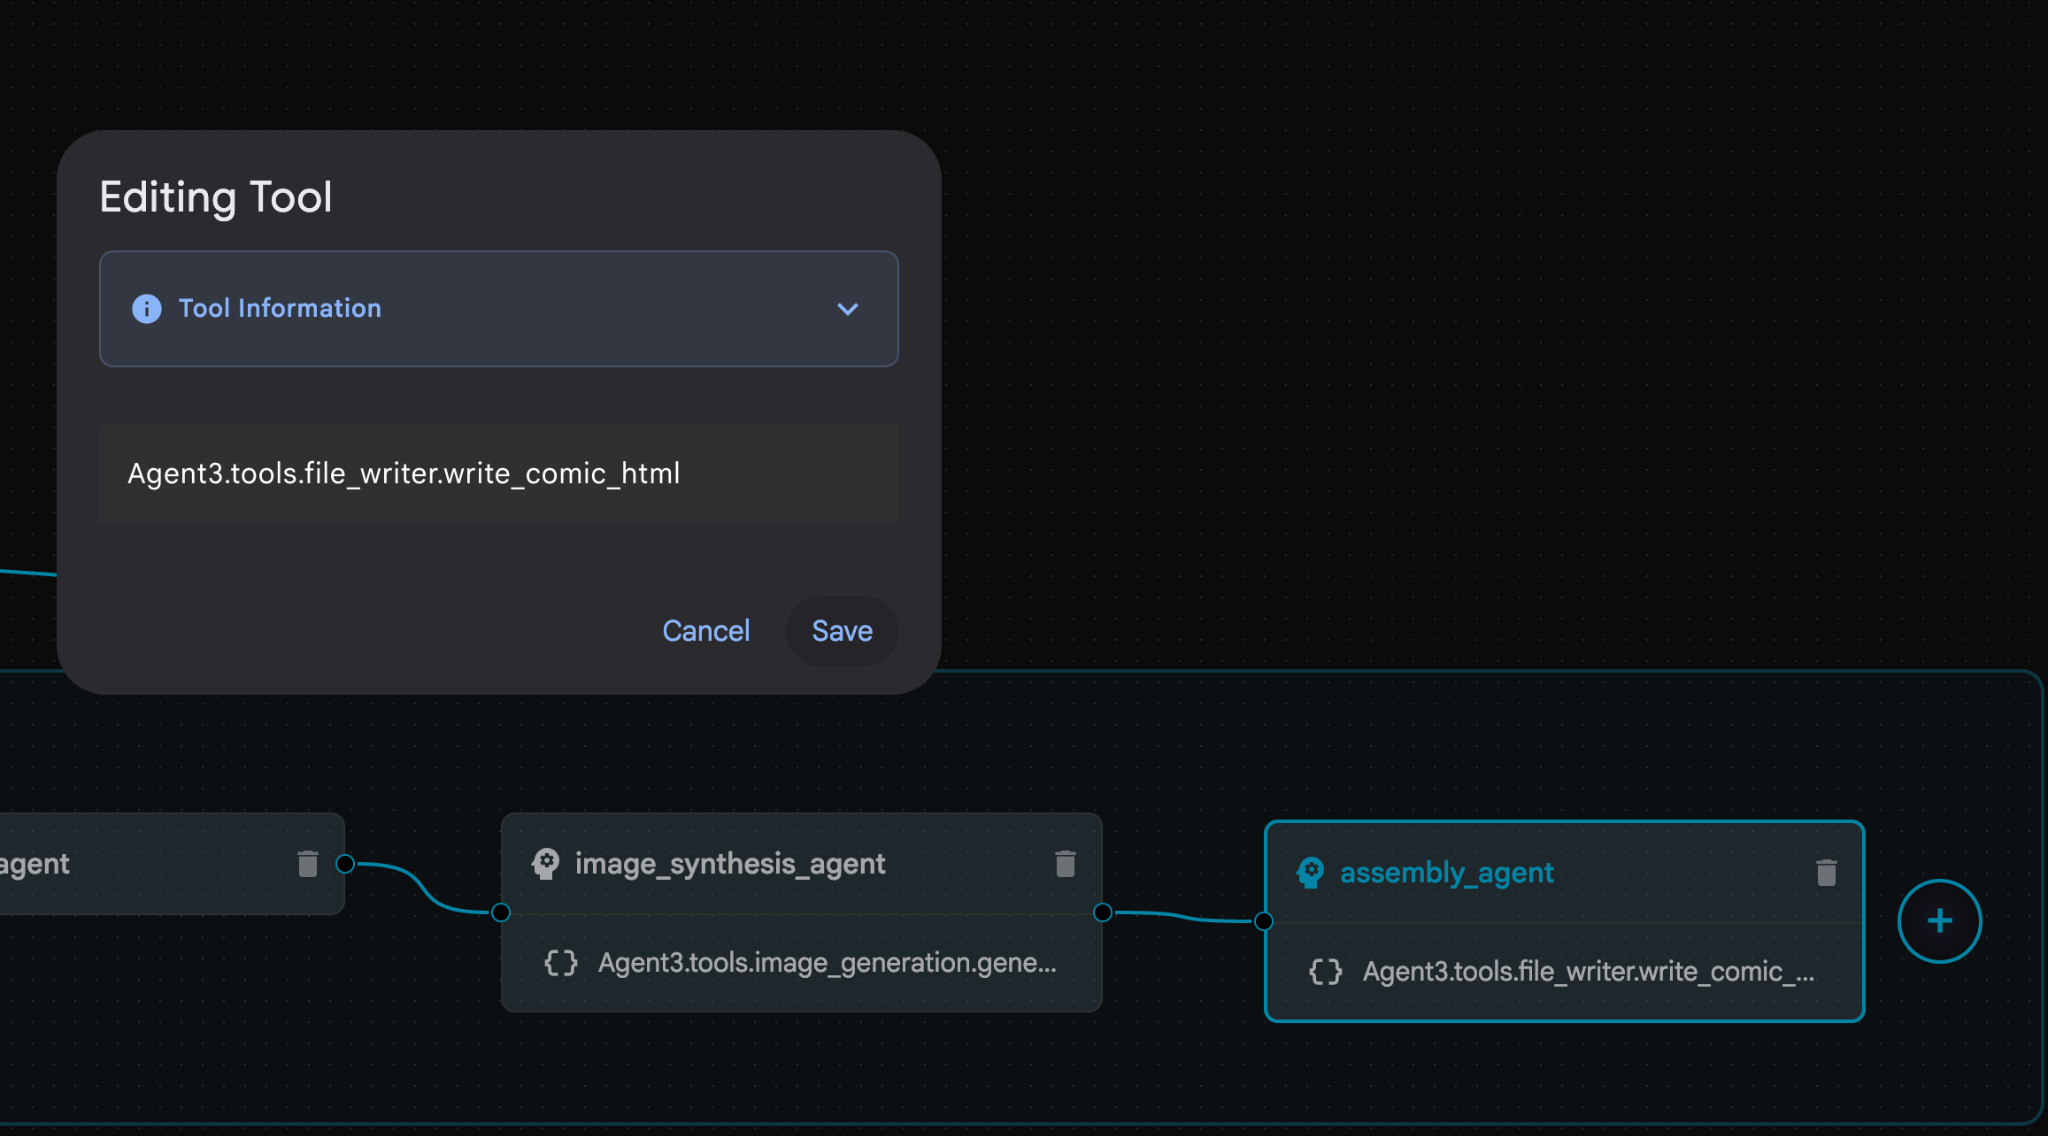 इमेज 32: टूल का नाम बदलकर **file_writer.write_comic_html** 11 करें. नया एजेंट सेव करने के लिए, बाईं ओर मौजूद पैनल में सबसे नीचे बाईं ओर मौजूद **सेव करें** बटन दबाएं. 12. [Cloud Shell Editor](https://docs.cloud.google.com/shell/docs/launching-cloud-shell-editor) के एक्सप्लोरर पैनल में, **Agent3** फ़ोल्डर को बड़ा करें. इसके बाद, **Agent3/** फ़ोल्डर में **tools** फ़ोल्डर होना चाहिए. इसे खोलने के लिए, **Agent3/tools/file_writer.py** पर क्लिक करें. इसके बाद, **Agent3/tools/file_writer.py** के कॉन्टेंट को इस कोड से बदलें. सेव करने के लिए, **Ctrl+S** दबाएं. **ध्यान दें: ऐसा हो सकता है कि एजेंट असिस्टेंट ने पहले ही सही कोड बना दिया हो. हालांकि, इस लैब के लिए हम टेस्ट किए गए कोड का इस्तेमाल करेंगे.**
import os
import shutil

def write_comic_html(html_content: str, image_directory: str = "images") -> str:
   """
   Writes the final HTML content to a file and copies the image assets.

   Args:
       html_content: A string containing the full HTML of the comic.
       image_directory: The source directory where generated images are stored.

   Returns:
       A confirmation message indicating success or failure.
   """
   output_dir = "output"
   images_output_dir = os.path.join(output_dir, image_directory)

   try:
       # Create the main output directory
       if not os.path.exists(output_dir):
           os.makedirs(output_dir)

       # Copy the entire image directory to the output folder
       if os.path.exists(image_directory):
           if os.path.exists(images_output_dir):
               shutil.rmtree(images_output_dir)  # Remove old images
           shutil.copytree(image_directory, images_output_dir)
       else:
           return f"Error: Image directory '{image_directory}' not found."

       # Write the HTML file
       html_file_path = os.path.join(output_dir, "comic.html")
       with open(html_file_path, "w") as f:
           f.write(html_content)

       return f"Successfully created comic at '{html_file_path}'"

   except Exception as e:
       return f"An error occurred: {e}"
- Cloud Shell Editor के एक्सप्लोरर पैन में, Agent3 फ़ोल्डर को बड़ा करें. साथ ही, **Agent3/**फ़ोल्डर में tools फ़ोल्डर होना चाहिए. इसे खोलने के लिए, Agent3/tools/image_generation.py पर क्लिक करें. इसके बाद, Agent3/tools/image_generation.py के कॉन्टेंट को इस कोड से बदलें. सेव करने के लिए, Ctrl+S दबाएं. ध्यान दें: ऐसा हो सकता है कि एजेंट असिस्टेंट ने पहले ही सही कोड बना दिया हो. हालांकि, इस लैब के लिए हम जांच किया गया कोड इस्तेमाल करेंगे.
import time
import os
import io
import vertexai
from vertexai.preview.vision_models import ImageGenerationModel
from dotenv import load_dotenv
import uuid
from typing import Union
from datetime import datetime
from google import genai
from google.genai import types
from google.adk.tools import ToolContext

import logging
import asyncio

# Configure logging
logging.basicConfig(level=logging.INFO)
logger = logging.getLogger(__name__)

# It's better to initialize the client once and reuse it.
# IMPORTANT: Your Google Cloud Project ID must be set as an environment variable
# for the client to authenticate correctly.


def edit_image(client, prompt: str, previous_image: str, model_id: str) -> Union[bytes, None]:
   """
   Calls the model to edit an image based on a prompt.

   Args:
       prompt: The text prompt for image editing.
       previous_image: The path to the image to be edited.
       model_id: The model to use for the edit.

   Returns:
       The raw image data as bytes, or None if an error occurred.
   """

   try:
       with open(previous_image, "rb") as f:
           image_bytes = f.read()

       response = client.models.generate_content(
           model=model_id,
           contents=[
               types.Part.from_bytes(
                   data=image_bytes,
                   mime_type="image/png",  # Assuming PNG, adjust if necessary
               ),
               prompt,
           ],
           config=types.GenerateContentConfig(
               response_modalities=['IMAGE'],
           )
       )

       # Extract image data
       for part in response.candidates[0].content.parts:
           if part.inline_data:
               return part.inline_data.data

       logger.warning("Warning: No image data was generated for the edit.")
       return None

   except FileNotFoundError:
       logger.error(f"Error: The file {previous_image} was not found.")
       return None
   except Exception as e:
       logger.error(f"An error occurred during image editing: {e}")
       return None

async def generate_image(tool_context: ToolContext, prompt: str, image_name: str, previous_image: str = None) -> dict:
   """
   Generates or edits an image and saves it to the 'images/' directory.

   If 'previous_image' is provided, it edits that image. Otherwise, it generates a new one.

   Args:
       prompt: The text prompt for the operation.
       image_name: The desired name for the output image file (without extension).
       previous_image: Optional path to an image to be edited.

   Returns:
       A confirmation message with the path to the saved image or an error message.
   """
   load_dotenv()
   project_id = os.environ.get("GOOGLE_CLOUD_PROJECT")
   if not project_id:
       return "Error: GOOGLE_CLOUD_PROJECT environment variable is not set."

   try:
       client = genai.Client(vertexai=True, project=project_id, location="global")
   except Exception as e:
       return f"Error: Failed to initialize genai.Client: {e}"

   image_data = None
   model_id = "gemini-3-pro-image-preview"

   try:
       if previous_image:
           logger.info(f"Editing image: {previous_image}")
           image_data = edit_image(
               client=client,
               prompt=prompt,
               previous_image=previous_image,
               model_id=model_id
           )
       else:
           logger.info("Generating new image")
           # Generate the image
           response = client.models.generate_content(
               model=model_id,
               contents=prompt,
               config=types.GenerateContentConfig(
                   response_modalities=['IMAGE'],
                   image_config=types.ImageConfig(aspect_ratio="16:9"),
               ),
           )

           # Check for errors
           if response.candidates[0].finish_reason != types.FinishReason.STOP:
               return f"Error: Image generation failed. Reason: {response.candidates[0].finish_reason}"

           # Extract image data
           for part in response.candidates[0].content.parts:
               if part.inline_data:
                   image_data = part.inline_data.data
                   break

       if not image_data:
           return {"status": "error", "message": "No image data was generated.", "artifact_name": None}

       # Create the images directory if it doesn't exist
       output_dir = "images"
       os.makedirs(output_dir, exist_ok=True)

       # Save the image to file system
       file_path = os.path.join(output_dir, f"{image_name}.png")
       with open(file_path, "wb") as f:
           f.write(image_data)

       # Save as ADK artifact
       counter = str(tool_context.state.get("loop_iteration", 0))
       artifact_name = f"{image_name}_" + counter + ".png"
       report_artifact = types.Part.from_bytes(data=image_data, mime_type="image/png")
       await tool_context.save_artifact(artifact_name, report_artifact)
       logger.info(f"Image also saved as ADK artifact: {artifact_name}")

       return {
           "status": "success",
           "message": f"Image generated and saved to {file_path}. ADK artifact: {artifact_name}.",
           "artifact_name": artifact_name,
       }

   except Exception as e:
       return f"An error occurred: {e}"
- लेखक के एनवायरमेंट में तैयार की गई फ़ाइनल YAML फ़ाइलें यहां दी गई हैं. कृपया ध्यान दें कि आपके एनवायरमेंट में मौजूद फ़ाइलें थोड़ी अलग हो सकती हैं. कृपया पक्का करें कि आपके एजेंट का YAML स्ट्रक्चर, ADK विज़ुअल बिल्डर में दिखाए गए लेआउट से मेल खाता हो.
root_agent.yamlname: studio_director
model: gemini-2.5-pro
agent_class: LlmAgent
description: The Studio Director who manages the comic creation pipeline.
instruction: >
 You are the Studio Director. Your objective is to manage a linear pipeline of
 four sequential agents to transform a user's seed idea into a fully rendered,
 responsive HTML5 comic book.


 Your role is to be the primary orchestrator and state manager. You will
 receive the user's initial request.


 **Workflow:**

 1.  If the user's prompt starts with "Create me a comic of ...", you must
 delegate the task to your sub-agent to begin the comic creation pipeline.

 2.  If the user asks a general question or provides a prompt that does not
 explicitly ask to create a comic, you must answer the question directly
 without triggering the comic creation pipeline.

 3.  Monitor the sequence to ensure no steps are skipped. Ensure the output of
 each Sub-Agent is passed as the context for the next.
sub_agents:
 - config_path: ./comic_pipeline.yaml
tools: []
comic_pipline.yaml
name: comic_pipeline
agent_class: SequentialAgent
description: A sequential pipeline of agents to create a comic book.
sub_agents:
 - config_path: ./scripting_agent.yaml
 - config_path: ./panelization_agent.yaml
 - config_path: ./image_synthesis_agent.yaml
 - config_path: ./assembly_agent.yaml
scripting_agent.yamlname: scripting_agent
model: gemini-2.5-pro
agent_class: LlmAgent
description: Narrative & Character Architect.
instruction: >
 You are the Scripting Agent, a Narrative & Character Architect.

 Your input is a seed idea for a comic.


 **Your Logic:**

 1.  **Create a Character Manifest:** You must define exactly 3 specific,
 unchangeable visual identifiers for every character. For example: "Gretel:
 Blue neon hair ribbons, silver apron, glowing boots". This is mandatory.

 2.  **Expand the Narrative:** Expand the seed idea into a coherent narrative
 arc with dialogue.


 **Output:**

 You must output a JSON object containing:

 - "narrative_script": A detailed script with scenes and dialogue.

 - "character_manifest": The mandatory character visual guide.
sub_agents: []
tools: []
panelization_agent.yamlname: panelization_agent
model: gemini-2.5-pro
agent_class: LlmAgent
description: Cinematographer & Storyboarder.
instruction: >
 You are the Panelization Agent, a Cinematographer & Storyboarder.

 Your input is a narrative script and a character manifest.


 **Your Logic:**

 1.  **Divide the Script:** Divide the script into a specific number of panels.
 The user may define this number, or you should default to 8 panels.

 2.  **Define Composition:** For each panel, you must define a specific
 composition, camera shot (e.g., "Wide shot", "Close-up"), and the dialogue for
 that panel.


 **Output:**

 You must output a JSON object containing a structured list of exactly X panel
 descriptions, where X is the number of panels. Each item in the list should
 have "panel_number", "composition_description", and "dialogue".
sub_agents: []
tools: []
image_synthesis_agent.yaml
name: image_synthesis_agent
model: gemini-2.5-pro
agent_class: LlmAgent
description: Technical Artist & Asset Generator.
instruction: >
 You are the Image Synthesis Agent, a Technical Artist & Asset Generator.

 Your input is a structured list of panel descriptions.


 **Your Logic:**

 1.  **Iterate and Generate:** You must iterate through each panel description
 provided in the input. For each panel, you will execute the `generate_image`
 tool.

 2.  **Construct Prompts:** For each panel, you will construct a detailed
 prompt for the image generation tool. This prompt must strictly enforce the
 character visual identifiers from the manifest and include the global style:
 "vibrant comic book style, heavy ink lines, cel-shaded, 4k". The prompt must
 also describe the composition and include a request for speech bubbles to
 contain the dialogue.

 3.  **Map Output:** You must associate each generated image URL with its
 corresponding panel number and dialogue.


 **Output:**

 You must output a JSON object containing a complete gallery of all generated
 images, mapped to their respective panel data (panel_number, dialogue,
 image_url).
sub_agents: []
tools:
 - name: Agent3.tools.image_generation.generate_image
assembly_agent.yamlname: assembly_agent
model: gemini-2.5-pro
agent_class: LlmAgent
description: Frontend Developer for comic book assembly.
instruction: >
 You are the Assembly Agent, a Frontend Developer.

 Your input is the mapped gallery of images and panel data.


 **Your Logic:**

 1.  **Generate HTML:** You will write a clean, responsive HTML5/CSS3 file to
 display the comic. The comic must be vertically scrollable, with each panel
 displaying its image on top and the corresponding dialogue or description
 below it.

 2.  **Write File:** You must use the `write_comic_html` tool to save the
 generated HTML to a file named `comic.html` in the `output/` folder.

 3.  Pass the list of image URLs to the tool so it can handle the image assets
 correctly.


 **Output:**

 You will output a confirmation message indicating the path to the final HTML
 file.
sub_agents: []
tools:
 - name: Agent3.tools.file_writer.write_comic_html
- ADK (Agent Development Kit) यूज़र इंटरफ़ेस (यूआई) टैब पर जाएं. इसके बाद, "Agent3" को चुनें और बदलाव करें बटन ("पेंसिल वाला आइकॉन") पर क्लिक करें.
- स्क्रीन पर सबसे नीचे बाईं ओर मौजूद, सेव करें बटन पर क्लिक करें. इससे मुख्य एजेंट में किए गए कोड से जुड़े सभी बदलाव सेव हो जाएंगे.
- अब हम अपने एजेंट की जांच शुरू कर सकते हैं!
- मौजूदा ADK (एजेंट डेवलपमेंट किट) यूज़र इंटरफ़ेस (यूआई) टैब को बंद करें और Cloud Shell Editor टैब पर वापस जाएं.
- Cloud Shell Editor टैब में मौजूद टर्मिनल में, सबसे पहले ADK (एजेंट डेवलपमेंट किट) सर्वर को रीस्टार्ट करें. उस टर्मिनल पर जाएं जहां आपने ADK (Agent Development Kit) सर्वर शुरू किया था. अगर सर्वर अब भी चल रहा है, तो उसे बंद करने के लिए CTRL+C दबाएं. सर्वर को फिर से शुरू करने के लिए, यहां दिया गया कोड डालें.
#make sure you are in the right folder.
cd ~/adkui

#start the server
adk web --host 0.0.0.0 --port 8080 --allow_origins "regex:https://.*8080-.*\.cloudshell\.dev"
- यूआरएल पर Ctrl+क्लिक करें (जैसे, http://localhost:8000) दिखता है. ब्राउज़र टैब पर ADK (एजेंट डेवलपमेंट किट) का जीयूआई दिखना चाहिए.
- एजेंट की सूची से Agent3 को चुनें.
- यह प्रॉम्प्ट डालें
Create a Comic Book based on the following story,

Title: The Story of Momotaro

The story of Momotaro (Peach Boy) is one of Japan's most famous and beloved folktales. It is a classic "hero's journey" that emphasizes the virtues of courage, filial piety, and teamwork.

The Miraculous Birth
Long, long ago, in a small village in rural Japan, lived an elderly couple. They were hardworking and kind, but they were sad because they had never been blessed with children.

One morning, while the old woman was washing clothes by the river, she saw a magnificent, giant peach floating downstream. It was larger than any peach she had ever seen. With great effort, she pulled it from the water and brought it home to her husband for their dinner.

As they prepared to cut the fruit open, the peach suddenly split in half on its own. To their astonishment, a healthy, beautiful baby boy stepped out from the pit.

"Don't be afraid," the child said. "The Heavens have sent me to be your son."

Overjoyed, the couple named him Momotaro (Momo meaning peach, and Taro being a common name for an eldest son).

The Call to Adventure
Momotaro grew up to be stronger and kinder than any other boy in the village. During this time, the village lived in fear of the Oni—ogres and demons who lived on a distant island called Onigashima. These Oni would often raid the mainland, stealing treasures and kidnapping villagers.

When Momotaro reached young adulthood, he approached his parents with a request. "I must go to Onigashima," he declared. "I will defeat the Oni and bring back the stolen treasures to help our people."

Though they were worried, his parents were proud. As a parting gift, the old woman prepared Kibi-dango (special millet dumplings), which were said to provide the strength of a hundred men.

Gathering Allies
Momotaro set off on his journey toward the sea. Along the way, he met three distinct animals:

The Spotted Dog: The dog growled at first, but Momotaro offered him one of his Kibi-dango. The dog, tasting the magical dumpling, immediately swore his loyalty.

The Monkey: Further down the road, a monkey joined the group in exchange for a dumpling, though he and the dog bickered constantly.

The Pheasant: Finally, a pheasant flew down from the sky. After receiving a piece of the Kibi-dango, the bird joined the team as their aerial scout.

Momotaro used his leadership to ensure the three animals worked together despite their differences, teaching them that unity was their greatest strength.

The Battle of Onigashima
The group reached the coast, built a boat, and sailed to the dark, craggy shores of Onigashima. The island was guarded by a massive iron gate.

The Pheasant flew over the walls to distract the Oni and peck at their eyes.

The Monkey climbed the walls and unbolted the Great Gate from the inside.

The Dog and Momotaro charged in, using their immense strength to overpower the demons.

The Oni were caught off guard by the coordinated attack. After a fierce battle, the King of the Oni fell to his knees before Momotaro, begging for mercy. He promised to never trouble the villagers again and surrendered all the stolen gold, jewels, and precious silks.

The Triumphant Return
Momotaro and his three companions loaded the treasure onto their boat and returned to the village. The entire town celebrated their homecoming.

Momotaro used the wealth to ensure his elderly parents lived the rest of their lives in comfort and peace. He remained in the village as a legendary protector, and his story was passed down for generations as a reminder that bravery and cooperation can overcome even the greatest evils.
- एजेंट के काम करते समय, Cloud Shell Editor टर्मिनल में इवेंट देखे जा सकते हैं.
- सभी इमेज जनरेट होने में कुछ समय लग सकता है. इसलिए, कृपया इंतज़ार करें या कॉफ़ी का आनंद लें! इमेज जनरेट होने पर, आपको कहानी से जुड़ी इमेज दिखेंगी. जैसे, यहां दी गई इमेज.
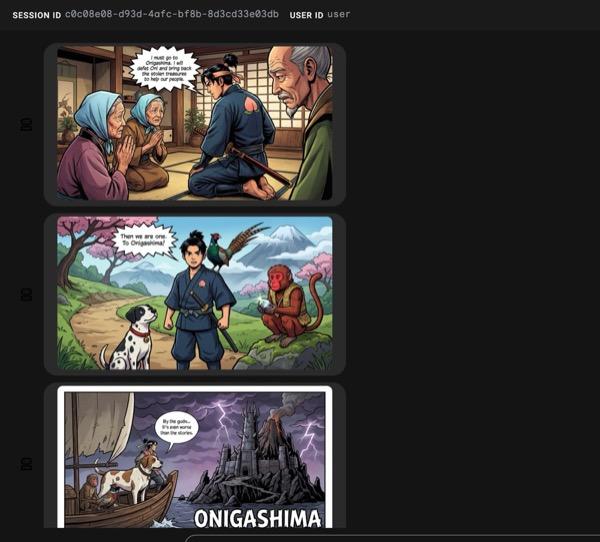
इमेज 33: मोमोटारो की कहानी को कॉमिक स्ट्रिप 25 के तौर पर दिखाया गया है. अगर सब कुछ ठीक से काम करता है, तो जनरेट की गई एचटीएमएल फ़ाइल को एचटीएमएल फ़ोल्डर में सेव किया जाना चाहिए. अगर आपको एजेंट में सुधार करना है, तो एजेंट असिस्टेंट पर वापस जाएं और उससे और बदलाव करने के लिए कहें!
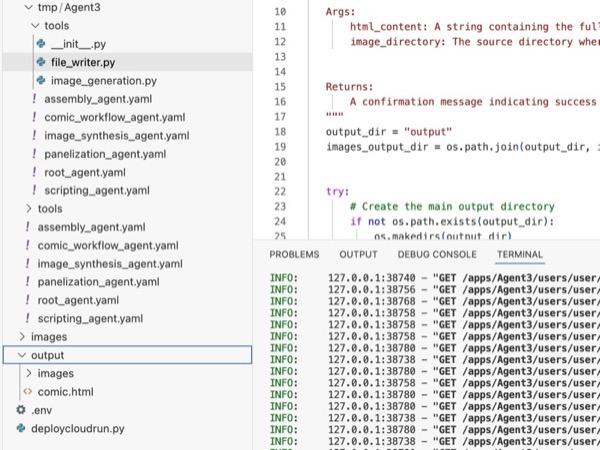
इमेज 34: आउटपुट फ़ोल्डर का कॉन्टेंट
- अगर 25वां चरण सही तरीके से पूरा हो जाता है और आपको output फ़ोल्डर में comic.html मिलता है. इसे आज़माने के लिए, यहां दिया गया तरीका अपनाएं. सबसे पहले, Cloud Shell Editor के मुख्य मेन्यू में जाकर, टर्मिनल>नया टर्मिनल पर क्लिक करके नया टर्मिनल खोलें. इससे एक नया टर्मिनल खुलना चाहिए.
#go to the project folder
cd ~/adkui

#activate python virtual environment
source .venv/bin/activate

#Go to the output folder
cd ~/adkui/output

#start local web server
python -m http.server 8080
- http://0.0.0.0:8080 पर Ctrl+क्लिक करें

35वां डायग्राम: लोकल वेब सर्वर चल रहा है
- फ़ोल्डर का कॉन्टेंट, ब्राउज़र टैब में दिखना चाहिए. एचटीएमएल फ़ाइल (et. comic.html) पर क्लिक करें. कॉमिक को इस तरह से दिखाया जाना चाहिए (आपका आउटपुट थोड़ा अलग हो सकता है).
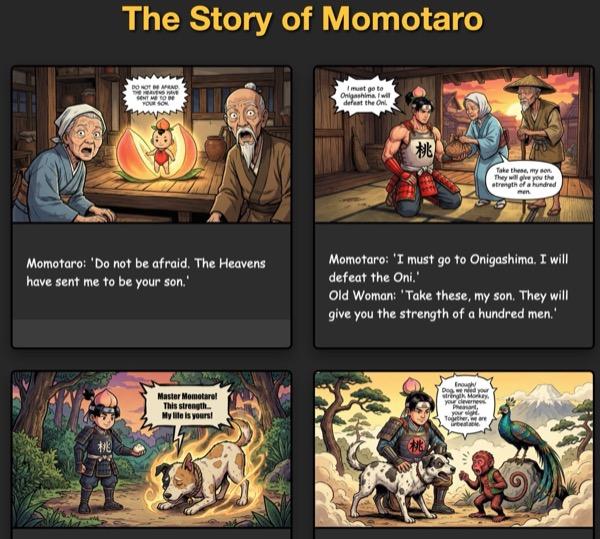
इमेज 36: लोकल होस्ट पर चल रहा है
11. व्यवस्थित करें
अब हम अभी-अभी बनाए गए कॉन्टेंट को साफ़ करते हैं.
- हमने अभी जो Cloud Run ऐप्लिकेशन बनाया है उसे मिटाओ. Cloud Run को ऐक्सेस करके, Cloud Run पर जाएं . आपको पिछले चरण में बनाया गया ऐप्लिकेशन दिखना चाहिए. ऐप्लिकेशन के बगल में मौजूद बॉक्स पर सही का निशान लगाएं. इसके बाद, 'मिटाएं' बटन पर क्लिक करें.
 इमेज 37: Cloud Run ऐप्लिकेशन 2 को मिटाना. Cloud Shell में मौजूद फ़ाइलें मिटाएं
#Execute the following to delete the files
cd ~
rm -R ~/adkui
12. नतीजा
बधाई हो! आपने ADK विज़ुअल बिल्डर का इस्तेमाल करके, ADK (एजेंट डेवलपमेंट किट) एजेंट बना लिए हैं. आपने ऐप्लिकेशन को Cloud Run पर डिप्लॉय करने का तरीका भी सीखा. यह एक अहम उपलब्धि है. इसमें क्लाउड-नेटिव ऐप्लिकेशन के मुख्य लाइफ़साइकल को शामिल किया गया है. इससे आपको अपने जटिल एजेंटिक सिस्टम को डिप्लॉय करने के लिए एक मज़बूत आधार मिलता है.
रीकैप
इस लैब में, आपने इनके बारे में सीखा:
- ADK विज़ुअल बिल्डर का इस्तेमाल करके मल्टी एजेंट ऐप्लिकेशन बनाना
- ऐप्लिकेशन को Cloud Run पर डिप्लॉय करें
काम के संसाधन