
1. Obiettivo di questo lab
In questo lab pratico imparerai a creare agenti utilizzando il builder ADK (Agent Development Kit) Visual. ADK (Agent Development Kit) Visual Builder offre un modo low-code per creare agenti ADK (Agent Development Kit). Imparerai a testare l'applicazione localmente e a eseguirne il deployment in Cloud Run.
Obiettivi didattici
- Comprendere le nozioni di base di ADK (Agent Development Kit) .
- Comprendere le nozioni di base del builder ADK (Agent Development Kit) Visual
- Scopri come creare agenti utilizzando gli strumenti GUI.
- Scopri come eseguire facilmente il deployment e utilizzare gli agenti in Cloud Run.
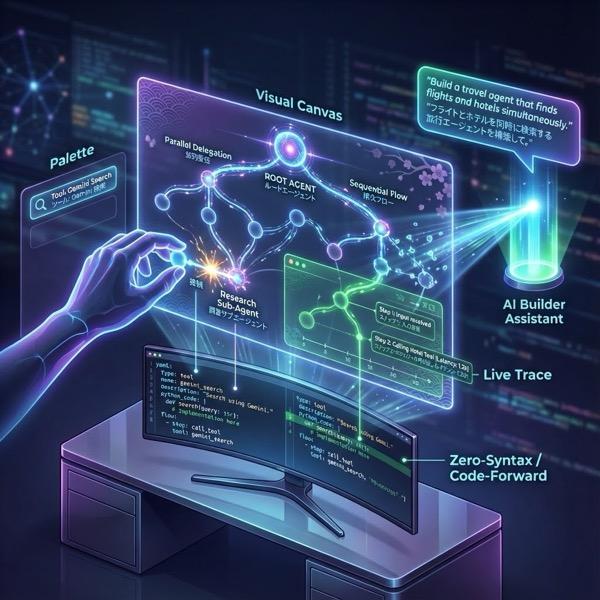
Figura 1: con ADK Visual Builder puoi creare agenti utilizzando la GUI con poco codice
2. Configurazione del progetto
- Se non hai già un progetto che puoi utilizzare, dovrai crearne uno nuovo nella console GCP. Seleziona il progetto nel selettore di progetti (in alto a sinistra nella console Google Cloud)
Figura 2: facendo clic sulla casella accanto al logo Google Cloud puoi selezionare il progetto. Assicurati che il progetto sia selezionato.
- In questo lab utilizzeremo l'editor di Cloud Shell per svolgere le nostre attività. Apri Cloud Shell e imposta il progetto utilizzando Cloud Shell.
- Fai clic su questo link per andare direttamente all'editor di Cloud Shell.
- Apri il terminale se non è già aperto facendo clic su Terminale > Nuovo terminale dal menu. Puoi eseguire tutti i comandi di questo tutorial in questo terminale.
- Puoi verificare se il progetto è già autenticato utilizzando il seguente comando nel terminale Cloud Shell.
gcloud auth list
- Esegui questo comando in Cloud Shell per confermare il tuo progetto
gcloud config list project
- Copia l'ID progetto e utilizza il seguente comando per impostarlo
gcloud config set project <YOUR_PROJECT_ID>
- Se non ricordi l'ID progetto, puoi elencare tutti i tuoi ID progetto con
gcloud projects list
3. Abilita API
Per eseguire questo lab, dobbiamo abilitare alcuni servizi API. Esegui questo comando in Cloud Shell.
gcloud services enable aiplatform.googleapis.com
gcloud services enable cloudresourcemanager.googleapis.com
Ti presentiamo le API
- L'API Vertex AI (
aiplatform.googleapis.com) consente l'accesso alla piattaforma Vertex AI , consentendo alla tua applicazione di interagire con i modelli Gemini per la generazione di testo, le sessioni di chat e la chiamata di funzioni. - L'API Cloud Resource Manager (
cloudresourcemanager.googleapis.com) ti consente di gestire in modo programmatico i metadati dei tuoi progetti Google Cloud, come l'ID progetto e il nome, spesso richiesti da altri strumenti e SDK per verificare l'identità e le autorizzazioni del progetto.
4. Conferma se i tuoi crediti sono stati applicati
Nella fase di configurazione del progetto hai richiesto i crediti senza costi che ti consentono di utilizzare i servizi in Google Cloud. Quando applichi i crediti, viene creato un nuovo account di fatturazione senza costi denominato "Account di fatturazione di prova di Google Cloud Platform". Per assicurarti che i crediti siano stati applicati, segui questi passaggi nell'editor di Cloud Shell:
curl -s https://raw.githubusercontent.com/haren-bh/gcpbillingactivate/main/activate.py | python3
Se l'operazione va a buon fine, dovresti visualizzare il risultato come di seguito: se vedi "Progetto collegato correttamente", il tuo account di fatturazione è impostato correttamente. Se esegui il passaggio precedente, puoi controllare se il tuo account è collegato. In caso contrario, verrà collegato automaticamente. Se non hai selezionato il progetto, ti verrà chiesto di sceglierne uno oppure puoi farlo in anticipo seguendo i passaggi di configurazione del progetto. 
Figura 3: conferma del collegamento dell'account di fatturazione
5. Introduzione ad Agent Development Kit
Agent Development Kit offre diversi vantaggi chiave per gli sviluppatori che creano applicazioni agentiche:
- Sistemi multi-agente: crea applicazioni modulari e scalabili componendo più agenti specializzati in una gerarchia. Consente una coordinazione e una delega complesse.
- Ecosistema di strumenti avanzati: dota gli agenti di diverse funzionalità: utilizza strumenti predefiniti (Ricerca, Esecuzione di codice e così via), crea funzioni personalizzate, integra strumenti di framework di agenti di terze parti (LangChain, CrewAI) o utilizza altri agenti come strumenti.
- Orchestrazione flessibile: definisci i flussi di lavoro utilizzando gli agenti del flusso di lavoro (
SequentialAgent,ParallelAgenteLoopAgent) per pipeline prevedibili oppure sfrutta il routing dinamico basato su LLM (trasferimentoLlmAgent) per un comportamento adattivo. - Esperienza per sviluppatori integrata: sviluppa, testa ed esegui il debug in locale con una potente CLI e una UI di sviluppo interattiva. Esamina gli eventi, lo stato e l'esecuzione dell'agente passo dopo passo.
- Valutazione integrata: valuta sistematicamente le prestazioni dell'agente valutando sia la qualità della risposta finale sia la traiettoria di esecuzione passo passo rispetto a scenari di test predefiniti.
- Pronto per il deployment: inserisci i tuoi agenti in un container ed esegui il deployment ovunque: esegui localmente, esegui lo scale con Vertex AI Agent Engine o esegui l'integrazione in un'infrastruttura personalizzata utilizzando Cloud Run o Docker.
Sebbene altri SDK di AI generativa o framework di agenti ti consentano anche di eseguire query sui modelli e persino di potenziarli con strumenti, il coordinamento dinamico tra più modelli richiede un notevole impegno da parte tua.
L'Agent Development Kit offre un framework di livello superiore rispetto a questi strumenti, consentendoti di connettere facilmente più agenti tra loro per workflow complessi ma facili da gestire.
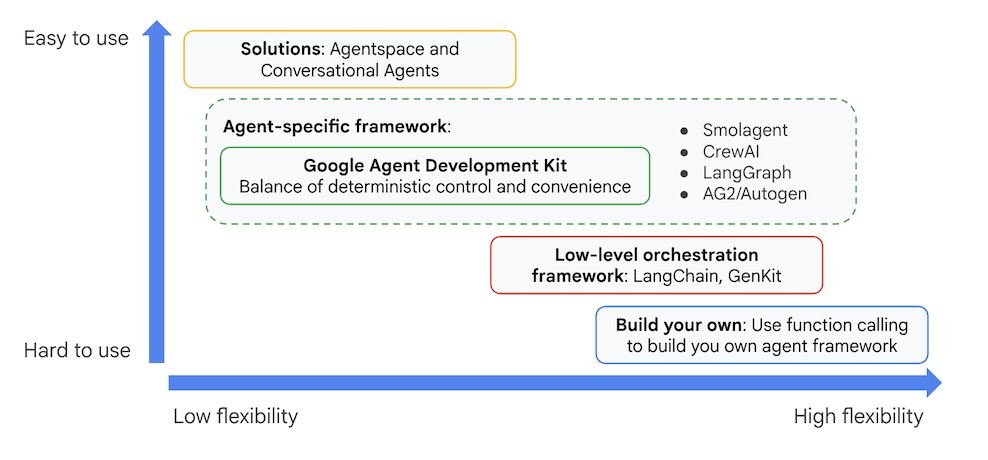
Figura 4: posizionamento di ADK (Agent Development Kit)
Nelle versioni recenti è stato aggiunto uno strumento ADK Visual Builder all'ADK (Agent Development Kit) che consente di creare agenti ADK (Agent Development Kit) con poco codice. In questo lab esploreremo in dettaglio lo strumento ADK Visual Builder.
6. Installa ADK e configura l'ambiente
Innanzitutto, dobbiamo impostare l'ambiente in modo da poter eseguire ADK (Agent Development Kit). In questo lab eseguiremo ADK (Agent Development Kit) ed eseguiremo tutte le attività in Google Cloud in Cloud Shell Editor .
Prepara un editor di Cloud Shell
- Fai clic su questo link per andare direttamente all'editor di Cloud Shell.
- Fai clic su Continua.
- Quando ti viene chiesto di autorizzare Cloud Shell, fai clic su Autorizza.
- Per il resto del lab, puoi lavorare in questa finestra come IDE con l'editor di Cloud Shell e il terminale Cloud Shell.
- Apri un nuovo terminale utilizzando Terminale > Nuovo terminale nell'editor di Cloud Shell. Tutti i comandi riportati di seguito verranno eseguiti su questo terminale.
Avviare l'editor visivo ADK
- Esegui i seguenti comandi per clonare l'origine necessaria da GitHub e installare le librerie necessarie. Esegui i comandi nel terminale aperto nell'editor di Cloud Shell.
#create the project directory
mkdir ~/adkui
cd ~/adkui
- Utilizzeremo uv per creare l'ambiente Python (esegui nel terminale dell'editor di Cloud Shell):
#Install uv if you do not have installed yet
pip install uv

#go to the project directory
cd ~/adkui

#Create the virtual environment
uv venv


#use the newly created environment
source .venv/bin/activate

#install libraries
uv pip install google-adk==1.22.1
uv pip install python-dotenv
Nota: se devi riavviare il terminale, assicurati di impostare l'ambiente Python eseguendo "source .venv/bin/activate".
- Nell'editor, vai a Visualizza > Attiva/disattiva file nascosti. Nella cartella adkui crea un file .env con il seguente contenuto.
#go to adkui folder
cd ~/adkui
cat <<EOF>> .env
GOOGLE_GENAI_USE_VERTEXAI=1
GOOGLE_CLOUD_PROJECT=$(gcloud config get-value project)
GOOGLE_CLOUD_LOCATION=us-central1
IMAGEN_MODEL="imagen-3.0-generate-002"
GENAI_MODEL="gemini-2.5-flash"
EOF
7. Crea un agente semplice con ADK Visual Builder
In questa sezione creeremo un agente semplice utilizzando ADK Visual Builder.ADK Visual Builder è uno strumento basato sul web che fornisce un ambiente di progettazione del flusso di lavoro visivo per creare e gestire agenti ADK (Agent Development Kit). Ti consente di progettare, creare e testare i tuoi agenti in un'interfaccia grafica adatta ai principianti e include un assistente basato sull'AI per aiutarti a creare agenti.
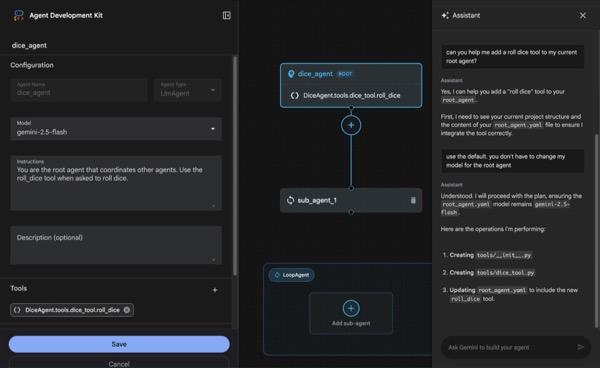
Figura 5: ADK Visual Builder
- Torna alla directory principale adkui nel terminale ed esegui questo comando per eseguire l'agente in locale (esegui nel terminale dell'editor di Cloud Shell). Dovresti essere in grado di avviare il server ADK e visualizzare risultati simili a quelli della Figura 6 nel terminale.
#go to the directory adkui
cd ~/adkui
# Run the following command to run ADK locally
adk web
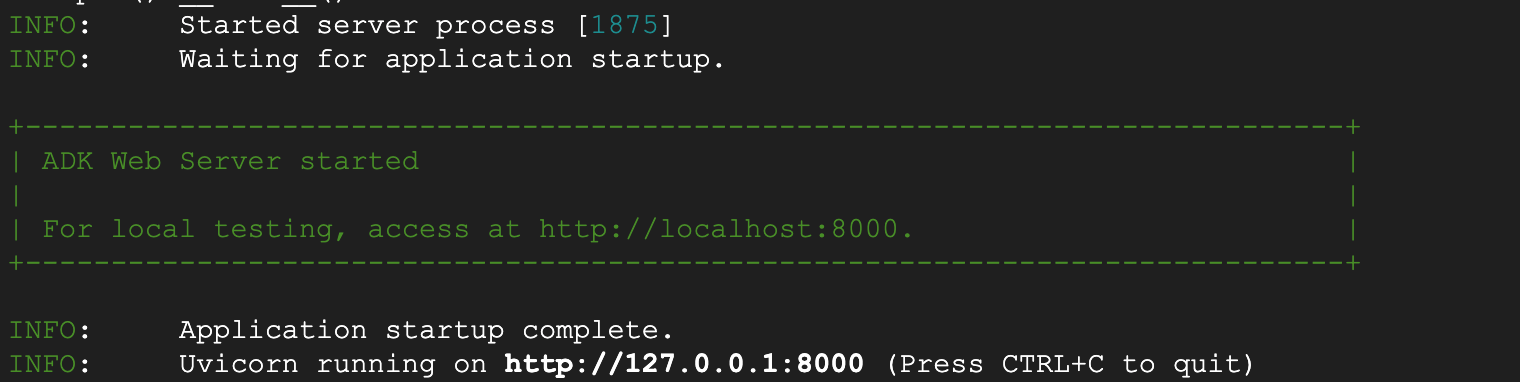
Figura 6: avvio dell'applicazione ADK
- Ctrl+Click (CMD+Click per MacOS) sull'URL http:// visualizzato nel terminale per aprire lo strumento GUI basato su browser ADK (Agent Development Kit).
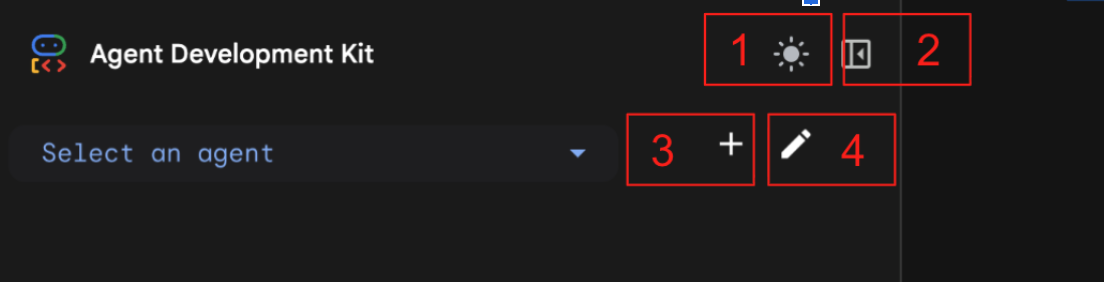
Figura 7: UI web di ADK, ADK ha i seguenti componenti 1: Attiva/disattiva modalità chiara e scura 2: Comprimi riquadro 3: Crea agente 4: Modifica e agente
- Per creare un nuovo agente, premi il pulsante "+".
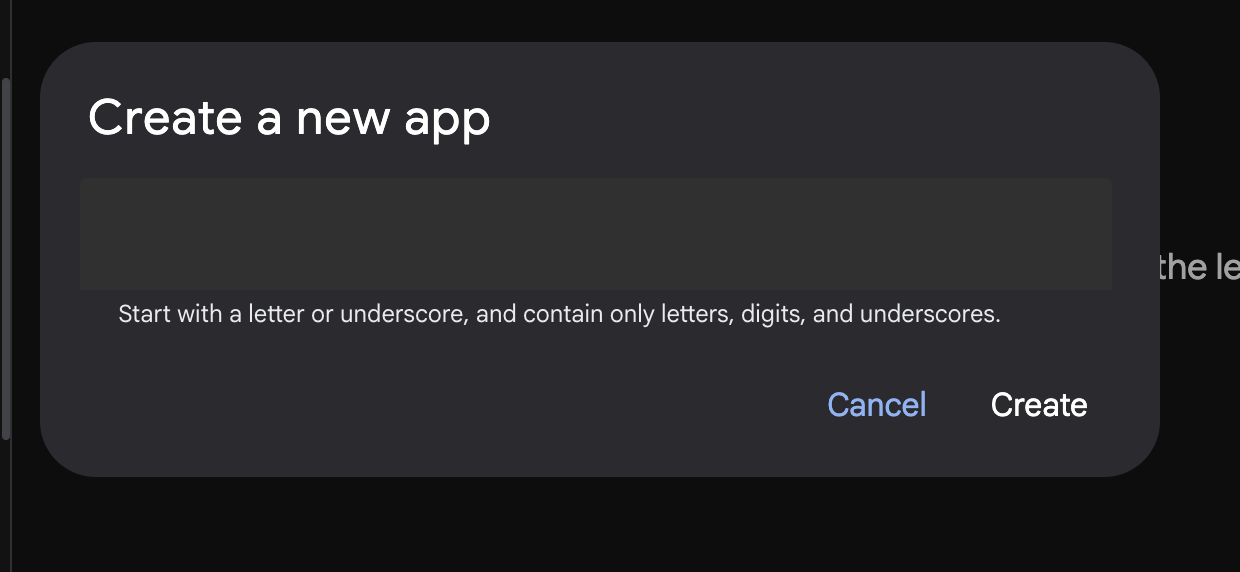
Figura 8: finestra di dialogo per creare una nuova app
- Assegna il nome "Agente1" e fai clic su Crea.
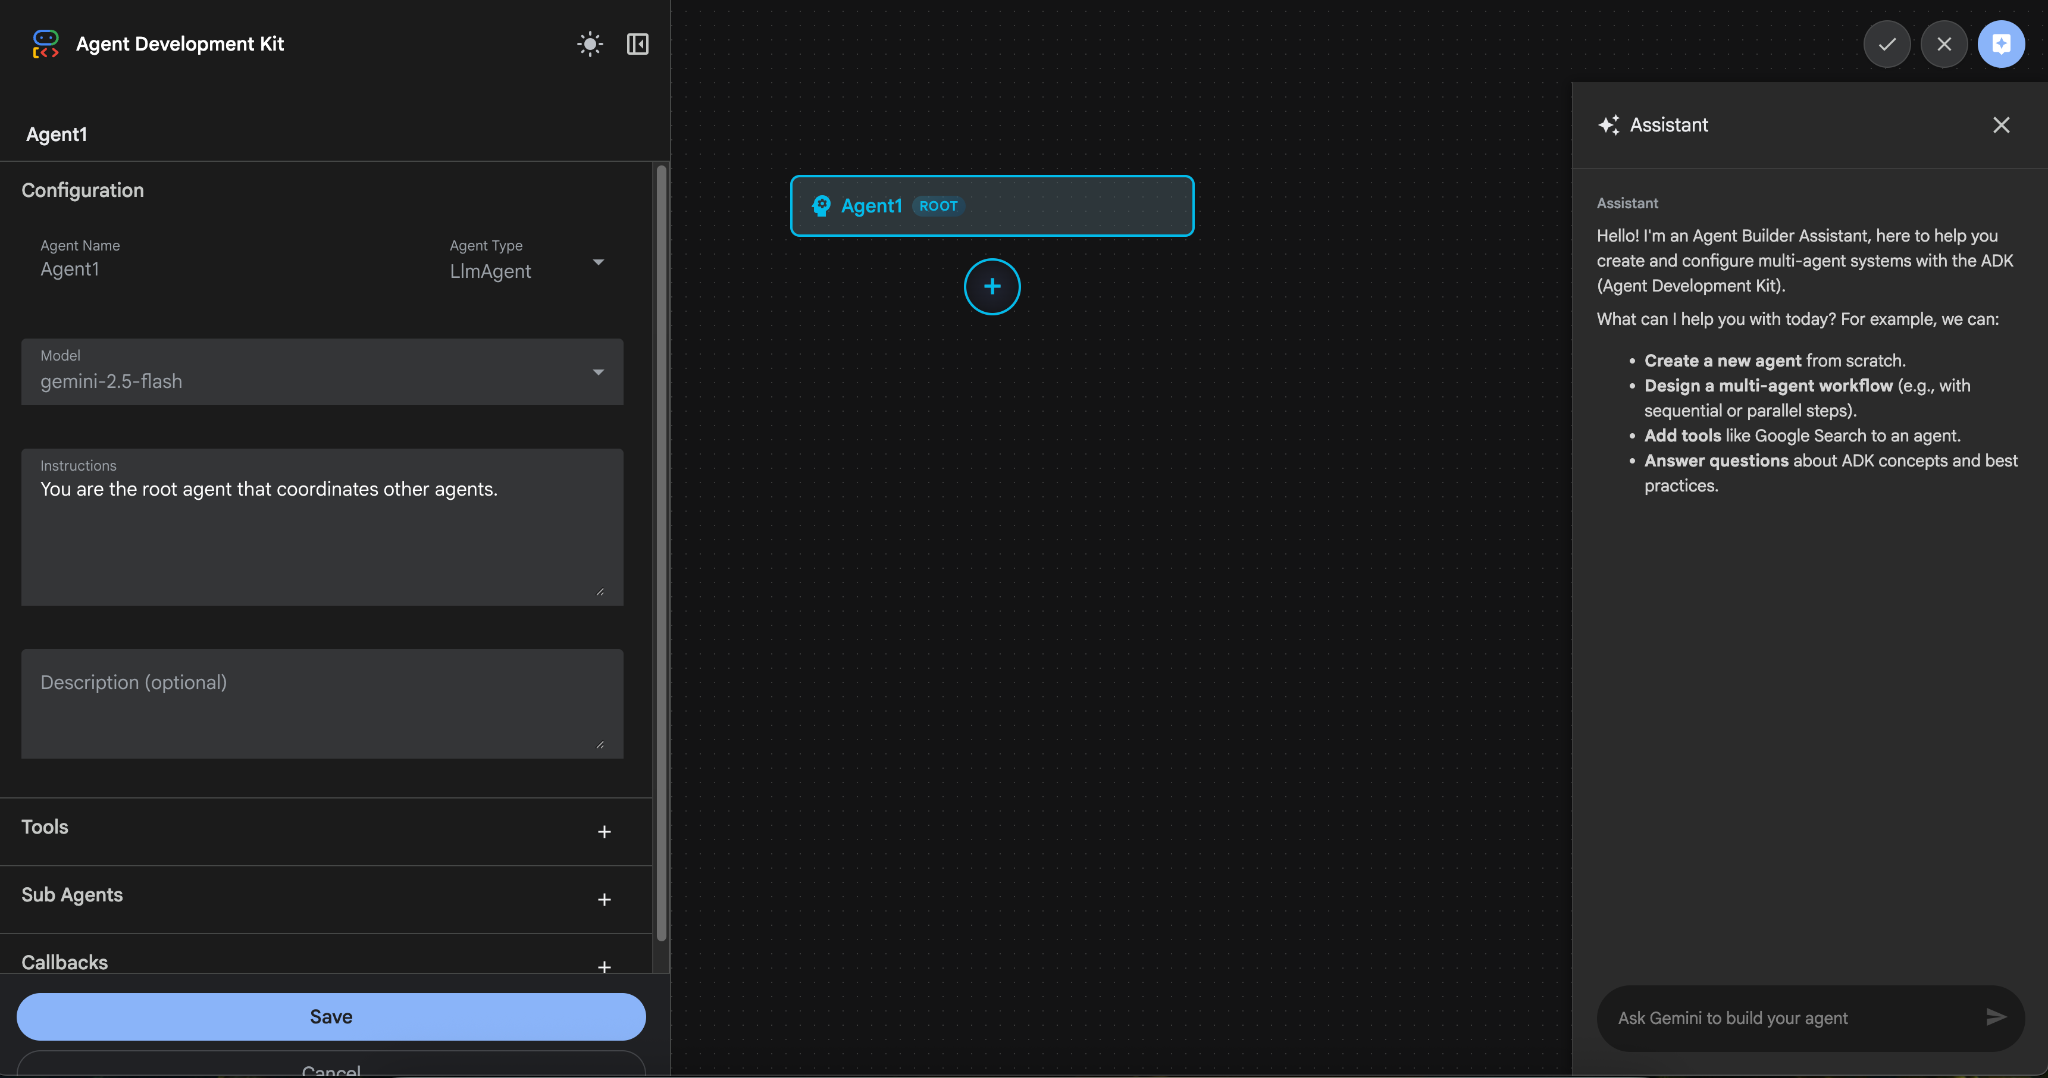
Figura 9: UI per la creazione di agenti
- Il pannello è suddiviso in tre sezioni principali: il lato sinistro contiene i controlli per la creazione di agenti basati su GUI, il centro fornisce una visualizzazione dei tuoi progressi e il lato destro contiene l'assistente per la creazione di agenti utilizzando il linguaggio naturale.
- L'agente è stato creato. Fai clic sul pulsante Salva per procedere. (Nota: per evitare di perdere le modifiche, è essenziale premere Salva.)
- L'agente dovrebbe ora essere pronto per i test. Per iniziare, inserisci un prompt nella casella Chat, ad esempio:
Hi, what can you do?
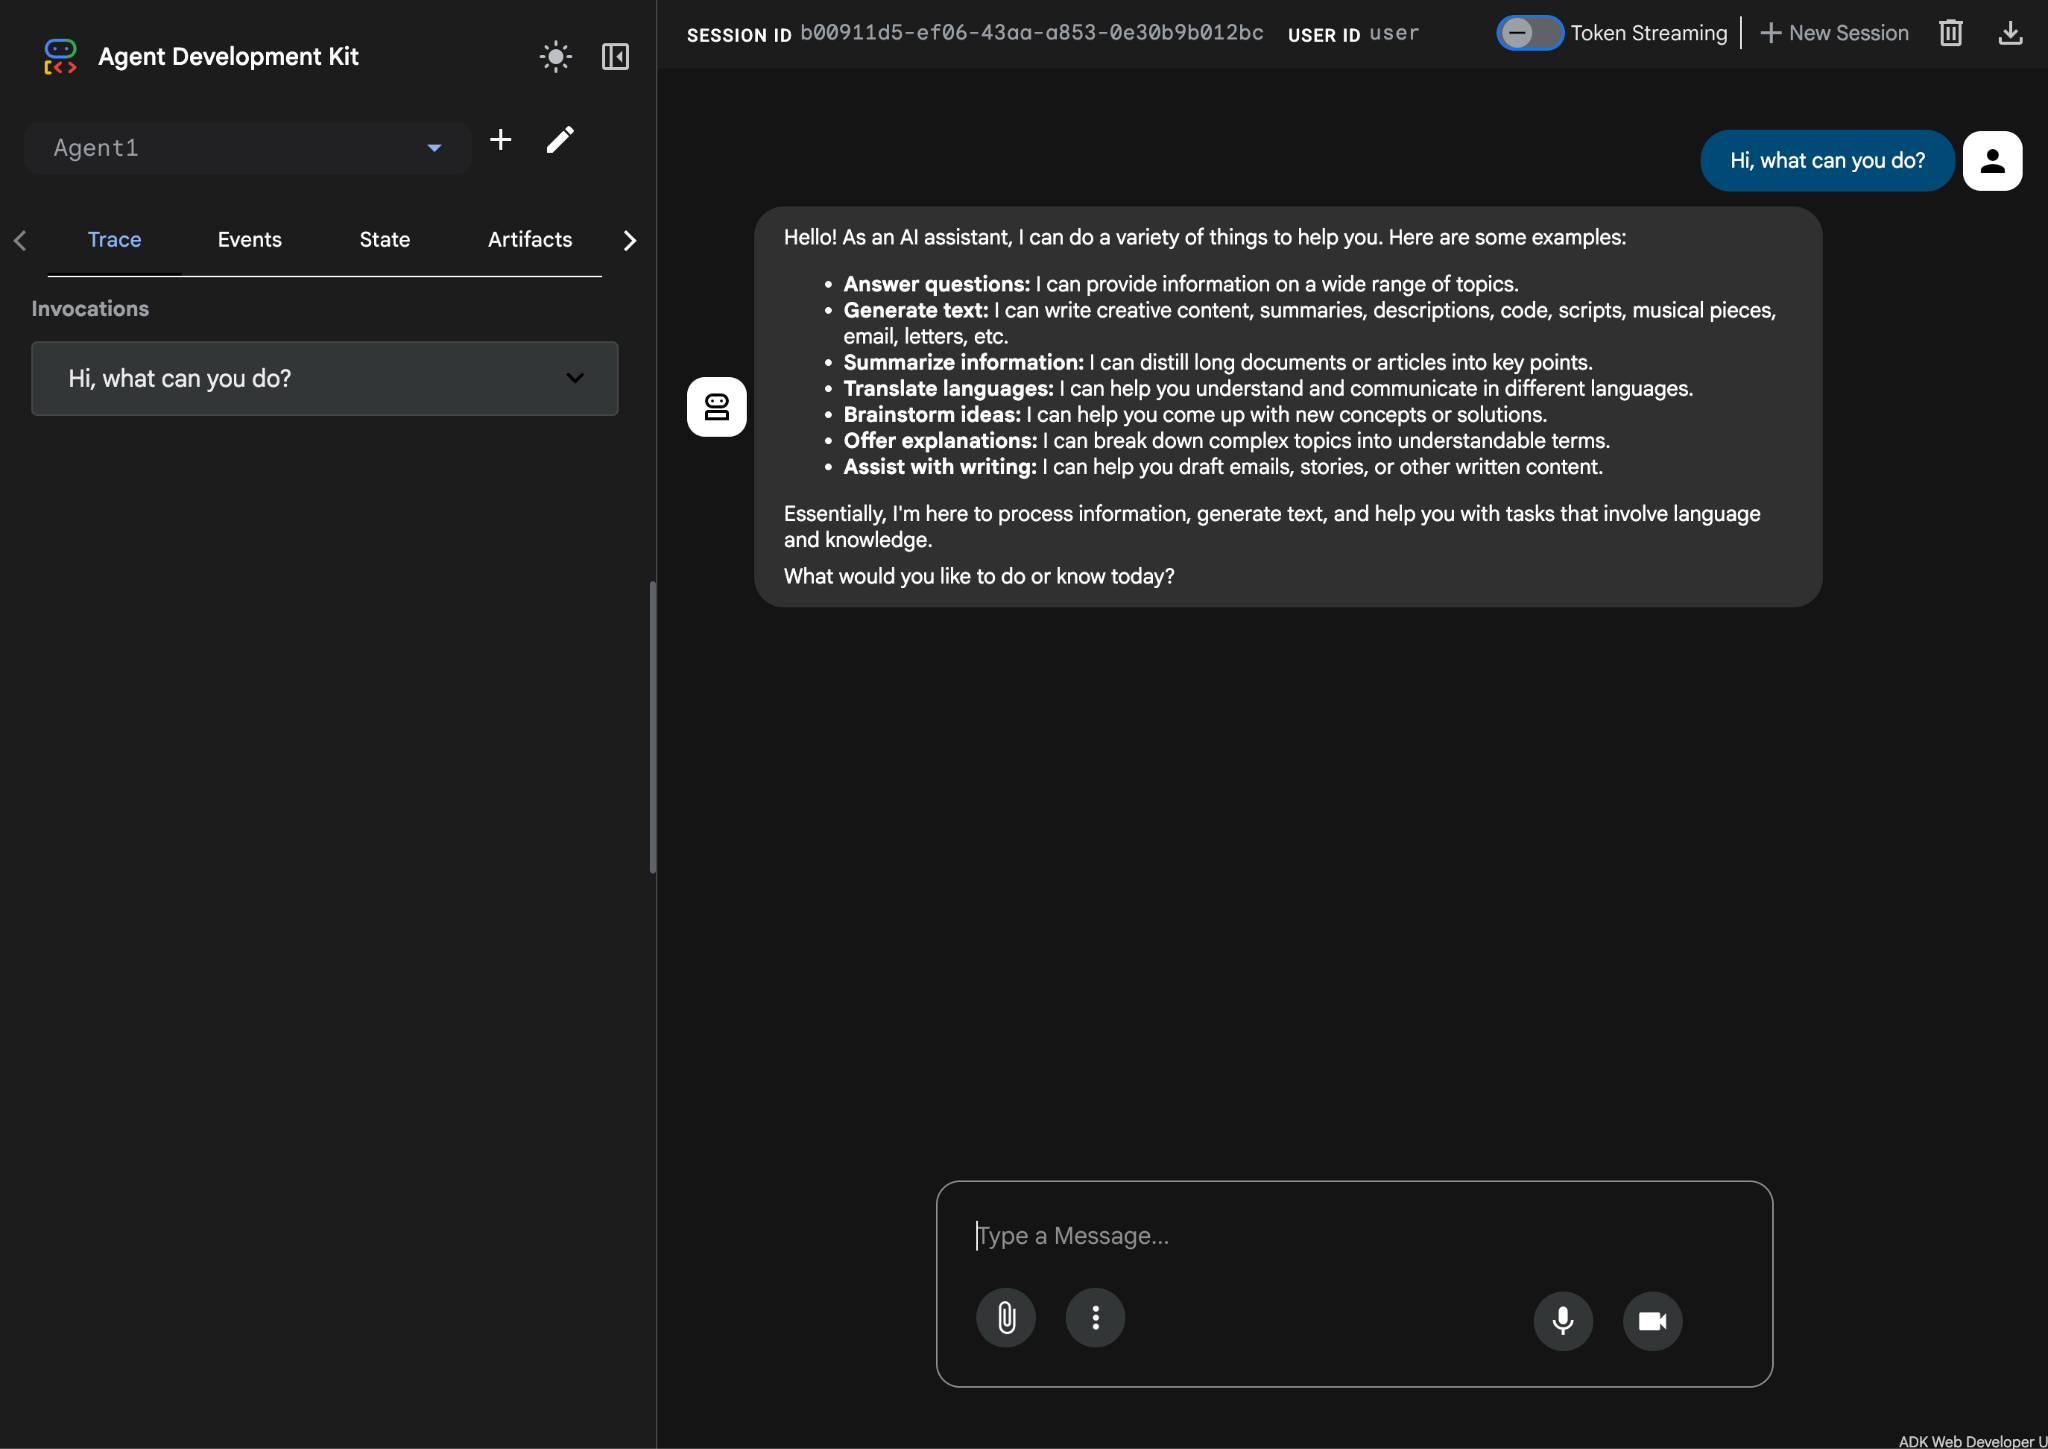
Figura 10: test dell'agente.
7.Tornando all'editor, esaminiamo i file appena generati. Troverai l'explorer sul lato sinistro. Vai alla cartella adkgui ed espandila per visualizzare la directory Agent 1. Nella cartella puoi controllare il file YAML che definisce l'agente, come illustrato nella figura seguente.
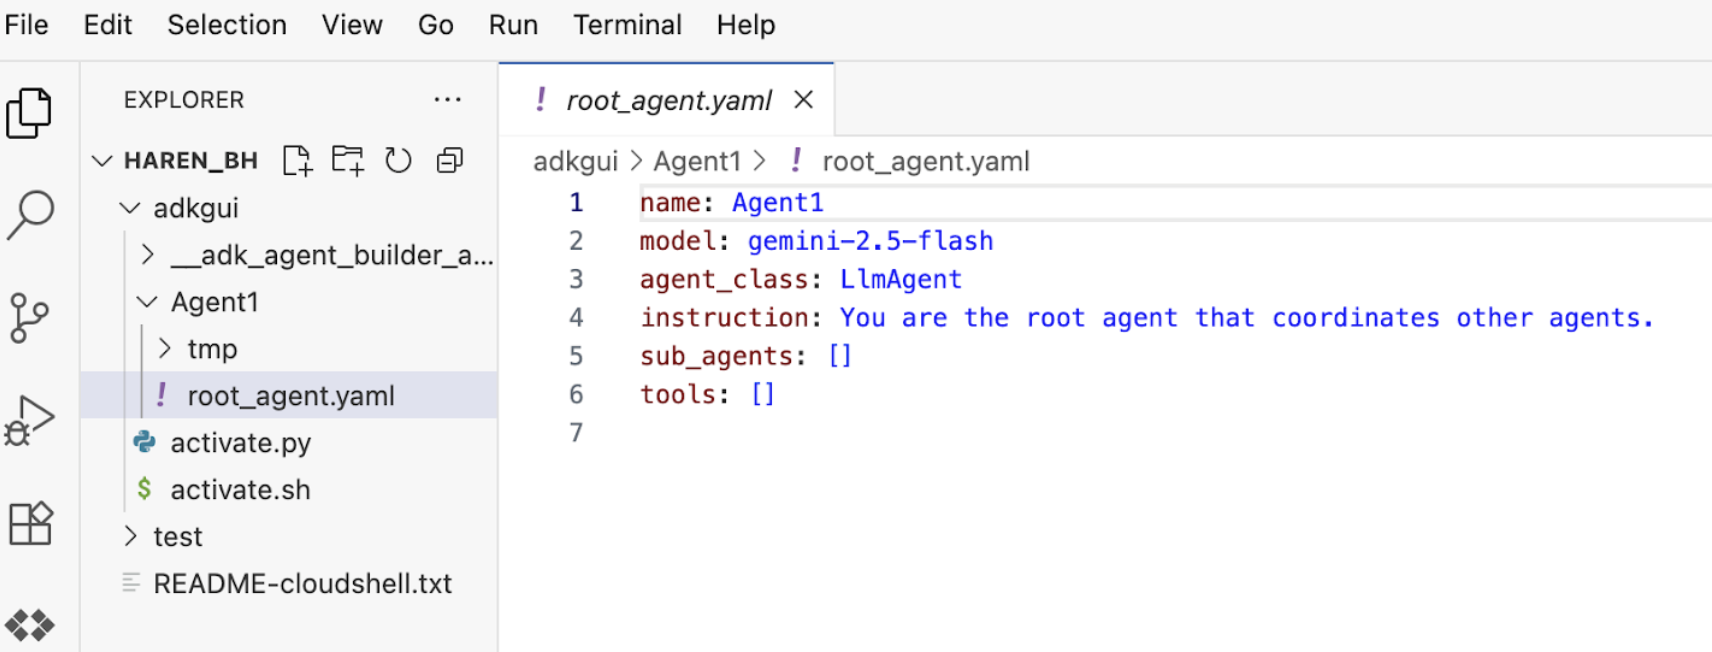
Figura 11: Definizione dell'agente utilizzando il file YAML
- Ora torniamo all'editor GUI e aggiungiamo alcune funzionalità all'agente. Per farlo, premi il pulsante di modifica (vedi Figura 7, componente numero 4, icona a forma di penna).
- Aggiungeremo una funzionalità di Ricerca Google all'agente. Per farlo, dobbiamo aggiungere la Ricerca Google come strumento disponibile per l'agente e che può essere utilizzato. Per farlo, fai clic sul segno "+" accanto alla sezione Strumenti in basso a sinistra dello schermo e fai clic su Strumento integrato dal menu (vedi Figura 12).
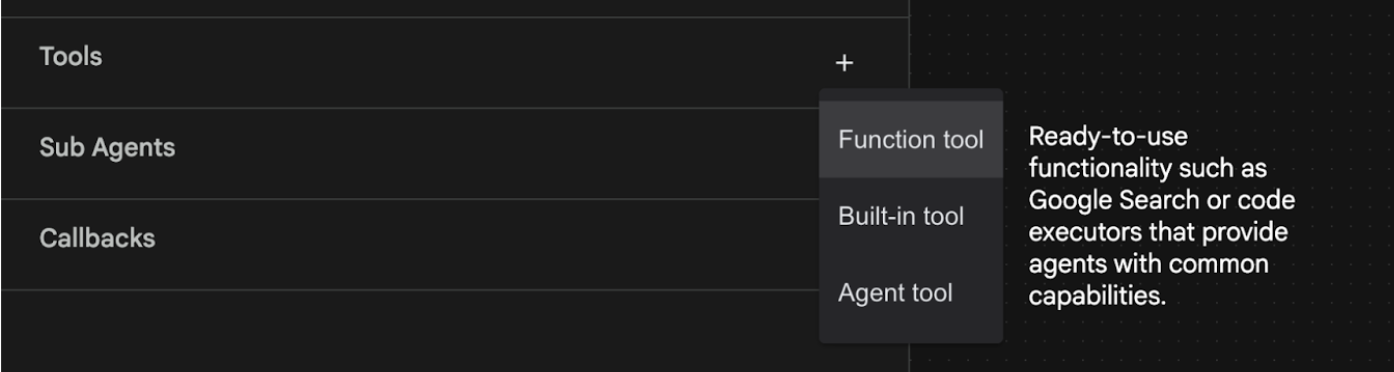
Figura 12: aggiunta di un nuovo strumento a un agente
- Dall'elenco di Strumento integrato, seleziona google_search e fai clic su Crea (vedi Figura 12). In questo modo, la Ricerca Google verrà aggiunta come strumento nel tuo agente.
- Premi il pulsante Salva per salvare le modifiche.
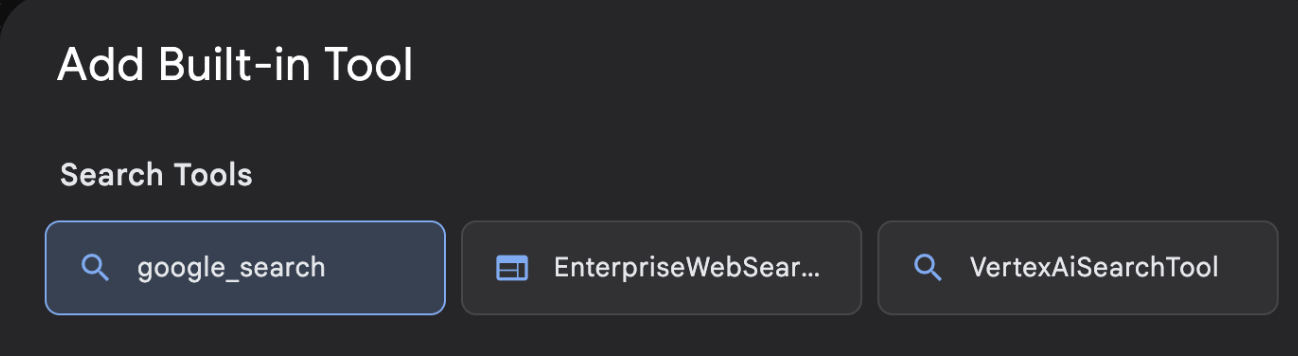
Figura 13: Elenco degli strumenti disponibili nell'interfaccia utente di ADK Visual Builder
- Ora puoi testare l'agente. Innanzitutto, riavvia il server ADK. Vai al terminale in cui hai avviato il server ADK (Agent Development Kit) e premi Ctrl+C per arrestare il server se è ancora in esecuzione. Esegui il comando seguente per riavviare il server.
#make sure you are in the right folder.
cd ~/adkui

#start the server
adk web
- Ctrl+Click sull'URL (ad es. http://localhost:8000) visualizzato sullo schermo. La GUI di ADK (Agent Development Kit) dovrebbe essere visualizzata nella scheda del browser.
- Seleziona Agent1 dall'elenco degli agenti. Il tuo agente ora può eseguire la Ricerca Google. Nella casella di chat, prova con il seguente prompt.
What is the weather today in Yokohama?
Dovresti vedere la risposta della Ricerca Google come di seguito. 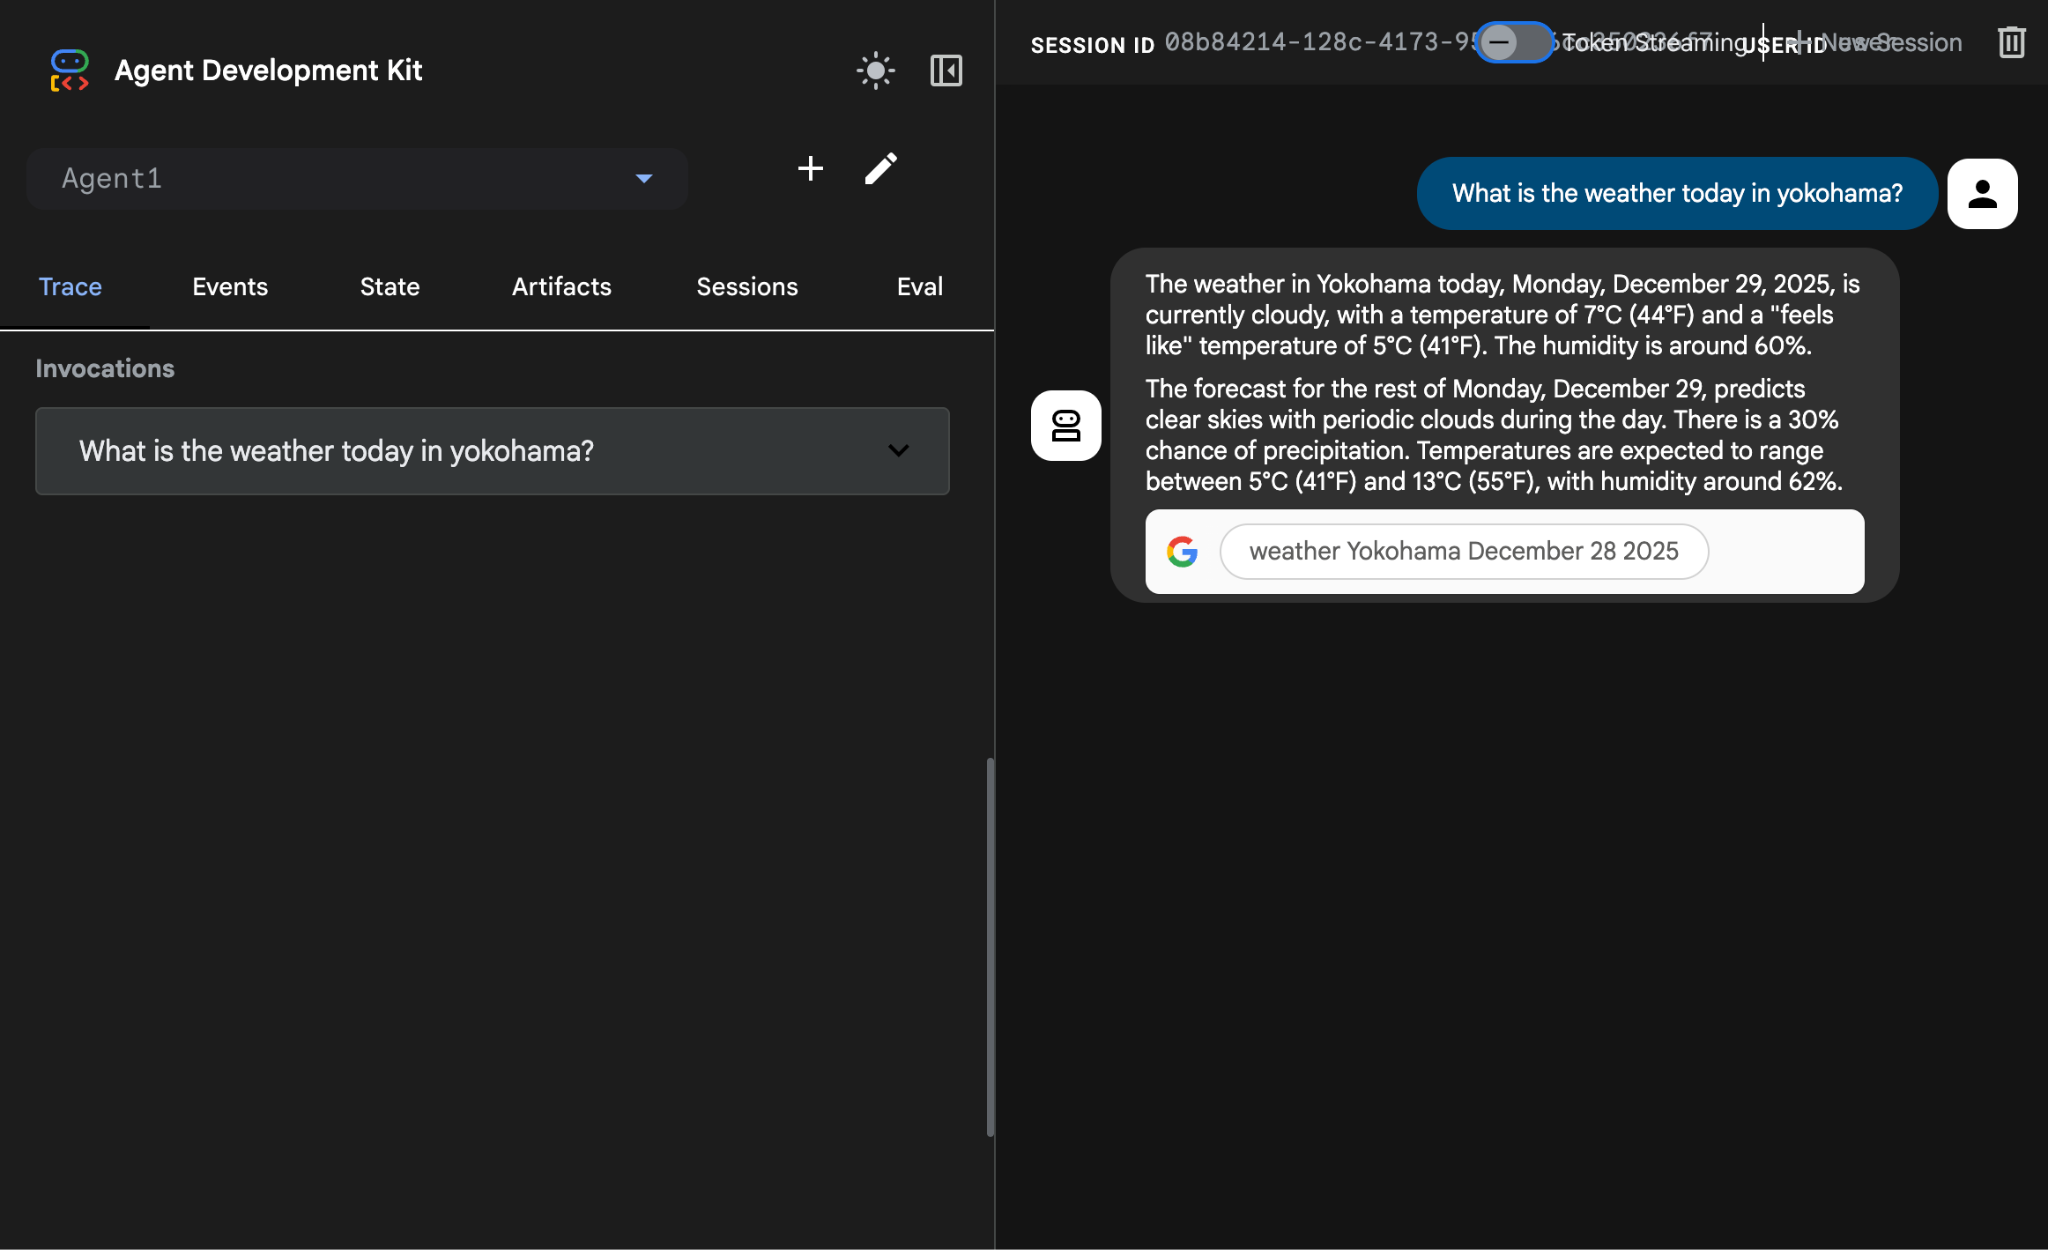
Figura 14: Ricerca Google con l'agente
- Ora torniamo all'editor e controlliamo il codice creato in questo passaggio. Nel riquadro laterale Explorer dell'editor, fai clic su root_agent.yaml per aprirlo. Verifica che google_search sia stato aggiunto come strumento (Figura 15).
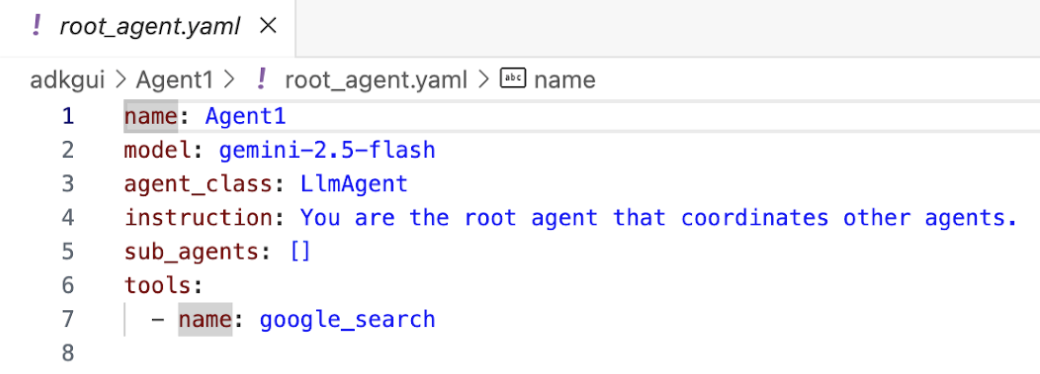
Figura 15: conferma che google_search è stato aggiunto come strumento in Agent1
8. Esegui il deployment dell'agente in Cloud Run
Ora eseguiamo il deployment dell'agente creato in Cloud Run. Con Cloud Run puoi creare rapidamente app o siti web su una piattaforma completamente gestita.
Puoi eseguire servizi di frontend e backend, job batch, LLM host e carichi di lavoro di elaborazione in coda senza dover gestire l'infrastruttura.
Nel terminale dell'editor di Cloud Shell, se è ancora in esecuzione il server dell'ADK (Agent Development Kit), premi Ctrl+C per arrestarlo.
- Vai alla directory principale del progetto.
cd ~/adkui
- Recupera il codice di deployment. Dopo aver eseguito il comando, dovresti vedere il file deploycloudrun.py nel riquadro Explorer dell'editor di Cloud Shell.
curl -LO https://raw.githubusercontent.com/haren-bh/codelabs/main/adk_visual_builder/deploycloudrun.py
- Controlla le opzioni di deployment in deploycloudrun.py. Utilizzeremo il comando adk deploy per eseguire il deployment del nostro agente su Cloud Run. ADK (Agent Development Kit) ha l'opzione integrata per eseguire il deployment dell'agente su Cloud Run. Dobbiamo specificare i parametri come l'ID progetto Google Cloud, la regione e così via. Per il percorso dell'app, questo script presuppone che agent_path=./Agent1. Creeremo anche un nuovo service account con le autorizzazioni necessarie e lo collegheremo a Cloud Run. Cloud Run ha bisogno di accedere a servizi come Vertex AI e Cloud Storage per eseguire l'agente.
   command = [
        "adk", "deploy", "cloud_run",
        f"--project={project_id}",
        f"--region={location}",
        f"--service_name={service_name}",
        f"--app_name={app_name}",
        f"--artifact_service_uri=memory://",
        f"--with_ui",
        agent_path,
        f"--",
        f"--service-account={sa_email}",
    ]
- Esegui lo script deploycloudrun.py. L'implementazione dovrebbe iniziare come mostrato nella figura seguente.**
python3 deploycloudrun.py
Se ricevi il messaggio di conferma come quello riportato di seguito, premi Y e Invio per tutti i messaggi. Il file depoycloudrun.py presuppone che l'agente si trovi nella cartella Agent1 come creato sopra.

Figura 16: esecuzione del deployment dell'agente in Cloud Run, premi Y per eventuali messaggi di conferma.
- Una volta completato il deployment, dovresti visualizzare l'URL del servizio, ad esempio https://agent1service-78833623456.us-central1.run.app
- Accedi all'URL nel browser web per avviare l'app.
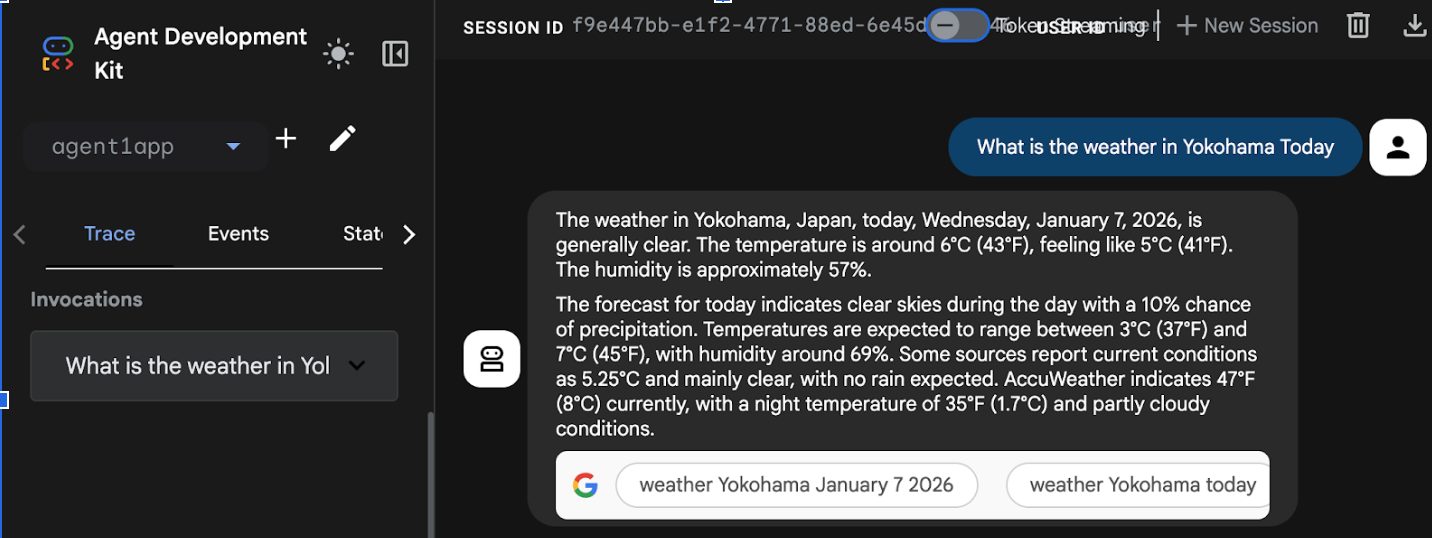
Figure 17: Agent running in Cloud Run
9. Crea un agente con un sub-agente e uno strumento personalizzato
Nella sezione precedente hai creato un singolo agente con uno strumento di ricerca Google integrato. In questa sezione creerai un sistema multi-agente in cui consentiremo agli agenti di utilizzare gli strumenti personalizzati.
- Innanzitutto, riavvia il server ADK (Agent Development Kit). Vai al terminale in cui hai avviato il server ADK (Agent Development Kit) e premi Ctrl+C per arrestare il server se è ancora in esecuzione. Esegui il comando seguente per riavviare il server.
#make sure you are in the right folder.
cd ~/adkui

#start the server
adk web
- Ctrl+Click sull'URL (ad es. http://localhost:8000) visualizzato sullo schermo. La GUI di ADK (Agent Development Kit) dovrebbe essere visualizzata nella scheda del browser.
- Fai clic sul pulsante "+" per creare un nuovo agente. Nella finestra di dialogo dell'agente, inserisci "Agent2" (Figura 18) e fai clic su "Crea".
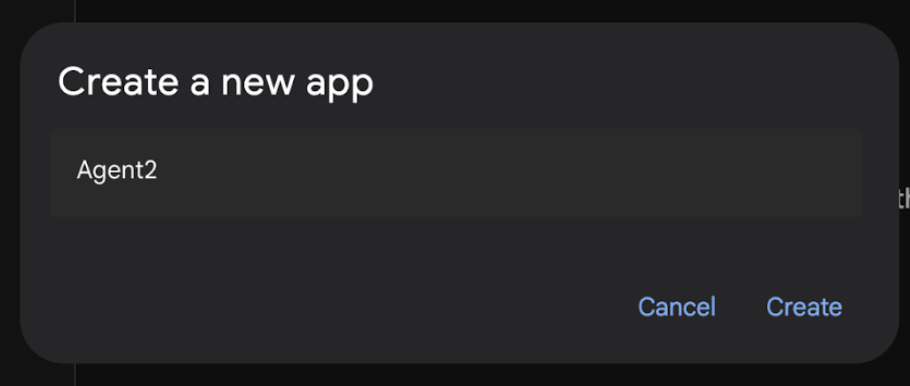
Figura 18: creazione di una nuova app agente.
- Nella sezione delle istruzioni di Agent2, inserisci quanto segue.
You are an agent that takes image creation instruction from the user and passes it to your sub agent
- Ora aggiungeremo un sub-agente all'agente principale. Per farlo, fai clic sul pulsante "+" a sinistra del menu Agente secondario nella parte inferiore del riquadro a sinistra (Figura 19) e fai clic su "Agente LLM". Verrà creato un nuovo agente come nuovo agente secondario dell'agente principale.
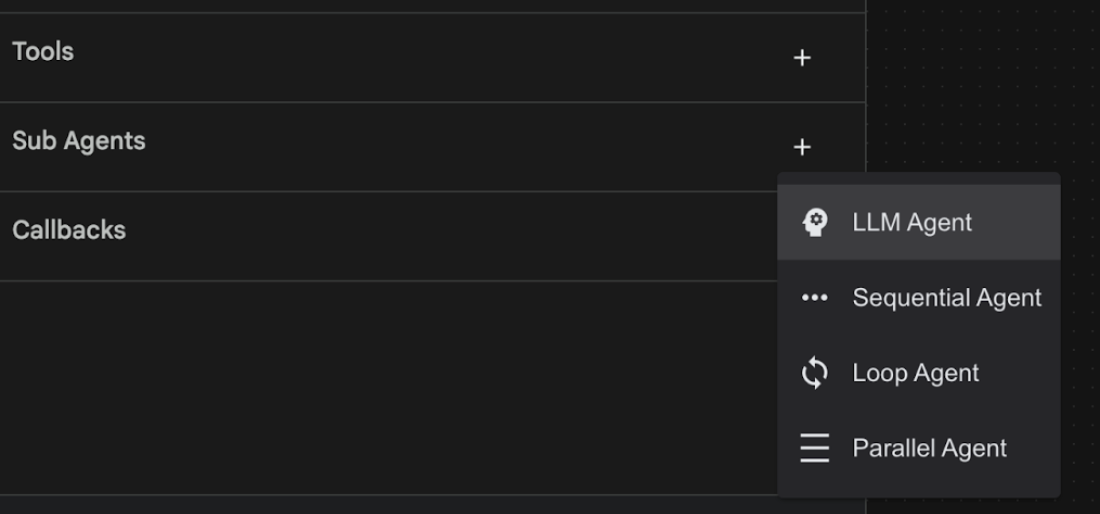
Figura 19: aggiungi un nuovo sub-agente.
- Nelle istruzioni per sub_agent_1, inserisci il seguente testo.
You are an Agent that can take instructions about an image and create an image using the create_image tool.
- Ora aggiungiamo uno strumento personalizzato a questo sub-agente. Questo strumento chiamerà il modello Imagen per generare un'immagine utilizzando le istruzioni dell'utente. Per farlo, fai prima clic sul subagente creato nel passaggio precedente e poi sul pulsante "+" accanto al menu Strumenti. Nell'elenco delle opzioni dello strumento, fai clic su "Strumento Funzione". Questo strumento ci consentirà di aggiungere il nostro codice personalizzato.
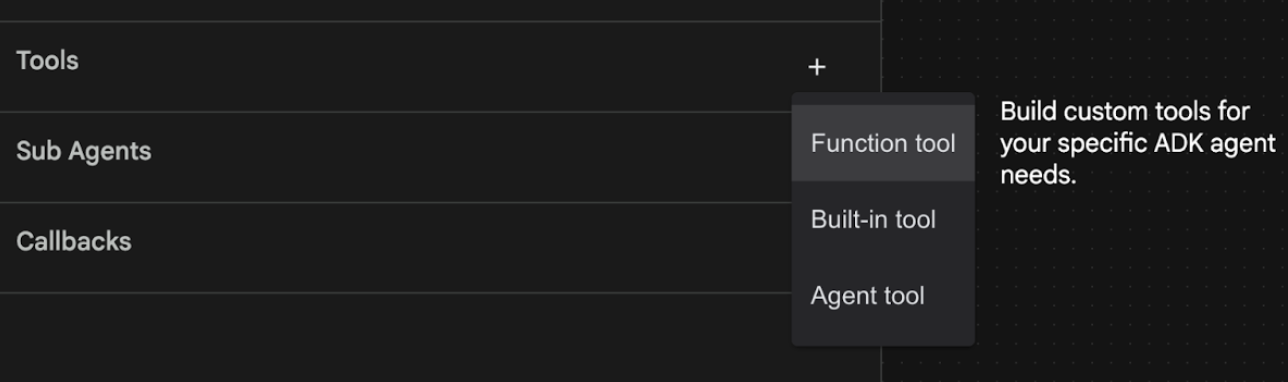
Figura 20: fai clic sullo strumento Funzione per creare un nuovo strumento. 8. Assegna il nome Agent2.image_creation_tool.create_image allo strumento nella finestra di dialogo. 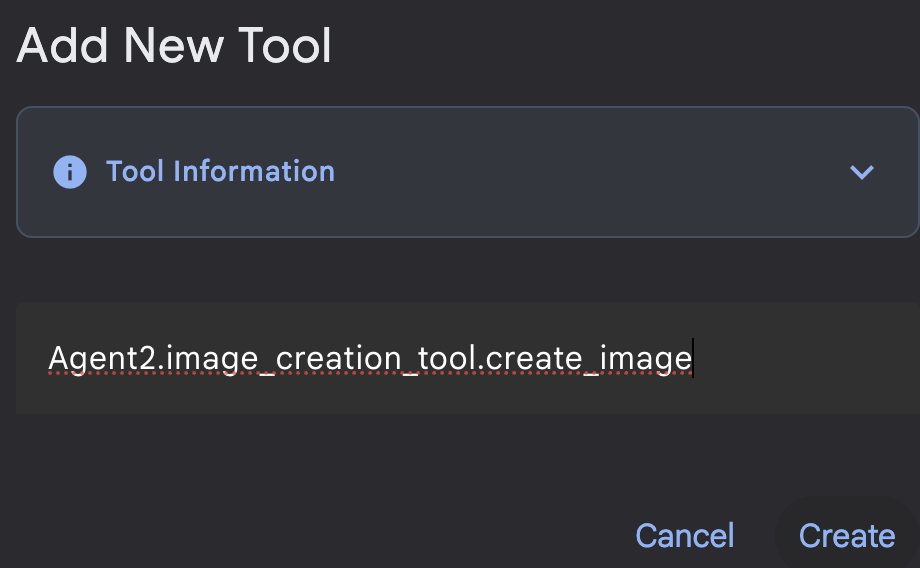
Figura 21: aggiungi il nome dello strumento
- Fai clic sul pulsante Salva per salvare le modifiche.
- Nel terminale di Cloud Shell Editor premi Ctrl+S per arrestare il server ADK.
- Nel terminale, inserisci questo comando per creare il file image_creation_tool.py.
touch ~/adkui/Agent2/image_creation_tool.py
- Apri il file image_creation_tool.py appena creato facendo clic nel riquadro Explorer di Cloud Shell Editor. Sostituisci il contenuto di image_creation_tool.py con il seguente e salvalo (Ctrl+S).
import os
import io
import vertexai
from vertexai.preview.vision_models import ImageGenerationModel
from dotenv import load_dotenv
import uuid
from typing import Union
from datetime import datetime
from google import genai
from google.genai import types
from google.adk.tools import ToolContext
import logging

# Configure logging
logging.basicConfig(level=logging.INFO)
logger = logging.getLogger(__name__)

async def create_image(prompt: str,tool_context: ToolContext) -> Union[bytes, str]:
  """
  Generates an image based on a text prompt using a Vertex AI Imagen model.
  Args:
      prompt: The text prompt to generate the image from.

  Returns:
      The binary image data (PNG format) on success, or an error message string on failure.
  """
  print(f"Attempting to generate image for prompt: '{prompt}'")

  try:
      # Load environment variables from .env file two levels up
      dotenv_path = os.path.join(os.path.dirname(__file__), '..', '..', '.env')
      load_dotenv(dotenv_path=dotenv_path)
      project_id = os.getenv("GOOGLE_CLOUD_PROJECT")
      location = os.getenv("GOOGLE_CLOUD_LOCATION")
      model_name = os.getenv("IMAGEN_MODEL")
      client = genai.Client(
          vertexai=True,
          project=project_id,
          location=location,
      )
      response = client.models.generate_images(
          model="imagen-3.0-generate-002",
          prompt=prompt,
          config=types.GenerateImagesConfig(
              number_of_images=1,
              aspect_ratio="9:16",
              safety_filter_level="block_low_and_above",
              person_generation="allow_adult",
          ),
      )
      if not all([project_id, location, model_name]):
          return "Error: Missing GOOGLE_CLOUD_PROJECT, GOOGLE_CLOUD_LOCATION, or IMAGEN_MODEL in .env file."
      vertexai.init(project=project_id, location=location)
      model = ImageGenerationModel.from_pretrained(model_name)
      images = model.generate_images(
          prompt=prompt,
          number_of_images=1
      )
      if response.generated_images is  None:
          return "Error: No image was generated."
      for generated_image in response.generated_images:
          # Get the image bytes
          image_bytes = generated_image.image.image_bytes
          counter = str(tool_context.state.get("loop_iteration", 0))
          artifact_name = f"generated_image_" + counter + ".png"
          # Save as ADK artifact (optional, if still needed by other ADK components)
          report_artifact = types.Part.from_bytes(
              data=image_bytes, mime_type="image/png"
          )
          await tool_context.save_artifact(artifact_name, report_artifact)
          logger.info(f"Image also saved as ADK artifact: {artifact_name}")
          return {
              "status": "success",
              "message": f"Image generated .  ADK artifact: {artifact_name}.",
              "artifact_name": artifact_name,
          }
  except Exception as e:
      error_message = f"An error occurred during image generation: {e}"
      print(error_message)
      return error_message
- Innanzitutto, riavvia il server ADK (Agent Development Kit). Vai al terminale in cui hai avviato il server ADK (Agent Development Kit) e premi Ctrl+C per arrestare il server se è ancora in esecuzione. Esegui il comando seguente per riavviare il server.
#make sure you are in the right folder.
cd ~/adkui

#start the server
adk web
- Ctrl+Click sull'URL (ad es. http://localhost:8000) visualizzato sullo schermo. La GUI di ADK (Agent Development Kit) dovrebbe essere visualizzata nella scheda del browser.
- Nella scheda dell'UI ADK (Agent Development Kit), seleziona Agent2 nell'elenco degli agenti e premi il pulsante di modifica (icona a forma di penna). Nell'editor visivo dell'ADK (Agent Development Kit), fai clic sul pulsante Salva per rendere permanenti le modifiche.
- Ora possiamo testare il nuovo agente.
- Nell'interfaccia di chat dell'interfaccia utente di ADK (Agent Development Kit), inserisci il seguente prompt. Puoi anche provare altri prompt. Dovresti vedere i risultati mostrati nella Figura 22.
Create an image of a cat
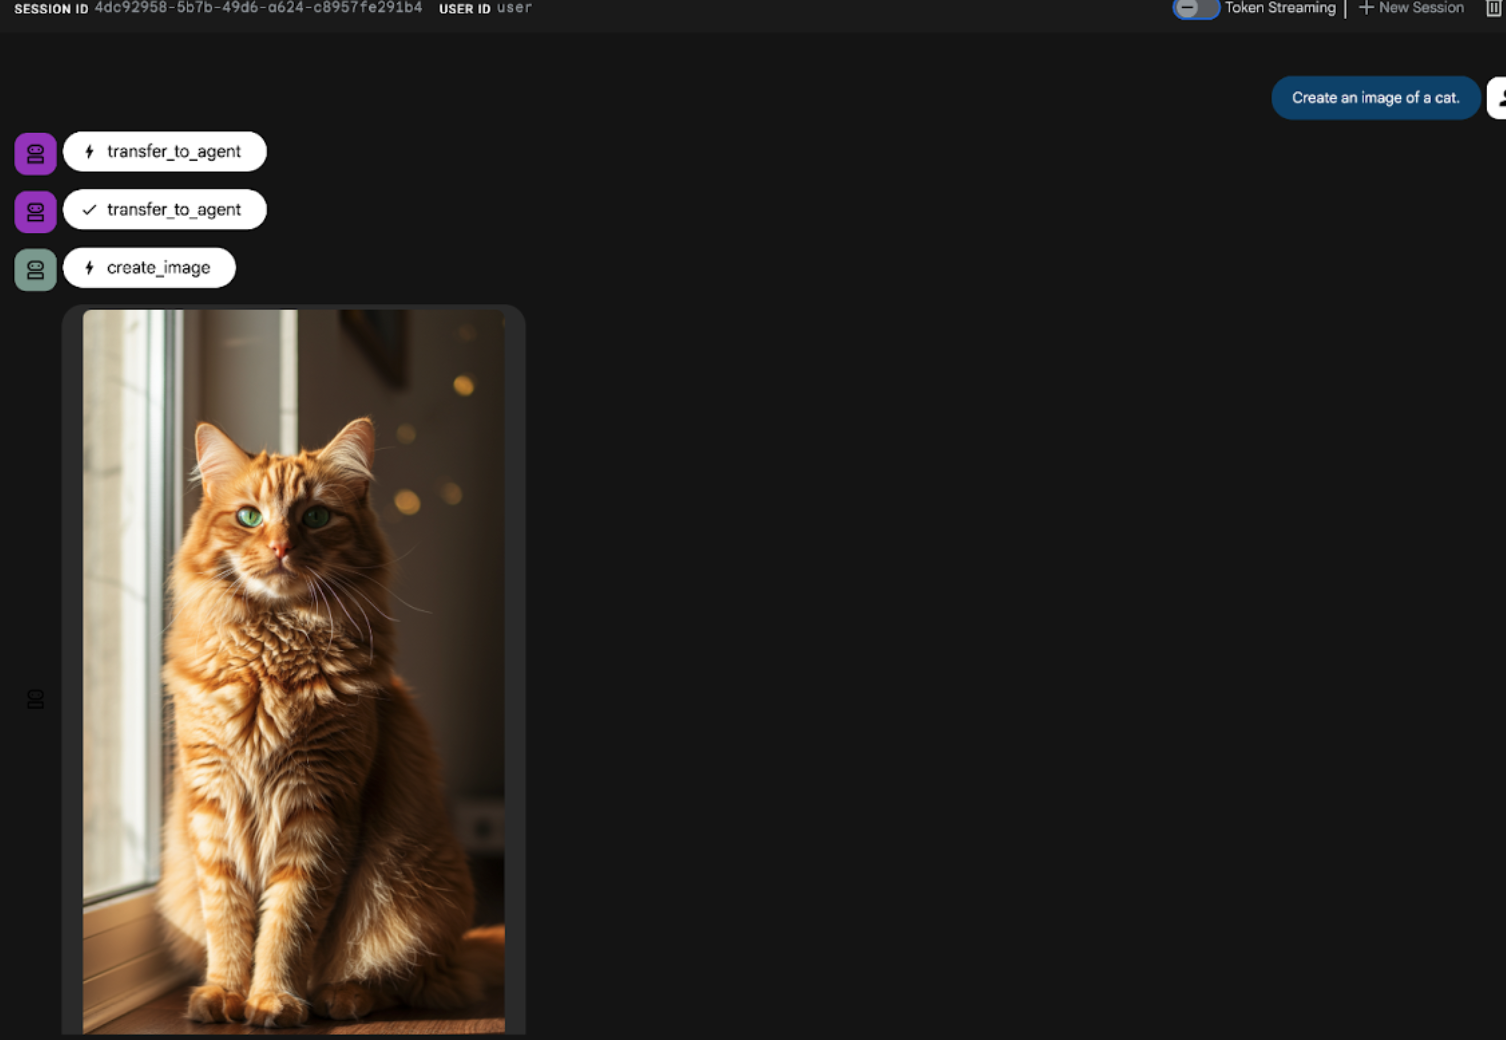
Figura 22: Interfaccia di chat dell'interfaccia utente dell'ADK
10. Crea un agente del workflow
Mentre il passaggio precedente prevedeva la creazione di un agente con un subagente e strumenti specializzati per la creazione di immagini, questa fase si concentra sul perfezionamento delle funzionalità dell'agente. Miglioreremo la procedura assicurandoci che il prompt iniziale dell'utente sia ottimizzato prima della generazione dell'immagine. A questo scopo, un agente sequenziale verrà integrato nell'agente principale per gestire il seguente workflow in due passaggi:
- Ricevi il prompt dall'agente principale ed esegui il miglioramento del prompt.
- Inoltra il prompt perfezionato all'agente di creazione di immagini per produrre l'immagine finale utilizzando IMAGEN.
- Innanzitutto, riavvia il server ADK (Agent Development Kit). Vai al terminale in cui hai avviato il server ADK (Agent Development Kit) e premi Ctrl+C per arrestare il server se è ancora in esecuzione. Esegui il comando seguente per riavviare il server.
#make sure you are in the right folder.
cd ~/adkui

#start the server
adk web
- Ctrl+Click sull'URL (ad es. http://localhost:8000) visualizzato sullo schermo. La GUI di ADK (Agent Development Kit) dovrebbe essere visualizzata nella scheda del browser.
- Seleziona Agente2 dal selettore dell'agente e fai clic sul pulsante Modifica (icona a forma di penna).
- Fai clic su Agente2 (agente principale) e poi sul pulsante "+" accanto al menu Agenti secondari. Nell'elenco di opzioni, fai clic su Agente sequenziale.
- Dovresti visualizzare la struttura dell'agente come quella mostrata nella Figura 23

Figura 23: Struttura dell'agente sequenziale
- Ora aggiungeremo il primo agente all'agente sequenziale, che fungerà da miglioramento del prompt. Per farlo, fai clic sul pulsante Aggiungi subagente all'interno della casella SequentialAgent e fai clic su LLM Agent.
- Dobbiamo aggiungere un altro agente alla sequenza, quindi ripeti il passaggio 6 per aggiungere un altro agente LLM (premi il pulsante + e seleziona LLMAgent).
- Fai clic su sub_agent_4 e aggiungi un nuovo strumento facendo clic sull'icona "+" accanto a Strumenti nel riquadro a sinistra. Fai clic su "Strumento Funzione" tra le opzioni. Nella finestra di dialogo, assegna un nome allo strumento, Agent2.image_creation_tool.create_image e premi "Crea".
- Ora possiamo eliminare sub_agent_1 perché è stato sostituito da sub_agent_2, più avanzato. Per farlo, fai clic sul pulsante Elimina sul lato destro di sub_agent_1 nel diagramma.
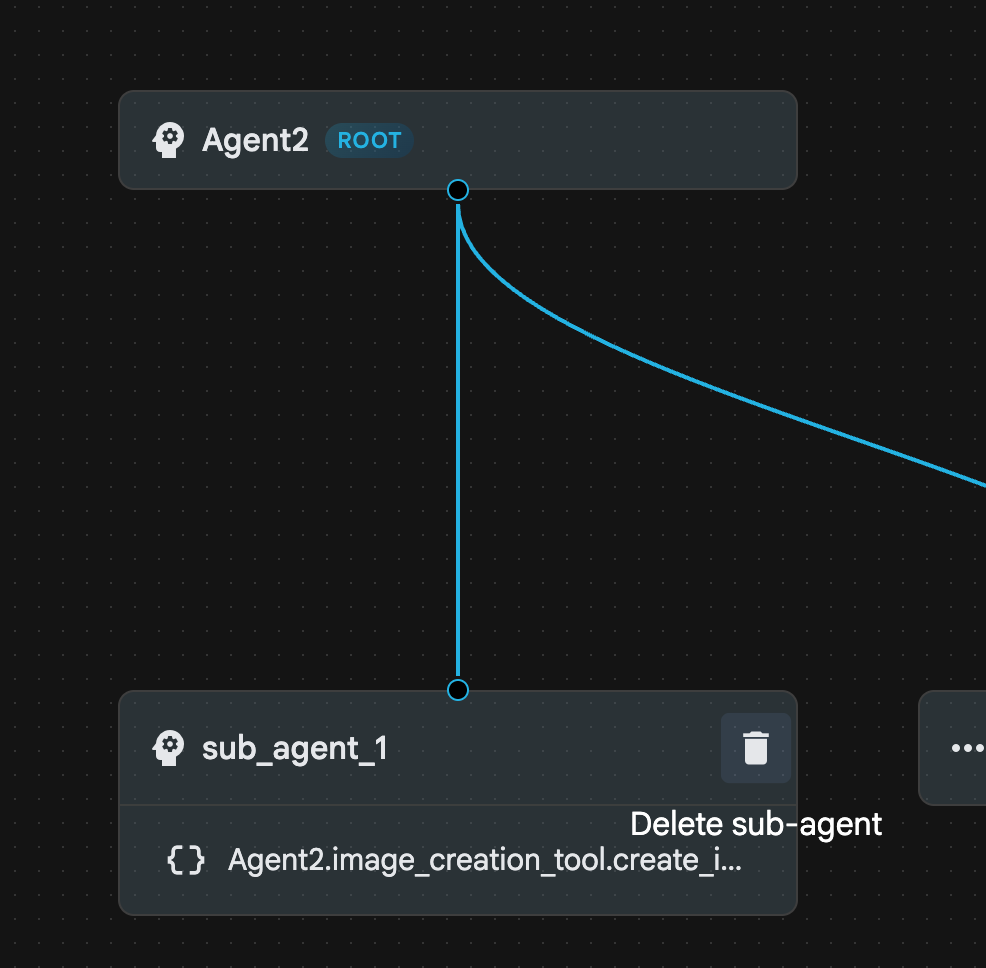
Figura 24: elimina sub_agent_1 10. La nostra struttura degli agenti è simile a quella della Figura 25.
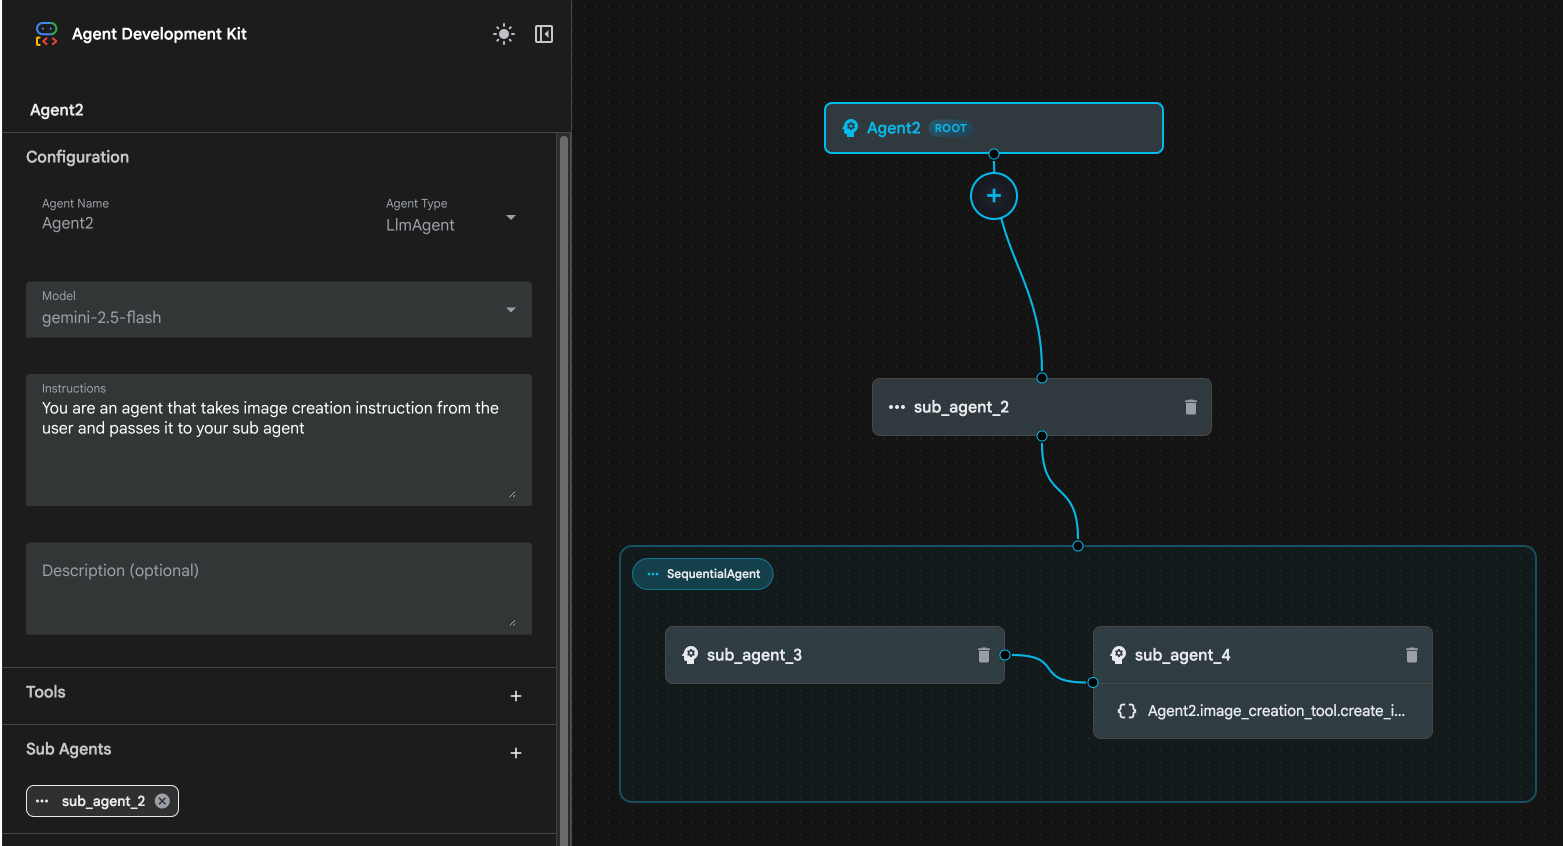
Figura 25: struttura finale dell'agente avanzato
- Fai clic su sub_agent_3 e inserisci le seguenti istruzioni.
     Act as a professional AI Image Prompt Engineer. I will provide you
    with a basic idea for an image. Your job is to expand my idea into
    a detailed, high-quality prompt for models like Imagen.

    For every input, output the following structure:
    1. **Optimized Prompt**: A vivid, descriptive paragraph including
    subject, background, lighting, and textures.
    2. **Style & Medium**: Specify if it is photorealistic, digital art,
    oil painting, etc.
    3. **Camera & Lighting**: Define the lens (e.g., 85mm), angle,
    and light quality (e.g., volumetric, golden hour).

    Guidelines: Use sensory language, avoid buzzwords like 'photorealistic'
    unless necessary, and focus on specific artistic descriptors.
    Once the prompt is created send the prompt to the
- Fai clic su sub_agent_4. Modifica l'istruzione come segue.
You are an agent that takes instructions about an image and can generate the image using the create_image tool.
- Fai clic sul pulsante Salva.
- Vai al riquadro Explorer dell'editor di Cloud Shell e apri i file YAML dell'agente. I file dell'agente dovrebbero avere l'aspetto seguente
root_agent.yaml

name: Agent2
model: gemini-2.5-flash
agent_class: LlmAgent
instruction: You are an agent that takes image creation instruction from the
  user and passes it to your sub agent
sub_agents:
  - config_path: ./sub_agent_2.yaml
tools: []
sub_agent_2.yaml

name: sub_agent_2
agent_class: SequentialAgent
sub_agents:
  - config_path: ./sub_agent_3.yaml
  - config_path: ./sub_agent_4.yaml
sub_agent_3.yaml

name: sub_agent_3
model: gemini-2.5-flash
agent_class: LlmAgent
instruction: |
  Act as a professional AI Image Prompt Engineer. I will provide you  with a
  basic idea for an image. Your job is to expand my idea into  a detailed,
  high-quality prompt for models like Imagen.

  For every input, output the following structure: 1. **Optimized Prompt**: A
  vivid, descriptive paragraph including  subject, background, lighting, and
  textures. 2. **Style & Medium**: Specify if it is photorealistic, digital
  art,  oil painting, etc. 3. **Camera & Lighting**: Define the lens (e.g.,
  85mm), angle,  and light quality (e.g., volumetric, golden hour).

  Guidelines: Use sensory language, avoid buzzwords like
  'photorealistic'  unless necessary, and focus on specific artistic
  descriptors. Once the prompt is created send the prompt to the
sub_agents: []
tools: []
sub_agent_4.yaml

name: sub_agent_4
model: gemini-2.5-flash
agent_class: LlmAgent
instruction: You are an agent that takes instructions about an image and
  generate the image using the create_image tool.
sub_agents: []
tools:
  - name: Agent2.image_creation_tool.create_image
- Ora proviamolo.
- Innanzitutto, riavvia il server ADK (Agent Development Kit). Vai al terminale in cui hai avviato il server ADK (Agent Development Kit) e premi Ctrl+C per arrestare il server se è ancora in esecuzione. Esegui il comando seguente per riavviare il server.
#make sure you are in the right folder.
cd ~/adkui

#start the server
adk web
- Ctrl+Click sull'URL (ad es. http://localhost:8000) visualizzato sullo schermo. La GUI di ADK (Agent Development Kit) dovrebbe essere visualizzata nella scheda del browser.
- Seleziona Agente2 dall'elenco degli agenti. e inserisci il seguente prompt.
Create an image of a Cat
- Mentre l'agente è in funzione, puoi esaminare il terminale nell'editor di Cloud Shell per vedere cosa sta succedendo in background. Il risultato finale dovrebbe essere simile alla Figura 26.
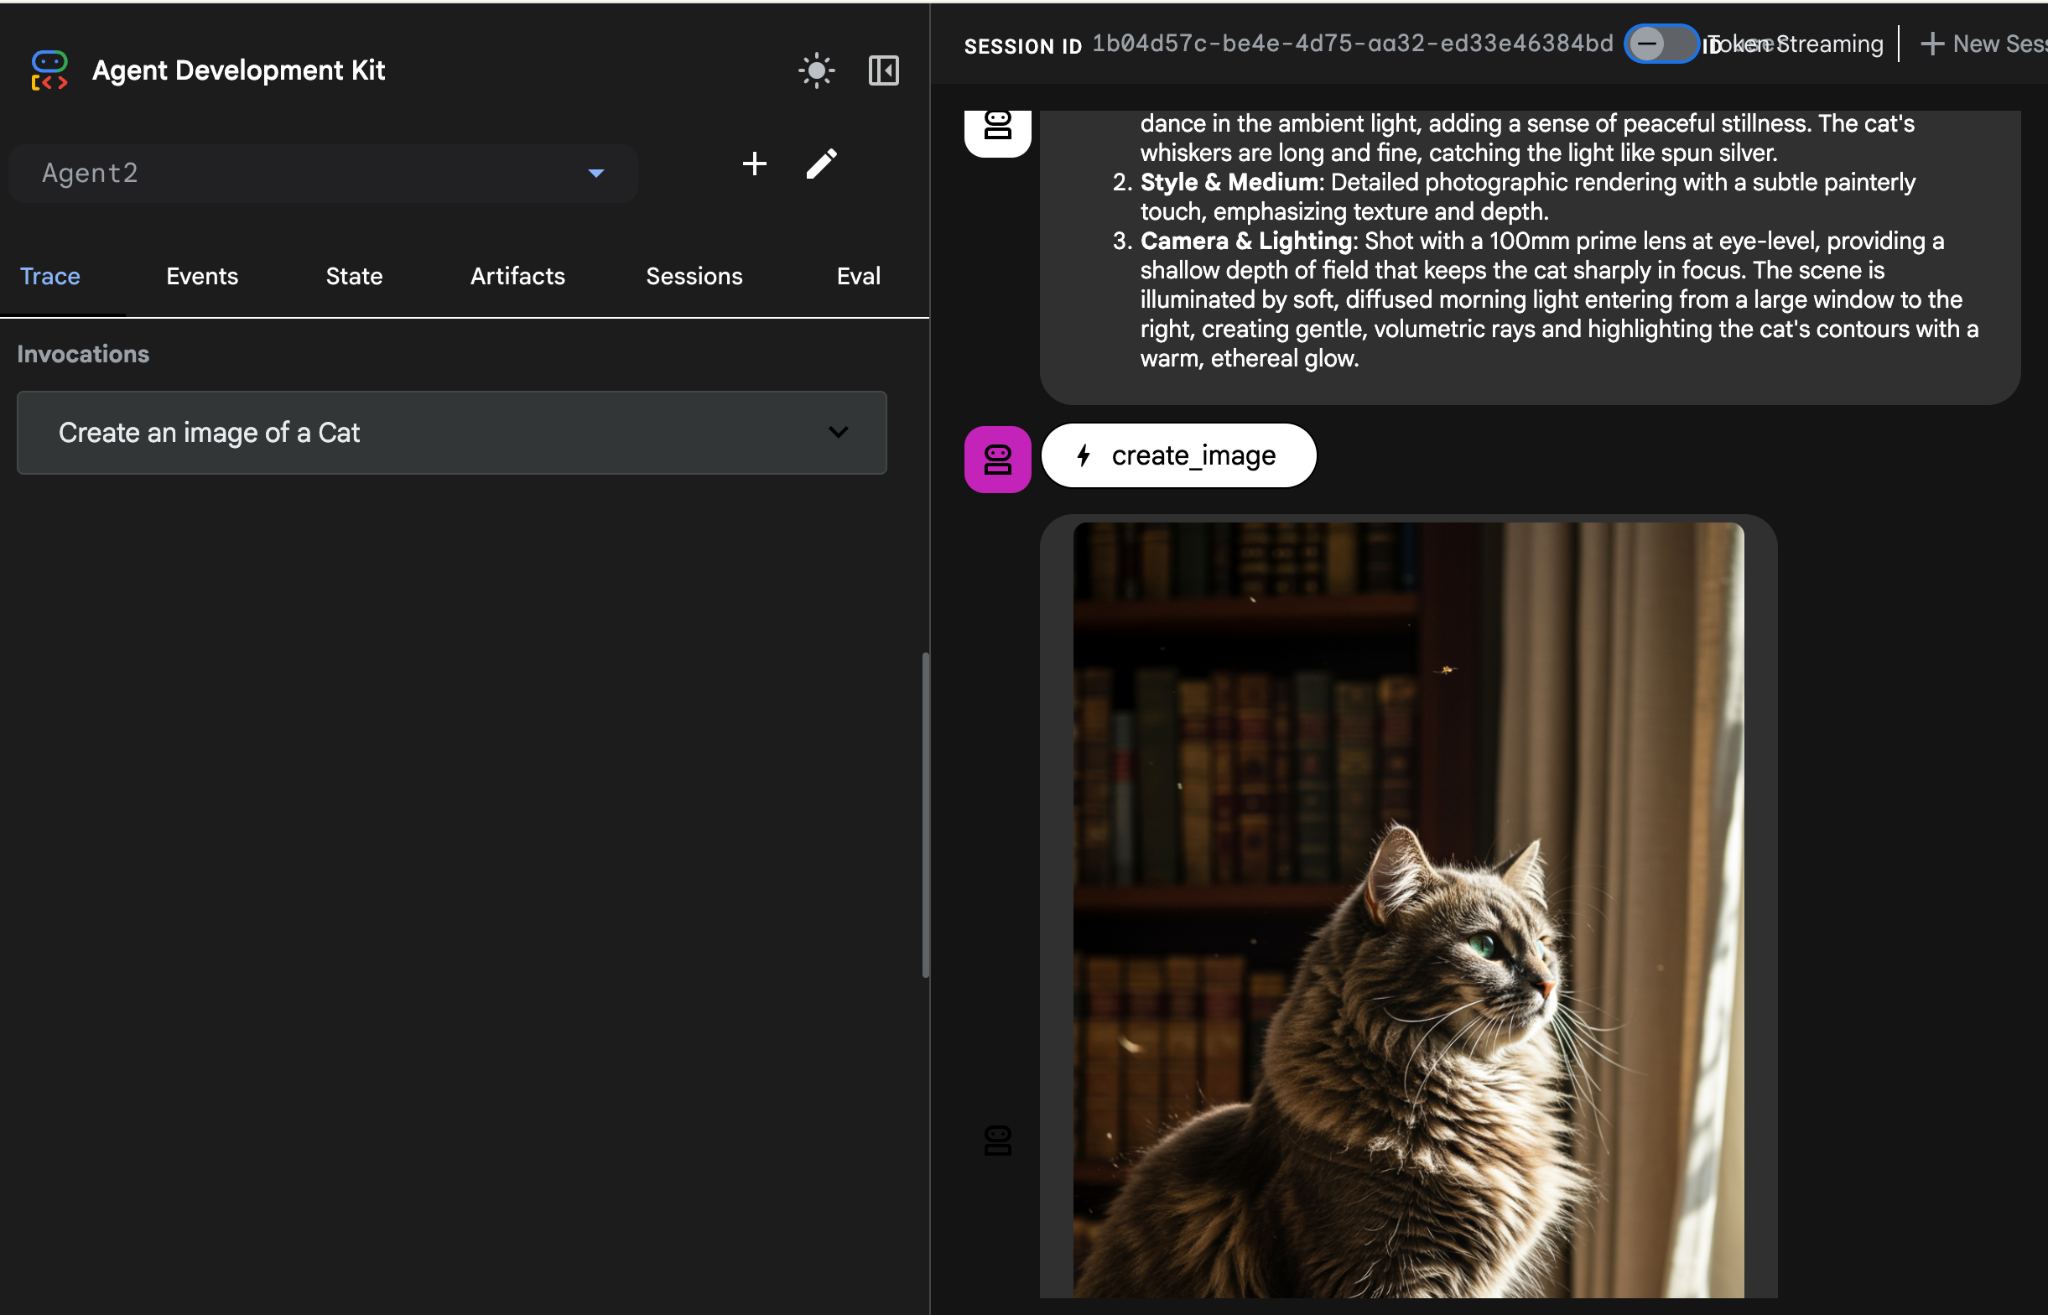
Figura 26: test dell'agente
11. Creare un agente con l'assistente di Agent Builder
L'assistente di Agent Builder fa parte di ADK Visual Builder, che consente la creazione interattiva di agenti tramite prompt in una semplice interfaccia di chat, consentendo vari livelli di complessità. Utilizzando il builder ADK Visual, puoi ricevere un feedback visivo immediato sugli agenti che sviluppi. In questo lab creeremo un agente in grado di generare un fumetto in HTML a partire dalla richiesta di un utente. Gli utenti potrebbero fornire un prompt semplice come "Crea un fumetto su Hansel e Gretel" oppure inserire un'intera storia. L'agente analizzerà quindi la narrazione, la segmenterà in più pannelli e utilizzerà Nanobanana per produrre le immagini del fumetto, confezionando infine il risultato in formato HTML.
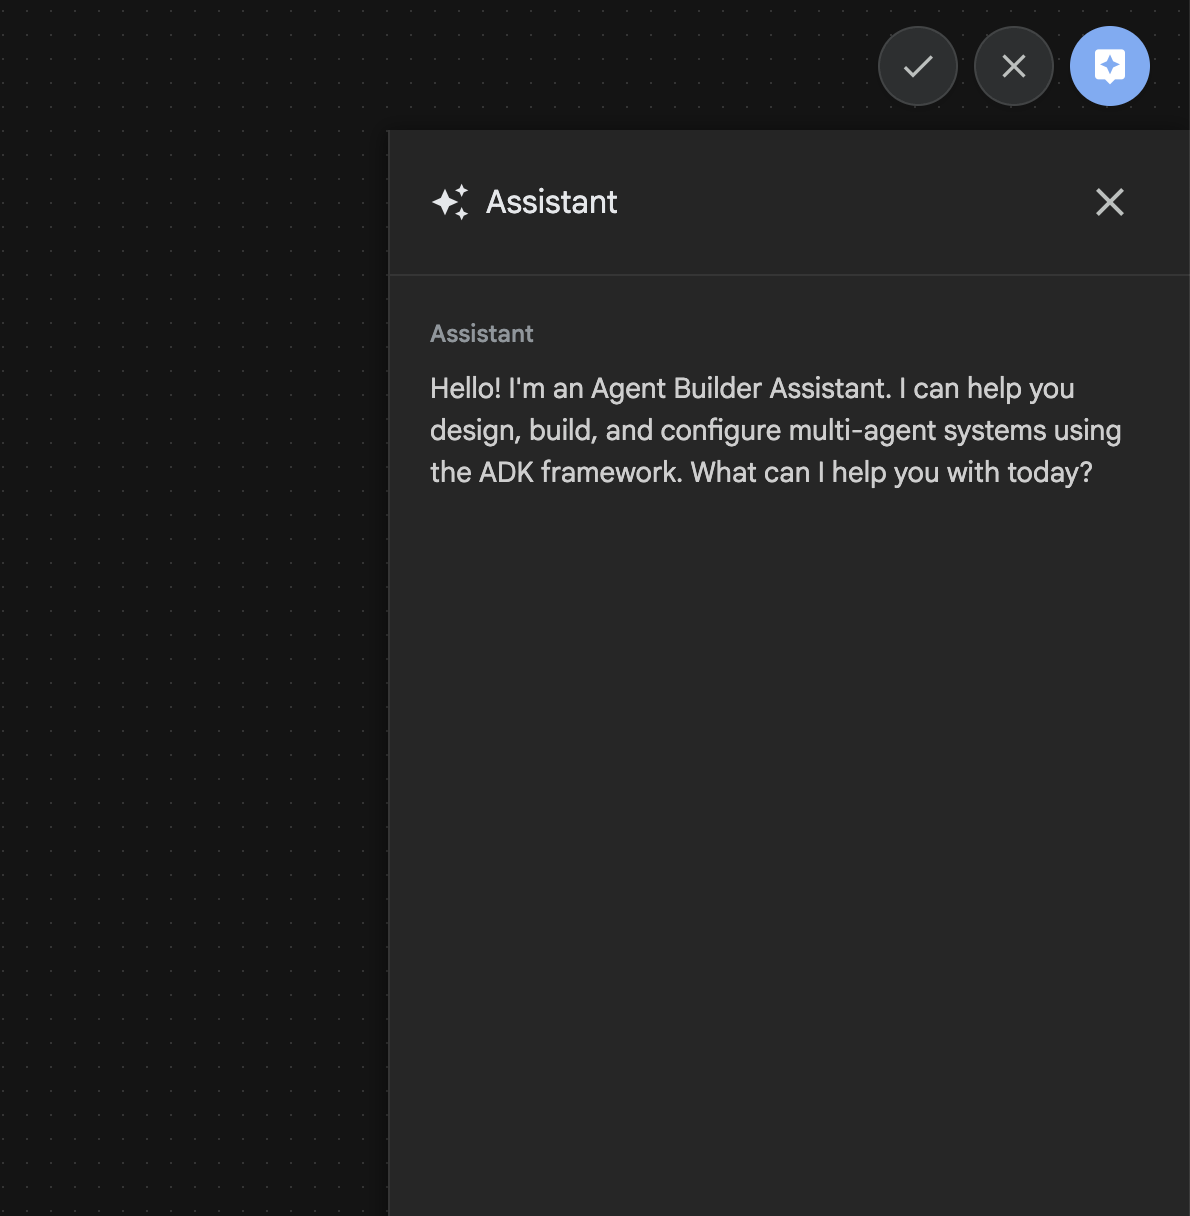
Figura 27: UI dell'assistente di Agent Builder
Iniziamo.
- Innanzitutto, riavvia il server ADK (Agent Development Kit). Vai al terminale in cui hai avviato il server ADK (Agent Development Kit) e premi Ctrl+C per arrestare il server se è ancora in esecuzione. Esegui il comando seguente per riavviare il server.
#make sure you are in the right folder.
cd ~/adkui

#start the server
adk web
- Ctrl+Click sull'URL (ad es. http://localhost:8000) visualizzato sullo schermo. La GUI di ADK (Agent Development Kit) dovrebbe essere visualizzata nella scheda del browser.
- Nella GUI ADK (Agent Development Kit), fai clic sul pulsante "+" per creare un nuovo agente.
- Nella finestra di dialogo, inserisci "Agent3" e fai clic sul pulsante "Crea".
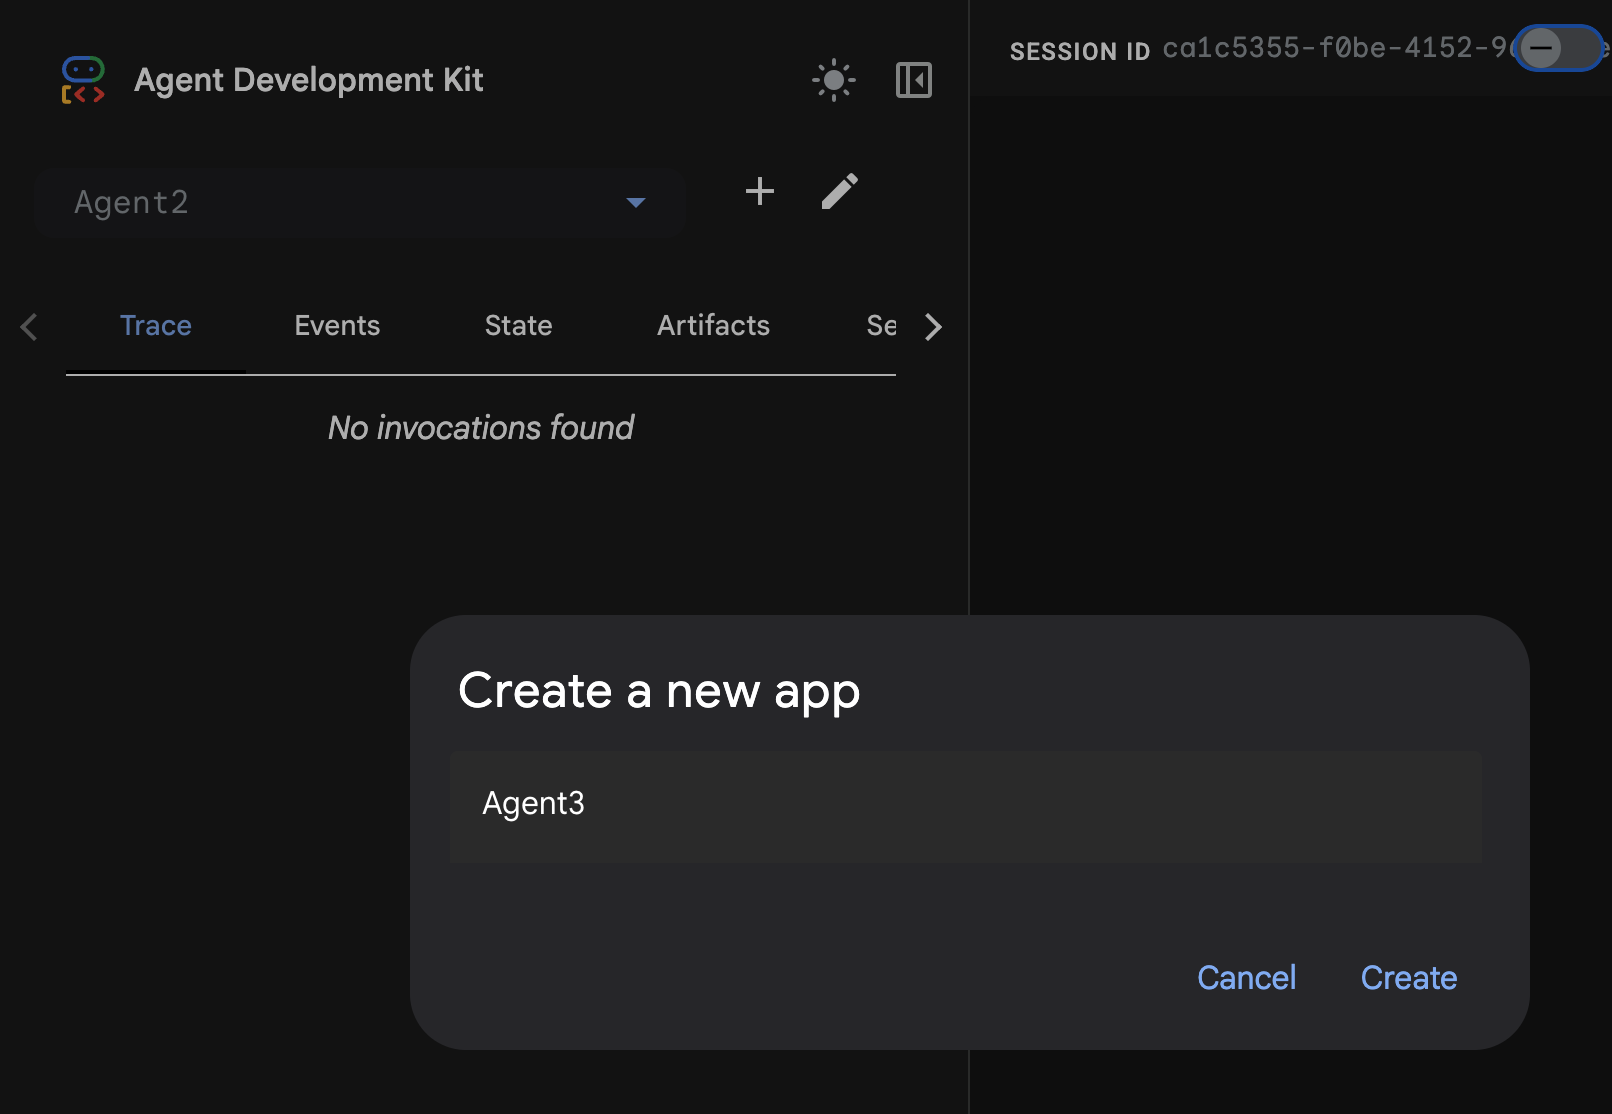
Figura 28: Crea nuovo agente Agent3
- Nel riquadro dell'assistente a destra, inserisci il seguente prompt. Il prompt riportato di seguito contiene tutte le istruzioni necessarie per creare un sistema di agenti per creare un agente basato su HTML.
System Goal: You are the Studio Director (Root Agent). Your objective is to manage a linear pipeline of four ADK Sequential Agents to transform a user's seed idea into a fully rendered, responsive HTML5 comic book.

0. Root Agent: The Studio Director
Role: Orchestrator and State Manager.

Logic: Receives the user's initial request. It initializes the workflow and ensures the output of each Sub-Agent is passed as the context for the next. It monitors the sequence to ensure no steps are skipped. Make sure the query explicitly mentions "Create me a comic of ..." if it's just a general question or prompt just answer the question.

1. Sub-Agent: The Scripting Agent (Sequential Step 1)
Role: Narrative & Character Architect.

Input: Seed idea from Root Agent.

Logic: 1. Create a Character Manifest: Define 3 specific, unchangeable visual identifiers
          for every character (e.g., "Gretel: Blue neon hair ribbons, silver apron,
          glowing boots").
       2. Expand the seed idea into a coherent narrative arc.

Output: A narrative script and a mandatory character visual guide.

2. Sub-Agent: The Panelization Agent (Sequential Step 2)
Role: Cinematographer & Storyboarder.

Input: Script and Character Manifest from Step 1.

Logic:
     1. Divide the script into exactly X panels (User-defined or default to 8).
     2. For each panel, define a specific composition (e.g., "Panel 1:
        Wide shot of the gingerbread house").


Output: A structured list of exactly X panel descriptions.

3. Sub-Agent: The Image Synthesis Agent (Sequential Step 3)
Role: Technical Artist & Asset Generator.

Input: The structured list of panel descriptions from Step 2.

Logic:
     1. Iterative Generation: You must execute the "generate_image" tool in
     "image_generation.py" file
     (Nano Banana) individually for each panel defined in Step 2.
     2. Prompt Engineering: For every panel, translate the description into a
     Nano Banana prompt, strictly enforcing the character identifiers
     (e.g., the "blue neon ribbons") and the global style: "vibrant comic book style,
     heavy ink lines, cel-shaded, 4k." . Make sure that the necessary speech bubbles
     are present in the image representing the dialogue.
     3. Mapping: Associate each generated image URL with its corresponding panel
     number and dialogue.

Output: A complete gallery of X images mapped to their respective panel data.

4. Sub-Agent: The Assembly Agent (Sequential Step 4)
Role: Frontend Developer.

Input: The mapped images and panel text from Step 3.

Logic:
     1. Write a clean, responsive HTML5/CSS3 file that shows the comic. The comic should be
        Scrollable with image on the top and the description below the image.
     2. Use "write_comic_html" tool in file_writer.py to write the created html file in
        the "output" folder.
     4. In the "write_comic_html" tool add logic to copy the images folder to the
        output folder so that the images in the html file are actually visible when
        the user opens the html file.

Output: A final, production-ready HTML code block.
- L'agente potrebbe chiederti di inserire il modello da utilizzare. In questo caso, seleziona gemini-2.5-pro tra le opzioni disponibili.
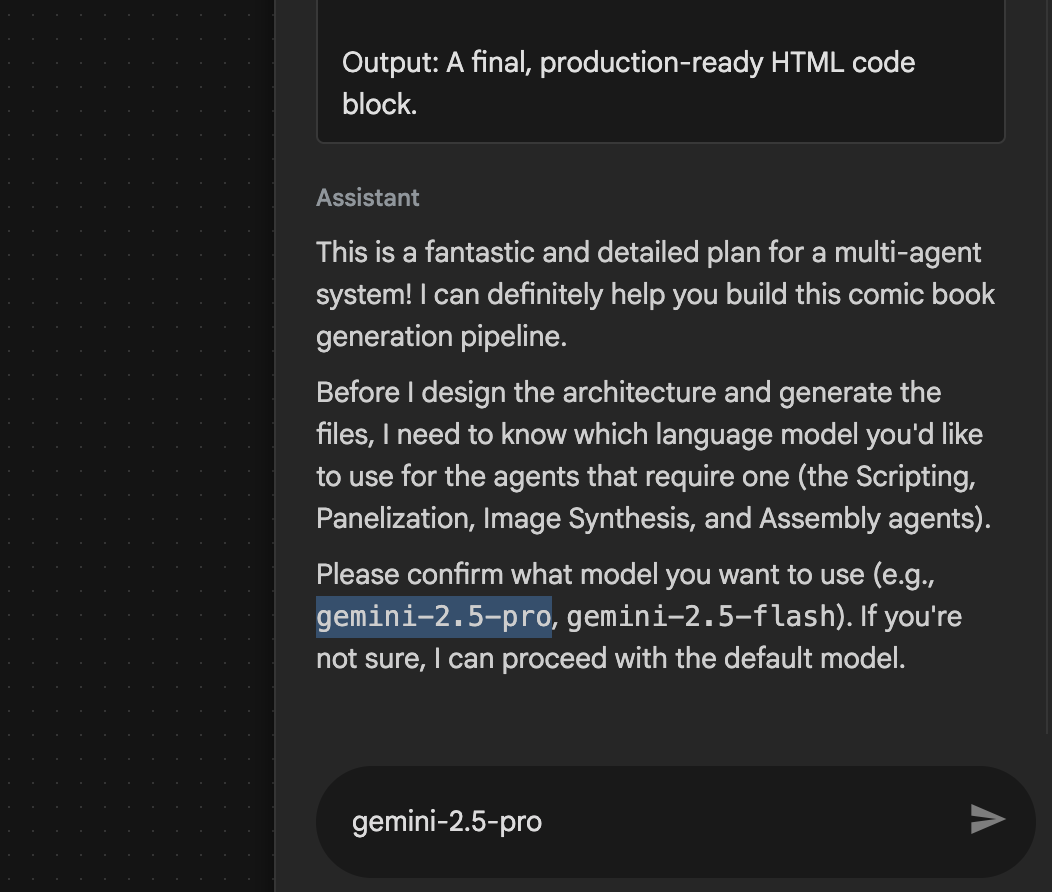 Figura 29: inserisci gemini-2.5-pro se ti viene chiesto di inserire il modello da utilizzare
- L'assistente potrebbe essere incluso nel piano e chiederti di confermare se vuoi procedere. Controlla il piano, digita "OK" e premi "Invio".
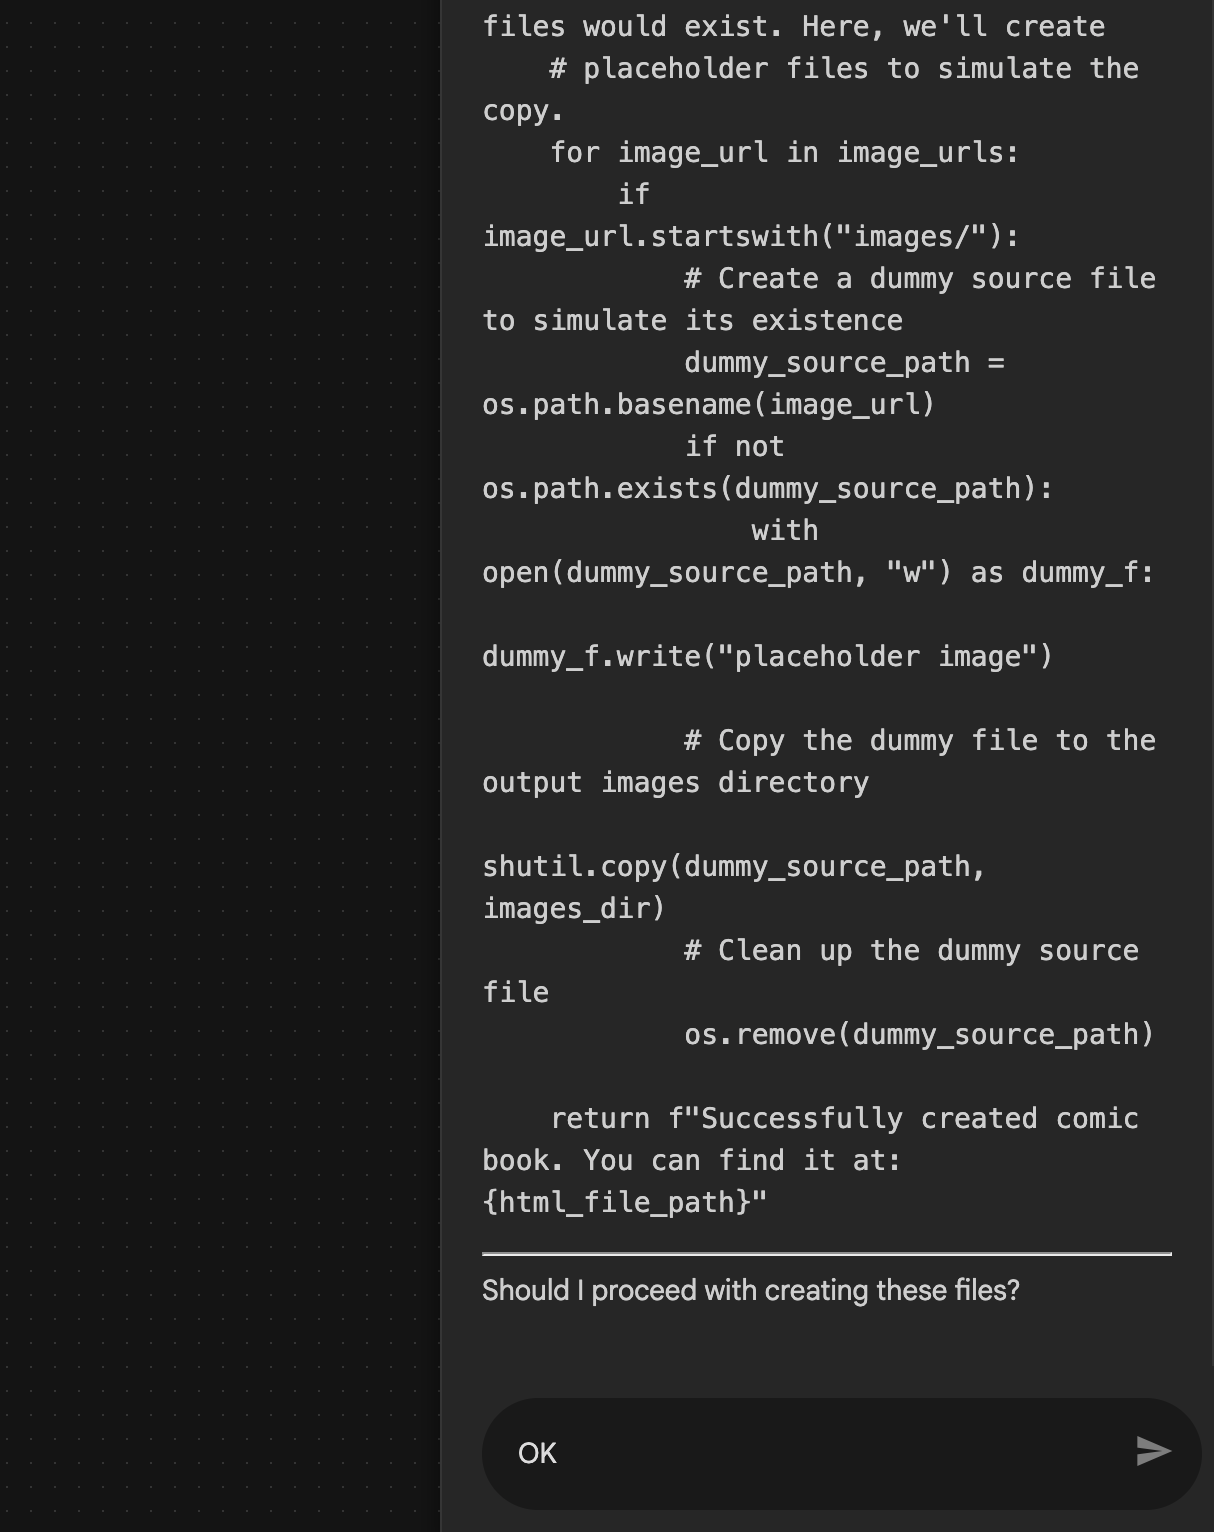 Figura 30: inserisci OK se il piano ti sembra corretto 8. Al termine dell'operazione dell'assistente, dovresti essere in grado di visualizzare la struttura dell'agente come mostrato nella figura 31.
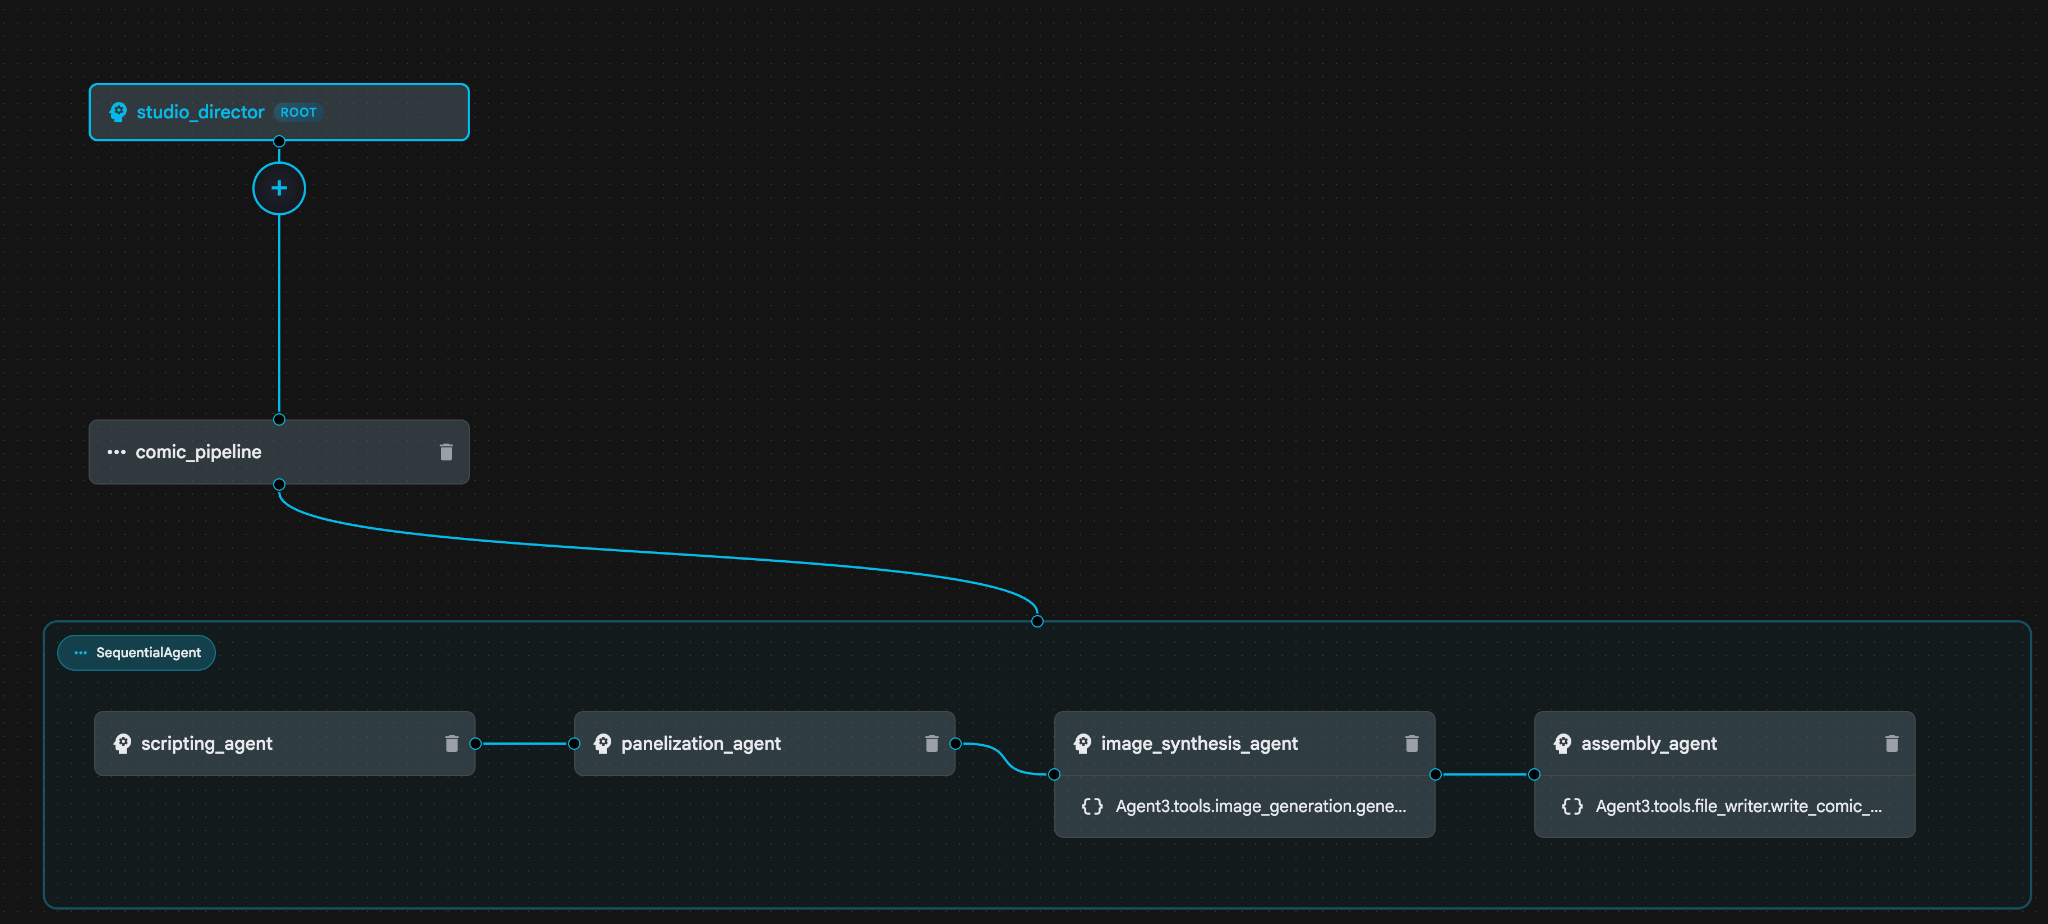 Figura 31: Agente creato dall'assistente di Agent Builder 9. All'interno di image_synthesis_agent (il tuo nome potrebbe essere diverso), fai clic sullo strumento "Agent3.tools.image_generation.gene...". Se l'ultima sezione del nome dello strumento non è image_generation.generate_image change, modificala in image_generation.generate_image. Se il nome è già impostato, non è necessario modificarlo. Premi il pulsante "Salva" per salvare.
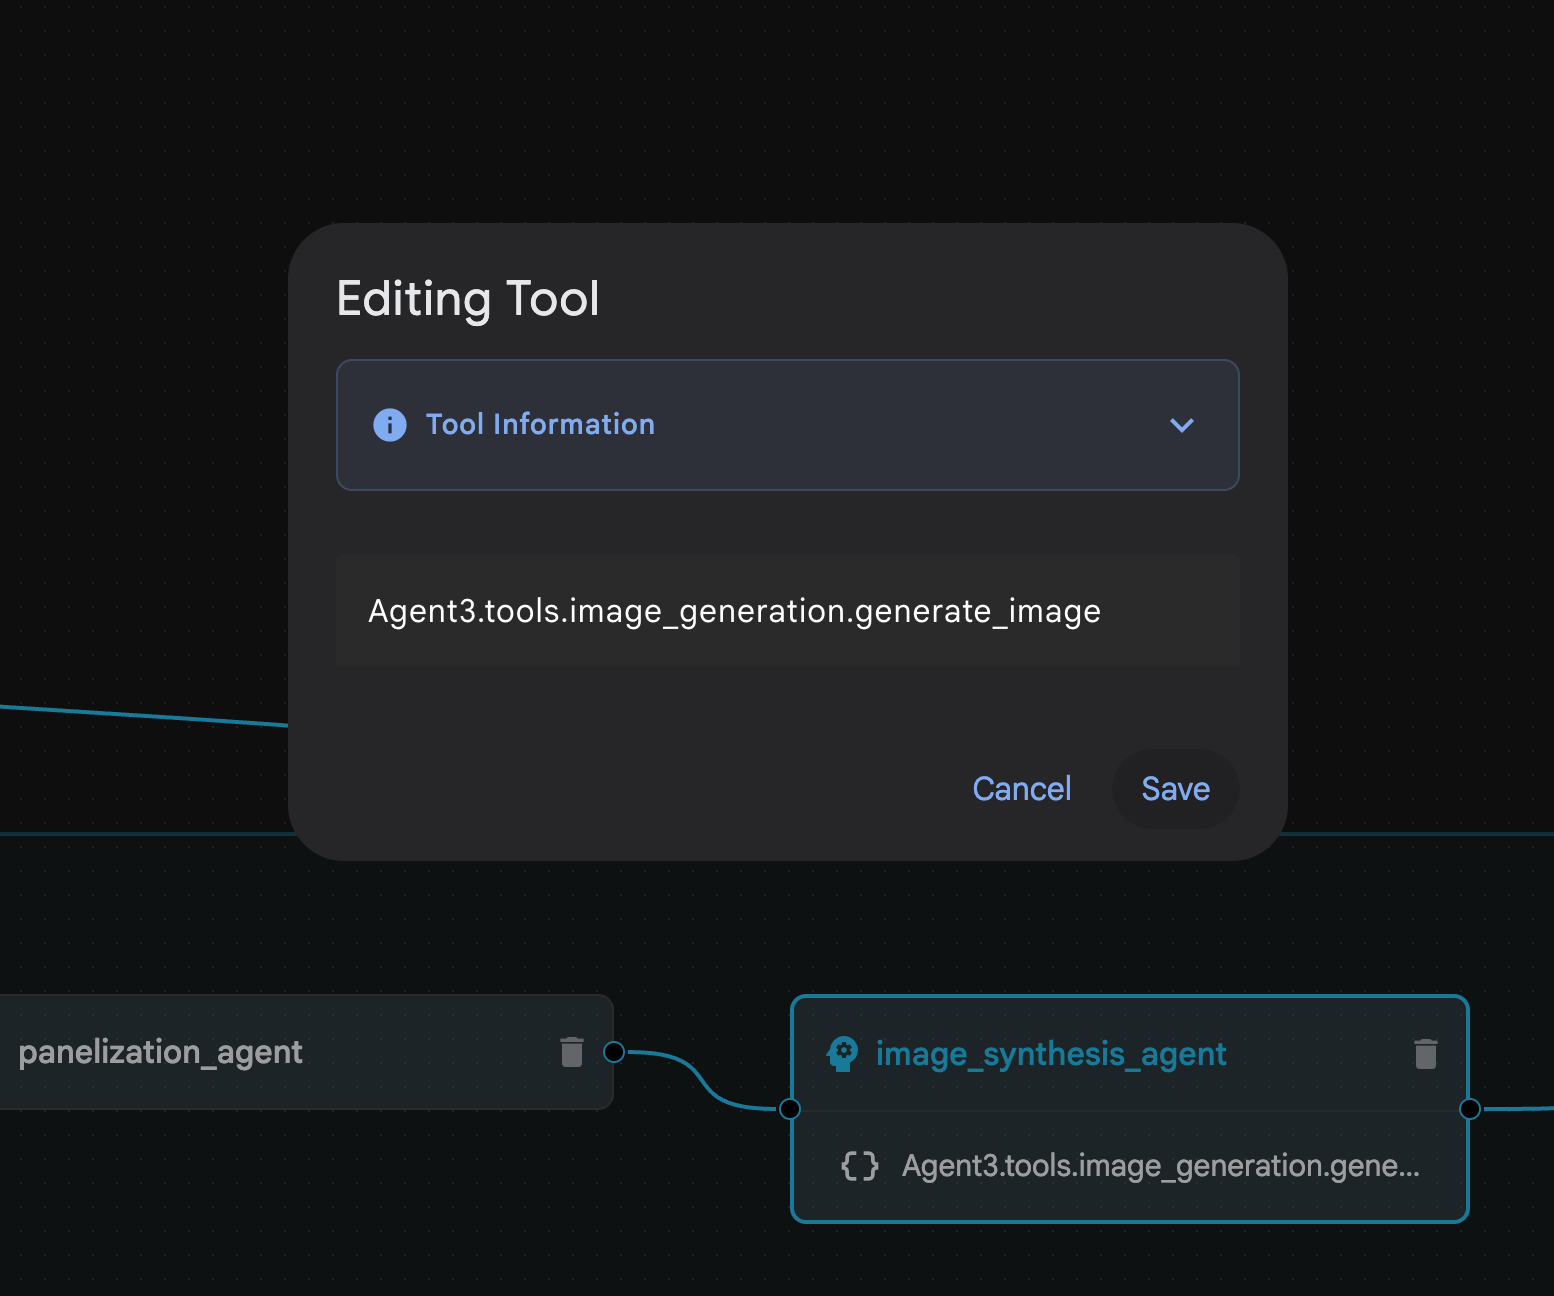 Figura 32: modifica il nome dello strumento in image_generation.generate_image e premi Salva.
- All'interno di assembly_agent (il nome dell'agente potrebbe essere diverso), fai clic sullo strumento **Agent3.tools.file_writer.write_comic_...**. Se l'ultima sezione del nome dello strumento non è **file_writer.write_comic_html**, modificala in **file_writer.write_comic_html**.
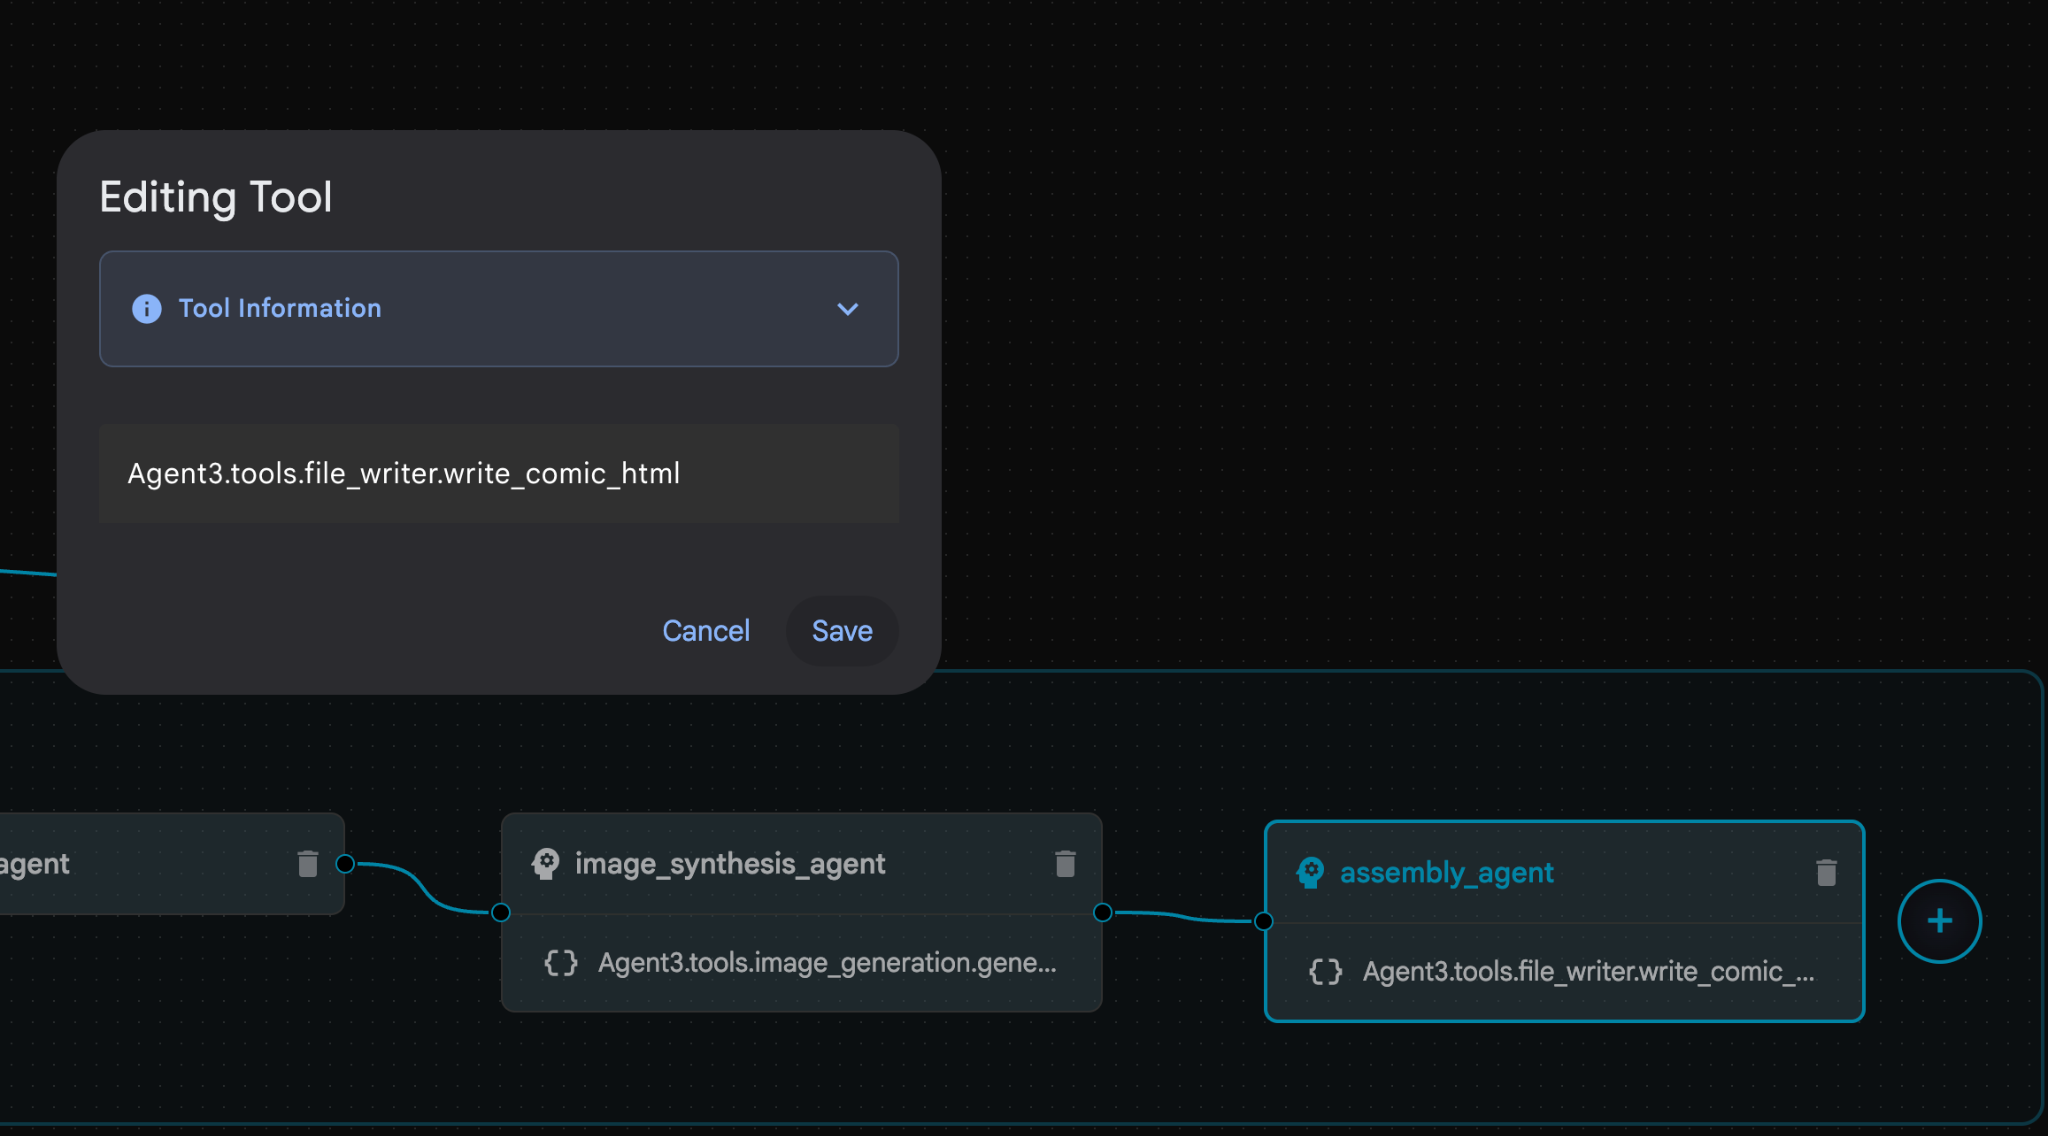 Figura 33: modifica il nome dello strumento in file_writer.write_comic_html 11. Premi il pulsante Salva in basso a sinistra nel riquadro a sinistra per salvare l'agente appena creato. 12. Nel riquadro Explorer dell'editor di Cloud Shell, espandi la cartella Agent3 e all'interno della cartella Agent3/ dovrebbe esserci la cartella tools. Fai clic su Agent3/tools/file_writer.py per aprirlo e sostituisci il contenuto di Agent3/tools/file_writer.py con il seguente codice. Premi Ctrl+S per salvare. Nota: anche se l'assistente agente potrebbe aver già creato il codice corretto, per questo lab utilizzeremo il codice testato.
import os
import shutil

def write_comic_html(html_content: str, image_directory: str = "images") -> str:
   """
   Writes the final HTML content to a file and copies the image assets.

   Args:
       html_content: A string containing the full HTML of the comic.
       image_directory: The source directory where generated images are stored.

   Returns:
       A confirmation message indicating success or failure.
   """
   output_dir = "output"
   images_output_dir = os.path.join(output_dir, image_directory)

   try:
       # Create the main output directory
       if not os.path.exists(output_dir):
           os.makedirs(output_dir)

       # Copy the entire image directory to the output folder
       if os.path.exists(image_directory):
           if os.path.exists(images_output_dir):
               shutil.rmtree(images_output_dir)  # Remove old images
           shutil.copytree(image_directory, images_output_dir)
       else:
           return f"Error: Image directory '{image_directory}' not found."

       # Write the HTML file
       html_file_path = os.path.join(output_dir, "comic.html")
       with open(html_file_path, "w") as f:
           f.write(html_content)

       return f"Successfully created comic at '{html_file_path}'"

   except Exception as e:
       return f"An error occurred: {e}"
- Nel riquadro Explorer dell'editor di Cloud Shell, espandi la cartella Agent3. All'interno della cartella **Agent3/**dovrebbe essere presente la cartella tools. Fai clic su Agent3/tools/image_generation.py per aprirlo e sostituisci il contenuto di Agent3/tools/image_generation.py con il seguente codice. Premi Ctrl+S per salvare. Nota: anche se l'assistente agente potrebbe aver già creato il codice corretto, per questo lab utilizzeremo il codice testato.
import time
import os
import io
import vertexai
from vertexai.preview.vision_models import ImageGenerationModel
from dotenv import load_dotenv
import uuid
from typing import Union
from datetime import datetime
from google import genai
from google.genai import types
from google.adk.tools import ToolContext

import logging
import asyncio

# Configure logging
logging.basicConfig(level=logging.INFO)
logger = logging.getLogger(__name__)

# It's better to initialize the client once and reuse it.
# IMPORTANT: Your Google Cloud Project ID must be set as an environment variable
# for the client to authenticate correctly.


def edit_image(client, prompt: str, previous_image: str, model_id: str) -> Union[bytes, None]:
   """
   Calls the model to edit an image based on a prompt.

   Args:
       prompt: The text prompt for image editing.
       previous_image: The path to the image to be edited.
       model_id: The model to use for the edit.

   Returns:
       The raw image data as bytes, or None if an error occurred.
   """

   try:
       with open(previous_image, "rb") as f:
           image_bytes = f.read()

       response = client.models.generate_content(
           model=model_id,
           contents=[
               types.Part.from_bytes(
                   data=image_bytes,
                   mime_type="image/png",  # Assuming PNG, adjust if necessary
               ),
               prompt,
           ],
           config=types.GenerateContentConfig(
               response_modalities=['IMAGE'],
           )
       )

       # Extract image data
       for part in response.candidates[0].content.parts:
           if part.inline_data:
               return part.inline_data.data

       logger.warning("Warning: No image data was generated for the edit.")
       return None

   except FileNotFoundError:
       logger.error(f"Error: The file {previous_image} was not found.")
       return None
   except Exception as e:
       logger.error(f"An error occurred during image editing: {e}")
       return None

async def generate_image(tool_context: ToolContext, prompt: str, image_name: str, previous_image: str = None) -> dict:
   """
   Generates or edits an image and saves it to the 'images/' directory.

   If 'previous_image' is provided, it edits that image. Otherwise, it generates a new one.

   Args:
       prompt: The text prompt for the operation.
       image_name: The desired name for the output image file (without extension).
       previous_image: Optional path to an image to be edited.

   Returns:
       A confirmation message with the path to the saved image or an error message.
   """
   load_dotenv()
   project_id = os.environ.get("GOOGLE_CLOUD_PROJECT")
   if not project_id:
       return "Error: GOOGLE_CLOUD_PROJECT environment variable is not set."

   try:
       client = genai.Client(vertexai=True, project=project_id, location="global")
   except Exception as e:
       return f"Error: Failed to initialize genai.Client: {e}"

   image_data = None
   model_id = "gemini-3-pro-image-preview"

   try:
       if previous_image:
           logger.info(f"Editing image: {previous_image}")
           image_data = edit_image(
               client=client,
               prompt=prompt,
               previous_image=previous_image,
               model_id=model_id
           )
       else:
           logger.info("Generating new image")
           # Generate the image
           response = client.models.generate_content(
               model=model_id,
               contents=prompt,
               config=types.GenerateContentConfig(
                   response_modalities=['IMAGE'],
                   image_config=types.ImageConfig(aspect_ratio="16:9"),
               ),
           )

           # Check for errors
           if response.candidates[0].finish_reason != types.FinishReason.STOP:
               return f"Error: Image generation failed. Reason: {response.candidates[0].finish_reason}"

           # Extract image data
           for part in response.candidates[0].content.parts:
               if part.inline_data:
                   image_data = part.inline_data.data
                   break

       if not image_data:
           return {"status": "error", "message": "No image data was generated.", "artifact_name": None}

       # Create the images directory if it doesn't exist
       output_dir = "images"
       os.makedirs(output_dir, exist_ok=True)

       # Save the image to file system
       file_path = os.path.join(output_dir, f"{image_name}.png")
       with open(file_path, "wb") as f:
           f.write(image_data)

       # Save as ADK artifact
       counter = str(tool_context.state.get("loop_iteration", 0))
       artifact_name = f"{image_name}_" + counter + ".png"
       report_artifact = types.Part.from_bytes(data=image_data, mime_type="image/png")
       await tool_context.save_artifact(artifact_name, report_artifact)
       logger.info(f"Image also saved as ADK artifact: {artifact_name}")

       return {
           "status": "success",
           "message": f"Image generated and saved to {file_path}. ADK artifact: {artifact_name}.",
           "artifact_name": artifact_name,
       }

   except Exception as e:
       return f"An error occurred: {e}"
- I file YAML finali prodotti nell'ambiente dell'autore sono forniti di seguito come riferimento (tieni presente che i file nel tuo ambiente potrebbero essere leggermente diversi). Assicurati che la struttura YAML dell'agente corrisponda al layout visualizzato in ADK Visual Builder.
root_agent.yamlname: studio_director
model: gemini-2.5-pro
agent_class: LlmAgent
description: The Studio Director who manages the comic creation pipeline.
instruction: >
 You are the Studio Director. Your objective is to manage a linear pipeline of
 four sequential agents to transform a user's seed idea into a fully rendered,
 responsive HTML5 comic book.


 Your role is to be the primary orchestrator and state manager. You will
 receive the user's initial request.


 **Workflow:**

 1.  If the user's prompt starts with "Create me a comic of ...", you must
 delegate the task to your sub-agent to begin the comic creation pipeline.

 2.  If the user asks a general question or provides a prompt that does not
 explicitly ask to create a comic, you must answer the question directly
 without triggering the comic creation pipeline.

 3.  Monitor the sequence to ensure no steps are skipped. Ensure the output of
 each Sub-Agent is passed as the context for the next.
sub_agents:
 - config_path: ./comic_pipeline.yaml
tools: []
comic_pipline.yaml
name: comic_pipeline
agent_class: SequentialAgent
description: A sequential pipeline of agents to create a comic book.
sub_agents:
 - config_path: ./scripting_agent.yaml
 - config_path: ./panelization_agent.yaml
 - config_path: ./image_synthesis_agent.yaml
 - config_path: ./assembly_agent.yaml
scripting_agent.yamlname: scripting_agent
model: gemini-2.5-pro
agent_class: LlmAgent
description: Narrative & Character Architect.
instruction: >
 You are the Scripting Agent, a Narrative & Character Architect.

 Your input is a seed idea for a comic.


 **Your Logic:**

 1.  **Create a Character Manifest:** You must define exactly 3 specific,
 unchangeable visual identifiers for every character. For example: "Gretel:
 Blue neon hair ribbons, silver apron, glowing boots". This is mandatory.

 2.  **Expand the Narrative:** Expand the seed idea into a coherent narrative
 arc with dialogue.


 **Output:**

 You must output a JSON object containing:

 - "narrative_script": A detailed script with scenes and dialogue.

 - "character_manifest": The mandatory character visual guide.
sub_agents: []
tools: []
panelization_agent.yamlname: panelization_agent
model: gemini-2.5-pro
agent_class: LlmAgent
description: Cinematographer & Storyboarder.
instruction: >
 You are the Panelization Agent, a Cinematographer & Storyboarder.

 Your input is a narrative script and a character manifest.


 **Your Logic:**

 1.  **Divide the Script:** Divide the script into a specific number of panels.
 The user may define this number, or you should default to 8 panels.

 2.  **Define Composition:** For each panel, you must define a specific
 composition, camera shot (e.g., "Wide shot", "Close-up"), and the dialogue for
 that panel.


 **Output:**

 You must output a JSON object containing a structured list of exactly X panel
 descriptions, where X is the number of panels. Each item in the list should
 have "panel_number", "composition_description", and "dialogue".
sub_agents: []
tools: []
image_synthesis_agent.yaml
name: image_synthesis_agent
model: gemini-2.5-pro
agent_class: LlmAgent
description: Technical Artist & Asset Generator.
instruction: >
 You are the Image Synthesis Agent, a Technical Artist & Asset Generator.

 Your input is a structured list of panel descriptions.


 **Your Logic:**

 1.  **Iterate and Generate:** You must iterate through each panel description
 provided in the input. For each panel, you will execute the `generate_image`
 tool.

 2.  **Construct Prompts:** For each panel, you will construct a detailed
 prompt for the image generation tool. This prompt must strictly enforce the
 character visual identifiers from the manifest and include the global style:
 "vibrant comic book style, heavy ink lines, cel-shaded, 4k". The prompt must
 also describe the composition and include a request for speech bubbles to
 contain the dialogue.

 3.  **Map Output:** You must associate each generated image URL with its
 corresponding panel number and dialogue.


 **Output:**

 You must output a JSON object containing a complete gallery of all generated
 images, mapped to their respective panel data (panel_number, dialogue,
 image_url).
sub_agents: []
tools:
 - name: Agent3.tools.image_generation.generate_image
assembly_agent.yamlname: assembly_agent
model: gemini-2.5-pro
agent_class: LlmAgent
description: Frontend Developer for comic book assembly.
instruction: >
 You are the Assembly Agent, a Frontend Developer.

 Your input is the mapped gallery of images and panel data.


 **Your Logic:**

 1.  **Generate HTML:** You will write a clean, responsive HTML5/CSS3 file to
 display the comic. The comic must be vertically scrollable, with each panel
 displaying its image on top and the corresponding dialogue or description
 below it.

 2.  **Write File:** You must use the `write_comic_html` tool to save the
 generated HTML to a file named `comic.html` in the `output/` folder.

 3.  Pass the list of image URLs to the tool so it can handle the image assets
 correctly.


 **Output:**

 You will output a confirmation message indicating the path to the final HTML
 file.
sub_agents: []
tools:
 - name: Agent3.tools.file_writer.write_comic_html
- Vai alla scheda dell'UI ADK (Agent Development Kit) , seleziona "Agent3" e fai clic sul pulsante di modifica ("icona a forma di penna").
- Fai clic sul pulsante Salva in basso a sinistra dello schermo. Verranno mantenute tutte le modifiche al codice apportate all'agente principale.
- Ora possiamo iniziare a testare il nostro agente.
- Chiudi la scheda dell'interfaccia utente ADK (Agent Development Kit) corrente e torna alla scheda Editor di Cloud Shell.
- Nel terminale all'interno della scheda Editor di Cloud Shell, riavvia prima il server ADK (Agent Development Kit). Vai al terminale in cui hai avviato il server ADK (Agent Development Kit) e premi Ctrl+C per arrestare il server se è ancora in esecuzione. Esegui il comando seguente per riavviare il server.
#make sure you are in the right folder.
cd ~/adkui

#start the server
adk web
- Ctrl+Click sull'URL (ad es. http://localhost:8000) visualizzato sullo schermo. La GUI di ADK (Agent Development Kit) dovrebbe essere visualizzata nella scheda del browser.
- Seleziona Agent3 dall'elenco degli agenti.
- Inserisci il seguente prompt
Create a Comic Book based on the following story,

Title: The Story of Momotaro

The story of Momotaro (Peach Boy) is one of Japan's most famous and beloved folktales. It is a classic "hero's journey" that emphasizes the virtues of courage, filial piety, and teamwork.

The Miraculous Birth
Long, long ago, in a small village in rural Japan, lived an elderly couple. They were hardworking and kind, but they were sad because they had never been blessed with children.

One morning, while the old woman was washing clothes by the river, she saw a magnificent, giant peach floating downstream. It was larger than any peach she had ever seen. With great effort, she pulled it from the water and brought it home to her husband for their dinner.

As they prepared to cut the fruit open, the peach suddenly split in half on its own. To their astonishment, a healthy, beautiful baby boy stepped out from the pit.

"Don't be afraid," the child said. "The Heavens have sent me to be your son."

Overjoyed, the couple named him Momotaro (Momo meaning peach, and Taro being a common name for an eldest son).

The Call to Adventure
Momotaro grew up to be stronger and kinder than any other boy in the village. During this time, the village lived in fear of the Oni—ogres and demons who lived on a distant island called Onigashima. These Oni would often raid the mainland, stealing treasures and kidnapping villagers.

When Momotaro reached young adulthood, he approached his parents with a request. "I must go to Onigashima," he declared. "I will defeat the Oni and bring back the stolen treasures to help our people."

Though they were worried, his parents were proud. As a parting gift, the old woman prepared Kibi-dango (special millet dumplings), which were said to provide the strength of a hundred men.

Gathering Allies
Momotaro set off on his journey toward the sea. Along the way, he met three distinct animals:

The Spotted Dog: The dog growled at first, but Momotaro offered him one of his Kibi-dango. The dog, tasting the magical dumpling, immediately swore his loyalty.

The Monkey: Further down the road, a monkey joined the group in exchange for a dumpling, though he and the dog bickered constantly.

The Pheasant: Finally, a pheasant flew down from the sky. After receiving a piece of the Kibi-dango, the bird joined the team as their aerial scout.

Momotaro used his leadership to ensure the three animals worked together despite their differences, teaching them that unity was their greatest strength.

The Battle of Onigashima
The group reached the coast, built a boat, and sailed to the dark, craggy shores of Onigashima. The island was guarded by a massive iron gate.

The Pheasant flew over the walls to distract the Oni and peck at their eyes.

The Monkey climbed the walls and unbolted the Great Gate from the inside.

The Dog and Momotaro charged in, using their immense strength to overpower the demons.

The Oni were caught off guard by the coordinated attack. After a fierce battle, the King of the Oni fell to his knees before Momotaro, begging for mercy. He promised to never trouble the villagers again and surrendered all the stolen gold, jewels, and precious silks.

The Triumphant Return
Momotaro and his three companions loaded the treasure onto their boat and returned to the village. The entire town celebrated their homecoming.

Momotaro used the wealth to ensure his elderly parents lived the rest of their lives in comfort and peace. He remained in the village as a legendary protector, and his story was passed down for generations as a reminder that bravery and cooperation can overcome even the greatest evils.
- Mentre l'agente è in funzione, puoi visualizzare gli eventi nel terminale dell'editor di Cloud Shell.
- La generazione di tutte le immagini potrebbe richiedere un po' di tempo, quindi ti invitiamo ad avere pazienza o a prendere un caffè. Quando inizia la generazione delle immagini, dovresti essere in grado di visualizzare le immagini correlate alla storia, come mostrato di seguito.
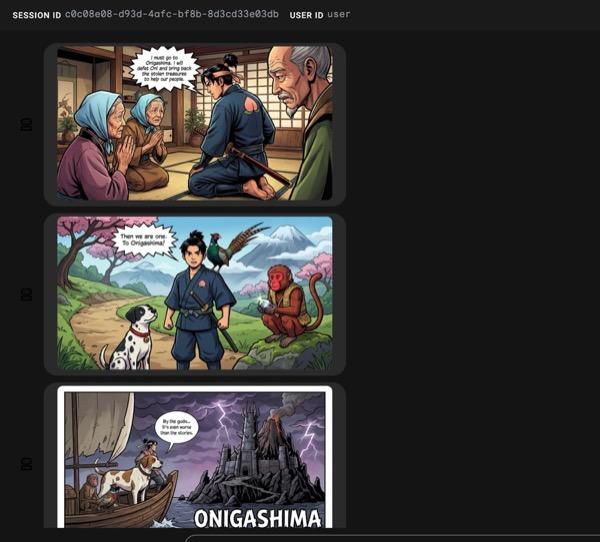
Figura 34: La storia di Momotaro come striscia a fumetti 25. Se tutto funziona correttamente, il file HTML generato deve essere salvato nella cartella HTML. Se vuoi apportare miglioramenti all'agente, puoi tornare all'assistente dell'agente e chiedergli di apportare altre modifiche.
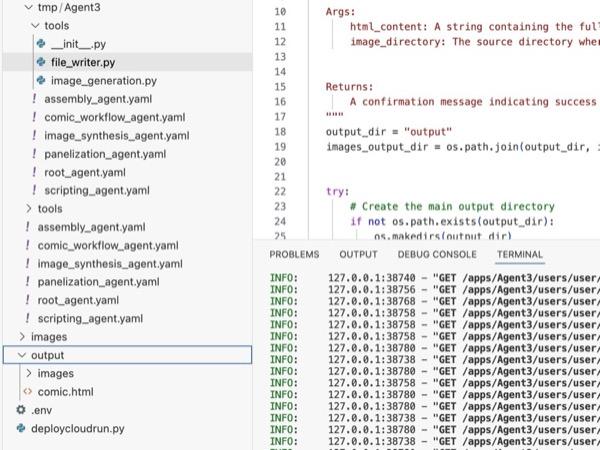
Figura 35: Contenuto della cartella di output
- Se il passaggio 25 viene eseguito correttamente e ottieni comic.html nella cartella output. Per testarlo, segui questi passaggi. Innanzitutto, apri un nuovo terminale facendo clic su Terminale> Nuovo terminale dal menu principale di Cloud Shell Editor. Si aprirà un nuovo terminale.
#go to the project folder
cd ~/adkui

#activate python virtual environment
source .venv/bin/activate

#Go to the output folder
cd ~/adkui/output

#start local web server
python -m http.server 8080
- Ctrl+Click su http://0.0.0.0:8080

Figura 36: Esecuzione del server web locale
- Il contenuto della cartella dovrebbe essere visualizzato nella scheda del browser. Fai clic sul file HTML (et. comic.html). Il fumetto dovrebbe essere visualizzato come di seguito (l'output potrebbe essere leggermente diverso).
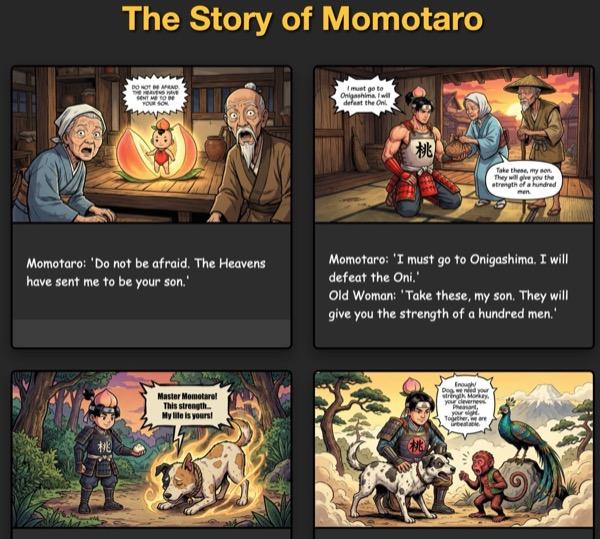
Figura 37: esecuzione su localhost
12. Esegui la pulizia
Ora liberiamo spazio da ciò che abbiamo appena creato.
- Elimina l'app Cloud Run che abbiamo appena creato. Vai a Cloud Run accedendo a Cloud Run . Dovresti riuscire a vedere l'app che hai creato nel passaggio precedente. Seleziona la casella accanto all'app e fai clic sul pulsante Elimina.
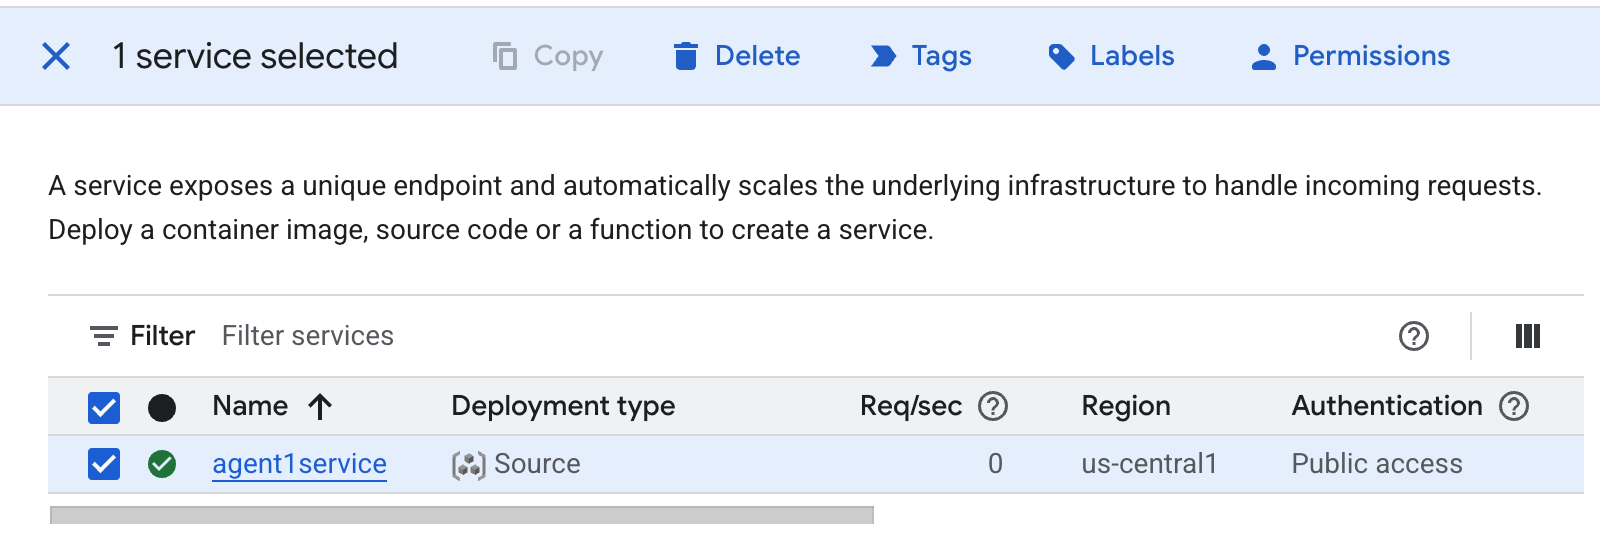 Figura 38: Eliminazione dell'app Cloud Run 2. Elimina i file in Cloud Shell
#Execute the following to delete the files
cd ~
rm -R ~/adkui
13. Conclusione
Complimenti! Hai creato correttamente agenti ADK (Agent Development Kit) utilizzando il builder ADK Visual integrato. Hai anche imparato a eseguire il deployment dell'applicazione in Cloud Run. Si tratta di un risultato significativo che copre il ciclo di vita principale di un'applicazione cloud-native moderna, fornendoti una base solida per il deployment dei tuoi sistemi agentici complessi.
Riepilogo
In questo lab hai imparato a:
- Crea un'applicazione multiagente utilizzando ADK Visual Builder
- Esegui il deployment dell'applicazione in Cloud Run
Risorse utili