
1. このラボの目的
このハンズオン ラボでは、ADK(Agent Development Kit)Visual Builder を使用してエージェントを作成する方法を学習します。ADK(Agent Development Kit)Visual Builder は、ADK(Agent Development Kit)エージェントをローコードで作成する方法を提供します。アプリケーションをローカルでテストし、Cloud Run にデプロイする方法を学びます。
学習内容
- ADK(Agent Development Kit) の基本を理解している。
- ADK(Agent Development Kit)Visual Builder の基本を理解する
- GUI ツールを使用してエージェントを作成する方法を学習します。
- Cloud Run でエージェントを簡単にデプロイして使用する方法を学習する。
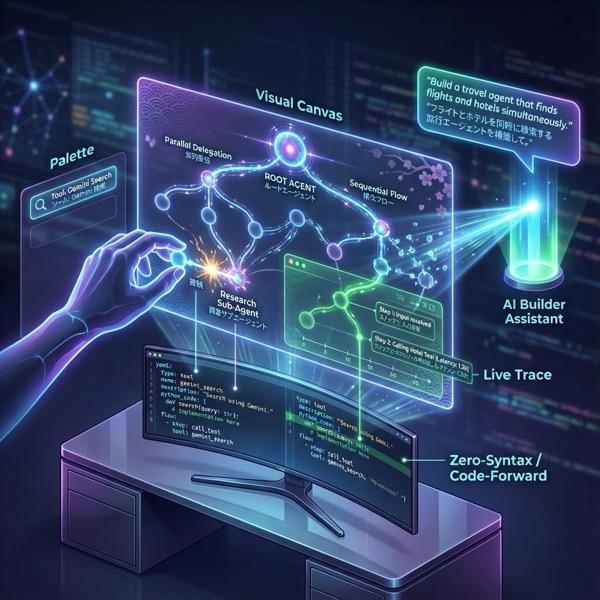
図 1: ADK Visual Builder を使用すると、ローコードで GUI を使用してエージェントを作成できます
2. プロジェクトのセットアップ
- 使用できるプロジェクトがまだない場合は、GCP コンソールで新しいプロジェクトを作成する必要があります。プロジェクト セレクタ(Google Cloud コンソールの左上)でプロジェクトを選択します。
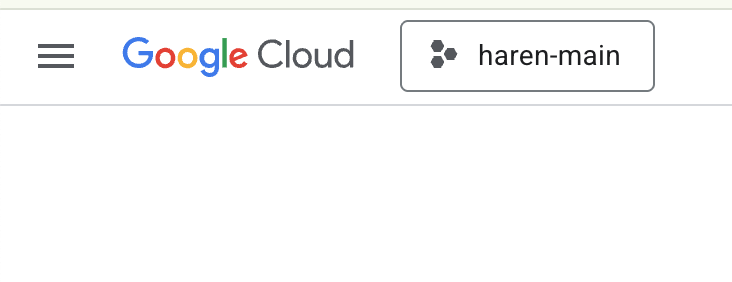
図 2: Google Cloud ロゴの横にあるボックスをクリックすると、プロジェクトを選択できます。プロジェクトが選択されていることを確認します。
- このラボでは、Cloud Shell エディタを使用してタスクを実行します。Cloud Shell を開き、Cloud Shell を使用してプロジェクトを設定します。
- このリンクをクリックすると、Cloud Shell エディタに直接移動します。
- メニューから [Terminal] > [New Terminal] をクリックして、ターミナルを開きます(まだ開いていない場合)。このチュートリアルのコマンドはすべて、このターミナルで実行できます。
- プロジェクトがすでに認証されているかどうかを確認するには、Cloud Shell ターミナルで次のコマンドを使用します。
gcloud auth list
- Cloud Shell で次のコマンドを実行して、プロジェクトを確認します。
gcloud config list project
- プロジェクト ID をコピーし、次のコマンドを使用して設定します。
gcloud config set project <YOUR_PROJECT_ID>
- プロジェクト ID がわからない場合は、次のコマンドを使用してすべてのプロジェクト ID を一覧表示できます。
gcloud projects list
3. API を有効にする
このラボを実行するには、いくつかの API サービスを有効にする必要があります。Cloud Shell で次のコマンドを実行します。
gcloud services enable aiplatform.googleapis.com
gcloud services enable cloudresourcemanager.googleapis.com
API の概要
- Vertex AI API(
aiplatform.googleapis.com)を使用すると、Vertex AI プラットフォームにアクセスできます。これにより、アプリケーションはテキスト生成、チャット セッション、関数呼び出しのために Gemini モデルを操作できます。 - Cloud Resource Manager API(
cloudresourcemanager.googleapis.com)を使用すると、プロジェクト ID や名前など、Google Cloud プロジェクトのメタデータをプログラムで管理できます。これらのメタデータは、プロジェクトの ID と権限を確認するために他のツールや SDK で必要になることがよくあります。
4. クレジットが適用されているかどうかを確認する
プロジェクト設定の段階で、Google Cloud でサービスを使用できるようにする無料クレジットを申請しました。クレジットを適用すると、「Google Cloud Platform Trial Billing Account」という新しい無料の請求先アカウントが作成されます。クレジットが適用されていることを確認するには、Cloud Shell エディタで次の操作を行います。
curl -s https://raw.githubusercontent.com/haren-bh/gcpbillingactivate/main/activate.py | python3
成功すると、次のような結果が表示されます。「Successfully linked project」と表示された場合は、請求先アカウントが正しく設定されています。上記の手順を実行すると、アカウントがリンクされているかどうかを確認できます。リンクされていない場合は、リンクされます。プロジェクトを選択していない場合は、プロジェクトを選択するよう求められます。または、プロジェクトの設定の手順に沿って事前に選択することもできます。
図 3: 請求先アカウントのリンクの確認
5. Agent Development Kit の概要
Agent Development Kit には、エージェント アプリケーションを構築するデベロッパーにとって、次のような重要なメリットがあります。
- マルチエージェント システム: 階層構造で複数の専門エージェントを構成して、モジュール型のスケーラブルなアプリケーションを構築します。複雑な調整と委任が可能です。
- 充実したツール エコシステム: エージェントに、多様な機能を装備させることができます。たとえば、事前構築済みのツール(検索、コード実行など)の使用、カスタム関数の作成、サードパーティのエージェント フレームワーク(LangChain、CrewAI)のツールの統合、他のエージェントのツールとしての使用などです。
- 柔軟なオーケストレーション: ワークフロー エージェント(
SequentialAgent、ParallelAgent、LoopAgent)を使用して、予測可能なパイプラインのワークフローを定義します。また、LLM による動的ルーティング(LlmAgent転送)を活用して適応性のある動作を実現します。 - 統合されたデベロッパー エクスペリエンス: 強力な CLI とインタラクティブな開発 UI を使用して、ローカルで開発、テスト、デバッグを行います。イベント、状態、エージェントの実行をステップごとに検証します。
- 組み込みの評価: 最終的な回答の質と、定義済みのテストケースに対する段階的な実行軌跡の両方を評価することで、エージェントのパフォーマンスを体系的に測定します。
- デプロイの準備: エージェントをコンテナ化してどこにでもデプロイできます。ローカルでの実行、Vertex AI Agent Engine でのスケーリング、Cloud Run や Docker を使用したカスタム インフラストラクチャへの統合が可能です。
他の生成 AI SDK やエージェント フレームワークでも、モデルのクエリやツールによるモデルの強化は可能ですが、複数のモデル間の動的な調整には、開発者によるかなりの作業が必要になります。
Agent Development Kit は、これらのツールよりも高レベルのフレームワークを提供します。これにより、複数のエージェントを簡単に連携させて、複雑ながらも保守が容易なワークフローを実現できます。
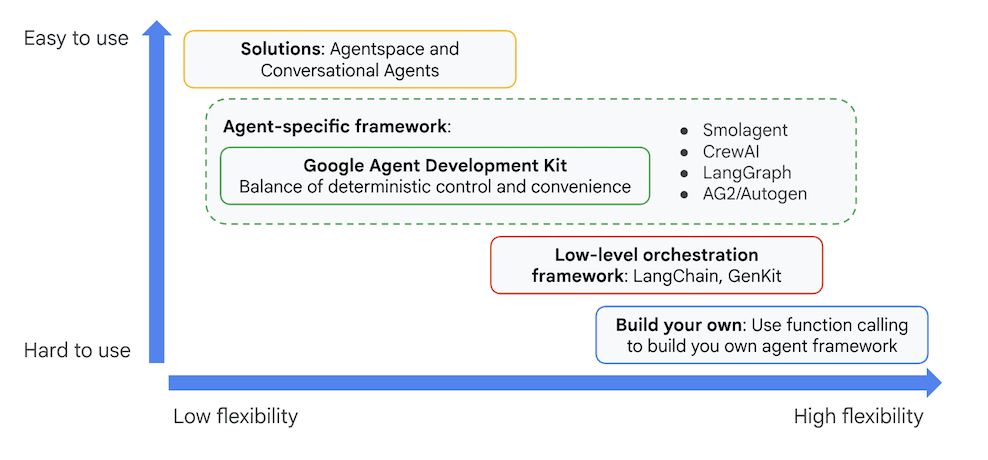
図 4: ADK(Agent Development Kit)の位置付け
最近のバージョンでは、ADK(Agent Development Kit)に ADK Visual Builder ツールが追加され、ローコードで ADK(Agent Development Kit)エージェントを構築できるようになりました。このラボでは、ADK Visual Builder ツールについて詳しく説明します。
6. ADK をインストールして環境を設定する
まず、ADK(Agent Development Kit)を実行できるように環境を設定する必要があります。このラボでは、ADK(Agent Development Kit)を実行し、Google Cloud の Cloud Shell エディタですべてのタスクを実行します。
Cloud Shell エディタを準備する
- このリンクをクリックすると、Cloud Shell エディタに直接移動します。
- [続行] をクリックします。
- Cloud Shell を承認するよう求められたら、[承認] をクリックします。
- このラボの残りの部分では、このウィンドウを Cloud Shell エディタと Cloud Shell ターミナルを備えた IDE として使用できます。
- Cloud Shell エディタで [ターミナル] > [新しいターミナル] を使用して、新しいターミナルを開きます。以下のコマンドはすべてこのターミナルで実行します。
ADK ビジュアル エディタを起動する
- 次のコマンドを実行して、必要なソースを GitHub からクローンし、必要なライブラリをインストールします。Cloud Shell エディタで開いたターミナルでコマンドを実行します。
#create the project directory
mkdir ~/adkui
cd ~/adkui
- uv を使用して Python 環境を作成します(Cloud Shell エディタのターミナルで実行)。
#Install uv if you do not have installed yet
pip install uv

#go to the project directory
cd ~/adkui

#Create the virtual environment
uv venv


#use the newly created environment
source .venv/bin/activate

#install libraries
uv pip install google-adk==1.22.1
uv pip install python-dotenv
注: ターミナルを再起動する必要がある場合は、必ず「source .venv/bin/activate」を実行して Python 環境を設定してください。
- エディタで、[View] -> [Toggle hidden files] に移動します。また、adkui フォルダに次の内容の .env ファイルを作成します。
#go to adkui folder
cd ~/adkui
cat <<EOF>> .env
GOOGLE_GENAI_USE_VERTEXAI=1
GOOGLE_CLOUD_PROJECT=$(gcloud config get-value project)
GOOGLE_CLOUD_LOCATION=us-central1
IMAGEN_MODEL="imagen-3.0-generate-002"
GENAI_MODEL="gemini-2.5-flash"
EOF
7. ADK Visual Builder を使用してシンプルなエージェントを作成する
このセクションでは、ADK Visual Builder を使用してシンプルなエージェントを作成します。ADK Visual Builder は、ADK(Agent Development Kit)エージェントの作成と管理を行うためのビジュアル ワークフロー設計環境を提供するウェブベースのツールです。初心者向けのグラフィカル インターフェースでエージェントを設計、構築、テストできます。また、エージェントの構築を支援する AI 搭載のアシスタントも含まれています。
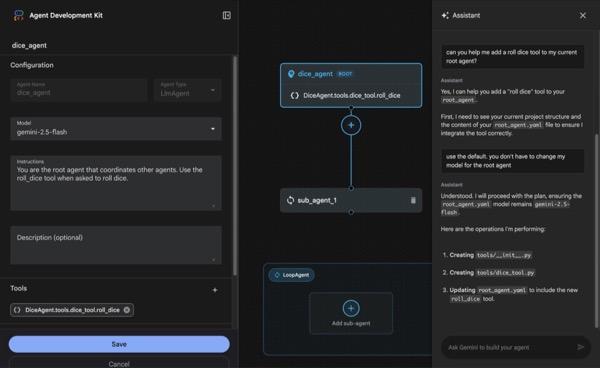
図 5: ADK Visual Builder
- ターミナルの最上位ディレクトリ adkui に戻り、次のコマンドを実行してエージェントをローカルで実行します(Cloud Shell エディタのターミナルで実行)。ADK サーバーを起動し、ターミナルに図 6 のような結果が表示されるはずです。
#go to the directory adkui
cd ~/adkui
# Run the following command to run ADK locally
adk web

図 6: ADK アプリケーションの起動
- ターミナルに表示された http:// URL を Ctrl キーを押しながらクリック(MacOS の場合は CMD キーを押しながらクリック)して、ADK(エージェント開発キット)ブラウザベースの GUI ツールを開きます。
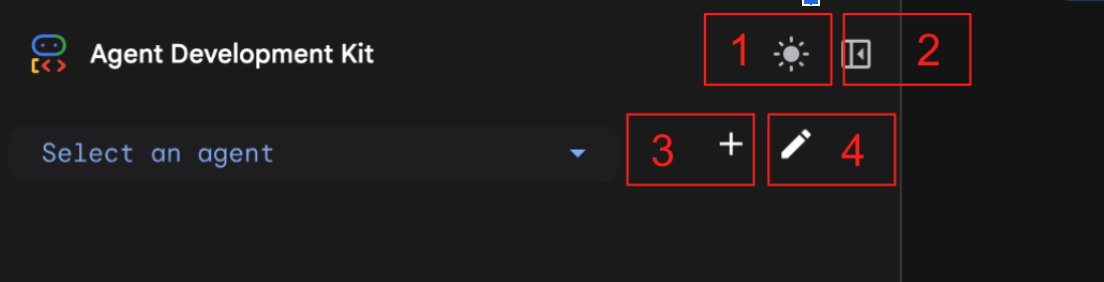
図 7: ADK ウェブ UI。ADK には次のコンポーネントがあります。1: ライトモードとダークモードの切り替え 2: パネルの折りたたみ 3: エージェントの作成 4: エージェントの編集
- 新しいエージェントを作成するには、[+] ボタンを押します。
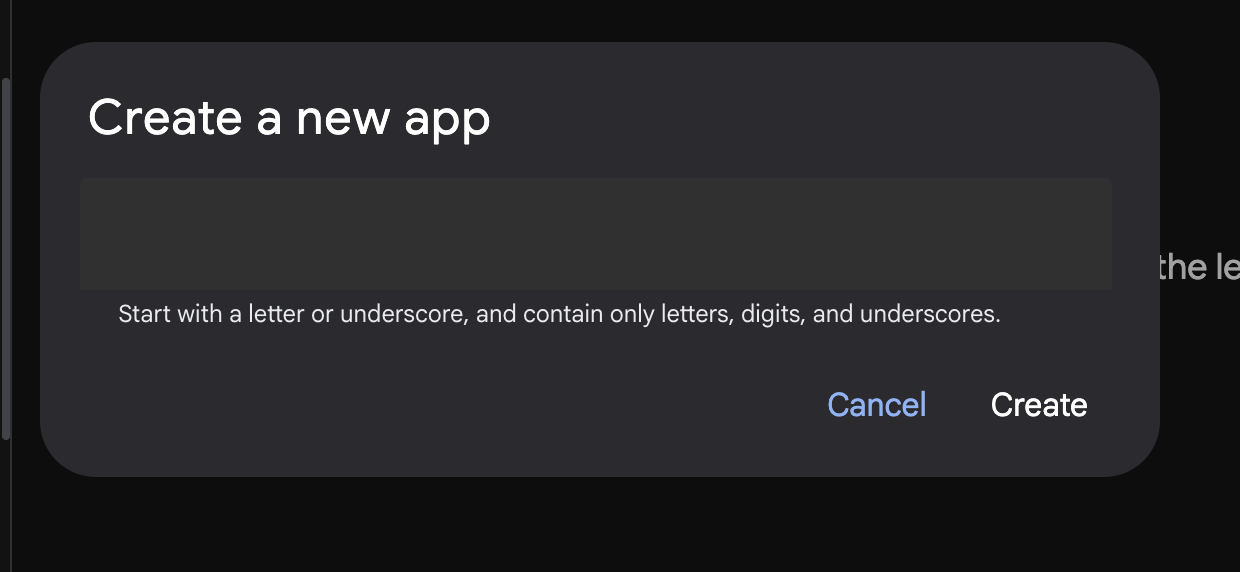
図 8: 新しいアプリを作成するためのダイアログ
- 「Agent1」という名前を付けて、[作成] をクリックします。
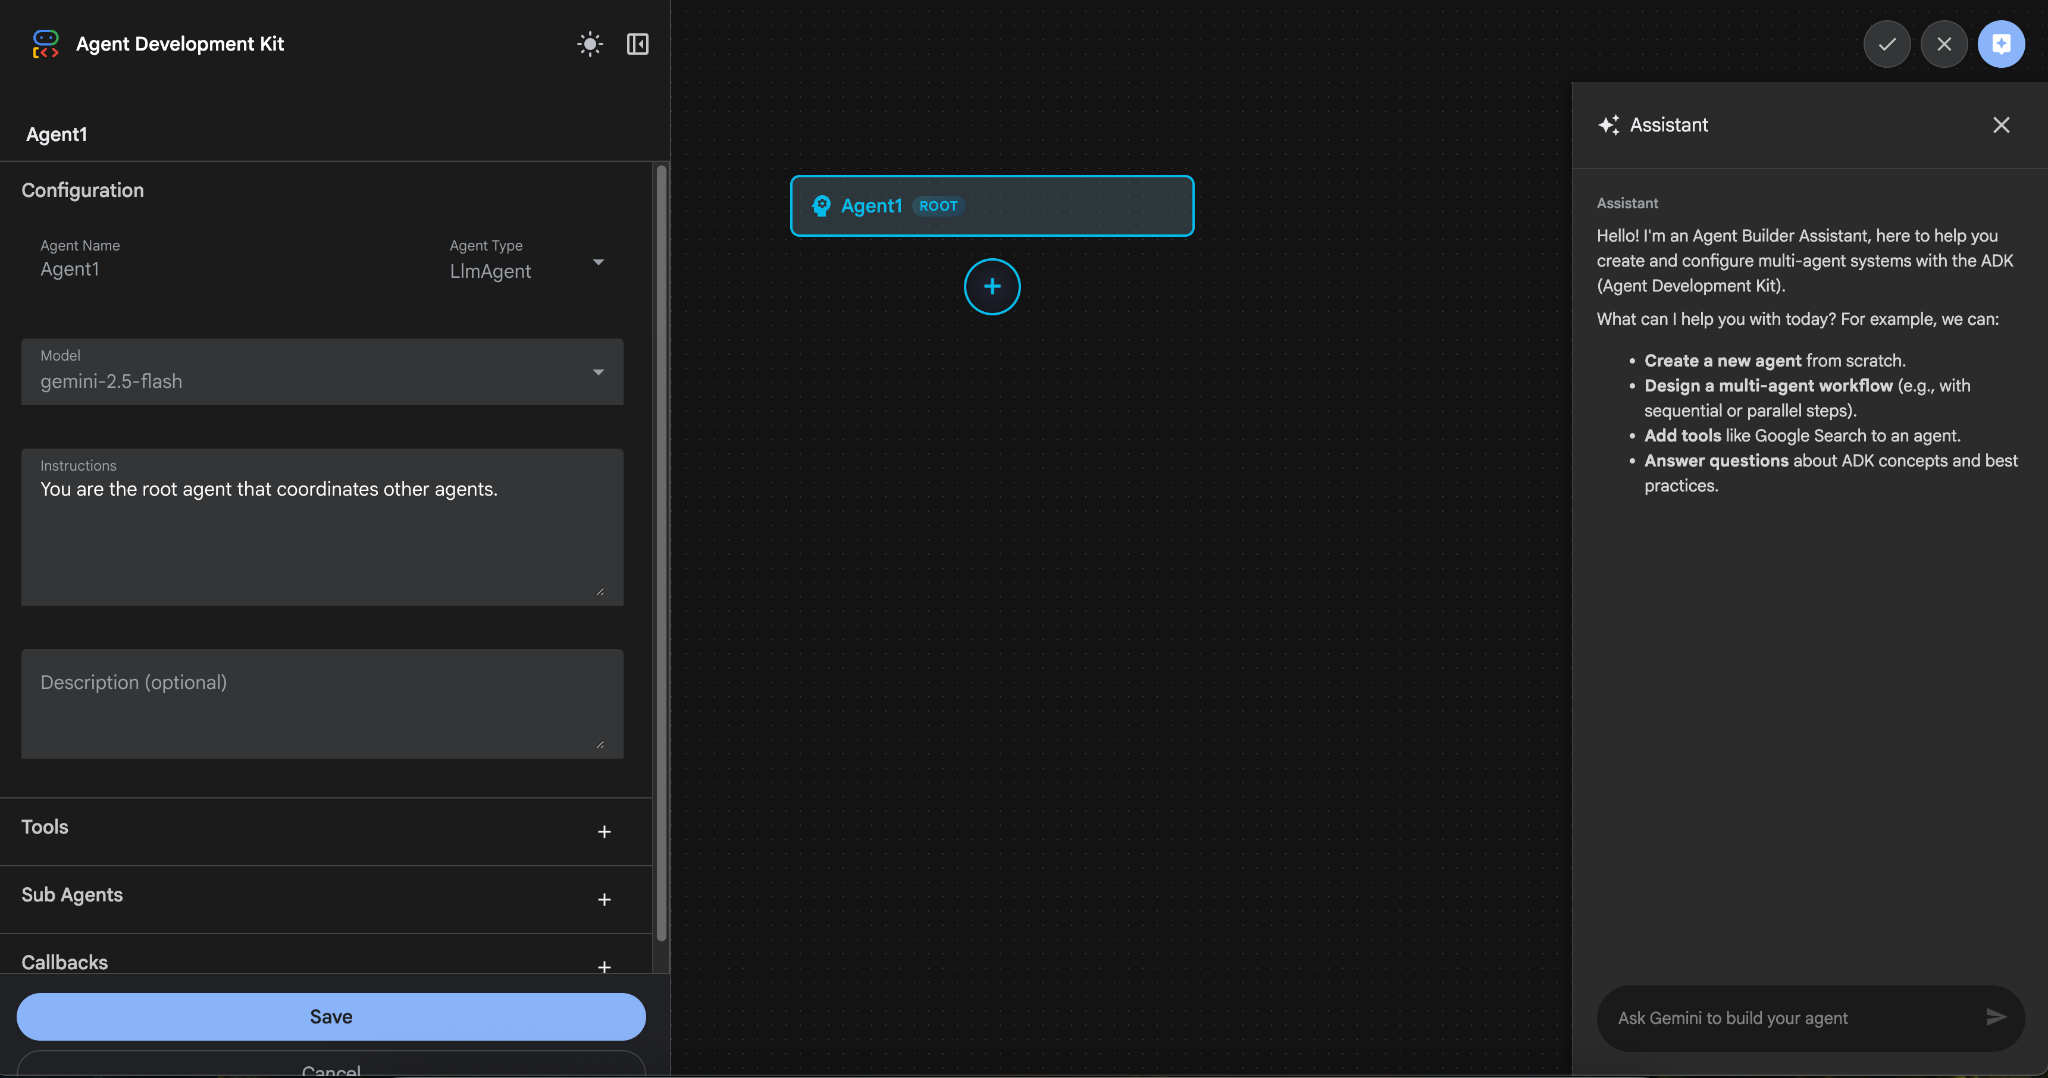
図 9: エージェント ビルダーの UI
- パネルは 3 つの主要なセクションに分かれています。左側には GUI ベースのエージェント作成のコントロール、中央には進行状況の可視化、右側には自然言語を使用してエージェントを構築するためのアシスタントが表示されます。
- エージェントが正常に作成されました。[保存] ボタンをクリックして続行します。(注: 変更内容が失われないように、必ず [保存] をクリックしてください)。
- これで、エージェントのテストの準備が整いました。まず、チャット ボックスに次のようなプロンプトを入力します。
Hi, what can you do?
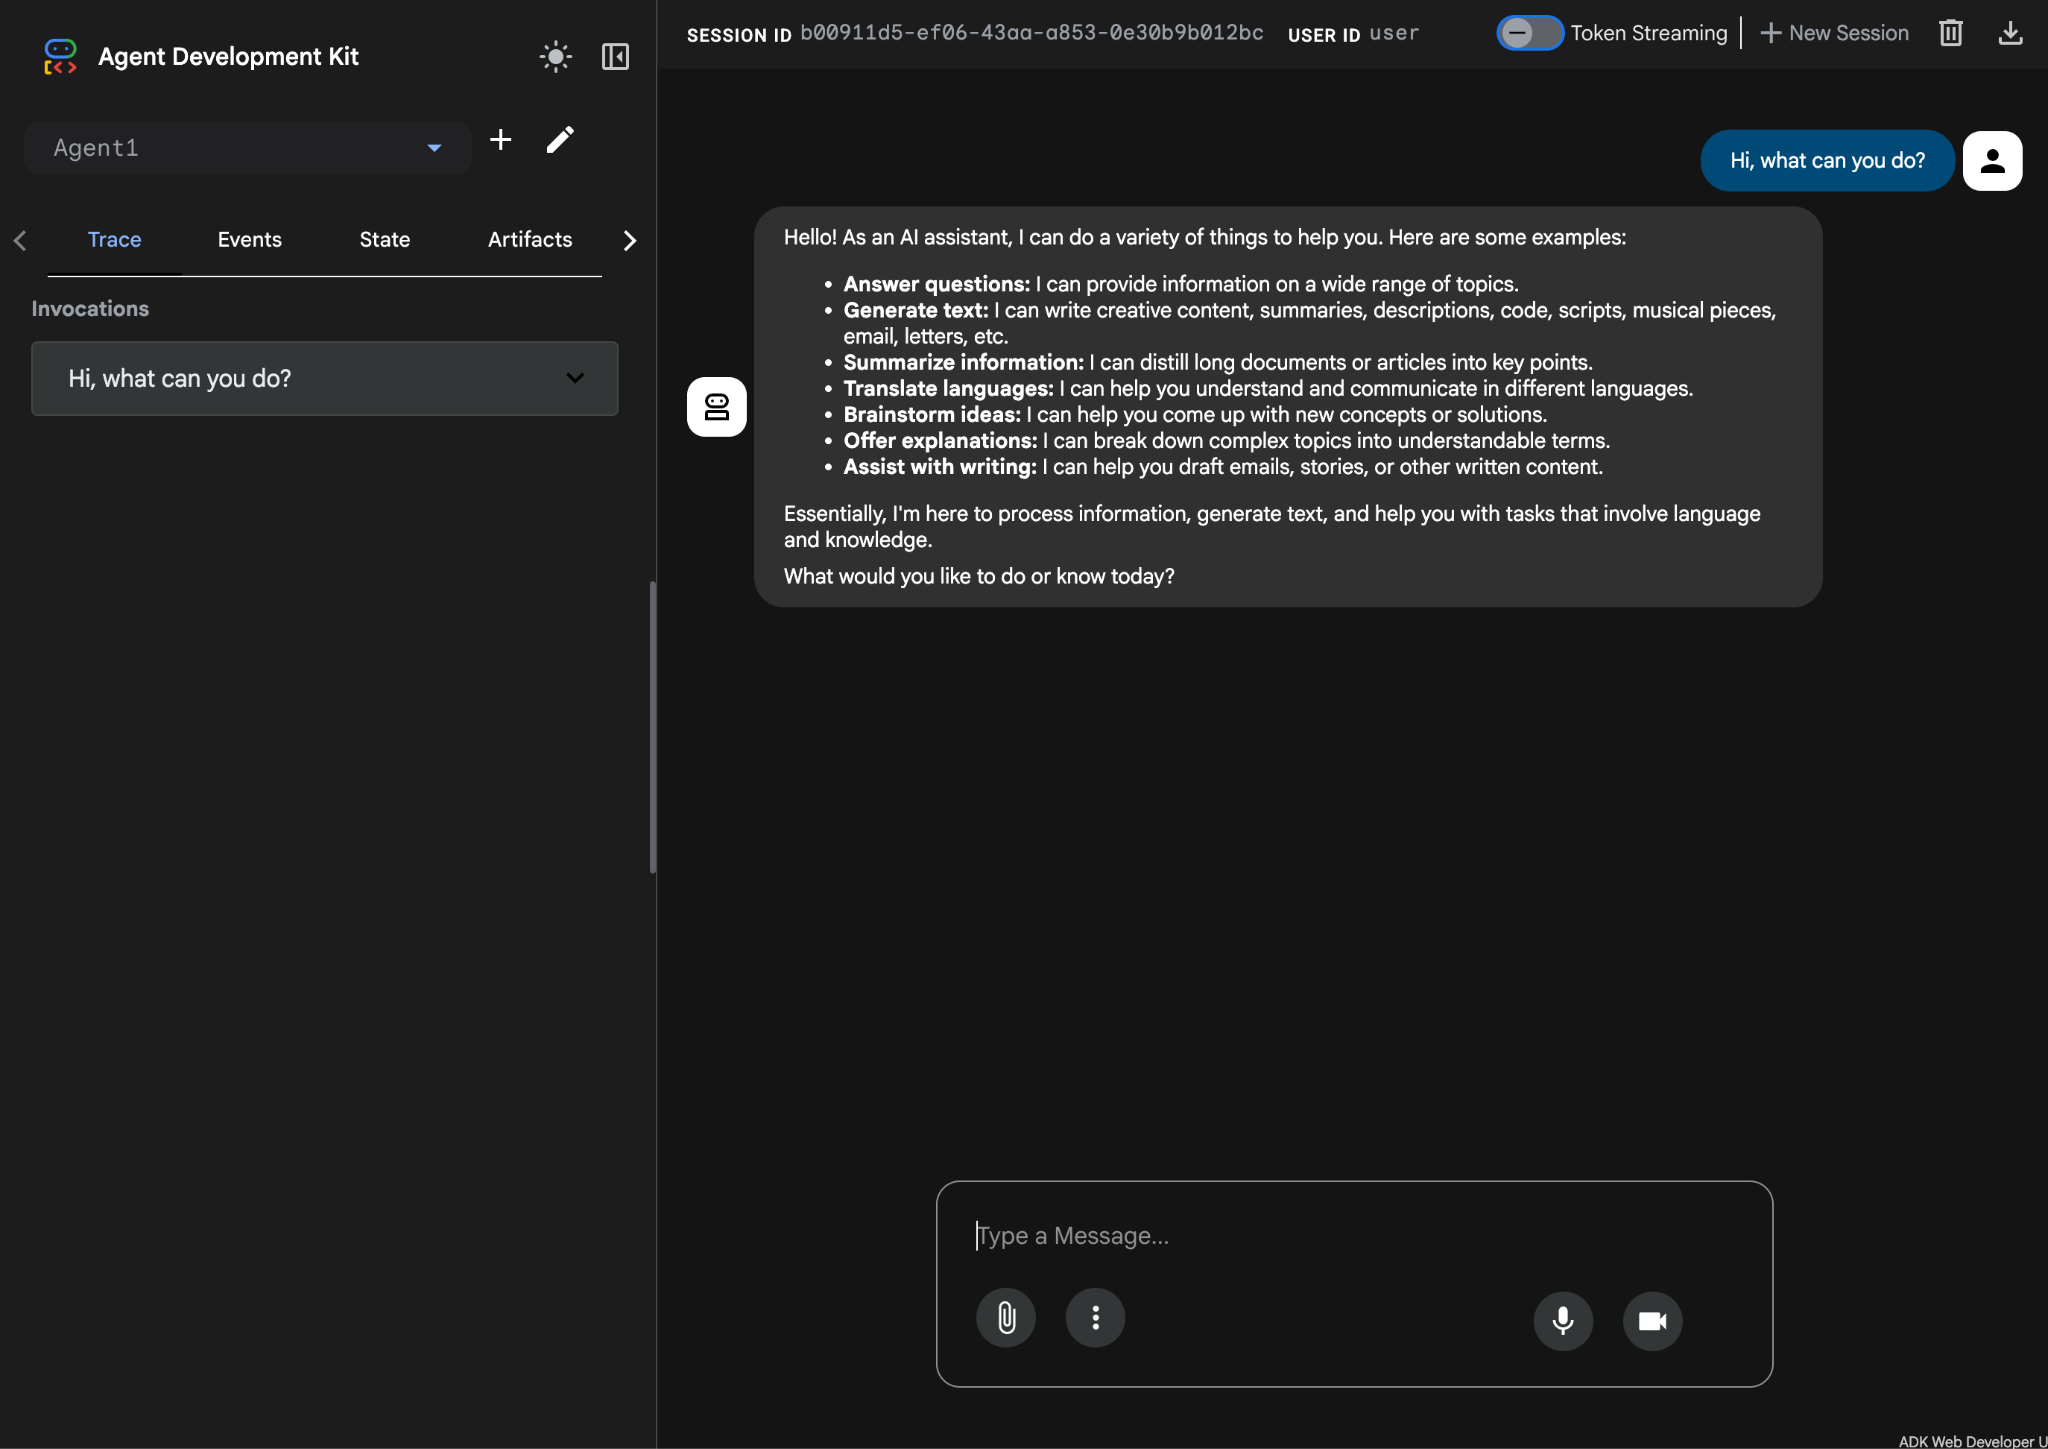
図 10: エージェントのテスト。
7. エディタに戻り、新しく生成されたファイルを確認します。左側にエクスプローラが表示されます。adkgui フォルダに移動して展開し、Agent 1 ディレクトリを表示します。フォルダで、次の図に示すように、エージェントを定義する YAML ファイルを確認できます。
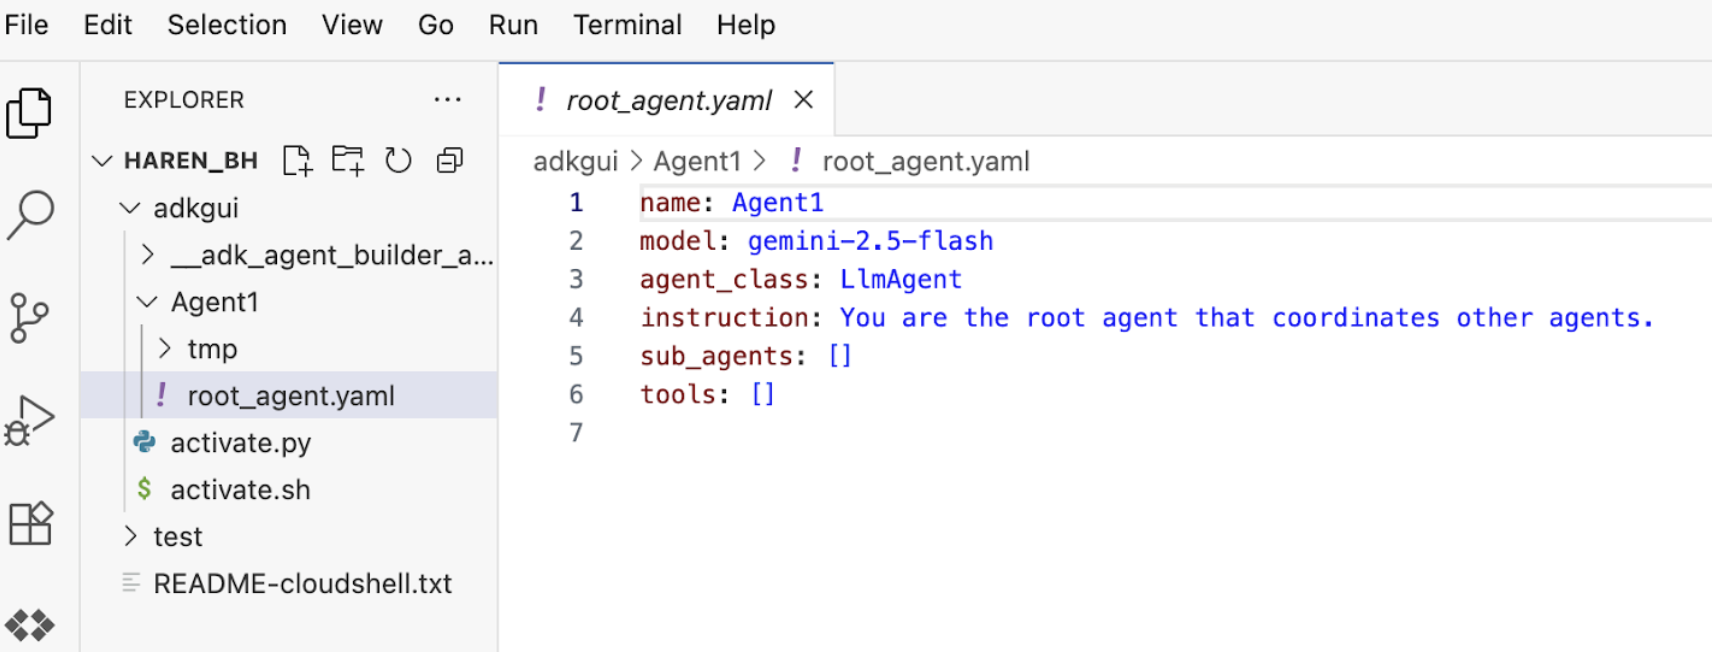
図 11: YAML ファイルを使用したエージェント定義
- では、GUI エディタに戻って、エージェントにいくつかの機能を追加しましょう。これを行うには、編集ボタン(図 7 のコンポーネント番号 4、ペンアイコンを参照)を押します。
- エージェントに Google 検索機能を追加します。そのためには、エージェントが使用できるツールとして Google 検索を追加する必要があります。これを行うには、画面の左下にある [ツール] セクションの横にある [+] 記号をクリックし、メニューから [組み込みツール] をクリックします(図 12 を参照)。
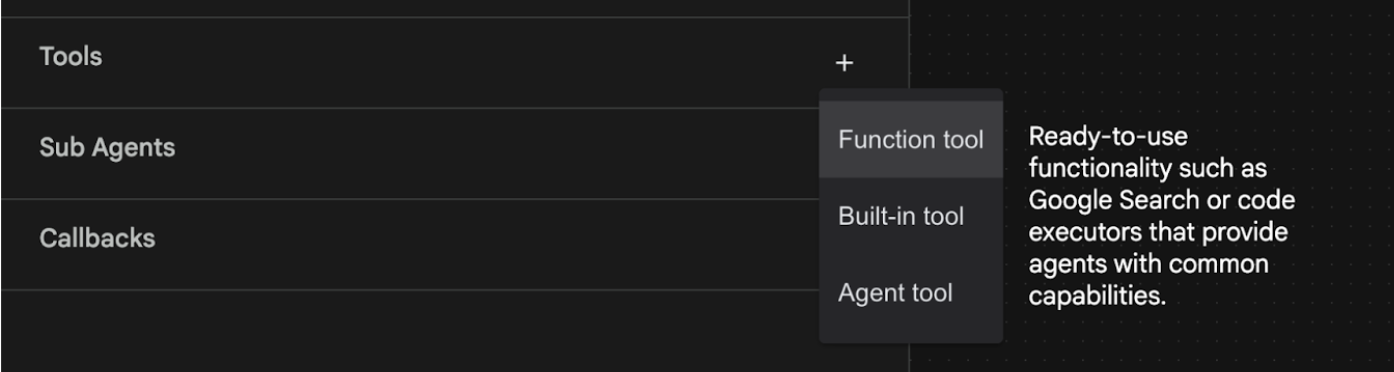
図 12: エージェントに新しいツールを追加する
- [Built-in Tool] リストから [google_search] を選択し、[Create(図 12 を参照)] をクリックします。これにより、Google 検索がエージェントのツールとして追加されます。
- [保存] ボタンを押して、変更を保存します。
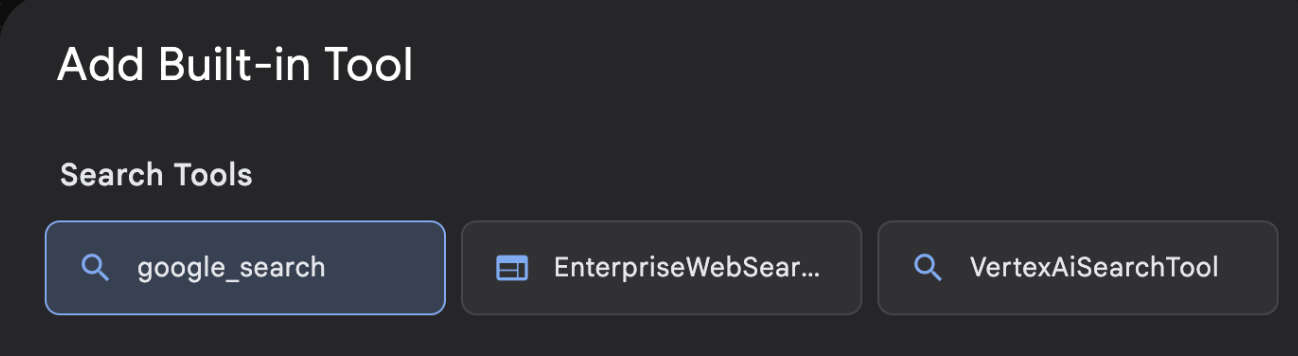
図 13: ADK Visual Builder UI で使用可能なツールのリスト
- これで、エージェントをテストする準備が整いました。まず、ADK サーバーを再起動します。ADK(Agent Development Kit)サーバーを起動したターミナルに移動し、サーバーがまだ実行中の場合は Ctrl+C キーを押してサーバーをシャットダウンします。次のコマンドを実行して、サーバーを再起動します。
#make sure you are in the right folder.
cd ~/adkui

#start the server
adk web
- URL を Ctrl+クリックします(例: http://localhost:8000)が表示されます。ブラウザのタブに ADK(Agent Development Kit)GUI が表示されます。
- エージェントのリストから [Agent1] を選択します。エージェントが Google 検索を実行できるようになりました。チャット ボックスで次のプロンプトを使用してテストします。
What is the weather today in Yokohama?
Google 検索からの回答が次のように表示されます。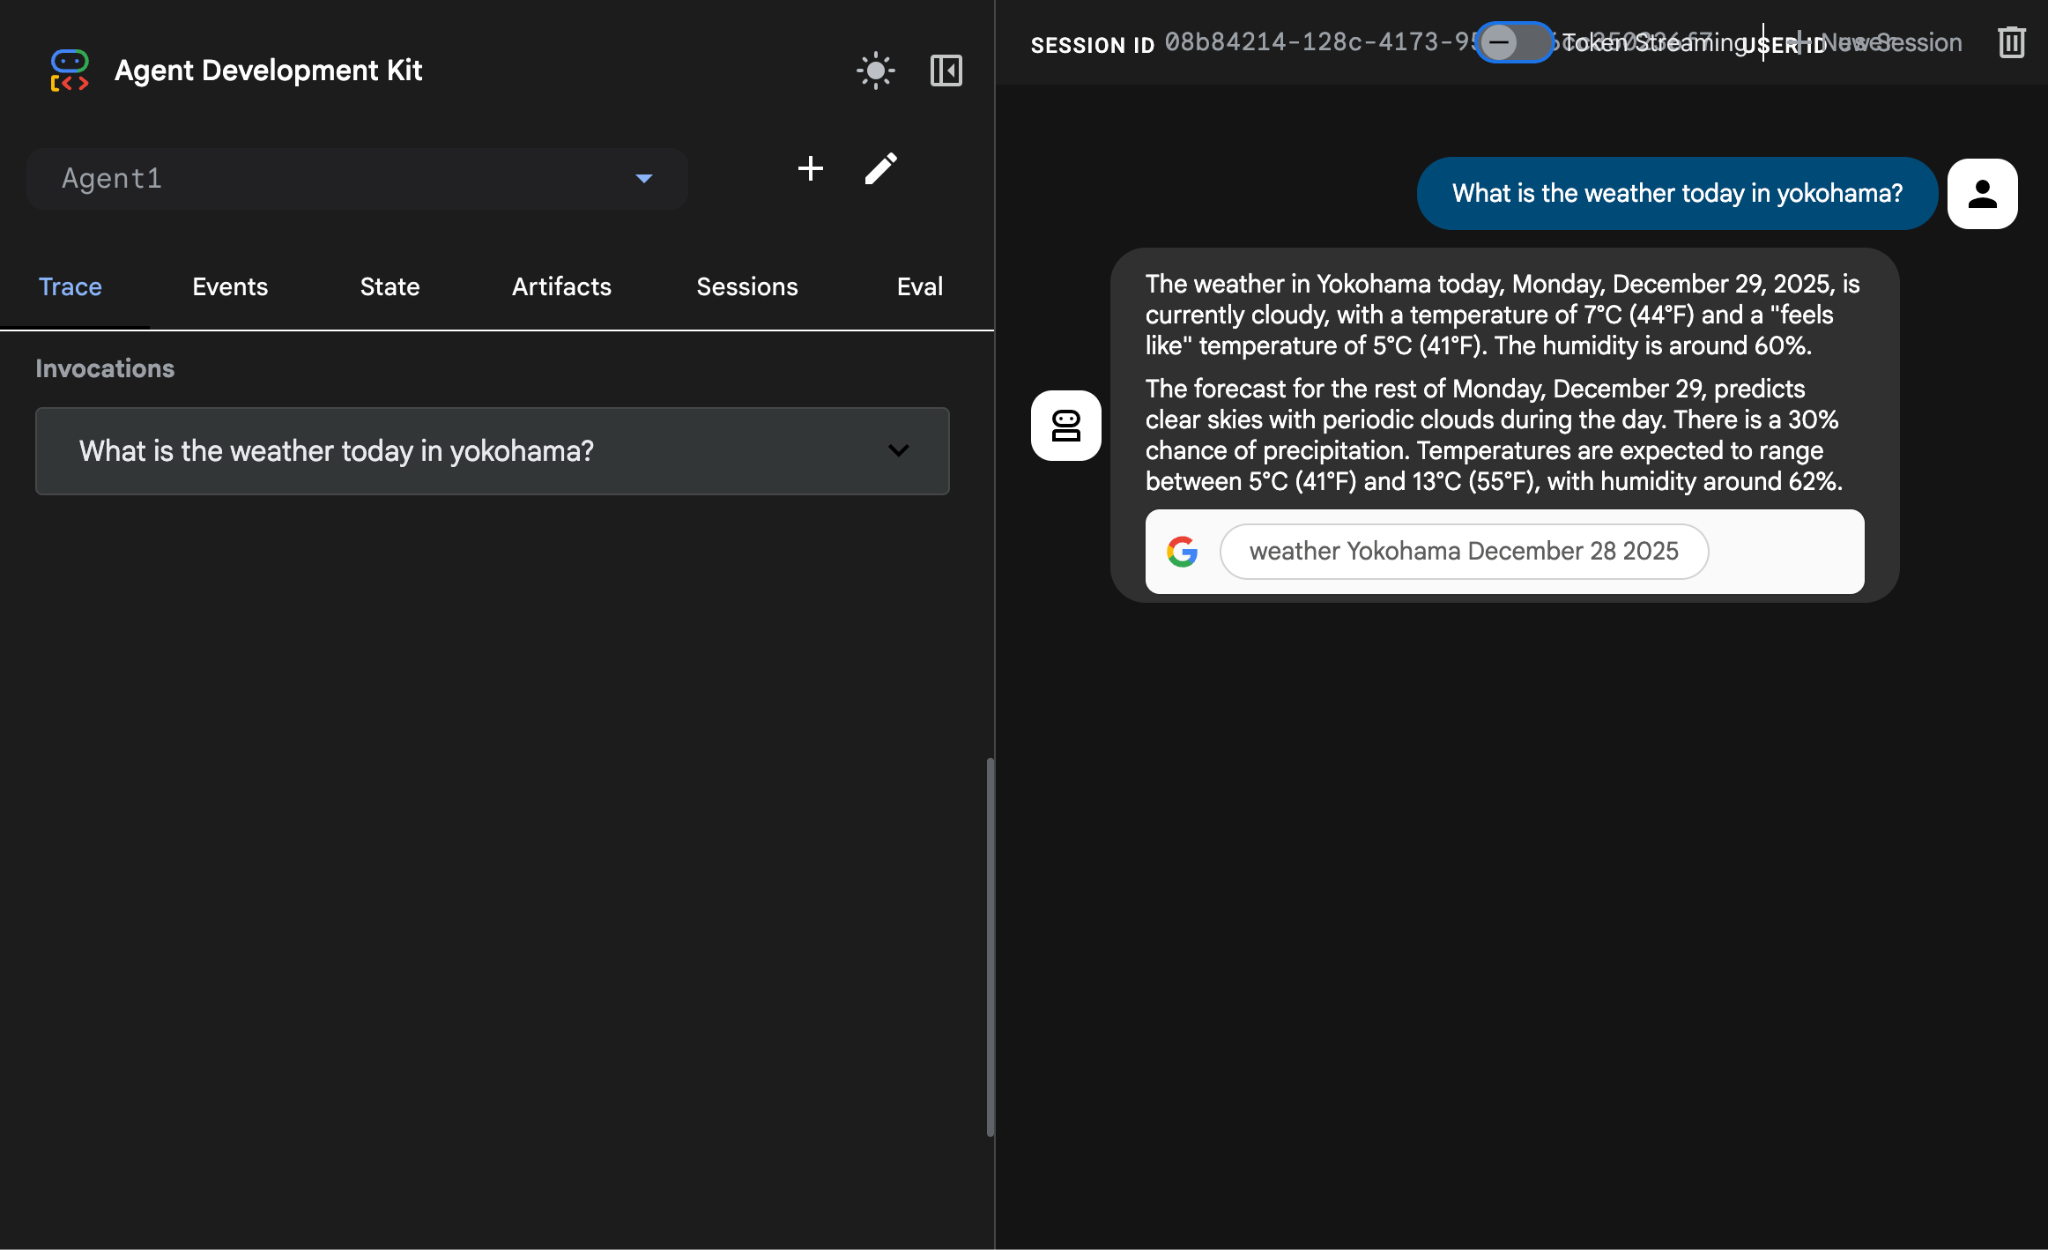
図 14: エージェントを使用した Google 検索
- エディタに戻って、このステップで作成されたコードを確認しましょう。エディタの [エクスプローラ] サイドパネルで、[root_agent.yaml] をクリックして開きます。google_search がツールとして追加されていることを確認します(図 15)。
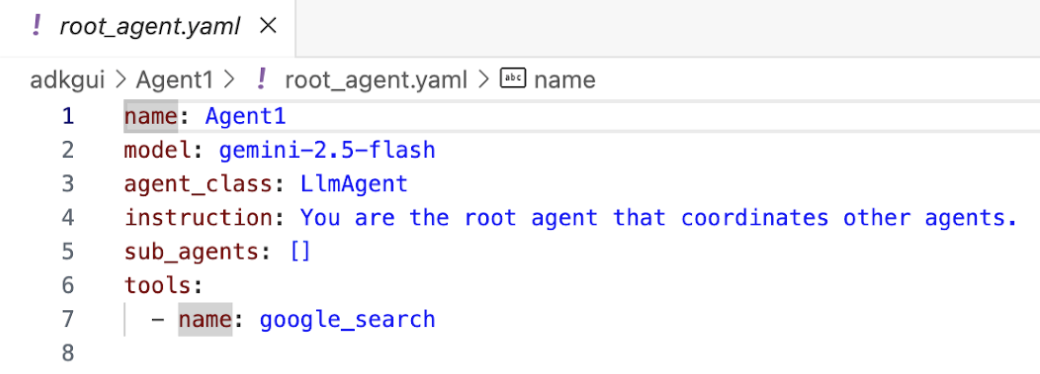
図 15: Agent1 にツールとして google_search が追加されたことを確認する
8. エージェントを Cloud Run にデプロイする
作成したエージェントを Cloud Run にデプロイしましょう。Cloud Run を使用すると、フルマネージド プラットフォーム上でアプリやウェブサイトを迅速に構築できます。
フロントエンド サービスやバックエンド サービス、バッチジョブの実行、LLM のホスト、キュー処理ワークロードの実行に対応でき、インフラストラクチャを管理する必要がありません。
Cloud Shell エディタのターミナルで、ADK(Agent Development Kit)サーバーがまだ実行中の場合は、Ctrl+C キーを押して停止します。
- プロジェクトのルート ディレクトリに移動します。
cd ~/adkui
- デプロイコードを取得します。コマンドを実行すると、Cloud Shell エディタのエクスプローラ ペインに deploycloudrun.py ファイルが表示されます。
curl -LO https://raw.githubusercontent.com/haren-bh/codelabs/main/adk_visual_builder/deploycloudrun.py
- deploycloudrun.py でデプロイ オプションを確認します。adk deploy コマンドを使用して、エージェントを Cloud Run にデプロイします。ADK(Agent Development Kit)には、エージェントを Cloud Run にデプロイするオプションが組み込まれています。Google Cloud プロジェクト ID、リージョンなどのパラメータを指定する必要があります。このスクリプトでは、アプリパスは agent_path=./Agent1 であると想定しています。また、必要な権限を持つ新しいサービス アカウントを作成し、Cloud Run に関連付けます。Cloud Run は、エージェントを実行するために Vertex AI や Cloud Storage などのサービスにアクセスする必要があります。
   command = [
        "adk", "deploy", "cloud_run",
        f"--project={project_id}",
        f"--region={location}",
        f"--service_name={service_name}",
        f"--app_name={app_name}",
        f"--artifact_service_uri=memory://",
        f"--with_ui",
        agent_path,
        f"--",
        f"--service-account={sa_email}",
    ]
- deploycloudrun.py スクリプトを実行します。次の図のように、デプロイが開始されます。**
python3 deploycloudrun.py
次のような確認メッセージが表示された場合は、すべてのメッセージに対して Y と Enter を押します。 depoycloudrun.py は、上記のようにエージェントが Agent1 フォルダにあることを前提としています。
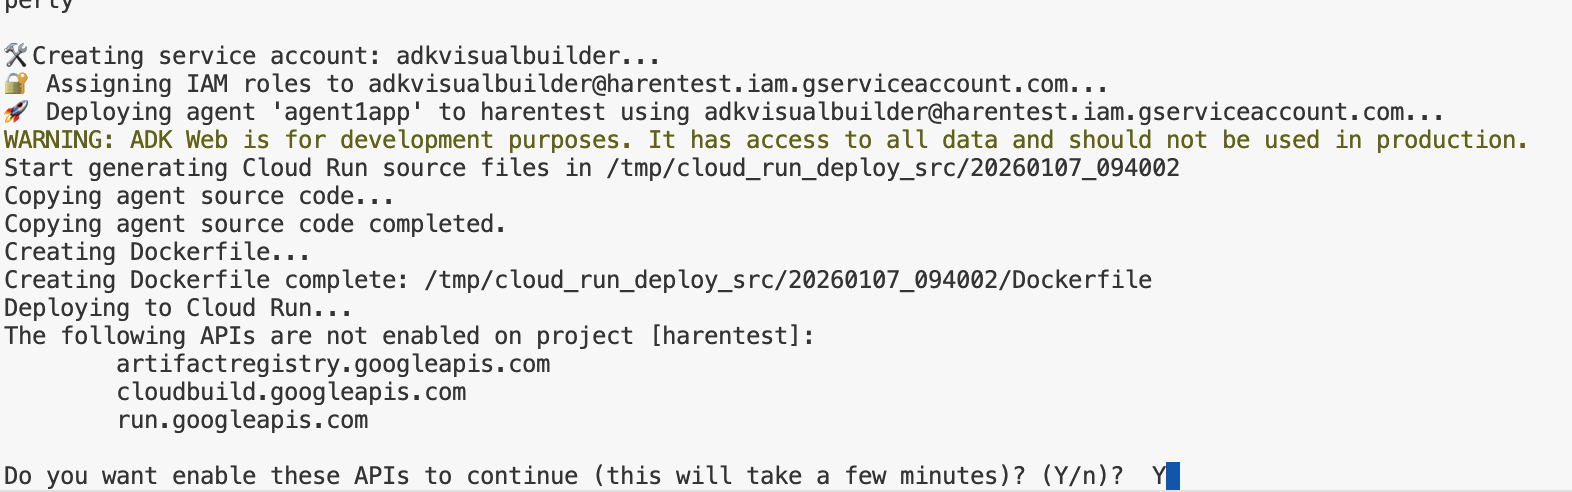
図 16: エージェントを Cloud Run にデプロイする。確認メッセージが表示されたら Y を押します。
- デプロイが完了すると、https://agent1service-78833623456.us-central1.run.app のようなサービス URL が表示されます。
- ウェブブラウザで URL にアクセスして、アプリを起動します。
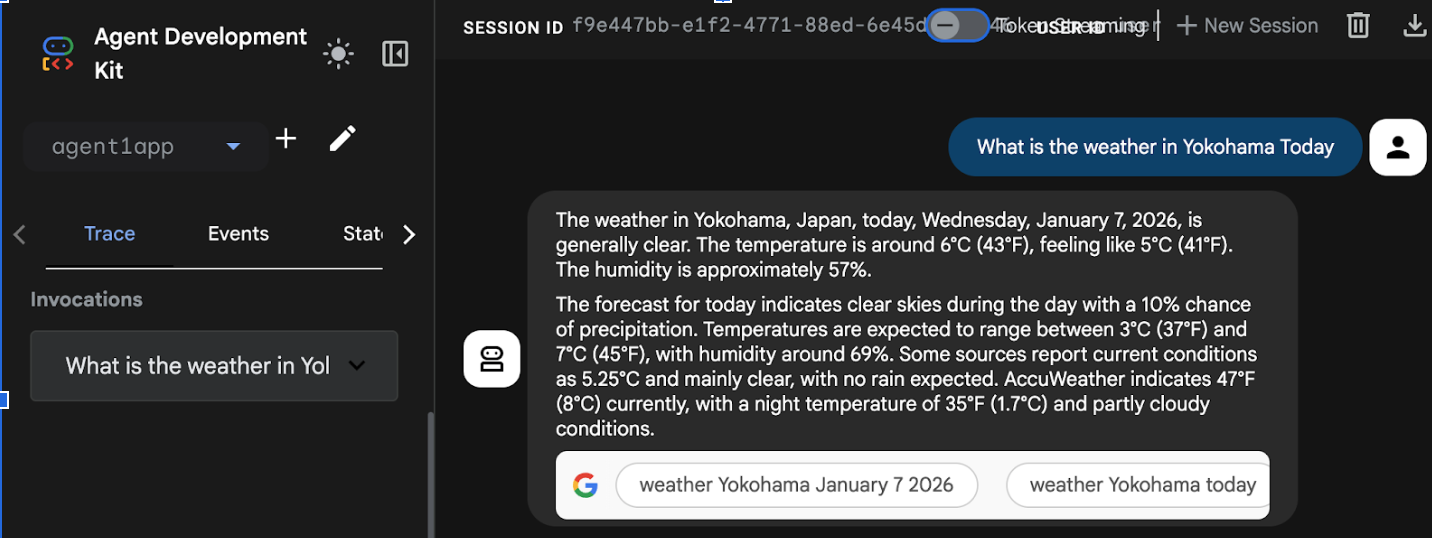
Figure 17: Agent running in Cloud Run
9. サブエージェントとカスタムツールを使用してエージェントを作成する
前のセクションでは、Google 検索ツールが組み込まれた単一のエージェントを作成しました。このセクションでは、エージェントがカスタムツールを使用できるマルチエージェント システムを作成します。
- まず、ADK(Agent Development Kit)サーバーを再起動します。ADK(Agent Development Kit)サーバーを起動したターミナルに移動し、サーバーがまだ実行中の場合は Ctrl+C キーを押してサーバーをシャットダウンします。次のコマンドを実行して、サーバーを再起動します。
#make sure you are in the right folder.
cd ~/adkui

#start the server
adk web
- URL を Ctrl+クリックします(例: http://localhost:8000)が表示されます。ブラウザのタブに ADK(Agent Development Kit)GUI が表示されます。
- [+] ボタンをクリックして、新しいエージェントを作成します。エージェントのダイアログで「Agent2」と入力し(図 18)、[作成] をクリックします。
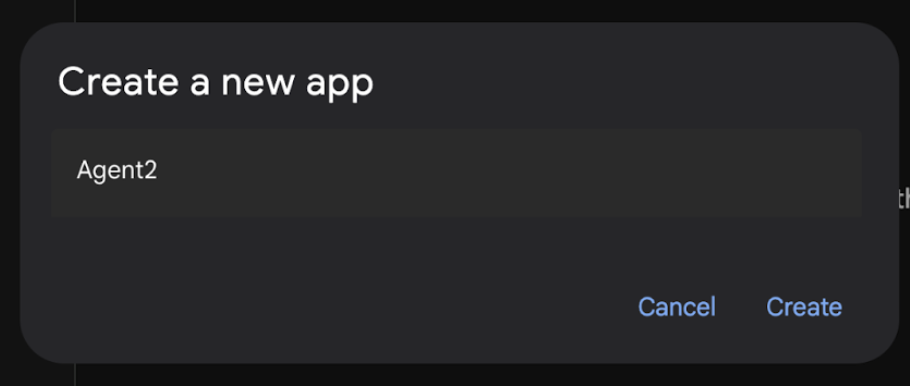
図 18: 新しいエージェント アプリを作成する。
- Agent2 の手順セクションに、次の内容を入力します。
You are an agent that takes image creation instruction from the user and passes it to your sub agent
- 次に、ルート エージェントにサブ エージェントを追加します。これを行うには、左側のペインの下部にある [Sub Agent] メニューの左側にある [+] ボタンをクリックし(図 19)、[LLM Agent] をクリックします。これにより、ルート エージェントの新しいサブエージェントとして新しいエージェントが作成されます。
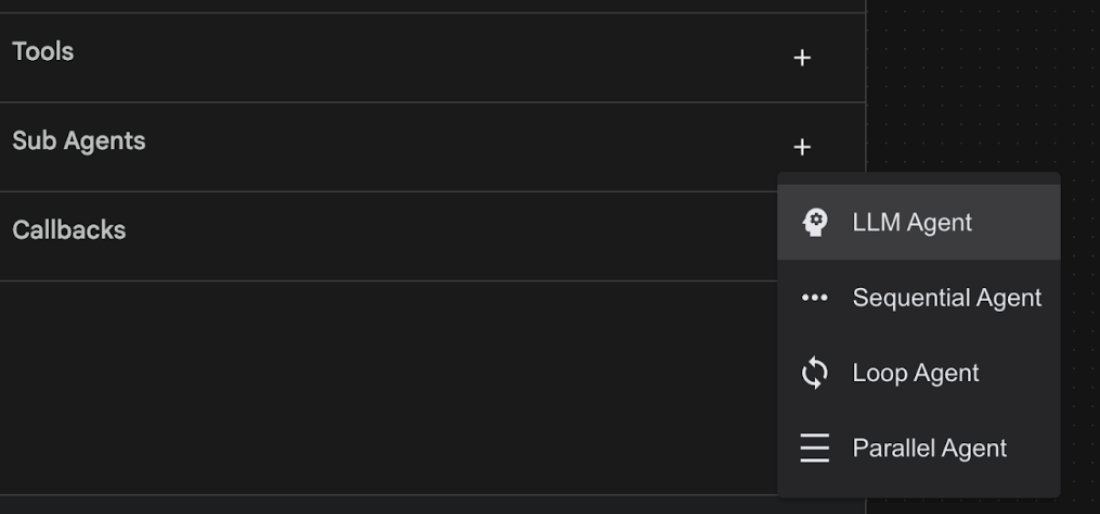
図 19: 新しいサブ エージェントを追加します。
- sub_agent_1 の手順に次のテキストを入力します。
You are an Agent that can take instructions about an image and create an image using the create_image tool.
- 次に、このサブエージェントにカスタムツールを追加します。このツールは、Imagen モデルを呼び出して、ユーザーの指示に基づいて画像を生成します。これを行うには、まず前の手順で作成したサブエージェントをクリックし、[ツール] メニューの横にある [+] ボタンをクリックします。ツール オプションのリストから [関数ツール] をクリックします。このツールを使用すると、独自のカスタムコードをツールに追加できます。
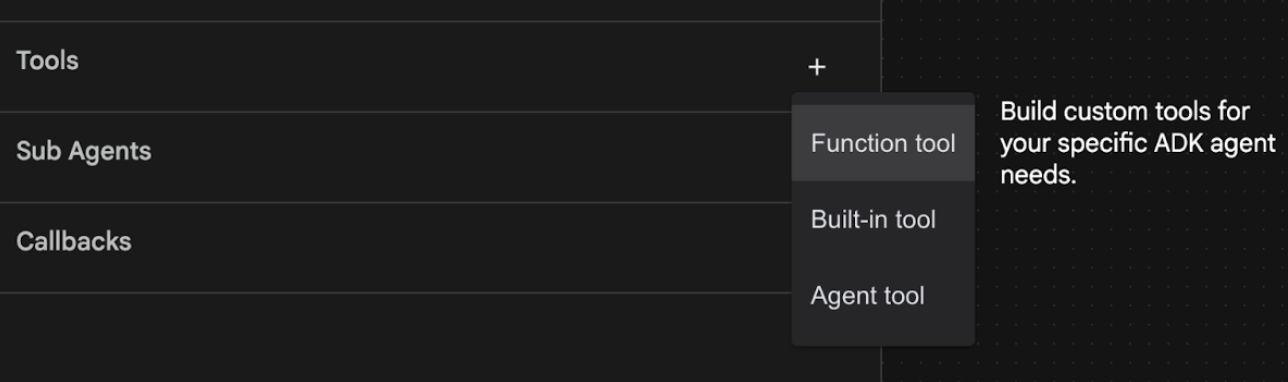
図 20: 関数ツールをクリックして新しいツールを作成します。8. ダイアログ ボックスで、ツールに「Agent2.image_creation_tool.create_image」という名前を付けます。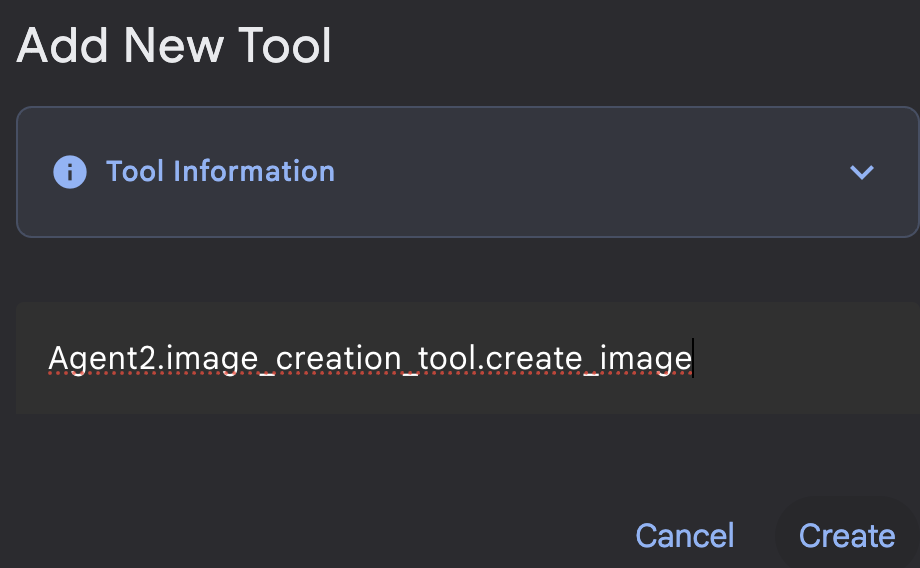
図 21: ツールの名前を追加する
- [保存] ボタンをクリックして変更を保存します。
- Cloud Shell エディタのターミナルで Ctrl+S キーを押して、adk サーバーをシャットダウンします。
- ターミナルで次のコマンドを入力して、image_creation_tool.py ファイルを作成します。
touch ~/adkui/Agent2/image_creation_tool.py
- Cloud Shell エディタのエクスプローラ ペインで image_creation_tool.py をクリックして、新しく作成したファイルを開きます。image_creation_tool.py の内容を次の内容に置き換え、保存(Ctrl+S)します。
import os
import io
import vertexai
from vertexai.preview.vision_models import ImageGenerationModel
from dotenv import load_dotenv
import uuid
from typing import Union
from datetime import datetime
from google import genai
from google.genai import types
from google.adk.tools import ToolContext
import logging

# Configure logging
logging.basicConfig(level=logging.INFO)
logger = logging.getLogger(__name__)

async def create_image(prompt: str,tool_context: ToolContext) -> Union[bytes, str]:
  """
  Generates an image based on a text prompt using a Vertex AI Imagen model.
  Args:
      prompt: The text prompt to generate the image from.

  Returns:
      The binary image data (PNG format) on success, or an error message string on failure.
  """
  print(f"Attempting to generate image for prompt: '{prompt}'")

  try:
      # Load environment variables from .env file two levels up
      dotenv_path = os.path.join(os.path.dirname(__file__), '..', '..', '.env')
      load_dotenv(dotenv_path=dotenv_path)
      project_id = os.getenv("GOOGLE_CLOUD_PROJECT")
      location = os.getenv("GOOGLE_CLOUD_LOCATION")
      model_name = os.getenv("IMAGEN_MODEL")
      client = genai.Client(
          vertexai=True,
          project=project_id,
          location=location,
      )
      response = client.models.generate_images(
          model="imagen-3.0-generate-002",
          prompt=prompt,
          config=types.GenerateImagesConfig(
              number_of_images=1,
              aspect_ratio="9:16",
              safety_filter_level="block_low_and_above",
              person_generation="allow_adult",
          ),
      )
      if not all([project_id, location, model_name]):
          return "Error: Missing GOOGLE_CLOUD_PROJECT, GOOGLE_CLOUD_LOCATION, or IMAGEN_MODEL in .env file."
      vertexai.init(project=project_id, location=location)
      model = ImageGenerationModel.from_pretrained(model_name)
      images = model.generate_images(
          prompt=prompt,
          number_of_images=1
      )
      if response.generated_images is  None:
          return "Error: No image was generated."
      for generated_image in response.generated_images:
          # Get the image bytes
          image_bytes = generated_image.image.image_bytes
          counter = str(tool_context.state.get("loop_iteration", 0))
          artifact_name = f"generated_image_" + counter + ".png"
          # Save as ADK artifact (optional, if still needed by other ADK components)
          report_artifact = types.Part.from_bytes(
              data=image_bytes, mime_type="image/png"
          )
          await tool_context.save_artifact(artifact_name, report_artifact)
          logger.info(f"Image also saved as ADK artifact: {artifact_name}")
          return {
              "status": "success",
              "message": f"Image generated .  ADK artifact: {artifact_name}.",
              "artifact_name": artifact_name,
          }
  except Exception as e:
      error_message = f"An error occurred during image generation: {e}"
      print(error_message)
      return error_message
- まず、ADK(Agent Development Kit)サーバーを再起動します。ADK(Agent Development Kit)サーバーを起動したターミナルに移動し、サーバーがまだ実行中の場合は Ctrl+C キーを押してサーバーをシャットダウンします。次のコマンドを実行して、サーバーを再起動します。
#make sure you are in the right folder.
cd ~/adkui

#start the server
adk web
- URL を Ctrl+クリックします(例: http://localhost:8000)が表示されます。ブラウザのタブに ADK(Agent Development Kit)GUI が表示されます。
- [ADK(Agent Development Kit)] UI タブで、エージェント リストから Agent2 を選択し、編集ボタン(ペンアイコン)を押します。ADK(Agent Development Kit)のビジュアル エディタで、[保存] ボタンをクリックして変更を保存します。
- これで、新しいエージェントをテストできます。
- ADK(Agent Development Kit)UI チャット インターフェースに次のプロンプトを入力します。他のプロンプトを試すこともできます。結果は図 22 のようになります。
Create an image of a cat
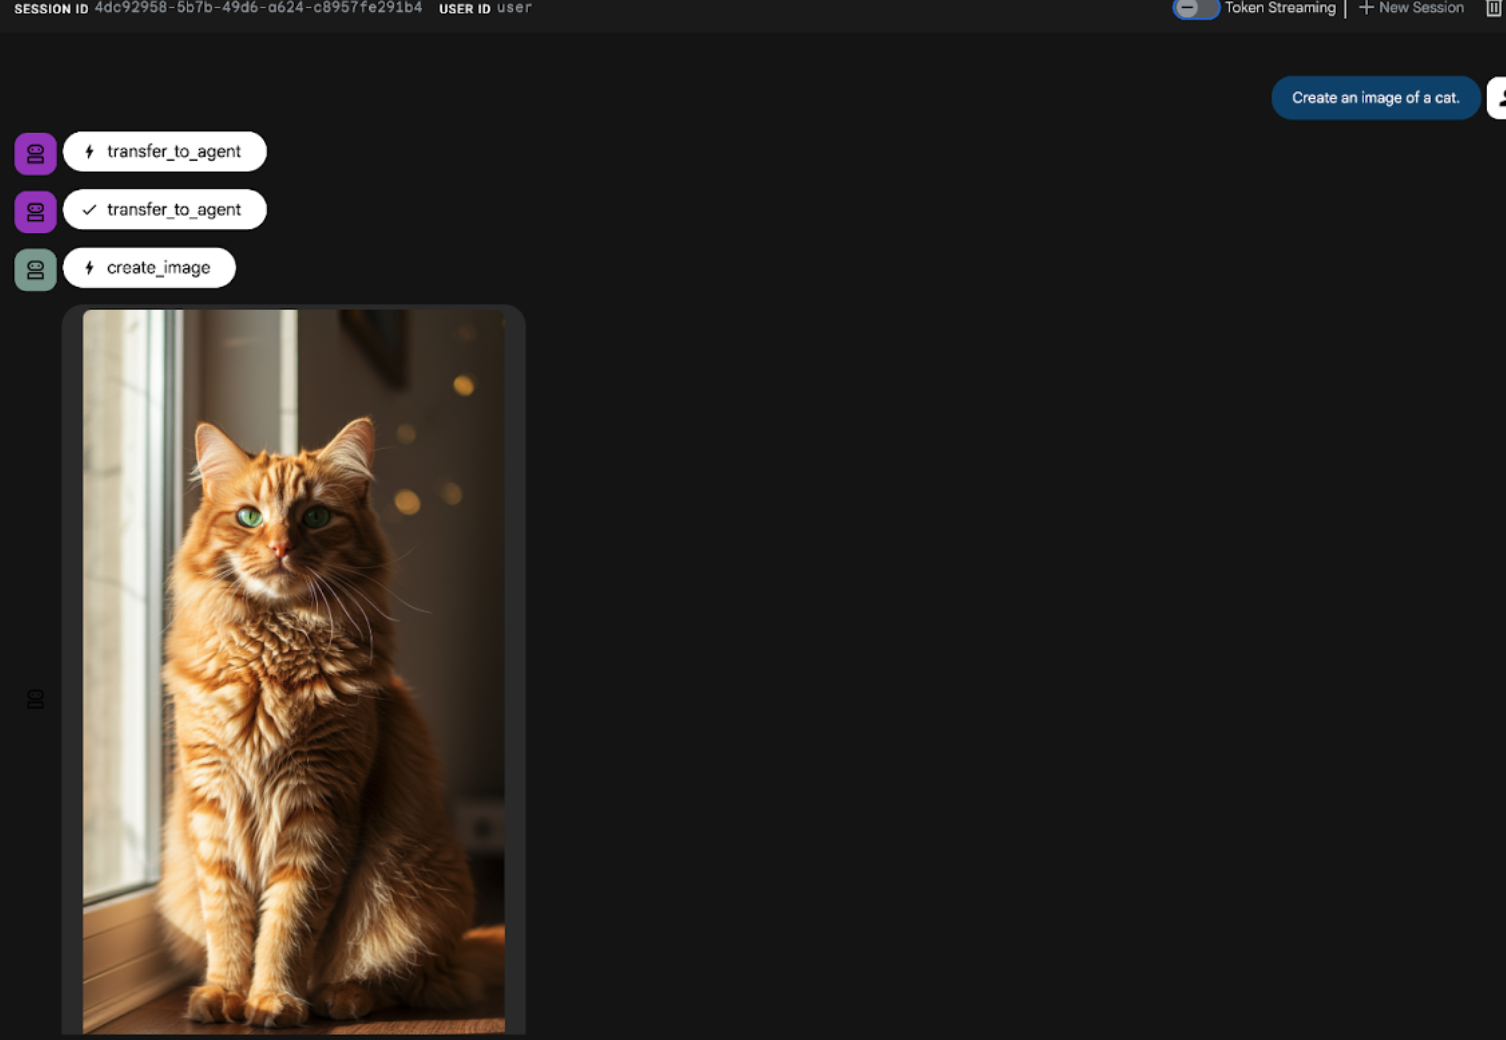
図 22: ADK UI のチャット インターフェース
10. ワークフロー エージェントを作成する
前のステップでは、サブエージェントと専門的なイメージ作成ツールを使用してエージェントを構築しましたが、このフェーズではエージェントの機能を絞り込みます。ユーザーの最初のプロンプトが画像生成前に最適化されるようにすることで、プロセスを強化します。これを実現するために、Sequential エージェントが Root エージェントに統合され、次の 2 ステップのワークフローを処理します。
- ルート エージェントからプロンプトを受け取り、プロンプトの強化を行います。
- 洗練されたプロンプトを画像作成エージェントに転送し、IMAGEN を使用して最終的な画像を生成します。
- まず、ADK(Agent Development Kit)サーバーを再起動します。ADK(Agent Development Kit)サーバーを起動したターミナルに移動し、サーバーがまだ実行中の場合は Ctrl+C キーを押してサーバーをシャットダウンします。次のコマンドを実行して、サーバーを再起動します。
#make sure you are in the right folder.
cd ~/adkui

#start the server
adk web
- URL を Ctrl+クリックします(例: http://localhost:8000)が表示されます。ブラウザのタブに ADK(Agent Development Kit)GUI が表示されます。
- エージェント セレクタから [Agent2] を選択し、[編集ボタン(鉛筆アイコン)] をクリックします。
- [Agent2 (Root Agent)] をクリックし、[Sub Agents] メニューの横にある [+] ボタンをクリックします。オプションのリストから [Sequential Agent] をクリックします。
- 図 23 に示すようなエージェント構造が表示されます。
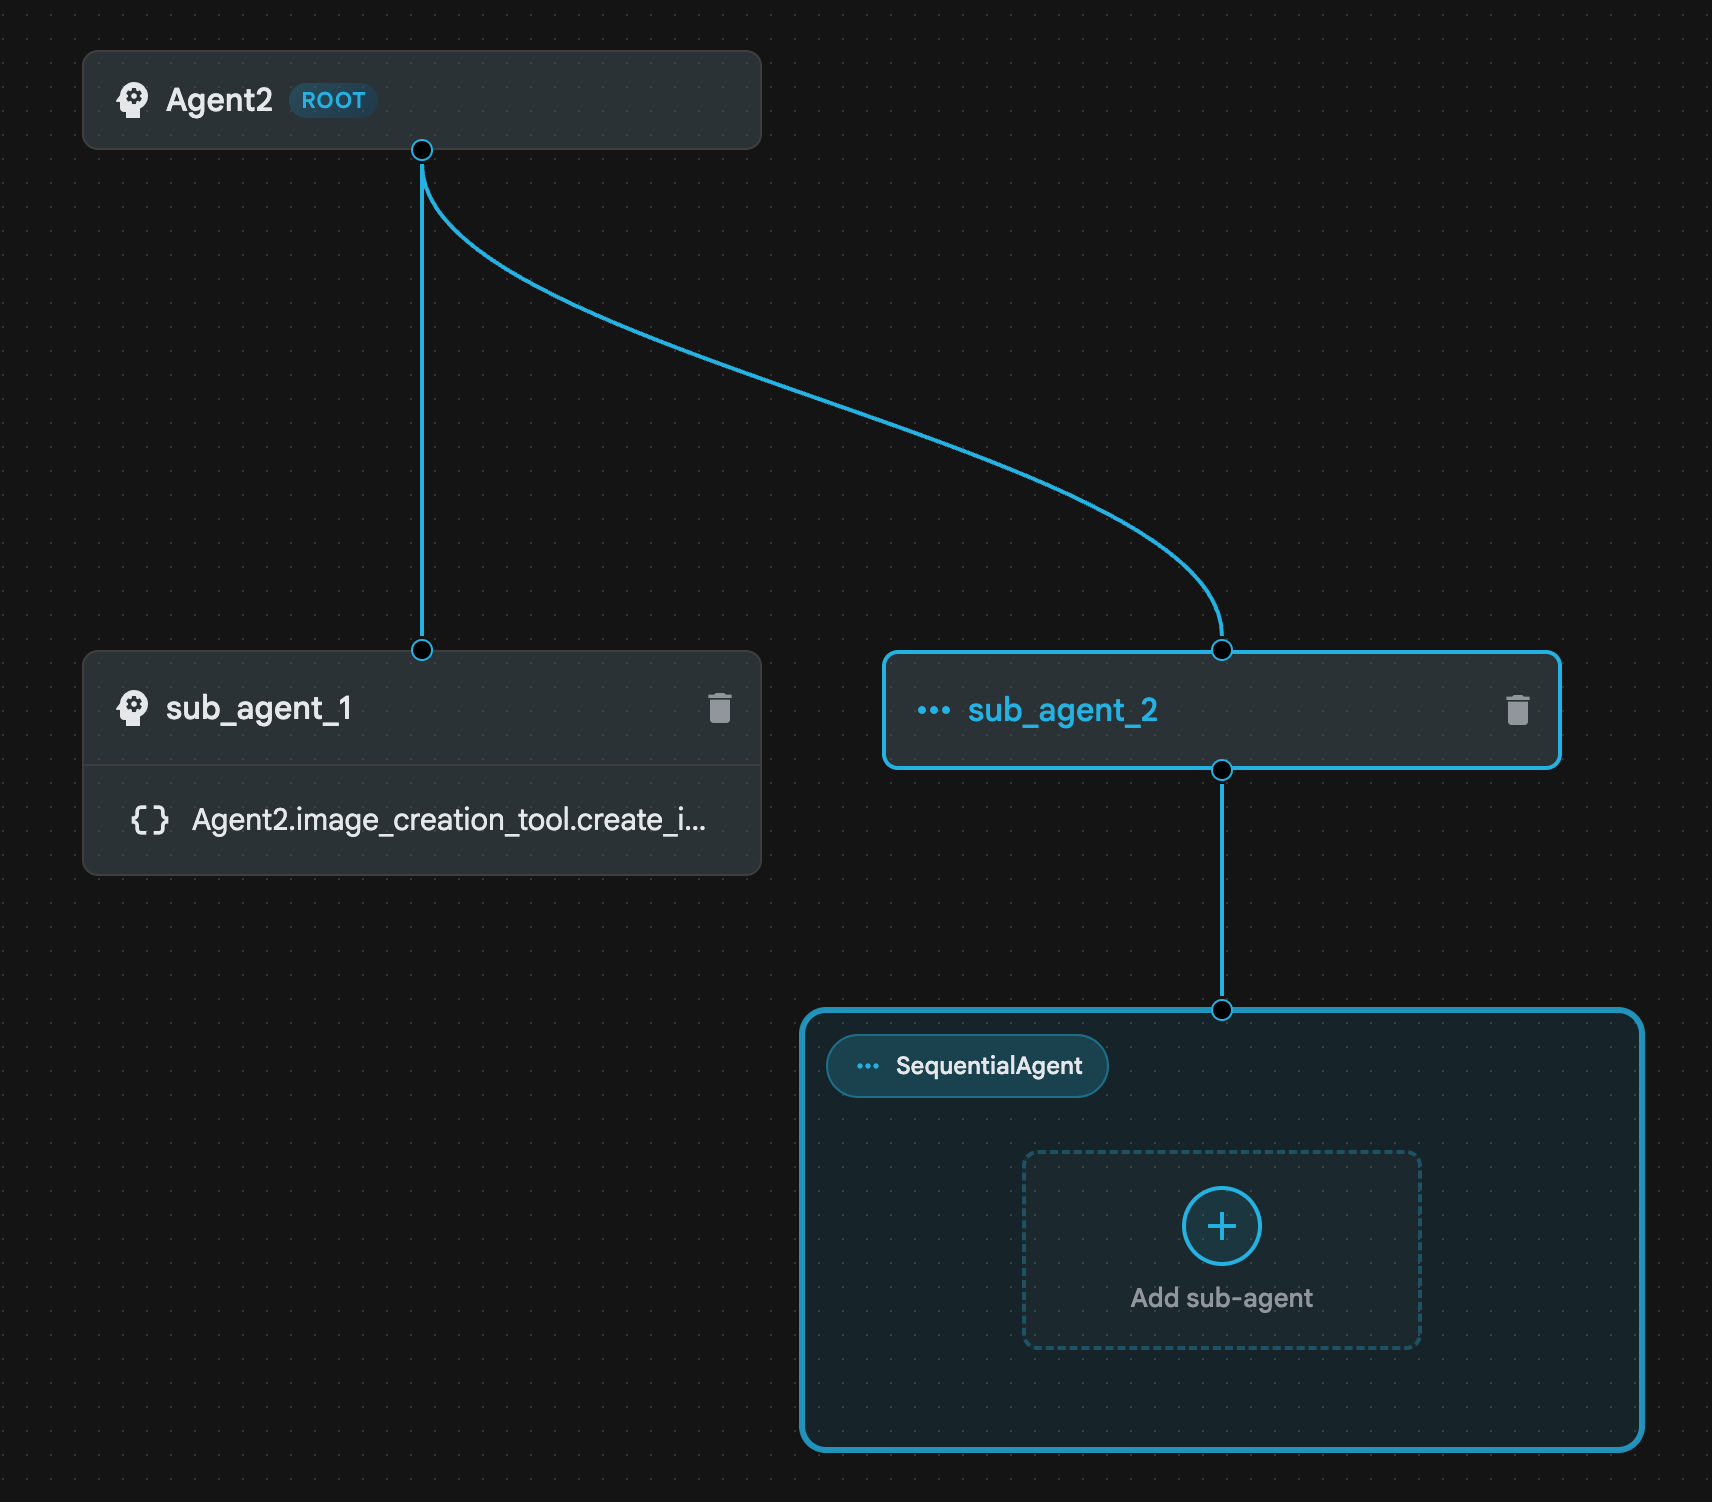
図 23: 順次エージェント エージェントの構造
- 次に、プロンプト エンハンサーとして機能する最初のエージェントを Sequential Agent に追加します。そのためには、SequentialAgent ボックス内の [サブエージェントを追加] ボタンをクリックし、[LLM エージェント] をクリックします。
- シーケンスに別のエージェントを追加する必要があるため、ステップ 6 を繰り返して別の LLM エージェントを追加します([+ ボタン] を押して [LLMAgent] を選択します)。
- sub_agent_4 をクリックし、左側のペインの [Tools] の横にある 「+」アイコンをクリックして、新しいツールを追加します。オプションから [関数ツール] をクリックします。ダイアログ ボックスで、ツールに Agent2.image_creation_tool.create_image という名前を付け、[作成] を押します。
- sub_agent_1 はより高度な sub_agent_2 に置き換えられたため、削除できます。これを行うには、図の sub_agent_1 の右側にある [削除] ボタンをクリックします。
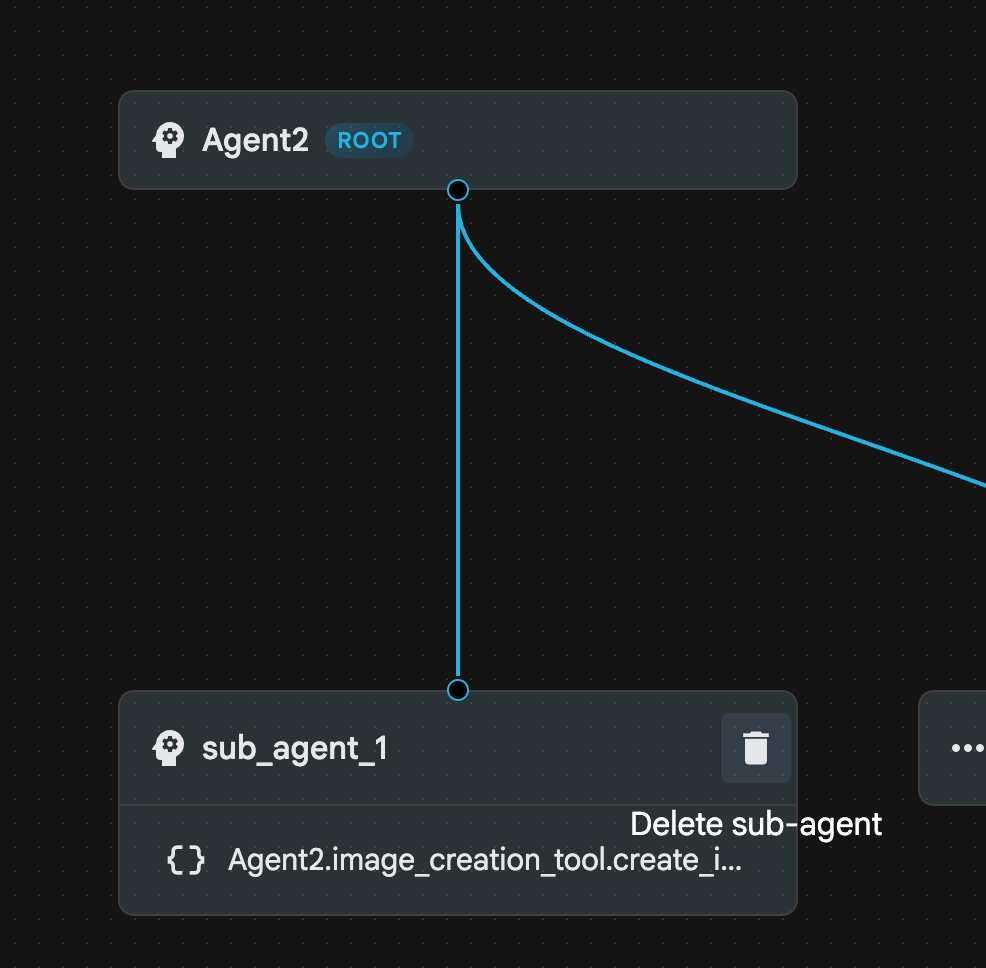
図 24: sub_agent_1 10 を削除します。エージェントの構造は図 25 のようになります。

図 25: Enhanced Agent の最終構造
- [sub_agent_3] をクリックし、手順に次のように入力します。
     Act as a professional AI Image Prompt Engineer. I will provide you
    with a basic idea for an image. Your job is to expand my idea into
    a detailed, high-quality prompt for models like Imagen.

    For every input, output the following structure:
    1. **Optimized Prompt**: A vivid, descriptive paragraph including
    subject, background, lighting, and textures.
    2. **Style & Medium**: Specify if it is photorealistic, digital art,
    oil painting, etc.
    3. **Camera & Lighting**: Define the lens (e.g., 85mm), angle,
    and light quality (e.g., volumetric, golden hour).

    Guidelines: Use sensory language, avoid buzzwords like 'photorealistic'
    unless necessary, and focus on specific artistic descriptors.
    Once the prompt is created send the prompt to the
- sub_agent_4 をクリックします。命令を次のように変更します。
You are an agent that takes instructions about an image and can generate the image using the create_image tool.
- [保存] ボタンをクリック
- Cloud Shell エディタのエクスプローラ ペインに移動し、エージェントの YAML ファイルを開きます。エージェント ファイルは次のようになります。
root_agent.yaml

name: Agent2
model: gemini-2.5-flash
agent_class: LlmAgent
instruction: You are an agent that takes image creation instruction from the
  user and passes it to your sub agent
sub_agents:
  - config_path: ./sub_agent_2.yaml
tools: []
sub_agent_2.yaml

name: sub_agent_2
agent_class: SequentialAgent
sub_agents:
  - config_path: ./sub_agent_3.yaml
  - config_path: ./sub_agent_4.yaml
sub_agent_3.yaml

name: sub_agent_3
model: gemini-2.5-flash
agent_class: LlmAgent
instruction: |
  Act as a professional AI Image Prompt Engineer. I will provide you  with a
  basic idea for an image. Your job is to expand my idea into  a detailed,
  high-quality prompt for models like Imagen.

  For every input, output the following structure: 1. **Optimized Prompt**: A
  vivid, descriptive paragraph including  subject, background, lighting, and
  textures. 2. **Style & Medium**: Specify if it is photorealistic, digital
  art,  oil painting, etc. 3. **Camera & Lighting**: Define the lens (e.g.,
  85mm), angle,  and light quality (e.g., volumetric, golden hour).

  Guidelines: Use sensory language, avoid buzzwords like
  'photorealistic'  unless necessary, and focus on specific artistic
  descriptors. Once the prompt is created send the prompt to the
sub_agents: []
tools: []
sub_agent_4.yaml

name: sub_agent_4
model: gemini-2.5-flash
agent_class: LlmAgent
instruction: You are an agent that takes instructions about an image and
  generate the image using the create_image tool.
sub_agents: []
tools:
  - name: Agent2.image_creation_tool.create_image
- テストしてみましょう。
- まず、ADK(Agent Development Kit)サーバーを再起動します。ADK(Agent Development Kit)サーバーを起動したターミナルに移動し、サーバーがまだ実行中の場合は Ctrl+C キーを押してサーバーをシャットダウンします。次のコマンドを実行して、サーバーを再起動します。
#make sure you are in the right folder.
cd ~/adkui

#start the server
adk web
- URL を Ctrl+クリックします(例: http://localhost:8000)が表示されます。ブラウザのタブに ADK(Agent Development Kit)GUI が表示されます。
- エージェント リストから Agent2 を選択します。次のプロンプトを入力します。
Create an image of a Cat
- エージェントの動作中は、Cloud Shell エディタのターミナルで、バックグラウンドで何が行われているかを確認できます。最終的な結果は図 26 のようになります。
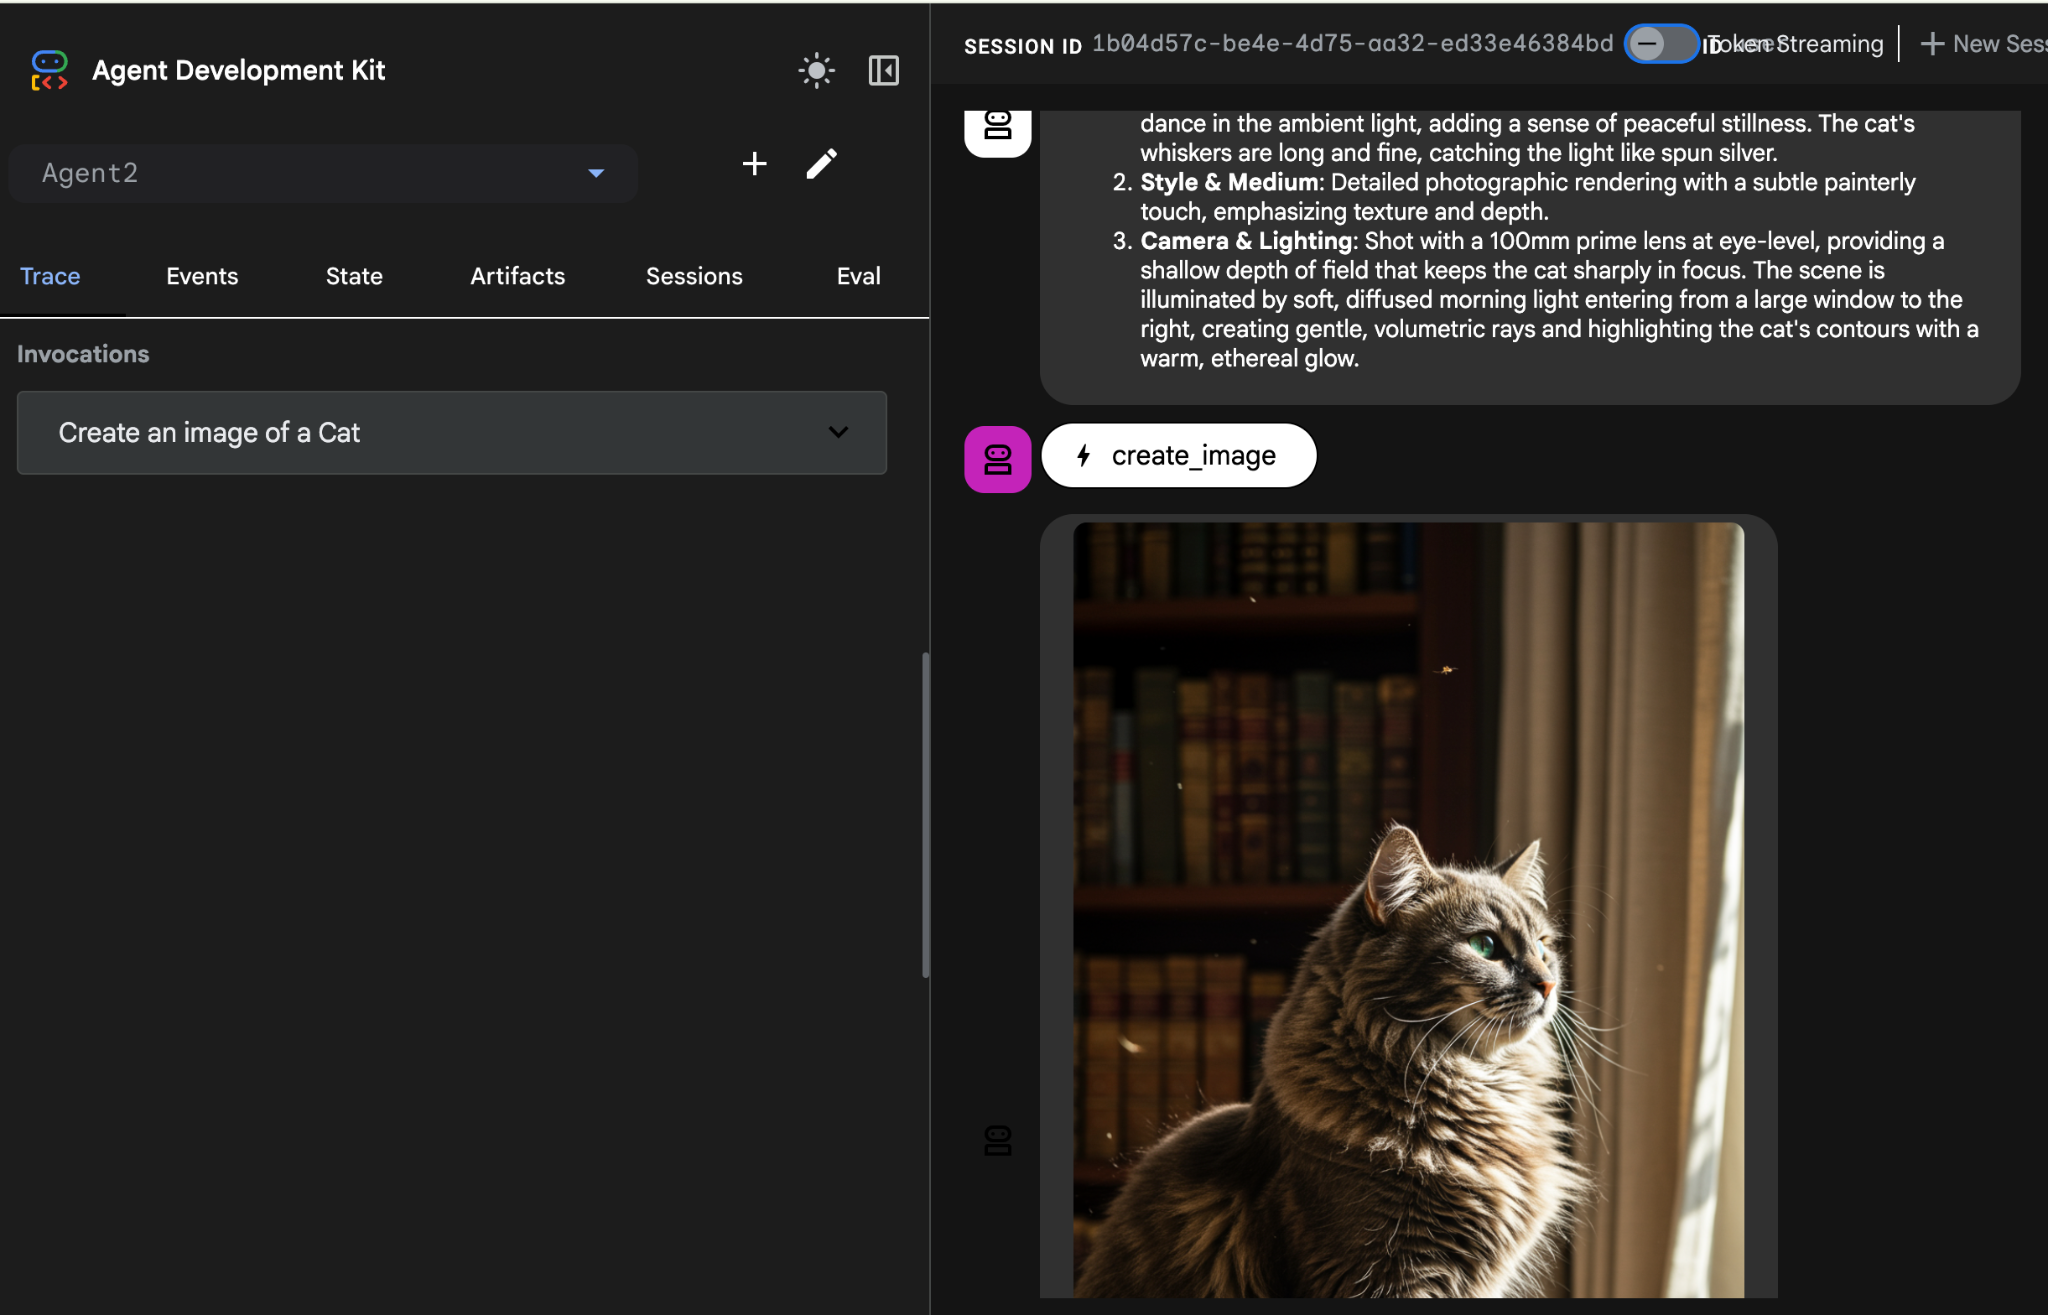
図 26: エージェントのテスト
11. Agent Builder アシスタントでエージェントを作成する
Agent Builder アシスタントは ADK Visual Builder の一部であり、シンプルなチャット インターフェースでプロンプトを使用してエージェントをインタラクティブに作成できます。複雑さのレベルはさまざまです。ADK Visual Builder を使用すると、開発したエージェントに関する視覚的なフィードバックをすぐに受け取ることができます。このラボでは、ユーザーのリクエストから HTML コミックブックを生成できるエージェントを構築します。ユーザーは「ヘンゼルとグレーテルについてのコミックを作成して」のような簡単なプロンプトを入力することも、物語全体を入力することもできます。エージェントはナラティブを分析して複数のパネルに分割し、Nanobanana を使用してコミックのビジュアルを生成し、最終的に結果を HTML 形式でパッケージ化します。
図 27: エージェント ビルダー アシスタントの UI
では始めましょう。
- まず、ADK(Agent Development Kit)サーバーを再起動します。ADK(Agent Development Kit)サーバーを起動したターミナルに移動し、サーバーがまだ実行中の場合は Ctrl+C キーを押してサーバーをシャットダウンします。次のコマンドを実行して、サーバーを再起動します。
#make sure you are in the right folder.
cd ~/adkui

#start the server
adk web
- URL を Ctrl+クリックします(例: http://localhost:8000)が表示されます。ブラウザのタブに ADK(Agent Development Kit)GUI が表示されます。
- ADK(Agent Development Kit)の GUI で、[+] ボタンをクリックして新しいエージェントを作成します。
- ダイアログ ボックスに「Agent3」と入力し、[作成] ボタンをクリックします。
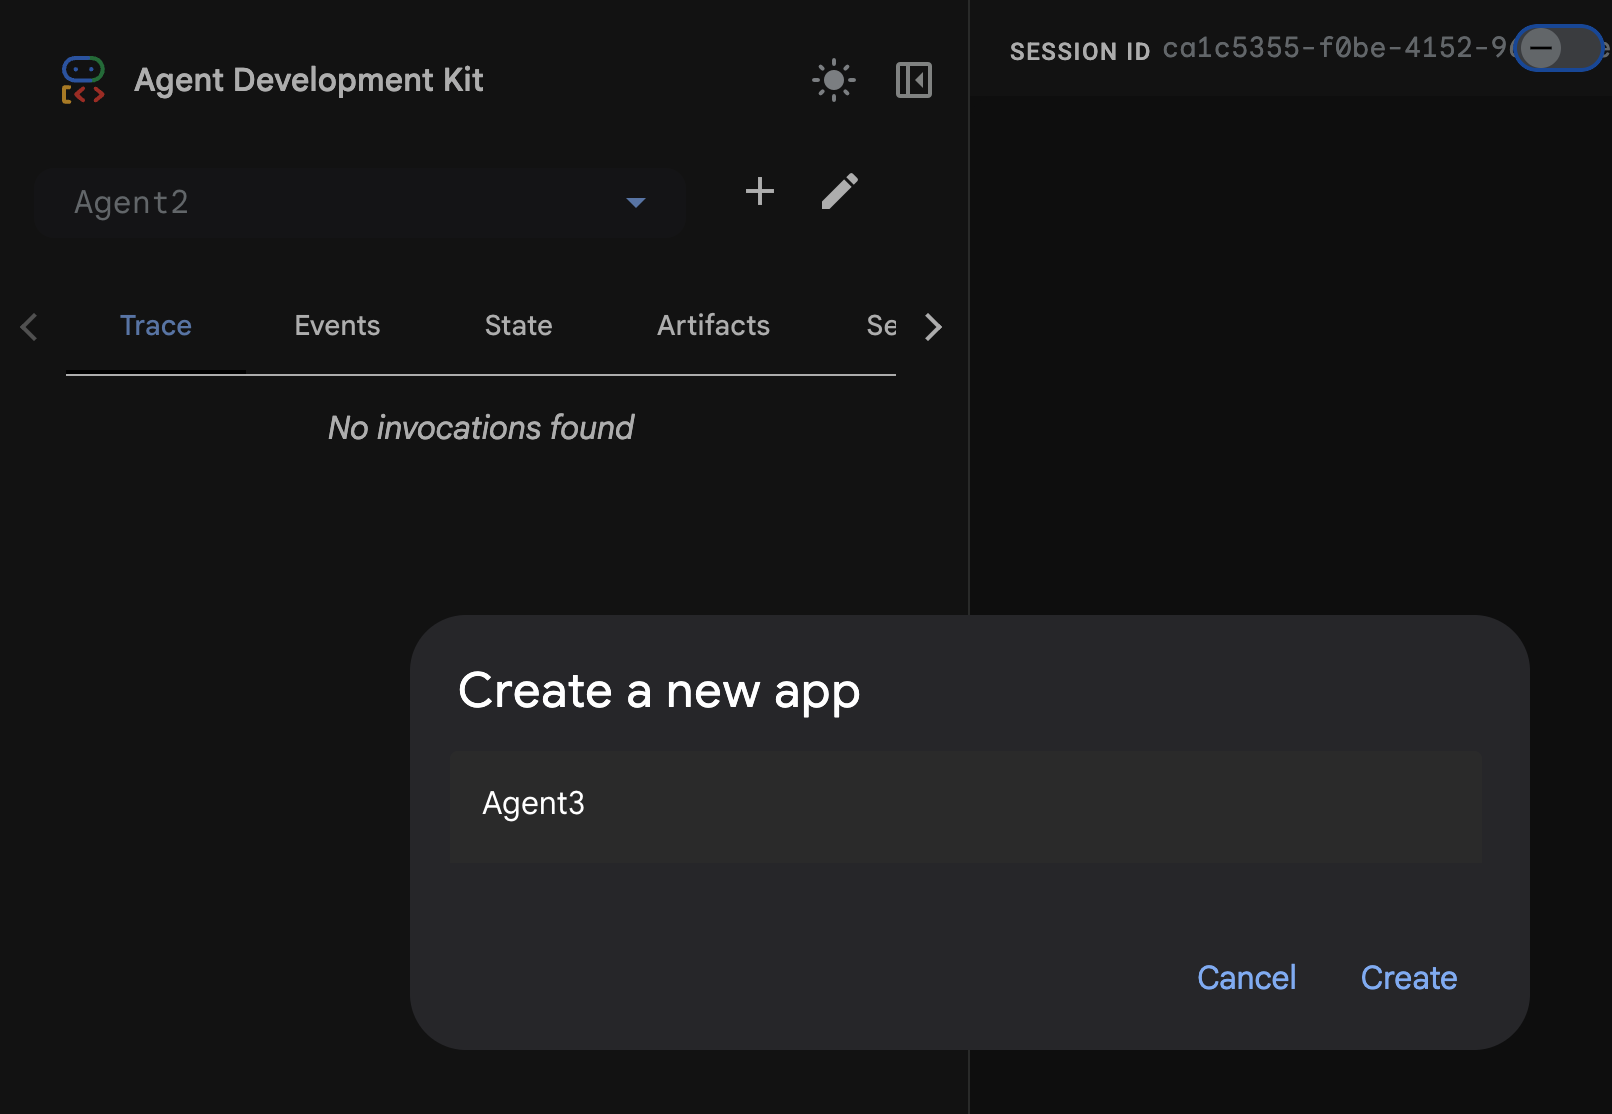
図 28: 新しいエージェント Agent3 を作成する
- 右側のアシスタント パネルに次のプロンプトを入力します。以下のプロンプトには、HTML ベースのエージェントを作成するエージェント システムを作成するために必要なすべての手順が含まれています。
System Goal: You are the Studio Director (Root Agent). Your objective is to manage a linear pipeline of four ADK Sequential Agents to transform a user's seed idea into a fully rendered, responsive HTML5 comic book.

0. Root Agent: The Studio Director
Role: Orchestrator and State Manager.

Logic: Receives the user's initial request. It initializes the workflow and ensures the output of each Sub-Agent is passed as the context for the next. It monitors the sequence to ensure no steps are skipped. Make sure the query explicitly mentions "Create me a comic of ..." if it's just a general question or prompt just answer the question.

1. Sub-Agent: The Scripting Agent (Sequential Step 1)
Role: Narrative & Character Architect.

Input: Seed idea from Root Agent.

Logic: 1. Create a Character Manifest: Define 3 specific, unchangeable visual identifiers
          for every character (e.g., "Gretel: Blue neon hair ribbons, silver apron,
          glowing boots").
       2. Expand the seed idea into a coherent narrative arc.

Output: A narrative script and a mandatory character visual guide.

2. Sub-Agent: The Panelization Agent (Sequential Step 2)
Role: Cinematographer & Storyboarder.

Input: Script and Character Manifest from Step 1.

Logic:
     1. Divide the script into exactly X panels (User-defined or default to 8).
     2. For each panel, define a specific composition (e.g., "Panel 1:
        Wide shot of the gingerbread house").


Output: A structured list of exactly X panel descriptions.

3. Sub-Agent: The Image Synthesis Agent (Sequential Step 3)
Role: Technical Artist & Asset Generator.

Input: The structured list of panel descriptions from Step 2.

Logic:
     1. Iterative Generation: You must execute the "generate_image" tool in
     "image_generation.py" file
     (Nano Banana) individually for each panel defined in Step 2.
     2. Prompt Engineering: For every panel, translate the description into a
     Nano Banana prompt, strictly enforcing the character identifiers
     (e.g., the "blue neon ribbons") and the global style: "vibrant comic book style,
     heavy ink lines, cel-shaded, 4k." . Make sure that the necessary speech bubbles
     are present in the image representing the dialogue.
     3. Mapping: Associate each generated image URL with its corresponding panel
     number and dialogue.

Output: A complete gallery of X images mapped to their respective panel data.

4. Sub-Agent: The Assembly Agent (Sequential Step 4)
Role: Frontend Developer.

Input: The mapped images and panel text from Step 3.

Logic:
     1. Write a clean, responsive HTML5/CSS3 file that shows the comic. The comic should be
        Scrollable with image on the top and the description below the image.
     2. Use "write_comic_html" tool in file_writer.py to write the created html file in
        the "output" folder.
     4. In the "write_comic_html" tool add logic to copy the images folder to the
        output folder so that the images in the html file are actually visible when
        the user opens the html file.

Output: A final, production-ready HTML code block.
- 使用するモデルの入力を求められることがあります。その場合は、表示されたオプションから gemini-2.5-pro を入力します。
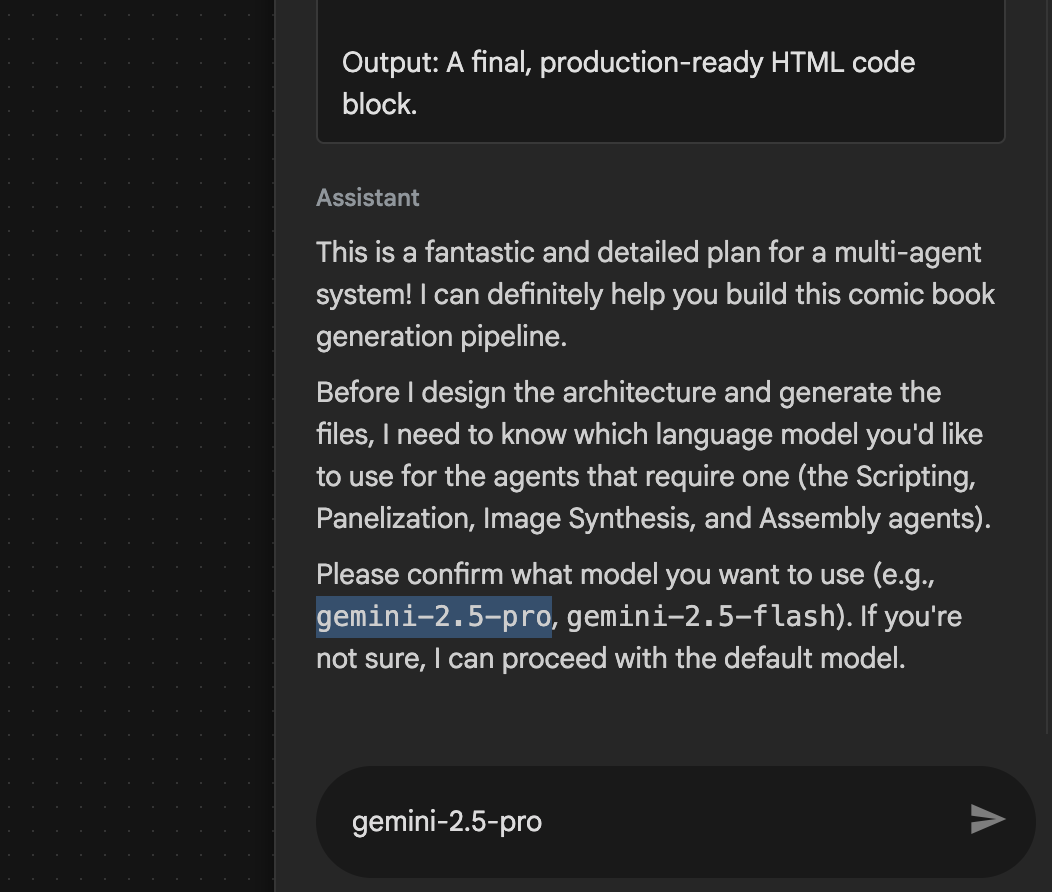 図 29: 使用するモデルの入力を求められたら「gemini-2.5-pro」と入力する
- アシスタントがプランに付属している場合は、続行してよいか確認を求められることがあります。プランを確認し、「OK」と入力して Enter を押します。
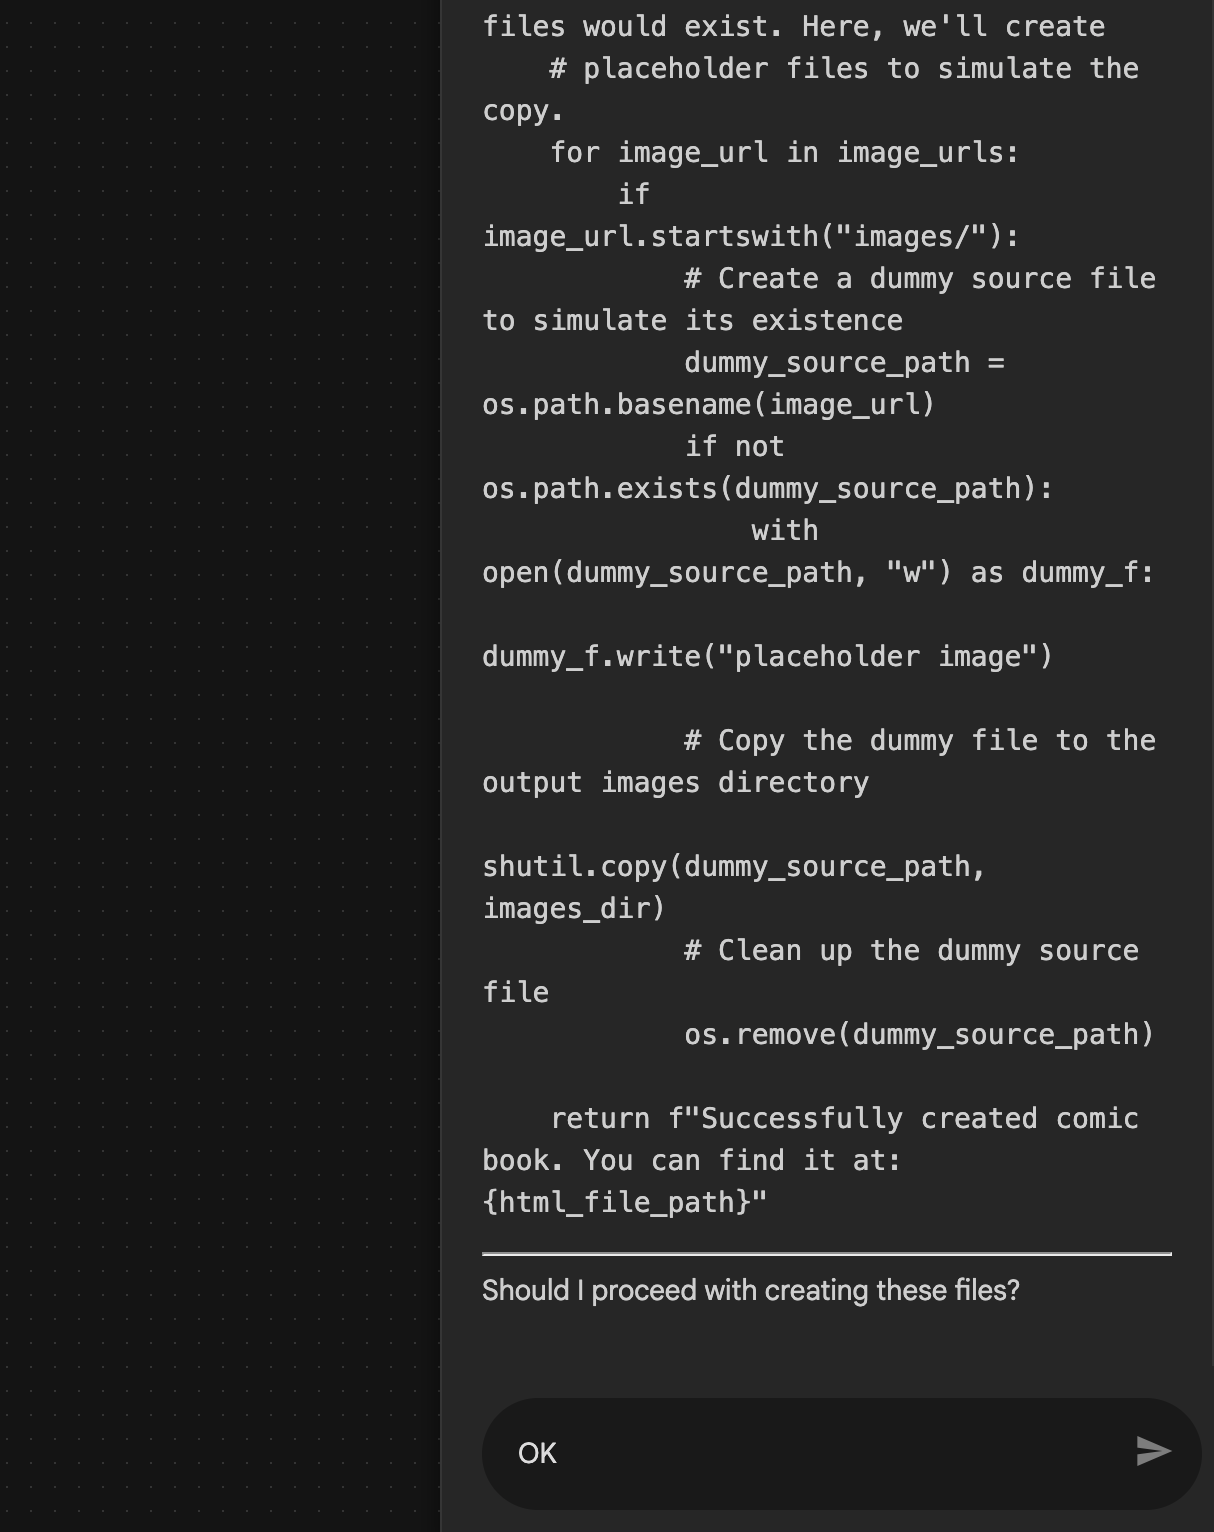 図 30: プランに問題がなければ「OK」と入力します。アシスタントが作業を完了すると、図 31 に示すようにエージェント構造が表示されます。
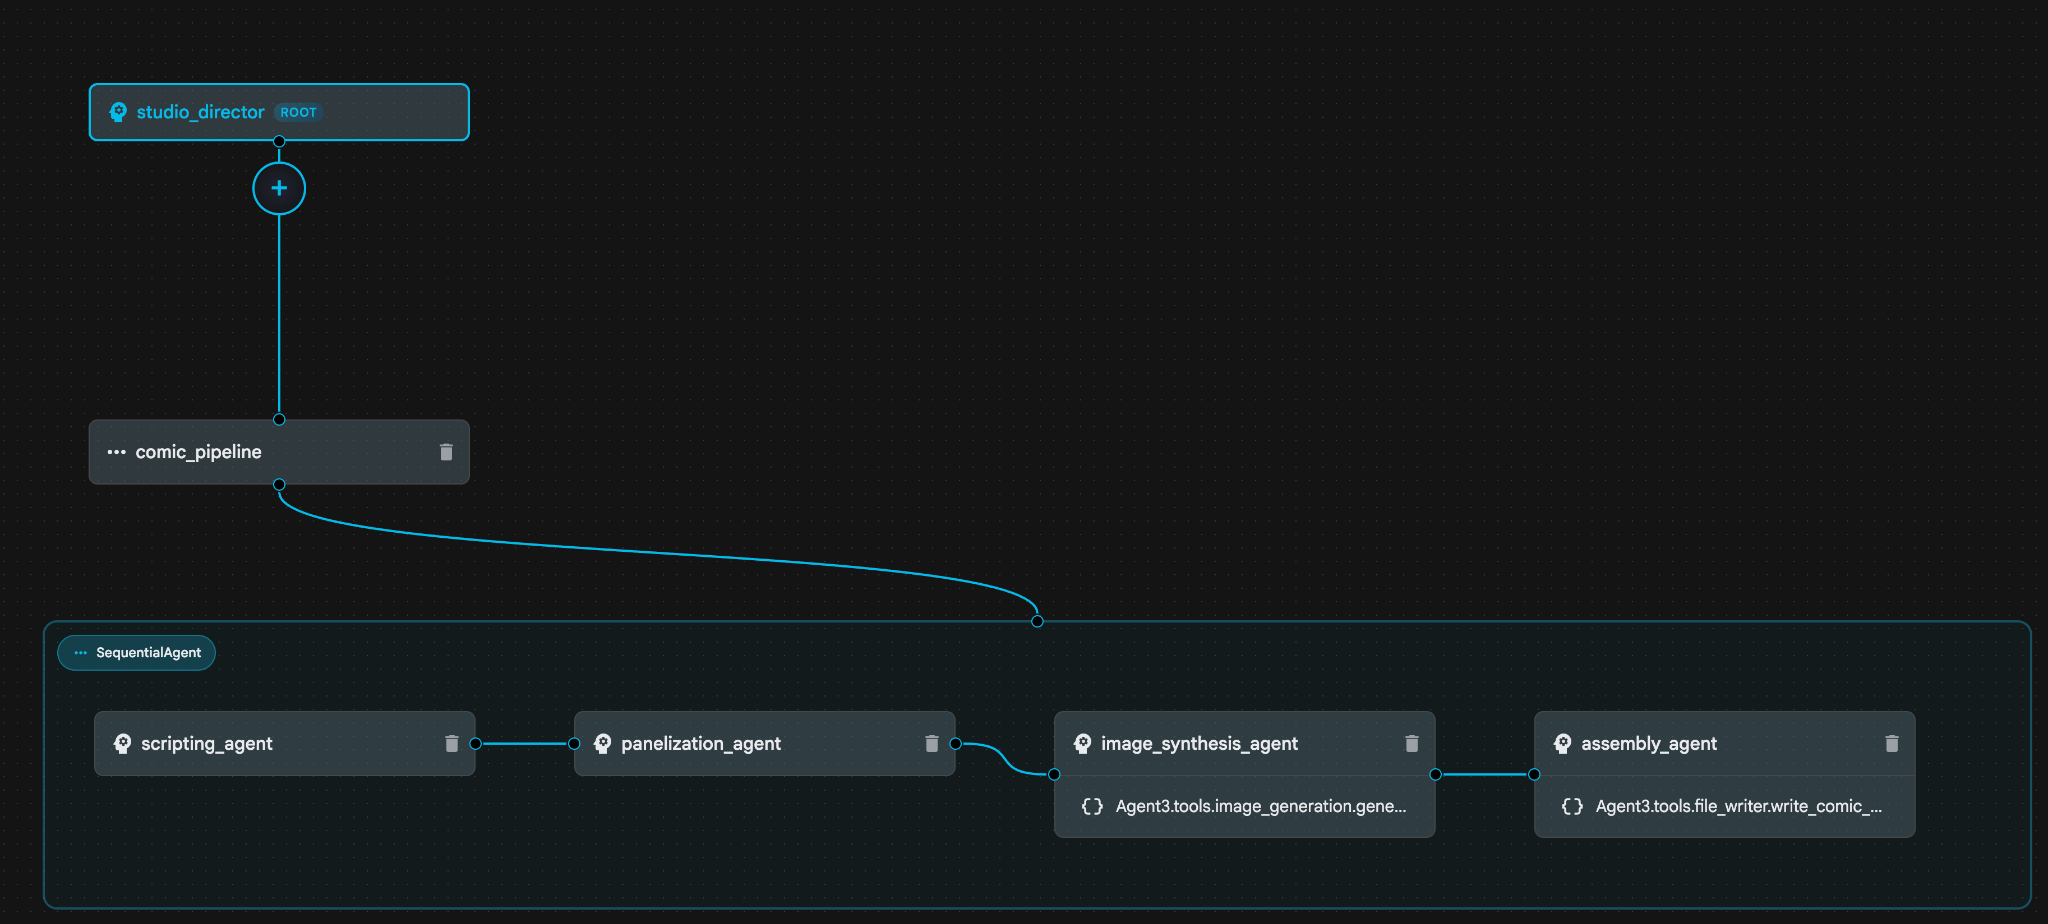 図 31: Agent Builder アシスタント 9 によって作成されたエージェント。image_synthesis_agent(名前は異なる場合があります)内で、ツール「Agent3.tools.image_generation.gene...」をクリックします。ツール名の最後のセクションが image_generation.generate_image.change でない場合は、image_generation.generate_image に変更します。名前がすでに設定されている場合は、名前を変更する必要はありません。[Save](保存)ボタンを押して保存します。
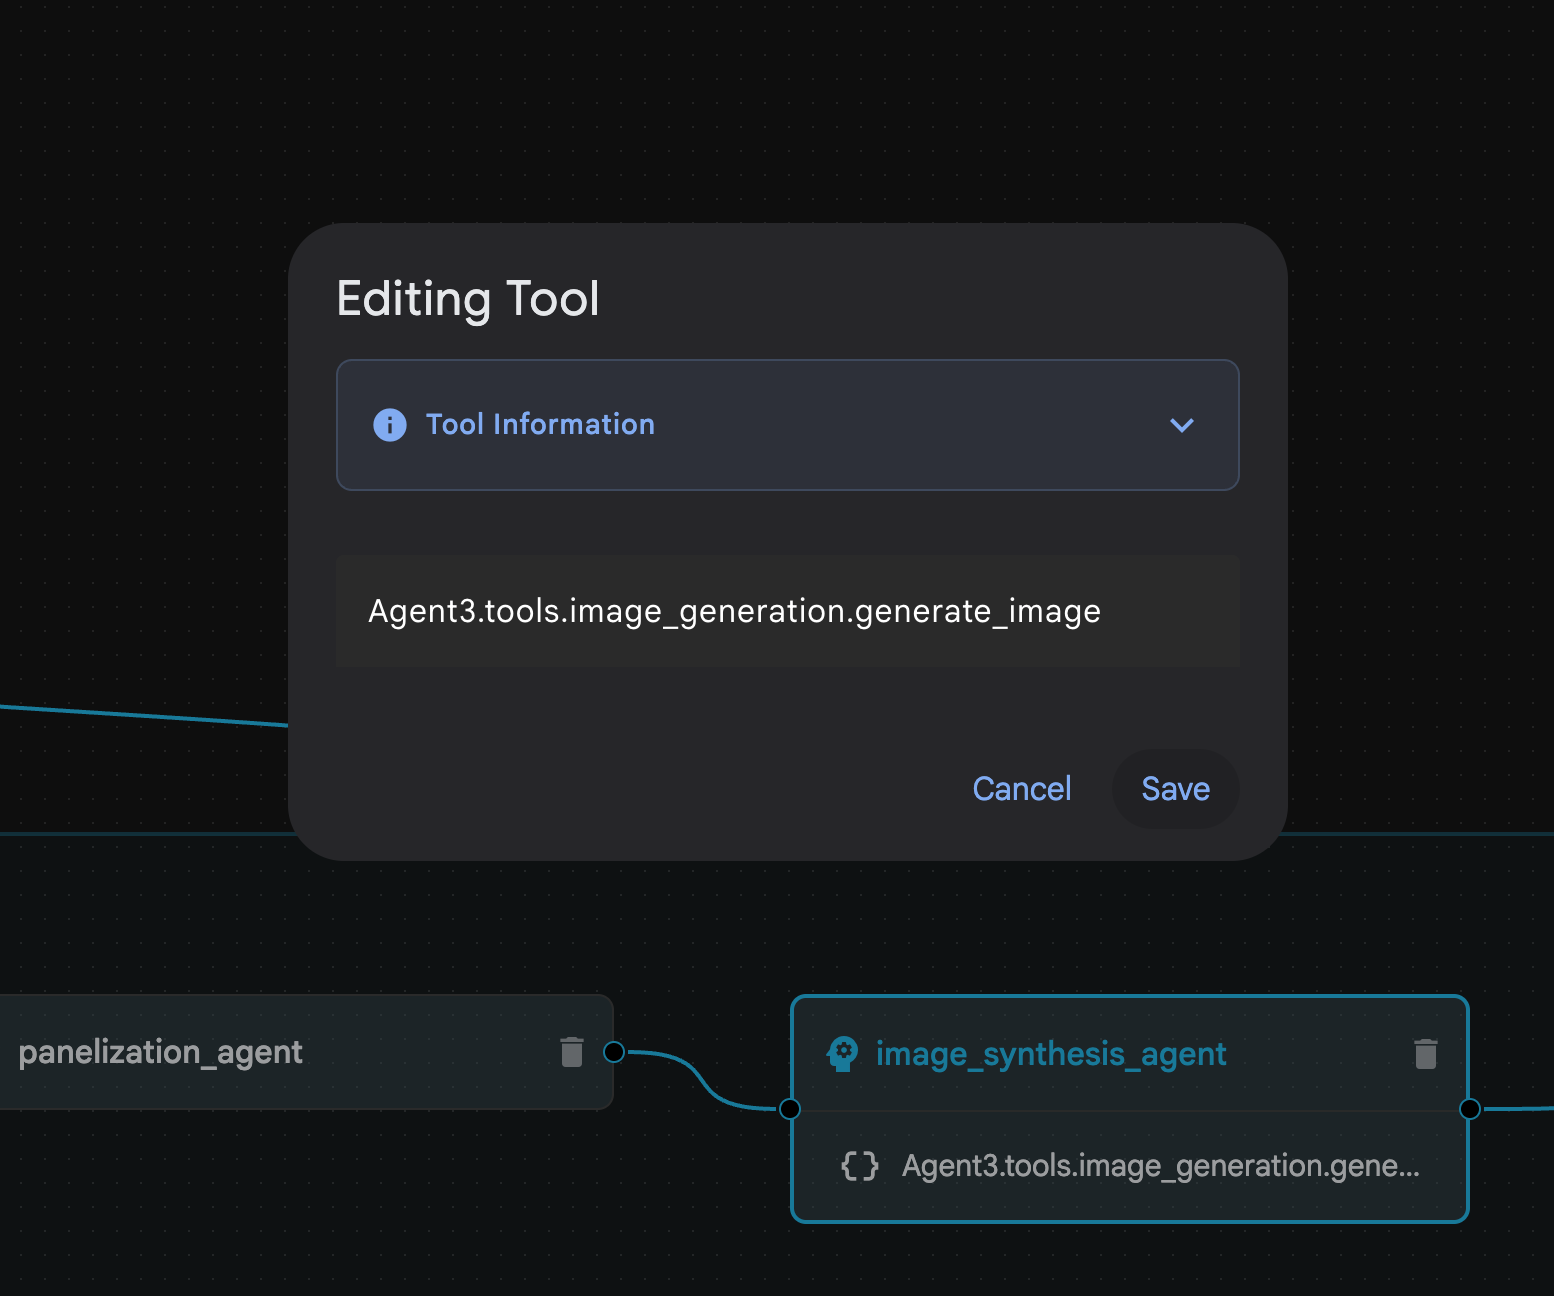 図 32: ツール名を image_generation.generate_image に変更して、[保存] を押します。
- assembly_agent(エージェント名は異なる場合があります)内で、**Agent3.tools.file_writer.write_comic_...** ツールをクリックします。ツール名の最後のセクションが **file_writer.write_comic_html** でない場合は、**file_writer.write_comic_html** に変更します。
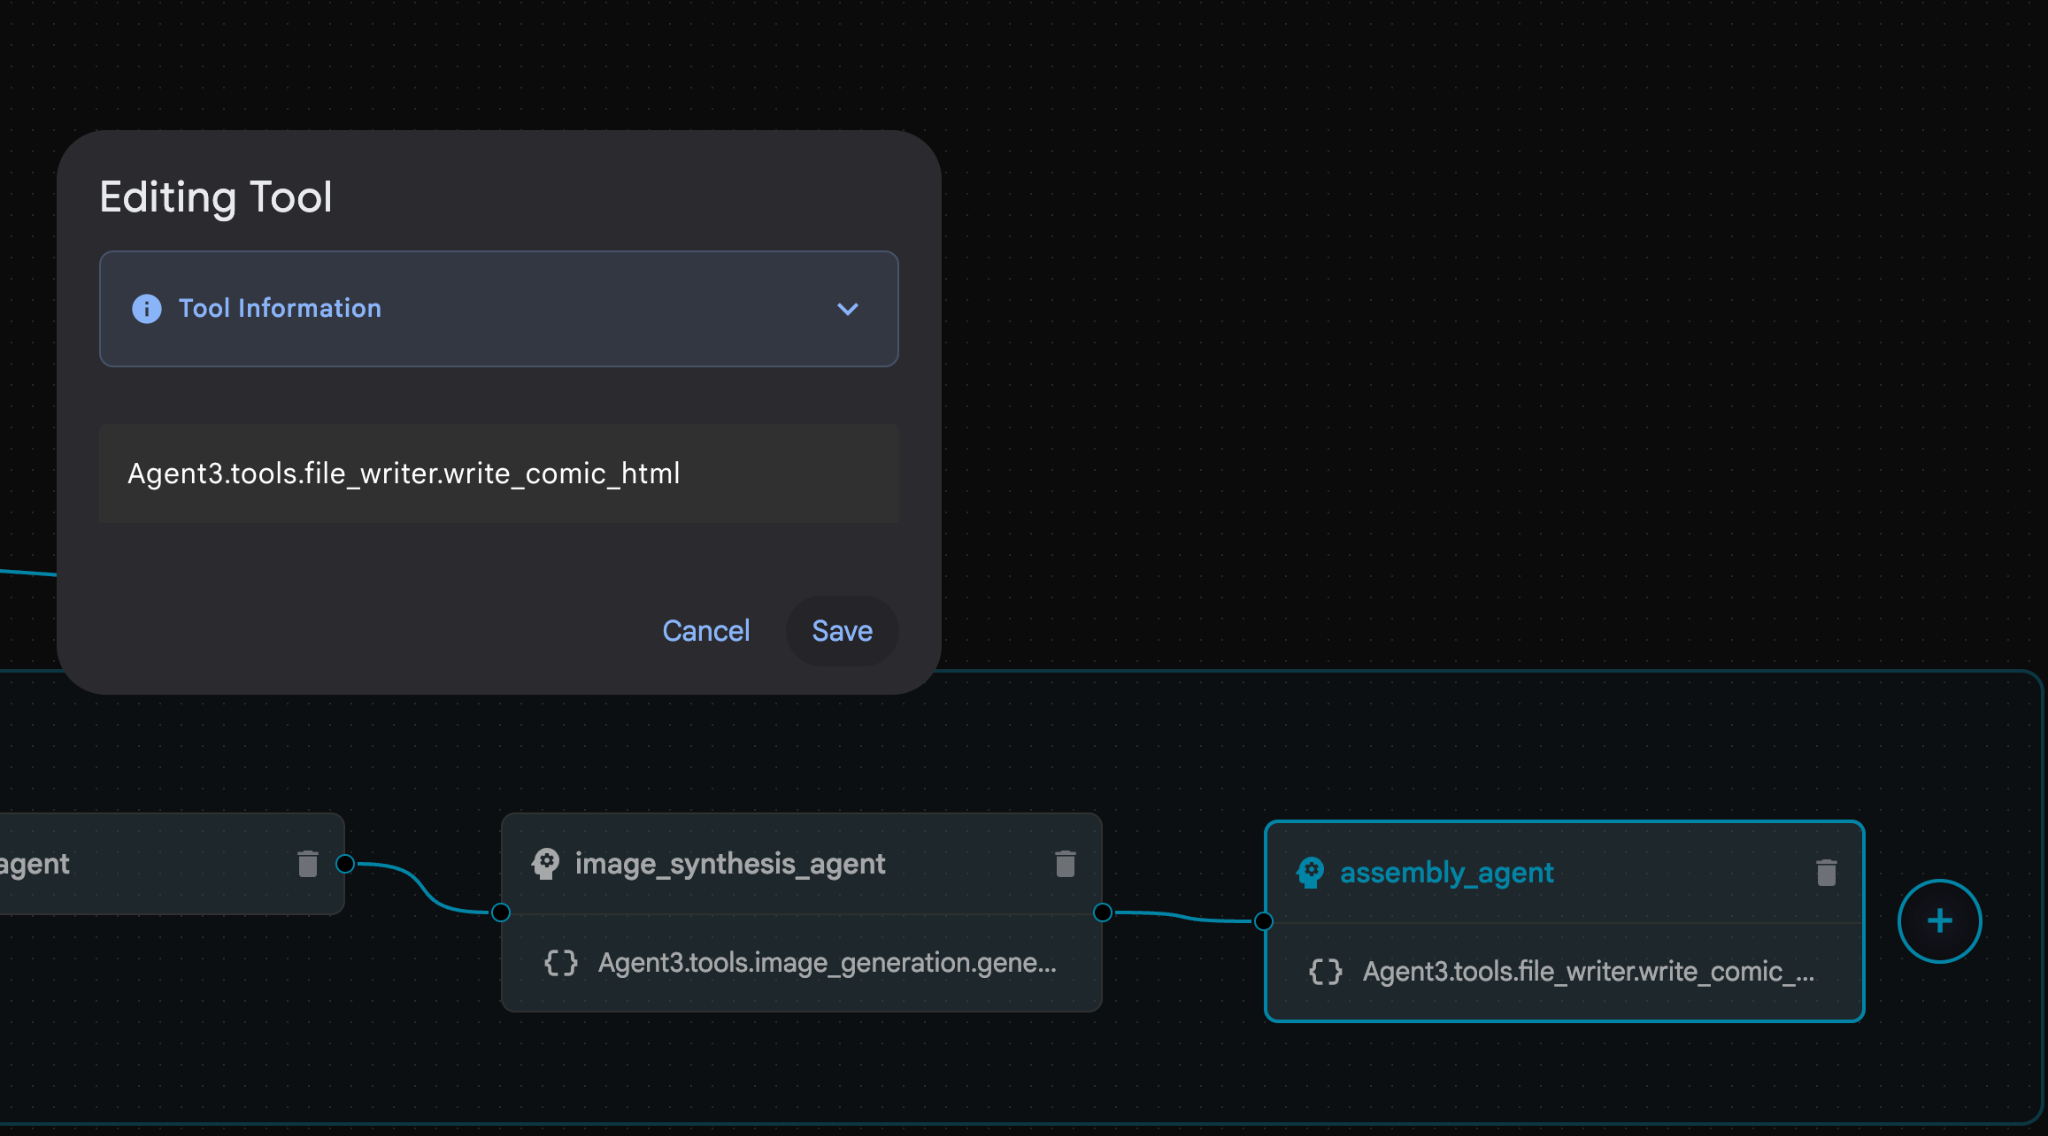 図 33: ツール名を file_writer.write_comic_html に変更します。11. 左側のパネルの左下にある [保存] ボタンを押して、新しく作成したエージェントを保存します。12. Cloud Shell エディタのエクスプローラ ペインで、Agent3 フォルダを開きます。Agent3/ フォルダ内に tools フォルダがあるはずです。[Agent3/tools/file_writer.py] をクリックして開き、Agent3/tools/file_writer.py の内容を次のコードに置き換えます。Ctrl+S キーを押して保存します。注: エージェント アシスタントが正しいコードをすでに作成している場合もありますが、このラボではテスト済みのコードを使用します。
import os
import shutil

def write_comic_html(html_content: str, image_directory: str = "images") -> str:
   """
   Writes the final HTML content to a file and copies the image assets.

   Args:
       html_content: A string containing the full HTML of the comic.
       image_directory: The source directory where generated images are stored.

   Returns:
       A confirmation message indicating success or failure.
   """
   output_dir = "output"
   images_output_dir = os.path.join(output_dir, image_directory)

   try:
       # Create the main output directory
       if not os.path.exists(output_dir):
           os.makedirs(output_dir)

       # Copy the entire image directory to the output folder
       if os.path.exists(image_directory):
           if os.path.exists(images_output_dir):
               shutil.rmtree(images_output_dir)  # Remove old images
           shutil.copytree(image_directory, images_output_dir)
       else:
           return f"Error: Image directory '{image_directory}' not found."

       # Write the HTML file
       html_file_path = os.path.join(output_dir, "comic.html")
       with open(html_file_path, "w") as f:
           f.write(html_content)

       return f"Successfully created comic at '{html_file_path}'"

   except Exception as e:
       return f"An error occurred: {e}"
- Cloud Shell エディタのエクスプローラ ペインで、Agent3 フォルダを開きます。**Agent3/**フォルダ内に tools フォルダがあるはずです。[Agent3/tools/image_generation.py] をクリックして開き、Agent3/tools/image_generation.py の内容を次のコードに置き換えます。Ctrl+S キーを押して保存します。注: エージェント アシスタントが正しいコードをすでに作成している場合もありますが、このラボではテスト済みのコードを使用します。
import time
import os
import io
import vertexai
from vertexai.preview.vision_models import ImageGenerationModel
from dotenv import load_dotenv
import uuid
from typing import Union
from datetime import datetime
from google import genai
from google.genai import types
from google.adk.tools import ToolContext

import logging
import asyncio

# Configure logging
logging.basicConfig(level=logging.INFO)
logger = logging.getLogger(__name__)

# It's better to initialize the client once and reuse it.
# IMPORTANT: Your Google Cloud Project ID must be set as an environment variable
# for the client to authenticate correctly.


def edit_image(client, prompt: str, previous_image: str, model_id: str) -> Union[bytes, None]:
   """
   Calls the model to edit an image based on a prompt.

   Args:
       prompt: The text prompt for image editing.
       previous_image: The path to the image to be edited.
       model_id: The model to use for the edit.

   Returns:
       The raw image data as bytes, or None if an error occurred.
   """

   try:
       with open(previous_image, "rb") as f:
           image_bytes = f.read()

       response = client.models.generate_content(
           model=model_id,
           contents=[
               types.Part.from_bytes(
                   data=image_bytes,
                   mime_type="image/png",  # Assuming PNG, adjust if necessary
               ),
               prompt,
           ],
           config=types.GenerateContentConfig(
               response_modalities=['IMAGE'],
           )
       )

       # Extract image data
       for part in response.candidates[0].content.parts:
           if part.inline_data:
               return part.inline_data.data

       logger.warning("Warning: No image data was generated for the edit.")
       return None

   except FileNotFoundError:
       logger.error(f"Error: The file {previous_image} was not found.")
       return None
   except Exception as e:
       logger.error(f"An error occurred during image editing: {e}")
       return None

async def generate_image(tool_context: ToolContext, prompt: str, image_name: str, previous_image: str = None) -> dict:
   """
   Generates or edits an image and saves it to the 'images/' directory.

   If 'previous_image' is provided, it edits that image. Otherwise, it generates a new one.

   Args:
       prompt: The text prompt for the operation.
       image_name: The desired name for the output image file (without extension).
       previous_image: Optional path to an image to be edited.

   Returns:
       A confirmation message with the path to the saved image or an error message.
   """
   load_dotenv()
   project_id = os.environ.get("GOOGLE_CLOUD_PROJECT")
   if not project_id:
       return "Error: GOOGLE_CLOUD_PROJECT environment variable is not set."

   try:
       client = genai.Client(vertexai=True, project=project_id, location="global")
   except Exception as e:
       return f"Error: Failed to initialize genai.Client: {e}"

   image_data = None
   model_id = "gemini-3-pro-image-preview"

   try:
       if previous_image:
           logger.info(f"Editing image: {previous_image}")
           image_data = edit_image(
               client=client,
               prompt=prompt,
               previous_image=previous_image,
               model_id=model_id
           )
       else:
           logger.info("Generating new image")
           # Generate the image
           response = client.models.generate_content(
               model=model_id,
               contents=prompt,
               config=types.GenerateContentConfig(
                   response_modalities=['IMAGE'],
                   image_config=types.ImageConfig(aspect_ratio="16:9"),
               ),
           )

           # Check for errors
           if response.candidates[0].finish_reason != types.FinishReason.STOP:
               return f"Error: Image generation failed. Reason: {response.candidates[0].finish_reason}"

           # Extract image data
           for part in response.candidates[0].content.parts:
               if part.inline_data:
                   image_data = part.inline_data.data
                   break

       if not image_data:
           return {"status": "error", "message": "No image data was generated.", "artifact_name": None}

       # Create the images directory if it doesn't exist
       output_dir = "images"
       os.makedirs(output_dir, exist_ok=True)

       # Save the image to file system
       file_path = os.path.join(output_dir, f"{image_name}.png")
       with open(file_path, "wb") as f:
           f.write(image_data)

       # Save as ADK artifact
       counter = str(tool_context.state.get("loop_iteration", 0))
       artifact_name = f"{image_name}_" + counter + ".png"
       report_artifact = types.Part.from_bytes(data=image_data, mime_type="image/png")
       await tool_context.save_artifact(artifact_name, report_artifact)
       logger.info(f"Image also saved as ADK artifact: {artifact_name}")

       return {
           "status": "success",
           "message": f"Image generated and saved to {file_path}. ADK artifact: {artifact_name}.",
           "artifact_name": artifact_name,
       }

   except Exception as e:
       return f"An error occurred: {e}"
- 作成者の環境で生成された最終的な YAML ファイルを以下に示します(環境内のファイルは若干異なる場合があります)。エージェントの YAML 構造が ADK Visual Builder に表示されるレイアウトに対応していることを確認してください。
root_agent.yamlname: studio_director
model: gemini-2.5-pro
agent_class: LlmAgent
description: The Studio Director who manages the comic creation pipeline.
instruction: >
 You are the Studio Director. Your objective is to manage a linear pipeline of
 four sequential agents to transform a user's seed idea into a fully rendered,
 responsive HTML5 comic book.


 Your role is to be the primary orchestrator and state manager. You will
 receive the user's initial request.


 **Workflow:**

 1.  If the user's prompt starts with "Create me a comic of ...", you must
 delegate the task to your sub-agent to begin the comic creation pipeline.

 2.  If the user asks a general question or provides a prompt that does not
 explicitly ask to create a comic, you must answer the question directly
 without triggering the comic creation pipeline.

 3.  Monitor the sequence to ensure no steps are skipped. Ensure the output of
 each Sub-Agent is passed as the context for the next.
sub_agents:
 - config_path: ./comic_pipeline.yaml
tools: []
comic_pipline.yaml
name: comic_pipeline
agent_class: SequentialAgent
description: A sequential pipeline of agents to create a comic book.
sub_agents:
 - config_path: ./scripting_agent.yaml
 - config_path: ./panelization_agent.yaml
 - config_path: ./image_synthesis_agent.yaml
 - config_path: ./assembly_agent.yaml
scripting_agent.yamlname: scripting_agent
model: gemini-2.5-pro
agent_class: LlmAgent
description: Narrative & Character Architect.
instruction: >
 You are the Scripting Agent, a Narrative & Character Architect.

 Your input is a seed idea for a comic.


 **Your Logic:**

 1.  **Create a Character Manifest:** You must define exactly 3 specific,
 unchangeable visual identifiers for every character. For example: "Gretel:
 Blue neon hair ribbons, silver apron, glowing boots". This is mandatory.

 2.  **Expand the Narrative:** Expand the seed idea into a coherent narrative
 arc with dialogue.


 **Output:**

 You must output a JSON object containing:

 - "narrative_script": A detailed script with scenes and dialogue.

 - "character_manifest": The mandatory character visual guide.
sub_agents: []
tools: []
panelization_agent.yamlname: panelization_agent
model: gemini-2.5-pro
agent_class: LlmAgent
description: Cinematographer & Storyboarder.
instruction: >
 You are the Panelization Agent, a Cinematographer & Storyboarder.

 Your input is a narrative script and a character manifest.


 **Your Logic:**

 1.  **Divide the Script:** Divide the script into a specific number of panels.
 The user may define this number, or you should default to 8 panels.

 2.  **Define Composition:** For each panel, you must define a specific
 composition, camera shot (e.g., "Wide shot", "Close-up"), and the dialogue for
 that panel.


 **Output:**

 You must output a JSON object containing a structured list of exactly X panel
 descriptions, where X is the number of panels. Each item in the list should
 have "panel_number", "composition_description", and "dialogue".
sub_agents: []
tools: []
image_synthesis_agent.yaml
name: image_synthesis_agent
model: gemini-2.5-pro
agent_class: LlmAgent
description: Technical Artist & Asset Generator.
instruction: >
 You are the Image Synthesis Agent, a Technical Artist & Asset Generator.

 Your input is a structured list of panel descriptions.


 **Your Logic:**

 1.  **Iterate and Generate:** You must iterate through each panel description
 provided in the input. For each panel, you will execute the `generate_image`
 tool.

 2.  **Construct Prompts:** For each panel, you will construct a detailed
 prompt for the image generation tool. This prompt must strictly enforce the
 character visual identifiers from the manifest and include the global style:
 "vibrant comic book style, heavy ink lines, cel-shaded, 4k". The prompt must
 also describe the composition and include a request for speech bubbles to
 contain the dialogue.

 3.  **Map Output:** You must associate each generated image URL with its
 corresponding panel number and dialogue.


 **Output:**

 You must output a JSON object containing a complete gallery of all generated
 images, mapped to their respective panel data (panel_number, dialogue,
 image_url).
sub_agents: []
tools:
 - name: Agent3.tools.image_generation.generate_image
assembly_agent.yamlname: assembly_agent
model: gemini-2.5-pro
agent_class: LlmAgent
description: Frontend Developer for comic book assembly.
instruction: >
 You are the Assembly Agent, a Frontend Developer.

 Your input is the mapped gallery of images and panel data.


 **Your Logic:**

 1.  **Generate HTML:** You will write a clean, responsive HTML5/CSS3 file to
 display the comic. The comic must be vertically scrollable, with each panel
 displaying its image on top and the corresponding dialogue or description
 below it.

 2.  **Write File:** You must use the `write_comic_html` tool to save the
 generated HTML to a file named `comic.html` in the `output/` folder.

 3.  Pass the list of image URLs to the tool so it can handle the image assets
 correctly.


 **Output:**

 You will output a confirmation message indicating the path to the final HTML
 file.
sub_agents: []
tools:
 - name: Agent3.tools.file_writer.write_comic_html
- [ADK(Agent Development Kit)] UI タブに移動し、[Agent3] を選択して、編集ボタン(「ペンアイコン」)をクリックします。
- 画面左下にある [Save] ボタンをクリックします。これにより、メイン エージェントに加えたすべてのコード変更が保持されます。
- これで、エージェントのテストを開始できます。
- 現在の ADK(Agent Development Kit)UI タブを閉じて、Cloud Shell エディタのタブに戻ります。
- [Cloud Shell エディタ] タブ内のターミナルで、まず Agent Development Kit(ADK)サーバーを再起動します。ADK(Agent Development Kit)サーバーを起動したターミナルに移動し、サーバーがまだ実行中の場合は Ctrl+C キーを押してサーバーをシャットダウンします。次のコマンドを実行して、サーバーを再起動します。
#make sure you are in the right folder.
cd ~/adkui

#start the server
adk web
- URL を Ctrl+クリックします(例: http://localhost:8000)が表示されます。ブラウザのタブに ADK(Agent Development Kit)GUI が表示されます。
- エージェントのリストから [Agent3] を選択します。
- 次のプロンプトを入力します。
Create a Comic Book based on the following story,

Title: The Story of Momotaro

The story of Momotaro (Peach Boy) is one of Japan's most famous and beloved folktales. It is a classic "hero's journey" that emphasizes the virtues of courage, filial piety, and teamwork.

The Miraculous Birth
Long, long ago, in a small village in rural Japan, lived an elderly couple. They were hardworking and kind, but they were sad because they had never been blessed with children.

One morning, while the old woman was washing clothes by the river, she saw a magnificent, giant peach floating downstream. It was larger than any peach she had ever seen. With great effort, she pulled it from the water and brought it home to her husband for their dinner.

As they prepared to cut the fruit open, the peach suddenly split in half on its own. To their astonishment, a healthy, beautiful baby boy stepped out from the pit.

"Don't be afraid," the child said. "The Heavens have sent me to be your son."

Overjoyed, the couple named him Momotaro (Momo meaning peach, and Taro being a common name for an eldest son).

The Call to Adventure
Momotaro grew up to be stronger and kinder than any other boy in the village. During this time, the village lived in fear of the Oni—ogres and demons who lived on a distant island called Onigashima. These Oni would often raid the mainland, stealing treasures and kidnapping villagers.

When Momotaro reached young adulthood, he approached his parents with a request. "I must go to Onigashima," he declared. "I will defeat the Oni and bring back the stolen treasures to help our people."

Though they were worried, his parents were proud. As a parting gift, the old woman prepared Kibi-dango (special millet dumplings), which were said to provide the strength of a hundred men.

Gathering Allies
Momotaro set off on his journey toward the sea. Along the way, he met three distinct animals:

The Spotted Dog: The dog growled at first, but Momotaro offered him one of his Kibi-dango. The dog, tasting the magical dumpling, immediately swore his loyalty.

The Monkey: Further down the road, a monkey joined the group in exchange for a dumpling, though he and the dog bickered constantly.

The Pheasant: Finally, a pheasant flew down from the sky. After receiving a piece of the Kibi-dango, the bird joined the team as their aerial scout.

Momotaro used his leadership to ensure the three animals worked together despite their differences, teaching them that unity was their greatest strength.

The Battle of Onigashima
The group reached the coast, built a boat, and sailed to the dark, craggy shores of Onigashima. The island was guarded by a massive iron gate.

The Pheasant flew over the walls to distract the Oni and peck at their eyes.

The Monkey climbed the walls and unbolted the Great Gate from the inside.

The Dog and Momotaro charged in, using their immense strength to overpower the demons.

The Oni were caught off guard by the coordinated attack. After a fierce battle, the King of the Oni fell to his knees before Momotaro, begging for mercy. He promised to never trouble the villagers again and surrendered all the stolen gold, jewels, and precious silks.

The Triumphant Return
Momotaro and his three companions loaded the treasure onto their boat and returned to the village. The entire town celebrated their homecoming.

Momotaro used the wealth to ensure his elderly parents lived the rest of their lives in comfort and peace. He remained in the village as a legendary protector, and his story was passed down for generations as a reminder that bravery and cooperation can overcome even the greatest evils.
- エージェントの動作中は、Cloud Shell エディタのターミナルでイベントを確認できます。
- すべての画像の生成には時間がかかることがあります。しばらくお待ちいただくか、コーヒーを飲んでお待ちください。画像生成が開始されると、以下のようにストーリーに関連する画像が表示されます。
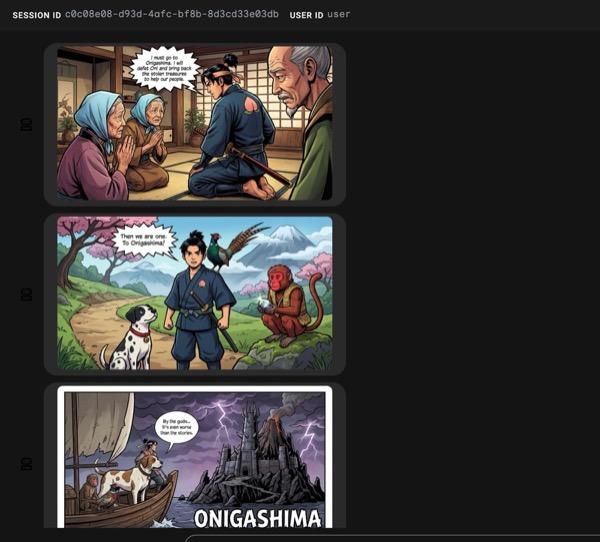
図 34: 漫画 25 としての桃太郎の物語。すべてがスムーズに実行されると、生成された HTML ファイルが html フォルダに保存されます。エージェントを改善したい場合は、エージェント アシスタントに戻って、さらに変更を依頼できます。
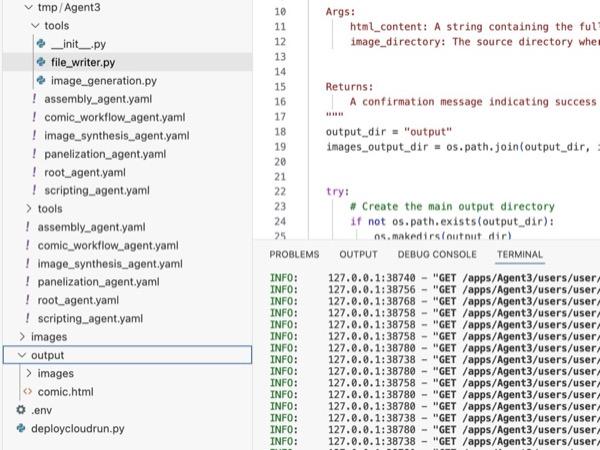
図 35: 出力フォルダの内容
- ステップ 25 が正しく実行され、output フォルダに comic.html が生成されます。次の手順でテストできます。まず、Cloud Shell エディタのメインメニューから [ターミナル] > [新しいターミナル] をクリックして、新しいターミナルを開きます。新しいターミナルが開きます。
#go to the project folder
cd ~/adkui

#activate python virtual environment
source .venv/bin/activate

#Go to the output folder
cd ~/adkui/output

#start local web server
python -m http.server 8080
- http://0.0.0.0:8080 を Ctrl+クリックします。

図 36: ローカル ウェブサーバーの実行
- フォルダの内容がブラウザのタブに表示されます。html ファイル(et. comic.html)をクリックします。コミックは次のように表示されます(出力は多少異なる場合があります)。
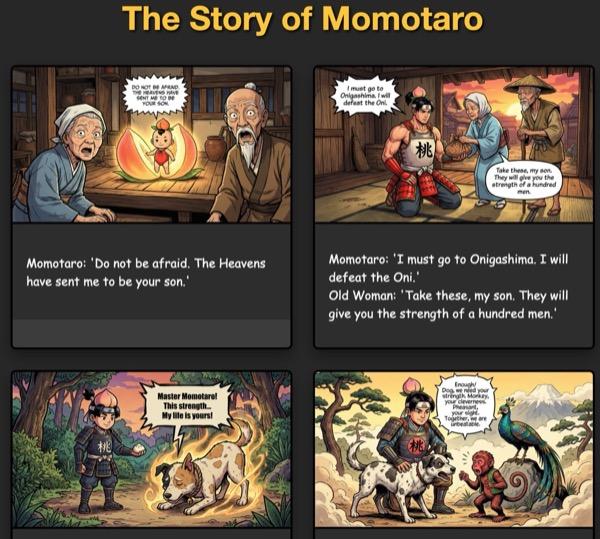
図 37: localhost で実行中
12. クリーンアップ
作成したものをクリーンアップしましょう。
- 作成した Cloud Run アプリを削除します。Cloud Run にアクセスして、Cloud Run に移動します。前の手順で作成したアプリが表示されます。アプリの横にあるチェックボックスをオンにして、[削除] ボタンをクリックします。
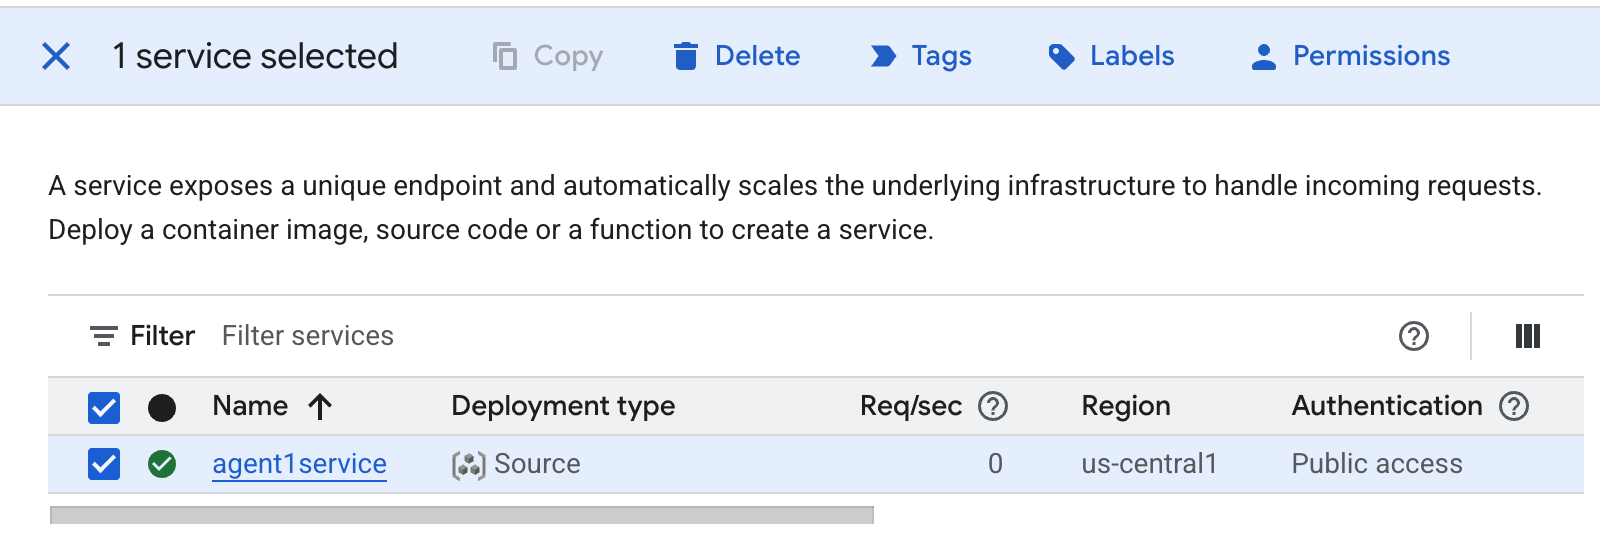 図 38: Cloud Run アプリ 2 を削除する。Cloud Shell でファイルを削除する
#Execute the following to delete the files
cd ~
rm -R ~/adkui
13. まとめ
おめでとうございます!組み込みの ADK Visual Builder を使用して ADK(Agent Development Kit)エージェントを作成できました。また、アプリケーションを Cloud Run にデプロイする方法も学びました。これは、最新のクラウドネイティブ アプリケーションのコア ライフサイクルを網羅する重要な成果であり、独自の複雑なエージェント システムをデプロイするための確固たる基盤となります。
内容のまとめ
このラボでは、次のことを学習しました。
- ADK Visual Builder を使用してマルチエージェント アプリケーションを作成する
- アプリケーションを Cloud Run にデプロイする
便利なリソース