
1. Cel tego laboratorium
W tym praktycznym module dowiesz się, jak tworzyć agentów za pomocą narzędzia pakiet ADK (Agent Development Kit) Visual Builder. Narzędzie pakiet ADK (Agent Development Kit) Visual Builder umożliwia tworzenie agentów pakiet ADK (Agent Development Kit) w sposób niskokodowy. Dowiesz się, jak testować aplikację lokalnie i wdrażać ją w Cloud Run.
Czego się nauczysz
- Poznaj podstawy pakietu ADK (Agent Development Kit) .
- Podstawy narzędzia ADK (pakiet Agent Development Kit) Visual Builder
- Dowiedz się, jak tworzyć agentów za pomocą narzędzi GUI.
- Dowiedz się, jak łatwo wdrażać i używać agentów w Cloud Run.
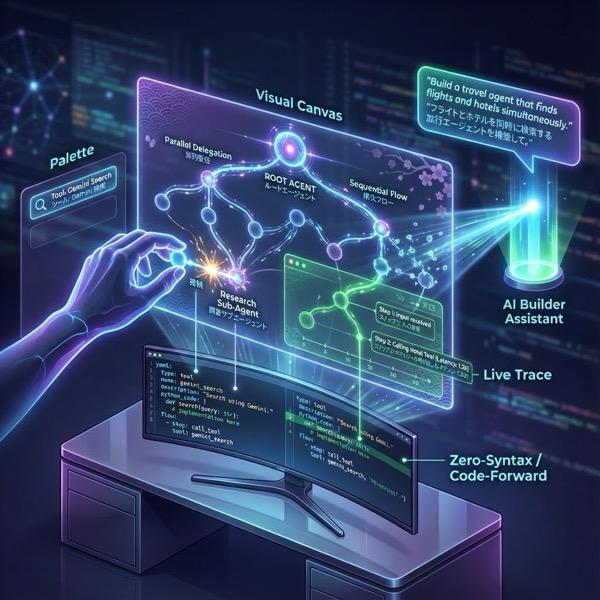
Ilustracja 1. Za pomocą narzędzia ADK Visual Builder możesz tworzyć agentów za pomocą interfejsu GUI, który nie wymaga pisania dużej ilości kodu.
2. Konfiguracja projektu
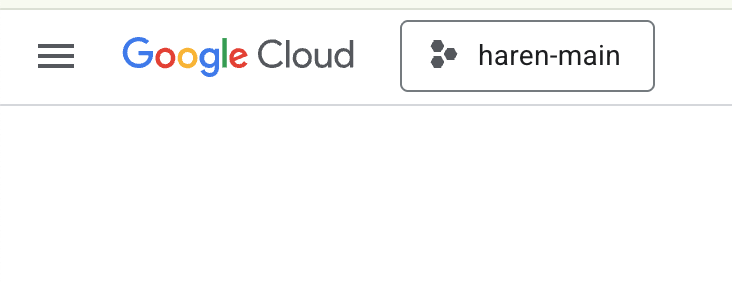
- Jeśli nie masz jeszcze projektu, którego możesz użyć, musisz utworzyć nowy projekt w konsoli GCP. Wybierz projekt w selektorze projektów (w lewym górnym rogu konsoli Google Cloud)
 .
.
Ilustracja 2. Kliknięcie pola obok logo Google Cloud umożliwia wybranie projektu. Sprawdź, czy projekt jest wybrany.
- W tym module do wykonania zadań użyjemy edytora Cloud Shell. Otwórz Cloud Shell i ustaw projekt za pomocą Cloud Shell.
- Kliknij ten link, aby przejść bezpośrednio do edytora Cloud Shell.
- Otwórz terminal, jeśli nie jest jeszcze otwarty, klikając Terminal>Nowy terminal w menu. Wszystkie polecenia z tego samouczka możesz uruchamiać w tym terminalu.
- Aby sprawdzić, czy projekt jest już uwierzytelniony, użyj w terminalu Cloud Shell tego polecenia:
gcloud auth list
- Aby potwierdzić projekt, uruchom w Cloud Shell to polecenie:
gcloud config list project
- Skopiuj identyfikator projektu i użyj tego polecenia, aby go ustawić:
gcloud config set project <YOUR_PROJECT_ID>
- Jeśli nie pamiętasz identyfikatora projektu, możesz wyświetlić listę wszystkich identyfikatorów projektów za pomocą polecenia
gcloud projects list
3. Włącz interfejsy API
Aby przeprowadzić to ćwiczenie, musimy włączyć niektóre usługi API. Uruchom w Cloud Shell to polecenie:
gcloud services enable aiplatform.googleapis.com
gcloud services enable cloudresourcemanager.googleapis.com
Przedstawiamy interfejsy API
- Interfejs Vertex AI API (
aiplatform.googleapis.com) umożliwia dostęp do platformy Vertex AI , dzięki czemu aplikacja może wchodzić w interakcje z modelami Gemini w celu generowania tekstu, prowadzenia sesji czatu i wywoływania funkcji. - Interfejs Cloud Resource Manager API (
cloudresourcemanager.googleapis.com) umożliwia zautomatyzowane zarządzanie metadanymi projektów Google Cloud, takimi jak identyfikator projektu i nazwa, które są często wymagane przez inne narzędzia i pakiety SDK do weryfikacji tożsamości i uprawnień projektu.
4. Sprawdzanie, czy środki zostały zastosowane
Na etapie konfiguracji projektu przesłano prośbę o przyznanie bezpłatnych środków, które umożliwiają korzystanie z usług w Google Cloud. Gdy zastosujesz środki, utworzymy nowe bezpłatne konto rozliczeniowe o nazwie „Konto rozliczeniowe w okresie próbnym Google Cloud Platform”. Aby sprawdzić, czy środki zostały zastosowane, wykonaj te czynności w edytorze Cloud Shell:
curl -s https://raw.githubusercontent.com/haren-bh/gcpbillingactivate/main/activate.py | python3
Jeśli operacja się powiedzie, zobaczysz wynik podobny do tego poniżej: jeśli pojawi się komunikat „Successfully linked project” (Projekt połączony), oznacza to, że konto rozliczeniowe zostało prawidłowo skonfigurowane. Wykonując powyższy krok, możesz sprawdzić, czy Twoje konto jest połączone. Jeśli nie jest, zostanie połączone. Jeśli nie masz wybranego projektu, pojawi się prośba o jego wybranie. Możesz też zrobić to wcześniej, wykonując czynności opisane w sekcji Konfigurowanie projektu. 
Ilustracja 3. Potwierdzenie połączenia konta rozliczeniowego
5. Wprowadzenie do pakietu Agent Development Kit
Pakiet Agent Development Kit oferuje kilka kluczowych korzyści dla deweloperów tworzących aplikacje oparte na agentach:
- Systemy wieloagentowe: twórz modułowe i skalowalne aplikacje, łącząc w hierarchii wielu wyspecjalizowanych agentów. Umożliwia złożoną koordynację i delegowanie.
- Bogaty ekosystem narzędzi: wyposaż agentów w różne funkcje: korzystaj z gotowych narzędzi (wyszukiwanie, wykonywanie kodu itp.), twórz funkcje niestandardowe, integruj narzędzia z zewnętrznych platform agentów (LangChain, CrewAI) lub używaj innych agentów jako narzędzi.
- Elastyczna orkiestracja: definiuj przepływy pracy za pomocą agentów przepływu pracy (
SequentialAgent,ParallelAgentiLoopAgent) w przypadku przewidywalnych potoków lub korzystaj z dynamicznego kierowania opartego na LLM (LlmAgentprzekazywanie) w celu dostosowywania zachowań. - Zintegrowane środowisko programistyczne: lokalne tworzenie, testowanie i debugowanie za pomocą zaawansowanego interfejsu wiersza poleceń i interaktywnego interfejsu programistycznego. Sprawdzaj zdarzenia, stan i wykonanie agenta krok po kroku.
- Wbudowana ocena: systematycznie oceniaj skuteczność agenta, sprawdzając zarówno jakość ostatecznej odpowiedzi, jak i trajektorię wykonania krok po kroku na podstawie predefiniowanych przypadków testowych.
- Gotowość do wdrożenia: konteneryzuj i wdrażaj agentów w dowolnym miejscu – uruchamiaj lokalnie, skaluj za pomocą Vertex AI Agent Engine lub integruj z infrastrukturą niestandardową za pomocą Cloud Run lub Dockera.
Inne pakiety SDK generatywnej AI lub platformy agentów również umożliwiają wysyłanie zapytań do modeli, a nawet udostępnianie im narzędzi, ale dynamiczna koordynacja między wieloma modelami wymaga znacznego nakładu pracy z Twojej strony.
Pakiet Agent Development Kit oferuje bardziej zaawansowaną platformę niż te narzędzia, co pozwala łatwo łączyć ze sobą wiele agentów w celu tworzenia złożonych, ale łatwych w utrzymaniu przepływów pracy.
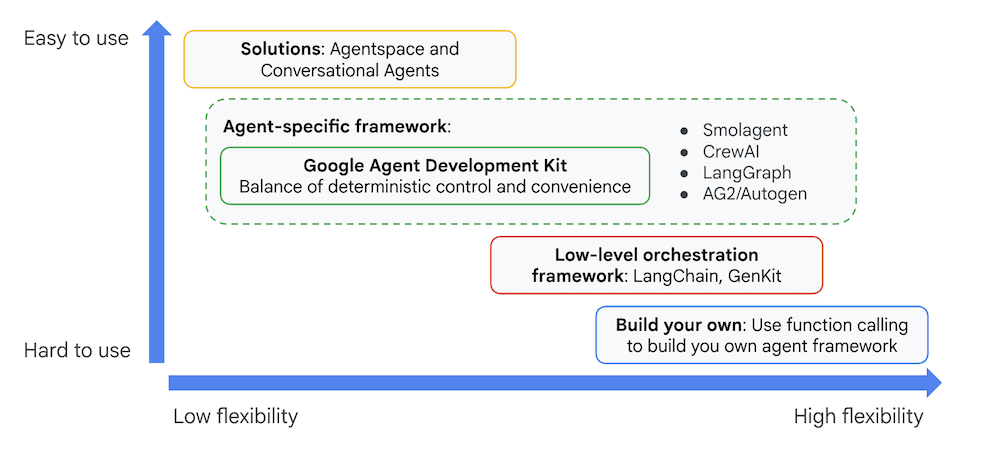
Rysunek 4. Pozycjonowanie pakietu ADK (Agent Development Kit)
W najnowszych wersjach do pakietu Agent Development Kit (ADK) dodano narzędzie ADK Visual Builder, które umożliwia tworzenie agentów pakietu Agent Development Kit (ADK) przy użyciu niewielkiej ilości kodu. W tym module szczegółowo omówimy narzędzie ADK Visual Builder.
6. Instalowanie ADK i konfigurowanie środowiska
Najpierw musimy skonfigurować środowisko, aby można było uruchomić ADK (Agent Development Kit). W tym module uruchomimy ADK (Agent Development Kit) i wykonamy wszystkie zadania w Google Cloud w edytorze Cloud Shell .
Przygotowywanie edytora Cloud Shell
- Kliknij ten link, aby przejść bezpośrednio do edytora Cloud Shell.
- Kliknij Dalej.
- Gdy pojawi się prośba o autoryzację Cloud Shell, kliknij Autoryzuj.
- W dalszej części tego modułu możesz pracować w tym oknie jako środowisku IDE z edytorem Cloud Shell i terminalem Cloud Shell.
- Otwórz nowy terminal, klikając Terminal>New Terminal (Terminal>Nowy terminal) w edytorze Cloud Shell. Wszystkie poniższe polecenia będą uruchamiane w tym terminalu.
Uruchamianie edytora wizualnego ADK
- Wykonaj te polecenia, aby sklonować potrzebne źródło z GitHub i zainstalować niezbędne biblioteki. Uruchom polecenia w terminalu otwartym w edytorze Cloud Shell.
#create the project directory
mkdir ~/adkui
cd ~/adkui
- Do utworzenia środowiska Pythona użyjemy narzędzia uv (uruchom w terminalu edytora Cloud Shell):
#Install uv if you do not have installed yet
pip install uv

#go to the project directory
cd ~/adkui

#Create the virtual environment
uv venv


#use the newly created environment
source .venv/bin/activate

#install libraries
uv pip install google-adk==1.22.1
uv pip install python-dotenv
Uwaga: jeśli kiedykolwiek będziesz musiał(a) ponownie uruchomić terminal, pamiętaj, aby skonfigurować środowisko Pythona, wykonując polecenie „source .venv/bin/activate”.
- W edytorze kliknij kolejno View (Widok) –> Toggle hidden files (Przełącz ukryte pliki). W folderze adkui utwórz plik .env o tej treści:
#go to adkui folder
cd ~/adkui
cat <<EOF>> .env
GOOGLE_GENAI_USE_VERTEXAI=1
GOOGLE_CLOUD_PROJECT=$(gcloud config get-value project)
GOOGLE_CLOUD_LOCATION=us-central1
IMAGEN_MODEL="imagen-3.0-generate-002"
GENAI_MODEL="gemini-2.5-flash"
EOF
7. Tworzenie prostego agenta za pomocą narzędzia ADK Visual Builder
W tej sekcji utworzymy prostego agenta za pomocą ADK Visual Builder.ADK Visual Builder to narzędzie internetowe, które zapewnia wizualne środowisko projektowania przepływu pracy do tworzenia agentów pakietu ADK (Agent Development Kit) i zarządzania nimi. Umożliwia projektowanie, tworzenie i testowanie agentów w przyjaznym dla początkujących interfejsie graficznym. Zawiera też asystenta opartego na AI, który pomaga w tworzeniu agentów.
Rysunek 5. ADK Visual Builder
- Wróć do katalogu głównego adkui w terminalu i wykonaj to polecenie, aby uruchomić agenta lokalnie (uruchom w terminalu edytora Cloud Shell). Powinien się uruchomić serwer ADK, a w terminalu powinny się pojawić wyniki podobne do tych na rysunku 6.
#go to the directory adkui
cd ~/adkui
# Run the following command to run ADK locally
adk web
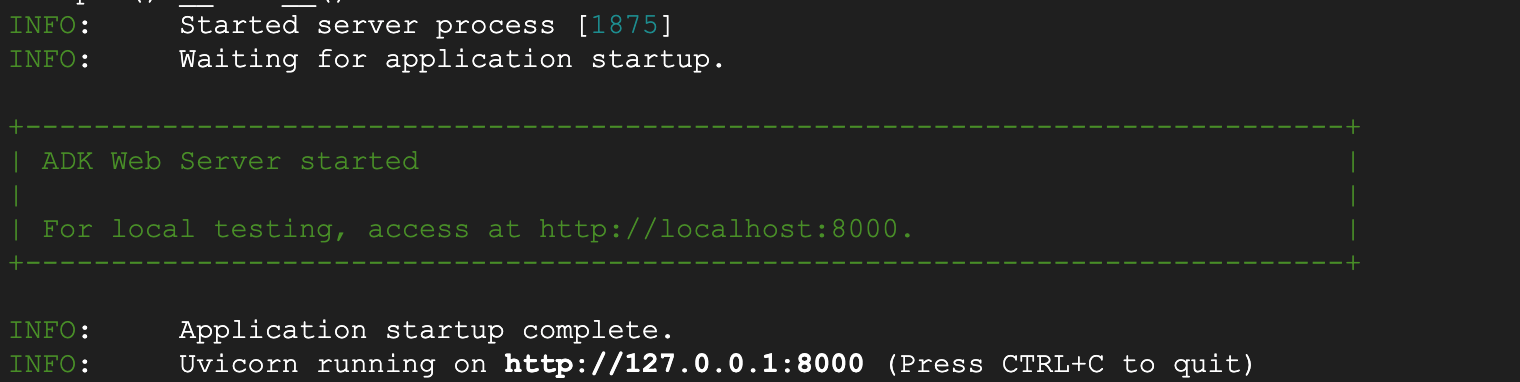
Ilustracja 6. Uruchamianie aplikacji ADK
- Ctrl+kliknięcie (CMD+kliknięcie w systemie macOS) adresu URL http:// wyświetlanego w terminalu, aby otworzyć narzędzie GUI w przeglądarce pakiet Agent Development Kit (ADK).
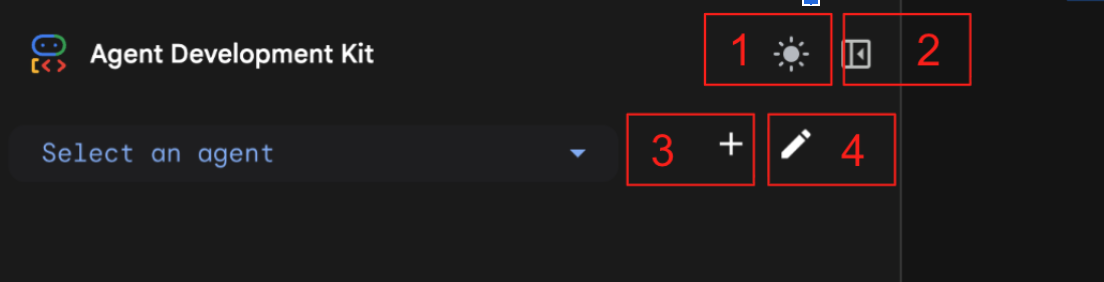
Ilustracja 7. Interfejs internetowy ADK. ADK ma te komponenty: 1. Przełączanie trybu jasnego i ciemnego, 2. Zwijanie panelu, 3. Tworzenie agenta, 4. Edytowanie agenta.
- Aby utworzyć nowego agenta, naciśnij przycisk „+”.
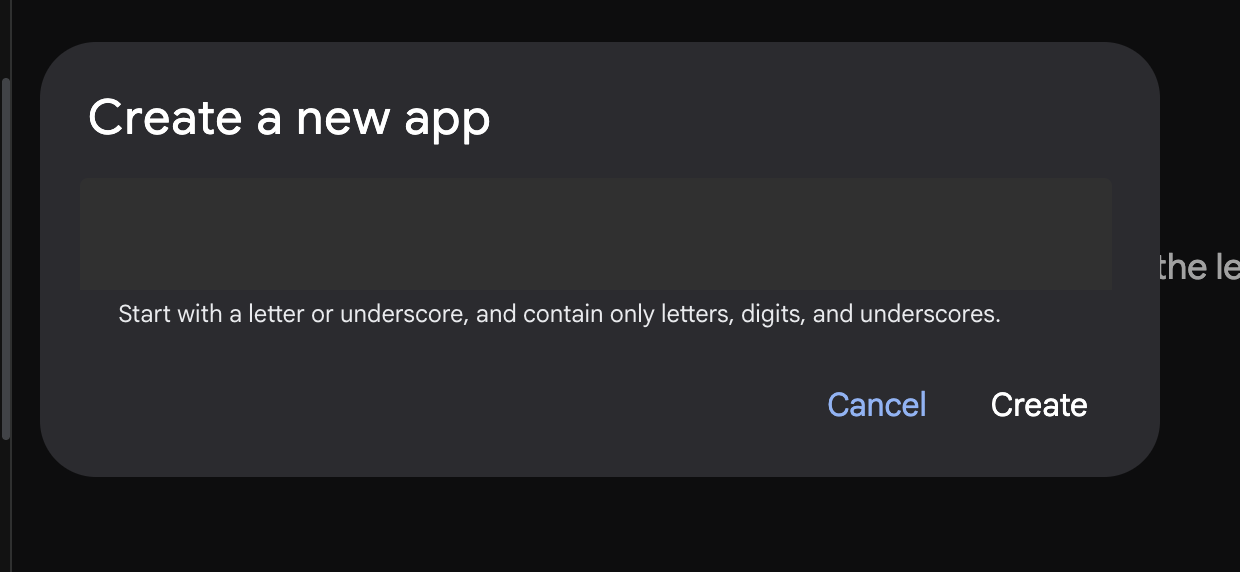
Rysunek 8. Okno dialogowe tworzenia nowej aplikacji
- Nadaj mu nazwę „Agent1” i kliknij Utwórz.
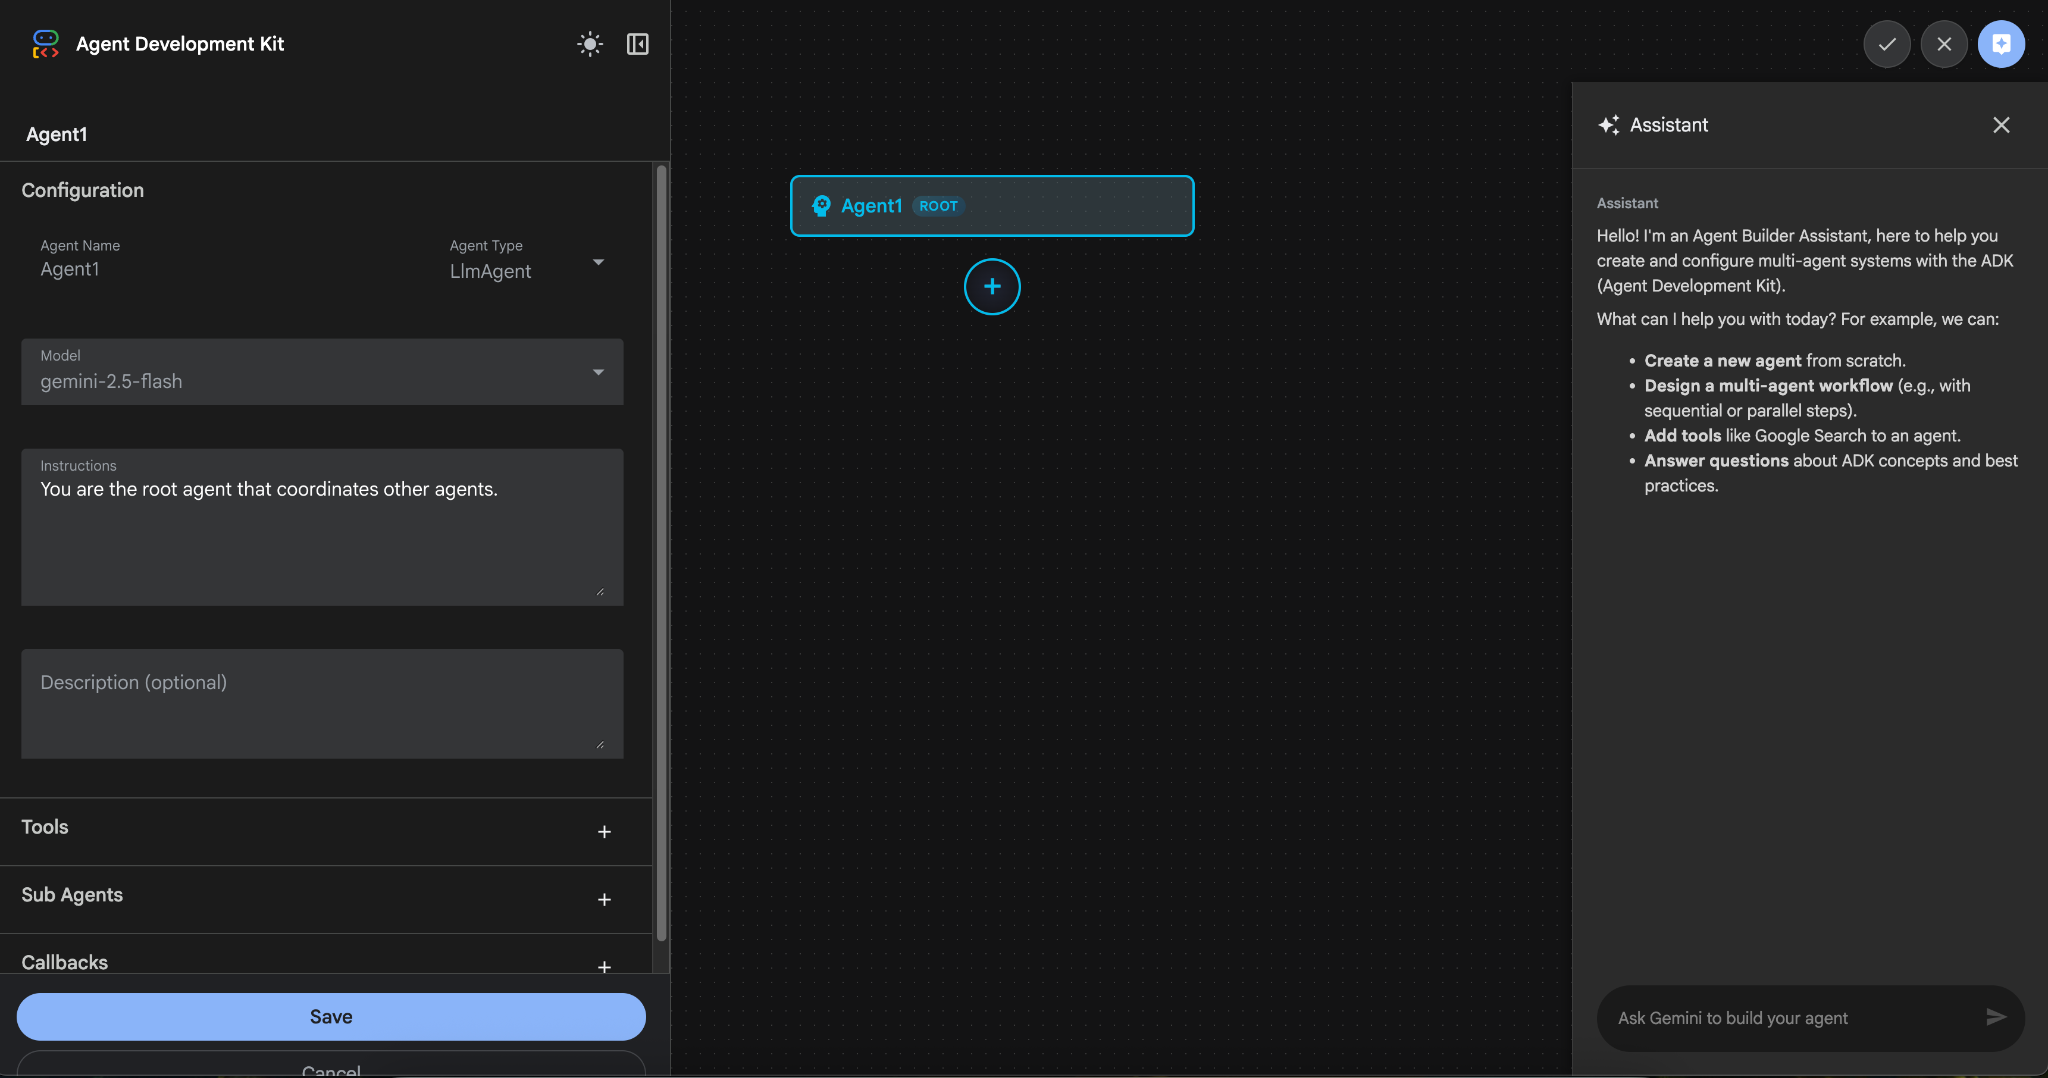
Rysunek 9. Interfejs Kreatora agentów
- Panel jest podzielony na 3 główne sekcje: po lewej stronie znajdują się elementy sterujące do tworzenia agentów na podstawie interfejsu GUI, pośrodku jest wizualizacja postępów, a po prawej stronie znajduje się Asystent do tworzenia agentów za pomocą języka naturalnego.
- Agent został utworzony. Aby kontynuować, kliknij przycisk Zapisz. Uwaga: aby nie utracić zmian, musisz kliknąć Zapisz.
- Agent powinien być teraz gotowy do testowania. Aby rozpocząć, wpisz prompta w polu czatu, np.:
Hi, what can you do?
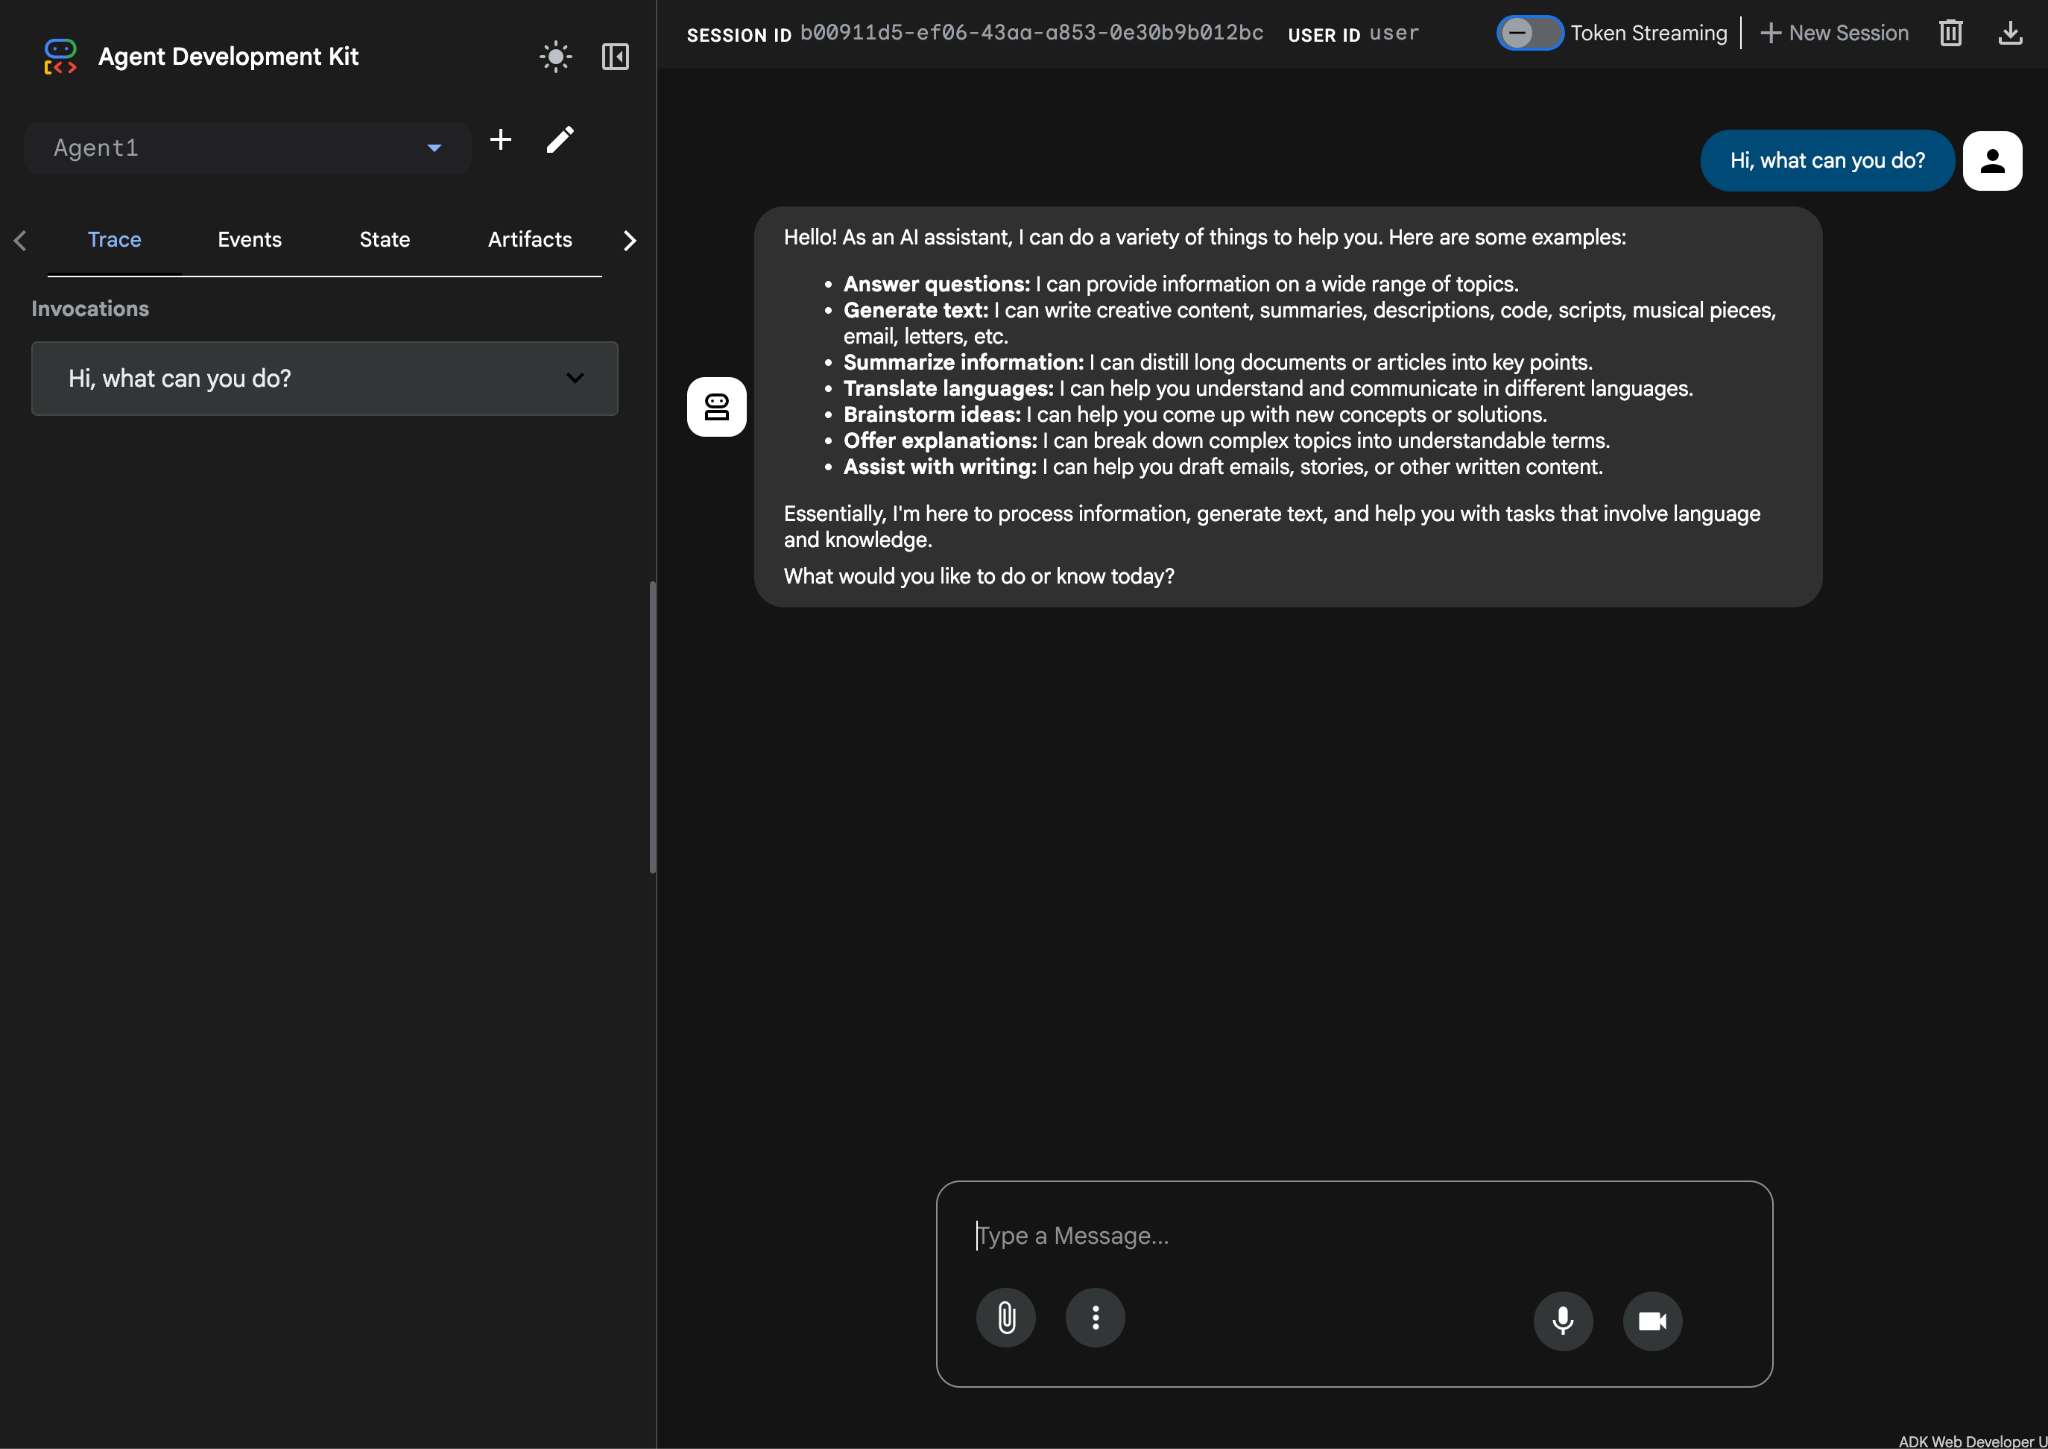
Ilustracja 10. Testowanie agenta.
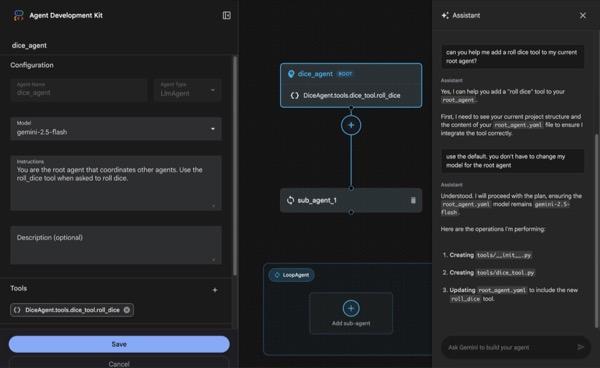
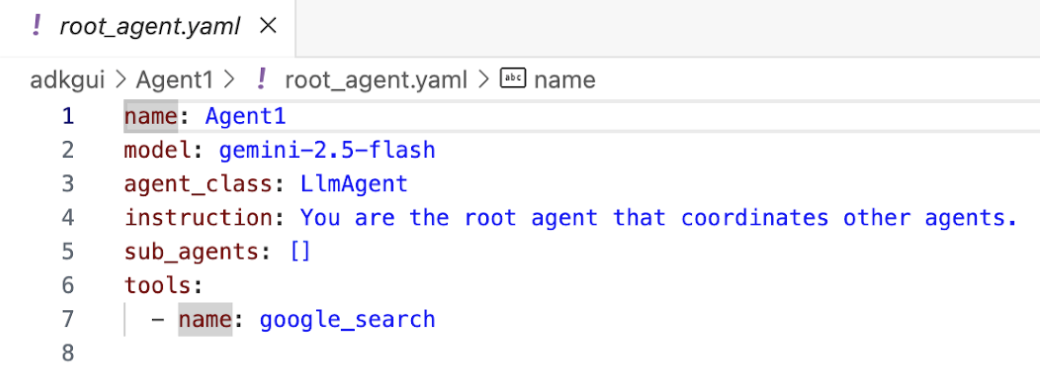
7.Wróćmy do edytora i przyjrzyjmy się nowo wygenerowanym plikom. Eksplorator znajdziesz po lewej stronie. Przejdź do folderu adkgui i rozwiń go, aby wyświetlić katalog Agent 1. W folderze możesz sprawdzić plik YAML, który definiuje agenta, jak pokazano na ilustracji poniżej.
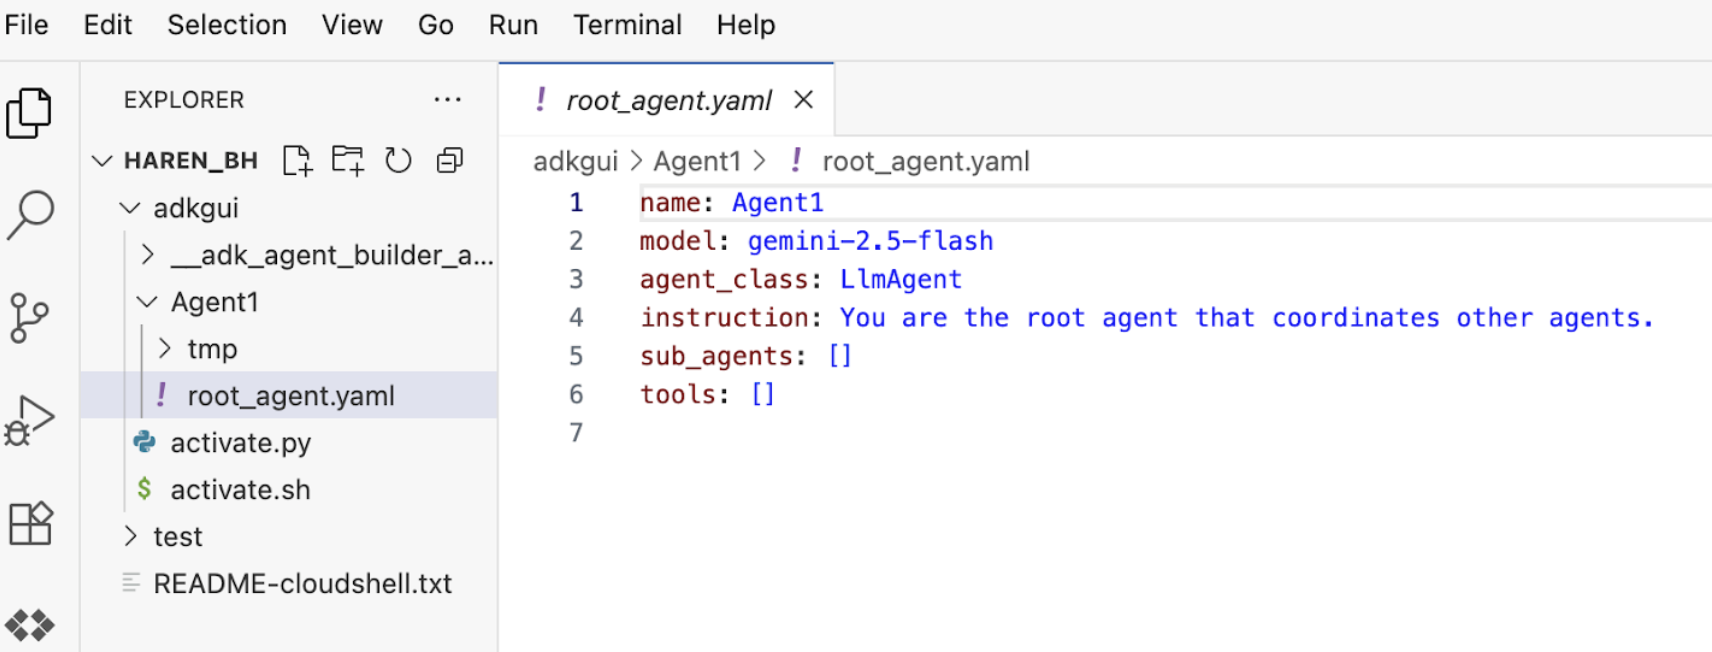
Ilustracja 11. Definicja agenta w pliku YAML
- Teraz wróćmy do edytora GUI i dodajmy kilka funkcji do agenta. Aby to zrobić, naciśnij przycisk edycji (patrz rysunek 7, element 4, ikona ołówka).
- Dodamy do agenta funkcję wyszukiwarki Google. W tym celu musimy dodać wyszukiwarkę Google jako narzędzie dostępne dla agenta, z którego może on korzystać. Aby to zrobić, kliknij znak „+” obok sekcji Narzędzia w lewym dolnym rogu ekranu, a następnie w menu kliknij Wbudowane narzędzie (patrz rysunek 12).
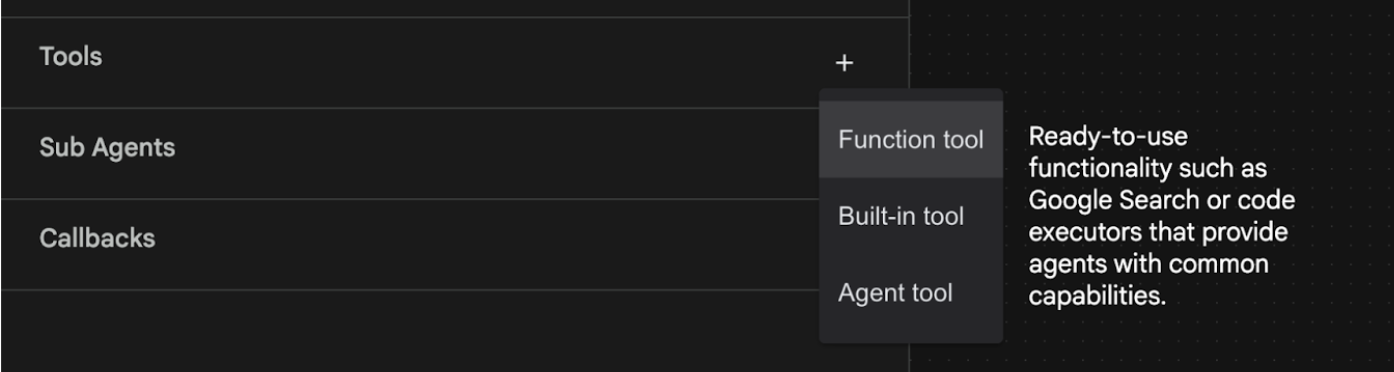
Ilustracja 12. Dodawanie nowego narzędzia do agenta
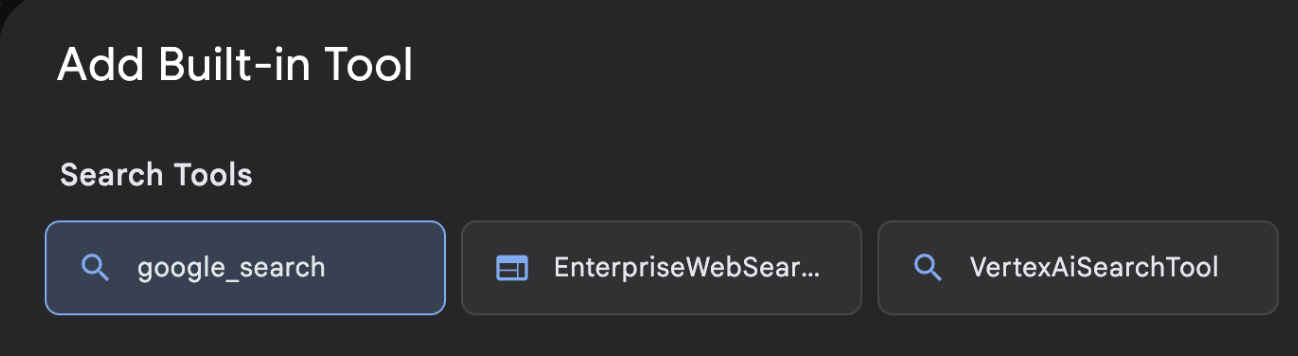
- Z listy Wbudowane narzędzie wybierz google_search i kliknij Utwórz (patrz rysunek 12). Spowoduje to dodanie wyszukiwarki Google jako narzędzia w Twoim agencie.
- Kliknij przycisk Zapisz, aby zapisać zmiany.
Ilustracja 13. Lista narzędzi dostępnych w interfejsie wizualnego narzędzia do tworzenia pakietu ADK
- Możesz teraz przetestować agenta. Najpierw ponownie uruchom serwer ADK. Otwórz terminal, w którym został uruchomiony serwer pakiet ADK (Agent Development Kit), i naciśnij CTRL+C, aby go zamknąć, jeśli nadal działa. Aby ponownie uruchomić serwer, wykonaj to polecenie:
#make sure you are in the right folder.
cd ~/adkui

#start the server
adk web
- Kliknij adres URL z naciśniętym klawiszem Ctrl (np. http://localhost:8000) wyświetlony na ekranie. W karcie przeglądarki powinien wyświetlić się interfejs graficzny pakietu ADK (Agent Development Kit).
- Na liście pracowników wybierz Agent1. Twój agent może teraz korzystać z wyszukiwarki Google. W oknie czatu przetestuj ten prompt:
What is the weather today in Yokohama?
Odpowiedź z wyszukiwarki Google powinna wyglądać tak jak poniżej. 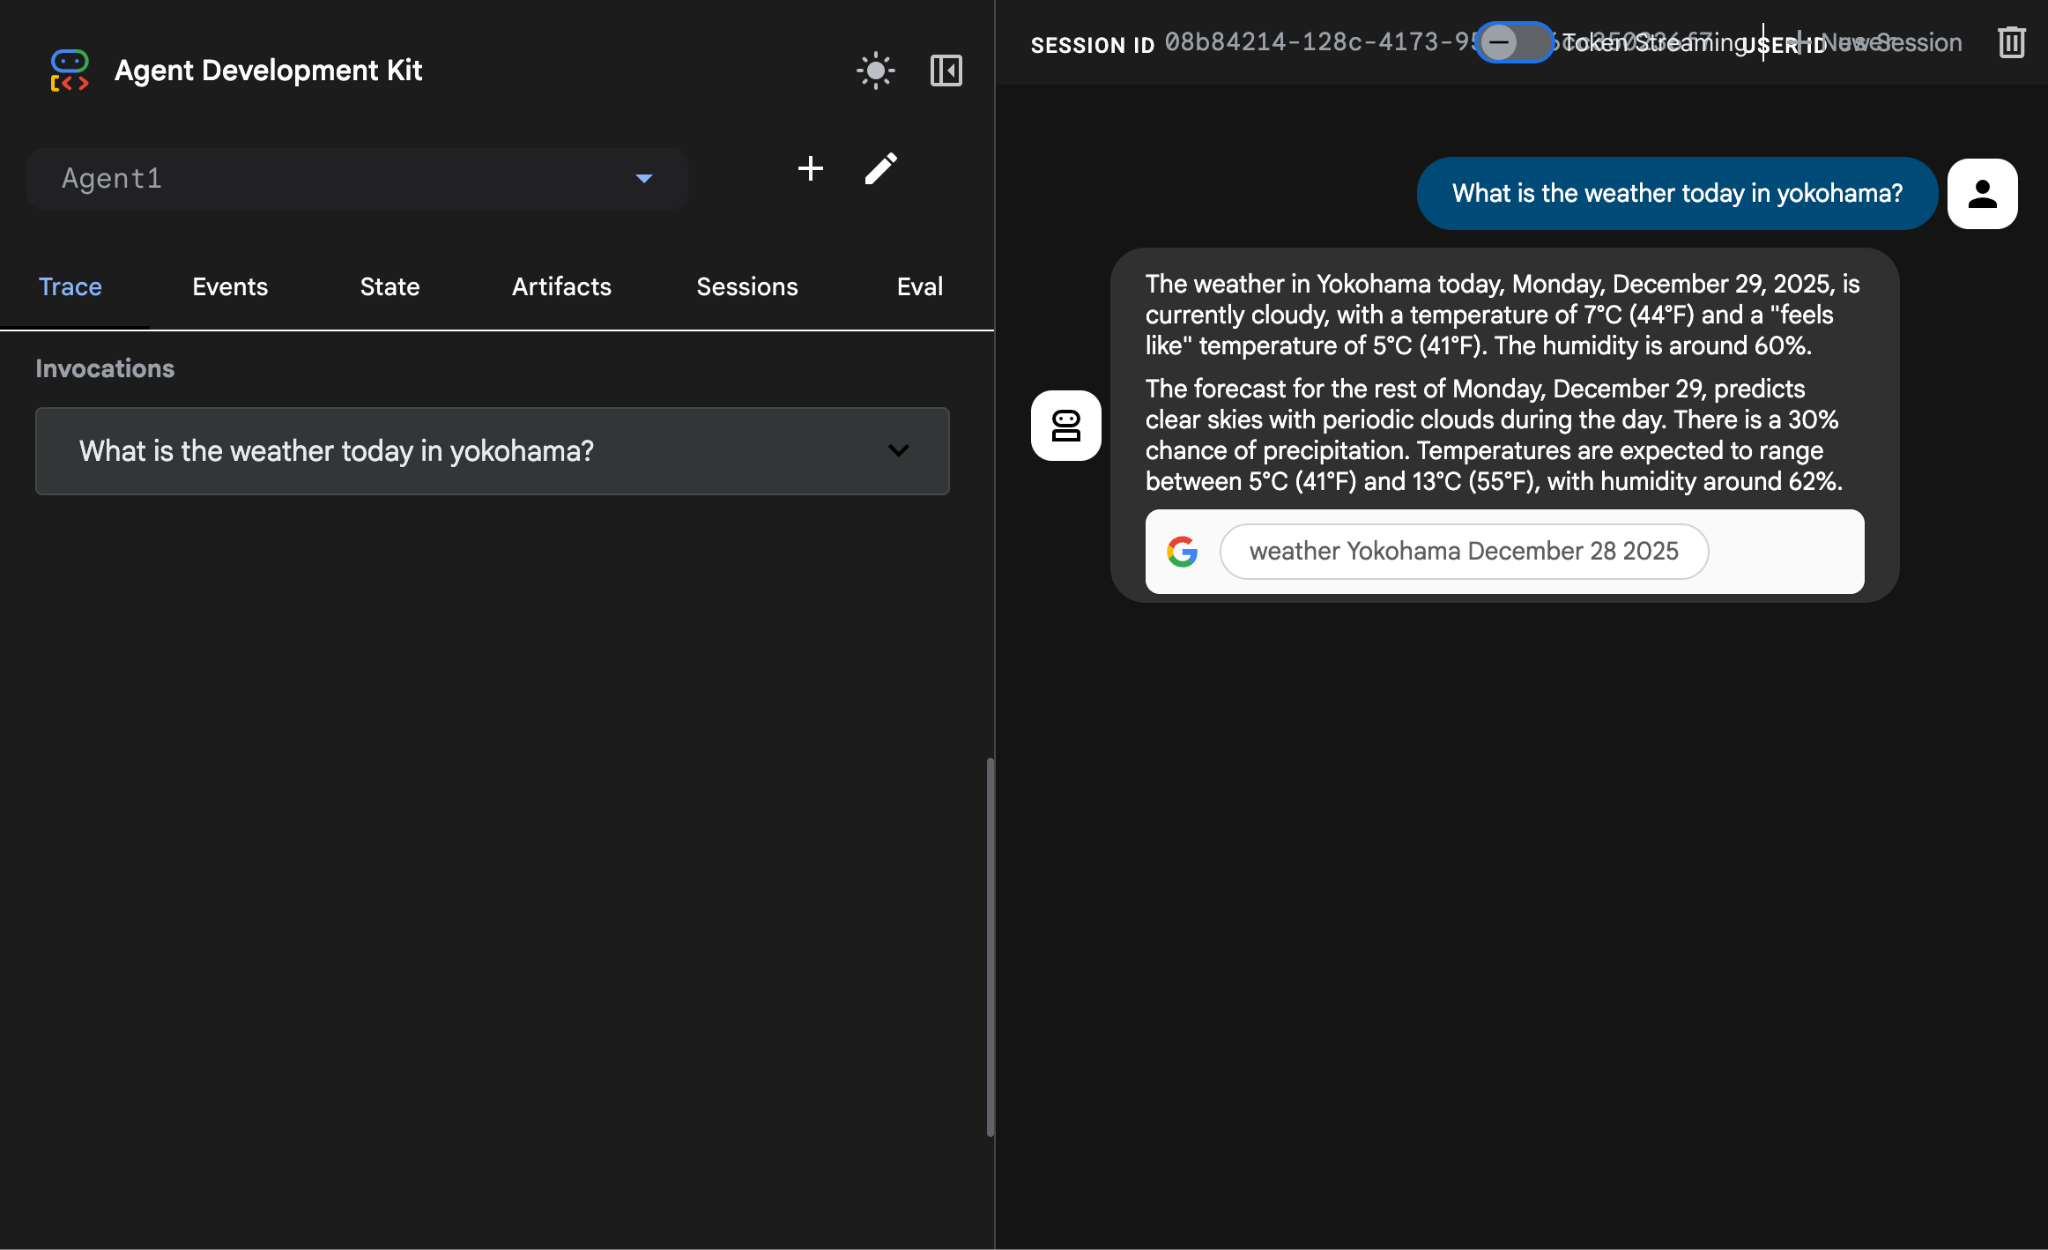
Ilustracja 14. Wyszukiwarka Google z agentem
- Teraz wróćmy do edytora i sprawdźmy kod utworzony w tym kroku. W panelu bocznym Eksplorator w Edytorze kliknij root_agent.yaml, aby otworzyć plik. Sprawdź, czy jako narzędzie dodano google_search (rysunek 15).
Ilustracja 15. Potwierdzenie, że google_search został dodany jako narzędzie w Agent1
8. Wdrażanie agenta w Cloud Run
Teraz wdróżmy utworzonego agenta w Cloud Run. Dzięki Cloud Run możesz szybko tworzyć aplikacje lub witryny na platformie w pełni zarządzanej.
Możesz uruchamiać usługi frontendu i backendu oraz zadania wsadowe, hostować duże modele językowe, a także tworzyć kolejki zadań przetwarzania bez konieczności zarządzania infrastrukturą.
Jeśli w terminalu edytora Cloud Shell nadal działa serwer pakietu Agent Development Kit (ADK), naciśnij Ctrl+C, aby go zatrzymać.
- Przejdź do katalogu głównego projektu.
cd ~/adkui
- Pobierz kod wdrożenia. Po uruchomieniu polecenia w panelu Eksplorator edytora Cloud Shell powinien pojawić się plik deploycloudrun.py.
curl -LO https://raw.githubusercontent.com/haren-bh/codelabs/main/adk_visual_builder/deploycloudrun.py
- Sprawdź opcje wdrażania w pliku deploycloudrun.py. Aby wdrożyć agenta w Cloud Run, użyjemy polecenia adk deploy. Pakiet ADK (Agent Development Kit) ma wbudowaną opcję wdrażania agenta w Cloud Run. Musimy określić parametry, takie jak identyfikator projektu Google Cloud, region itp. W przypadku ścieżki aplikacji ten skrypt zakłada, że agent_path=./Agent1. Utworzymy też nowe konto usługi z niezbędnymi uprawnieniami i dołączymy je do Cloud Run. Cloud Run potrzebuje dostępu do usług takich jak Vertex AI i Cloud Storage, aby uruchomić agenta.
   command = [
        "adk", "deploy", "cloud_run",
        f"--project={project_id}",
        f"--region={location}",
        f"--service_name={service_name}",
        f"--app_name={app_name}",
        f"--artifact_service_uri=memory://",
        f"--with_ui",
        agent_path,
        f"--",
        f"--service-account={sa_email}",
    ]
- Uruchom skrypt deploycloudrun.py**. Wdrożenie powinno się rozpocząć zgodnie z rysunkiem poniżej**.
python3 deploycloudrun.py
Jeśli pojawi się komunikat z potwierdzeniem podobny do tego poniżej, naciśnij Y i Enter w przypadku wszystkich wiadomości. Skrypt depoycloudrun.py zakłada, że agent znajduje się w folderze Agent1, tak jak w przykładzie powyżej.
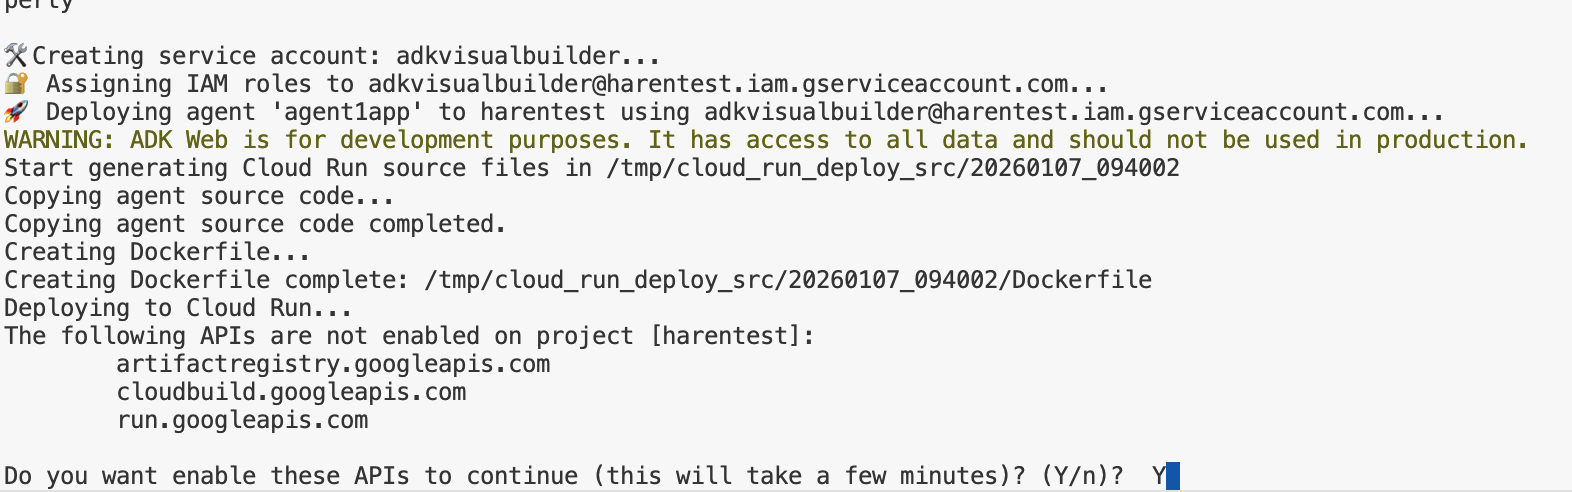
Ilustracja 16. Wdrażanie agenta w Cloud Run. W odpowiedzi na wiadomości z potwierdzeniem naciśnij Y.
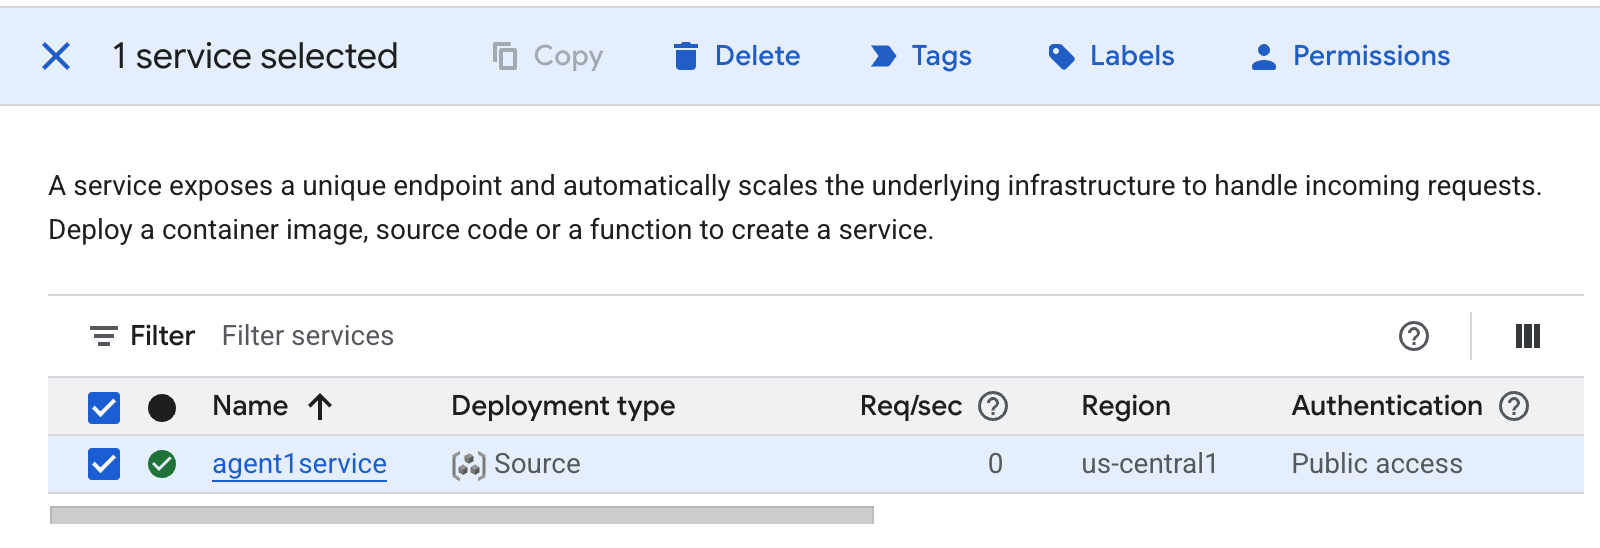
- Po zakończeniu wdrażania powinien się wyświetlić adres URL usługi, np. https://agent1service-78833623456.us-central1.run.app.
- Otwórz adres URL w przeglądarce, aby uruchomić aplikację.
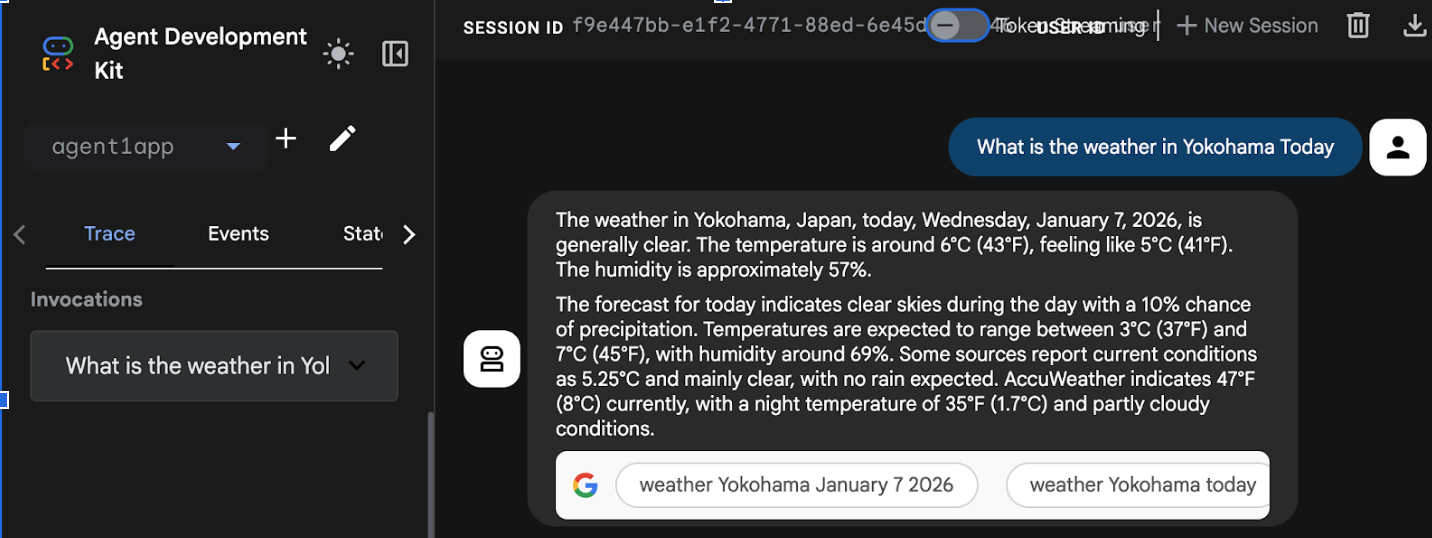
Figure 17: Agent running in Cloud Run
9. Tworzenie agenta z sub-agentem i narzędziem niestandardowym
W poprzedniej sekcji utworzyliśmy pojedynczego agenta z wbudowanym narzędziem wyszukiwarki Google. W tej sekcji utworzysz system z wieloma agentami, w którym agenci mogą korzystać z niestandardowych narzędzi.
- Najpierw ponownie uruchom serwer pakietu ADK (Agent Development Kit). Otwórz terminal, w którym został uruchomiony serwer pakiet Agent Development Kit (ADK), i naciśnij CTRL+C, aby go zamknąć, jeśli nadal działa. Aby ponownie uruchomić serwer, wykonaj to polecenie:
#make sure you are in the right folder.
cd ~/adkui

#start the server
adk web
- Kliknij adres URL z naciśniętym klawiszem Ctrl (np. http://localhost:8000) wyświetlony na ekranie. W karcie przeglądarki powinien wyświetlić się interfejs graficzny pakietu ADK (Agent Development Kit).
- Aby utworzyć nowego agenta, kliknij przycisk „+”. W oknie dialogowym agenta wpisz „Agent2” (rysunek 18) i kliknij „Utwórz”.
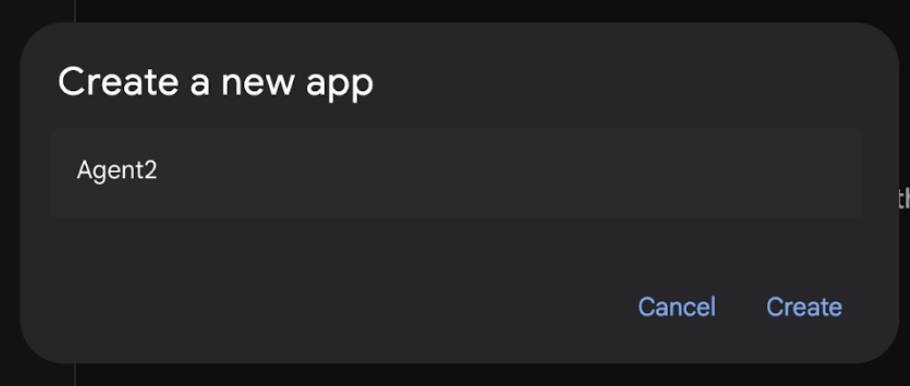
Ilustracja 18. Tworzenie nowej aplikacji agenta.
- W sekcji instrukcji narzędzia Agent2 wpisz ten tekst.
You are an agent that takes image creation instruction from the user and passes it to your sub agent
- Teraz dodamy sub-agenta do agenta głównego. Aby to zrobić, kliknij przycisk „+” po lewej stronie menu Sub Agent u dołu panelu po lewej stronie (rysunek 19) i wybierz „LLM Agent” (Agent LLM). Spowoduje to utworzenie nowego agenta jako nowego subagenta agenta głównego.
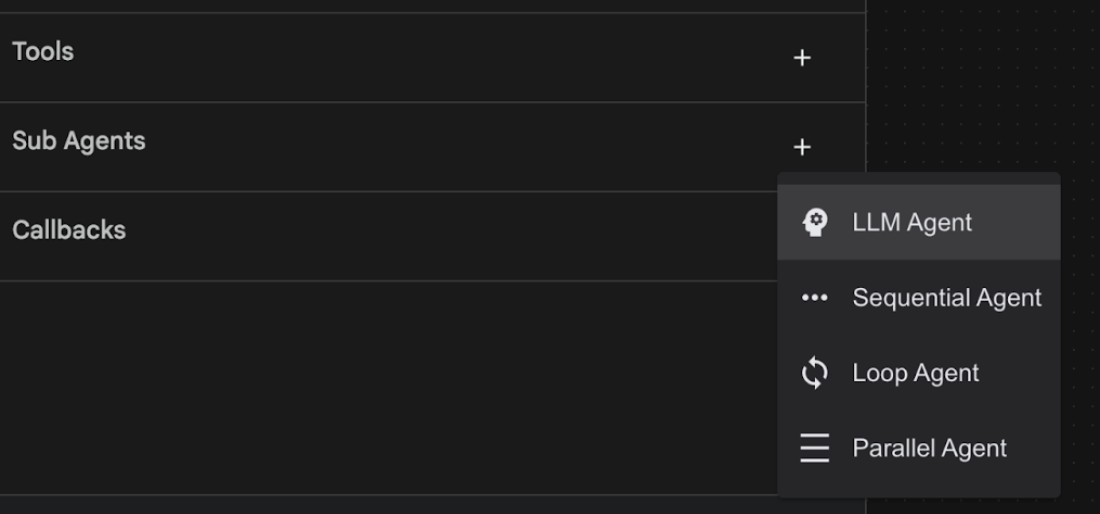
Ilustracja 19. Dodawanie nowego sub-agenta.
- W sekcji Instrukcje dla sub_agent_1 wpisz ten tekst:
You are an Agent that can take instructions about an image and create an image using the create_image tool.
- Teraz dodajmy do tego sub-agenta niestandardowe narzędzie. To narzędzie wywoła model Imagen, aby wygenerować obraz na podstawie instrukcji użytkownika. Aby to zrobić, najpierw kliknij utworzonego w poprzednim kroku subagenta i kliknij przycisk „+” obok menu Narzędzia. Na liście opcji narzędzia kliknij „Narzędzie funkcji”. To narzędzie pozwoli nam dodać do niego własny kod.
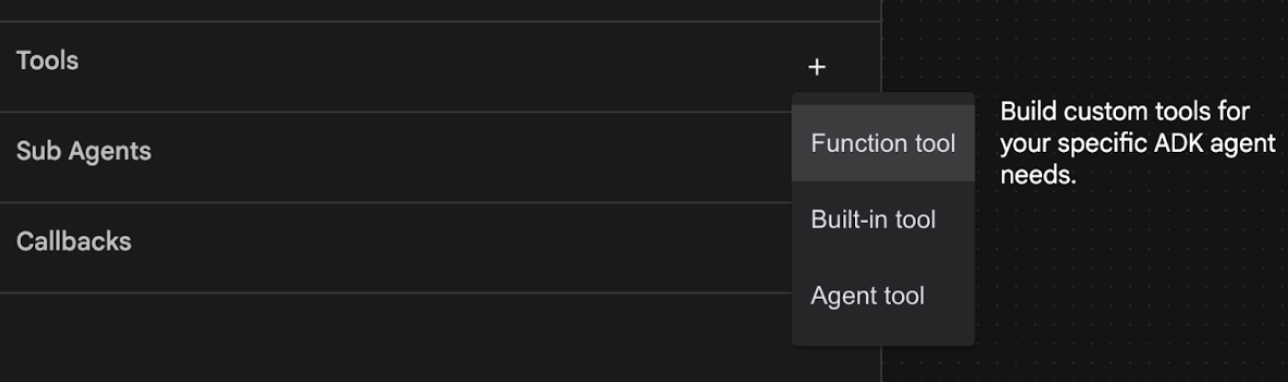
Ilustracja 20. Kliknij narzędzie Funkcja, aby utworzyć nowe narzędzie. 8. W oknie dialogowym nadaj narzędziu nazwę Agent2.image_creation_tool.create_image. 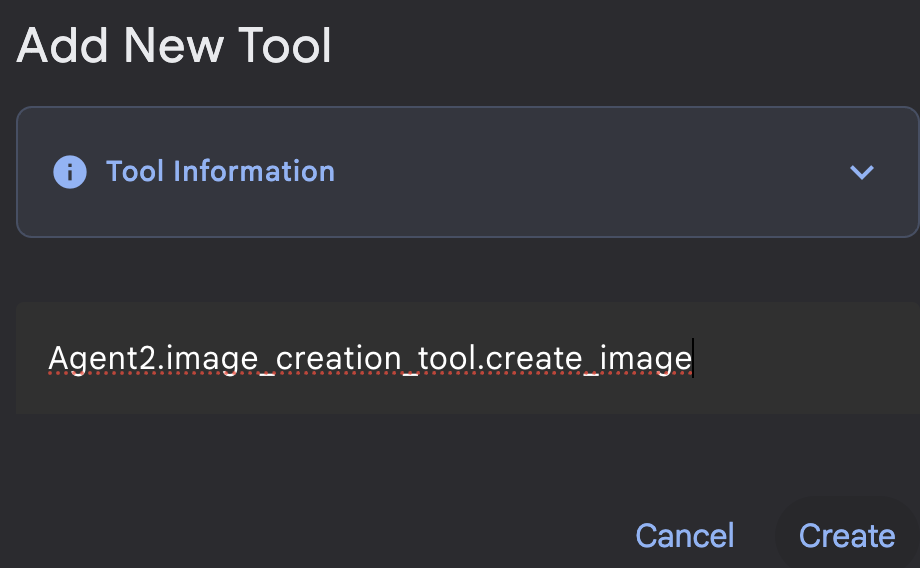
Ilustracja 21. Dodawanie nazwy narzędzia
- Aby zapisać zmiany, kliknij przycisk Zapisz.
- W terminalu edytora Cloud Shell naciśnij Ctrl+S, aby zamknąć serwer ADK.
- W terminalu wpisz to polecenie, aby utworzyć plik image_creation_tool.py.
touch ~/adkui/Agent2/image_creation_tool.py
- Otwórz nowo utworzony plik image_creation_tool.py, klikając go w panelu Eksplorator w edytorze Cloud Shell. Zastąp zawartość pliku image_creation_tool.py poniższym kodem i zapisz go (Ctrl+S).
import os
import io
import vertexai
from vertexai.preview.vision_models import ImageGenerationModel
from dotenv import load_dotenv
import uuid
from typing import Union
from datetime import datetime
from google import genai
from google.genai import types
from google.adk.tools import ToolContext
import logging

# Configure logging
logging.basicConfig(level=logging.INFO)
logger = logging.getLogger(__name__)

async def create_image(prompt: str,tool_context: ToolContext) -> Union[bytes, str]:
  """
  Generates an image based on a text prompt using a Vertex AI Imagen model.
  Args:
      prompt: The text prompt to generate the image from.

  Returns:
      The binary image data (PNG format) on success, or an error message string on failure.
  """
  print(f"Attempting to generate image for prompt: '{prompt}'")

  try:
      # Load environment variables from .env file two levels up
      dotenv_path = os.path.join(os.path.dirname(__file__), '..', '..', '.env')
      load_dotenv(dotenv_path=dotenv_path)
      project_id = os.getenv("GOOGLE_CLOUD_PROJECT")
      location = os.getenv("GOOGLE_CLOUD_LOCATION")
      model_name = os.getenv("IMAGEN_MODEL")
      client = genai.Client(
          vertexai=True,
          project=project_id,
          location=location,
      )
      response = client.models.generate_images(
          model="imagen-3.0-generate-002",
          prompt=prompt,
          config=types.GenerateImagesConfig(
              number_of_images=1,
              aspect_ratio="9:16",
              safety_filter_level="block_low_and_above",
              person_generation="allow_adult",
          ),
      )
      if not all([project_id, location, model_name]):
          return "Error: Missing GOOGLE_CLOUD_PROJECT, GOOGLE_CLOUD_LOCATION, or IMAGEN_MODEL in .env file."
      vertexai.init(project=project_id, location=location)
      model = ImageGenerationModel.from_pretrained(model_name)
      images = model.generate_images(
          prompt=prompt,
          number_of_images=1
      )
      if response.generated_images is  None:
          return "Error: No image was generated."
      for generated_image in response.generated_images:
          # Get the image bytes
          image_bytes = generated_image.image.image_bytes
          counter = str(tool_context.state.get("loop_iteration", 0))
          artifact_name = f"generated_image_" + counter + ".png"
          # Save as ADK artifact (optional, if still needed by other ADK components)
          report_artifact = types.Part.from_bytes(
              data=image_bytes, mime_type="image/png"
          )
          await tool_context.save_artifact(artifact_name, report_artifact)
          logger.info(f"Image also saved as ADK artifact: {artifact_name}")
          return {
              "status": "success",
              "message": f"Image generated .  ADK artifact: {artifact_name}.",
              "artifact_name": artifact_name,
          }
  except Exception as e:
      error_message = f"An error occurred during image generation: {e}"
      print(error_message)
      return error_message
- Najpierw ponownie uruchom serwer pakietu ADK (Agent Development Kit). Otwórz terminal, w którym został uruchomiony serwer pakiet Agent Development Kit (ADK), i naciśnij CTRL+C, aby go zamknąć, jeśli nadal działa. Aby ponownie uruchomić serwer, wykonaj to polecenie:
#make sure you are in the right folder.
cd ~/adkui

#start the server
adk web
- Kliknij adres URL z naciśniętym klawiszem Ctrl (np. http://localhost:8000) wyświetlony na ekranie. W karcie przeglądarki powinien wyświetlić się interfejs graficzny pakietu ADK (Agent Development Kit).
- Na karcie interfejsu pakietu ADK (Agent Development Kit) wybierz Agent2 na liście agentów i kliknij przycisk edycji (ikonę ołówka). W edytorze wizualnym ADK (Agent Development Kit) kliknij przycisk Zapisz, aby zachować zmiany.
- Teraz możemy przetestować nowego agenta.
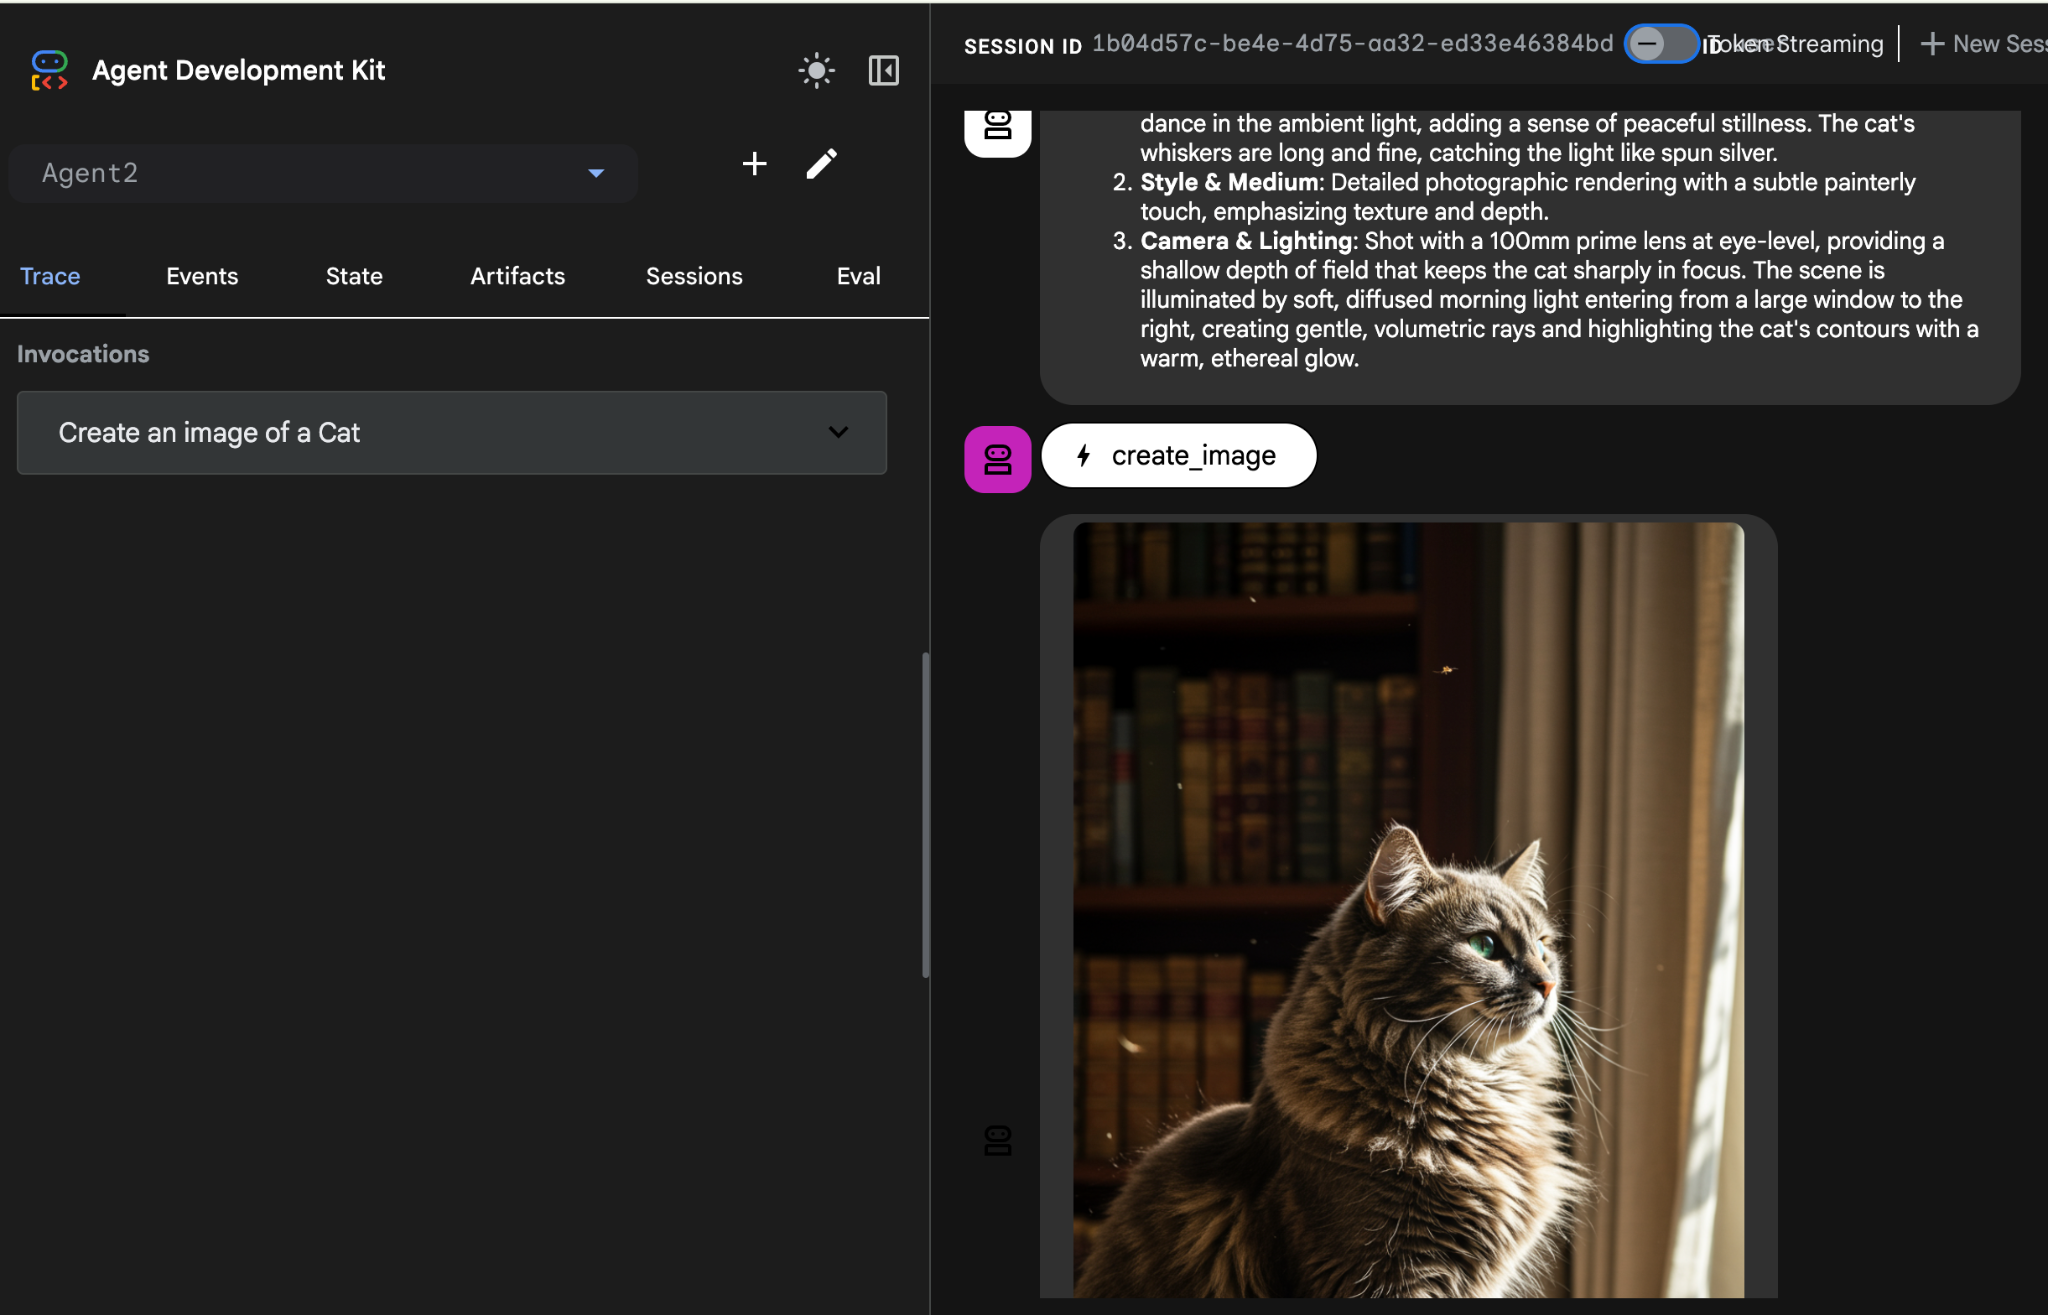
- W interfejsie czatu ADK (pakiet Agent Development Kit) wpisz ten prompt. Możesz też wypróbować inne prompty. Powinny się wyświetlić wyniki widoczne na rysunku 22.
Create an image of a cat
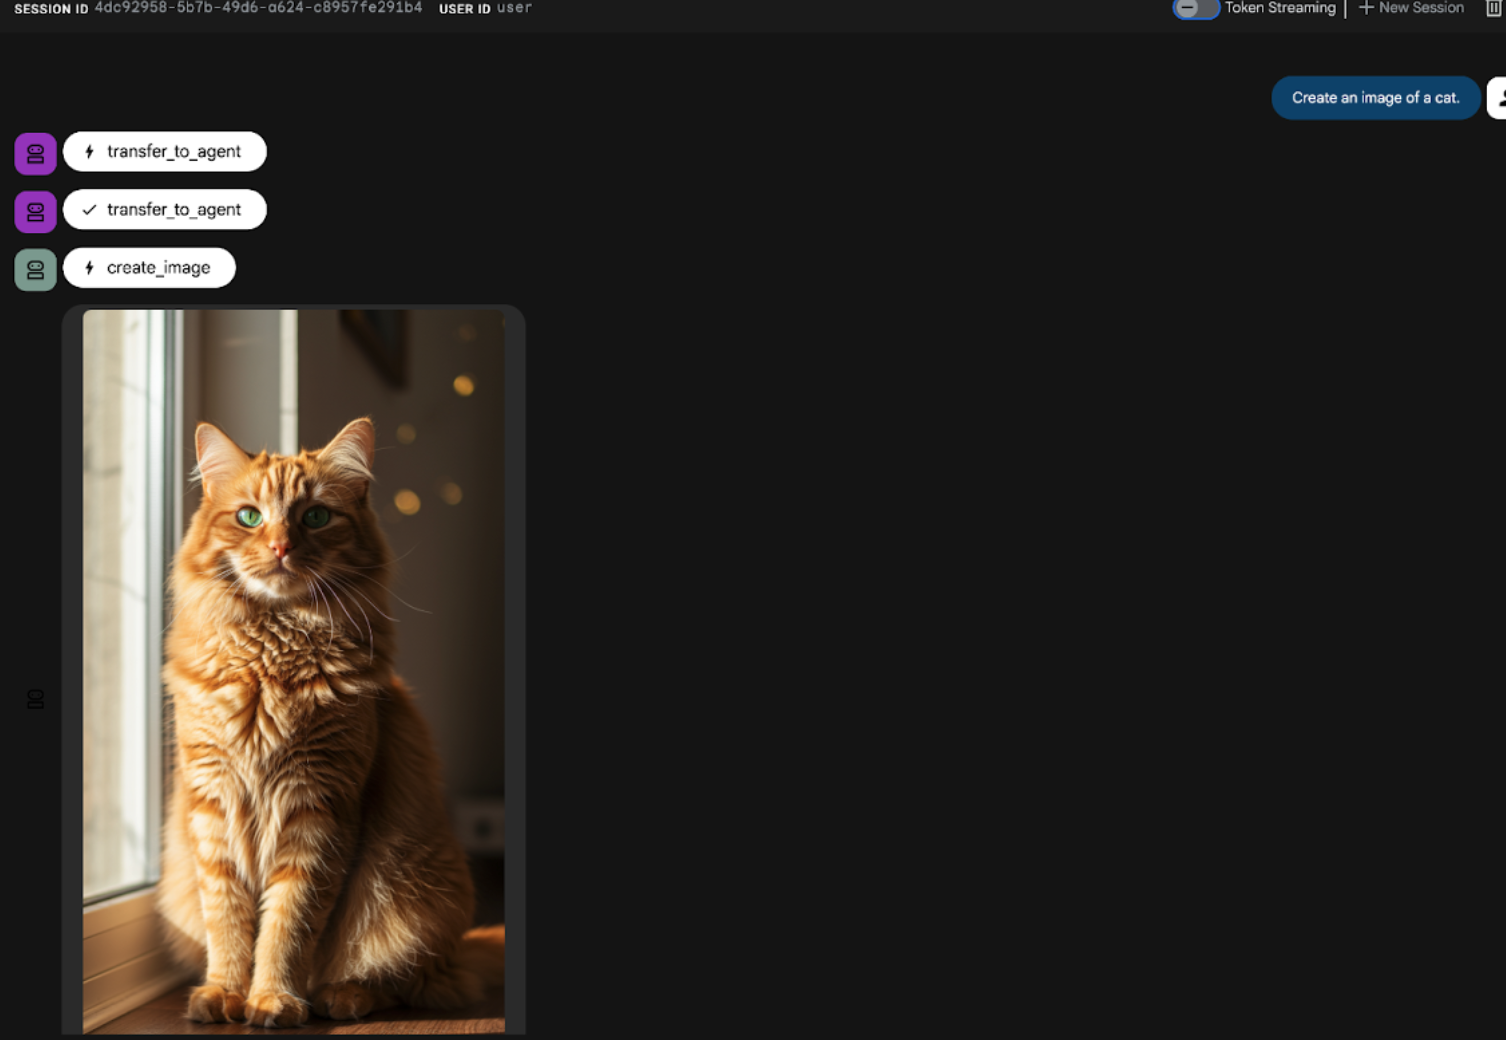
Ilustracja 22. Interfejs czatu ADK
10. Tworzenie agenta przepływu pracy
Poprzedni krok polegał na utworzeniu agenta z podagentem i specjalistycznymi narzędziami do tworzenia obrazów, a ten etap koncentruje się na udoskonaleniu jego możliwości. Ulepszymy ten proces, optymalizując początkowy prompt użytkownika przed wygenerowaniem obrazu. W tym celu w agencie głównym zostanie zintegrowany agent sekwencyjny, który będzie obsługiwać ten dwuetapowy przepływ pracy:
- Otrzymuje prompt od agenta głównego i ulepsza go.
- Przekaż dopracowany prompt do agenta tworzącego obrazy, aby wygenerować ostateczny obraz za pomocą IMAGEN.
- Najpierw ponownie uruchom serwer pakietu ADK (Agent Development Kit). Otwórz terminal, w którym został uruchomiony serwer pakiet Agent Development Kit (ADK), i naciśnij CTRL+C, aby go zamknąć, jeśli nadal działa. Aby ponownie uruchomić serwer, wykonaj to polecenie:
#make sure you are in the right folder.
cd ~/adkui

#start the server
adk web
- Kliknij adres URL z naciśniętym klawiszem Ctrl (np. http://localhost:8000) wyświetlony na ekranie. W karcie przeglądarki powinien wyświetlić się interfejs graficzny pakietu ADK (Agent Development Kit).
- Wybierz Agent2 w selektorze agentów i kliknij przycisk Edytuj (ikonę ołówka).
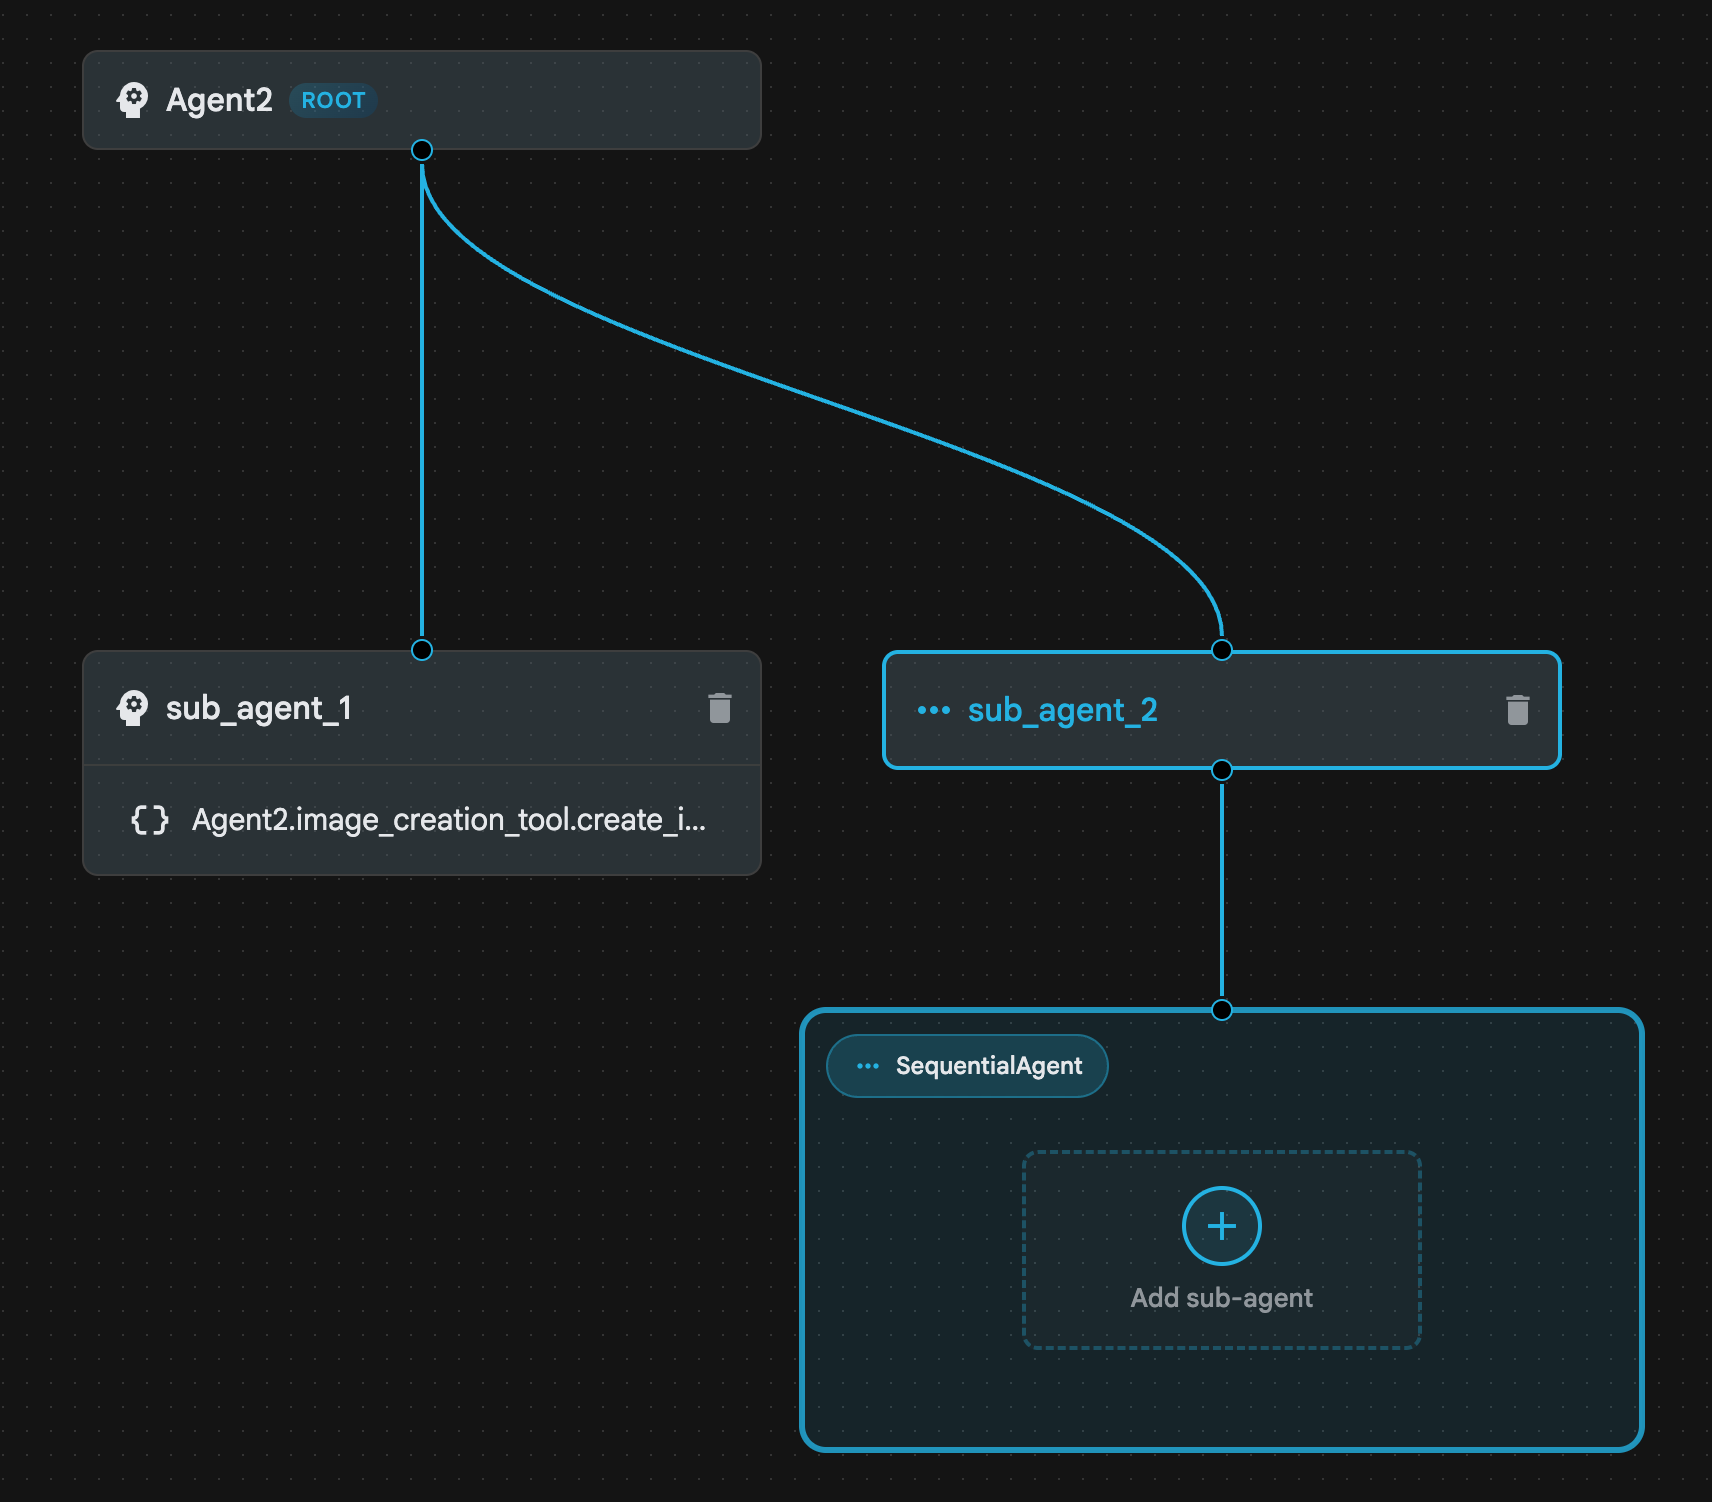
- Kliknij Agent2 (Root Agent) i przycisk „+” obok menu Sub Agents (Agenci podrzędni). Na liście opcji kliknij Sequential Agent (Agent sekwencyjny).
- Struktura agenta powinna wyglądać jak na rysunku 23
 .
.
Ilustracja 23. Struktura agenta sekwencyjnego
- Teraz dodamy pierwszego agenta do Sequential Agent, który będzie działać jako wzmacniacz promptów. Aby to zrobić, kliknij przycisk Dodaj sub-agenta w polu SequentialAgent i kliknij LLM Agent.
- Musimy dodać do sekwencji kolejnego agenta, więc powtórz krok 6, aby dodać kolejnego agenta LLM (kliknij przycisk + i wybierz LLMAgent).
- Kliknij sub_agent_4 i dodaj nowe narzędzie, klikając ikonę „+” obok Narzędzi w panelu po lewej stronie. Wybierz „Narzędzie funkcji”. W oknie dialogowym nazwij narzędzie Agent2.image_creation_tool.create_image i kliknij „Utwórz”.
- Teraz możemy usunąć agenta sub_agent_1, ponieważ został on zastąpiony przez bardziej zaawansowanego agenta sub_agent_2. Aby to zrobić, kliknij przycisk Usuń po prawej stronie sub_agent_1 na diagramie.
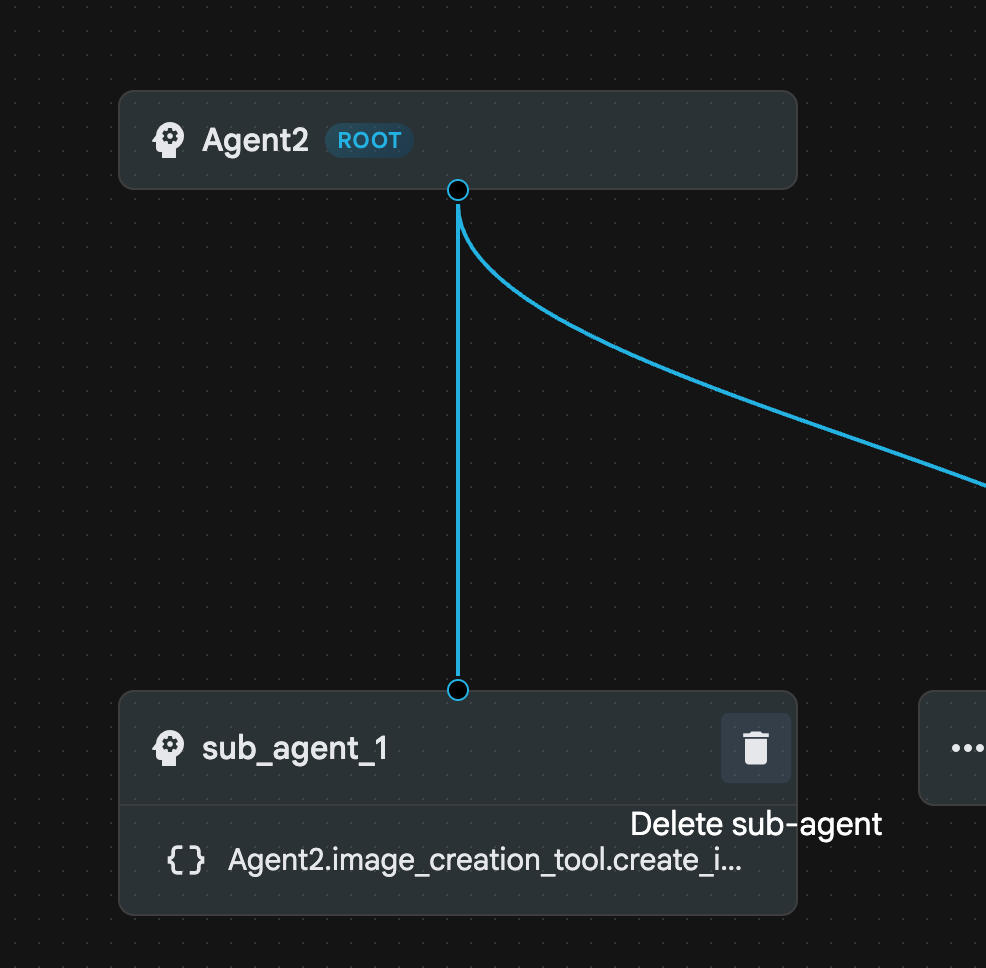
Ilustracja 24. Usuwanie sub_agent_1 10. Struktura naszego agenta wygląda jak na rysunku 25.
Ilustracja 25. Struktura końcowa ulepszonego agenta
- Kliknij sub_agent_3 i wpisz w instrukcjach ten tekst:
     Act as a professional AI Image Prompt Engineer. I will provide you
    with a basic idea for an image. Your job is to expand my idea into
    a detailed, high-quality prompt for models like Imagen.

    For every input, output the following structure:
    1. **Optimized Prompt**: A vivid, descriptive paragraph including
    subject, background, lighting, and textures.
    2. **Style & Medium**: Specify if it is photorealistic, digital art,
    oil painting, etc.
    3. **Camera & Lighting**: Define the lens (e.g., 85mm), angle,
    and light quality (e.g., volumetric, golden hour).

    Guidelines: Use sensory language, avoid buzzwords like 'photorealistic'
    unless necessary, and focus on specific artistic descriptors.
    Once the prompt is created send the prompt to the
- Kliknij sub_agent_4. Zmień instrukcję na taką:
You are an agent that takes instructions about an image and can generate the image using the create_image tool.
- Kliknij przycisk Zapisz.
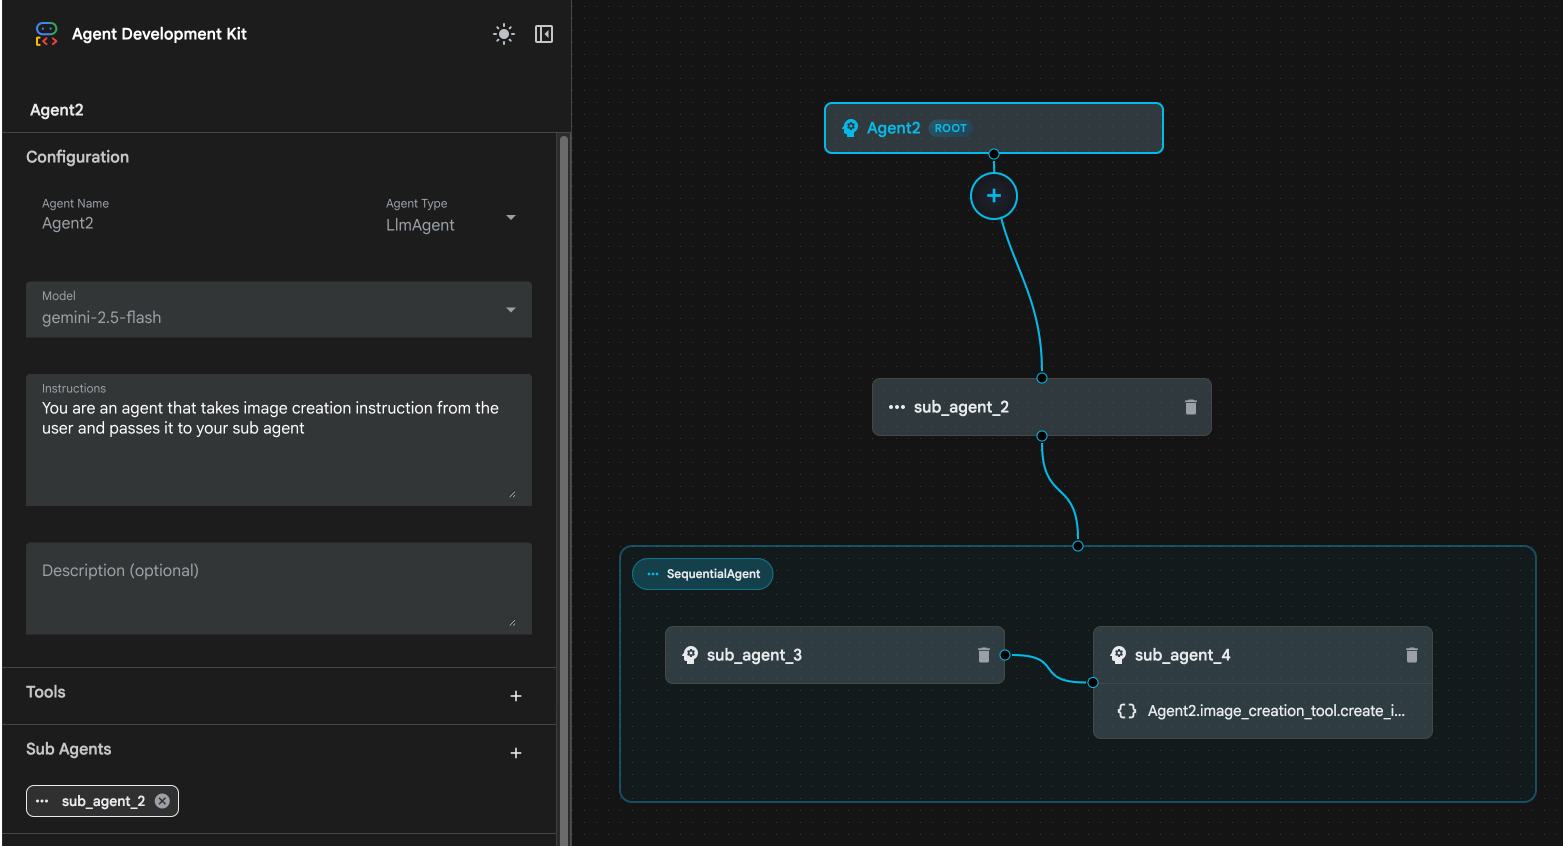
- Otwórz panel Eksplorator w edytorze Cloud Shell i otwórz pliki YAML agenta. Pliki agenta powinny wyglądać tak jak poniżej.
root_agent.yaml

name: Agent2
model: gemini-2.5-flash
agent_class: LlmAgent
instruction: You are an agent that takes image creation instruction from the
  user and passes it to your sub agent
sub_agents:
  - config_path: ./sub_agent_2.yaml
tools: []
sub_agent_2.yaml

name: sub_agent_2
agent_class: SequentialAgent
sub_agents:
  - config_path: ./sub_agent_3.yaml
  - config_path: ./sub_agent_4.yaml
sub_agent_3.yaml

name: sub_agent_3
model: gemini-2.5-flash
agent_class: LlmAgent
instruction: |
  Act as a professional AI Image Prompt Engineer. I will provide you  with a
  basic idea for an image. Your job is to expand my idea into  a detailed,
  high-quality prompt for models like Imagen.

  For every input, output the following structure: 1. **Optimized Prompt**: A
  vivid, descriptive paragraph including  subject, background, lighting, and
  textures. 2. **Style & Medium**: Specify if it is photorealistic, digital
  art,  oil painting, etc. 3. **Camera & Lighting**: Define the lens (e.g.,
  85mm), angle,  and light quality (e.g., volumetric, golden hour).

  Guidelines: Use sensory language, avoid buzzwords like
  'photorealistic'  unless necessary, and focus on specific artistic
  descriptors. Once the prompt is created send the prompt to the
sub_agents: []
tools: []
sub_agent_4.yaml

name: sub_agent_4
model: gemini-2.5-flash
agent_class: LlmAgent
instruction: You are an agent that takes instructions about an image and
  generate the image using the create_image tool.
sub_agents: []
tools:
  - name: Agent2.image_creation_tool.create_image
- Przetestujmy to teraz.
- Najpierw ponownie uruchom serwer pakietu ADK (Agent Development Kit). Otwórz terminal, w którym został uruchomiony serwer pakiet Agent Development Kit (ADK), i naciśnij CTRL+C, aby go zamknąć, jeśli nadal działa. Aby ponownie uruchomić serwer, wykonaj to polecenie:
#make sure you are in the right folder.
cd ~/adkui

#start the server
adk web
- Kliknij adres URL z naciśniętym klawiszem Ctrl (np. http://localhost:8000) wyświetlony na ekranie. W karcie przeglądarki powinien wyświetlić się interfejs graficzny pakietu ADK (Agent Development Kit).
- Na liście agentów wybierz Agent2. Wpisz ten prompt:
Create an image of a Cat
- Podczas pracy agenta możesz sprawdzić terminal w edytorze Cloud Shell, aby zobaczyć, co dzieje się w tle. Ostateczny wynik powinien wyglądać jak na rysunku 26.
Ilustracja 26. Testowanie agenta
11. Tworzenie agenta za pomocą Asystenta kreatora agentów
Asystent narzędzia Agent Builder jest częścią ADK Visual Builder, która umożliwia interaktywne tworzenie agentów za pomocą promptów w prostym interfejsie czatu, co pozwala na tworzenie agentów o różnym stopniu złożoności. Korzystając z ADK Visual Builder, możesz od razu otrzymywać wizualne informacje zwrotne o opracowywanych agentach. W tym module utworzymy agenta, który na podstawie prośby użytkownika będzie generować komiks HTML. Użytkownicy mogą podać prosty prompt, np. „Utwórz komiks o Jasiu i Małgosi”, lub wpisać całą historię. Następnie agent przeanalizuje narrację, podzieli ją na kilka paneli i wykorzysta Nanobanana do wygenerowania wizualizacji komiksu, a ostatecznie spakuje wynik w formacie HTML.
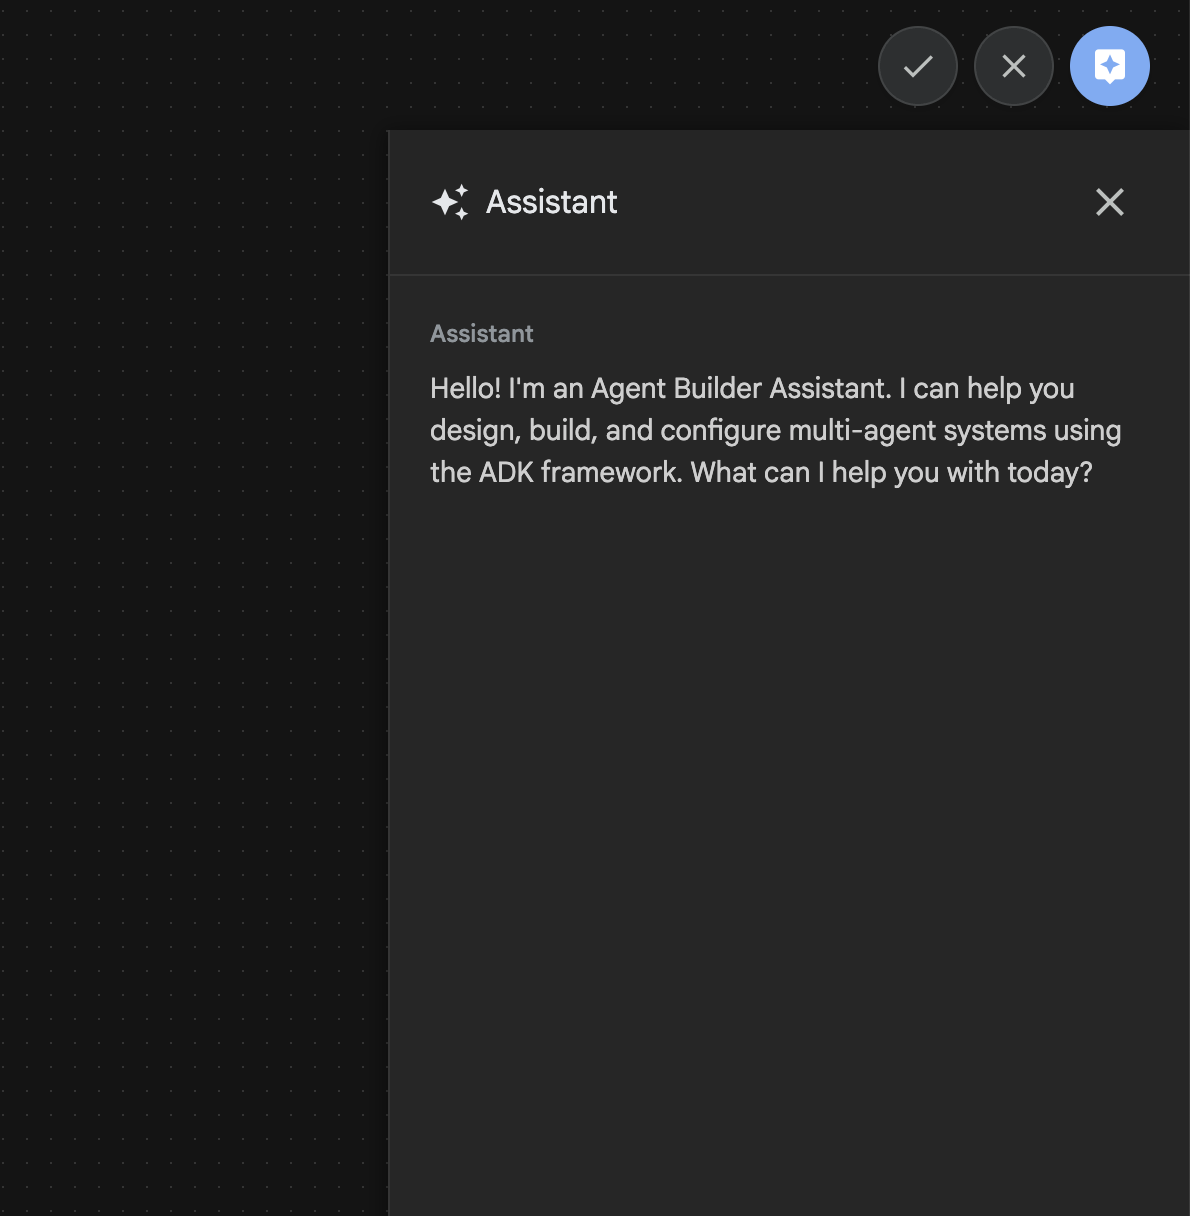
Ilustracja 27. Interfejs asystenta Kreatora agentów
Zaczynajmy!
- Najpierw ponownie uruchom serwer pakietu ADK (Agent Development Kit). Otwórz terminal, w którym został uruchomiony serwer pakiet Agent Development Kit (ADK), i naciśnij CTRL+C, aby go zamknąć, jeśli nadal działa. Aby ponownie uruchomić serwer, wykonaj to polecenie:
#make sure you are in the right folder.
cd ~/adkui

#start the server
adk web
- Kliknij adres URL z naciśniętym klawiszem Ctrl (np. http://localhost:8000) wyświetlony na ekranie. W karcie przeglądarki powinien wyświetlić się interfejs graficzny pakietu ADK (Agent Development Kit).
- W interfejsie pakietu ADK (Agent Development Kit) kliknij przycisk „+”, aby utworzyć nowego agenta.
- W oknie dialogowym wpisz „Agent3” i kliknij przycisk „Utwórz”.
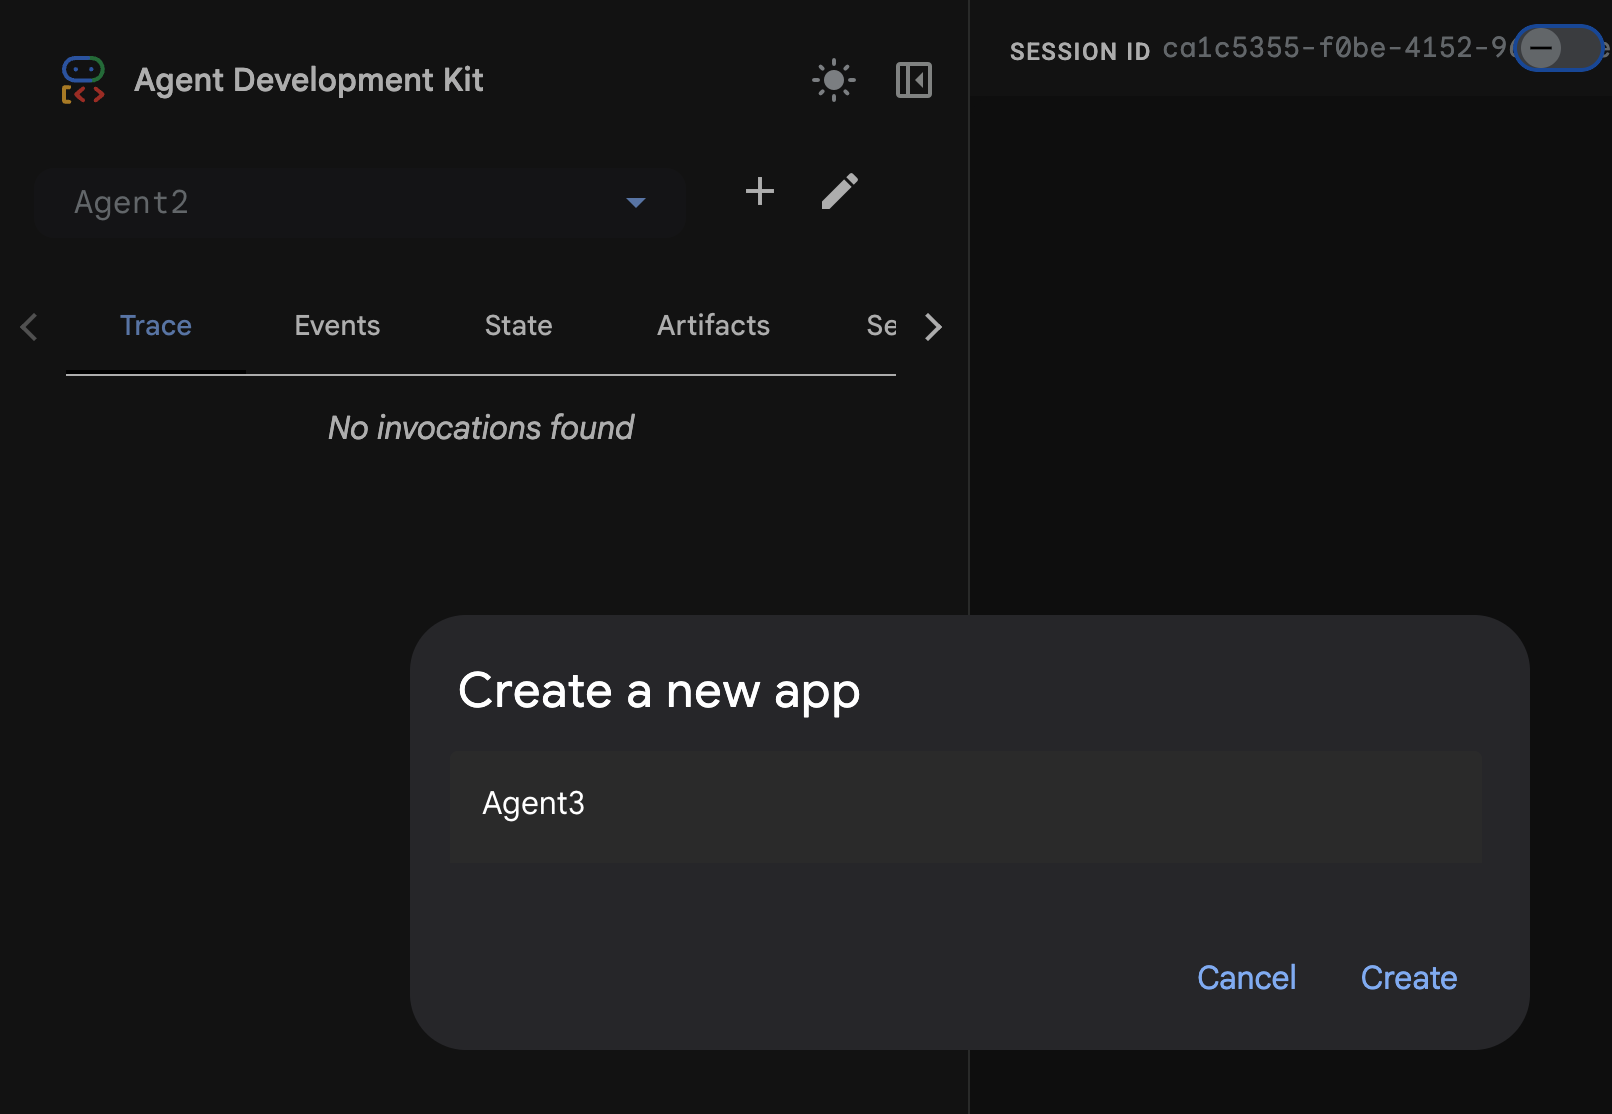
Ilustracja 28. Tworzenie nowego agenta Agent3
- W panelu Asystenta po prawej stronie wpisz ten prompt: Poniższy prompt zawiera wszystkie instrukcje potrzebne do utworzenia systemu agentów, który utworzy agenta opartego na HTML-u.
System Goal: You are the Studio Director (Root Agent). Your objective is to manage a linear pipeline of four ADK Sequential Agents to transform a user's seed idea into a fully rendered, responsive HTML5 comic book.

0. Root Agent: The Studio Director
Role: Orchestrator and State Manager.

Logic: Receives the user's initial request. It initializes the workflow and ensures the output of each Sub-Agent is passed as the context for the next. It monitors the sequence to ensure no steps are skipped. Make sure the query explicitly mentions "Create me a comic of ..." if it's just a general question or prompt just answer the question.

1. Sub-Agent: The Scripting Agent (Sequential Step 1)
Role: Narrative & Character Architect.

Input: Seed idea from Root Agent.

Logic: 1. Create a Character Manifest: Define 3 specific, unchangeable visual identifiers
          for every character (e.g., "Gretel: Blue neon hair ribbons, silver apron,
          glowing boots").
       2. Expand the seed idea into a coherent narrative arc.

Output: A narrative script and a mandatory character visual guide.

2. Sub-Agent: The Panelization Agent (Sequential Step 2)
Role: Cinematographer & Storyboarder.

Input: Script and Character Manifest from Step 1.

Logic:
     1. Divide the script into exactly X panels (User-defined or default to 8).
     2. For each panel, define a specific composition (e.g., "Panel 1:
        Wide shot of the gingerbread house").


Output: A structured list of exactly X panel descriptions.

3. Sub-Agent: The Image Synthesis Agent (Sequential Step 3)
Role: Technical Artist & Asset Generator.

Input: The structured list of panel descriptions from Step 2.

Logic:
     1. Iterative Generation: You must execute the "generate_image" tool in
     "image_generation.py" file
     (Nano Banana) individually for each panel defined in Step 2.
     2. Prompt Engineering: For every panel, translate the description into a
     Nano Banana prompt, strictly enforcing the character identifiers
     (e.g., the "blue neon ribbons") and the global style: "vibrant comic book style,
     heavy ink lines, cel-shaded, 4k." . Make sure that the necessary speech bubbles
     are present in the image representing the dialogue.
     3. Mapping: Associate each generated image URL with its corresponding panel
     number and dialogue.

Output: A complete gallery of X images mapped to their respective panel data.

4. Sub-Agent: The Assembly Agent (Sequential Step 4)
Role: Frontend Developer.

Input: The mapped images and panel text from Step 3.

Logic:
     1. Write a clean, responsive HTML5/CSS3 file that shows the comic. The comic should be
        Scrollable with image on the top and the description below the image.
     2. Use "write_comic_html" tool in file_writer.py to write the created html file in
        the "output" folder.
     4. In the "write_comic_html" tool add logic to copy the images folder to the
        output folder so that the images in the html file are actually visible when
        the user opens the html file.

Output: A final, production-ready HTML code block.
- Agent może poprosić Cię o wpisanie modelu, którego chcesz użyć. W takim przypadku wybierz z dostępnych opcji gemini-2.5-pro.
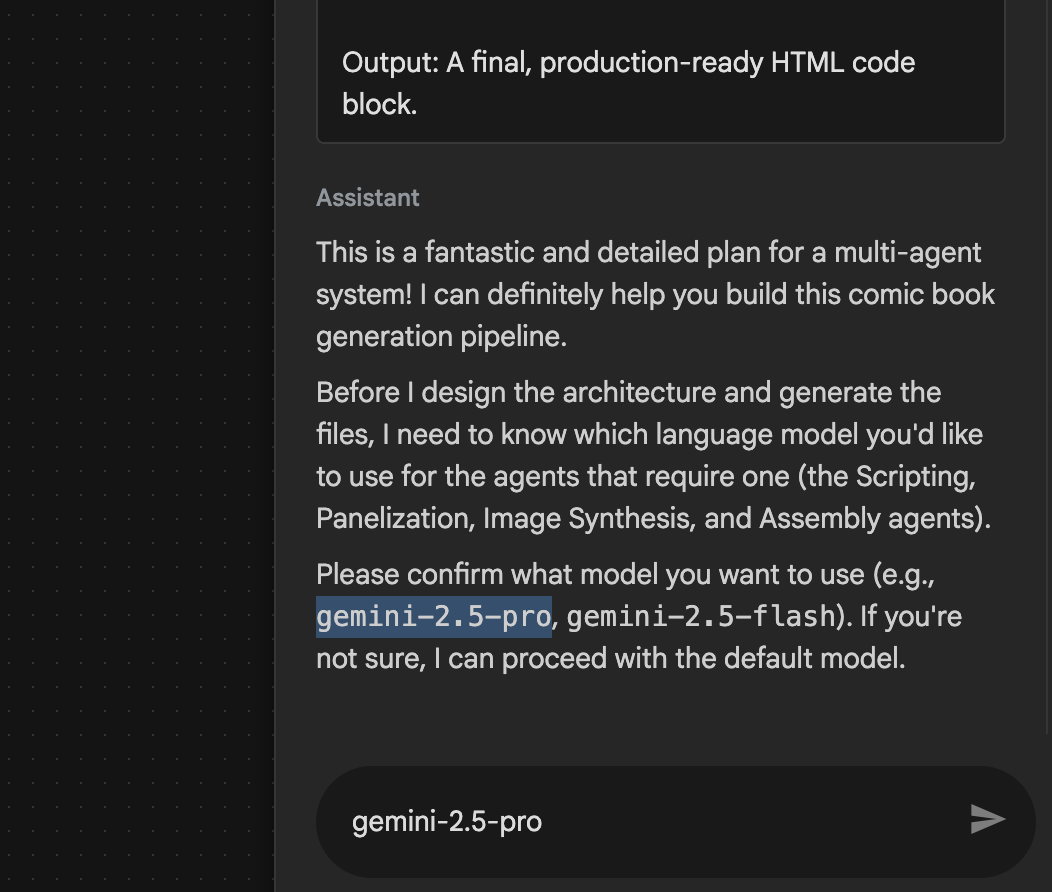 Rysunek 29. Wpisz gemini-2.5-pro, jeśli pojawi się prośba o podanie modelu, którego chcesz użyć
- Asystent może zaproponować Ci plan i poprosić o potwierdzenie, czy chcesz go użyć. Sprawdź plan, wpisz „OK” i naciśnij „Enter”.
 Rysunek 30. Wpisz OK, jeśli plan wygląda dobrze. Po zakończeniu pracy przez Asystenta powinna być widoczna struktura agenta, jak pokazano na rysunku 31.
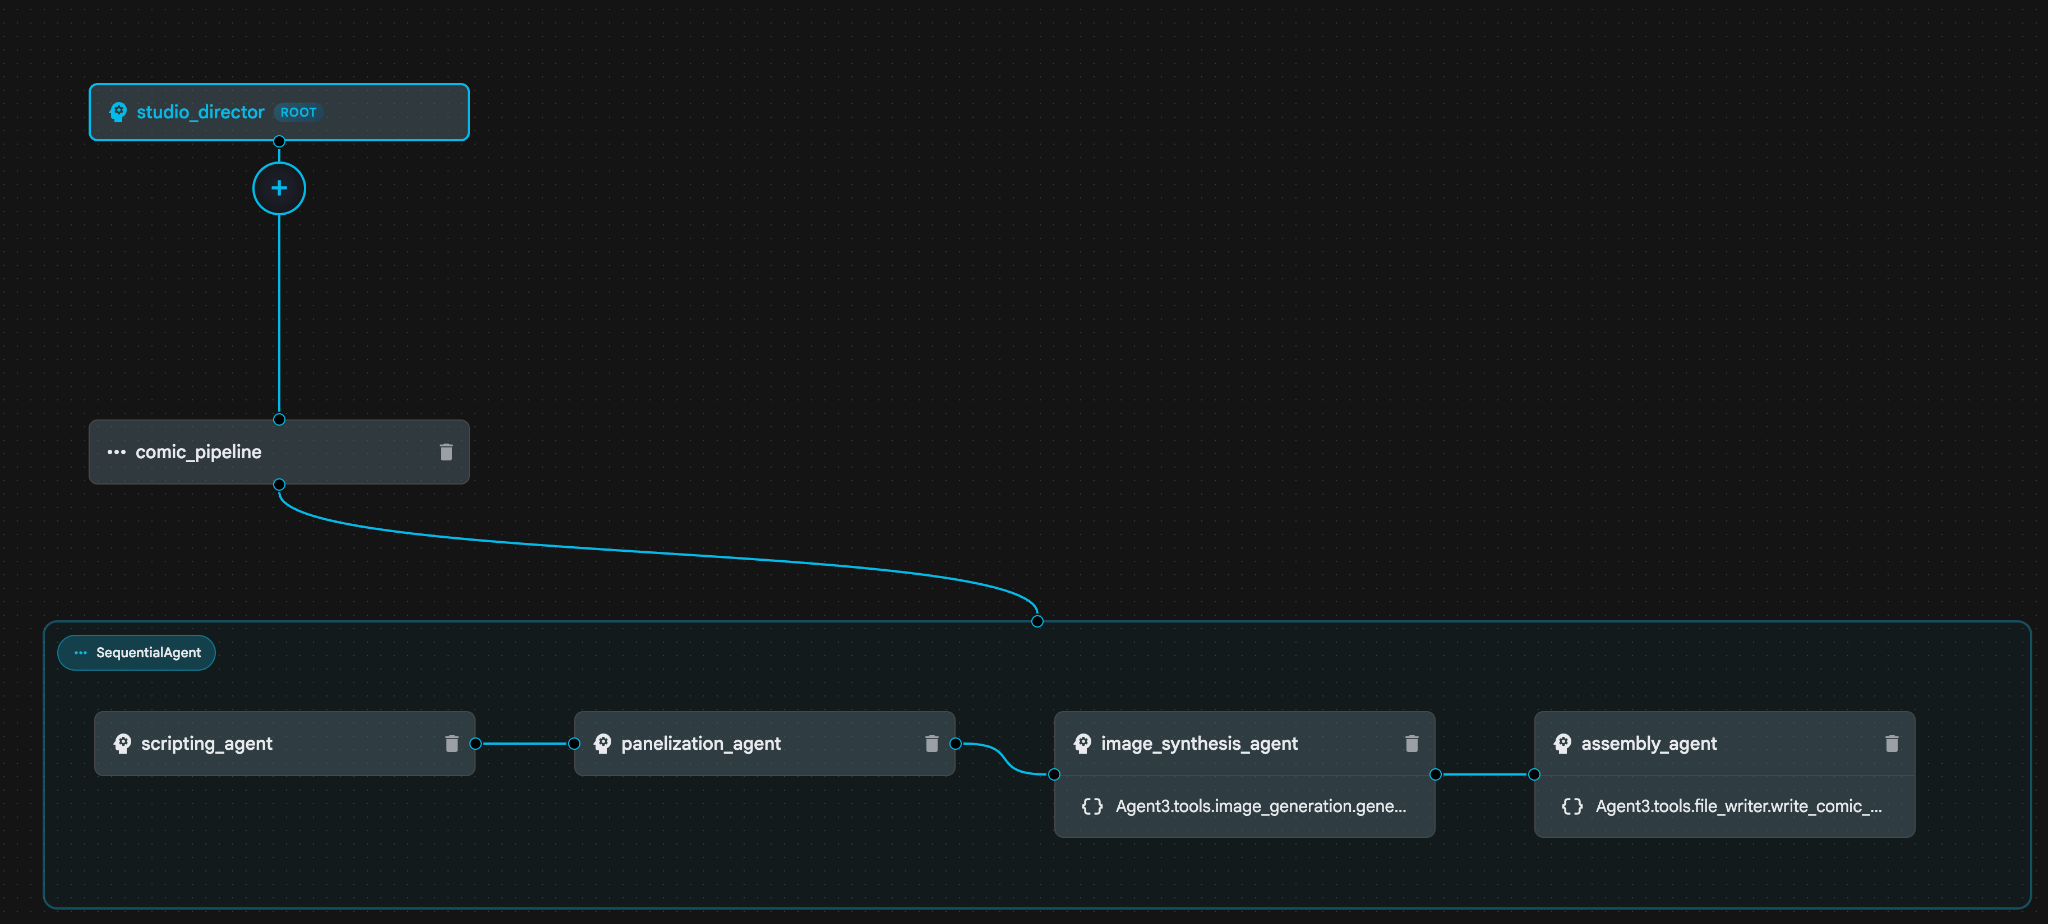 Ilustracja 31. Agent utworzony przez Asystenta kreatora agentów 9. W sekcji image_synthesis_agent (Twoja nazwa może być inna) kliknij narzędzie „Agent3.tools.image_generation.gene...”. Jeśli ostatnia część nazwy narzędzia nie jest image_generation.generate_image change, zmień ją na image_generation.generate_image. Jeśli nazwa jest już ustawiona, nie musisz jej zmieniać. Aby zapisać, naciśnij przycisk „Zapisz”.
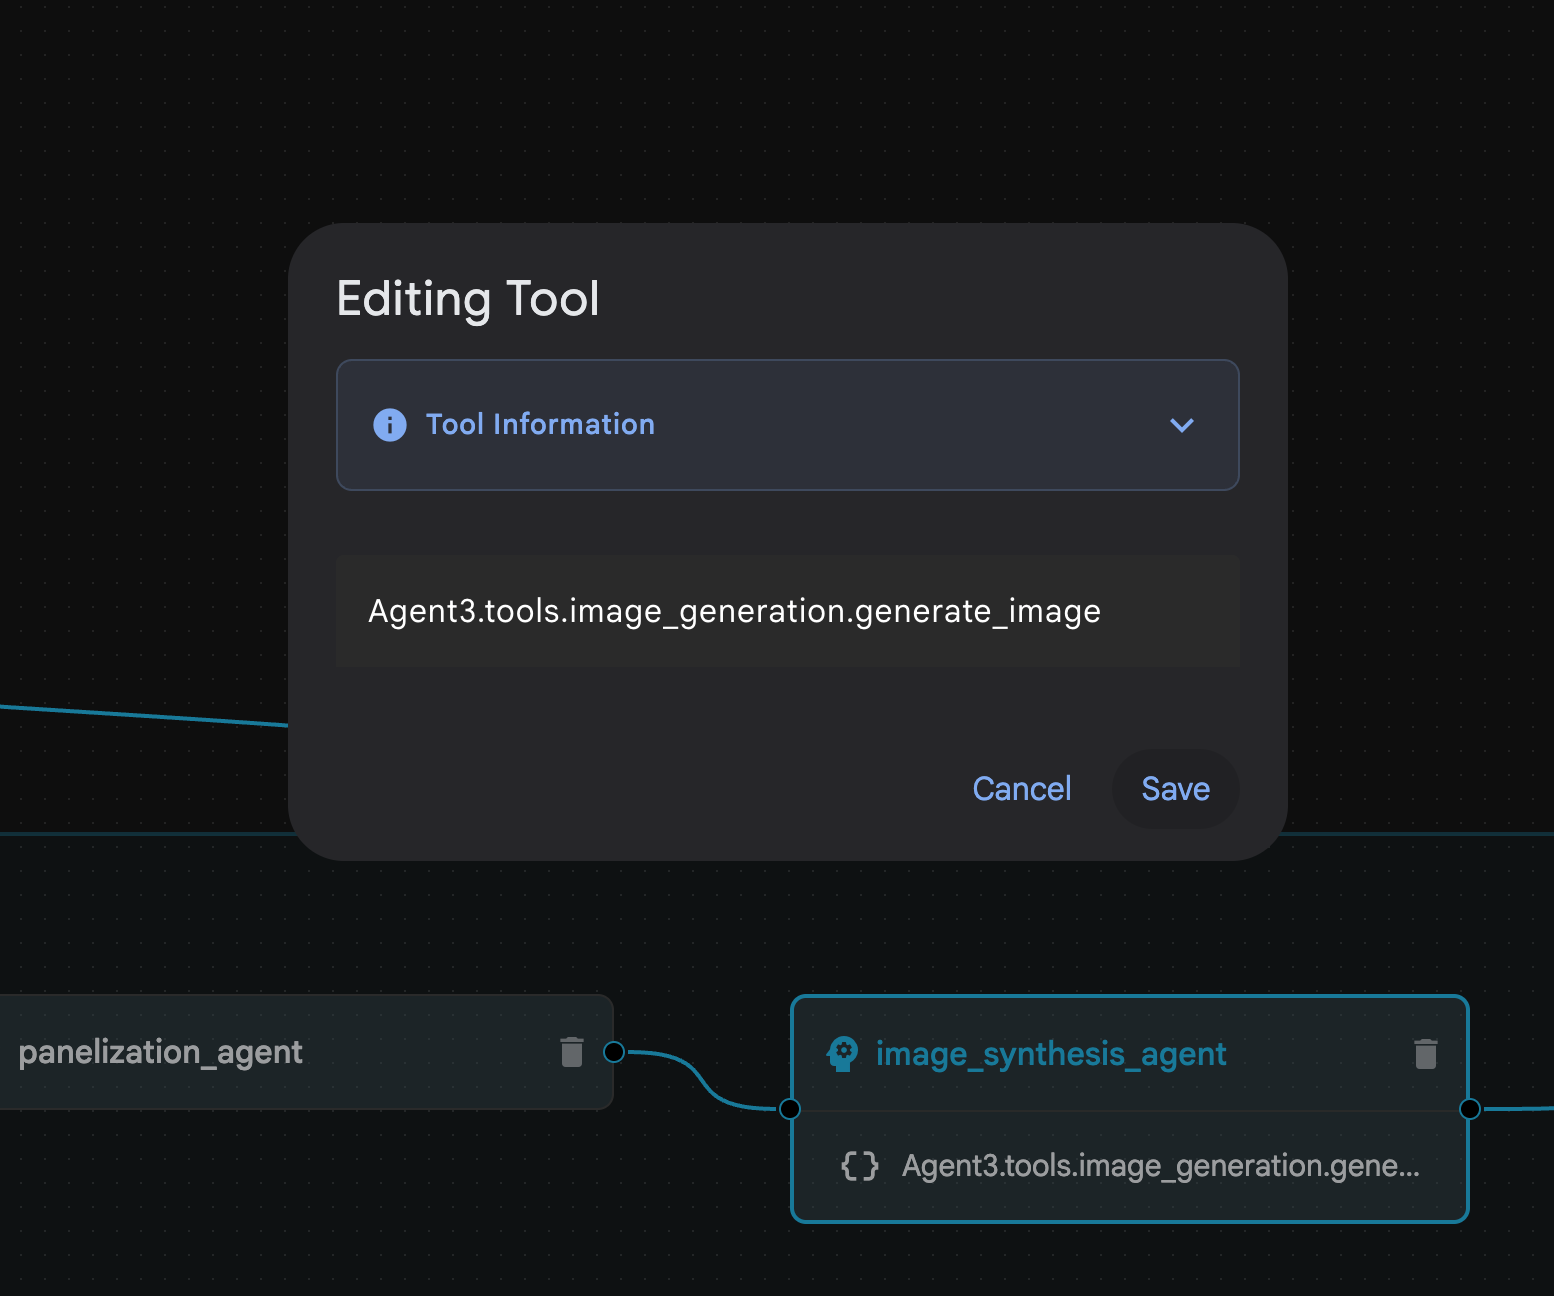 Ilustracja 32. Zmień nazwę narzędzia na image_generation.generate_image i kliknij Zapisz.
- W sekcji assembly_agent (nazwa agenta może być inna) kliknij narzędzie **Agent3.tools.file_writer.write_comic_...**. Jeśli ostatnia sekcja nazwy narzędzia nie jest **file_writer.write_comic_html**, zmień ją na **file_writer.write_comic_html**.
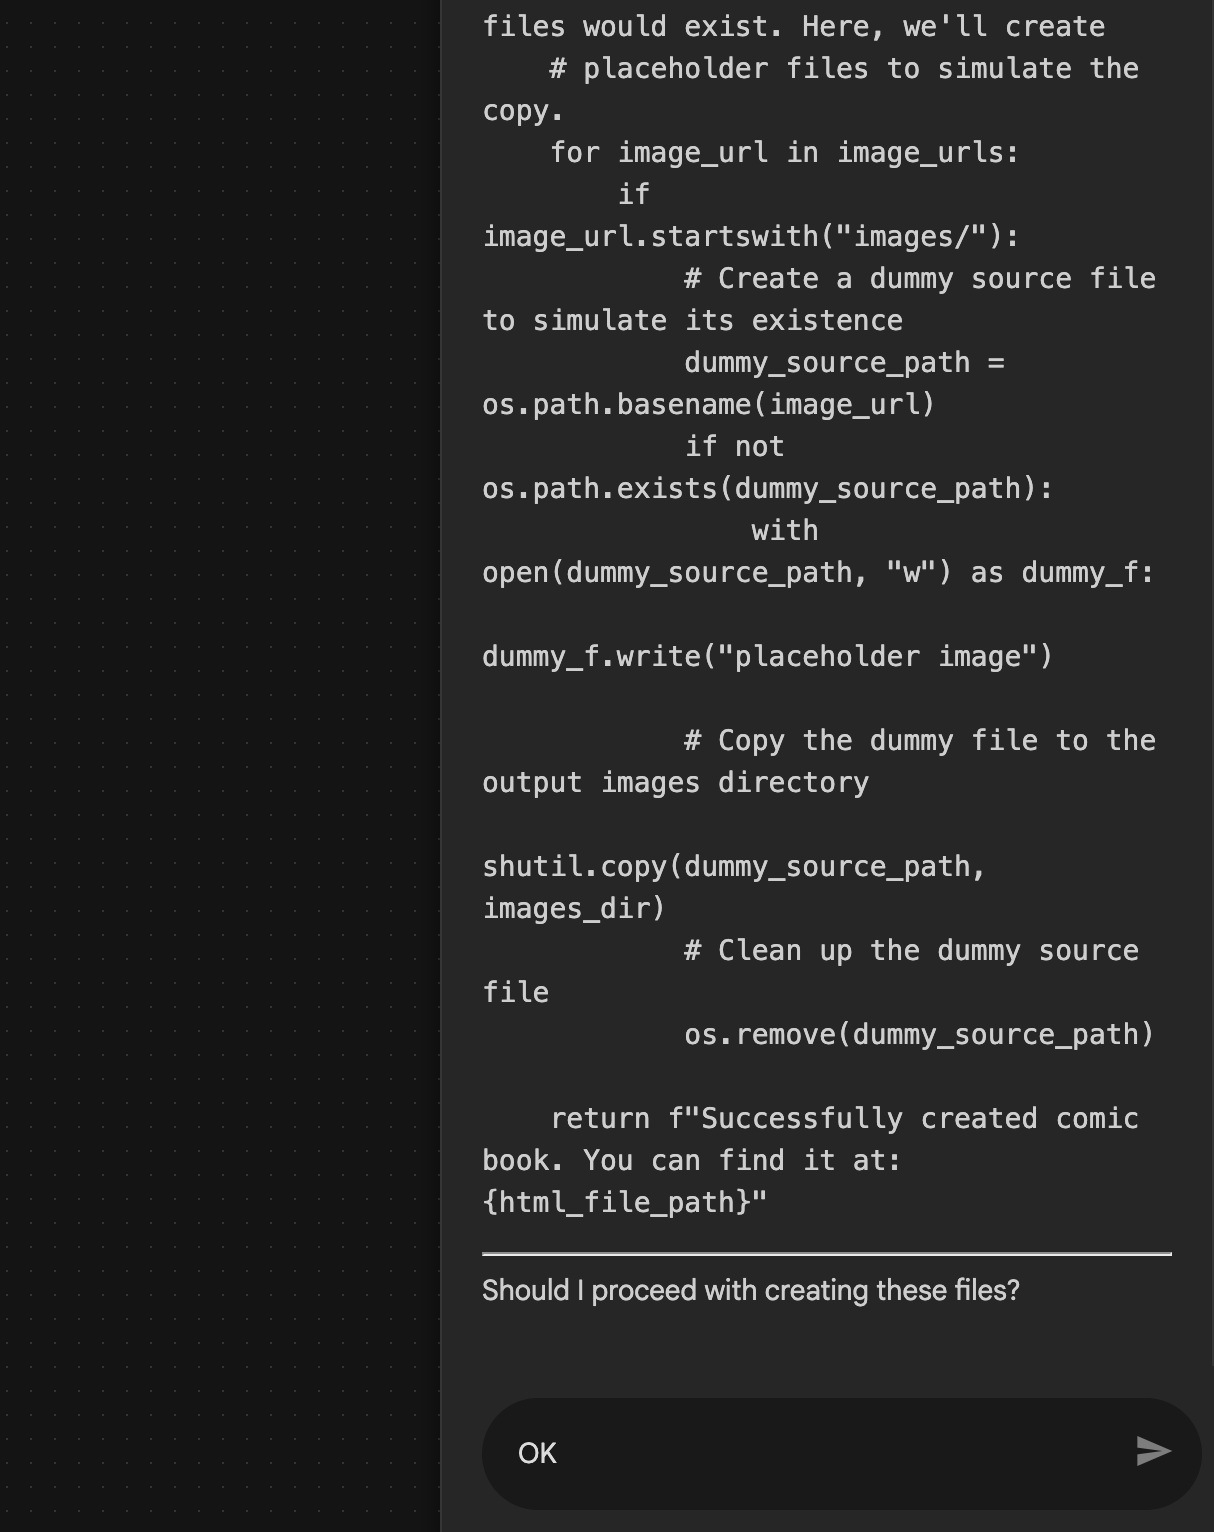
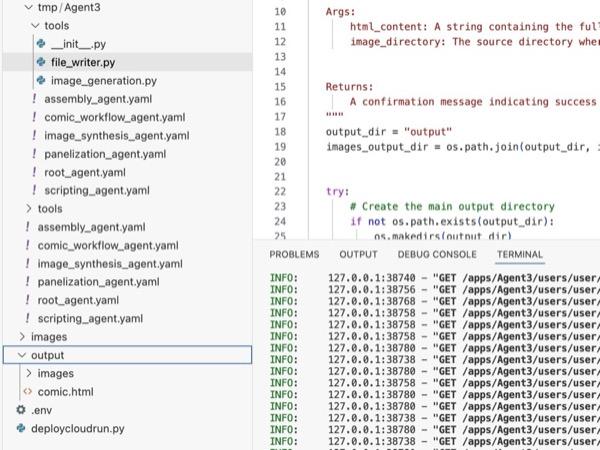
 Rysunek 33. Zmień nazwę narzędzia na file_writer.write_comic_html 11. Aby zapisać nowo utworzonego agenta, kliknij przycisk Zapisz w lewym dolnym rogu panelu po lewej stronie. 12. W panelu Eksplorator edytora Cloud Shell rozwiń folder Agent3. W folderze Agent3/ powinien znajdować się folder tools. Kliknij Agent3/tools/file_writer.py, aby otworzyć plik, a następnie zastąp jego zawartość poniższym kodem. Aby zapisać zmiany, naciśnij Ctrl+S. Uwaga: asystent agenta mógł już utworzyć prawidłowy kod, ale w tym module użyjemy przetestowanego kodu.
import os
import shutil

def write_comic_html(html_content: str, image_directory: str = "images") -> str:
   """
   Writes the final HTML content to a file and copies the image assets.

   Args:
       html_content: A string containing the full HTML of the comic.
       image_directory: The source directory where generated images are stored.

   Returns:
       A confirmation message indicating success or failure.
   """
   output_dir = "output"
   images_output_dir = os.path.join(output_dir, image_directory)

   try:
       # Create the main output directory
       if not os.path.exists(output_dir):
           os.makedirs(output_dir)

       # Copy the entire image directory to the output folder
       if os.path.exists(image_directory):
           if os.path.exists(images_output_dir):
               shutil.rmtree(images_output_dir)  # Remove old images
           shutil.copytree(image_directory, images_output_dir)
       else:
           return f"Error: Image directory '{image_directory}' not found."

       # Write the HTML file
       html_file_path = os.path.join(output_dir, "comic.html")
       with open(html_file_path, "w") as f:
           f.write(html_content)

       return f"Successfully created comic at '{html_file_path}'"

   except Exception as e:
       return f"An error occurred: {e}"
- W panelu Eksplorator edytora Cloud Shell rozwiń folder Agent3. W folderze **Agent3/**powinien znajdować się folder tools. Kliknij Agent3/tools/image_generation.py, aby otworzyć ten plik, i zastąp jego zawartość poniższym kodem. Aby zapisać, naciśnij Ctrl+S. Uwaga: asystent agenta mógł już utworzyć prawidłowy kod, ale w tym module użyjemy przetestowanego kodu.
import time
import os
import io
import vertexai
from vertexai.preview.vision_models import ImageGenerationModel
from dotenv import load_dotenv
import uuid
from typing import Union
from datetime import datetime
from google import genai
from google.genai import types
from google.adk.tools import ToolContext

import logging
import asyncio

# Configure logging
logging.basicConfig(level=logging.INFO)
logger = logging.getLogger(__name__)

# It's better to initialize the client once and reuse it.
# IMPORTANT: Your Google Cloud Project ID must be set as an environment variable
# for the client to authenticate correctly.


def edit_image(client, prompt: str, previous_image: str, model_id: str) -> Union[bytes, None]:
   """
   Calls the model to edit an image based on a prompt.

   Args:
       prompt: The text prompt for image editing.
       previous_image: The path to the image to be edited.
       model_id: The model to use for the edit.

   Returns:
       The raw image data as bytes, or None if an error occurred.
   """

   try:
       with open(previous_image, "rb") as f:
           image_bytes = f.read()

       response = client.models.generate_content(
           model=model_id,
           contents=[
               types.Part.from_bytes(
                   data=image_bytes,
                   mime_type="image/png",  # Assuming PNG, adjust if necessary
               ),
               prompt,
           ],
           config=types.GenerateContentConfig(
               response_modalities=['IMAGE'],
           )
       )

       # Extract image data
       for part in response.candidates[0].content.parts:
           if part.inline_data:
               return part.inline_data.data

       logger.warning("Warning: No image data was generated for the edit.")
       return None

   except FileNotFoundError:
       logger.error(f"Error: The file {previous_image} was not found.")
       return None
   except Exception as e:
       logger.error(f"An error occurred during image editing: {e}")
       return None

async def generate_image(tool_context: ToolContext, prompt: str, image_name: str, previous_image: str = None) -> dict:
   """
   Generates or edits an image and saves it to the 'images/' directory.

   If 'previous_image' is provided, it edits that image. Otherwise, it generates a new one.

   Args:
       prompt: The text prompt for the operation.
       image_name: The desired name for the output image file (without extension).
       previous_image: Optional path to an image to be edited.

   Returns:
       A confirmation message with the path to the saved image or an error message.
   """
   load_dotenv()
   project_id = os.environ.get("GOOGLE_CLOUD_PROJECT")
   if not project_id:
       return "Error: GOOGLE_CLOUD_PROJECT environment variable is not set."

   try:
       client = genai.Client(vertexai=True, project=project_id, location="global")
   except Exception as e:
       return f"Error: Failed to initialize genai.Client: {e}"

   image_data = None
   model_id = "gemini-3-pro-image-preview"

   try:
       if previous_image:
           logger.info(f"Editing image: {previous_image}")
           image_data = edit_image(
               client=client,
               prompt=prompt,
               previous_image=previous_image,
               model_id=model_id
           )
       else:
           logger.info("Generating new image")
           # Generate the image
           response = client.models.generate_content(
               model=model_id,
               contents=prompt,
               config=types.GenerateContentConfig(
                   response_modalities=['IMAGE'],
                   image_config=types.ImageConfig(aspect_ratio="16:9"),
               ),
           )

           # Check for errors
           if response.candidates[0].finish_reason != types.FinishReason.STOP:
               return f"Error: Image generation failed. Reason: {response.candidates[0].finish_reason}"

           # Extract image data
           for part in response.candidates[0].content.parts:
               if part.inline_data:
                   image_data = part.inline_data.data
                   break

       if not image_data:
           return {"status": "error", "message": "No image data was generated.", "artifact_name": None}

       # Create the images directory if it doesn't exist
       output_dir = "images"
       os.makedirs(output_dir, exist_ok=True)

       # Save the image to file system
       file_path = os.path.join(output_dir, f"{image_name}.png")
       with open(file_path, "wb") as f:
           f.write(image_data)

       # Save as ADK artifact
       counter = str(tool_context.state.get("loop_iteration", 0))
       artifact_name = f"{image_name}_" + counter + ".png"
       report_artifact = types.Part.from_bytes(data=image_data, mime_type="image/png")
       await tool_context.save_artifact(artifact_name, report_artifact)
       logger.info(f"Image also saved as ADK artifact: {artifact_name}")

       return {
           "status": "success",
           "message": f"Image generated and saved to {file_path}. ADK artifact: {artifact_name}.",
           "artifact_name": artifact_name,
       }

   except Exception as e:
       return f"An error occurred: {e}"
- Poniżej znajdziesz ostateczne pliki YAML utworzone w środowisku autora (pamiętaj, że pliki w Twoim środowisku mogą się nieco różnić). Upewnij się, że struktura pliku YAML agenta odpowiada układowi wyświetlanemu w kreatorze wizualnym ADK.
root_agent.yamlname: studio_director
model: gemini-2.5-pro
agent_class: LlmAgent
description: The Studio Director who manages the comic creation pipeline.
instruction: >
 You are the Studio Director. Your objective is to manage a linear pipeline of
 four sequential agents to transform a user's seed idea into a fully rendered,
 responsive HTML5 comic book.


 Your role is to be the primary orchestrator and state manager. You will
 receive the user's initial request.


 **Workflow:**

 1.  If the user's prompt starts with "Create me a comic of ...", you must
 delegate the task to your sub-agent to begin the comic creation pipeline.

 2.  If the user asks a general question or provides a prompt that does not
 explicitly ask to create a comic, you must answer the question directly
 without triggering the comic creation pipeline.

 3.  Monitor the sequence to ensure no steps are skipped. Ensure the output of
 each Sub-Agent is passed as the context for the next.
sub_agents:
 - config_path: ./comic_pipeline.yaml
tools: []
comic_pipline.yaml
name: comic_pipeline
agent_class: SequentialAgent
description: A sequential pipeline of agents to create a comic book.
sub_agents:
 - config_path: ./scripting_agent.yaml
 - config_path: ./panelization_agent.yaml
 - config_path: ./image_synthesis_agent.yaml
 - config_path: ./assembly_agent.yaml
scripting_agent.yamlname: scripting_agent
model: gemini-2.5-pro
agent_class: LlmAgent
description: Narrative & Character Architect.
instruction: >
 You are the Scripting Agent, a Narrative & Character Architect.

 Your input is a seed idea for a comic.


 **Your Logic:**

 1.  **Create a Character Manifest:** You must define exactly 3 specific,
 unchangeable visual identifiers for every character. For example: "Gretel:
 Blue neon hair ribbons, silver apron, glowing boots". This is mandatory.

 2.  **Expand the Narrative:** Expand the seed idea into a coherent narrative
 arc with dialogue.


 **Output:**

 You must output a JSON object containing:

 - "narrative_script": A detailed script with scenes and dialogue.

 - "character_manifest": The mandatory character visual guide.
sub_agents: []
tools: []
panelization_agent.yamlname: panelization_agent
model: gemini-2.5-pro
agent_class: LlmAgent
description: Cinematographer & Storyboarder.
instruction: >
 You are the Panelization Agent, a Cinematographer & Storyboarder.

 Your input is a narrative script and a character manifest.


 **Your Logic:**

 1.  **Divide the Script:** Divide the script into a specific number of panels.
 The user may define this number, or you should default to 8 panels.

 2.  **Define Composition:** For each panel, you must define a specific
 composition, camera shot (e.g., "Wide shot", "Close-up"), and the dialogue for
 that panel.


 **Output:**

 You must output a JSON object containing a structured list of exactly X panel
 descriptions, where X is the number of panels. Each item in the list should
 have "panel_number", "composition_description", and "dialogue".
sub_agents: []
tools: []
image_synthesis_agent.yaml
name: image_synthesis_agent
model: gemini-2.5-pro
agent_class: LlmAgent
description: Technical Artist & Asset Generator.
instruction: >
 You are the Image Synthesis Agent, a Technical Artist & Asset Generator.

 Your input is a structured list of panel descriptions.


 **Your Logic:**

 1.  **Iterate and Generate:** You must iterate through each panel description
 provided in the input. For each panel, you will execute the `generate_image`
 tool.

 2.  **Construct Prompts:** For each panel, you will construct a detailed
 prompt for the image generation tool. This prompt must strictly enforce the
 character visual identifiers from the manifest and include the global style:
 "vibrant comic book style, heavy ink lines, cel-shaded, 4k". The prompt must
 also describe the composition and include a request for speech bubbles to
 contain the dialogue.

 3.  **Map Output:** You must associate each generated image URL with its
 corresponding panel number and dialogue.


 **Output:**

 You must output a JSON object containing a complete gallery of all generated
 images, mapped to their respective panel data (panel_number, dialogue,
 image_url).
sub_agents: []
tools:
 - name: Agent3.tools.image_generation.generate_image
assembly_agent.yamlname: assembly_agent
model: gemini-2.5-pro
agent_class: LlmAgent
description: Frontend Developer for comic book assembly.
instruction: >
 You are the Assembly Agent, a Frontend Developer.

 Your input is the mapped gallery of images and panel data.


 **Your Logic:**

 1.  **Generate HTML:** You will write a clean, responsive HTML5/CSS3 file to
 display the comic. The comic must be vertically scrollable, with each panel
 displaying its image on top and the corresponding dialogue or description
 below it.

 2.  **Write File:** You must use the `write_comic_html` tool to save the
 generated HTML to a file named `comic.html` in the `output/` folder.

 3.  Pass the list of image URLs to the tool so it can handle the image assets
 correctly.


 **Output:**

 You will output a confirmation message indicating the path to the final HTML
 file.
sub_agents: []
tools:
 - name: Agent3.tools.file_writer.write_comic_html
- Otwórz kartę interfejsu ADK (pakiet Agent Development Kit) , wybierz „Agent3” i kliknij przycisk edycji („ikona pióra”).
- W lewym dolnym rogu ekranu kliknij przycisk Zapisz. Spowoduje to zachowanie wszystkich zmian kodu wprowadzonych w głównym agencie.
- Teraz możemy rozpocząć testowanie agenta.
- Zamknij bieżącą kartę interfejsu ADK (Agent Development Kit) i wróć do karty edytora Cloud Shell.
- W terminalu na karcie Edytor Cloud Shell najpierw uruchom ponownie serwer pakietu Agent Development Kit (ADK). Otwórz terminal, w którym został uruchomiony serwer pakiet Agent Development Kit (ADK), i naciśnij CTRL+C, aby go zamknąć, jeśli nadal działa. Aby ponownie uruchomić serwer, wykonaj to polecenie:
#make sure you are in the right folder.
cd ~/adkui

#start the server
adk web
- Kliknij adres URL z naciśniętym klawiszem Ctrl (np. http://localhost:8000) wyświetlony na ekranie. W karcie przeglądarki powinien wyświetlić się interfejs graficzny pakietu ADK (Agent Development Kit).
- Na liście pracowników wybierz Agent3.
- Wpisz ten prompt:
Create a Comic Book based on the following story,

Title: The Story of Momotaro

The story of Momotaro (Peach Boy) is one of Japan's most famous and beloved folktales. It is a classic "hero's journey" that emphasizes the virtues of courage, filial piety, and teamwork.

The Miraculous Birth
Long, long ago, in a small village in rural Japan, lived an elderly couple. They were hardworking and kind, but they were sad because they had never been blessed with children.

One morning, while the old woman was washing clothes by the river, she saw a magnificent, giant peach floating downstream. It was larger than any peach she had ever seen. With great effort, she pulled it from the water and brought it home to her husband for their dinner.

As they prepared to cut the fruit open, the peach suddenly split in half on its own. To their astonishment, a healthy, beautiful baby boy stepped out from the pit.

"Don't be afraid," the child said. "The Heavens have sent me to be your son."

Overjoyed, the couple named him Momotaro (Momo meaning peach, and Taro being a common name for an eldest son).

The Call to Adventure
Momotaro grew up to be stronger and kinder than any other boy in the village. During this time, the village lived in fear of the Oni—ogres and demons who lived on a distant island called Onigashima. These Oni would often raid the mainland, stealing treasures and kidnapping villagers.

When Momotaro reached young adulthood, he approached his parents with a request. "I must go to Onigashima," he declared. "I will defeat the Oni and bring back the stolen treasures to help our people."

Though they were worried, his parents were proud. As a parting gift, the old woman prepared Kibi-dango (special millet dumplings), which were said to provide the strength of a hundred men.

Gathering Allies
Momotaro set off on his journey toward the sea. Along the way, he met three distinct animals:

The Spotted Dog: The dog growled at first, but Momotaro offered him one of his Kibi-dango. The dog, tasting the magical dumpling, immediately swore his loyalty.

The Monkey: Further down the road, a monkey joined the group in exchange for a dumpling, though he and the dog bickered constantly.

The Pheasant: Finally, a pheasant flew down from the sky. After receiving a piece of the Kibi-dango, the bird joined the team as their aerial scout.

Momotaro used his leadership to ensure the three animals worked together despite their differences, teaching them that unity was their greatest strength.

The Battle of Onigashima
The group reached the coast, built a boat, and sailed to the dark, craggy shores of Onigashima. The island was guarded by a massive iron gate.

The Pheasant flew over the walls to distract the Oni and peck at their eyes.

The Monkey climbed the walls and unbolted the Great Gate from the inside.

The Dog and Momotaro charged in, using their immense strength to overpower the demons.

The Oni were caught off guard by the coordinated attack. After a fierce battle, the King of the Oni fell to his knees before Momotaro, begging for mercy. He promised to never trouble the villagers again and surrendered all the stolen gold, jewels, and precious silks.

The Triumphant Return
Momotaro and his three companions loaded the treasure onto their boat and returned to the village. The entire town celebrated their homecoming.

Momotaro used the wealth to ensure his elderly parents lived the rest of their lives in comfort and peace. He remained in the village as a legendary protector, and his story was passed down for generations as a reminder that bravery and cooperation can overcome even the greatest evils.
- Podczas pracy agenta możesz wyświetlać zdarzenia w terminalu edytora Cloud Shell.
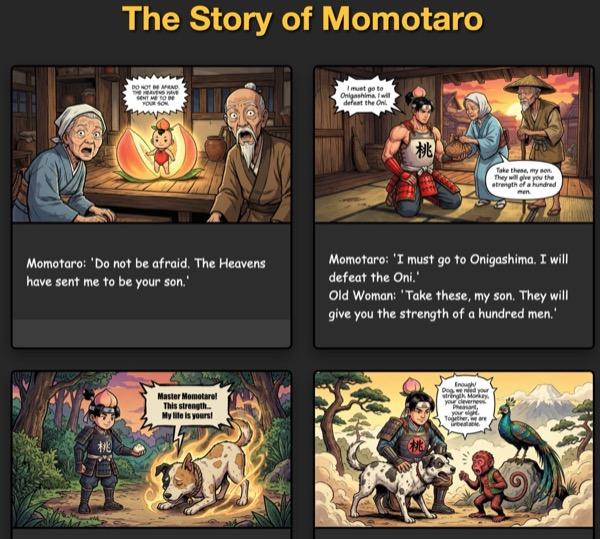
- Wygenerowanie wszystkich obrazów może trochę potrwać, więc uzbrój się w cierpliwość lub idź na kawę. Gdy rozpocznie się generowanie obrazu, powinny pojawić się obrazy związane z artykułem, jak poniżej.
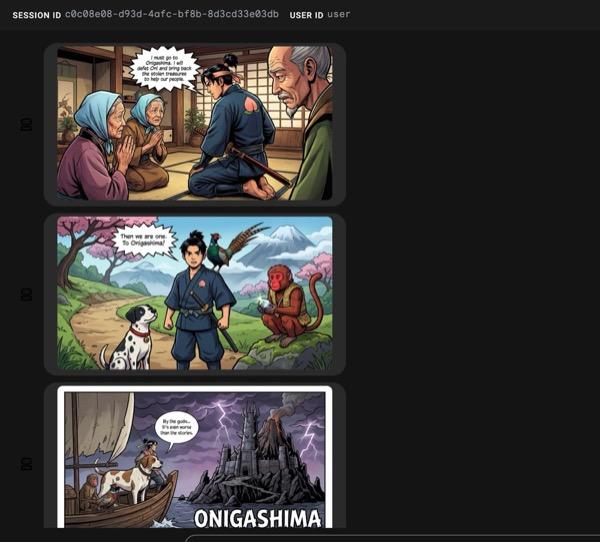
Ilustracja 34. Historia Momotaro w formie komiksu. Jeśli wszystko przebiegnie pomyślnie, wygenerowany plik HTML powinien zostać zapisany w folderze HTML. Jeśli chcesz ulepszyć agenta, możesz wrócić do asystenta agenta i poprosić go o wprowadzenie dalszych zmian.
Ilustracja 35. Zawartość folderu wyjściowego
- Jeśli krok 25 zostanie wykonany prawidłowo i w folderze output pojawi się plik comic.html. Aby to sprawdzić, wykonaj te czynności. Najpierw otwórz nowy terminal, klikając Terminal > New Terminal (Terminal > Nowy terminal) w menu głównym edytora Cloud Shell. Powinien otworzyć się nowy terminal.
#go to the project folder
cd ~/adkui

#activate python virtual environment
source .venv/bin/activate

#Go to the output folder
cd ~/adkui/output

#start local web server
python -m http.server 8080
- Kliknij z naciśniętym klawiszem Ctrl http://0.0.0.0:8080

Ilustracja 36. Uruchamianie lokalnego serwera WWW
- Zawartość folderu powinna być wyświetlana na karcie przeglądarki. Kliknij plik HTML (np. comic.html). Komiks powinien być wyświetlany w sposób pokazany poniżej (dane wyjściowe mogą się nieco różnić).
Ilustracja 37. Uruchamianie na hoście lokalnym
12. Czyszczenie danych
Teraz zwolnijmy miejsce z tego, co właśnie utworzyliśmy.
- Usuń utworzoną właśnie aplikację Cloud Run. Otwórz Cloud Run, klikając Cloud Run . Powinna być widoczna aplikacja utworzona w poprzednim kroku. Zaznacz pole obok aplikacji i kliknij przycisk Usuń.
 Ilustracja 38. Usuwanie aplikacji Cloud Run 2. Usuwanie plików w Cloud Shell
#Execute the following to delete the files
cd ~
rm -R ~/adkui
13. Podsumowanie
Gratulacje! Udało Ci się utworzyć agentów ADK (pakiet Agent Development Kit) za pomocą wbudowanego narzędzia ADK Visual Builder. Dowiedzieliśmy się też, jak wdrożyć aplikację w Cloud Run. To ważne osiągnięcie, które obejmuje podstawowy cykl życia nowoczesnej aplikacji natywnej dla chmury i zapewnia solidne podstawy do wdrażania własnych złożonych systemów opartych na agentach.
Podsumowanie
W tym module nauczyliśmy się:
- Tworzenie aplikacji wieloagentowej za pomocą ADK Visual Builder
- Wdrażanie aplikacji w Cloud Run
Przydatne materiały