
1. Bu laboratuvarın amacı
Bu uygulamalı laboratuvarda, ADK (Agent Development Kit) Visual Builder'ı kullanarak nasıl temsilci oluşturacağınızı öğreneceksiniz. ADK (Agent Development Kit) Visual Builder, ADK (Agent Development Kit) ajanları oluşturmak için az kodlu bir yöntem sunar. Uygulamayı yerel olarak test etmeyi ve Cloud Run'da dağıtmayı öğreneceksiniz.
Neler öğreneceksiniz?
- ADK (Agent Development Kit) ile ilgili temel bilgileri öğrenin.
- ADK (Agent Development Kit) Visual Builder'ın temel özelliklerini anlama
- GUI araçlarını kullanarak nasıl temsilci oluşturacağınızı öğrenin.
- Aracıları Cloud Run'da kolayca dağıtmayı ve kullanmayı öğrenin.
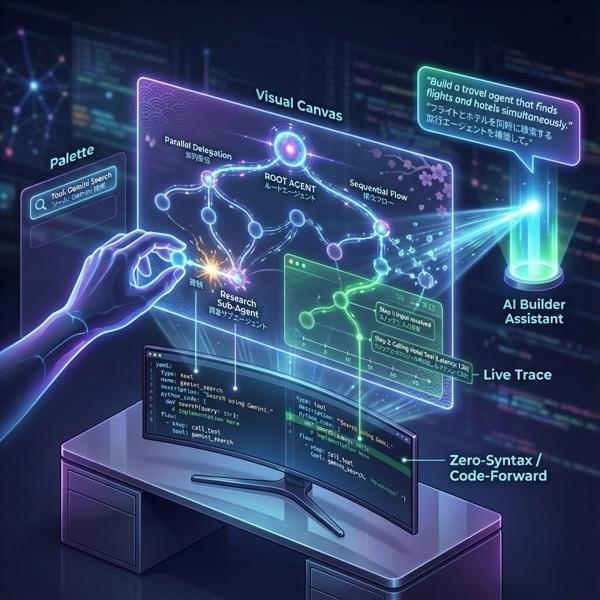
Şekil 1: ADK Visual Builder ile az kodlu bir şekilde GUI kullanarak temsilciler oluşturabilirsiniz.
2. Proje Ayarları
- Kullanabileceğiniz bir projeniz yoksa GCP Console'da yeni bir proje oluşturmanız gerekir. Proje seçicide (Google Cloud Console'un sol üst kısmı) projeyi seçin.

Şekil 2: Google Cloud logosunun hemen yanındaki kutuyu tıklayarak projenizi seçebilirsiniz. Projenizin seçili olduğundan emin olun.
- Bu laboratuvarda görevlerimizi gerçekleştirmek için Cloud Shell Düzenleyici'yi kullanacağız. Cloud Shell'i açın ve Cloud Shell'i kullanarak projeyi ayarlayın.
- Doğrudan Cloud Shell Düzenleyici'ye gitmek için bu bağlantıyı tıklayın.
- Henüz açık değilse menüden Terminal>Yeni Terminal'i tıklayarak Terminal'i açın. Bu eğitimdeki tüm komutları bu terminalde çalıştırabilirsiniz.
- Cloud Shell terminalinde aşağıdaki komutu kullanarak projenin kimliğinin doğrulanıp doğrulanmadığını kontrol edebilirsiniz.
gcloud auth list
- Projenizi onaylamak için Cloud Shell'de aşağıdaki komutu çalıştırın:
gcloud config list project
- Proje kimliğini kopyalayın ve ayarlamak için aşağıdaki komutu kullanın.
gcloud config set project <YOUR_PROJECT_ID>
- Proje kimliğinizi hatırlamıyorsanız aşağıdaki komutla tüm proje kimliklerinizi listeleyebilirsiniz:
gcloud projects list
3. API'leri etkinleştir
Bu laboratuvarı çalıştırmak için bazı API hizmetlerini etkinleştirmemiz gerekiyor. Cloud Shell'de aşağıdaki komutu çalıştırın.
gcloud services enable aiplatform.googleapis.com
gcloud services enable cloudresourcemanager.googleapis.com
API'lerle tanışın
- Vertex AI API (
aiplatform.googleapis.com), Vertex AI platformuna erişimi etkinleştirir. Böylece uygulamanız, metin oluşturma, sohbet oturumları ve işlev çağrısı için Gemini modelleriyle etkileşim kurabilir. - Cloud Resource Manager API (
cloudresourcemanager.googleapis.com), Google Cloud projelerinizin meta verilerini (ör. proje kimliği ve adı) programatik olarak yönetmenize olanak tanır. Bu meta veriler, proje kimliğini ve izinlerini doğrulamak için genellikle diğer araçlar ve SDK'lar tarafından gereklidir.
4. Kredilerinizin uygulanıp uygulanmadığını onaylama
Proje Kurulumu aşamasında, Google Cloud'daki hizmetleri kullanmanızı sağlayan ücretsiz kredilere başvurdunuz. Kredileri uyguladığınızda "Google Cloud Platform Deneme Faturalandırma Hesabı" adlı yeni bir ücretsiz faturalandırma hesabı oluşturulur. Kredilerin uygulandığından emin olmak için Cloud Shell Düzenleyici'de aşağıdaki adımları uygulayın.
curl -s https://raw.githubusercontent.com/haren-bh/gcpbillingactivate/main/activate.py | python3
İşlem başarılı olursa sonucu aşağıdaki gibi görürsünüz: "Proje başarıyla bağlandı" mesajını görürseniz faturalandırma hesabınız doğru şekilde ayarlanmıştır. Yukarıdaki adımı uygulayarak hesabınızın bağlı olup olmadığını kontrol edebilirsiniz. Bağlı değilse hesap sizin için bağlanır. Projeyi seçmediyseniz bir proje seçmeniz istenir. Dilerseniz proje kurulumundaki adımları uygulayarak projeyi önceden de seçebilirsiniz. 
Şekil 3: Bağlı faturalandırma hesabı onayı
5. Agent Development Kit'e giriş
Agent Development Kit, ajan uygulamaları geliştiren geliştiriciler için çeşitli önemli avantajlar sunar:
- Birden fazla temsilci sistemi: Hiyerarşide birden fazla uzmanlaşmış temsilciyi bir araya getirerek modüler ve ölçeklenebilir uygulamalar oluşturun. Karmaşık koordinasyon ve yetki devrini etkinleştirin.
- Zengin Araç Ekosistemi: Temsilcilere çeşitli özellikler kazandırın: Önceden oluşturulmuş araçları (Arama, Kod Yürütme vb.) kullanın, özel işlevler oluşturun, üçüncü taraf temsilci çerçevelerindeki (LangChain, CrewAI) araçları entegre edin veya hatta diğer temsilcileri araç olarak kullanın.
- Esnek Düzenleme: Tahmin edilebilir ardışık düzenler için iş akışı aracılarını (
SequentialAgent,ParallelAgentveLoopAgent) kullanarak iş akışları tanımlayın veya uyarlanabilir davranış için LLM destekli dinamik yönlendirmeden (LlmAgentaktarma) yararlanın. - Entegre Geliştirici Deneyimi: Güçlü bir KSA ve etkileşimli geliştirme kullanıcı arayüzü ile yerel olarak geliştirin, test edin ve hataları ayıklayın. Etkinlikleri, durumu ve aracı yürütme adımını adım adım inceleyin.
- Yerleşik Değerlendirme: Hem nihai yanıt kalitesini hem de adım adım yürütme sürecini önceden tanımlanmış test senaryolarına göre değerlendirerek temsilci performansını sistematik olarak değerlendirin.
- Dağıtıma Hazır: Temsilcilerinizi container'a dönüştürün ve her yerde dağıtın. Yerel olarak çalıştırın, Vertex AI Agent Engine ile ölçeklendirin veya Cloud Run ya da Docker kullanarak özel altyapıya entegre edin.
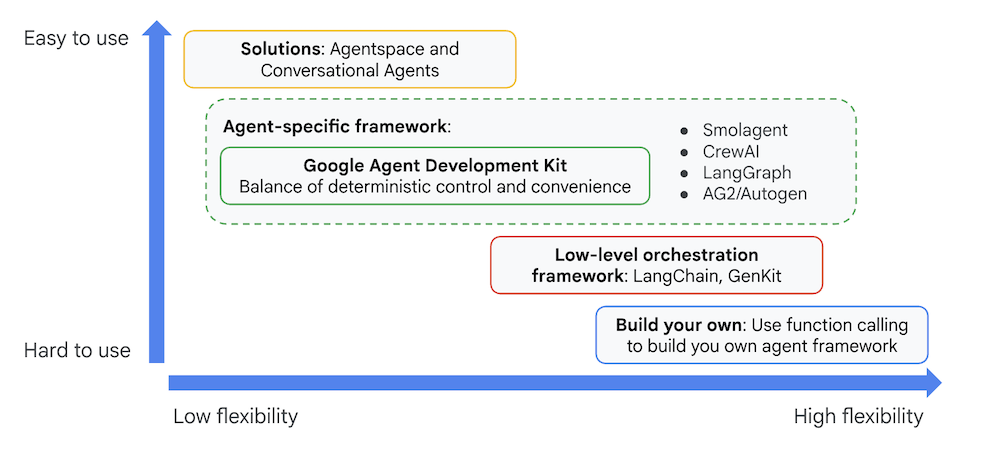
Diğer üretken yapay zeka SDK'ları veya aracı çerçeveleri de modellere sorgu göndermenize ve hatta bunları araçlarla desteklemenize olanak tanır. Ancak birden fazla model arasında dinamik koordinasyon sağlamak için sizin tarafınızda önemli miktarda çalışma yapılması gerekir.
Agent Development Kit, bu araçlardan daha üst düzey bir çerçeve sunar. Bu sayede, karmaşık ancak bakımı kolay iş akışları için birden fazla temsilciyi birbirine kolayca bağlayabilirsiniz.
Şekil 4: ADK (Agent Development Kit) konumlandırması
Son sürümlerde ADK (Agent Development Kit)'ye ADK Visual Builder aracı eklendi. Bu araç, az kodlu ADK (Agent Development Kit) temsilcileri oluşturmanıza olanak tanır. Bu laboratuvarda ADK Visual Builder aracını ayrıntılı olarak inceleyeceğiz.
6. ADK'yı yükleme ve ortamınızı ayarlama
Öncelikle ADK (Agent Development Kit)'yı çalıştırabilmemiz için ortamı ayarlamamız gerekir. Bu laboratuvarda ADK (Agent Development Kit)'yı çalıştırıp tüm görevleri Google Cloud'daki Cloud Shell Düzenleyici'de gerçekleştireceğiz .
Cloud Shell Düzenleyici hazırlama
- Doğrudan Cloud Shell Düzenleyici'ye gitmek için bu bağlantıyı tıklayın.
- Devam'ı tıklayın.
- Cloud Shell'i yetkilendirmeniz istendiğinde Yetkilendir'i tıklayın.
- Bu laboratuvarın geri kalanında, Cloud Shell Editor ve Cloud Shell Terminal ile bu pencerede IDE'niz olarak çalışabilirsiniz.
- Cloud Shell Düzenleyici'de Terminal>New Terminal'i (Terminal>Yeni Terminal) kullanarak yeni bir terminal açın. Aşağıdaki tüm komutlar bu terminalde çalıştırılacak.
ADK Visual Editor'ı başlatma
- Gerekli kaynağı GitHub'dan klonlamak ve gerekli kitaplıkları yüklemek için aşağıdaki komutları yürütün. Cloud Shell Düzenleyici'de açılan terminalde komutları çalıştırın.
#create the project directory
mkdir ~/adkui
cd ~/adkui
- Python ortamı oluşturmak için uv'yi kullanacağız (Cloud Shell Düzenleyici terminalinde çalıştırın):
#Install uv if you do not have installed yet
pip install uv

#go to the project directory
cd ~/adkui

#Create the virtual environment
uv venv


#use the newly created environment
source .venv/bin/activate

#install libraries
uv pip install google-adk==1.22.1
uv pip install python-dotenv
Not: Terminali yeniden başlatmanız gerekirse "source .venv/bin/activate" komutunu çalıştırarak Python ortamınızı ayarladığınızdan emin olun.
- Düzenleyicide Görünüm > Gizli dosyaları aç/kapat'a gidin. Ayrıca adkui klasöründe aşağıdaki içeriğe sahip bir .env dosyası oluşturun.
#go to adkui folder
cd ~/adkui
cat <<EOF>> .env
GOOGLE_GENAI_USE_VERTEXAI=1
GOOGLE_CLOUD_PROJECT=$(gcloud config get-value project)
GOOGLE_CLOUD_LOCATION=us-central1
IMAGEN_MODEL="imagen-3.0-generate-002"
GENAI_MODEL="gemini-2.5-flash"
EOF
7. ADK Visual Builder ile basit bir temsilci oluşturma
Bu bölümde, ADK Visual Builder'ı kullanarak basit bir temsilci oluşturacağız.ADK Visual Builder, ADK (Agent Development Kit) temsilcilerini oluşturmak ve yönetmek için görsel iş akışı tasarım ortamı sağlayan web tabanlı bir araçtır. Bu araç, temsilcilerinizi yeni başlayanlara uygun bir grafik arayüzde tasarlamanıza, oluşturmanıza ve test etmenize olanak tanır. Ayrıca, temsilci oluşturmanıza yardımcı olacak yapay zeka destekli bir asistan içerir.
Şekil 5: ADK Visual Builder
- Terminalde adkui üst dizinine geri dönün ve aracı yerel olarak çalıştırmak için aşağıdaki komutu yürütün (Cloud Shell Düzenleyici terminalinde çalıştırın). ADK sunucusunu başlatabilmeli ve terminalde Şekil 6'ya benzer sonuçlar görebilmelisiniz.
#go to the directory adkui
cd ~/adkui
# Run the following command to run ADK locally
adk web
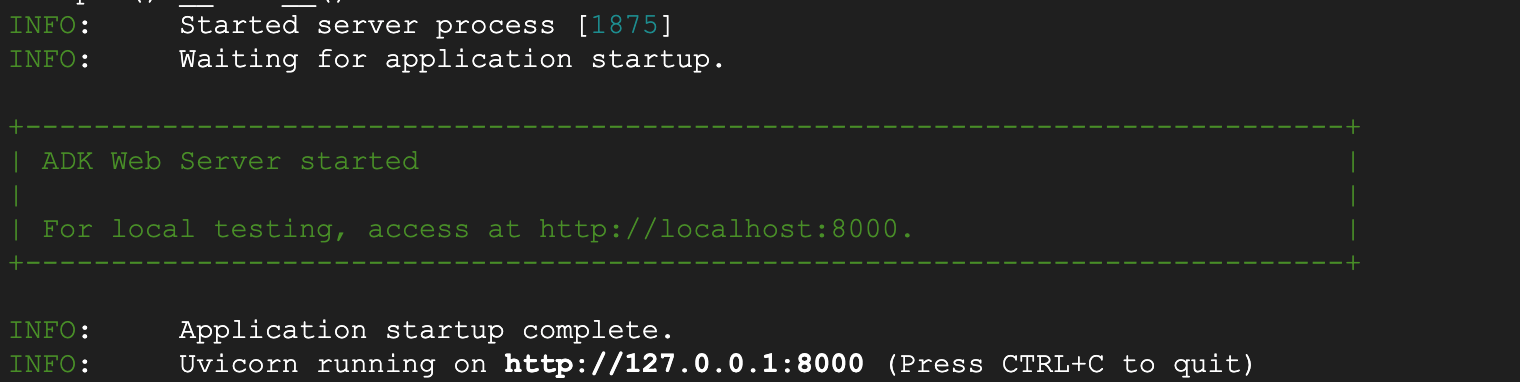
Şekil 6: ADK uygulama başlangıcı
- ADK (Agent Development Kit) tarayıcı tabanlı GUI aracını açmak için terminalde gösterilen http:// URL'sini Ctrl+Tıklayın (MacOS için CMD+Tıklayın).

Şekil 7: ADK web kullanıcı arayüzü, ADK'nın aşağıdaki bileşenleri içerir: 1: Açık ve koyu modu değiştirme 2: Paneli daraltma 3: Aracı oluşturma 4: Aracı düzenleme
- Yeni bir temsilci oluşturmak için "+" düğmesine basın.
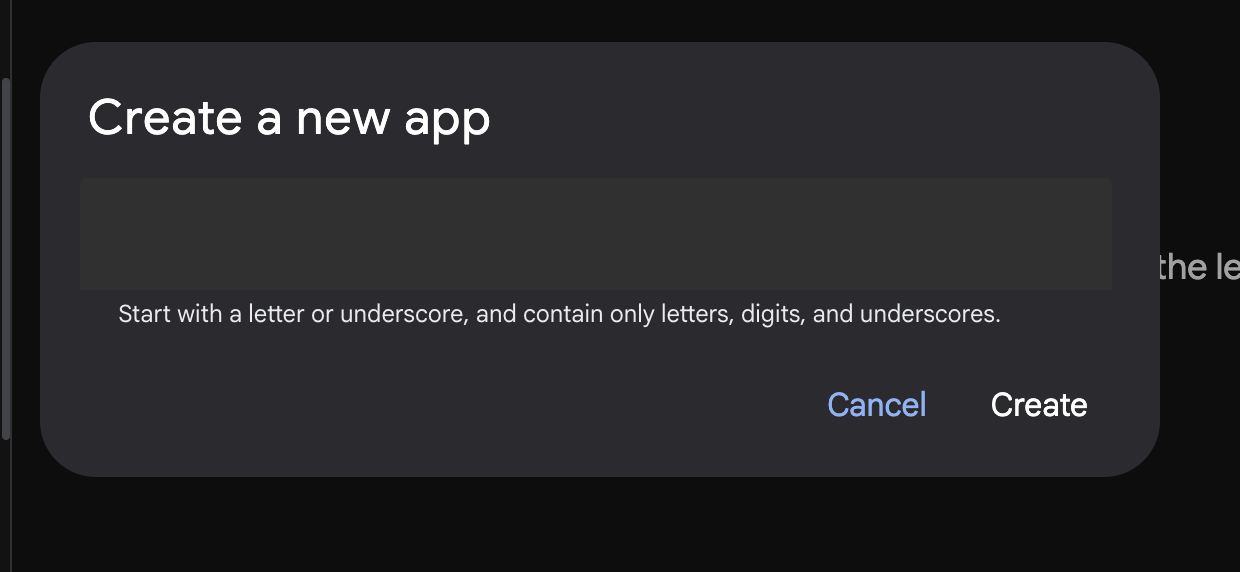
Şekil 8: Yeni uygulama oluşturma iletişim kutusu
- "Agent1" adını verin ve Oluştur'u tıklayın.
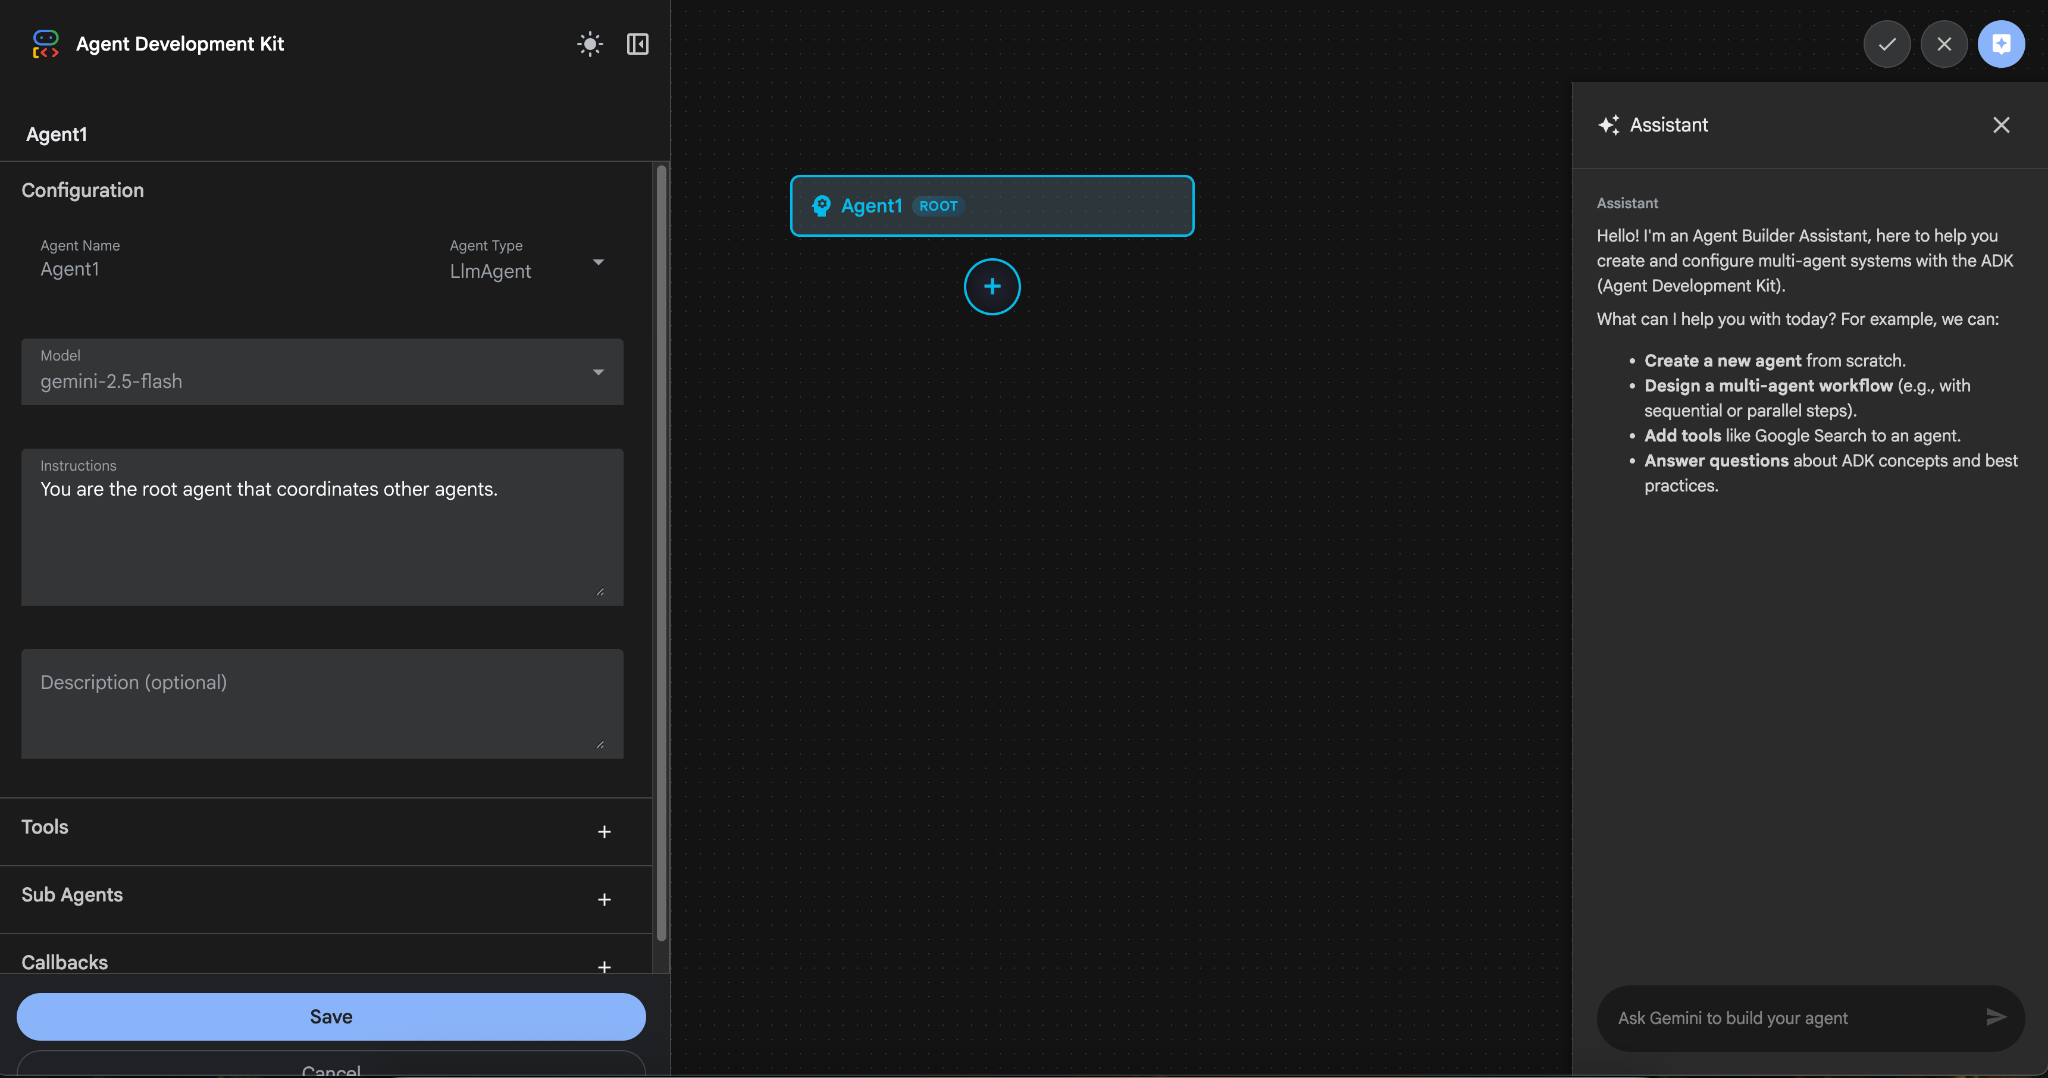
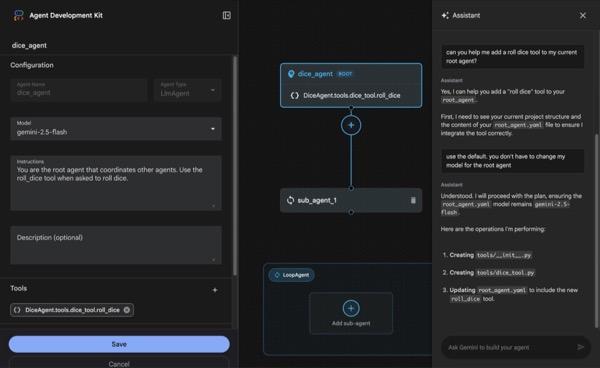
Şekil 9: Temsilci oluşturucu için kullanıcı arayüzü
- Panel üç ana bölümden oluşur: Sol tarafta GUI tabanlı aracı oluşturma kontrolleri, ortada ilerlemenizin görselleştirilmesi, sağ tarafta ise doğal dil kullanarak aracı oluşturmaya yönelik Asistan yer alır.
- Ajanınız başarıyla oluşturuldu. Devam etmek için Kaydet düğmesini tıklayın. (Not: Değişikliklerinizi kaybetmemek için Kaydet'e basmanız gerekir.)
- Temsilci artık test için hazır olmalıdır. Başlamak için Chat kutusuna aşağıdaki gibi bir istem girin:
Hi, what can you do?
Şekil 10: Temsilciyi test etme.
7.Düzenleyiciye dönerek yeni oluşturulan dosyaları inceleyelim. Gezgini sol tarafta bulabilirsiniz. adkgui klasörüne gidin ve Agent 1 dizinini göstermek için klasörü genişletin. Klasörde, aşağıdaki şekilde gösterildiği gibi aracıyı tanımlayan YAML dosyasını kontrol edebilirsiniz.

Şekil 11: YAML dosyası kullanılarak aracı tanımı
- Şimdi GUI düzenleyiciye geri dönüp aracıya birkaç özellik ekleyelim. Bunu yapmak için düzenle düğmesine basın (Şekil 7, bileşen numarası 4, kalem simgesi).
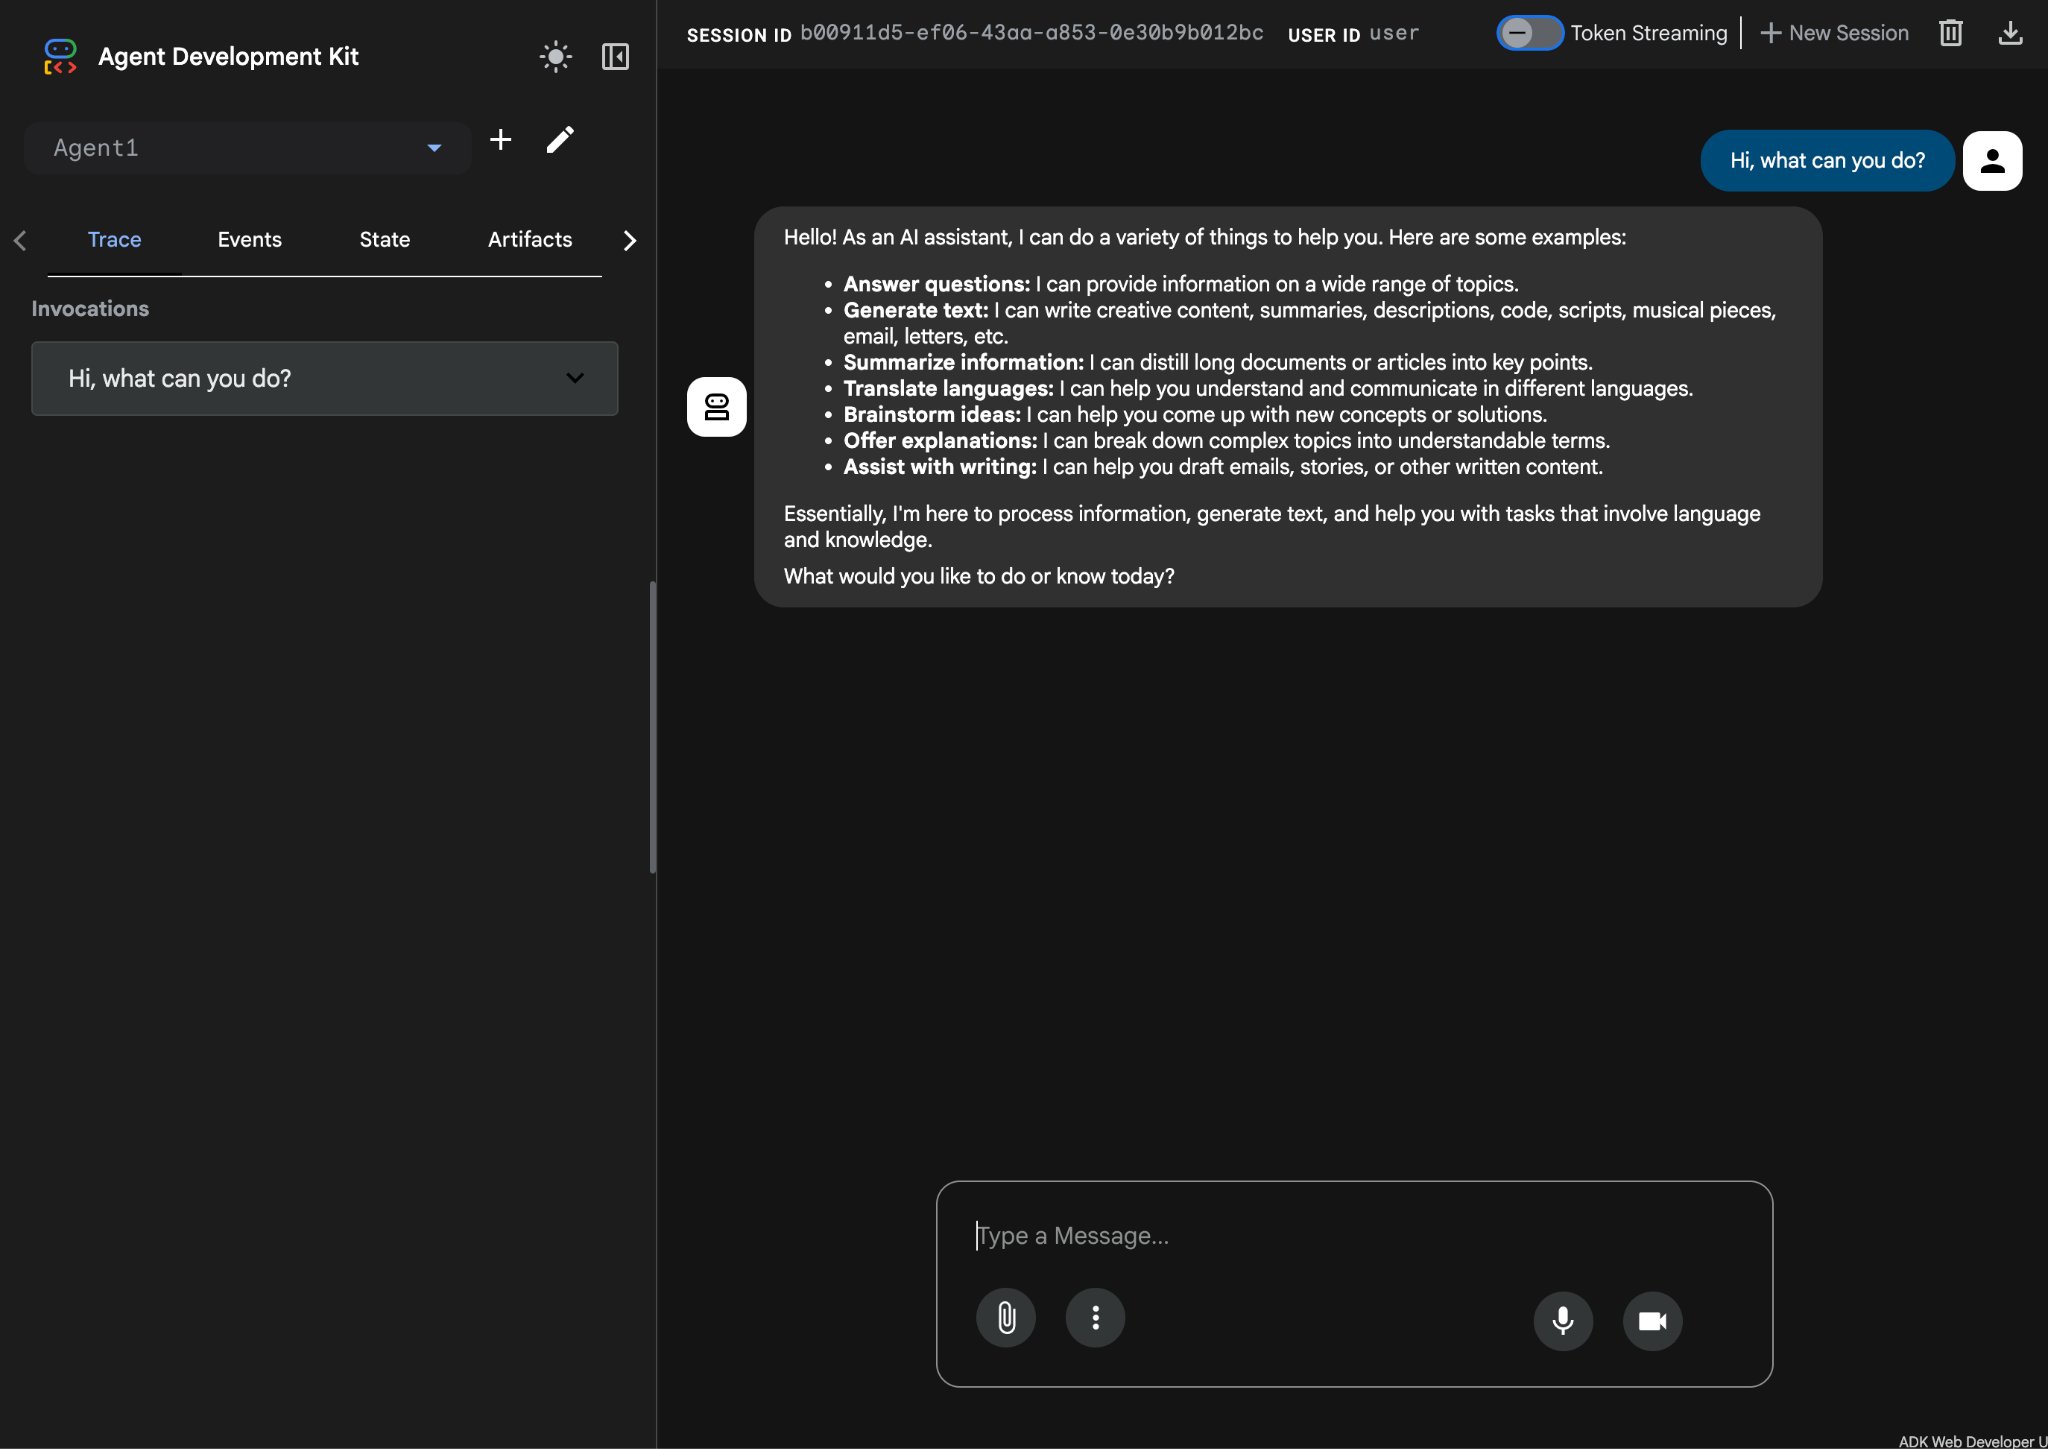
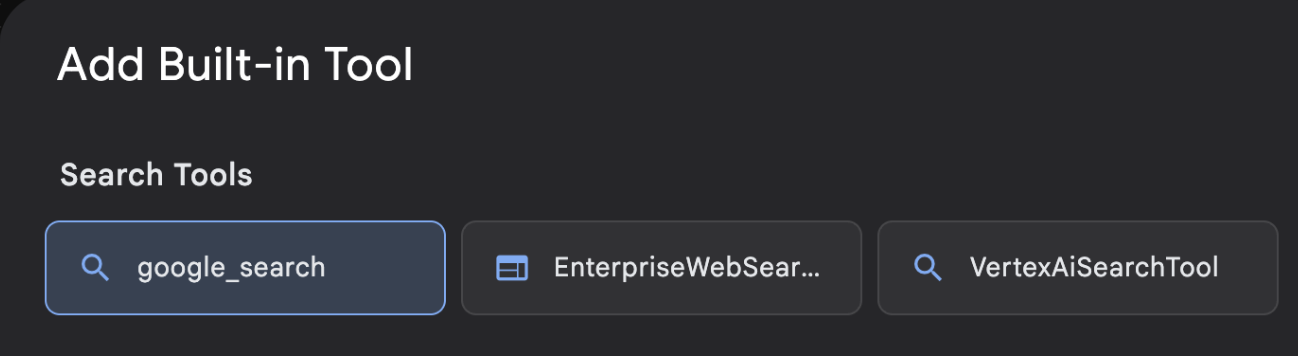
- Aracıya Google Arama özelliği ekleyeceğiz. Bunun için Google Arama'yı, aracının kullanabileceği bir araç olarak eklememiz gerekiyor. Bunu yapmak için ekranın sol alt kısmındaki Araçlar bölümünün yanındaki "+" işaretini ve menüden Yerleşik araç'ı tıklayın (Şekil 12'ye bakın).
Şekil 12: Temsilciye yeni bir araç ekleme
- Yerleşik Araç listesinden google_search'ü seçin ve Oluştur'u tıklayın (Şekil 12'ye bakın). Bu işlem, Google Arama'yı aracınıza bir araç olarak ekler.
- Değişikliklerin kaydedilmesi için Kaydet düğmesine basın.
Şekil 13: ADK Görsel Oluşturucu kullanıcı arayüzünde bulunan araçların listesi
- Artık temsilciyi test etmeye hazırsınız. Öncelikle ADK sunucusunu yeniden başlatın. ADK (Agent Development Kit) sunucusunu başlattığınız terminale gidin ve sunucu hâlâ çalışıyorsa CTRL+C tuşlarına basarak sunucuyu kapatın. Sunucuyu yeniden başlatmak için aşağıdaki komutu çalıştırın.
#make sure you are in the right folder.
cd ~/adkui

#start the server
adk web
- URL'yi Ctrl+tıklayın (ör. http://localhost:8000) ekranda gösterilir. ADK (Agent Development Kit) GUI, tarayıcı sekmesinde gösterilmelidir.
- Müşteri temsilcileri listesinden Agent1'i seçin. Temsilciniz artık Google Arama yapabilir. Sohbet kutusunda aşağıdaki istemle test edin.
What is the weather today in Yokohama?
Google Arama'dan aşağıdaki gibi bir yanıt alırsınız. 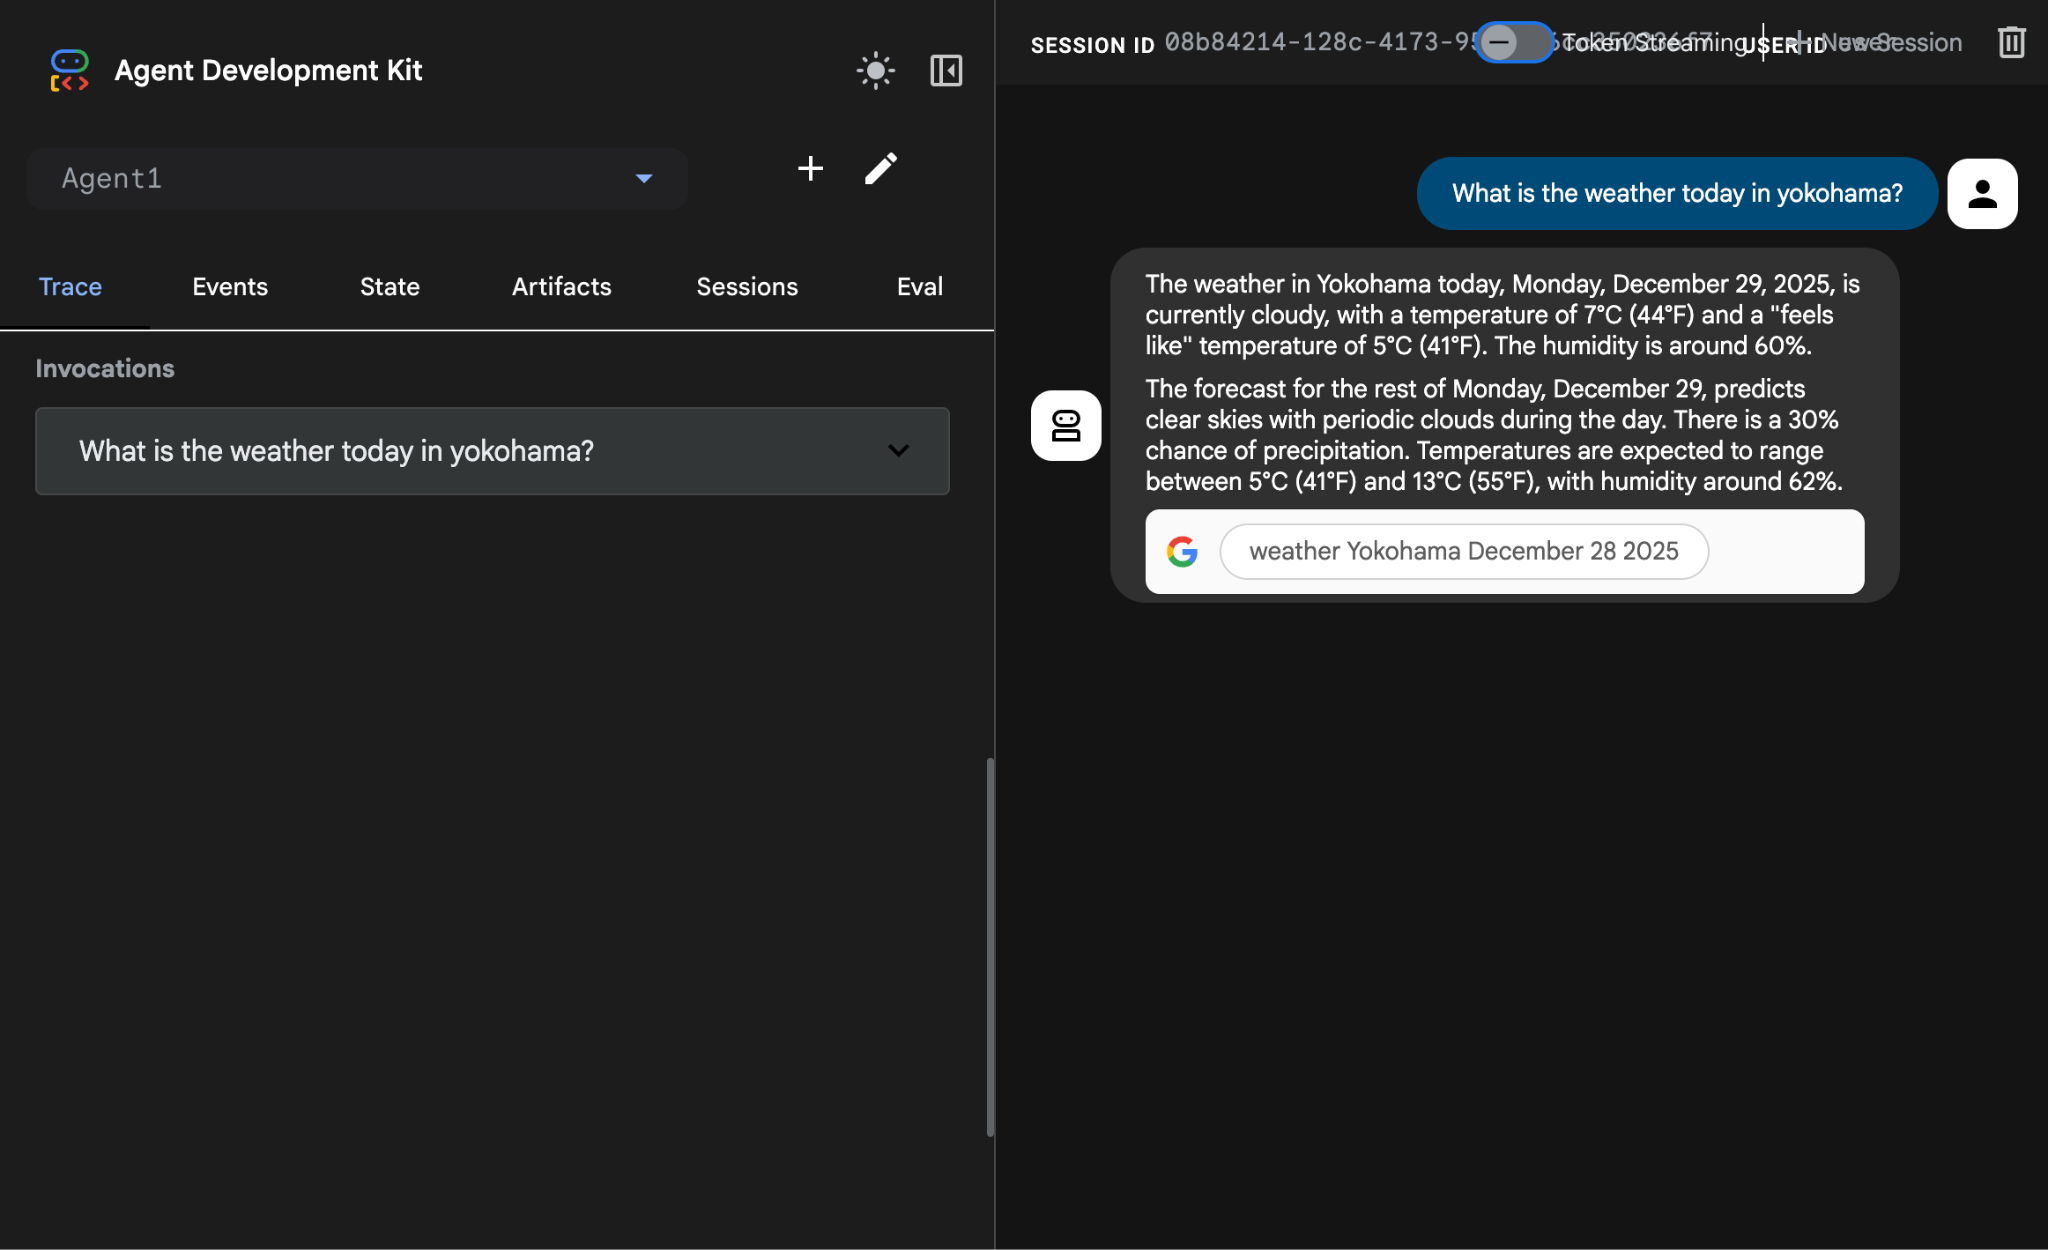
Şekil 14: Google Arama ile arama yapma
- Şimdi düzenleyiciye geri dönüp bu adımda oluşturulan kodu kontrol edelim. Açmak için Düzenleyici Gezgin yan panelinde root_agent.yaml dosyasını tıklayın. google_search'ün araç olarak eklendiğini onaylayın (Şekil 15).
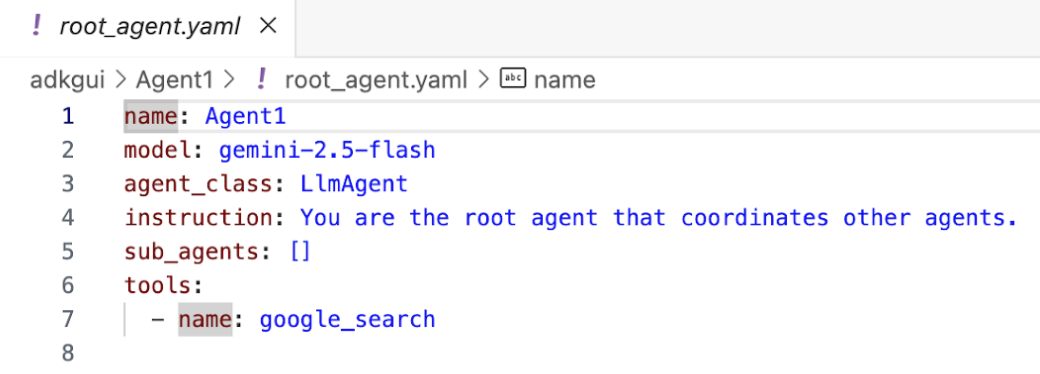
Şekil 15: google_search'ün Agent1'e araç olarak eklendiğinin onayı
8. Aracıyı Cloud Run'a dağıtma
Şimdi oluşturulan aracıyı Cloud Run'a dağıtalım. Cloud Run ile tümüyle yönetilen bir platformda hızlıca uygulama veya web sitesi oluşturabilirsiniz.
Altyapıyı yönetmenize gerek kalmadan ön uç ve arka uç hizmetlerini çalıştırabilir, toplu işler yapabilir, LLM'leri barındırabilir ve işleme iş yüklerini sıraya alabilirsiniz.
Cloud Shell Düzenleyici terminalinde, ADK (Agent Development Kit) sunucusunu hâlâ çalıştırıyorsanız Ctrl+C tuşlarına basarak durdurun.
- Projenin kök dizinine gidin.
cd ~/adkui
- Dağıtım kodunu alın. Komutu çalıştırdıktan sonra deploycloudrun.py dosyasını Cloud Shell Düzenleyici Gezgin bölmesinde görmeniz gerekir.
curl -LO https://raw.githubusercontent.com/haren-bh/codelabs/main/adk_visual_builder/deploycloudrun.py
- deploycloudrun.py dosyasındaki dağıtım seçeneklerini kontrol edin. Aracımızı Cloud Run'a dağıtmak için adk deploy komutunu kullanacağız. ADK (Agent Development Kit), aracıyı Cloud Run'a dağıtmak için yerleşik bir seçeneğe sahiptir. Google Cloud proje kimliği, bölge vb. gibi parametreleri belirtmemiz gerekir. Bu komut dosyası, uygulama yolu için agent_path=./Agent1 olduğunu varsayar. Ayrıca, gerekli izinlere sahip yeni bir hizmet hesabı oluşturup Cloud Run'a bağlayacağız. Cloud Run'ın, aracıyı çalıştırmak için Vertex AI ve Cloud Storage gibi hizmetlere erişmesi gerekir.
   command = [
        "adk", "deploy", "cloud_run",
        f"--project={project_id}",
        f"--region={location}",
        f"--service_name={service_name}",
        f"--app_name={app_name}",
        f"--artifact_service_uri=memory://",
        f"--with_ui",
        agent_path,
        f"--",
        f"--service-account={sa_email}",
    ]
- deploycloudrun.py komut dosyasını çalıştırın**. Dağıtım, aşağıdaki şekilde gösterildiği gibi başlamalıdır.**
python3 deploycloudrun.py
Aşağıdaki gibi bir onay mesajı alırsanız tüm mesajlar için Y ve Enter tuşlarına basın. depoycloudrun.py , temsilcinizin yukarıda oluşturulduğu gibi Agent1 klasöründe olduğunu varsayar.
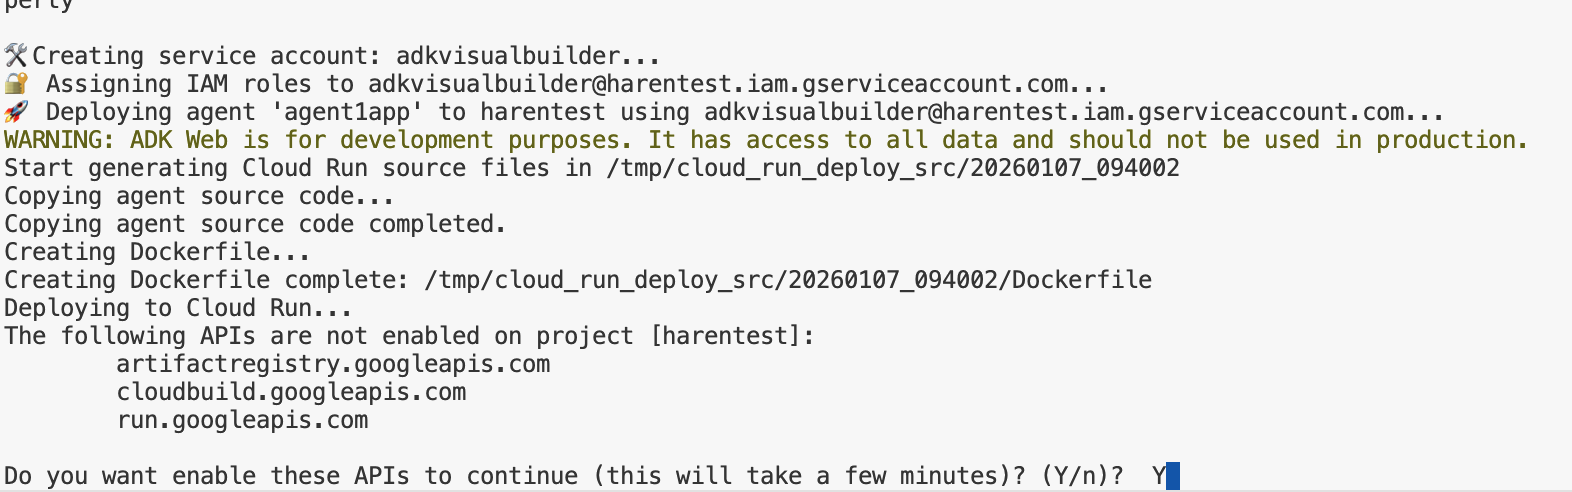
Şekil 16: Cloud Run'a aracı dağıtma, onay mesajları için Y tuşuna basın.
- Dağıtım tamamlandıktan sonra https://agent1service-78833623456.us-central1.run.app gibi bir hizmet URL'si görmeniz gerekir.
- Uygulamayı başlatmak için web tarayıcınızda URL'ye erişin.
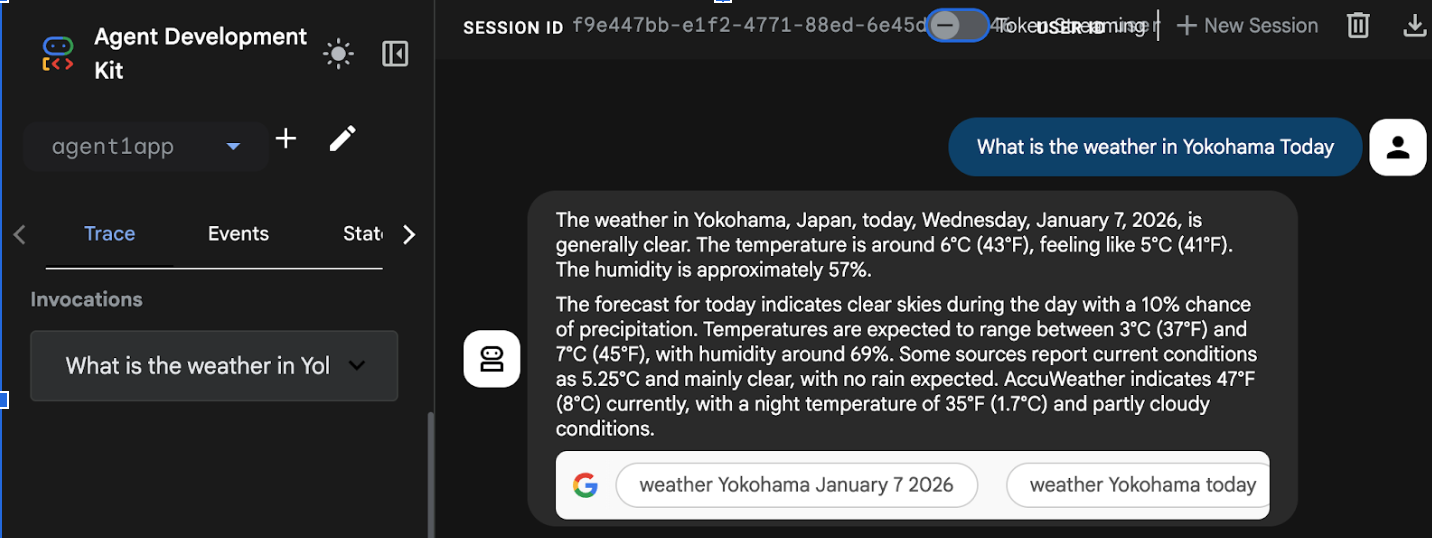
Figure 17: Agent running in Cloud Run
9. Alt ajan ve özel araç içeren bir ajan oluşturma
Önceki bölümde, yerleşik bir Google Arama Aracı içeren tek bir aracı oluşturmuştunuz. Bu bölümde, temsilcilerin özel araçları kullanmasına izin verdiğimiz çoklu temsilci sistemi oluşturacaksınız.
- Öncelikle ADK (Agent Development Kit) sunucusunu yeniden başlatın. ADK (Agent Development Kit) sunucusunu başlattığınız terminale gidin ve sunucu hâlâ çalışıyorsa CTRL+C tuşlarına basarak sunucuyu kapatın. Sunucuyu yeniden başlatmak için aşağıdaki komutu çalıştırın.
#make sure you are in the right folder.
cd ~/adkui

#start the server
adk web
- URL'yi Ctrl+tıklayın (ör. http://localhost:8000) ekranda gösterilir. ADK (Agent Development Kit) GUI, tarayıcı sekmesinde gösterilmelidir.
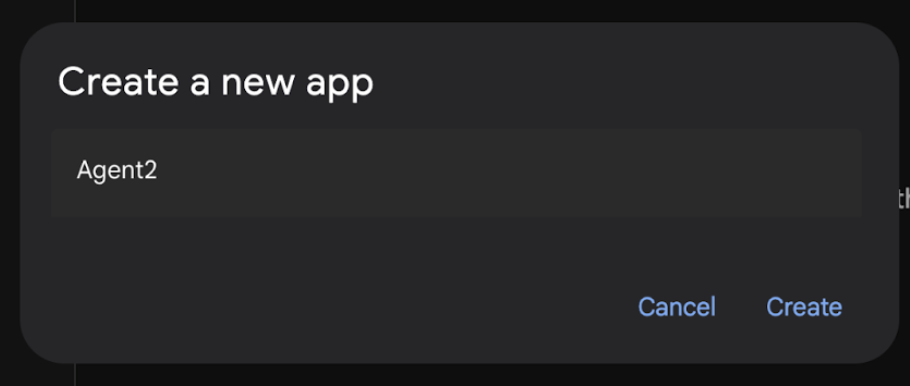
- Yeni bir aracı oluşturmak için "+" düğmesini tıklayın. Temsilci iletişim kutusuna "Agent2" (Şekil 18) yazın ve "Create"i (Oluştur) tıklayın.
Şekil 18: Yeni bir Ajan uygulaması oluşturma.
- Agent2'nin talimatlar bölümüne aşağıdakileri girin.
You are an agent that takes image creation instruction from the user and passes it to your sub agent
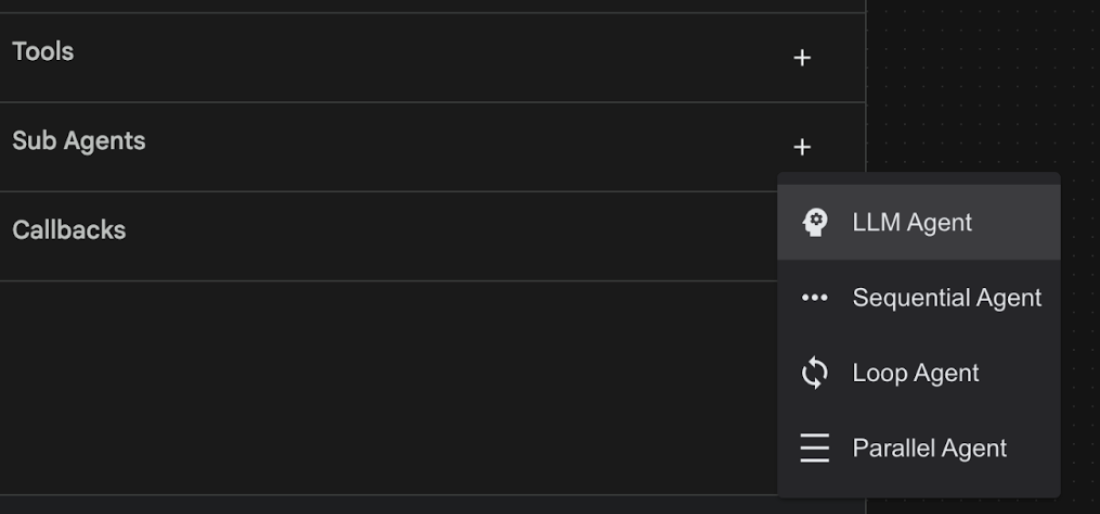
- Şimdi kök temsilciye bir alt temsilci ekleyeceğiz. Bunu yapmak için sol bölmenin en altındaki Alt Aracı menüsünün sol tarafındaki "+" düğmesini (Şekil 19) ve "LLM Aracı"nı tıklayın. Bu işlem, kök aracının yeni bir alt aracısı olarak yeni bir aracı oluşturur.
Şekil 19: Yeni bir alt temsilci ekleme.
- sub_agent_1 için talimatlar bölümüne aşağıdaki metni girin.
You are an Agent that can take instructions about an image and create an image using the create_image tool.
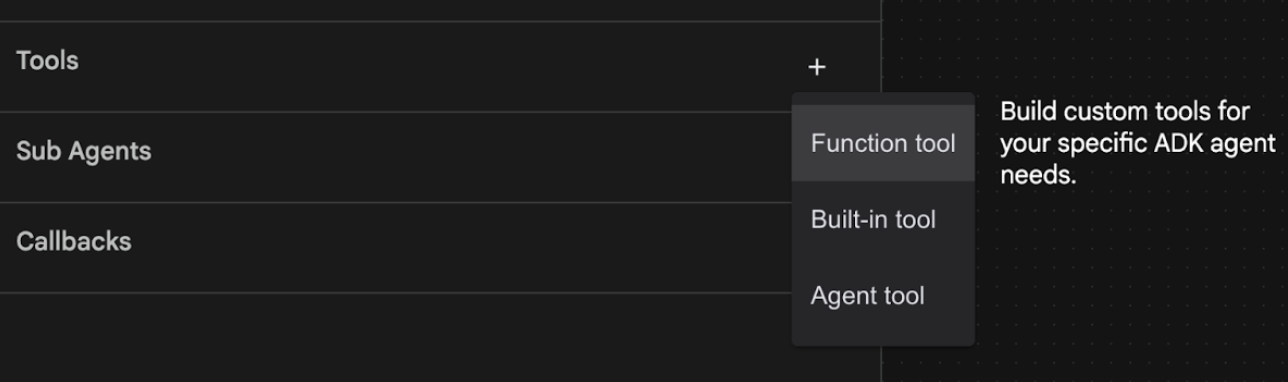
- Şimdi bu alt temsilciye özel bir araç ekleyelim. Bu araç, kullanıcının talimatlarını kullanarak bir resim üretmek için Imagen modelini çağırır. Bunu yapmak için önce önceki adımda oluşturulan alt temsilciyi ve ardından Araçlar menüsünün yanındaki "+" düğmesini tıklayın. Araç seçenekleri listesinden "İşlev aracı"nı tıklayın. Bu araç, araca kendi özel kodumuzu eklememize olanak tanır.
Şekil 20: Yeni bir araç oluşturmak için İşlev aracını tıklayın. 8. İletişim kutusunda aracı Agent2.image_creation_tool.create_image olarak adlandırın. 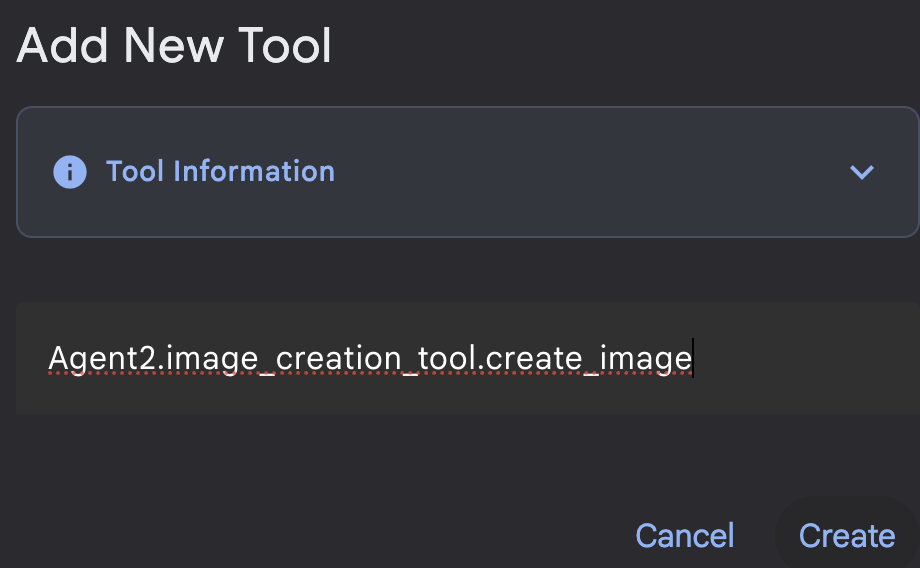
Şekil 21: Araç adı ekleme
- Değişiklikleri kaydetmek için Kaydet düğmesini tıklayın.
- Cloud Shell Düzenleyici Terminali'nde adk sunucusunu kapatmak için Ctrl+S tuşlarına basın.
- Terminalde aşağıdaki komutu girerek image_creation_tool.py dosyasını oluşturun.
touch ~/adkui/Agent2/image_creation_tool.py
- Cloud Shell Düzenleyici'nin Gezgin bölmesinde yeni oluşturulan image_creation_tool.py dosyasını tıklayarak açın. Ardından, image_creation_tool.py dosyasının içeriğini aşağıdakiyle değiştirip kaydedin (Ctrl+S).
import os
import io
import vertexai
from vertexai.preview.vision_models import ImageGenerationModel
from dotenv import load_dotenv
import uuid
from typing import Union
from datetime import datetime
from google import genai
from google.genai import types
from google.adk.tools import ToolContext
import logging

# Configure logging
logging.basicConfig(level=logging.INFO)
logger = logging.getLogger(__name__)

async def create_image(prompt: str,tool_context: ToolContext) -> Union[bytes, str]:
  """
  Generates an image based on a text prompt using a Vertex AI Imagen model.
  Args:
      prompt: The text prompt to generate the image from.

  Returns:
      The binary image data (PNG format) on success, or an error message string on failure.
  """
  print(f"Attempting to generate image for prompt: '{prompt}'")

  try:
      # Load environment variables from .env file two levels up
      dotenv_path = os.path.join(os.path.dirname(__file__), '..', '..', '.env')
      load_dotenv(dotenv_path=dotenv_path)
      project_id = os.getenv("GOOGLE_CLOUD_PROJECT")
      location = os.getenv("GOOGLE_CLOUD_LOCATION")
      model_name = os.getenv("IMAGEN_MODEL")
      client = genai.Client(
          vertexai=True,
          project=project_id,
          location=location,
      )
      response = client.models.generate_images(
          model="imagen-3.0-generate-002",
          prompt=prompt,
          config=types.GenerateImagesConfig(
              number_of_images=1,
              aspect_ratio="9:16",
              safety_filter_level="block_low_and_above",
              person_generation="allow_adult",
          ),
      )
      if not all([project_id, location, model_name]):
          return "Error: Missing GOOGLE_CLOUD_PROJECT, GOOGLE_CLOUD_LOCATION, or IMAGEN_MODEL in .env file."
      vertexai.init(project=project_id, location=location)
      model = ImageGenerationModel.from_pretrained(model_name)
      images = model.generate_images(
          prompt=prompt,
          number_of_images=1
      )
      if response.generated_images is  None:
          return "Error: No image was generated."
      for generated_image in response.generated_images:
          # Get the image bytes
          image_bytes = generated_image.image.image_bytes
          counter = str(tool_context.state.get("loop_iteration", 0))
          artifact_name = f"generated_image_" + counter + ".png"
          # Save as ADK artifact (optional, if still needed by other ADK components)
          report_artifact = types.Part.from_bytes(
              data=image_bytes, mime_type="image/png"
          )
          await tool_context.save_artifact(artifact_name, report_artifact)
          logger.info(f"Image also saved as ADK artifact: {artifact_name}")
          return {
              "status": "success",
              "message": f"Image generated .  ADK artifact: {artifact_name}.",
              "artifact_name": artifact_name,
          }
  except Exception as e:
      error_message = f"An error occurred during image generation: {e}"
      print(error_message)
      return error_message
- Öncelikle ADK (Agent Development Kit) sunucusunu yeniden başlatın. ADK (Agent Development Kit) sunucusunu başlattığınız terminale gidin ve sunucu hâlâ çalışıyorsa CTRL+C tuşlarına basarak sunucuyu kapatın. Sunucuyu yeniden başlatmak için aşağıdaki komutu çalıştırın.
#make sure you are in the right folder.
cd ~/adkui

#start the server
adk web
- URL'yi Ctrl+tıklayın (ör. http://localhost:8000) ekranda gösterilir. ADK (Agent Development Kit) GUI, tarayıcı sekmesinde gösterilmelidir.
- ADK (Agent Development Kit) kullanıcı arayüzü sekmesinde, Agent listesinden Agent2'yi seçin ve düzenle düğmesine (kalem simgesi) basın. Değişiklikleri kalıcı hale getirmek için ADK (Agent Development Kit) Görsel Düzenleyici'de Kaydet düğmesini tıklayın.
- Şimdi yeni temsilciyi test edebiliriz.
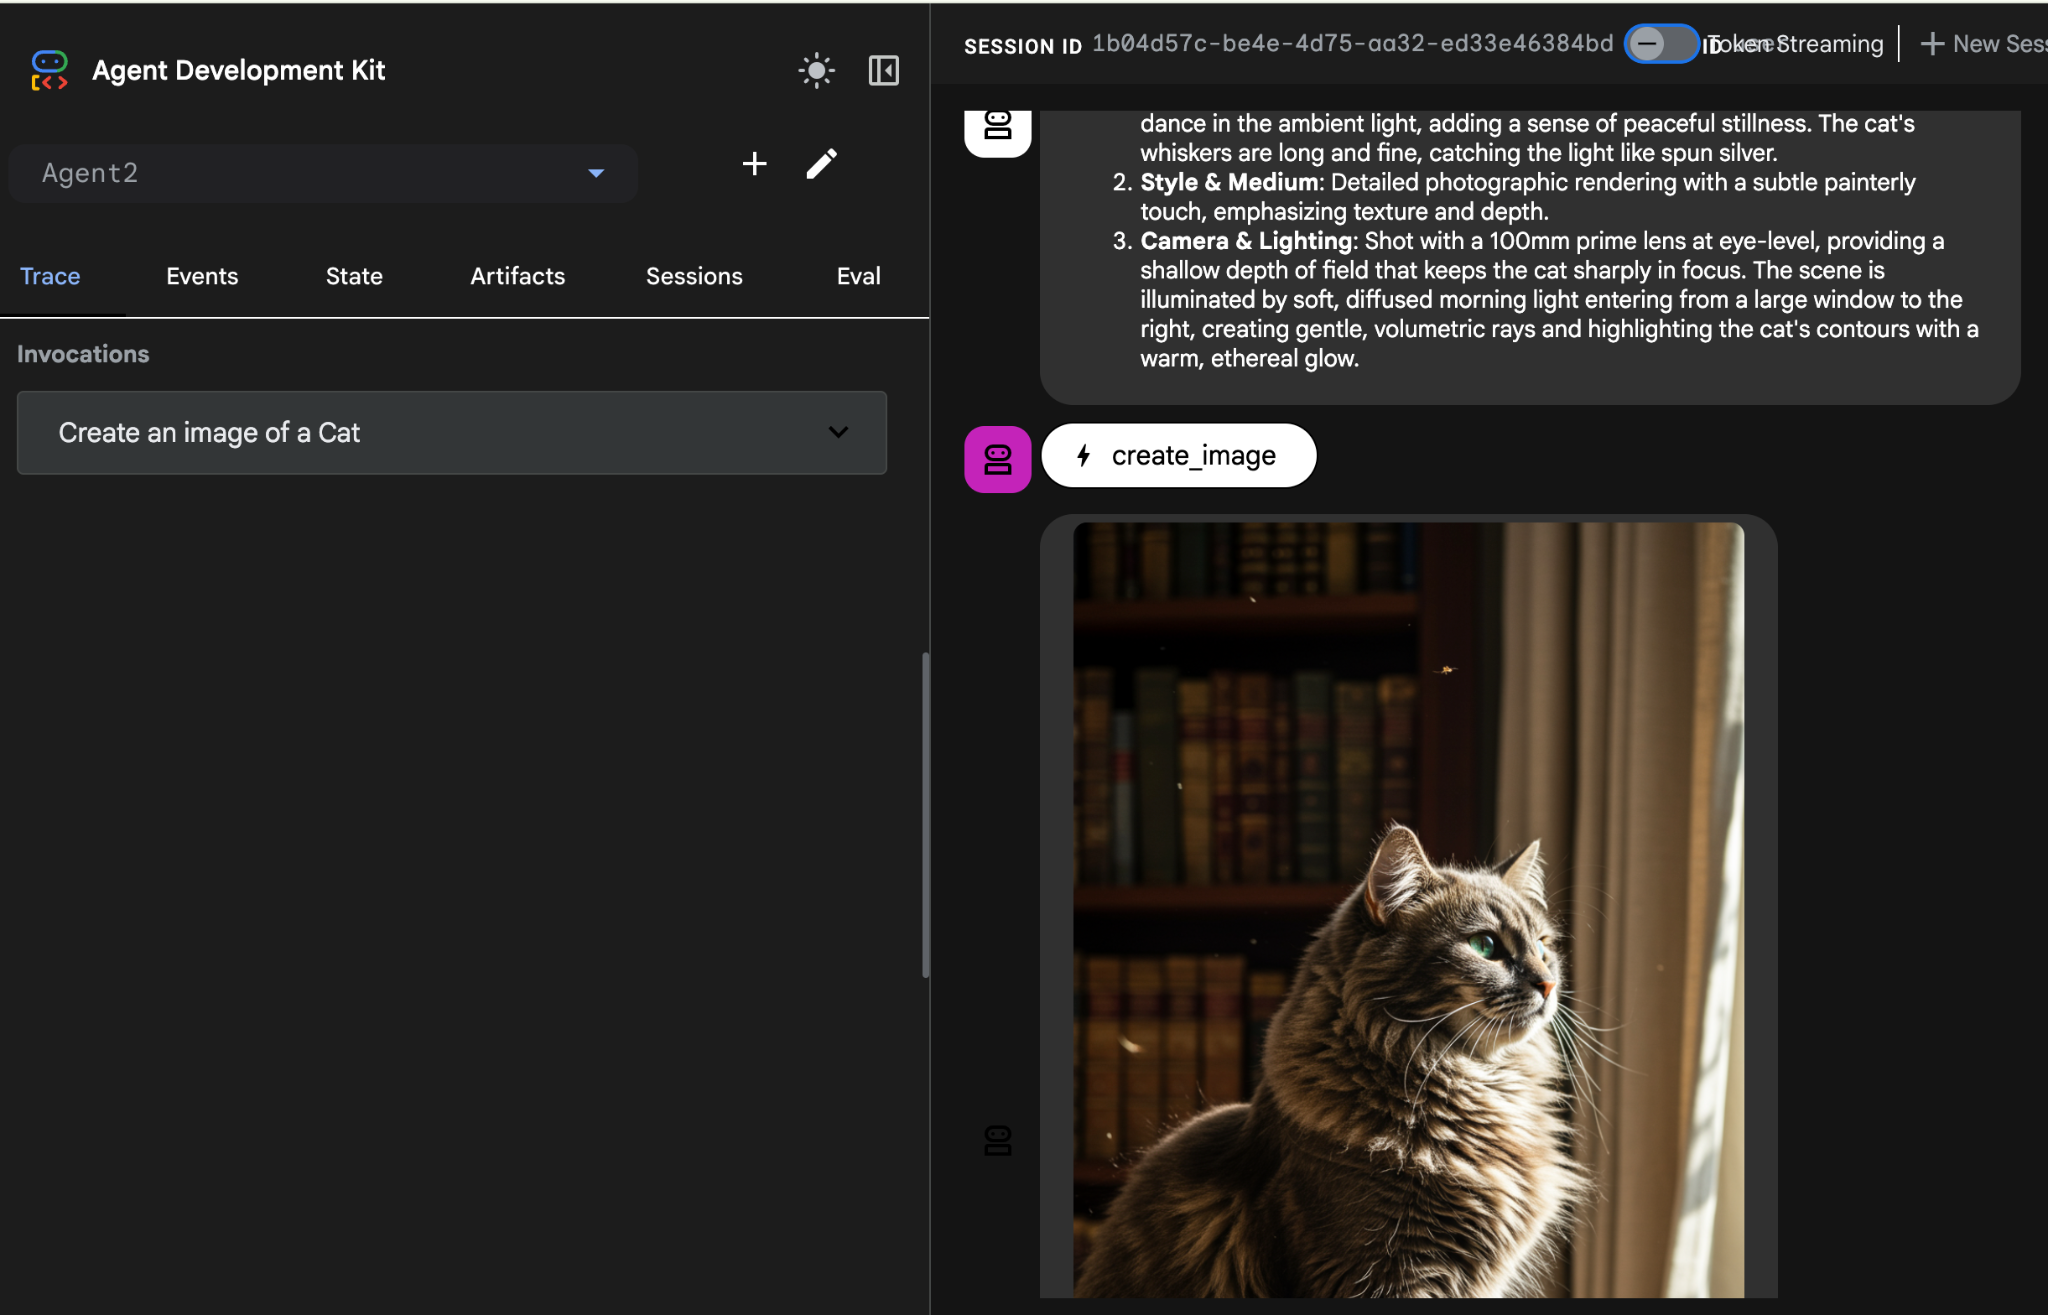
- ADK (Agent Development Kit) kullanıcı arayüzü sohbet arayüzüne aşağıdaki istemi girin. Diğer istemleri de deneyebilirsiniz. Sonuçları Şekil 22'de görebilirsiniz.
Create an image of a cat
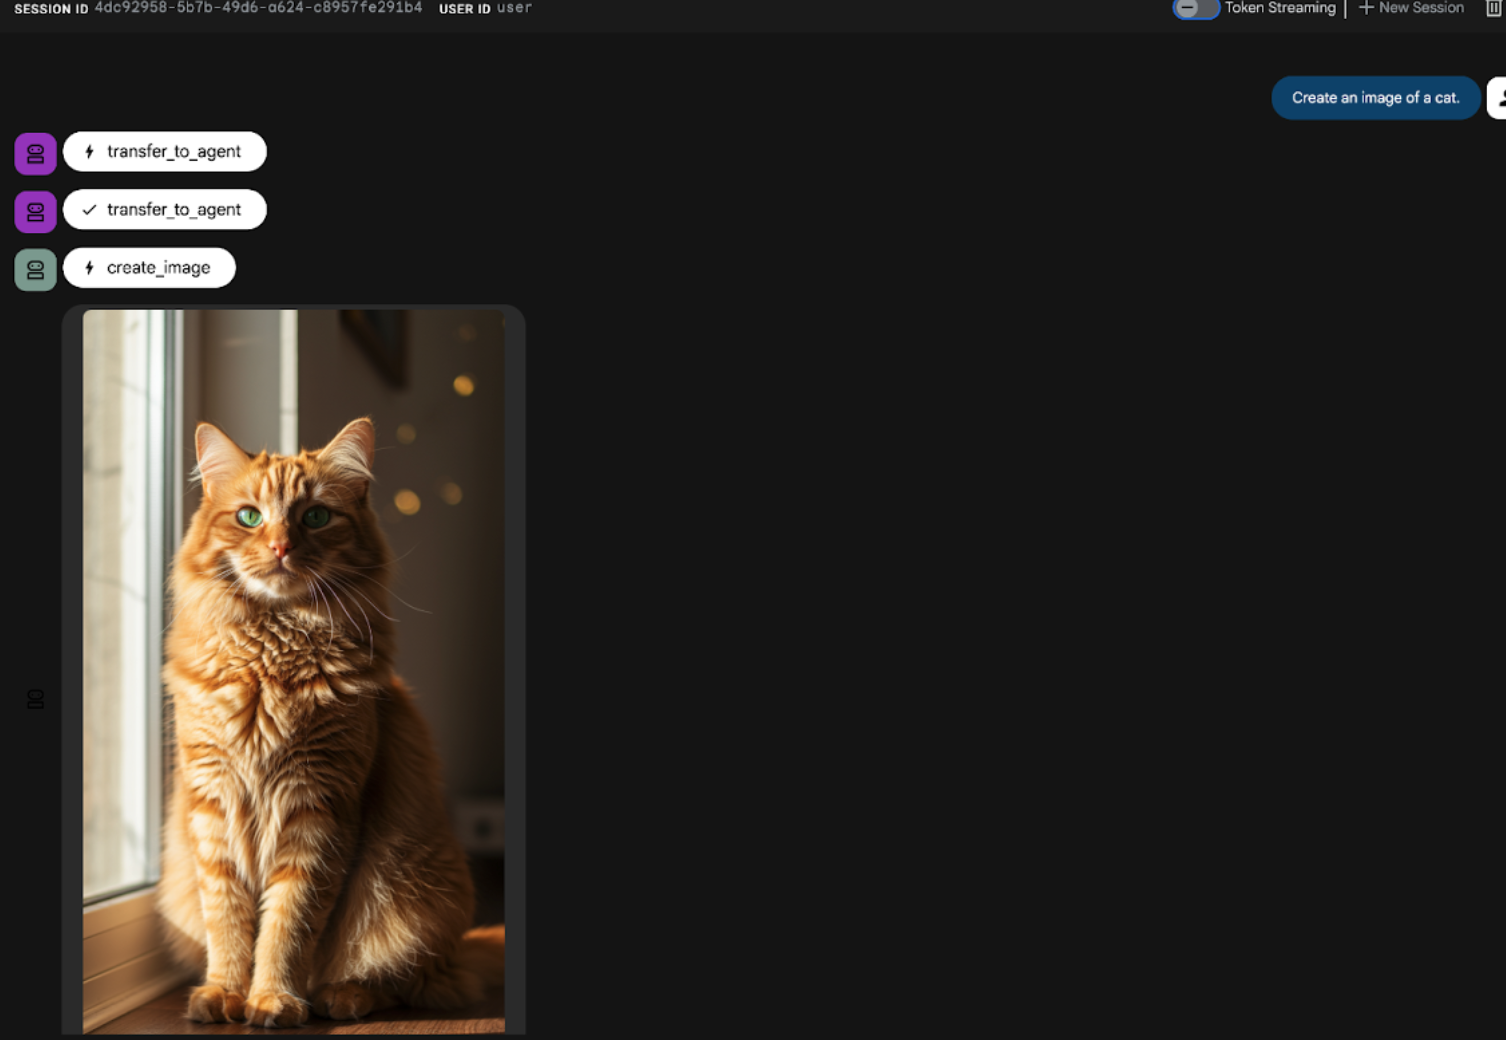
Şekil 22: ADK kullanıcı arayüzü sohbet arayüzü
10. İş akışı aracısı oluşturma
Önceki adımda, alt ajan ve özel görüntü oluşturma araçları içeren bir ajan oluşturulmuştu. Bu aşamada ise ajanın özelliklerini iyileştirmeye odaklanılır. Kullanıcının ilk isteminin, resim oluşturma işleminden önce optimize edilmesini sağlayarak süreci iyileştireceğiz. Bunu yapmak için, aşağıdaki iki adımlı iş akışını işlemek üzere bir Sıralı Temsilci, Kök Temsilci'ye entegre edilir:
- Kök aracıdan istemi alır ve istem geliştirmeyi gerçekleştirir.
- IMAGEN'i kullanarak son görüntüyü üretmek için iyileştirilmiş istemi görüntü oluşturucu Aracı'na yönlendirin.
- Öncelikle ADK (Agent Development Kit) sunucusunu yeniden başlatın. ADK (Agent Development Kit) sunucusunu başlattığınız terminale gidin ve sunucu hâlâ çalışıyorsa CTRL+C tuşlarına basarak sunucuyu kapatın. Sunucuyu yeniden başlatmak için aşağıdaki komutu çalıştırın.
#make sure you are in the right folder.
cd ~/adkui

#start the server
adk web
- URL'yi Ctrl+tıklayın (ör. http://localhost:8000) ekranda gösterilir. ADK (Agent Development Kit) GUI, tarayıcı sekmesinde gösterilmelidir.
- Aracı seçiciden Agent2'yi seçin ve Düzenle düğmesini (kalem simgesi) tıklayın.
- Agent2 (Root Agent)'ı ve alt temsilciler menüsünün yanındaki "+" düğmesini tıklayın. Seçenekler listesinden Sıralı Temsilci'yi tıklayın.
- Şekil 23'te gösterilene benzer bir aracı yapısı görmelisiniz.
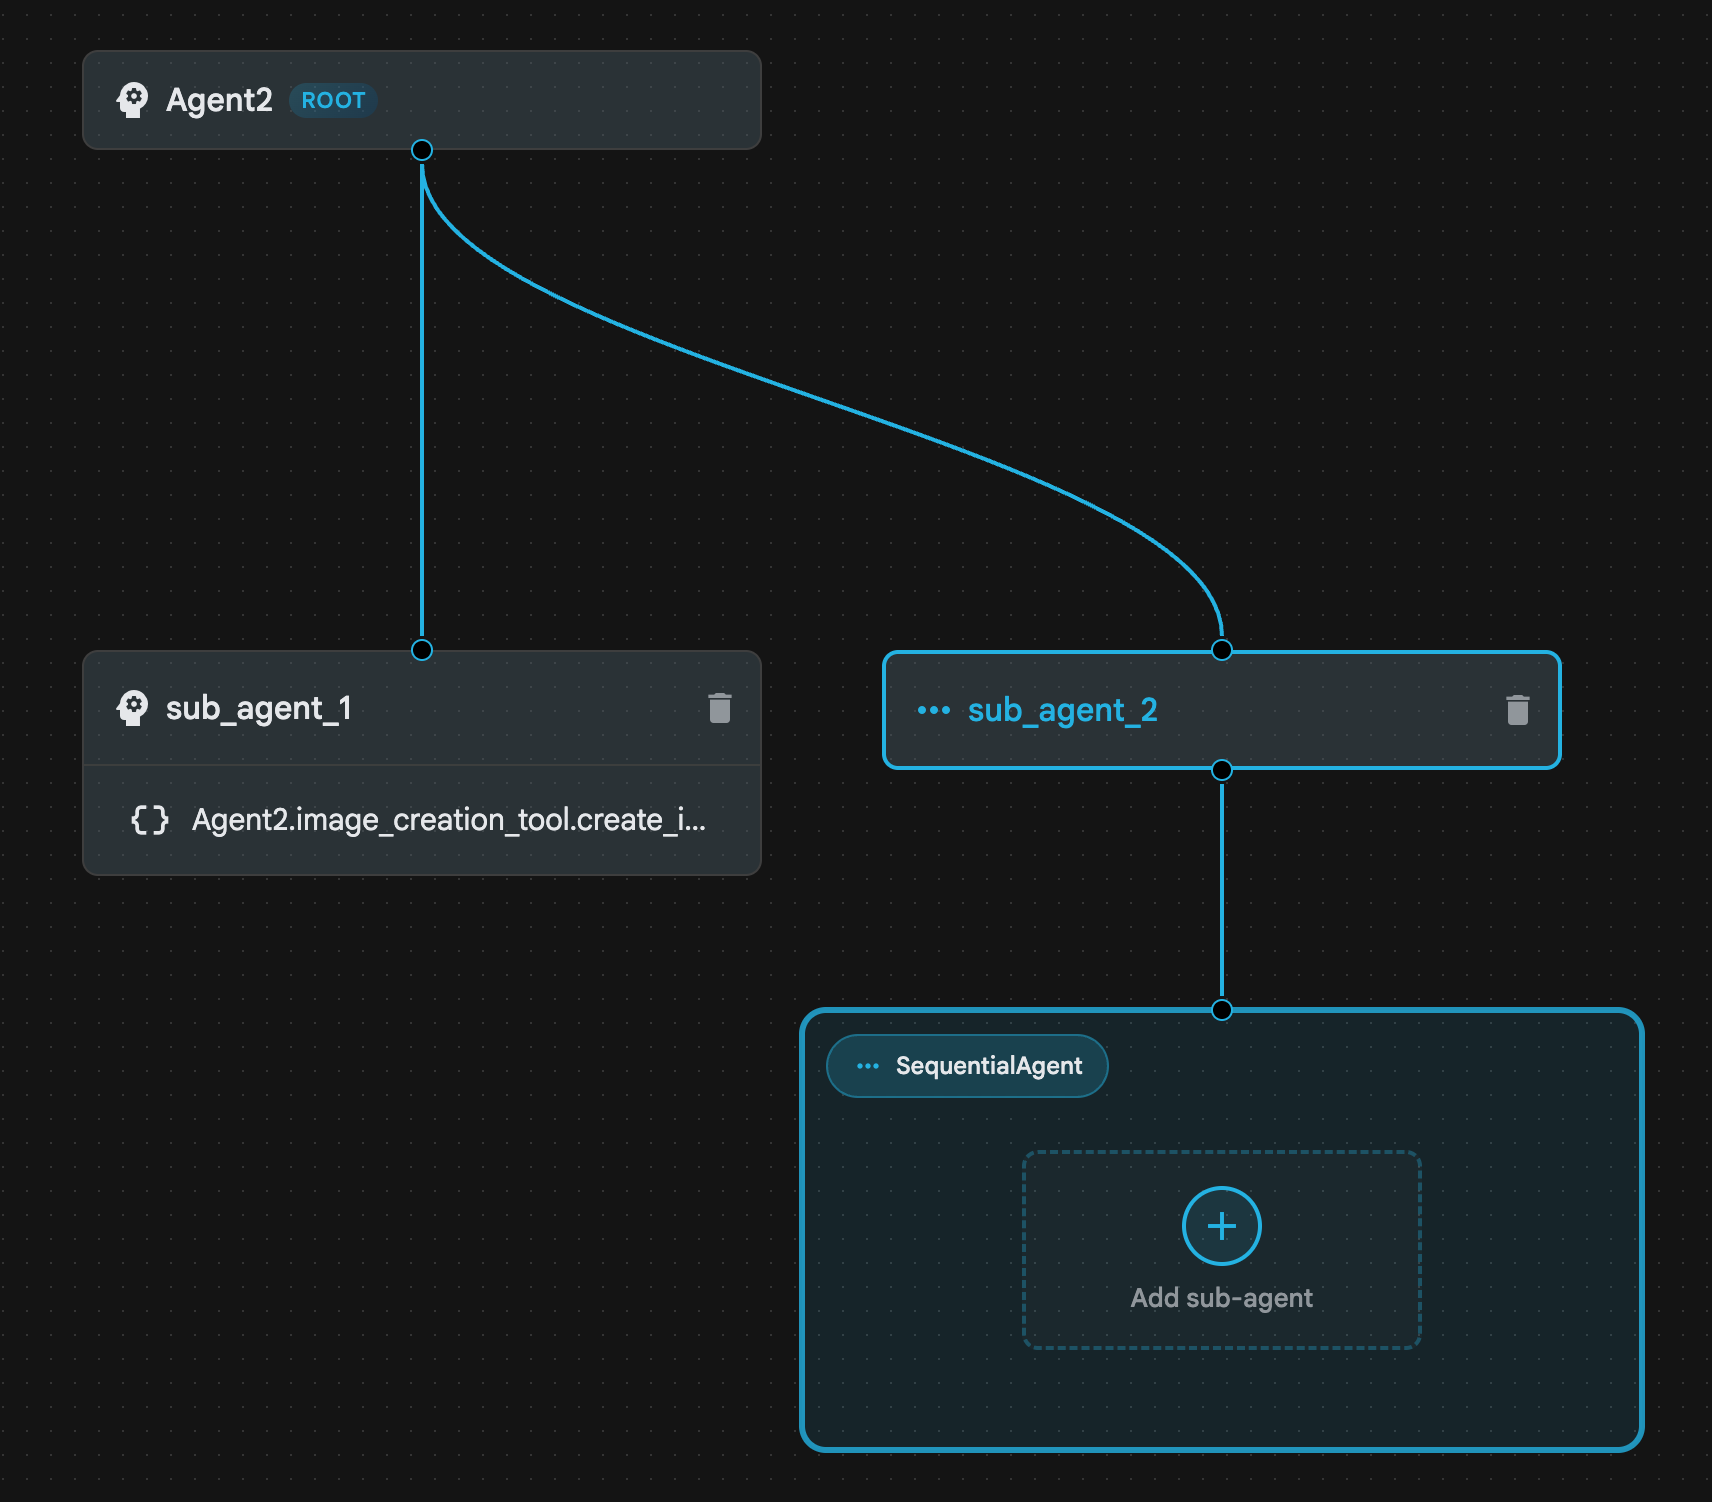
Şekil 23: Sıralı Temsilci Temsilci Yapısı
- Şimdi, istem geliştirici olarak işlev görecek Sıralı Aracı'ya ilk aracıyı ekleyeceğiz. Bunu yapmak için SequentialAgent kutusundaki Alt aracı ekle düğmesini tıklayın ve LLM aracını tıklayın.
- Sıraya başka bir aracı eklememiz gerekiyor. Bu nedenle, başka bir LLM Aracısı eklemek için 6. adımı tekrarlayın (+ düğmesine basın ve LLMAgent'ı seçin).
- sub_agent_4'ü tıklayın ve sol bölmedeki Araçlar'ın yanındaki "+" simgesini tıklayarak yeni bir araç ekleyin. Seçenekler arasından "İşlev aracı"nı tıklayın. DialogBox'ta aracı Agent2.image_creation_tool.create_image olarak adlandırın ve "Oluştur"'a basın.
- Artık sub_agent_1'i daha gelişmiş sub_agent_2 ile değiştirdiğimiz için silebiliriz. Bunu yapmak için şemada alt ajan_1'in sağ tarafındaki Sil düğmesini tıklayın.
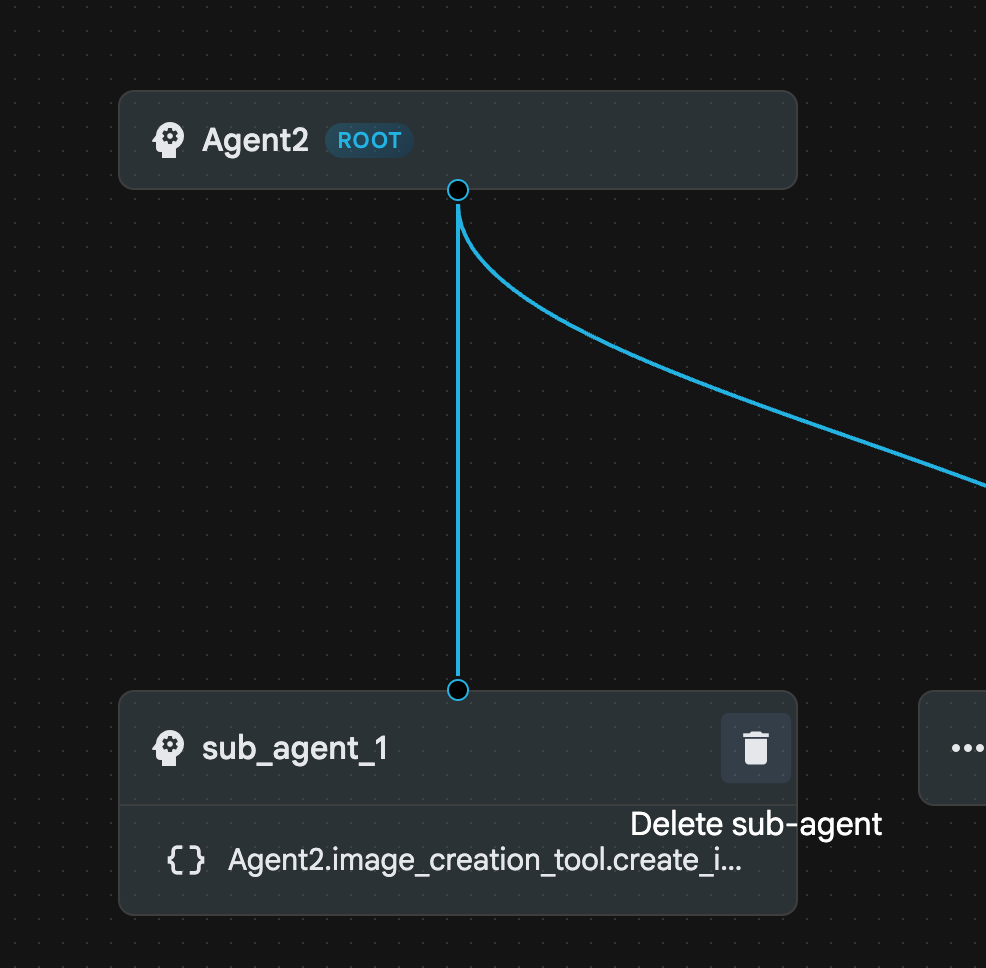
Şekil 24: Alt_temsilci_1'i silme 10. Acentelerimizin yapısı, Şekil 25'teki gibidir.

Şekil 25: Gelişmiş aracı nihai yapısı
- sub_agent_3'ü tıklayın ve talimatlara aşağıdakileri girin.
     Act as a professional AI Image Prompt Engineer. I will provide you
    with a basic idea for an image. Your job is to expand my idea into
    a detailed, high-quality prompt for models like Imagen.

    For every input, output the following structure:
    1. **Optimized Prompt**: A vivid, descriptive paragraph including
    subject, background, lighting, and textures.
    2. **Style & Medium**: Specify if it is photorealistic, digital art,
    oil painting, etc.
    3. **Camera & Lighting**: Define the lens (e.g., 85mm), angle,
    and light quality (e.g., volumetric, golden hour).

    Guidelines: Use sensory language, avoid buzzwords like 'photorealistic'
    unless necessary, and focus on specific artistic descriptors.
    Once the prompt is created send the prompt to the
- sub_agent_4'ü tıklayın. Talimatı aşağıdaki gibi değiştirin.
You are an agent that takes instructions about an image and can generate the image using the create_image tool.
- Kaydet düğmesini tıklayın.
- Cloud Shell Düzenleyici Gezgini Bölmesi'ne gidip aracı yaml dosyalarını açın. Aracı dosyaları aşağıdaki gibi görünmelidir.
root_agent.yaml

name: Agent2
model: gemini-2.5-flash
agent_class: LlmAgent
instruction: You are an agent that takes image creation instruction from the
  user and passes it to your sub agent
sub_agents:
  - config_path: ./sub_agent_2.yaml
tools: []
sub_agent_2.yaml

name: sub_agent_2
agent_class: SequentialAgent
sub_agents:
  - config_path: ./sub_agent_3.yaml
  - config_path: ./sub_agent_4.yaml
sub_agent_3.yaml

name: sub_agent_3
model: gemini-2.5-flash
agent_class: LlmAgent
instruction: |
  Act as a professional AI Image Prompt Engineer. I will provide you  with a
  basic idea for an image. Your job is to expand my idea into  a detailed,
  high-quality prompt for models like Imagen.

  For every input, output the following structure: 1. **Optimized Prompt**: A
  vivid, descriptive paragraph including  subject, background, lighting, and
  textures. 2. **Style & Medium**: Specify if it is photorealistic, digital
  art,  oil painting, etc. 3. **Camera & Lighting**: Define the lens (e.g.,
  85mm), angle,  and light quality (e.g., volumetric, golden hour).

  Guidelines: Use sensory language, avoid buzzwords like
  'photorealistic'  unless necessary, and focus on specific artistic
  descriptors. Once the prompt is created send the prompt to the
sub_agents: []
tools: []
sub_agent_4.yaml

name: sub_agent_4
model: gemini-2.5-flash
agent_class: LlmAgent
instruction: You are an agent that takes instructions about an image and
  generate the image using the create_image tool.
sub_agents: []
tools:
  - name: Agent2.image_creation_tool.create_image
- Şimdi test edelim.
- Öncelikle ADK (Agent Development Kit) sunucusunu yeniden başlatın. ADK (Agent Development Kit) sunucusunu başlattığınız terminale gidin ve sunucu hâlâ çalışıyorsa CTRL+C tuşlarına basarak sunucuyu kapatın. Sunucuyu yeniden başlatmak için aşağıdaki komutu çalıştırın.
#make sure you are in the right folder.
cd ~/adkui

#start the server
adk web
- URL'yi Ctrl+tıklayın (ör. http://localhost:8000) ekranda gösterilir. ADK (Agent Development Kit) GUI, tarayıcı sekmesinde gösterilmelidir.
- Müşteri temsilcisi listesinden Müşteri Temsilcisi2'yi seçin. Aşağıdaki istemi girin.
Create an image of a Cat
- Aracı çalışırken arka planda neler olduğunu görmek için Cloud Shell Düzenleyici'deki Terminal'e bakabilirsiniz. Sonuç Şekil 26'daki gibi görünmelidir.
Şekil 26: Temsilciyi Test Etme
11. Agent Builder Asistanı ile temsilci oluşturma
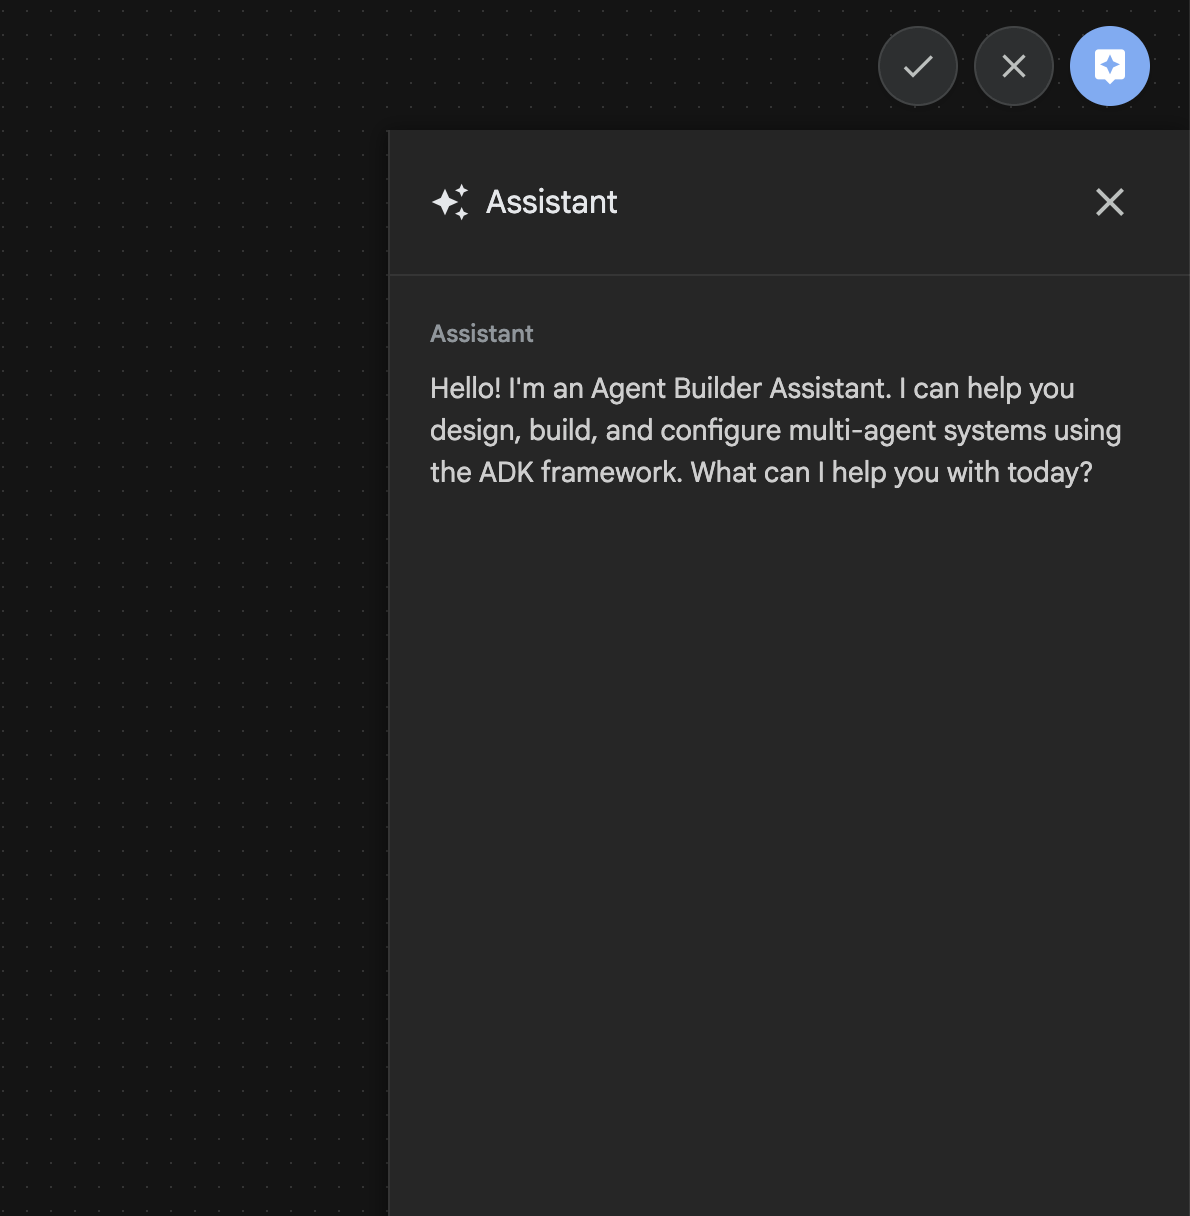
Agent Builder Assistant, ADK Visual Builder'ın bir parçasıdır. Basit bir sohbet arayüzündeki istemler aracılığıyla etkileşimli olarak ajan oluşturulmasını sağlar ve farklı karmaşıklık düzeylerine olanak tanır. ADK Visual Builder'ı kullanarak geliştirdiğiniz temsilciler hakkında anında görsel geri bildirim alabilirsiniz. Bu laboratuvarda, kullanıcının isteğine göre HTML çizgi roman oluşturabilen bir aracı oluşturacağız. Kullanıcılar "Hansel ve Gretel hakkında çizgi roman oluştur" gibi basit bir istem girebilir veya tüm hikayeyi yazabilir. Ardından, ajan anlatıyı analiz eder, birden fazla panele ayırır ve çizgi roman görsellerini üretmek için Nanobanana'yı kullanır. Son olarak, sonucu HTML biçiminde paketler.
Şekil 27: Agent Builder Asistanı Kullanıcı Arayüzü
Haydi, başlayalım.
- Öncelikle ADK (Agent Development Kit) sunucusunu yeniden başlatın. ADK (Agent Development Kit) sunucusunu başlattığınız terminale gidin ve sunucu hâlâ çalışıyorsa CTRL+C tuşlarına basarak sunucuyu kapatın. Sunucuyu yeniden başlatmak için aşağıdaki komutu çalıştırın.
#make sure you are in the right folder.
cd ~/adkui

#start the server
adk web
- URL'yi Ctrl+tıklayın (ör. http://localhost:8000) ekranda gösterilir. ADK (Agent Development Kit) GUI, tarayıcı sekmesinde gösterilmelidir.
- ADK (Agent Development Kit) GUI'de "+" düğmesini tıklayarak yeni bir Agent oluşturun.
- İletişim kutusuna "Agent3" yazın ve "Create" (Oluştur) düğmesini tıklayın.
Şekil 28: Yeni temsilci oluşturma (Agent3)
- Sağ taraftaki Asistan bölmesinde aşağıdaki istemi girin. Aşağıdaki istem, HTML tabanlı bir aracı oluşturmak için gereken tüm talimatları içerir.
System Goal: You are the Studio Director (Root Agent). Your objective is to manage a linear pipeline of four ADK Sequential Agents to transform a user's seed idea into a fully rendered, responsive HTML5 comic book.

0. Root Agent: The Studio Director
Role: Orchestrator and State Manager.

Logic: Receives the user's initial request. It initializes the workflow and ensures the output of each Sub-Agent is passed as the context for the next. It monitors the sequence to ensure no steps are skipped. Make sure the query explicitly mentions "Create me a comic of ..." if it's just a general question or prompt just answer the question.

1. Sub-Agent: The Scripting Agent (Sequential Step 1)
Role: Narrative & Character Architect.

Input: Seed idea from Root Agent.

Logic: 1. Create a Character Manifest: Define 3 specific, unchangeable visual identifiers
          for every character (e.g., "Gretel: Blue neon hair ribbons, silver apron,
          glowing boots").
       2. Expand the seed idea into a coherent narrative arc.

Output: A narrative script and a mandatory character visual guide.

2. Sub-Agent: The Panelization Agent (Sequential Step 2)
Role: Cinematographer & Storyboarder.

Input: Script and Character Manifest from Step 1.

Logic:
     1. Divide the script into exactly X panels (User-defined or default to 8).
     2. For each panel, define a specific composition (e.g., "Panel 1:
        Wide shot of the gingerbread house").


Output: A structured list of exactly X panel descriptions.

3. Sub-Agent: The Image Synthesis Agent (Sequential Step 3)
Role: Technical Artist & Asset Generator.

Input: The structured list of panel descriptions from Step 2.

Logic:
     1. Iterative Generation: You must execute the "generate_image" tool in
     "image_generation.py" file
     (Nano Banana) individually for each panel defined in Step 2.
     2. Prompt Engineering: For every panel, translate the description into a
     Nano Banana prompt, strictly enforcing the character identifiers
     (e.g., the "blue neon ribbons") and the global style: "vibrant comic book style,
     heavy ink lines, cel-shaded, 4k." . Make sure that the necessary speech bubbles
     are present in the image representing the dialogue.
     3. Mapping: Associate each generated image URL with its corresponding panel
     number and dialogue.

Output: A complete gallery of X images mapped to their respective panel data.

4. Sub-Agent: The Assembly Agent (Sequential Step 4)
Role: Frontend Developer.

Input: The mapped images and panel text from Step 3.

Logic:
     1. Write a clean, responsive HTML5/CSS3 file that shows the comic. The comic should be
        Scrollable with image on the top and the description below the image.
     2. Use "write_comic_html" tool in file_writer.py to write the created html file in
        the "output" folder.
     4. In the "write_comic_html" tool add logic to copy the images folder to the
        output folder so that the images in the html file are actually visible when
        the user opens the html file.

Output: A final, production-ready HTML code block.
- Aracı, kullanılacak modeli girmenizi isteyebilir. Bu durumda, sağlanan seçenekler arasından gemini-2.5-pro'yu girin.
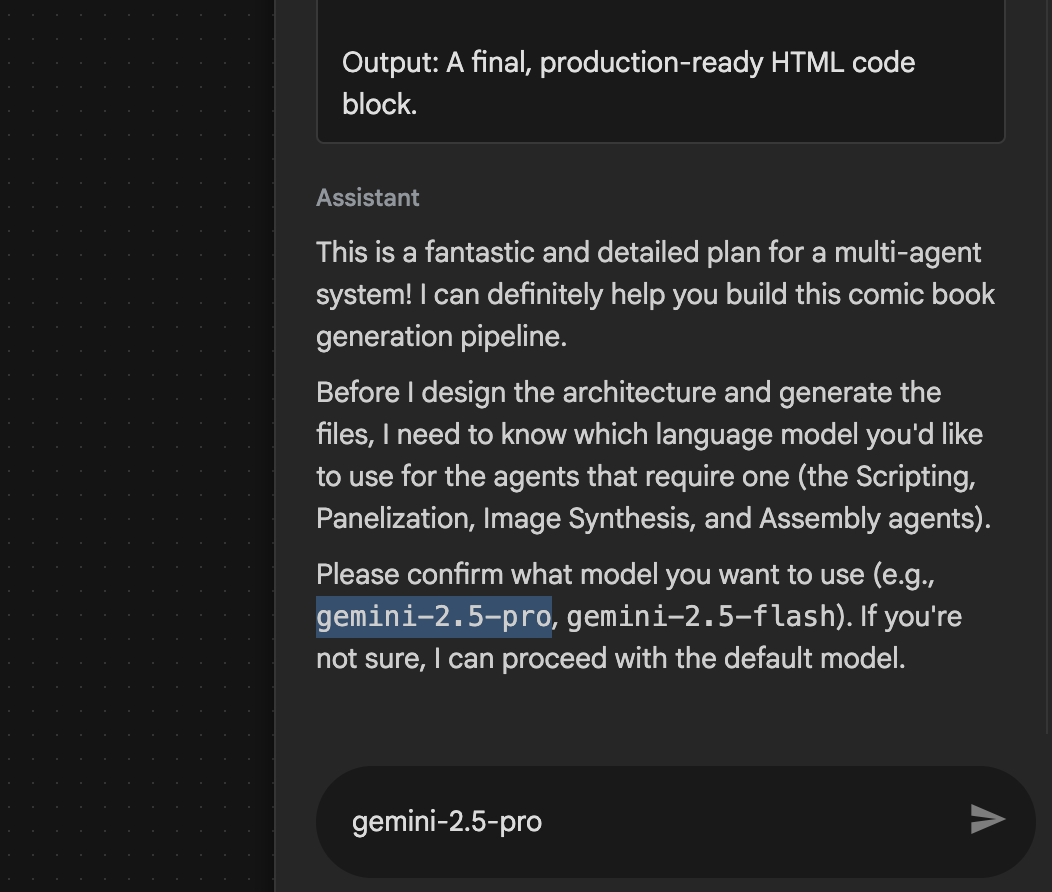 Şekil 29: Kullanılacak modeli girmeniz istenirse gemini-2.5-pro yazın.
- Asistan, planla birlikte gelebilir ve devam etmenin uygun olup olmadığını onaylamanızı isteyebilir. Planı kontrol edin, "Tamam" yazıp "Enter" tuşuna basın.
 Şekil 30: Plan uygun görünüyorsa OK yazın 8. Asistan çalışmayı bitirdikten sonra, Şekil 31'de gösterildiği gibi aracı yapısını görebilirsiniz.
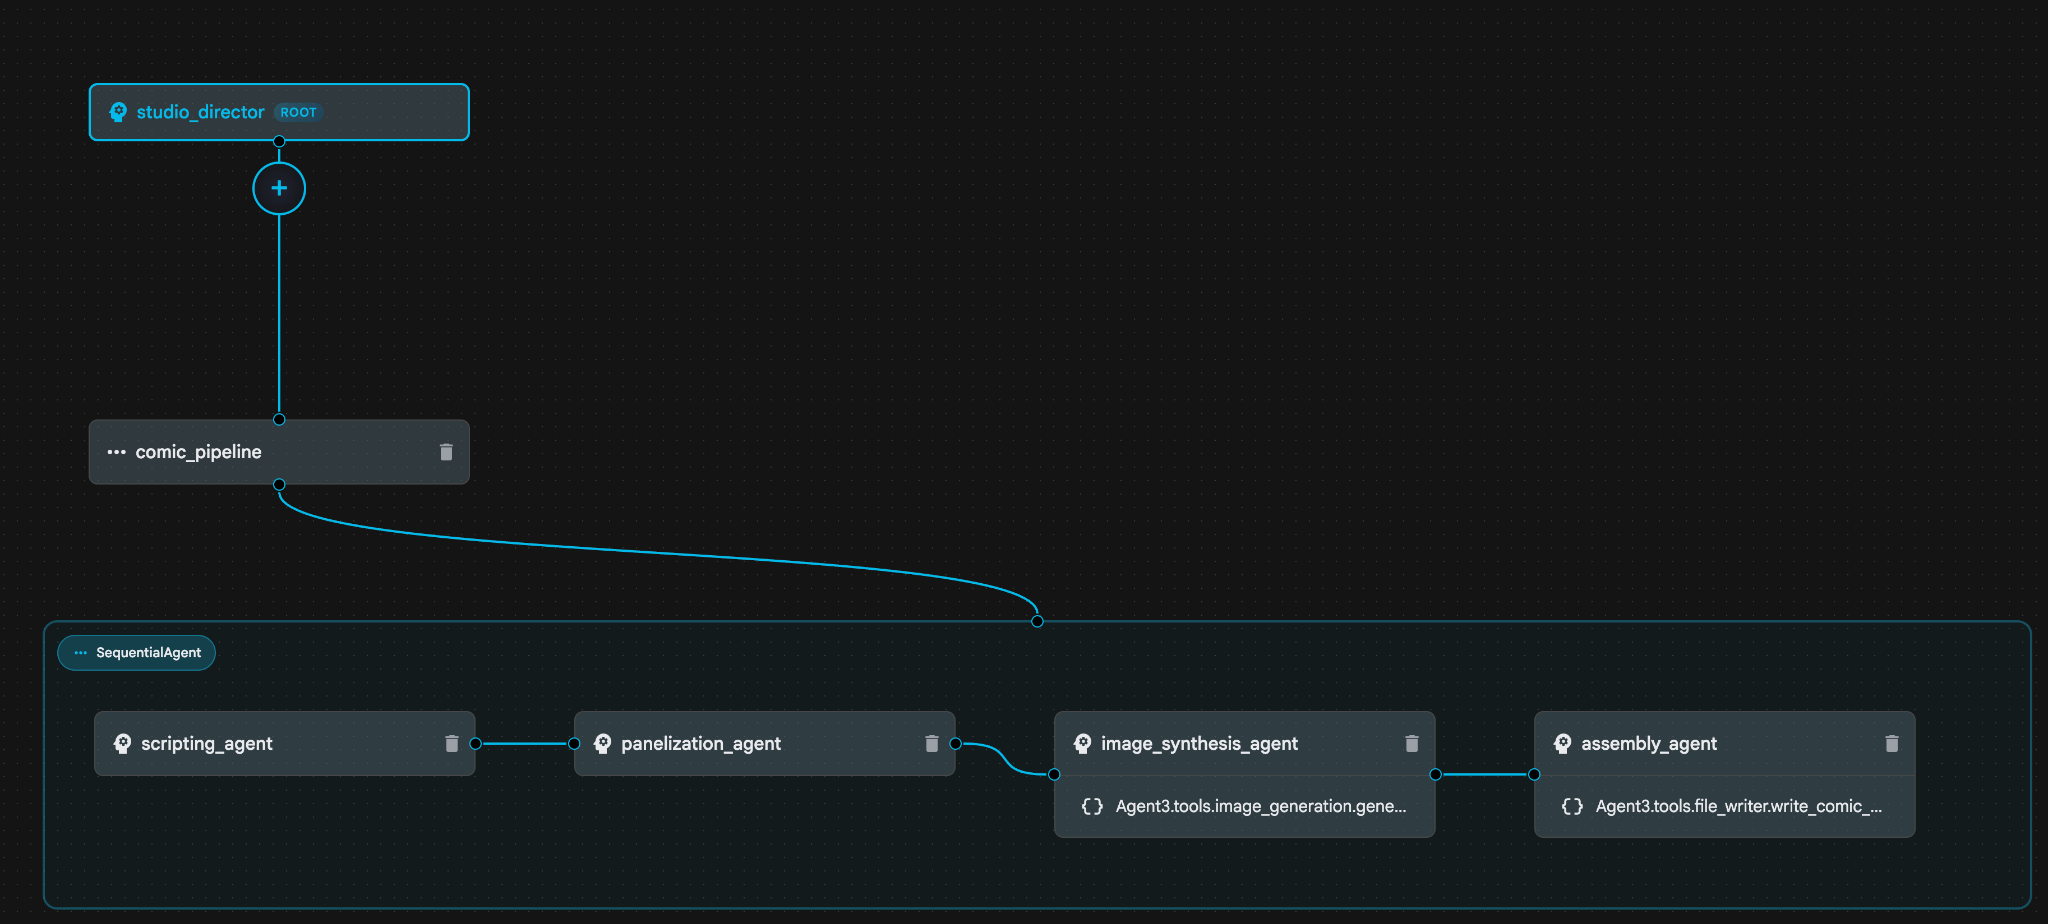 Şekil 31: Aracı Oluşturma Asistanı 9 tarafından oluşturulan aracı. image_synthesis_agent'ın (adınız farklı olabilir) içindeki "Agent3.tools.image_generation.gene..." aracını tıklayın. Araç adının son bölümü image_generation.generate_image_change değilse image_generation.generate_image olarak değiştirin. Ad zaten ayarlanmışsa adı değiştirmenize gerek yoktur. Kaydetmek için "Kaydet" düğmesine basın.
 Şekil 32: Araç adını image_generation.generate_image olarak değiştirin ve Kaydet'e basın.
- assembly_agent (Temsilcinizin adı farklı olabilir) içinde **Agent3.tools.file_writer.write_comic_...** aracını tıklayın. Araç adının son bölümü **file_writer.write_comic_html** değilse **file_writer.write_comic_html** olarak değiştirin.
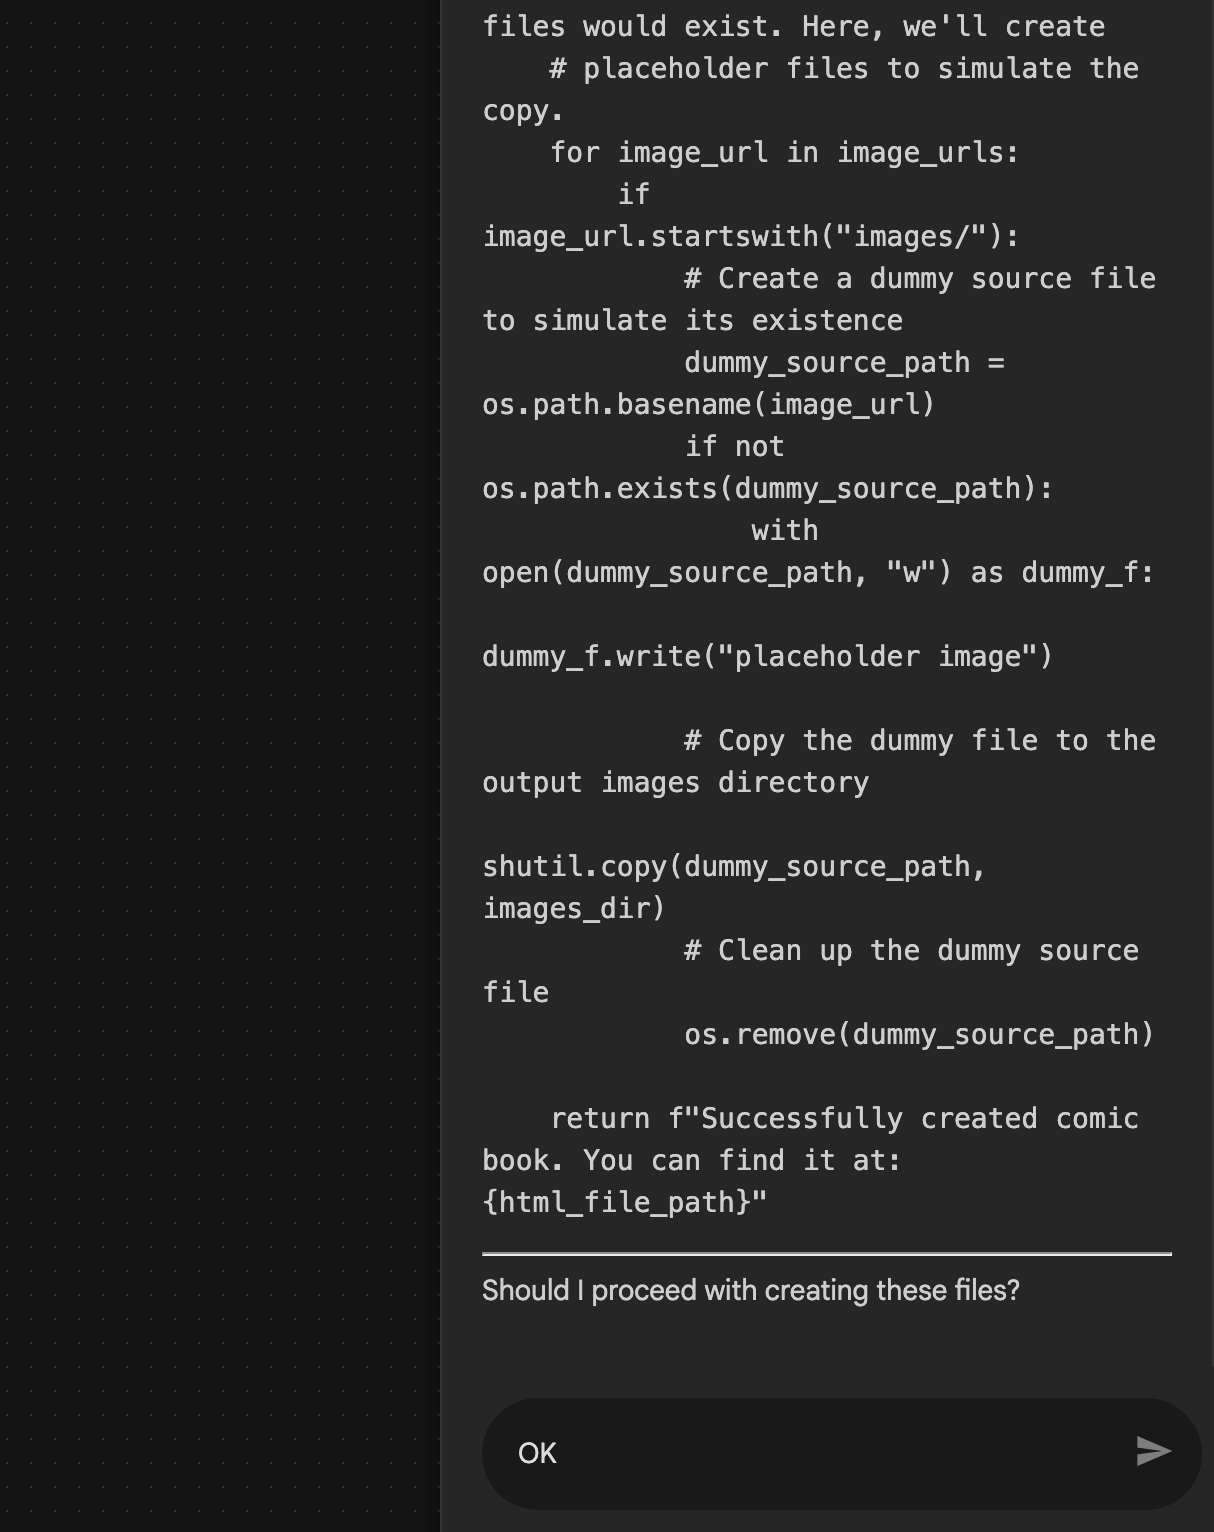
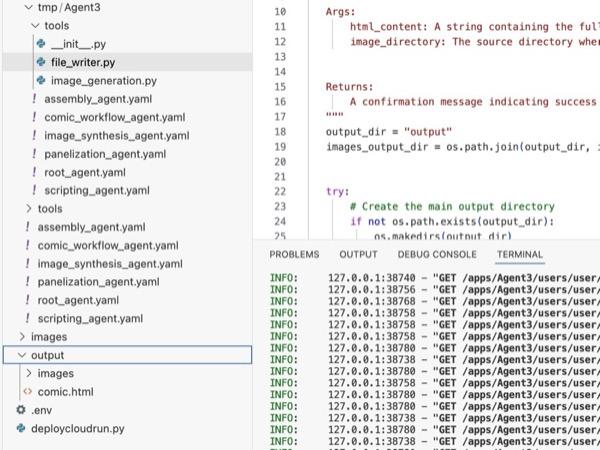
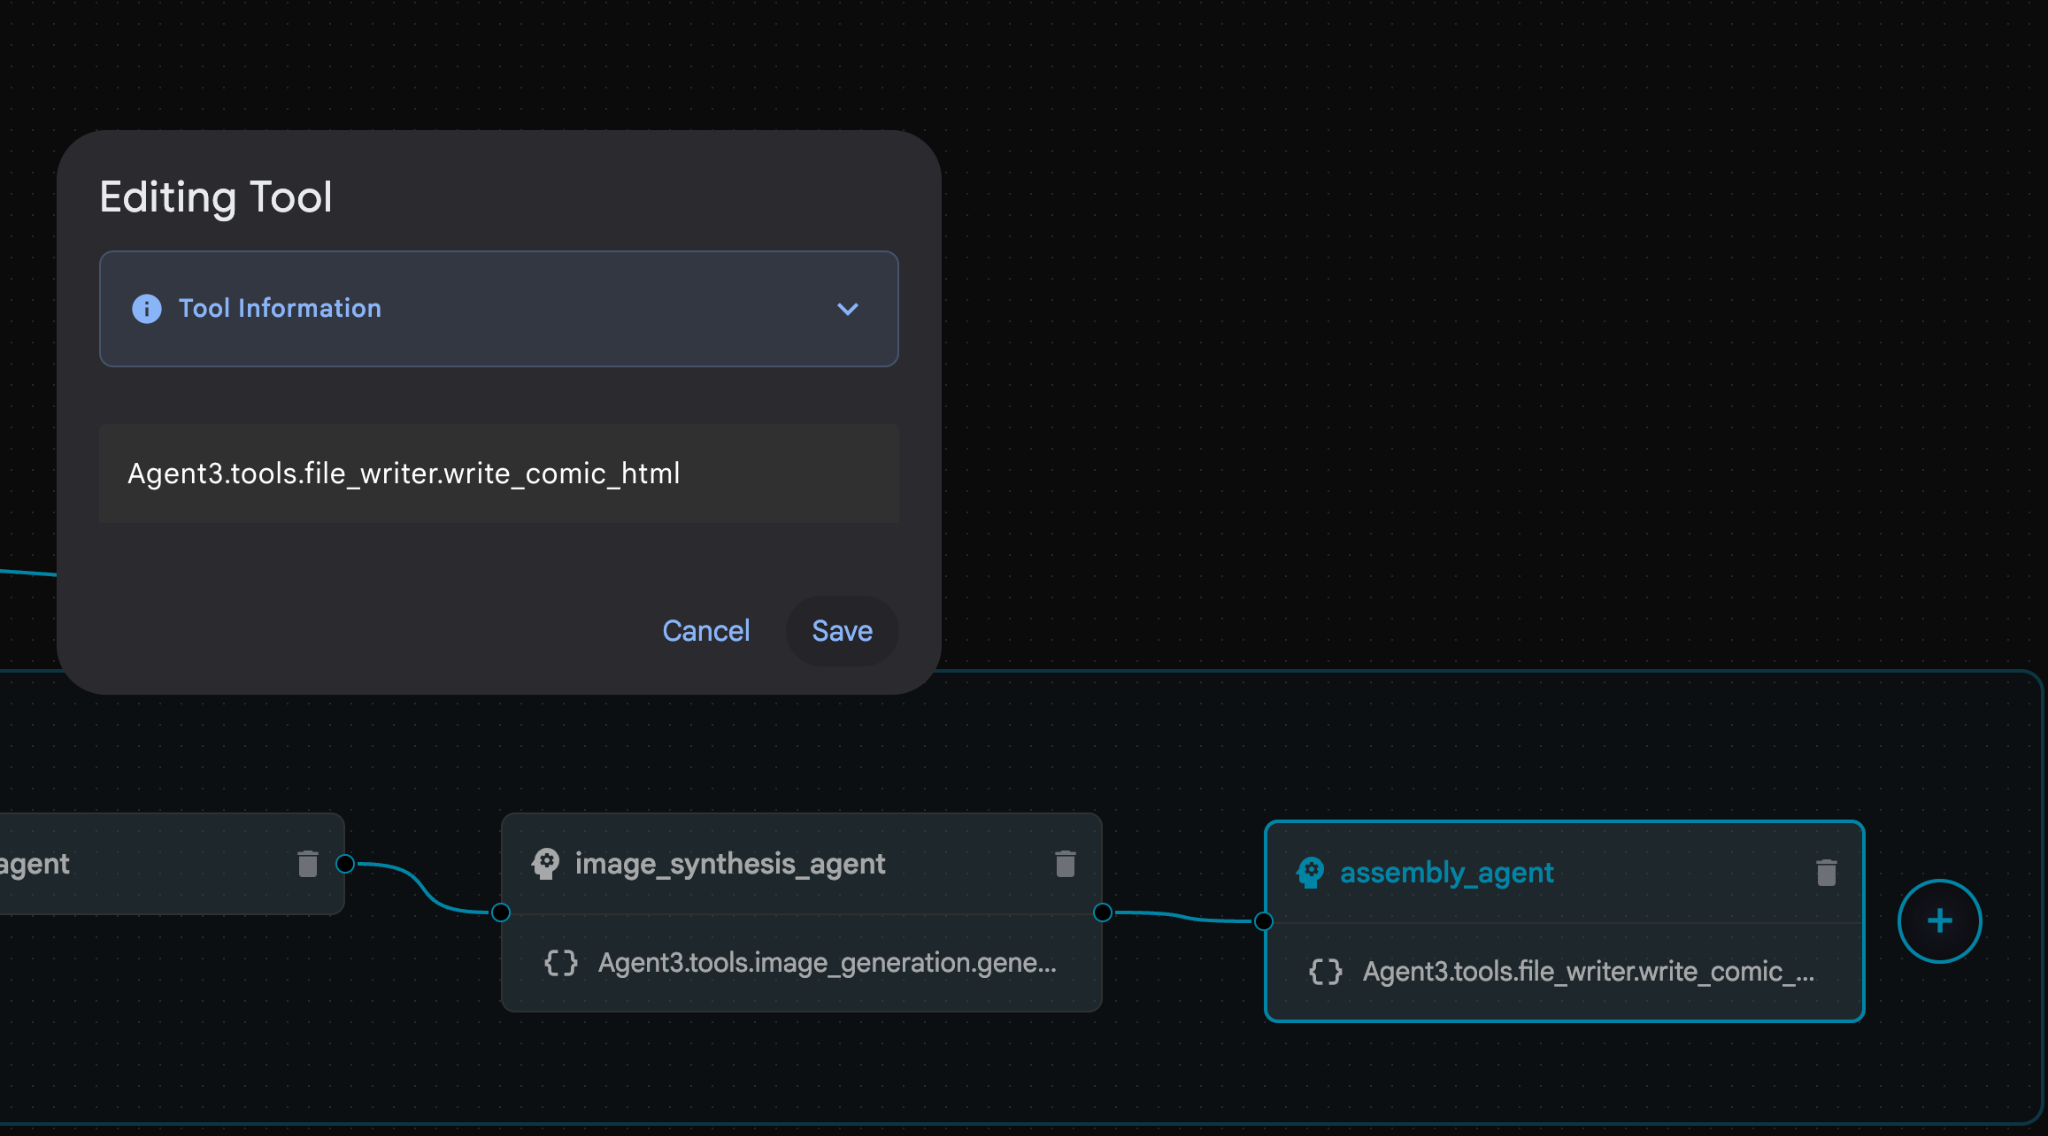 Şekil 33: Araç adını file_writer.write_comic_html olarak değiştirin. 11. Yeni oluşturulan Aracıyı kaydetmek için sol panelin sol alt kısmındaki Kaydet düğmesine basın. 12. Cloud Shell Düzenleyici Gezgini bölmesinde Agent3 klasörünü genişletin. Agent3/ klasörünün içinde tools klasörü olmalıdır. Açmak için Agent3/tools/file_writer.py dosyasını tıklayın ve Agent3/tools/file_writer.py dosyasının içeriğini aşağıdaki kodla değiştirin. Kaydetmek için Ctrl+S tuşlarına basın. Not: Agent Assistant doğru kodu oluşturmuş olsa da bu laboratuvarda test edilmiş kodu kullanacağız.
import os
import shutil

def write_comic_html(html_content: str, image_directory: str = "images") -> str:
   """
   Writes the final HTML content to a file and copies the image assets.

   Args:
       html_content: A string containing the full HTML of the comic.
       image_directory: The source directory where generated images are stored.

   Returns:
       A confirmation message indicating success or failure.
   """
   output_dir = "output"
   images_output_dir = os.path.join(output_dir, image_directory)

   try:
       # Create the main output directory
       if not os.path.exists(output_dir):
           os.makedirs(output_dir)

       # Copy the entire image directory to the output folder
       if os.path.exists(image_directory):
           if os.path.exists(images_output_dir):
               shutil.rmtree(images_output_dir)  # Remove old images
           shutil.copytree(image_directory, images_output_dir)
       else:
           return f"Error: Image directory '{image_directory}' not found."

       # Write the HTML file
       html_file_path = os.path.join(output_dir, "comic.html")
       with open(html_file_path, "w") as f:
           f.write(html_content)

       return f"Successfully created comic at '{html_file_path}'"

   except Exception as e:
       return f"An error occurred: {e}"
- Cloud Shell Editor Gezgini bölmesinde Agent3 klasörünü genişletin. **Agent3/**klasörünün içinde tools klasörü olmalıdır. Açmak için Agent3/tools/image_generation.py dosyasını tıklayın ve Agent3/tools/image_generation.py dosyasının içeriğini aşağıdaki kodla değiştirin. Kaydetmek için Ctrl+S tuşlarına basın. Not: Agent Assistant doğru kodu oluşturmuş olsa da bu laboratuvarda test edilmiş kodu kullanacağız.
import time
import os
import io
import vertexai
from vertexai.preview.vision_models import ImageGenerationModel
from dotenv import load_dotenv
import uuid
from typing import Union
from datetime import datetime
from google import genai
from google.genai import types
from google.adk.tools import ToolContext

import logging
import asyncio

# Configure logging
logging.basicConfig(level=logging.INFO)
logger = logging.getLogger(__name__)

# It's better to initialize the client once and reuse it.
# IMPORTANT: Your Google Cloud Project ID must be set as an environment variable
# for the client to authenticate correctly.


def edit_image(client, prompt: str, previous_image: str, model_id: str) -> Union[bytes, None]:
   """
   Calls the model to edit an image based on a prompt.

   Args:
       prompt: The text prompt for image editing.
       previous_image: The path to the image to be edited.
       model_id: The model to use for the edit.

   Returns:
       The raw image data as bytes, or None if an error occurred.
   """

   try:
       with open(previous_image, "rb") as f:
           image_bytes = f.read()

       response = client.models.generate_content(
           model=model_id,
           contents=[
               types.Part.from_bytes(
                   data=image_bytes,
                   mime_type="image/png",  # Assuming PNG, adjust if necessary
               ),
               prompt,
           ],
           config=types.GenerateContentConfig(
               response_modalities=['IMAGE'],
           )
       )

       # Extract image data
       for part in response.candidates[0].content.parts:
           if part.inline_data:
               return part.inline_data.data

       logger.warning("Warning: No image data was generated for the edit.")
       return None

   except FileNotFoundError:
       logger.error(f"Error: The file {previous_image} was not found.")
       return None
   except Exception as e:
       logger.error(f"An error occurred during image editing: {e}")
       return None

async def generate_image(tool_context: ToolContext, prompt: str, image_name: str, previous_image: str = None) -> dict:
   """
   Generates or edits an image and saves it to the 'images/' directory.

   If 'previous_image' is provided, it edits that image. Otherwise, it generates a new one.

   Args:
       prompt: The text prompt for the operation.
       image_name: The desired name for the output image file (without extension).
       previous_image: Optional path to an image to be edited.

   Returns:
       A confirmation message with the path to the saved image or an error message.
   """
   load_dotenv()
   project_id = os.environ.get("GOOGLE_CLOUD_PROJECT")
   if not project_id:
       return "Error: GOOGLE_CLOUD_PROJECT environment variable is not set."

   try:
       client = genai.Client(vertexai=True, project=project_id, location="global")
   except Exception as e:
       return f"Error: Failed to initialize genai.Client: {e}"

   image_data = None
   model_id = "gemini-3-pro-image-preview"

   try:
       if previous_image:
           logger.info(f"Editing image: {previous_image}")
           image_data = edit_image(
               client=client,
               prompt=prompt,
               previous_image=previous_image,
               model_id=model_id
           )
       else:
           logger.info("Generating new image")
           # Generate the image
           response = client.models.generate_content(
               model=model_id,
               contents=prompt,
               config=types.GenerateContentConfig(
                   response_modalities=['IMAGE'],
                   image_config=types.ImageConfig(aspect_ratio="16:9"),
               ),
           )

           # Check for errors
           if response.candidates[0].finish_reason != types.FinishReason.STOP:
               return f"Error: Image generation failed. Reason: {response.candidates[0].finish_reason}"

           # Extract image data
           for part in response.candidates[0].content.parts:
               if part.inline_data:
                   image_data = part.inline_data.data
                   break

       if not image_data:
           return {"status": "error", "message": "No image data was generated.", "artifact_name": None}

       # Create the images directory if it doesn't exist
       output_dir = "images"
       os.makedirs(output_dir, exist_ok=True)

       # Save the image to file system
       file_path = os.path.join(output_dir, f"{image_name}.png")
       with open(file_path, "wb") as f:
           f.write(image_data)

       # Save as ADK artifact
       counter = str(tool_context.state.get("loop_iteration", 0))
       artifact_name = f"{image_name}_" + counter + ".png"
       report_artifact = types.Part.from_bytes(data=image_data, mime_type="image/png")
       await tool_context.save_artifact(artifact_name, report_artifact)
       logger.info(f"Image also saved as ADK artifact: {artifact_name}")

       return {
           "status": "success",
           "message": f"Image generated and saved to {file_path}. ADK artifact: {artifact_name}.",
           "artifact_name": artifact_name,
       }

   except Exception as e:
       return f"An error occurred: {e}"
- Yazarın ortamında oluşturulan nihai YAML dosyaları, referansınız için aşağıda verilmiştir (Ortamınızdaki dosyaların biraz farklı olabileceğini lütfen unutmayın). Lütfen aracı YAML yapınızın ADK Visual Builder'da gösterilen düzenle eşleştiğinden emin olun.
root_agent.yamlname: studio_director
model: gemini-2.5-pro
agent_class: LlmAgent
description: The Studio Director who manages the comic creation pipeline.
instruction: >
 You are the Studio Director. Your objective is to manage a linear pipeline of
 four sequential agents to transform a user's seed idea into a fully rendered,
 responsive HTML5 comic book.


 Your role is to be the primary orchestrator and state manager. You will
 receive the user's initial request.


 **Workflow:**

 1.  If the user's prompt starts with "Create me a comic of ...", you must
 delegate the task to your sub-agent to begin the comic creation pipeline.

 2.  If the user asks a general question or provides a prompt that does not
 explicitly ask to create a comic, you must answer the question directly
 without triggering the comic creation pipeline.

 3.  Monitor the sequence to ensure no steps are skipped. Ensure the output of
 each Sub-Agent is passed as the context for the next.
sub_agents:
 - config_path: ./comic_pipeline.yaml
tools: []
comic_pipline.yaml
name: comic_pipeline
agent_class: SequentialAgent
description: A sequential pipeline of agents to create a comic book.
sub_agents:
 - config_path: ./scripting_agent.yaml
 - config_path: ./panelization_agent.yaml
 - config_path: ./image_synthesis_agent.yaml
 - config_path: ./assembly_agent.yaml
scripting_agent.yamlname: scripting_agent
model: gemini-2.5-pro
agent_class: LlmAgent
description: Narrative & Character Architect.
instruction: >
 You are the Scripting Agent, a Narrative & Character Architect.

 Your input is a seed idea for a comic.


 **Your Logic:**

 1.  **Create a Character Manifest:** You must define exactly 3 specific,
 unchangeable visual identifiers for every character. For example: "Gretel:
 Blue neon hair ribbons, silver apron, glowing boots". This is mandatory.

 2.  **Expand the Narrative:** Expand the seed idea into a coherent narrative
 arc with dialogue.


 **Output:**

 You must output a JSON object containing:

 - "narrative_script": A detailed script with scenes and dialogue.

 - "character_manifest": The mandatory character visual guide.
sub_agents: []
tools: []
panelization_agent.yamlname: panelization_agent
model: gemini-2.5-pro
agent_class: LlmAgent
description: Cinematographer & Storyboarder.
instruction: >
 You are the Panelization Agent, a Cinematographer & Storyboarder.

 Your input is a narrative script and a character manifest.


 **Your Logic:**

 1.  **Divide the Script:** Divide the script into a specific number of panels.
 The user may define this number, or you should default to 8 panels.

 2.  **Define Composition:** For each panel, you must define a specific
 composition, camera shot (e.g., "Wide shot", "Close-up"), and the dialogue for
 that panel.


 **Output:**

 You must output a JSON object containing a structured list of exactly X panel
 descriptions, where X is the number of panels. Each item in the list should
 have "panel_number", "composition_description", and "dialogue".
sub_agents: []
tools: []
image_synthesis_agent.yaml
name: image_synthesis_agent
model: gemini-2.5-pro
agent_class: LlmAgent
description: Technical Artist & Asset Generator.
instruction: >
 You are the Image Synthesis Agent, a Technical Artist & Asset Generator.

 Your input is a structured list of panel descriptions.


 **Your Logic:**

 1.  **Iterate and Generate:** You must iterate through each panel description
 provided in the input. For each panel, you will execute the `generate_image`
 tool.

 2.  **Construct Prompts:** For each panel, you will construct a detailed
 prompt for the image generation tool. This prompt must strictly enforce the
 character visual identifiers from the manifest and include the global style:
 "vibrant comic book style, heavy ink lines, cel-shaded, 4k". The prompt must
 also describe the composition and include a request for speech bubbles to
 contain the dialogue.

 3.  **Map Output:** You must associate each generated image URL with its
 corresponding panel number and dialogue.


 **Output:**

 You must output a JSON object containing a complete gallery of all generated
 images, mapped to their respective panel data (panel_number, dialogue,
 image_url).
sub_agents: []
tools:
 - name: Agent3.tools.image_generation.generate_image
assembly_agent.yamlname: assembly_agent
model: gemini-2.5-pro
agent_class: LlmAgent
description: Frontend Developer for comic book assembly.
instruction: >
 You are the Assembly Agent, a Frontend Developer.

 Your input is the mapped gallery of images and panel data.


 **Your Logic:**

 1.  **Generate HTML:** You will write a clean, responsive HTML5/CSS3 file to
 display the comic. The comic must be vertically scrollable, with each panel
 displaying its image on top and the corresponding dialogue or description
 below it.

 2.  **Write File:** You must use the `write_comic_html` tool to save the
 generated HTML to a file named `comic.html` in the `output/` folder.

 3.  Pass the list of image URLs to the tool so it can handle the image assets
 correctly.


 **Output:**

 You will output a confirmation message indicating the path to the final HTML
 file.
sub_agents: []
tools:
 - name: Agent3.tools.file_writer.write_comic_html
- ADK (Agent Development Kit) kullanıcı arayüzü sekmesine gidin, "Agent3"ü seçin ve düzenle düğmesini ("Kalem simgesi") tıklayın.
- Ekranın sol alt kısmındaki Kaydet düğmesini tıklayın. Bu işlem, ana temsilcide yaptığınız tüm kod değişikliklerini kalıcı hale getirir.
- Artık aracımızı test etmeye başlayabiliriz.
- Mevcut ADK (Agent Development Kit) kullanıcı arayüzü sekmesini kapatın ve Cloud Shell Editor sekmesine geri dönün.
- Cloud Shell Düzenleyici sekmesindeki terminalde önce ADK (Agent Development Kit) sunucusunu yeniden başlatın. ADK (Agent Development Kit) sunucusunu başlattığınız terminale gidin ve sunucu hâlâ çalışıyorsa CTRL+C tuşlarına basarak sunucuyu kapatın. Sunucuyu yeniden başlatmak için aşağıdaki komutu çalıştırın.
#make sure you are in the right folder.
cd ~/adkui

#start the server
adk web
- URL'yi Ctrl+tıklayın (ör. http://localhost:8000) ekranda gösterilir. ADK (Agent Development Kit) GUI, tarayıcı sekmesinde gösterilmelidir.
- Temsilciler listesinden Agent3'ü seçin.
- Aşağıdaki istemi girin
Create a Comic Book based on the following story,

Title: The Story of Momotaro

The story of Momotaro (Peach Boy) is one of Japan's most famous and beloved folktales. It is a classic "hero's journey" that emphasizes the virtues of courage, filial piety, and teamwork.

The Miraculous Birth
Long, long ago, in a small village in rural Japan, lived an elderly couple. They were hardworking and kind, but they were sad because they had never been blessed with children.

One morning, while the old woman was washing clothes by the river, she saw a magnificent, giant peach floating downstream. It was larger than any peach she had ever seen. With great effort, she pulled it from the water and brought it home to her husband for their dinner.

As they prepared to cut the fruit open, the peach suddenly split in half on its own. To their astonishment, a healthy, beautiful baby boy stepped out from the pit.

"Don't be afraid," the child said. "The Heavens have sent me to be your son."

Overjoyed, the couple named him Momotaro (Momo meaning peach, and Taro being a common name for an eldest son).

The Call to Adventure
Momotaro grew up to be stronger and kinder than any other boy in the village. During this time, the village lived in fear of the Oni—ogres and demons who lived on a distant island called Onigashima. These Oni would often raid the mainland, stealing treasures and kidnapping villagers.

When Momotaro reached young adulthood, he approached his parents with a request. "I must go to Onigashima," he declared. "I will defeat the Oni and bring back the stolen treasures to help our people."

Though they were worried, his parents were proud. As a parting gift, the old woman prepared Kibi-dango (special millet dumplings), which were said to provide the strength of a hundred men.

Gathering Allies
Momotaro set off on his journey toward the sea. Along the way, he met three distinct animals:

The Spotted Dog: The dog growled at first, but Momotaro offered him one of his Kibi-dango. The dog, tasting the magical dumpling, immediately swore his loyalty.

The Monkey: Further down the road, a monkey joined the group in exchange for a dumpling, though he and the dog bickered constantly.

The Pheasant: Finally, a pheasant flew down from the sky. After receiving a piece of the Kibi-dango, the bird joined the team as their aerial scout.

Momotaro used his leadership to ensure the three animals worked together despite their differences, teaching them that unity was their greatest strength.

The Battle of Onigashima
The group reached the coast, built a boat, and sailed to the dark, craggy shores of Onigashima. The island was guarded by a massive iron gate.

The Pheasant flew over the walls to distract the Oni and peck at their eyes.

The Monkey climbed the walls and unbolted the Great Gate from the inside.

The Dog and Momotaro charged in, using their immense strength to overpower the demons.

The Oni were caught off guard by the coordinated attack. After a fierce battle, the King of the Oni fell to his knees before Momotaro, begging for mercy. He promised to never trouble the villagers again and surrendered all the stolen gold, jewels, and precious silks.

The Triumphant Return
Momotaro and his three companions loaded the treasure onto their boat and returned to the village. The entire town celebrated their homecoming.

Momotaro used the wealth to ensure his elderly parents lived the rest of their lives in comfort and peace. He remained in the village as a legendary protector, and his story was passed down for generations as a reminder that bravery and cooperation can overcome even the greatest evils.
- Aracı çalışırken etkinlikleri Cloud Shell Düzenleyici terminalinde görebilirsiniz.
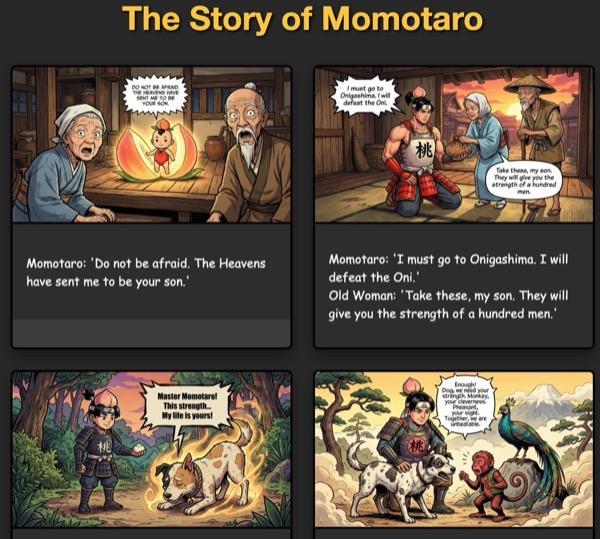
- Tüm görsellerin oluşturulması biraz zaman alabilir. Lütfen bekleyin veya hızlıca bir kahve için! Resim oluşturma işlemi başladığında, hikayeyle ilgili resimleri aşağıdaki gibi görebilirsiniz.
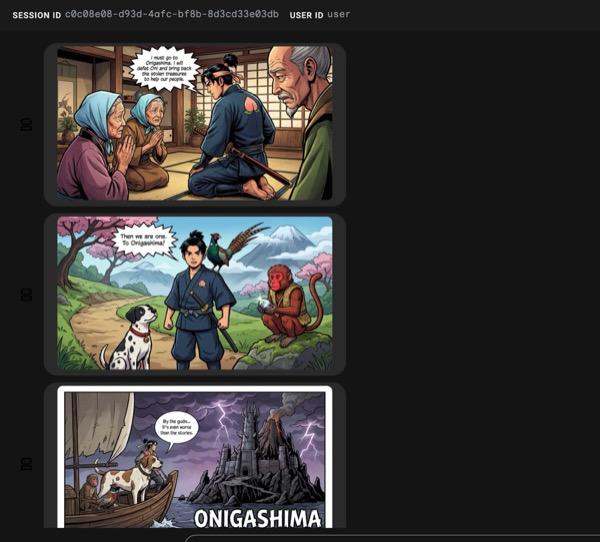
Şekil 34: Momotaro'nun 25. çizgi romanı. Her şey sorunsuz çalışırsa oluşturulan HTML dosyası, HTML klasörüne kaydedilir. Temsilcide iyileştirmeler yapmak istiyorsanız Temsilci Asistanı'na geri dönüp daha fazla değişiklik yapmasını isteyebilirsiniz.
Şekil 35: Çıkış klasörünün içeriği
- 25. adım doğru şekilde çalışırsa output klasöründe comic.html dosyasını görürsünüz. Test etmek için aşağıdaki adımları uygulayabilirsiniz. Öncelikle Cloud Shell Düzenleyici'nin ana menüsünden Terminal>New Terminal'ı (Terminal>Yeni Terminal) tıklayarak yeni bir terminal açın. Yeni bir terminal açılır.
#go to the project folder
cd ~/adkui

#activate python virtual environment
source .venv/bin/activate

#Go to the output folder
cd ~/adkui/output

#start local web server
python -m http.server 8080
- http://0.0.0.0:8080 adresini Ctrl+tıklayın.

Şekil 36: Yerel web sunucusu çalıştırma
- Klasörün içeriği tarayıcı sekmesinde gösterilmelidir. HTML dosyasını (et. comic.html) tıklayın. Çizgi roman aşağıdaki gibi gösterilmelidir (Çıkışınız biraz farklı olabilir).
Şekil 37: localhost'ta çalıştırma
12. Temizleme
Şimdi de oluşturduğumuz öğeleri temizleyelim.
- Yeni oluşturduğumuz Cloud Run uygulamasını silin. Cloud Run'a erişerek Cloud Run'a gidin . Önceki adımda oluşturduğunuz uygulamayı görebilmeniz gerekir. Uygulamanın yanındaki kutuyu işaretleyin ve Sil düğmesini tıklayın.
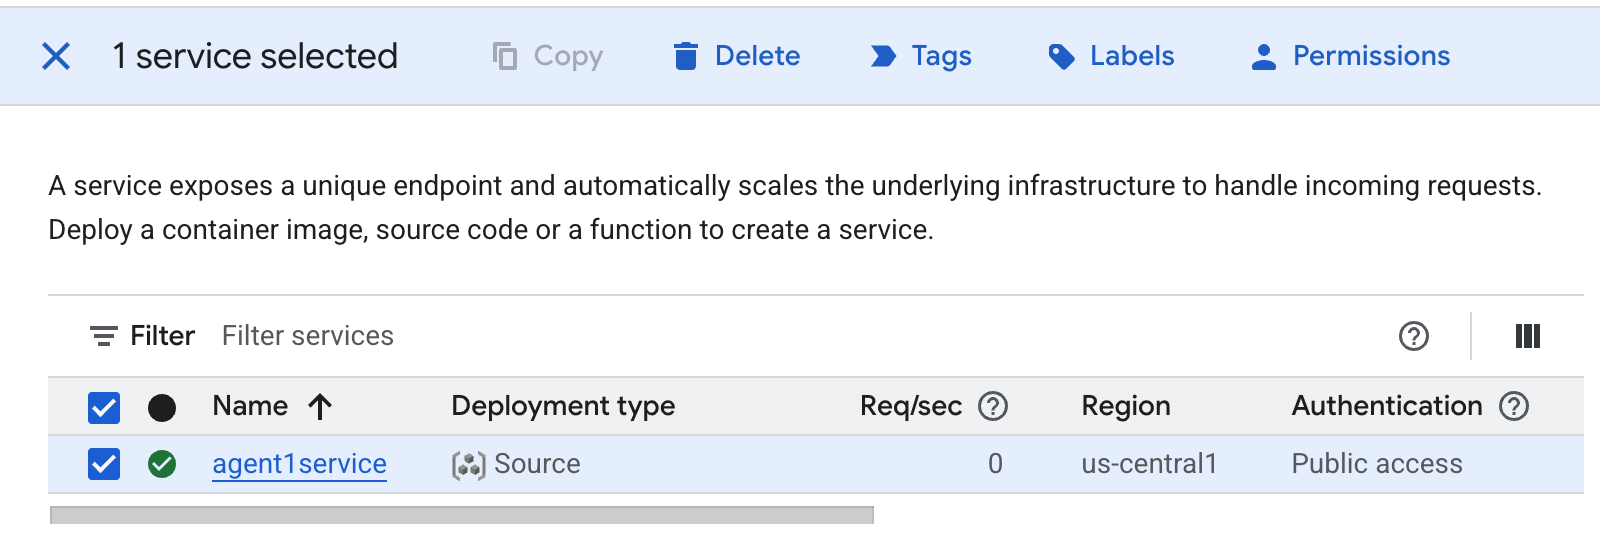 Şekil 38: Cloud Run uygulaması 2'yi silme. Cloud Shell'deki dosyaları silme
#Execute the following to delete the files
cd ~
rm -R ~/adkui
13. Sonuç
Tebrikler! Yerleşik ADK Visual Builder'ı kullanarak ADK (Agent Development Kit) temsilcilerini başarıyla oluşturdunuz. Ayrıca uygulamayı Cloud Run'a dağıtmayı da öğrendiniz. Bu önemli başarı, modern bir bulutta yerel uygulamanın temel yaşam döngüsünü kapsar ve kendi karmaşık ajan tabanlı sistemlerinizi dağıtmak için sağlam bir temel sunar.
Özet
Bu laboratuvarda şunları öğrendiniz:
- ADK Visual Builder'ı kullanarak çoklu aracı uygulaması oluşturma
- Uygulamayı Cloud Run'a dağıtma
Faydalı kaynaklar