
1. Objective of this lab
In this hands-on lab you will build a multi agent application using ADK (Agent Development Kit) that generates an image, based on your prompt and evaluates it against your prompt. If the image does not satisfactorily meet the requirements described in the prompt, the agent will continuously generate images until the image that meets your requirements is generated. Each of the agents in this hands-on have a single purpose, the agents co-operate with each other to achieve the overall goal. You will learn how to test the application locally and deploy in Agent Runtime.
What you'll learn
- Understand the basics of ADK (Agent Development Kit) and learn how to create a multi-agent system.
- Learn how to easily deploy and use the agents in Agent Runtime.
- Understand the basics of A2A protocol
- Learn how to use A2A protocol and ADK (Agent Development Kit) together to create open agents.
2. Project Setup
- Go to the GCP console by clicking the following link GCP console.
- If you already do not have a project that you can use, you will need to create a new project in the GCP console. Select the project that at the project selector (Top Left of the Google Cloud Console) If you do not already have a project please follow these steps to create a new project. Once you create a new project please select your project.
Figure 2: Clicking on the box right next to the Google Cloud logo allows you to select your project. Make sure your project is selected.
- In this lab, we will use Cloud Shell Editor to perform our tasks. Open the Cloud Shell and set the project using Cloud Shell.
- Click this link to navigate directly to Cloud Shell Editor
- On the side bar of the Cloud Shell Editor, click on the Open Folder button.
- Your home folder should already be selected, just press OK and your home folder will be your root folder for this task.

- Open the Terminal if it's not already open by Clicking Terminal>New Terminal from the menu. You can run all the commands in this tutorial in this terminal.
- You can check if the project is already authenticated using the following command in the Cloud Shell terminal.
gcloud auth list
- If you can't remember your project ID, you can list all your project IDs with
gcloud projects list
- Copy the project ID and use the following command to set it
gcloud config set project <YOUR_PROJECT_ID>
- Run the following command in Cloud Shell to confirm your project
gcloud config list project
3. Enable APIs
We need to enable some API services to run this lab. Run the following command in Cloud Shell.
gcloud services enable aiplatform.googleapis.com
gcloud services enable cloudresourcemanager.googleapis.com
Introducing the APIs
- Gemini Enterprise Agent Platform API (
aiplatform.googleapis.com) enables access to the Gemini Enterprise Agent Platform platform, allowing your application to interact with Gemini models for text generation, chat sessions, and function calling. - Cloud Resource Manager API (
cloudresourcemanager.googleapis.com) allows you to programmatically manage metadata for your Google Cloud projects, such as project ID and name, which is often required by other tools and SDKs to verify project identity and permissions.
4. Introduction to Agent Development Kit
Agent Development Kit offers several key advantages for developers building agentic applications:
- Multi-Agent Systems: Build modular and scalable applications by composing multiple specialized agents in a hierarchy. Enable complex coordination and delegation.
- Rich Tool Ecosystem: Equip agents with diverse capabilities: use pre-built tools (Search, Code Execution, etc.), create custom functions, integrate tools from third-party agent frameworks (LangChain, CrewAI), or even use other agents as tools.
- Flexible Orchestration: Define workflows using workflow agents (
SequentialAgent,ParallelAgent, andLoopAgent) for predictable pipelines, or leverage LLM-driven dynamic routing (LlmAgenttransfer) for adaptive behavior. - Integrated Developer Experience: Develop, test, and debug locally with a powerful CLI and an interactive dev UI. Inspect events, state, and agent execution step-by-step.
- Built-in Evaluation: Systematically assess agent performance by evaluating both the final response quality and the step-by-step execution trajectory against predefined test cases.
- Deployment Ready: Containerize and deploy your agents anywhere – run locally, scale with Agent Runtime, or integrate into custom infrastructure using Cloud Run or Docker.
While other Gen AI SDKs or agent frameworks also allow you to query models and even empower them with tools, dynamic coordination between multiple models requires a significant amount of work on your end.
Agent Development Kit offers a higher-level framework than these tools, allowing you to easily connect multiple agents to one another for complex but easy-to-maintain workflows.

Figure 1: Positioning of ADK (Agent Development Kit)
5. Introduction to Agent Runtime
Agent Runtime is a fully managed service to deploy agents in Google Cloud. With Agent Runtime, developers can develop, customize, deploy, serve, manage OSS AI agents( ADK (Agent Development Kit) , LangChain, LangGraph, CrewAI, AutoGen, and more!) on Gemini Enterprise Agent Platform.
Agent Runtime also provides services to handle the user data also known as agent memory. Currently two kinds of memory services are available.
- Short-term memory: With Agent Engine Sessions you can store, manage, and retrieve the ongoing conversation history (state) within a single session as short-term memory.
- Long-term memory: With Agent Engine Memory Bank, Store, transform, and retrieve memories (state), particularly across multiple sessions as long-term memories.
You can deploy Agents in other Google Cloud services such as Cloud Run or GKE as well, you should consider using Agent Runtime for following use cases.
- Stateful managed runtime: If you need a stateful, fully managed runtime for your agent deployment Agent Runtime is a good choice as it abstracts away common tasks such session management, persistence for AI Agents.
- Code Execution: If your Agent needs to execute code that is dynamically generated during the user session, Agent Runtime provides a secure Sandbox where you can execute the code.
- Flexible long term memory: If you need flexible long term memory for your agents, Gemini Enterprise Agent Platform Memory Bank that can be used with Agent Runtime can provide a flexible way to remember the information about your user that can be used across the sessions.
You can also combine Agent Runtime with other runtimes like Cloud Run to create a flexible application architecture. Below is an example of a reference architecture using various services to build an agent.
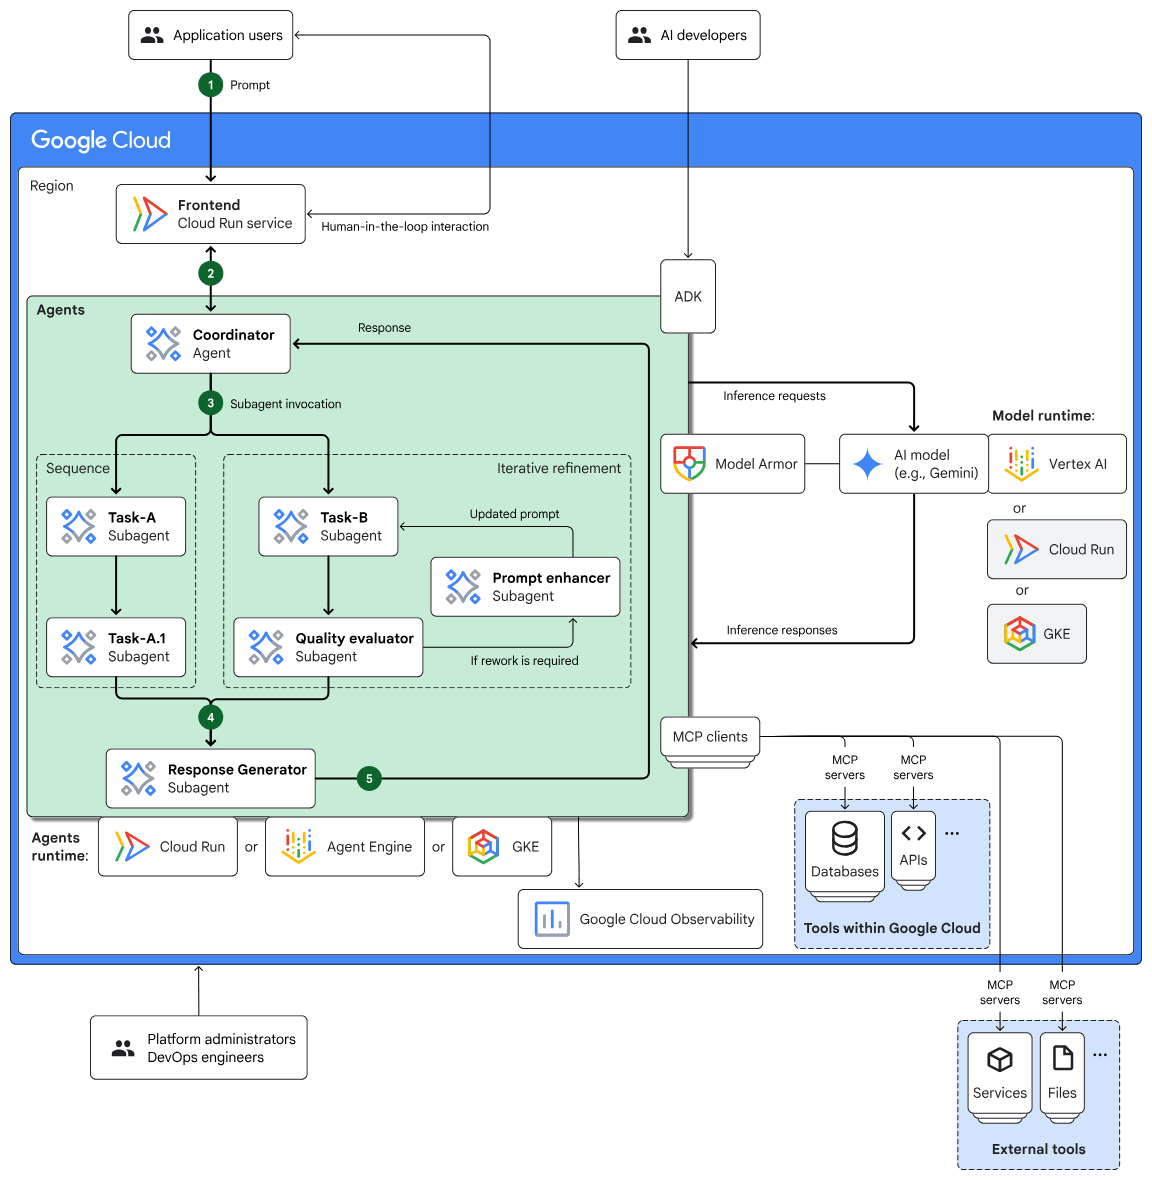
Figure 2: A sample reference architecture for building Agents using multiple services.
6. Introduction to A2A
The Agent2Agent (A2A) protocol is an open standard designed to enable seamless and secure communication and collaboration between autonomous AI agents from different frameworks, vendors, and domains.
- Universal Interoperability: A2A allows agents to work together regardless of their underlying technologies, fostering a truly multi-agent ecosystem. This means agents built by different companies on different platforms can communicate and coordinate.
- Capability Discovery: Agents can advertise their capabilities using "Agent Cards" (JSON documents), which describe their identity, supported A2A features, skills, and authentication requirements. This allows other agents to discover and select the most suitable agent for a given task.
- Secure by Default: Security is a core principle. A2A incorporates enterprise-grade authentication and authorization mechanisms, utilizing standards like HTTPS/TLS, JWT, OIDC, and API keys to ensure secure interactions and protect sensitive data.
- Modality Agnostic: The protocol supports various communication modalities, including text, audio, and video streaming, as well as interactive forms and embedded iframes. This flexibility allows agents to exchange information in the most appropriate format for the task and user.
- Structured Task Management: A2A defines clear protocols for task delegation, monitoring, and completion. It supports grouping related tasks and managing them across different agents using unique task IDs. Tasks can transition through defined lifecycles (e.g., submitted, working, completed).
- Opaque Execution: A significant feature is that agents don't need to reveal their internal reasoning processes, memory, or specific tools to other agents. They only expose their callable services, promoting modularity and privacy.
- Built on Existing Standards: A2A leverages established web technologies such as HTTP, Server-Sent Events (SSE) for real-time streaming, and JSON-RPC for structured data exchange, making it easier to integrate with existing IT infrastructure.
- Asynchronous Communication: The protocol is designed with asynchronous communication as a primary consideration, facilitating flexible task progression and enabling push notifications for updates even when a connection isn't persistently maintained.
7. Agent Architecture
In this lab, you will create a multi-agent application that generates an image according to your specification and evaluates the image before presenting it to you.
The system is structured with a main agent called image_scoring that orchestrates the entire process. This main agent has a sub-agent called image_generation_scoring_agent which in turn has its own sub-agents for more specific tasks. This creates a hierarchical relationship where the main agent delegates tasks to its sub-agents. 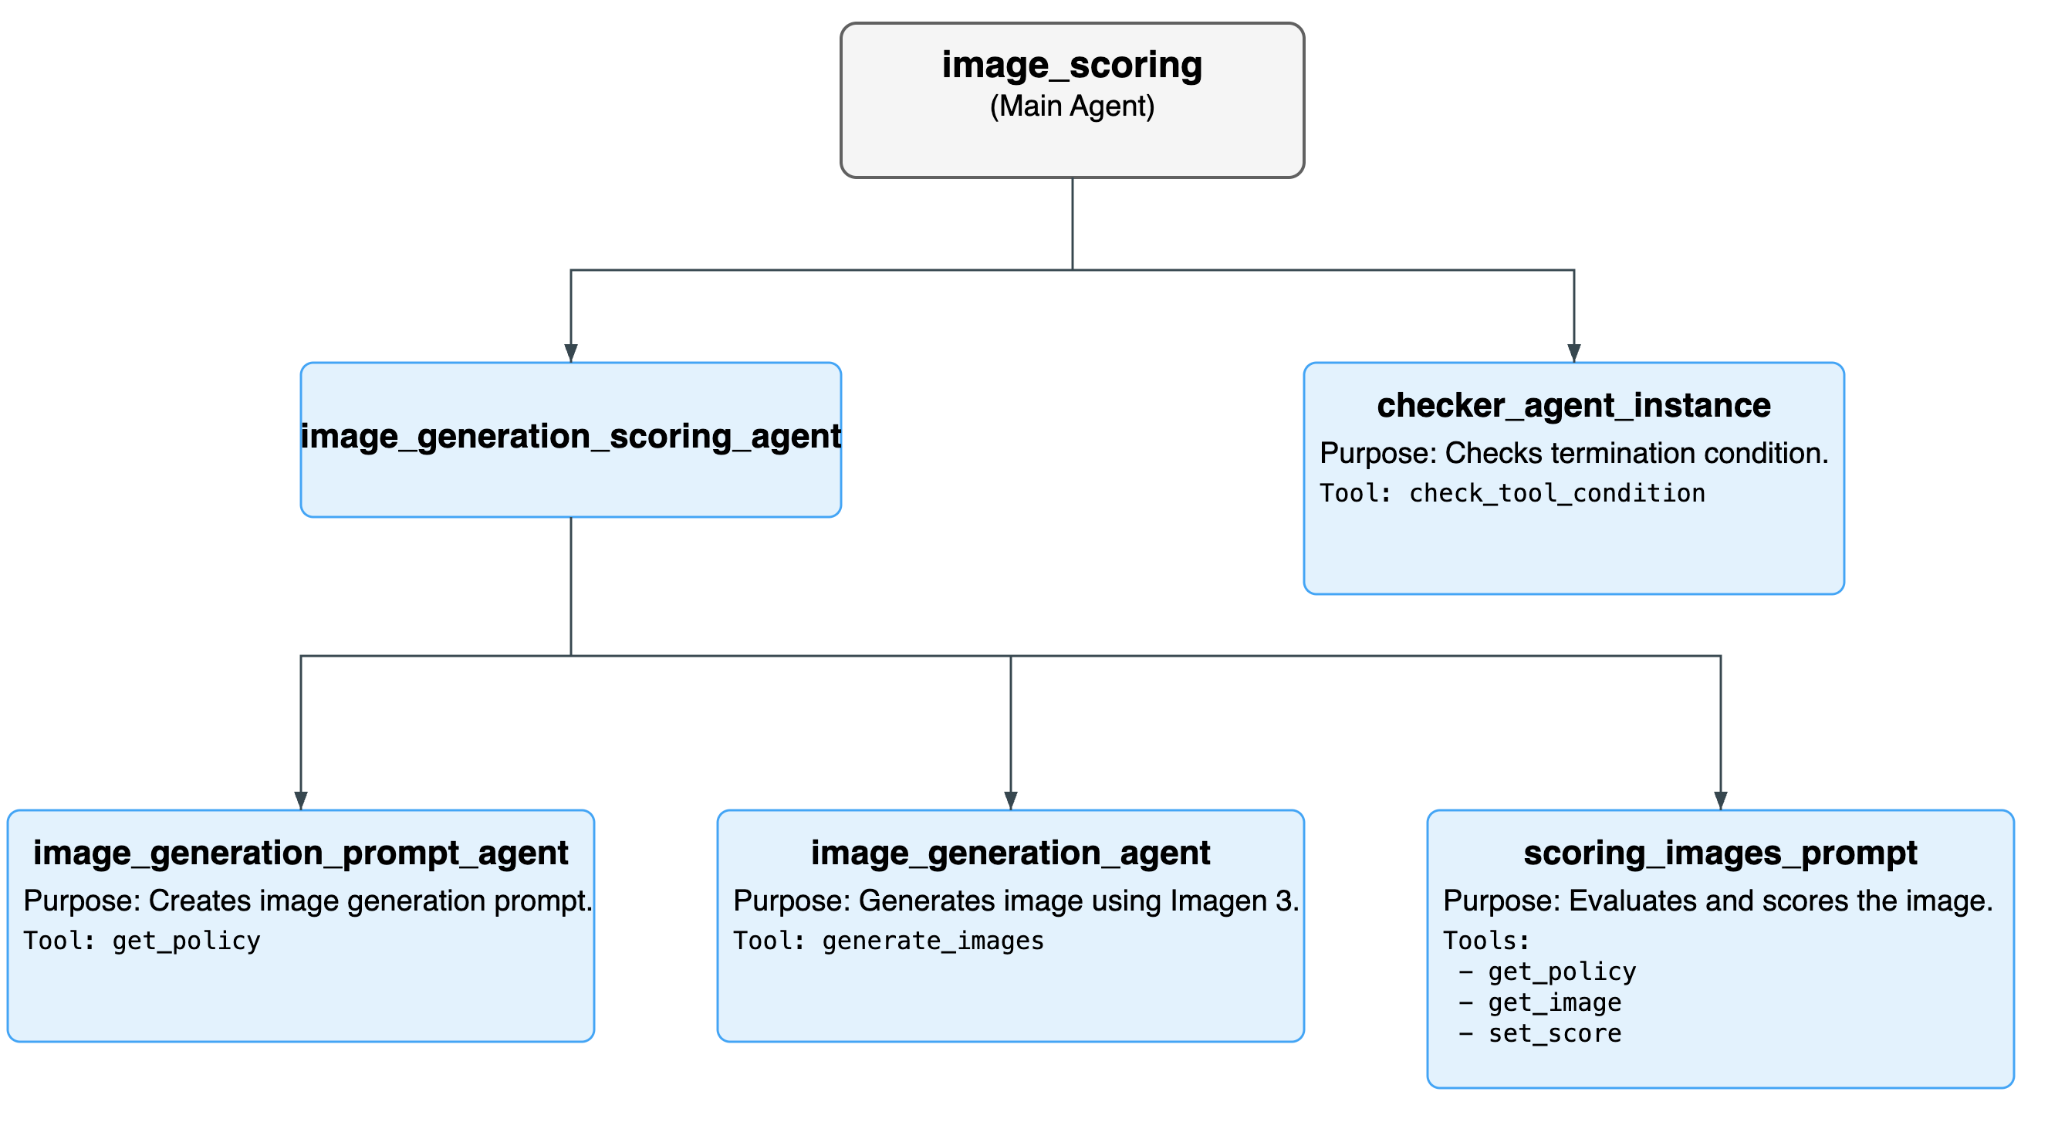
Figure 3: Overall Agent flow.
List of All Agents
Agent | Purpose | Sub-agents |
image_scoring (Main Agent) | This is the root agent that manages the overall workflow. It repeatedly runs the image_generation_scoring_agent and the checker_agent in a loop until a termination condition is met. | image_generation_scoring_agent |
image_generation_scoring_agent (Sub-agent of image_scoring) | This agent is responsible for the core logic of generating and scoring images. It executes a sequence of three sub-agents to achieve this. | image_generation_prompt_agent |
checker_agent_instance (Sub-agent of image_scoring) | This agent checks if the image scoring process should continue or terminate. It uses the check_tool_condition tool to evaluate the termination condition. | - |
checker_agent_instance (Sub-agent of image_scoring) | This agent is an expert in creating prompts for image generation. It takes an input text and generates a detailed prompt suitable for the image generation model. | - |
image_generation_prompt_agent (Sub-agent of image_generation_scoring_agent) | This agent is an expert in creating prompts for image generation. It takes an input text and generates a detailed prompt suitable for the image generation model. | - |
scoring_images_prompt (Sub-agent of image_generation_scoring_agent): | This agent is an expert in evaluating and scoring images based on various criteria. It takes the generated image and assigns a score to it. | - |
List of All the Tools used
Tool | Description | User Agent |
check_tool_condition | This tool checks if the loop termination condition is met or if the maximum number of iterations has been reached. If either of these is true, it stops the loop. | checker_agent_instance |
generate_images | This tool generates images using the Imagen 3 model. It can also save the generated images to a Google Cloud Storage bucket. | image_generation_agent |
get_policy | This tool fetches a policy from a JSON file. The policy is used by the image_generation_prompt_agent to create the image generation prompt and by the scoring_images_prompt to score the images. | image_generation_agent |
get_image | This tool loads the generated image artifact so that it can be scored. | scoring_images_prompt |
set_score | This tool sets the total score of the generated image in the session state. | scoring_images_prompt |
8. Install ADK and set up your environment
In this Hands on we will use Cloud Shell to perform the tasks.
Prepare a Cloud Shell Editor tab (Skip this step if Cloud Shell Editor is already open)
- Go to the GCP console by clicking the following link GCP console.
- If you already do not have a project that you can use, you will need to create a new project in the GCP console. Select the project that at the project selector (Top Left of the Google Cloud Console) If you do not already have a project please follow these steps to create a new project. Once you create a new project please select your project.
Figure 2: Clicking on the box right next to the Google Cloud logo allows you to select your project. Make sure your project is selected.
- In this lab, we will use Cloud Shell Editor to perform our tasks. Open the Cloud Shell and set the project using Cloud Shell.
- Click this link to navigate directly to Cloud Shell Editor
- On the side bar of the Cloud Shell Editor, click on the Open Folder button.
- Your home folder should already be selected, just press OK and your home folder will be your root folder for this task.
- Open the Terminal if it's not already open by Clicking Terminal>New Terminal from the menu. You can run all the commands in this tutorial in this terminal.
- You can check if the project is already authenticated using the following command in the Cloud Shell terminal.
gcloud auth list
- If you can't remember your project ID, you can list all your project IDs with
gcloud projects list
- Copy the project ID and use the following command to set it
gcloud config set project <YOUR_PROJECT_ID>
- Run the following command in Cloud Shell to confirm your project
gcloud config list project
Download and install the ADK and code samples for this lab
- Execute the following commands to clone the needed source from github and install necessary libraries. Run the commands in the Terminal opened in Cloud Shell Editor.
#create the project directory
mkdir ~/imagescoring
cd ~/imagescoring
#clone the code in the local directory
git clone https://github.com/haren-bh/multiagenthandson.git
- We will use uv to create python environment (Run in Cloud Shell Editor Terminal):
#Install uv if you do not have installed yet
pip install uv

#Create the virtual environment
uv venv .adkvenv

source .adkvenv/bin/activate

#go to the project directory
cd ~/imagescoring/multiagenthandson

#install dependencies
uv pip install -r pyproject.toml
- If you do not have a cloud storage bucket, create a new one in Google Cloud Storage. You can also create the bucket using gcloud command. Grant Agent Runtime access to Google Cloud Storage (Run in Cloud Shell Editor Terminal).
# First, make sure your PROJECT_ID variable is set
PROJECT_ID=$(gcloud config get-value project)

# Now, create the bucket with a unique name
# We'll use the project ID to help ensure uniqueness
gcloud storage buckets create gs://${PROJECT_ID}-imagescoring-bucket

#Now lets give Agent Runtime the permission to access Cloud Storage
# 1. Get the current Project ID (text) and Project Number (numeric)
PROJECT_ID=$(gcloud config get-value project)
PROJECT_NUMBER=$(gcloud projects describe $PROJECT_ID --format="value(projectNumber)")

# 2. Construct the Reasoning Engine Service Account email
SA_EMAIL="service-${PROJECT_NUMBER}@gcp-sa-aiplatform-re.iam.gserviceaccount.com"
# 3. Create Agent Runtime Service account if not already created
gcloud beta services identity create --service=aiplatform.googleapis.com --project=${PROJECT_NUMBER}

# 3. Grant GCS Access
gcloud projects add-iam-policy-binding $PROJECT_ID --member="serviceAccount:$SA_EMAIL" --role="roles/storage.objectUser" --condition=None
- In the editor go to View->Toggle hidden files. And in the image_scoring folder create a .env file with the following content. Add the required details such as your project name and cloud storage bucket (Run in Cloud Shell Editor Terminal).
#go to image_scoring folder
cd ~/imagescoring/multiagenthandson/image_scoring
cat <<EOF>> .env
GOOGLE_GENAI_USE_VERTEXAI=1
GOOGLE_CLOUD_PROJECT=$(gcloud config get-value project)
GOOGLE_CLOUD_LOCATION=global
AGENT_ENGINE_LOCATION=us-central1
GOOGLE_CLOUD_STORAGE_BUCKET=$(gcloud config get-value project)-imagescoring-bucket
GCS_BUCKET_NAME=$(gcloud config get-value project)-imagescoring-bucket
SCORE_THRESHOLD=40
IMAGEN_MODEL="gemini-3.1-flash-lite-image"
GENAI_MODEL="gemini-3.5-flash"
EOF
- Navigate to the imagescoring/multiagenthandson/image_scoring folder in the Explorer side pane. Click on agent.py file to open it and look at the agent structure there. This agent contains the root agent that will connect to the other sub agents.
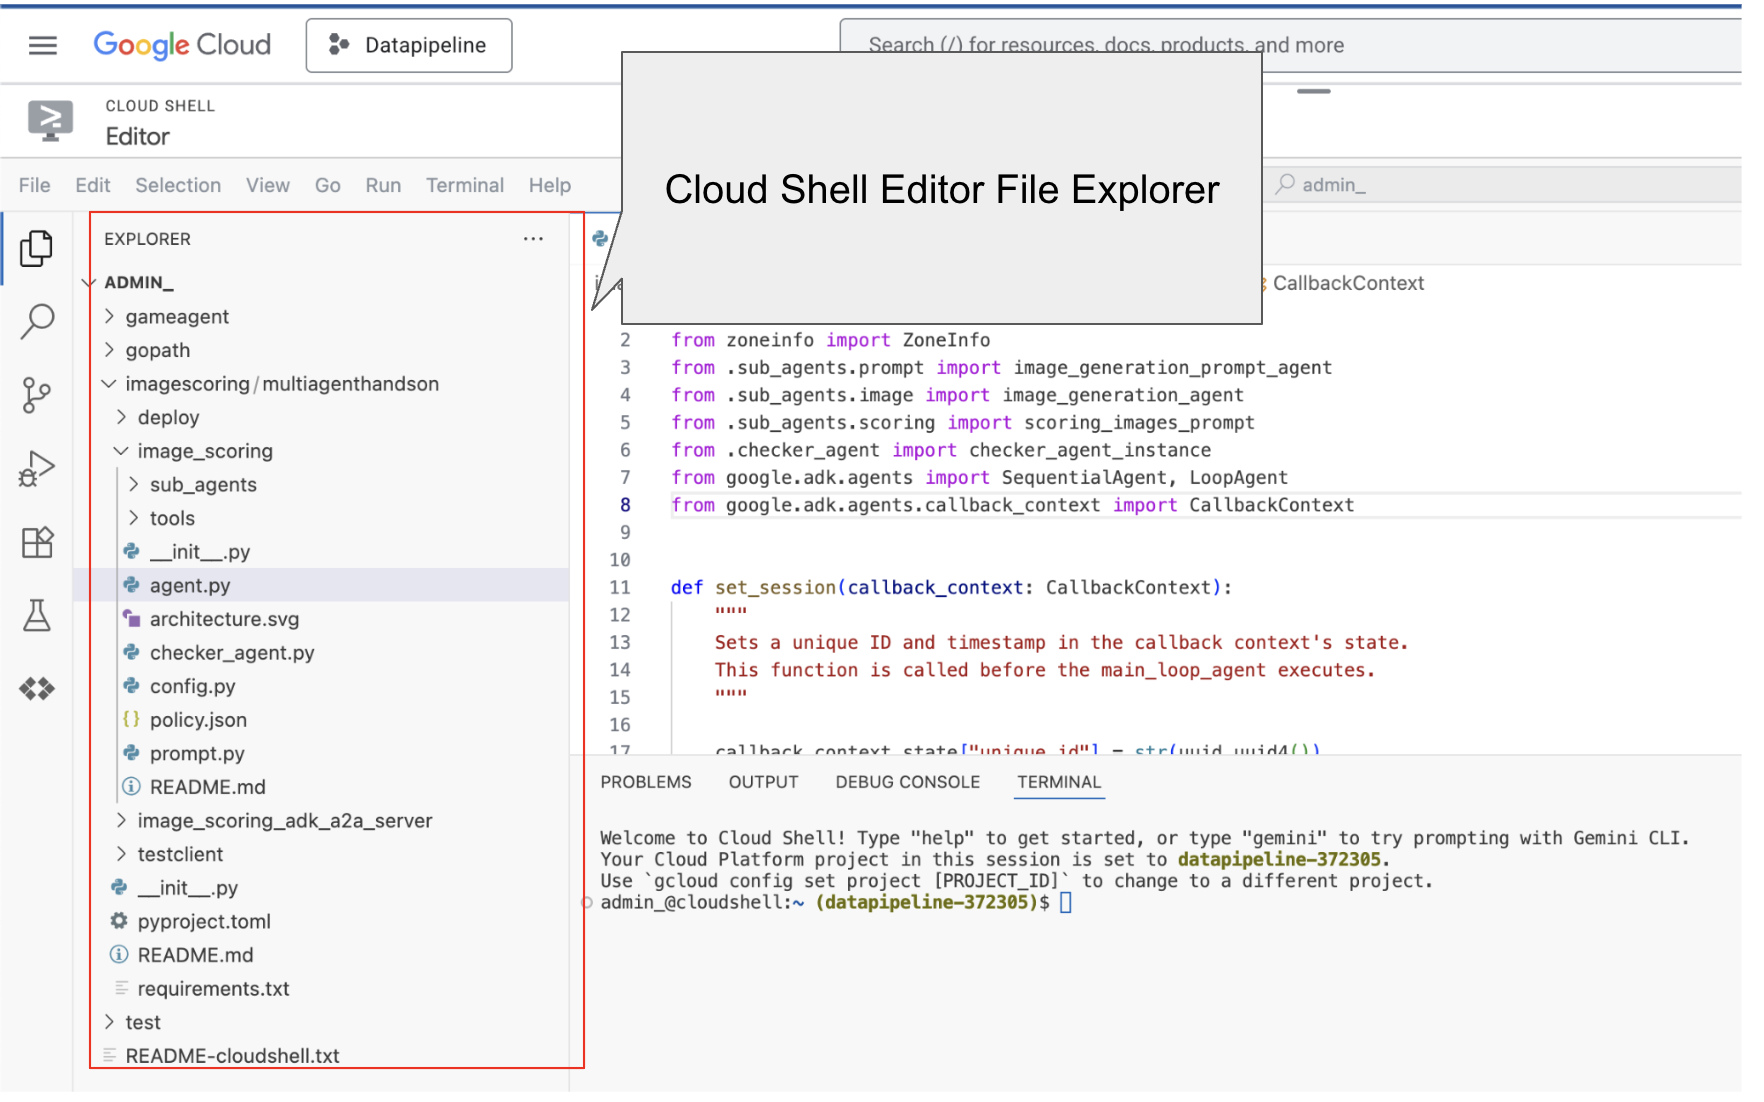
Figure 4: The folder structure that can be seen from the Explorer Side Pane. You can simply click on a file to see the content of the file.
- Go back to the top directory multiagenthandson in the terminal and execute the following command to run the agent locally (Run in Cloud Shell Editor Terminal).
#go to the directory multiagenthandson
cd ~/imagescoring/multiagenthandson
# Run the following command to run agents locally
adk web --host 0.0.0.0 --port 8080 --allow_origins "regex:https://.*8080-.*\.cloudshell\.dev"
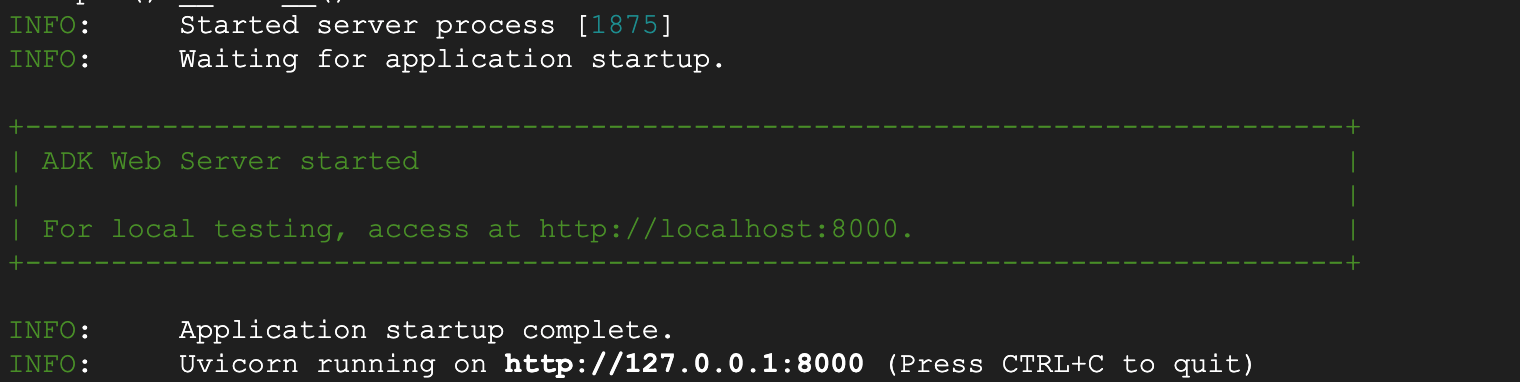
Figure 5: ADK application startup
- Ctrl+Click (CMD+Click for MacOS) on the http:// url displayed on the terminal to open the ADK's browser based GUI client. It should look like Figure 5
- Select image_scoring on the dropdown menu on the top left side (see Figure 5). Now let's generate some images! You should find the images in Google Cloud Storage bucket as well. You can click on "Artifacts" section to see your saved images locally. Try the following prompts or your own prompts.
- A peaceful mountain landscape at sunset
- A cat riding a bicycle
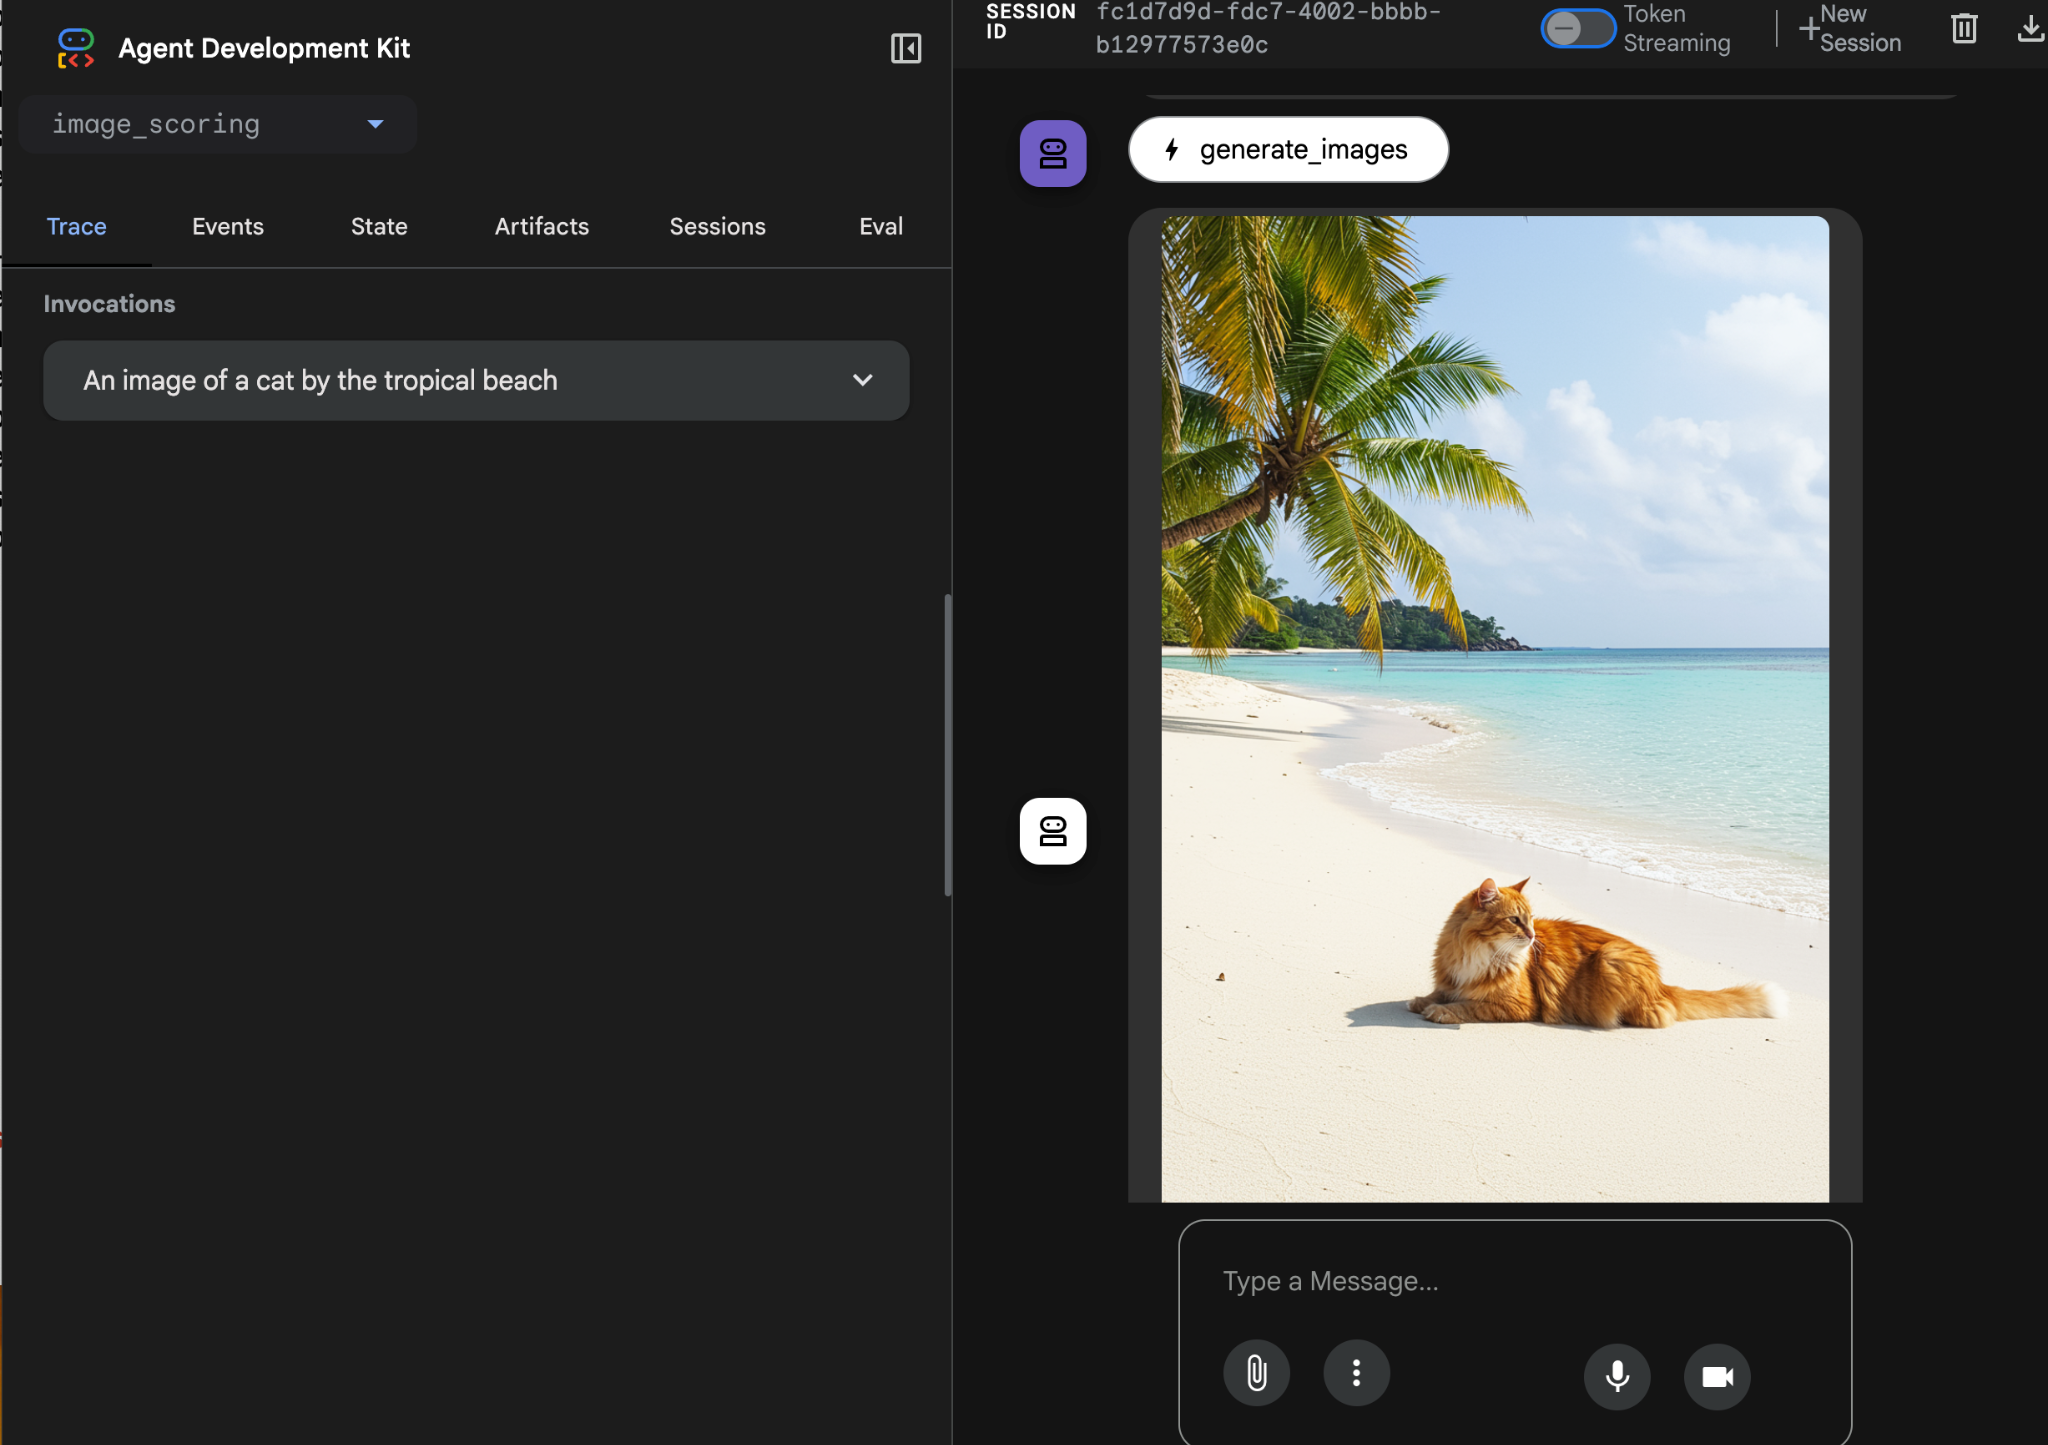
Figure 6: Sample output
9. Deploy to Agent Runtime
Now we deploy the agent to the Agent Engine. Agent Engine is a fully managed service for deploying agents in GCP. Agent Engine is compatible with ADK (Agent Development Kit) so the agents built with ADK (Agent Development Kit) can be deployed in Agent Engine.
- Before moving to the steps below at the Cloud Shell Editor terminal, shutdown the ADK server with Ctrl+C.
- Create the requirements.txt file using poetry. Poetry will use pyproject.toml to create requirements.txt file. After running the command check if requirements.txt file has been created (Run in Cloud Shell Editor Terminal).
# Go to the parent folder containing pyproject.toml file
cd ~/imagescoring/multiagenthandson

# install poetry-plugin-export
uv pip install poetry-plugin-export

#Create requirements.txt file
python3 -m poetry export -f requirements.txt --output requirements.txt --without-hashes
- Create the package. We need to bundle our app into a .whl python package. We will use poetry to do that. Once you execute the command make sure a dist folder is created and it contains the .whl file (Run in Cloud Shell Editor Terminal).
# Go to the parent folder containing pyproject.toml file
cd ~/imagescoring/multiagenthandson

#Create python package, to create whl file
python3 -m poetry build
- Now we will prepare the script that deploys our image-scoring agent to the Agent Engine service. Within the deploy directory, locate deploy.py in the Cloud Shell Editor side pane and click to open it. Verify its content as follows
import vertexai
from image_scoring.agent import root_agent
import os
import glob # To easily find the wheel file
from dotenv import load_dotenv

# Load environment variables from image_scoring/.env
env_path = os.path.join(os.path.dirname(__file__), "..", "image_scoring", ".env")
load_dotenv(env_path)

PROJECT_ID = os.getenv("GOOGLE_CLOUD_PROJECT")
LOCATION = os.getenv("GOOGLE_CLOUD_LOCATION", "us-central1")
STAGING_BUCKET = f"gs://{os.getenv('GOOGLE_CLOUD_STORAGE_BUCKET')}"

from vertexai import agent_engines

client=vertexai.Client(
    project=PROJECT_ID,
    location=LOCATION,
)
remote_app = client.agent_engines.create(
    agent=root_agent,
    config={
        "display_name": "image-scoring",
        "staging_bucket": STAGING_BUCKET,
        "requirements": open(os.path.join(os.getcwd(), "requirements.txt")).readlines() + ["./dist/image_scoring-0.1.0-py3-none-any.whl"],
        "extra_packages": [
            "./dist/image_scoring-0.1.0-py3-none-any.whl",
        ],     "env_vars":{"GCS_BUCKET_NAME":os.getenv('GOOGLE_CLOUD_STORAGE_BUCKET')}
    }
)
print(f"DEBUG: AgentEngine attributes: {dir(remote_app)}")
try:
    print(remote_app.api_resource.name)
except AttributeError:
    print("Could not find resource_name, check DEBUG output above.")
- We can now run the deploy script. First go to the top folder multiagenthandson (Run in Cloud Shell Editor Terminal).
#go to multiagenthandson folder
cd ~/imagescoring/multiagenthandson

#run deploy script from the parent folder containing deploy.py
python3 -m deploy.deploy
After you deploy you should see something like below, 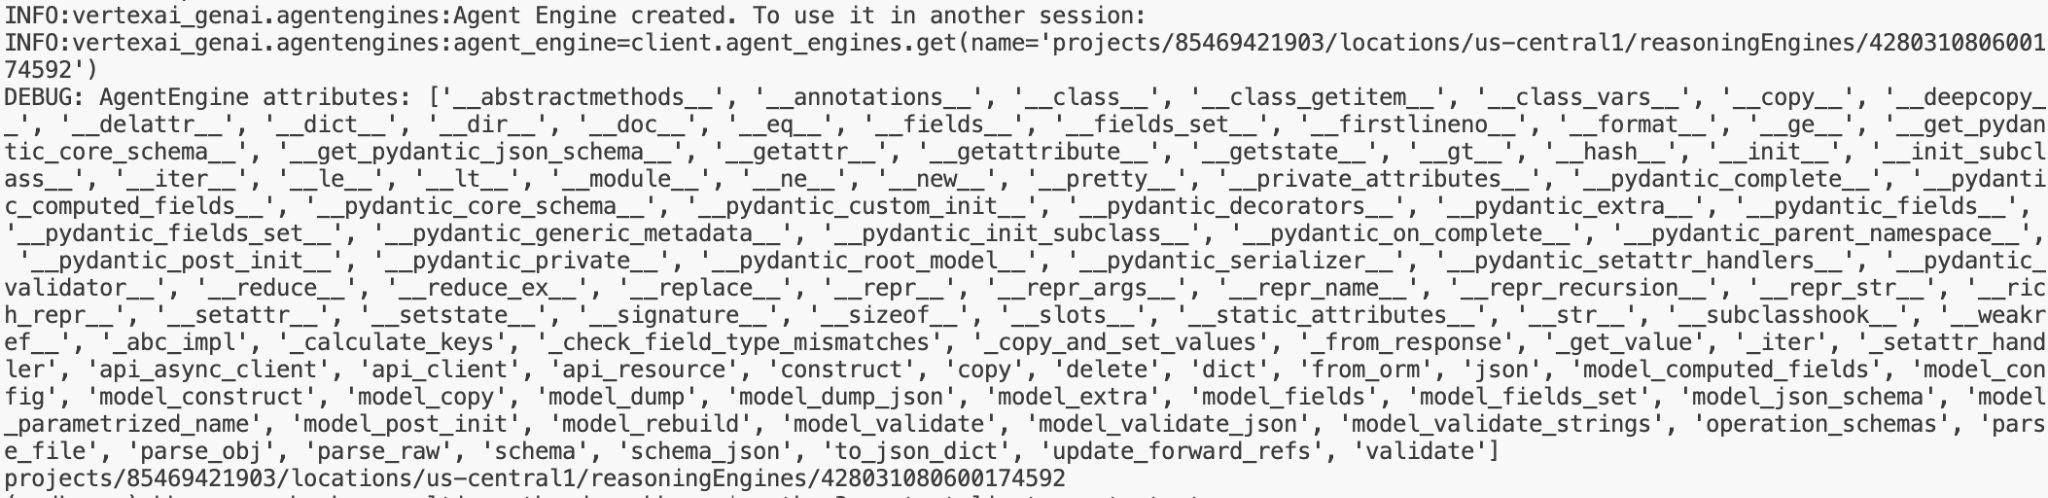
Figure 7: Sample output
- Now let's test the deployed agent. In order to test the remotely deployed agent engine first copy the agent location from the deploy output in the terminal. It should look something like this, projects/xxx/locations/us-central1/reasoningEngines/xxx .
From the multiagenthandson root directory, run the following command in the Cloud Shell Editor Terminal.
#go to multiagenthandson folder
cd ~/imagescoring/multiagenthandson

#execute remote_test.py
python3 -m testclient.remote_test
- Enter your reasoning engine id, it should look like "
projects/xxx/locations/us-central1/reasoningEngines/xxx"and enter your prompt to create your image. You can confirm your image output in cloud storage folder.
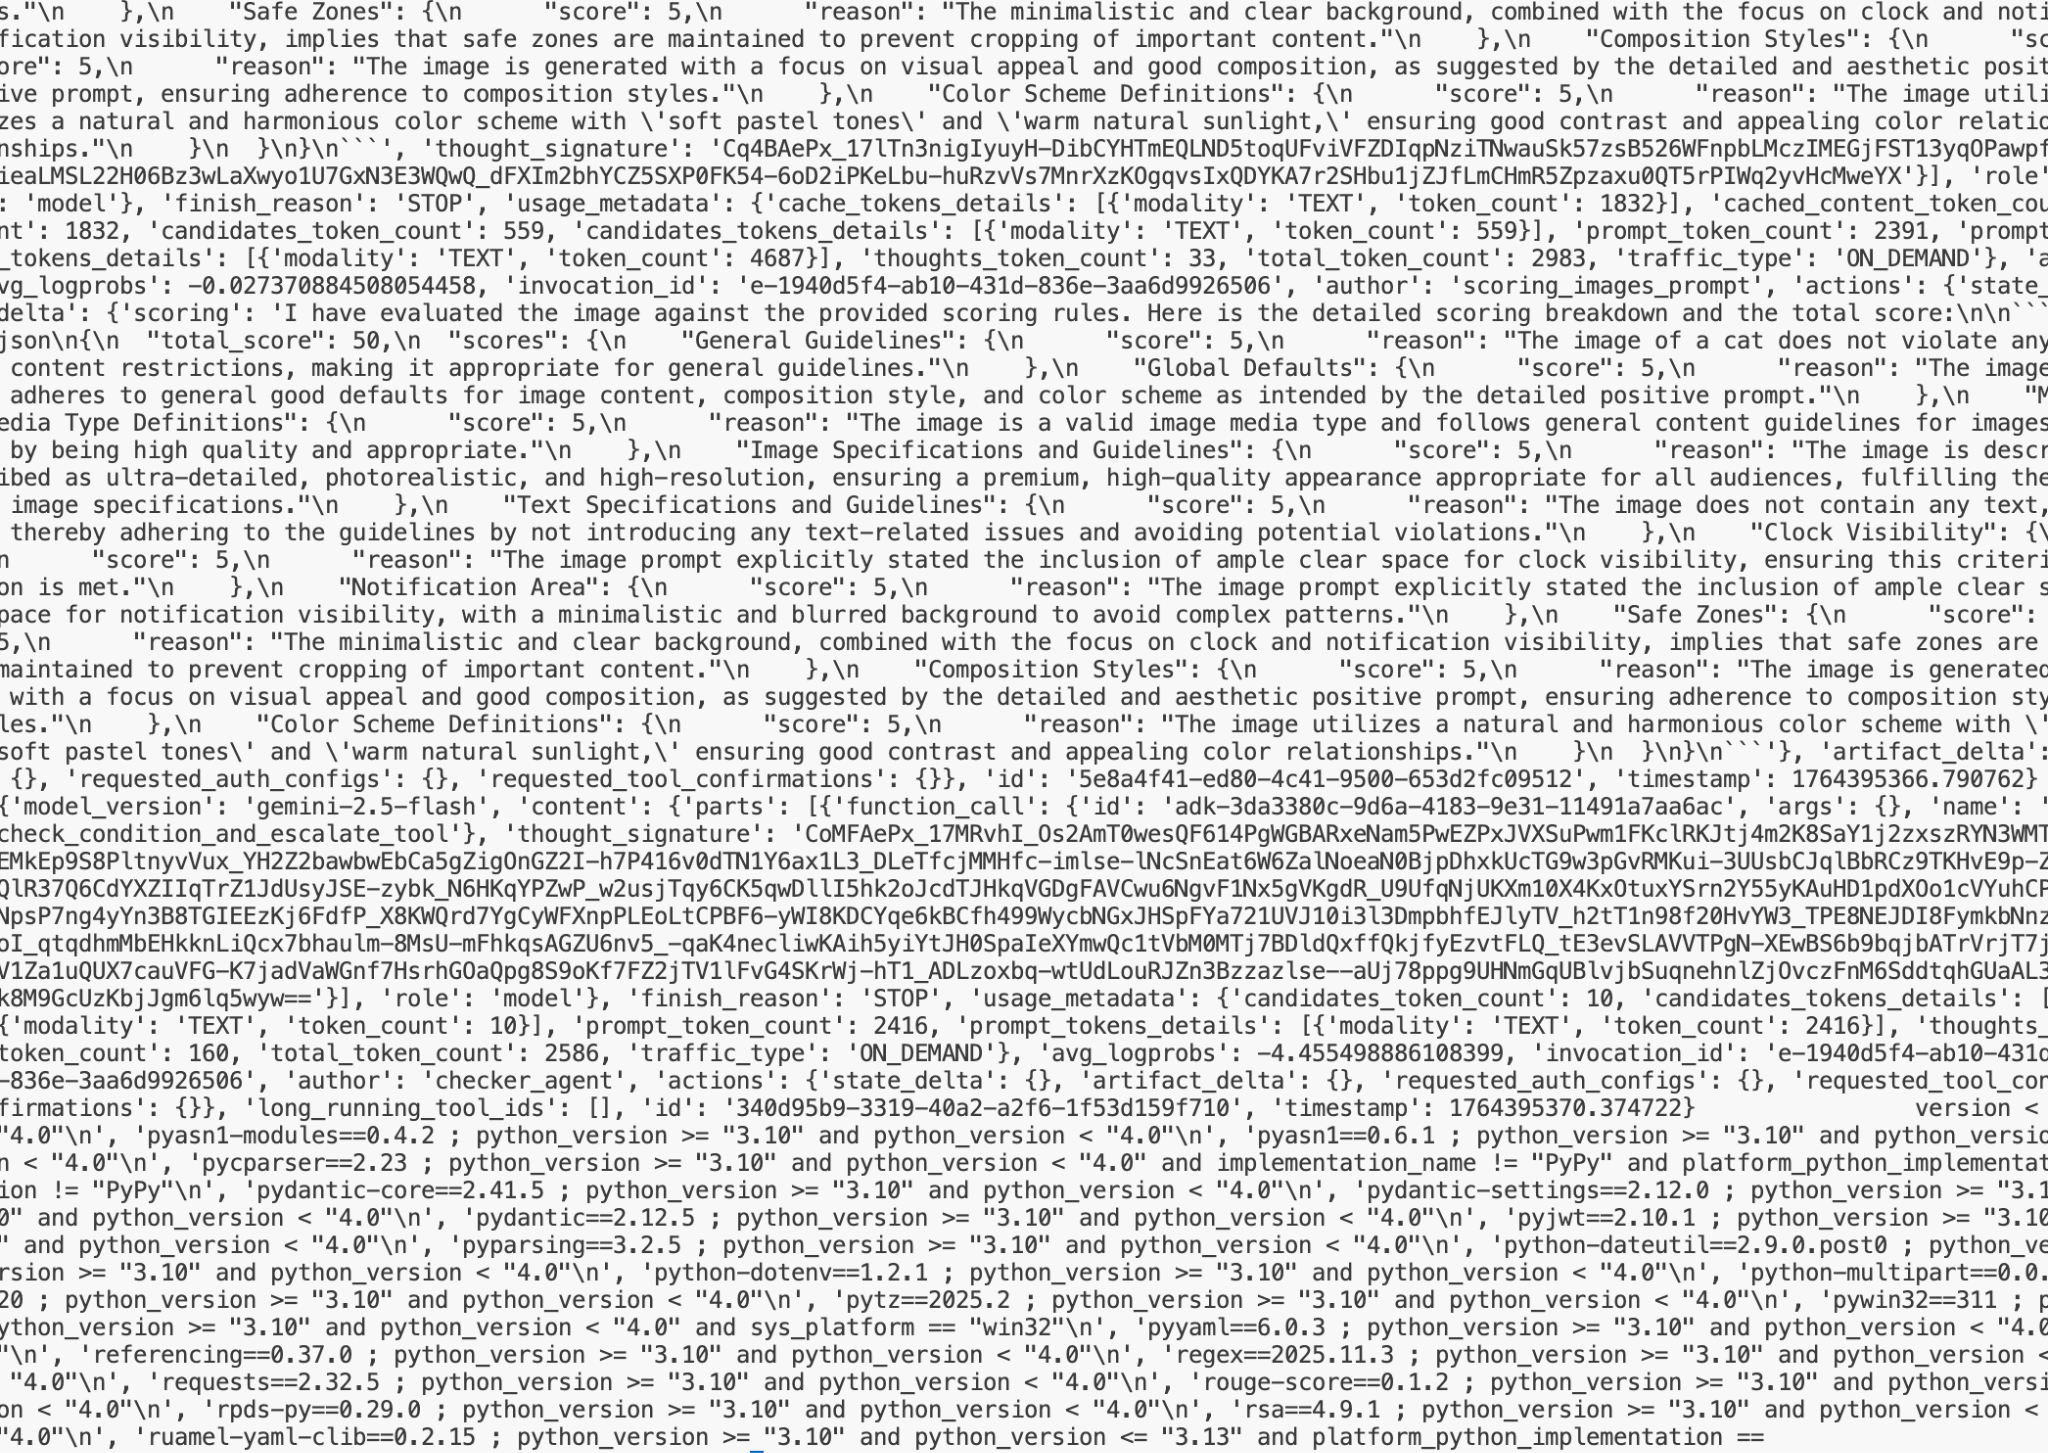
Figure 8: Sample output
10. Create an A2A agent
In this step we are going to create a simple A2A agent based on the agent we created in the previous steps. Existing ADK (Agent Development Kit) agents can be published under A2A protocol. These are the key things you will learn in this step.
- Learn the basics of A2A protocol.
- Learn how ADK and A2A protocols work with each other.
- Learn how to interact with A2A protocol.
In this hands on we will use the code in image_scoring_adk_a2a_server folder. Before you start the task please change your directory to this folder (Run in Cloud Shell Editor Terminal).
#change directory to image_scoring_adk_a2a_server
cd ~/imagescoring/multiagenthandson/image_scoring_adk_a2a_server

#copy the env file
cp ~/imagescoring/multiagenthandson/image_scoring/.env remote_a2a/image_scoring
1. Create A2A agent card
A2A protocol requires an agent card that contains all the information about the agent such as agent capabilities, agent usage guide etc. Once an A2A agent is deployed the agent card is viewable using the ".well-known/agent-card.json" link. Clients can refer to this information to send the request to agents.
Navigate to the remote_a2a/image_scoring directory and locate agents.json in the Cloud Shell Editor side pane. Click the file to open it and verify that the content matches the following:
{
 "name": "image_scoring",
 "description": "Agent that generates images based on user prompts and scores their adherence to the prompt.",
 "url": "http://localhost:8001/a2a/image_scoring",
 "version": "1.0.0",
 "defaultInputModes": ["text/plain"],
 "defaultOutputModes": ["image/png", "text/plain"],
 "capabilities": {
   "streaming": true,
   "functions": true
 },
 "skills": [
   {
     "id": "generate_and_score_image",
     "name": "Generate and Score Image",
     "description": "Generates an image from a given text prompt and then evaluates how well the generated image adheres to the original prompt, providing a score.",
     "tags": ["image generation", "image scoring", "evaluation", "AI art"],
     "examples": [
       "Generate an image of a futuristic city at sunset",
       "Create an image of a cat playing a piano",
       "Show me an image of a serene forest with a hidden waterfall"
     ]
   }
 ]
}
2. Create A2A agent Inside the image_scoring_adk_a2a_server root directory, verify that the a2a_agent.py file exists. You can open it by clicking the filename in the Cloud Shell Editor side pane. This file serves as the entry point for the A2A agent and should have the following content:
#change directory to image_scoring_adk_a2a_server
cd ~/imagescoring/multiagenthandson/image_scoring_adk_a2a_server
from google.adk.agents.remote_a2a_agent import RemoteA2aAgent

root_agent = RemoteA2aAgent(
   name="image_scoring",
   description="Agent to give interesting facts.",
   agent_card="http://localhost:8001/a2a/image_scoring/.well-known/agent.json",

   # Optional configurations
   timeout=300.0,          # HTTP timeout (seconds)
   httpx_client=None,      # Custom HTTP client
)
3. Run A2A agent
Now we are ready to run the agent! To run the agent execute following command from inside the top folder image_scoring_adk_a2a_server (Run in Cloud Shell Editor Terminal).
#following command runs the ADK agent as a2a agent
adk api_server --a2a --port 8001 remote_a2a
4. Test A2A agent
Once the agent is running we can now go and test the agent. First of all, let's go ahead and check the agent card. Open a new terminal using Terminal>New Terminal and run the following command (Run in the newly opened Cloud Shell Editor Terminal).
#Execute the following
curl http://localhost:8001/a2a/image_scoring/.well-known/agent.json
Executing the above should show the agent card for our A2A agent, which is mainly the content of agent.json that we created in the previous step.
Let's now send a request to the agent. We can use curl to send request to the agent (Run in the newly opened Cloud Shell Editor Terminal),
curl -X POST   http://localhost:8001/a2a/image_scoring   -H 'Content-Type: application/json'   -d '{
    "id": "uuid-123",
    "params": {
      "message": {
        "messageId": "msg-456",
        "parts": [{"text": "Create an image of a cat"}],
        "role": "user"
      }
    }
  }'
In the above request, you can change the prompt by changing the "Create an image of a cat" line. Once you run the command, you can check for the output image in the specified google cloud storage.
11. Clean up
Now let's clean up what we just created.
- Delete the Agent Runtime server we just created. Go to Gemini Enterprise Agent Platform by typing Gemini Enterprise Agent Platform in the search bar of Google Cloud Console. Click on the Agent Engine on the left hand side.You can delete the Agent by clicking delete.
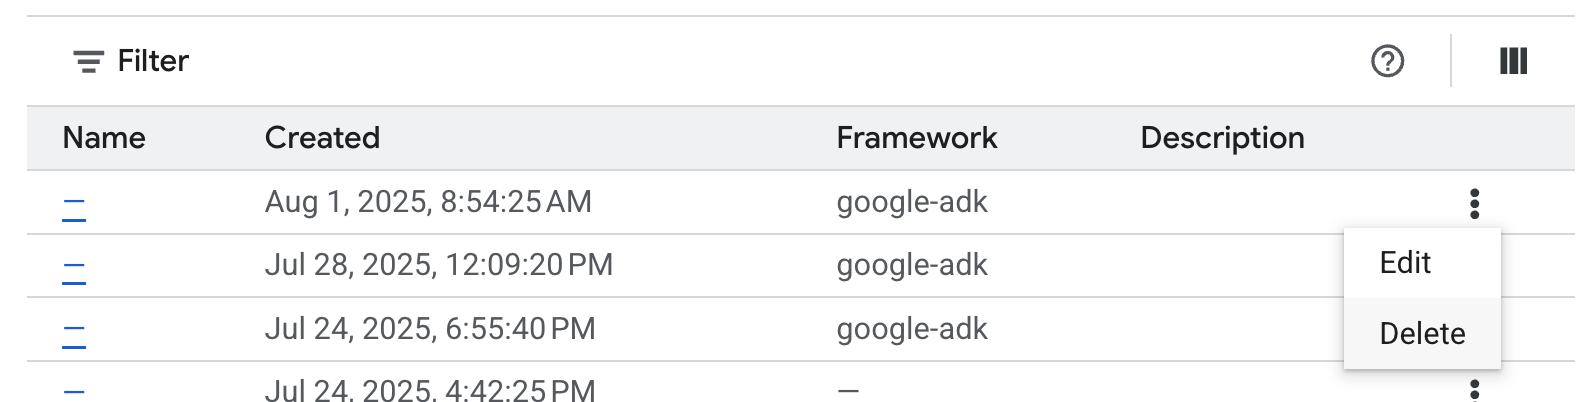
Figure 9: You can delete the Agent Runtime instances from Google Cloud Console
- Delete the files in Cloud Shell
#Execute the following to delete the files
cd ~
rm -R ~/imagescoring
- Delete the bucket. You can go to the GCP console->Cloud Storage , select and delete your bucket.
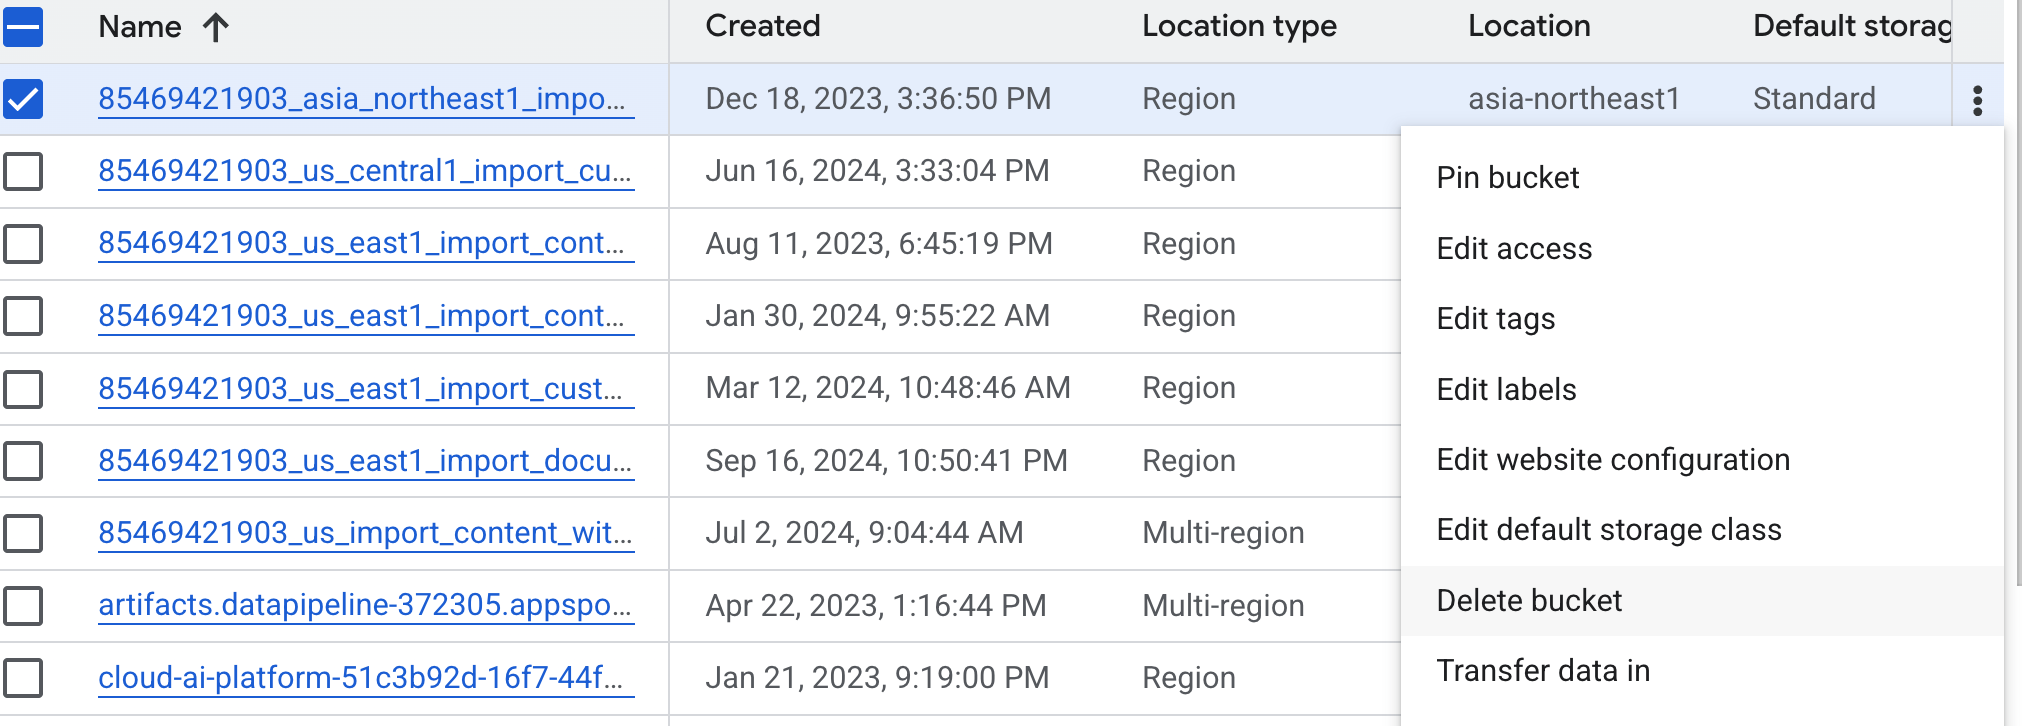
Figure 10: Deleting the bucket
12. Conclusion
Congratulations! You have successfully deployed a multi-agent ADK (Agent Development Kit) application to Agent Runtime. This is a significant achievement that covers the core lifecycle of a modern cloud-native application, providing you with a solid foundation for deploying your own complex agentic systems.
Recap
In this lab you learned to:
- Create multi agent application using ADK (Agent Development Kit)
- Deploy the application to Agent Runtime
- Create an Agent that can communicate using A2A protocol.
Useful resources
From Prototype to Production
This lab is part of the Production-Ready AI with Google Cloud Learning Path.
- Explore the full curriculum to bridge the gap from prototype to production.
- Share your progress with the hashtag #ProductionReadyAI.