
1. Panoramica
Gli agenti AI stanno diventando sempre più popolari e rivoluzionano l'automazione delle attività e il processo decisionale grazie alla loro capacità di operare in modo autonomo, apprendere e interagire con l'ambiente per raggiungere gli obiettivi.
Ma come si fa esattamente a creare un agente? Questo codelab ti aiuterà a iniziare mostrandoti come creare un agente di valuta in grado di convertire le valute di diversi paesi. L'obiettivo è quello di illustrare le ultime tecnologie per aiutarti a comprendere gli acronimi che potresti aver visto circolare su internet (MCP, ADK, A2A).
Model Context Protocol (MCP)
Il Model Context Protocol (MCP) è un protocollo aperto che standardizza il modo in cui le applicazioni forniscono il contesto ai LLM. MCP fornisce un modo standardizzato per connettere i modelli di AI a risorse, prompt e strumenti.
Agent Development Kit (ADK)
Agent Development Kit (ADK) è un framework di orchestrazione flessibile per lo sviluppo e il deployment di agenti AI. ADK è indipendente dal modello, dal deployment ed è progettato per la compatibilità con altri framework. ADK è stato progettato per rendere lo sviluppo di agenti più simile allo sviluppo di software, in modo che gli sviluppatori possano creare, eseguire il deployment e orchestrare più facilmente architetture basate su agenti che vanno da semplici attività a workflow complessi.
Protocollo Agent2Agent (A2A)
Il protocollo Agent2Agent (A2A) è uno standard aperto progettato per consentire una comunicazione e una collaborazione fluide tra gli agenti AI. Proprio come MCP fornisce un modo standardizzato per consentire agli LLM di accedere a dati e strumenti, A2A fornisce un modo standardizzato per consentire agli agenti di comunicare tra loro. In un mondo in cui gli agenti sono creati utilizzando framework diversi e da fornitori diversi, A2A fornisce un linguaggio comune, abbattendo i silos e promuovendo l'interoperabilità.
Obiettivi didattici
- Come creare un server MCP locale
- Deployment del server MCP in Cloud Run
- Come creare un agente con Agent Development Kit che utilizza gli strumenti MCP
- Come esporre un agente ADK come server A2A
- Test del server A2A utilizzando il client A2A
Che cosa ti serve
2. Prima di iniziare
Crea un progetto
- Nella console Google Cloud, nella pagina di selezione del progetto, seleziona o crea un progetto Google Cloud.
- Verifica che la fatturazione sia attivata per il tuo progetto Cloud. Scopri come verificare se la fatturazione è abilitata per un progetto.
- Attiva Cloud Shell facendo clic su questo link. Puoi passare dal terminale Cloud Shell (per eseguire comandi cloud) all'editor (per creare progetti) facendo clic sul pulsante corrispondente in Cloud Shell.
- Una volta eseguita la connessione a Cloud Shell, verifica di essere già autenticato e che il progetto sia impostato sul tuo ID progetto utilizzando il seguente comando:
gcloud auth list
- Esegui questo comando in Cloud Shell per verificare che il comando gcloud conosca il tuo progetto.
gcloud config list project
- Utilizza il seguente comando per impostare il progetto:
export PROJECT_ID=<YOUR_PROJECT_ID>
gcloud config set project $PROJECT_ID
- Abilita le API richieste utilizzando il seguente comando. L'operazione potrebbe richiedere alcuni minuti.
gcloud services enable cloudresourcemanager.googleapis.com \
                       servicenetworking.googleapis.com \
                       run.googleapis.com \
                       cloudbuild.googleapis.com \
                       artifactregistry.googleapis.com \
                       aiplatform.googleapis.com \
                       compute.googleapis.com
- Assicurati di avere Python 3.10 o versioni successive
Per i comandi gcloud e il relativo utilizzo, consulta la documentazione.
3. Installazione
- Clona il repository:
git clone https://github.com/jackwotherspoon/currency-agent.git
cd currency-agent
- Installa uv (utilizzato per gestire le dipendenze):
# macOS and Linux
curl -LsSf https://astral.sh/uv/install.sh | sh

# Windows (uncomment below line)
# powershell -ExecutionPolicy ByPass -c "irm https://astral.sh/uv/install.ps1 | iex"
- Configura le variabili di ambiente (tramite il file
.env):
Crea un file .env eseguendo il seguente comando:
echo "GOOGLE_GENAI_USE_VERTEXAI=TRUE" >> .env \
&& echo "GOOGLE_CLOUD_PROJECT=$PROJECT_ID" >> .env \
&& echo "GOOGLE_CLOUD_LOCATION=us-central1" >> .env
4. Crea un server MCP locale
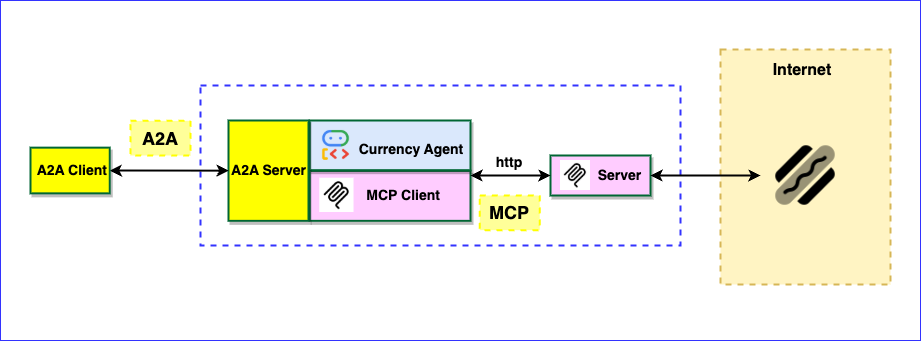
Prima di orchestrare l'agente di valuta, devi creare un server MCP per esporre gli strumenti di cui l'agente avrà bisogno.
Un server MCP ti consente di scrivere programmi leggeri per esporre funzionalità specifiche (come il recupero dei tassi di cambio) come strumenti. Un agente o anche più agenti possono quindi accedere a questi strumenti utilizzando il Model Context Protocol (MCP) standardizzato.
Il pacchetto Python FastMCP può essere utilizzato per creare un server MCP che espone un singolo strumento chiamato get_exchange_rate. Lo strumento get_exchange_rate effettua una chiamata su internet all'API Frankfurter per ottenere il tasso di cambio attuale tra due valute.
Il codice per il server MCP è disponibile nel file mcp-server/server.py:
import logging
import os

import httpx
from fastmcp import FastMCP

# Set up logging
logger = logging.getLogger(__name__)
logging.basicConfig(format="[%(levelname)s]: %(message)s", level=logging.INFO)

mcp = FastMCP("Currency MCP Server 💵")

@mcp.tool()
def get_exchange_rate(
    currency_from: str = 'USD',
    currency_to: str = 'EUR',
    currency_date: str = 'latest',
):
    """Use this to get current exchange rate.

    Args:
        currency_from: The currency to convert from (e.g., "USD").
        currency_to: The currency to convert to (e.g., "EUR").
        currency_date: The date for the exchange rate or "latest". Defaults to "latest".

    Returns:
        A dictionary containing the exchange rate data, or an error message if the request fails.
    """
    logger.info(f"--- 🛠️ Tool: get_exchange_rate called for converting {currency_from} to {currency_to} ---")
    try:
        response = httpx.get(
            f'https://api.frankfurter.app/{currency_date}',
            params={'from': currency_from, 'to': currency_to},
        )
        response.raise_for_status()

        data = response.json()
        if 'rates' not in data:
            return {'error': 'Invalid API response format.'}
        logger.info(f'✅ API response: {data}')
        return data
    except httpx.HTTPError as e:
        return {'error': f'API request failed: {e}'}
    except ValueError:
        return {'error': 'Invalid JSON response from API.'}

if __name__ == "__main__":
    logger.info(f"🚀 MCP server started on port {os.getenv('PORT', 8080)}")
    # Could also use 'sse' transport, host="0.0.0.0" required for Cloud Run.
    asyncio.run(
        mcp.run_async(
            transport="http",
            host="0.0.0.0",
            port=os.getenv("PORT", 8080),
        )
    )
Per avviare il server MCP in locale, apri un terminale ed esegui questo comando (il server verrà avviato su http://localhost:8080):
uv run mcp-server/server.py
Verifica che il server MCP funzioni correttamente e che lo strumento get_exchange_rate sia accessibile utilizzando il Model Context Protocol.
In una finestra del nuovo terminale (in modo da non arrestare il server MCP locale), esegui quanto segue:
uv run mcp-server/test_server.py
Dovresti visualizzare l'output del tasso di cambio attuale di 1 USD (dollaro statunitense) in EUR (euro):
--- 🛠️ Tool found: get_exchange_rate ---
--- 🪛 Calling get_exchange_rate tool for USD to EUR ---
--- ✅ Success: {
  "amount": 1.0,
  "base": "USD",
  "date": "2025-05-26",
  "rates": {
    "EUR": 0.87866
  }
} ---
Fantastico! Hai un server MCP funzionante con uno strumento a cui il tuo agente potrà accedere.
Prima di passare alla stazione successiva, arresta il server MCP in esecuzione in locale eseguendo Ctrl+C (o Command+C su Mac) nel terminale in cui l'hai avviato.
5. Esegui il deployment del server MCP in Cloud Run
Ora puoi eseguire il deployment del server MCP come server MCP remoto su Cloud Run 🚀☁️
Vantaggi dell'esecuzione di un server MCP da remoto
L'esecuzione di un server MCP in remoto su Cloud Run può offrire diversi vantaggi:
- 📈Scalabilità: Cloud Run è progettato per scalare rapidamente per gestire tutte le richieste in entrata. Cloud Run scala automaticamente il server MCP in base alla domanda.
- 👥 Server centralizzato: puoi condividere l'accesso a un server MCP centralizzato con i membri del team tramite i privilegi IAM, consentendo loro di connettersi dalle loro macchine locali anziché eseguire tutti i propri server localmente. Se viene apportata una modifica al server MCP, tutti i membri del team ne trarranno vantaggio.
- 🔐 Sicurezza: Cloud Run offre un modo semplice per forzare le richieste autenticate. In questo modo, solo le connessioni sicure possono accedere al server MCP, impedendo l'accesso non autorizzato.
Passa alla directory mcp-server:
cd mcp-server
Esegui il deployment del server MCP in Cloud Run:
gcloud run deploy mcp-server --no-allow-unauthenticated --region=us-central1 --source .
Se il servizio è stato implementato correttamente, viene visualizzato un messaggio simile al seguente:
Service [mcp-server] revision [mcp-server-12345-abc] has been deployed and is serving 100 percent of traffic.
Autenticazione dei client MCP
Poiché hai specificato --no-allow-unauthenticated per richiedere l'autenticazione, qualsiasi client MCP che si connette al server MCP remoto dovrà autenticarsi.
La documentazione ufficiale per Ospitare server MCP su Cloud Run fornisce ulteriori informazioni su questo argomento a seconda di dove esegui il client MCP.
Per creare un tunnel autenticato al server MCP remoto sulla tua macchina locale, devi eseguire il proxy Cloud Run.
Per impostazione predefinita, l'URL dei servizi Cloud Run richiede che tutte le richieste siano autorizzate con il ruolo IAM Cloud Run Invoker (roles/run.invoker). Questo binding dei criteri IAM garantisce che venga utilizzato un meccanismo di sicurezza efficace per autenticare il client MCP locale.
Assicurati che tu o i membri del team che tentano di accedere al server MCP remoto disponiate del ruolo IAM roles/run.invoker associato alla vostra entità IAM (account Google Cloud).
gcloud run services proxy mcp-server --region=us-central1
Dovresti vedere l'output seguente:
Proxying to Cloud Run service [mcp-server] in project [<YOUR_PROJECT_ID>] region [us-central1]
http://127.0.0.1:8080 proxies to https://mcp-server-abcdefgh-uc.a.run.app
Tutto il traffico verso http://127.0.0.1:8080 verrà ora autenticato e inoltrato al server MCP remoto.
Testare il server MCP remoto
In un nuovo terminale, torna alla cartella radice ed esegui di nuovo il file mcp-server/test_server.py per assicurarti che il server MCP remoto funzioni.
cd ..
uv run mcp-server/test_server.py
Dovresti vedere un output simile a quello visualizzato durante l'esecuzione del server in locale:
--- 🛠️ Tool found: get_exchange_rate ---
--- 🪛 Calling get_exchange_rate tool for USD to EUR ---
--- ✅ Success: {
  "amount": 1.0,
  "base": "USD",
  "date": "2025-05-26",
  "rates": {
    "EUR": 0.87866
  }
} ---
Se vuoi verificare che il server remoto sia stato effettivamente chiamato, puoi eseguire query sui log del server MCP Cloud Run di cui è stato eseguito il deployment:
gcloud run services logs read mcp-server --region us-central1 --limit 5
Nei log dovrebbe essere visualizzato l'output seguente:
2025-06-04 14:28:29,871 [INFO]: --- 🛠️ Tool: get_exchange_rate called for converting USD to EUR ---
2025-06-04 14:28:30,610 [INFO]: HTTP Request: GET https://api.frankfurter.app/latest?from=USD&to=EUR "HTTP/1.1 200 OK"
2025-06-04 14:28:30,611 [INFO]: ✅ API response: {'amount': 1.0, 'base': 'USD', 'date': '2025-06-03', 'rates': {'EUR': 0.87827}}
Ora che hai un server MCP remoto, puoi procedere alla creazione di un agente. 🤖
6. Creare un agente con Agent Development Kit (ADK)
Hai un server MCP di cui è stato eseguito il deployment, ora è il momento di creare l'agente di valuta utilizzando Agent Development Kit (ADK).
L'Agent Development Kit ha recentemente rilasciato la versione stabile 1.0.0. Questo traguardo indica che l'ADK Python è ora pronto per la produzione e offre una piattaforma affidabile e solida per consentire agli sviluppatori di creare e implementare i propri agenti in ambienti live in tutta sicurezza.
ADK rende la creazione di agenti estremamente leggera e consente loro di connettersi facilmente ai server MCP con il supporto integrato per gli strumenti MCP. L'agente di valuta accederà allo strumento get_exchange_rate utilizzando la classe MCPToolset di ADK.
Il codice dell'agente di valuta si trova in currency_agent/agent.py:
import logging
import os

from dotenv import load_dotenv
from google.adk.agents import LlmAgent
from google.adk.a2a.utils.agent_to_a2a import to_a2a
from google.adk.tools.mcp_tool import MCPToolset, StreamableHTTPConnectionParams

logger = logging.getLogger(__name__)
logging.basicConfig(format="[%(levelname)s]: %(message)s", level=logging.INFO)

load_dotenv()

SYSTEM_INSTRUCTION = (
    "You are a specialized assistant for currency conversions. "
    "Your sole purpose is to use the 'get_exchange_rate' tool to answer questions about currency exchange rates. "
    "If the user asks about anything other than currency conversion or exchange rates, "
    "politely state that you cannot help with that topic and can only assist with currency-related queries. "
    "Do not attempt to answer unrelated questions or use tools for other purposes."
)

logger.info("--- 🔧 Loading MCP tools from MCP Server... ---")
logger.info("--- 🤖 Creating ADK Currency Agent... ---")

root_agent = LlmAgent(
    model="gemini-2.5-flash",
    name="currency_agent",
    description="An agent that can help with currency conversions",
    instruction=SYSTEM_INSTRUCTION,
    tools=[
        MCPToolset(
            connection_params=StreamableHTTPConnectionParams(
                url=os.getenv("MCP_SERVER_URL", "http://localhost:8080/mcp")
            )
        )
    ],
)
Per testare rapidamente l'agente di valuta, puoi sfruttare la UI di sviluppo di ADK, a cui puoi accedere eseguendo adk web:
uv run adk web
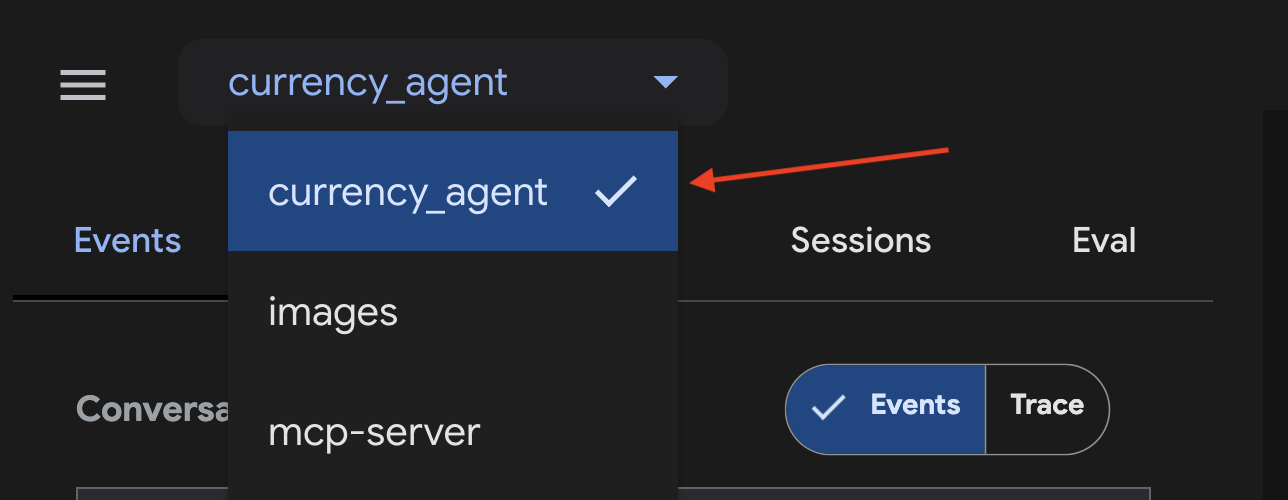
In un browser, vai a http://localhost:8000 per visualizzare e testare l'agente.
Assicurati che currency_agent sia selezionato come agente nell'angolo in alto a sinistra della UI web.
Chiedi all'agente nella chat qualcosa del tipo "Quanto fanno 250 CAD in USD?". Prima di fornire una risposta, dovresti vedere l'agente chiamare il nostro strumento MCP get_exchange_rate.
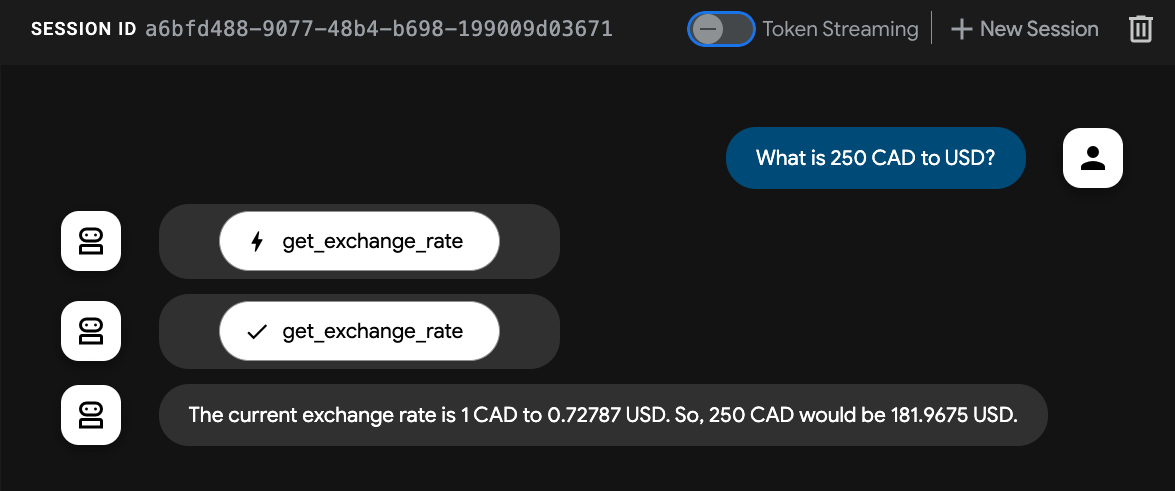
L'agente funziona. Può gestire query relative alle conversioni di valuta 💸.
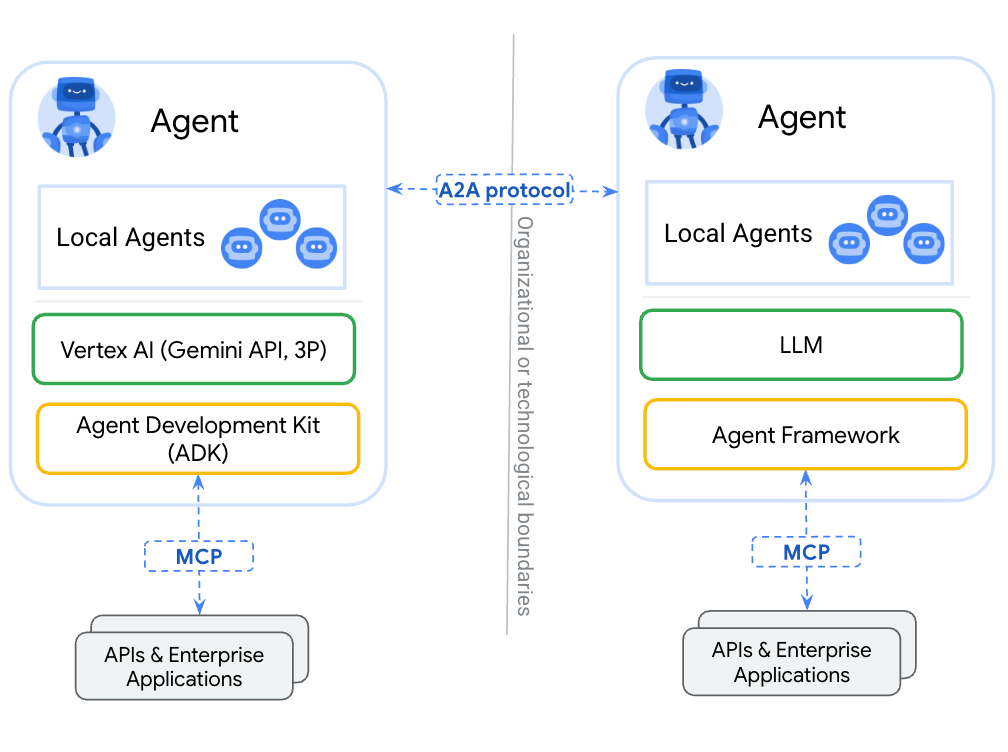
7. Protocollo A2A (Agent2Agent)
Il protocollo Agent2Agent (A2A) è uno standard aperto progettato per consentire una comunicazione e una collaborazione fluide tra gli agenti AI. Ciò consente agli agenti creati utilizzando framework diversi e da fornitori diversi di comunicare tra loro in un linguaggio comune, eliminando i silos e promuovendo l'interoperabilità.
A2A consente agli agenti di:
- Scopri:trova altri agenti e scopri le loro competenze (AgentSkill) e capacità (AgentCapabilities) utilizzando le schede degli agenti standardizzate.
- Comunica:scambia messaggi e dati in modo sicuro.
- Collabora:delega attività e coordina azioni per raggiungere obiettivi complessi.
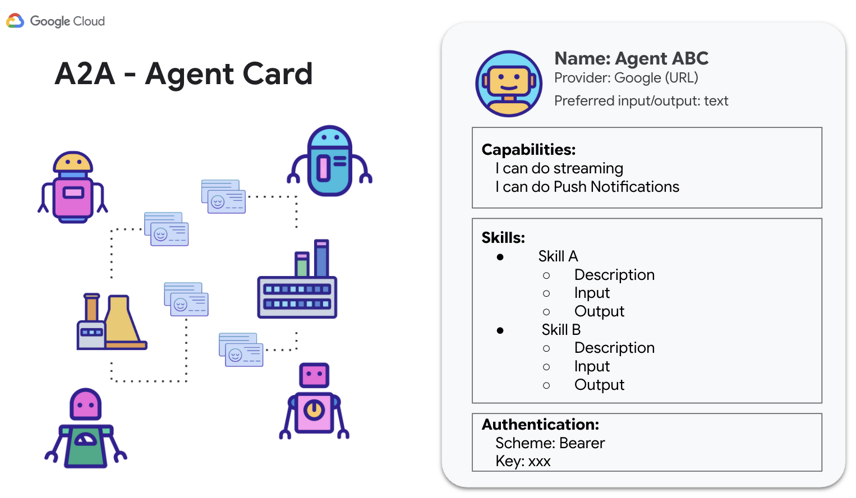
Il protocollo A2A facilita questa comunicazione tramite meccanismi come le "schede dell'agente", che fungono da biglietti da visita digitali che gli agenti possono utilizzare per pubblicizzare le proprie funzionalità e i dati di connessione.
Ora è il momento di esporre l'agente di valuta utilizzando A2A in modo che possa essere chiamato da altri agenti e client.
SDK Python A2A
L'SDK Python A2A fornisce modelli Pydantic per ciascuna delle risorse menzionate in precedenza: AgentSkill, AgentCapabilities e AgentCard. Fornisce un'interfaccia per accelerare lo sviluppo e l'integrazione con il protocollo A2A.
Un AgentSkill è il modo in cui pubblicizzerai ad altri agenti che l'agente di cambio ha uno strumento per get_exchange_rate:
# A2A Agent Skill definition
skill = AgentSkill(
    id='get_exchange_rate',
    name='Currency Exchange Rates Tool',
    description='Helps with exchange values between various currencies',
    tags=['currency conversion', 'currency exchange'],
    examples=['What is exchange rate between USD and GBP?'],
)
Poi, nell'ambito di AgentCard, verranno elencate le competenze e le capacità dell'agente insieme a ulteriori dettagli come le modalità di input e output che l'agente può gestire:
# A2A Agent Card definition
agent_card = AgentCard(
    name='Currency Agent',
    description='Helps with exchange rates for currencies',
    url=f'http://{host}:{port}/',
    version='1.0.0',
    defaultInputModes=["text"],
    defaultOutputModes=["text"],
    capabilities=AgentCapabilities(streaming=True),
    skills=[skill],
)
È arrivato il momento di mettere tutto insieme con l'agente di valuta e mostrare la potenza di A2A.
8. Esposizione del server A2A dell'agente di valuta
ADK semplifica il processo di creazione e connessione degli agenti utilizzando il protocollo A2A. Per rendere accessibile (esporre) un agente ADK esistente come server A2A, utilizza la funzione to_a2a(root_agent) di ADK (per tutti i dettagli, consulta la documentazione di ADK).
La funzione to_a2a converte un agente esistente in modo che funzioni con A2A e possa esporlo come server tramite uvicorn. Ciò significa che hai un controllo più rigoroso su ciò che vuoi esporre se prevedi di mettere in produzione il tuo agente. La funzione to_a2a() genera automaticamente una scheda dell'agente in base al codice dell'agente utilizzando l'SDK Python A2A.
Se esaminiamo il file currency_agent/agent.py, possiamo vedere l'utilizzo di to_a2a e come l'agente di cambio sia esposto come server A2A con solo due righe di codice.
from google.adk.a2a.utils.agent_to_a2a import to_a2a
# ... see file for full code

# Make the agent A2A-compatible
a2a_app = to_a2a(root_agent, port=10000)
Per eseguire il server A2A, in un nuovo terminale esegui questo comando:
uv run uvicorn currency_agent.agent:a2a_app --host localhost --port 10000
Se il server viene avviato correttamente, l'output sarà simile al seguente, a indicare che è in esecuzione sulla porta 10000:
[INFO]: --- 🔧 Loading MCP tools from MCP Server... ---
[INFO]: --- 🤖 Creating ADK Currency Agent... ---
INFO:     Started server process [45824]
INFO:     Waiting for application startup.
INFO:     Application startup complete.
INFO:     Uvicorn running on http://localhost:10000 (Press CTRL+C to quit)
L'agente di valuta ora viene eseguito correttamente come server A2A, con la possibilità di essere chiamato da altri agenti o client utilizzando il protocollo A2A.
Verifica che l'agente remoto sia in esecuzione
Puoi verificare che l'agente sia attivo e funzionante visitando l'URL della scheda dell'agente per l'agente di valuta generato automaticamente dalla funzione to_a2a().
Nel browser, vai a [http://localhost:10000/.well-known/agent.json]
Dovresti visualizzare la seguente scheda dell'agente:
{
  "capabilities": {

  },
  "defaultInputModes": [
    "text/plain"
  ],
  "defaultOutputModes": [
    "text/plain"
  ],
  "description": "An agent that can help with currency conversions",
  "name": "currency_agent",
  "preferredTransport": "JSONRPC",
  "protocolVersion": "0.3.0",
  "skills": [
    {
      "description": "An agent that can help with currency conversions I am a specialized assistant for currency conversions. my sole purpose is to use the 'get_exchange_rate' tool to answer questions about currency exchange rates. If the user asks about anything other than currency conversion or exchange rates, politely state that I cannot help with that topic and can only assist with currency-related queries. Do not attempt to answer unrelated questions or use tools for other purposes.",
      "id": "currency_agent",
      "name": "model",
      "tags": [
        "llm"
      ]
    },
    {
      "description": "Use this to get current exchange rate.\n\nArgs:\n    currency_from: The currency to convert from (e.g., \"USD\").\n    currency_to: The currency to convert to (e.g., \"EUR\").\n    currency_date: The date for the exchange rate or \"latest\". Defaults to \"latest\".\n\nReturns:\n    A dictionary containing the exchange rate data, or an error message if the request fails.",
      "id": "currency_agent-get_exchange_rate",
      "name": "get_exchange_rate",
      "tags": [
        "llm",
        "tools"
      ]
    }
  ],
  "supportsAuthenticatedExtendedCard": false,
  "url": "http://localhost:10000",
  "version": "0.0.1"
}
Testare il server A2A
Ora puoi testare il server inviandogli alcune richieste utilizzando A2A.
L'SDK Python A2A fornisce una classe a2a.client.A2AClient che semplifica questa operazione.
Il file currency_agent/test_client.py contiene codice che esegue diversi scenari di test sul server A2A.
# ... see file for full code

# Example test using A2AClient
async def run_single_turn_test(client: A2AClient) -> None:
    """Runs a single-turn non-streaming test."""

    send_message_payload = create_send_message_payload(text="how much is 100 USD in CAD?")
    request = SendMessageRequest(
        id=str(uuid4()), params=MessageSendParams(**send_message_payload)
    )

    print("--- ✉️  Single Turn Request ---")
    # Send Message
    response: SendMessageResponse = await client.send_message(request)
    print_json_response(response, "📥 Single Turn Request Response")
    if not isinstance(response.root, SendMessageSuccessResponse):
        print("received non-success response. Aborting get task ")
        return

    if not isinstance(response.root.result, Task):
        print("received non-task response. Aborting get task ")
        return

    task_id: str = response.root.result.id
    print("--- ❔ Query Task ---")
    # query the task
    get_request = GetTaskRequest(id=str(uuid4()), params=TaskQueryParams(id=task_id))
    get_response: GetTaskResponse = await client.get_task(get_request)
    print_json_response(get_response, "📥 Query Task Response")

# ----- Main Entrypoint (Create client --> Run tests) -----
async def main() -> None:
    """Main function to run the tests."""
    print(f'--- 🔄 Connecting to agent at {AGENT_URL}... ---')
    try:
        async with httpx.AsyncClient() as httpx_client:
            # Create a resolver to fetch the agent card
            resolver = A2ACardResolver(
                httpx_client=httpx_client,
                base_url=AGENT_URL,
            )
            agent_card = await resolver.get_agent_card()
            # Create a client to interact with the agent
            client = A2AClient(
                httpx_client=httpx_client,
                agent_card=agent_card,
            )
            print('--- ✅ Connection successful. ---')

            await run_single_turn_test(client)
            await run_multi_turn_test(client)

    except Exception as e:
        traceback.print_exc()
        print(f'--- ❌ An error occurred: {e} ---')
        print('Ensure the agent server is running.')
Esegui i test utilizzando il seguente comando:
uv run currency_agent/test_client.py
L'esecuzione di un test riuscita comporta quanto segue:
--- 🔄 Connecting to agent at http://localhost:10000... ---
--- ✅ Connection successful. ---
--- ✉️ Single Turn Request ---
--- 📥 Single Turn Request Response ---
{"id":"3bc92d7b-d857-4e93-9ff0-b2fb865f6e35","jsonrpc":"2.0","result":{"artifacts":[{"artifactId":"35e89e14-b977-4397-a23b-92c84bc32379","parts":[{"kind":"text","text":"Based on the current exchange rate, 1 USD is equivalent to 1.3704 CAD. Therefore, 100 USD would be 137.04 CAD.\n"}]}],"contextId":"2d66f277-152c-46ef-881d-7fe32866e9f5","history":[{"contextId":"2d66f277-152c-46ef-881d-7fe32866e9f5","kind":"message","messageId":"59819269f7d04849b0bfca7d43ec073c","parts":[{"kind":"text","text":"how much is 100 USD in CAD?"}],"role":"user","taskId":"52ae2392-84f5-429a-a14b-8413d3d20d97"},{"contextId":"2d66f277-152c-46ef-881d-7fe32866e9f5","kind":"message","messageId":"286095c6-12c9-40cb-9596-a9676d570dbd","parts":[],"role":"agent","taskId":"52ae2392-84f5-429a-a14b-8413d3d20d97"}],"id":"52ae2392-84f5-429a-a14b-8413d3d20d97","kind":"task","status":{"state":"completed"}}}

// ...

--- 🚀 First turn completed, no further input required for this test case. ---
Funziona! Hai testato correttamente la comunicazione con l'agente di valuta tramite un server A2A. 🎉
Dai un'occhiata al repository a2a-samples su GitHub per vedere casi d'uso più avanzati.
Vuoi eseguire il deployment del tuo agente? Vertex AI Agent Engine offre un'esperienza gestita per il deployment degli agenti AI in produzione.
9. Complimenti
Complimenti! Hai creato e implementato correttamente un server MCP remoto, creato un agente di valuta utilizzando Agent Development Kit (ADK) che si connette agli strumenti utilizzando MCP ed esposto l'agente utilizzando il protocollo Agent2Agent (A2A). L'agente di conversione della valuta ora è disponibile per interagire con altri agenti di qualsiasi framework utilizzando A2A.
Qui trovi un link alla documentazione completa del codice.
Argomenti trattati
- Come creare un server MCP locale
- Deployment del server MCP in Cloud Run
- Come creare un agente con Agent Development Kit che utilizza gli strumenti MCP
- Come esporre un agente ADK come server A2A
- Test del server A2A utilizzando il client A2A
Esegui la pulizia
Per evitare che al tuo account Google Cloud vengano addebitati costi relativi alle risorse utilizzate in questo lab, segui questi passaggi:
- Nella console Google Cloud, vai alla pagina Gestisci risorse.
- Nell'elenco dei progetti, seleziona il progetto che vuoi eliminare, quindi fai clic su Elimina.
- Nella finestra di dialogo, digita l'ID progetto, quindi fai clic su Chiudi per eliminare il progetto.