
1. 概要
AI エージェントは急速に普及しており、自律的に動作し、学習し、環境とやり取りして目標を達成する能力により、タスクの自動化と意思決定に革命をもたらしています。
では、エージェントを構築するにはどうすればよいのでしょうか。この Codelab では、さまざまな国の通貨を換算できる通貨エージェントを作成する方法を説明し、開発の開始を支援します。この記事では、インターネットでよく見かける略語(MCP、ADK、A2A)を理解できるように、最新のテクノロジーについて説明します。
Model Context Protocol(MCP)
Model Context Protocol(MCP)は、アプリケーションが LLM にコンテキストを提供する方法を標準化するオープン プロトコルです。MCP は、AI モデルをリソース、プロンプト、ツールに接続するための標準化された方法を提供します。
Agent Development Kit(ADK)
Agent Development Kit(ADK)は、AI エージェントの開発とデプロイ用の柔軟なオーケストレーション フレームワークです。ADK は、モデルやデプロイに依存せず、他のフレームワークとの互換性を保つよう構築されています。ADK は、エージェント開発をソフトウェア開発のような感覚で行えるよう設計されており、デベロッパーは基本的なタスクから複雑なワークフローまで、幅広いエージェント アーキテクチャを簡単に作成、デプロイ、オーケストレートできます。
Agent2Agent(A2A)プロトコル
Agent2Agent(A2A)プロトコルは、AI エージェント間のシームレスな通信とコラボレーションを可能にするように設計されたオープン スタンダードです。MCP が LLM にデータやツールへのアクセス権を付与するための標準化された方法を提供するのと同様に、A2A はエージェントが他のエージェントと通信するための標準化された方法を提供します。さまざまなフレームワークを使用してさまざまなベンダーがエージェントを構築する世界において、A2A は共通言語を提供し、サイロを解消して相互運用性を促進します。
学習内容
- ローカル MCP サーバーを作成する方法
- MCP サーバーを Cloud Run にデプロイする
- MCP ツールを使用する Agent Development Kit でエージェントを構築する方法
- ADK エージェントを A2A サーバーとして公開する方法
- A2A クライアントを使用して A2A サーバーをテストする
必要なもの
2. 始める前に
プロジェクトを作成する
- Google Cloud コンソールのプロジェクト選択ページで、Google Cloud プロジェクトを選択または作成します。
- Cloud プロジェクトに対して課金が有効になっていることを確認します。プロジェクトで課金が有効になっているかどうかを確認する方法をご覧ください。
- このリンクをクリックして、Cloud Shell をアクティブにします。Cloud Shell の対応するボタンをクリックすると、Cloud Shell ターミナル(クラウド コマンドの実行用)とエディタ(プロジェクトのビルド用)を切り替えることができます。
- Cloud Shell に接続したら、次のコマンドを使用して、すでに認証済みであることと、プロジェクトがプロジェクト ID に設定されていることを確認します。
gcloud auth list
- Cloud Shell で次のコマンドを実行して、gcloud コマンドがプロジェクトを認識していることを確認します。
gcloud config list project
- 次のコマンドを使用して、プロジェクトを設定します。
export PROJECT_ID=<YOUR_PROJECT_ID>
gcloud config set project $PROJECT_ID
- 次のコマンドを使用して、必要な API を有効にします。これには数分かかることがあります。
gcloud services enable cloudresourcemanager.googleapis.com \
                       servicenetworking.googleapis.com \
                       run.googleapis.com \
                       cloudbuild.googleapis.com \
                       artifactregistry.googleapis.com \
                       aiplatform.googleapis.com \
                       compute.googleapis.com
- Python 3.10 以降がインストールされていることを確認する
gcloud コマンドとその使用方法については、ドキュメントをご覧ください。
3. インストール
- リポジトリのクローンを作成します。
git clone https://github.com/jackwotherspoon/currency-agent.git
cd currency-agent
- uv(依存関係の管理に使用)をインストールします。
# macOS and Linux
curl -LsSf https://astral.sh/uv/install.sh | sh

# Windows (uncomment below line)
# powershell -ExecutionPolicy ByPass -c "irm https://astral.sh/uv/install.ps1 | iex"
- 環境変数を構成します(
.envファイルを使用)。
次のコマンドを実行して .env ファイルを作成します。
echo "GOOGLE_GENAI_USE_VERTEXAI=TRUE" >> .env \
&& echo "GOOGLE_CLOUD_PROJECT=$PROJECT_ID" >> .env \
&& echo "GOOGLE_CLOUD_LOCATION=us-central1" >> .env
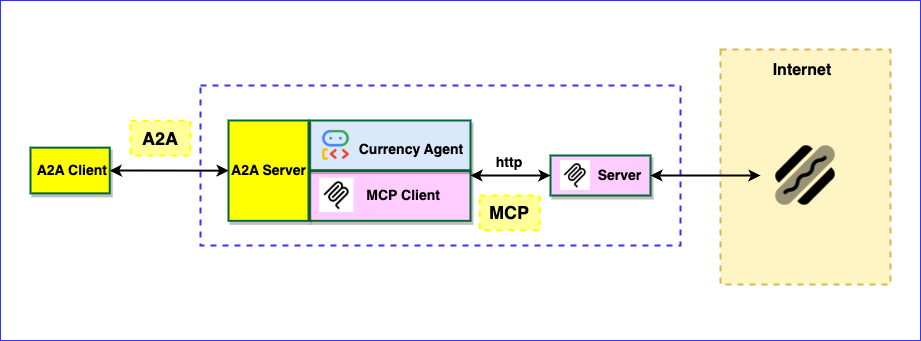
4. ローカル MCP サーバーを作成する
通貨エージェントをオーケストレートする前に、エージェントが必要とするツールを公開するための MCP サーバーを作成します。
MCP サーバーを使用すると、特定の機能(通貨換算レートの取得など)をツールとして公開する軽量プログラムを作成できます。エージェント(または複数のエージェント)は、標準化された Model Context Protocol(MCP)を使用してこれらのツールにアクセスできます。
FastMCP Python パッケージを利用して、get_exchange_rate という単一のツールを公開する MCP サーバーを作成できます。get_exchange_rate ツールは、インターネット経由で Frankfurter API を呼び出して、2 つの通貨間の現在の為替レートを取得します。
MCP サーバーのコードは mcp-server/server.py ファイルにあります。
import logging
import os

import httpx
from fastmcp import FastMCP

# Set up logging
logger = logging.getLogger(__name__)
logging.basicConfig(format="[%(levelname)s]: %(message)s", level=logging.INFO)

mcp = FastMCP("Currency MCP Server 💵")

@mcp.tool()
def get_exchange_rate(
    currency_from: str = 'USD',
    currency_to: str = 'EUR',
    currency_date: str = 'latest',
):
    """Use this to get current exchange rate.

    Args:
        currency_from: The currency to convert from (e.g., "USD").
        currency_to: The currency to convert to (e.g., "EUR").
        currency_date: The date for the exchange rate or "latest". Defaults to "latest".

    Returns:
        A dictionary containing the exchange rate data, or an error message if the request fails.
    """
    logger.info(f"--- 🛠️ Tool: get_exchange_rate called for converting {currency_from} to {currency_to} ---")
    try:
        response = httpx.get(
            f'https://api.frankfurter.app/{currency_date}',
            params={'from': currency_from, 'to': currency_to},
        )
        response.raise_for_status()

        data = response.json()
        if 'rates' not in data:
            return {'error': 'Invalid API response format.'}
        logger.info(f'✅ API response: {data}')
        return data
    except httpx.HTTPError as e:
        return {'error': f'API request failed: {e}'}
    except ValueError:
        return {'error': 'Invalid JSON response from API.'}

if __name__ == "__main__":
    logger.info(f"🚀 MCP server started on port {os.getenv('PORT', 8080)}")
    # Could also use 'sse' transport, host="0.0.0.0" required for Cloud Run.
    asyncio.run(
        mcp.run_async(
            transport="http",
            host="0.0.0.0",
            port=os.getenv("PORT", 8080),
        )
    )
MCP サーバーをローカルで起動するには、ターミナルを開いて次のコマンドを実行します(サーバーは http://localhost:8080 で起動します)。
uv run mcp-server/server.py
MCP サーバーが正しく機能し、Model Context Protocol を使用して get_exchange_rate ツールにアクセスできることをテストします。
新しいターミナル ウィンドウで(ローカル MCP サーバーを停止しないように)、次のコマンドを実行します。
uv run mcp-server/test_server.py
1 米ドル(USD)からユーロ(EUR)への現在の為替レートが出力されます。
--- 🛠️ Tool found: get_exchange_rate ---
--- 🪛 Calling get_exchange_rate tool for USD to EUR ---
--- ✅ Success: {
  "amount": 1.0,
  "base": "USD",
  "date": "2025-05-26",
  "rates": {
    "EUR": 0.87866
  }
} ---
ところ、これで、エージェントがアクセスできるツールを備えた MCP サーバーが正常に動作するようになりました。
次のステーションに進む前に、起動したターミナルで Ctrl+C(Mac の場合は Command+C)を実行して、ローカルで実行中の MCP サーバーを停止します。
5. MCP サーバーを Cloud Run にデプロイする
これで、MCP サーバーをリモート MCP サーバーとして Cloud Run にデプロイする準備が整いました 🚀☁️
MCP サーバーをリモートで実行するメリット
MCP サーバーを Cloud Run でリモートで実行すると、次のようなメリットがあります。
- 📈スケーラビリティ: Cloud Run は、すべての受信リクエストを処理するために迅速にスケールアウトするように構築されています。そのため、需要に応じて MCP サーバーを自動的にスケールしてくれます。
- 👥集中型サーバー: 集中型 MCP サーバーへのアクセスを IAM 権限を通じてチームメンバーと共有できます。これにより、各自のローカルマシンからサーバーに接続でき、ローカルで独自のサーバーを実行する必要がなくなります。また、MCP サーバーに変更が加えられた場合はそれをチームメンバー全員が利用できます。
- 🔐セキュリティ: Cloud Run では、リクエストの認証を簡単に必須化できます。これにより、MCP サーバーへの安全な接続のみが許可され、不正アクセスが防止されます。
mcp-server ディレクトリに移動します。
cd mcp-server
MCP サーバーを Cloud Run にデプロイします。
gcloud run deploy mcp-server --no-allow-unauthenticated --region=us-central1 --source .
サービスが正常にデプロイされると、次のようなメッセージが表示されます。
Service [mcp-server] revision [mcp-server-12345-abc] has been deployed and is serving 100 percent of traffic.
MCP クライアントの認証
--no-allow-unauthenticated を指定して認証を必須にしたため、リモート MCP サーバーに接続する MCP クライアントは認証を受ける必要があります。
Cloud Run で MCP サーバーをホストする方法に関する公式ドキュメントで、MCP クライアントの実行場所別にこのトピックに関する詳細情報を提供しています。
Cloud Run プロキシを実行して、ローカルマシンでリモート MCP サーバーへの認証済みトンネルを作成する必要があります。
デフォルトでは、Cloud Run サービスの URL では、すべてのリクエストに Cloud Run 起動元(roles/run.invoker)IAM ロールによる認可が必要です。この IAM ポリシー バインディングにより、ローカル MCP クライアントの認証に強力なセキュリティ メカニズムが使用されます。
リモート MCP サーバーにアクセスしようとしているチームメンバーに、IAM プリンシパル(Google Cloud アカウント)にバインドされた roles/run.invoker IAM ロールがあることを確認します。
gcloud run services proxy mcp-server --region=us-central1
次の出力が表示されます。
Proxying to Cloud Run service [mcp-server] in project [<YOUR_PROJECT_ID>] region [us-central1]
http://127.0.0.1:8080 proxies to https://mcp-server-abcdefgh-uc.a.run.app
これで、http://127.0.0.1:8080 へのすべてのトラフィックが認証され、リモート MCP サーバーに転送されます。
リモート MCP サーバーをテストする
新しいターミナルで、ルートフォルダに戻り、mcp-server/test_server.py ファイルを再度実行して、リモート MCP サーバーが動作していることを確認します。
cd ..
uv run mcp-server/test_server.py
サーバーをローカルで実行したときと同じような出力が表示されます。
--- 🛠️ Tool found: get_exchange_rate ---
--- 🪛 Calling get_exchange_rate tool for USD to EUR ---
--- ✅ Success: {
  "amount": 1.0,
  "base": "USD",
  "date": "2025-05-26",
  "rates": {
    "EUR": 0.87866
  }
} ---
リモート サーバーが実際に呼び出されたことを確認する場合は、デプロイされた Cloud Run MCP サーバーのログをクエリできます。
gcloud run services logs read mcp-server --region us-central1 --limit 5
ログに次のような出力が表示されます。
2025-06-04 14:28:29,871 [INFO]: --- 🛠️ Tool: get_exchange_rate called for converting USD to EUR ---
2025-06-04 14:28:30,610 [INFO]: HTTP Request: GET https://api.frankfurter.app/latest?from=USD&to=EUR "HTTP/1.1 200 OK"
2025-06-04 14:28:30,611 [INFO]: ✅ API response: {'amount': 1.0, 'base': 'USD', 'date': '2025-06-03', 'rates': {'EUR': 0.87827}}
リモート MCP サーバーができたので、エージェントの作成に進みましょう。🤖
6. Agent Development Kit(ADK)を使用してエージェントを作成する
MCP サーバーをデプロイしたので、Agent Development Kit(ADK)を使用して通貨エージェントを作成します。
Agent Development Kit は最近 v1.0.0 安定版リリースをリリースしました。このマイルストーンは、Python ADK が本番環境に対応したことを意味します。これにより、デベロッパーは信頼性と堅牢性に優れたプラットフォームを使用して、ライブ環境でエージェントを自信を持って構築し、デプロイできるようになります。
ADK を使用すると、エージェントを非常に軽量に作成でき、MCP ツールが組み込まれているため、MCP サーバーに簡単に接続できます。通貨エージェントは、ADK の MCPToolset クラスを使用して get_exchange_rate ツールにアクセスします。
通貨エージェントのコードは currency_agent/agent.py にあります。
import logging
import os

from dotenv import load_dotenv
from google.adk.agents import LlmAgent
from google.adk.a2a.utils.agent_to_a2a import to_a2a
from google.adk.tools.mcp_tool import MCPToolset, StreamableHTTPConnectionParams

logger = logging.getLogger(__name__)
logging.basicConfig(format="[%(levelname)s]: %(message)s", level=logging.INFO)

load_dotenv()

SYSTEM_INSTRUCTION = (
    "You are a specialized assistant for currency conversions. "
    "Your sole purpose is to use the 'get_exchange_rate' tool to answer questions about currency exchange rates. "
    "If the user asks about anything other than currency conversion or exchange rates, "
    "politely state that you cannot help with that topic and can only assist with currency-related queries. "
    "Do not attempt to answer unrelated questions or use tools for other purposes."
)

logger.info("--- 🔧 Loading MCP tools from MCP Server... ---")
logger.info("--- 🤖 Creating ADK Currency Agent... ---")

root_agent = LlmAgent(
    model="gemini-2.5-flash",
    name="currency_agent",
    description="An agent that can help with currency conversions",
    instruction=SYSTEM_INSTRUCTION,
    tools=[
        MCPToolset(
            connection_params=StreamableHTTPConnectionParams(
                url=os.getenv("MCP_SERVER_URL", "http://localhost:8080/mcp")
            )
        )
    ],
)
通貨エージェントをすばやくテストするには、adk web を実行してアクセスする ADK の開発 UI を利用します。
uv run adk web
ブラウザで http://localhost:8000 にアクセスして、エージェントを表示してテストします。
ウェブ UI の左上でエージェントとして currency_agent が選択されていることを確認します。
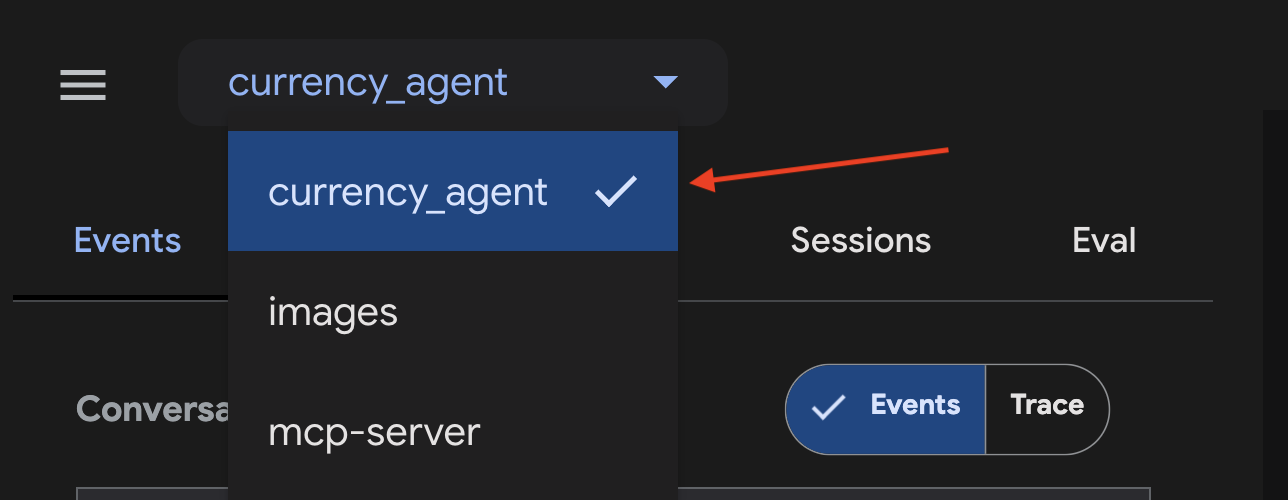
チャット エリアでエージェントに「250 カナダドルは米ドルでいくらですか?」などと質問します。エージェントが応答する前に get_exchange_rate MCP ツールを呼び出していることがわかります。
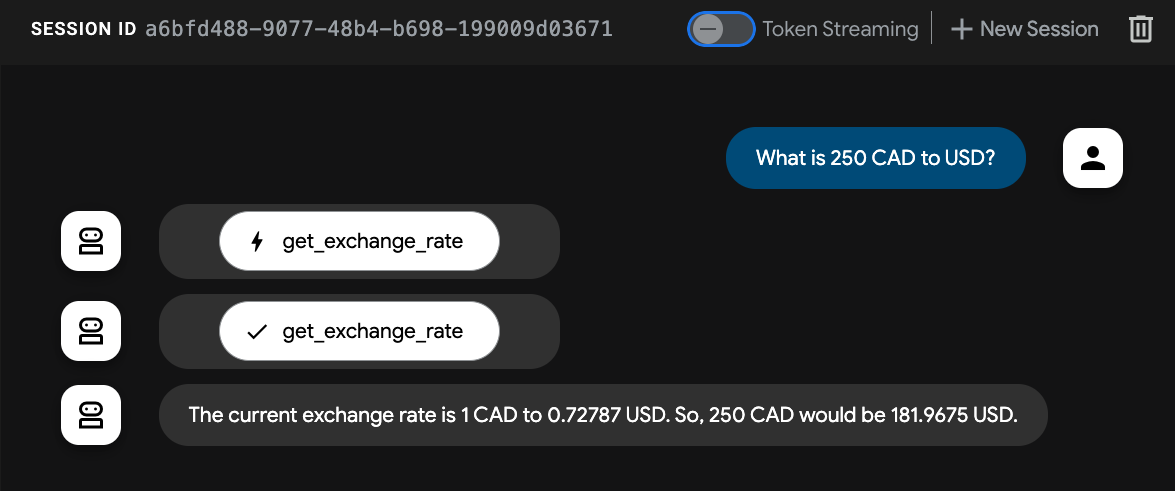
エージェントが動作します。通貨換算 💸 に関するクエリを処理できます。
7. Agent2Agent(A2A)プロトコル
Agent2Agent(A2A)プロトコルは、AI エージェント間のシームレスな通信とコラボレーションを可能にするように設計されたオープン スタンダードです。これにより、さまざまなフレームワークを使用してさまざまなベンダーによって構築されたエージェントが共通の言語で相互に通信できるようになり、サイロが解消され、相互運用性が促進されます。

A2A を使用すると、エージェントは次のことができます。
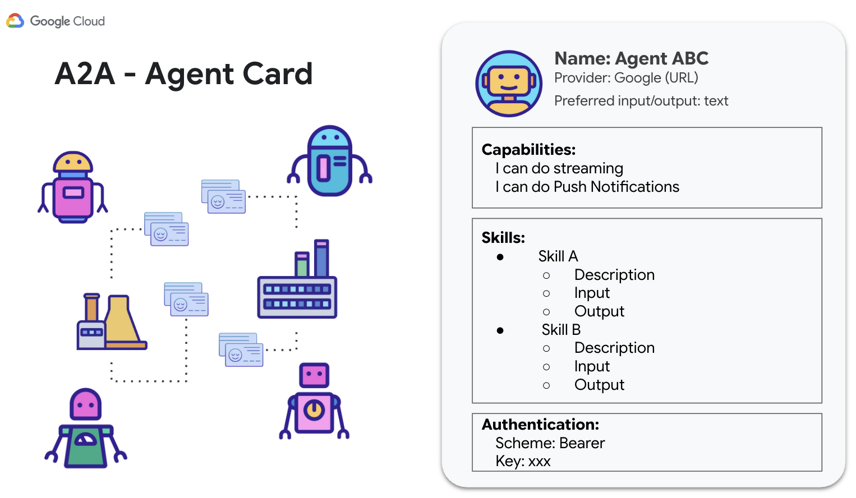
- 検出: 標準化されたエージェント カードを使用して、他のエージェントを見つけ、そのスキル(AgentSkill)と機能(AgentCapabilities)を学習します。
- コミュニケーション: メッセージとデータを安全に交換します。
- コラボレーション: 複雑な目標を達成するために、タスクを委任し、アクションを調整します。
A2A プロトコルは、エージェントが機能と接続情報を通知するために使用できるデジタル名刺として機能する「エージェント カード」などのメカニズムを通じて、この通信を容易にします。
次に、他のエージェントやクライアントから呼び出せるように、A2A を使用して通貨エージェントを公開します。
A2A Python SDK
A2A Python SDK には、前述のリソース(AgentSkill、AgentCapabilities、AgentCard)ごとに Pydantic モデルが用意されています。これにより、A2A プロトコルを使用した開発と統合を迅速に行うためのインターフェースが提供されます。
AgentSkill は、通貨エージェントに get_exchange_rate のツールがあることを他のエージェントに通知する方法です。
# A2A Agent Skill definition
skill = AgentSkill(
    id='get_exchange_rate',
    name='Currency Exchange Rates Tool',
    description='Helps with exchange values between various currencies',
    tags=['currency conversion', 'currency exchange'],
    examples=['What is exchange rate between USD and GBP?'],
)
AgentCard の一部として、エージェントのスキルと能力が、エージェントが処理できる入力モードや出力モードなどの詳細とともに表示されます。
# A2A Agent Card definition
agent_card = AgentCard(
    name='Currency Agent',
    description='Helps with exchange rates for currencies',
    url=f'http://{host}:{port}/',
    version='1.0.0',
    defaultInputModes=["text"],
    defaultOutputModes=["text"],
    capabilities=AgentCapabilities(streaming=True),
    skills=[skill],
)
通貨エージェントを使用してすべてをまとめ、A2A の力を発揮する時が来ました。
8. 通貨エージェント A2A サーバーの公開
ADK を使用すると、A2A プロトコルを使用してエージェントを構築して接続するプロセスが簡素化されます。既存の ADK エージェントを A2A サーバーとしてアクセス可能にする(公開する)には、ADK の to_a2a(root_agent) 関数を使用します(詳しくは、ADK のドキュメントをご覧ください)。
to_a2a 関数は、既存のエージェントを A2A で動作するように変換し、uvicorn を介してサーバーとして公開できるようにします。つまり、エージェントを本番環境に移行する場合は、公開する内容をより厳密に制御できます。to_a2a() 関数は、内部で A2A Python SDK を使用して、エージェント コードに基づいてエージェント カードを自動生成します。
currency_agent/agent.py ファイルの中身を見てみると、to_a2a の使用方法と、通貨エージェントがわずか 2 行のコードで A2A サーバーとして公開されていることがわかります。
from google.adk.a2a.utils.agent_to_a2a import to_a2a
# ... see file for full code

# Make the agent A2A-compatible
a2a_app = to_a2a(root_agent, port=10000)
A2A サーバーを実行するには、新しいターミナルで次のコマンドを実行します。
uv run uvicorn currency_agent.agent:a2a_app --host localhost --port 10000
サーバーが正常に起動すると、次の出力が表示され、ポート 10000 で実行されていることが示されます。
[INFO]: --- 🔧 Loading MCP tools from MCP Server... ---
[INFO]: --- 🤖 Creating ADK Currency Agent... ---
INFO:     Started server process [45824]
INFO:     Waiting for application startup.
INFO:     Application startup complete.
INFO:     Uvicorn running on http://localhost:10000 (Press CTRL+C to quit)
通貨エージェントは A2A サーバーとして正常に実行され、A2A プロトコルを使用して他のエージェントやクライアントから呼び出すことができるようになりました。
リモート エージェントが実行されていることを確認する
to_a2a() 関数によって自動生成された通貨エージェントのエージェントカードの URL にアクセスすると、エージェントが稼働中であることを再確認できます。
ブラウザで [http://localhost:10000/.well-known/agent.json] にアクセスします。
次のようなエージェント カードが表示されます。
{
  "capabilities": {

  },
  "defaultInputModes": [
    "text/plain"
  ],
  "defaultOutputModes": [
    "text/plain"
  ],
  "description": "An agent that can help with currency conversions",
  "name": "currency_agent",
  "preferredTransport": "JSONRPC",
  "protocolVersion": "0.3.0",
  "skills": [
    {
      "description": "An agent that can help with currency conversions I am a specialized assistant for currency conversions. my sole purpose is to use the 'get_exchange_rate' tool to answer questions about currency exchange rates. If the user asks about anything other than currency conversion or exchange rates, politely state that I cannot help with that topic and can only assist with currency-related queries. Do not attempt to answer unrelated questions or use tools for other purposes.",
      "id": "currency_agent",
      "name": "model",
      "tags": [
        "llm"
      ]
    },
    {
      "description": "Use this to get current exchange rate.\n\nArgs:\n    currency_from: The currency to convert from (e.g., \"USD\").\n    currency_to: The currency to convert to (e.g., \"EUR\").\n    currency_date: The date for the exchange rate or \"latest\". Defaults to \"latest\".\n\nReturns:\n    A dictionary containing the exchange rate data, or an error message if the request fails.",
      "id": "currency_agent-get_exchange_rate",
      "name": "get_exchange_rate",
      "tags": [
        "llm",
        "tools"
      ]
    }
  ],
  "supportsAuthenticatedExtendedCard": false,
  "url": "http://localhost:10000",
  "version": "0.0.1"
}
A2A サーバーをテストする
A2A を使用してリクエストを送信し、サーバーをテストできるようになりました。
A2A Python SDK には、この処理を簡素化する a2a.client.A2AClient クラスが用意されています。
currency_agent/test_client.py ファイルには、A2A サーバーに対して複数の異なるテストケースを実行するコードが含まれています。
# ... see file for full code

# Example test using A2AClient
async def run_single_turn_test(client: A2AClient) -> None:
    """Runs a single-turn non-streaming test."""

    send_message_payload = create_send_message_payload(text="how much is 100 USD in CAD?")
    request = SendMessageRequest(
        id=str(uuid4()), params=MessageSendParams(**send_message_payload)
    )

    print("--- ✉️  Single Turn Request ---")
    # Send Message
    response: SendMessageResponse = await client.send_message(request)
    print_json_response(response, "📥 Single Turn Request Response")
    if not isinstance(response.root, SendMessageSuccessResponse):
        print("received non-success response. Aborting get task ")
        return

    if not isinstance(response.root.result, Task):
        print("received non-task response. Aborting get task ")
        return

    task_id: str = response.root.result.id
    print("--- ❔ Query Task ---")
    # query the task
    get_request = GetTaskRequest(id=str(uuid4()), params=TaskQueryParams(id=task_id))
    get_response: GetTaskResponse = await client.get_task(get_request)
    print_json_response(get_response, "📥 Query Task Response")

# ----- Main Entrypoint (Create client --> Run tests) -----
async def main() -> None:
    """Main function to run the tests."""
    print(f'--- 🔄 Connecting to agent at {AGENT_URL}... ---')
    try:
        async with httpx.AsyncClient() as httpx_client:
            # Create a resolver to fetch the agent card
            resolver = A2ACardResolver(
                httpx_client=httpx_client,
                base_url=AGENT_URL,
            )
            agent_card = await resolver.get_agent_card()
            # Create a client to interact with the agent
            client = A2AClient(
                httpx_client=httpx_client,
                agent_card=agent_card,
            )
            print('--- ✅ Connection successful. ---')

            await run_single_turn_test(client)
            await run_multi_turn_test(client)

    except Exception as e:
        traceback.print_exc()
        print(f'--- ❌ An error occurred: {e} ---')
        print('Ensure the agent server is running.')
次のコマンドを使用してテストを実行します。
uv run currency_agent/test_client.py
テストが正常に実行されると、次のようになります。
--- 🔄 Connecting to agent at http://localhost:10000... ---
--- ✅ Connection successful. ---
--- ✉️ Single Turn Request ---
--- 📥 Single Turn Request Response ---
{"id":"3bc92d7b-d857-4e93-9ff0-b2fb865f6e35","jsonrpc":"2.0","result":{"artifacts":[{"artifactId":"35e89e14-b977-4397-a23b-92c84bc32379","parts":[{"kind":"text","text":"Based on the current exchange rate, 1 USD is equivalent to 1.3704 CAD. Therefore, 100 USD would be 137.04 CAD.\n"}]}],"contextId":"2d66f277-152c-46ef-881d-7fe32866e9f5","history":[{"contextId":"2d66f277-152c-46ef-881d-7fe32866e9f5","kind":"message","messageId":"59819269f7d04849b0bfca7d43ec073c","parts":[{"kind":"text","text":"how much is 100 USD in CAD?"}],"role":"user","taskId":"52ae2392-84f5-429a-a14b-8413d3d20d97"},{"contextId":"2d66f277-152c-46ef-881d-7fe32866e9f5","kind":"message","messageId":"286095c6-12c9-40cb-9596-a9676d570dbd","parts":[],"role":"agent","taskId":"52ae2392-84f5-429a-a14b-8413d3d20d97"}],"id":"52ae2392-84f5-429a-a14b-8413d3d20d97","kind":"task","status":{"state":"completed"}}}

// ...

--- 🚀 First turn completed, no further input required for this test case. ---
動作します。A2A サーバー経由で通貨エージェントと通信できることをテストできました。🎉
GitHub の a2a-samples リポジトリで、より高度なユースケースを確認してください。
エージェントのデプロイをお考えですか?Vertex AI Agent Engine は、AI エージェントを本番環境にデプロイするためのマネージド エクスペリエンスを提供します。
9. 完了
おめでとうございます!リモート MCP サーバーを正常に構築してデプロイし、MCP を使用してツールに接続する Agent Development Kit(ADK)を使用して通貨エージェントを作成し、Agent2Agent(A2A)プロトコルを使用してエージェントを公開しました。通貨エージェントが A2A を使用して任意のフレームワークの他のエージェントとやり取りできるようになりました。
コードのドキュメント全文へのリンクはこちらです。
学習した内容
- ローカル MCP サーバーを作成する方法
- MCP サーバーを Cloud Run にデプロイする
- MCP ツールを使用する Agent Development Kit でエージェントを構築する方法
- ADK エージェントを A2A サーバーとして公開する方法
- A2A クライアントを使用して A2A サーバーをテストする
クリーンアップ
このラボで使用したリソースについて、Google Cloud アカウントに課金されないようにするには、次の操作を行います。
- Google Cloud コンソールで、[リソースの管理] ページに移動します。
- プロジェクト リストで、削除するプロジェクトを選択し、[削除] をクリックします。
- ダイアログでプロジェクト ID を入力し、[シャットダウン] をクリックしてプロジェクトを削除します。