
1. 개요
AI 에이전트는 자율적으로 작동하고, 학습하고, 환경과 상호작용하여 목표를 달성하는 능력으로 작업 자동화와 의사 결정을 혁신하면서 인기가 빠르게 높아지고 있습니다.
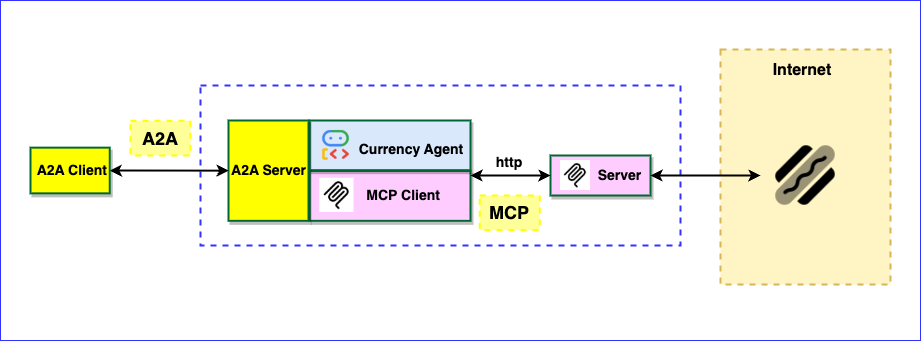
하지만 에이전트를 빌드하려면 어떻게 해야 할까요? 이 Codelab에서는 여러 국가의 통화 간에 변환할 수 있는 통화 에이전트를 빌드하는 방법을 보여주어 시작하는 데 도움을 줍니다. 인터넷에서 떠돌아다니는 약어 (MCP, ADK, A2A)를 이해할 수 있도록 최신 기술을 살펴보는 것을 목표로 합니다.
Model Context Protocol(MCP)
모델 컨텍스트 프로토콜 (MCP)은 애플리케이션이 LLM에 컨텍스트를 제공하는 방식을 표준화하는 개방형 프로토콜입니다. MCP는 AI 모델을 리소스, 프롬프트, 도구에 연결하는 표준화된 방법을 제공합니다.
에이전트 개발 키트(ADK)
에이전트 개발 키트 (ADK)는 AI 에이전트를 개발하고 배포하기 위한 유연한 오케스트레이션 프레임워크입니다. ADK는 모델에 구애받지 않고 배포에 구애받지 않으며 다른 프레임워크와의 호환성을 위해 빌드됩니다. ADK는 에이전트 개발을 소프트웨어 개발과 유사하게 만들어 개발자가 간단한 작업부터 복잡한 워크플로에 이르기까지 다양한 에이전트 아키텍처를 더 쉽게 만들고, 배포하고, 오케스트레이션할 수 있도록 설계되었습니다.
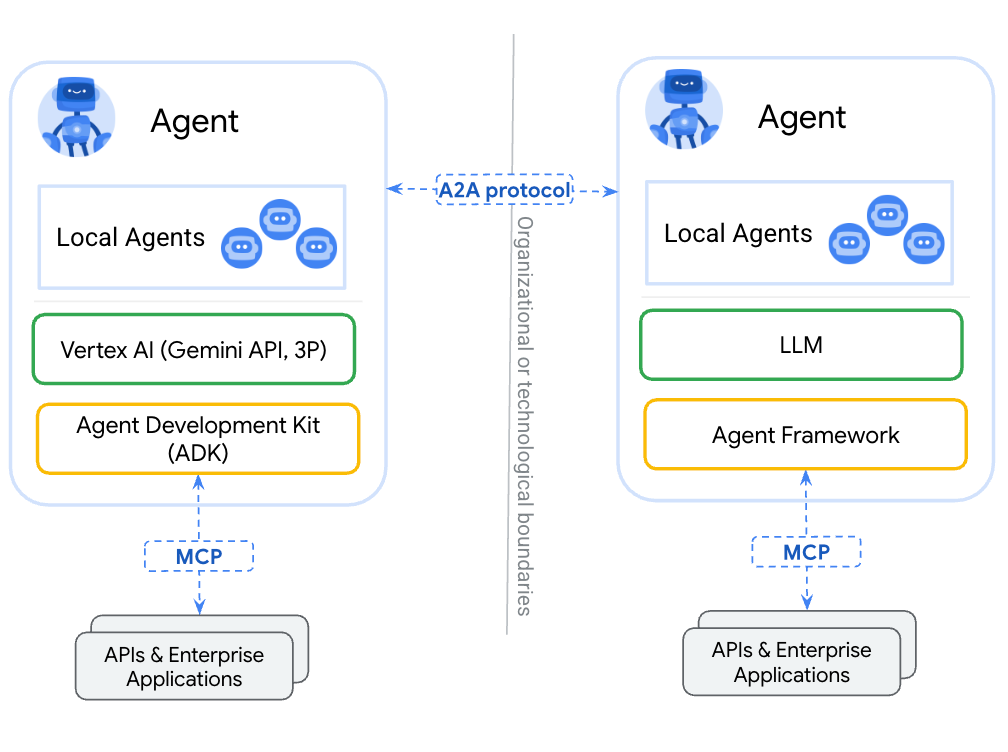
Agent2Agent (A2A) 프로토콜
Agent2Agent (A2A) 프로토콜은 AI 에이전트 간의 원활한 통신과 협업을 지원하도록 설계된 개방형 표준입니다. MCP가 LLM에 데이터 및 도구에 대한 액세스 권한을 부여하는 표준화된 방법을 제공하는 것처럼 A2A는 에이전트가 다른 에이전트와 대화할 수 있는 표준화된 방법을 제공합니다. 다양한 프레임워크와 여러 공급업체를 사용하여 에이전트를 빌드하는 세상에서 A2A는 공통 언어를 제공하여 사일로를 허물고 상호 운용성을 촉진합니다.
학습할 내용
- 로컬 MCP 서버를 만드는 방법
- Cloud Run에 MCP 서버 배포
- MCP 도구를 사용하는 에이전트 개발 키트로 에이전트를 빌드하는 방법
- ADK 에이전트를 A2A 서버로 노출하는 방법
- A2A 클라이언트를 사용하여 A2A 서버 테스트
필요한 항목
2. 시작하기 전에
프로젝트 만들기
- Google Cloud 콘솔의 프로젝트 선택기 페이지에서 Google Cloud 프로젝트를 선택하거나 만듭니다.
- Cloud 프로젝트에 결제가 사용 설정되어 있는지 확인합니다. 프로젝트에 결제가 사용 설정되어 있는지 확인하는 방법을 알아보세요.
- 이 링크를 클릭하여 Cloud Shell을 활성화합니다. Cloud Shell에서 해당 버튼을 클릭하여 Cloud Shell 터미널 (클라우드 명령어 실행)과 편집기 (프로젝트 빌드) 간에 전환할 수 있습니다.
- Cloud Shell에 연결되면 다음 명령어를 사용하여 이미 인증되었는지, 프로젝트가 프로젝트 ID로 설정되었는지 확인합니다.
gcloud auth list
- Cloud Shell에서 다음 명령어를 실행하여 gcloud 명령어가 프로젝트를 알고 있는지 확인합니다.
gcloud config list project
- 다음 명령어를 사용하여 프로젝트를 설정합니다.
export PROJECT_ID=<YOUR_PROJECT_ID>
gcloud config set project $PROJECT_ID
- 다음 명령어를 사용하여 필요한 API를 사용 설정합니다. 이 과정에 몇 분 정도 소요될 수 있습니다.
gcloud services enable cloudresourcemanager.googleapis.com \
                       servicenetworking.googleapis.com \
                       run.googleapis.com \
                       cloudbuild.googleapis.com \
                       artifactregistry.googleapis.com \
                       aiplatform.googleapis.com \
                       compute.googleapis.com
- Python 3.10 이상이 있어야 합니다.
gcloud 명령어 및 사용법은 문서를 참고하세요.
3. 설치
- 저장소를 클론합니다.
git clone https://github.com/jackwotherspoon/currency-agent.git
cd currency-agent
- uv (종속 항목 관리에 사용)를 설치합니다.
# macOS and Linux
curl -LsSf https://astral.sh/uv/install.sh | sh

# Windows (uncomment below line)
# powershell -ExecutionPolicy ByPass -c "irm https://astral.sh/uv/install.ps1 | iex"
- 환경 변수를 구성합니다 (
.env파일을 통해).
다음을 실행하여 .env 파일을 만듭니다.
echo "GOOGLE_GENAI_USE_VERTEXAI=TRUE" >> .env \
&& echo "GOOGLE_CLOUD_PROJECT=$PROJECT_ID" >> .env \
&& echo "GOOGLE_CLOUD_LOCATION=us-central1" >> .env
4. 로컬 MCP 서버 만들기
통화 에이전트를 오케스트레이션하기 전에 먼저 에이전트에 필요한 도구를 노출하는 MCP 서버를 만듭니다.
MCP 서버를 사용하면 특정 기능 (예: 환율 가져오기)을 도구로 노출하는 경량 프로그램을 작성할 수 있습니다. 그러면 에이전트 또는 여러 에이전트가 표준화된 모델 컨텍스트 프로토콜 (MCP)을 사용하여 이러한 도구에 액세스할 수 있습니다.
FastMCP Python 패키지를 활용하여 get_exchange_rate라는 단일 도구를 노출하는 MCP 서버를 만들 수 있습니다. get_exchange_rate 도구는 인터넷을 통해 Frankfurter API를 호출하여 두 통화 간의 현재 환율을 가져옵니다.
MCP 서버 코드는 mcp-server/server.py 파일에서 확인할 수 있습니다.
import logging
import os

import httpx
from fastmcp import FastMCP

# Set up logging
logger = logging.getLogger(__name__)
logging.basicConfig(format="[%(levelname)s]: %(message)s", level=logging.INFO)

mcp = FastMCP("Currency MCP Server 💵")

@mcp.tool()
def get_exchange_rate(
    currency_from: str = 'USD',
    currency_to: str = 'EUR',
    currency_date: str = 'latest',
):
    """Use this to get current exchange rate.

    Args:
        currency_from: The currency to convert from (e.g., "USD").
        currency_to: The currency to convert to (e.g., "EUR").
        currency_date: The date for the exchange rate or "latest". Defaults to "latest".

    Returns:
        A dictionary containing the exchange rate data, or an error message if the request fails.
    """
    logger.info(f"--- 🛠️ Tool: get_exchange_rate called for converting {currency_from} to {currency_to} ---")
    try:
        response = httpx.get(
            f'https://api.frankfurter.app/{currency_date}',
            params={'from': currency_from, 'to': currency_to},
        )
        response.raise_for_status()

        data = response.json()
        if 'rates' not in data:
            return {'error': 'Invalid API response format.'}
        logger.info(f'✅ API response: {data}')
        return data
    except httpx.HTTPError as e:
        return {'error': f'API request failed: {e}'}
    except ValueError:
        return {'error': 'Invalid JSON response from API.'}

if __name__ == "__main__":
    logger.info(f"🚀 MCP server started on port {os.getenv('PORT', 8080)}")
    # Could also use 'sse' transport, host="0.0.0.0" required for Cloud Run.
    asyncio.run(
        mcp.run_async(
            transport="http",
            host="0.0.0.0",
            port=os.getenv("PORT", 8080),
        )
    )
MCP 서버를 로컬로 시작하려면 터미널을 열고 다음 명령어를 실행합니다 (서버가 http://localhost:8080에서 시작됨).
uv run mcp-server/server.py
MCP 서버가 올바르게 작동하고 모델 컨텍스트 프로토콜을 사용하여 get_exchange_rate 도구에 액세스할 수 있는지 테스트합니다.
새 터미널 창에서 (로컬 MCP 서버가 중지되지 않도록) 다음을 실행합니다.
uv run mcp-server/test_server.py
1 USD (미국 달러)에 대한 EUR (유로)의 현재 환율이 출력됩니다.
--- 🛠️ Tool found: get_exchange_rate ---
--- 🪛 Calling get_exchange_rate tool for USD to EUR ---
--- ✅ Success: {
  "amount": 1.0,
  "base": "USD",
  "date": "2025-05-26",
  "rates": {
    "EUR": 0.87866
  }
} ---
좋습니다. 에이전트가 액세스할 수 있는 도구가 포함된 MCP 서버가 작동합니다.
다음 스테이션으로 이동하기 전에 시작한 터미널에서 Ctrl+C (Mac의 경우 Command+C)를 실행하여 로컬에서 실행 중인 MCP 서버를 중지합니다.
5. Cloud Run에 MCP 서버 배포
이제 MCP 서버를 원격 MCP 서버로 Cloud Run에 배포할 수 있습니다. 🚀☁️
원격으로 MCP 서버를 실행하는 이점
Cloud Run에서 MCP 서버를 원격으로 실행하면 다음과 같은 여러 이점이 있습니다.
- 📈확장성: Cloud Run은 모든 수신 요청을 처리하기 위해 빠르게 확장되도록 빌드되어 있습니다. Cloud Run은 수요에 따라 MCP 서버를 자동으로 확장합니다.
- 👥중앙 집중식 서버: IAM 권한을 통해 팀원과 중앙 집중식 MCP 서버에 대한 액세스 권한을 공유하여 팀원이 로컬로 자체 서버를 실행하는 대신 로컬 머신에서 서버에 연결할 수 있습니다. MCP 서버가 변경되면 모든 팀원이 혜택을 누릴 수 있습니다.
- 🔐보안: Cloud Run은 인증된 요청을 강제하는 쉬운 방법을 제공합니다. 이렇게 하면 MCP 서버에 대한 보안 연결만 허용되어 무단 액세스가 방지됩니다.
mcp-server 디렉터리로 변경합니다.
cd mcp-server
MCP 서버를 Cloud Run에 배포합니다.
gcloud run deploy mcp-server --no-allow-unauthenticated --region=us-central1 --source .
서비스가 성공적으로 배포되면 다음과 같은 메시지가 표시됩니다.
Service [mcp-server] revision [mcp-server-12345-abc] has been deployed and is serving 100 percent of traffic.
MCP 클라이언트 인증
인증이 필요하도록 --no-allow-unauthenticated를 지정했으므로 원격 MCP 서버에 연결하는 모든 MCP 클라이언트에서 인증을 수행해야 합니다.
Cloud Run에서 MCP 서버 호스팅에 관한 공식 문서에서는 MCP 클라이언트를 실행하는 위치에 따라 이 주제에 관한 자세한 정보를 제공합니다.
Cloud Run 프록시를 실행하여 로컬 머신의 원격 MCP 서버로 인증된 터널을 만들어야 합니다.
기본적으로 Cloud Run 서비스의 URL에는 모든 요청이 Cloud Run 호출자 (roles/run.invoker) IAM 역할로 승인되어야 합니다. 이 IAM 정책 바인딩은 강력한 보안 메커니즘을 사용하여 로컬 MCP 클라이언트를 인증하게 합니다.
원격 MCP 서버에 액세스하려는 사용자 또는 팀 구성원의 IAM 주 구성원 (Google Cloud 계정)에 roles/run.invoker IAM 역할이 바인딩되어 있는지 확인해야 합니다.
gcloud run services proxy mcp-server --region=us-central1
다음과 같은 출력이 표시됩니다.
Proxying to Cloud Run service [mcp-server] in project [<YOUR_PROJECT_ID>] region [us-central1]
http://127.0.0.1:8080 proxies to https://mcp-server-abcdefgh-uc.a.run.app
이제 http://127.0.0.1:8080로 향하는 모든 트래픽이 인증되고 원격 MCP 서버로 전달됩니다.
원격 MCP 서버 테스트
새 터미널에서 루트 폴더로 돌아가 mcp-server/test_server.py 파일을 다시 실행하여 원격 MCP 서버가 작동하는지 확인합니다.
cd ..
uv run mcp-server/test_server.py
서버를 로컬로 실행했을 때와 비슷한 출력이 표시됩니다.
--- 🛠️ Tool found: get_exchange_rate ---
--- 🪛 Calling get_exchange_rate tool for USD to EUR ---
--- ✅ Success: {
  "amount": 1.0,
  "base": "USD",
  "date": "2025-05-26",
  "rates": {
    "EUR": 0.87866
  }
} ---
배포된 Cloud Run MCP 서버의 로그를 쿼리하여 원격 서버가 실제로 호출되었는지 확인할 수 있습니다.
gcloud run services logs read mcp-server --region us-central1 --limit 5
로그에 다음이 출력되어야 합니다.
2025-06-04 14:28:29,871 [INFO]: --- 🛠️ Tool: get_exchange_rate called for converting USD to EUR ---
2025-06-04 14:28:30,610 [INFO]: HTTP Request: GET https://api.frankfurter.app/latest?from=USD&to=EUR "HTTP/1.1 200 OK"
2025-06-04 14:28:30,611 [INFO]: ✅ API response: {'amount': 1.0, 'base': 'USD', 'date': '2025-06-03', 'rates': {'EUR': 0.87827}}
이제 원격 MCP 서버가 있으므로 에이전트를 만들 수 있습니다. 🤖
6. 에이전트 개발 키트 (ADK)로 에이전트 만들기
배포된 MCP 서버가 있으므로 이제 에이전트 개발 키트 (ADK)를 사용하여 통화 에이전트를 만들 차례입니다.
에이전트 개발 키트에서 최근 v1.0.0 안정화 버전을 출시했습니다. 이번 마일스톤은 Python ADK가 이제 프로덕션에 사용할 수 있으며, 개발자가 라이브 환경에서 에이전트를 자신 있게 빌드하고 배포할 수 있는 안정적이고 강력한 플랫폼을 제공한다는 것을 의미합니다.
ADK를 사용하면 에이전트를 매우 가볍게 만들 수 있으며 MCP 도구에 대한 기본 지원을 통해 MCP 서버에 쉽게 연결할 수 있습니다. 통화 에이전트는 ADK의 MCPToolset 클래스를 사용하여 get_exchange_rate 도구에 액세스합니다.
통화 에이전트의 코드는 currency_agent/agent.py에 있습니다.
import logging
import os

from dotenv import load_dotenv
from google.adk.agents import LlmAgent
from google.adk.a2a.utils.agent_to_a2a import to_a2a
from google.adk.tools.mcp_tool import MCPToolset, StreamableHTTPConnectionParams

logger = logging.getLogger(__name__)
logging.basicConfig(format="[%(levelname)s]: %(message)s", level=logging.INFO)

load_dotenv()

SYSTEM_INSTRUCTION = (
    "You are a specialized assistant for currency conversions. "
    "Your sole purpose is to use the 'get_exchange_rate' tool to answer questions about currency exchange rates. "
    "If the user asks about anything other than currency conversion or exchange rates, "
    "politely state that you cannot help with that topic and can only assist with currency-related queries. "
    "Do not attempt to answer unrelated questions or use tools for other purposes."
)

logger.info("--- 🔧 Loading MCP tools from MCP Server... ---")
logger.info("--- 🤖 Creating ADK Currency Agent... ---")

root_agent = LlmAgent(
    model="gemini-2.5-flash",
    name="currency_agent",
    description="An agent that can help with currency conversions",
    instruction=SYSTEM_INSTRUCTION,
    tools=[
        MCPToolset(
            connection_params=StreamableHTTPConnectionParams(
                url=os.getenv("MCP_SERVER_URL", "http://localhost:8080/mcp")
            )
        )
    ],
)
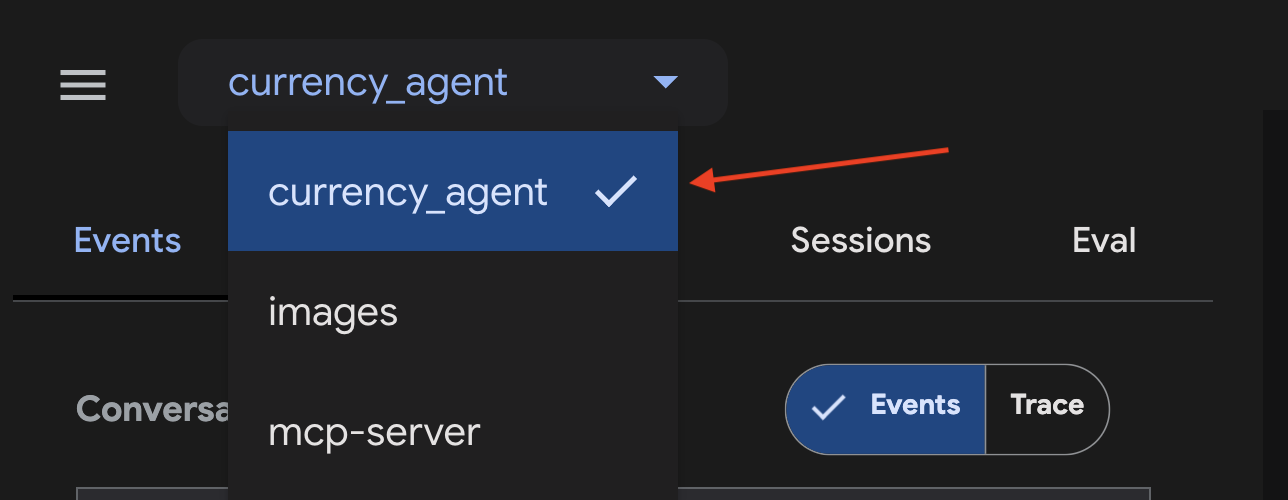
통화 에이전트를 빠르게 테스트하려면 adk web를 실행하여 액세스하는 ADK의 개발 UI를 활용하면 됩니다.
uv run adk web
브라우저에서 http://localhost:8000로 이동하여 에이전트를 확인하고 테스트하세요.
웹 UI의 왼쪽 상단에 currency_agent이 에이전트로 선택되어 있는지 확인합니다.
채팅 영역에서 에이전트에게 "250캐나다달러는 미국 달러로 얼마야?"와 같이 질문합니다. 에이전트가 대답하기 전에 get_exchange_rate MCP 도구를 호출하는 것을 확인할 수 있습니다.
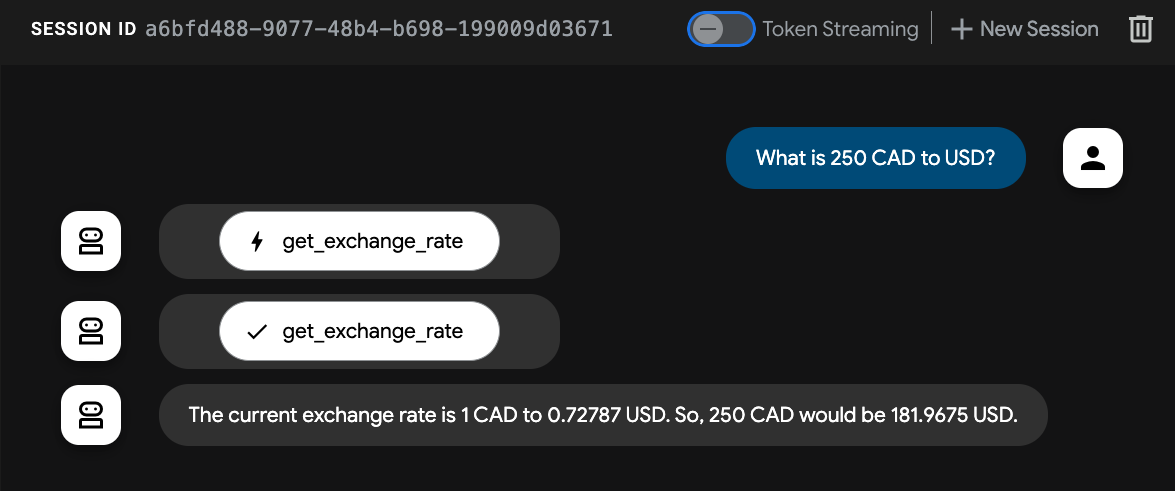
에이전트가 작동합니다. 환전 💸과 관련된 질문을 처리할 수 있습니다.
7. Agent2Agent(A2A) 프로토콜
Agent2Agent (A2A) 프로토콜은 AI 에이전트 간의 원활한 통신과 협업을 지원하도록 설계된 개방형 표준입니다. 이를 통해 다양한 프레임워크를 사용하여 여러 공급업체에서 빌드한 에이전트가 공통 언어로 서로 통신하여 사일로를 해체하고 상호 운용성을 촉진할 수 있습니다.
A2A를 사용하면 상담사가 다음 작업을 할 수 있습니다.
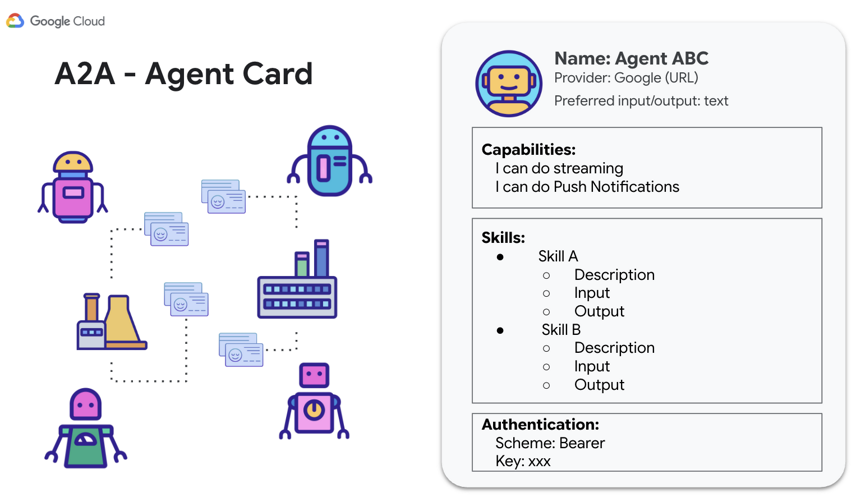
- 검색: 표준화된 에이전트 카드를 사용하여 다른 에이전트를 찾고 에이전트의 스킬 (AgentSkill)과 기능 (AgentCapabilities)을 알아봅니다.
- 커뮤니케이션: 메시지와 데이터를 안전하게 교환합니다.
- 협업: 복잡한 목표를 달성하기 위해 작업을 위임하고 작업을 조율합니다.
A2A 프로토콜은 에이전트가 자신의 기능과 연결 정보를 광고하는 데 사용할 수 있는 디지털 명함 역할을 하는 '에이전트 카드'와 같은 메커니즘을 통해 이러한 커뮤니케이션을 지원합니다.
이제 다른 에이전트와 클라이언트가 호출할 수 있도록 A2A를 사용하여 통화 에이전트를 노출할 차례입니다.
A2A Python SDK
A2A Python SDK는 앞서 언급한 리소스(AgentSkill, AgentCapabilities, AgentCard) 각각에 대한 Pydantic 모델을 제공합니다. 이를 통해 A2A 프로토콜을 사용한 개발 및 통합을 신속하게 처리할 수 있는 인터페이스가 제공됩니다.
AgentSkill는 통화 에이전트가 get_exchange_rate 도구를 가지고 있음을 다른 에이전트에게 알리는 방법입니다.
# A2A Agent Skill definition
skill = AgentSkill(
    id='get_exchange_rate',
    name='Currency Exchange Rates Tool',
    description='Helps with exchange values between various currencies',
    tags=['currency conversion', 'currency exchange'],
    examples=['What is exchange rate between USD and GBP?'],
)
그런 다음 AgentCard의 일부로 에이전트가 처리할 수 있는 입력 및 출력 모드와 같은 추가 세부정보와 함께 에이전트의 기술과 기능을 나열합니다.
# A2A Agent Card definition
agent_card = AgentCard(
    name='Currency Agent',
    description='Helps with exchange rates for currencies',
    url=f'http://{host}:{port}/',
    version='1.0.0',
    defaultInputModes=["text"],
    defaultOutputModes=["text"],
    capabilities=AgentCapabilities(streaming=True),
    skills=[skill],
)
이제 통화 에이전트를 사용하여 모든 것을 한데 모아 A2A의 강력한 기능을 선보일 때입니다.
8. 통화 에이전트 A2A 서버 노출
ADK는 A2A 프로토콜을 사용하여 에이전트를 빌드하고 연결하는 프로세스를 간소화합니다. 기존 ADK 에이전트를 A2A 서버로 액세스 가능하게 (노출) 만드는 작업은 ADK의 to_a2a(root_agent) 함수를 사용하여 실행됩니다 (자세한 내용은 ADK 문서 참고).
to_a2a 함수는 기존 에이전트가 A2A와 함께 작동하도록 변환하고 uvicorn를 통해 서버로 노출할 수 있도록 합니다. 즉, 에이전트를 프로덕션에 배포하려는 경우 노출할 항목을 더 세부적으로 제어할 수 있습니다. to_a2a() 함수는 내부적으로 A2A Python SDK를 사용하여 에이전트 코드를 기반으로 에이전트 카드를 자동 생성합니다.
currency_agent/agent.py 파일을 살펴보면 to_a2a의 사용법과 통화 에이전트가 단 두 줄의 코드로 A2A 서버로 노출되는 방식을 확인할 수 있습니다.
from google.adk.a2a.utils.agent_to_a2a import to_a2a
# ... see file for full code

# Make the agent A2A-compatible
a2a_app = to_a2a(root_agent, port=10000)
A2A 서버를 실행하려면 새 터미널에서 다음을 실행합니다.
uv run uvicorn currency_agent.agent:a2a_app --host localhost --port 10000
서버가 성공적으로 시작되면 포트 10000에서 실행되고 있음을 나타내는 다음과 같은 출력이 표시됩니다.
[INFO]: --- 🔧 Loading MCP tools from MCP Server... ---
[INFO]: --- 🤖 Creating ADK Currency Agent... ---
INFO:     Started server process [45824]
INFO:     Waiting for application startup.
INFO:     Application startup complete.
INFO:     Uvicorn running on http://localhost:10000 (Press CTRL+C to quit)
이제 통화 에이전트가 A2A 프로토콜을 사용하여 다른 에이전트나 클라이언트가 호출할 수 있는 A2A 서버로 성공적으로 실행됩니다.
원격 에이전트가 실행 중인지 확인
to_a2a() 함수에 의해 자동 생성된 통화 에이전트의 에이전트 카드 URL을 방문하여 에이전트가 실행 중인지 다시 한번 확인할 수 있습니다.
브라우저에서 [http://localhost:10000/.well-known/agent.json]으로 이동합니다.
다음과 같은 상담사 카드가 표시됩니다.
{
  "capabilities": {

  },
  "defaultInputModes": [
    "text/plain"
  ],
  "defaultOutputModes": [
    "text/plain"
  ],
  "description": "An agent that can help with currency conversions",
  "name": "currency_agent",
  "preferredTransport": "JSONRPC",
  "protocolVersion": "0.3.0",
  "skills": [
    {
      "description": "An agent that can help with currency conversions I am a specialized assistant for currency conversions. my sole purpose is to use the 'get_exchange_rate' tool to answer questions about currency exchange rates. If the user asks about anything other than currency conversion or exchange rates, politely state that I cannot help with that topic and can only assist with currency-related queries. Do not attempt to answer unrelated questions or use tools for other purposes.",
      "id": "currency_agent",
      "name": "model",
      "tags": [
        "llm"
      ]
    },
    {
      "description": "Use this to get current exchange rate.\n\nArgs:\n    currency_from: The currency to convert from (e.g., \"USD\").\n    currency_to: The currency to convert to (e.g., \"EUR\").\n    currency_date: The date for the exchange rate or \"latest\". Defaults to \"latest\".\n\nReturns:\n    A dictionary containing the exchange rate data, or an error message if the request fails.",
      "id": "currency_agent-get_exchange_rate",
      "name": "get_exchange_rate",
      "tags": [
        "llm",
        "tools"
      ]
    }
  ],
  "supportsAuthenticatedExtendedCard": false,
  "url": "http://localhost:10000",
  "version": "0.0.1"
}
A2A 서버 테스트
이제 A2A를 사용하여 서버에 요청을 보내 서버를 테스트할 수 있습니다.
A2A Python SDK는 이를 간소화하는 a2a.client.A2AClient 클래스를 제공합니다.
currency_agent/test_client.py 파일에는 A2A 서버에 대해 여러 가지 테스트 사례를 실행하는 코드가 포함되어 있습니다.
# ... see file for full code

# Example test using A2AClient
async def run_single_turn_test(client: A2AClient) -> None:
    """Runs a single-turn non-streaming test."""

    send_message_payload = create_send_message_payload(text="how much is 100 USD in CAD?")
    request = SendMessageRequest(
        id=str(uuid4()), params=MessageSendParams(**send_message_payload)
    )

    print("--- ✉️  Single Turn Request ---")
    # Send Message
    response: SendMessageResponse = await client.send_message(request)
    print_json_response(response, "📥 Single Turn Request Response")
    if not isinstance(response.root, SendMessageSuccessResponse):
        print("received non-success response. Aborting get task ")
        return

    if not isinstance(response.root.result, Task):
        print("received non-task response. Aborting get task ")
        return

    task_id: str = response.root.result.id
    print("--- ❔ Query Task ---")
    # query the task
    get_request = GetTaskRequest(id=str(uuid4()), params=TaskQueryParams(id=task_id))
    get_response: GetTaskResponse = await client.get_task(get_request)
    print_json_response(get_response, "📥 Query Task Response")

# ----- Main Entrypoint (Create client --> Run tests) -----
async def main() -> None:
    """Main function to run the tests."""
    print(f'--- 🔄 Connecting to agent at {AGENT_URL}... ---')
    try:
        async with httpx.AsyncClient() as httpx_client:
            # Create a resolver to fetch the agent card
            resolver = A2ACardResolver(
                httpx_client=httpx_client,
                base_url=AGENT_URL,
            )
            agent_card = await resolver.get_agent_card()
            # Create a client to interact with the agent
            client = A2AClient(
                httpx_client=httpx_client,
                agent_card=agent_card,
            )
            print('--- ✅ Connection successful. ---')

            await run_single_turn_test(client)
            await run_multi_turn_test(client)

    except Exception as e:
        traceback.print_exc()
        print(f'--- ❌ An error occurred: {e} ---')
        print('Ensure the agent server is running.')
다음 명령어를 사용하여 테스트를 실행합니다.
uv run currency_agent/test_client.py
테스트가 성공적으로 실행되면 다음과 같은 결과가 나타납니다.
--- 🔄 Connecting to agent at http://localhost:10000... ---
--- ✅ Connection successful. ---
--- ✉️ Single Turn Request ---
--- 📥 Single Turn Request Response ---
{"id":"3bc92d7b-d857-4e93-9ff0-b2fb865f6e35","jsonrpc":"2.0","result":{"artifacts":[{"artifactId":"35e89e14-b977-4397-a23b-92c84bc32379","parts":[{"kind":"text","text":"Based on the current exchange rate, 1 USD is equivalent to 1.3704 CAD. Therefore, 100 USD would be 137.04 CAD.\n"}]}],"contextId":"2d66f277-152c-46ef-881d-7fe32866e9f5","history":[{"contextId":"2d66f277-152c-46ef-881d-7fe32866e9f5","kind":"message","messageId":"59819269f7d04849b0bfca7d43ec073c","parts":[{"kind":"text","text":"how much is 100 USD in CAD?"}],"role":"user","taskId":"52ae2392-84f5-429a-a14b-8413d3d20d97"},{"contextId":"2d66f277-152c-46ef-881d-7fe32866e9f5","kind":"message","messageId":"286095c6-12c9-40cb-9596-a9676d570dbd","parts":[],"role":"agent","taskId":"52ae2392-84f5-429a-a14b-8413d3d20d97"}],"id":"52ae2392-84f5-429a-a14b-8413d3d20d97","kind":"task","status":{"state":"completed"}}}

// ...

--- 🚀 First turn completed, no further input required for this test case. ---
잘했습니다. A2A 서버를 통해 통화 에이전트와 통신할 수 있는지 테스트했습니다. 🎉
GitHub의 a2a-samples 저장소에서 고급 사용 사례를 확인하세요.
에이전트를 배포하고 싶으신가요? Vertex AI Agent Engine은 AI 에이전트를 프로덕션에 배포하기 위한 관리형 환경을 제공합니다.
9. 축하합니다
축하합니다. 원격 MCP 서버를 빌드하고 배포하고, MCP를 사용하여 도구에 연결하는 에이전트 개발 키트 (ADK)를 사용하여 통화 에이전트를 만들고, Agent2Agent (A2A) 프로토콜을 사용하여 에이전트를 노출했습니다. 이제 통화 에이전트가 A2A를 사용하여 모든 프레임워크의 다른 에이전트와 상호작용할 수 있습니다.
전체 코드 문서는 여기에서 확인할 수 있습니다.
학습한 내용
- 로컬 MCP 서버를 만드는 방법
- Cloud Run에 MCP 서버 배포
- MCP 도구를 사용하는 에이전트 개발 키트로 에이전트를 빌드하는 방법
- ADK 에이전트를 A2A 서버로 노출하는 방법
- A2A 클라이언트를 사용하여 A2A 서버 테스트
삭제
이 실습에서 사용한 리소스의 비용이 Google Cloud 계정에 청구되지 않도록 하려면 다음 단계를 따르세요.
- Google Cloud 콘솔에서 리소스 관리 페이지로 이동합니다.
- 프로젝트 목록에서 삭제할 프로젝트를 선택하고 삭제를 클릭합니다.
- 대화상자에서 프로젝트 ID를 입력하고 종료를 클릭하여 프로젝트를 삭제합니다.