
1. 소개

Google Cloud Dataflow
최종 업데이트: 2023년 7월 5일
Dataflow란 무엇인가요?
Dataflow는 다양한 데이터 처리 패턴을 실행하는 관리형 서비스입니다. 이 사이트의 문서에서는 서비스 기능 사용에 대한 지침을 포함하여 Dataflow를 사용하여 일괄 및 스트리밍 데이터 처리 파이프라인을 배포하는 방법을 설명합니다.
Apache Beam SDK는 일괄 및 스트리밍 파이프라인을 모두 개발할 수 있는 오픈소스 프로그래밍 모델입니다. Apache Beam 프로그램을 사용하여 파이프라인을 만든 다음 Dataflow 서비스에서 파이프라인을 실행합니다. Apache Beam 문서는 Apache Beam 프로그래밍 모델, SDK, 기타 실행기에 대한 심층적인 개념 정보와 참조 자료를 제공합니다.
신속한 스트리밍 데이터 분석
Dataflow를 사용하면 데이터 지연 시간을 줄이면서 스트리밍 데이터 파이프라인을 빠르고 간편하게 개발할 수 있습니다.
운영 및 관리 간소화
Dataflow는 서버리스 방식으로 데이터 엔지니어링 워크로드에서 운영 오버헤드를 제거하므로 팀이 서버 클러스터를 관리하는 대신 프로그래밍에 집중할 수 있습니다.
총소유비용 절감
Dataflow는 리소스 자동 확장과 비용 최적화된 일괄 처리 기능을 결합해 무제한에 가까운 용량을 제공하므로 시즌성 워크로드와 급증하는 워크로드를 과다 지출 없이 관리할 수 있습니다.
주요 특징
자동화된 리소스 관리 및 동적 작업 재분배
Dataflow는 처리 리소스의 프로비저닝 및 관리를 자동화하여 지연 시간을 최소화하고 사용률을 극대화하므로 인스턴스를 직접 가동하거나 예약할 필요가 없습니다. 작업 파티션 나누기도 자동화 및 최적화되어 지연 작업이 동적으로 재조정됩니다. '핫키'를 뒤쫓을 필요가 없음 전처리할 수 있습니다
수평 자동 확장
처리량 최적화를 위해 작업자 리소스가 수평식으로 자동 확장되어 전반적인 가격 대비 성능이 개선됩니다.
일괄 처리 시 유연한 리소스 예약 가격 책정
심야 근무와 같이 작업 예약 시간을 유연하게 처리해야 하는 경우 유연한 리소스 예약 (FlexRS)으로 일괄 처리 비용을 낮춰줍니다. 이러한 유연한 작업은 6시간 내에 실행을 위해 검색되도록 보장되어 큐에 배치됩니다.
이 과정에서 실행할 항목
JupyterLab 메모장에서 Apache Beam 대화형 실행자를 사용하면 REPL(Read-eval-print-loop) 워크플로에서 반복적으로 파이프라인을 개발하고 파이프라인 그래프를 검사하고 개별 PCollection을 파싱할 수 있습니다. 이 Apache Beam 노트북은 최신 데이터 과학 및 머신러닝 프레임워크가 사전 설치된 노트북 가상 머신을 호스팅하는 관리형 서비스인 Vertex AI Workbench를 통해 제공됩니다.
이 Codelab에서는 Apache Beam 노트북에서 도입한 기능에 중점을 둡니다.
학습할 내용
- 노트북 인스턴스를 만드는 방법
- 기본 파이프라인 만들기
- 제한되지 않은 소스에서 데이터 읽기
- 데이터 시각화
- 노트북에서 Dataflow 작업 실행
- 노트북 저장
필요한 항목
- 결제가 사용 설정된 Google Cloud Platform 프로젝트
- Google Cloud Dataflow 및 Google Cloud PubSub가 사용 설정되었습니다.
2. 설정
- Cloud 콘솔의 프로젝트 선택기 페이지에서 Cloud 프로젝트를 선택하거나 만듭니다.
다음 API가 사용 설정되어 있는지 확인합니다.
- Dataflow API
- Cloud Pub/Sub API
- Compute Engine
- Notebooks API
이는 API의 & 서비스 페이지
이 가이드에서는 Pub/Sub 구독에서 데이터를 읽으므로 Compute Engine 기본 서비스 계정에 편집자 역할이 있거나 Pub/Sub 편집자 역할을 부여합니다.
3. Apache Beam 메모장 시작하기
Apache Beam 메모장 인스턴스 실행
- 콘솔에서 Dataflow를 실행합니다.
- 왼쪽 메뉴를 사용하여 Workbench 페이지를 선택합니다.
- 사용자 관리 노트북 탭이 표시되었는지 확인합니다.
- 툴바에서 새 노트북을 클릭합니다.
- Apache Beam > GPU 제외를 선택합니다.
- 새 노트북 페이지에서 노트북 VM의 서브네트워크를 선택하고 만들기를 클릭합니다.
- 링크가 활성화되면 JupyterLab 열기를 클릭합니다. Vertex AI Workbench가 새 Apache Beam 노트북 인스턴스를 만듭니다.
4. 파이프라인 생성하기
메모장 인스턴스 만들기
파일 > 신규 > Notebook을 클릭하고 Apache Beam 2.47 이상인 커널을 선택합니다.
노트북에 코드 추가 시작하기
- 각 섹션의 코드를 복사하여 노트북의 새 셀 내에 붙여넣습니다.
- 셀 실행
JupyterLab 메모장에서 Apache Beam 대화형 실행자를 사용하면 REPL(Read-eval-print-loop) 워크플로에서 반복적으로 파이프라인을 개발하고 파이프라인 그래프를 검사하고 개별 PCollection을 파싱할 수 있습니다.
Apache Beam은 메모장 인스턴스에 설치되므로 메모장에 interactive_runner 및 interactive_beam 모듈을 포함합니다.
import apache_beam as beam
from apache_beam.runners.interactive.interactive_runner import InteractiveRunner
import apache_beam.runners.interactive.interactive_beam as ib
노트북에서 다른 Google 서비스를 사용하는 경우 다음 가져오기 문을 추가합니다.
from apache_beam.options import pipeline_options
from apache_beam.options.pipeline_options import GoogleCloudOptions
import google.auth
상호작용 옵션 설정
다음은 데이터 캡처 기간을 60초로 설정합니다. 더 빠르게 반복하려면 더 짧은 시간(예: '10초')으로 설정하세요.
ib.options.recording_duration = '60s'
추가 대화형 옵션은 Interactive_beam.options 클래스를 참조하세요.
InteractiveRunner 객체를 사용하여 파이프라인을 초기화합니다.
# Setting up the Apache Beam pipeline options.
options = pipeline_options.PipelineOptions()

# Set the pipeline mode to stream the data from Pub/Sub.
options.view_as(pipeline_options.StandardOptions).streaming = True

# Sets the project to the default project in your current Google Cloud environment.
# The project will be used for creating a subscription to the Pub/Sub topic.
_, options.view_as(GoogleCloudOptions).project = google.auth.default()

# The Google Cloud PubSub topic for this example.
topic = "projects/pubsub-public-data/topics/shakespeare-kinglear"

p = beam.Pipeline(InteractiveRunner(), options=options)
데이터 읽기 및 시각화
다음 예시는 지정된 Pub/Sub 주제에 대한 구독을 생성하고 구독에서 읽는 Apache Beam 파이프라인을 보여줍니다.
words = p | "read" >> beam.io.ReadFromPubSub(topic=topic)
파이프라인은 소스의 윈도우를 기준으로 단어 수를 계산합니다. 각 윈도우가 10초 길이인 고정 윈도우가 생성됩니다.
windowed_words = (words
   | "window" >> beam.WindowInto(beam.window.FixedWindows(10)))
데이터에 윈도우가 만들어지면 단어는 윈도우를 기준으로 계산됩니다.
windowed_word_counts = (windowed_words
   | "count" >> beam.combiners.Count.PerElement())
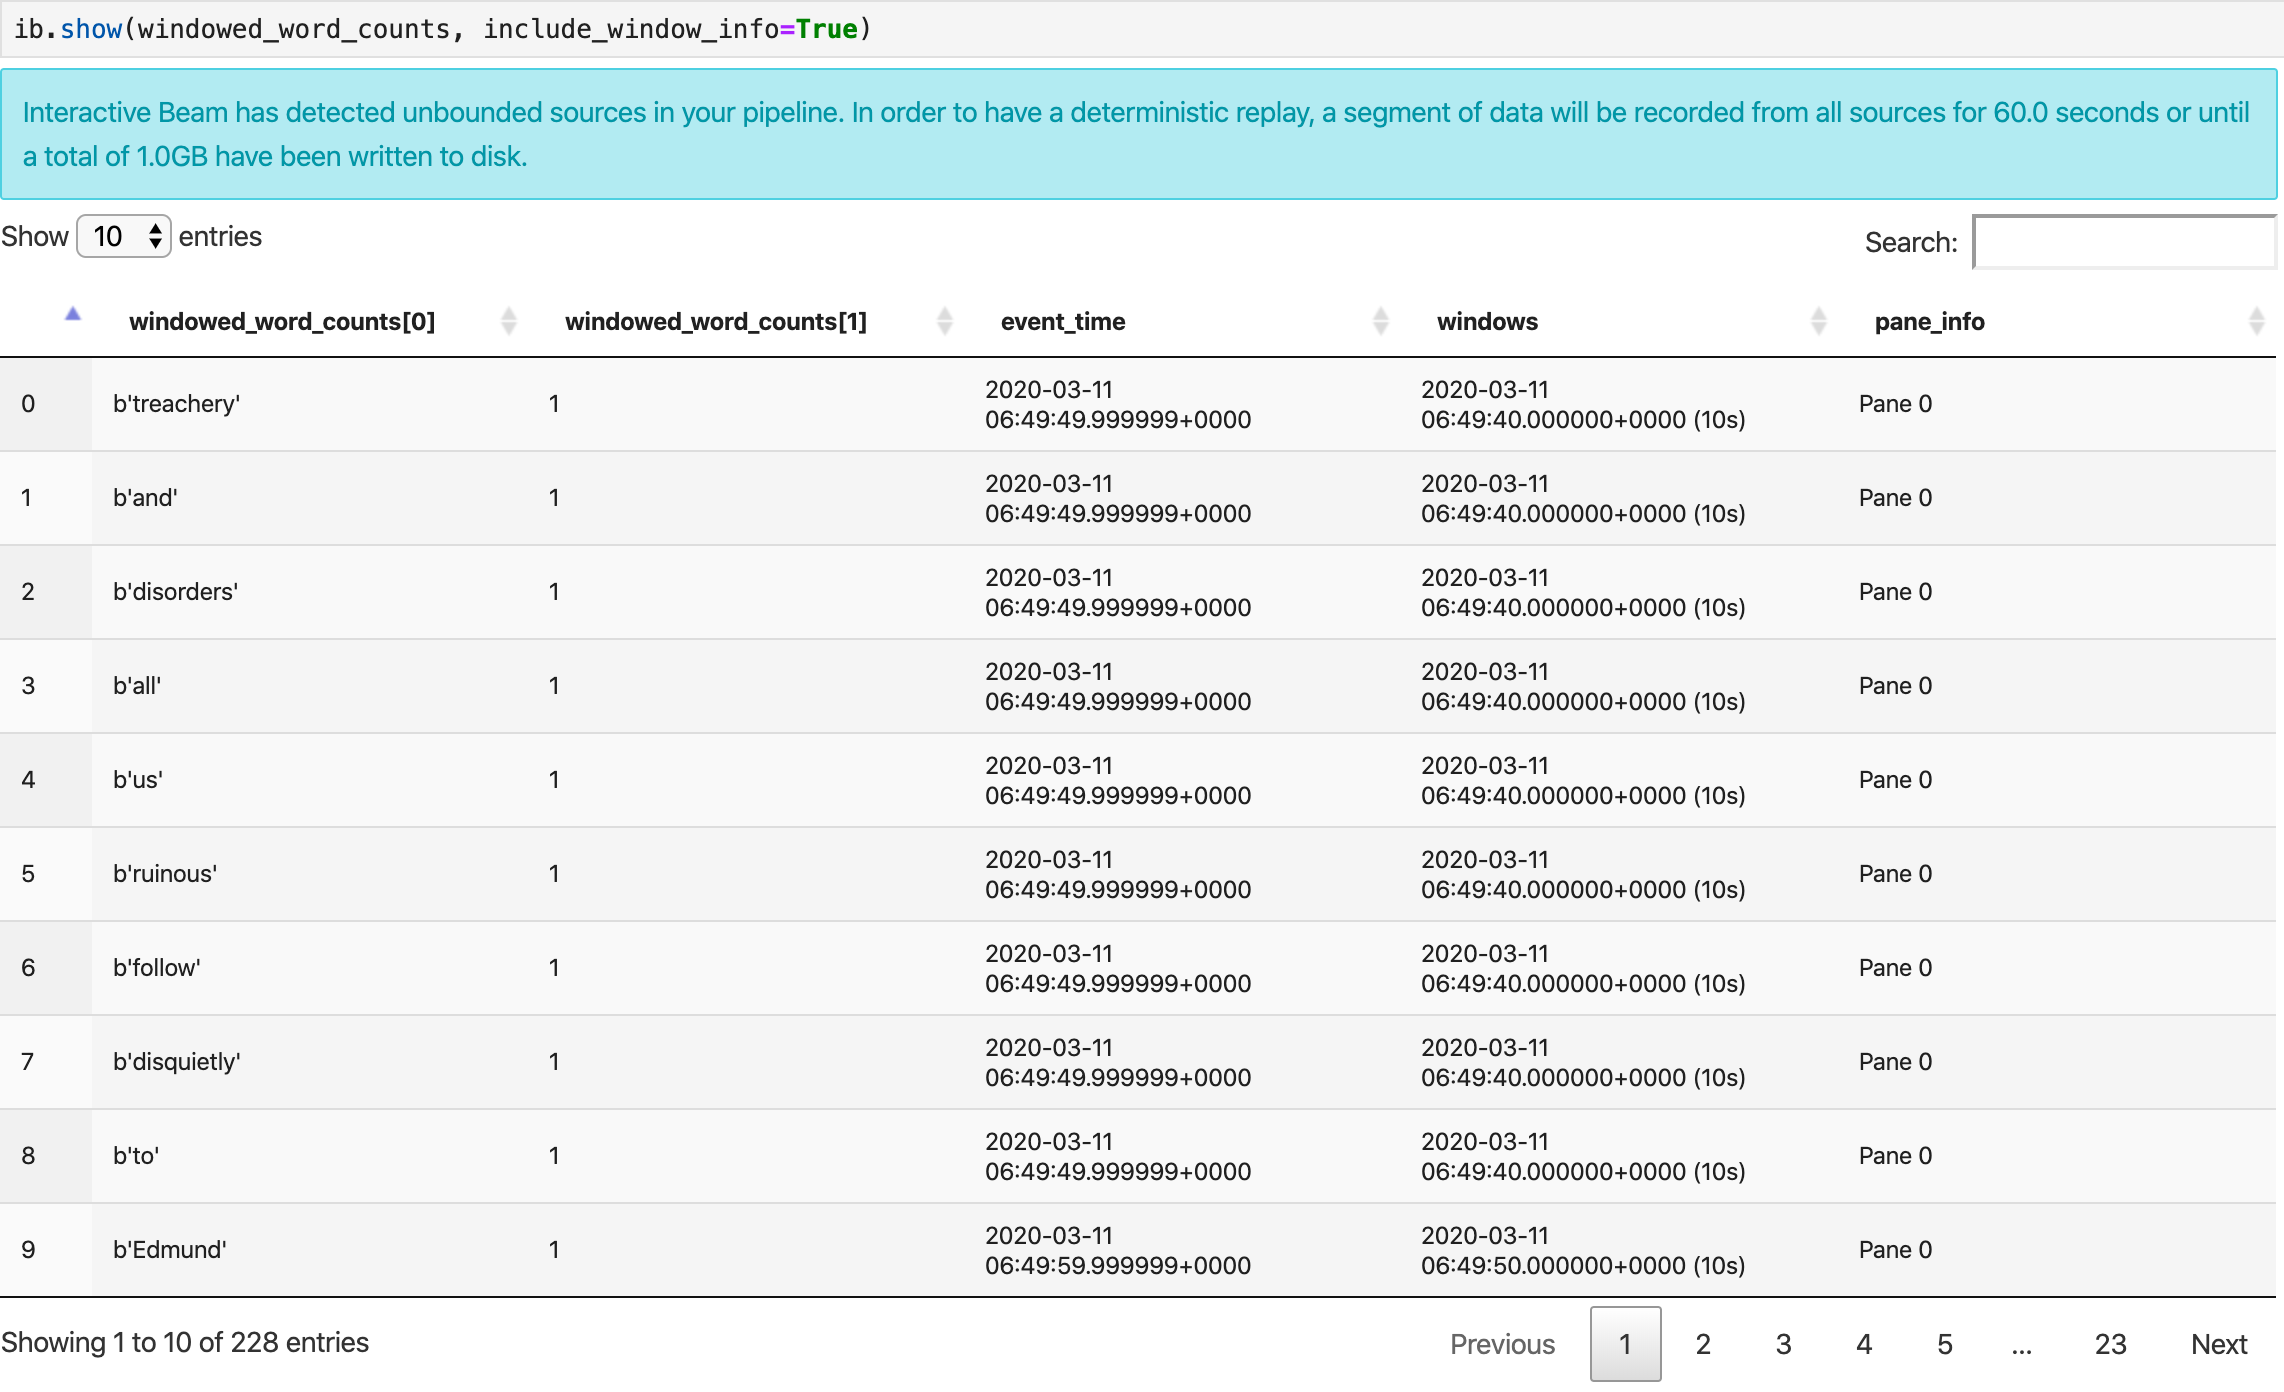
데이터 시각화
show() 메서드는 노트북에서 결과 PCollection을 시각화합니다.
ib.show(windowed_word_counts, include_window_info=True)
데이터 시각화를 표시하려면 show() 메서드에 visualize_data=True를 전달합니다. 새 셀을 추가합니다.
ib.show(windowed_word_counts, include_window_info=True, visualize_data=True)
여러 필터를 시각화에 적용할 수 있습니다. 다음 시각화를 사용하면 라벨과 축을 기준으로 필터링할 수 있습니다.

5. Pandas DataFrame 사용
Apache Beam 노트북의 또 다른 유용한 시각화는 Pandas DataFrame입니다. 다음 예시는 먼저 단어를 소문자로 변환한 다음 각 단어의 빈도를 계산합니다.
windowed_lower_word_counts = (windowed_words
   | "to lower case" >> beam.Map(lambda word: word.lower())
   | "count lowered" >> beam.combiners.Count.PerElement())
collect() 메서드는 Pandas DataFrame에 출력을 제공합니다.
ib.collect(windowed_lower_word_counts, include_window_info=True)
6. (선택사항) 노트북에서 Dataflow 작업 실행
- Dataflow에서 작업을 실행하려면 추가 권한이 필요합니다. Compute Engine 기본 서비스 계정에 편집자 역할이 있는지 확인하거나 다음 IAM 역할을 부여합니다.
- Dataflow 관리자
- Dataflow 작업자
- 스토리지 관리자
- 서비스 계정 사용자 (roles/iam.serviceAccountUser)
역할에 관한 자세한 내용은 문서를 참고하세요.
- (선택사항) Dataflow 작업을 실행하기 전에 메모장을 사용하여 커널을 다시 시작한 다음 모든 셀을 다시 실행하고 출력을 확인합니다.
- 다음 import 문을 삭제합니다.
from apache_beam.runners.interactive.interactive_runner import InteractiveRunner
import apache_beam.runners.interactive.interactive_beam as ib
- 다음 import 문을 추가합니다.
from apache_beam.runners import DataflowRunner
- 다음 녹화 시간 옵션 삭제:
ib.options.recording_duration = '60s'
- 파이프라인 옵션에 다음을 추가합니다. 이미 소유한 버킷을 가리키도록 Cloud Storage 위치를 조정하거나 이 용도로 새 버킷을 만들 수 있습니다. 지역 값을
us-central1에서 변경할 수도 있습니다.
# Set the Google Cloud region to run Dataflow.
options.view_as(GoogleCloudOptions).region = 'us-central1'

# Choose a Cloud Storage location.
dataflow_gcs_location = 'gs://<change me>/dataflow'

# Choose a location for your output files
output_gcs_location = '%s/results/' % dataflow_gcs_location


# Set the staging location. This location is used to stage the
# Dataflow pipeline and SDK binary.
options.view_as(GoogleCloudOptions).staging_location = '%s/staging' % dataflow_gcs_location

# Set the temporary location. This location is used to store temporary files
# or intermediate results before outputting to the sink.
options.view_as(GoogleCloudOptions).temp_location = '%s/temp' % dataflow_gcs_location
beam.Pipeline()의 생성자에서InteractiveRunner를DataflowRunner로 바꿉니다.p은 파이프라인을 만들 때 사용한 파이프라인 객체입니다.
p = beam.Pipeline(DataflowRunner(), options=options)
- 코드에서 대화형 호출을 삭제합니다. 예를 들어 코드에서
show(),collect(),head(),show_graph(),watch()를 삭제합니다. - 결과를 보려면 싱크를 추가해야 합니다. 이전 섹션에서는 결과를 노트북으로 시각화했지만 이번에는 이 노트북 외부의 Dataflow에서 작업을 실행합니다. 따라서 결과를 보려면 외부 위치가 필요합니다. 이 예에서는 결과를 GCS (Google Cloud Storage)의 텍스트 파일에 작성합니다. 스트리밍 파이프라인이므로 데이터 기간 설정을 사용하면 기간별로 텍스트 파일을 하나씩 만들려고 합니다. 이를 위해 파이프라인에 다음 단계를 추가합니다.
result = (windowed_lower_word_counts
    | "decode words and format" >> beam.Map(lambda x: f"{x[0].decode('utf-8')}: {x[1]}")
    | "write events to file" >> beam.io.fileio.WriteToFiles(path=output_gcs_location, shards=1, max_writers_per_bundle=0))
- 파이프라인 코드 끝에
p.run()을 추가합니다. - 이제 노트북 코드를 검토하여 모든 변경사항을 통합했는지 확인합니다. 다음과 같이 표시됩니다.
import apache_beam as beam
from apache_beam.options import pipeline_options
from apache_beam.options.pipeline_options import GoogleCloudOptions
import google.auth
from apache_beam.runners import DataflowRunner

# Setting up the Apache Beam pipeline options.
options = pipeline_options.PipelineOptions()

# Set the pipeline mode to stream the data from Pub/Sub.
options.view_as(pipeline_options.StandardOptions).streaming = True

# Sets the project to the default project in your current Google Cloud environment.
# The project will be used for creating a subscription to the Pub/Sub topic.
_, options.view_as(GoogleCloudOptions).project = google.auth.default()

# Set the Google Cloud region to run Dataflow.
options.view_as(GoogleCloudOptions).region = 'us-central1'

# Choose a Cloud Storage location.
dataflow_gcs_location = 'gs://<change me>/dataflow'

# Choose a location for your output files
output_gcs_location = '%s/results/' % dataflow_gcs_location


# Set the staging location. This location is used to stage the
# Dataflow pipeline and SDK binary.
options.view_as(GoogleCloudOptions).staging_location = '%s/staging' % dataflow_gcs_location

# Set the temporary location. This location is used to store temporary files
# or intermediate results before outputting to the sink.
options.view_as(GoogleCloudOptions).temp_location = '%s/temp' % dataflow_gcs_location


# The Google Cloud PubSub topic for this example.
topic = "projects/pubsub-public-data/topics/shakespeare-kinglear"

p = beam.Pipeline(DataflowRunner(), options=options)
words = p | "read" >> beam.io.ReadFromPubSub(topic=topic)
windowed_words = (words
   | "window" >> beam.WindowInto(beam.window.FixedWindows(10)))

windowed_words_counts = (windowed_words
   | "count" >> beam.combiners.Count.PerElement())

windowed_lower_word_counts = (windowed_words
   | "to lower case" >> beam.Map(lambda word: word.lower())
   | "count lowered" >> beam.combiners.Count.PerElement())

result = (windowed_lower_word_counts
    | "decode words and format" >> beam.Map(lambda x: f"{x[0].decode('utf-8')}: {x[1]}")
    | "write events to file" >> beam.io.fileio.WriteToFiles(path=output_gcs_location, shards=1, max_writers_per_bundle=0))

p.run()
- 셀을 실행합니다.
- 다음과 비슷한 출력이 표시됩니다.
<DataflowPipelineResult <Job
 clientRequestId: '20230623100011457336-8998'
 createTime: '2023-06-23T10:00:33.447347Z'
 currentStateTime: '1970-01-01T00:00:00Z'
 id: '2023-06-23_03_00_33-11346237320103246437'
 location: 'us-central1'
 name: 'beamapp-root-0623075553-503897-boh4u4wb'
 projectId: 'your-project-id'
 stageStates: []
 startTime: '2023-06-23T10:00:33.447347Z'
 steps: []
 tempFiles: []
 type: TypeValueValuesEnum(JOB_TYPE_STREAMING, 2)> at 0x7fc7e4084d60>
- 작업이 실행 중인지 확인하려면 Dataflow의 작업 페이지로 이동합니다. 목록에 새 작업이 표시됩니다. 작업이 데이터 처리를 시작하는 데 약 5~10분이 걸립니다.
- 데이터가 처리되면 Cloud Storage로 이동하여 Dataflow가 결과를 저장하는 디렉터리 (정의된
output_gcs_location)로 이동합니다. 창당 하나의 파일이 있는 텍스트 파일 목록이 표시됩니다.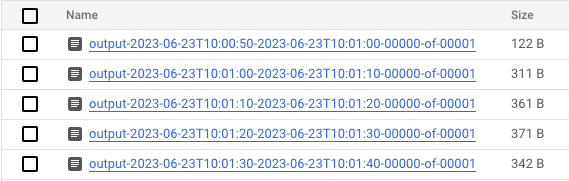
- 파일을 다운로드하고 콘텐츠를 검사합니다. 단어의 개수와 쌍을 이루는 단어 목록을 포함해야 합니다. 또는 명령줄 인터페이스를 사용하여 파일을 검사합니다. 노트북의 새 셀에서 다음을 실행하면 됩니다.
! gsutils cat gs://<your-bucket-here>/results/<file-name>
- 다음과 비슷한 출력이 표시됩니다.
|
|
|
|
|
|
|
|
|
|
|
|
|
|
|
- 작업이 끝났습니다. 만든 작업을 정리하고 중지해야 합니다 (이 Codelab의 마지막 단계 참고).
대화형 메모장에서 이 변환을 수행하는 방법에 대한 예시는 메모장 인스턴스의 Dataflow 단어 수 메모장을 참조하세요.
또는 노트북을 실행 가능한 스크립트로 내보내고 이전 단계를 사용하여 생성된 .py 파일을 수정한 다음, Dataflow 서비스에 파이프라인을 배포할 수 있습니다.
7. 메모장 저장
생성된 메모장은 실행 중인 메모장 인스턴스에 로컬로 저장됩니다. 개발 중에 노트북 인스턴스를 재설정하거나 종료해도 새 노트북은 /home/jupyter 디렉터리에 생성되는 한 유지됩니다. 하지만 노트북 인스턴스가 삭제되면 해당 노트북도 삭제됩니다.
나중에 사용할 수 있도록 노트북을 로컬에 다운로드하거나, GitHub에 저장하거나, 다른 파일 형식으로 내보냅니다.
8. 삭제
Apache Beam 노트북 인스턴스 사용을 완료한 후에는 노트북 인스턴스를 종료하고 스트리밍 작업을 중지(실행한 경우)하여 Google Cloud에서 만든 리소스를 삭제합니다.
또는 이 Codelab의 목적으로만 프로젝트를 만든 경우 완전히 프로젝트를 종료할 수도 있습니다.