1. Introduction
Accessibility services are a feature of the Android framework designed to provide alternative navigation feedback to the user on behalf of applications installed on Android devices. An accessibility service can communicate to the user on the application's behalf, for example by converting text to speech or providing haptic feedback when a user is hovering on an important area of the screen. This codelab shows you how to create a very simple accessibility service.
What is an Accessibility Service?
An Accessibility Service assists users with disabilities in using Android devices and apps. It is a long-running privileged service that helps users process information on the screen and lets them to interact meaningfully with a device.
Examples of common accessibility services
- Switch Access: allows Android users with mobility limitations to interact with devices using one or more switches.
- Voice Access (beta): allows Android users with mobility limitations to control a device with spoken commands.
- Talkback: a screen reader commonly used by visually impaired or blind users.
Building an accessibility service
While Google provides services like Switch Access, Voice Access, and Talkback for Android users, these services cannot possibly serve all users with disabilities. Since many users with disabilities have unique needs, Android's APIs for creating accessibility services are open, and developers are free to create accessibility services and distribute them through the Play Store.
What you'll be building
In this codelab, you'll develop a simple service that does a few useful things using the accessibility API. If you can write a basic Android app, you can develop a similar service.
The accessibility API is powerful: the code for the service you'll be building is contained in only four files, and uses ~200 lines of code!
The end user
You'll build a service for a hypothetical user with the following characteristics:
- The user has difficulty reaching the side buttons on a device.
- The user has difficulty scrolling or swiping.
Service details
Your service will overlay a global action bar on the screen. The user can touch buttons on this bar to perform the following actions:
- Power off the device without reaching the actual power button on the side of the phone.
- Adjust the volume without touching the volume buttons on the side of the phone.
- Perform scroll actions without actually scrolling.
- Perform a swipe without having to use a swipe gesture.
What you'll need
This codelab assumes you'll be using the following:
- A computer running Android Studio.
- A terminal for executing simple shell commands.
- A device running Android 7.0 (Nougat) connected to the computer you'll use for development.
Let's get started!
2. Getting set up
Using the terminal, create a directory where you'll be working. Change into this directory.
Download the Code
You can clone the repo that contains the code for this codelab:
git clone https://github.com/android/codelab-android-accessibility.git
The repo contains several Android Studio projects. Using Android Studio, open GlobalActionBarService.
Launch Android Studio by clicking the Studio icon:

Select the Import project (Eclipse ADT, Gradle, etc.) option:
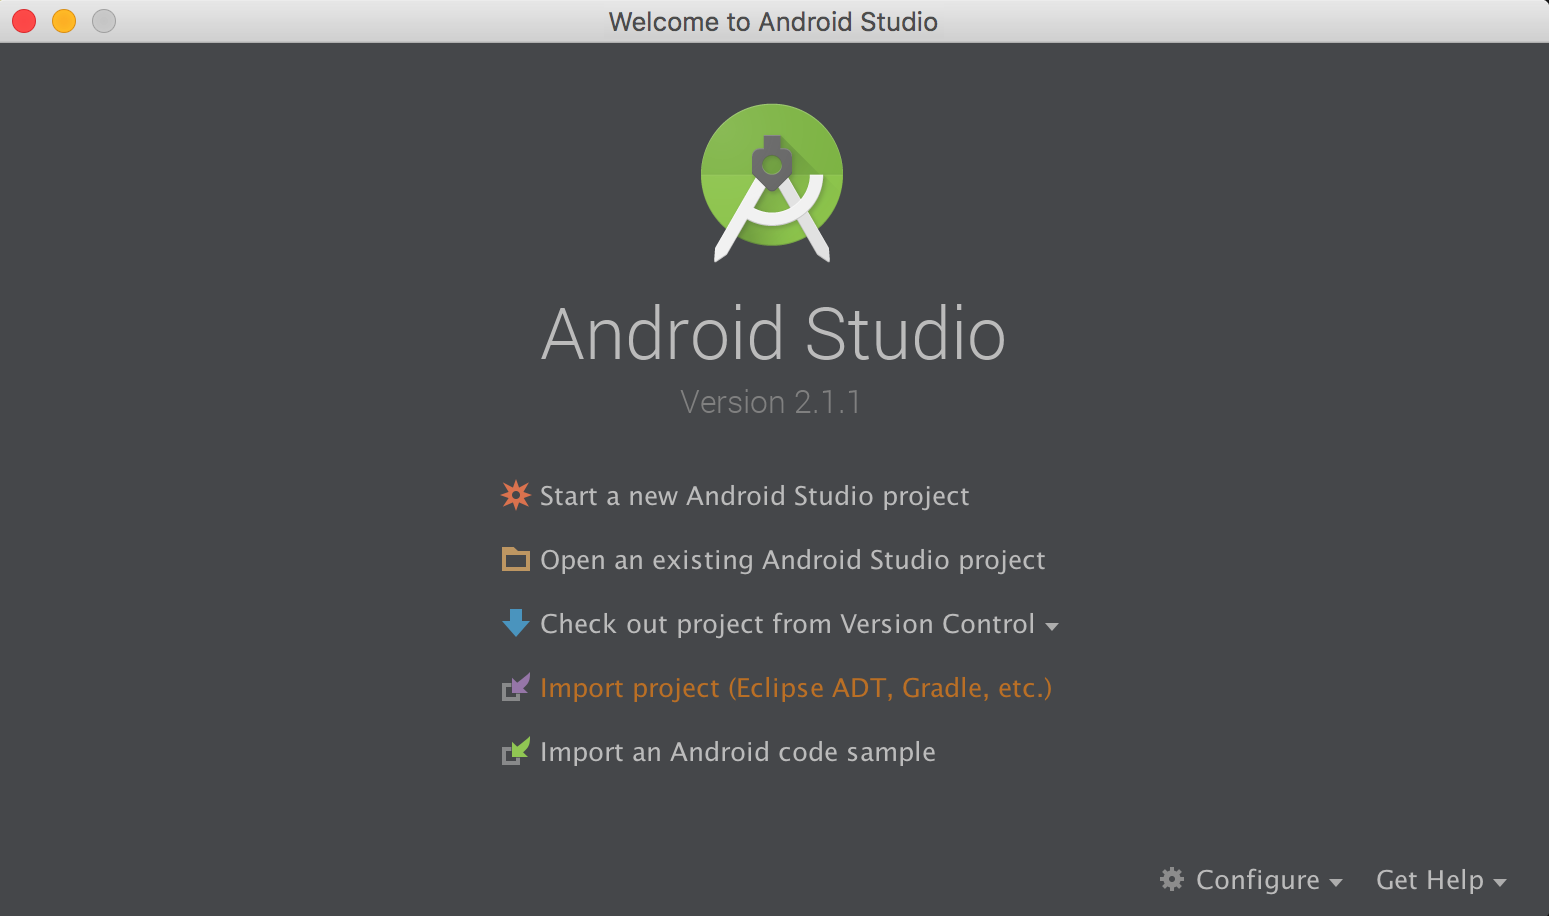
Navigate to the location where you cloned the source, and select GlobalActionBarService.
Then, using a terminal, change into the root directory.
3. Understanding the starting code
Explore the project you've opened.
The bare-bones skeleton for the accessibility service has already been created for you. All the code you'll write in this codelab is restricted to the following four files:
- app/src/main/AndroidManifest.xml
- app/src/main/res/layout/action_bar.xml
- app/src/main/res/xml/global_action_bar_service.xml
- app/src/main/java/com/example/android/globalactionbarservice/GlobalActionBarService.java
Here is a walkthrough of the contents of each file.
AndroidManifest.xml
Information about the accessibility service is declared in the manifest:
<?xml version="1.0" encoding="utf-8"?>
<manifest xmlns:android="http://schemas.android.com/apk/res/android"
   package="com.example.android.globalactionbarservice">

   <application>
       <service
           android:name=".GlobalActionBarService"
           android:permission="android.permission.BIND_ACCESSIBILITY_SERVICE"
           android:exported="true">
           <intent-filter>
               <action android:name="android.accessibilityservice.AccessibilityService" />
           </intent-filter>
           <meta-data
               android:name="android.accessibilityservice"
               android:resource="@xml/global_action_bar_service" />
       </service>
   </application>
</manifest>
The following three required items are declared in AndroidManifest.xml:
- Permission to bind to an accessibility service:
<service
    ...
    android:permission = "android.permission.BIND_ACCESSIBILITY_SERVICE">
    ...
</service>
- The AccessibilityService intent:
<intent-filter>
   <action android:name="android.accessibilityservice.AccessibilityService" />
</intent-filter>
- Location of the file that contains the metadata for the service you're creating:
<meta-data
       ...
       android:resource="@xml/global_action_bar_service" />
</service>
global_action_bar_service.xml
This file contains the metadata for the service.
<accessibility-service xmlns:android="http://schemas.android.com/apk/res/android"
   android:accessibilityFeedbackType="feedbackGeneric"
   android:accessibilityFlags="flagDefault"
   android:canPerformGestures="true"
   android:canRetrieveWindowContent="true" />
Using an <accessibility-service> element, the following metadata have been defined:
- The feedback type for this service (this codelab uses feedbackGeneric, which is a good default).
- The accessibility flags for the service (this codelab uses default flags).
- The capabilities needed for the service:
- In order to do swiping, android:canPerformGestures is set to true.
- In order to retrieve window content, android:canRetrieveWindowContent is set to true.
GlobalActionBarService.java
Most of the code for the accessibility service lives in GlobalActionBarService.java. Initially, the file contains the absolute bare minimum code for an accessibility service:
- A class which extends AccessibilityService.
- A couple of required overridden methods (left empty in this codelab).
public class GlobalActionBarService extends AccessibilityService {

   @Override
   public void onAccessibilityEvent(AccessibilityEvent event) {

   }

   @Override
   public void onInterrupt() {

   }
}
You'll add code to this file during the codelab.
action_bar.xml
The service exposes a UI with four buttons, and action_bar.xml layout file contains the markup for displaying those buttons:
<LinearLayout xmlns:android="http://schemas.android.com/apk/res/android"
   android:orientation="horizontal"
   android:layout_width="match_parent"
   android:layout_height="wrap_content">
</LinearLayout>
This file contains an empty LinearLayout for now. You'll be adding markup for the buttons during the codelab.
Launching the application
Make sure a device is connected to your computer. Press the green Play icon  from the menu bar towards the top of the screen. This should launch the app you're working on.
Go to Settings > Accessibility. The Global Action Bar Service is installed on your device.
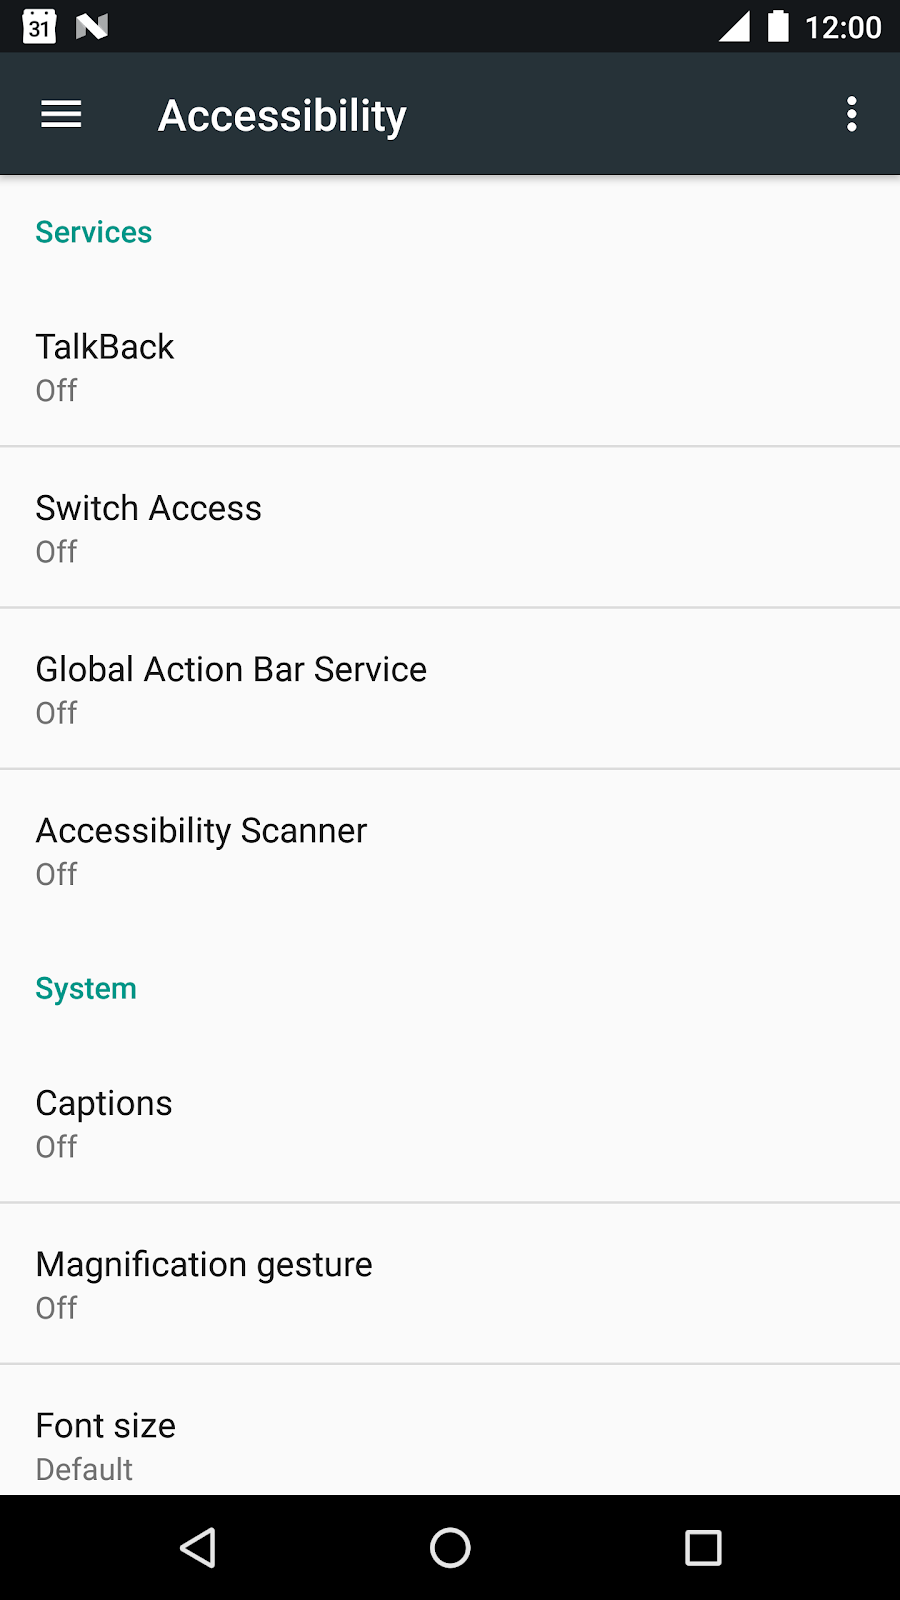
Click on Global Action Bar Service and turn it on. You should see the following permission dialog:
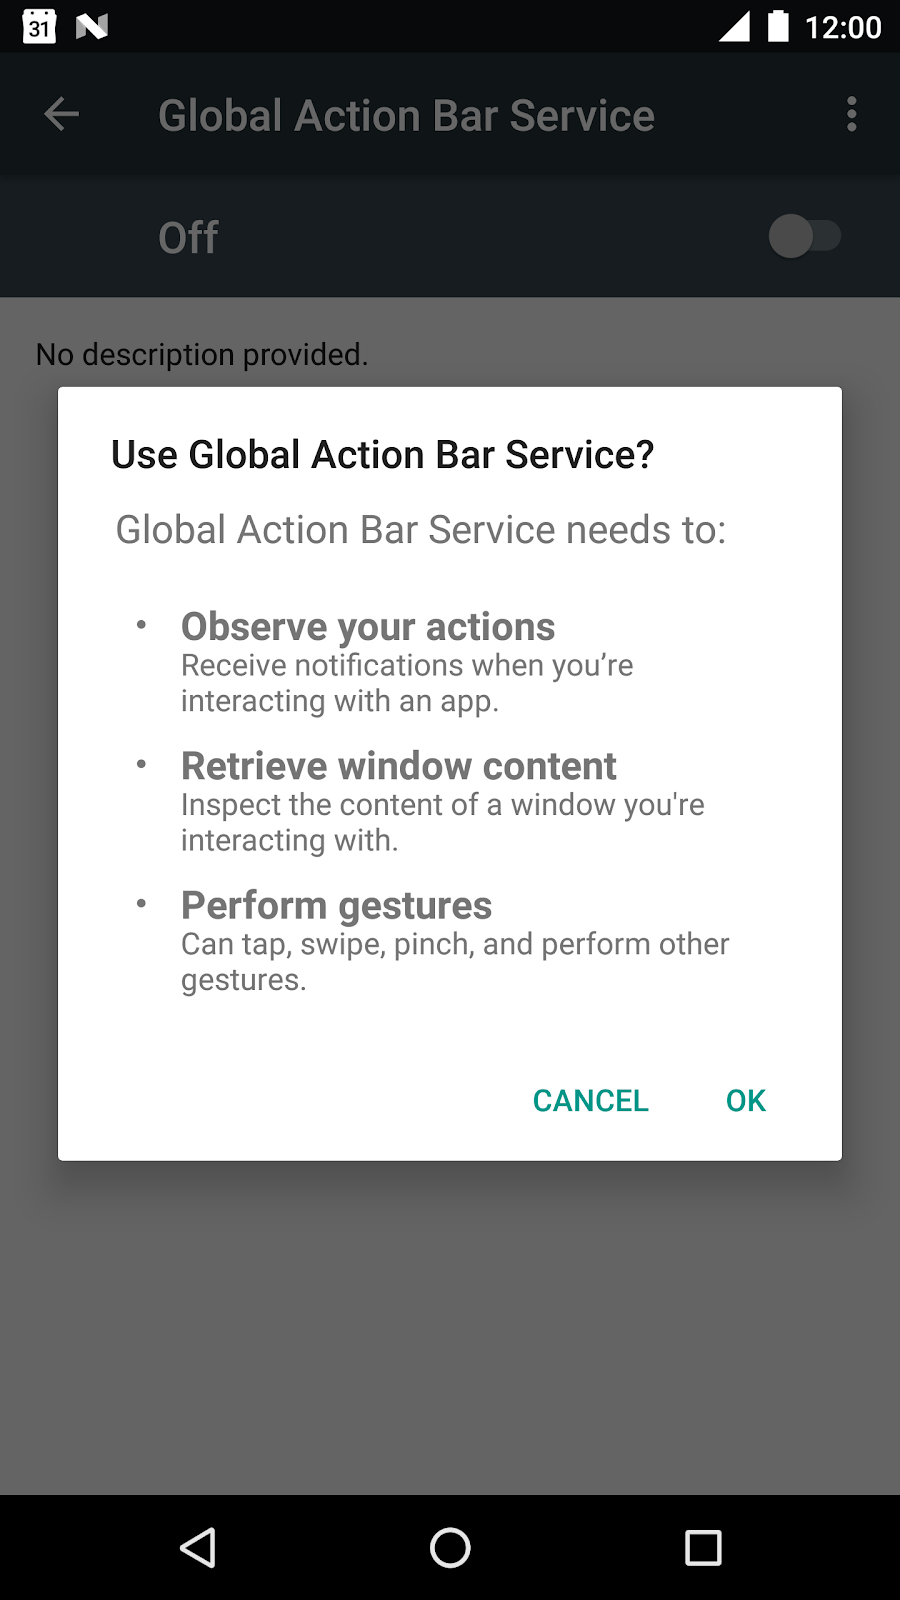
The accessibility service requests permission to observe user actions, retrieve window content, and perform gestures on behalf of the user! When using a third party accessibility service, make sure you really trust the source!
Running the service doesn't do much, since we have not added any functionality yet. Let's start to do that.
4. Creating the buttons
Open action_bar.xml in res/layout. Add the markup inside the currently empty LinearLayout:
<LinearLayout ...>
    <Button
        android:id="@+id/power"
        android:text="@string/power"
        android:layout_width="wrap_content"
        android:layout_height="wrap_content"/>
    <Button
        android:id="@+id/volume_up"
        android:text="@string/volume"
        android:layout_width="wrap_content"
        android:layout_height="wrap_content"/>
    <Button
        android:id="@+id/scroll"
        android:text="@string/scroll"
        android:layout_width="wrap_content"
        android:layout_height="wrap_content"/>
    <Button
        android:id="@+id/swipe"
        android:text="@string/swipe"
        android:layout_width="wrap_content"
        android:layout_height="wrap_content"/>
</LinearLayout>
This creates buttons the user will press to trigger actions on the device.
Open GlobalActionBarService.java and add a variable to store the layout for the action bar:
public class GlobalActionBarService extends AccessibilityService {
    FrameLayout mLayout;
    ...
}
Now add an onServiceStarted() method:
public class GlobalActionBarService extends AccessibilityService {
   FrameLayout mLayout;

   @Override
   protected void onServiceConnected() {
       // Create an overlay and display the action bar
       WindowManager wm = (WindowManager) getSystemService(WINDOW_SERVICE);
       mLayout = new FrameLayout(this);
       WindowManager.LayoutParams lp = new WindowManager.LayoutParams();
       lp.type = WindowManager.LayoutParams.TYPE_ACCESSIBILITY_OVERLAY;
       lp.format = PixelFormat.TRANSLUCENT;
       lp.flags |= WindowManager.LayoutParams.FLAG_NOT_FOCUSABLE;
       lp.width = WindowManager.LayoutParams.WRAP_CONTENT;
       lp.height = WindowManager.LayoutParams.WRAP_CONTENT;
       lp.gravity = Gravity.TOP;
       LayoutInflater inflater = LayoutInflater.from(this);
       inflater.inflate(R.layout.action_bar, mLayout);
       wm.addView(mLayout, lp);
   }
}
The code inflates the layout and adds the action bar towards the top of the screen.
The onServiceConnected() method runs when the service is connected. At this time, the accessibility service has all permissions it needs to be functional. The key permission you'll use here is the WindowManager.LayoutParams.TYPE_ACCESSIBILITY_OVERLAY permission. This permission lets you draw directly on the screen above existing content without having to go through a complicated permissions flow.
Accessibility Service lifecycle
The lifecycle of an accessibility service is managed exclusively by the system and follows the established service life cycle.
- An accessibility service starts when the user explicitly turns the service on in the device settings.
- After the system binds to a service, it calls onServiceConnected(). This method can be overridden by services that want to perform post binding setup.
- An accessibility service stops either when the user turns it off in device settings or when it calls disableSelf().
Running the service
Before you can launch the service using Android studio, you need to ensure that your Run settings are correctly configured.
Edit your Run configuration (use Run from the top menu and go to Edit Configurations. Then, using the dropdown, change the Launch Option from "Default Activity" to "Nothing".
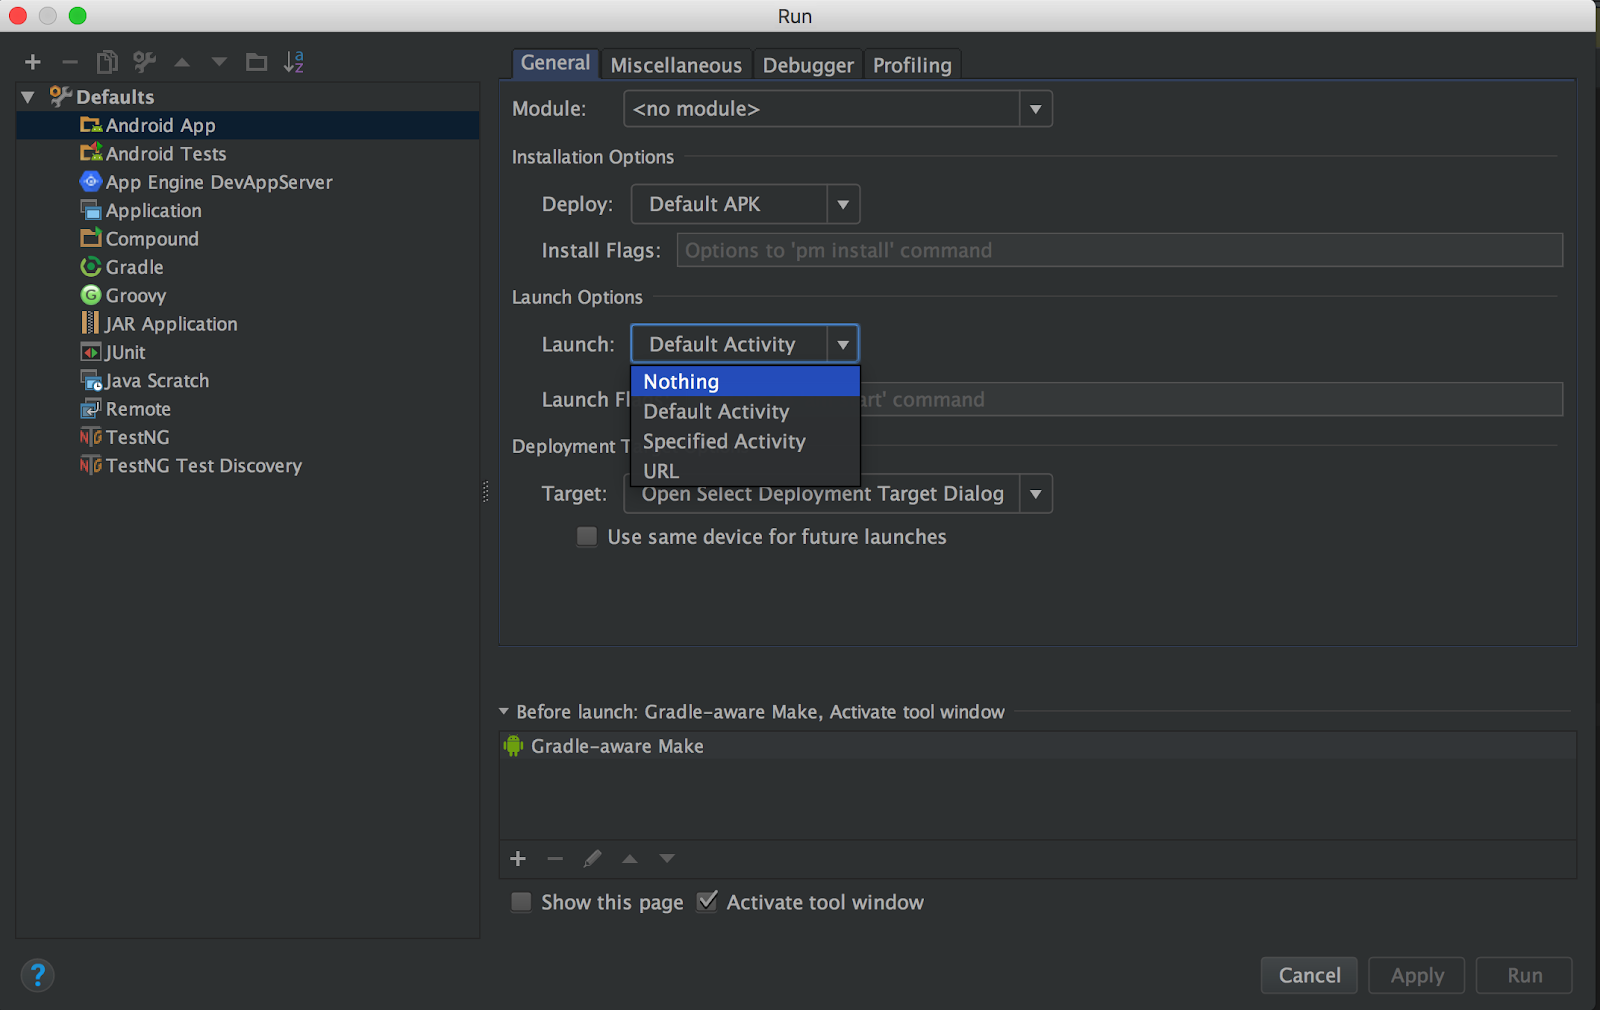
You should now be able to launch the service using Android Studio.
Press the green Play icon  from the menu bar towards the top of the screen. Then, visit Settings > Accessibility and turn on Global Action Bar Service.
You should see the four buttons that form the service UI overlayed on top of the content displayed on the screen.
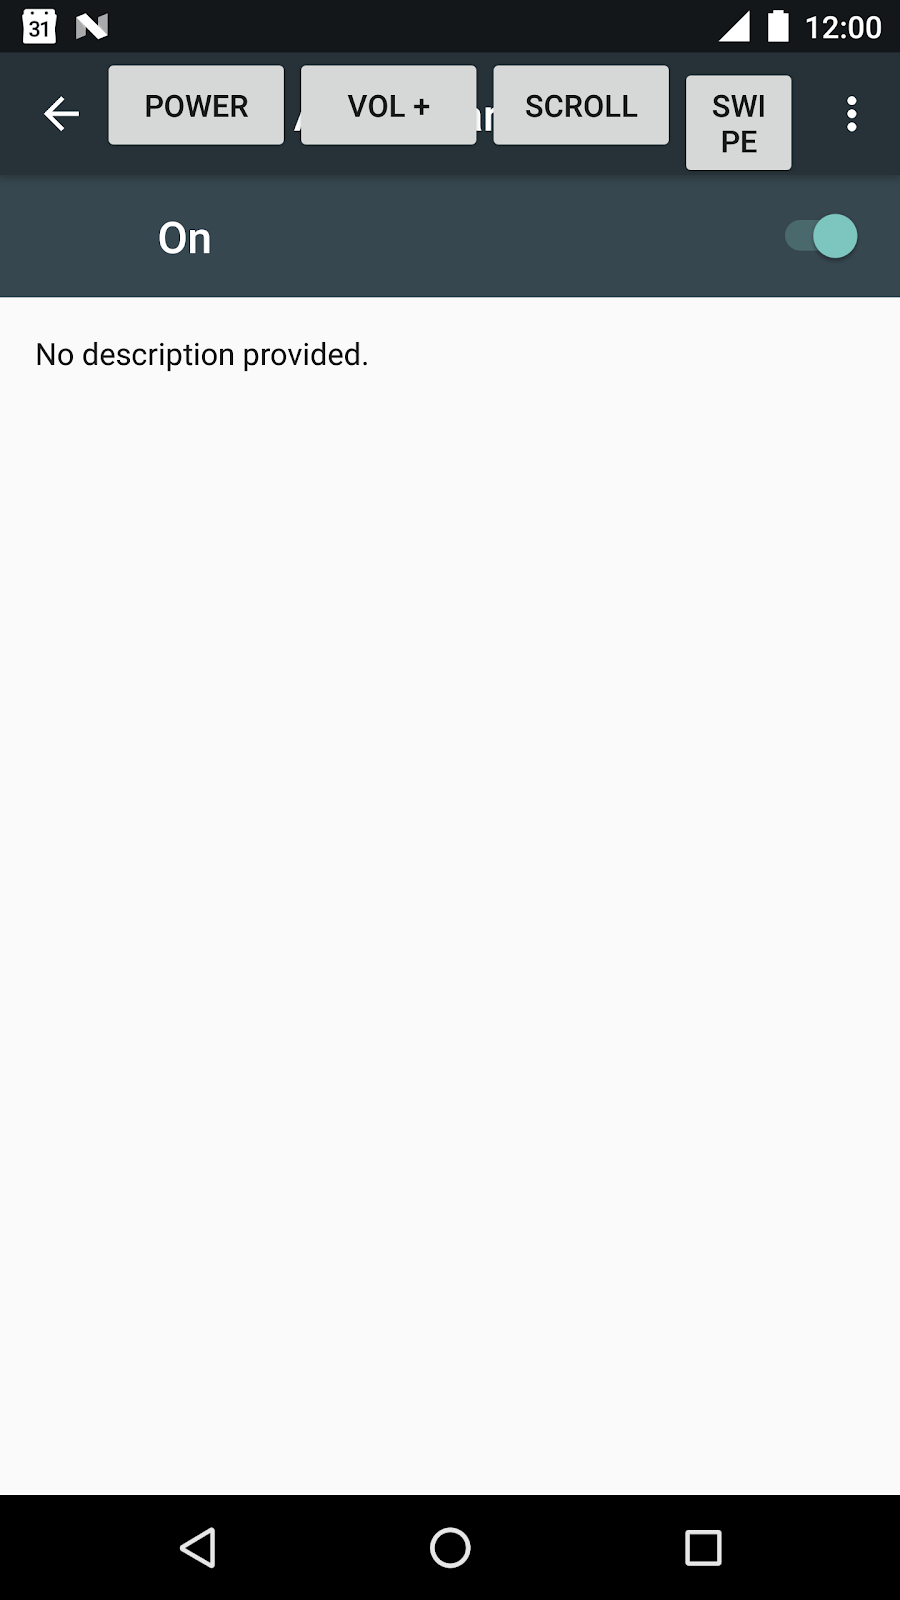
You'll now add functionality to the four buttons, so that a user can touch them to perform useful actions.
5. Configuring the Power button
Add the configurePowerButton() method to GlobalActionBarService.java:
private void configurePowerButton() {
   Button powerButton = (Button) mLayout.findViewById(R.id.power);
   powerButton.setOnClickListener(new View.OnClickListener() {
       @Override
       public void onClick(View view) {
           performGlobalAction(GLOBAL_ACTION_POWER_DIALOG);
       }
   });
}
For access to the power button menu, configurePowerButton() uses the performGlobalAction() method, which is provided by AccessibilityService. The code you just added is simple: clicking the button triggers an onClickListener(). This calls performGlobalAction(GLOBAL_ACTION_POWER_DIALOG) and displays the power dialog to the user.
Note that global actions are not tied to any views. Hitting the Back button, the Home button, the Recents button are other examples of global actions.
Now add configurePowerButton() to the end of the onServiceConnected() method:
@Override
protected void onServiceConnected() {
   ...
   configurePowerButton();
}
Press the green Play icon  from the menu bar towards the top of the screen. Then, visit Settings > Accessibility and start the Global Action Bar Service.
Press the Power button to display the power dialog.
6. Configuring the Volume Button
Add the configureVolumeButton() method to GlobalActionBarService.java:
private void configureVolumeButton() {
   Button volumeUpButton = (Button) mLayout.findViewById(R.id.volume_up);
   volumeUpButton.setOnClickListener(new View.OnClickListener() {
       @Override
       public void onClick(View view) {
           AudioManager audioManager = (AudioManager) getSystemService(AUDIO_SERVICE);
           audioManager.adjustStreamVolume(AudioManager.STREAM_MUSIC,
                   AudioManager.ADJUST_RAISE, AudioManager.FLAG_SHOW_UI);
       }
   });
}
The configureVolumeButton() method adds an onClickListener() that gets triggered when the user presses the volume button. Inside this listener, configureVolumeButton() uses an AudioManager to adjust the stream volume.
Note that anyone can control the volume (you don't need to be an accessibility service to do this).
Now add configureVolumeButton() to the end of the onServiceConnected() method:
@Override
protected void onServiceConnected() {
   ...

   configureVolumeButton();
}
Press the green Play icon  from the menu bar towards the top of the screen. Then, visit Settings > Accessibility and start the Global Action Bar Service.
Press the Volume button to change the volume.
The hypothetical user who is unable to reach the volume controls on the side of the device can now use Global Action Bar Service to change (increase) the volume.
7. Configuring the Scroll Button
This section involves coding up two methods. The first method finds a scrollable node, and the second methods performs the scroll action on behalf of the user.
Add the findScrollableNode method to GlobalActionBarService.java:
private AccessibilityNodeInfo findScrollableNode(AccessibilityNodeInfo root) {
   Deque<AccessibilityNodeInfo> deque = new ArrayDeque<>();
   deque.add(root);
   while (!deque.isEmpty()) {
       AccessibilityNodeInfo node = deque.removeFirst();
       if (node.getActionList().contains(AccessibilityNodeInfo.AccessibilityAction.ACTION_SCROLL_FORWARD)) {
           return node;
       }
       for (int i = 0; i < node.getChildCount(); i++) {
           deque.addLast(node.getChild(i));
       }
   }
   return null;
}
An accessibility service does not have access to the actual views on the screen. Instead, it sees a reflection of what is on the screen in the form of a tree made up of AccessibilityNodeInfo objects. These objects contain information about the view that they represent (the location of the view, any text associated with the view, metadata that has been added for accessibility, actions supported by the view, etc.). The findScrollableNode() method performs a breadth-first traversal of this tree, starting at the root node. If it finds a scrollable node (i..e., a node that supports the AccessibilityNodeInfo.AccessibilityAction.ACTION_SCROLL_FORWARD action), it returns it, otherwise it returns null.
Now add the configureScrollButton() method to GlobalActionBarService.java:
private void configureScrollButton() {
   Button scrollButton = (Button) mLayout.findViewById(R.id.scroll);
   scrollButton.setOnClickListener(new View.OnClickListener() {
       @Override
       public void onClick(View view) {
           AccessibilityNodeInfo scrollable = findScrollableNode(getRootInActiveWindow());
           if (scrollable != null) {
               scrollable.performAction(AccessibilityNodeInfo.AccessibilityAction.ACTION_SCROLL_FORWARD.getId());
           }
       }
   });
}
This method creates an onClickListener() which fires when the scroll button is clicked. It tries to find a scrollable node and if successful, performs the scroll action.
Now add configureScrollButton() to onServiceConnected():
@Override
protected void onServiceConnected() {
   ...

   configureScrollButton();
}
Press the green Play icon  from the menu bar towards the top of the screen. Then, visit Settings > Accessibility and start the Global Action Bar Service.
Press the back button to go to Settings > Accessibility. The items on the accessibility settings activity are scrollable, and touching the Scroll button performs a scroll action. Our hypothetical user who is unable to easily perform scroll actions can now use the Scroll button to scroll over a list of items.
8. Configuring the Swipe Button
Add the configureSwipeButton() method to GlobalActionBarService.java:
private void configureSwipeButton() {
   Button swipeButton = (Button) mLayout.findViewById(R.id.swipe);
   swipeButton.setOnClickListener(new View.OnClickListener() {
       @Override
       public void onClick(View view) {
           Path swipePath = new Path();
           swipePath.moveTo(1000, 1000);
           swipePath.lineTo(100, 1000);
           GestureDescription.Builder gestureBuilder = new GestureDescription.Builder();
           gestureBuilder.addStroke(new GestureDescription.StrokeDescription(swipePath, 0, 500));
           dispatchGesture(gestureBuilder.build(), null, null);
       }
   });
}
The configureSwipeButton() method uses a new API that was added in N that performs gestures on behalf of the user. The code uses a GestureDescription object to specify the path for the gesture to be performed (hardcoded values are used in this codelab), and then dispatches the swipe gesture on behalf of the user using the AccessibilityService dispatchGesture() method.
Now add configureSwipeButton() to onServiceConnected():
@Override
protected void onServiceConnected() {
   ...
   configureSwipeButton();
}
Press the green Play icon  from the menu bar towards the top of the screen. Then, visit Settings > Accessibility and start the Global Action Bar Service.
The easiest way to test the swipe functionality is to open the Maps application installed on your phone. Once the map loads, touching the Swipe button swipes the screen to the right.
9. Summary
Congratulations! You've built a simple, functional accessibility service.
You can extend this service in a variety of ways. For example:
- Make the action bar moveable (it just sits on top of the screen for now).
- Allow the user to both increase and decrease the volume.
- Allow the user to swipe both left and right.
- Add support for additional gestures that the action bar can respond to.
This codelab covers only a small subset of the functionality provided by the accessibility APIs. The API also covers the following (partial list):
- Support for multiple windows.
- Support for AccessibilityEvents. When the UI changes, accessibility services are notified about those changes using AccessibilityEvent objects. The service can then respond as appropriate to the UI changes.
- Ability to control magnification.
This codelab gets you started with writing an accessibility service. If you know a user with specific accessibility issues that you would like to address, you can now build a service to help that user.
