
1. 准备工作
在此 Codelab 中,您将学习如何使用 Dialogflow CX(用于构建对话式界面的对话式 AI 平台 [CAIP])构建零售聊天机器人。Dialogflow CX 可以实现虚拟代理,例如:聊天机器人、语音聊天机器人、电话网关,并且可以支持 50 多种不同语言的多个渠道。
此 Codelab 将指导您如何为零售网站构建聊天机器人。我们将为一家名为 G-Records 的虚构企业构建聊天机器人。G-Records 是一家位于加利福尼亚州的摇滚唱片公司。该唱片公司签约了 4 支摇滚乐队:Alice Googler、G's N' Roses、The Goo Fighters 和 The Google Dolls。G-Records 正在向所有摇滚乐迷销售乐队周边商品。
完成此 Codelab 后,您可以使用聊天机器人订购衬衫或音乐,也可以询问订单相关事宜。
学习内容
您将通过实践了解 Dialogflow CX 相较于 Dialogflow ES 的优势!它包括以下概念:
- 如何在 Google Cloud 中创建 Dialogflow CX 虚拟客服
- 了解如何创建流程
- 了解如何创建实体
- 了解如何创建 intent
- 了解如何使用状态处理程序创建网页和过渡网页
- 了解如何使用 intent 路由转换页面
- 了解如何使用参数和条件路由转换页面
- 了解如何使用系统函数返回条件性回答
- 了解如何创建回退消息
- 了解如何使用模拟器
- 了解如何创建测试用例和测试覆盖率
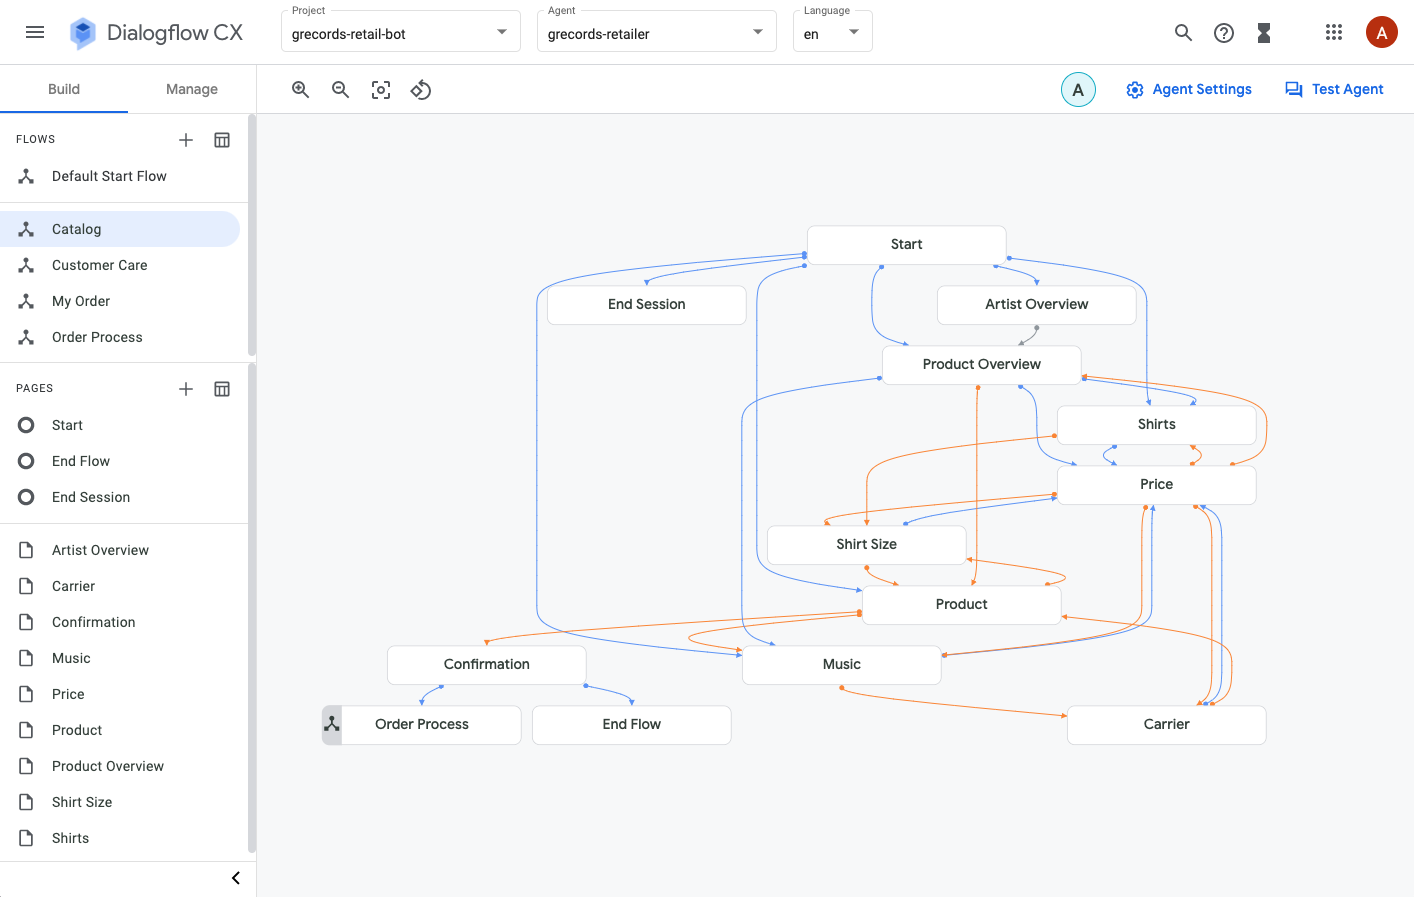
最终的 Dialogflow CX 代理设计将如下所示:
所需条件
- 您需要拥有 Google 身份 / Gmail 邮箱才能创建 Dialogflow CX 代理。
- Google Cloud 访问权限。
2. 环境设置
创建 Google Cloud 项目
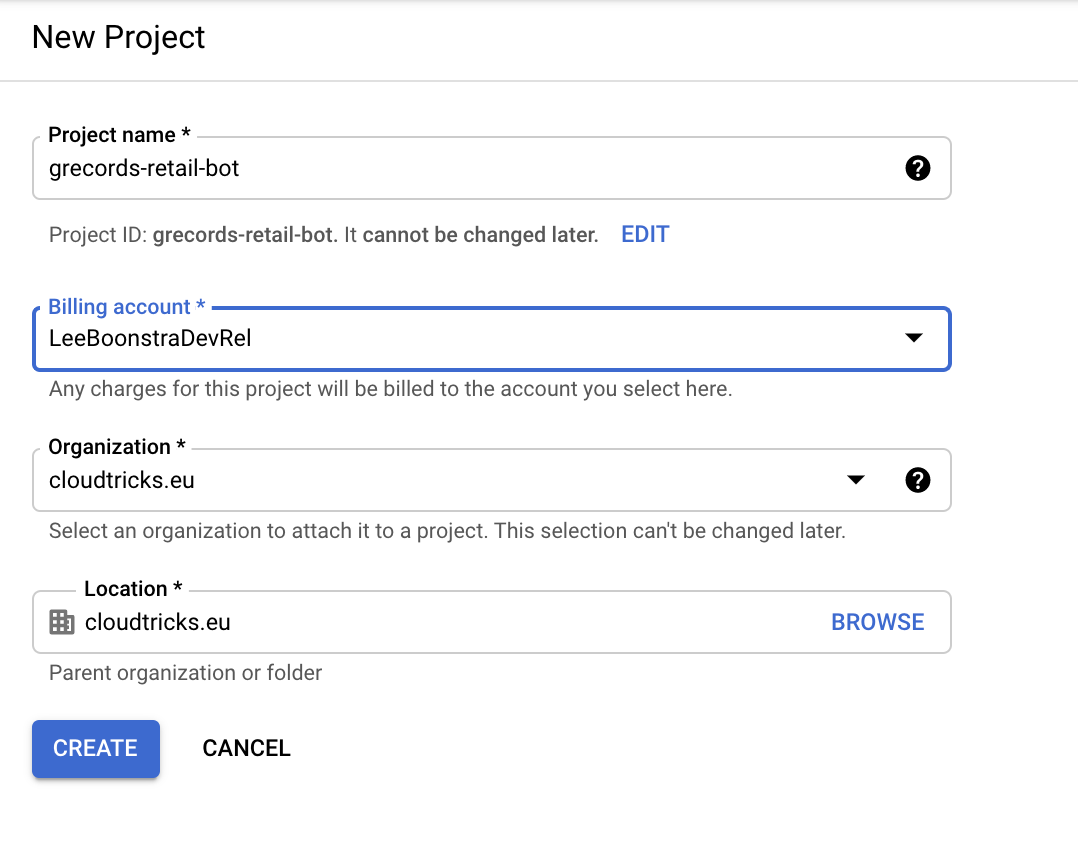
由于 Dialogflow CX 在 Google Cloud 中运行,因此您必须创建 Google Cloud 项目。项目用于组织您的所有 Google Cloud 资源。项目由一组协作者、已启用的 API(和其他资源)、监控工具、结算信息以及身份验证和访问权限控制组成。
创建新项目时,您需要输入项目名称。您必须将其与现有的结算账号和组织相关联。
结算账号用于定义一组给定资源的付款方,并且可以关联到一个或多个项目。项目的使用费将计入关联的结算账号名下。在大多数情况下,您在创建项目时配置结算。 如需了解详情,请参阅结算文档。确保您的 Cloud 项目已启用结算功能。
启用 Dialogflow API
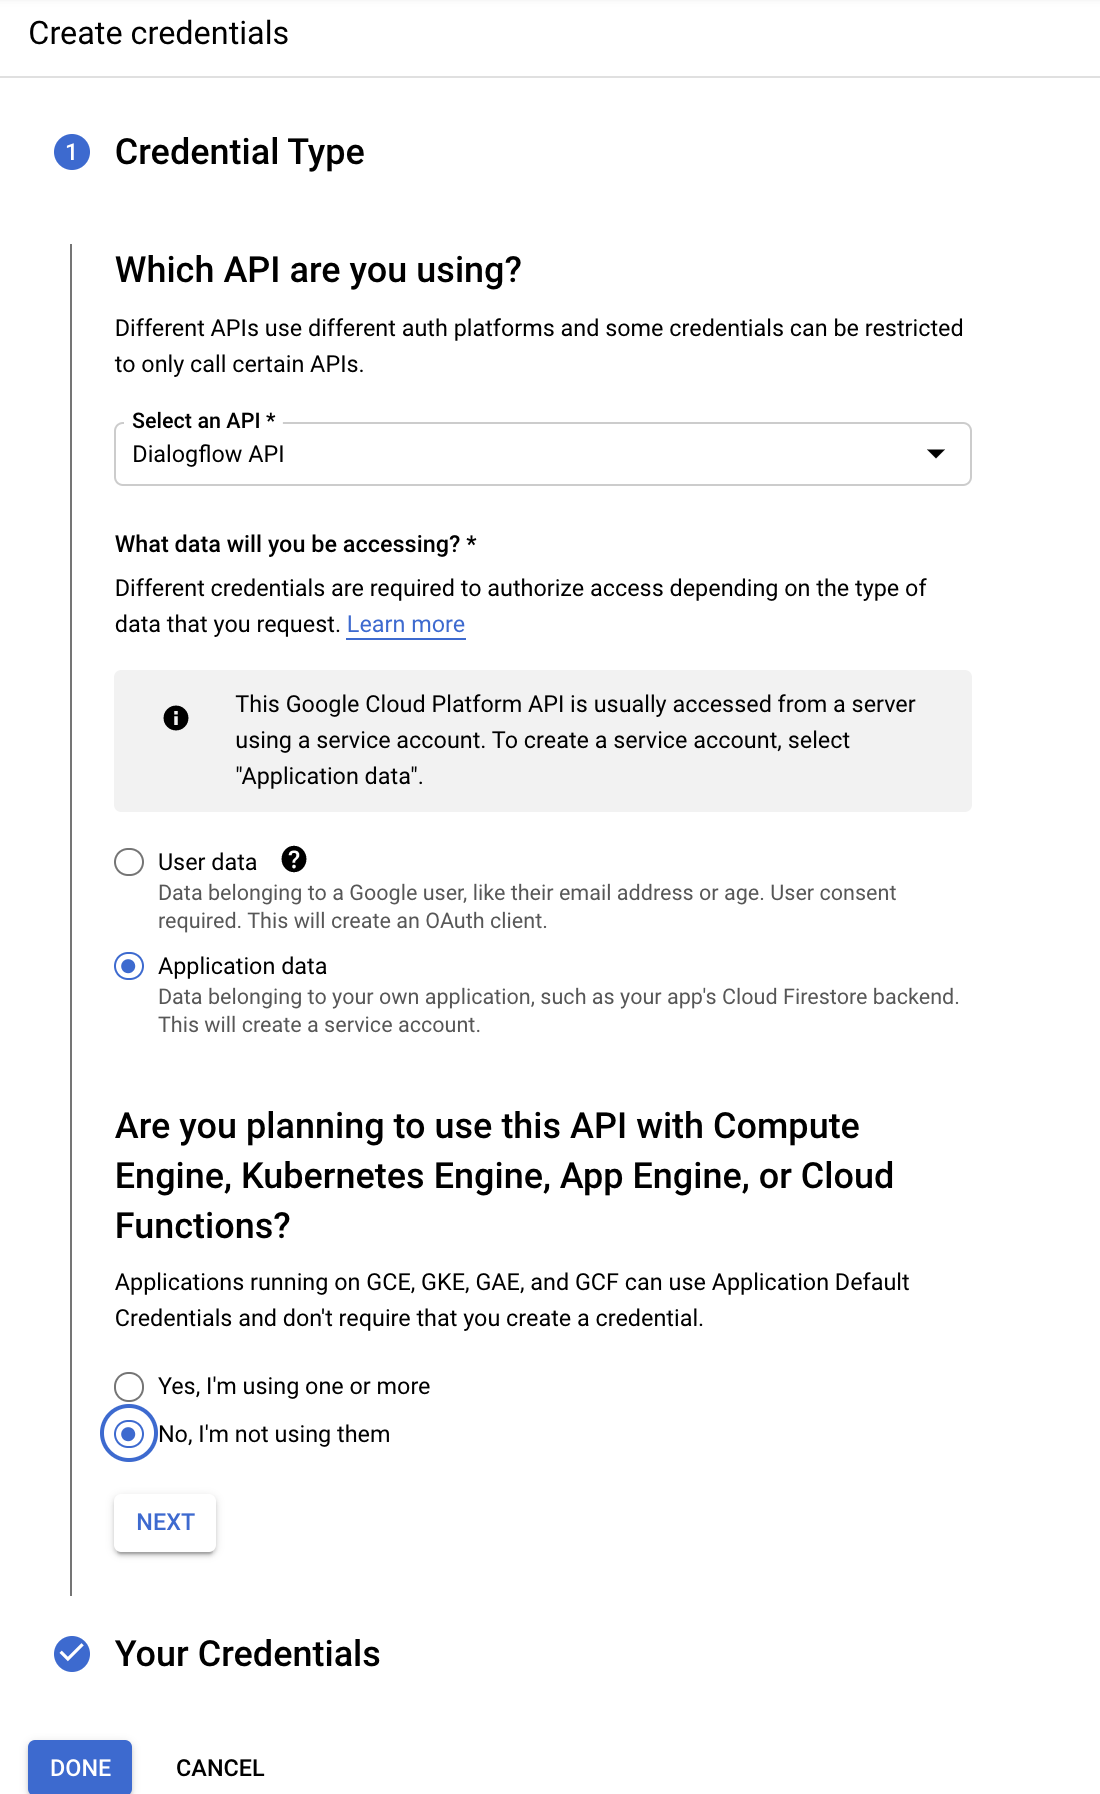
如需使用 Dialogflow,您必须为项目启用 Dialogflow API。
- 选择要为其启用 API 的项目,然后点击继续。
- 收起“API 和服务”菜单,然后点击创建凭据
- 点击应用数据
- 由于您目前未使用 Kubernetes Engine、App Engine 或 Cloud Functions,因此请选择否,我未使用这些服务。
- 点击完成。
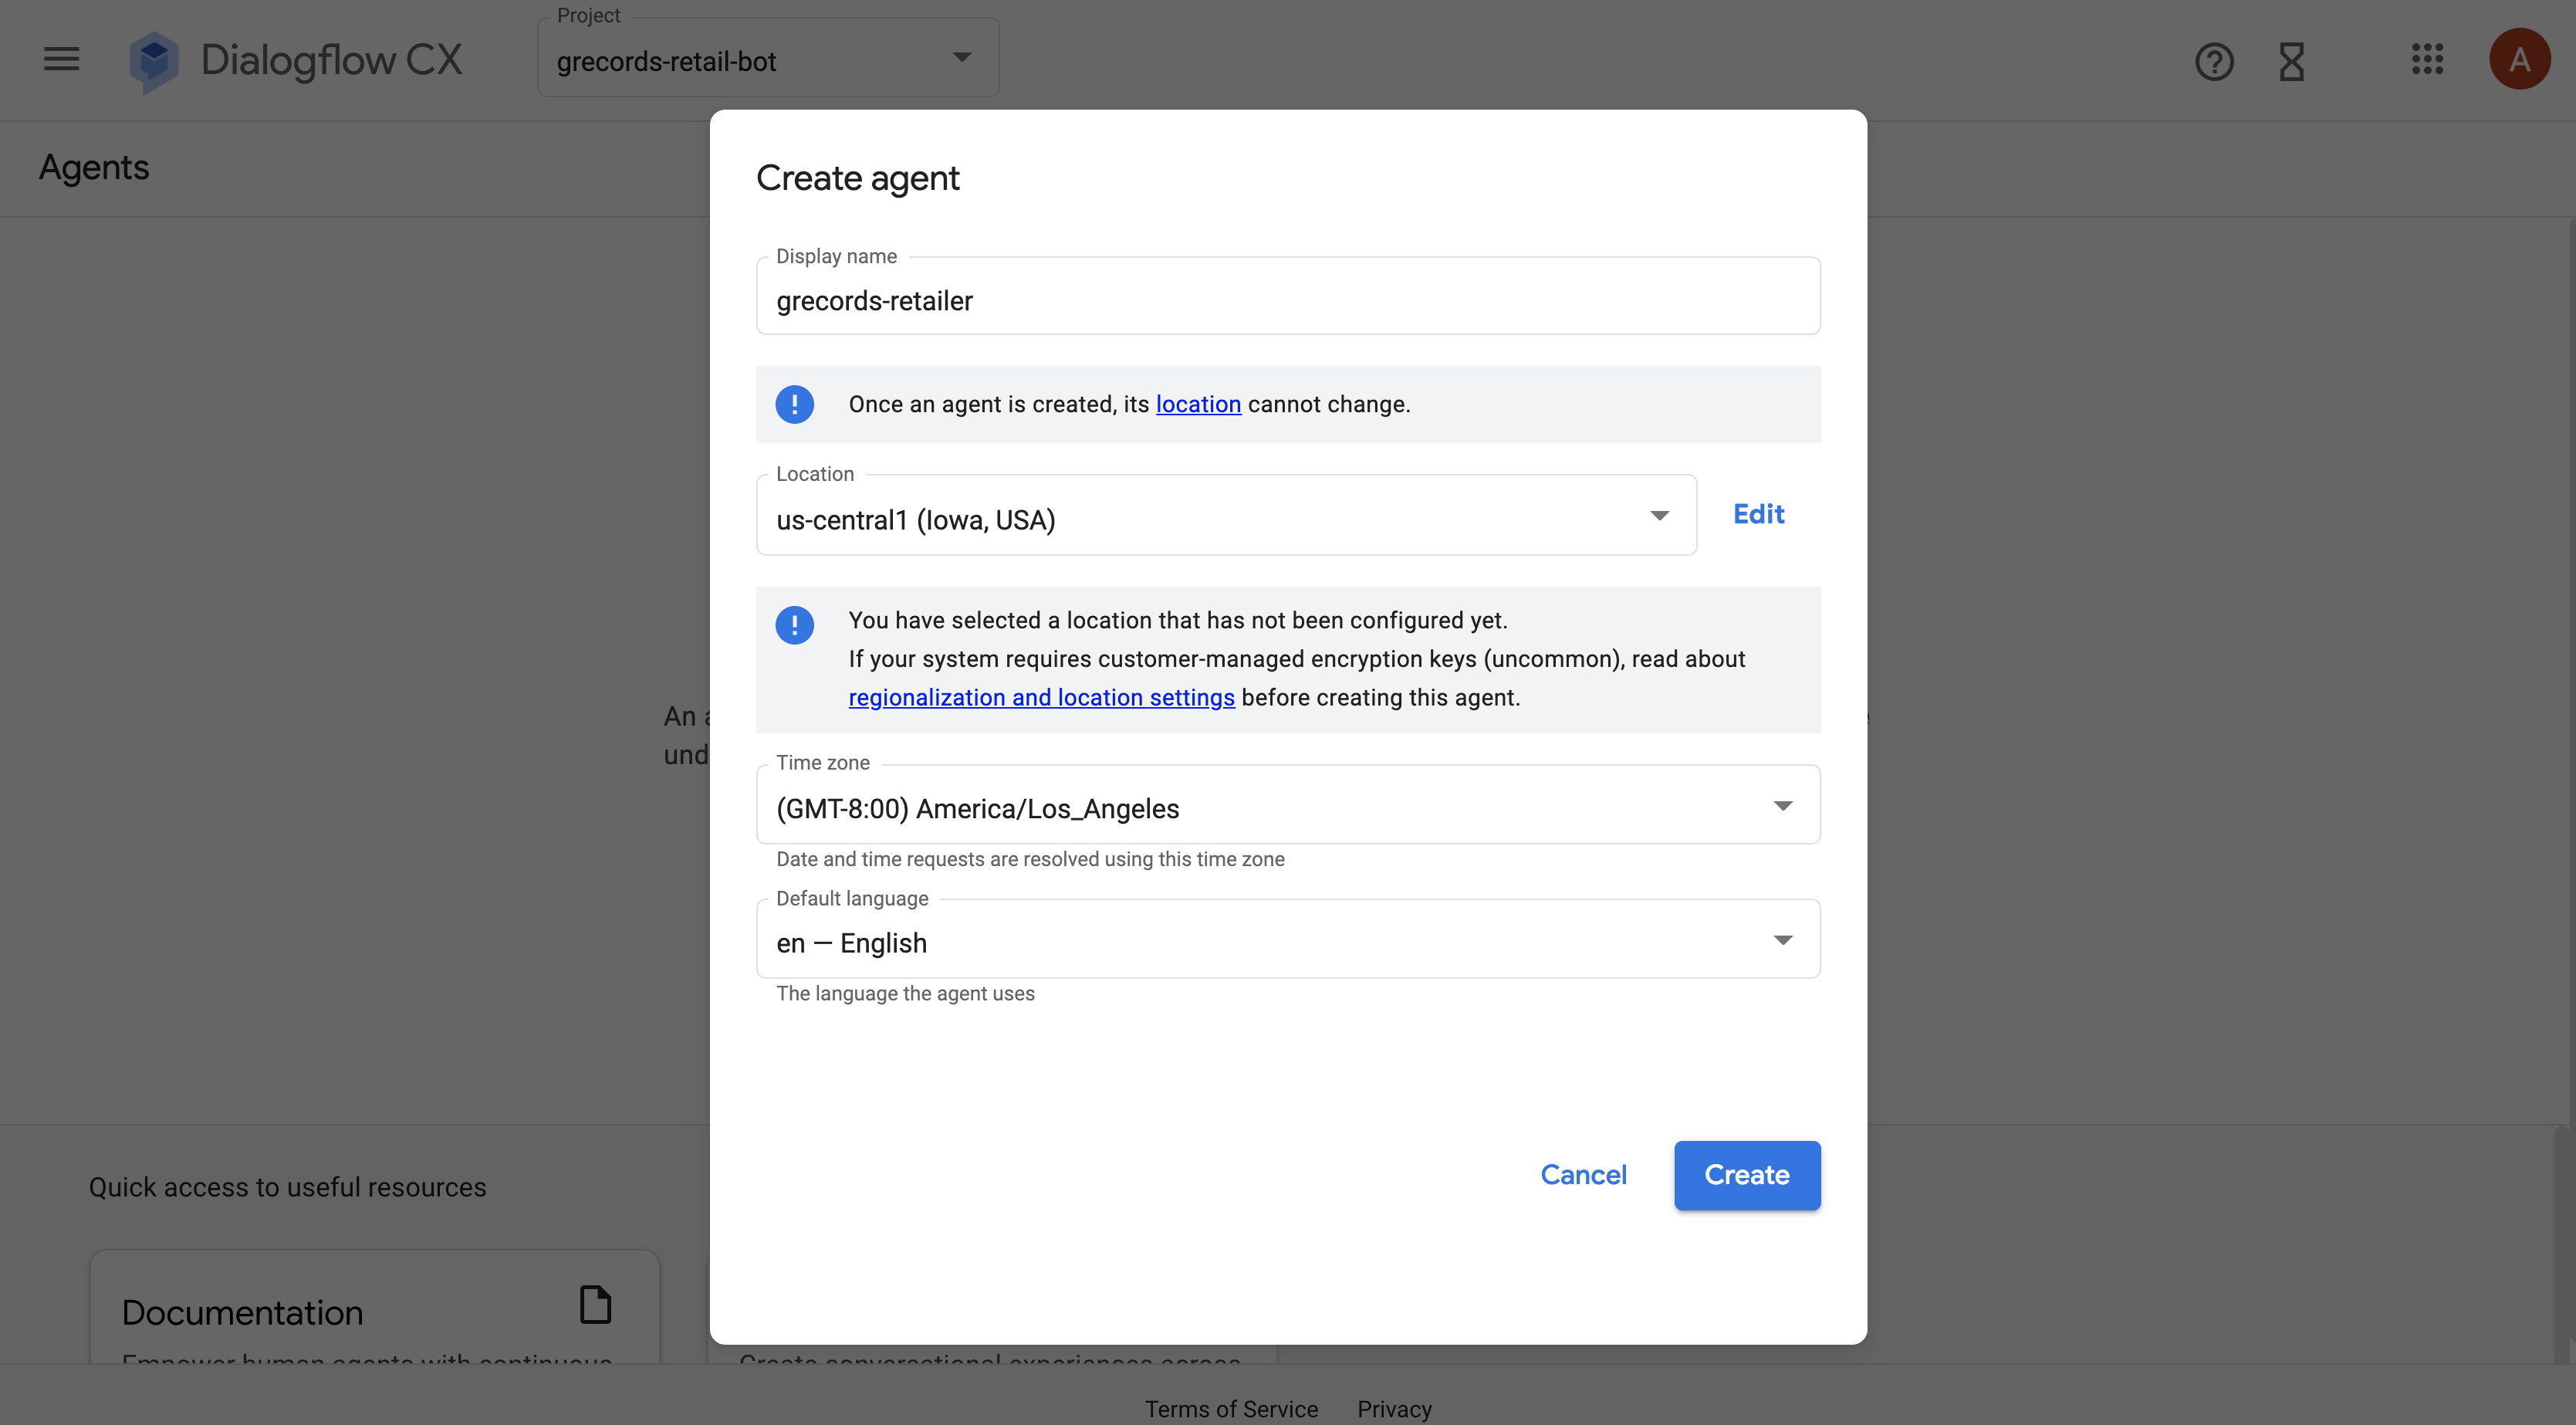
创建新的 Dialogflow CX 代理
如需创建新的 Dialogflow CX 代理,请先打开 Dialogflow CX 控制台:
- 选择之前创建的 Google Cloud 项目。
- 点击 Create agent。
填写基本代理设置表单:
- 您可以选择任何显示名。
- 选择 us-central1 作为位置
- 选择您的首选时区。
- 选择 en - 英语作为默认语言
点击创建。
好了,一切准备就绪。我们终于可以开始对虚拟客服进行建模了。
3. 流程
复杂的对话框通常涉及多个对话主题。对于我们为 G-Records 构建的聊天机器人,如果用于销售乐队周边商品,则需要包含有关商品清单、付款、订单状态和客户服务问题的对话。我们可以将这些对话主题拆分为多个流。
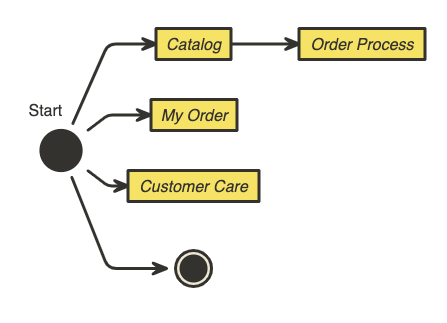
借助流程,团队可以处理各个对话路径。一种不错的做法是简化流程,使其能够轻松适应屏幕,并更具模块化。
对于 Dialogflow CX 而言,流程是一个新概念。Dialogflow Essentials 具有超级代理的概念,该概念在某种程度上与流类似。不过,您会更频繁地使用 Flow。
在本实验的后续部分,我们将使用可以结束流程的状态处理程序(因此它会跳回下一个或上一个流程),或者您可以结束整个代理会话。
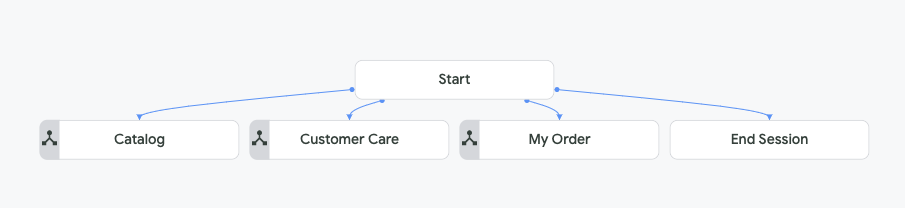
让我们开始创建一些流程吧。
创建流程
- 在 Dialogflow CX 中,依次点击 + 图标 > 创建流。
- 指定名称:
Catalog,然后按 Enter 键。
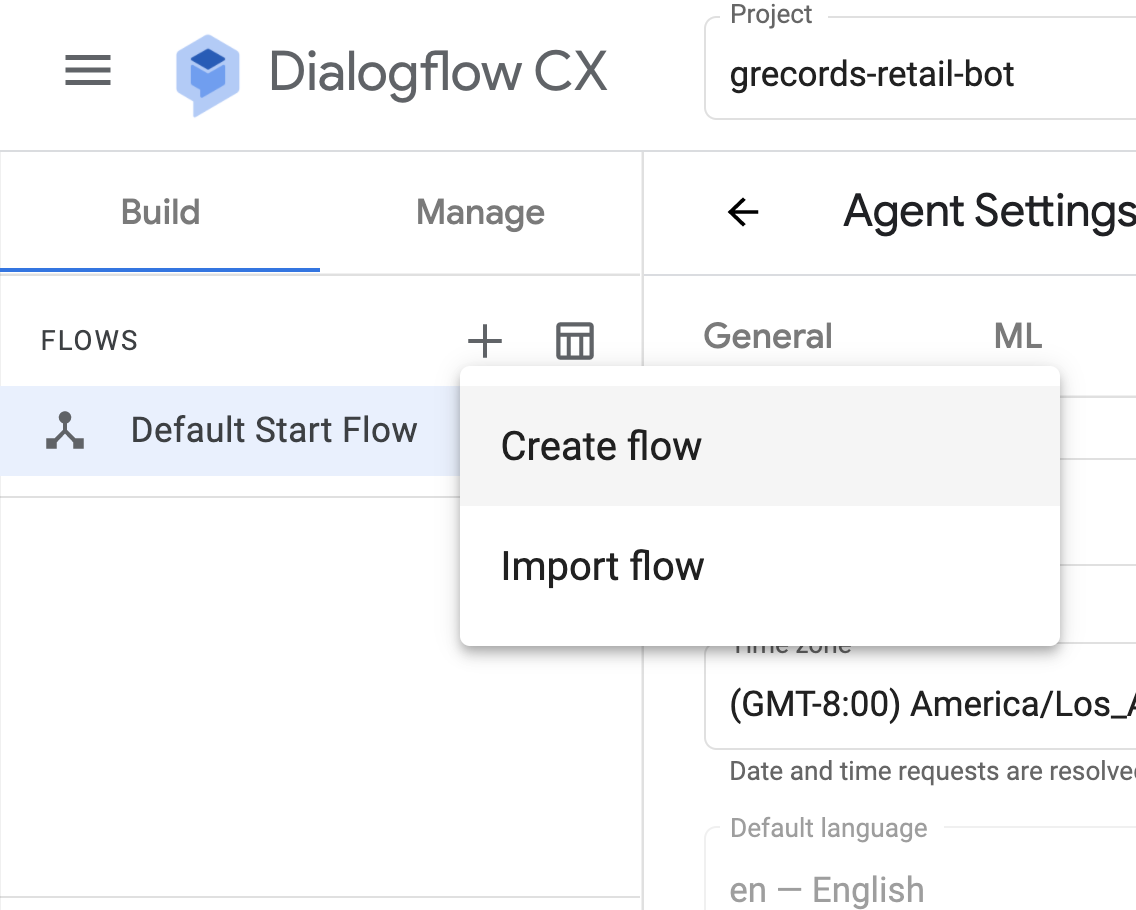
您的第一个流程目录已创建。现在,创建其他流程:
Order ProcessMy OrderCustomer Care
在本实验的后面部分,我们将设置页面状态处理程序,以确保最终的可视化效果如下所示:
模拟器
在 Dialogflow CX 控制台的右侧,您可以使用内置模拟器测试虚拟客服。您可以从对话的开头或从特定流程开始测试对话。
- 点击屏幕右上角的 Test Agent 按钮。
- 在“与代理对话”字段中输入:
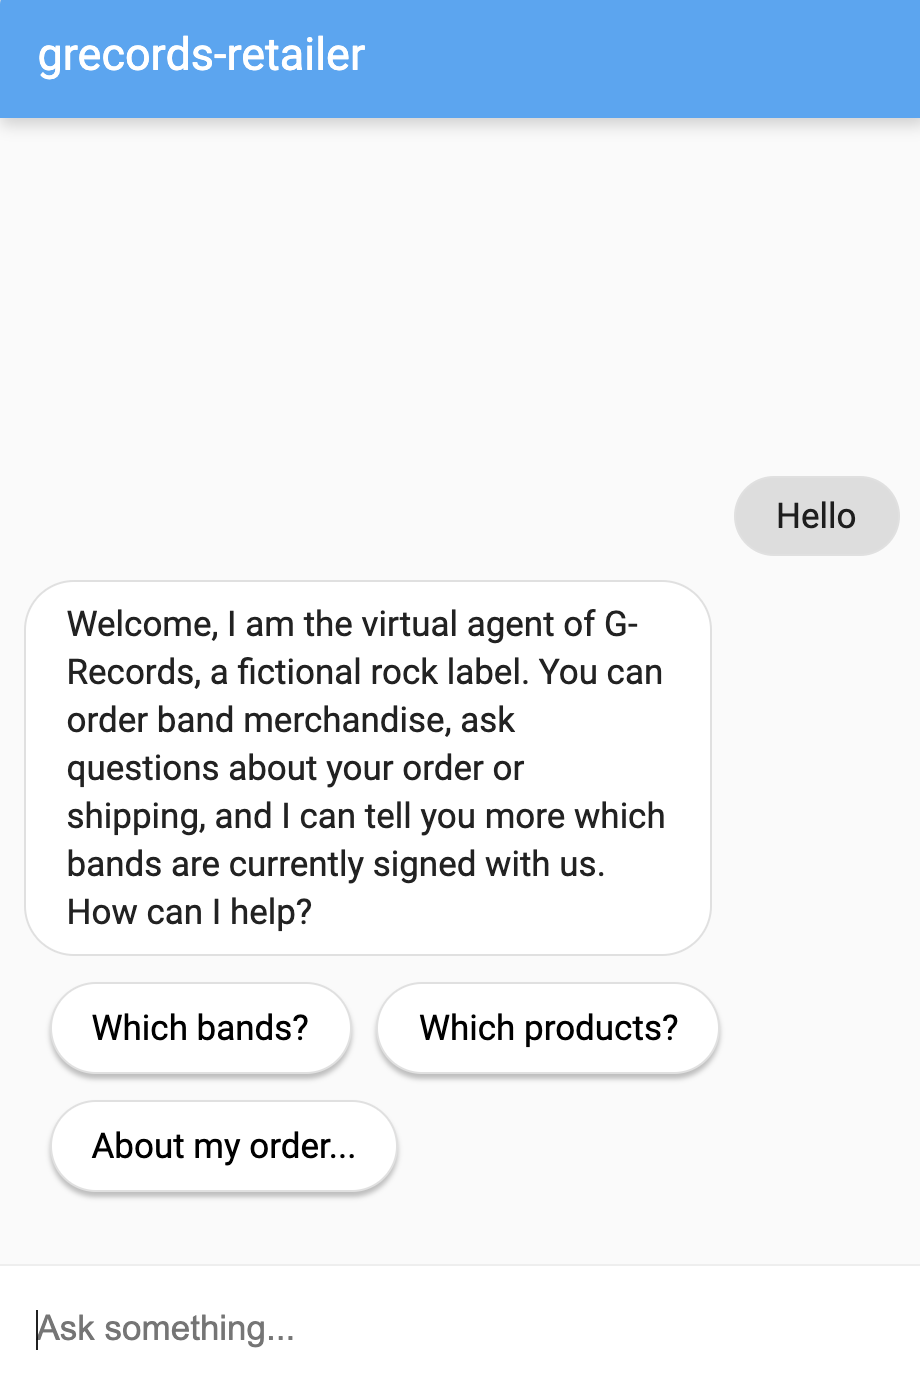
Hello虚拟客服会使用默认欢迎文本进行响应:您好!您需要什么帮助?
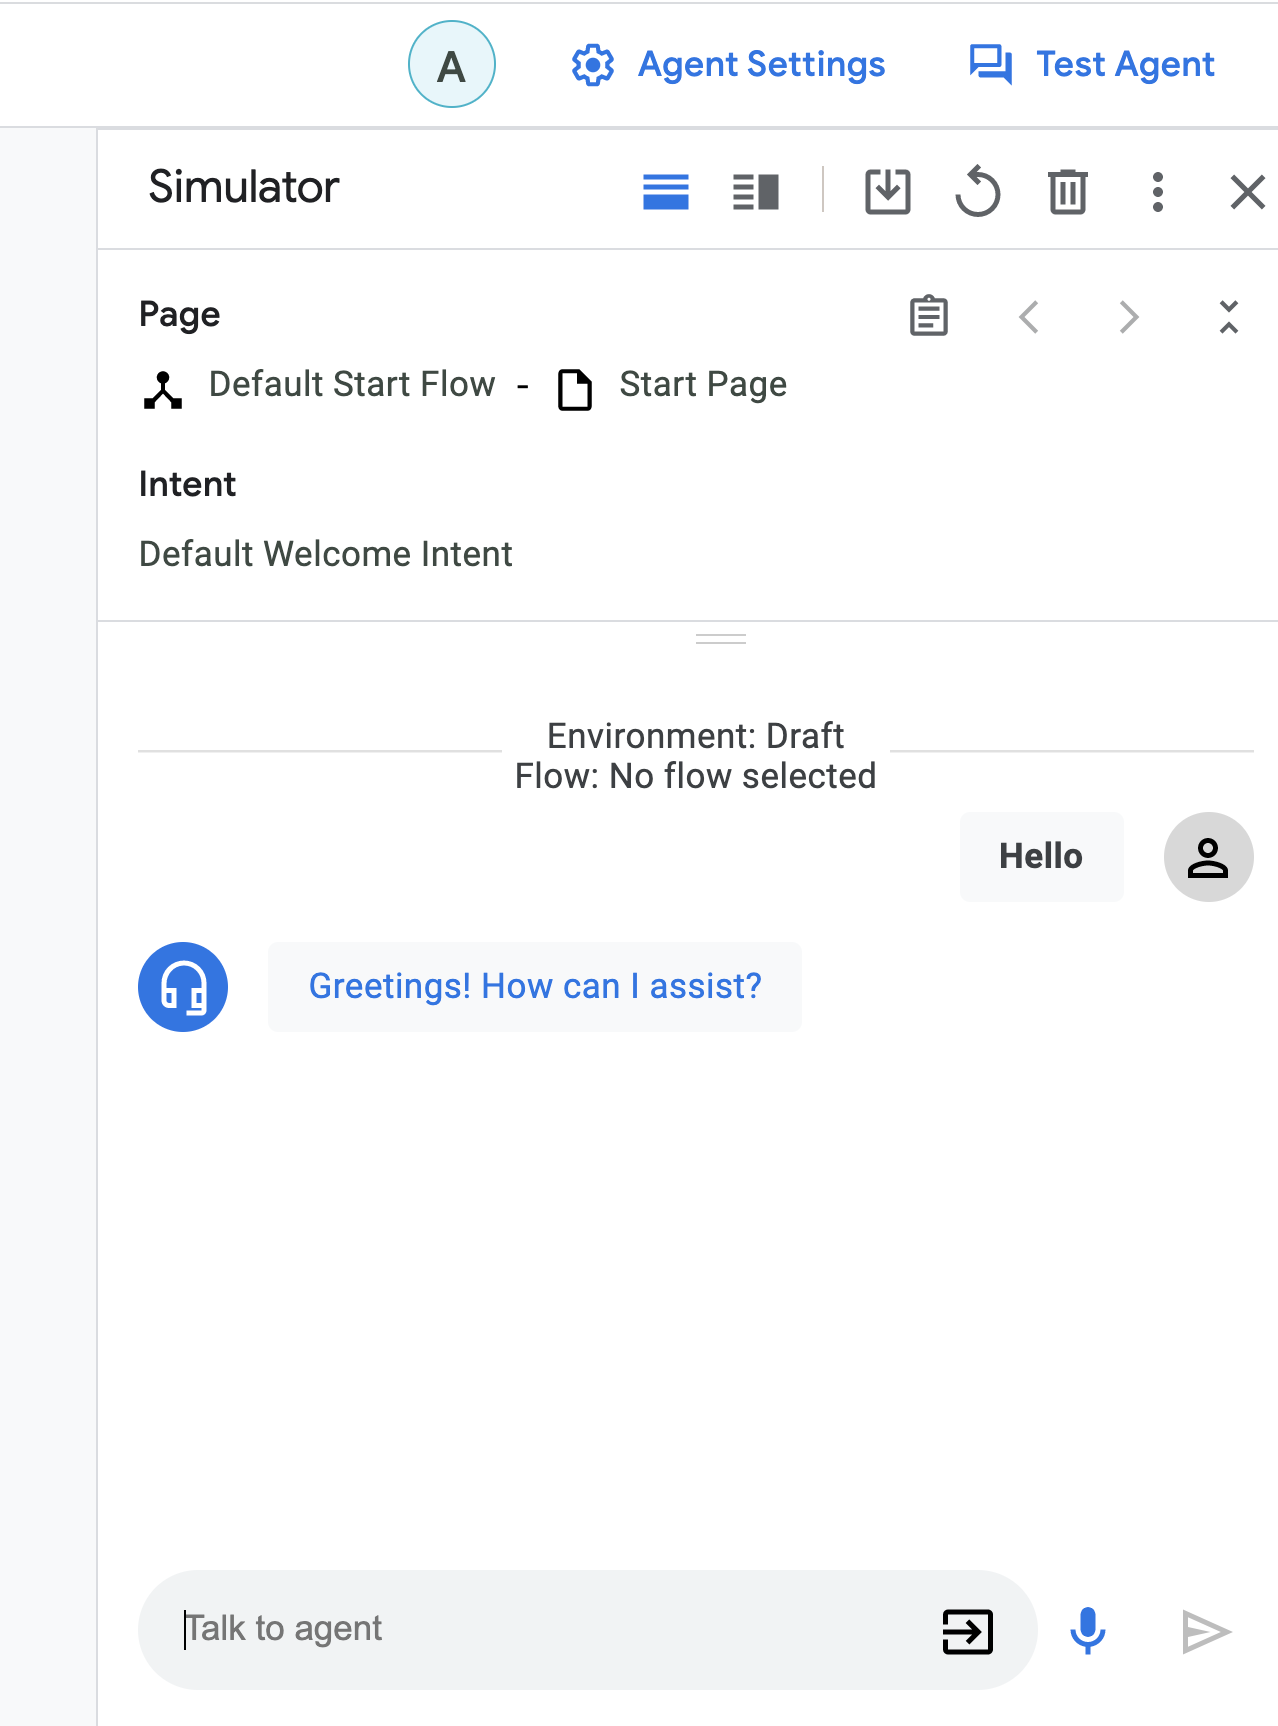
我们来修改此默认欢迎文本。
Default Start Flow
我们先来创建一个意图路由,该路由会在您向虚拟客服问好后触发。
- 在左侧边栏中,依次点击构建 > 流,然后点击默认初始流,并选择开始树节点。
系统随即会打开开始页面。它会自动在构建 > 网页边栏部分中选择“起始页”。
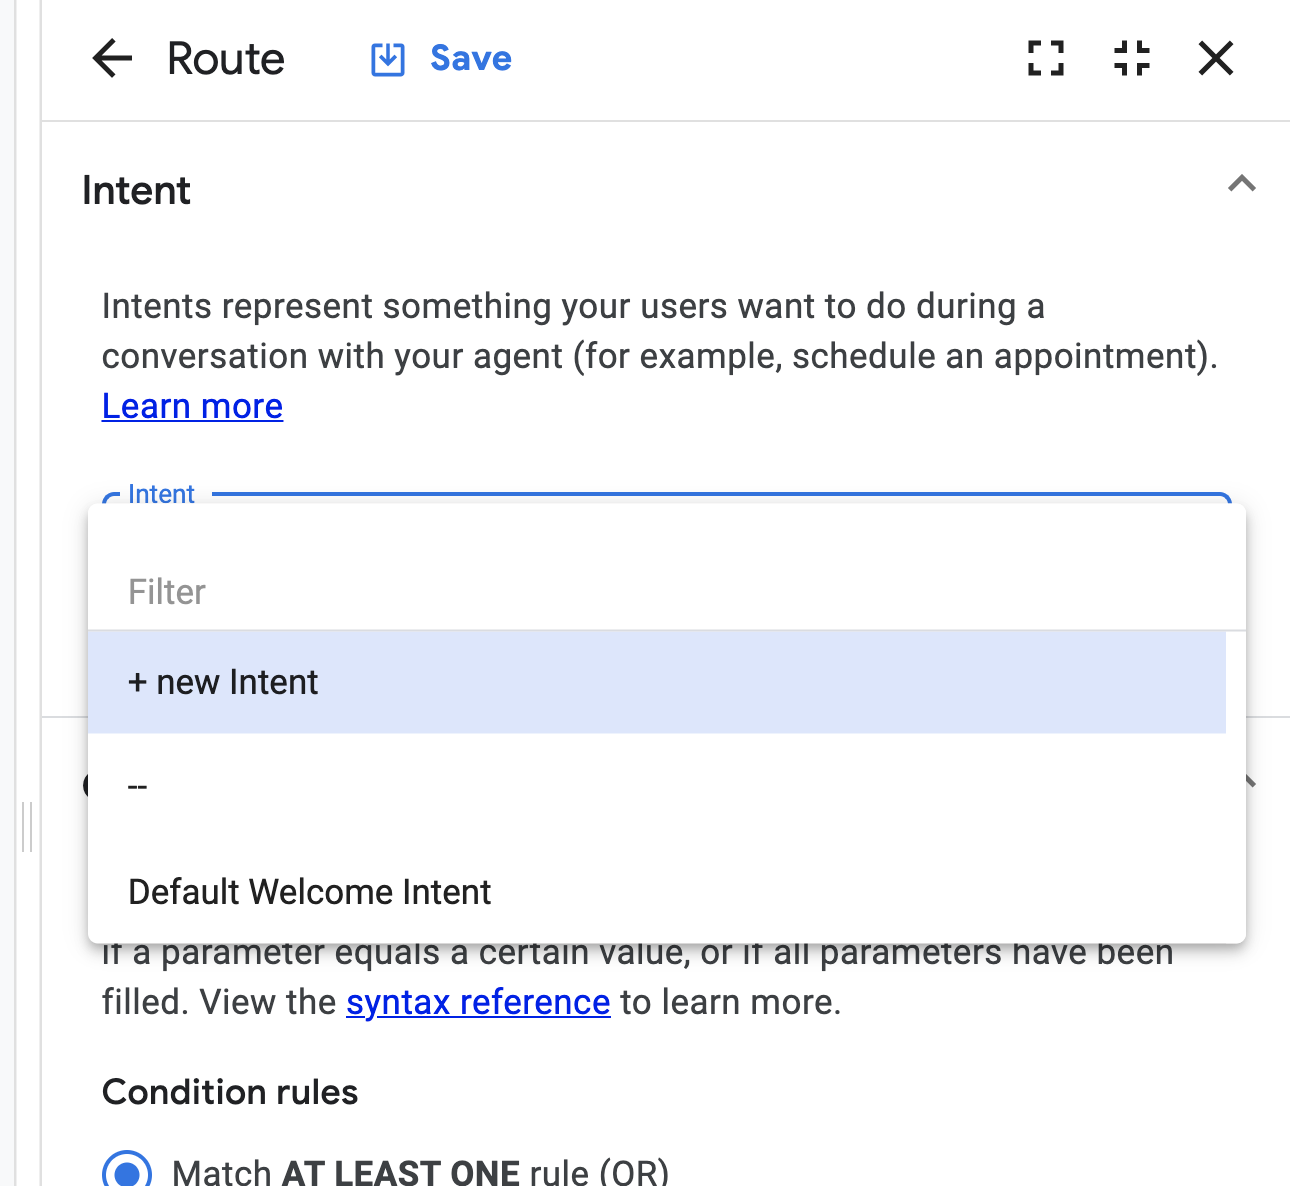
- 在开始 > 路由中,点击默认欢迎意图。
意图用于对一轮对话中的最终用户意图进行分类。在 Dialogflow CX 中,意图可以作为状态处理程序的一部分,用于确定下一个活跃页面或 fulfillment
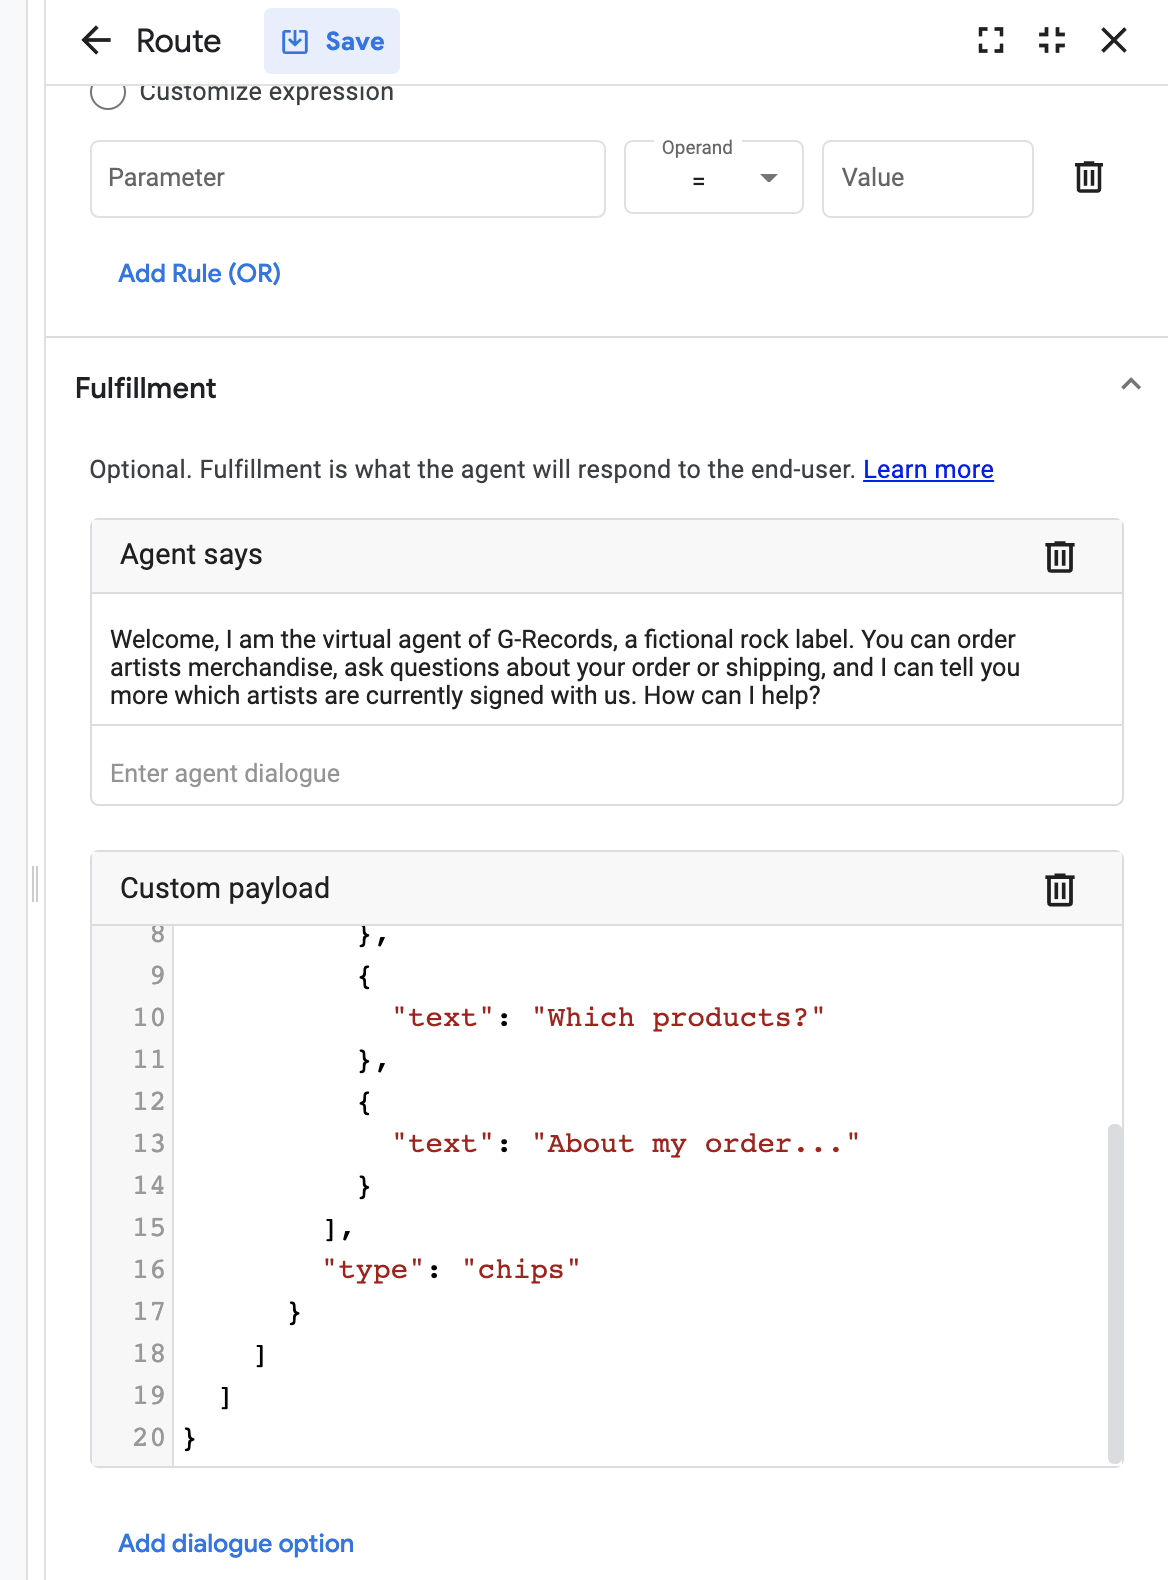
- 移除所有 Agent says 条目,并添加以下新文本:
Welcome, I am the virtual agent of G-Records, a fictional rock label. You can order artists merchandise, ask questions about your order or shipping, and I can tell you more which artists are currently signed with us. How can I help?
为了简化对话,我们还需要一些快速回复按钮 / 建议内容信息卡。
- 点击添加对话选项 > 自定义载荷,然后使用以下代码段。
- 使用以下代码段作为自定义载荷,然后点击保存。
如需详细了解自定义载荷,请参阅文档。
{
    "richContent": [
      [
        {
          "type": "chips",
          "options": [
            {
              "text": "Which artists?"
            },
            {
              "text": "Which products?"
            },
            {
              "text": "About my order..."
            }
          ]
        }
      ]
    ]
  }
- 接下来,在模拟器中测试欢迎 intent。
您可能想知道为什么看不到任何富媒体内容。这是因为建议芯片等富媒体内容依赖于集成。以下步骤需要使用结算账号,但如果您没有结算账号,可以跳过这些步骤。
- 在左侧边栏中,依次点击管理 > 集成。
- 选择 Dialogflow Messenger,然后点击连接。
- 在弹出式窗口中,点击启用。
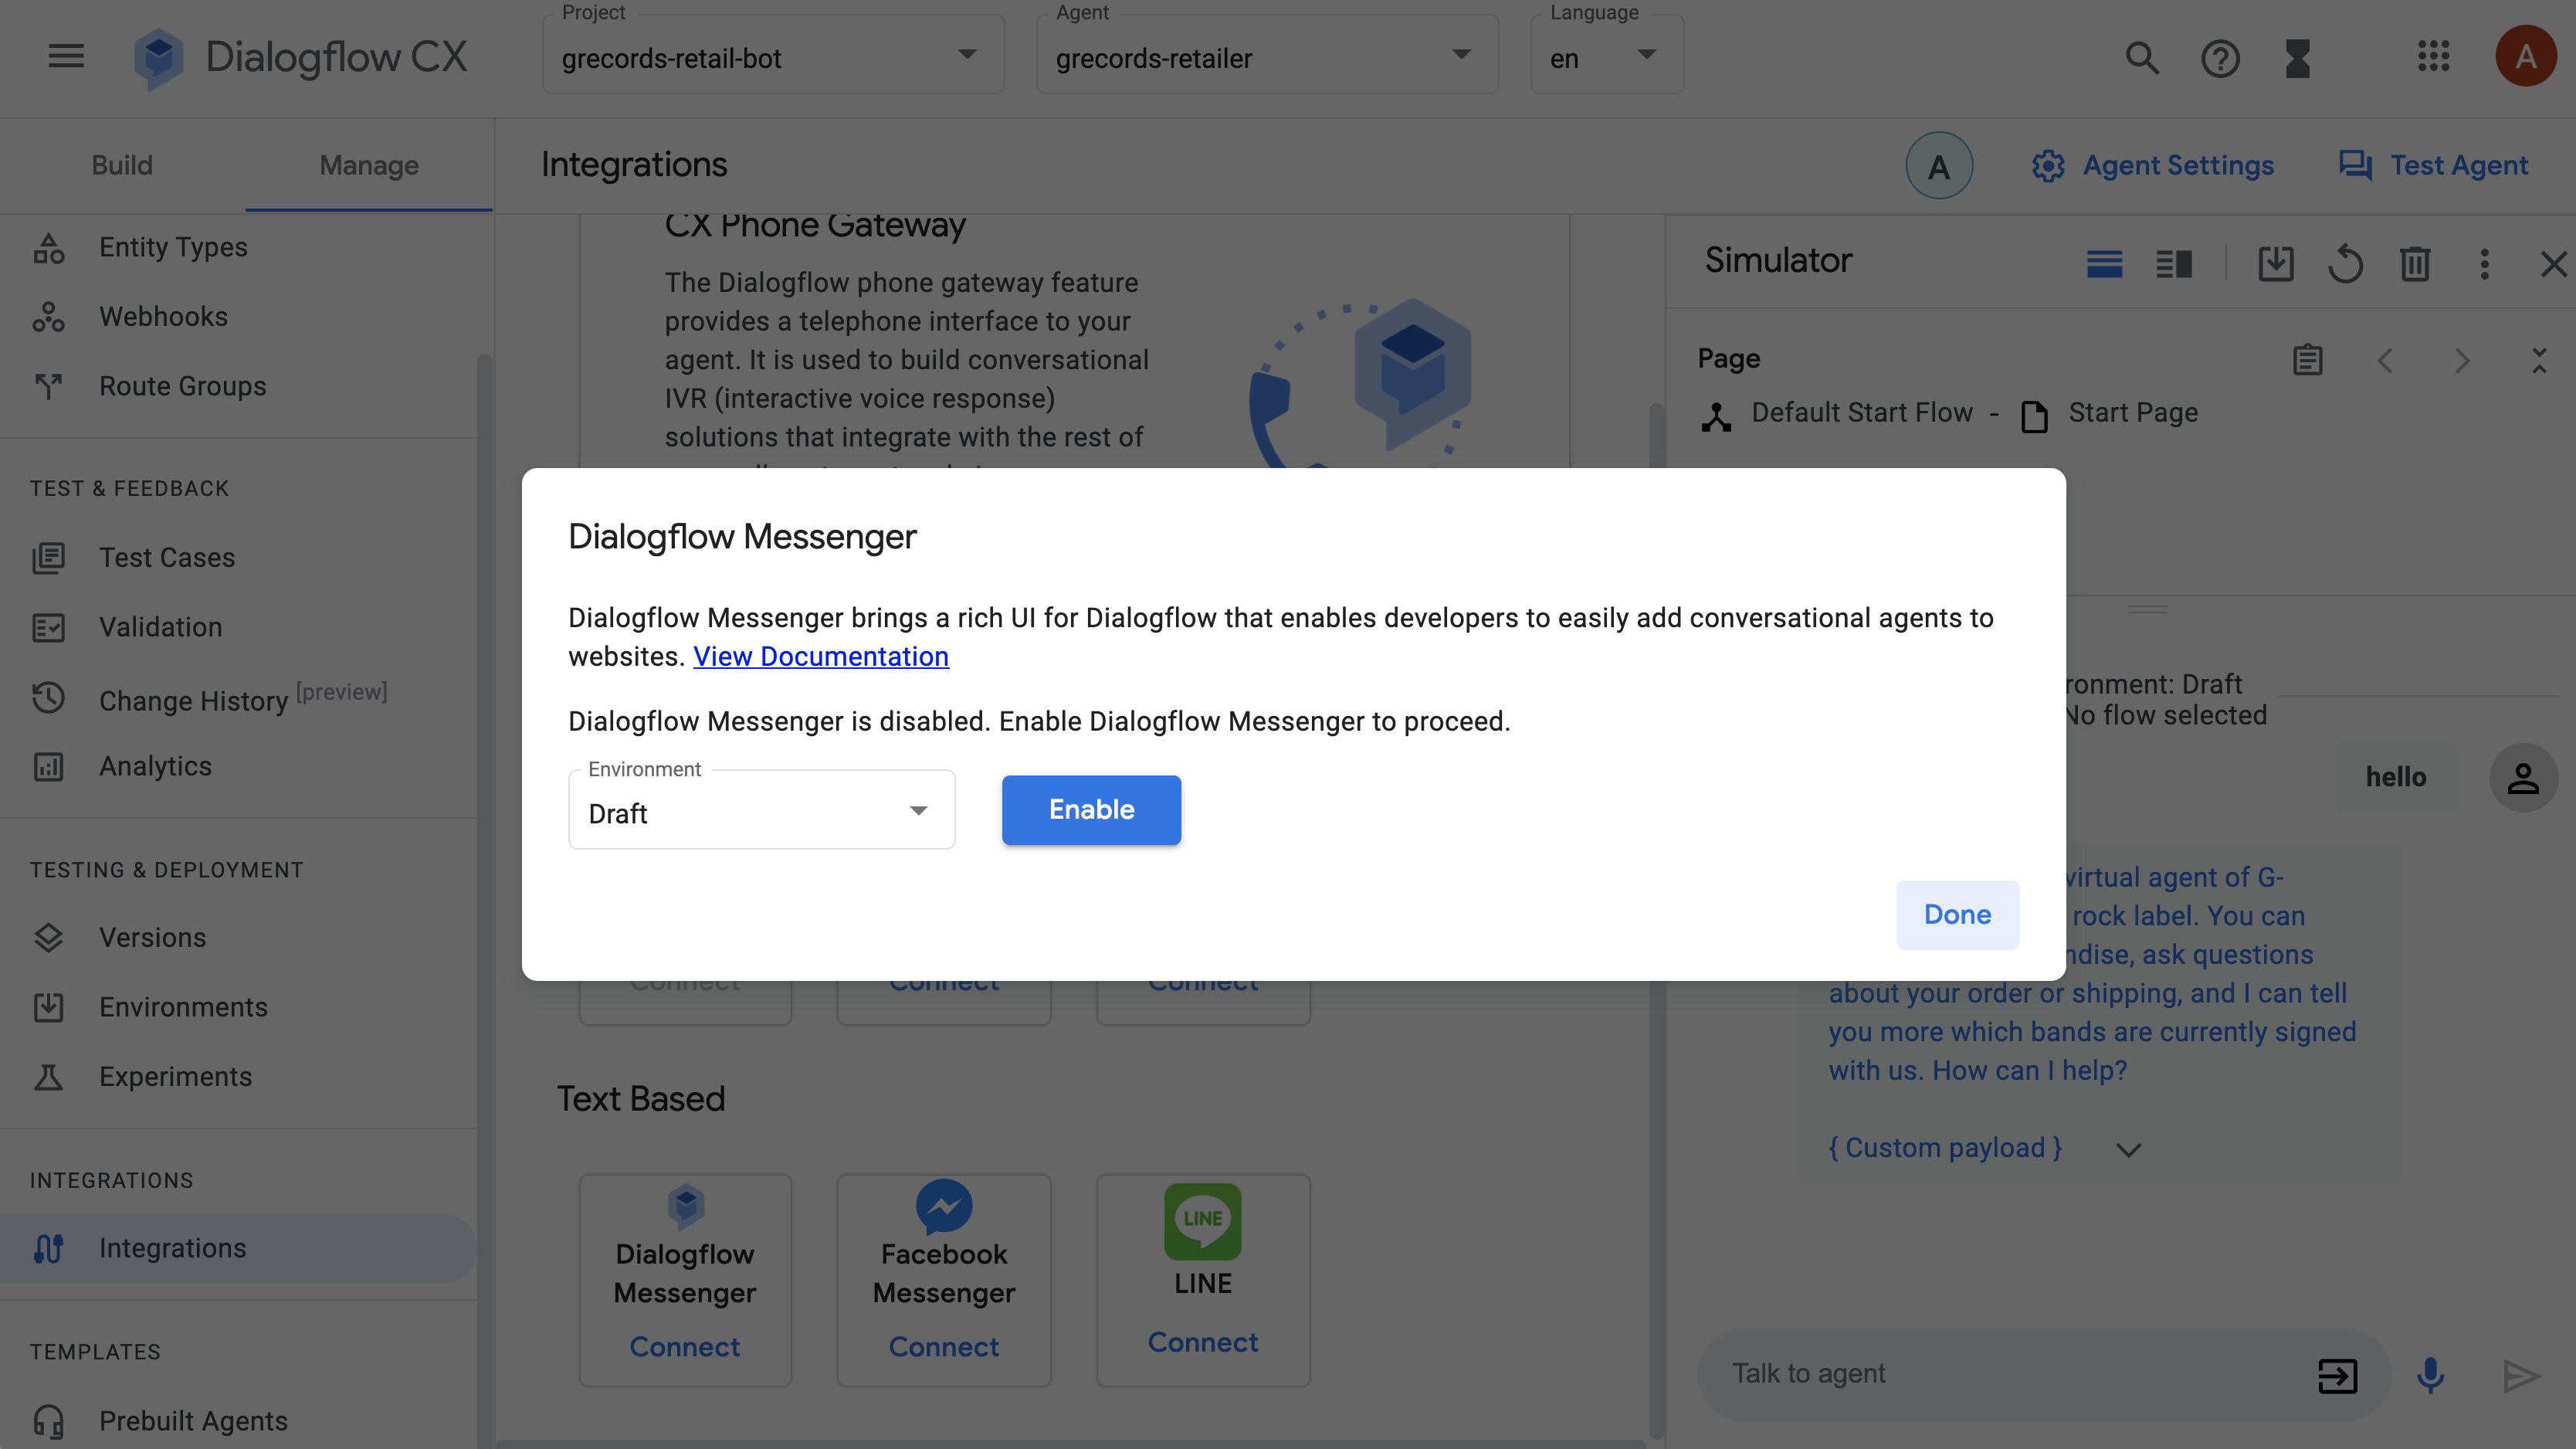
系统会再次显示一个弹出式窗口,其中包含集成 JavaScript 代码,您可以将该代码粘贴到您的网站中,以在网站上集成 Dialogflow Messenger 组件。由于我们还没有网站,因此将在工具中直接测试虚拟客服。
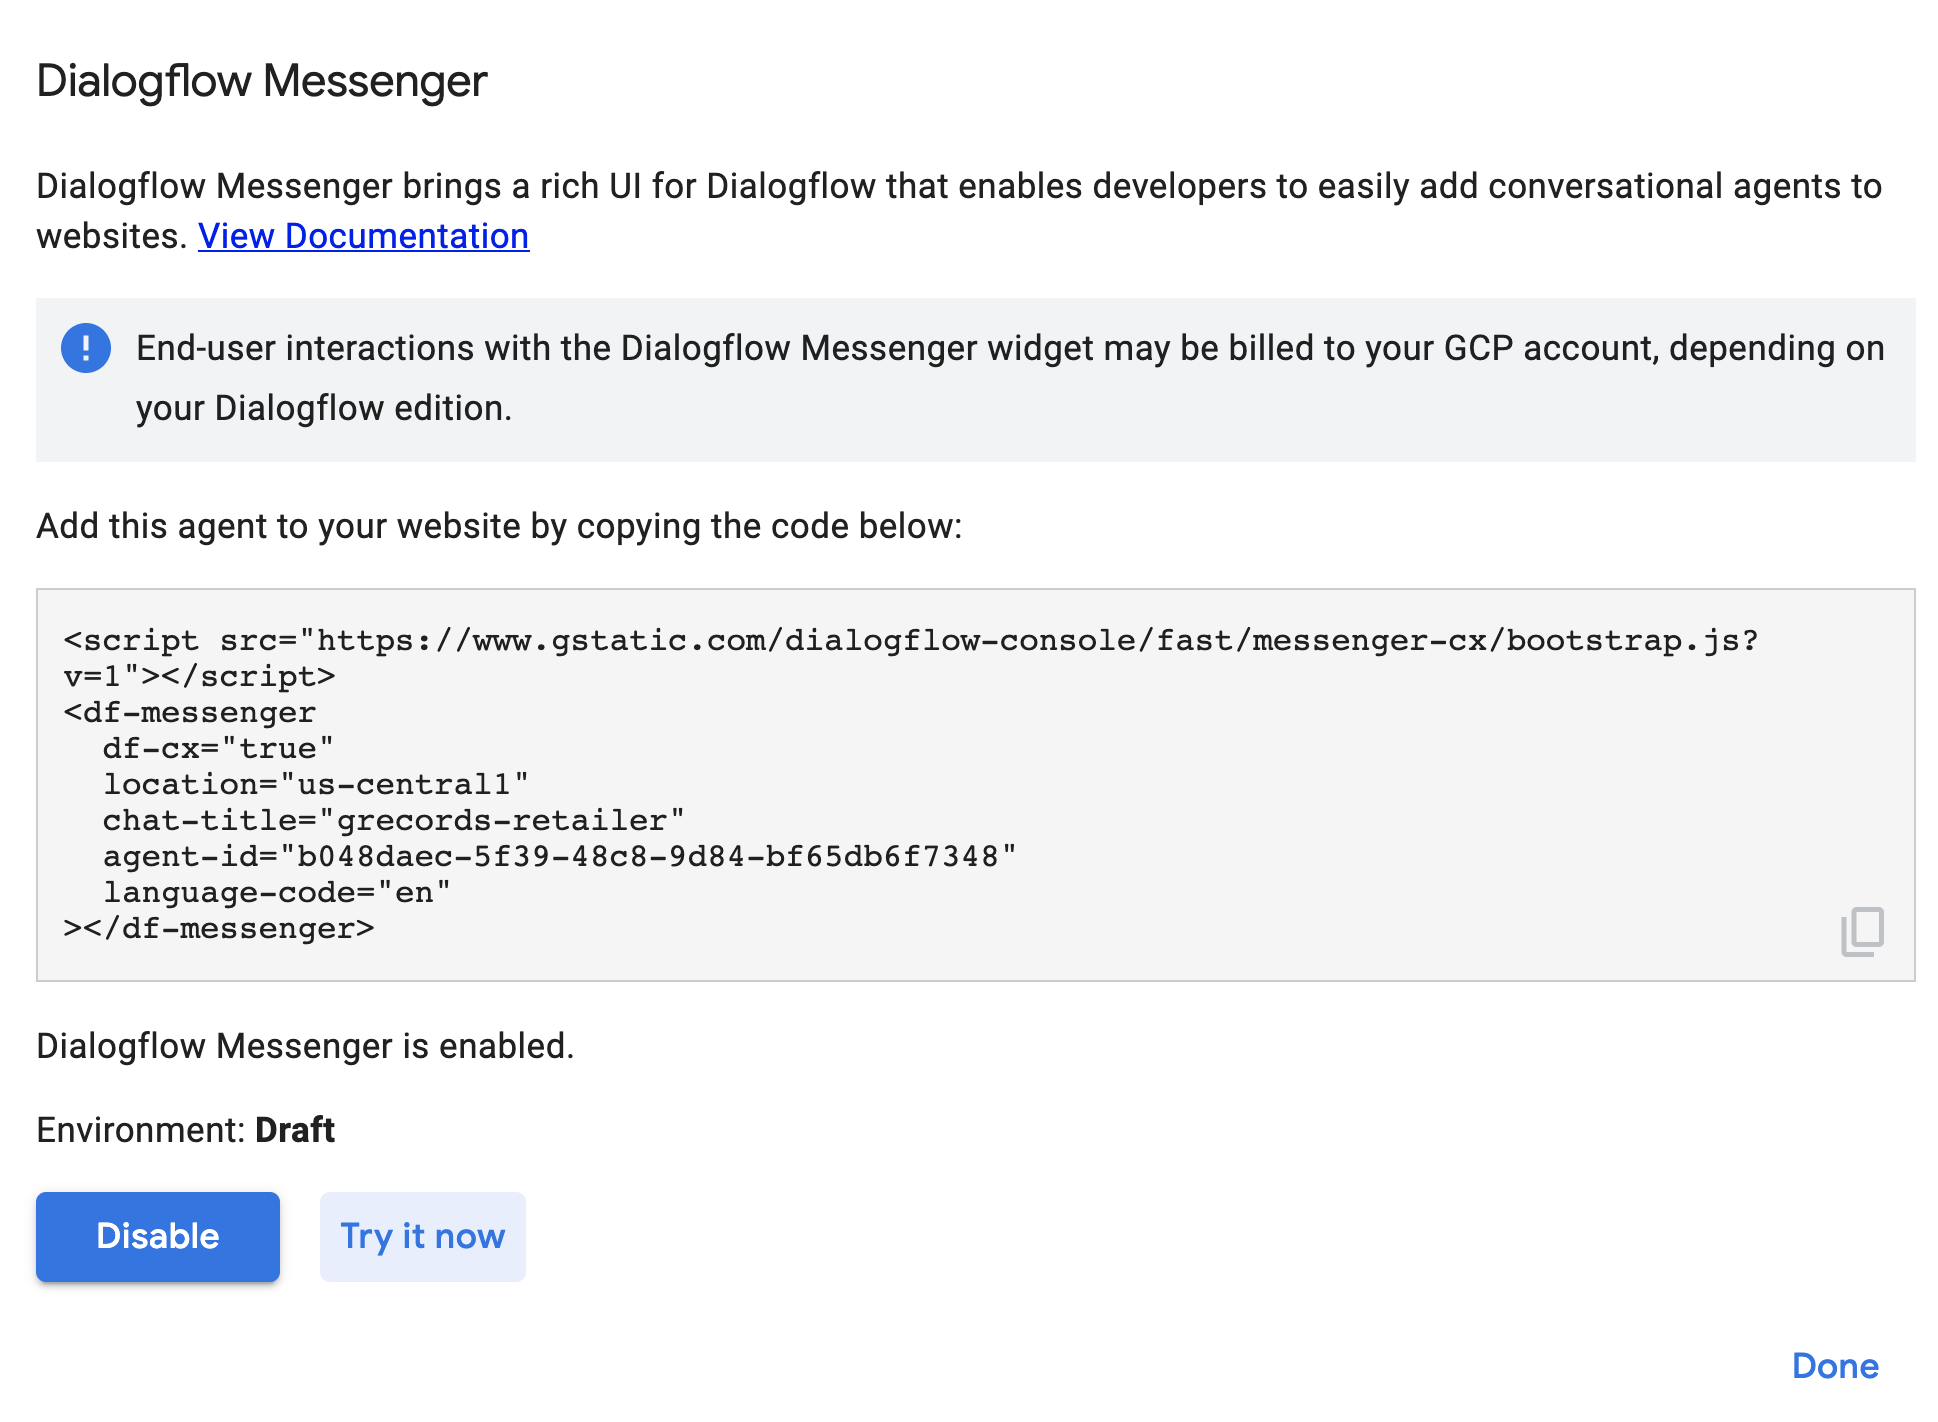
- 点击立即试用链接。
- 点击右下角的聊天机器人图标,打开聊天窗口。输入
Hello以开始对话。
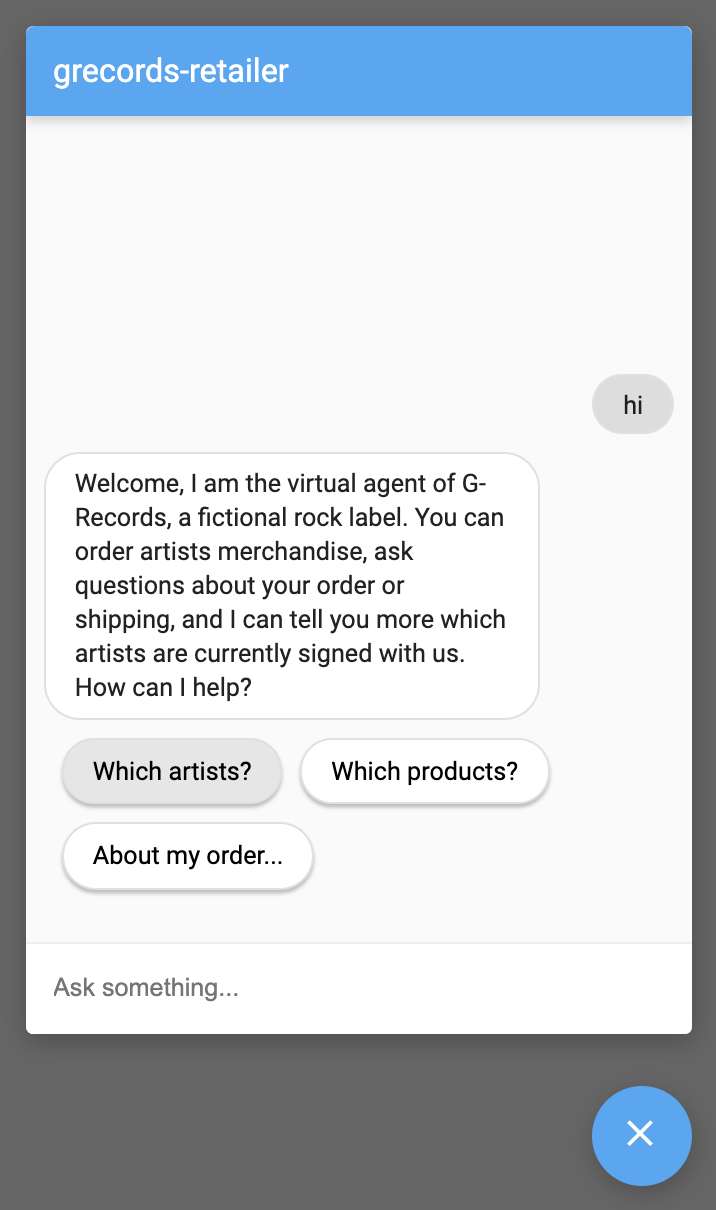
目前,当您点击建议芯片时,虚拟客服无法理解您的意思。这是因为我们的虚拟客服尚未在状态之间切换。我们可以在 Dialogflow CX 中使用网页来实现此目的。我们继续进行实验,首先创建一些实体和意图。
4. 实体类型
实体类型用于控制最终用户输入数据的提取方式。Dialogflow CX 实体类型与 Dialogflow ES 实体类型非常相似。Dialogflow 提供预定义的系统实体,这些实体可以匹配许多常见的数据类型。例如,有用于匹配日期、时间、颜色、电子邮件地址等类型的系统实体。您还可以自行创建自定义实体来匹配自定义数据。
我们先准备好所有自定义实体,然后再设计流程中的页面。我们将创建以下实体:
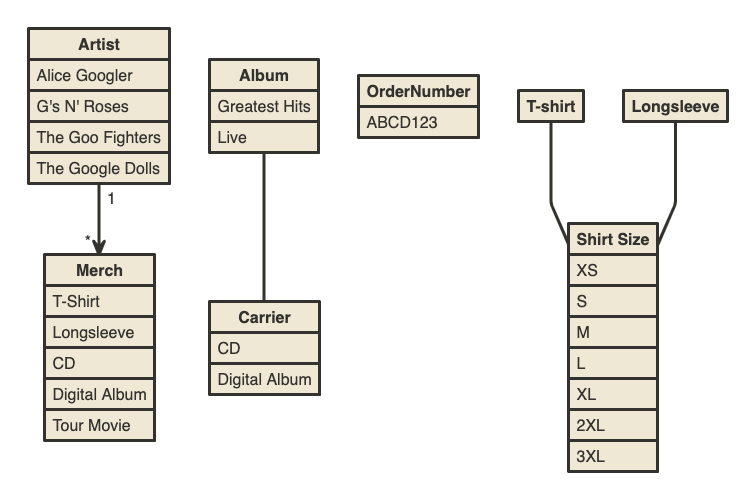
创建实体
我们来创建一个 Artist 实体。
- 依次点击管理 > 实体类型
- 点击 + 创建
- 显示名称:
Artist - 实体:
The Google Dolls(含同义词:Google Dolls)The Goo Fighters(含同义词:Goo Fighters)G's N' Roses(含同义词:Gs and Roses)Alice Googler- 点击“高级选项”,然后勾选模糊匹配。(如果您拼错了乐队名称,系统可能仍会将其与正确的实体匹配。)
- 在“高级选项”中,还需选中在日志中进行编辑。(如果您拼错了频段名称,系统会在日志中更正该名称。)
- 点击保存
我们还需要一个 Merch 实体的实体:
- 依次点击管理 > 实体类型
- 点击 + 创建
- 显示名称:
Merch - 实体:
T-shirtLongsleeve(含同义词:Longsleeve shirt)Tour MovieDigital Album(包含同义词:MP3 Album、MP3)CD(同义词为Disc、Physical CD)
- 点击保存
我们还需要一个 Album 的实体:
- 依次点击管理 > 实体类型
- 点击 + 创建
- 显示名称:
Album - 实体:
LiveGreatest Hits(含同义词:Hits)
- 点击保存
我们还需要一个用于服装尺码的实体:
- 依次点击管理 > 实体类型
- 点击 + 创建
- 显示名称:
ShirtSize - 实体:
XS(含同义词:Extra Small)S(含同义词:Small)M(含同义词:Medium)L(含同义词:Large)XL(含同义词:Extra Large)2XL(含同义词:Extra Extra Large)3XL
- 点击保存
以及一个用于订单号的实体,订单号通常由 4 个字母数字和 3 个数字组成。(例如 ABCD123)
- 依次点击管理 > 实体类型
- 点击 + 创建
- 显示名称:
OrderNumber - 正则表达式实体
- 实体:[A-Z]{4}[0-9]{3}
- 点击保存
您的实体配置应如下所示:
@音乐人: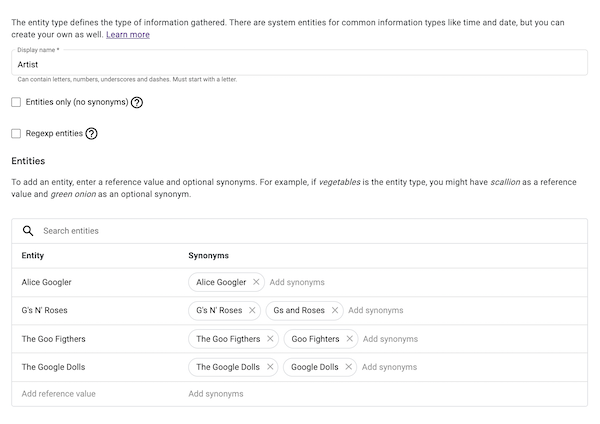
@Merch: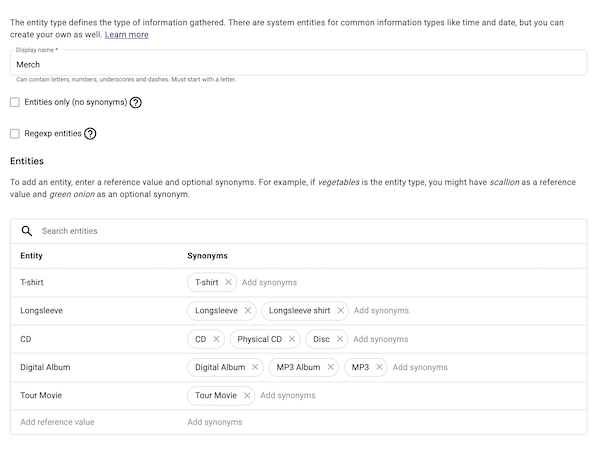
@相册: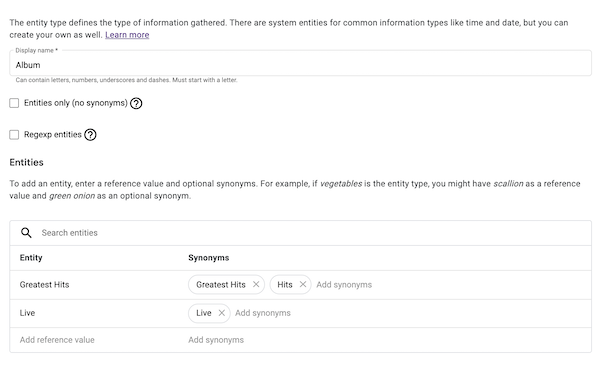
@ShirtSize: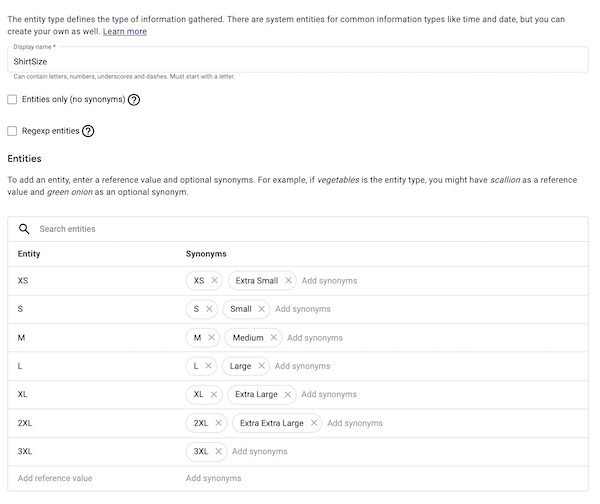
@OrderNumber: 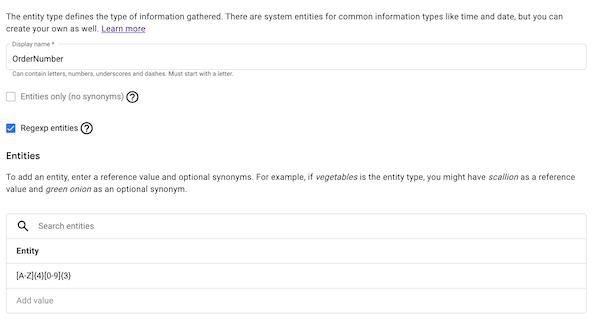
自定义实体准备就绪后,我们就可以准备意图了。我们继续完成实验。
5. 意图
意图用于对一轮对话中的最终用户意图进行分类。在 Dialogflow CX 中,它们得到了大幅简化,不再是对话控制的基础组件。Dialogflow CX 仅使用意图来匹配用户所说的话。在 Dialogflow ES 中,您必须将所有内容(参数、事件、实现等)与意图相关联。Dialogflow CX 中的意图仅包含训练语句,因此可以重复使用。它不再控制对话。因此,创建意图的过程非常简单:
意图中的训练短语可以利用实体来提取“变量”输入,因此最好提前创建实体类型,这正是我们在实验步骤的上一页中所做的。
创建 intent
我们先来准备所有 intent,然后再设计流程中的网页。
- 依次点击管理 > 意图。
- 点击 + 创建
使用以下详细信息:
- 显示名为
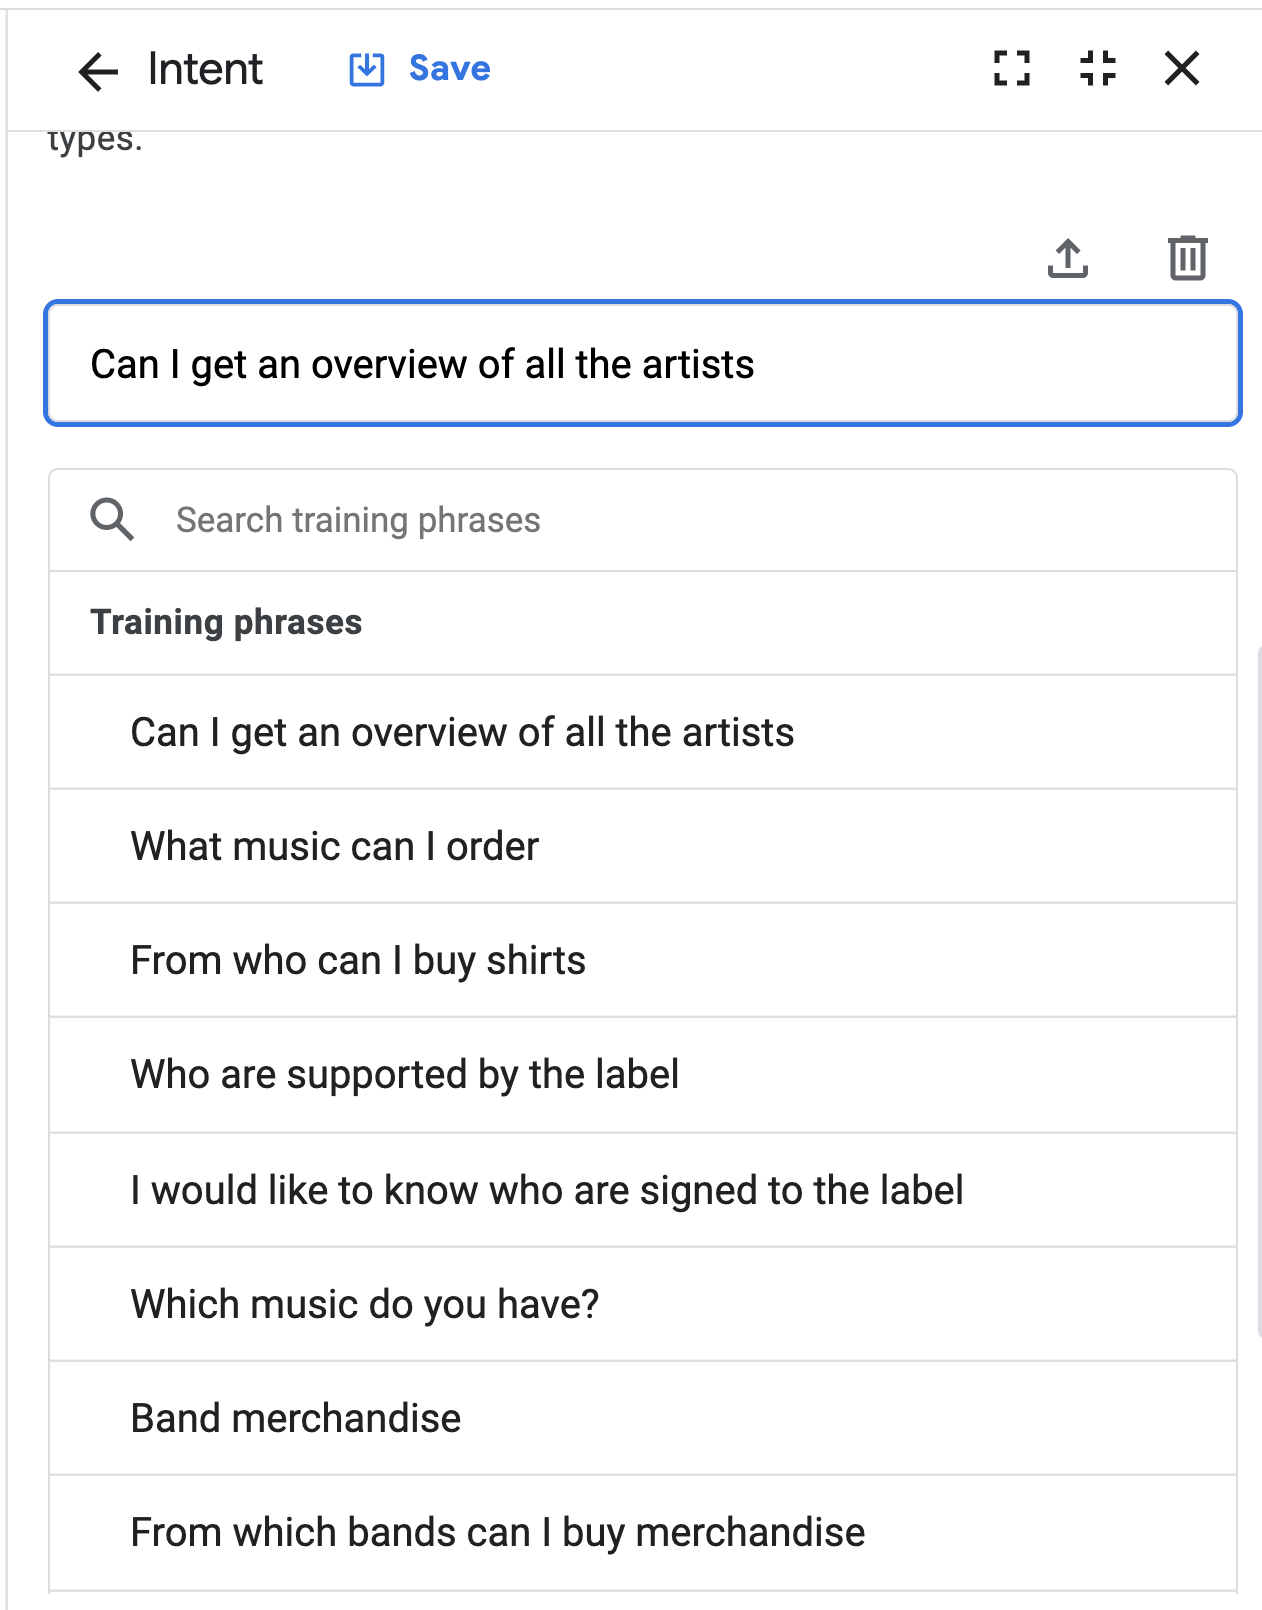
redirect.artists.overview - 广告内容描述
Artists overview: The bands supported by the label
向下滚动,然后创建以下训练短语:
Which bands are signed?Which bandsWhich artistsWhich artists are part of the record labelWho is part of the labelFrom which bands can I buy merchandiseBand merchandiseWhich music do you have?I would like to know who are signed to the labelWho are supported by the labelFrom who can I buy shirtsWhat music can I orderCan I get an overview of all the artists
- 点击保存。
- 现在,我们继续创建所有其他 intent。发挥自己的想象力,想出更多训练短语。根据最佳实践,每个意图应至少包含 10 个训练短语,以涵盖用户可能会触发该意图的不同方式。在本实验中,少于 10 个也应该没问题。
以下是一些需要检查的事项:
- 请注意,在您输入训练短语时,Dialogflow CX 会自动为实体添加注释。如果未执行此操作,您可能需要更新实体(通过添加同义词)或自行手动为训练短语添加注释。
- 较短的训练短语:Dialogflow 的 NLU 系统也可以使用较短的训练短语,我们在此处提供了一些示例。
- 过度训练:如果某个意图的训练短语过多,可能会导致过度训练,从而产生不太理想的结果。最佳实践是使用迭代式和增量式测试,并在没有匹配的意图时添加训练短语。
显示名 | 训练短语 |
|
|
|
|
|
|
|
|
|
|
|
|
|
|
|
|
|
|
|
|
|
|
|
|
|
|
|
|
|
|
|
|
|
|
|
|
|
|
|
|
现在,可重用的元素(流、实体和意图)已准备就绪,接下来我们可以通过创建页面和状态处理程序将这些元素组合在一起。
6. 页面和状态处理程序
Dialogflow CX 对话(会话)可以描述并直观呈现为有限状态机。以自动售货机为例,它可以建模为有限状态机。它具有以下状态:等待投币、选择糖果、给予糖果,并且在给定一组输入的情况下,它会在这些状态之间移动。例如,投入硬币后,自动售货机从“等待投入硬币”状态变为“选择糖果”状态。页面是我们可以用来为 Dialogflow CX 虚拟客服建模这些状态的方式。
当最终用户在对话中与 Dialogflow CX 互动时,对话会从一个页面转移到另一个页面,因此在任何给定时刻,只有一个页面是当前页面,当前页面被视为活跃页面,与该页面关联的流也被视为活跃流。
您可以为每个流定义多个页面,其中组合页面可以处理该流所针对的主题的完整对话。每个流都有一个特殊的起始页。当流最初处于活跃状态时,起始页将变为当前页面。每轮对话期间,当前页面要么保持不变,要么转换到其他页面。借助这一概念,您可以创建包含多个页面和多轮对话的大型代理。
页面包含 fulfillment(静态入口对话和/或 webhook)、参数和状态处理程序。对话控制通过状态处理程序进行,这使您可以创建各种转换路由来转换到另一个 Dialogflow CX 页面,包括使其成为有条件的(用于对话分支)。
对话的状态通过处理页面之间的转换来控制,而页面之间的转换则通过三种不同类型的路由来实现:
- 意图路由:何时应匹配意图(例如,根据最终用户的发言更改页面)。(视觉图中的蓝线)。
- 条件路由:应检查条件时(例如,根据会话中存储的某些参数更改页面)。(可视化图表中的橙色线条。)
- 事件处理程序:当应处理某个回退事件时(例如,处理无输入、无匹配项,以便将最终用户明确引导至意图或条件路线)(视觉图中的绿线)。
对话话语(即向用户返回的内容或响应)由 fulfillment 定义,可以是静态的,也可以是动态的:
- 静态 fulfillment:何时提供静态 fulfillment 响应
- 动态 fulfillment:何时为动态响应调用 fulfillment 网络钩子
对于零售机器人,我们将创建一些 intent 路由,并提供一些静态入口 fulfillment 响应,这些响应会在页面激活后立即呈现给用户。稍后,我们将创建带有条件路由的参数,以收集您下商品订单所需的信息。
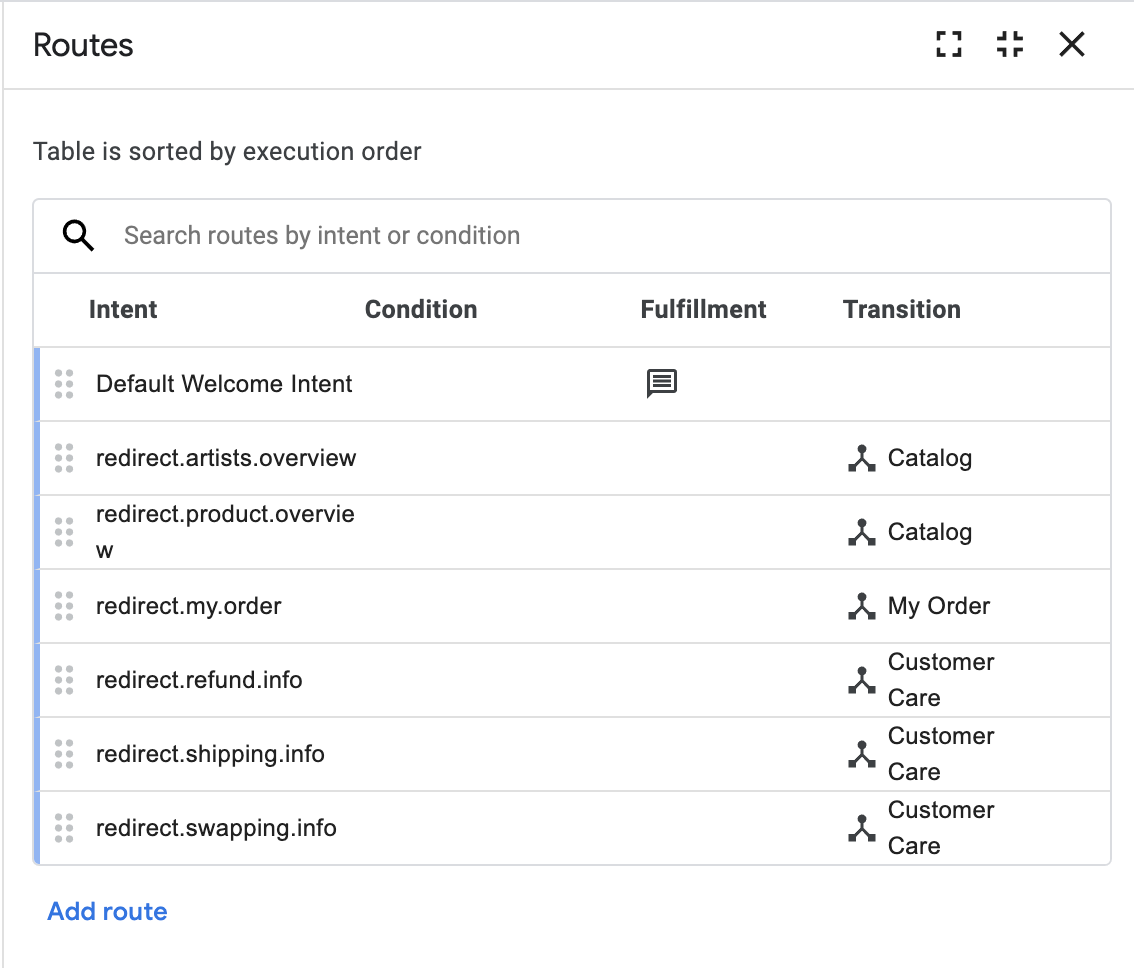
页面意图路由
在“默认初始流”中创建页面
以下是默认初始流的流程图:
让我们一起点击此链接:
- 点击构建 > 默认初始流
- 点击初始页
- 点击 Routes 旁边的 + 图标
- 添加了 redirect.artists.overview
- 向下滚动到过渡,然后过渡到目录流程。
- 点击保存
- 针对
redirect.product.overview和此表中的其他 11 行重复上述步骤:
页面(在流程中) | 路线 > Intent | 路线 > 转场到 |
开始 |
| - |
开始 |
| 流程:目录 |
开始 |
| 流程:目录 |
开始 |
| 流程:目录 |
开始 |
| 流程:目录 |
开始 |
| 流程:目录 |
开始 |
| 流程:目录 |
开始 |
| 流程:客户服务 |
开始 |
| 流程:客户服务 |
开始 |
| 流程:客户服务 |
开始 |
| 流程:“我的订单” |
开始 |
| 流程:“我的订单” |
开始 |
| 流程:“我的订单” |
开始 |
| 网页:结束会话 |
默认初始流的工作方式类似于拨打呼叫中心时的选项菜单。不过,在此虚拟客服中,它接受了自然语言训练,意图中包含训练短语。因此,互动由对话驱动,而不是由 DTMF 选项驱动,更加自然和人性化。
在目录流程中创建页面
以下聊天记录属于目录流程:
> "Hi"
"Welcome, I am the virtual agent of G-Records, a fictional rock label.
You can order artists merchandise, ask questions about your order or shipping,
and I can tell you more which artists are currently signed with us. How can I help?"
> "Which bands are signed with this record label?"
"The following bands are signed with G-Records:
Alice Googler, G's N' Roses, The Goo Fighters and The Google Dolls.

From which of these artists would you like to order merchandise?"
> "Alice Googler"
"You want to rock with Alice Googler merchandise. Awesome!

We sell shirts, music or the tour movie.

Which merchandise item do you want?"
"(Suggestion chips: [Shirts] [Music] [Tour Movie])"
> "I would like to buy a Shirt"
"Do you want a longsleeve or a t-shirt?"
"(Suggestion chips: [T-shirt, Longsleeve, Price?])"
> "What's the price difference?"
"A t-shirt costs $25 and a longsleeve costs $30.

Do you want a longsleeve or a t-shirt?"
> "A t-shirt",
"What shirt size do you want?"
"(Suggestion chips: [XS, S, M, L, XL, 2XL, 3XL])"
> "M"
"A T-shirt of Alice Googler size: M costs $25. Shall I continue to order?"
选择音乐或导览视频时,对话框会有所不同:对于音乐,对话框将如下所示:
 > "Music"
"We have a Greatest Hits Album or the Live Album. Which one do you want?"
"(Suggestion chips: [Greatest Hits, Live, Price?])"
> "The Live Album"
"Do you want this album on CD or MP3?"
"(Suggestion chips: [CD, MP3])"
> "What's the price difference?"
"A CD costs $15. The digital album on MP3 costs $10.
Do you want this album on CD or MP3?"
> "Digital Album",
"The Digital Album: Alice Googler - Live costs $10. Shall I continue to order?"
对于“导览视频”,对话框将如下所示:
 > "Tour Movie"
"The Tour Movie of G's N' Roses costs $25. Shall I continue to order?
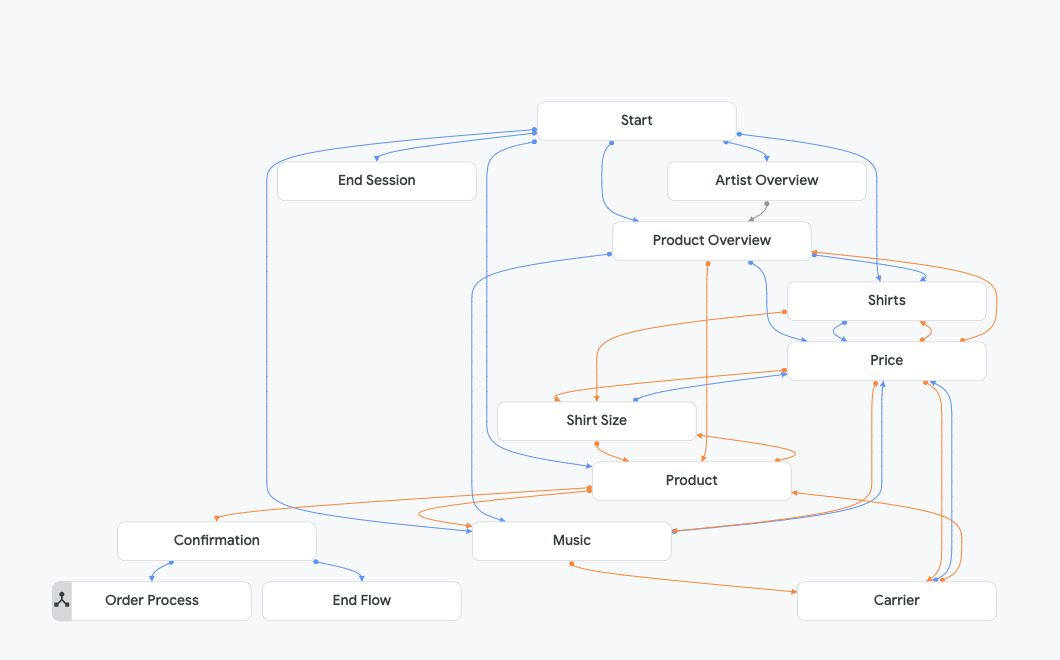
以下是“目录”流程中所有页面的流程图:
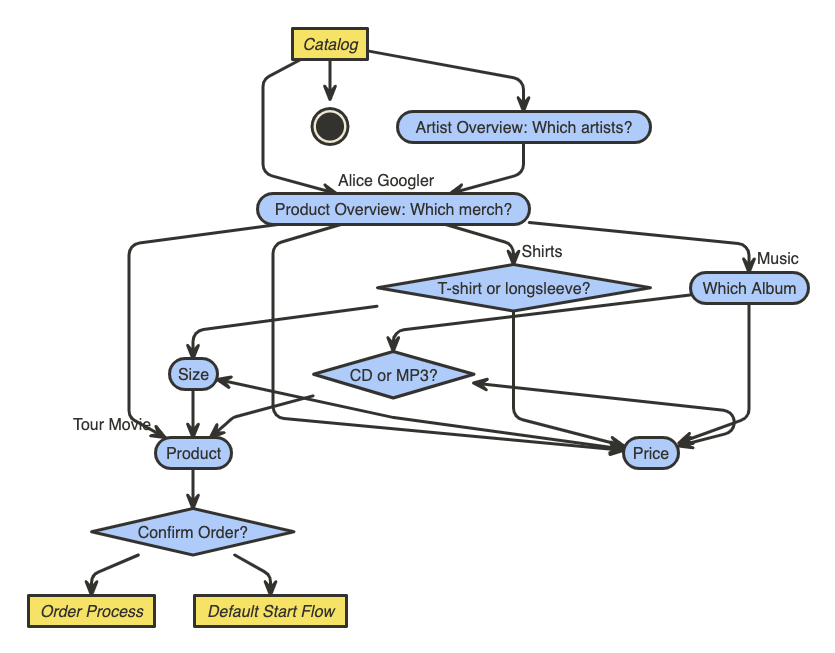
请注意此流程的复杂性:
- 我可以跳过“哪些艺术家”问题,直接询问“有哪些周边商品”。
- 在默认启动流程中,我可以问:“我想买 The Google Dolls T 恤”或“我想买点东西”。这意味着虚拟客服会询问后续问题,以填充这些必需参数的槽位。直接跳转到商品页面。
- 价格对话框来自将重复使用的“价格”页面。
- 虽然导览视频的对话看起来是最简单的,但我们实际上会对其进行特殊处理。我们将重复使用对话的这一部分,因此如果最终用户一次性输入所有信息,也可以直接输入此部分,以便用于其他产品:
 > "I want The Goo Fighters longsleeve size S."
"The longsleeve of The Goo Fighters size S costs $30. Shall I continue to order?"
我们先从关联网页开始。
- 依次点击 Build > Catalog
- 点击初始页
- 点击 Routes 旁边的 + 图标
- 添加了 redirect.artists.overview
- 向下滚动到 Transition,选择 Page,然后选择:+ new Page
- 使用页面名称:
Artist Overview,然后点击保存
现在,我们来完成流程的其余部分:
- 您可以针对以下网页、意图和实现重复上述步骤。接管此桌。页面是您将在流程中选择的页面,路线 > 过渡到是您将创建并过渡到的新流程或页面。
页面(在流程中) | 路线 > Intent | 路线 > 转场到 |
目录开始 |
| 音乐人概览 |
目录开始 |
| 产品 |
目录开始 |
| 产品概览 |
目录开始 |
| 产品概览 |
目录开始 |
| 衬衫 |
目录开始 |
| 音乐 |
目录开始 |
| 结束会话 |
目录开始 |
| 结束流程 |
音乐人概览 |
| 产品概览 |
现在,我们继续添加更多静态实现。
- 在目录流程中,点击音乐人概览页面。
- 在 Entry fulfillment 部分中,点击 Edit fulfillment。
- 使用以下静态实现(代理说):
The following bands are signed with G-Records: Alice Googler, G's N' Roses, The Goo Fighters and The Google Dolls.
- 点击保存
- 在目录流程中,点击商品概览页面。
- 在 Entry fulfillment 部分中,点击 Edit fulfillment。
- 使用以下静态履单(代理说):
We sell shirts, music or the tour movie.
- 点击保存。
页面参数
参数用于捕获和引用最终用户在会话期间提供的值。每个参数都有一个名称和一个实体类型。@Artist 和 @Merch 是我们需要收集的最低限度的参数,以便处理商品订单。对于 T 恤或长袖,您还需要收集 @ShirtSize;如果您想订购音乐,还需要 @Carrier 和 @Album 名称。
这些参数需要标记为“required”(必需)。一旦需要,您就需要提供自定义提示来记住最终用户,以便提供正确的答案,从而收集这些参数。Dialogflow CX 中有几种机制可以帮助您实现上述目标。
例如,您可以在参数部分中提供自定义静态 fulfillment 消息。如果参数是必需的,则会显示这些参数实现。这些响应消息将添加到响应队列中。在代理每轮对话期间,系统可以(且有时需要)调用多个 fulfillment,每个 fulfillment 都可以生成响应消息。Dialogflow 会在响应队列中维护这些响应。如需详细了解网页生命周期以及这些实现将添加到响应队列中的顺序,请参阅 Dialogflow CX 网页文档。
在“音乐人概览”页面上创建参数
我们来定义一些网页参数:
- 在目录流程中,点击音乐人概览页面。
- 点击参数块中的 +。添加 artist 参数:
- 显示名称:
artist - 实体类型:
@Artist - 必需:勾选
- 在日志中隐去:检查
- 现在,我们将添加一些自定义参数履单消息。如果虚拟客服尚未收集音乐人参数,最终用户将收到添加到响应队列中的以下代理响应:
From which of these artists would you like to order merchandise?
- 添加第二个对话选项,提供丰富的建议内容信息卡。点击添加对话选项,然后使用以下代码(采用 JSON 格式):
{
  "richContent": [
    [
      {
        "options": [
          {
            "text": "The Google Dolls"
          },
          {
            "text": "The Goo Fighters"
          },
          {
            "text": "Alice Googler"
          },
          {
            "text": "G's N' Roses"
          }
        ],
        "type": "chips"
      }
    ]
  ]
}
您可以根据最终用户尝试回答这些问题的次数,处理不同的回退执行提示。您可以使用参数事件处理程序来实现这一点。您可以从各种内置事件处理程序中进行选择,例如参数无效、话语太长、无输入、第一次尝试无输入、第二次尝试或无匹配项。“无输入”与“无匹配”之间的区别在于,“无输入”是指用户从未提供过答案,而“无匹配”是指用户提供了答案,但 Dialogflow CX 无法将此答案与某个网页的意图相匹配。
- 向下滚动到重新提示事件处理程序部分。
- 点击添加事件处理脚本,然后选择相应事件:
No-match default - 使用以下事件静态文本实现:
I missed that. Please, specify the artist. You can choose between: Alice Googler, G's N' Roses, The Google Dolls or The Goo Fighters. Which artist do you want to buy merchandise from?
- 点击保存
- 点击添加事件处理脚本,然后选择事件:
No-input default - 使用以下事件静态文本实现:
I am sorry, I could understand the artist's name. You can choose between Alice Googler, G's N' Roses, The Google Dolls or The Goo Fighters. Which artist do you want to buy merchandise from?
- 点击保存
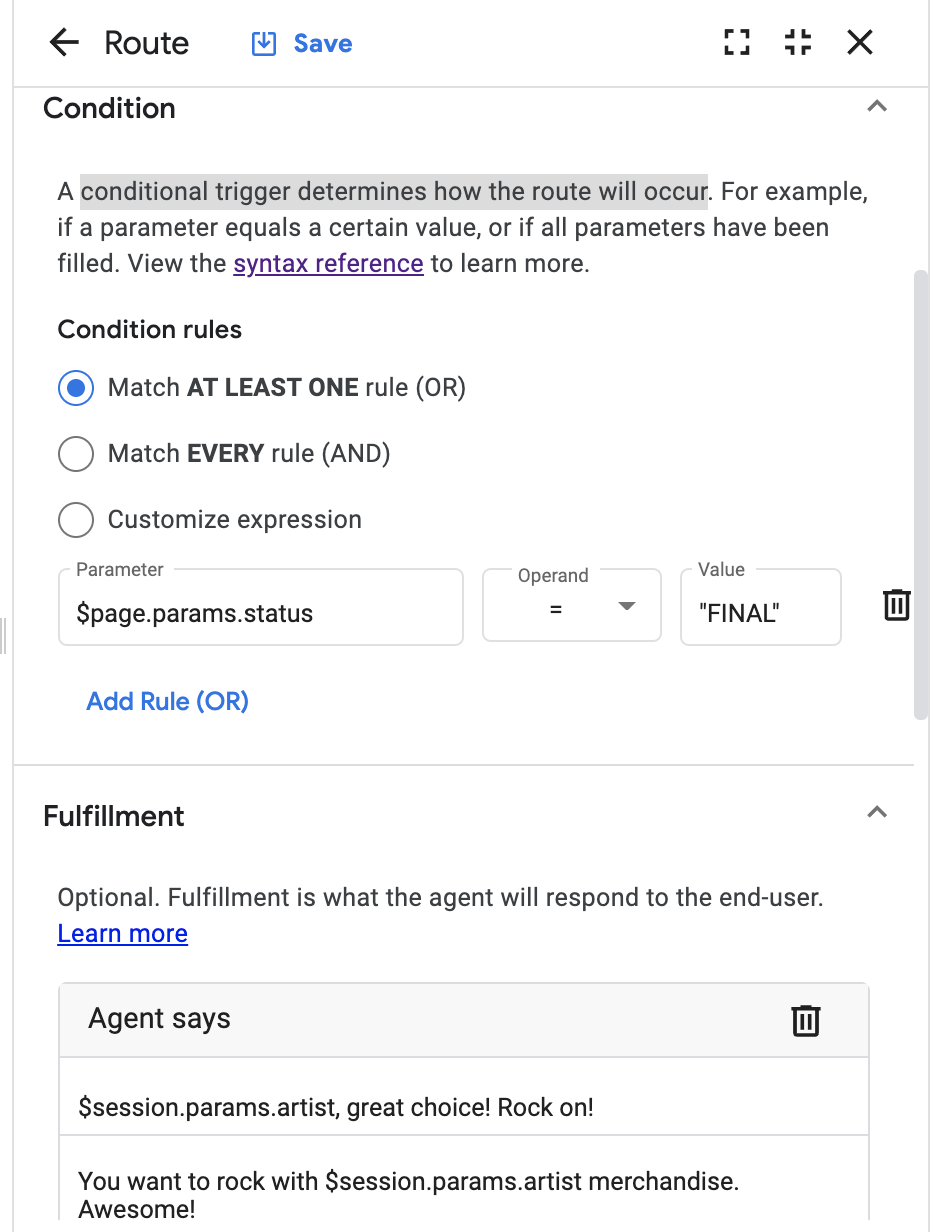
页面条件路由
与页面条件路由结合使用时,参数的功能非常强大。当条件的评估结果为 true 时,系统会调用关联的页面路由。条件可以是“参数等于特定值”“参数不得缺失”“已完成的表单”等等。如需详细了解参数和条件,请参阅 Dialogflow CX 文档。
对于我们的零售虚拟客服,我们需要收集一系列参数,因此需要创建一个条件来检查“表单”是否已填写完毕。表单是指应从最终用户处收集的参数列表。虚拟客服会与最终用户进行多轮对话,直到收集到所有必需的表单参数(也称为“页面参数”)为止。
Dialogflow CX 会自动设置最终用户在表单填充期间提供的参数值。如需检查当前页面的整个表单是否已填充,请使用以下条件:$page.params.status = "FINAL"
在“音乐人概览”页面上创建条件路由
我们来创建一个条件路由,一旦知道艺术家,就会过渡到下一页:
- 在音乐人概览页面中,点击路线部分中的 + 图标。
- 向下滚动到条件部分。
- 选择至少一个(或)
- 接下来,我们将编写一个表达式,
- 参数:
$page.params.status - 运算符:
= - 值:
"FINAL"
- 现在,我们将在路由上创建一个特定的静态履单消息,以确认最终用户的选择。向下滚动到 Fulfillment 代码块,然后编写以下履单消息:
$session.params.artist, great choice! Rock on!You want to rock with $session.params.artist merchandise. Awesome!
- 当条件为 true 时,您应转换到产品概览页面。向下滚动到过渡部分,然后使用以下页面:
Product Overview - 点击保存。
在“产品概览”页面上创建路线
现在,我们已经了解了如何创建参数和条件路由,接下来我们为以下网页创建更多参数:
产品概览
- 在产品概览页面中创建
artist参数:
- 显示名称:
artist - 实体类型:
@Artist - 必需:勾选
- 在日志中隐去:检查
- 初始提示 fulfillment:
From which of these artists would you like to order merchandise?
{
  "richContent": [
    [
      {
        "options": [
          {
            "text": "The Google Dolls"
          },
          {
            "text": "The Goo Fighters"
          },
          {
            "text": "Alice Googler"
          },
          {
            "text": "G's N' Roses"
          }
        ],
        "type": "chips"
      }
    ]
  ]
}
- 事件处理脚本 >
No-match default:To buy merchandise you can choose between the following artists: Alice Googler, G's N' Roses, The Google Dolls or The Goo Fighters. Which artist do you want to buy merchandise from? - 自定义载荷:
{
  "richContent": [
    [
      {
        "options": [
          {
            "text": "The Google Dolls"
          },
          {
            "text": "The Goo Fighters"
          },
          {
            "text": "Alice Googler"
          },
          {
            "text": "G's N' Roses"
          }
        ],
        "type": "chips"
      }
    ]
  ]
}
- 事件处理脚本 >
No-input default:To buy merchandise you can choose between the following artists: Alice Googler, G's N' Roses, The Google Dolls or The Goo Fighters. Which artist were you trying to mention? - 自定义载荷:
{
  "richContent": [
    [
      {
        "options": [
          {
            "text": "The Google Dolls"
          },
          {
            "text": "The Goo Fighters"
          },
          {
            "text": "Alice Googler"
          },
          {
            "text": "G's N' Roses"
          }
        ],
        "type": "chips"
      }
    ]
  ]
}
- 创建
merch参数:
- 显示名称:
merch - 实体类型:
@Merch - 必需:勾选
- 在日志中隐去:检查
- 履行:
Which merchandise item do you want? - 点击:添加对话选项 > 自定义载荷:
{
    "richContent": [
      [
        {
          "type": "chips",
          "options": [
            {
              "text": "Shirts"
            },
            {
              "text": "Music"
            },
            {
              "text": "Tour movie"
            }
          ]
        }
      ]
    ]
  }
- 事件处理脚本 >
No-match default - 事件处理程序 fulfillment:
We sell Shirts, Music or the Tour movie. Which of these items do you want? - 自定义载荷:
{
    "richContent": [
      [
        {
          "type": "chips",
          "options": [
            {
              "text": "Shirts"
            },
            {
              "text": "Music"
            },
            {
              "text": "Tour movie"
            }
          ]
        }
      ]
    ]
  }
- 事件处理脚本 >
No-input default - 事件处理程序 fulfillment:
I couldn't understand which merchandise item you wanted to buy. You can choose between: Shirts, Music or the Tour movie. Which item do you want? - 自定义载荷:
{
    "richContent": [
      [
        {
          "type": "chips",
          "options": [
            {
              "text": "Shirts"
            },
            {
              "text": "Music"
            },
            {
              "text": "Tour movie"
            }
          ]
        }
      ]
    ]
  }
- 创建一个路由,当提供
artist和merch商品时,该路由将过渡到 Product 页面。
- 条件:
- 符合所有规则 (AND)
- 表达式:
$session.params.artist != null - 表达式:
$session.params.merch != null - 履行:
Alright! $session.params.merch of $session.params.artist, let's go! - 转换:网页:
Product
- 为用户说“衬衫”时创建路由
- 意图:redirect.shirts
- 转换:网页:
Shirts
- 为用户说“音乐”时创建路由
- 意图:redirect.music
- 转换:网页:
Music
- 创建当用户询问价格信息时的路线
- 意图:redirect.price
- 过渡:创建新页面:
Price
设置上述配置后,您将看到类似于下图的可视化效果。请注意,在图中,intent 路由为蓝色,条件路由为橙色。虽然未显示,但事件处理程序为绿色,当多个路由类型转换到某个页面时,相应线条将为灰色。

到目前为止,您已了解如何使用状态处理程序(例如基于参数的意图路由和条件路由)创建流、实体、意图和页面。在本实验的后续部分中,我们将使用业务逻辑中的条件分支,根据输入提供不同的对话。
您可以使用以下配置来完成虚拟客服的设置。
“衬衫”页面:
- 在衬衫页面中创建以下配置:
- 条目履行:
Do you want a longsleeve or a t-shirt? - 条目 fulfillment 自定义载荷:
{
    "richContent": [
      [
        {
          "type": "chips",
          "options": [
            {
              "text": "T-shirt"
            },
            {
              "text": "Longsleeve"
            },
            {
              "text": "Price?"
            }
          ]
        }
      ]
    ]
  }
- 创建意图路由:
redirect.price转场到Price页面 - 创建以下参数:
- 参数:
merch- 实体类型:@Merch、Required和Redact in log - 参数 > 事件处理程序 >
No-match default - 参数 > 事件处理程序 fulfillment:
You can choose between a t-shirt or a longsleeve. Which of these do you want? - 参数 > 事件处理程序 fulfillment 自定义载荷:
{
    "richContent": [
      [
        {
          "type": "chips",
          "options": [
            {
              "text": "T-shirt"
            },
            {
              "text": "Longsleeve"
            }
          ]
        }
      ]
    ]
  }
- 参数 > 事件处理程序 >
No-input default - 参数 > 事件处理程序 fulfillment:
I couldn't understand if you want the t-shirt or the longsleeve. Which of these do you want? - 参数 > 事件处理程序 fulfillment 自定义载荷:
{
    "richContent": [
      [
        {
          "type": "chips",
          "options": [
            {
              "text": "T-shirt"
            },
            {
              "text": "Longsleeve"
            }
          ]
        }
      ]
    ]
  }
- 点击条目履单,然后向下滚动到参数预设,每次“衬衫”页面处于活跃状态时,系统都会将类别参数设置为 shirts:
参数 | 值 |
|
|
- 添加条件路由:
- 至少符合一个规则(或)
- 表达式:
$session.params.merch = "T-shirt" - 表达式:
$session.params.merch = "Longsleeve" - 过渡到新页面:
Shirt Size
价格页面:
由于价格消息将取决于所选的商品或类别(音乐或衬衫),因此我们将在本实验的后续部分中修复此部分。目前,只需输入一个占位符即可。
- 在价格页面中创建以下配置:
- 条目履行:
PRICE TODO
由于您可以在对话中的多个位置询问价格,因此它应始终为您提供答案,并将您转回对话的上一部分,以便继续下单。在对话树中,有 5 个位置可用于分支,以获取价格信息。(衬衫、衬衫尺码、音乐、配送公司,以及通过 Intent 路由直接返回),因此我们需要一些条件路由来返回:
- 添加条件路由:
- 符合所有规则 (AND)
- 表达式:
$session.params.category = "shirts" - 表达式:
$session.params.merch = "null" - 过渡到新页面:
Shirts
- 添加条件路由:
- 符合所有规则 (AND)
- 表达式:
$session.params.category = "shirts" - 表达式:
$session.params.size = "null" - 过渡到新页面:
Shirt Size
- 添加条件路由:
- 符合所有规则 (AND)
- 表达式:
$session.params.category = "music" - 表达式:
$session.params.album = "null" - 过渡到新页面:
Music
- 添加条件路由:
- 符合所有规则 (AND)
- 表达式:
$session.params.category = "music" - 表达式:
$session.params.merch = "null" - 过渡到新页面:
Carrier
- 添加条件路由:
- 符合所有规则 (AND)
- 表达式:
$session.params.category = "null" - 过渡到新页面:
Product Overview
衬衫尺寸页面:
- 在衬衫尺码页面中创建以下配置:
- 条目履行:
What shirt size do you want? - 条目 fulfillment 自定义载荷:
{
    "richContent": [
      [
        {
          "type": "chips",
          "options": [
            {
              "text": "XS"
            },
            {
              "text": "S"
            },
            {
              "text": "M"
            },
            {
              "text": "L"
            },
            {
              "text": "XL"
            },
            {
              "text": "2XL"
            },
            {
              "text": "3XL"
            }
          ]
        }
      ]
    ]
  }
- 创建意图路由:
redirect.price,并转换到Price页面。 - 创建以下参数:
- 参数:
shirtsize- 实体类型:@ShirtSize-Required、Redact In Log - 参数 > 事件处理程序 >
No-match default - 参数 > 事件处理程序 fulfillment:
Please tell me the shirt size, such as XL. - 参数 > 事件处理程序 fulfillment 自定义载荷:
{
    "richContent": [
      [
        {
          "type": "chips",
          "options": [
            {
              "text": "XS"
            },
            {
              "text": "S"
            },
            {
              "text": "M"
            },
            {
              "text": "L"
            },
            {
              "text": "XL"
            },
            {
              "text": "2XL"
            },
            {
              "text": "3XL"
            }
          ]
        }
      ]
    ]
  }
- 参数 > 事件处理程序 >
No-input default - 参数 > 事件处理程序 fulfillment:
I couldn't understand the shirt size. What size do you want? - 参数 > 事件处理程序 fulfillment 自定义载荷:
{
    "richContent": [
      [
        {
          "type": "chips",
          "options": [
            {
              "text": "XS"
            },
            {
              "text": "S"
            },
            {
              "text": "M"
            },
            {
              "text": "L"
            },
            {
              "text": "XL"
            },
            {
              "text": "2XL"
            },
            {
              "text": "3XL"
            }
          ]
        }
      ]
    ]
  }
- 添加条件路由:
- 符合所有规则 (AND)
- 表达式:
$page.params.shirtsize != "null" - 过渡到页面:
Product
音乐页面:
- 在音乐页面中创建以下配置:
- 条目履行:
We have a Greatest Hits Album or the Live Album. Which one do you want? - 条目 fulfillment 自定义载荷:
{
    "richContent": [
      [
        {
          "type": "chips",
          "options": [
            {
              "text": "Greatest Hits"
            },
            {
              "text": "Live"
            },
            {
              "text": "Price?"
            }
          ]
        }
      ]
    ]
  }
- 创建意图路由:
redirect.price,并转换到页面:Price。 - 创建以下参数:
- 参数:
album- 实体类型:@Album-Required、Redact In Log - 参数 > 事件处理程序 >
No-match default - 参数 > 事件处理程序 fulfillment:
You can choose between Greatest Hits and Live Album. Which of these do you want? - 参数 > 事件处理程序 fulfillment 自定义载荷:
{
    "richContent": [
      [
        {
          "type": "chips",
          "options": [
            {
              "text": "Greatest Hits"
            },
            {
              "text": "Live"
            }
          ]
        }
      ]
    ]
  }
- 参数 > 事件处理程序 >
No-input default - 参数 > 事件处理程序 fulfillment:
I couldn't understand if you want the album: Greatest Hit or Live. Which of these do you want? - 参数 > 事件处理程序 fulfillment 自定义载荷:
{
    "richContent": [
      [
        {
          "type": "chips",
          "options": [
            {
              "text": "Greatest Hits"
            },
            {
              "text": "Live"
            }
          ]
        }
      ]
    ]
  }
- 点击入口履单,然后向下滚动到参数预设,每次音乐页面处于活跃状态时,类别参数都会设置为 music:
参数 | 值 |
|
|
- 添加条件路由:
- 符合所有规则 (AND)
- 表达式:
$page.params.album != "null" - 过渡到页面:
Carrier
运营商页面:
- 在运营商页面中创建以下配置:
- 条目履行:
Do you want this album on CD or MP3? - 条目 fulfillment 自定义载荷:
{
    "richContent": [
      [
        {
          "type": "chips",
          "options": [
            {
              "text": "CD"
            },
            {
              "text": "MP3"
            },
            {
              "text": "Price?"
            }
          ]
        }
      ]
    ]
  }
- 创建意图路由:
redirect.price,该路由会转换到Price页面。 - 创建以下参数:
- 参数:
merch- 实体类型:@Merch-Required、Redact In Log - 参数 > 事件处理程序 >
No-match default - 参数 > 事件处理程序 fulfillment:
Do you want a physical CD or the digital album? - 参数 > 事件处理程序 fulfillment:自定义载荷:
{
    "richContent": [
      [
        {
          "type": "chips",
          "options": [
            {
              "text": "CD"
            },
            {
              "text": "Digital Album"
            }
          ]
        }
      ]
    ]
  }
- 参数 > 事件处理程序 >
No-input default - 参数 > 事件处理程序 fulfillment:
I couldn't understand if you mean CD or MP3. Which one do you want? - 参数 > 事件处理程序 fulfillment:自定义载荷:
{
    "richContent": [
      [
        {
          "type": "chips",
          "options": [
            {
              "text": "CD"
            },
            {
              "text": "MP3"
            }
          ]
        }
      ]
    ]
  }
- 添加条件路由:
- 符合所有规则 (AND)
- 表达式:
$page.params.merch != "null" - 过渡到页面:
Product
商品页面:
- 创建以下参数:
参数显示名称 | 形参实体类型 | 检查 |
|
| 必需,在日志中隐去 |
|
| 必需,在日志中隐去 |
- 艺术家参数需要以下初始提示 fulfillment,当不知道艺术家时,系统会显示此 fulfillment。
You didn't mention which artist you are interested in. You can ask me to buy the $session.params.merch of the artist you like or ask which artists we signed. How can I help?
{
  "richContent": [
    [
      {
        "options": [
          {
            "text": "Which artists?"
          }
        ],
        "type": "chips"
      }
    ]
  ]
}
- 此外,还添加了带有 fulfillment 的
No-input default事件处理脚本:I couldn't understand what you just said. Ask me which artists are signed. - 以及一个带有 fulfillment 的
No-match default事件处理脚本:I missed that. Please ask me which artists are signed.
- merch 参数也需要重新提示事件处理程序。
- 添加一个带有 fulfillment 的
No-input default事件处理脚本:I couldn't understand what you just said. Which merchandise item do you want? - 以及一个带有 fulfillment 的
No-match default事件处理脚本:I missed that. Which merchandise item do you want?
如果已知音乐人且用户选择了“巡回演唱会电影”,则下一个路由将转换到确认页面。
- 添加条件路由:
- 符合所有规则 (AND)
- 表达式:
$session.params.artist != null - 表达式:
$session.params.merch = "Tour Movie" - 参数预设添加参数 >
price = 25 - 过渡到新页面:
Confirmation
如果系统知道艺术家是谁,并且用户选择了“T 恤”并选择了衬衫尺寸,则下一个路线将过渡到确认页面。
- 添加条件路由:
- 自定义表达式:
$session.params.artist != null AND $session.params.merch = "T-shirt" AND $session.params.shirtsize != null - 参数预设添加参数 >
price = 25 - 过渡到页面:
Confirmation
如果系统知道相应歌手,并且用户选择了“长袖”和衬衫尺码,则下一个路线将转到确认页面。
- 添加条件路由:
- 自定义表达式:
$session.params.artist != null AND $session.params.merch = "Longsleeve" AND $session.params.shirtsize != null - 参数预设添加参数 >
price = 30 - 过渡到页面:
Confirmation
如果已知音乐人,且用户选择了“CD”并选择了专辑名称,则下一个路线将过渡到确认页面。
- 添加条件路由:
- 自定义表达式:
$session.params.artist != null AND $session.params.merch = "CD" AND $session.params.album != null - 参数预设添加参数 >
price = 15 - 过渡到页面:
Confirmation
如果已知艺术家,且用户选择了“数字专辑”并选择了专辑名称,则下一个路线将过渡到确认页面。
- 添加条件路由:
- 自定义表达式:
$session.params.artist != null AND $session.params.merch = "Digital Album" AND $session.params.album != null - 参数预设添加参数 >
price = 10 - 过渡到页面:
Confirmation
接下来,我们将使用检测缺失信息的提示来创建一些高级条件。如果已知音乐人,且用户选择了“CD”或“数字专辑”,但未选择专辑名称,则下一个路线将转换回音乐页面。
- 添加条件路由:
- 自定义表达式:
$session.params.artist != null AND ($session.params.merch = "CD" OR $session.params.merch = "Digital Album") AND $session.params.album = null - 履行:
I would also need to know which album you would like to buy! - 过渡到页面:
Music
如果已知艺术家,且用户选择了“T 恤”或“长袖”,但未选择 T 恤尺码,则最后一个路线将过渡到确认页面。
- 添加条件路由:
- 自定义表达式:
$session.params.artist != null AND ($session.params.merch = "T-shirt" OR $session.params.merch = "Longsleeve") AND $session.params.shirtsize = null - 履行:
I would also need to know which shirt size you need! - 过渡到页面:
Shirt Size
在本实验的下一部分中,我们将利用条件实现来根据输入提供不同的实现消息。
7. 条件式响应
有些回答会根据输入返回不同的对话,对话会分支,我们称之为条件性回答。如果您未使用 webhook fulfillment,那么在后端确定条件性响应时,这会变得很有趣。例如:
if [condition]
  [response]
elif [condition]
  [response]
elif [condition]
  [response]
else
  [response]
endif
- [条件] 的一个示例可以是:
$session.params.user-age >= 21。它使用的格式与路由中的条件类似。 - [response] 采用静态文本响应
- 条件响应始终以
if开头 elif和else块是可选的
Dialogflow CX 还可以使用内置的系统函数。例如,格式化日期或时间,或显示当前时间 ($sys.func.NOW())
我们来修复确认和价格页面,完成目录流程。
确认页面:
现在,我们将构建确认页面。它具有以下要求:
- 如果商品是 CD 或数字专辑。我们将在确认信息中显示以下字段:artist、merch、album 和 price。
- 如果商品是 T 恤或长袖。我们将在确认页面中显示以下字段:音乐人、商品、尺码和价格。
- 否则(即,如果 merch 为 Tour Movie)。我们将在确认信息中显示以下字段:艺术家、商品和价格。
- 点击确认页面。
- 依次点击“Edit Fulfillment”(修改 Fulfillment)>“Agent Responses”(代理回答)> Add dialogue 选项 > Conditional Response:
if ($session.params.merch = "CD" OR $session.params.merch = "Digital Album")
  The $session.params.merch: $session.params.artist - $session.params.album costs $$session.params.price. Shall I continue to order?
elif ($session.params.merch = "T-shirt" OR $session.params.merch = "Longsleeve")
  A $session.params.merch of $session.params.artist size: $session.params.shirtsize costs $$session.params.price. Shall I continue to order?
elif $session.params.merch = "Tour Movie"
  The $session.params.merch of $session.params.artist costs $$session.params.price. Shall I continue to order?
else
  It looks like something went wrong with your order. You can say "Reset", to restart the order process.
endif
- Create the following Custom payload:
- Custom payload:
{
  "richContent": [
    [
      {
        "options": [
          {
            "text": "Yes, confirm"
          }
        ],
        "type": "chips"
      }
    ]
  ]
}
Next, create two intent routes:
confirm.proceed.ordertransitions to:Order ProcessFlow.decline.proceed.ordertransitions toEnd Flow
When the user declines the order, and does not want to proceed the order process, we will have to transition back to the welcome page, but all the parameters have to be cleared. We can do this by specifically setting null to all the possible parameters. You can do this with Parameter presets.
- In the decline.proceed.order intent route, scroll down to Parameter presets and add the following parameters:
Parameter | Value |
|
|
|
|
|
|
|
|
|
|
|
|
|
|
Notice that we have created an additional parameter called restart. If this parameter is present, the Default Start Flow, should know to continue the conversation by showing a customized message.
- Click on the Default Start Flow, Start Page, and create another Conditional Route:
$session.params.restart = "true"- Fulfillment:
"Welcome back, as the virtual agent of G-Records, I can help you order artists merchandise, you can ask questions about your order or shipping, and I can tell you more which artists are currently signed with us. How can I help?" - Custom payload:
{
    "richContent": [
      [
        {
          "type": "chips",
          "options": [
            {
              "text": "Which artists?"
            },
            {
              "text": "Which products?"
            },
            {
              "text": "About my order..."
            }
          ]
        }
      ]
    ]
  }
- Select the Start Page and click on the
redirect.endintent. Create the following fulfillment:Thank you for contacting G-Records! Have a nice day!
Price Page:
Let's also fix the Price TODOs. The price information will be static for now. Click on the Price Page in the Catalog Flow, and use the following entry fulfillment:
- Delete the Agent Says entry fulfillment.
- Create a new Conditional Response:
if $session.params.category = "shirts"
  A t-shirt costs $25 and a longsleeve costs $30.
elif $session.params.category = "music"
  A CD costs $15. The digital album on MP3 costs $10.
else
  A t-shirt costs $25 and a longsleeve costs $30. A CD costs $15 and a digital album on MP3 $10. In case you are interested in the Tour Movie, that one is $25.
endif
Well done, by now you completed the Catalog flow. Your flow should look similar to this diagram:
8. Wrapping up the agent
We are almost at the end of this lab. Let's configure the last flows together, and take in practice all the new things that we have learned.
Creating the My Order Flow
- Go to the My Order Flow, and create the following intent transitions:
Page (In Flow) | Routes > Intent | Routes > Transition To |
My Order Start |
| My Order |
My Order Start |
| My Order Status |
My Order Start |
| My Order Cancellation |
My Order Start |
| End Session |
My Order Start |
| End Flow |
My Order |
| My Order Status |
My Order |
| My Order Cancellation |
Default Start Flow |
| Flow: My Order |
Default Start Flow |
| Flow: My Order |
- Let's create the following entry fulfillment for the My Order Page:
- Entry fulfillment:
I can look up the status of your order, or I can cancel an order.
- In the My Order Page create the following parameter:
- Displayname:
ordernumber - Entity Type:
@OrderNumber - Required: checked
- Initial prompt fulfillment:
What's the order number? For example ABCD123. - Event Handler:
No-match default:To proceed with your order I will need an order number. Order numbers start with 4 characters and end with 3 numbers, such as ABCD123. Which order number may I use? - Event Handler:
No-input default:I missed that. To proceed with your order I will need an order number. Order numbers start with 4 characters and end with 3 numbers, such as ABCD123. Which order number may I use?
- Create the following conditional route:
- Customize Expression:
$page.params.status = "FINAL" - Fulfillment:
And do you want to Cancel your order, or should I look up the status?
- Click on Add state handler > Event Handlers and create the Event Handler:
No-input default
- Fulfillment:
I'm sorry, what was that? Would you like me to cancel an order or look up the status? - Custom payload:
{
  "richContent": [
    [
      {
        "options": [
          {
            "text": "Status"
          },
          {
            "text": "Cancel"
          }
        ],
        "type": "chips"
      }
    ]
  ]
}
- Create the Event Handler:
No-match default
- Fulfillment:
Would you like me to cancel an order or lookup the status? - Custom payload:
{
  "richContent": [
    [
      {
        "options": [
          {
            "text": "Status"
          },
          {
            "text": "Cancel"
          }
        ],
        "type": "chips"
      }
    ]
  ]
}
- In the My Order Status Page create the following parameter:
- Displayname:
ordernumber - Entity Type:
@OrderNumber - Required checked
- Initial prompt fulfillment:
What's the order number? For example ABCD123. - Event Handler:
No-match default:To proceed with your order I will need an order number. Order numbers start with 4 characters and end with 3 numbers, such as ABCD123. Which order number may I use? - Event Handler:
No-input default:I missed that. To proceed with your order I will need an order number. Order numbers start with 4 characters and end with 3 numbers, such as ABCD123. Which order number may I use?
- In the My Order Status Page create the following conditional route:
- Customize Expression:
$session.params.ordernumber != null - Fulfillment:
Your order $session.params.ordernumber has been shipped, it can take up to approx 2 weeks before you will receive your items. - Add dialogue option > Text:
Is there anything else I can help you with?
- In the My Order Cancelation Page create the following parameter:
- Displayname:
ordernumber - Entity Type:
@OrderNumber - Required checked
- Initial prompt fulfillment:
What's the order number? For example ABCD123. - Event Handler:
No-match default:To proceed with your order I will need an order number. Order numbers start with 4 characters and end with 3 numbers, such as ABCD123. Which order number may I use? - Event Handler:
No-input default:I missed that. To proceed with your order I will need an order number. Order numbers start with 4 characters and end with 3 numbers, such as ABCD123. Which order number may I use?
- In the My Order Cancelation Page create the following conditional route:
- Customize Expression:
$session.params.ordernumber != null - Fulfillment:
Your order $session.params.ordernumber has been canceled. - Add dialogue option > Text:
Is there anything else I can help you with?
- Test the flow and create the following two test scenarios:
>"About my order"
>"ABCD123"
>"Status"
And:
>"What's the status of order DEFG222"
- Select the Start Page and click on the
redirect.endintent. Create the following fulfillment:Thank you for contacting G-Records! Have a nice day! - Select the Start Page and click on the
redirect.homeintent. Create the following parameter preset:restart = true
Default Negative intents (Fallback)
When you create a virtual agent, a default negative intent is created for you. You can add training phrases to this intent that act as negative examples that will trigger a No-match event. There may be cases where end-user input has a slight resemblance to training phrases in normal intents, but you do not want these inputs to match any normal intents.
- Try in the simulator:
I don't like Alice Googler.
You will see that the virtual agent answers with the Product Overview Page, to continue ordering Alice Googler merchandise. However, your end user does not like that artist. Let's use the Default Negative Intent for this.
- Go to Manage > Intents and select the Default Negative Intent.
- Add the following training phrases that will trigger the No-match event.
I don't like Alice GooglerI am not a fan of G's N' RosesI can't stand the music of the Google Dolls
- Hit Save and test the following sentence in the simulator:
I am really not a fan of the Goo Fighters
This time the No-match event was triggered, you stayed on the Start Page.
Default Fallback Messages
- Click the Default Start Flow, select the
sys.no-input-defaultevent handler.
The No-input fallback basically means: No text or speech answers were detected. Likely no answers were given, or the system couldn't hear it. Therefore, let's make the fallback messages more specific. Use the tab key, to create alternative dialogues:
- Remove all answers, and add these text dialogues:
I'm sorry, I didn't receive an answer. Can you say it again?I missed your answer, can you say it again?Sorry, I didn't hear anything. Can you say it again?I couldn't hear what you were saying, what was that?I'm sorry, I missed your answer. What were you trying to say?
Don't forget to click Save.
- Click the Default Start Flow, select the
sys.no-match-defaultevent handler.
The No Match fallback basically means: Text or speech answers were detected but nothing in Dialogflow CX got matched.
- Remove all answers, and add these text dialogues:
Sorry, I didn't get that. Can you please rephrase?I'm sorry, I don't understand. Can you please rephrase?I don't understand, please rephrase.Sorry, I didn't get that. What was that?I didn't get that, can you please rephrase?
Don't forget to click Save.
- It's advised to repeat these steps for the Catalog, My Order, Order Process and Customer Care flows.
Here's a tip: when creating fallback messages, make them more explicit, by rephrasing the previous question or by mentioning an example. You could create these type of No-match and No-input events on Page level when creating parameters. In our labs, we have already done this.
Creating the Order Process Flow
- Go to the Order Process Flow, and create the following intent transitions:
Page (In Flow) | Routes > Intent | Routes > Transition To |
Order Process Start |
| End Session |
Order Process Start |
| End Flow |
Order Process Start |
| New Page: Shipping Details |
- Let's create the following entry fulfillment for the Shipping Details Page:
- Entry fulfillment:
To complete your order I will first need to collect your shipping details.
- Create the following parameters:
These parameters will make use of built-in system entities. System entity support differs for each language. See the docs for more information.
Parameter Display name | Entity | Required? | Initial prompt fulfillment | No-match default | No-input default |
| @sys.person | Required |
|
|
|
| @sys.person | Required |
|
|
|
| @sys.address | Required |
|
|
|
| @sys.any | Required |
|
|
|
| @sys.geo-city | Required |
|
|
|
| @sys.geo-country | Required |
|
|
|
| @sys.email | Required |
|
|
|
- Create the following conditional route:
- Customize Expression:
$page.params.status = "FINAL" - Transition to new Page:
Payment Details
- Create the following entry fulfillment.
Let's fake it that this virtual agent makes use of Google Pay. Don't worry this tutorial won't make real transactions. Create the following entry dialogues:
- Agent Says:
Alright $session.params.firstname! We will make use of Google Pay, that's connected to your email account: $session.params.email.
- Conditional Response
if $session.params.merch != "Digital Album"
  Shipping costs an additional 5 dollars. This will make the total price $$sys.func.TO_TEXT($sys.func.ADD($session.params.price, 5)).
  Your merchandise will be shipped to:
  $session.params.firstname $session.params.lastname
  $session.params.address
  $session.params.zipcode $session.params.city
  $session.params.country
  To continue the order process please explicitly say "I confirm". Do you want to confirm your $session.params.artist $session.params.merch order?
else
  The total costs will be: $$session.params.price.
  After purchasing the digital album, you will receive an email with the download link.
  To continue the order process please explicitly say "I confirm".
  Do you want to confirm your $session.params.artist $session.params.merch order?
endif
- 创建以下意图路由
- 意图:
confirm.proceed.order - 客服人员说:
Thank you for your order! Your merchandise will be shipped today! - 添加对话选项 > 文字:
Here's the order number: ABCD123。 - 添加对话选项 > 文字:
Have a good day! - 过渡:
End Session
- 选择开始页面,然后点击
redirect.end意图。创建以下履单:Thank you for contacting G-Records! Have a nice day! - 选择开始页面,然后点击
redirect.home意图。创建以下参数预设:restart = true
太棒了!到目前为止,我们已经拥有一个可正常运行的真实零售商聊天机器人!在下一个实验中,我们将测试虚拟客服的表现!
9. 测试虚拟客服
您可以使用内置的模拟器来测试虚拟客服的对话。在模拟器中测试流程的优势在于,您可以清楚地了解模拟器在遍历流程时收集的流程、页面、参数和 (DTMF) 事件。这样一来,测试就会比直接在集成中测试更容易,因为这些类型的信息将对最终用户隐藏。您甚至可以创建测试用例,并保存和重复使用这些测试用例。这很有意义,因为当您随着时间的推移维护或修改流程时,您需要确保所做的任何更改都不会破坏之前的工作。
您还可以将之前创建的测试用例存储在 Google Cloud Storage 或本地,以便导出和导入这些测试。导出测试会下载一个 blob 文件。如需详细了解模拟器和测试用例,请参阅模拟器 / 测试用例文档。
在创建一些测试用例之前,我们先完成虚拟客服的其余部分:
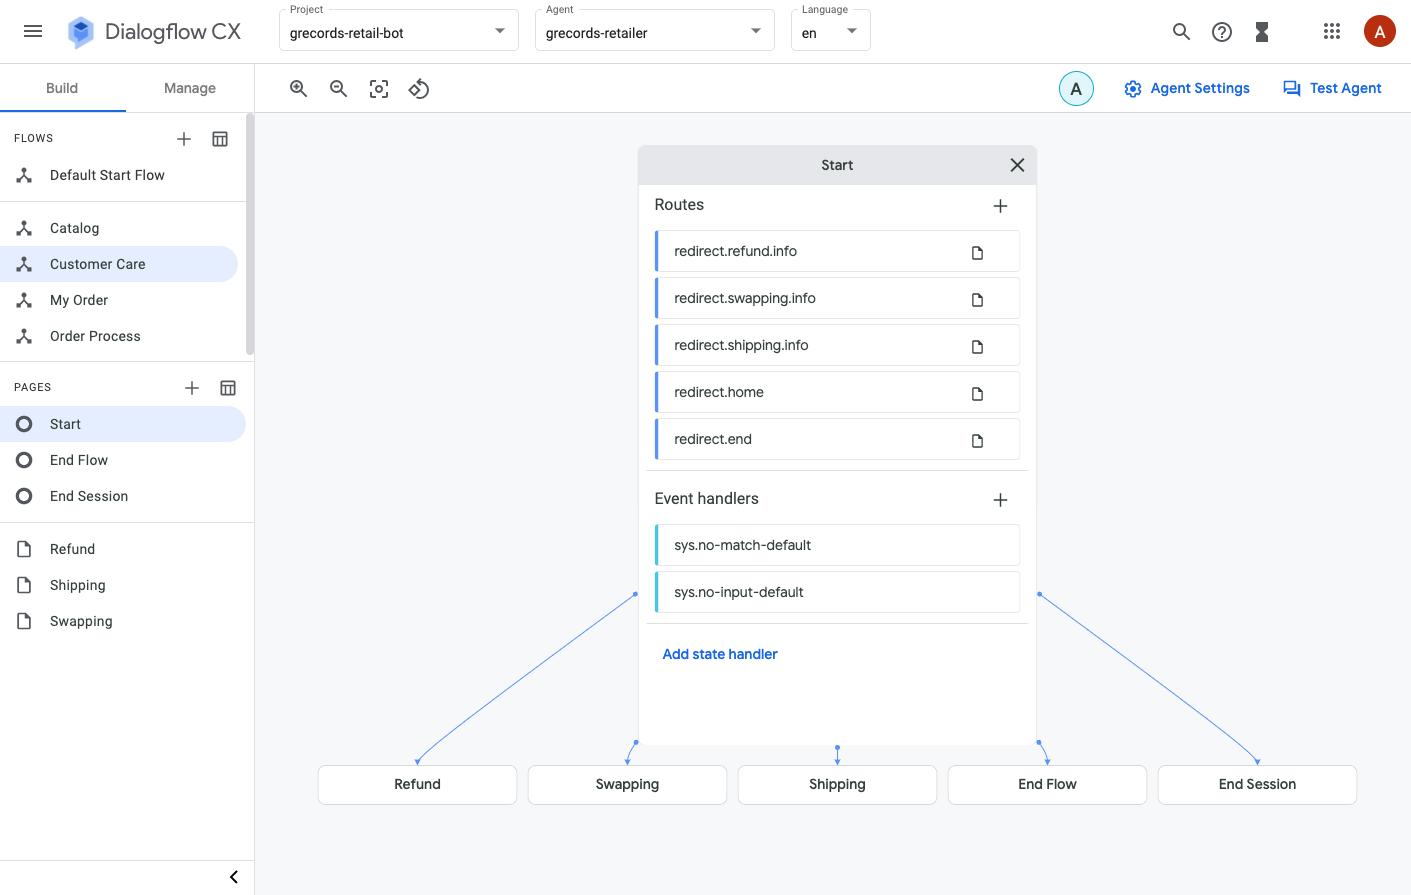
创建客户服务流程
- 前往客户服务流程,然后创建以下 intent 转换:
页面(在流程中) | 路线 > Intent | 路线 > 转场到 |
Customer Care 启动 |
| 运费 |
Customer Care 启动 |
| 退款 |
Customer Care 启动 |
| 交换 |
Customer Care 启动 |
| 结束流程 |
Customer Care 启动 |
| 结束会话 |
- 为配送页面创建以下 fulfillment 条目:
Shipping physical merchandise items can take up to 2 weeks.Is there anything else I can help you with?
- 为退款页面创建以下条目实现:
We offer free returns and refunds. We provide one free return label for each order. You can use it within 30 days from receiving your order. If your refund is accepted, we will refund the price you paid for your item back to your original payment method.Is there anything else I can help you with?
- 为交换页面创建以下条目实现:
If you would like to change your item for a different one, please return your unwanted item and place a new order. If your refund is accepted, we will refund the price you paid for your item back to your original payment method.Is there anything else I can help you with?
- 选择开始页面,然后点击
redirect.end意图。创建以下履单:Thank you for contacting G-Records! Have a nice day! - 选择开始页面,然后点击
redirect.home意图。创建以下参数预设:restart = true
创建测试用例
- 点击屏幕右侧的 Test Agent 按钮。
首次打开模拟器时,您需要选择代理环境和有效流。在大多数情况下,您应该使用草稿环境和默认开始流程。
- 类型:
Hi
- 提问:
Which artists are signed with your label? - 请说:
The Google Dolls - 请说:
I am interested in buying a shirt - 请说:
A t-shirt - 请说:
Medium - 现在,点击“保存测试用例”按钮。您可以在模拟器顶部找到它(位于重做箭头和重置回收站图标旁边)
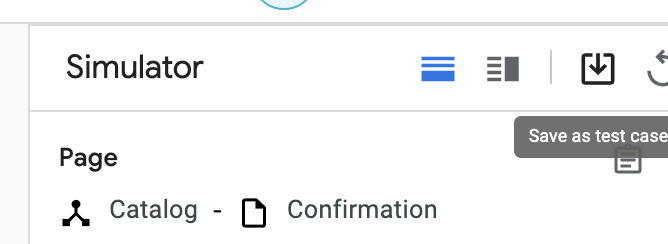
- 向其提供以下详细信息:
- 测试用例名称:
Buy Google Dolls t-shirt size M - 标签:#catalog、#shirts、#t-shirt、#TheGoogleDolls
- 点击保存
让我们创建更多测试用例。
- 首先,点击“重置”(垃圾桶)图标,清除当前对话。
- 创建以下测试用例:
购买 Alice Googler T 恤:
>"Buy the Alice Googler t-shirt."
>"XL"
- 测试用例名称:
Buy the Alice Googler t-shirt - 标记:
#catalog, #shirts, #t-shirt, #AliceGoogler
购买 M 码 T 恤:(请注意,虽然未提及艺术家名称,但您确实想跳过乐队概览、商品概览、衬衫和衬衫尺码页面)
>"Buy a t-shirt size M"
>"The Google Fighters"
- 测试用例名称:
Buy a t-shirt size M - 标记:
#catalog, #shirts, #t-shirt, #TheGoogleFighters - 说明:(请注意,此处未提及艺术家名称,但您确实想跳过乐队概览、商品概览、衬衫和衬衫尺码页面)
购买 Guns N' Roses 的音乐(注意:此操作会跳过乐队概览和商品概览页面)
>"Purchase music of G's N' Roses"
>"Live"
>"CD"
- 测试用例名称:
Purchase music of G's N' Roses - 标记:
#catalog, #music, #CD, #GsNRoses, #live - 说明:(请注意,此操作会跳过频段概览和产品概览页面)
查看价格信息:
>"Which products"
>"Shirts"
>"What's the price difference?"
>"Longsleeve"
>"What does it cost?"
>"M"
>"The Google Dolls"
>"No"
>"Which bands"
>"The Gooo Fighters"
>"Music"
>"How much does it cost?"
>"Greatest Hits"
>"What's the price difference?"
>"Mp3"
>"No"
>"I want to buy the tour movie"
>"Alice Googler"
>"Yes"
- 测试用例名称:
Price info - 标记:
#catalog, #music, #tourmovie, #shirts - 说明:测试对话框中各个位置的价格信息
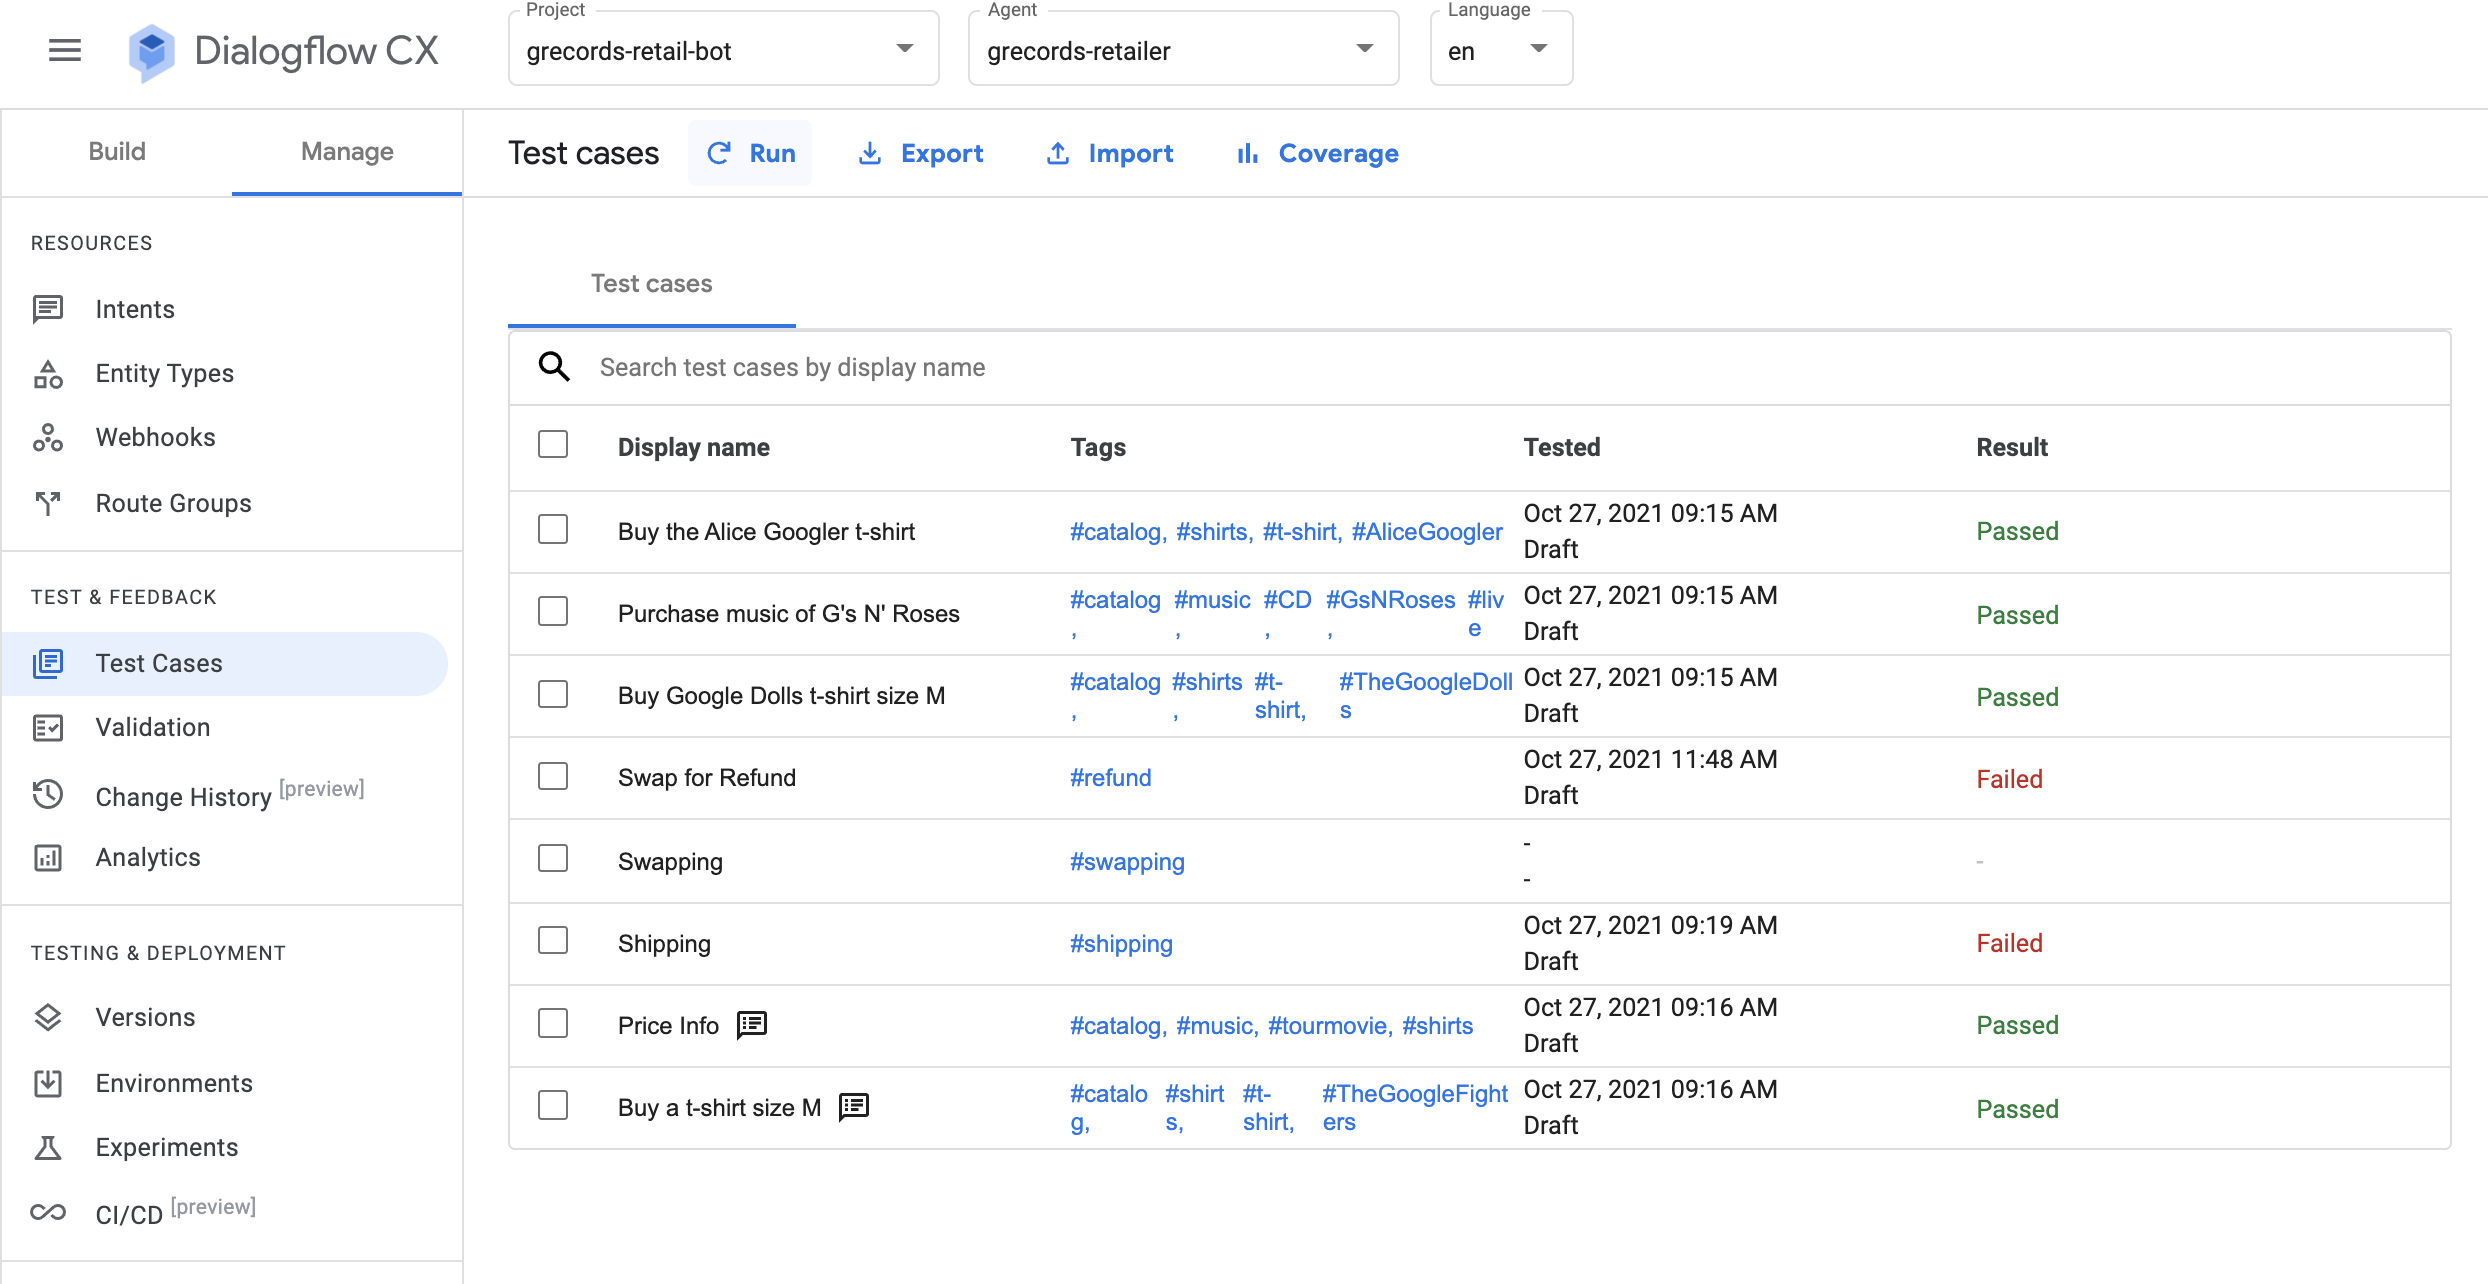
测试预录的测试用例
- 在左侧的 Dialogflow 主菜单中,依次选择管理 > 测试用例。
- 选择所有测试用例,然后按表格上方的运行按钮。
Dialogflow CX 会针对保存为“黄金测试用例”的录制内容运行所有选定的测试用例;如果结果与您保存的结果相同,则表示测试通过。- 如果流程中出现了一些变化,例如网页配置不正确,或者意图将您引导至错误的网页,那么测试将会失败。
- 在模拟器中,提出以下问题:
How long will shipping take? - 记下结果,并将测试用例另存为
Shipping,并添加标记:#shipping。 - 前往“管理”>“测试用例”面板,然后按网格右上角的运行按钮,以仅运行
Shipping测试用例。
此测试应该会通过。
- 返回到客户服务流程,选择起始页,然后点击路线标题。
系统会显示一个包含网格的界面,其中显示了所有路线。
- 移除
redirect.shipping.info route - 前往“管理”>“测试用例”面板,然后按网格右上角的运行按钮,以仅运行
Shipping测试用例。
此测试应该会失败。
- 您可以点击失败的测试,查看失败的详细信息。
在这种情况下,测试失败并显示以下错误消息:
Page: Page mismatch:
Expected: Shipping
Actual: Start Page
这是因为相应网页已不再存在于流程中。我们预期会显示 Shipping 页面,但实际上我们始终停留在 Start 页面。(或者最终用户会收到回退消息。)
换句话说,这是一个漏报的请求,即假负例测试结果。测试失败。我们预期会显示配送页面,但实际情况是没有任何反应,或者显示了回退消息。
- 返回“客户服务”流程,然后将
redirect.shipping.info添加为意图路线,添加到开始页面。别忘了切换到配送页面,然后点击保存。 - 在模拟器中记录以下测试用例:
I want to swap my item,并将此测试用例另存为Swapping#swapping。 - 依次打开管理 > 意图 > redirect.refund.info,然后添加以下训练短语:
I want to swap this item for a refund
如果没有该训练短语,当用户要求更换商品以获得退款时,系统会触发 redirect.swapping.info intent,但我们不想提供有关更换商品的信息,而是想提供有关退款的信息。
- 在模拟器中创建以下黄金测试用例:
I want to swap this item for a refund,并将此测试用例另存为Swap for Refund#refund - 返回到管理 > 意向 > redirect.refund.info 意向,然后移除
I want to swap this item for a refund行。 - 返回到管理 > 测试用例,选择换货并退款测试用例,然后运行该测试用例。
您的最新测试失败,并显示以下错误消息:
If you would like to change your item for a different one, please return your unwanted item and place a new order. If your refund is accepted, we will refund the price you paid for your item back to your original payment method.`
Is there anything else I can help you with?
 Page: Page mismatch:
Expected: Refund
Actual: Swapping
换句话说,这是一个被误解的请求,即假正例测试结果。测试失败。我们预期的是退款页面,但换货页面变为活跃状态。
覆盖率
在 Dialogflow CX 中,测试覆盖率是一种用于描述在运行特定测试套件时虚拟客服的对话(页面和 intent)执行程度的指标。测试覆盖率(以百分比表示)较高的虚拟客服在测试期间执行的对话更多,这意味着与测试覆盖率较低的虚拟客服相比,它包含未检测到的 bug(例如未正确理解的请求)的可能性更低。
- 如需查看所有测试用例的测试覆盖率报告,请点击覆盖率。
- 点击转场效果标签页。
这样您就可以看到所有页面过渡的测试覆盖率。
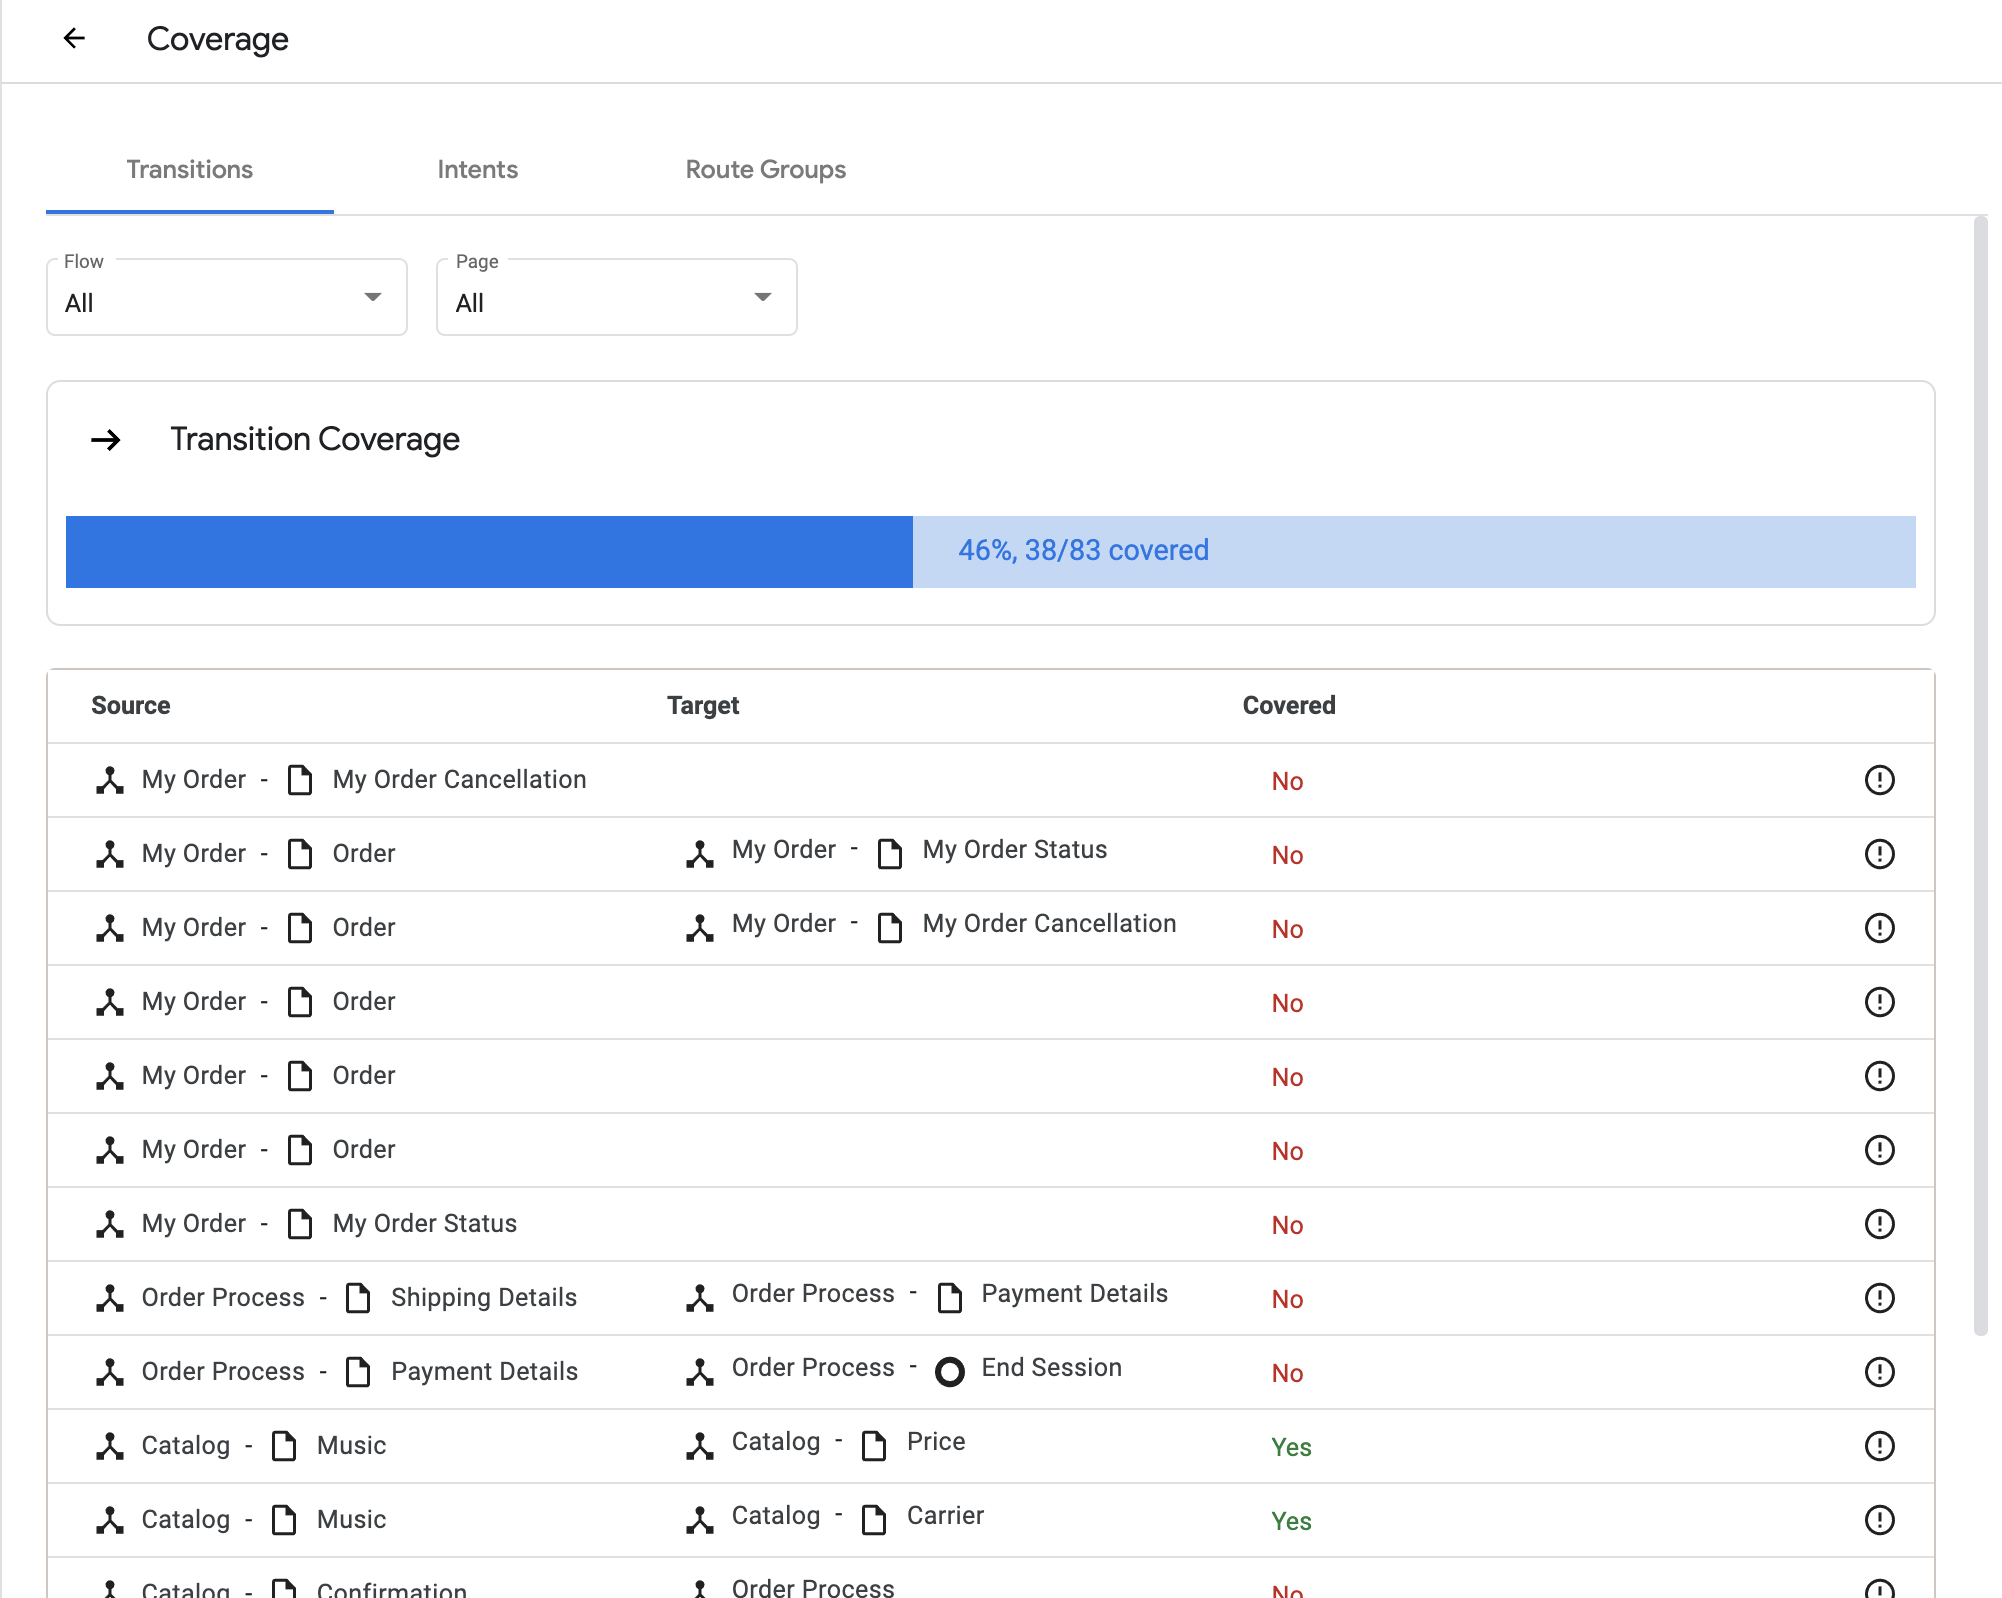
- 点击意图标签页。
这样您就可以看到所有 intent 的测试覆盖率。

恭喜,到目前为止,您已经构建并测试了一个完整的零售商聊天机器人真实示例!让我们前往下一个实验页面,阅读总结并找到一些实用参考资料!
10. 总结
Dialogflow CX 是一款对话式 AI 平台 (CAIP),用于创建聊天机器人或语音聊天机器人等虚拟客服。借助可视化机器人构建工具、可重复使用的意图以及处理多轮对话的能力,Dialogflow CX 可帮助您的团队加快创建企业级对话体验。
在此 Codelab 中,您学习了如何构建真实的零售虚拟客服。我们介绍了以下概念:
- 流
- 参数、自定义实体和系统实体
- 页面
- 状态处理程序,例如 intent 路由和条件路由
- 静态 fulfillment 消息和条件式响应
- 回退 intent
- 模拟器、测试用例和覆盖率
参考
如需详细了解 Dialogflow CX,请参阅以下博客和文档!