
۱. قبل از شروع
در این آزمایشگاه کد، یاد خواهید گرفت که چگونه با استفاده از Dialogflow CX ، یک پلتفرم هوش مصنوعی محاورهای (CAIP) برای ساخت رابطهای کاربری محاورهای، یک چتبات خردهفروشی بسازید. Dialogflow CX میتواند عاملهای مجازی مانند: چتباتها، رباتهای صوتی، درگاههای تلفن را پیادهسازی کند و از چندین کانال در بیش از 50 زبان مختلف پشتیبانی کند.
این آزمایشگاه کد به شما نحوه ساخت یک چتبات وبسایت برای یک فروشگاه خردهفروشی را راهنمایی میکند. کسبوکار فرضی که ما در حال ساخت چتبات برای آن هستیم، G-Records نام دارد. G-Records یک ناشر موسیقی راک مستقر در کالیفرنیا است. این ناشر با ۴ گروه راک قرارداد دارد: آلیس گوگلر ، جی ان روزز ، گو فایترز و گوگل دالز . G-Records کالاهای گروهها را به همه طرفداران راک میفروشد.
در پایان این آزمایشگاه کدنویسی، میتوانید از چتبات برای سفارش تیشرت یا موسیقی استفاده کنید یا در مورد سفارش خود سوال بپرسید.
آنچه یاد خواهید گرفت
شما با انجام این کار، مزایای Dialogflow CX را در مقایسه با Dialogflow ES خواهید آموخت! این شامل مفاهیم زیر است:
- نحوه ایجاد یک عامل مجازی Dialogflow CX در Google Cloud
- آموزش ایجاد جریانها
- آموزش ایجاد موجودیت ها
- آموزش ایجاد intent ها
- یادگیری نحوه ایجاد صفحات و صفحات انتقال با استفاده از کنترلکنندههای حالت
- یاد بگیرید چگونه صفحات را با مسیرهای هدف منتقل کنید
- یاد بگیرید چگونه صفحات را با پارامترها و مسیرهای شرطی انتقال دهید
- یادگیری نحوه برگرداندن پاسخهای شرطی با توابع سیستمی
- آموزش ایجاد پیامهای جایگزین
- آموزش استفاده از شبیه ساز
- یادگیری نحوه ایجاد موارد آزمون و پوشش آزمون
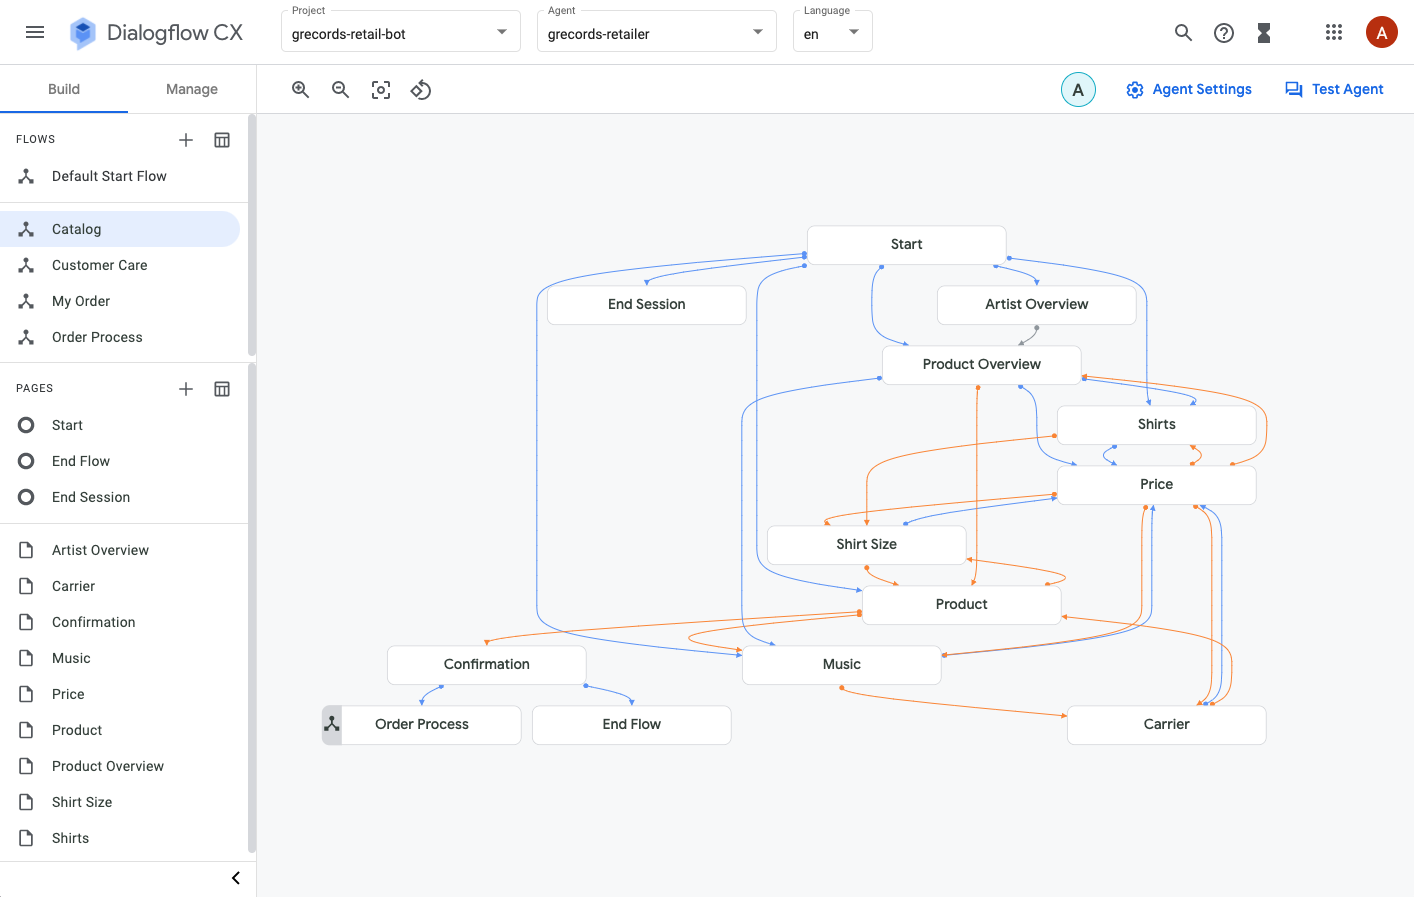
طرح نهایی عامل Dialogflow CX به شکل زیر خواهد بود:
آنچه نیاز دارید
- برای ایجاد یک عامل تجربه مشتری در Dialogflow، به یک آدرس Google Identity / Gmail نیاز دارید.
- دسترسی به فضای ابری گوگل.
۲. تنظیمات محیطی
ایجاد یک پروژه گوگل کلود
از آنجایی که Dialogflow CX در Google Cloud اجرا میشود، باید یک پروژه Google Cloud ایجاد کنید . یک پروژه تمام منابع Google Cloud شما را سازماندهی میکند. این پروژه شامل مجموعهای از همکاران، APIهای فعال (و سایر منابع)، ابزارهای نظارتی، اطلاعات صورتحساب و کنترلهای احراز هویت و دسترسی است.
هنگام ایجاد یک پروژه جدید، باید نام پروژه را وارد کنید و آن را به یک حساب و سازمان صورتحساب موجود پیوند دهید.
یک حساب صورتحساب برای تعریف اینکه چه کسی هزینه مجموعهای از منابع را پرداخت میکند، استفاده میشود و میتواند به یک یا چند پروژه مرتبط باشد. هزینه استفاده از پروژه به حساب صورتحساب مرتبط واریز میشود. در بیشتر موارد، هنگام ایجاد یک پروژه، صورتحساب را پیکربندی میکنید. برای اطلاعات بیشتر، به مستندات صورتحساب مراجعه کنید. مطمئن شوید که صورتحساب برای پروژه ابری شما فعال است.

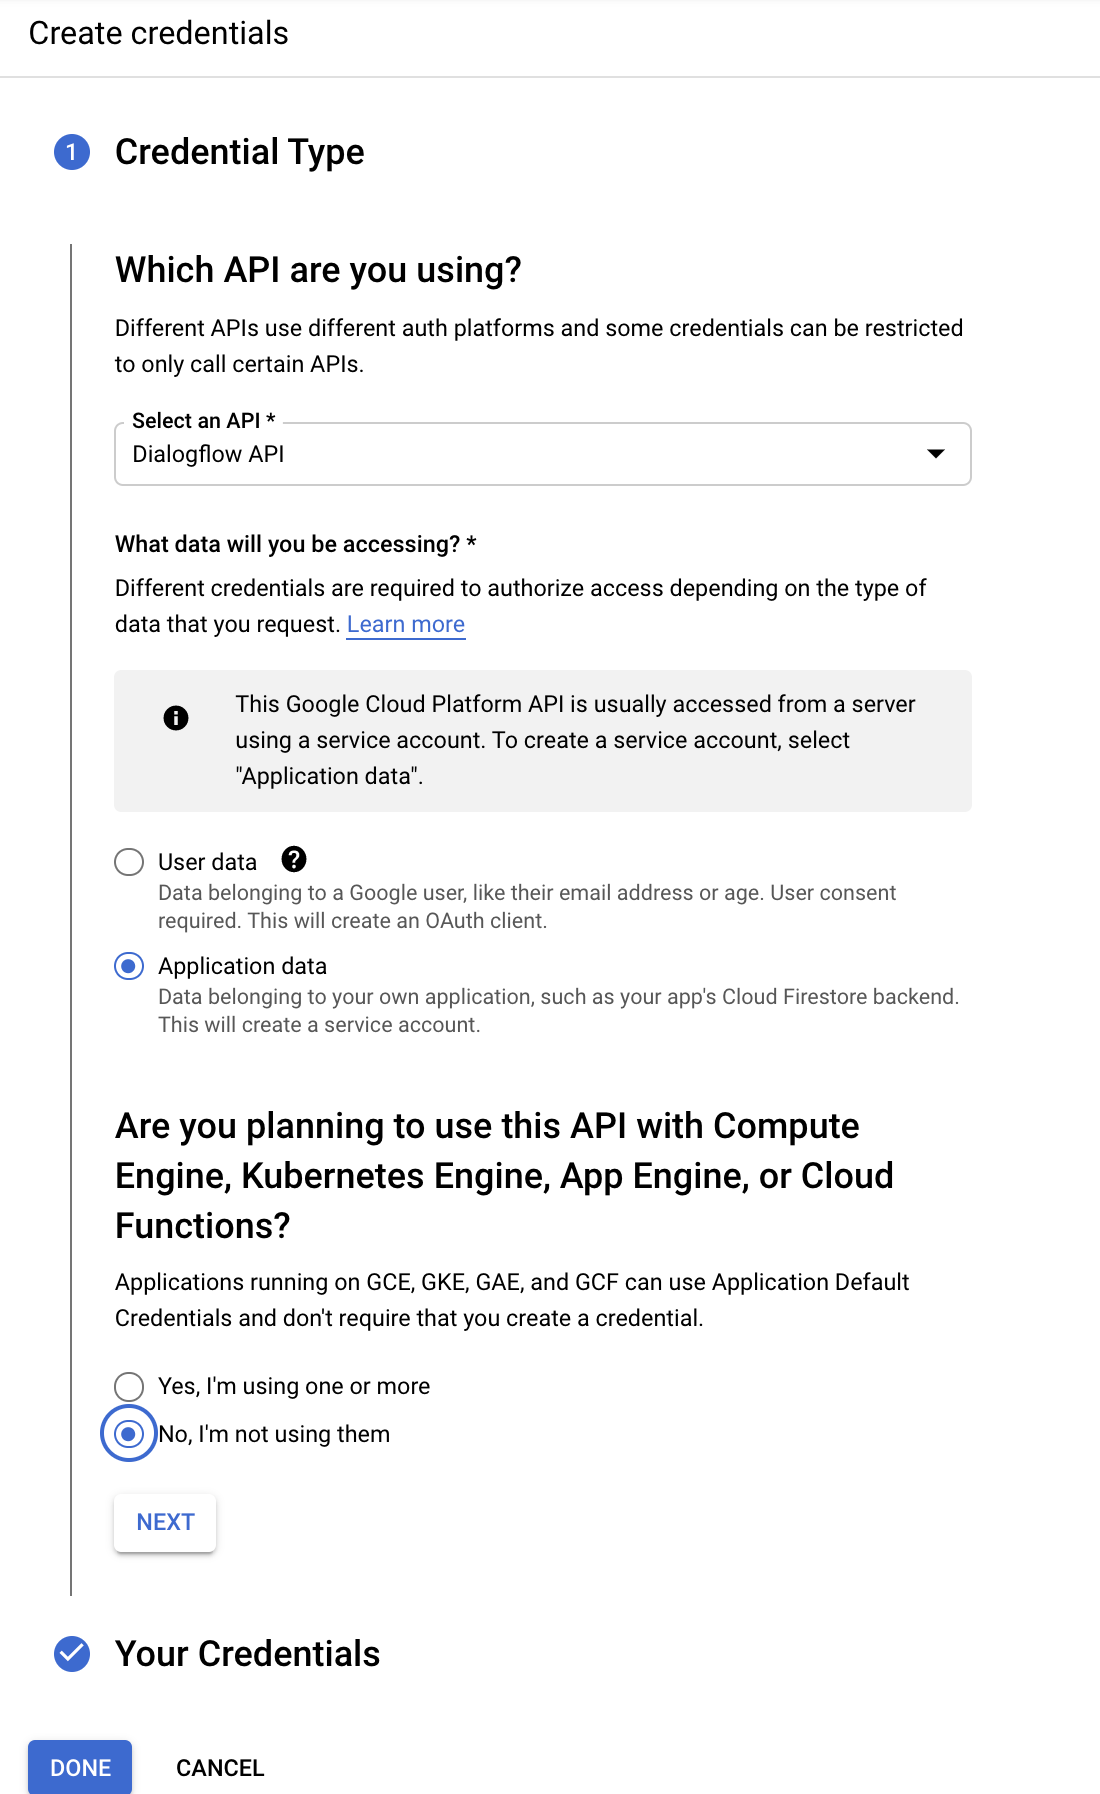
فعال کردن API دیالوگ فلو
برای استفاده از Dialogflow، باید API مربوط به Dialogflow را برای پروژه خود فعال کنید.
- پروژهای را که میخواهید API را برای آن فعال کنید، انتخاب کنید و روی ادامه کلیک کنید.
- منوی APIها و خدمات را ببندید و روی ایجاد اعتبارنامهها کلیک کنید.
- روی دادههای برنامه کلیک کنید
- بگو نه، من از آنها استفاده نمیکنم چون تو فعلاً از Kubernetes Engine، App Engine یا Cloud Functions استفاده نمیکنی.
- کلیک کنید انجام شد
یک عامل جدید Dialogflow CX ایجاد کنید
برای ایجاد یک عامل جدید Dialogflow CX، ابتدا کنسول Dialogflow CX را باز کنید:
- پروژه Google Cloud که قبلاً ایجاد شده است را انتخاب کنید.
- روی ایجاد عامل کلیک کنید.
فرم مربوط به تنظیمات اولیه اپراتور را تکمیل کنید:
- شما میتوانید هر نام نمایشی را انتخاب کنید.
- به عنوان مکان انتخاب کنید: us-central1
- منطقه زمانی دلخواه خود را انتخاب کنید.
- انتخاب زبان انگلیسی به عنوان زبان پیشفرض
روی ایجاد کلیک کنید.

بسیار خب، همه چیز آماده است. بالاخره میتوانیم مدلسازی عامل مجازی خود را شروع کنیم.
۳. جریانها
گفتگوهای پیچیده اغلب شامل چندین موضوع مکالمه هستند. در مورد ربات گفتگویی که ما برای G-Records میسازیم، برای فروش کالاهای گروه موسیقی، گفتگوهایی در مورد کاتالوگ محصولات، پرداخت، وضعیت سفارش و سوالات مربوط به خدمات مشتری خواهیم داشت. میتوانیم این موضوعات مکالمه را به جریانهایی تقسیم کنیم.

جریانها به تیمها اجازه میدهند تا روی مسیرهای مکالمهی فردی کار کنند. یک روش خوب، سادهسازی جریان است، به طوری که به راحتی روی صفحه نمایش جا شود و ماژولارتر باشد.
جریانها (Flows) مفهوم جدیدی در Dialogflow CX هستند. Dialogflow Essentials مفهوم Mega Agents را دارد که به نوعی شبیه Flows هستند. با این حال، شما از Flows خیلی بیشتر استفاده خواهید کرد.
بعداً در این تمرین، از کنترلکنندههای حالت استفاده خواهیم کرد که میتوانند یک جریان را پایان دهند (بنابراین به جریان بعدی یا قبلی پرش میکند)، یا میتوانید کل جلسه عامل را پایان دهید.
بیایید برویم و چند جریان ایجاد کنیم.
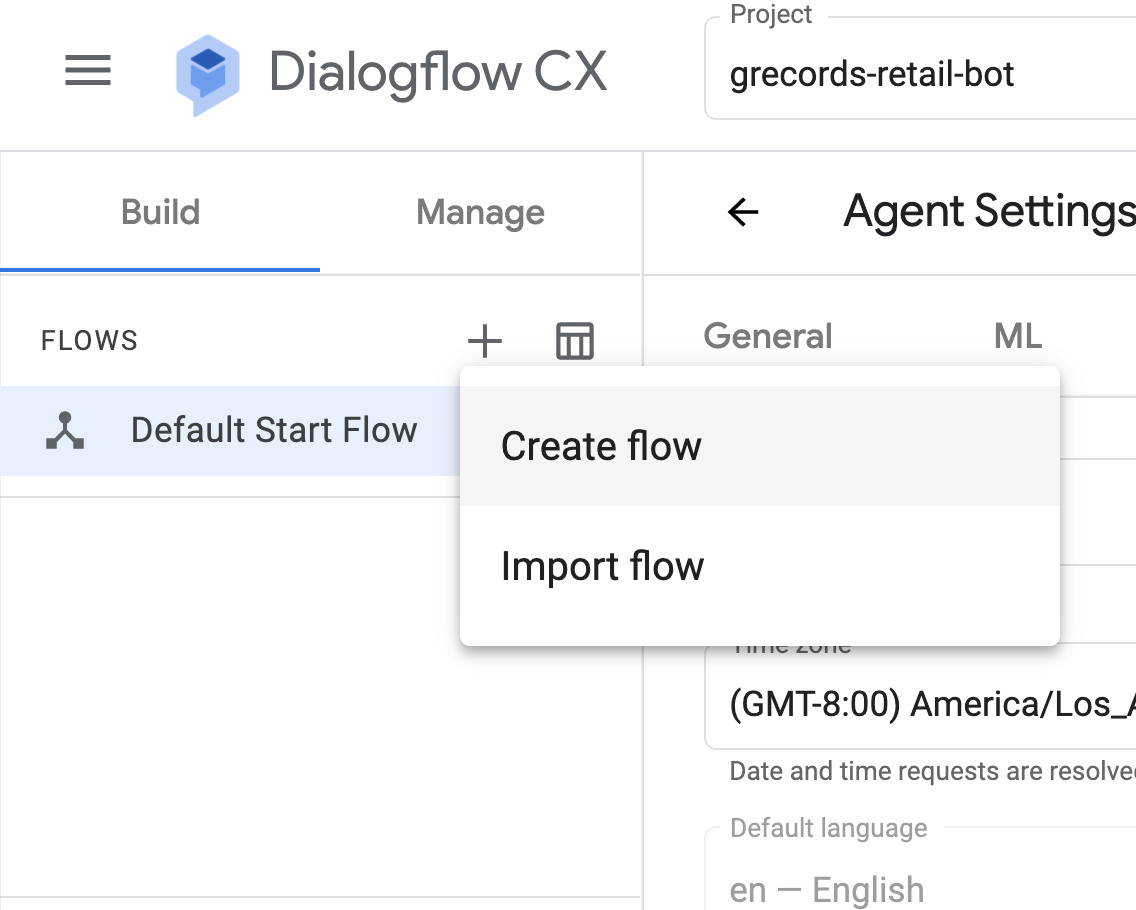
ایجاد جریانها
- در Dialogflow CX ، روی آیکون + > ایجاد جریان کلیک کنید.
- نام را مشخص کنید:
Catalogو اینتر را بزنید.
اولین کاتالوگ جریان شما ایجاد شده است. اکنون جریانهای دیگر را ایجاد کنید:
-
Order Process -
My Order -
Customer Care

بعداً در این تمرین، کنترلکنندههای وضعیت صفحه را تنظیم خواهیم کرد، این کار تضمین میکند که در نهایت تجسم به این شکل خواهد بود:

شبیهساز
در سمت راست کنسول Dialogflow CX میتوانید عامل مجازی را با شبیهساز داخلی آزمایش کنید. میتوانید مکالمه را از ابتدای مکالمه یا از یک جریان خاص آزمایش کنید.
- روی دکمه Test Agent ، در سمت راست بالای صفحه کلیک کنید.
- در قسمت گفتگو با نماینده بنویسید:
Helloنماینده مجازی با یک متن خوشامدگویی پیشفرض پاسخ خواهد داد: با درود! چگونه میتوانم کمک کنم؟

بیایید این متن خوشامدگویی پیشفرض را تغییر دهیم.
جریان شروع پیشفرض
بیایید با ایجاد یک Intent Route شروع کنیم که به محض استقبال از عامل مجازی فعال میشود.
- در نوار کناری سمت چپ Build > Flows ، روی Default Start Flow کلیک کنید و گره Start tree را انتخاب کنید.
این کار صفحه شروع را باز میکند. به طور خودکار صفحه شروع را در بخش نوار کناری Build > Pages انتخاب میکند.
- در منوی Start > Routes روی Default Welcome Intent کلیک کنید.
یک هدف، قصد کاربر نهایی را برای یک نوبت مکالمه دستهبندی میکند. در Dialogflow CX، اهداف میتوانند بخشی از یک کنترلکننده وضعیت برای مسیریابی صفحه فعال بعدی یا انجام کار باشند.
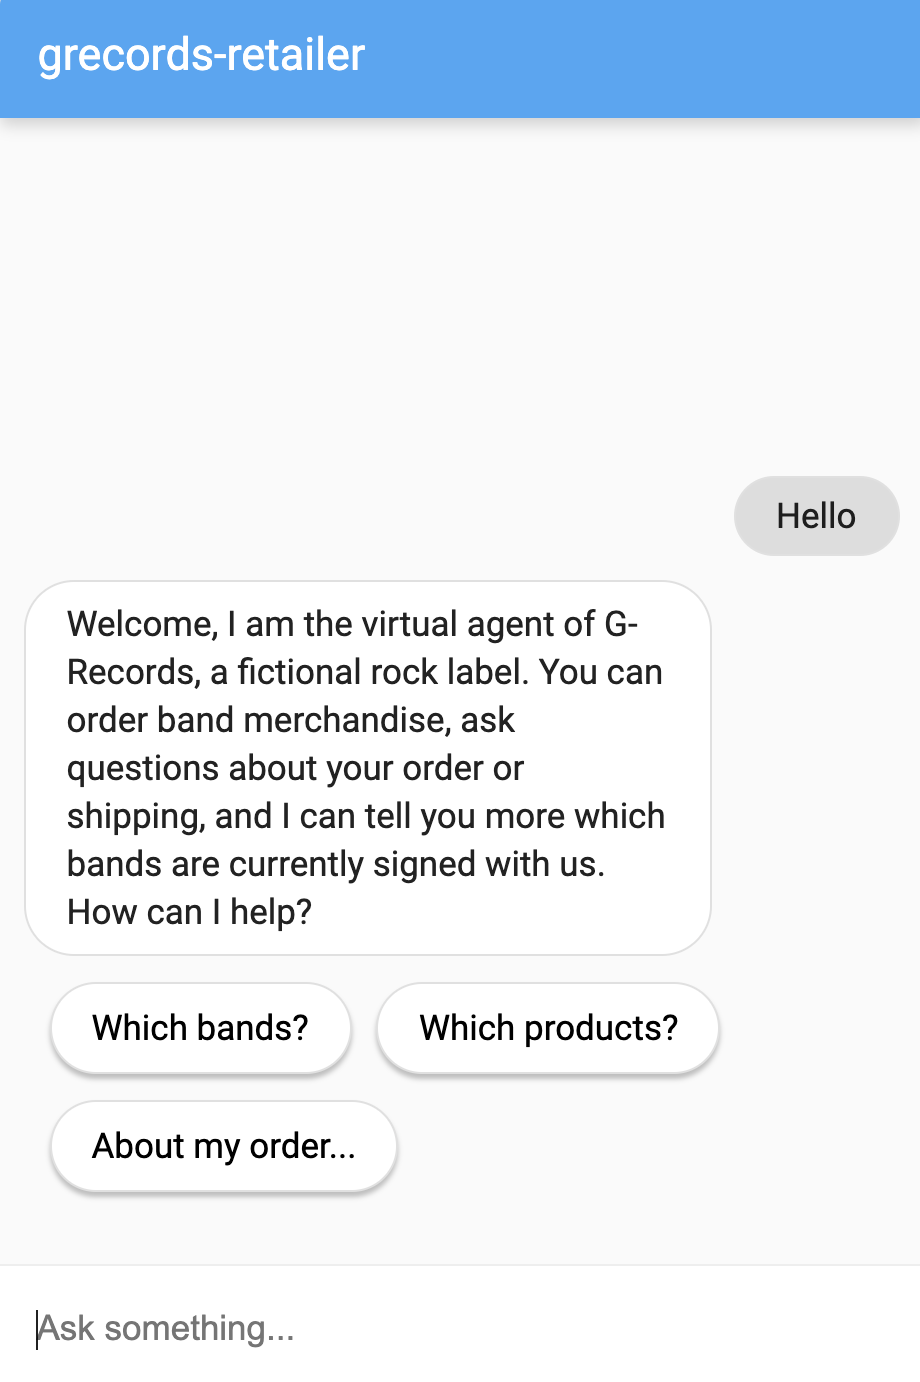
- تمام ورودیهای Agent says را حذف کنید و این متن جدید را اضافه کنید:
Welcome, I am the virtual agent of G-Records, a fictional rock label. You can order artists merchandise, ask questions about your order or shipping, and I can tell you more which artists are currently signed with us. How can I help?
برای سادهسازی مکالمه، به چند دکمه پاسخ سریع/تراشه پیشنهاد نیز نیاز خواهیم داشت.
- روی گزینهی Add dialog > Custom payload کلیک کنید و از قطعه کد زیر استفاده کنید.
- از قطعه کد زیر به عنوان یک payload سفارشی استفاده کنید و روی ذخیره کلیک کنید.
برای مطالعه بیشتر در مورد بارهای سفارشی، به مستندات مراجعه کنید.
{
    "richContent": [
      [
        {
          "type": "chips",
          "options": [
            {
              "text": "Which artists?"
            },
            {
              "text": "Which products?"
            },
            {
              "text": "About my order..."
            }
          ]
        }
      ]
    ]
  }

- ادامه دهید و هدف خوشامدگویی را در شبیهساز آزمایش کنید.
احتمالاً از خود میپرسید که چرا نمیتوانید هیچ محتوای غنیای را ببینید. دلیلش این است که محتوای غنی مانند تراشههای پیشنهادی به یکپارچهسازی وابسته هستند. مراحل زیر به یک حساب صورتحساب نیاز دارند، اما اگر حساب ندارید میتوانید از آنها صرف نظر کنید.
- در نوار کناری سمت چپ، روی مدیریت > ادغامها کلیک کنید.
- پیامرسان Dialogflow را انتخاب کنید و روی Connect کلیک کنید.
- در پنجره باز شده، روی فعال کردن کلیک کنید.
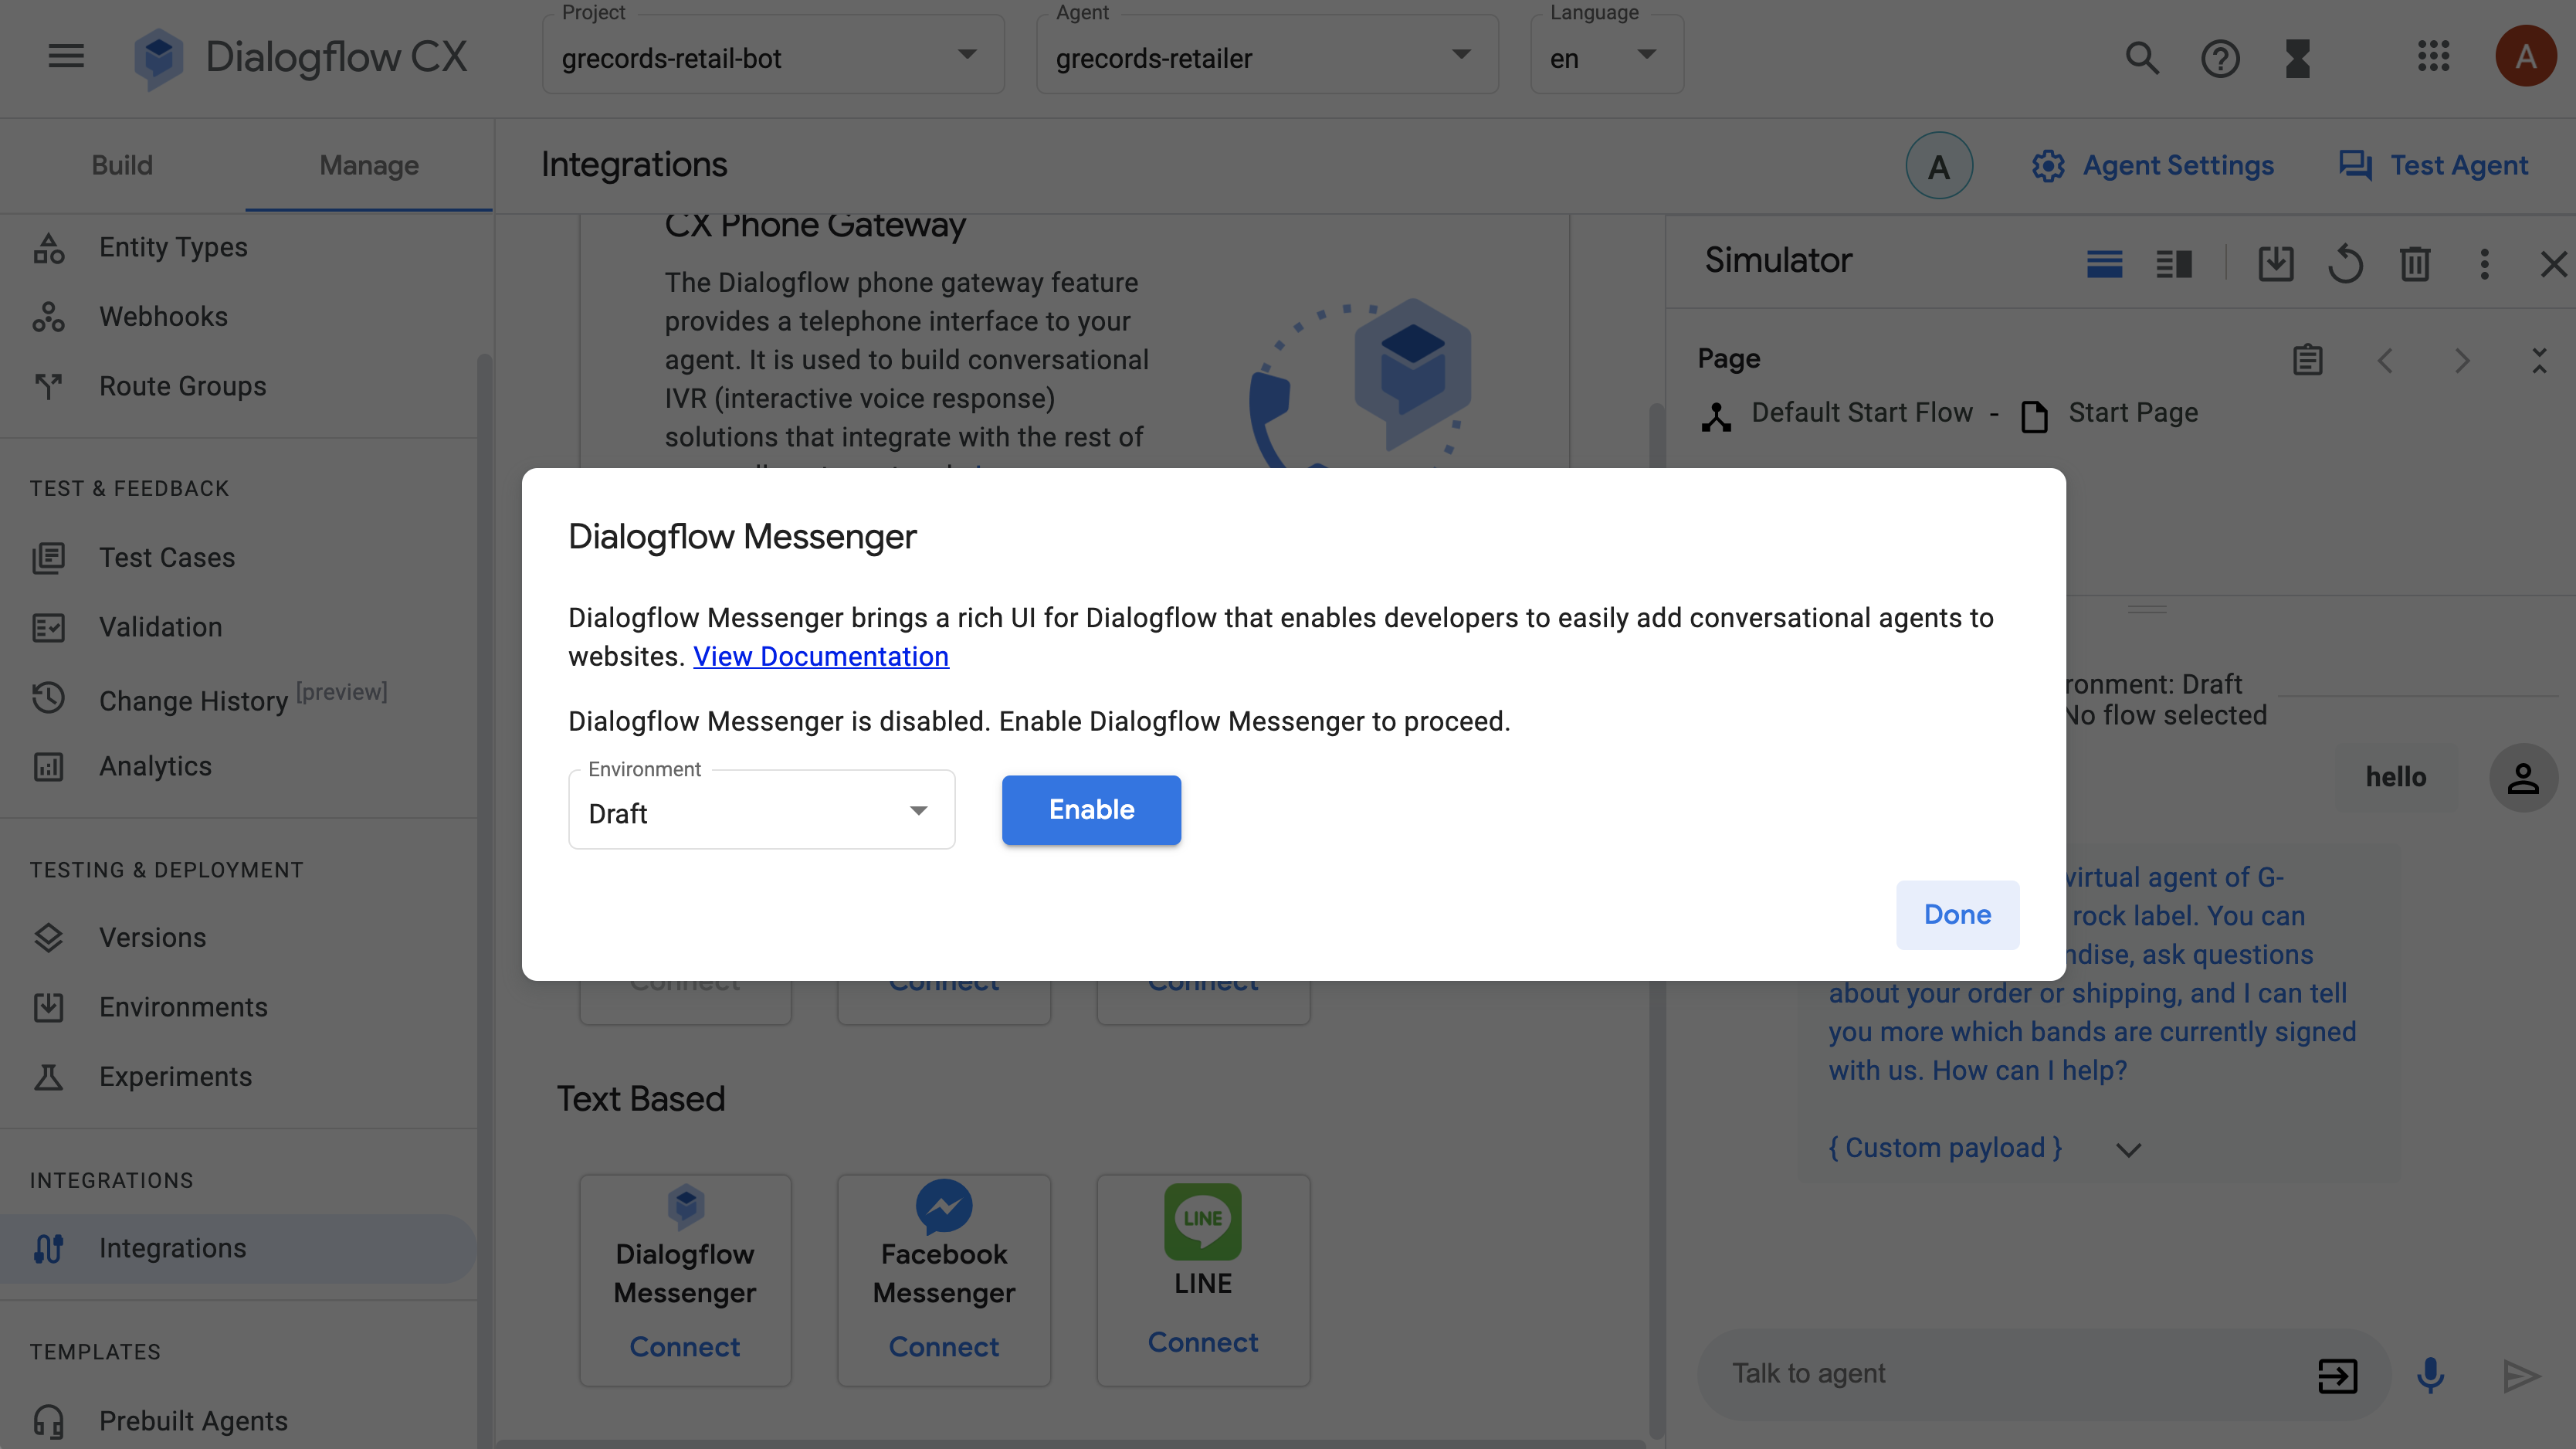
یک پنجرهی بازشو دیگر نمایش داده خواهد شد، این بار با کد جاوا اسکریپت ادغام که میتوانید آن را در وبسایت خود جایگذاری کنید تا کامپوننت پیامرسان Dialogflow را در وبسایت خود ادغام کنید. از آنجایی که ما هنوز وبسایتی نداریم، عامل مجازی را مستقیماً در ابزار آزمایش خواهیم کرد.

- روی لینک «اکنون امتحان کنید» کلیک کنید.
- برای باز کردن پنجره چت، روی آیکون ربات چت در پایین سمت راست کلیک کنید. برای شروع مکالمه،
Helloرا بنویسید.

فعلاً، وقتی روی تراشههای پیشنهاد کلیک میکنید، عامل مجازی منظور شما را نمیفهمد. دلیلش این است که عامل مجازی ما هنوز بین حالتها جابجا نمیشود. میتوانیم این کار را در Dialogflow CX با صفحات انجام دهیم. بیایید تمرین را ادامه دهیم، ابتدا چند موجودیت و هدف ایجاد خواهیم کرد.
۴. انواع موجودیت
انواع موجودیت برای کنترل نحوه استخراج دادهها از ورودی کاربر نهایی استفاده میشوند. انواع موجودیت Dialogflow CX بسیار شبیه به انواع موجودیت Dialogflow ES هستند. Dialogflow موجودیتهای سیستمی از پیش تعریف شدهای را ارائه میدهد که میتوانند با بسیاری از انواع دادههای رایج مطابقت داشته باشند. به عنوان مثال، موجودیتهای سیستمی برای تطبیق تاریخها، زمانها، رنگها، آدرسهای ایمیل و غیره وجود دارد. همچنین میتوانید موجودیتهای سفارشی خود را برای تطبیق دادههای سفارشی ایجاد کنید.
بیایید قبل از اینکه بتوانیم صفحات را به صورت جریانی طراحی کنیم، با آمادهسازی تمام موجودیتهای سفارشی شروع کنیم. موجودیتهای زیر را ایجاد خواهیم کرد:

ایجاد موجودیتها
بیایید یک موجودیت Artist ایجاد کنیم.
- روی مدیریت > انواع موجودیت کلیک کنید
- کلیک + ایجاد
- نام نمایشی:
Artist - نهادها:
-
The Google Dolls(با مترادف:Google Dolls) -
The Goo Fighters(با مترادف:Goo Fighters) -
G's N' Roses(با مترادف:Gs and Roses) -
Alice Googler - روی گزینههای پیشرفته کلیک کنید و گزینه تطبیق فازی را تیک بزنید. (اگر نام گروه را اشتباه بنویسید، ممکن است همچنان آن را با موجودیت درست مطابقت دهد.)
- در گزینههای پیشرفته، گزینهی ویرایش در گزارش را نیز بررسی کنید. (اگر نام گروه را اشتباه بنویسید، نام در گزارش اصلاح خواهد شد.)
- روی ذخیره کلیک کنید
ما همچنین به یک موجودیت برای کالای Merch نیاز خواهیم داشت:
- روی مدیریت > انواع موجودیت کلیک کنید
- کلیک + ایجاد
- نام نمایشی:
Merch - نهادها:
-
T-shirt -
Longsleeve(با مترادف:Longsleeve shirt) -
Tour Movie -
Digital Album(با مترادف:MP3 Album،MP3) -
CD(با مترادفهایDisc،Physical CD)
- روی ذخیره کلیک کنید
ما همچنین به یک موجودیت برای آلبوم نیاز خواهیم داشت:
- روی مدیریت > انواع موجودیت کلیک کنید
- کلیک + ایجاد
- نام نمایشی:
Album - نهادها:
-
Live -
Greatest Hits(با مترادف:Hits)
- روی ذخیره کلیک کنید
ما همچنین به یک موجودیت برای اندازه لباسها نیاز خواهیم داشت:
- روی مدیریت > انواع موجودیت کلیک کنید
- کلیک + ایجاد
- نام نمایشی:
ShirtSize - نهادها:
-
XS(با مترادف:Extra Small) -
S(با مترادف:Small) -
M(با مترادف:Medium) -
L(با مترادف:Large) -
XL(با مترادف:Extra Large) -
2XL(با مترادف:Extra Extra Large) -
3XL
- روی ذخیره کلیک کنید
و یک موجودیت برای شماره سفارشها ، که معمولاً ۴ عدد و ۳ حرف هستند. (مانند ABCD123)
- روی مدیریت > انواع موجودیت کلیک کنید
- کلیک + ایجاد
- نام نمایشی:
OrderNumber - موجودیتهای Regexp
- نهاد: [AZ]{4}[0-9]{3}
- روی ذخیره کلیک کنید
پیکربندی entity شما باید مشابه موارد زیر باشد:
@هنرمند: 
@کالا: 
@آلبوم: 
@سایز پیراهن: 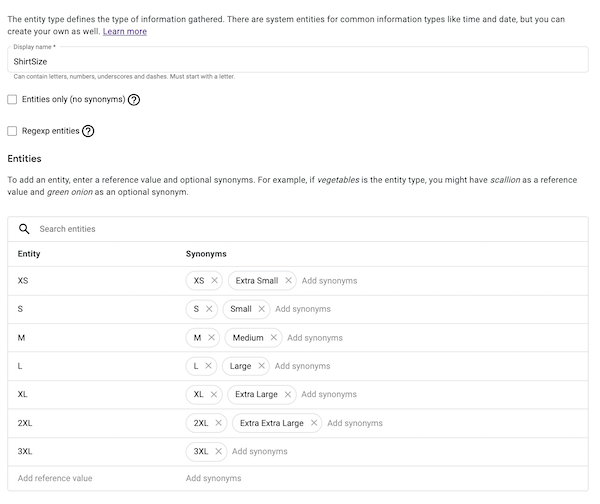
@شماره سفارش: 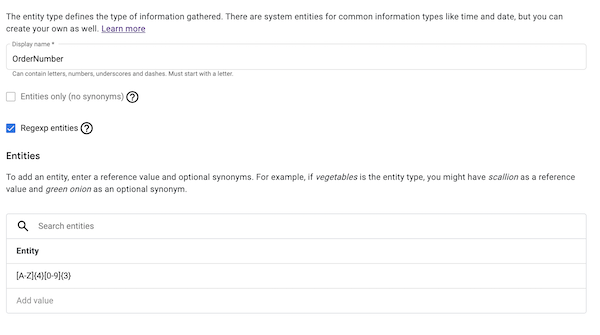
وقتی موجودیتهای سفارشی آماده شدند، میتوانیم intentها را آماده کنیم. بیایید تمرین را ادامه دهیم.
۵. اهداف
یک Intent، قصد کاربر نهایی را برای یک نوبت مکالمه دستهبندی میکند. این موارد در Dialogflow CX به طرز چشمگیری ساده شدهاند و دیگر یک بلوک سازنده برای کنترل مکالمه نیستند. Dialogflow CX فقط از intentها برای مطابقت با آنچه کاربران میگویند استفاده میکند. در Dialogflow ES، شما مجبور بودید همه چیز را به یک intent (پارامترها، رویدادها، تحقق و غیره) مرتبط کنید. intentها در Dialogflow CX فقط شامل عبارات آموزشی هستند و بنابراین قابل استفاده مجدد هستند. دیگر مکالمه را کنترل نمیکند. بنابراین فرآیند ایجاد intentها ساده خواهد بود:
عبارات آموزشی در intentها میتوانند از Entityها برای استخراج ورودی «متغیر» استفاده کنند، به همین دلیل است که ایجاد انواع entity از قبل، کاری که در صفحه قبل مراحل آزمایش انجام دادیم، یک تمرین خوب است.
ایجاد Intentها
بیایید قبل از اینکه بتوانیم صفحات را به صورت جریانی طراحی کنیم، با آمادهسازی تمام اهداف شروع کنیم.
- روی مدیریت > اهداف کلیک کنید.
- روی + ایجاد کلیک کنید
از جزئیات زیر استفاده کنید:
- نام نمایشی
redirect.artists.overview -
Artists overview: The bands supported by the label

به پایین بروید و عبارات آموزشی زیر را ایجاد کنید:
-
Which bands are signed? -
Which bands -
Which artists -
Which artists are part of the record label -
Who is part of the label -
From which bands can I buy merchandise -
Band merchandise -
Which music do you have? -
I would like to know who are signed to the label -
Who are supported by the label -
From who can I buy shirts -
What music can I order -
Can I get an overview of all the artists

- روی ذخیره کلیک کنید.
- حالا بیایید ادامه دهیم و تمام اهداف دیگر را ایجاد کنیم. از تخیل خود برای ایجاد عبارات آموزشی بیشتر استفاده کنید. بهترین روش این است که حداقل 10 عبارت آموزشی برای هر هدف داشته باشید تا روشهای مختلفی را که یک کاربر ممکن است آن هدف را فعال کند، پوشش دهید. برای هدف این آزمایش، داشتن عبارات آموزشی کمتر نیز باید خوب باشد.
چند نکته برای جستجو:
- توجه داشته باشید که همزمان با وارد کردن عبارت آموزشی، Dialogflow CX به طور خودکار موجودیتهای شما را حاشیهنویسی میکند. اگر این کار را نکند، ممکن است لازم باشد موجودیت خود را بهروزرسانی کنید (با اضافه کردن یک مترادف) یا خودتان به صورت دستی عبارت آموزشی را حاشیهنویسی کنید.
- عبارات آموزشی کوتاهتر: سیستم NLU در Dialogflow میتواند با عبارات آموزشی کوتاهتر نیز کار کند و ما در اینجا چند مثال ارائه دادهایم.
- آموزش بیش از حد: عبارات آموزشی زیاد برای یک هدف ممکن است باعث آموزش بیش از حد و نتیجه نامطلوب شود. بهترین روش استفاده از آزمایشهای تکراری و افزایشی و اضافه کردن عبارات آموزشی در مواردی است که هدفی با آن مطابقت ندارد.
نام نمایشی | عبارات آموزشی |
| |
| |
| |
| |
| |
| |
| |
| |
| |
| |
| |
| |
| |
| |
| |
| |
| |
| |
| |
| |
اکنون که عناصر قابل استفاده مجدد ما (جریانها، موجودیتها و اهداف) آماده شدهاند، میتوانیم با ایجاد صفحات و کنترلکنندههای حالت، آنها را کنار هم قرار دهیم.
۶. صفحات و کنترلکنندههای وضعیت
یک مکالمه (یک جلسه) در Dialogflow CX را میتوان به عنوان یک ماشین حالت متناهی توصیف و تجسم کرد. به عنوان مثال، یک دستگاه فروش خودکار را در نظر بگیرید، میتوان آن را به عنوان یک ماشین حالت متناهی مدلسازی کرد. این دستگاه حالتهای زیر را دارد: منتظر سکه، انتخاب آبنبات، دادن آبنبات و با دریافت مجموعهای از ورودیها، بین این حالتها حرکت میکند. به عنوان مثال، وارد کردن یک سکه، دستگاه فروش خودکار را از حالت منتظر سکه به حالت انتخاب آبنبات منتقل میکند. صفحات نحوه مدلسازی این حالتها برای یک عامل مجازی Dialogflow CX هستند.
همانطور که یک کاربر نهایی در یک مکالمه با Dialogflow CX تعامل میکند، مکالمه از صفحهای به صفحه دیگر منتقل میشود، بنابراین در هر لحظه، دقیقاً یک صفحه، صفحه فعلی است، صفحه فعلی فعال در نظر گرفته میشود و همچنین جریان مرتبط با آن صفحه نیز فعال در نظر گرفته میشود.
برای هر جریان ، صفحات زیادی تعریف میکنید که صفحات ترکیبی شما میتوانند یک مکالمه کامل در مورد موضوع (موضوعاتی) که جریان برای آن طراحی شده است را مدیریت کنند. هر جریان یک صفحه شروع ویژه دارد. وقتی یک جریان برای اولین بار فعال میشود، صفحه شروع به صفحه فعلی تبدیل میشود. برای هر نوبت مکالمه، صفحه فعلی یا ثابت میماند یا به صفحه دیگری منتقل میشود. این مفهوم به شما امکان میدهد تا عاملهای بزرگتری با صفحات زیاد و نوبتهای مکالمه متعدد ایجاد کنید.
صفحات شامل اجراها (دیالوگهای ورودی استاتیک و/یا وبهوکها)، پارامترها و کنترلکنندههای حالت هستند . کنترل مکالمه از طریق کنترلکنندههای حالت انجام میشود که به شما امکان میدهد مسیرهای انتقال مختلفی را برای انتقال به صفحه CX دیگر Dialogflow ایجاد کنید، از جمله مشروط کردن آن (برای شاخهبندی مکالمات).
وضعیت یک مکالمه با مدیریت انتقال بین صفحات با سه نوع مسیر مختلف کنترل میشود:
- مسیرهای هدف : چه زمانی یک هدف باید تطبیق داده شود (مثلاً تغییر صفحه بر اساس آنچه کاربر نهایی میگوید). (خطوط آبی در نمودار بصری.)
- مسیرهای شرط : زمانی که یک شرط باید بررسی شود (مثلاً تغییر صفحه بر اساس پارامترهای خاص ذخیره شده در جلسه) (خطوط نارنجی در نمودار بصری.)
- کنترلکنندههای رویداد : زمانی که یک رویداد پشتیبان خاص باید مدیریت شود (مثلاً مدیریت ورودی بدون تطابق، به منظور رفع ابهام کاربر نهایی به مسیر intent یا condition) (خطوط سبز در نمودار بصری.)
گفتارهای مکالمه (یعنی محتوا یا پاسخ به کاربر) با تحقق تعریف میشوند که میتواند ایستا یا پویا باشد:
- اجرای ایستا : زمانی که یک پاسخ اجرای ایستا ارائه میشود
- تکمیل پویا : زمانی که یک وبهوک تکمیل برای پاسخهای پویا فراخوانی میشود.
برای ربات خردهفروشی خود، چند مسیر هدف ایجاد میکنیم و چند پاسخ استاتیک برای تکمیل ورود ارائه میدهیم که به محض فعال شدن صفحه به کاربر ارائه میشوند. بعداً، پارامترهایی با مسیرهای شرطی ایجاد خواهیم کرد تا اطلاعات مورد نیاز شما برای ثبت سفارش کالا را جمعآوری کنیم.
مسیرهای هدف صفحه
ایجاد صفحات در جریان شروع پیشفرض
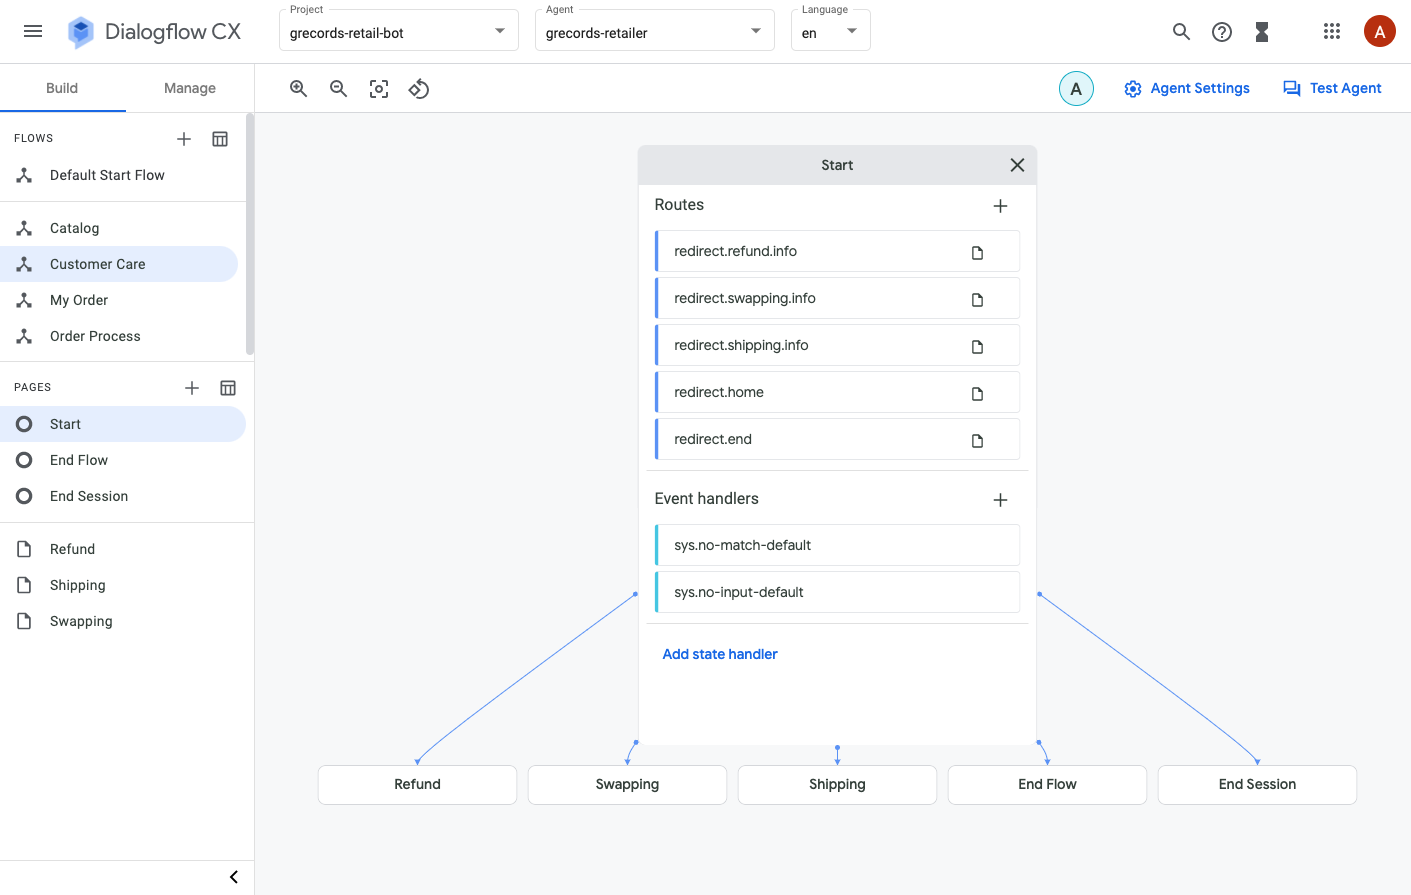
در اینجا نمودار جریان شروع پیشفرض آمده است:
بیایید با هم روی این کلیک کنیم:
- روی ساخت > جریان شروع پیشفرض کلیک کنید
- روی صفحه شروع کلیک کنید
- روی آیکون + کنار مسیرها کلیک کنید
- اضافه کردن redirect.artists.overview
- به پایین اسکرول کنید تا به بخش Transition برسید و سپس به بخش Catalog بروید.
- ذخیره را بزنید
- مراحل بالا را برای
redirect.product.overviewو ۱۱ ردیف دیگر از این جدول تکرار کنید:
صفحه (در جریان) | مسیرها > قصد | مسیرها > انتقال به |
شروع | | - |
شروع | | جریان: کاتالوگ |
شروع | | جریان: کاتالوگ |
شروع | | جریان: کاتالوگ |
شروع | | جریان: کاتالوگ |
شروع | | جریان: کاتالوگ |
شروع | | جریان: کاتالوگ |
شروع | | جریان: خدمات مشتری |
شروع | | جریان: خدمات مشتری |
شروع | | جریان: خدمات مشتری |
شروع | | جریان: سفارش من |
شروع | | جریان: سفارش من |
شروع | | جریان: سفارش من |
شروع | | صفحه: پایان جلسه |

جریان شروع پیشفرض مانند یک منوی گزینه هنگام تماس با مرکز تماس عمل میکند. با این حال، در این عامل مجازی، با زبان طبیعی آموزش داده میشود و عبارات آموزشی در intents قرار دارند. بنابراین تعامل توسط مکالمه هدایت میشود و نه توسط گزینههای DTMF و طبیعیتر و شبیهتر به انسان است.
ایجاد صفحات در جریان کاتالوگ
متن چت زیر مربوط به جریان کاتالوگ است:
> "Hi"
"Welcome, I am the virtual agent of G-Records, a fictional rock label.
You can order artists merchandise, ask questions about your order or shipping,
and I can tell you more which artists are currently signed with us. How can I help?"
> "Which bands are signed with this record label?"
"The following bands are signed with G-Records:
Alice Googler, G's N' Roses, The Goo Fighters and The Google Dolls.

From which of these artists would you like to order merchandise?"
> "Alice Googler"
"You want to rock with Alice Googler merchandise. Awesome!

We sell shirts, music or the tour movie.

Which merchandise item do you want?"
"(Suggestion chips: [Shirts] [Music] [Tour Movie])"
> "I would like to buy a Shirt"
"Do you want a longsleeve or a t-shirt?"
"(Suggestion chips: [T-shirt, Longsleeve, Price?])"
> "What's the price difference?"
"A t-shirt costs $25 and a longsleeve costs $30.

Do you want a longsleeve or a t-shirt?"
> "A t-shirt",
"What shirt size do you want?"
"(Suggestion chips: [XS, S, M, L, XL, 2XL, 3XL])"
> "M"
"A T-shirt of Alice Googler size: M costs $25. Shall I continue to order?"
وقتی موسیقی یا تور فیلم را انتخاب میکنید، دیالوگ متفاوت خواهد بود: برای موسیقی، دیالوگ به این شکل خواهد بود:
 > "Music"
"We have a Greatest Hits Album or the Live Album. Which one do you want?"
"(Suggestion chips: [Greatest Hits, Live, Price?])"
> "The Live Album"
"Do you want this album on CD or MP3?"
"(Suggestion chips: [CD, MP3])"
> "What's the price difference?"
"A CD costs $15. The digital album on MP3 costs $10.
Do you want this album on CD or MP3?"
> "Digital Album",
"The Digital Album: Alice Googler - Live costs $10. Shall I continue to order?"
برای فیلم تور، دیالوگ به این شکل خواهد بود:
 > "Tour Movie"
"The Tour Movie of G's N' Roses costs $25. Shall I continue to order?
در اینجا نمودار جریان تمام صفحات موجود در جریان کاتالوگ آمده است:

به پیچیدگی این جریان توجه کنید:
- میتوانم از سوال «کدام هنرمند» صرف نظر کنم و فوراً بپرسم «کدام کالاها موجود است» .
- از جریان شروع پیشفرض، میتوانم بپرسم: «میخواهم تیشرت عروسکهای گوگل را بخرم» یا «میخواهم چیزی بخرم». این یعنی نماینده مجازی سوالات تکمیلی میپرسد تا جای خالی این پارامترهای مورد نیاز را پر کند. این مستقیماً به صفحه محصول میرود.
- کادر محاورهای قیمت از صفحه قیمت میآید که دوباره استفاده خواهد شد.
- اگرچه دیالوگ فیلم تور سادهترین دیالوگ به نظر میرسد، اما در واقع کار خاصی با آن انجام خواهیم داد. ما از این بخش دیالوگ دوباره استفاده خواهیم کرد، بنابراین کاربران نهایی میتوانند در صورت نیاز به تخصص در تمام اطلاعات، آن را مستقیماً برای یکی از محصولات دیگر نیز وارد کنند:
 > "I want The Goo Fighters longsleeve size S."
"The longsleeve of The Goo Fighters size S costs $30. Shall I continue to order?"
بیایید ابتدا با اتصال صفحات شروع کنیم.
- روی ساخت > کاتالوگ کلیک کنید
- روی صفحه شروع کلیک کنید
- روی آیکون + کنار مسیرها کلیک کنید
- اضافه کردن redirect.artists.overview
- به پایین اسکرول کنید تا به بخش Transition برسید ، صفحه را انتخاب کنید و سپس این گزینهها را انتخاب کنید: + صفحه جدید
- از نام صفحه استفاده کنید:
Artist Overviewو روی ذخیره کلیک کنید
حالا بیایید بقیه جریان را تمام کنیم:
- مراحل قبلی را میتوان با صفحات، اهداف و تحققهای زیر تکرار کرد. این جدول را در اختیار بگیرید. صفحه ، صفحهای است که در جریان انتخاب خواهید کرد، مسیرها > انتقال به، جریان یا صفحه جدیدی است که ایجاد خواهید کرد و به آن انتقال خواهید یافت.
صفحه (در جریان) | مسیرها > قصد | مسیرها > انتقال به |
شروع کاتالوگ | | نمای کلی هنرمند |
شروع کاتالوگ | | محصول |
شروع کاتالوگ | | بررسی اجمالی محصول |
شروع کاتالوگ | | بررسی اجمالی محصول |
شروع کاتالوگ | | پیراهنها |
شروع کاتالوگ | | موسیقی |
شروع کاتالوگ | | پایان جلسه |
شروع کاتالوگ | | جریان نهایی |
نمای کلی هنرمند | | بررسی اجمالی محصول |
حالا بیایید ادامه دهیم و تکمیلهای استاتیک بیشتری اضافه کنیم.
- در صفحه کاتالوگ، روی صفحه «نمای کلی هنرمند» کلیک کنید.
- در بخش «انجام سفارش ورودی»، روی «ویرایش سفارش» کلیک کنید.
- از برآوردهسازیهای استاتیک زیر استفاده کنید ( به گفتهی نماینده ):
-
The following bands are signed with G-Records: Alice Googler, G's N' Roses, The Goo Fighters and The Google Dolls.
- روی ذخیره کلیک کنید
- در جریان کاتالوگ، روی صفحه نمای کلی محصول کلیک کنید.
- در بخش «انجام سفارش ورودی»، روی «ویرایش سفارش» کلیک کنید.
- از اجرای استاتیک زیر استفاده کنید ( عامل میگوید ):
-
We sell shirts, music or the tour movie.
- ذخیره را بزنید.
پارامترهای صفحه
پارامترها برای ثبت و ارجاع مقادیری که توسط کاربر نهایی در طول یک جلسه ارائه شدهاند، استفاده میشوند. هر پارامتر دارای یک نام و یک نوع موجودیت است. @Artist و @Merch حداقل پارامترهایی هستند که برای سفارش کالا باید جمعآوری کنیم. برای تیشرت یا لباس آستینبلند، شما همچنین باید @ShirtSize را جمعآوری کنید و در صورتی که میخواهید موسیقی سفارش دهید، به نامهای @Carrier و @Album نیز نیاز خواهید داشت.
این پارامترها باید به صورت الزامی علامتگذاری شوند. و زمانی که الزامی شد، باید دستورالعملهای سفارشی ارائه دهید تا کاربر نهایی شما را به خاطر بسپارد و پاسخهای صحیح را ارائه دهد تا این پارامترها جمعآوری شوند. چند مکانیسم در Dialogflow CX وجود دارد که میتواند در این زمینه به شما کمک کند.
برای مثال، میتوانید پیامهای سفارشی استاتیک برای انجام درخواستها را در بخش پارامتر ارائه دهید. اگر پارامتر مورد نیاز باشد، این انجامهای پارامتر نمایش داده میشوند. این پیامهای پاسخ به صف پاسخ اضافه میشوند. در طول نوبت یک عامل، میتوان (و گاهی اوقات مطلوب) چندین انجام را فراخوانی کرد که هر کدام ممکن است یک پیام پاسخ ایجاد کنند. Dialogflow این پاسخها را در یک صف پاسخ نگهداری میکند. برای مطالعه بیشتر در مورد چرخه حیات صفحه و ترتیب اضافه شدن این انجامها به صف پاسخ، مستندات صفحه Dialogflow CX را مطالعه کنید.
ایجاد پارامترها در صفحه نمای کلی هنرمند
بیایید برخی از پارامترهای صفحه را تعریف کنیم:
- در بخش کاتالوگ ، روی صفحه «نمای کلی هنرمند» کلیک کنید.
- روی + در بلوک پارامترها کلیک کنید. پارامتر هنرمند را اضافه کنید:
- نام نمایشی:
artist - نوع موجودیت:
@Artist - مورد نیاز: تیک بزنید
- ویرایش در لاگ: بررسی کنید
- حالا چند پیام سفارشی برای تکمیل پارامتر اضافه میکنیم. اگر پارامتر artist هنوز توسط عامل مجازی جمعآوری نشده باشد، کاربر نهایی پاسخ این عامل را که به صف پاسخها اضافه شده است، دریافت خواهد کرد:
From which of these artists would you like to order merchandise?
- یک گزینه گفتگوی دوم اضافه کنید که تراشههای پیشنهادی غنی ارائه میدهد. روی گزینه افزودن گفتگو کلیک کنید و از این کد (در JSON ) استفاده کنید:
{
  "richContent": [
    [
      {
        "options": [
          {
            "text": "The Google Dolls"
          },
          {
            "text": "The Goo Fighters"
          },
          {
            "text": "Alice Googler"
          },
          {
            "text": "G's N' Roses"
          }
        ],
        "type": "chips"
      }
    ]
  ]
}
میتوان بر اساس تعداد دفعات تلاش کاربر نهایی برای پاسخ به این درخواستها، درخواستهای بازگشتی مختلفی را مدیریت کرد. شما میتوانید این کار را با استفاده از کنترلکنندههای رویداد پارامترها انجام دهید. کنترلکنندههای رویداد داخلی مختلفی برای انتخاب وجود دارد، مانند پارامترهای نامعتبر ، عبارات خیلی طولانی ، ورودی وجود ندارد ، ورودی در اولین تلاش وجود ندارد ، دومین تلاش وجود ندارد، یا تطابق وجود ندارد . تفاوت بین ورودی وجود ندارد و تطابق وجود ندارد این است که بدون ورودی، کاربر هرگز پاسخی ارائه نمیدهد، در حالی که بدون تطابق، کاربر پاسخی ارائه میدهد اما Dialogflow CX نمیتواند این پاسخ را با یک صفحه مطابقت دهد.
- به پایین اسکرول کنید تا به بخش Reprompt event handlers برسید.
- روی افزودن کنترلکننده رویداد کلیک کنید و رویداد را انتخاب کنید:
No-match default - از متن استاتیک رویداد زیر برای تکمیل استفاده کنید:
I missed that. Please, specify the artist. You can choose between: Alice Googler, G's N' Roses, The Google Dolls or The Goo Fighters. Which artist do you want to buy merchandise from?
- روی ذخیره کلیک کنید
- روی افزودن کنترلکننده رویداد کلیک کنید و رویداد را انتخاب کنید:
No-input default - از متن استاتیک رویداد زیر برای تکمیل استفاده کنید:
I am sorry, I could understand the artist's name. You can choose between Alice Googler, G's N' Roses, The Google Dolls or The Goo Fighters. Which artist do you want to buy merchandise from?
- روی ذخیره کلیک کنید
مسیرهای وضعیت صفحه
پارامترها در ترکیب با مسیرهای شرطی صفحه بسیار قدرتمند هستند. وقتی یک شرط درست ارزیابی شود، مسیر صفحه مرتبط فراخوانی میشود. یک شرط میتواند باشد، یک پارامتر برابر با یک مقدار خاص است ، یا یک پارامتر نمیتواند وجود نداشته باشد ، یا یک فرم که تکمیل شده است ، و بسیاری موارد دیگر. میتوانید اطلاعات بیشتر در مورد پارامترها و شرایط را در مستندات Dialogflow CX بیابید.
برای عامل مجازی خردهفروشیمان، باید دنبالهای از پارامترها را جمعآوری کنیم، از این رو باید شرطی ایجاد کنیم تا بررسی کنیم که آیا یک «فرم» تکمیل شده است یا خیر. یک فرم فهرستی از پارامترهایی است که باید از کاربر نهایی برای صفحه جمعآوری شود. عامل مجازی با کاربر نهایی برای چندین نوبت مکالمه تعامل میکند تا زمانی که تمام پارامترهای فرم مورد نیاز، که به عنوان پارامترهای صفحه نیز شناخته میشوند، را جمعآوری کند.
Dialogflow CX به طور خودکار مقادیر پارامترهای ارائه شده توسط کاربر نهایی را هنگام پر کردن فرم تنظیم میکند. برای بررسی اینکه آیا فرم کامل صفحه فعلی پر شده است، از شرط زیر استفاده کنید: $page.params.status = "FINAL"
ایجاد مسیرهای شرطی در صفحه نمای کلی هنرمند
بیایید یک مسیر شرطی ایجاد کنیم که به محض مشخص شدن هنرمند، به صفحه بعد منتقل شود:
- در صفحه «مرور هنرمند» ، روی نماد + در بخش «مسیرها» کلیک کنید.
- به پایین اسکرول کنید تا به بخش «وضعیت» برسید.
- حداقل یکی را انتخاب کنید (یا)
- در مرحله بعد، عبارتی خواهیم نوشت که
- پارامتر:
$page.params.status - عملگر:
= - مقدار:
"FINAL"
- اکنون، یک پیام تکمیل سفارش استاتیک خاص در مسیر ایجاد خواهیم کرد که انتخاب کاربر نهایی را تأیید میکند. به پایین صفحه، به بلوک تکمیل سفارش بروید و پیامهای تکمیل سفارش زیر را بنویسید:
-
$session.params.artist, great choice! Rock on! -
You want to rock with $session.params.artist merchandise. Awesome!
- وقتی شرط درست باشد، باید به صفحه مرور کلی محصول بروید. به پایین صفحه بروید تا به بخش انتقال برسید و از صفحه زیر استفاده کنید:
Product Overview - ذخیره را بزنید.

ایجاد مسیرها در صفحه نمای کلی محصول
حالا که میدانیم چگونه میتوان پارامترها و مسیرهای شرطی ایجاد کرد، بیایید پارامترهای بیشتری برای صفحات زیر ایجاد کنیم:
بررسی اجمالی محصول
- ایجاد پارامتر
artistدر صفحه مرور کلی محصول :
- نام نمایشی:
artist - نوع موجودیت:
@Artist - مورد نیاز: تیک بزنید
- ویرایش در لاگ: بررسی کنید
- انجام سریع اولیه:
From which of these artists would you like to order merchandise?
{
  "richContent": [
    [
      {
        "options": [
          {
            "text": "The Google Dolls"
          },
          {
            "text": "The Goo Fighters"
          },
          {
            "text": "Alice Googler"
          },
          {
            "text": "G's N' Roses"
          }
        ],
        "type": "chips"
      }
    ]
  ]
}
- کنترلکننده رویداد >
No-match default:To buy merchandise you can choose between the following artists: Alice Googler, G's N' Roses, The Google Dolls or The Goo Fighters. Which artist do you want to buy merchandise from? - بار سفارشی:
{
  "richContent": [
    [
      {
        "options": [
          {
            "text": "The Google Dolls"
          },
          {
            "text": "The Goo Fighters"
          },
          {
            "text": "Alice Googler"
          },
          {
            "text": "G's N' Roses"
          }
        ],
        "type": "chips"
      }
    ]
  ]
}
- کنترلکننده رویداد >
No-input default:To buy merchandise you can choose between the following artists: Alice Googler, G's N' Roses, The Google Dolls or The Goo Fighters. Which artist were you trying to mention? - بار سفارشی:
{
  "richContent": [
    [
      {
        "options": [
          {
            "text": "The Google Dolls"
          },
          {
            "text": "The Goo Fighters"
          },
          {
            "text": "Alice Googler"
          },
          {
            "text": "G's N' Roses"
          }
        ],
        "type": "chips"
      }
    ]
  ]
}
- پارامتر ایجاد
merch:
- نام نمایشی:
merch - نوع نهاد:
@Merch - مورد نیاز: تیک بزنید
- ویرایش در لاگ: بررسی کنید
- تکمیل سفارش:
Which merchandise item do you want? - کلیک کنید: گزینه گفتگو را اضافه کنید > بار سفارشی :
{
    "richContent": [
      [
        {
          "type": "chips",
          "options": [
            {
              "text": "Shirts"
            },
            {
              "text": "Music"
            },
            {
              "text": "Tour movie"
            }
          ]
        }
      ]
    ]
  }
- مدیریت رویداد >
No-match default - تکمیل سفارش توسط مسئول رویداد:
We sell Shirts, Music or the Tour movie. Which of these items do you want? - بار سفارشی:
{
    "richContent": [
      [
        {
          "type": "chips",
          "options": [
            {
              "text": "Shirts"
            },
            {
              "text": "Music"
            },
            {
              "text": "Tour movie"
            }
          ]
        }
      ]
    ]
  }
- کنترلکننده رویداد >
No-input default - تکمیل سفارش توسط مسئول رویداد:
I couldn't understand which merchandise item you wanted to buy. You can choose between: Shirts, Music or the Tour movie. Which item do you want? - بار سفارشی:
{
    "richContent": [
      [
        {
          "type": "chips",
          "options": [
            {
              "text": "Shirts"
            },
            {
              "text": "Music"
            },
            {
              "text": "Tour movie"
            }
          ]
        }
      ]
    ]
  }
- مسیری ایجاد کنید که وقتی
artistو کالایmerchارائه میشوند، به صفحه محصول منتقل شود.
- وضعیت:
- مطابقت با هر قانون (و)
- عبارت:
$session.params.artist != null - عبارت:
$session.params.merch != null - تکمیل:
Alright! $session.params.merch of $session.params.artist, let's go! - انتقال: صفحه:
Product
- ایجاد مسیری برای زمانی که کاربر میگوید «پیراهن»
- هدف: تغییر مسیر.پیراهنها
- گذار: صفحه:
Shirts
- ایجاد مسیری برای زمانی که کاربر میگوید «موسیقی»
- هدف: تغییر مسیر.موسیقی
- انتقال: صفحه:
Music
- ایجاد مسیری برای زمانی که کاربر اطلاعات قیمت را درخواست میکند
- هدف: تغییر مسیر.قیمت
- انتقال: ایجاد صفحه جدید:
Price
وقتی پیکربندی بالا را انجام دادید، تصویری مشابه تصویر زیر خواهید دید. توجه داشته باشید که مسیرهای intent در نمودار آبی و مسیرهای condition نارنجی هستند. اگرچه تصویرسازی نشدهاند، اما event handlers سبز هستند و وقتی چندین نوع مسیر به یک صفحه منتقل میشوند، خط خاکستری خواهد بود.

تاکنون، شما یاد گرفتهاید که چگونه Flowها ، Entitiesها ، Intentها و صفحات را با State Handlerهایی مانند: Intent Routes و Conditional Routes بر اساس پارامترها ایجاد کنید. بعداً در این تمرین، از شاخهبندی شرطی در انجام کار استفاده خواهیم کرد تا دیالوگهای مختلفی را بر اساس ورودی ارائه دهیم.
برای نهایی کردن عامل مجازی ما میتوانید از پیکربندیهای زیر استفاده کنید.
صفحه پیراهنها:
- تنظیمات زیر را در صفحه پیراهنها ایجاد کنید:
- تکمیل فرم ورود:
Do you want a longsleeve or a t-shirt? - تکمیل ورود، بار سفارشی:
{
    "richContent": [
      [
        {
          "type": "chips",
          "options": [
            {
              "text": "T-shirt"
            },
            {
              "text": "Longsleeve"
            },
            {
              "text": "Price?"
            }
          ]
        }
      ]
    ]
  }
- یک مسیر Intent ایجاد کنید:
redirect.priceبا یک انتقال به صفحهPrice - پارامتر زیر را ایجاد کنید:
- پارامتر:
merch- نوع موجودیت:@Merch،RequiredوRedact in log - پارامتر > کنترلکننده رویداد >
No-match default - پارامتر > تکمیل رویداد کنترلکننده:
You can choose between a t-shirt or a longsleeve. Which of these do you want? - پارامتر > اجرای کنترلکننده رویداد payload سفارشی:
{
    "richContent": [
      [
        {
          "type": "chips",
          "options": [
            {
              "text": "T-shirt"
            },
            {
              "text": "Longsleeve"
            }
          ]
        }
      ]
    ]
  }
- پارامتر > کنترلکننده رویداد >
No-input default - پارامتر > تکمیل رویداد هندلر:
I couldn't understand if you want the t-shirt or the longsleeve. Which of these do you want? - پارامتر > اجرای کنترلکننده رویداد payload سفارشی:
{
    "richContent": [
      [
        {
          "type": "chips",
          "options": [
            {
              "text": "T-shirt"
            },
            {
              "text": "Longsleeve"
            }
          ]
        }
      ]
    ]
  }
- روی تکمیل ورودی کلیک کنید و به پایین اسکرول کنید تا به Parameter presets برسید، هر بار که صفحه Shirts فعال میشود، پارامتر category روی shirts تنظیم میشود:
پارامتر | ارزش |
| |
- اضافه کردن یک مسیر شرطی:
- حداقل یک قانون را مطابقت دهید (یا)
- عبارت:
$session.params.merch = "T-shirt" - عبارت:
$session.params.merch = "Longsleeve" - انتقال به صفحه جدید:
Shirt Size
صفحه قیمت:
از آنجایی که پیامهای مربوط به قیمتها بسته به کالا یا دسته بندی انتخاب شده (موسیقی یا تیشرت) خواهد بود، این بخش را بعداً در تمرین اصلاح خواهیم کرد. فعلاً فقط وارد کردن یک متغیر کافی است.
- تنظیمات زیر را در صفحه قیمت ایجاد کنید:
- تکمیل ورود:
PRICE TODO
از آنجایی که میتوانید قیمت را از مکانهای مختلف مکالمه درخواست کنید، باید همیشه به شما پاسخ دهد و شما را به قسمت قبلی مکالمه منتقل کند تا سفارش را ادامه دهید. 5 مکان در درخت گفتگو وجود دارد که میتوانید برای دریافت اطلاعات قیمت به آنها مراجعه کنید. (پیراهن، سایز پیراهن، موسیقی، اپراتور و همچنین مستقیماً از طریق یک مسیر Intent)، بنابراین برای بازگشت به عقب به چند مسیر شرطی نیاز خواهیم داشت:
- یک مسیر شرطی اضافه کنید:
- مطابقت با هر قانون (و)
- Expression:
$session.params.category = "shirts" - Expression:
$session.params.merch = "null" - Transition to new page:
Shirts
- Add a Conditional Route:
- Match Every rule (AND)
- Expression:
$session.params.category = "shirts" - Expression:
$session.params.size = "null" - Transition to new page:
Shirt Size
- Add a Conditional Route:
- Match Every rule (AND)
- Expression:
$session.params.category = "music" - Expression:
$session.params.album = "null" - Transition to new page:
Music
- Add a Conditional Route:
- Match Every rule (AND)
- Expression:
$session.params.category = "music" - Expression:
$session.params.merch = "null" - Transition to new page:
Carrier
- Add a Conditional Route:
- Match Every rule (AND)
- Expression:
$session.params.category = "null" - Transition to new page:
Product Overview
Shirt Size Page:
- Create the following configurations in the Shirt Size Page:
- Entry fulfillment:
What shirt size do you want? - Entry fulfillment Custom payload:
{
    "richContent": [
      [
        {
          "type": "chips",
          "options": [
            {
              "text": "XS"
            },
            {
              "text": "S"
            },
            {
              "text": "M"
            },
            {
              "text": "L"
            },
            {
              "text": "XL"
            },
            {
              "text": "2XL"
            },
            {
              "text": "3XL"
            }
          ]
        }
      ]
    ]
  }
- Create an Intent route :
redirect.pricewith a transition to thePricePage. - Create the following parameter:
- Parameter:
shirtsize- Entity Type:@ShirtSize-Required,Redact In Log - Parameter > Event Handler >
No-match default - Parameter > Event Handler Fulfillment:
Please tell me the shirt size, such as XL. - Parameter > Event Handler Fulfillment Custom payload:
{
    "richContent": [
      [
        {
          "type": "chips",
          "options": [
            {
              "text": "XS"
            },
            {
              "text": "S"
            },
            {
              "text": "M"
            },
            {
              "text": "L"
            },
            {
              "text": "XL"
            },
            {
              "text": "2XL"
            },
            {
              "text": "3XL"
            }
          ]
        }
      ]
    ]
  }
- Parameter > Event Handler >
No-input default - Parameter > Event Handler Fulfillment:
I couldn't understand the shirt size. What size do you want? - Parameter > Event Handler Fulfillment Custom payload:
{
    "richContent": [
      [
        {
          "type": "chips",
          "options": [
            {
              "text": "XS"
            },
            {
              "text": "S"
            },
            {
              "text": "M"
            },
            {
              "text": "L"
            },
            {
              "text": "XL"
            },
            {
              "text": "2XL"
            },
            {
              "text": "3XL"
            }
          ]
        }
      ]
    ]
  }
- Add a Conditional Route:
- Match Every rule (AND)
- Expression:
$page.params.shirtsize != "null" - Transition to Page:
Product
Music Page:
- Create the following configurations in the Music Page:
- Entry fulfillment:
We have a Greatest Hits Album or the Live Album. Which one do you want? - Entry fulfillment Custom payload:
{
    "richContent": [
      [
        {
          "type": "chips",
          "options": [
            {
              "text": "Greatest Hits"
            },
            {
              "text": "Live"
            },
            {
              "text": "Price?"
            }
          ]
        }
      ]
    ]
  }
- Create an Intent Route :
redirect.pricewith a transition to Page:Price. - Create the following parameter:
- Parameter:
album- Entity Type:@Album-Required,Redact In Log - Parameter > Event Handler >
No-match default - Parameter > Event Handler Fulfillment:
You can choose between Greatest Hits and Live Album. Which of these do you want? - Parameter > Event Handler Fulfillment Custom payload:
{
    "richContent": [
      [
        {
          "type": "chips",
          "options": [
            {
              "text": "Greatest Hits"
            },
            {
              "text": "Live"
            }
          ]
        }
      ]
    ]
  }
- Parameter > Event Handler >
No-input default - Parameter > Event Handler Fulfillment:
I couldn't understand if you want the album: Greatest Hit or Live. Which of these do you want? - Parameter > Event Handler Fulfillment Custom payload:
{
    "richContent": [
      [
        {
          "type": "chips",
          "options": [
            {
              "text": "Greatest Hits"
            },
            {
              "text": "Live"
            }
          ]
        }
      ]
    ]
  }
- Click on the entry fulfillment and scroll down to Parameter presets , each time when the Music page gets active, the category parameter will be set to music :
پارامتر | ارزش |
| |
- Add a Conditional Route:
- Match Every rule (AND)
- Expression:
$page.params.album != "null" - Transition to Page:
Carrier
Carrier Page:
- Create the following configurations in the Carrier Page:
- Entry fulfillment:
Do you want this album on CD or MP3? - Entry fulfillment Custom payload:
{
    "richContent": [
      [
        {
          "type": "chips",
          "options": [
            {
              "text": "CD"
            },
            {
              "text": "MP3"
            },
            {
              "text": "Price?"
            }
          ]
        }
      ]
    ]
  }
- Create an Intent route :
redirect.pricewhich transitions to thePricePage. - Create the following parameter:
- Parameter:
merch- Entity Type:@Merch-Required,Redact In Log - Parameter > Event Handler >
No-match default - Parameter > Event Handler Fulfillment:
Do you want a physical CD or the digital album? - Parameter > Event Handler Fulfillment: Custom payload:
{
    "richContent": [
      [
        {
          "type": "chips",
          "options": [
            {
              "text": "CD"
            },
            {
              "text": "Digital Album"
            }
          ]
        }
      ]
    ]
  }
- Parameter > Event Handler >
No-input default - Parameter > Event Handler Fulfillment:
I couldn't understand if you mean CD or MP3. Which one do you want? - Parameter > Event Handler Fulfillment: Custom payload:
{
    "richContent": [
      [
        {
          "type": "chips",
          "options": [
            {
              "text": "CD"
            },
            {
              "text": "MP3"
            }
          ]
        }
      ]
    ]
  }
- Add a Conditional Route:
- Match Every rule (AND)
- Expression:
$page.params.merch != "null" - Transition to Page:
Product
صفحه محصول:
- Create the following parameters:
Parameter Displayname | Parameter Entity Type | چکها |
| | Required, Redact in log |
| | Required, Redact in log |
- The artist parameter needs the following initial prompt fulfillment, which will be shown when the artist isn't known.
You didn't mention which artist you are interested in. You can ask me to buy the $session.params.merch of the artist you like or ask which artists we signed. How can I help?
{
  "richContent": [
    [
      {
        "options": [
          {
            "text": "Which artists?"
          }
        ],
        "type": "chips"
      }
    ]
  ]
}
- Also add a
No-input defaultevent handler with fulfillment:I couldn't understand what you just said. Ask me which artists are signed. - And a
No-match defaultevent handler with fulfillment:I missed that. Please ask me which artists are signed.
- The merch parameter needs reprompt event handlers as well.
- Add a
No-input defaultevent handler with fulfillment:I couldn't understand what you just said. Which merchandise item do you want? - And a
No-match defaultevent handler with fulfillment:I missed that. Which merchandise item do you want?
The next route will transition to the confirmation page when the artist is known and the user chooses a "Tour Movie".
- Add a Conditional Route:
- Match Every rule (AND)
- Expression:
$session.params.artist != null - Expression:
$session.params.merch = "Tour Movie" - Parameter Presets Add Parameter >
price = 25 - Transition to new page:
Confirmation
The next route will transition to the confirmation page when the artist is known and the user chooses a "T-shirt" and the shirt size is chosen.
- Add a Conditional Route:
- Custom Expression:
$session.params.artist != null AND $session.params.merch = "T-shirt" AND $session.params.shirtsize != null - Parameter Presets Add Parameter >
price = 25 - Transition to page:
Confirmation
The next route will transition to the confirmation page when the artist is known and the user chooses a "Longsleeve" and the shirt size is chosen.
- Add a Conditional Route:
- Custom Expression:
$session.params.artist != null AND $session.params.merch = "Longsleeve" AND $session.params.shirtsize != null - Parameter Presets Add Parameter >
price = 30 - Transition to page:
Confirmation
The next route will transition to the confirmation page when the artist is known and the user chooses a "CD" also the album name is chosen.
- Add a Conditional Route:
- Custom Expression:
$session.params.artist != null AND $session.params.merch = "CD" AND $session.params.album != null - Parameter Presets Add Parameter >
price = 15 - Transition to page:
Confirmation
The next route will transition to the confirmation page when the artist is known and the user chooses a "Digital Album" and the album name is chosen.
- Add a Conditional Route:
- Custom Expression:
$session.params.artist != null AND $session.params.merch = "Digital Album" AND $session.params.album != null - Parameter Presets Add Parameter >
price = 10 - Transition to page:
Confirmation
Next, we will now make some advanced conditionals with prompts that detect missing information. The next route will transition back to the music page when the artist is known and the user chooses a "CD" or a "Digital Album" but the album name was not chosen.
- Add a Conditional Route:
- Custom Expression:
$session.params.artist != null AND ($session.params.merch = "CD" OR $session.params.merch = "Digital Album") AND $session.params.album = null - Fulfillment:
I would also need to know which album you would like to buy! - Transition to page:
Music
And the last route will transition to the confirmation page when the artist is known and the user choose a "T-shirt" or a "Longsleeve", but when t-shirt size was not chosen.
- Add a conditional Route:
- Custom Expression:
$session.params.artist != null AND ($session.params.merch = "T-shirt" OR $session.params.merch = "Longsleeve") AND $session.params.shirtsize = null - Fulfillment:
I would also need to know which shirt size you need! - Transition to page:
Shirt Size
In the next part of the lab, we will make use of conditional fulfillments to give different fulfillment messages depending on the input.
7. Conditional Responses
Some responses will return a different dialogue based on the input, The dialogues will branch off, we call this conditional responses . This can become interesting, when you are not making use of webhook fulfillments, where the conditional responses were determined on the back-end. An example could look like:
if [condition]
  [response]
elif [condition]
  [response]
elif [condition]
  [response]
else
  [response]
endif
- An example of a [condition] could be:
$session.params.user-age >= 21. It uses a similar formatting as the conditions in the routes. - An [response] takes the static text response
- Conditional responses always start with
if -
elifandelseblocks are optional
Dialogflow CX can also make use of built-in system functions to make use of. For example to format a date or time, or to display the current time ( $sys.func.NOW() )
Let's finalize the Catalog flow, by fixing the Confirmation and Price Pages.
Confirmation Page:
Now we will build the confirmation page. It has the following requirements:
- If merch is CD or Digital Album . We will show the following fields in the confirmation: artist , merch , album and price .
- If merch is T-shirt or Longsleeve . We will show the following fields in the confirmation: artist , merch , size and price .
- Else (and thus if merch is Tour Movie ). We will show the following fields in the confirmation: artist , merch and price .
- Click on the Confirmation Page.
- Click Edit Fulfillment > Agent Responses > Add dialogue option > Conditional Response :
if ($session.params.merch = "CD" OR $session.params.merch = "Digital Album")
  The $session.params.merch: $session.params.artist - $session.params.album costs $$session.params.price. Shall I continue to order?
elif ($session.params.merch = "T-shirt" OR $session.params.merch = "Longsleeve")
  A $session.params.merch of $session.params.artist size: $session.params.shirtsize costs $$session.params.price. Shall I continue to order?
elif $session.params.merch = "Tour Movie"
  The $session.params.merch of $session.params.artist costs $$session.params.price. Shall I continue to order?
else
  It looks like something went wrong with your order. You can say "Reset", to restart the order process.
endif
- Create the following Custom payload:
- Custom payload:
{
  "richContent": [
    [
      {
        "options": [
          {
            "text": "Yes, confirm"
          }
        ],
        "type": "chips"
      }
    ]
  ]
}
Next, create two intent routes:
confirm.proceed.ordertransitions to:Order ProcessFlow.decline.proceed.ordertransitions toEnd Flow
When the user declines the order, and does not want to proceed the order process, we will have to transition back to the welcome page, but all the parameters have to be cleared. We can do this by specifically setting null to all the possible parameters. You can do this with Parameter presets.
- In the decline.proceed.order intent route, scroll down to Parameter presets and add the following parameters:
Parameter | Value |
|
|
|
|
|
|
|
|
|
|
|
|
|
|
Notice that we have created an additional parameter called restart. If this parameter is present, the Default Start Flow, should know to continue the conversation by showing a customized message.
- Click on the Default Start Flow, Start Page, and create another Conditional Route:
$session.params.restart = "true"- Fulfillment:
"Welcome back, as the virtual agent of G-Records, I can help you order artists merchandise, you can ask questions about your order or shipping, and I can tell you more which artists are currently signed with us. How can I help?" - Custom payload:
{
    "richContent": [
      [
        {
          "type": "chips",
          "options": [
            {
              "text": "Which artists?"
            },
            {
              "text": "Which products?"
            },
            {
              "text": "About my order..."
            }
          ]
        }
      ]
    ]
  }
- Select the Start Page and click on the
redirect.endintent. Create the following fulfillment:Thank you for contacting G-Records! Have a nice day!
Price Page:
Let's also fix the Price TODOs. The price information will be static for now. Click on the Price Page in the Catalog Flow, and use the following entry fulfillment:
- Delete the Agent Says entry fulfillment.
- Create a new Conditional Response:
if $session.params.category = "shirts"
  A t-shirt costs $25 and a longsleeve costs $30.
elif $session.params.category = "music"
  A CD costs $15. The digital album on MP3 costs $10.
else
  A t-shirt costs $25 and a longsleeve costs $30. A CD costs $15 and a digital album on MP3 $10. In case you are interested in the Tour Movie, that one is $25.
endif

Well done, by now you completed the Catalog flow. Your flow should look similar to this diagram:
8. Wrapping up the agent
We are almost at the end of this lab. Let's configure the last flows together, and take in practice all the new things that we have learned.
Creating the My Order Flow
- Go to the My Order Flow, and create the following intent transitions:
Page (In Flow) | Routes > Intent | Routes > Transition To |
My Order Start |
| My Order |
My Order Start |
| My Order Status |
My Order Start |
| My Order Cancellation |
My Order Start |
| End Session |
My Order Start |
| End Flow |
My Order |
| My Order Status |
My Order |
| My Order Cancellation |
Default Start Flow |
| Flow: My Order |
Default Start Flow |
| Flow: My Order |
- Let's create the following entry fulfillment for the My Order Page:
- Entry fulfillment:
I can look up the status of your order, or I can cancel an order.
- In the My Order Page create the following parameter:
- Displayname:
ordernumber - Entity Type:
@OrderNumber - Required: checked
- Initial prompt fulfillment:
What's the order number? For example ABCD123. - Event Handler:
No-match default:To proceed with your order I will need an order number. Order numbers start with 4 characters and end with 3 numbers, such as ABCD123. Which order number may I use? - Event Handler:
No-input default:I missed that. To proceed with your order I will need an order number. Order numbers start with 4 characters and end with 3 numbers, such as ABCD123. Which order number may I use?
- Create the following conditional route:
- Customize Expression:
$page.params.status = "FINAL" - Fulfillment:
And do you want to Cancel your order, or should I look up the status?
- Click on Add state handler > Event Handlers and create the Event Handler:
No-input default
- Fulfillment:
I'm sorry, what was that? Would you like me to cancel an order or look up the status? - Custom payload:
{
  "richContent": [
    [
      {
        "options": [
          {
            "text": "Status"
          },
          {
            "text": "Cancel"
          }
        ],
        "type": "chips"
      }
    ]
  ]
}
- Create the Event Handler:
No-match default
- Fulfillment:
Would you like me to cancel an order or lookup the status? - Custom payload:
{
  "richContent": [
    [
      {
        "options": [
          {
            "text": "Status"
          },
          {
            "text": "Cancel"
          }
        ],
        "type": "chips"
      }
    ]
  ]
}
- In the My Order Status Page create the following parameter:
- Displayname:
ordernumber - Entity Type:
@OrderNumber - Required checked
- Initial prompt fulfillment:
What's the order number? For example ABCD123. - Event Handler:
No-match default:To proceed with your order I will need an order number. Order numbers start with 4 characters and end with 3 numbers, such as ABCD123. Which order number may I use? - Event Handler:
No-input default:I missed that. To proceed with your order I will need an order number. Order numbers start with 4 characters and end with 3 numbers, such as ABCD123. Which order number may I use?
- In the My Order Status Page create the following conditional route:
- Customize Expression:
$session.params.ordernumber != null - Fulfillment:
Your order $session.params.ordernumber has been shipped, it can take up to approx 2 weeks before you will receive your items. - Add dialogue option > Text:
Is there anything else I can help you with?
- In the My Order Cancelation Page create the following parameter:
- Displayname:
ordernumber - Entity Type:
@OrderNumber - Required checked
- Initial prompt fulfillment:
What's the order number? For example ABCD123. - Event Handler:
No-match default:To proceed with your order I will need an order number. Order numbers start with 4 characters and end with 3 numbers, such as ABCD123. Which order number may I use? - Event Handler:
No-input default:I missed that. To proceed with your order I will need an order number. Order numbers start with 4 characters and end with 3 numbers, such as ABCD123. Which order number may I use?
- In the My Order Cancelation Page create the following conditional route:
- Customize Expression:
$session.params.ordernumber != null - Fulfillment:
Your order $session.params.ordernumber has been canceled. - Add dialogue option > Text:
Is there anything else I can help you with?
- Test the flow and create the following two test scenarios:
>"About my order"
>"ABCD123"
>"Status"
And:
>"What's the status of order DEFG222"
- Select the Start Page and click on the
redirect.endintent. Create the following fulfillment:Thank you for contacting G-Records! Have a nice day! - Select the Start Page and click on the
redirect.homeintent. Create the following parameter preset:restart = true
Default Negative intents (Fallback)
When you create a virtual agent, a default negative intent is created for you. You can add training phrases to this intent that act as negative examples that will trigger a No-match event. There may be cases where end-user input has a slight resemblance to training phrases in normal intents, but you do not want these inputs to match any normal intents.
- Try in the simulator:
I don't like Alice Googler.
You will see that the virtual agent answers with the Product Overview Page, to continue ordering Alice Googler merchandise. However, your end user does not like that artist. Let's use the Default Negative Intent for this.
- Go to Manage > Intents and select the Default Negative Intent.
- Add the following training phrases that will trigger the No-match event.
I don't like Alice GooglerI am not a fan of G's N' RosesI can't stand the music of the Google Dolls
- Hit Save and test the following sentence in the simulator:
I am really not a fan of the Goo Fighters
This time the No-match event was triggered, you stayed on the Start Page.
Default Fallback Messages
- Click the Default Start Flow, select the
sys.no-input-defaultevent handler.
The No-input fallback basically means: No text or speech answers were detected. Likely no answers were given, or the system couldn't hear it. Therefore, let's make the fallback messages more specific. Use the tab key, to create alternative dialogues:
- Remove all answers, and add these text dialogues:
I'm sorry, I didn't receive an answer. Can you say it again?I missed your answer, can you say it again?Sorry, I didn't hear anything. Can you say it again?I couldn't hear what you were saying, what was that?I'm sorry, I missed your answer. What were you trying to say?
Don't forget to click Save.
- Click the Default Start Flow, select the
sys.no-match-defaultevent handler.
The No Match fallback basically means: Text or speech answers were detected but nothing in Dialogflow CX got matched.
- Remove all answers, and add these text dialogues:
Sorry, I didn't get that. Can you please rephrase?I'm sorry, I don't understand. Can you please rephrase?I don't understand, please rephrase.Sorry, I didn't get that. What was that?I didn't get that, can you please rephrase?
Don't forget to click Save.
- It's advised to repeat these steps for the Catalog, My Order, Order Process and Customer Care flows.
Here's a tip: when creating fallback messages, make them more explicit, by rephrasing the previous question or by mentioning an example. You could create these type of No-match and No-input events on Page level when creating parameters. In our labs, we have already done this.
Creating the Order Process Flow
- Go to the Order Process Flow, and create the following intent transitions:
Page (In Flow) | Routes > Intent | Routes > Transition To |
Order Process Start |
| End Session |
Order Process Start |
| End Flow |
Order Process Start |
| New Page: Shipping Details |
- Let's create the following entry fulfillment for the Shipping Details Page:
- Entry fulfillment:
To complete your order I will first need to collect your shipping details.
- Create the following parameters:
These parameters will make use of built-in system entities. System entity support differs for each language. See the docs for more information.
Parameter Display name | Entity | Required? | Initial prompt fulfillment | No-match default | No-input default |
| @sys.person | Required |
|
|
|
| @sys.person | Required |
|
|
|
| @sys.address | Required |
|
|
|
| @sys.any | Required |
|
|
|
| @sys.geo-city | Required |
|
|
|
| @sys.geo-country | Required |
|
|
|
| @sys.email | Required |
|
|
|
- Create the following conditional route:
- Customize Expression:
$page.params.status = "FINAL" - Transition to new Page:
Payment Details
- Create the following entry fulfillment.
Let's fake it that this virtual agent makes use of Google Pay. Don't worry this tutorial won't make real transactions. Create the following entry dialogues:
- Agent Says:
Alright $session.params.firstname! We will make use of Google Pay, that's connected to your email account: $session.params.email.
- Conditional Response
if $session.params.merch != "Digital Album"
  Shipping costs an additional 5 dollars. This will make the total price $$sys.func.TO_TEXT($sys.func.ADD($session.params.price, 5)).
  Your merchandise will be shipped to:
  $session.params.firstname $session.params.lastname
  $session.params.address
  $session.params.zipcode $session.params.city
  $session.params.country
  To continue the order process please explicitly say "I confirm". Do you want to confirm your $session.params.artist $session.params.merch order?
else
  The total costs will be: $$session.params.price.
  After purchasing the digital album, you will receive an email with the download link.
  To continue the order process please explicitly say "I confirm".
  Do you want to confirm your $session.params.artist $session.params.merch order?
endif
- Create the following Intent Route
- Intent:
confirm.proceed.order - Agent Says:
Thank you for your order! Your merchandise will be shipped today! - Add Dialogue Option > Text:
Here's the order number: ABCD123. - Add Dialogue Option > Text:
Have a good day! - Transition:
End Session
- Select the Start Page and click on the
redirect.endintent. Create the following fulfillment:Thank you for contacting G-Records! Have a nice day! - Select the Start Page and click on the
redirect.homeintent. Create the following parameter preset:restart = true
Awesome! By now we have a fully working realworld retailer chatbot! In the next lab, we will test how well the virtual agent performs!
9. Test your virtual agent
You can use the built-in simulator to test the dialogues of your virtual agent. The advantage of testing the flows in the simulator is that you will see a nice overview of flows, pages, parameters, and (DTMF) events that the simulator collected while walking through your flows. This makes testing easier than testing it directly in an integration, as those types of information will be hidden from the end user. It's even possible to create test cases, save and reuse those test cases. This makes a lot of sense, for when you maintain or edit your flows over time, and you want to be sure that none of your changes break your previous work.
It is also possible to export and import previously made test cases, by storing the tests in Google Cloud Storage or local. Exporting a test will download a blob file. To learn more about the simulator and test cases check out the Simulator / Test Cases Docs .
Before creating some test cases, let's first finalize the rest of our virtual agent:
Creating the Customer Care Flow
- Go to the Customer Care Flow, and create the following intent transitions:
Page (In Flow) | Routes > Intent | Routes > Transition To |
Customer Care Start | | حمل و نقل |
Customer Care Start | | بازپرداخت |
Customer Care Start | | تعویض |
Customer Care Start | | End Flow |
Customer Care Start | | پایان جلسه |
- Create the following entry fulfillments for the Shipping Page:
-
Shipping physical merchandise items can take up to 2 weeks. -
Is there anything else I can help you with?
- Create the following entry fulfillments for the Refund Page:
-
We offer free returns and refunds. We provide one free return label for each order. You can use it within 30 days from receiving your order. If your refund is accepted, we will refund the price you paid for your item back to your original payment method. -
Is there anything else I can help you with?
- Create the following entry fulfillments for the Swapping Page:
-
If you would like to change your item for a different one, please return your unwanted item and place a new order. If your refund is accepted, we will refund the price you paid for your item back to your original payment method. -
Is there anything else I can help you with?
- Select the Start Page and click on the
redirect.endintent. Create the following fulfillment:Thank you for contacting G-Records! Have a nice day! - Select the Start Page and click on the
redirect.homeintent. Create the following parameter preset:restart = true
Create test cases
- Click the Test Agent button on the right side of the screen.
When you first open the simulator, you need to select an agent environment and active flow. In most cases, you should use the draft environment and default start flow.
- Type:
Hi

- Ask:
Which artists are signed with your label? - Say:
The Google Dolls - Say:
I am interested in buying a shirt - Say:
A t-shirt - Say:
Medium - Now click on the save test case button. Which you can find in the top of the simulator (next to the redo arrow, and reset trash bin icon)

- Give it the following details:
- Test case name:
Buy Google Dolls t-shirt size M - Tags: #catalog, #shirts, #t-shirt, #TheGoogleDolls
- روی ذخیره کلیک کنید
Let's create more test cases.
- First clear the current dialogue, by clicking on the Reset (thrash bin) icon.
- Create the following test cases:
Buy the Alice Googler t-shirt:
>"Buy the Alice Googler t-shirt."
>"XL"
- Test case name:
Buy the Alice Googler t-shirt - Tags:
#catalog, #shirts, #t-shirt, #AliceGoogler
Buy a t-shirt size M: (Note the Artist name hasn't been mentioned, but you do want to skip the bands overview, products overview, shirts and shirt size pages)
>"Buy a t-shirt size M"
>"The Google Fighters"
- Test case name:
Buy a t-shirt size M - Tags:
#catalog, #shirts, #t-shirt, #TheGoogleFighters - Description: (Note the Artist name hasn't been mentioned, but you do want to skip the bands overview, products overview, shirts and shirt size pages)
Purchase Music of G's N' Roses (Note this will skip the bands overview and products overview page)
>"Purchase music of G's N' Roses"
>"Live"
>"CD"
- Test case name:
Purchase music of G's N' Roses - Tags:
#catalog, #music, #CD, #GsNRoses, #live - Description: (Note this will skip the bands overview and products overview page)
Check price information:
>"Which products"
>"Shirts"
>"What's the price difference?"
>"Longsleeve"
>"What does it cost?"
>"M"
>"The Google Dolls"
>"No"
>"Which bands"
>"The Gooo Fighters"
>"Music"
>"How much does it cost?"
>"Greatest Hits"
>"What's the price difference?"
>"Mp3"
>"No"
>"I want to buy the tour movie"
>"Alice Googler"
>"Yes"
- Test case name:
Price info - Tags:
#catalog, #music, #tourmovie, #shirts - Description: Test price info on various points in the dialogue
Test pre-recorded test cases
- Select Manage > Test Cases in the Dialogflow main menu on the left.
- Select all the test cases and press the Run button, above the table.
Dialogflow CX will run all the selected test cases against the recording that was saved as a "Golden Test Case", if the results are the same as how you saved it, then the tests are passed. - Did something change in the flows like Pages that are not correctly configured, or intents that directed you to the wrong pages, then the tests will fail.

- In the simulator ask the following question:
How long will shipping take? - Note the result, and save the test case as
Shippingwith the tag:#shipping. - Go to the Manage > Test Cases panel and press the Run button on the top right of the grid, to run only the
Shippingtest case.
This test should pass.
- Go back to the Customer Care Flow, Select the Start Page and click on the Routes header.
This will show a screen with a grid that shows all the routes.
- Remove the
redirect.shipping.info route - Go to the Manage > Test Cases panel and press the Run button on the top right of the grid, to run only the
Shippingtest case.
This test should fail.
- You can click on the failed test, to see the details of the fail.
In this case the test failed with the below error message:
Page: Page mismatch:
Expected: Shipping
Actual: Start Page
The reason for this is because the page doesn't exist in the flow anymore. We expected the Shipping Page, but instead we never moved away from the Start Page. (or your end-users would receive a fallback message.)
With other words, this is a missed request, a False Negative Test result. The test failed. We expected the Shipping Page, but nothing happens, or a fallback message was shown.
- Go back to the Customer Care Flow, and add the
redirect.shipping.infoas an intent route, to the Start Page. Don't forget to transition to the Shipping Page and hit Save . - In the simulator record the following test case:
I want to swap my item, save this test case asSwapping#swapping. - Open Manage >Intents > redirect.refund.info and add the following training phrase:
I want to swap this item for a refund
Without that training phrase, when a user would ask to change an item for a refund, it would hit the redirect.swapping.info intent, but we don't want to give information on changing items, we want to give information on refunds.
- Create the following golden test case:
I want to swap this item for a refundin the simulator, and save this test case asSwap for Refund#refund - Go back to the Manage >Intents > redirect.refund.info intent, and remove the
I want to swap this item for a refundline. - Go back to Manage > Test Cases , select the Swap for Refund test case, and Run it.
Your latest test failed, with the below error message:
If you would like to change your item for a different one, please return your unwanted item and place a new order. If your refund is accepted, we will refund the price you paid for your item back to your original payment method.`
Is there anything else I can help you with?
 Page: Page mismatch:
Expected: Refund
Actual: Swapping
With other words, this is a missed understood request, a False Positive Test result. The test failed. We expected the Refund Page, but Swapping Page became active.
پوشش
In Dialogflow CX, test coverage is a measure used to describe the degree to which the dialogue of the virtual agent (Pages and Intents) is executed when a particular test suite runs. A virtual agent with high test coverage, measured as a percentage, has had more of its dialogues executed during testing, which suggests it has a lower chance of containing undetected bugs (like missed understood requests) compared to a virtual agent with low test coverage.
- To view a test coverage report for all test cases, click Coverage .
- Click on the tab Transitions .
This will show you the test coverage for all the page transitions.

- Click on the tab Intents .
This will show you the test coverage for all the intents.

Congratulations, by now you have built and tested a complete real world example of a retailer bot! Let's go to the next lab page to read the conclusion and find some handy references!
۱۰. نتیجهگیری
Dialogflow CX is a Conversational AI Platform (CAIP) for creating virtual agents like chat or voice bots. Dialogflow CX empowers your team to accelerate creating enterprise-level conversational experiences through visual bot builders, reusable intents, and the ability to address multi-turn conversations.
In this codelab, you have learned how to build a real world retail virtual agent. We addressed the following concepts:
- جریانها
- Parameters, Custom & System Entities
- صفحات
- State Handlers like Intent Routes and Condition Routes
- Static Fulfillment Messages and Conditional Responses
- Fallback intents
- Simulator, Test Cases and Coverage

منابع
To learn more about Dialogflow CX have a look into the following blogs and documentation!