
1. Прежде чем начать
В этом практическом занятии вы научитесь создавать чат-бота для розничной торговли с помощью Dialogflow CX , платформы разговорного искусственного интеллекта (CAIP) для создания диалоговых пользовательских интерфейсов. Dialogflow CX может реализовывать виртуальных агентов, таких как: чат-боты, голосовые боты, телефонные шлюзы, и поддерживает множество каналов на более чем 50 различных языках.
В этом практическом занятии вы узнаете, как создать веб-чат-бота для розничной торговли. Вымышленная компания, для которой мы будем создавать чат-бота, называется G-Records . G-Records — это рок-лейбл, базирующийся в Калифорнии. У лейбла заключены контракты с четырьмя рок-группами: Alice Googler , G's N' Roses , The Goo Fighters и The Google Dolls . G-Records продает товары с символикой групп всем поклонникам рока.
В конце этого практического занятия вы можете воспользоваться чат-ботом, чтобы заказать футболки или музыку, или же задать вопросы о статусе вашего заказа.

Что вы узнаете
На практике вы узнаете о преимуществах Dialogflow CX по сравнению с Dialogflow ES! Это включает в себя следующие концепции:
- Как создать виртуального агента Dialogflow CX в Google Cloud
- Узнайте, как создавать потоки.
- Узнайте, как создавать сущности.
- Узнайте, как создавать интенты.
- Узнайте, как создавать страницы и осуществлять переходы между страницами с помощью обработчиков состояний.
- Узнайте, как осуществлять переходы между страницами с помощью маршрутов Intent.
- Узнайте, как осуществлять переходы между страницами с помощью параметров и условных маршрутов.
- Узнайте, как возвращать условные ответы с помощью системных функций.
- Узнайте, как создавать резервные сообщения.
- Узнайте, как пользоваться симулятором.
- Узнайте, как создавать тестовые примеры и определять покрытие тестами.
Окончательный дизайн агента Dialogflow CX будет выглядеть следующим образом:

Что вам понадобится
- Для создания агента Dialogflow CX вам потребуется учетная запись Google Identity / Gmail.
- Доступ к облаку Google.
2. Настройка среды
Создайте проект в Google Cloud.
Поскольку Dialogflow CX работает в Google Cloud, вам необходимо создать проект Google Cloud . Проект организует все ваши ресурсы Google Cloud. Он включает в себя набор участников, включенные API (и другие ресурсы), инструменты мониторинга, платежную информацию, а также средства аутентификации и контроля доступа.
При создании нового проекта вам потребуется ввести его название . Также необходимо будет связать его с существующим платежным аккаунтом и организацией.
Платежный аккаунт используется для определения того, кто оплачивает определенный набор ресурсов, и может быть связан с одним или несколькими проектами. Использование проекта оплачивается с помощью связанного платежного аккаунта. В большинстве случаев настройка выставления счетов производится при создании проекта. Для получения дополнительной информации см. документацию по выставлению счетов . Убедитесь, что выставление счетов включено для вашего облачного проекта.

Включите API Dialogflow
Для использования Dialogflow вам необходимо включить API Dialogflow для вашего проекта.
- Выберите проект, для которого хотите включить API, и нажмите «Продолжить» .
- Сверните меню «API и сервисы» и нажмите «Создать учетные данные» .
- Нажмите «Данные приложения» .
- Скажите «Нет, я их не использую», поскольку вы пока не используете Kubernetes Engine, App Engine или Cloud Functions.
- Нажмите «Готово».

Создайте нового агента Dialogflow CX.
Для создания нового агента Dialogflow CX сначала откройте консоль Dialogflow CX:
- Выберите ранее созданный проект Google Cloud.
- Нажмите «Создать агента» .
Заполните форму для основных настроек агента:
- Вы можете выбрать любое отображаемое имя.
- В качестве местоположения выберите: us-central1
- Выберите предпочитаемый часовой пояс.
- Выберите английский язык (en) в качестве языка по умолчанию.
Нажмите «Создать» .

Итак, всё готово. Наконец-то мы можем приступить к моделированию нашего виртуального агента.
3. Потоки
Сложные диалоги часто включают в себя несколько тем для обсуждения. В случае с чат-ботом, который мы разрабатываем для G-Records для продажи товаров музыкальной группы, у нас будут диалоги о каталоге продукции, оплате, статусе заказа и вопросах службы поддержки клиентов. Мы могли бы разделить эти темы на отдельные сценарии.

Схемы взаимодействия позволяют командам работать над индивидуальными сценариями общения. Хорошей практикой было бы упростить схему взаимодействия, чтобы она легко помещалась на экране и была более модульной.
Потоки — это новая концепция в Dialogflow CX. В Dialogflow Essentials есть концепция мега-агентов, которые в чем-то похожи на потоки. Однако потоки используются гораздо чаще.
В дальнейшем в этой лабораторной работе мы будем использовать обработчики состояний , которые могут завершить поток (чтобы он вернулся к следующему или предыдущему потоку), или вы можете завершить всю сессию агента.
Давайте создадим несколько сценариев.
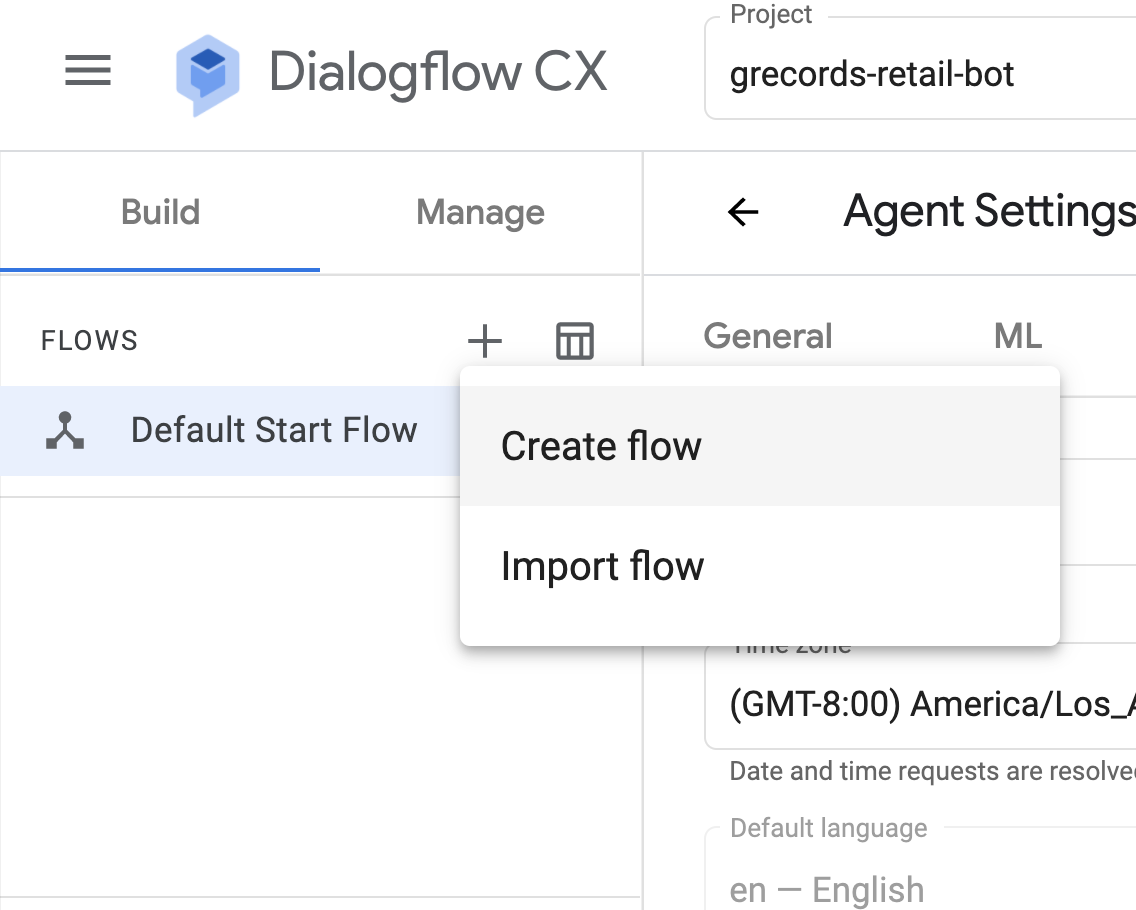
Создание потоков
- В Dialogflow CX нажмите на значок «+» > Создать поток .
- Укажите название:
Catalogи нажмите Enter.
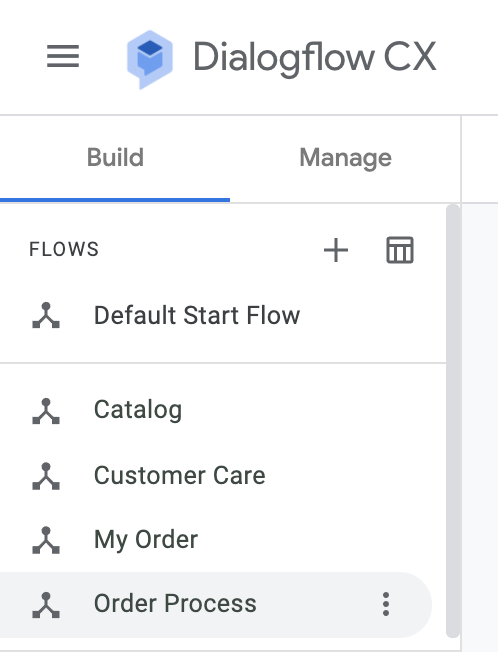
Первый каталог потоков создан. Теперь создайте остальные потоки:
-
Order Process -
My Order -
Customer Care
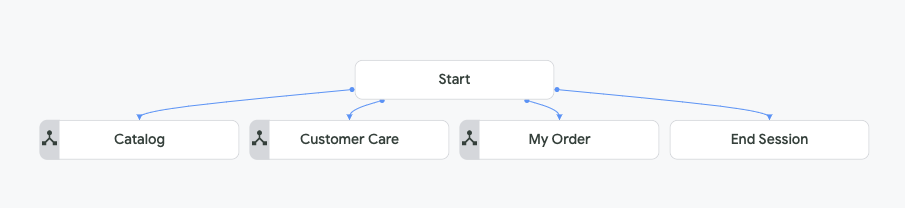
Позже в этой лабораторной работе мы настроим обработчики состояния страницы, это гарантирует, что в итоге визуализация будет выглядеть следующим образом:
Симулятор
В правой части консоли Dialogflow CX вы можете протестировать виртуального агента с помощью встроенного симулятора. Вы можете протестировать диалог с самого начала или с определенного этапа.
- Нажмите на кнопку «Тестовый агент» в правом верхнем углу экрана.
- В поле «Обратиться к агенту» напишите:
HelloВиртуальный агент ответит стандартным приветственным текстом: «Приветствую! Чем я могу помочь?»

Давайте изменим этот приветственный текст по умолчанию.
Последовательность запуска по умолчанию
Начнём с создания маршрута Intent , который будет запускаться после приветствия виртуального агента.
- В левой боковой панели «Создание > Потоки» щелкните «Начальный поток по умолчанию » и выберите узел дерева «Начало» .
Это откроет стартовую страницу. Она автоматически выбирается в разделе «Создание > Страницы» в боковой панели.
- В меню «Пуск» > «Маршруты» щелкните по пункту «По умолчанию — приветственный интент» .
Интент классифицирует намерение конечного пользователя в течение одного хода диалога. В Dialogflow CX интенты могут быть частью обработчика состояния для маршрутизации на следующую активную страницу или выполнения запроса.
- Удалите все записи типа «Агент говорит» и добавьте новый текст:
Welcome, I am the virtual agent of G-Records, a fictional rock label. You can order artists merchandise, ask questions about your order or shipping, and I can tell you more which artists are currently signed with us. How can I help?
Для оптимизации диалога нам также понадобятся кнопки для быстрого ответа / кнопки для предложений.
- Нажмите на опцию «Добавить диалоговое окно» > «Пользовательская полезная нагрузка» и используйте приведенный ниже фрагмент кода.
- Используйте приведенный ниже фрагмент кода в качестве пользовательской полезной нагрузки и нажмите «Сохранить» .
Чтобы узнать больше о пользовательских полезных нагрузках, ознакомьтесь с документацией .
{
    "richContent": [
      [
        {
          "type": "chips",
          "options": [
            {
              "text": "Which artists?"
            },
            {
              "text": "Which products?"
            },
            {
              "text": "About my order..."
            }
          ]
        }
      ]
    ]
  }

- Протестируйте приветственное сообщение в симуляторе.
Вы, вероятно, задаетесь вопросом, почему не видите расширенный контент. Это связано с тем, что расширенный контент, такой как подсказки, зависит от интеграции. Для выполнения следующих шагов потребуется учетная запись для выставления счетов, но вы можете пропустить их, если у вас ее нет.
- В левой боковой панели нажмите «Управление» > «Интеграции» .
- Выберите Dialogflow Messenger и нажмите «Подключиться» .
- Во всплывающем окне нажмите «Включить» .
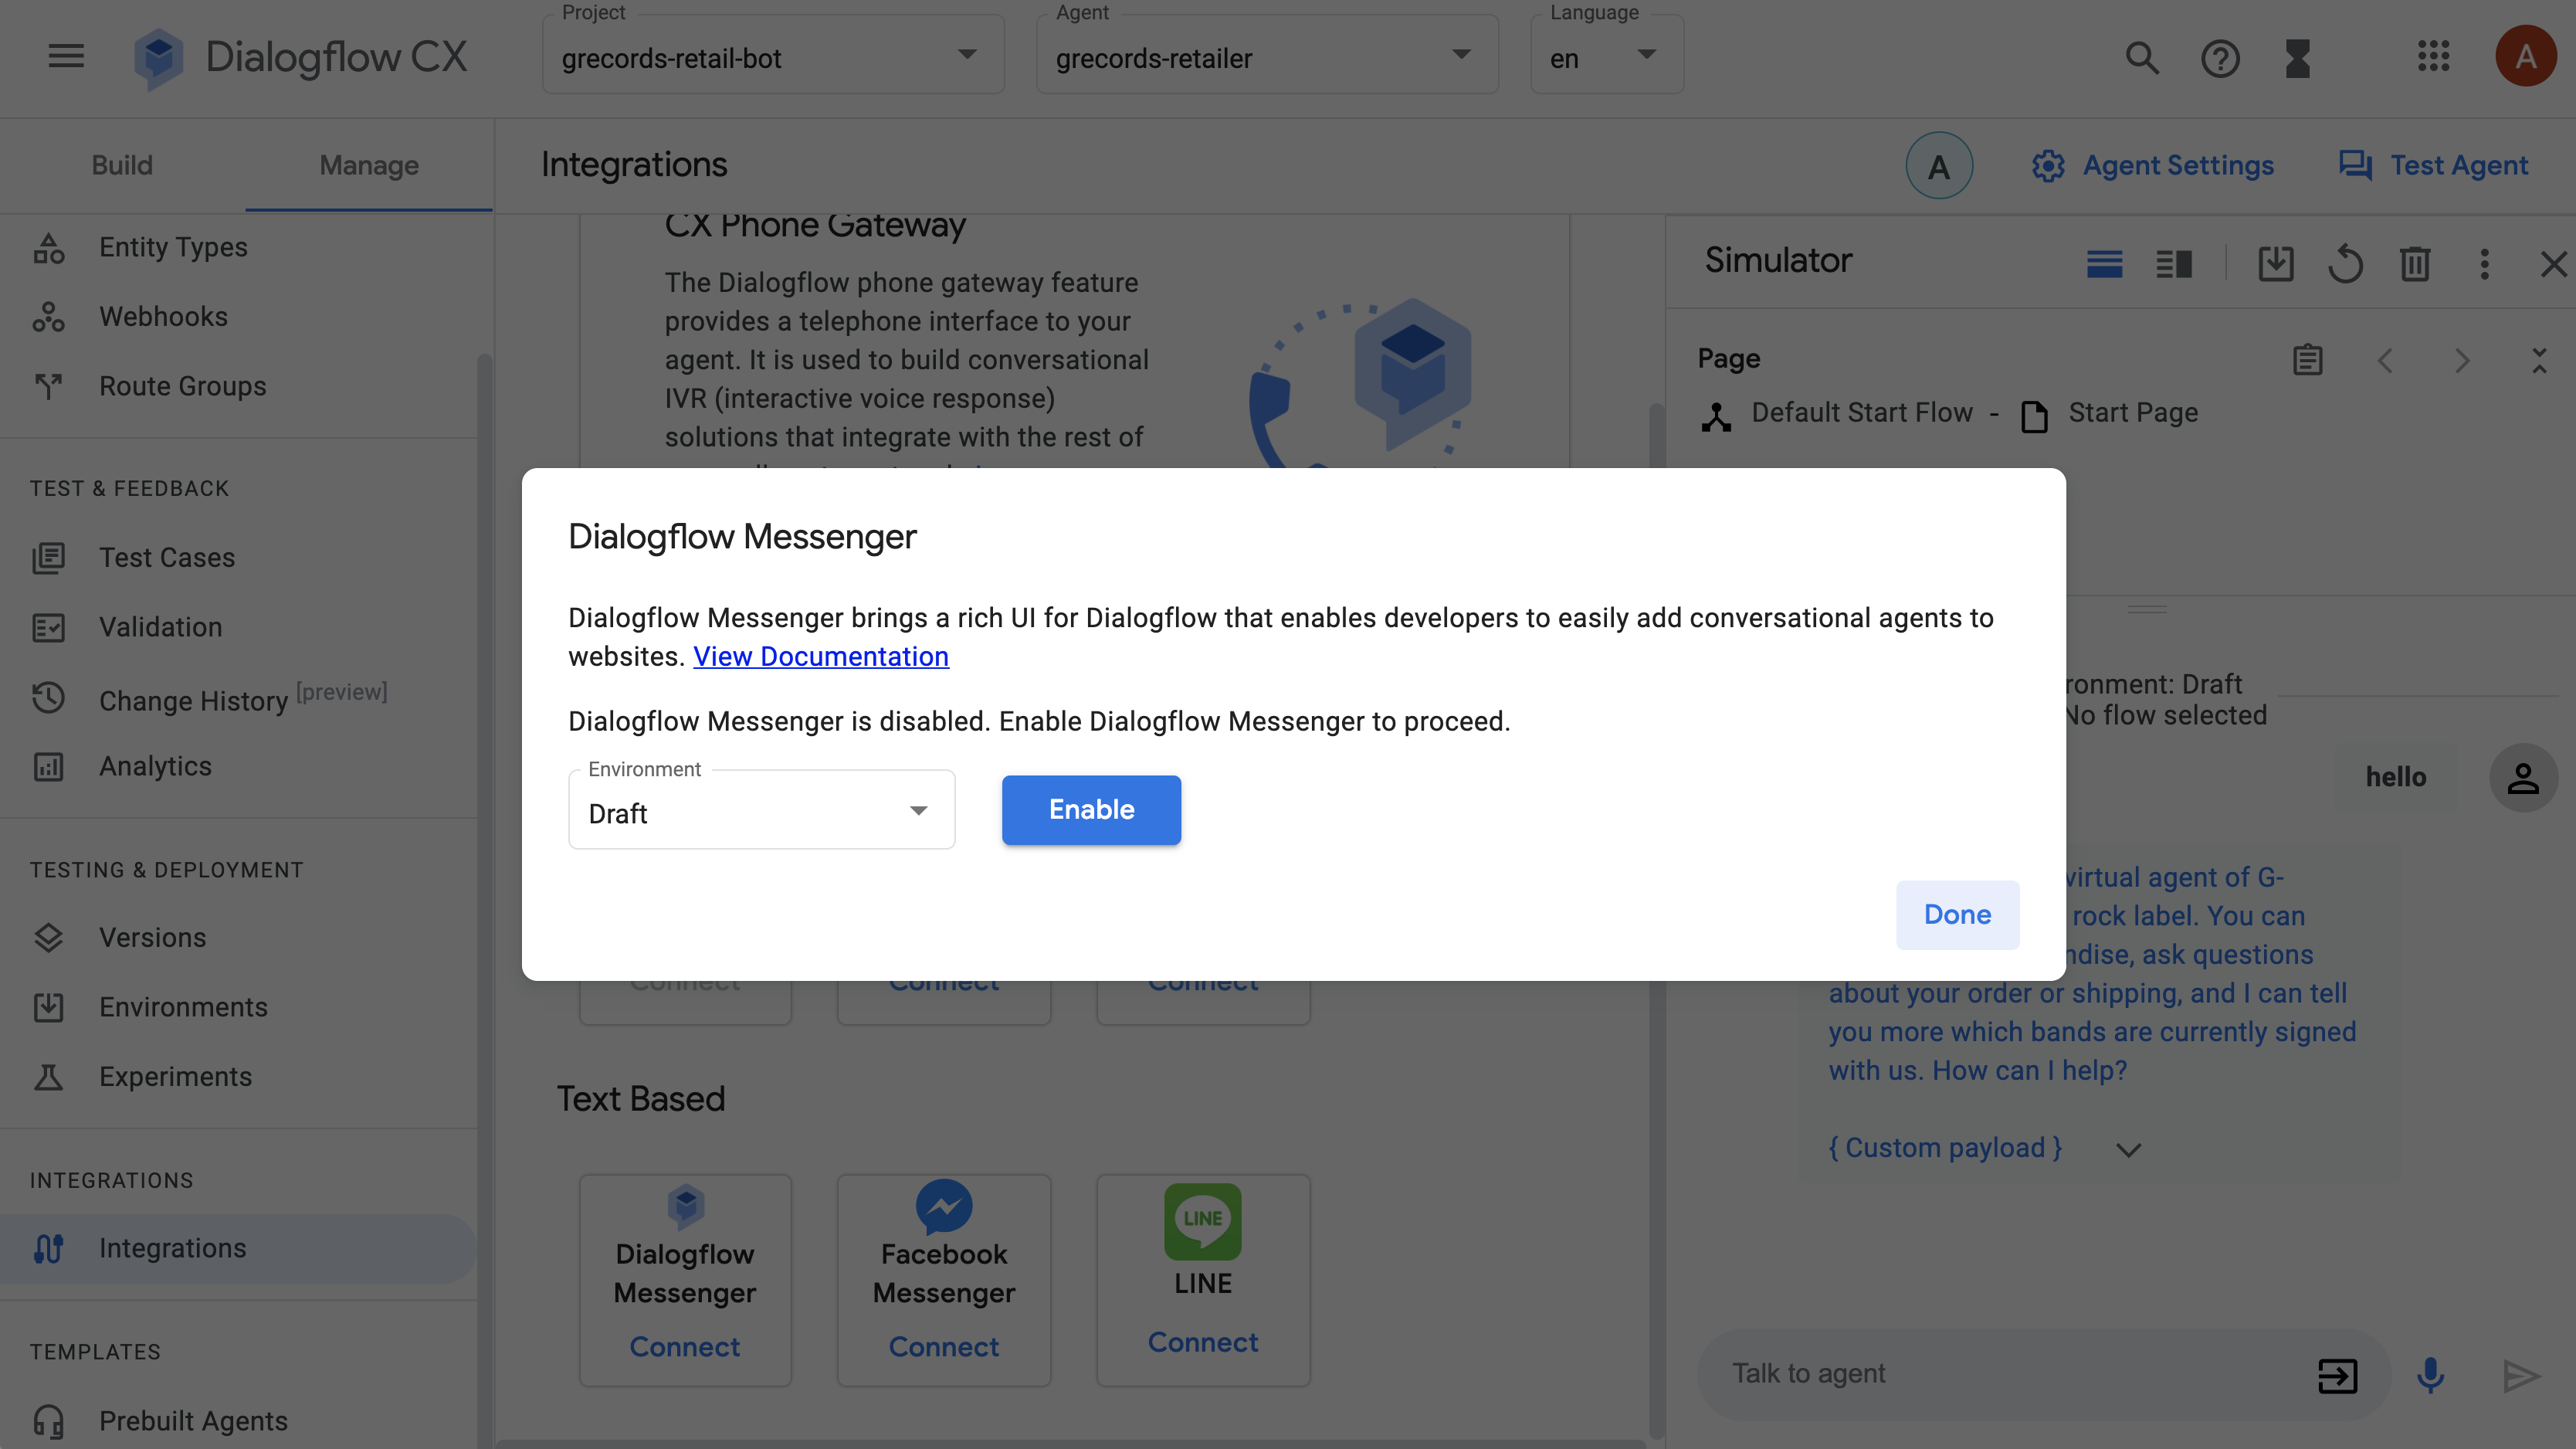
Появится еще одно всплывающее окно, на этот раз с кодом JavaScript для интеграции, который вы можете вставить на свой сайт, чтобы интегрировать компонент Dialogflow Messenger. Поскольку у нас пока нет сайта, мы протестируем виртуального агента непосредственно в инструменте.
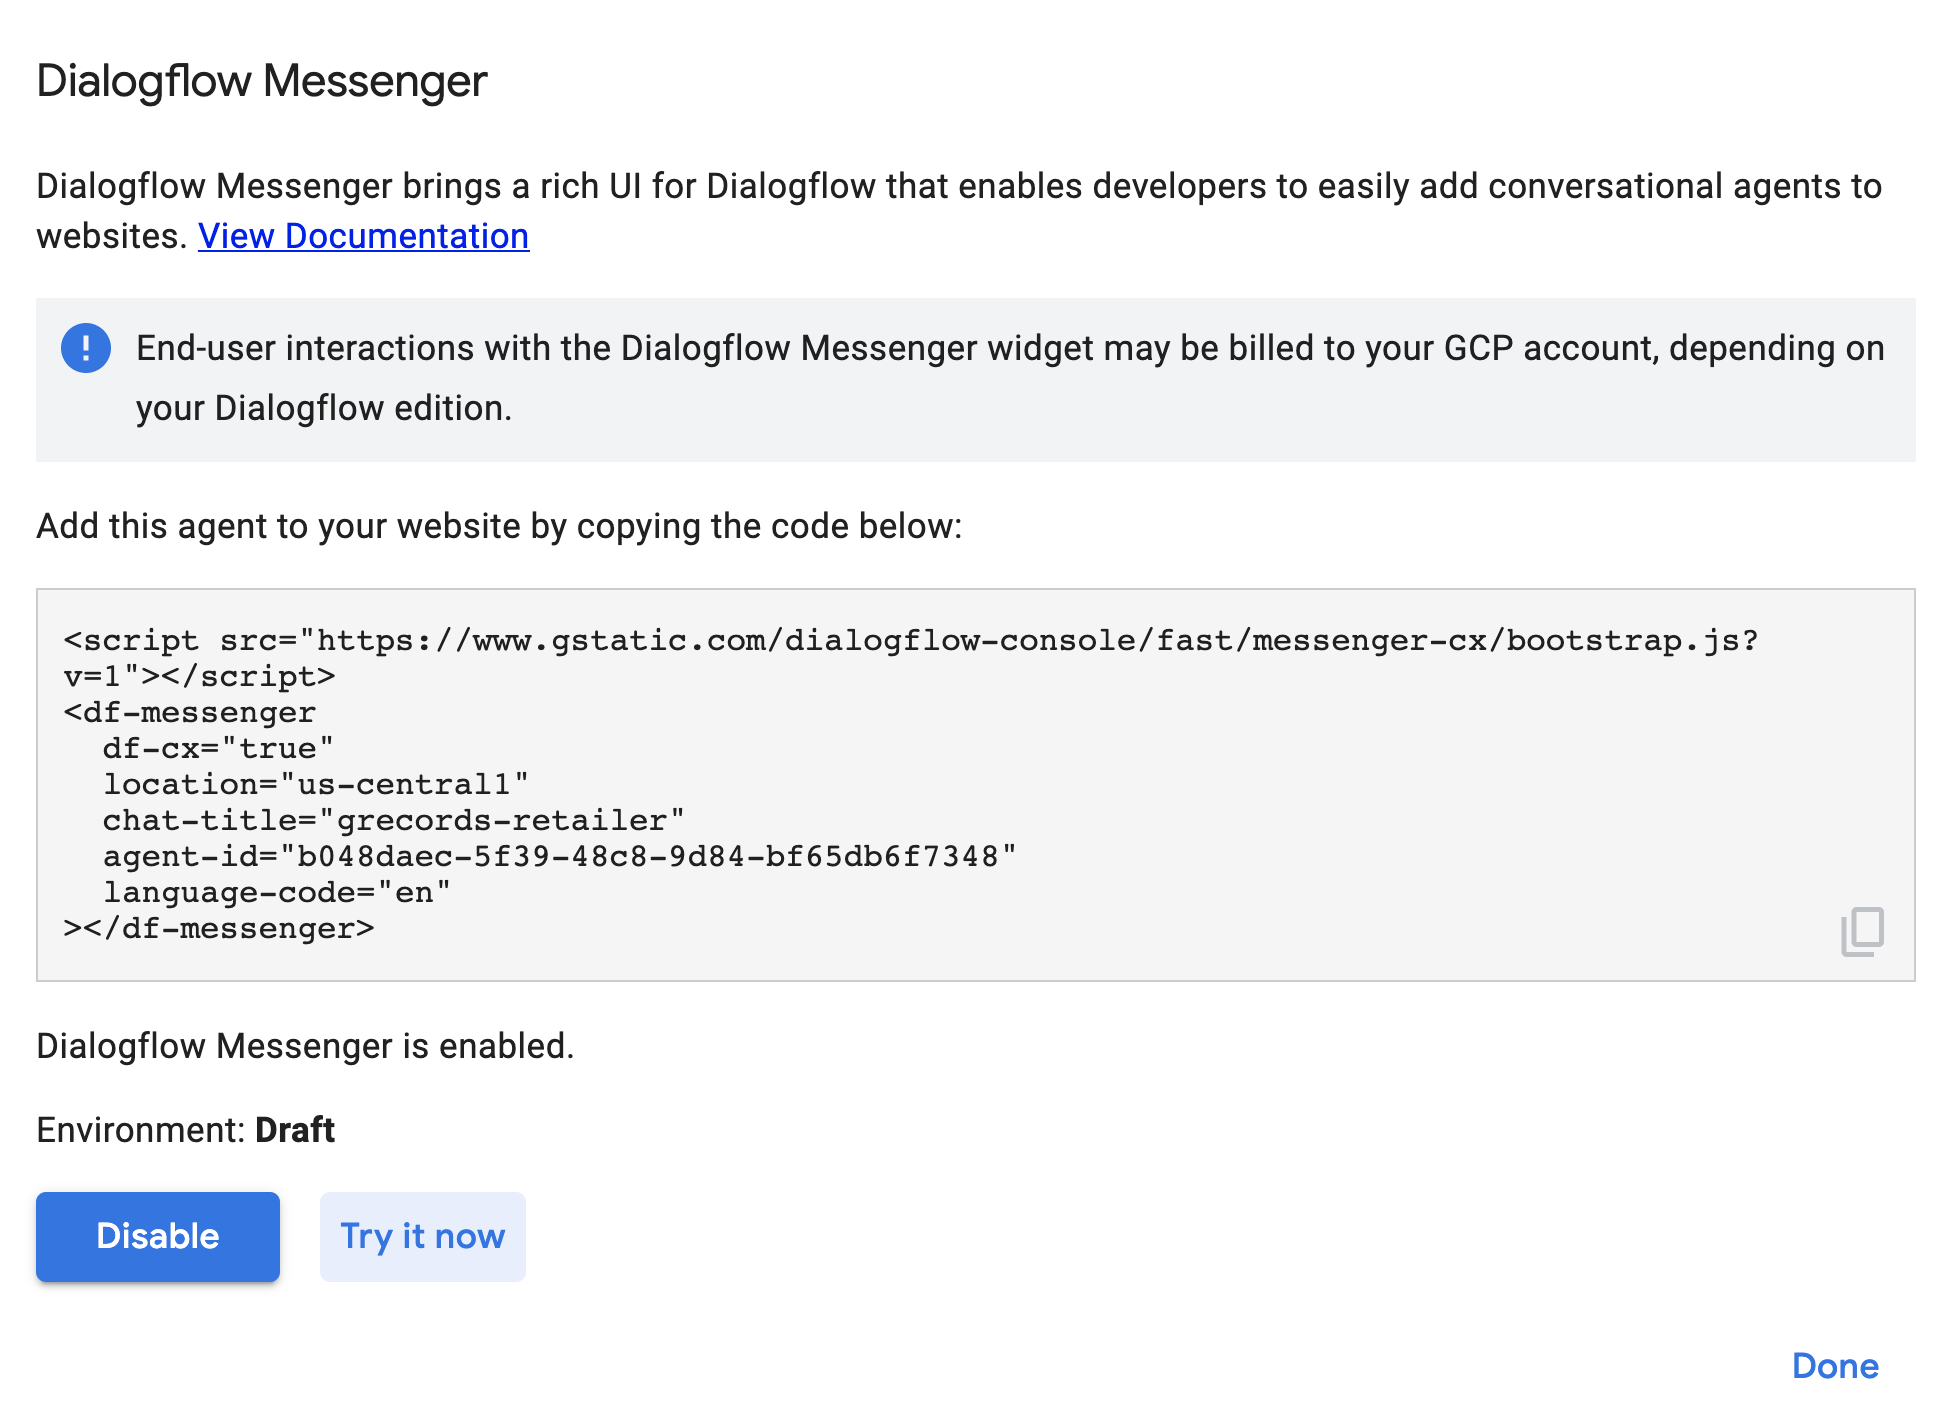
- Нажмите на ссылку «Попробовать сейчас» .
- Нажмите на значок чат-бота в правом нижнем углу, чтобы открыть окно чата. Напишите
Hello, чтобы начать разговор.

На данный момент, когда вы нажимаете на подсказки, виртуальный агент не поймет, что вы имеете в виду. Это потому, что наш виртуальный агент еще не переключается между состояниями. В Dialogflow CX это можно сделать с помощью страниц . Давайте продолжим лабораторную работу, сначала создадим несколько сущностей и интентов .
4. Типы сущностей
Типы сущностей используются для управления способом извлечения данных из пользовательского ввода. Типы сущностей Dialogflow CX очень похожи на типы сущностей Dialogflow ES. Dialogflow предоставляет предопределенные системные сущности, которые могут соответствовать многим распространенным типам данных. Например, существуют системные сущности для сопоставления дат, времени, цветов, адресов электронной почты и так далее. Вы также можете создавать собственные пользовательские сущности для сопоставления пользовательских данных.
Начнём с подготовки всех пользовательских сущностей, прежде чем приступать к проектированию страниц в потоке. Мы создадим следующие сущности:

Создание сущностей
Давайте создадим сущность «Художник» .
- Нажмите «Управление» > «Типы сущностей».
- Нажмите + Создать
- Отображаемое имя:
Artist - Сущности:
-
The Google Dolls(синоним:Google Dolls) -
The Goo Fighters(синоним:Goo Fighters) -
G's N' Roses(синоним:Gs and Roses) -
Alice Googler - Нажмите «Дополнительные параметры» и установите флажок «Нечеткое сопоставление» . (Даже если вы неправильно напишете название группы, система все равно может сопоставить его с правильным объектом.)
- В дополнительных настройках также установите флажок «Скрывать в журнале» . (Если вы неправильно напишете название группы, оно будет исправлено в журнале.)
- Нажмите «Сохранить».
Нам также понадобится сущность для товара "Торговец" :
- Нажмите «Управление» > «Типы сущностей».
- Нажмите + Создать
- Отображаемое имя:
Merch - Сущности:
-
T-shirt -
Longsleeve(синоним:Longsleeve shirt) -
Tour Movie -
Digital Album(синонимы:MP3 Album,MP3) -
CD(синонимы:Disc,Physical CD)
- Нажмите «Сохранить».
Нам также понадобится объект для альбома :
- Нажмите «Управление» > «Типы сущностей».
- Нажмите + Создать
- Отображаемое имя:
Album - Сущности:
-
Live -
Greatest Hits(с синонимом:Hits)
- Нажмите «Сохранить».
Нам также понадобится сущность для размеров одежды:
- Нажмите «Управление» > «Типы сущностей».
- Нажмите + Создать
- Отображаемое имя:
ShirtSize - Сущности:
-
XS(синоним:Extra Small) -
S(с синонимом:Small) -
M(синоним:Medium) -
L(с синонимом:Large) -
XL(синоним:Extra Large) -
2XL(синоним:Extra Extra Large) -
3XL
- Нажмите «Сохранить».
А также идентификатор для порядковых номеров , которые обычно состоят из 4 буквенно-цифровых и 3 цифровых символов (например, ABCD123).
- Нажмите «Управление» > «Типы сущностей».
- Нажмите + Создать
- Отображаемое имя:
OrderNumber - Сущности, выраженные регулярными выражениями
- Сущность: [AZ]{4}[0-9]{3}
- Нажмите «Сохранить».
Конфигурация вашей сущности должна выглядеть примерно так:
@Художник: 
@Merch: 
@Альбом: 
@РазмерРубашки: 
@Номер заказа: 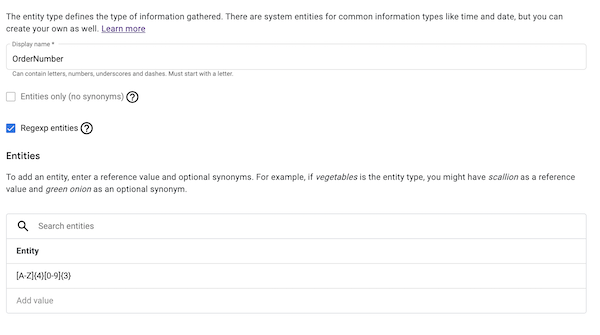
После подготовки пользовательских сущностей мы можем подготовить намерения. Давайте продолжим лабораторную работу.
5. Намерения
Интент классифицирует намерение конечного пользователя в течение одного хода диалога. В Dialogflow CX они были значительно упрощены, и больше не являются базовым элементом управления диалогом. Dialogflow CX использует интенты только для сопоставления с тем, что говорят пользователи. В Dialogflow ES приходилось привязывать к интенту всё (параметры, события, выполнение и т. д.). Интенты в Dialogflow CX содержат только обучающие фразы и, следовательно, могут использоваться повторно. Они больше не управляют диалогом. Таким образом, процесс создания интентов будет простым:
В обучающих фразах в интентах можно использовать сущности для извлечения «переменных» входных данных, поэтому рекомендуется создавать типы сущностей заранее, что мы и сделали на предыдущей странице этапов лабораторной работы.
Формирование намерений
Начнём с подготовки всех намерений, прежде чем приступать к разработке страниц в виде последовательности действий.
- Нажмите «Управление» > «Намерения» .
- Нажмите + Создать
Используйте следующие данные:
- Отображаемое имя
redirect.artists.overview - Описание.
Artists overview: The bands supported by the label

Прокрутите вниз и создайте следующие обучающие фразы :
-
Which bands are signed? -
Which bands -
Which artists -
Which artists are part of the record label -
Who is part of the label -
From which bands can I buy merchandise -
Band merchandise -
Which music do you have? -
I would like to know who are signed to the label -
Who are supported by the label -
From who can I buy shirts -
What music can I order -
Can I get an overview of all the artists

- Нажмите « Сохранить ».
- Теперь давайте продолжим и создадим все остальные намерения. Используйте свою фантазию, чтобы придумать больше обучающих фраз. Лучше всего иметь не менее 10 обучающих фраз для каждого намерения, чтобы охватить различные способы, которыми пользователь может активировать это намерение. Для целей этой лабораторной работы меньшее количество тоже будет приемлемо.
Вот несколько моментов, на которые стоит обратить внимание:
- Обратите внимание, что по мере ввода обучающей фразы Dialogflow CX автоматически аннотирует ваши сущности. Если этого не происходит, вам может потребоваться обновить сущность (добавив синоним) или вручную аннотировать обучающую фразу.
- Более короткие обучающие фразы: система обработки естественного языка Dialogflow также может работать с более короткими обучающими фразами, и мы привели здесь несколько примеров.
- Переобучение: Слишком большое количество обучающих фраз для определенного намерения может привести к переобучению и менее желаемому результату. Рекомендуется использовать итеративное и инкрементальное тестирование и добавлять обучающие фразы в случае, если не найдено совпадение с намерением.
Отображаемое имя | Тренировочные фразы |
| |
| |
| |
| |
| |
| |
| |
| |
| |
| |
| |
| |
| |
| |
| |
| |
| |
| |
| |
| |
Теперь, когда наши многократно используемые элементы (потоки, сущности и намерения) подготовлены, мы можем объединить их, создав страницы и обработчики состояний.
6. Страницы и обработчики состояний
Диалог в Dialogflow CX (сессия) можно описать и визуализировать как конечный автомат . В качестве примера возьмем торговый автомат, который можно смоделировать как конечный автомат. Он имеет следующие состояния: Ожидание монет, Выбор конфеты, Выдача конфеты, и, получив набор входных данных, он переходит между этими состояниями. Например, вставка монеты переводит торговый автомат из состояния «Ожидание монет» в состояние «Выбор конфеты». Страницы — это способ моделирования этих состояний для виртуального агента Dialogflow CX.
В процессе взаимодействия конечного пользователя с Dialogflow CX диалог переходит со страницы на страницу, поэтому в любой момент времени активной считается ровно одна страница, и, соответственно, активным считается и весь процесс, связанный с этой страницей.
Для каждого потока вы определяете множество страниц, где объединенные страницы могут обрабатывать полный диалог по теме (темам), для которой предназначен поток. Каждый поток имеет специальную стартовую страницу. Когда поток впервые становится активным, стартовая страница становится текущей. Для каждого хода диалога текущая страница либо остается неизменной, либо переходит на другую страницу. Эта концепция позволит вам создавать более крупные агенты с множеством страниц и несколькими ходами диалога.
Страницы содержат элементы обработки запросов (статические диалоги ввода и/или веб-хуки), параметры и обработчики состояний . Управление диалогом осуществляется через обработчики состояний, что позволяет создавать различные маршруты перехода на другую страницу Dialogflow CX, включая условные переходы (для разветвления диалогов).
Состояние диалога контролируется путем обработки переходов между страницами с использованием трех различных типов маршрутов:
- Маршруты намерений : Когда необходимо сопоставить намерение (например, смена страницы в зависимости от действий конечного пользователя). (Синие линии на визуальной диаграмме.)
- Условные маршруты : Когда следует проверить условие (например, смена страницы на основе определенных параметров, хранящихся в сессии) (Оранжевые линии на визуальной диаграмме).
- Event handlers : When a certain fallback event should be handled (eg handling no input, no match, in order to disambiguate the end user to either an intent or condition route) (Green lines in the visual diagram.)
Контекст диалога (то есть содержание или ответ пользователю) определяется выполнением запроса, которое может быть как статическим, так и динамическим:
- Статическое выполнение : когда предоставляется ответ со статическим выполнением.
- Динамическое выполнение : когда вызывается веб-хук выполнения для получения динамических ответов.
Для нашего бота для розничной торговли мы создадим несколько маршрутов намерений и предоставим несколько статических ответов для выполнения запросов , которые будут отображаться пользователю сразу после активации страницы. Позже мы создадим параметры с маршрутами условий для сбора информации, необходимой для оформления заказа на товар.
Маршруты намерений страницы
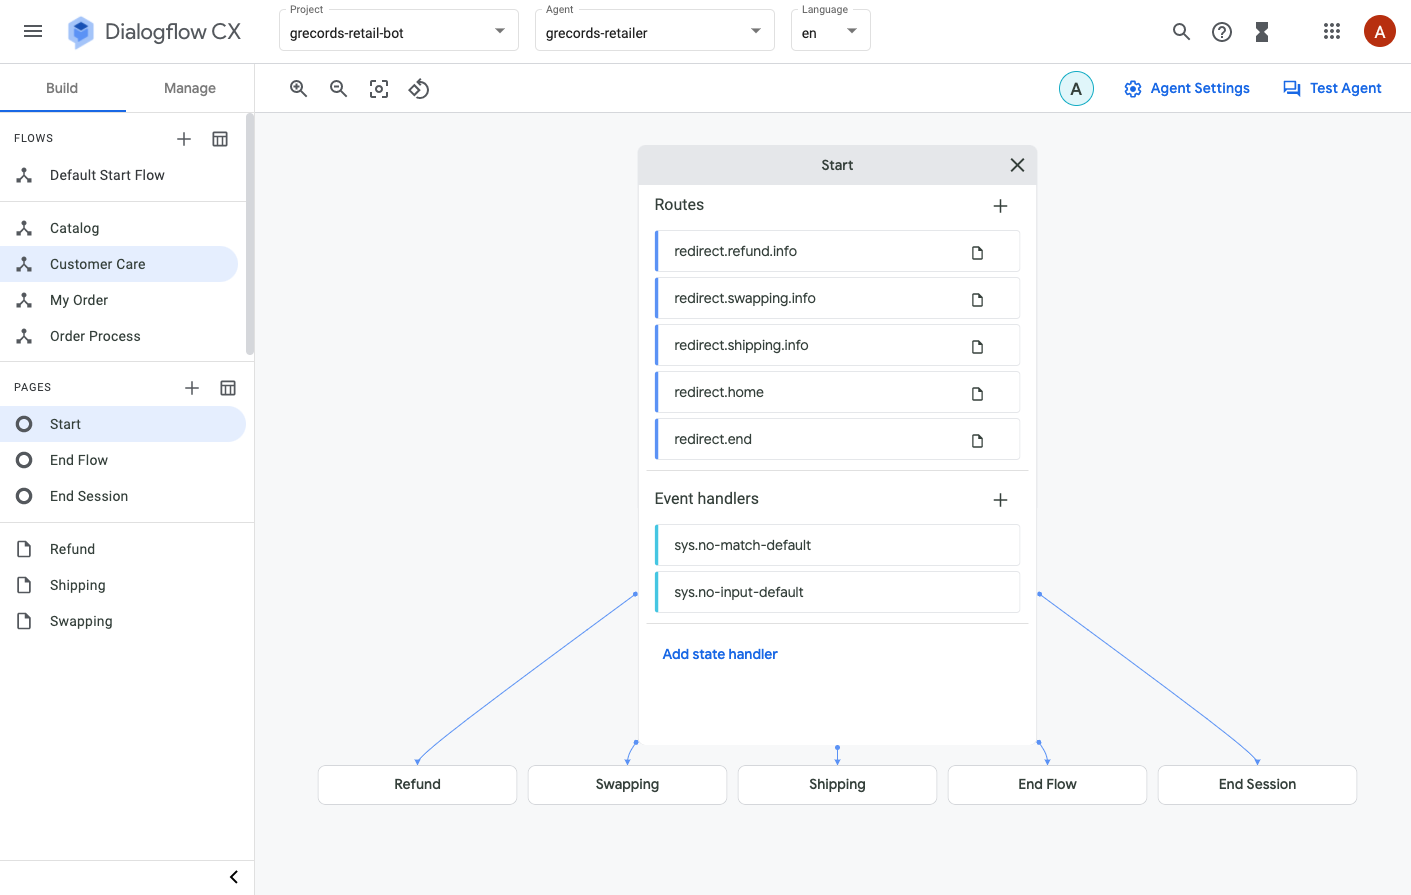
Создание страниц в стандартном начальном потоке.
Вот блок-схема стандартного начального процесса:
Давайте нажмем на это вместе:
- Нажмите «Сборка» > «Запуск по умолчанию».
- Нажмите « Начальная страница».
- Нажмите на значок «+» рядом с пунктом «Маршруты».
- Добавить redirect.artists.overview
- Прокрутите вниз до раздела «Переходы» и перейдите к процессу «Каталог» .
- Нажмите « Сохранить» .
- Повторите описанные выше шаги для
redirect.product.overviewи остальных 11 строк из этой таблицы:
Страница (в потоке) | Маршруты > Намерение | Маршруты > Переход к |
Начинать | | - |
Начинать | | Последовательность: Каталог |
Начинать | | Последовательность: Каталог |
Начинать | | Последовательность: Каталог |
Начинать | | Последовательность: Каталог |
Начинать | | Последовательность: Каталог |
Начинать | | Последовательность: Каталог |
Начинать | | Схема работы: Обслуживание клиентов |
Начинать | | Схема работы: Обслуживание клиентов |
Начинать | | Схема работы: Обслуживание клиентов |
Начинать | | Последовательность действий: Мой заказ |
Начинать | | Последовательность действий: Мой заказ |
Начинать | | Последовательность действий: Мой заказ |
Начинать | | Страница: Завершение сессии |

Стандартный сценарий запуска будет работать так же, как меню параметров при звонке в колл-центр. Однако в этом виртуальном агенте он обучен на естественном языке, а обучающие фразы представлены в виде интентов. Поэтому взаимодействие основано на разговоре, а не на DTMF-опциях, и является более естественным и человекоподобным.
Создание страниц в потоке каталога
Приведенная ниже расшифровка чата относится к процессу «Каталог»:
> "Hi"
"Welcome, I am the virtual agent of G-Records, a fictional rock label.
You can order artists merchandise, ask questions about your order or shipping,
and I can tell you more which artists are currently signed with us. How can I help?"
> "Which bands are signed with this record label?"
"The following bands are signed with G-Records:
Alice Googler, G's N' Roses, The Goo Fighters and The Google Dolls.

From which of these artists would you like to order merchandise?"
> "Alice Googler"
"You want to rock with Alice Googler merchandise. Awesome!

We sell shirts, music or the tour movie.

Which merchandise item do you want?"
"(Suggestion chips: [Shirts] [Music] [Tour Movie])"
> "I would like to buy a Shirt"
"Do you want a longsleeve or a t-shirt?"
"(Suggestion chips: [T-shirt, Longsleeve, Price?])"
> "What's the price difference?"
"A t-shirt costs $25 and a longsleeve costs $30.

Do you want a longsleeve or a t-shirt?"
> "A t-shirt",
"What shirt size do you want?"
"(Suggestion chips: [XS, S, M, L, XL, 2XL, 3XL])"
> "M"
"A T-shirt of Alice Googler size: M costs $25. Shall I continue to order?"
Диалог будет отличаться в зависимости от того, выберете ли вы «Музыка» или «Туристический фильм» : при выборе «Музыка» диалог будет выглядеть так:
 > "Music"
"We have a Greatest Hits Album or the Live Album. Which one do you want?"
"(Suggestion chips: [Greatest Hits, Live, Price?])"
> "The Live Album"
"Do you want this album on CD or MP3?"
"(Suggestion chips: [CD, MP3])"
> "What's the price difference?"
"A CD costs $15. The digital album on MP3 costs $10.
Do you want this album on CD or MP3?"
> "Digital Album",
"The Digital Album: Alice Googler - Live costs $10. Shall I continue to order?"
Диалоги для фильма-тура будут выглядеть следующим образом:
 > "Tour Movie"
"The Tour Movie of G's N' Roses costs $25. Shall I continue to order?
Вот блок-схема всех страниц в процессе работы с каталогом:

Обратите внимание на сложность этого процесса:
- Я мог бы пропустить вопрос о том, каких художников вы представляете , и сразу спросить: «Какие товары доступны?» .
- В стандартном сценарии запуска я могу спросить: «Я хочу купить футболку с изображением кукол Google» или «Я хочу что-нибудь купить». Это означает, что виртуальный агент задаст дополнительные вопросы, чтобы заполнить поля для этих необходимых параметров. Затем он сразу перейдет на страницу товара.
- Диалоговое окно «Цена» берется со страницы «Цена» и будет использоваться повторно.
- Хотя диалог для видеоролика о туре кажется самым простым, на самом деле мы сделаем с ним кое-что особенное. Мы повторно используем эту часть диалога, чтобы конечные пользователи могли вводить её напрямую и для других продуктов, если им потребуется сразу запросить всю необходимую информацию:
 > "I want The Goo Fighters longsleeve size S."
"The longsleeve of The Goo Fighters size S costs $30. Shall I continue to order?"
Давайте начнём с соединения страниц.
- Нажмите «Создать» > «Каталог».
- Нажмите « Начальная страница».
- Нажмите на значок «+» рядом с пунктом «Маршруты».
- Добавить redirect.artists.overview
- Прокрутите вниз до раздела «Переходы» , выберите «Страница» и нажмите: «+ новая страница».
- Укажите название страницы:
Artist Overviewи нажмите «Сохранить».
Теперь давайте завершим остальную часть процесса:
- Предыдущие шаги можно повторить со следующими страницами, намерениями и выполнениями. Перейдите к этой таблице. Страница — это страница, которую вы выберете в потоке, Маршруты > Переход на — это новый поток или страница, которую вы создадите и на которую перейдете.
Страница (в потоке) | Маршруты > Намерение | Маршруты > Переход к |
Начало каталога | | Обзор художника |
Начало каталога | | Продукт |
Начало каталога | | Обзор продукта |
Начало каталога | | Обзор продукта |
Начало каталога | | Рубашки |
Начало каталога | | Музыка |
Начало каталога | | Завершение сессии |
Начало каталога | | Конечный поток |
Обзор художника | | Обзор продукта |
Теперь продолжим и добавим еще несколько статических запросов.
- В каталоге перейдите на страницу «Обзор художника» .
- В разделе «Выполнение записи» нажмите «Редактировать выполнение» .
- Используйте следующие статические запросы ( говорит агент ):
-
The following bands are signed with G-Records: Alice Googler, G's N' Roses, The Goo Fighters and The Google Dolls.
- Нажмите «Сохранить».
- В процессе работы с каталогом перейдите на страницу «Обзор продукции» .
- В разделе «Выполнение записи» нажмите «Редактировать выполнение» .
- Используйте следующее статическое выполнение ( говорит агент ):
-
We sell shirts, music or the tour movie.
- Нажмите « Сохранить ».
Параметры страницы
Параметры используются для сбора и ссылки на значения, предоставленные конечным пользователем во время сессии. Каждый параметр имеет имя и тип сущности. @Artist и @Merch — это минимальный набор параметров, необходимых для оформления заказа на товары. Для футболок или лонгсливов также потребуется @ShirtSize , а если вы хотите заказать музыку, вам также понадобятся @Carrier и @Album name.
Эти параметры необходимо пометить как обязательные . После того, как они станут обязательными, вам потребуется добавить пользовательские подсказки, чтобы запомнить конечного пользователя и попросить его дать правильные ответы для сбора этих параметров. В Dialogflow CX есть несколько механизмов, которые могут вам в этом помочь.
Например, в разделе «Параметры» можно указать пользовательские статические сообщения об обработке запроса. Если параметр является обязательным, будут показаны соответствующие ответы. Эти сообщения будут добавлены в очередь ответов . Во время очереди оператора возможно (и иногда желательно) вызвать несколько запросов на обработку, каждый из которых может сгенерировать сообщение с ответом. Dialogflow хранит эти ответы в очереди ответов . Чтобы узнать больше о жизненном цикле страницы и порядке добавления запросов в очередь ответов, ознакомьтесь с документацией Dialogflow CX Page Docs .
Создание параметров на странице «Обзор исполнителя».
Давайте определим некоторые параметры страницы:
- В меню «Каталог» перейдите на страницу «Обзор исполнителя» .
- Нажмите кнопку « +» в блоке «Параметры» . Добавьте параметр исполнителя :
- Отображаемое имя:
artist - Тип сущности:
@Artist - Обязательно: Отметьте галочкой
- Редактировать в журнале: Проверить
- Теперь добавим несколько пользовательских сообщений об обработке параметров. Если виртуальный агент еще не получил данные об исполнителе , конечный пользователь получит следующий ответ от агента, добавленный в очередь ответов:
From which of these artists would you like to order merchandise?
- Добавьте второй вариант диалога, предоставляющий расширенные подсказки. Нажмите «Добавить вариант диалога» и используйте следующий код (в формате JSON ):
{
  "richContent": [
    [
      {
        "options": [
          {
            "text": "The Google Dolls"
          },
          {
            "text": "The Goo Fighters"
          },
          {
            "text": "Alice Googler"
          },
          {
            "text": "G's N' Roses"
          }
        ],
        "type": "chips"
      }
    ]
  ]
}
Можно обрабатывать различные резервные варианты ответов в зависимости от количества попыток пользователя ответить на эти запросы. Это делается с помощью обработчиков событий параметров . Существует множество встроенных обработчиков событий на выбор, таких как «Недопустимые параметры », «Слишком длинные фразы» , «Нет ввода» , «Нет ввода с первой попытки» , «Нет ввода со второй попытки » или «Нет совпадения» . Разница между отсутствием ввода и отсутствием совпадения заключается в том, что при отсутствии ввода пользователь никогда не давал ответа, тогда как при отсутствии совпадения пользователь давал ответ, но Dialogflow CX не мог сопоставить его с страницей.
- Прокрутите вниз до раздела обработчиков событий Reprompt .
- Нажмите «Добавить обработчик событий» и выберите событие:
No-match default - Используйте следующее статическое текстовое оформление события:
I missed that. Please, specify the artist. You can choose between: Alice Googler, G's N' Roses, The Google Dolls or The Goo Fighters. Which artist do you want to buy merchandise from?
- Нажмите «Сохранить».
- Нажмите «Добавить обработчик событий» и выберите событие:
No-input default - Используйте следующее статическое текстовое оформление события:
I am sorry, I could understand the artist's name. You can choose between Alice Googler, G's N' Roses, The Google Dolls or The Goo Fighters. Which artist do you want to buy merchandise from?
- Нажмите «Сохранить».
Маршруты условий страниц
Параметры очень эффективны в сочетании с условными маршрутами страниц . Когда условие выполняется, вызывается соответствующий маршрут страницы. Условием может быть, например, параметр равен определенному значению , параметр не может отсутствовать , форма заполнена и многое другое. Более подробную информацию о параметрах и условиях можно найти в документации Dialogflow CX.
Для нашего виртуального агента по розничной торговле нам потребуется собрать последовательность параметров, поэтому нам нужно будет создать условие для проверки того, была ли заполнена «форма». Форма — это список параметров, которые должны быть собраны у конечного пользователя для страницы. Виртуальный агент взаимодействует с конечным пользователем в течение нескольких диалогов, пока не соберет все необходимые параметры формы, которые также известны как параметры страницы.
Dialogflow CX автоматически устанавливает значения параметров, предоставленных конечным пользователем во время заполнения формы. Чтобы проверить, заполнена ли форма на текущей странице полностью, используйте следующее условие: $page.params.status = "FINAL"
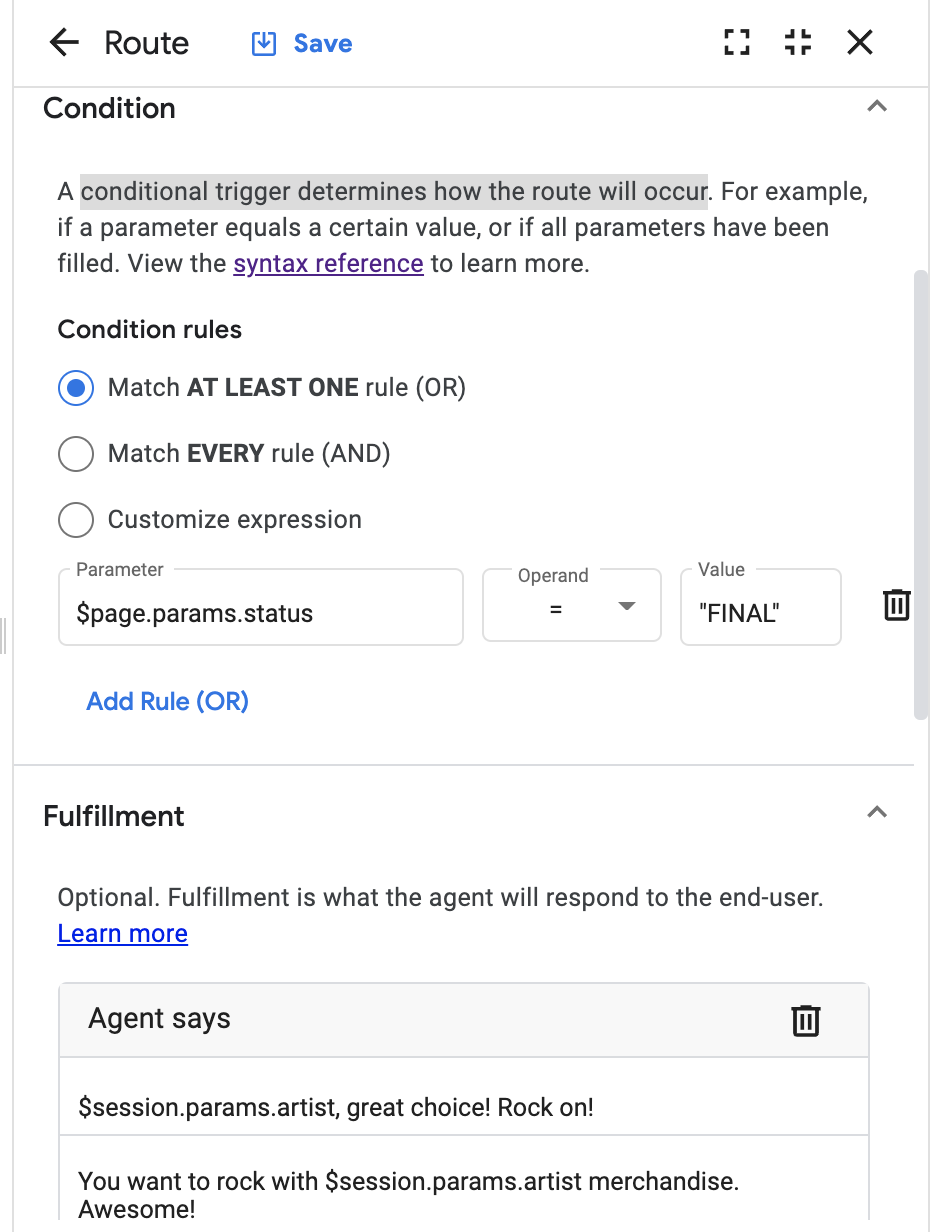
Создание условных маршрутов на странице «Обзор исполнителя».
Давайте создадим условный маршрут, который будет переходить на следующую страницу, как только станет известен исполнитель:
- На странице «Обзор исполнителя» в разделе «Маршруты» нажмите на значок «+» .
- Прокрутите вниз до раздела «Состояние» .
- Выберите хотя бы один (ИЛИ)
- Далее мы напишем выражение, которое
- Параметр:
$page.params.status - Оператор:
= - Значение:
"FINAL"
- Теперь мы создадим для маршрута специальное статическое сообщение, подтверждающее выбор конечного пользователя. Прокрутите вниз до блока «Выполнение» и напишите следующие сообщения:
-
$session.params.artist, great choice! Rock on! -
You want to rock with $session.params.artist merchandise. Awesome!
- Если условие выполняется, следует перейти на страницу «Обзор продукта» . Прокрутите страницу вниз до раздела «Переход» и воспользуйтесь следующей страницей:
Product Overview. - Нажмите « Сохранить ».
Создание маршрутов на странице «Обзор продукта».
Теперь, когда мы знаем, как создавать параметры и условные маршруты, давайте создадим ещё несколько параметров для следующих страниц:
Обзор продукта
- Создайте параметр
artistна странице обзора продукта :
- Отображаемое имя:
artist - Тип сущности:
@Artist - Обязательно: Отметьте галочкой
- Редактировать в журнале: Проверить
- Первоначальный запрос на выполнение:
From which of these artists would you like to order merchandise?
{
  "richContent": [
    [
      {
        "options": [
          {
            "text": "The Google Dolls"
          },
          {
            "text": "The Goo Fighters"
          },
          {
            "text": "Alice Googler"
          },
          {
            "text": "G's N' Roses"
          }
        ],
        "type": "chips"
      }
    ]
  ]
}
- Обработчик событий >
No-match default:To buy merchandise you can choose between the following artists: Alice Googler, G's N' Roses, The Google Dolls or The Goo Fighters. Which artist do you want to buy merchandise from? - Пользовательская полезная нагрузка:
{
  "richContent": [
    [
      {
        "options": [
          {
            "text": "The Google Dolls"
          },
          {
            "text": "The Goo Fighters"
          },
          {
            "text": "Alice Googler"
          },
          {
            "text": "G's N' Roses"
          }
        ],
        "type": "chips"
      }
    ]
  ]
}
- Обработчик событий >
No-input default:To buy merchandise you can choose between the following artists: Alice Googler, G's N' Roses, The Google Dolls or The Goo Fighters. Which artist were you trying to mention? - Пользовательская полезная нагрузка:
{
  "richContent": [
    [
      {
        "options": [
          {
            "text": "The Google Dolls"
          },
          {
            "text": "The Goo Fighters"
          },
          {
            "text": "Alice Googler"
          },
          {
            "text": "G's N' Roses"
          }
        ],
        "type": "chips"
      }
    ]
  ]
}
- Создать параметр
merch:
- Отображаемое имя:
merch - Тип сущности:
@Merch - Обязательно: Отметьте галочкой
- Редактировать в журнале: Проверить
- Выполнение заказа:
Which merchandise item do you want? - Нажмите: Добавить параметр диалога > Пользовательская полезная нагрузка :
{
    "richContent": [
      [
        {
          "type": "chips",
          "options": [
            {
              "text": "Shirts"
            },
            {
              "text": "Music"
            },
            {
              "text": "Tour movie"
            }
          ]
        }
      ]
    ]
  }
- Обработчик событий >
No-match default - Организация мероприятий:
We sell Shirts, Music or the Tour movie. Which of these items do you want? - Пользовательская полезная нагрузка:
{
    "richContent": [
      [
        {
          "type": "chips",
          "options": [
            {
              "text": "Shirts"
            },
            {
              "text": "Music"
            },
            {
              "text": "Tour movie"
            }
          ]
        }
      ]
    ]
  }
- Обработчик событий >
No-input default - Обработчик мероприятия:
I couldn't understand which merchandise item you wanted to buy. You can choose between: Shirts, Music or the Tour movie. Which item do you want? - Пользовательская полезная нагрузка:
{
    "richContent": [
      [
        {
          "type": "chips",
          "options": [
            {
              "text": "Shirts"
            },
            {
              "text": "Music"
            },
            {
              "text": "Tour movie"
            }
          ]
        }
      ]
    ]
  }
- Создайте маршрут, который будет перенаправлять на страницу товара , когда будет указан
artistиmerch.
- Состояние:
- Соответствует каждому правилу (И)
- Выражение:
$session.params.artist != null - Выражение:
$session.params.merch != null - Выполнение:
Alright! $session.params.merch of $session.params.artist, let's go! - Переход: Страница:
Product
- Создайте маршрут для обработки ситуации, когда пользователь произносит слово "Рубашки".
- Назначение: перенаправление.рубашки
- Переход: Страница:
Shirts
- Создайте маршрут для случая, когда пользователь произносит слово "Музыка".
- Intention: redirect.music
- Переход: Страница:
Music
- Создайте маршрут для обработки запросов пользователя о ценах.
- Intent: redirect.price
- Переход: Создать новую страницу:
Price
После настройки указанных выше параметров вы увидите визуализацию, похожую на изображение ниже. Обратите внимание, что маршруты намерений на диаграмме обозначены синим цветом, а маршруты условий — оранжевым. Хотя это и не показано на схеме, обработчики событий обозначены зеленым цветом, а при переходе на страницу по нескольким типам маршрутов линия будет серой.

К настоящему моменту вы уже научились создавать потоки , сущности , намерения и страницы с обработчиками состояния , такими как маршруты намерений и условные маршруты на основе параметров . Позже в этой лабораторной работе мы будем использовать условное ветвление в процессе выполнения, чтобы предоставлять различные диалоги в зависимости от введенных данных.
Для завершения настройки нашего виртуального агента вы можете использовать следующие параметры.
Страница с футболками:
- На странице «Футболки» создайте следующие параметры:
- Условия участия:
Do you want a longsleeve or a t-shirt? - Выполнение запроса. Пользовательская полезная нагрузка:
{
    "richContent": [
      [
        {
          "type": "chips",
          "options": [
            {
              "text": "T-shirt"
            },
            {
              "text": "Longsleeve"
            },
            {
              "text": "Price?"
            }
          ]
        }
      ]
    ]
  }
- Создайте маршрут Intent :
redirect.priceс переходом на страницуPrice. - Создайте следующий параметр:
- Параметр:
merch- Тип сущности:@Merch,RequiredиRedact in log - Параметр > Обработчик событий >
No-match default - Параметр > Выполнение обработчика событий:
You can choose between a t-shirt or a longsleeve. Which of these do you want? - Параметр > Выполнение обработчика событий. Пользовательская полезная нагрузка:
{
    "richContent": [
      [
        {
          "type": "chips",
          "options": [
            {
              "text": "T-shirt"
            },
            {
              "text": "Longsleeve"
            }
          ]
        }
      ]
    ]
  }
- Параметр > Обработчик событий >
No-input default - Параметр > Выполнение обработчика событий:
I couldn't understand if you want the t-shirt or the longsleeve. Which of these do you want? - Параметр > Выполнение обработчика событий. Пользовательская полезная нагрузка:
{
    "richContent": [
      [
        {
          "type": "chips",
          "options": [
            {
              "text": "T-shirt"
            },
            {
              "text": "Longsleeve"
            }
          ]
        }
      ]
    ]
  }
- Нажмите на пункт «Выполнение записи» и прокрутите вниз до раздела «Предварительные настройки параметров» . Каждый раз при активации страницы «Рубашки» параметр категории будет устанавливаться на «Рубашки ».
Параметр | Ценить |
| |
- Добавить условный маршрут:
- Соответствует хотя бы одному правилу (ИЛИ)
- Выражение:
$session.params.merch = "T-shirt" - Выражение:
$session.params.merch = "Longsleeve" - Переход на новую страницу:
Shirt Size
Страница с ценами:
Поскольку сообщения о ценах будут зависеть от выбранного товара или категории (музыка или футболки), мы исправим эту часть позже в лаборатории. Пока достаточно просто ввести заглушку.
- На странице «Цены» создайте следующие параметры конфигурации:
- Заполнение заявки:
PRICE TODO
Поскольку вы можете запросить цену в разных местах диалога, система всегда должна давать ответ и возвращать вас к предыдущей части диалога для продолжения заказа. В дереве диалога есть 5 мест, где вы можете получить информацию о цене (рубашка, размер рубашки, музыка, перевозчик, а также напрямую через маршрут Intent), поэтому нам понадобятся условные маршруты для возвращения назад:
- Добавьте условный маршрут:
- Соответствует каждому правилу (И)
- Выражение:
$session.params.category = "shirts" - Выражение:
$session.params.merch = "null" - Переход на новую страницу:
Shirts
- Добавить условный маршрут:
- Соответствует каждому правилу (И)
- Expression:
$session.params.category = "shirts" - Expression:
$session.params.size = "null" - Transition to new page:
Shirt Size
- Add a Conditional Route:
- Match Every rule (AND)
- Expression:
$session.params.category = "music" - Expression:
$session.params.album = "null" - Transition to new page:
Music
- Add a Conditional Route:
- Match Every rule (AND)
- Expression:
$session.params.category = "music" - Expression:
$session.params.merch = "null" - Transition to new page:
Carrier
- Add a Conditional Route:
- Match Every rule (AND)
- Expression:
$session.params.category = "null" - Transition to new page:
Product Overview
Shirt Size Page:
- Create the following configurations in the Shirt Size Page:
- Entry fulfillment:
What shirt size do you want? - Entry fulfillment Custom payload:
{
    "richContent": [
      [
        {
          "type": "chips",
          "options": [
            {
              "text": "XS"
            },
            {
              "text": "S"
            },
            {
              "text": "M"
            },
            {
              "text": "L"
            },
            {
              "text": "XL"
            },
            {
              "text": "2XL"
            },
            {
              "text": "3XL"
            }
          ]
        }
      ]
    ]
  }
- Create an Intent route :
redirect.pricewith a transition to thePricePage. - Create the following parameter:
- Parameter:
shirtsize- Entity Type:@ShirtSize-Required,Redact In Log - Parameter > Event Handler >
No-match default - Parameter > Event Handler Fulfillment:
Please tell me the shirt size, such as XL. - Parameter > Event Handler Fulfillment Custom payload:
{
    "richContent": [
      [
        {
          "type": "chips",
          "options": [
            {
              "text": "XS"
            },
            {
              "text": "S"
            },
            {
              "text": "M"
            },
            {
              "text": "L"
            },
            {
              "text": "XL"
            },
            {
              "text": "2XL"
            },
            {
              "text": "3XL"
            }
          ]
        }
      ]
    ]
  }
- Parameter > Event Handler >
No-input default - Parameter > Event Handler Fulfillment:
I couldn't understand the shirt size. What size do you want? - Parameter > Event Handler Fulfillment Custom payload:
{
    "richContent": [
      [
        {
          "type": "chips",
          "options": [
            {
              "text": "XS"
            },
            {
              "text": "S"
            },
            {
              "text": "M"
            },
            {
              "text": "L"
            },
            {
              "text": "XL"
            },
            {
              "text": "2XL"
            },
            {
              "text": "3XL"
            }
          ]
        }
      ]
    ]
  }
- Add a Conditional Route:
- Match Every rule (AND)
- Expression:
$page.params.shirtsize != "null" - Transition to Page:
Product
Music Page:
- Create the following configurations in the Music Page:
- Entry fulfillment:
We have a Greatest Hits Album or the Live Album. Which one do you want? - Entry fulfillment Custom payload:
{
    "richContent": [
      [
        {
          "type": "chips",
          "options": [
            {
              "text": "Greatest Hits"
            },
            {
              "text": "Live"
            },
            {
              "text": "Price?"
            }
          ]
        }
      ]
    ]
  }
- Create an Intent Route :
redirect.pricewith a transition to Page:Price. - Create the following parameter:
- Parameter:
album- Entity Type:@Album-Required,Redact In Log - Parameter > Event Handler >
No-match default - Parameter > Event Handler Fulfillment:
You can choose between Greatest Hits and Live Album. Which of these do you want? - Parameter > Event Handler Fulfillment Custom payload:
{
    "richContent": [
      [
        {
          "type": "chips",
          "options": [
            {
              "text": "Greatest Hits"
            },
            {
              "text": "Live"
            }
          ]
        }
      ]
    ]
  }
- Parameter > Event Handler >
No-input default - Parameter > Event Handler Fulfillment:
I couldn't understand if you want the album: Greatest Hit or Live. Which of these do you want? - Parameter > Event Handler Fulfillment Custom payload:
{
    "richContent": [
      [
        {
          "type": "chips",
          "options": [
            {
              "text": "Greatest Hits"
            },
            {
              "text": "Live"
            }
          ]
        }
      ]
    ]
  }
- Click on the entry fulfillment and scroll down to Parameter presets , each time when the Music page gets active, the category parameter will be set to music :
Параметр | Ценить |
| |
- Add a Conditional Route:
- Match Every rule (AND)
- Expression:
$page.params.album != "null" - Transition to Page:
Carrier
Carrier Page:
- Create the following configurations in the Carrier Page:
- Entry fulfillment:
Do you want this album on CD or MP3? - Entry fulfillment Custom payload:
{
    "richContent": [
      [
        {
          "type": "chips",
          "options": [
            {
              "text": "CD"
            },
            {
              "text": "MP3"
            },
            {
              "text": "Price?"
            }
          ]
        }
      ]
    ]
  }
- Create an Intent route :
redirect.pricewhich transitions to thePricePage. - Create the following parameter:
- Parameter:
merch- Entity Type:@Merch-Required,Redact In Log - Parameter > Event Handler >
No-match default - Parameter > Event Handler Fulfillment:
Do you want a physical CD or the digital album? - Parameter > Event Handler Fulfillment: Custom payload:
{
    "richContent": [
      [
        {
          "type": "chips",
          "options": [
            {
              "text": "CD"
            },
            {
              "text": "Digital Album"
            }
          ]
        }
      ]
    ]
  }
- Parameter > Event Handler >
No-input default - Parameter > Event Handler Fulfillment:
I couldn't understand if you mean CD or MP3. Which one do you want? - Parameter > Event Handler Fulfillment: Custom payload:
{
    "richContent": [
      [
        {
          "type": "chips",
          "options": [
            {
              "text": "CD"
            },
            {
              "text": "MP3"
            }
          ]
        }
      ]
    ]
  }
- Add a Conditional Route:
- Match Every rule (AND)
- Expression:
$page.params.merch != "null" - Transition to Page:
Product
Product Page:
- Create the following parameters:
Parameter Displayname | Parameter Entity Type | Проверки |
| | Required, Redact in log |
| | Required, Redact in log |
- The artist parameter needs the following initial prompt fulfillment, which will be shown when the artist isn't known.
You didn't mention which artist you are interested in. You can ask me to buy the $session.params.merch of the artist you like or ask which artists we signed. How can I help?
{
  "richContent": [
    [
      {
        "options": [
          {
            "text": "Which artists?"
          }
        ],
        "type": "chips"
      }
    ]
  ]
}
- Also add a
No-input defaultevent handler with fulfillment:I couldn't understand what you just said. Ask me which artists are signed. - And a
No-match defaultevent handler with fulfillment:I missed that. Please ask me which artists are signed.
- The merch parameter needs reprompt event handlers as well.
- Add a
No-input defaultevent handler with fulfillment:I couldn't understand what you just said. Which merchandise item do you want? - And a
No-match defaultevent handler with fulfillment:I missed that. Which merchandise item do you want?
The next route will transition to the confirmation page when the artist is known and the user chooses a "Tour Movie".
- Add a Conditional Route:
- Match Every rule (AND)
- Expression:
$session.params.artist != null - Expression:
$session.params.merch = "Tour Movie" - Parameter Presets Add Parameter >
price = 25 - Transition to new page:
Confirmation
The next route will transition to the confirmation page when the artist is known and the user chooses a "T-shirt" and the shirt size is chosen.
- Add a Conditional Route:
- Custom Expression:
$session.params.artist != null AND $session.params.merch = "T-shirt" AND $session.params.shirtsize != null - Parameter Presets Add Parameter >
price = 25 - Transition to page:
Confirmation
The next route will transition to the confirmation page when the artist is known and the user chooses a "Longsleeve" and the shirt size is chosen.
- Add a Conditional Route:
- Custom Expression:
$session.params.artist != null AND $session.params.merch = "Longsleeve" AND $session.params.shirtsize != null - Parameter Presets Add Parameter >
price = 30 - Transition to page:
Confirmation
The next route will transition to the confirmation page when the artist is known and the user chooses a "CD" also the album name is chosen.
- Add a Conditional Route:
- Custom Expression:
$session.params.artist != null AND $session.params.merch = "CD" AND $session.params.album != null - Parameter Presets Add Parameter >
price = 15 - Transition to page:
Confirmation
The next route will transition to the confirmation page when the artist is known and the user chooses a "Digital Album" and the album name is chosen.
- Add a Conditional Route:
- Custom Expression:
$session.params.artist != null AND $session.params.merch = "Digital Album" AND $session.params.album != null - Parameter Presets Add Parameter >
price = 10 - Transition to page:
Confirmation
Next, we will now make some advanced conditionals with prompts that detect missing information. The next route will transition back to the music page when the artist is known and the user chooses a "CD" or a "Digital Album" but the album name was not chosen.
- Add a Conditional Route:
- Custom Expression:
$session.params.artist != null AND ($session.params.merch = "CD" OR $session.params.merch = "Digital Album") AND $session.params.album = null - Fulfillment:
I would also need to know which album you would like to buy! - Transition to page:
Music
And the last route will transition to the confirmation page when the artist is known and the user choose a "T-shirt" or a "Longsleeve", but when t-shirt size was not chosen.
- Add a conditional Route:
- Custom Expression:
$session.params.artist != null AND ($session.params.merch = "T-shirt" OR $session.params.merch = "Longsleeve") AND $session.params.shirtsize = null - Fulfillment:
I would also need to know which shirt size you need! - Transition to page:
Shirt Size
In the next part of the lab, we will make use of conditional fulfillments to give different fulfillment messages depending on the input.
7. Conditional Responses
Some responses will return a different dialogue based on the input, The dialogues will branch off, we call this conditional responses . This can become interesting, when you are not making use of webhook fulfillments, where the conditional responses were determined on the back-end. An example could look like:
if [condition]
  [response]
elif [condition]
  [response]
elif [condition]
  [response]
else
  [response]
endif
- An example of a [condition] could be:
$session.params.user-age >= 21. It uses a similar formatting as the conditions in the routes. - An [response] takes the static text response
- Conditional responses always start with
if -
elifandelseblocks are optional
Dialogflow CX can also make use of built-in system functions to make use of. For example to format a date or time, or to display the current time ( $sys.func.NOW() )
Let's finalize the Catalog flow, by fixing the Confirmation and Price Pages.
Confirmation Page:
Now we will build the confirmation page. It has the following requirements:
- If merch is CD or Digital Album . We will show the following fields in the confirmation: artist , merch , album and price .
- If merch is T-shirt or Longsleeve . We will show the following fields in the confirmation: artist , merch , size and price .
- Else (and thus if merch is Tour Movie ). We will show the following fields in the confirmation: artist , merch and price .
- Click on the Confirmation Page.
- Click Edit Fulfillment > Agent Responses > Add dialogue option > Conditional Response :
if ($session.params.merch = "CD" OR $session.params.merch = "Digital Album")
  The $session.params.merch: $session.params.artist - $session.params.album costs $$session.params.price. Shall I continue to order?
elif ($session.params.merch = "T-shirt" OR $session.params.merch = "Longsleeve")
  A $session.params.merch of $session.params.artist size: $session.params.shirtsize costs $$session.params.price. Shall I continue to order?
elif $session.params.merch = "Tour Movie"
  The $session.params.merch of $session.params.artist costs $$session.params.price. Shall I continue to order?
else
  It looks like something went wrong with your order. You can say "Reset", to restart the order process.
endif
- Create the following Custom payload:
- Custom payload:
{
  "richContent": [
    [
      {
        "options": [
          {
            "text": "Yes, confirm"
          }
        ],
        "type": "chips"
      }
    ]
  ]
}
Next, create two intent routes:
confirm.proceed.ordertransitions to:Order ProcessFlow.decline.proceed.ordertransitions toEnd Flow
When the user declines the order, and does not want to proceed the order process, we will have to transition back to the welcome page, but all the parameters have to be cleared. We can do this by specifically setting null to all the possible parameters. You can do this with Parameter presets.
- In the decline.proceed.order intent route, scroll down to Parameter presets and add the following parameters:
Parameter | Value |
|
|
|
|
|
|
|
|
|
|
|
|
|
|
Notice that we have created an additional parameter called restart. If this parameter is present, the Default Start Flow, should know to continue the conversation by showing a customized message.
- Click on the Default Start Flow, Start Page, and create another Conditional Route:
$session.params.restart = "true"- Fulfillment:
"Welcome back, as the virtual agent of G-Records, I can help you order artists merchandise, you can ask questions about your order or shipping, and I can tell you more which artists are currently signed with us. How can I help?" - Custom payload:
{
    "richContent": [
      [
        {
          "type": "chips",
          "options": [
            {
              "text": "Which artists?"
            },
            {
              "text": "Which products?"
            },
            {
              "text": "About my order..."
            }
          ]
        }
      ]
    ]
  }
- Select the Start Page and click on the
redirect.endintent. Create the following fulfillment:Thank you for contacting G-Records! Have a nice day!
Price Page:
Let's also fix the Price TODOs. The price information will be static for now. Click on the Price Page in the Catalog Flow, and use the following entry fulfillment:
- Delete the Agent Says entry fulfillment.
- Create a new Conditional Response:
if $session.params.category = "shirts"
  A t-shirt costs $25 and a longsleeve costs $30.
elif $session.params.category = "music"
  A CD costs $15. The digital album on MP3 costs $10.
else
  A t-shirt costs $25 and a longsleeve costs $30. A CD costs $15 and a digital album on MP3 $10. In case you are interested in the Tour Movie, that one is $25.
endif

Well done, by now you completed the Catalog flow. Your flow should look similar to this diagram:
8. Wrapping up the agent
We are almost at the end of this lab. Let's configure the last flows together, and take in practice all the new things that we have learned.
Creating the My Order Flow
- Go to the My Order Flow, and create the following intent transitions:
Page (In Flow) | Routes > Intent | Routes > Transition To |
My Order Start |
| My Order |
My Order Start |
| My Order Status |
My Order Start |
| My Order Cancellation |
My Order Start |
| End Session |
My Order Start |
| End Flow |
My Order |
| My Order Status |
My Order |
| My Order Cancellation |
Default Start Flow |
| Flow: My Order |
Default Start Flow |
| Flow: My Order |
- Let's create the following entry fulfillment for the My Order Page:
- Entry fulfillment:
I can look up the status of your order, or I can cancel an order.
- In the My Order Page create the following parameter:
- Displayname:
ordernumber - Entity Type:
@OrderNumber - Required: checked
- Initial prompt fulfillment:
What's the order number? For example ABCD123. - Event Handler:
No-match default:To proceed with your order I will need an order number. Order numbers start with 4 characters and end with 3 numbers, such as ABCD123. Which order number may I use? - Event Handler:
No-input default:I missed that. To proceed with your order I will need an order number. Order numbers start with 4 characters and end with 3 numbers, such as ABCD123. Which order number may I use?
- Create the following conditional route:
- Customize Expression:
$page.params.status = "FINAL" - Fulfillment:
And do you want to Cancel your order, or should I look up the status?
- Click on Add state handler > Event Handlers and create the Event Handler:
No-input default
- Fulfillment:
I'm sorry, what was that? Would you like me to cancel an order or look up the status? - Custom payload:
{
  "richContent": [
    [
      {
        "options": [
          {
            "text": "Status"
          },
          {
            "text": "Cancel"
          }
        ],
        "type": "chips"
      }
    ]
  ]
}
- Create the Event Handler:
No-match default
- Fulfillment:
Would you like me to cancel an order or lookup the status? - Custom payload:
{
  "richContent": [
    [
      {
        "options": [
          {
            "text": "Status"
          },
          {
            "text": "Cancel"
          }
        ],
        "type": "chips"
      }
    ]
  ]
}
- In the My Order Status Page create the following parameter:
- Displayname:
ordernumber - Entity Type:
@OrderNumber - Required checked
- Initial prompt fulfillment:
What's the order number? For example ABCD123. - Event Handler:
No-match default:To proceed with your order I will need an order number. Order numbers start with 4 characters and end with 3 numbers, such as ABCD123. Which order number may I use? - Event Handler:
No-input default:I missed that. To proceed with your order I will need an order number. Order numbers start with 4 characters and end with 3 numbers, such as ABCD123. Which order number may I use?
- In the My Order Status Page create the following conditional route:
- Customize Expression:
$session.params.ordernumber != null - Fulfillment:
Your order $session.params.ordernumber has been shipped, it can take up to approx 2 weeks before you will receive your items. - Add dialogue option > Text:
Is there anything else I can help you with?
- In the My Order Cancelation Page create the following parameter:
- Displayname:
ordernumber - Entity Type:
@OrderNumber - Required checked
- Initial prompt fulfillment:
What's the order number? For example ABCD123. - Event Handler:
No-match default:To proceed with your order I will need an order number. Order numbers start with 4 characters and end with 3 numbers, such as ABCD123. Which order number may I use? - Event Handler:
No-input default:I missed that. To proceed with your order I will need an order number. Order numbers start with 4 characters and end with 3 numbers, such as ABCD123. Which order number may I use?
- In the My Order Cancelation Page create the following conditional route:
- Customize Expression:
$session.params.ordernumber != null - Fulfillment:
Your order $session.params.ordernumber has been canceled. - Add dialogue option > Text:
Is there anything else I can help you with?
- Test the flow and create the following two test scenarios:
>"About my order"
>"ABCD123"
>"Status"
And:
>"What's the status of order DEFG222"
- Select the Start Page and click on the
redirect.endintent. Create the following fulfillment:Thank you for contacting G-Records! Have a nice day! - Select the Start Page and click on the
redirect.homeintent. Create the following parameter preset:restart = true
Default Negative intents (Fallback)
When you create a virtual agent, a default negative intent is created for you. You can add training phrases to this intent that act as negative examples that will trigger a No-match event. There may be cases where end-user input has a slight resemblance to training phrases in normal intents, but you do not want these inputs to match any normal intents.
- Try in the simulator:
I don't like Alice Googler.
You will see that the virtual agent answers with the Product Overview Page, to continue ordering Alice Googler merchandise. However, your end user does not like that artist. Let's use the Default Negative Intent for this.
- Go to Manage > Intents and select the Default Negative Intent.
- Add the following training phrases that will trigger the No-match event.
I don't like Alice GooglerI am not a fan of G's N' RosesI can't stand the music of the Google Dolls
- Hit Save and test the following sentence in the simulator:
I am really not a fan of the Goo Fighters
This time the No-match event was triggered, you stayed on the Start Page.
Default Fallback Messages
- Click the Default Start Flow, select the
sys.no-input-defaultevent handler.
The No-input fallback basically means: No text or speech answers were detected. Likely no answers were given, or the system couldn't hear it. Therefore, let's make the fallback messages more specific. Use the tab key, to create alternative dialogues:
- Remove all answers, and add these text dialogues:
I'm sorry, I didn't receive an answer. Can you say it again?I missed your answer, can you say it again?Sorry, I didn't hear anything. Can you say it again?I couldn't hear what you were saying, what was that?I'm sorry, I missed your answer. What were you trying to say?
Don't forget to click Save.
- Click the Default Start Flow, select the
sys.no-match-defaultevent handler.
The No Match fallback basically means: Text or speech answers were detected but nothing in Dialogflow CX got matched.
- Remove all answers, and add these text dialogues:
Sorry, I didn't get that. Can you please rephrase?I'm sorry, I don't understand. Can you please rephrase?I don't understand, please rephrase.Sorry, I didn't get that. What was that?I didn't get that, can you please rephrase?
Don't forget to click Save.
- It's advised to repeat these steps for the Catalog, My Order, Order Process and Customer Care flows.
Here's a tip: when creating fallback messages, make them more explicit, by rephrasing the previous question or by mentioning an example. You could create these type of No-match and No-input events on Page level when creating parameters. In our labs, we have already done this.
Creating the Order Process Flow
- Go to the Order Process Flow, and create the following intent transitions:
Page (In Flow) | Routes > Intent | Routes > Transition To |
Order Process Start |
| End Session |
Order Process Start |
| End Flow |
Order Process Start |
| New Page: Shipping Details |
- Let's create the following entry fulfillment for the Shipping Details Page:
- Entry fulfillment:
To complete your order I will first need to collect your shipping details.
- Create the following parameters:
These parameters will make use of built-in system entities. System entity support differs for each language. See the docs for more information.
Parameter Display name | Entity | Required? | Initial prompt fulfillment | No-match default | No-input default |
| @sys.person | Required |
|
|
|
| @sys.person | Required |
|
|
|
| @sys.address | Required |
|
|
|
| @sys.any | Required |
|
|
|
| @sys.geo-city | Required |
|
|
|
| @sys.geo-country | Required |
|
|
|
| @sys.email | Required |
|
|
|
- Create the following conditional route:
- Customize Expression:
$page.params.status = "FINAL" - Transition to new Page:
Payment Details
- Create the following entry fulfillment.
Let's fake it that this virtual agent makes use of Google Pay. Don't worry this tutorial won't make real transactions. Create the following entry dialogues:
- Agent Says:
Alright $session.params.firstname! We will make use of Google Pay, that's connected to your email account: $session.params.email.
- Conditional Response
if $session.params.merch != "Digital Album"
  Shipping costs an additional 5 dollars. This will make the total price $$sys.func.TO_TEXT($sys.func.ADD($session.params.price, 5)).
  Your merchandise will be shipped to:
  $session.params.firstname $session.params.lastname
  $session.params.address
  $session.params.zipcode $session.params.city
  $session.params.country
  To continue the order process please explicitly say "I confirm". Do you want to confirm your $session.params.artist $session.params.merch order?
else
  The total costs will be: $$session.params.price.
  After purchasing the digital album, you will receive an email with the download link.
  To continue the order process please explicitly say "I confirm".
  Do you want to confirm your $session.params.artist $session.params.merch order?
endif
- Create the following Intent Route
- Intent:
confirm.proceed.order - Agent Says:
Thank you for your order! Your merchandise will be shipped today! - Add Dialogue Option > Text:
Here's the order number: ABCD123. - Add Dialogue Option > Text:
Have a good day! - Transition:
End Session
- Select the Start Page and click on the
redirect.endintent. Create the following fulfillment:Thank you for contacting G-Records! Have a nice day! - Select the Start Page and click on the
redirect.homeintent. Create the following parameter preset:restart = true
Awesome! By now we have a fully working realworld retailer chatbot! In the next lab, we will test how well the virtual agent performs!
9. Test your virtual agent
You can use the built-in simulator to test the dialogues of your virtual agent. The advantage of testing the flows in the simulator is that you will see a nice overview of flows, pages, parameters, and (DTMF) events that the simulator collected while walking through your flows. This makes testing easier than testing it directly in an integration, as those types of information will be hidden from the end user. It's even possible to create test cases, save and reuse those test cases. This makes a lot of sense, for when you maintain or edit your flows over time, and you want to be sure that none of your changes break your previous work.
It is also possible to export and import previously made test cases, by storing the tests in Google Cloud Storage or local. Exporting a test will download a blob file. To learn more about the simulator and test cases check out the Simulator / Test Cases Docs .
Before creating some test cases, let's first finalize the rest of our virtual agent:
Creating the Customer Care Flow
- Go to the Customer Care Flow, and create the following intent transitions:
Page (In Flow) | Routes > Intent | Routes > Transition To |
Customer Care Start | | Перевозки |
Customer Care Start | | Возвращать деньги |
Customer Care Start | | Обмен |
Customer Care Start | | End Flow |
Customer Care Start | | End Session |
- Create the following entry fulfillments for the Shipping Page:
-
Shipping physical merchandise items can take up to 2 weeks. -
Is there anything else I can help you with?
- Create the following entry fulfillments for the Refund Page:
-
We offer free returns and refunds. We provide one free return label for each order. You can use it within 30 days from receiving your order. If your refund is accepted, we will refund the price you paid for your item back to your original payment method. -
Is there anything else I can help you with?
- Create the following entry fulfillments for the Swapping Page:
-
If you would like to change your item for a different one, please return your unwanted item and place a new order. If your refund is accepted, we will refund the price you paid for your item back to your original payment method. -
Is there anything else I can help you with?
- Select the Start Page and click on the
redirect.endintent. Create the following fulfillment:Thank you for contacting G-Records! Have a nice day! - Select the Start Page and click on the
redirect.homeintent. Create the following parameter preset:restart = true
Create test cases
- Click the Test Agent button on the right side of the screen.
When you first open the simulator, you need to select an agent environment and active flow. In most cases, you should use the draft environment and default start flow.
- Type:
Hi

- Ask:
Which artists are signed with your label? - Say:
The Google Dolls - Say:
I am interested in buying a shirt - Say:
A t-shirt - Say:
Medium - Now click on the save test case button. Which you can find in the top of the simulator (next to the redo arrow, and reset trash bin icon)
- Give it the following details:
- Test case name:
Buy Google Dolls t-shirt size M - Tags: #catalog, #shirts, #t-shirt, #TheGoogleDolls
- Нажмите «Сохранить».
Let's create more test cases.
- First clear the current dialogue, by clicking on the Reset (thrash bin) icon.
- Create the following test cases:
Buy the Alice Googler t-shirt:
>"Buy the Alice Googler t-shirt."
>"XL"
- Test case name:
Buy the Alice Googler t-shirt - Tags:
#catalog, #shirts, #t-shirt, #AliceGoogler
Buy a t-shirt size M: (Note the Artist name hasn't been mentioned, but you do want to skip the bands overview, products overview, shirts and shirt size pages)
>"Buy a t-shirt size M"
>"The Google Fighters"
- Test case name:
Buy a t-shirt size M - Tags:
#catalog, #shirts, #t-shirt, #TheGoogleFighters - Description: (Note the Artist name hasn't been mentioned, but you do want to skip the bands overview, products overview, shirts and shirt size pages)
Purchase Music of G's N' Roses (Note this will skip the bands overview and products overview page)
>"Purchase music of G's N' Roses"
>"Live"
>"CD"
- Test case name:
Purchase music of G's N' Roses - Tags:
#catalog, #music, #CD, #GsNRoses, #live - Description: (Note this will skip the bands overview and products overview page)
Check price information:
>"Which products"
>"Shirts"
>"What's the price difference?"
>"Longsleeve"
>"What does it cost?"
>"M"
>"The Google Dolls"
>"No"
>"Which bands"
>"The Gooo Fighters"
>"Music"
>"How much does it cost?"
>"Greatest Hits"
>"What's the price difference?"
>"Mp3"
>"No"
>"I want to buy the tour movie"
>"Alice Googler"
>"Yes"
- Test case name:
Price info - Tags:
#catalog, #music, #tourmovie, #shirts - Description: Test price info on various points in the dialogue
Test pre-recorded test cases
- Select Manage > Test Cases in the Dialogflow main menu on the left.
- Select all the test cases and press the Run button, above the table.
Dialogflow CX will run all the selected test cases against the recording that was saved as a "Golden Test Case", if the results are the same as how you saved it, then the tests are passed. - Did something change in the flows like Pages that are not correctly configured, or intents that directed you to the wrong pages, then the tests will fail.

- In the simulator ask the following question:
How long will shipping take? - Note the result, and save the test case as
Shippingwith the tag:#shipping. - Go to the Manage > Test Cases panel and press the Run button on the top right of the grid, to run only the
Shippingtest case.
This test should pass.
- Go back to the Customer Care Flow, Select the Start Page and click on the Routes header.
This will show a screen with a grid that shows all the routes.
- Remove the
redirect.shipping.info route - Go to the Manage > Test Cases panel and press the Run button on the top right of the grid, to run only the
Shippingtest case.
This test should fail.
- You can click on the failed test, to see the details of the fail.
In this case the test failed with the below error message:
Page: Page mismatch:
Expected: Shipping
Actual: Start Page
The reason for this is because the page doesn't exist in the flow anymore. We expected the Shipping Page, but instead we never moved away from the Start Page. (or your end-users would receive a fallback message.)
With other words, this is a missed request, a False Negative Test result. The test failed. We expected the Shipping Page, but nothing happens, or a fallback message was shown.
- Go back to the Customer Care Flow, and add the
redirect.shipping.infoas an intent route, to the Start Page. Don't forget to transition to the Shipping Page and hit Save . - In the simulator record the following test case:
I want to swap my item, save this test case asSwapping#swapping. - Open Manage >Intents > redirect.refund.info and add the following training phrase:
I want to swap this item for a refund
Without that training phrase, when a user would ask to change an item for a refund, it would hit the redirect.swapping.info intent, but we don't want to give information on changing items, we want to give information on refunds.
- Create the following golden test case:
I want to swap this item for a refundin the simulator, and save this test case asSwap for Refund#refund - Go back to the Manage >Intents > redirect.refund.info intent, and remove the
I want to swap this item for a refundline. - Go back to Manage > Test Cases , select the Swap for Refund test case, and Run it.
Your latest test failed, with the below error message:
If you would like to change your item for a different one, please return your unwanted item and place a new order. If your refund is accepted, we will refund the price you paid for your item back to your original payment method.`
Is there anything else I can help you with?
 Page: Page mismatch:
Expected: Refund
Actual: Swapping
With other words, this is a missed understood request, a False Positive Test result. The test failed. We expected the Refund Page, but Swapping Page became active.
Покрытие
In Dialogflow CX, test coverage is a measure used to describe the degree to which the dialogue of the virtual agent (Pages and Intents) is executed when a particular test suite runs. A virtual agent with high test coverage, measured as a percentage, has had more of its dialogues executed during testing, which suggests it has a lower chance of containing undetected bugs (like missed understood requests) compared to a virtual agent with low test coverage.
- To view a test coverage report for all test cases, click Coverage .
- Click on the tab Transitions .
This will show you the test coverage for all the page transitions.

- Click on the tab Intents .
This will show you the test coverage for all the intents.

Congratulations, by now you have built and tested a complete real world example of a retailer bot! Let's go to the next lab page to read the conclusion and find some handy references!
10. Conclusion
Dialogflow CX is a Conversational AI Platform (CAIP) for creating virtual agents like chat or voice bots. Dialogflow CX empowers your team to accelerate creating enterprise-level conversational experiences through visual bot builders, reusable intents, and the ability to address multi-turn conversations.
In this codelab, you have learned how to build a real world retail virtual agent. We addressed the following concepts:
- Потоки
- Parameters, Custom & System Entities
- Страницы
- State Handlers like Intent Routes and Condition Routes
- Static Fulfillment Messages and Conditional Responses
- Fallback intents
- Simulator, Test Cases and Coverage

Ссылки
To learn more about Dialogflow CX have a look into the following blogs and documentation!