
1. Tổng quan

Document AI là gì?
Document AI là một nền tảng giúp bạn trích xuất thông tin chi tiết từ tài liệu. Về cơ bản, nó cung cấp danh sách ngày càng tăng các trình xử lý tài liệu (còn được gọi là trình phân tích cú pháp hoặc trình phân chia, tuỳ thuộc vào chức năng của chúng).
Có hai cách để bạn có thể quản lý các bộ xử lý Document AI:
- theo cách thủ công, từ bảng điều khiển web;
- theo phương thức lập trình bằng Document AI API.
Sau đây là ảnh chụp màn hình ví dụ cho thấy danh sách bộ xử lý của bạn, cả trên bảng điều khiển web và trong mã Python:
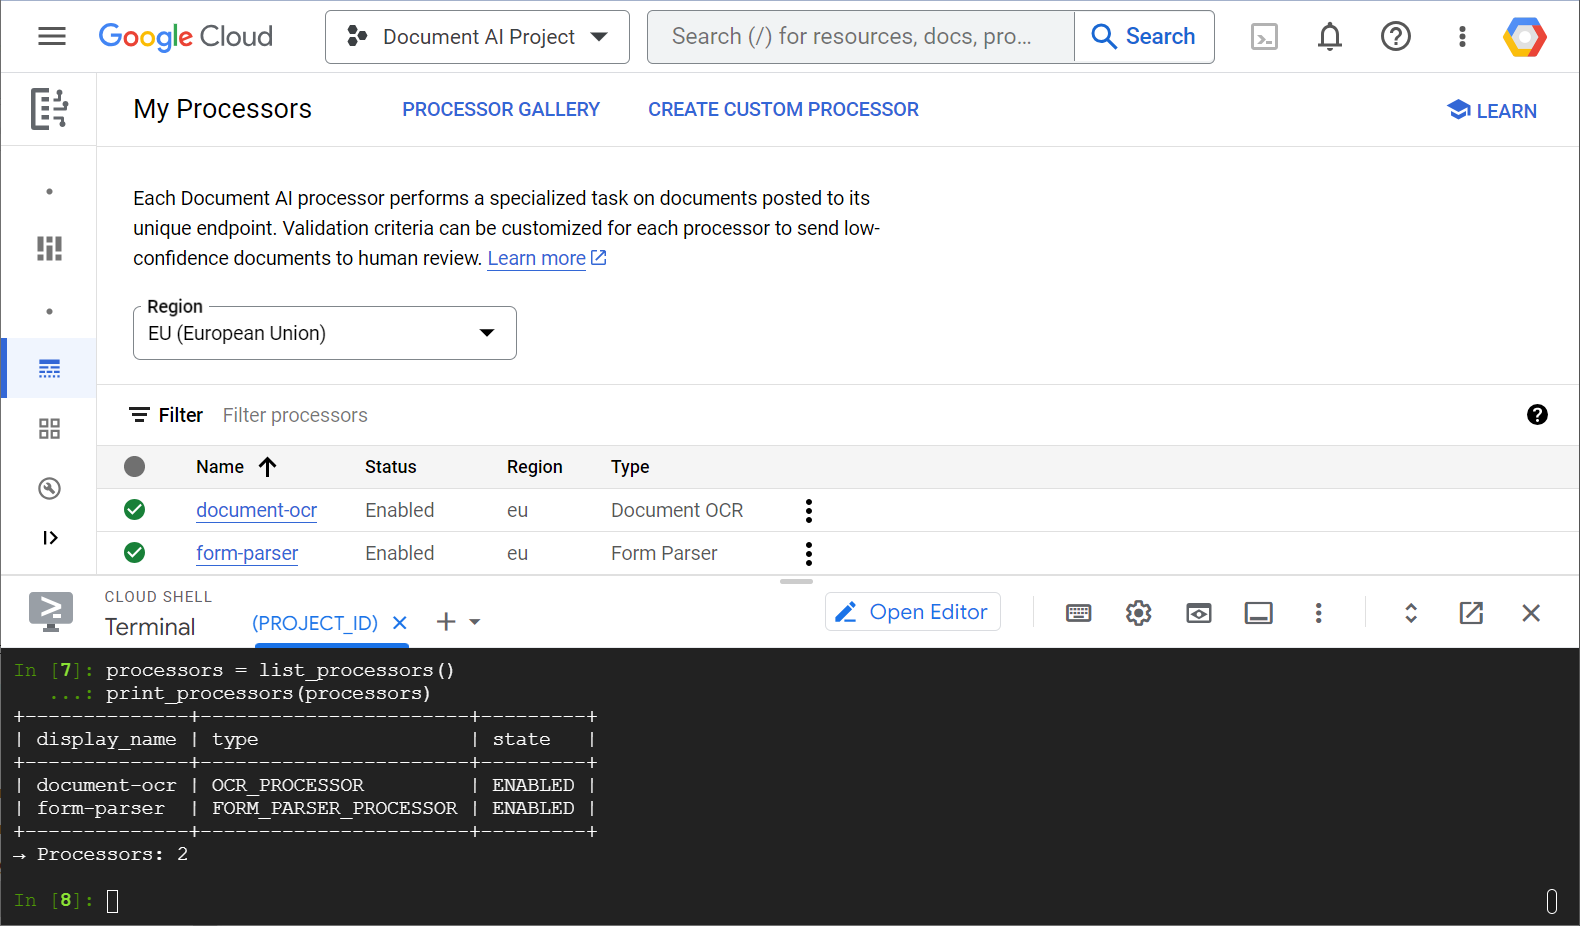
Trong phòng thí nghiệm này, bạn sẽ tập trung vào việc quản lý các trình xử lý Document AI theo phương thức lập trình bằng thư viện ứng dụng Python.
Nội dung bạn sẽ thấy
- Cách thiết lập môi trường
- Cách tìm nạp các loại bộ xử lý
- Cách tạo bộ xử lý
- Cách liệt kê các trình xử lý dự án
- Cách sử dụng bộ xử lý
- Cách bật/tắt bộ xử lý
- Cách quản lý các phiên bản bộ xử lý
- Cách xoá bộ xử lý
Bạn cần có
- Một dự án trên Google Cloud
- Một trình duyệt, chẳng hạn như Chrome hoặc Firefox
- Làm quen với cách sử dụng Python
Bản khảo sát
Bạn sẽ sử dụng hướng dẫn này như thế nào?
Bạn đánh giá thế nào về trải nghiệm của mình với Python?
Bạn đánh giá thế nào về trải nghiệm của mình khi sử dụng các dịch vụ của Google Cloud?
2. Thiết lập và yêu cầu
Thiết lập môi trường theo tốc độ của riêng bạn
- Đăng nhập vào Google Cloud Console rồi tạo một dự án mới hoặc sử dụng lại một dự án hiện có. Nếu chưa có tài khoản Gmail hoặc Google Workspace, bạn phải tạo một tài khoản.


- Tên dự án là tên hiển thị của những người tham gia dự án này. Đây là một chuỗi ký tự mà các API của Google không sử dụng. Bạn luôn có thể cập nhật thông tin này.
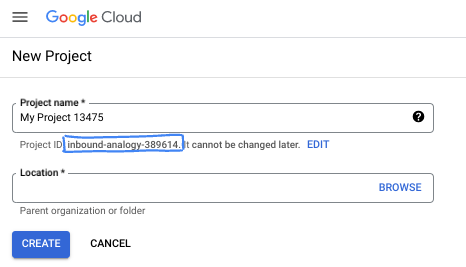
- Mã dự án là mã duy nhất trên tất cả các dự án trên Google Cloud và không thể thay đổi (bạn không thể thay đổi mã này sau khi đã đặt). Cloud Console sẽ tự động tạo một chuỗi duy nhất; thường thì bạn không cần quan tâm đến chuỗi này. Trong hầu hết các lớp học lập trình, bạn sẽ cần tham chiếu đến Mã dự án (thường được xác định là
PROJECT_ID). Nếu không thích mã nhận dạng được tạo, bạn có thể tạo một mã nhận dạng ngẫu nhiên khác. Hoặc bạn có thể thử tên người dùng của riêng mình để xem tên đó có được chấp nhận hay không. Bạn không thể thay đổi tên này sau bước này và tên này sẽ tồn tại trong suốt thời gian của dự án. - Để bạn nắm được thông tin, có một giá trị thứ ba là Số dự án mà một số API sử dụng. Tìm hiểu thêm về cả 3 giá trị này trong tài liệu.
- Tiếp theo, bạn cần bật tính năng thanh toán trong Cloud Console để sử dụng các tài nguyên/API trên đám mây. Việc thực hiện lớp học lập trình này sẽ không tốn nhiều chi phí, nếu có. Để tắt các tài nguyên nhằm tránh bị tính phí ngoài phạm vi hướng dẫn này, bạn có thể xoá các tài nguyên đã tạo hoặc xoá dự án. Người dùng mới của Google Cloud đủ điều kiện tham gia chương trình Dùng thử miễn phí trị giá 300 USD.
Khởi động Cloud Shell
Mặc dù có thể vận hành Google Cloud từ xa trên máy tính xách tay, nhưng trong phòng thí nghiệm này, bạn sẽ sử dụng Cloud Shell, một môi trường dòng lệnh chạy trên Cloud.
Kích hoạt Cloud Shell
- Trong Cloud Console, hãy nhấp vào Kích hoạt Cloud Shell
 .
.

Nếu đây là lần đầu tiên bạn khởi động Cloud Shell, bạn sẽ thấy một màn hình trung gian mô tả về Cloud Shell. Nếu bạn thấy màn hình trung gian, hãy nhấp vào Tiếp tục.
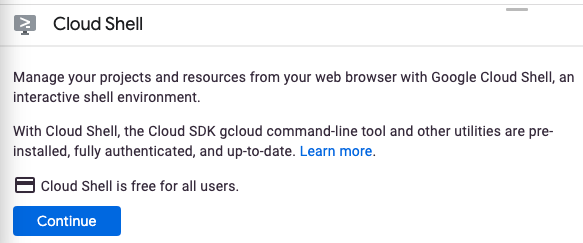
Quá trình cung cấp và kết nối với Cloud Shell chỉ mất vài giây.

Máy ảo này được trang bị tất cả các công cụ phát triển cần thiết. Nền tảng này cung cấp một thư mục chính có dung lượng 5 GB và chạy trong Google Cloud, giúp tăng cường đáng kể hiệu suất mạng và hoạt động xác thực. Bạn có thể thực hiện hầu hết, nếu không muốn nói là tất cả, công việc của mình trong lớp học lập trình này bằng trình duyệt.
Sau khi kết nối với Cloud Shell, bạn sẽ thấy rằng mình đã được xác thực và dự án được đặt thành mã dự án của bạn.
- Chạy lệnh sau trong Cloud Shell để xác nhận rằng bạn đã được xác thực:
gcloud auth list
Đầu ra của lệnh
 Credentialed Accounts
ACTIVE  ACCOUNT
*       <my_account>@<my_domain.com>

To set the active account, run:
    $ gcloud config set account `ACCOUNT`
- Chạy lệnh sau trong Cloud Shell để xác nhận rằng lệnh gcloud biết về dự án của bạn:
gcloud config list project
Đầu ra của lệnh
[core]
project = <PROJECT_ID>
Nếu không, bạn có thể đặt nó bằng lệnh sau:
gcloud config set project <PROJECT_ID>
Đầu ra của lệnh
Updated property [core/project].
3. Thiết lập môi trường
Trước khi có thể bắt đầu sử dụng Document AI, hãy chạy lệnh sau trong Cloud Shell để bật Document AI API:
gcloud services enable documentai.googleapis.com
Bạn sẽ thấy như sau:
Operation "operations/..." finished successfully.
Giờ đây, bạn có thể sử dụng Document AI!
Chuyển đến thư mục chính:
cd ~
Tạo một môi trường ảo Python để tách biệt các phần phụ thuộc:
virtualenv venv-docai
Kích hoạt môi trường ảo:
source venv-docai/bin/activate
Cài đặt IPython, thư viện ứng dụng Document AI và python-tabulate (bạn sẽ dùng để in kết quả yêu cầu theo định dạng đẹp):
pip install ipython google-cloud-documentai tabulate
Bạn sẽ thấy như sau:
...
Installing collected packages: ..., tabulate, ipython, google-cloud-documentai
Successfully installed ... google-cloud-documentai-2.15.0 ...
Giờ đây, bạn đã sẵn sàng sử dụng thư viện ứng dụng Document AI!
Thiết lập các biến môi trường sau:
export PROJECT_ID=$(gcloud config get-value core/project)
# Choose "us" or "eu"
export API_LOCATION="us"
Từ giờ trở đi, bạn phải hoàn tất tất cả các bước trong cùng một phiên.
Đảm bảo bạn xác định đúng các biến môi trường:
echo $PROJECT_ID
echo $API_LOCATION
Trong các bước tiếp theo, bạn sẽ sử dụng một trình thông dịch Python tương tác có tên là IPython mà bạn vừa cài đặt. Bắt đầu một phiên bằng cách chạy ipython trong Cloud Shell:
ipython
Bạn sẽ thấy như sau:
Python 3.12.3 (main, Feb  4 2025, 14:48:35) [GCC 13.3.0]
Type 'copyright', 'credits' or 'license' for more information
IPython 9.1.0 -- An enhanced Interactive Python. Type '?' for help.

In [1]:
Sao chép mã sau vào phiên IPython:
import os
from typing import Iterator, MutableSequence, Optional, Sequence, Tuple

import google.cloud.documentai_v1 as docai
from tabulate import tabulate

PROJECT_ID = os.getenv("PROJECT_ID", "")
API_LOCATION = os.getenv("API_LOCATION", "")

assert PROJECT_ID, "PROJECT_ID is undefined"
assert API_LOCATION in ("us", "eu"), "API_LOCATION is incorrect"

# Test processors
document_ocr_display_name = "document-ocr"
form_parser_display_name = "form-parser"

test_processor_display_names_and_types = (
    (document_ocr_display_name, "OCR_PROCESSOR"),
    (form_parser_display_name, "FORM_PARSER_PROCESSOR"),
)

def get_client() -> docai.DocumentProcessorServiceClient:
    client_options = {"api_endpoint": f"{API_LOCATION}-documentai.googleapis.com"}
    return docai.DocumentProcessorServiceClient(client_options=client_options)

def get_parent(client: docai.DocumentProcessorServiceClient) -> str:
    return client.common_location_path(PROJECT_ID, API_LOCATION)

def get_client_and_parent() -> Tuple[docai.DocumentProcessorServiceClient, str]:
    client = get_client()
    parent = get_parent(client)
    return client, parent
Bạn đã sẵn sàng thực hiện yêu cầu đầu tiên và tìm nạp các loại bộ xử lý.
4. Tìm nạp các loại bộ xử lý
Trước khi tạo một bộ xử lý ở bước tiếp theo, hãy tìm nạp các loại bộ xử lý hiện có. Bạn có thể truy xuất danh sách này bằng fetch_processor_types.
Thêm các hàm sau vào phiên IPython:
def fetch_processor_types() -> MutableSequence[docai.ProcessorType]:
    client, parent = get_client_and_parent()
    response = client.fetch_processor_types(parent=parent)

    return response.processor_types

def print_processor_types(processor_types: Sequence[docai.ProcessorType]):
    def sort_key(pt):
        return (not pt.allow_creation, pt.category, pt.type_)

    sorted_processor_types = sorted(processor_types, key=sort_key)
    data = processor_type_tabular_data(sorted_processor_types)
    headers = next(data)
    colalign = next(data)

    print(tabulate(data, headers, tablefmt="pretty", colalign=colalign))
    print(f"→ Processor types: {len(sorted_processor_types)}")

def processor_type_tabular_data(
    processor_types: Sequence[docai.ProcessorType],
) -> Iterator[Tuple[str, str, str, str]]:
    def locations(pt):
        return ", ".join(sorted(loc.location_id for loc in pt.available_locations))

    yield ("type", "category", "allow_creation", "locations")
    yield ("left", "left", "left", "left")
    if not processor_types:
        yield ("-", "-", "-", "-")
        return
    for pt in processor_types:
        yield (pt.type_, pt.category, f"{pt.allow_creation}", locations(pt))
Liệt kê các loại bộ xử lý:
processor_types = fetch_processor_types()
print_processor_types(processor_types)
Bạn sẽ nhận được nội dung tương tự như sau:
+--------------------------------------+-------------+----------------+-----------+
| type                                 | category    | allow_creation | locations |
+--------------------------------------+-------------+----------------+-----------+
| CUSTOM_CLASSIFICATION_PROCESSOR      | CUSTOM      | True           | eu, us    |
...
| FORM_PARSER_PROCESSOR                | GENERAL     | True           | eu, us    |
| LAYOUT_PARSER_PROCESSOR              | GENERAL     | True           | eu, us    |
| OCR_PROCESSOR                        | GENERAL     | True           | eu, us    |
| BANK_STATEMENT_PROCESSOR             | SPECIALIZED | True           | eu, us    |
| EXPENSE_PROCESSOR                    | SPECIALIZED | True           | eu, us    |
...
+--------------------------------------+-------------+----------------+-----------+
→ Processor types: 19
Giờ đây, bạn đã có tất cả thông tin cần thiết để tạo bộ xử lý ở bước tiếp theo.
5. Tạo bộ xử lý
Để tạo một trình xử lý, hãy gọi create_processor bằng tên hiển thị và loại trình xử lý.
Thêm hàm sau:
def create_processor(display_name: str, type: str) -> docai.Processor:
    client, parent = get_client_and_parent()
    processor = docai.Processor(display_name=display_name, type_=type)

    return client.create_processor(parent=parent, processor=processor)
Tạo các trình xử lý kiểm thử:
separator = "=" * 80
for display_name, type in test_processor_display_names_and_types:
    print(separator)
    print(f"Creating {display_name} ({type})...")
    try:
        create_processor(display_name, type)
    except Exception as err:
        print(err)
print(separator)
print("Done")
Bạn sẽ nhận được những thông tin sau:
================================================================================
Creating document-ocr (OCR_PROCESSOR)...
================================================================================
Creating form-parser (FORM_PARSER_PROCESSOR)...
================================================================================
Done
Bạn đã tạo bộ xử lý mới!
Tiếp theo, hãy xem cách liệt kê các bộ xử lý.
6. Liệt kê các trình xử lý dự án
list_processors trả về danh sách tất cả các bộ xử lý thuộc dự án của bạn.
Thêm các hàm sau:
def list_processors() -> MutableSequence[docai.Processor]:
    client, parent = get_client_and_parent()
    response = client.list_processors(parent=parent)

    return list(response.processors)

def print_processors(processors: Optional[Sequence[docai.Processor]] = None):
    def sort_key(processor):
        return processor.display_name

    if processors is None:
        processors = list_processors()
    sorted_processors = sorted(processors, key=sort_key)
    data = processor_tabular_data(sorted_processors)
    headers = next(data)
    colalign = next(data)

    print(tabulate(data, headers, tablefmt="pretty", colalign=colalign))
    print(f"→ Processors: {len(sorted_processors)}")

def processor_tabular_data(
    processors: Sequence[docai.Processor],
) -> Iterator[Tuple[str, str, str]]:
    yield ("display_name", "type", "state")
    yield ("left", "left", "left")
    if not processors:
        yield ("-", "-", "-")
        return
    for processor in processors:
        yield (processor.display_name, processor.type_, processor.state.name)
Gọi các hàm:
processors = list_processors()
print_processors(processors)
Bạn sẽ nhận được những thông tin sau:
+--------------+-----------------------+---------+
| display_name | type                  | state   |
+--------------+-----------------------+---------+
| document-ocr | OCR_PROCESSOR         | ENABLED |
| form-parser  | FORM_PARSER_PROCESSOR | ENABLED |
+--------------+-----------------------+---------+
→ Processors: 2
Để truy xuất một trình xử lý theo tên hiển thị, hãy thêm hàm sau:
def get_processor(
    display_name: str,
    processors: Optional[Sequence[docai.Processor]] = None,
) -> Optional[docai.Processor]:
    if processors is None:
        processors = list_processors()
    for processor in processors:
        if processor.display_name == display_name:
            return processor
    return None
Kiểm thử hàm:
processor = get_processor(document_ocr_display_name, processors)

assert processor is not None
print(processor)
Bạn sẽ thấy như sau:
name: "projects/PROJECT_NUM/locations/LOCATION/processors/PROCESSOR_ID"
type_: "OCR_PROCESSOR"
display_name: "document-ocr"
state: ENABLED
...
Giờ đây, bạn đã biết cách liệt kê các trình xử lý dự án và truy xuất chúng theo tên hiển thị. Tiếp theo, hãy xem cách sử dụng bộ xử lý.
7. Sử dụng bộ xử lý
Bạn có thể xử lý tài liệu theo hai cách:
- Đồng bộ: Gọi
process_documentđể phân tích một tài liệu và sử dụng trực tiếp kết quả. - Không đồng bộ: Gọi
batch_process_documentsđể khởi chạy quy trình xử lý hàng loạt trên nhiều tài liệu hoặc tài liệu có kích thước lớn.
Tài liệu kiểm thử của bạn ( PDF) là một bảng câu hỏi được quét và có câu trả lời viết tay. Tải tệp này xuống thư mục làm việc của bạn, ngay từ phiên IPython:
!gsutil cp gs://cloud-samples-data/documentai/form.pdf .
Kiểm tra nội dung của thư mục làm việc:
!ls
Bạn cần có những thông tin sau:
... form.pdf ... venv-docai ...
Bạn có thể sử dụng phương thức đồng bộ process_document để phân tích một tệp cục bộ. Thêm hàm sau:
def process_file(
    processor: docai.Processor,
    file_path: str,
    mime_type: str,
) -> docai.Document:
    client = get_client()
    with open(file_path, "rb") as document_file:
        document_content = document_file.read()
    document = docai.RawDocument(content=document_content, mime_type=mime_type)
    request = docai.ProcessRequest(raw_document=document, name=processor.name)

    response = client.process_document(request)

    return response.document
Vì tài liệu của bạn là một bảng câu hỏi, hãy chọn trình phân tích biểu mẫu. Ngoài việc trích xuất văn bản (in và viết tay) mà mọi bộ xử lý đều thực hiện, bộ xử lý chung này còn phát hiện các trường biểu mẫu.
Phân tích tài liệu:
processor = get_processor(form_parser_display_name)
assert processor is not None

file_path = "./form.pdf"
mime_type = "application/pdf"

document = process_file(processor, file_path, mime_type)
Tất cả các bộ xử lý đều chạy quy trình Nhận dạng ký tự quang học (OCR) ở lần đầu tiên trên tài liệu. Xem lại văn bản được phát hiện bằng công nghệ OCR:
document.text.split("\n")
Bạn sẽ thấy nội dung tương tự như sau:
['FakeDoc M.D.',
 'HEALTH INTAKE FORM',
 'Please fill out the questionnaire carefully. The information you provide will be used to complete',
 'your health profile and will be kept confidential.',
 'Date:',
 '9/14/19',
 'Name:',
 'Sally Walker',
 'DOB: 09/04/1986',
 'Address: 24 Barney Lane',
 'City: Towaco',
 'State: NJ Zip: 07082',
 'Email: Sally, walker@cmail.com',
 '_Phone #: (906) 917-3486',
 'Gender: F',
 'Marital Status:',
  ...
]
Thêm các hàm sau để in các trường biểu mẫu được phát hiện:
def print_form_fields(document: docai.Document):
    sorted_form_fields = form_fields_sorted_by_ocr_order(document)
    data = form_field_tabular_data(sorted_form_fields, document)
    headers = next(data)
    colalign = next(data)

    print(tabulate(data, headers, tablefmt="pretty", colalign=colalign))
    print(f"→ Form fields: {len(sorted_form_fields)}")

def form_field_tabular_data(
    form_fields: Sequence[docai.Document.Page.FormField],
    document: docai.Document,
) -> Iterator[Tuple[str, str, str]]:
    yield ("name", "value", "confidence")
    yield ("right", "left", "right")
    if not form_fields:
        yield ("-", "-", "-")
        return
    for form_field in form_fields:
        name_layout = form_field.field_name
        value_layout = form_field.field_value
        name = text_from_layout(name_layout, document)
        value = text_from_layout(value_layout, document)
        confidence = value_layout.confidence
        yield (name, value, f"{confidence:.1%}")
Ngoài ra, hãy thêm các hàm tiện ích sau:
def form_fields_sorted_by_ocr_order(
    document: docai.Document,
) -> MutableSequence[docai.Document.Page.FormField]:
    def sort_key(form_field):
        # Sort according to the field name detected position
        text_anchor = form_field.field_name.text_anchor
        return text_anchor.text_segments[0].start_index if text_anchor else 0

    fields = (field for page in document.pages for field in page.form_fields)

    return sorted(fields, key=sort_key)


def text_from_layout(
    layout: docai.Document.Page.Layout,
    document: docai.Document,
) -> str:
    full_text = document.text
    segs = layout.text_anchor.text_segments
    text = "".join(full_text[seg.start_index : seg.end_index] for seg in segs)
    if text.endswith("\n"):
        text = text[:-1]

    return text
In các trường biểu mẫu được phát hiện:
print_form_fields(document)
Bạn sẽ nhận được bản in như sau:
+-----------------+-------------------------+------------+
|            name | value                   | confidence |
+-----------------+-------------------------+------------+
|           Date: | 9/14/19                 |      83.0% |
|           Name: | Sally Walker            |      87.3% |
|            DOB: | 09/04/1986              |      88.5% |
|        Address: | 24 Barney Lane          |      82.4% |
|           City: | Towaco                  |      90.0% |
|          State: | NJ                      |      89.4% |
|            Zip: | 07082                   |      91.4% |
|          Email: | Sally, walker@cmail.com |      79.7% |
|       _Phone #: | walker@cmail.com        |      93.2% |
|                 | (906                    |            |
|         Gender: | F                       |      88.2% |
| Marital Status: | Single                  |      85.2% |
|     Occupation: | Software Engineer       |      81.5% |
|    Referred By: | None                    |      76.9% |
...
+-----------------+-------------------------+------------+
→ Form fields: 17
Kiểm tra tên và giá trị trường đã được phát hiện ( PDF). Sau đây là nửa trên của bảng câu hỏi:
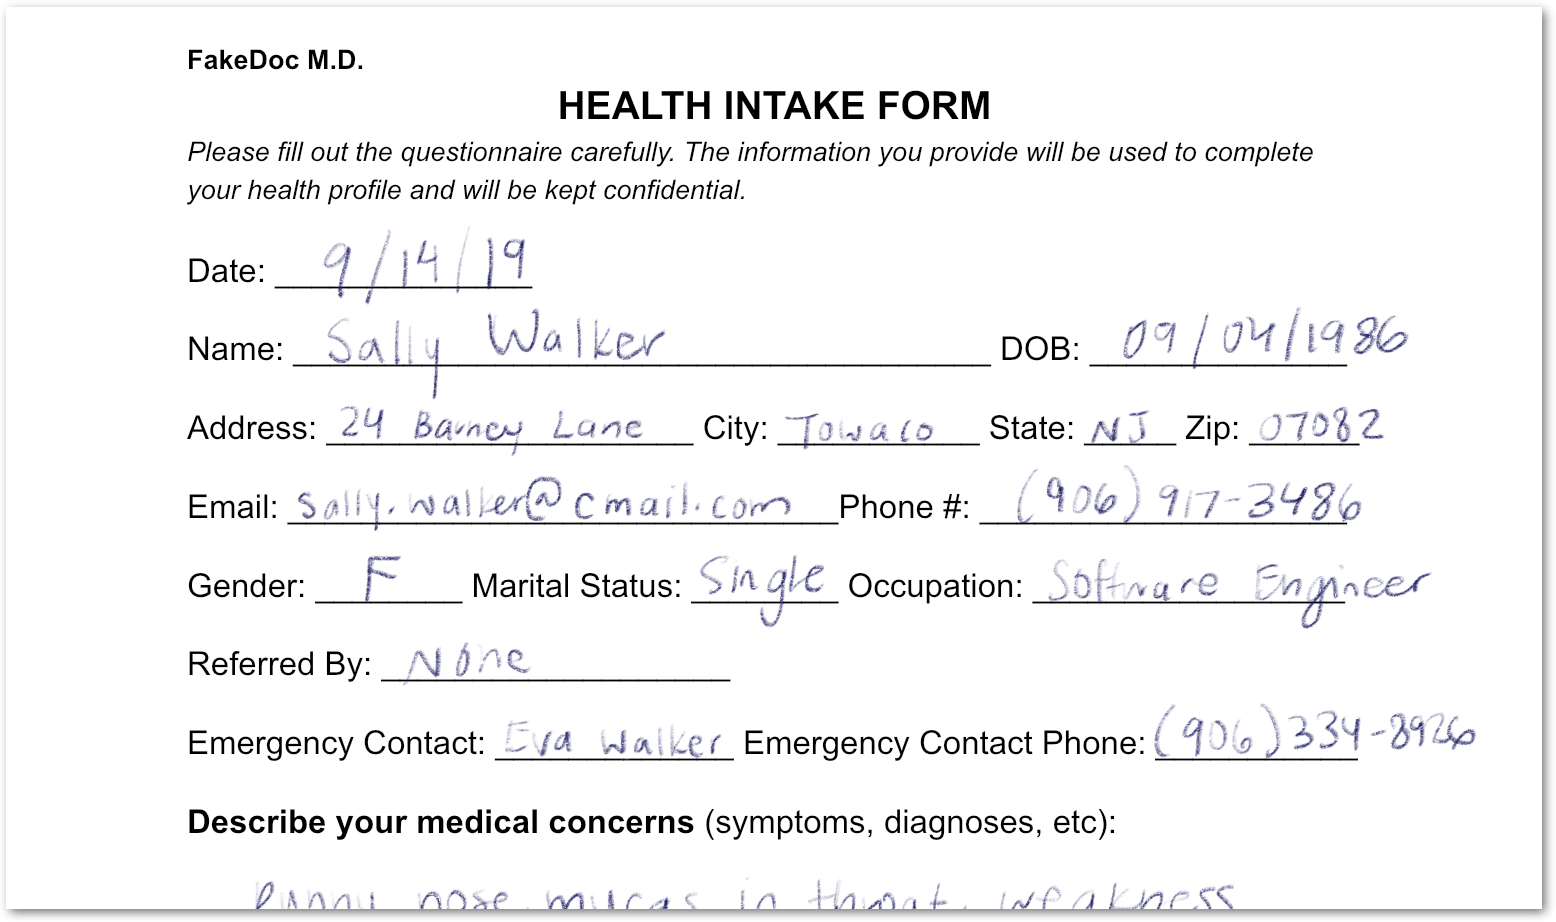
Bạn đã phân tích một biểu mẫu chứa cả văn bản in và văn bản viết tay. Bạn cũng đã phát hiện các trường của nó với độ tin cậy cao. Kết quả là các pixel của bạn đã được chuyển đổi thành dữ liệu có cấu trúc!
8. Bật và tắt bộ xử lý
Với disable_processor và enable_processor, bạn có thể kiểm soát việc có thể sử dụng bộ xử lý hay không.
Thêm các hàm sau:
def update_processor_state(processor: docai.Processor, enable_processor: bool):
    client = get_client()
    if enable_processor:
        request = docai.EnableProcessorRequest(name=processor.name)
        operation = client.enable_processor(request)
    else:
        request = docai.DisableProcessorRequest(name=processor.name)
        operation = client.disable_processor(request)
    operation.result()  # Wait for operation to complete

def enable_processor(processor: docai.Processor):
    update_processor_state(processor, True)

def disable_processor(processor: docai.Processor):
    update_processor_state(processor, False)
Tắt trình xử lý trình phân tích cú pháp biểu mẫu và kiểm tra trạng thái của các trình xử lý:
processor = get_processor(form_parser_display_name)
assert processor is not None

disable_processor(processor)
print_processors()
Bạn sẽ nhận được những thông tin sau:
+--------------+-----------------------+----------+
| display_name | type                  | state    |
+--------------+-----------------------+----------+
| document-ocr | OCR_PROCESSOR         | ENABLED  |
| form-parser  | FORM_PARSER_PROCESSOR | DISABLED |
+--------------+-----------------------+----------+
→ Processors: 2
Bật lại trình xử lý trình phân tích cú pháp biểu mẫu:
enable_processor(processor)
print_processors()
Bạn sẽ nhận được những thông tin sau:
+--------------+-----------------------+---------+
| display_name | type                  | state   |
+--------------+-----------------------+---------+
| document-ocr | OCR_PROCESSOR         | ENABLED |
| form-parser  | FORM_PARSER_PROCESSOR | ENABLED |
+--------------+-----------------------+---------+
→ Processors: 2
Tiếp theo, hãy xem cách quản lý các phiên bản bộ xử lý.
9. Quản lý phiên bản bộ xử lý
Bộ xử lý có thể có nhiều phiên bản. Hãy xem cách sử dụng các phương thức list_processor_versions và set_default_processor_version.
Thêm các hàm sau:
def list_processor_versions(
    processor: docai.Processor,
) -> MutableSequence[docai.ProcessorVersion]:
    client = get_client()
    response = client.list_processor_versions(parent=processor.name)

    return list(response)


def get_sorted_processor_versions(
    processor: docai.Processor,
) -> MutableSequence[docai.ProcessorVersion]:
    def sort_key(processor_version: docai.ProcessorVersion):
        return processor_version.name

    versions = list_processor_versions(processor)

    return sorted(versions, key=sort_key)


def print_processor_versions(processor: docai.Processor):
    versions = get_sorted_processor_versions(processor)
    default_version_name = processor.default_processor_version
    data = processor_versions_tabular_data(versions, default_version_name)
    headers = next(data)
    colalign = next(data)

    print(tabulate(data, headers, tablefmt="pretty", colalign=colalign))
    print(f"→ Processor versions: {len(versions)}")


def processor_versions_tabular_data(
    versions: Sequence[docai.ProcessorVersion],
    default_version_name: str,
) -> Iterator[Tuple[str, str, str]]:
    yield ("version", "display name", "default")
    yield ("left", "left", "left")
    if not versions:
        yield ("-", "-", "-")
        return
    for version in versions:
        mapping = docai.DocumentProcessorServiceClient.parse_processor_version_path(
            version.name
        )
        processor_version = mapping["processor_version"]
        is_default = "Y" if version.name == default_version_name else ""
        yield (processor_version, version.display_name, is_default)
Liệt kê các phiên bản hiện có của bộ xử lý OCR:
processor = get_processor(document_ocr_display_name)
assert processor is not None
print_processor_versions(processor)
Bạn sẽ nhận được các phiên bản bộ xử lý:
+--------------------------------+--------------------------+---------+
| version                        | display name             | default |
+--------------------------------+--------------------------+---------+
| pretrained-ocr-v1.0-2020-09-23 | Google Stable            |         |
| pretrained-ocr-v1.1-2022-09-12 | Google Release Candidate |         |
| pretrained-ocr-v1.2-2022-11-10 | Google Release Candidate |         |
| pretrained-ocr-v2.0-2023-06-02 | Google Stable            | Y       |
| pretrained-ocr-v2.1-2024-08-07 | Google Release Candidate |         |
+--------------------------------+--------------------------+---------+
→ Processor versions: 5
Bây giờ, hãy thêm một hàm để thay đổi phiên bản bộ xử lý mặc định:
def set_default_processor_version(processor: docai.Processor, version_name: str):
    client = get_client()
    request = docai.SetDefaultProcessorVersionRequest(
        processor=processor.name,
        default_processor_version=version_name,
    )

    operation = client.set_default_processor_version(request)
    operation.result()  # Wait for operation to complete
Chuyển sang phiên bản bộ xử lý mới nhất:
processor = get_processor(document_ocr_display_name)
assert processor is not None
versions = get_sorted_processor_versions(processor)

new_version = versions[-1]  # Latest version
set_default_processor_version(processor, new_version.name)

# Update the processor info
processor = get_processor(document_ocr_display_name)
assert processor is not None
print_processor_versions(processor)
Bạn sẽ nhận được cấu hình phiên bản mới:
+--------------------------------+--------------------------+---------+
| version                        | display name             | default |
+--------------------------------+--------------------------+---------+
| pretrained-ocr-v1.0-2020-09-23 | Google Stable            |         |
| pretrained-ocr-v1.1-2022-09-12 | Google Release Candidate |         |
| pretrained-ocr-v1.2-2022-11-10 | Google Release Candidate |         |
| pretrained-ocr-v2.0-2023-06-02 | Google Stable            |         |
| pretrained-ocr-v2.1-2024-08-07 | Google Release Candidate | Y       |
+--------------------------------+--------------------------+---------+
→ Processor versions: 5
Và tiếp theo là phương pháp quản lý bộ xử lý tối ưu (xoá).
10. Xoá bộ xử lý
Cuối cùng, hãy xem cách sử dụng phương thức delete_processor.
Thêm hàm sau:
def delete_processor(processor: docai.Processor):
    client = get_client()
    operation = client.delete_processor(name=processor.name)
    operation.result()  # Wait for operation to complete
Xoá bộ xử lý kiểm thử:
processors_to_delete = [dn for dn, _ in test_processor_display_names_and_types]
print("Deleting processors...")

for processor in list_processors():
    if processor.display_name not in processors_to_delete:
        continue
    print(f"  Deleting {processor.display_name}...")
    delete_processor(processor)

print("Done\n")
print_processors()
Bạn sẽ nhận được những thông tin sau:
Deleting processors...
  Deleting form-parser...
  Deleting document-ocr...
Done

+--------------+------+-------+
| display_name | type | state |
+--------------+------+-------+
| -            | -    | -     |
+--------------+------+-------+
→ Processors: 0
Bạn đã tìm hiểu tất cả các phương pháp quản lý bộ xử lý! Bạn sắp hoàn tất...
11. Xin chúc mừng!
Bạn đã tìm hiểu cách quản lý các trình xử lý Document AI bằng Python!
Dọn dẹp
Để dọn dẹp môi trường phát triển, hãy làm như sau trong Cloud Shell:
- Nếu bạn vẫn đang trong phiên IPython, hãy quay lại shell:
exit - Ngừng sử dụng môi trường ảo Python:
deactivate - Xoá thư mục môi trường ảo:
cd ~ ; rm -rf ./venv-docai
Để xoá dự án trên đám mây của bạn, hãy làm như sau trong Cloud Shell:
- Lấy mã dự án hiện tại:
PROJECT_ID=$(gcloud config get-value core/project) - Hãy đảm bảo rằng đây là dự án bạn muốn xoá:
echo $PROJECT_ID - Xoá dự án:
gcloud projects delete $PROJECT_ID
Tìm hiểu thêm
- Hãy dùng thử Document AI trong trình duyệt: https://cloud.google.com/document-ai/docs/drag-and-drop
- Thông tin chi tiết về bộ xử lý Document AI: https://cloud.google.com/document-ai/docs/processors-list
- Python trên Google Cloud: https://cloud.google.com/python
- Thư viện ứng dụng đám mây cho Python: https://github.com/googleapis/google-cloud-python
Giấy phép
Tác phẩm này được cấp phép theo giấy phép Ghi công theo Creative Commons 2.0 Chung.