
1. Introduction
Flutter is Google's UI toolkit for building beautiful, natively compiled applications for mobile, web, and desktop from a single codebase.
In this codelab, you'll build and test a simple Flutter app. The app will use the Provider package for managing state.
What you'll learn
- How to create widget tests using the widget testing framework
- How to create an integration test to test the app's UI and performance using the
integration_testlibrary - How to test data classes (providers) with the help of unit tests
What you'll build
In this codelab, you'll start by building a simple application with a list of items. We provide the source code for you so you can get right to the testing. The app supports the following operations:
- Adding the items to favorites
- Viewing the list of favorites
- Removing items from the favorites list
Once the app is complete, you will write the following tests:
|
|
 GIF of the app running on Android
What would you like to learn from this codelab?
2. Set up your Flutter development environment
You need two pieces of software to complete this lab—the Flutter SDK and an editor.
You can run the codelab using any of these devices:
- A physical Android or iOS device connected to your computer and set to Developer mode.
- The iOS simulator (requires installing Xcode tools).
- The Android Emulator (requires setup in Android Studio).
- A browser (Chrome is required for debugging).
- As a Windows, Linux, or macOS desktop application. You must develop on the platform where you plan to deploy. So, if you want to develop a Windows desktop app, you must develop on Windows to access the appropriate build chain. There are operating system-specific requirements that are covered in detail on docs.flutter.dev/desktop.
3. Getting started
Create a new Flutter app & update dependencies
This codelab focuses on testing a Flutter mobile app. You will quickly create the app to be tested using source files that you copy and paste. The rest of the codelab then focuses on learning different kinds of testing.
 Create a simple templated Flutter app, either using the instructions in Getting Started with your first Flutter app, or on the command line as follows.
$ flutter create --empty testing_app
Creating project testing_app...
Resolving dependencies in `testing_app`...
Downloading packages...
Got dependencies in `testing_app`.
Wrote 128 files.

All done!
You can find general documentation for Flutter at: https://docs.flutter.dev/
Detailed API documentation is available at: https://api.flutter.dev/
If you prefer video documentation, consider: https://www.youtube.com/c/flutterdev

In order to run your empty application, type:

  $ cd testing_app
  $ flutter run

Your empty application code is in testing_app/lib/main.dart.
Add pub dependencies on the command line.
providerfor easy state management,integration_testfor self-driving testing of Flutter code on devices and emulators,flutter_driverfor an advanced API to test Flutter applications that run on real devices and emulators,testfor general test tooling,go_routerfor handling app navigation.
$ cd testing_app
$ flutter pub add provider go_router dev:test 'dev:flutter_driver:{"sdk":"flutter"}' 'dev:integration_test:{"sdk":"flutter"}'
Resolving dependencies...
Downloading packages...
+ _fe_analyzer_shared 67.0.0 (68.0.0 available)
+ analyzer 6.4.1 (6.5.0 available)
+ args 2.5.0
+ convert 3.1.1
+ coverage 1.7.2
+ crypto 3.0.3
+ file 7.0.0
+ flutter_driver 0.0.0 from sdk flutter
+ flutter_web_plugins 0.0.0 from sdk flutter
+ frontend_server_client 4.0.0
+ fuchsia_remote_debug_protocol 0.0.0 from sdk flutter
+ glob 2.1.2
+ go_router 14.0.2
+ http_multi_server 3.2.1
+ http_parser 4.0.2
+ integration_test 0.0.0 from sdk flutter
+ io 1.0.4
+ js 0.7.1
  leak_tracker 10.0.4 (10.0.5 available)
  leak_tracker_flutter_testing 3.0.3 (3.0.5 available)
+ logging 1.2.0
  material_color_utilities 0.8.0 (0.11.1 available)
  meta 1.12.0 (1.14.0 available)
+ mime 1.0.5
+ nested 1.0.0
+ node_preamble 2.0.2
+ package_config 2.1.0
+ platform 3.1.4
+ pool 1.5.1
+ process 5.0.2
+ provider 6.1.2
+ pub_semver 2.1.4
+ shelf 1.4.1
+ shelf_packages_handler 3.0.2
+ shelf_static 1.1.2
+ shelf_web_socket 1.0.4
+ source_map_stack_trace 2.1.1
+ source_maps 0.10.12
+ sync_http 0.3.1
+ test 1.25.2 (1.25.4 available)
  test_api 0.7.0 (0.7.1 available)
+ test_core 0.6.0 (0.6.2 available)
+ typed_data 1.3.2
+ watcher 1.1.0
+ web 0.5.1
+ web_socket_channel 2.4.5
+ webdriver 3.0.3
+ webkit_inspection_protocol 1.2.1
+ yaml 3.1.2
Changed 44 dependencies!
9 packages have newer versions incompatible with dependency constraints.
Try `flutter pub outdated` for more information.
The following dependencies should have been added to your pubspec.yaml:
pubspec.yaml
name: testing_app
description: "A new Flutter project."
publish_to: 'none'
version: 0.1.0

environment:
  sdk: '>=3.4.0-0 <4.0.0'

dependencies:
  flutter:
    sdk: flutter
  go_router: ^14.0.2
  provider: ^6.1.2

dev_dependencies:
  flutter_test:
    sdk: flutter
  flutter_lints: ^3.0.0
  test: ^1.25.2
  flutter_driver:
    sdk: flutter
  integration_test:
    sdk: flutter

flutter:
  uses-material-design: true
Open the project in your code editor of choice, and run the app. Alternatively, run it on the command line as follows.
$ flutter run
4. Build the app
Next, you'll build out the app so that you can test it. The app contains the following files:
lib/models/favorites.dart- creates the model class for favorites listlib/screens/favorites.dart- creates the layout for the favorites listlib/screens/home.dart- creates a list of itemslib/main.dart- the main file where the app starts
First, create the Favorites model in lib/models/favorites.dart
Create a new directory named models in the lib directory, and then create a new file named favorites.dart. In that file add the following code:
lib/models/favorites.dart
import 'package:flutter/material.dart';

/// The [Favorites] class holds a list of favorite items saved by the user.
class Favorites extends ChangeNotifier {
  final List<int> _favoriteItems = [];

  List<int> get items => _favoriteItems;

  void add(int itemNo) {
    _favoriteItems.add(itemNo);
    notifyListeners();
  }

  void remove(int itemNo) {
    _favoriteItems.remove(itemNo);
    notifyListeners();
  }
}
Add the Favorites page in lib/screens/favorites.dart
Create a new directory named screens in the lib directory, and in that directory create a new file named favorites.dart. In that file add the following code:
lib/screens/favorites.dart
import 'package:flutter/material.dart';
import 'package:provider/provider.dart';

import '../models/favorites.dart';

class FavoritesPage extends StatelessWidget {
  const FavoritesPage({super.key});

  static String routeName = 'favorites_page';

  @override
  Widget build(BuildContext context) {
    return Scaffold(
      appBar: AppBar(
        title: const Text('Favorites'),
      ),
      body: Consumer<Favorites>(
        builder: (context, value, child) => ListView.builder(
          itemCount: value.items.length,
          padding: const EdgeInsets.symmetric(vertical: 16),
          itemBuilder: (context, index) => FavoriteItemTile(value.items[index]),
        ),
      ),
    );
  }
}

class FavoriteItemTile extends StatelessWidget {
  const FavoriteItemTile(this.itemNo, {super.key});

  final int itemNo;

  @override
  Widget build(BuildContext context) {
    return Padding(
      padding: const EdgeInsets.all(8.0),
      child: ListTile(
        leading: CircleAvatar(
          backgroundColor: Colors.primaries[itemNo % Colors.primaries.length],
        ),
        title: Text(
          'Item $itemNo',
          key: Key('favorites_text_$itemNo'),
        ),
        trailing: IconButton(
          key: Key('remove_icon_$itemNo'),
          icon: const Icon(Icons.close),
          onPressed: () {
            Provider.of<Favorites>(context, listen: false).remove(itemNo);
            ScaffoldMessenger.of(context).showSnackBar(
              const SnackBar(
                content: Text('Removed from favorites.'),
                duration: Duration(seconds: 1),
              ),
            );
          },
        ),
      ),
    );
  }
}
Add the Home page in lib/screens/home.dart
In the lib/screens directory create another new file named home.dart. In lib/screens/home.dart add the following code:
lib/screens/home.dart
import 'package:flutter/material.dart';
import 'package:go_router/go_router.dart';
import 'package:provider/provider.dart';
import '../models/favorites.dart';
import 'favorites.dart';

class HomePage extends StatelessWidget {
  static String routeName = '/';

  const HomePage({super.key});

  @override
  Widget build(BuildContext context) {
    return Scaffold(
      appBar: AppBar(
        title: const Text('Testing Sample'),
        actions: <Widget>[
          TextButton.icon(
            onPressed: () {
              context.go('/${FavoritesPage.routeName}');
            },
            icon: const Icon(Icons.favorite_border),
            label: const Text('Favorites'),
          ),
        ],
      ),
      body: ListView.builder(
        itemCount: 100,
        cacheExtent: 20.0,
        padding: const EdgeInsets.symmetric(vertical: 16),
        itemBuilder: (context, index) => ItemTile(index),
      ),
    );
  }
}

class ItemTile extends StatelessWidget {
  final int itemNo;

  const ItemTile(this.itemNo, {super.key});

  @override
  Widget build(BuildContext context) {
    var favoritesList = Provider.of<Favorites>(context);

    return Padding(
      padding: const EdgeInsets.all(8.0),
      child: ListTile(
        leading: CircleAvatar(
          backgroundColor: Colors.primaries[itemNo % Colors.primaries.length],
        ),
        title: Text(
          'Item $itemNo',
          key: Key('text_$itemNo'),
        ),
        trailing: IconButton(
          key: Key('icon_$itemNo'),
          icon: favoritesList.items.contains(itemNo)
              ? const Icon(Icons.favorite)
              : const Icon(Icons.favorite_border),
          onPressed: () {
            !favoritesList.items.contains(itemNo)
                ? favoritesList.add(itemNo)
                : favoritesList.remove(itemNo);
            ScaffoldMessenger.of(context).showSnackBar(
              SnackBar(
                content: Text(favoritesList.items.contains(itemNo)
                    ? 'Added to favorites.'
                    : 'Removed from favorites.'),
                duration: const Duration(seconds: 1),
              ),
            );
          },
        ),
      ),
    );
  }
}
Replace the contents of lib/main.dart
Replace the contents of lib/main.dart with the following code:
lib/main.dart
import 'package:flutter/material.dart';
import 'package:go_router/go_router.dart';
import 'package:provider/provider.dart';
import 'models/favorites.dart';
import 'screens/favorites.dart';
import 'screens/home.dart';

void main() {
  runApp(const TestingApp());
}

final _router = GoRouter(
  routes: [
    GoRoute(
      path: HomePage.routeName,
      builder: (context, state) {
        return const HomePage();
      },
      routes: [
        GoRoute(
          path: FavoritesPage.routeName,
          builder: (context, state) {
            return const FavoritesPage();
          },
        ),
      ],
    ),
  ],
);

class TestingApp extends StatelessWidget {
  const TestingApp({super.key});

  @override
  Widget build(BuildContext context) {
    return ChangeNotifierProvider<Favorites>(
      create: (context) => Favorites(),
      child: MaterialApp.router(
        title: 'Testing Sample',
        theme: ThemeData(
          colorScheme: ColorScheme.fromSeed(
            seedColor: Colors.deepPurple,
          ),
          useMaterial3: true,
        ),
        routerConfig: _router,
      ),
    );
  }
}
The app is now complete, but untested.
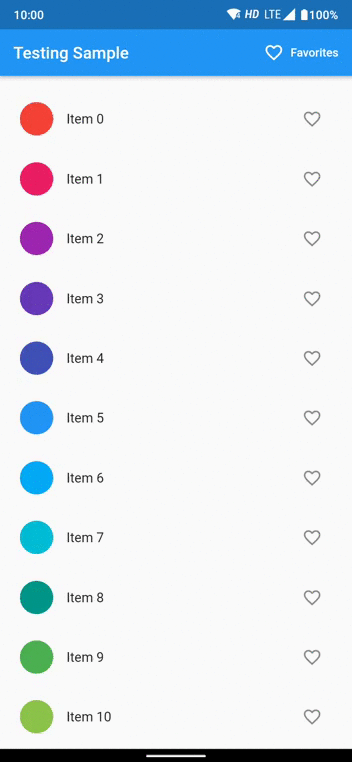
Run the app. It should look like the following screenshot:

The app shows a list of items. Tap the heart-shaped icon on any row to fill in the heart and add the item to the favorites list. The Favorites button on the AppBar takes you to a second screen containing the favorites list.
The app is now ready for testing. You'll start testing the app in the next step.
5. Unit testing the provider
You'll start by unit testing the favorites model. What is a unit test? A unit test verifies that every individual unit of software, be it a function, object or a widget, performs its intended task correctly.
All the test files in a Flutter app, except for integration tests, are placed in the test directory.
Remove test/widget_test.dart
Before you begin testing, delete the widget_test.dart file. You'll be adding your own test files.
Create a new test file
First, you'll test the add() method in the Favorites model to verify that a new item gets added to the list, and that the list reflects the change. By convention, the directory structure in the test directory mimics that in the lib directory and the Dart files have the same name with _test appended.
Create a models directory in the test directory. In this new directory, create a favorites_test.dart file with the following content:
test/models/favorites_test.dart
import 'package:test/test.dart';
import 'package:testing_app/models/favorites.dart';

void main() {
  group('Testing App Provider', () {
    var favorites = Favorites();

    test('A new item should be added', () {
      var number = 35;
      favorites.add(number);
      expect(favorites.items.contains(number), true);
    });
  });
}
The Flutter testing framework allows you to bind similar tests related to each other in a group. There can be multiple groups in a single test file intended to test different parts of the corresponding file in the lib directory.
The test() method takes two positional parameters: the description of the test and the callback where you actually write the test.
Test removing an item from the list. Insert the following test in the same Testing App Provider group:
test/models/favorites_test.dart
test('An item should be removed', () {
  var number = 45;
  favorites.add(number);
  expect(favorites.items.contains(number), true);
  favorites.remove(number);
  expect(favorites.items.contains(number), false);
});
Run the test
At the command line, navigate to the project's root directory and enter the following command:
$ flutter test test/models/favorites_test.dart
If everything works, you should see a message similar to the following:
00:06 +2: All tests passed!
The complete test file: test/models/favorites_test.dart.
For more information on unit testing, visit An introduction to unit testing.
6. Widget testing
In this step you'll add code to test widgets. Widget testing is unique to Flutter, where you can test each widget in an isolated fashion. This step tests the HomePage and FavoritesPage screens individually.
Widget testing uses the testWidget() function instead of the test() function. Like the test() function, the testWidget() function takes two parameters: description, and callback, however the callback takes a WidgetTester as its argument.
Widget tests use TestFlutterWidgetsBinding, a class that provides the same resources to your widgets that they would have in a running app, e.g. information about screen size, the ability to schedule animations, but without running inside an app. Instead, a virtual environment is used to instantiate the widget, and then run tests the results. Here, pumpWidget kicks off the process by telling the framework to mount and measure a particular widget just as it would in an application.
The widget testing framework provides finders to find widgets, for example text(), byType(), and byIcon(). The framework also provides matchers to verify the results.
Start by testing the HomePage widget.
Create a new test file
The first test verifies whether scrolling the HomePage works properly.
Create a new file in the test directory and name it home_test.dart. In the newly created file, add the following code:
test/home_test.dart
import 'package:flutter/material.dart';
import 'package:flutter_test/flutter_test.dart';
import 'package:provider/provider.dart';
import 'package:testing_app/models/favorites.dart';
import 'package:testing_app/screens/home.dart';

Widget createHomeScreen() => ChangeNotifierProvider<Favorites>(
      create: (context) => Favorites(),
      child: const MaterialApp(
        home: HomePage(),
      ),
    );

void main() {
  group('Home Page Widget Tests', () {
    testWidgets('Testing Scrolling', (tester) async {
      await tester.pumpWidget(createHomeScreen());
      expect(find.text('Item 0'), findsOneWidget);
      await tester.fling(
        find.byType(ListView),
        const Offset(0, -200),
        3000,
      );
      await tester.pumpAndSettle();
      expect(find.text('Item 0'), findsNothing);
    });
  });
}
The createHomeScreen() function is used to create an app that loads the widget to be tested in a MaterialApp, wrapped into a ChangeNotifierProvider. The HomePage widget needs both of these widgets to be present above it in the widget tree so it can inherit from them and get access to the data they offer. This function is passed as a parameter to the pumpWidget() function.
Next, test whether the framework can find a ListView rendered onto the screen.
Add the following code snippet to home_test.dart:
test/home_test.dart
group('Home Page Widget Tests', () {

  // BEGINNING OF NEW CONTENT
  testWidgets('Testing if ListView shows up', (tester) async {
    await tester.pumpWidget(createHomeScreen());
    expect(find.byType(ListView), findsOneWidget);
  });
  // END OF NEW CONTENT

    testWidgets('Testing Scrolling', (tester) async {
      await tester.pumpWidget(createHomeScreen());
      expect(find.text('Item 0'), findsOneWidget);
      await tester.fling(
        find.byType(ListView),
        const Offset(0, -200),
        3000,
      );
      await tester.pumpAndSettle();
      expect(find.text('Item 0'), findsNothing);
    });
});
Run the test
First, run the test in the same way you would run a unit test, with the command:
$ flutter test test/home_test.dart
The test should run quickly, and you should see a message like this one:
00:02 +2: All tests passed!
You can also run widget tests using a device or an emulator, which allows you to watch the test running. It also gives you the ability to use hot restart.
Plug-in your device or start your emulator. You can also run the test as a desktop application.
From the command line, navigate to the project's root directory and enter the following command:
$ flutter run test/home_test.dart
You may need to select the device to run the test on. In that case, follow the instructions and select a device:
Multiple devices found:
Linux (desktop) • linux  • linux-x64      • Ubuntu 22.04.1 LTS 5.15.0-58-generic
Chrome (web)    • chrome • web-javascript • Google Chrome 109.0.5414.119
[1]: Linux (linux)
[2]: Chrome (chrome)
Please choose one (To quit, press "q/Q"):
If everything works you should see an output similar to the following:
Launching test/home_test.dart on Linux in debug mode...
Building Linux application...
flutter: 00:00 +0: Home Page Widget Tests Testing if ListView shows up
Syncing files to device Linux...                                    62ms

Flutter run key commands.
r Hot reload. 🔥🔥🔥
R Hot restart.
h List all available interactive commands.
d Detach (terminate "flutter run" but leave application running).
c Clear the screen
q Quit (terminate the application on the device).

💪 Running with sound null safety 💪

An Observatory debugger and profiler on Linux is available at: http://127.0.0.1:35583/GCpdLBqf2UI=/
flutter: 00:00 +1: Home Page Widget Tests Testing Scrolling
The Flutter DevTools debugger and profiler on Linux is available at:
http://127.0.0.1:9100?uri=http://127.0.0.1:35583/GCpdLBqf2UI=/
flutter: 00:02 +2: All tests passed!
Next, you'll make changes to the test file and press Shift + R to hot restart the app and re-run all the tests. Do not stop the application.
Add more tests to the group that tests the HomePage widgets. Copy the following test to your file:
test/home_test.dart
testWidgets('Testing IconButtons', (tester) async {
  await tester.pumpWidget(createHomeScreen());
  expect(find.byIcon(Icons.favorite), findsNothing);
  await tester.tap(find.byIcon(Icons.favorite_border).first);
  await tester.pumpAndSettle(const Duration(seconds: 1));
  expect(find.text('Added to favorites.'), findsOneWidget);
  expect(find.byIcon(Icons.favorite), findsWidgets);
  await tester.tap(find.byIcon(Icons.favorite).first);
  await tester.pumpAndSettle(const Duration(seconds: 1));
  expect(find.text('Removed from favorites.'), findsOneWidget);
  expect(find.byIcon(Icons.favorite), findsNothing);
});
This test verifies that tapping the IconButton changes from Icons.favorite_border (an open heart) to Icons.favorite (a filled-in heart) and then back to Icons.favorite_border when tapped again.
Enter Shift + R. This hot restarts the app and re-runs all the tests.
The complete test file: test/home_test.dart.
Use the same process to test the FavoritesPage with the following code. Follow the same steps and run it.
test/favorites_test.dart
import 'package:flutter/material.dart';
import 'package:flutter_test/flutter_test.dart';
import 'package:provider/provider.dart';
import 'package:testing_app/models/favorites.dart';
import 'package:testing_app/screens/favorites.dart';

late Favorites favoritesList;

Widget createFavoritesScreen() => ChangeNotifierProvider<Favorites>(
      create: (context) {
        favoritesList = Favorites();
        return favoritesList;
      },
      child: const MaterialApp(
        home: FavoritesPage(),
      ),
    );

void addItems() {
  for (var i = 0; i < 10; i += 2) {
    favoritesList.add(i);
  }
}

void main() {
  group('Favorites Page Widget Tests', () {
    testWidgets('Test if ListView shows up', (tester) async {
      await tester.pumpWidget(createFavoritesScreen());
      addItems();
      await tester.pumpAndSettle();
      expect(find.byType(ListView), findsOneWidget);
    });

    testWidgets('Testing Remove Button', (tester) async {
      await tester.pumpWidget(createFavoritesScreen());
      addItems();
      await tester.pumpAndSettle();
      var totalItems = tester.widgetList(find.byIcon(Icons.close)).length;
      await tester.tap(find.byIcon(Icons.close).first);
      await tester.pumpAndSettle();
      expect(tester.widgetList(find.byIcon(Icons.close)).length,
          lessThan(totalItems));
      expect(find.text('Removed from favorites.'), findsOneWidget);
    });
  });
}
This test verifies whether an item disappears when the close (remove) button is pressed.
For more information on widget testing, visit:
7. Testing app UI with integration tests
Integration tests are used to test how the individual pieces of an app work together as a whole. The integration_test library is used to perform integration tests in Flutter. This is Flutter's version of Selenium WebDriver, Protractor, Espresso, or Earl Gray. The package uses flutter_driver internally to drive the test on a device.
Writing integration tests in Flutter is similar to writing widget tests, with the exception that integration tests run on a mobile device, browser, or desktop application, called the target device.
Write the test
Create a directory called integration_test in the project's root directory, and in that directory create a new file named app_test.dart.
integration_test/app_test.dart
import 'package:flutter/material.dart';
import 'package:flutter_test/flutter_test.dart';
import 'package:testing_app/main.dart';

void main() {
  group('Testing App', () {
    testWidgets('Favorites operations test', (tester) async {
      await tester.pumpWidget(const TestingApp());

      final iconKeys = [
        'icon_0',
        'icon_1',
        'icon_2',
      ];

      for (var icon in iconKeys) {
        await tester.tap(find.byKey(ValueKey(icon)));
        await tester.pumpAndSettle(const Duration(seconds: 1));

        expect(find.text('Added to favorites.'), findsOneWidget);
      }

      await tester.tap(find.text('Favorites'));
      await tester.pumpAndSettle();

      final removeIconKeys = [
        'remove_icon_0',
        'remove_icon_1',
        'remove_icon_2',
      ];

      for (final iconKey in removeIconKeys) {
        await tester.tap(find.byKey(ValueKey(iconKey)));
        await tester.pumpAndSettle(const Duration(seconds: 1));

        expect(find.text('Removed from favorites.'), findsOneWidget);
      }
    });
  });
}
Run the test
Plug-in your device or start your emulator. You can also run the test as a desktop application.
At the command line, navigate to the project's root directory and enter the following command:
$ flutter test integration_test/app_test.dart
If everything works, you should see an output similar to the following:
Multiple devices found:
Linux (desktop) • linux  • linux-x64      • Ubuntu 22.04.1 LTS 5.15.0-58-generic
Chrome (web)    • chrome • web-javascript • Google Chrome 109.0.5414.119
[1]: Linux (linux)
[2]: Chrome (chrome)
Please choose one (To quit, press "q/Q"): 1
00:00 +0: loading /home/miquel/tmp/testing_app/integration_test/app_test.dart                                                B00:08 +0: loading /home/miquel/tmp/testing_app/integration_test/app_test.dart
00:26 +1: All tests passed!
8. Testing app performance with Flutter Driver
Write a performance test
Create a new test file named perf_test.dart in the integration_test folder with the following content:
integration_test/perf_test.dart
import 'package:flutter/material.dart';
import 'package:flutter_test/flutter_test.dart';
import 'package:integration_test/integration_test.dart';
import 'package:testing_app/main.dart';

void main() {
  group('Testing App Performance', () {
    final binding = IntegrationTestWidgetsFlutterBinding.ensureInitialized();
    binding.framePolicy = LiveTestWidgetsFlutterBindingFramePolicy.fullyLive;

    testWidgets('Scrolling test', (tester) async {
      await tester.pumpWidget(const TestingApp());

      final listFinder = find.byType(ListView);

      await binding.traceAction(() async {
        await tester.fling(listFinder, const Offset(0, -500), 10000);
        await tester.pumpAndSettle();

        await tester.fling(listFinder, const Offset(0, 500), 10000);
        await tester.pumpAndSettle();
      }, reportKey: 'scrolling_summary');
    });
  });
}
The ensureInitialized() function verifies if the integration test driver is initialized, reinitializing it if required. Setting framePolicy to fullyLive is good for testing animated code.
This test scrolls through the list of items really fast and then scrolls all the way up. The traceAction() function records the actions and generates a timeline summary.
Capture the performance results
To capture the results, create a folder named test_driver with a file named perf_driver.dart, and add the following code:
test_driver/perf_driver.dart
import 'package:flutter_driver/flutter_driver.dart' as driver;
import 'package:integration_test/integration_test_driver.dart';

Future<void> main() {
  return integrationDriver(
    responseDataCallback: (data) async {
      if (data != null) {
        final timeline = driver.Timeline.fromJson(
            data['scrolling_summary'] as Map<String, dynamic>);

        final summary = driver.TimelineSummary.summarize(timeline);

        await summary.writeTimelineToFile(
          'scrolling_summary',
          pretty: true,
          includeSummary: true,
        );
      }
    },
  );
}
Run the test
Plug-in your device or start your emulator.
At the command line, navigate to the project's root directory and enter the following command:
$ flutter drive \
  --driver=test_driver/perf_driver.dart \
  --target=integration_test/perf_test.dart \
  --profile \
  --no-dds
If everything works, you should see an output similar to the following:
Running "flutter pub get" in testing_app...
Resolving dependencies...
  archive 3.3.2 (3.3.6 available)
  collection 1.17.0 (1.17.1 available)
  js 0.6.5 (0.6.7 available)
  matcher 0.12.13 (0.12.14 available)
  meta 1.8.0 (1.9.0 available)
  path 1.8.2 (1.8.3 available)
  test 1.22.0 (1.23.0 available)
  test_api 0.4.16 (0.4.18 available)
  test_core 0.4.20 (0.4.23 available)
  vm_service 9.4.0 (11.0.1 available)
  webdriver 3.0.1 (3.0.2 available)
Got dependencies!
Running Gradle task 'assembleProfile'...                         1,379ms
✓  Built build/app/outputs/flutter-apk/app-profile.apk (14.9MB).
Installing build/app/outputs/flutter-apk/app-profile.apk...        222ms
I/flutter ( 6125): 00:04 +1: Testing App Performance (tearDownAll)
I/flutter ( 6125): 00:04 +2: All tests passed!
All tests passed.
After the test completes successfully, the build directory at the root of the project contains two files:
scrolling_summary.timeline_summary.jsoncontains the summary. Open the file with any text editor to review the information contained within.scrolling_summary.timeline.jsoncontains the complete timeline data.
For more details on integration testing, visit:
9. Congratulations!
You've completed the codelab and have learned different ways to test a Flutter app.
What you've learned
- How to test providers with the help of unit tests
- How to test widgets using the widget testing framework
- How to test the app's UI using integration tests
- How to test the app's performance using integration tests
To learn more about testing in Flutter, visit