
۱. مقدمه
افزودن خریدهای درونبرنامهای به یک برنامه Flutter نیاز به تنظیم صحیح فروشگاههای App و Play، تأیید خرید و اعطای مجوزهای لازم، مانند مزایای اشتراک، دارد.
در این آزمایشگاه کد، شما سه نوع خرید درونبرنامهای را به یک برنامه (که برای شما ارائه شده است) اضافه خواهید کرد و این خریدها را با استفاده از یک backend دارت با Firebase تأیید خواهید کرد. برنامه ارائه شده، Dash Clicker، شامل یک بازی است که از نماد Dash به عنوان واحد پول استفاده میکند. شما گزینههای خرید زیر را اضافه خواهید کرد:
- یک گزینه خرید تکرارپذیر برای ۲۰۰۰ دش به طور همزمان.
- یک خرید ارتقاء یکباره برای تبدیل Dash به سبک قدیمی به Dash مدرن.
- اشتراکی که کلیکهای خودکار ایجاد شده را دو برابر میکند.
اولین گزینه خرید، به کاربر ۲۰۰۰ دش (Dash) به طور مستقیم میدهد. این دشها مستقیماً در دسترس کاربر هستند و میتوانند بارها خریداری شوند. این دشها، مصرفی نامیده میشوند زیرا مستقیماً مصرف میشوند و میتوانند چندین بار مصرف شوند.
گزینه دوم، دش (Dash) را به یک دش (Dash) زیباتر ارتقا میدهد. این خرید فقط یک بار قابل انجام است و برای همیشه در دسترس خواهد بود. چنین خریدی غیرقابل مصرف نامیده میشود زیرا توسط برنامه قابل مصرف نیست اما برای همیشه معتبر است.
سومین و آخرین گزینه خرید، اشتراک است. تا زمانی که اشتراک فعال باشد، کاربر سریعتر دش دریافت میکند، اما وقتی پرداخت هزینه اشتراک را متوقف کند، مزایا نیز از بین میروند.
سرویس backend (که برای شما نیز ارائه شده است) به عنوان یک برنامه Dart اجرا میشود، تأیید میکند که خریدها انجام شدهاند و آنها را با استفاده از Firestore ذخیره میکند. Firestore برای آسانتر کردن فرآیند استفاده میشود، اما در برنامه اصلی خود میتوانید از هر نوع سرویس backend استفاده کنید.


آنچه خواهید ساخت
- شما یک برنامه را برای پشتیبانی از خریدهای مصرفی و اشتراکها گسترش خواهید داد.
- همچنین یک برنامهی بکاند دارت را برای تأیید و ذخیرهی اقلام خریداریشده توسعه خواهید داد.
آنچه یاد خواهید گرفت
- نحوه پیکربندی اپ استور و پلی استور با محصولات قابل خرید.
- نحوه ارتباط با فروشگاهها برای تأیید خریدها و ذخیره آنها در Firestore.
- نحوه مدیریت خریدها در برنامه شما.
آنچه نیاز دارید
- اندروید استودیو
- Xcode (برای توسعه iOS)
- کیت توسعه نرمافزار فلاتر
۲. محیط توسعه را راهاندازی کنید
برای شروع این آزمایشگاه کد، کد را دانلود کنید و شناسه بسته (bundle identifier) را برای iOS و نام بسته (package name) را برای اندروید تغییر دهید.
کد را دانلود کنید
برای کپی کردن مخزن GitHub از طریق خط فرمان، از دستور زیر استفاده کنید:
git clone https://github.com/flutter/codelabs.git flutter-codelabs
یا اگر ابزار cli گیتهاب را نصب کردهاید، از دستور زیر استفاده کنید:
gh repo clone flutter/codelabs flutter-codelabs
کد نمونه در دایرکتوری flutter-codelabs که شامل کد مجموعهای از codelabs است، کپی میشود. کد مربوط به این codelab در flutter-codelabs/in_app_purchases قرار دارد.
ساختار دایرکتوری زیر flutter-codelabs/in_app_purchases شامل مجموعهای از تصاویر لحظهای از جایی است که باید در انتهای هر مرحلهی نامگذاری شده باشید. کد آغازین در مرحلهی ۰ قرار دارد، بنابراین به صورت زیر به آن بروید:
cd flutter-codelabs/in_app_purchases/step_00
اگر میخواهید به مرحله بعدی بروید یا ببینید که بعد از یک مرحله چه شکلی باید داشته باشد، به دایرکتوری که نام آن مرحله مورد نظر شماست نگاه کنید. کد آخرین مرحله در زیر پوشه complete قرار دارد.
پروژه اولیه را تنظیم کنید
پروژه اولیه را از step_00/app در IDE مورد علاقه خود باز کنید. ما از اندروید استودیو برای اسکرینشاتها استفاده کردیم، اما ویژوال استودیو کد نیز گزینه بسیار خوبی است. با هر دو ویرایشگر، مطمئن شوید که آخرین افزونههای Dart و Flutter نصب شدهاند.
برنامههایی که میخواهید بسازید، برای اطلاع از اینکه کدام محصولات و با چه قیمتی در دسترس هستند، باید با اپ استور و پلی استور ارتباط برقرار کنند. هر برنامه با یک شناسه منحصر به فرد شناسایی میشود. برای اپ استور iOS، این شناسه، شناسه بسته نرمافزاری و برای پلی استور اندروید، شناسه برنامه است. این شناسهها معمولاً با استفاده از نمادگذاری معکوس نام دامنه ساخته میشوند. به عنوان مثال، هنگام ساخت یک برنامه خرید درون برنامهای برای flutter.dev، dev.flutter.inapppurchase استفاده خواهید کرد. به یک شناسه برای برنامه خود فکر کنید، اکنون میخواهید آن را در تنظیمات پروژه تنظیم کنید.
ابتدا، شناسه بسته نرمافزاری را برای iOS تنظیم کنید. برای انجام این کار، فایل Runner.xcworkspace را در برنامه Xcode باز کنید.
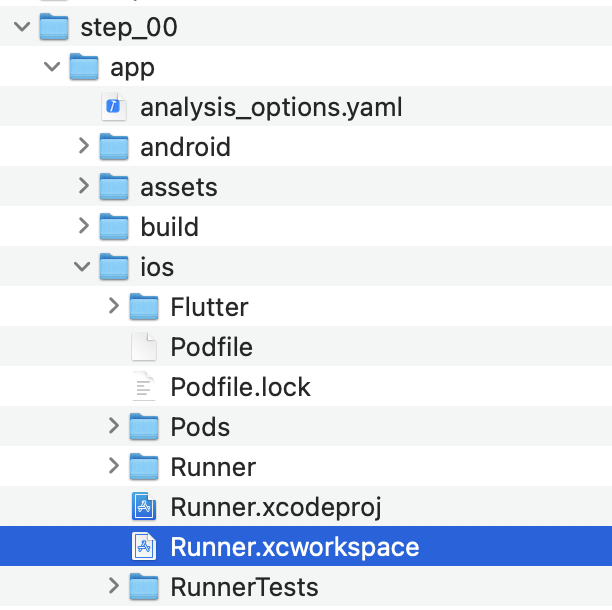
در ساختار پوشه Xcode، پروژه Runner در بالا قرار دارد و اهداف Flutter ، Runner و Products در زیر پروژه Runner قرار دارند. برای ویرایش تنظیمات پروژه خود، روی Runner دوبار کلیک کنید و روی Signing & Capabilities کلیک کنید. شناسه بستهای را که اخیراً انتخاب کردهاید، در قسمت Team وارد کنید تا تیم خود را تنظیم کنید.

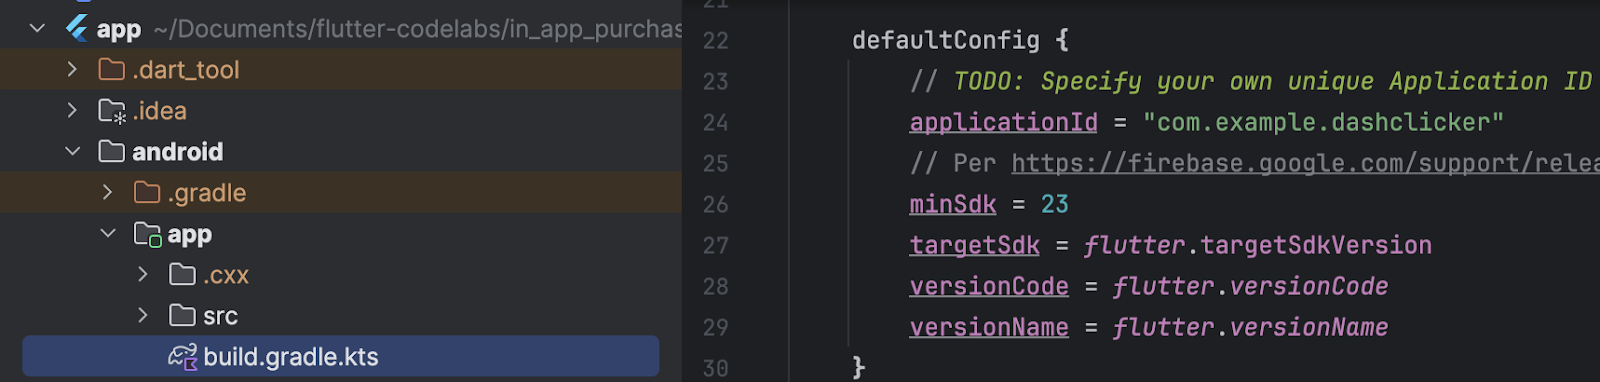
اکنون میتوانید Xcode را ببندید و به اندروید استودیو برگردید تا پیکربندی اندروید را تکمیل کنید. برای انجام این کار، فایل build.gradle.kts را در مسیر android/app, باز کنید و applicationId خود (در خط 24 در تصویر زیر) را به شناسه برنامه، همان شناسه بسته iOS، تغییر دهید. توجه داشته باشید که شناسههای فروشگاههای iOS و اندروید لازم نیست یکسان باشند، با این حال یکسان نگه داشتن آنها احتمال خطا را کاهش میدهد و بنابراین در این آزمایشگاه کد نیز از شناسههای یکسان استفاده خواهیم کرد.
۳. افزونه را نصب کنید
در این بخش از codelab، افزونهی in_app_purchase را نصب خواهید کرد.
اضافه کردن وابستگی در pubspec
با اضافه کردن in_app_purchase به وابستگیهای پروژه خود، in_app_purchase به pubspec اضافه کنید:
$ cd app
$ flutter pub add in_app_purchase dev:in_app_purchase_platform_interface
Resolving dependencies...
Downloading packages...
  characters 1.4.0 (1.4.1 available)
  flutter_lints 5.0.0 (6.0.0 available)
+ in_app_purchase 3.2.3
+ in_app_purchase_android 0.4.0+3
+ in_app_purchase_platform_interface 1.4.0
+ in_app_purchase_storekit 0.4.4
+ json_annotation 4.9.0
  lints 5.1.1 (6.0.0 available)
  material_color_utilities 0.11.1 (0.13.0 available)
  meta 1.16.0 (1.17.0 available)
  provider 6.1.5 (6.1.5+1 available)
  test_api 0.7.6 (0.7.7 available)
Changed 5 dependencies!
7 packages have newer versions incompatible with dependency constraints.
Try `flutter pub outdated` for more information.
pubspec.yaml خود را باز کنید و تأیید کنید که اکنون in_app_purchase به عنوان ورودی در زیر dependencies و in_app_purchase_platform_interface در زیر dev_dependencies فهرست شدهاند.
pubspec.yaml
dependencies:
  flutter:
    sdk: flutter
  cloud_firestore: ^6.0.0
  cupertino_icons: ^1.0.8
  firebase_auth: ^6.0.1
  firebase_core: ^4.0.0
  google_sign_in: ^7.1.1
  http: ^1.5.0
  intl: ^0.20.2
  provider: ^6.1.5
  logging: ^1.3.0
  in_app_purchase: ^3.2.3

dev_dependencies:
  flutter_test:
    sdk: flutter
  flutter_lints: ^5.0.0
  in_app_purchase_platform_interface: ^1.4.0
۴. اپ استور را راهاندازی کنید
برای تنظیم خریدهای درونبرنامهای و آزمایش آنها در iOS، باید یک برنامه جدید در اپ استور ایجاد کنید و محصولات قابل خرید را در آنجا ایجاد کنید. لازم نیست چیزی منتشر کنید یا برنامه را برای بررسی به اپل ارسال کنید. برای انجام این کار به یک حساب توسعهدهنده نیاز دارید. اگر ندارید، در برنامه توسعهدهنده اپل ثبتنام کنید .
قراردادهای برنامههای پولی
برای استفاده از خریدهای درونبرنامهای، باید یک توافقنامه فعال برای برنامههای پولی در App Store Connect داشته باشید. به https://appstoreconnect.apple.com/ بروید و روی توافقنامهها، مالیات و بانکداری کلیک کنید.

در اینجا توافقنامههایی برای برنامههای رایگان و پولی مشاهده خواهید کرد. وضعیت برنامههای رایگان باید فعال و وضعیت برنامههای پولی جدید باشد. مطمئن شوید که شرایط را مشاهده کردهاید، آنها را پذیرفتهاید و تمام اطلاعات مورد نیاز را وارد کردهاید.

وقتی همه چیز به درستی تنظیم شده باشد، وضعیت برنامههای پولی فعال خواهد بود. این بسیار مهم است زیرا بدون توافقنامه فعال، نمیتوانید خریدهای درونبرنامهای را امتحان کنید.

ثبت شناسه برنامه
یک شناسه جدید در پورتال توسعهدهندگان اپل ایجاد کنید. به developer.apple.com/account/resources/identifiers/list مراجعه کنید و روی نماد "بهعلاوه" در کنار سربرگ شناسهها کلیک کنید.

شناسههای برنامه را انتخاب کنید

برنامه را انتخاب کنید

توضیحاتی ارائه دهید و شناسه بسته را طوری تنظیم کنید که با شناسه بسته که قبلاً در XCode تنظیم شده بود، مطابقت داشته باشد.

برای راهنمایی بیشتر در مورد نحوه ایجاد شناسه برنامه جدید، به راهنمای حساب توسعهدهنده مراجعه کنید.
ایجاد یک برنامه جدید
یک برنامه جدید در اپ استور ایجاد کنید. با شناسه بسته منحصر به فرد خود ارتباط برقرار کنید.


برای راهنمایی بیشتر در مورد نحوه ایجاد یک برنامه جدید و مدیریت توافقنامهها، به راهنمای اتصال به فروشگاه App مراجعه کنید.
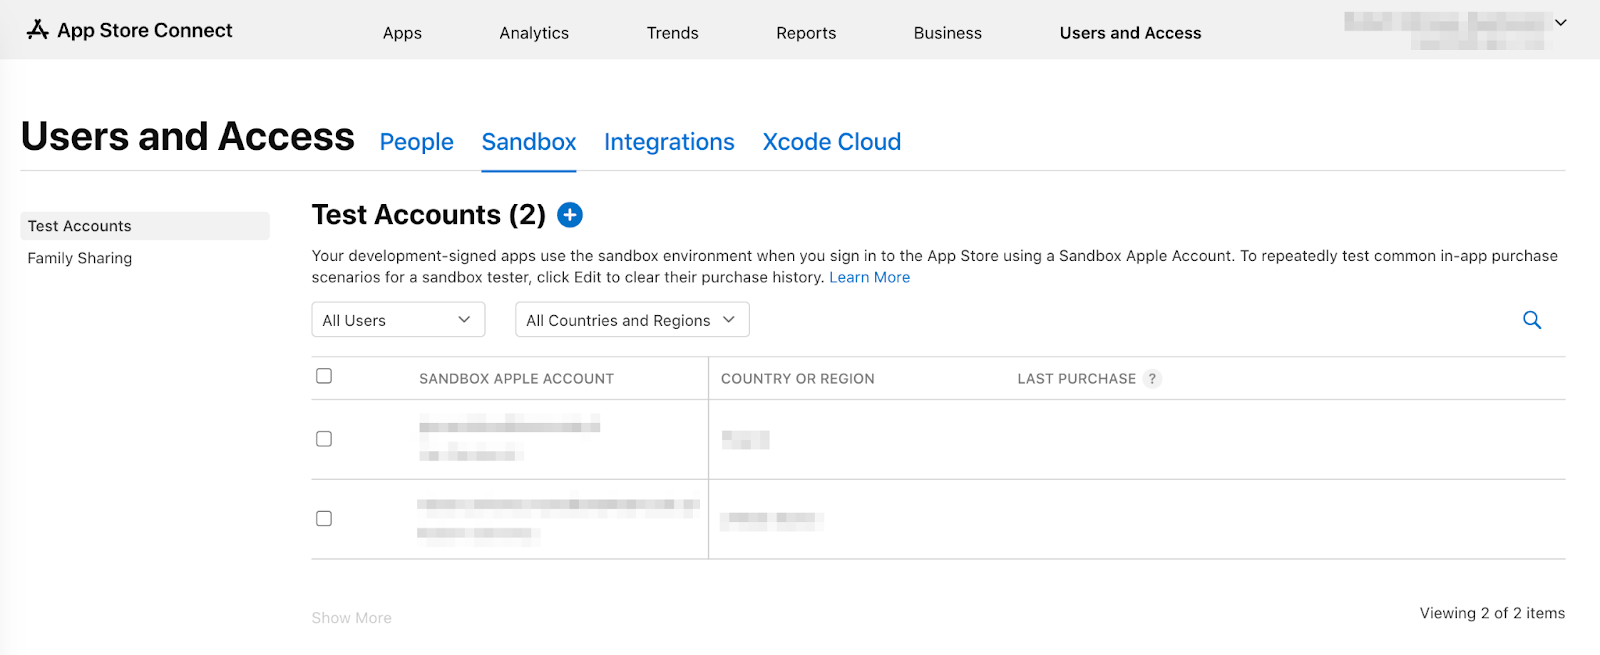
برای آزمایش خریدهای درونبرنامهای، به یک کاربر آزمایشی در محیط سندباکس نیاز دارید. این کاربر آزمایشی نباید به iTunes متصل باشد - فقط برای آزمایش خریدهای درونبرنامهای استفاده میشود. نمیتوانید از آدرس ایمیلی که قبلاً برای یک حساب اپل استفاده شده است استفاده کنید. در بخش کاربران و دسترسی ، برای ایجاد یک حساب سندباکس جدید یا مدیریت اپل آیدیهای موجود در محیط سندباکس، به سندباکس بروید.
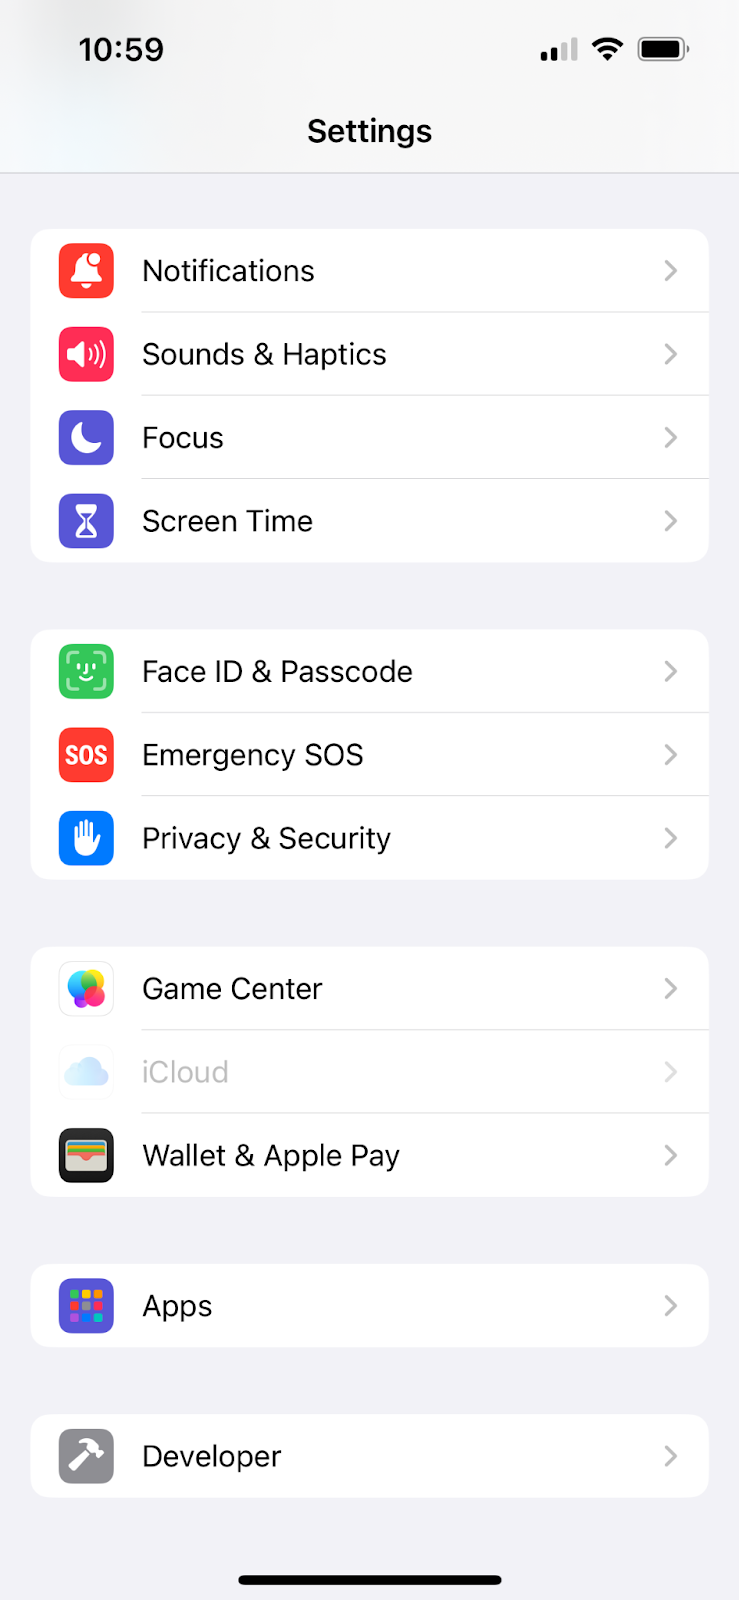
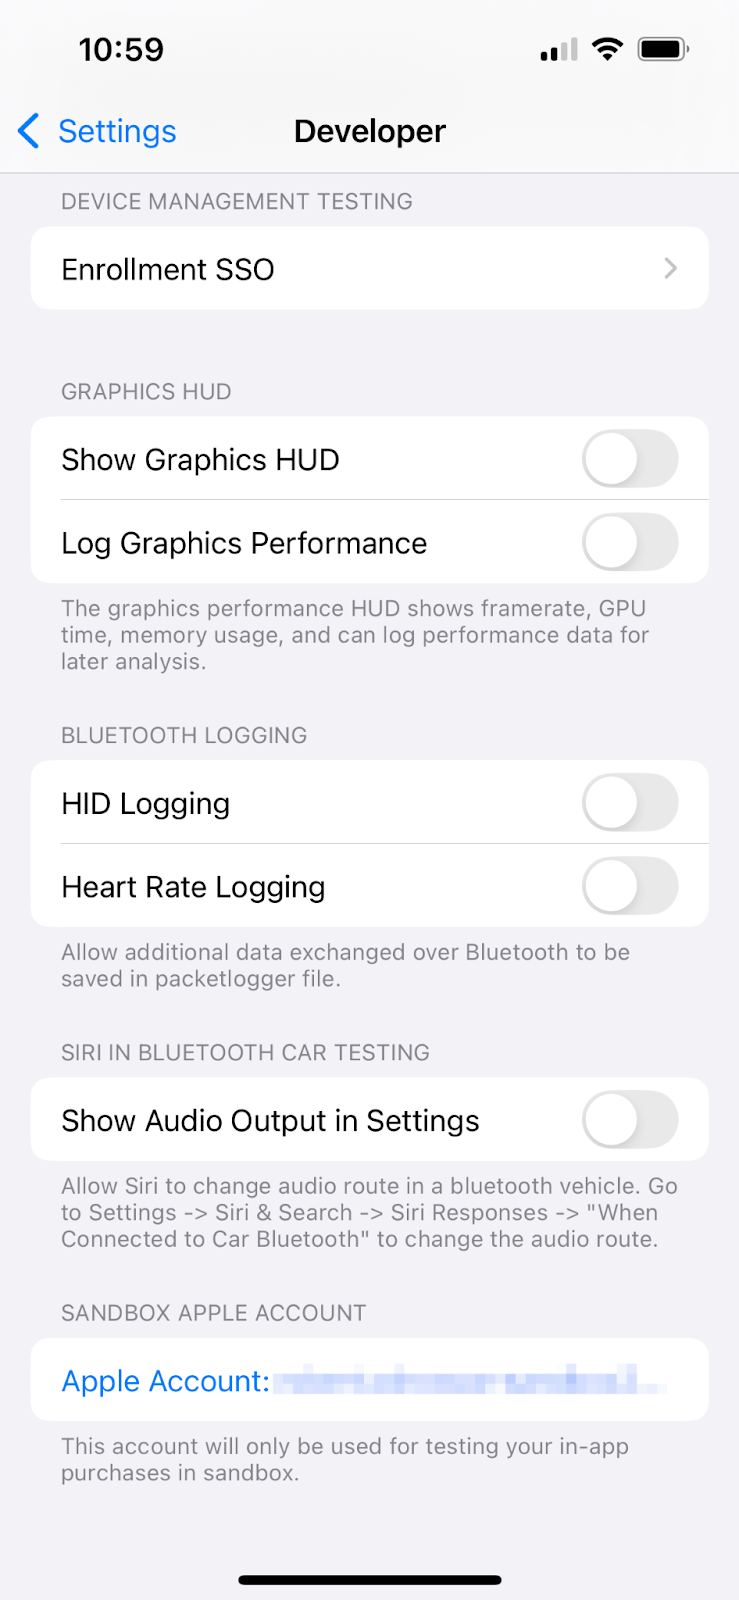
اکنون میتوانید با رفتن به تنظیمات > توسعهدهنده > حساب کاربری اپل در سندباکس، حساب کاربری سندباکس خود را در آیفون تنظیم کنید.
پیکربندی خریدهای درونبرنامهای شما
حالا سه مورد قابل خرید را پیکربندی خواهید کرد:
-
dash_consumable_2k: یک خرید مصرفی که میتواند بارها خریداری شود و به ازای هر خرید، ۲۰۰۰ دش (واحد پول درونبرنامهای) به کاربر اعطا میکند. -
dash_upgrade_3d: یک خرید «ارتقاء» غیرقابل مصرف که فقط یک بار میتوان آن را خریداری کرد و به کاربر یک دش (Dash) با ظاهری متفاوت برای کلیک کردن میدهد. -
dash_subscription_doubler: اشتراکی که در طول مدت اشتراک، به ازای هر کلیک دو برابر Dash به کاربر میدهد.
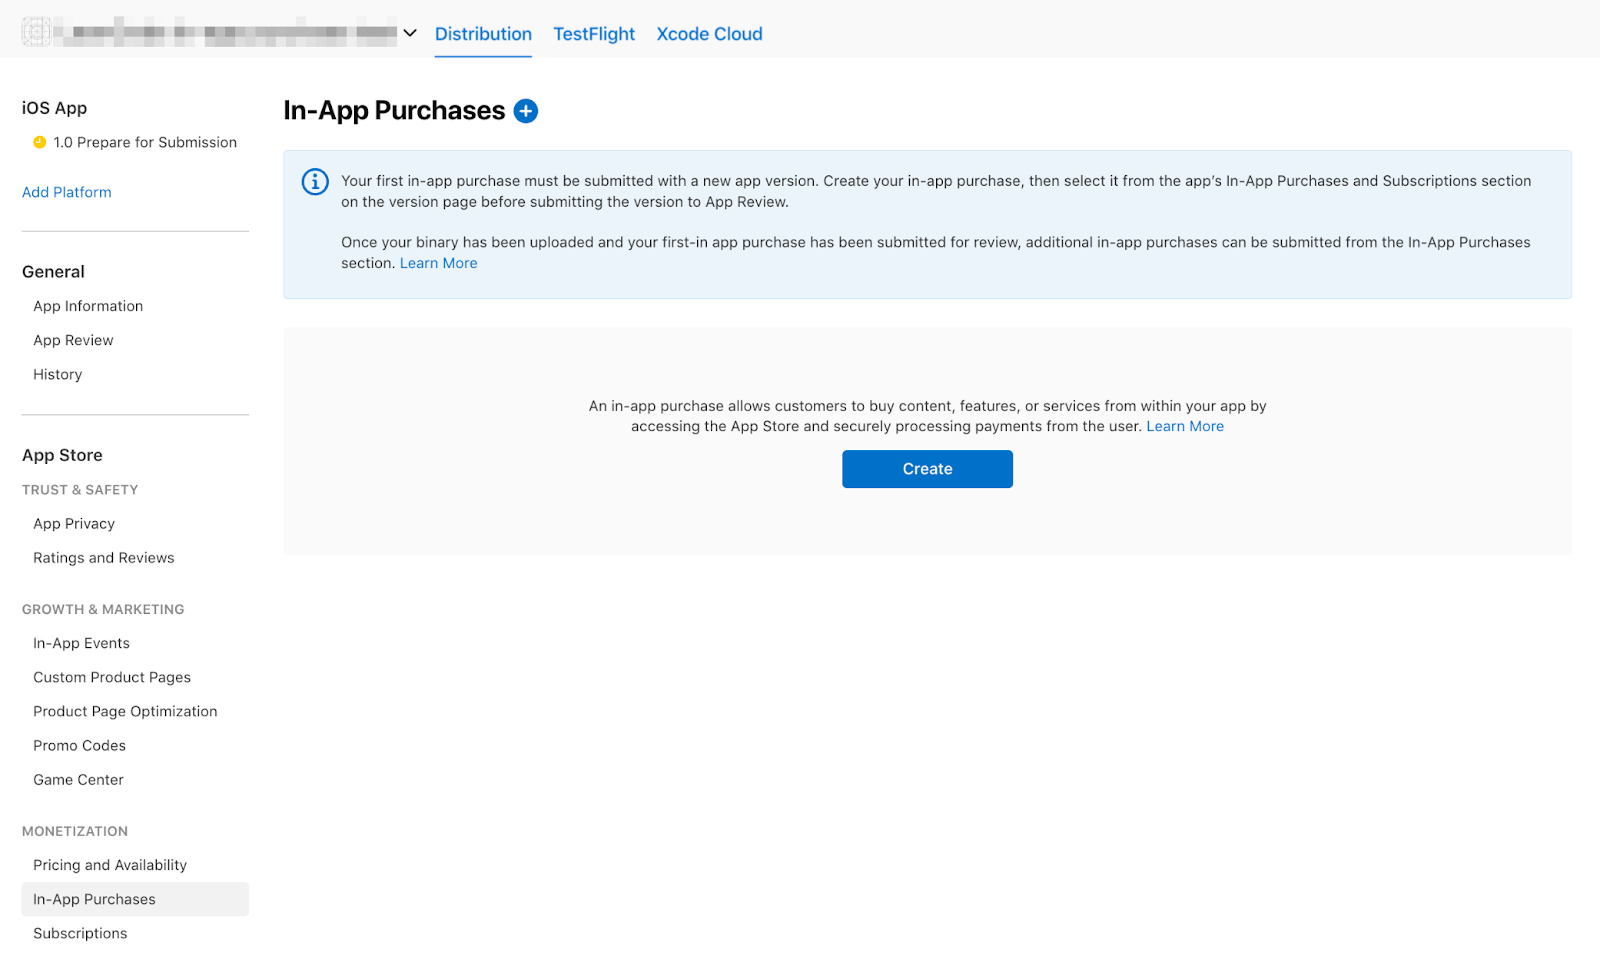
به خریدهای درون برنامهای بروید.
خریدهای درونبرنامهای خود را با شناسههای مشخصشده ایجاد کنید:
-
dash_consumable_2kبه عنوان یک Consumable تنظیم کنید.dash_consumable_2kبه عنوان شناسه محصول استفاده کنید. نام مرجع فقط در App Store Connect استفاده میشود، فقط آن را رویdash consumable 2kتنظیم کنید.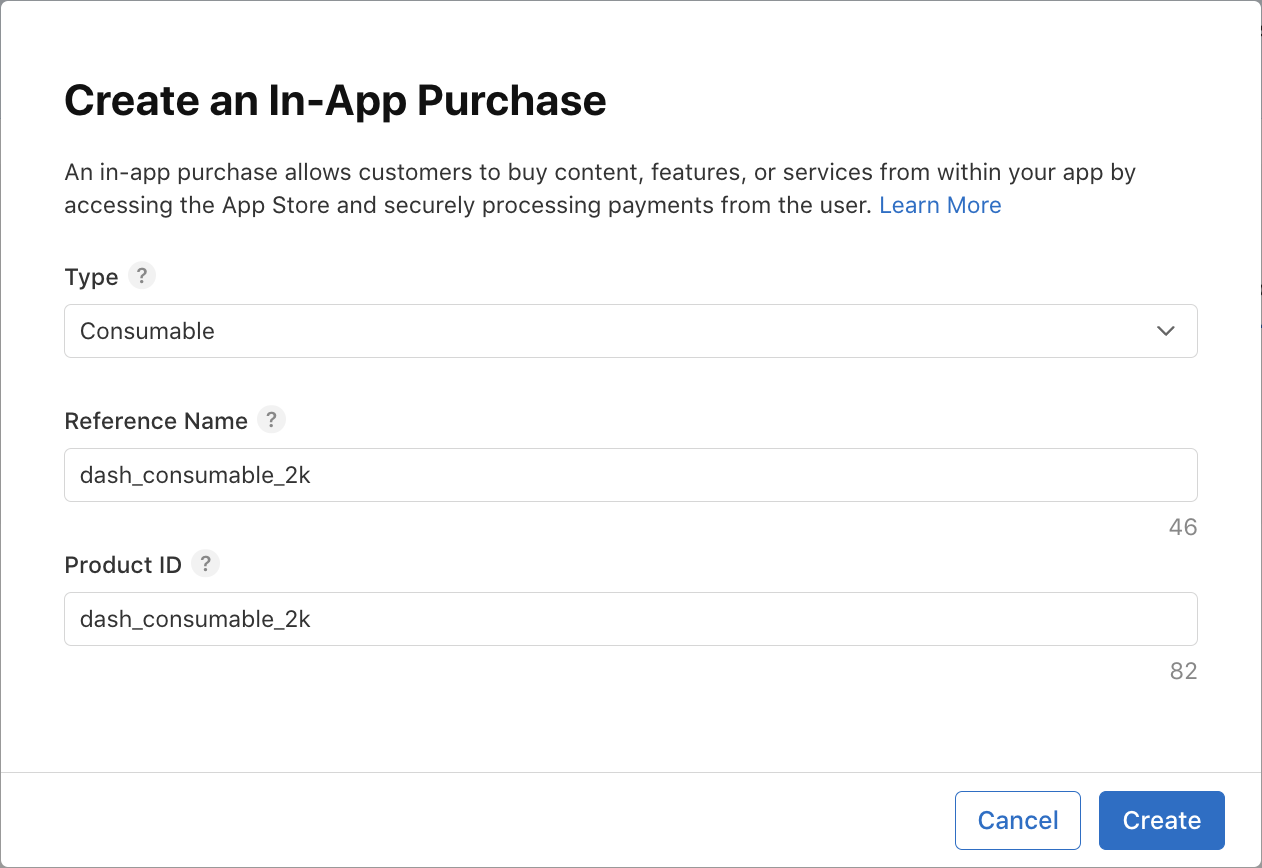 تنظیم در دسترس بودن. محصول باید در کشور کاربر سندباکس موجود باشد.
 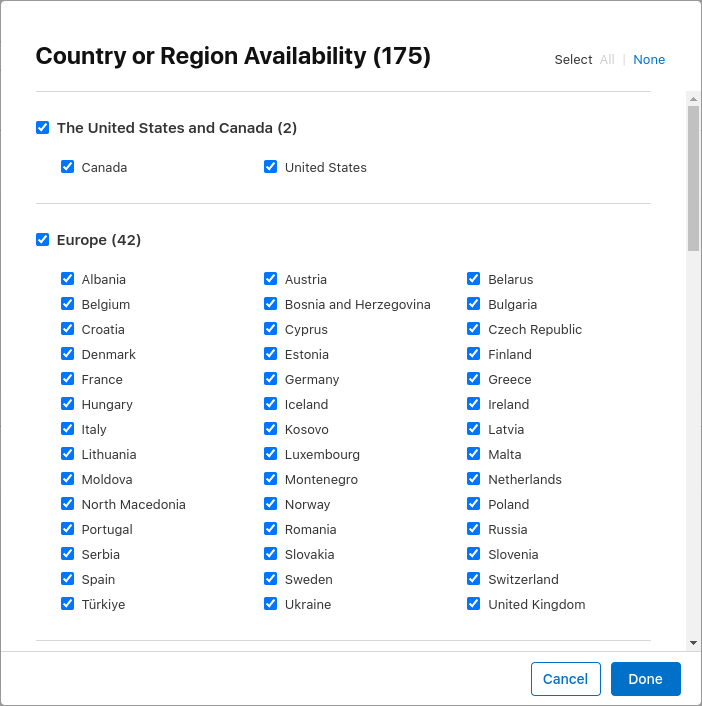 قیمتگذاری را اضافه کنید و قیمت را روی
 $1.99یا معادل آن به ارزهای دیگر تنظیم کنید.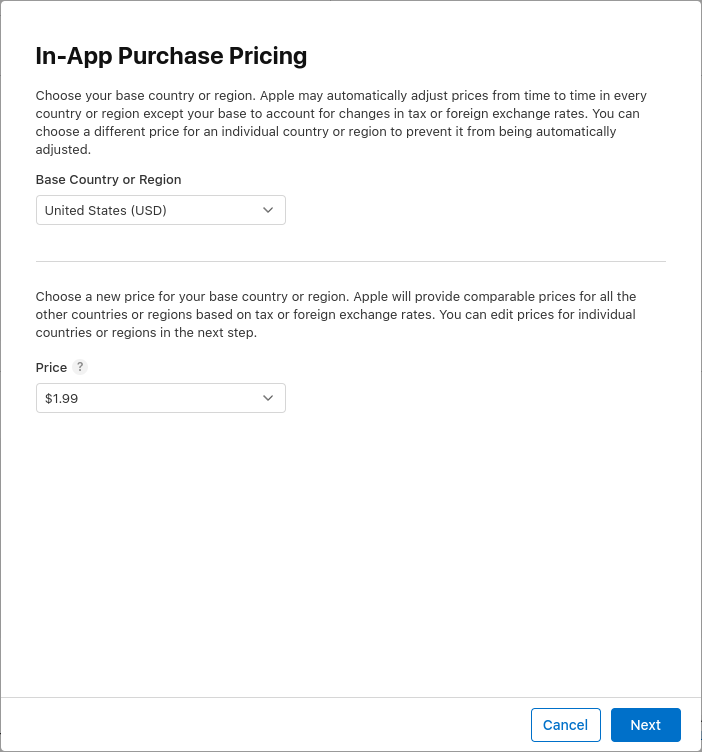 برای خرید، محلهای مورد نظر خود را اضافه کنید. با خرید تماس بگیرید.
 Spring is in the air2000 dashes fly out.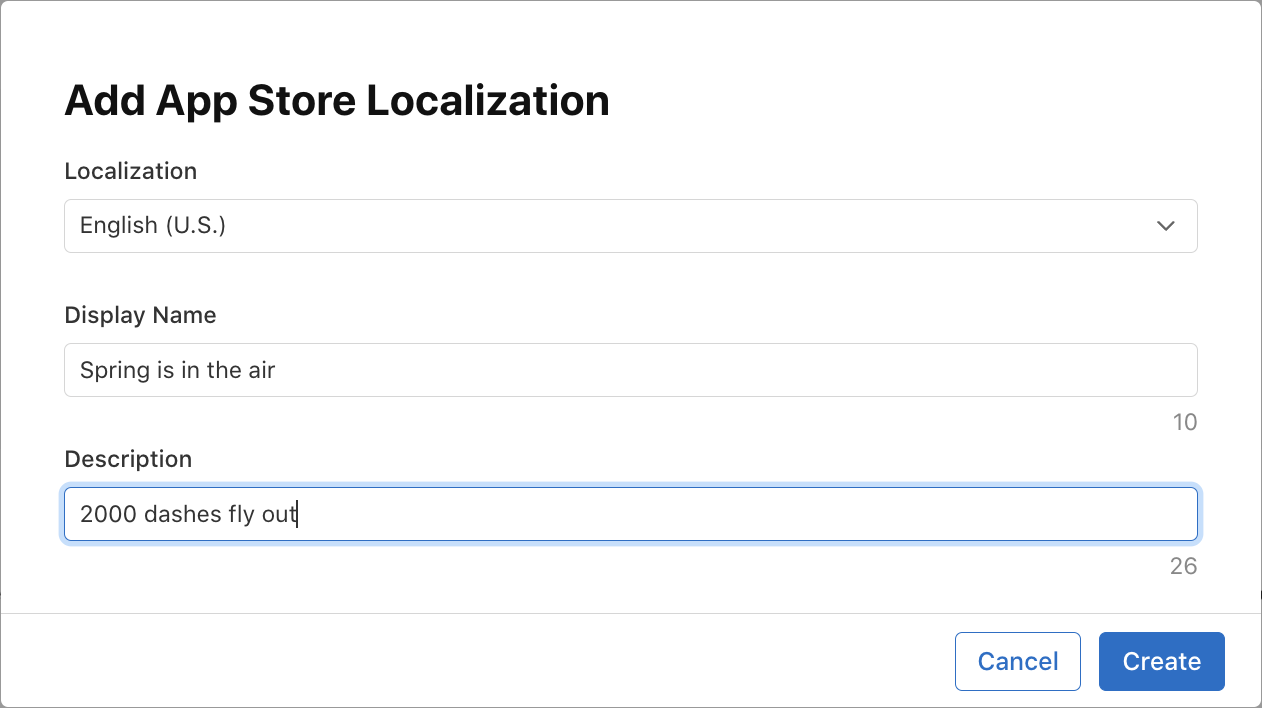 یک اسکرینشات از نقد و بررسی اضافه کنید. محتوا تا زمانی که محصول برای نقد و بررسی ارسال نشده باشد، مهم نیست، اما لازم است که محصول در حالت «آماده ارسال» باشد، که این حالت برای زمانی که برنامه محصولات را از اپ استور دریافت میکند، ضروری است.
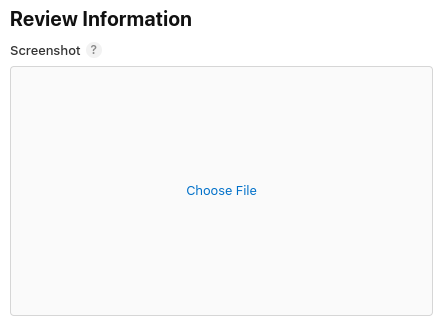
-
dash_upgrade_3dبه عنوان یک کالای غیر مصرفی تنظیم کنید. ازdash_upgrade_3dبه عنوان شناسه محصول استفاده کنید. نام مرجع راdash upgrade 3dقرار دهید. خرید را با نام3D Dashwith نامگذاری کنید. این محصولBrings your dash back to the futureو به عنوان توضیحات نمایش میدهد. قیمت را روی$0.99تنظیم کنید. موجودی را پیکربندی کنید و تصویر صفحه نقد و بررسی را به همان روشی که برای محصولdash_consumable_2kانجام دادید، آپلود کنید.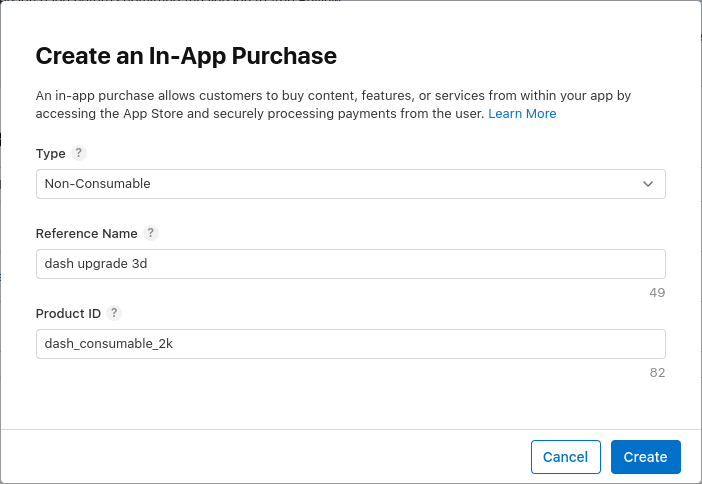
-
dash_subscription_doublerبه عنوان یک اشتراک با قابلیت تمدید خودکار تنظیم کنید. روند اشتراکها کمی متفاوت است. ابتدا، باید یک گروه اشتراک ایجاد کنید. وقتی چندین اشتراک بخشی از یک گروه باشند، یک کاربر فقط میتواند همزمان در یکی از آنها مشترک شود، اما میتواند بین این اشتراکها ارتقا یا کاهش رتبه دهد. کافیست این گروه راsubscriptionsبنامید.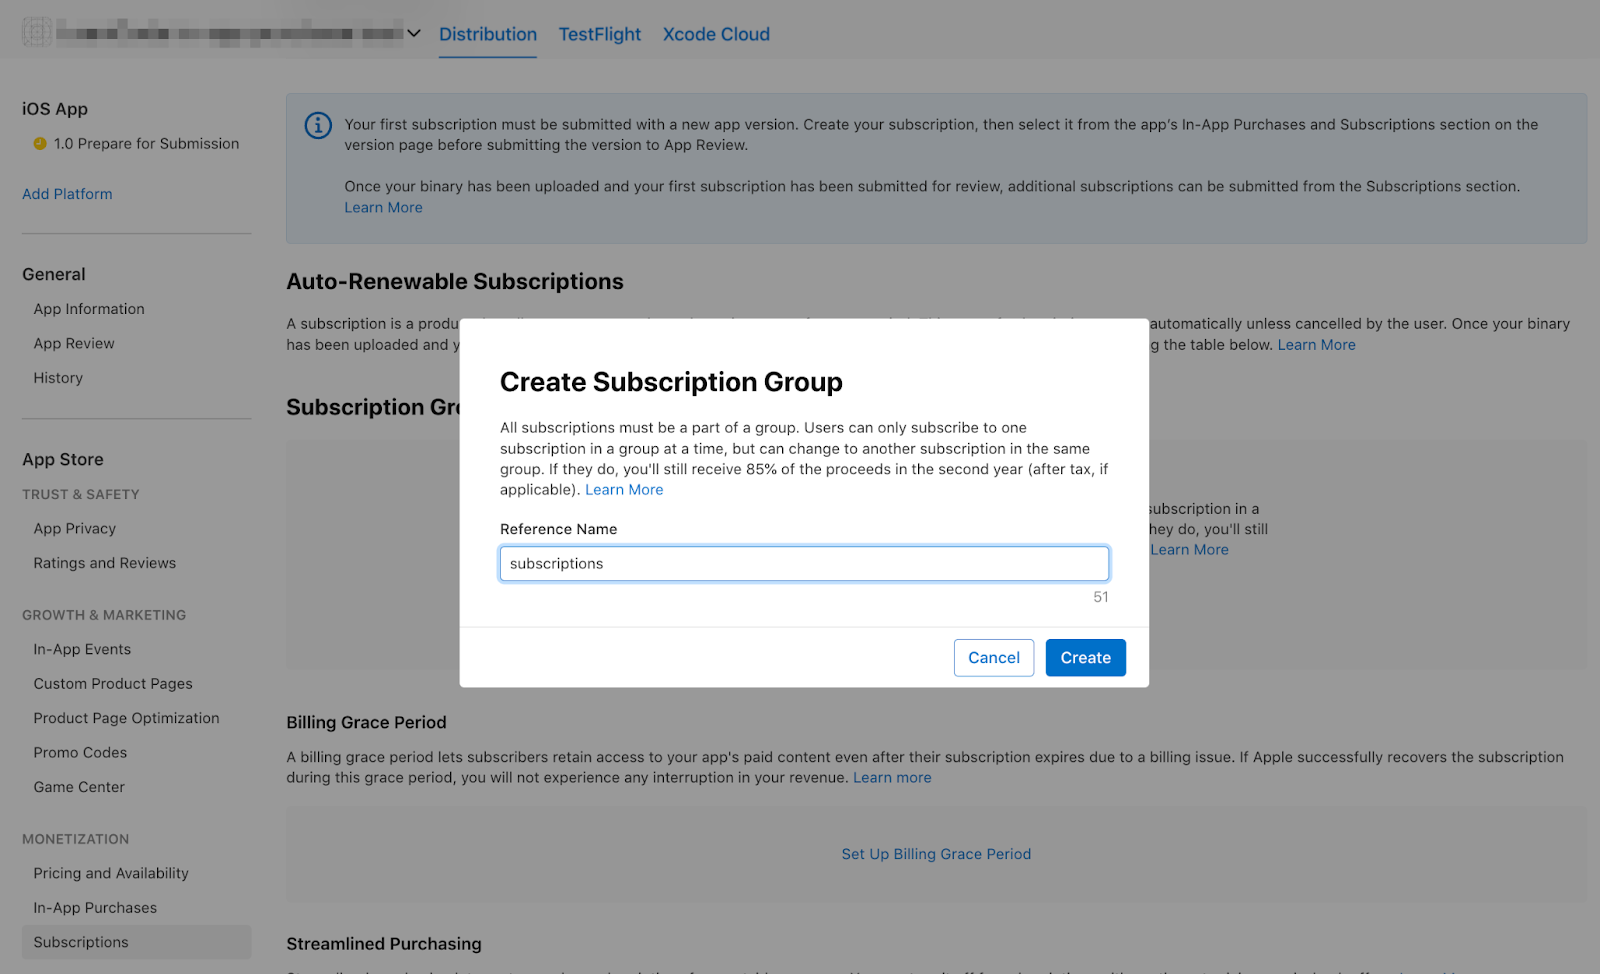 و محلیسازی را برای گروه اشتراک اضافه کنید.
 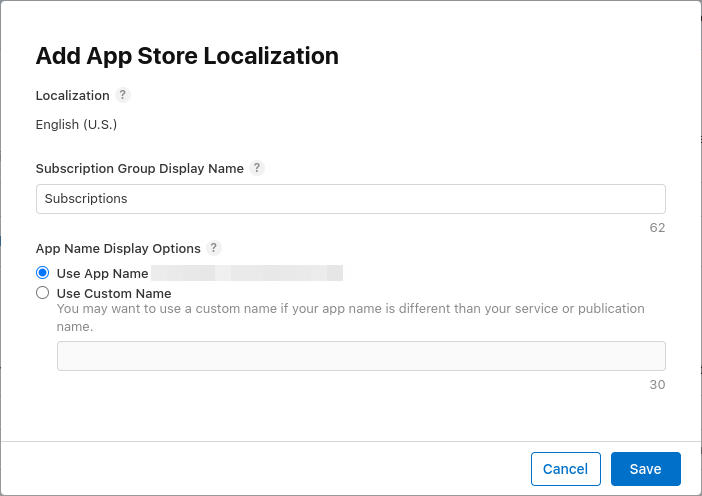 در مرحله بعد، اشتراک را ایجاد خواهید کرد. نام مرجع را روی
 dash subscription doublerو شناسه محصول را رویdash_subscription_doublerتنظیم کنید.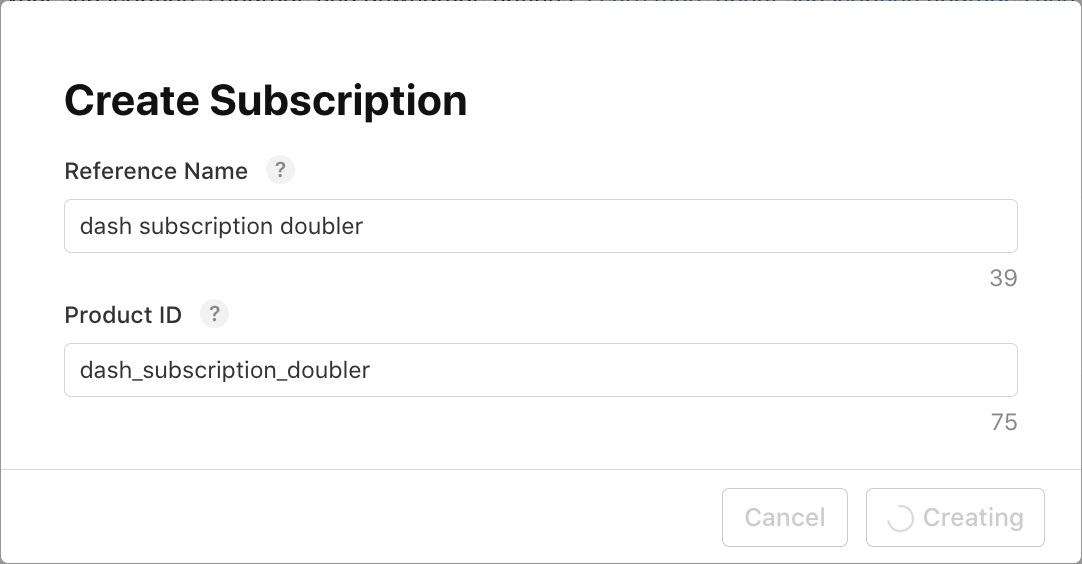 سپس، مدت اشتراک ۱ هفته و محلیسازیها را انتخاب کنید. نام این اشتراک را
 Jet Engineبا توضیحاتDoubles your clicksبگذارید. قیمت را روی$0.49تنظیم کنید. در دسترس بودن را پیکربندی کنید و تصویر نقد و بررسی را به همان روشی که برای محصولdash_consumable_2kانجام دادید، آپلود کنید.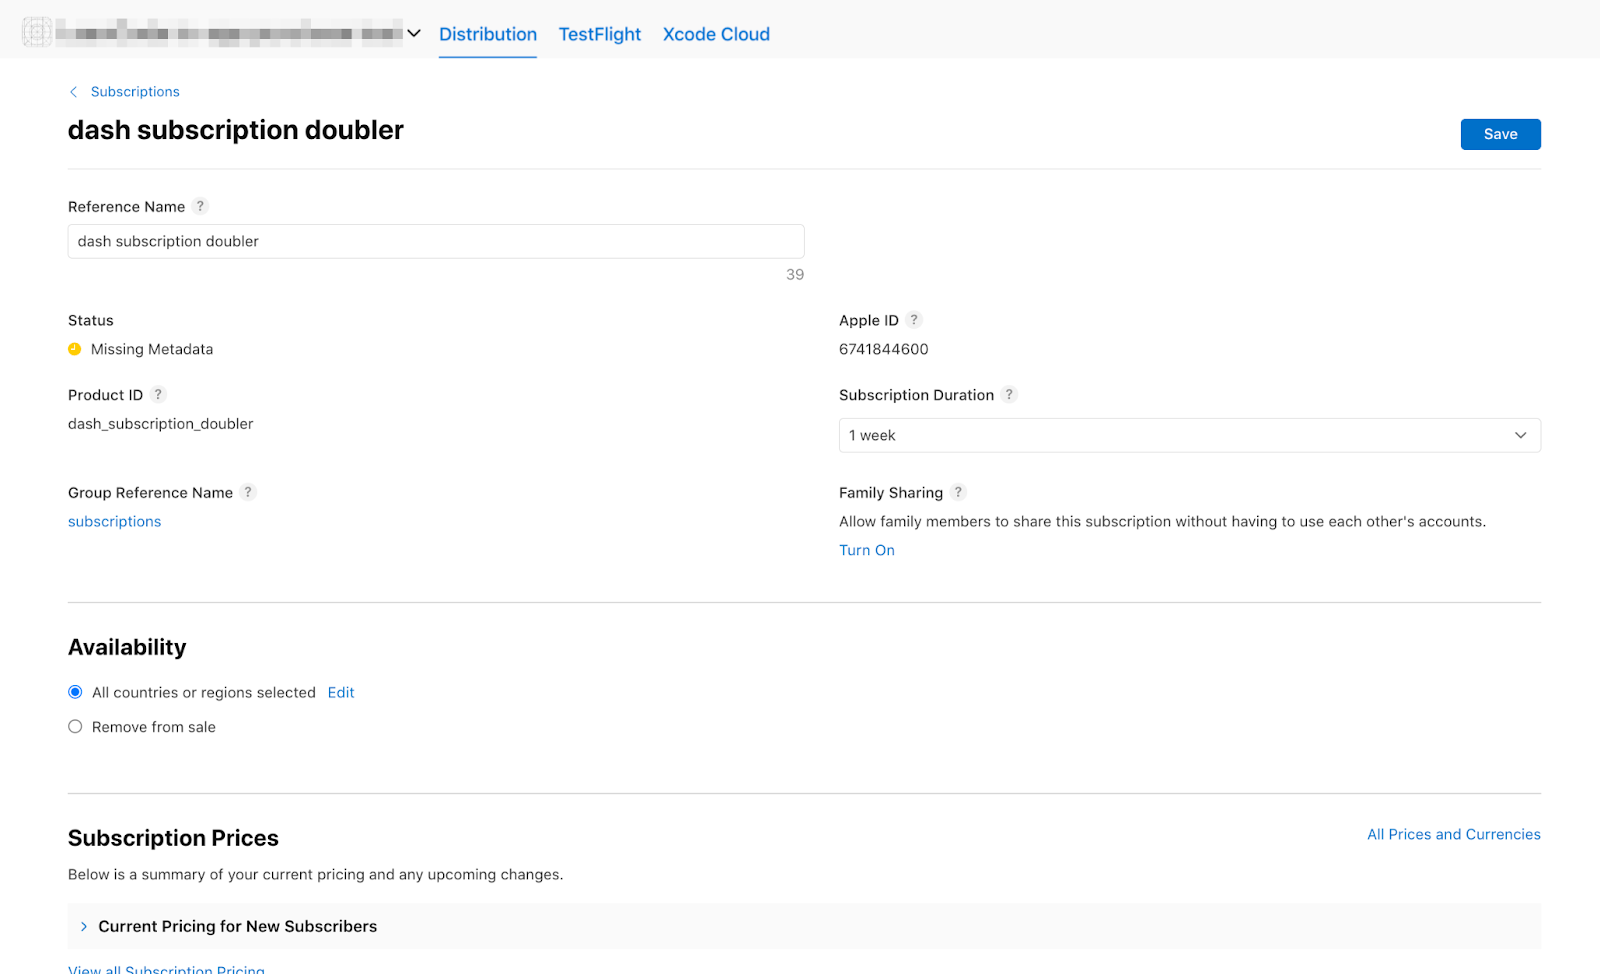
اکنون باید محصولات موجود در لیستها را مشاهده کنید:


۵. فروشگاه Play را راهاندازی کنید
همانند اپ استور، برای استفاده از پلی استور نیز به یک حساب توسعهدهنده نیاز دارید. اگر هنوز حساب کاربری ندارید، یک حساب کاربری ثبت کنید .
یک برنامه جدید ایجاد کنید
یک برنامه جدید در کنسول گوگل پلی ایجاد کنید:
- کنسول Play را باز کنید.
- همه برنامهها > ایجاد برنامه را انتخاب کنید.
- یک زبان پیشفرض انتخاب کنید و یک عنوان برای برنامه خود اضافه کنید. نام برنامه خود را همانطور که میخواهید در گوگل پلی نمایش داده شود، تایپ کنید. میتوانید بعداً نام را تغییر دهید.
- مشخص کنید که برنامه شما یک بازی است. میتوانید بعداً این را تغییر دهید.
- مشخص کنید که آیا برنامه شما رایگان است یا پولی.
- دستورالعملهای محتوا و اعلامیههای قوانین صادرات ایالات متحده را تکمیل کنید.
- ایجاد برنامه را انتخاب کنید.
پس از ایجاد برنامه، به داشبورد بروید و تمام وظایف موجود در بخش «راهاندازی برنامه» را انجام دهید. در اینجا، اطلاعاتی در مورد برنامه خود، مانند رتبهبندی محتوا و تصاویر صفحه، ارائه میدهید. 
درخواست را امضا کنید
برای اینکه بتوانید خریدهای درونبرنامهای را آزمایش کنید، حداقل به یک نسخه آپلود شده در گوگل پلی نیاز دارید.
برای این کار، لازم است نسخه آزمایشی شما با چیزی غیر از کلیدهای اشکالزدایی امضا شده باشد.
ایجاد یک فروشگاه کلید
اگر از قبل یک keystore دارید، به مرحله بعدی بروید. در غیر این صورت، با اجرای دستور زیر در خط فرمان، یکی ایجاد کنید.
در مک/لینوکس، از دستور زیر استفاده کنید:
keytool -genkey -v -keystore ~/key.jks -keyalg RSA -keysize 2048 -validity 10000 -alias key
در ویندوز، از دستور زیر استفاده کنید:
keytool -genkey -v -keystore c:\Users\USER_NAME\key.jks -storetype JKS -keyalg RSA -keysize 2048 -validity 10000 -alias key
این دستور فایل key.jks را در دایرکتوری خانگی شما ذخیره میکند. اگر میخواهید فایل را در جای دیگری ذخیره کنید، آرگومانی که به پارامتر -keystore میدهید را تغییر دهید.
keystore
فایل خصوصی است؛ آن را در کنترل منبع عمومی بررسی نکنید!
مرجع کلید اصلی از برنامه
فایلی با نام <your app dir>/android/key.properties ایجاد کنید که حاوی ارجاعی به keystore شما باشد:
storePassword=<password from previous step>
keyPassword=<password from previous step>
keyAlias=key
storeFile=<location of the key store file, such as /Users/<user name>/key.jks>
پیکربندی امضا در Gradle
با ویرایش فایل <your app dir>/android/app/build.gradle.kts امضای برنامه خود را پیکربندی کنید.
اطلاعات keystore را از فایل properties خود قبل از بلوک android اضافه کنید:
import java.util.Properties
import java.io.FileInputStream

plugins {
    // omitted
}

val keystoreProperties = Properties()
val keystorePropertiesFile = rootProject.file("key.properties")
if (keystorePropertiesFile.exists()) {
    keystoreProperties.load(FileInputStream(keystorePropertiesFile))
}

android {
    // omitted
}
فایل key.properties را در شیء keystoreProperties بارگذاری کنید.
بلوک buildTypes را به صورت زیر بهروزرسانی کنید:
   buildTypes {
        release {
            signingConfig = signingConfigs.getByName("release")
        }
    }
بلوک signingConfigs را در فایل build.gradle.kts ماژول خود با اطلاعات پیکربندی امضا پیکربندی کنید:
   signingConfigs {
        create("release") {
            keyAlias = keystoreProperties["keyAlias"] as String
            keyPassword = keystoreProperties["keyPassword"] as String
            storeFile = keystoreProperties["storeFile"]?.let { file(it) }
            storePassword = keystoreProperties["storePassword"] as String
        }
    }

    buildTypes {
        release {
            signingConfig = signingConfigs.getByName("release")
        }
    }
نسخههای منتشر شده از برنامه شما اکنون به طور خودکار امضا میشوند.
برای اطلاعات بیشتر در مورد امضای برنامه، به امضای برنامه در developer.android.com مراجعه کنید.
اولین ساخته خود را آپلود کنید
پس از اینکه برنامه شما برای امضا پیکربندی شد، باید بتوانید برنامه خود را با اجرای دستور زیر بسازید:
flutter build appbundle
این دستور به طور پیشفرض یک نسخه آزمایشی (release build) ایجاد میکند و خروجی آن را میتوانید در <your app dir>/build/app/outputs/bundle/release/ بیابید.
از داشبورد کنسول گوگل پلی، به مسیر Test and release > Testing > Closed testing بروید و یک نسخه آزمایشی بسته جدید ایجاد کنید.
در مرحله بعد، بسته برنامه app-release.aab را که توسط دستور build ایجاد شده است، آپلود کنید.
روی ذخیره کلیک کنید و سپس روی بررسی انتشار کلیک کنید.
در نهایت، برای فعال کردن نسخه آزمایشی بسته، روی شروع انتشار به آزمایش بسته کلیک کنید.
تنظیم کاربران آزمایشی
برای اینکه بتوانید خریدهای درونبرنامهای را آزمایش کنید، باید حسابهای گوگل آزمایشکنندگان شما در دو مکان به کنسول گوگل پلی اضافه شوند:
- به مسیر آزمایشی خاص (آزمایش داخلی)
- به عنوان آزمایش کننده مجوز
ابتدا، با اضافه کردن تستر به مسیر تست داخلی شروع کنید. به مسیر تست و انتشار > تست > تست داخلی برگردید و روی تب تسترها کلیک کنید.

با کلیک روی «ایجاد لیست ایمیل»، یک لیست ایمیل جدید ایجاد کنید. برای لیست یک نام انتخاب کنید و آدرسهای ایمیل حسابهای گوگلی که نیاز به دسترسی به خریدهای درونبرنامهای آزمایشی دارند را اضافه کنید.
سپس، کادر انتخاب مربوط به لیست را علامت بزنید و روی ذخیره تغییرات کلیک کنید.
سپس، آزمایشکنندگان مجوز را اضافه کنید:
- به نمای «همه برنامهها» در کنسول گوگل پلی برگردید.
- به تنظیمات > آزمایش مجوز بروید.
- همان آدرسهای ایمیل آزمایشکنندگانی را که باید بتوانند خریدهای درونبرنامهای را آزمایش کنند، اضافه کنید.
- پاسخ لایسنس را روی
RESPOND_NORMALLYتنظیم کنید. - روی ذخیره تغییرات کلیک کنید.

پیکربندی خریدهای درونبرنامهای شما
اکنون مواردی را که میتوان از طریق برنامه خریداری کرد، پیکربندی خواهید کرد.
درست مانند اپ استور، باید سه خرید مختلف را تعریف کنید:
-
dash_consumable_2k: یک خرید مصرفی که میتواند بارها خریداری شود و به ازای هر خرید، ۲۰۰۰ دش (واحد پول درونبرنامهای) به کاربر اعطا میکند. -
dash_upgrade_3d: یک خرید «ارتقاء» غیرقابل مصرف که فقط یک بار میتوان آن را خریداری کرد و به کاربر یک دش (Dash) با ظاهری متفاوت برای کلیک کردن میدهد. -
dash_subscription_doubler: اشتراکی که در طول مدت اشتراک، به ازای هر کلیک دو برابر Dash به کاربر میدهد.
ابتدا، اقلام مصرفی و غیر مصرفی را اضافه کنید.
- به کنسول گوگل پلی بروید و برنامه مورد نظر خود را انتخاب کنید.
- به کسب درآمد > محصولات > محصولات درون برنامهای بروید.
- روی ایجاد محصول کلیک کنید

- تمام اطلاعات مورد نیاز برای محصول خود را وارد کنید. مطمئن شوید که شناسه محصول با شناسهای که قصد استفاده از آن را دارید، دقیقاً مطابقت دارد.
- روی ذخیره کلیک کنید.
- روی فعال کردن کلیک کنید.
- این فرآیند را برای خرید «ارتقاء» کالای غیرمصرفی تکرار کنید.
سپس، اشتراک را اضافه کنید:
- به کنسول گوگل پلی بروید و برنامه مورد نظر خود را انتخاب کنید.
- به کسب درآمد > محصولات > اشتراکها بروید.
- روی ایجاد اشتراک کلیک کنید

- تمام اطلاعات مورد نیاز برای اشتراک خود را وارد کنید. مطمئن شوید که شناسه محصول دقیقاً با شناسهای که قصد استفاده از آن را دارید، مطابقت دارد.
- روی ذخیره کلیک کنید
اکنون خریدهای شما باید در کنسول Play تنظیم شده باشند.
۶. فایربیس را راهاندازی کنید
در این آزمایشگاه کد، شما از یک سرویس backend برای تأیید و پیگیری خریدهای کاربران استفاده خواهید کرد.
استفاده از سرویس backend مزایای متعددی دارد:
- شما میتوانید تراکنشها را به صورت امن تأیید کنید.
- میتوانید به رویدادهای صورتحساب از فروشگاههای برنامه واکنش نشان دهید.
- شما میتوانید خریدها را در یک پایگاه داده پیگیری کنید.
- کاربران نمیتوانند با تنظیم مجدد ساعت سیستم خود، برنامه شما را فریب دهند تا ویژگیهای پریمیوم را ارائه دهد.
در حالی که روشهای زیادی برای راهاندازی یک سرویس backend وجود دارد، شما این کار را با استفاده از توابع ابری و Firestore و با استفاده از Firebase خود گوگل انجام خواهید داد.
نوشتن بخش بکاند خارج از محدودهی این آزمایشگاه کد در نظر گرفته میشود، بنابراین کد اولیه از قبل شامل یک پروژهی فایربیس است که خریدهای اولیه برای شروع کار را مدیریت میکند.
افزونههای فایربیس نیز در برنامهی آغازین گنجانده شدهاند.
کاری که باقی مانده این است که پروژه Firebase خود را ایجاد کنید، هم برنامه و هم backend را برای Firebase پیکربندی کنید و در نهایت backend را مستقر کنید.
ایجاد یک پروژه فایربیس
به کنسول Firebase بروید و یک پروژه Firebase جدید ایجاد کنید. برای این مثال، نام پروژه را Dash Clicker بگذارید.
در برنامهی بکاند، شما خریدها را به یک کاربر خاص مرتبط میکنید، بنابراین به احراز هویت نیاز دارید. برای این کار، از ماژول احراز هویت فایربیس با ورود به سیستم گوگل استفاده کنید.
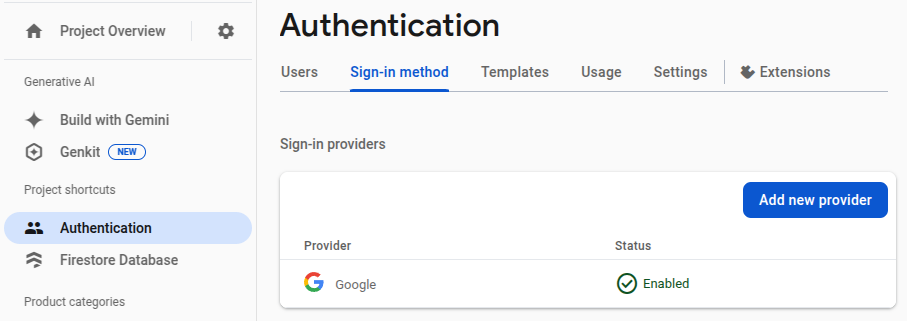
- از داشبورد Firebase، به Authentication بروید و در صورت نیاز آن را فعال کنید.
- به برگه «روش ورود» بروید و ارائهدهنده ورود به سیستم گوگل را فعال کنید.
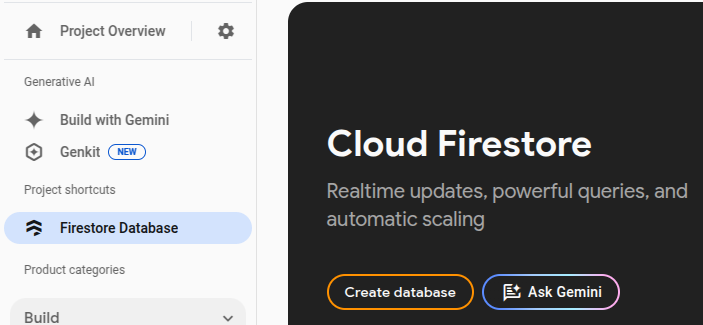
از آنجا که از پایگاه داده Firestore فایربیس نیز استفاده خواهید کرد، این را نیز فعال کنید.
قوانین Cloud Firestore را به این صورت تنظیم کنید:
rules_version = '2';
service cloud.firestore {
  match /databases/{database}/documents {
    match /purchases/{purchaseId} {
      allow read: if request.auth != null && request.auth.uid == resource.data.userId
    }
  }
}
راهاندازی فایربیس برای فلاتر
روش پیشنهادی برای نصب Firebase روی برنامه Flutter استفاده از FlutterFire CLI است. دستورالعملهای توضیح داده شده در صفحه تنظیمات را دنبال کنید.
هنگام اجرای flutterfire configure، پروژهای را که در مرحله قبل ایجاد کردهاید، انتخاب کنید.
$ flutterfire configure

i Found 5 Firebase projects.
? Select a Firebase project to configure your Flutter application with ›
❯ in-app-purchases-1234 (in-app-purchases-1234)
  other-flutter-codelab-1 (other-flutter-codelab-1)
  other-flutter-codelab-2 (other-flutter-codelab-2)
  other-flutter-codelab-3 (other-flutter-codelab-3)
  other-flutter-codelab-4 (other-flutter-codelab-4)
  <create a new project>
در مرحله بعد، با انتخاب دو پلتفرم ، iOS و اندروید را فعال کنید.
? Which platforms should your configuration support (use arrow keys & space to select)? ›
✔ android
✔ ios
  macos
  web
وقتی از شما در مورد لغو firebase_options.dart سوال شد، بله را انتخاب کنید.
? Generated FirebaseOptions file lib/firebase_options.dart already exists, do you want to override it? (y/n) › yes
راهاندازی فایربیس برای اندروید: مراحل بعدی
از داشبورد فایربیس، به نمای کلی پروژه بروید، تنظیمات را انتخاب کنید و سپس تب عمومی (General ) را انتخاب کنید.
به پایین اسکرول کنید تا به برنامههای شما (Your apps) برسید و برنامهی dashclicker (android) را انتخاب کنید.

برای اینکه بتوانید در حالت اشکالزدایی با گوگل وارد سیستم شوید، باید اثر انگشت هش SHA-1 مربوط به گواهی اشکالزدایی خود را ارائه دهید.
هش گواهی امضای اشکالزدایی خود را دریافت کنید
در ریشه پروژه برنامه Flutter خود، دایرکتوری را به پوشه android/ تغییر دهید و سپس یک گزارش امضا ایجاد کنید.
cd android
./gradlew :app:signingReport
لیست بزرگی از کلیدهای امضا به شما نمایش داده میشود. از آنجایی که به دنبال هش مربوط به گواهی اشکالزدایی هستید، به دنبال گواهیای باشید که ویژگیهای Variant و Config روی debug تنظیم شده باشد. احتمالاً keystore در پوشه home شما در مسیر .android/debug.keystore قرار دارد.
> Task :app:signingReport
Variant: debug
Config: debug
Store: /<USER_HOME_FOLDER>/.android/debug.keystore
Alias: AndroidDebugKey
MD5: XX:XX:XX:XX:XX:XX:XX:XX:XX:XX:XX:XX:XX:XX:XX:XX
SHA1: XX:XX:XX:XX:XX:XX:XX:XX:XX:XX:XX:XX:XX:XX:XX:XX:XX:XX:XX:XX
SHA-256: XX:XX:XX:XX:XX:XX:XX:XX:XX:XX:XX:XX:XX:XX:XX:XX:XX:XX:XX:XX:XX:XX:XX:XX:XX:XX:XX:XX:XX:XX:XX:XX
Valid until: Tuesday, January 19, 2038
هش SHA-1 را کپی کنید و آخرین فیلد را در پنجرهی محاورهای ارسال برنامه پر کنید.
در نهایت، دستور flutterfire configure را دوباره اجرا کنید تا برنامه بهروزرسانی شود و پیکربندی امضا را نیز شامل شود.
$ flutterfire configure
? You have an existing `firebase.json` file and possibly already configured your project for Firebase. Would you prefer to reuse the valus in your existing `firebase.json` file to configure your project? (y/n) › yes
✔ You have an existing `firebase.json` file and possibly already configured your project for Firebase. Would you prefer to reuse the values in your existing `firebase.json` file to configure your project? · yes
راهاندازی فایربیس برای iOS: مراحل بعدی
فضای ios/Runner.xcworkspace را با Xcode یا با IDE مورد نظر خود باز کنید.
در VSCode روی پوشه ios/ کلیک راست کرده و سپس open in xcode .
در اندروید استودیو، روی پوشه ios/ کلیک راست کنید، سپس روی flutter و سپس گزینه open iOS module in Xcode کلیک کنید.
برای فعال کردن ورود با گوگل در iOS، گزینه پیکربندی CFBundleURLTypes را به فایلهای plist ساخت خود اضافه کنید. (برای اطلاعات بیشتر، مستندات بسته google_sign_in را بررسی کنید.) در این مورد، فایل ios/Runner/Info.plist است.
جفت کلید-مقدار قبلاً اضافه شده است، اما مقادیر آنها باید جایگزین شوند:
- مقدار
REVERSED_CLIENT_IDرا از فایلGoogleService-Info.plist، بدون عنصر<string>..</string>اطراف آن، دریافت کنید. - مقدار را در فایل
ios/Runner/Info.plistخود، زیر کلیدCFBundleURLTypesجایگزین کنید.
<key>CFBundleURLTypes</key>
<array>
    <dict>
        <key>CFBundleTypeRole</key>
        <string>Editor</string>
        <key>CFBundleURLSchemes</key>
        <array>
            <!-- TODO Replace this value: -->
            <!-- Copied from GoogleService-Info.plist key REVERSED_CLIENT_ID -->
            <string>com.googleusercontent.apps.REDACTED</string>
        </array>
    </dict>
</array>
اکنون کار شما با راهاندازی Firebase تمام شده است.
۷. به بهروزرسانیهای خرید گوش دهید
در این بخش از آزمایشگاه کد، برنامه را برای خرید محصولات آماده خواهید کرد. این فرآیند شامل گوش دادن به بهروزرسانیهای خرید و خطاها پس از شروع برنامه است.
به بهروزرسانیهای خرید گوش دهید
در main.dart, ویجت MyHomePage را پیدا کنید که دارای یک Scaffold با BottomNavigationBar است که شامل دو صفحه میباشد. این صفحه همچنین سه Provider برای DashCounter ، DashUpgrades, و DashPurchases ایجاد میکند. DashCounter تعداد فعلی Dashes را پیگیری کرده و به طور خودکار آنها را افزایش میدهد. DashUpgrades ارتقاءهایی را که میتوانید با Dashes خریداری کنید، مدیریت میکند. این آزمایشگاه کد بر DashPurchases تمرکز دارد.
به طور پیشفرض، شیء یک ارائهدهنده زمانی تعریف میشود که آن شیء برای اولین بار درخواست شود. این شیء مستقیماً هنگام شروع برنامه به خرید بهروزرسانیها گوش میدهد، بنابراین بارگذاری تنبل را روی این شیء با lazy: false غیرفعال کنید:
lib/main.dart
ChangeNotifierProvider<DashPurchases>(
  create: (context) => DashPurchases(
    context.read<DashCounter>(),
  ),
  lazy: false,                                             // Add this line
),
شما همچنین به یک نمونه از InAppPurchaseConnection نیاز دارید. با این حال، برای اینکه برنامه قابل آزمایش باشد، به روشی برای شبیهسازی اتصال نیاز دارید. برای انجام این کار، یک متد نمونه ایجاد کنید که بتواند در تست لغو شود و آن را به main.dart اضافه کنید.
lib/main.dart
// Gives the option to override in tests.
class IAPConnection {
  static InAppPurchase? _instance;
  static set instance(InAppPurchase value) {
    _instance = value;
  }

  static InAppPurchase get instance {
    _instance ??= InAppPurchase.instance;
    return _instance!;
  }
}
تست را به صورت زیر بهروزرسانی کنید:
تست/widget_test.dart
import 'package:dashclicker/main.dart';
import 'package:flutter_test/flutter_test.dart';
import 'package:in_app_purchase/in_app_purchase.dart';     // Add this import
import 'package:in_app_purchase_platform_interface/src/in_app_purchase_platform_addition.dart'; // And this import

void main() {
  testWidgets('App starts', (tester) async {
    IAPConnection.instance = TestIAPConnection();          // Add this line
    await tester.pumpWidget(const MyApp());
    expect(find.text('Tim Sneath'), findsOneWidget);
  });
}

class TestIAPConnection implements InAppPurchase {         // Add from here
  @override
  Future<bool> buyConsumable({
    required PurchaseParam purchaseParam,
    bool autoConsume = true,
  }) {
    return Future.value(false);
  }

  @override
  Future<bool> buyNonConsumable({required PurchaseParam purchaseParam}) {
    return Future.value(false);
  }

  @override
  Future<void> completePurchase(PurchaseDetails purchase) {
    return Future.value();
  }

  @override
  Future<bool> isAvailable() {
    return Future.value(false);
  }

  @override
  Future<ProductDetailsResponse> queryProductDetails(Set<String> identifiers) {
    return Future.value(
      ProductDetailsResponse(productDetails: [], notFoundIDs: []),
    );
  }

  @override
  T getPlatformAddition<T extends InAppPurchasePlatformAddition?>() {
    // TODO: implement getPlatformAddition
    throw UnimplementedError();
  }

  @override
  Stream<List<PurchaseDetails>> get purchaseStream =>
      Stream.value(<PurchaseDetails>[]);

  @override
  Future<void> restorePurchases({String? applicationUserName}) {
    // TODO: implement restorePurchases
    throw UnimplementedError();
  }

  @override
  Future<String> countryCode() {
    // TODO: implement countryCode
    throw UnimplementedError();
  }
}                                                          // To here.
در lib/logic/dash_purchases.dart ، به کد مربوط به DashPurchasesChangeNotifier بروید. در این مرحله، فقط یک DashCounter وجود دارد که میتوانید به Dashهای خریداری شده خود اضافه کنید.
یک ویژگی اشتراک جریان، _subscription (از نوع StreamSubscription<List<PurchaseDetails>> _subscription; )، نمونه IAPConnection.instance, و importها اضافه کنید. کد حاصل باید به شکل زیر باشد:
lib/logic/dash_purchases.dart
import 'dart:async';

import 'package:flutter/foundation.dart';
import 'package:flutter/material.dart';
import 'package:in_app_purchase/in_app_purchase.dart';           // Add this import

import '../main.dart';                                           // And this import
import '../model/purchasable_product.dart';
import '../model/store_state.dart';
import 'dash_counter.dart';

class DashPurchases extends ChangeNotifier {
  DashCounter counter;
  StoreState storeState = StoreState.available;
  late StreamSubscription<List<PurchaseDetails>> _subscription;  // Add this line
  List<PurchasableProduct> products = [
    PurchasableProduct(
      'Spring is in the air',
      'Many dashes flying out from their nests',
      '\$0.99',
    ),
    PurchasableProduct(
      'Jet engine',
      'Doubles you clicks per second for a day',
      '\$1.99',
    ),
  ];

  bool get beautifiedDash => false;

  final iapConnection = IAPConnection.instance;                  // And this line

  DashPurchases(this.counter);

  Future<void> buy(PurchasableProduct product) async {
    product.status = ProductStatus.pending;
    notifyListeners();
    await Future<void>.delayed(const Duration(seconds: 5));
    product.status = ProductStatus.purchased;
    notifyListeners();
    await Future<void>.delayed(const Duration(seconds: 5));
    product.status = ProductStatus.purchasable;
    notifyListeners();
  }
}
کلمه کلیدی late به _subscription اضافه شده است زیرا _subscription در سازنده مقداردهی اولیه شده است. این پروژه به طور پیشفرض طوری تنظیم شده است که nullable نباشد (NNBD)، به این معنی که ویژگیهایی که nullable اعلام نشدهاند باید مقداری غیر null داشته باشند. تعریف late به شما امکان میدهد تعریف این مقدار را به تأخیر بیندازید.
در سازنده، جریان purchaseUpdated را دریافت کرده و شروع به گوش دادن به جریان کنید. در متد dispose() ، اشتراک جریان را لغو کنید.
lib/logic/dash_purchases.dart
import 'dart:async';

import 'package:flutter/foundation.dart';
import 'package:flutter/material.dart';
import 'package:in_app_purchase/in_app_purchase.dart';

import '../main.dart';
import '../model/purchasable_product.dart';
import '../model/store_state.dart';
import 'dash_counter.dart';

class DashPurchases extends ChangeNotifier {
  DashCounter counter;
  StoreState storeState = StoreState.notAvailable;         // Modify this line
  late StreamSubscription<List<PurchaseDetails>> _subscription;
  List<PurchasableProduct> products = [
    PurchasableProduct(
      'Spring is in the air',
      'Many dashes flying out from their nests',
      '\$0.99',
    ),
    PurchasableProduct(
      'Jet engine',
      'Doubles you clicks per second for a day',
      '\$1.99',
    ),
  ];

  bool get beautifiedDash => false;

  final iapConnection = IAPConnection.instance;

  DashPurchases(this.counter) {                            // Add from here
    final purchaseUpdated = iapConnection.purchaseStream;
    _subscription = purchaseUpdated.listen(
      _onPurchaseUpdate,
      onDone: _updateStreamOnDone,
      onError: _updateStreamOnError,
    );
  }

  @override
  void dispose() {
    _subscription.cancel();
    super.dispose();
  }                                                        // To here.

  Future<void> buy(PurchasableProduct product) async {
    product.status = ProductStatus.pending;
    notifyListeners();
    await Future<void>.delayed(const Duration(seconds: 5));
    product.status = ProductStatus.purchased;
    notifyListeners();
    await Future<void>.delayed(const Duration(seconds: 5));
    product.status = ProductStatus.purchasable;
    notifyListeners();
  }
                                                           // Add from here
  void _onPurchaseUpdate(List<PurchaseDetails> purchaseDetailsList) {
    // Handle purchases here
  }

  void _updateStreamOnDone() {
    _subscription.cancel();
  }

  void _updateStreamOnError(dynamic error) {
    //Handle error here
  }                                                        // To here.
}
اکنون، برنامه بهروزرسانیهای خرید را دریافت میکند، بنابراین، در بخش بعدی، شما خریدی انجام خواهید داد!
قبل از ادامه، تستها را با استفاده از « flutter test" اجرا کنید تا مطمئن شوید همه چیز به درستی تنظیم شده است.
$ flutter test

00:01 +1: All tests passed!
۸. خرید کنید
در این بخش از آزمایشگاه کد، محصولات آزمایشی موجود را با محصولات قابل خرید واقعی جایگزین خواهید کرد. این محصولات از فروشگاهها بارگیری میشوند، در یک لیست نشان داده میشوند و با لمس محصول خریداری میشوند.
محصول قابل خرید تطبیقی
PurchasableProduct یک محصول آزمایشی (mock product) نمایش میدهد. با جایگزینی کلاس PurchasableProduct در purchasable_product.dart با کد زیر، آن را بهروزرسانی کنید تا محتوای واقعی را نشان دهد:
lib/model/purchasable_product.dart
import 'package:in_app_purchase/in_app_purchase.dart';

enum ProductStatus { purchasable, purchased, pending }

class PurchasableProduct {
  String get id => productDetails.id;
  String get title => productDetails.title;
  String get description => productDetails.description;
  String get price => productDetails.price;
  ProductStatus status;
  ProductDetails productDetails;

  PurchasableProduct(this.productDetails) : status = ProductStatus.purchasable;
}
در dash_purchases.dart, خریدهای ساختگی را حذف کرده و آنها را با یک لیست خالی جایگزین کنید، List<PurchasableProduct> products = []; .
خریدهای موجود را بارگیری کنید
برای اینکه به کاربر امکان خرید بدهید، خریدهای فروشگاه را بارگذاری کنید. ابتدا بررسی کنید که آیا فروشگاه در دسترس است یا خیر. وقتی فروشگاه در دسترس نباشد، تنظیم storeState روی notAvailable یک پیام خطا به کاربر نمایش میدهد.
lib/logic/dash_purchases.dart
  Future<void> loadPurchases() async {
    final available = await iapConnection.isAvailable();
    if (!available) {
      storeState = StoreState.notAvailable;
      notifyListeners();
      return;
    }
  }
وقتی فروشگاه در دسترس قرار گرفت، خریدهای موجود را بارگذاری کنید. با توجه به تنظیمات قبلی Google Play و App Store، انتظار داشته باشید storeKeyConsumable ، storeKeySubscription, و storeKeyUpgrade ببینید. وقتی خرید مورد انتظار در دسترس نیست، این اطلاعات را در کنسول چاپ کنید؛ همچنین ممکن است بخواهید این اطلاعات را به سرویس backend ارسال کنید.
متد await iapConnection.queryProductDetails(ids) هم شناسههایی که پیدا نشدهاند و هم محصولات قابل خریدی که پیدا شدهاند را برمیگرداند. از productDetails از پاسخ برای بهروزرسانی رابط کاربری استفاده کنید و StoreState را روی available تنظیم کنید.
lib/logic/dash_purchases.dart
import '../constants.dart';

// ...

  Future<void> loadPurchases() async {
    final available = await iapConnection.isAvailable();
    if (!available) {
      storeState = StoreState.notAvailable;
      notifyListeners();
      return;
    }
    const ids = <String>{
      storeKeyConsumable,
      storeKeySubscription,
      storeKeyUpgrade,
    };
    final response = await iapConnection.queryProductDetails(ids);
    products = response.productDetails
        .map((e) => PurchasableProduct(e))
        .toList();
    storeState = StoreState.available;
    notifyListeners();
  }
تابع loadPurchases() را در سازنده فراخوانی کنید:
lib/logic/dash_purchases.dart
  DashPurchases(this.counter) {
    final purchaseUpdated = iapConnection.purchaseStream;
    _subscription = purchaseUpdated.listen(
      _onPurchaseUpdate,
      onDone: _updateStreamOnDone,
      onError: _updateStreamOnError,
    );
    loadPurchases();                                       // Add this line
  }
در نهایت، مقدار فیلد storeState را از StoreState.available به StoreState.loading:
lib/logic/dash_purchases.dart
StoreState storeState = StoreState.loading;
نمایش محصولات قابل خرید
فایل purchase_page.dart در نظر بگیرید. ویجت PurchasePage بسته به StoreState _PurchasesLoading ، _PurchaseList, یا _PurchasesNotAvailable, را نشان میدهد. این ویجت همچنین خریدهای قبلی کاربر را که در مرحله بعدی استفاده میشود، نشان میدهد.
ویجت _PurchaseList فهرست محصولات قابل خرید را نشان میدهد و یک درخواست خرید به شیء DashPurchases ارسال میکند.
lib/pages/purchase_page.dart
class _PurchaseList extends StatelessWidget {
  @override
  Widget build(BuildContext context) {
    var purchases = context.watch<DashPurchases>();
    var products = purchases.products;
    return Column(
      children: products
          .map(
            (product) => _PurchaseWidget(
              product: product,
              onPressed: () {
                purchases.buy(product);
              },
            ),
          )
          .toList(),
    );
  }
}
اگر فروشگاههای اندروید و iOS به درستی پیکربندی شده باشند، باید بتوانید محصولات موجود در آنها را ببینید. توجه داشته باشید که هنگام ورود به کنسولهای مربوطه، ممکن است مدتی طول بکشد تا خریدها در دسترس قرار گیرند.

به dash_purchases.dart برگردید و تابع خرید یک محصول را پیادهسازی کنید. شما فقط باید اقلام مصرفی را از اقلام غیر مصرفی جدا کنید. محصولات ارتقاء و اشتراک، اقلام غیر مصرفی هستند.
lib/logic/dash_purchases.dart
  Future<void> buy(PurchasableProduct product) async {
    final purchaseParam = PurchaseParam(productDetails: product.productDetails);
    switch (product.id) {
      case storeKeyConsumable:
        await iapConnection.buyConsumable(purchaseParam: purchaseParam);
      case storeKeySubscription:
      case storeKeyUpgrade:
        await iapConnection.buyNonConsumable(purchaseParam: purchaseParam);
      default:
        throw ArgumentError.value(
          product.productDetails,
          '${product.id} is not a known product',
        );
    }
  }
قبل از ادامه، متغیر _beautifiedDashUpgrade را ایجاد کنید و getter beautifiedDash را برای ارجاع به آن بهروزرسانی کنید.
lib/logic/dash_purchases.dart
  bool get beautifiedDash => _beautifiedDashUpgrade;
  bool _beautifiedDashUpgrade = false;
متد _onPurchaseUpdate بهروزرسانیهای خرید را دریافت میکند، وضعیت محصول نمایش داده شده در صفحه خرید را بهروزرسانی میکند و خرید را در منطق شمارنده اعمال میکند. فراخوانی تابع completePurchase پس از مدیریت خرید بسیار مهم است تا فروشگاه بداند که خرید به درستی مدیریت شده است.
lib/logic/dash_purchases.dart
  Future<void> _onPurchaseUpdate(
    List<PurchaseDetails> purchaseDetailsList,
  ) async {
    for (var purchaseDetails in purchaseDetailsList) {
      await _handlePurchase(purchaseDetails);
    }
    notifyListeners();
  }

  Future<void> _handlePurchase(PurchaseDetails purchaseDetails) async {
    if (purchaseDetails.status == PurchaseStatus.purchased) {
      switch (purchaseDetails.productID) {
        case storeKeySubscription:
          counter.applyPaidMultiplier();
        case storeKeyConsumable:
          counter.addBoughtDashes(2000);
        case storeKeyUpgrade:
          _beautifiedDashUpgrade = true;
      }
    }

    if (purchaseDetails.pendingCompletePurchase) {
      await iapConnection.completePurchase(purchaseDetails);
    }
  }
۹. تنظیمات بکاند
قبل از اینکه به سراغ ردیابی و تأیید خریدها بروید، یک backend دارت برای پشتیبانی از انجام این کار راهاندازی کنید.
در این بخش، از پوشهی dart-backend/ به عنوان ریشه استفاده کنید.
مطمئن شوید که ابزارهای زیر را نصب کردهاید:
نمای کلی پروژه پایه
از آنجا که برخی از بخشهای این پروژه خارج از محدوده این آزمایشگاه کد در نظر گرفته میشوند، در کد اولیه گنجانده شدهاند. ایده خوبی است که قبل از شروع، آنچه را که از قبل در کد اولیه وجود دارد، مرور کنید تا ایدهای از نحوه ساختاردهی امور داشته باشید.
این کد backend میتواند به صورت محلی روی دستگاه شما اجرا شود، برای استفاده از آن نیازی به استقرار آن ندارید. با این حال، باید بتوانید از دستگاه توسعه خود (اندروید یا آیفون) به دستگاهی که سرور روی آن اجرا خواهد شد متصل شوید. برای این کار، آنها باید در یک شبکه باشند و شما باید آدرس IP دستگاه خود را بدانید.
سعی کنید سرور را با استفاده از دستور زیر اجرا کنید:
$ dart ./bin/server.dart

Serving at http://0.0.0.0:8080
بکاند دارت از shelf و shelf_router برای سرویسدهی به نقاط انتهایی API استفاده میکند. به طور پیشفرض، سرور هیچ مسیری ارائه نمیدهد. بعداً شما یک مسیر برای مدیریت فرآیند تأیید خرید ایجاد خواهید کرد.
یکی از بخشهایی که از قبل در کد اولیه گنجانده شده است، IapRepository در lib/iap_repository.dart است. از آنجا که یادگیری نحوه تعامل با Firestore یا پایگاههای داده به طور کلی، به این آزمایشگاه کد مربوط نمیشود، کد اولیه شامل توابعی برای ایجاد یا بهروزرسانی خریدها در Firestore و همچنین تمام کلاسهای مربوط به آن خریدها است.
تنظیم دسترسی فایربیس
برای دسترسی به Firebase Firestore، به یک کلید دسترسی حساب سرویس نیاز دارید. با باز کردن تنظیمات پروژه Firebase، یکی ایجاد کنید و به بخش حسابهای سرویس بروید، سپس گزینه Generate new private key را انتخاب کنید.

فایل JSON دانلود شده را در پوشه assets/ کپی کنید و نام آن را به service-account-firebase.json تغییر دهید.
تنظیم دسترسی به گوگل پلی
برای دسترسی به فروشگاه Play جهت تأیید خریدها، باید یک حساب کاربری سرویس با این مجوزها ایجاد کنید و اعتبارنامههای JSON مربوط به آن را دانلود کنید.
- از صفحه API توسعهدهندگان اندروید گوگل پلی در کنسول ابری گوگل دیدن کنید.
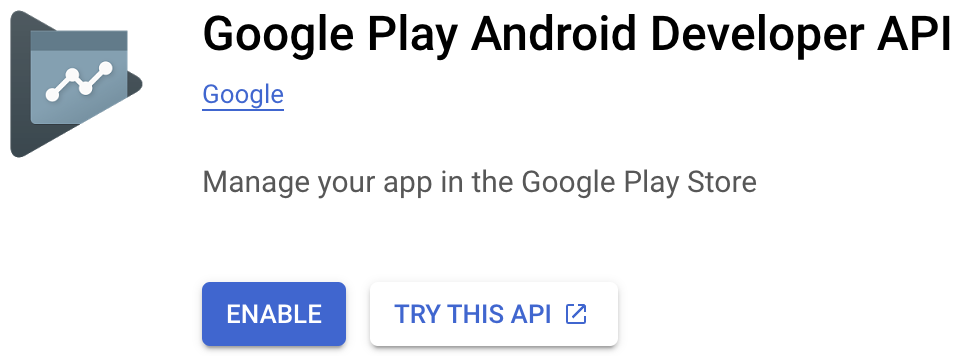 در صورتی که کنسول گوگل پلی از شما درخواست ایجاد یا پیوند به یک پروژه موجود را داشته باشد، ابتدا این کار را انجام دهید و سپس به این صفحه برگردید.
 - سپس، به صفحه حسابهای سرویس بروید و روی + ایجاد حساب سرویس کلیک کنید.
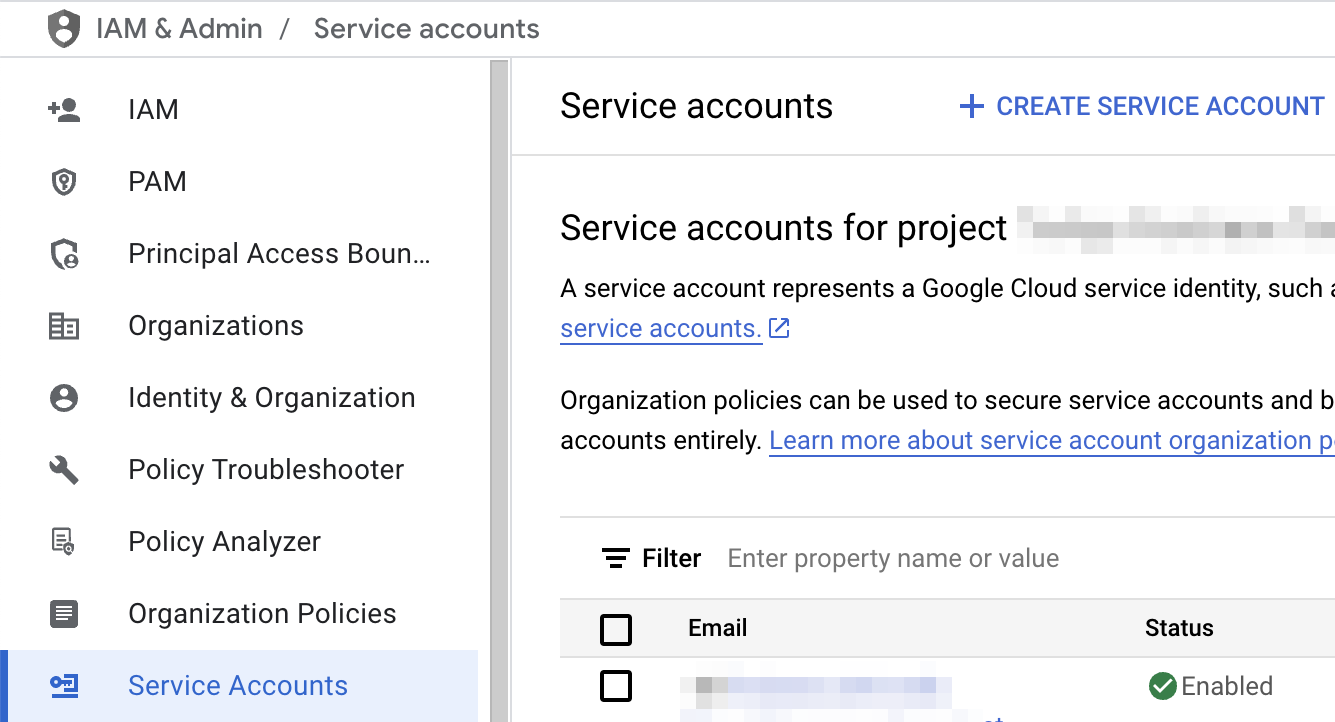
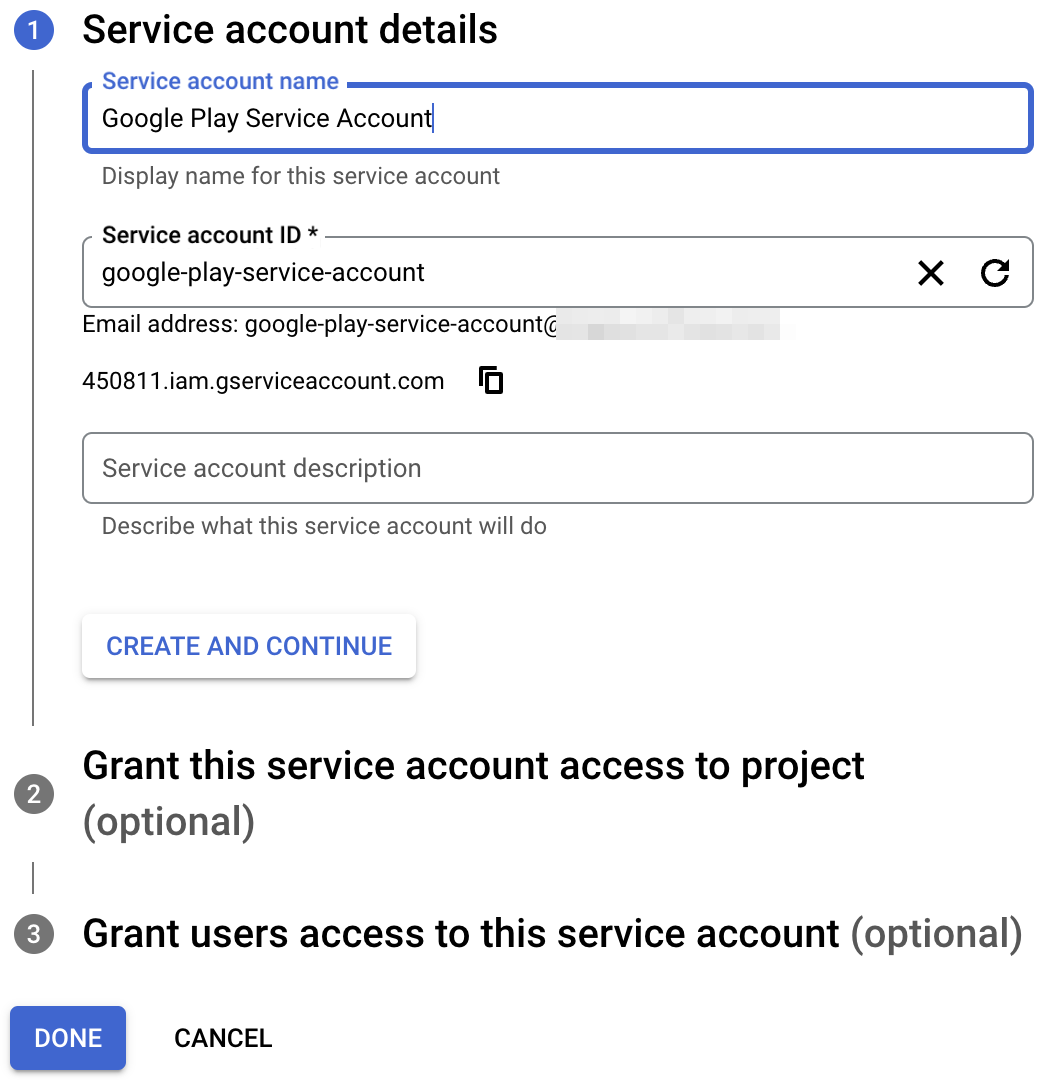
- نام حساب سرویس را وارد کنید و روی ایجاد و ادامه کلیک کنید.
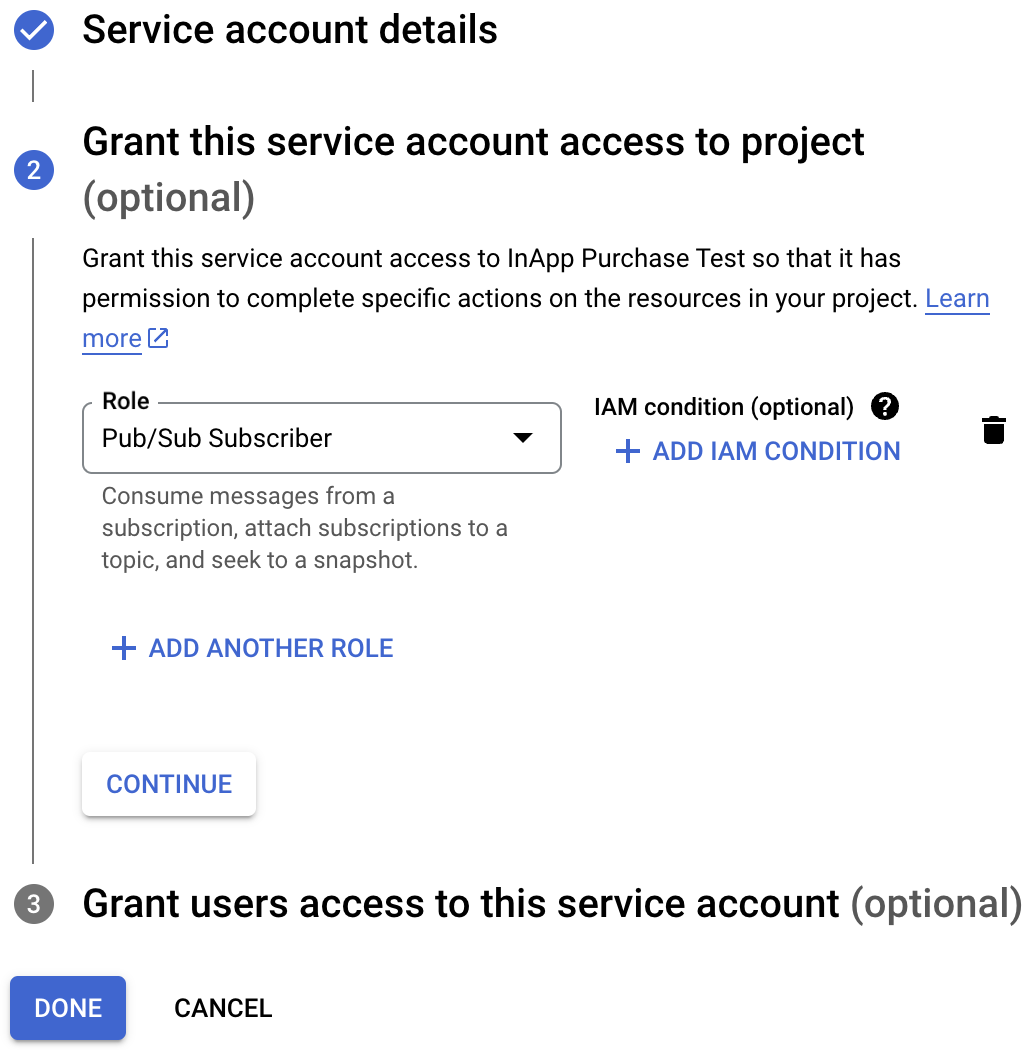
- نقش Pub/Sub Subscriber را انتخاب کنید و روی Done کلیک کنید.
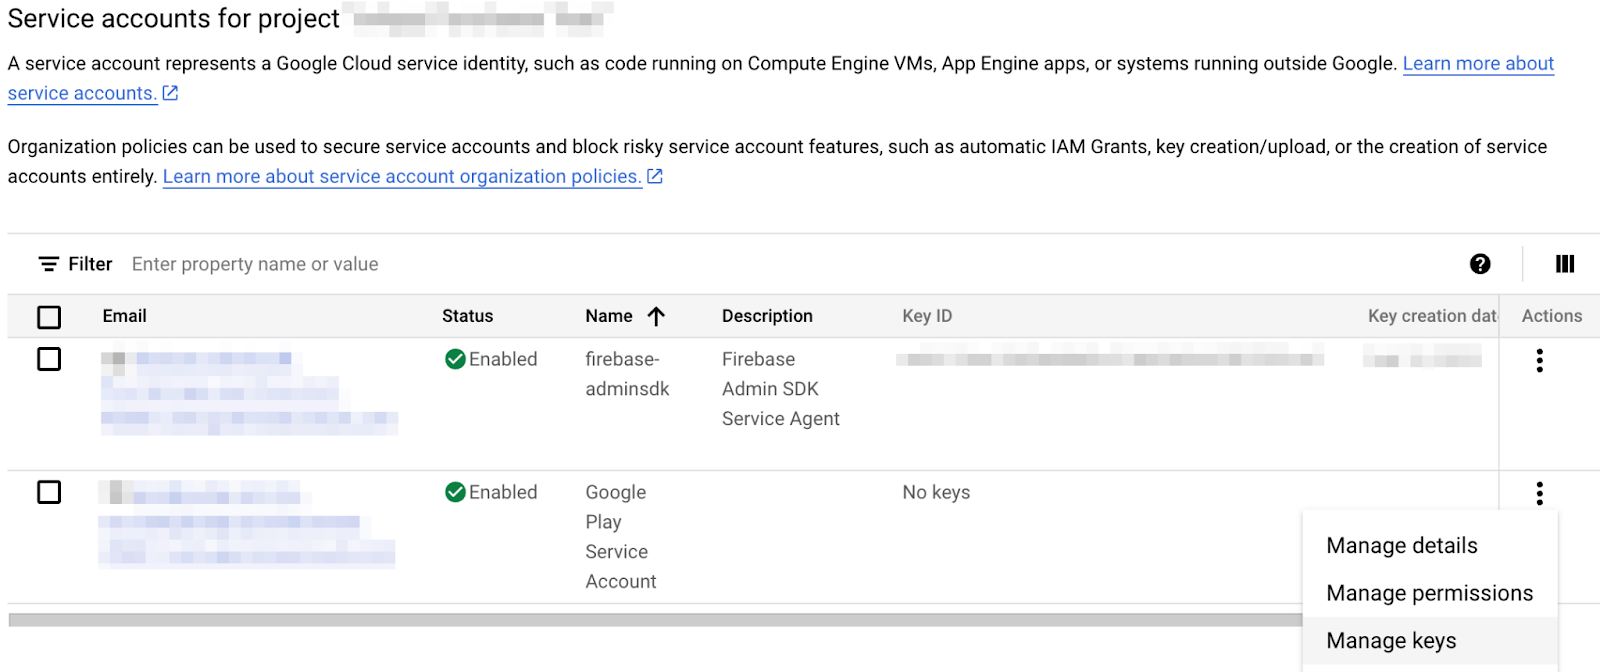
- پس از ایجاد حساب کاربری، به بخش مدیریت کلیدها (Manage keys) بروید.
- افزودن کلید > ایجاد کلید جدید را انتخاب کنید.
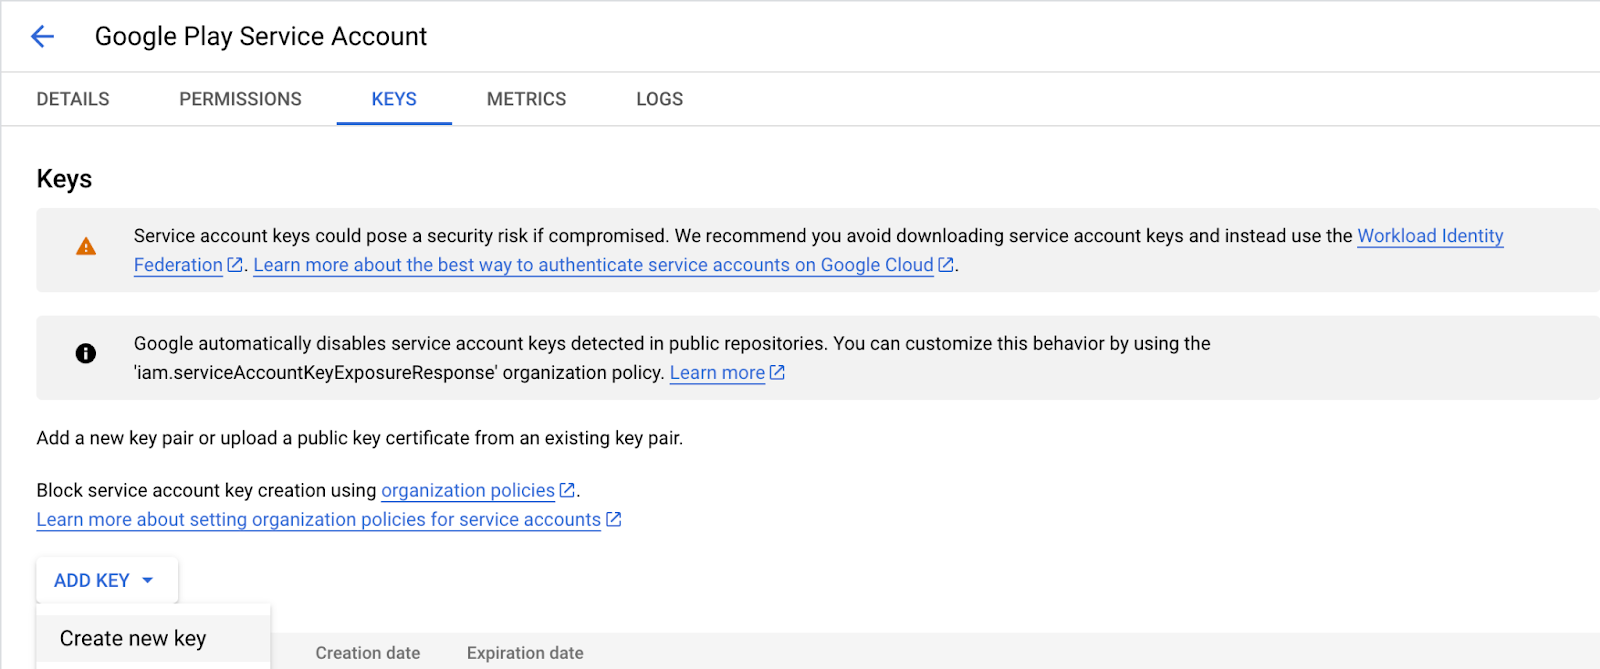
- یک کلید JSON ایجاد و دانلود کنید.
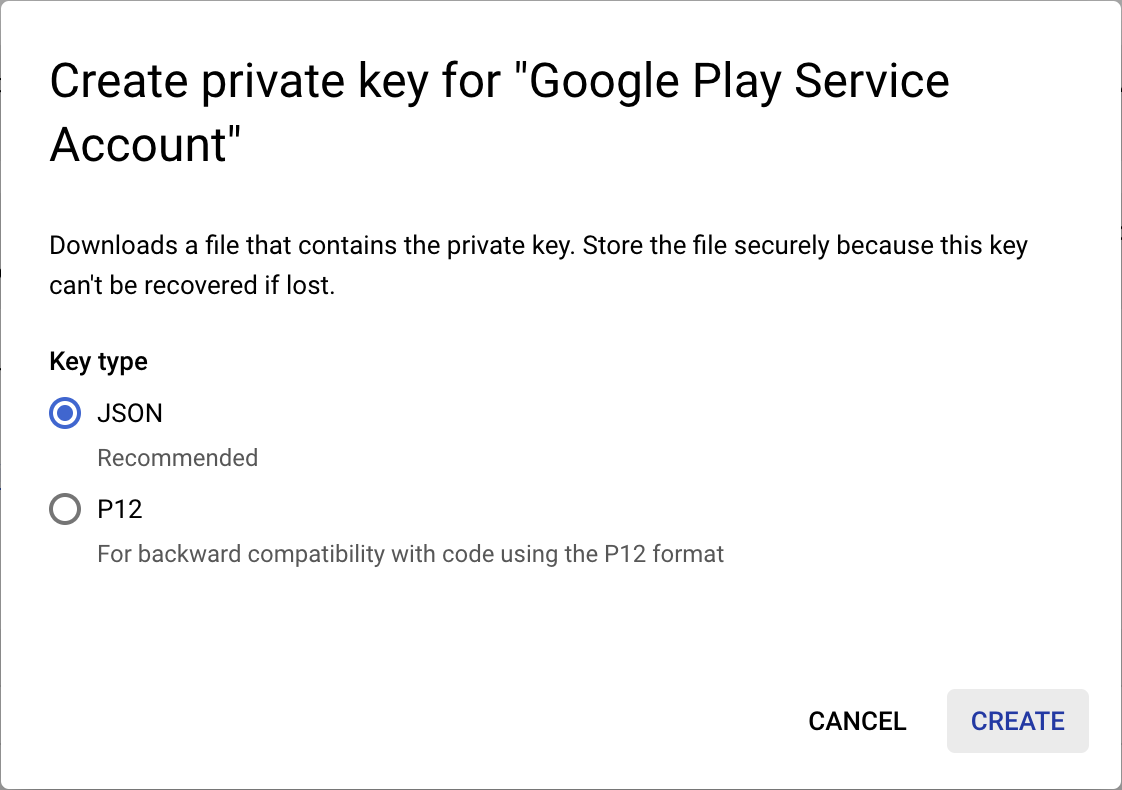
- فایل دانلود شده را به
service-account-google-play.json,تغییر نام دهید و آن را به دایرکتوریassets/منتقل کنید. - سپس، به صفحه کاربران و مجوزها در کنسول Play بروید
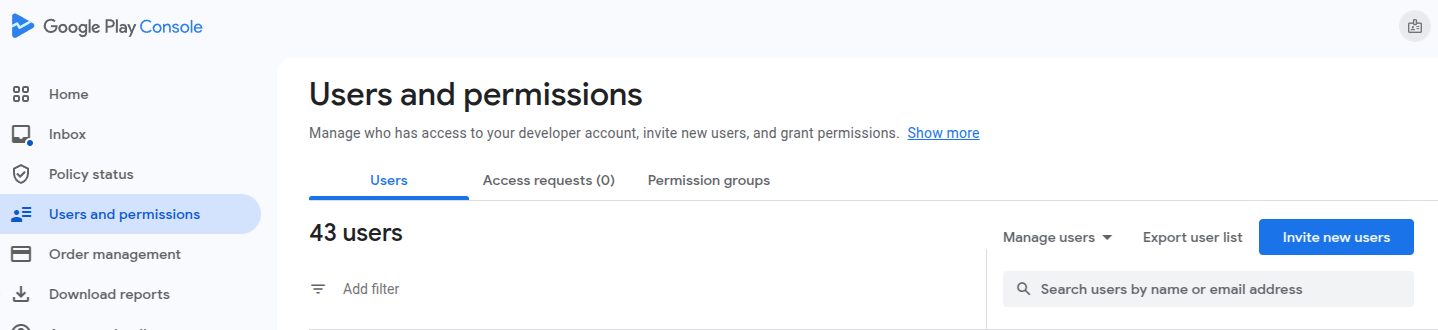
- روی دعوت از کاربران جدید کلیک کنید و آدرس ایمیل حساب سرویس ایجاد شده قبلی را وارد کنید. میتوانید ایمیل را در جدول صفحه حسابهای سرویس پیدا کنید.

- مجوزهای مشاهده دادههای مالی و مدیریت سفارشات و اشتراکها را برای برنامه اعطا کنید.
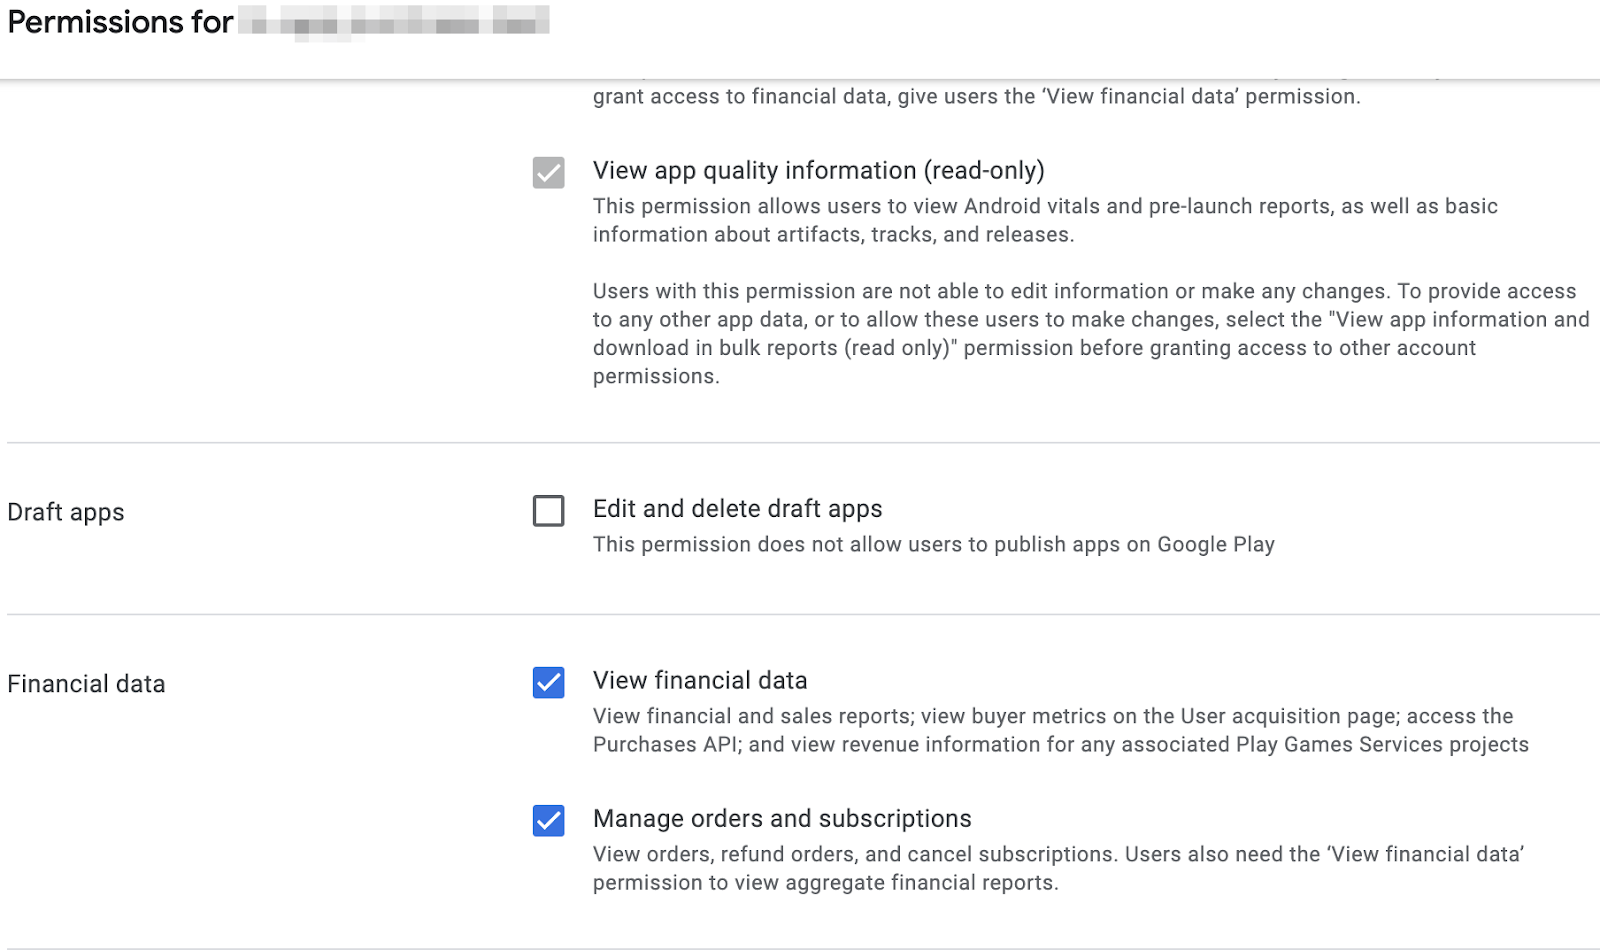
- روی دعوت از کاربر کلیک کنید.
یک کار دیگر که باید انجام دهیم این است که lib/constants.dart, را باز کنیم و مقدار androidPackageId را با شناسه بستهای که برای برنامه اندروید خود انتخاب کردهاید، جایگزین کنیم.
تنظیم دسترسی به اپ استور اپل
برای دسترسی به اپ استور جهت تأیید خریدها، باید یک راز مشترک تنظیم کنید:
- اتصال به اپ استور را باز کنید.
- Go to My Apps, and select your app.
- In the sidebar navigation, go to General > App information .
- Click Manage under App-Specific Shared Secret header.
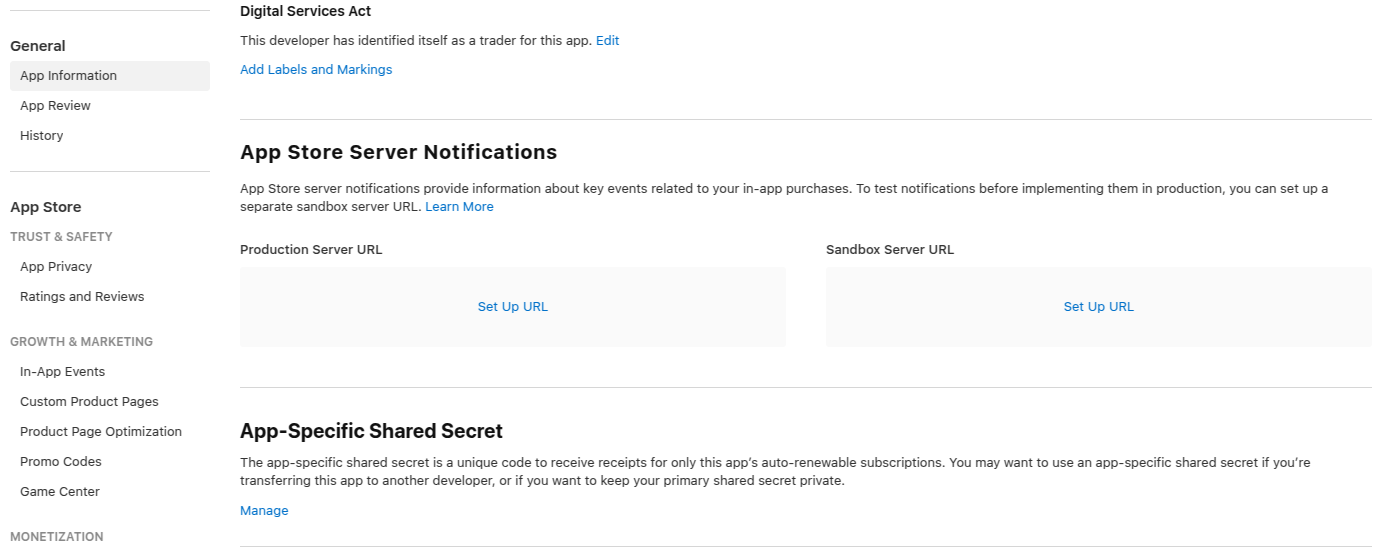
- Generate a new secret, and copy it.
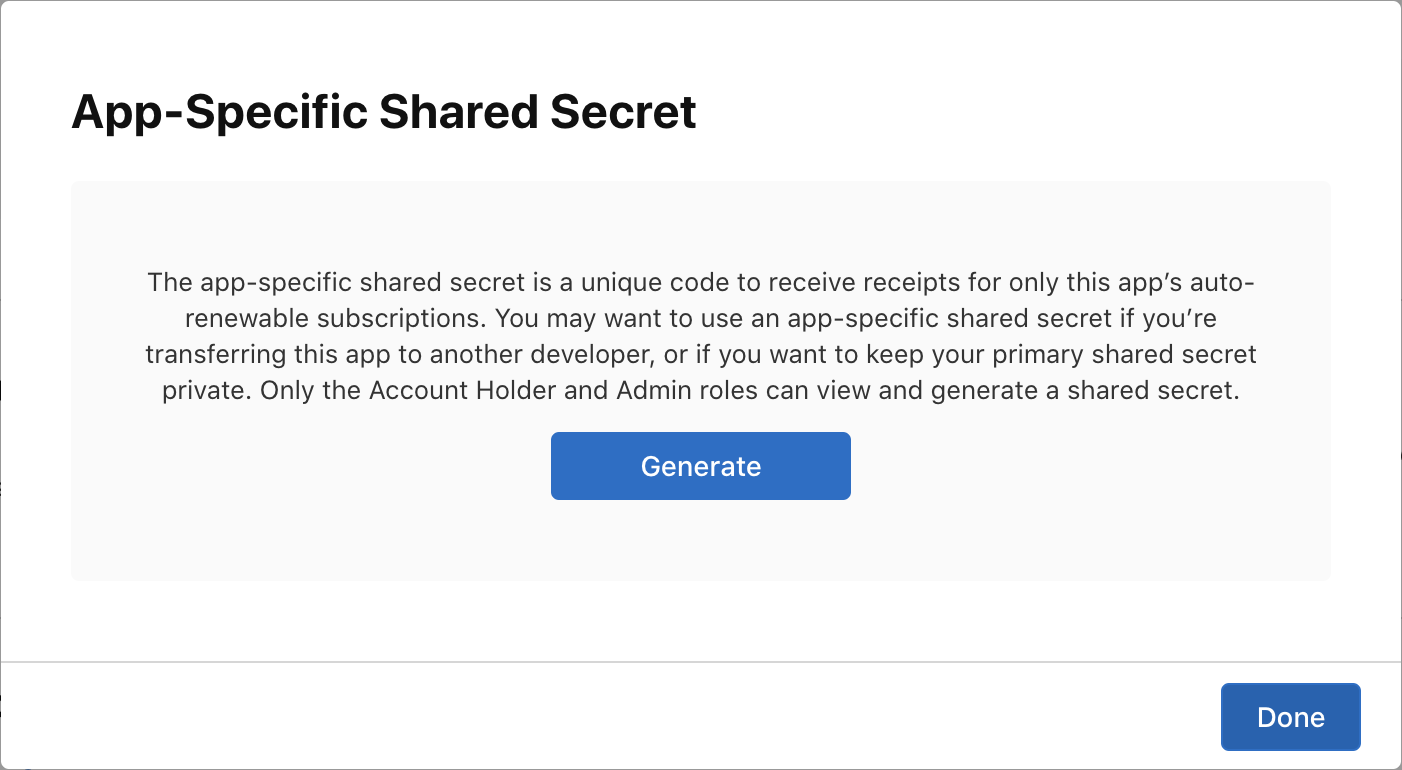
- Open
lib/constants.dart,and replace the value ofappStoreSharedSecretwith the shared secret you just generated.
Constants configuration file
Before proceeding, make sure that the following constants are configured in the lib/constants.dart file:
-
androidPackageId: Package ID used on Android, such ascom.example.dashclicker -
appStoreSharedSecret: Shared secret to access App Store Connect to perform purchase verification. -
bundleId: Bundle ID used on iOS, such ascom.example.dashclicker
You can ignore the rest of the constants for the time being.
10. Verify purchases
The general flow for verifying purchases is similar for iOS and Android.
For both stores, your application receives a token when a purchase is made.
This token is sent by the app to your backend service, which then, in turn, verifies the purchase with the respective store's servers using the provided token.
The backend service can then choose to store the purchase, and reply to the application whether the purchase was valid or not.
By having the backend service do the validation with the stores rather than the application running on your user's device, you can prevent the user gaining access to premium features by, for example, rewinding their system clock.
Set up the Flutter side
Set up authentication
As you are going to send the purchases to your backend service, you want to make sure the user is authenticated while making a purchase. Most of the authentication logic is already added for you in the starter project, you just have to make sure the PurchasePage shows the login button when the user is not logged in yet. Add the following code to the beginning of the build method of PurchasePage :
lib/pages/purchase_page.dart
import 'package:flutter/material.dart';
import 'package:provider/provider.dart';

import '../logic/dash_purchases.dart';
import '../logic/firebase_notifier.dart';                  // Add this import
import '../model/firebase_state.dart';                     // And this import
import '../model/purchasable_product.dart';
import '../model/store_state.dart';
import '../repo/iap_repo.dart';
import 'login_page.dart';                                  // And this one as well

class PurchasePage extends StatelessWidget {
  const PurchasePage({super.key});

  @override
  Widget build(BuildContext context) {                     // Update from here
    var firebaseNotifier = context.watch<FirebaseNotifier>();
    if (firebaseNotifier.state == FirebaseState.loading) {
      return _PurchasesLoading();
    } else if (firebaseNotifier.state == FirebaseState.notAvailable) {
      return _PurchasesNotAvailable();
    }

    if (!firebaseNotifier.loggedIn) {
      return const LoginPage();
    }                                                      // To here.

    // ...
Call verification endpoint from the app
In the app, create the _verifyPurchase(PurchaseDetails purchaseDetails) function that calls the /verifypurchase endpoint on your Dart backend using an http post call.
Send the selected store ( google_play for the Play Store or app_store for the App Store), the serverVerificationData , and the productID . The server returns status code indicating whether the purchase is verified.
In the app constants, configure the server IP to your local machine IP address.
lib/logic/dash_purchases.dart
import 'dart:async';
import 'dart:convert';                                     // Add this import

import 'package:flutter/foundation.dart';
import 'package:flutter/material.dart';
import 'package:http/http.dart' as http;                   // And this import
import 'package:in_app_purchase/in_app_purchase.dart';

import '../constants.dart';
import '../main.dart';
import '../model/purchasable_product.dart';
import '../model/store_state.dart';
import 'dash_counter.dart';
import 'firebase_notifier.dart';                           // And this one

class DashPurchases extends ChangeNotifier {
  DashCounter counter;
  FirebaseNotifier firebaseNotifier;                       // Add this line
  StoreState storeState = StoreState.loading;
  late StreamSubscription<List<PurchaseDetails>> _subscription;
  List<PurchasableProduct> products = [];

  bool get beautifiedDash => _beautifiedDashUpgrade;
  bool _beautifiedDashUpgrade = false;

  final iapConnection = IAPConnection.instance;

  DashPurchases(this.counter, this.firebaseNotifier) {     // Update this line
    final purchaseUpdated = iapConnection.purchaseStream;
    _subscription = purchaseUpdated.listen(
      _onPurchaseUpdate,
      onDone: _updateStreamOnDone,
      onError: _updateStreamOnError,
    );
    loadPurchases();
  }
Add the firebaseNotifier with the creation of DashPurchases in main.dart:
lib/main.dart
        ChangeNotifierProvider<DashPurchases>(
          create: (context) => DashPurchases(
            context.read<DashCounter>(),
            context.read<FirebaseNotifier>(),
          ),
          lazy: false,
        ),
Add a getter for the User in the FirebaseNotifier, so you can pass the user ID to the verify purchase function.
lib/logic/firebase_notifier.dart
  Future<FirebaseFirestore> get firestore async {
    var isInitialized = await _isInitialized.future;
    if (!isInitialized) {
      throw Exception('Firebase is not initialized');
    }
    return FirebaseFirestore.instance;
  }

  User? get user => FirebaseAuth.instance.currentUser;     // Add this line

  Future<void> load() async {
    // ...
Add the function _verifyPurchase to the DashPurchases class. This async function returns a boolean indicating whether the purchase is validated.
lib/logic/dash_purchases.dart
  Future<bool> _verifyPurchase(PurchaseDetails purchaseDetails) async {
    final url = Uri.parse('http://$serverIp:8080/verifypurchase');
    const headers = {
      'Content-type': 'application/json',
      'Accept': 'application/json',
    };
    final response = await http.post(
      url,
      body: jsonEncode({
        'source': purchaseDetails.verificationData.source,
        'productId': purchaseDetails.productID,
        'verificationData':
            purchaseDetails.verificationData.serverVerificationData,
        'userId': firebaseNotifier.user?.uid,
      }),
      headers: headers,
    );
    if (response.statusCode == 200) {
      return true;
    } else {
      return false;
    }
  }
Call the _verifyPurchase function in _handlePurchase just before you apply the purchase. You should only apply the purchase when it's verified. In a production app, you can specify this further to, for example, apply a trial subscription when the store is temporarily unavailable. However, for this example, apply the purchase when the purchase is verified successfully.
lib/logic/dash_purchases.dart
  Future<void> _onPurchaseUpdate(
    List<PurchaseDetails> purchaseDetailsList,
  ) async {
    for (var purchaseDetails in purchaseDetailsList) {
      await _handlePurchase(purchaseDetails);
    }
    notifyListeners();
  }

  Future<void> _handlePurchase(PurchaseDetails purchaseDetails) async {
    if (purchaseDetails.status == PurchaseStatus.purchased) {
      // Send to server
      var validPurchase = await _verifyPurchase(purchaseDetails);

      if (validPurchase) {
        // Apply changes locally
        switch (purchaseDetails.productID) {
          case storeKeySubscription:
            counter.applyPaidMultiplier();
          case storeKeyConsumable:
            counter.addBoughtDashes(2000);
          case storeKeyUpgrade:
            _beautifiedDashUpgrade = true;
        }
      }
    }

    if (purchaseDetails.pendingCompletePurchase) {
      await iapConnection.completePurchase(purchaseDetails);
    }
  }
In the app everything is now ready to validate the purchases.
Set up the backend service
Next, set up the backend for verifying purchases on the backend.
Build purchase handlers
Because the verification flow for both stores is close to identical, set up an abstract PurchaseHandler class with separate implementations for each store.

Start by adding a purchase_handler.dart file to the lib/ folder, where you define an abstract PurchaseHandler class with two abstract methods for verifying two different kinds of purchases: subscriptions and non-subscriptions.
lib/purchase_handler.dart
import 'products.dart';

/// Generic purchase handler,
/// must be implemented for Google Play and Apple Store
abstract class PurchaseHandler {
  /// Verify if non-subscription purchase (aka consumable) is valid
  /// and update the database
  Future<bool> handleNonSubscription({
    required String userId,
    required ProductData productData,
    required String token,
  });

  /// Verify if subscription purchase (aka non-consumable) is valid
  /// and update the database
  Future<bool> handleSubscription({
    required String userId,
    required ProductData productData,
    required String token,
  });
}
As you can see, each method requires three parameters:
-
userId:The ID of the logged-in user, so you can tie purchases to the user. -
productData:Data about the product. You are going to define this in a minute. -
token:The token provided to the user by the store.
Additionally, to make these purchase handlers easier to use, add a verifyPurchase() method that can be used for both subscriptions and non-subscriptions:
lib/purchase_handler.dart
  /// Verify if purchase is valid and update the database
  Future<bool> verifyPurchase({
    required String userId,
    required ProductData productData,
    required String token,
  }) async {
    switch (productData.type) {
      case ProductType.subscription:
        return handleSubscription(
          userId: userId,
          productData: productData,
          token: token,
        );
      case ProductType.nonSubscription:
        return handleNonSubscription(
          userId: userId,
          productData: productData,
          token: token,
        );
    }
  }
Now, you can just call verifyPurchase for both cases, but still have separate implementations!
The ProductData class contains basic information about the different purchasable products, which includes the product ID (sometimes also referred to as SKU) and the ProductType .
lib/products.dart
class ProductData {
  final String productId;
  final ProductType type;

  const ProductData(this.productId, this.type);
}
The ProductType can either be a subscription or a non-subscription.
lib/products.dart
enum ProductType { subscription, nonSubscription }
Finally, the list of products is defined as a map in the same file.
lib/products.dart
const productDataMap = {
  'dash_consumable_2k': ProductData(
    'dash_consumable_2k',
    ProductType.nonSubscription,
  ),
  'dash_upgrade_3d': ProductData(
    'dash_upgrade_3d',
    ProductType.nonSubscription,
  ),
  'dash_subscription_doubler': ProductData(
    'dash_subscription_doubler',
    ProductType.subscription,
  ),
};
Next, define some placeholder implementations for the Google Play Store and the Apple App Store. Start with Google Play:
Create lib/google_play_purchase_handler.dart , and add a class that extends the PurchaseHandler you just wrote:
lib/google_play_purchase_handler.dart
import 'dart:async';

import 'package:googleapis/androidpublisher/v3.dart' as ap;

import 'constants.dart';
import 'iap_repository.dart';
import 'products.dart';
import 'purchase_handler.dart';

class GooglePlayPurchaseHandler extends PurchaseHandler {
  final ap.AndroidPublisherApi androidPublisher;
  final IapRepository iapRepository;

  GooglePlayPurchaseHandler(this.androidPublisher, this.iapRepository);

  @override
  Future<bool> handleNonSubscription({
    required String? userId,
    required ProductData productData,
    required String token,
  }) async {
    return true;
  }

  @override
  Future<bool> handleSubscription({
    required String? userId,
    required ProductData productData,
    required String token,
  }) async {
    return true;
  }
}
For now, it returns true for the handler methods; you'll get to them later.
As you might have noticed, the constructor takes an instance of the IapRepository . The purchase handler uses this instance to store information about purchases in Firestore later on. To communicate with Google Play, you use the provided AndroidPublisherApi .
Next, do the same for the app store handler. Create lib/app_store_purchase_handler.dart , and add a class that extends the PurchaseHandler again:
lib/app_store_purchase_handler.dart
import 'dart:async';

import 'package:app_store_server_sdk/app_store_server_sdk.dart';

import 'constants.dart';
import 'iap_repository.dart';
import 'products.dart';
import 'purchase_handler.dart';

class AppStorePurchaseHandler extends PurchaseHandler {
  final IapRepository iapRepository;

  AppStorePurchaseHandler(this.iapRepository);

  @override
  Future<bool> handleNonSubscription({
    required String userId,
    required ProductData productData,
    required String token,
  }) async {
    return true;
  }

  @override
  Future<bool> handleSubscription({
    required String userId,
    required ProductData productData,
    required String token,
  }) async {
    return true;
  }
}
Great! Now you have two purchase handlers. Next, create the purchase verification API endpoint.
Use purchase handlers
Open bin/server.dart and create an API endpoint using shelf_route :
bin/server.dart
import 'dart:convert';

import 'package:firebase_backend_dart/helpers.dart';
import 'package:firebase_backend_dart/products.dart';
import 'package:shelf/shelf.dart';
import 'package:shelf_router/shelf_router.dart';

Future<void> main() async {
  final router = Router();

  final purchaseHandlers = await _createPurchaseHandlers();

  router.post('/verifypurchase', (Request request) async {
    final dynamic payload = json.decode(await request.readAsString());

    final (:userId, :source, :productData, :token) = getPurchaseData(payload);

    final result = await purchaseHandlers[source]!.verifyPurchase(
      userId: userId,
      productData: productData,
      token: token,
    );

    if (result) {
      return Response.ok('all good!');
    } else {
      return Response.internalServerError();
    }
  });

  await serveHandler(router.call);
}

({String userId, String source, ProductData productData, String token})
getPurchaseData(dynamic payload) {
  if (payload case {
    'userId': String userId,
    'source': String source,
    'productId': String productId,
    'verificationData': String token,
  }) {
    return (
      userId: userId,
      source: source,
      productData: productDataMap[productId]!,
      token: token,
    );
  } else {
    throw const FormatException('Unexpected JSON');
  }
}
The code is doing the following:
- Define a POST endpoint that will be called from the app you created previously.
- Decode the JSON payload and extract the following information:
-
userId: Logged in user ID -
source: Store used, eitherapp_storeorgoogle_play. -
productData: Obtained from theproductDataMapyou created previously. -
token: Contains the verification data to send to the stores.
-
- Call to the
verifyPurchasemethod, either for theGooglePlayPurchaseHandleror theAppStorePurchaseHandler, depending on the source. - If the verification was successful, the method returns a
Response.okto the client. - If the verification fails, the method returns a
Response.internalServerErrorto the client.
After creating the API endpoint, you need to configure the two purchase handlers. This requires you to load the service account keys you obtained in the previous step and configure the access to the different services, including the Android Publisher API and the Firebase Firestore API. Then, create the two purchase handlers with the different dependencies:
bin/server.dart
import 'dart:convert';
import 'dart:io'; // new

import 'package:firebase_backend_dart/app_store_purchase_handler.dart'; // new
import 'package:firebase_backend_dart/google_play_purchase_handler.dart'; // new
import 'package:firebase_backend_dart/helpers.dart';
import 'package:firebase_backend_dart/iap_repository.dart'; // new
import 'package:firebase_backend_dart/products.dart';
import 'package:firebase_backend_dart/purchase_handler.dart'; // new
import 'package:googleapis/androidpublisher/v3.dart' as ap; // new
import 'package:googleapis/firestore/v1.dart' as fs; // new
import 'package:googleapis_auth/auth_io.dart' as auth; // new
import 'package:shelf/shelf.dart';
import 'package:shelf_router/shelf_router.dart';

Future<Map<String, PurchaseHandler>> _createPurchaseHandlers() async {
  // Configure Android Publisher API access
  final serviceAccountGooglePlay =
      File('assets/service-account-google-play.json').readAsStringSync();
  final clientCredentialsGooglePlay =
      auth.ServiceAccountCredentials.fromJson(serviceAccountGooglePlay);
  final clientGooglePlay =
      await auth.clientViaServiceAccount(clientCredentialsGooglePlay, [
    ap.AndroidPublisherApi.androidpublisherScope,
  ]);
  final androidPublisher = ap.AndroidPublisherApi(clientGooglePlay);

  // Configure Firestore API access
  final serviceAccountFirebase =
      File('assets/service-account-firebase.json').readAsStringSync();
  final clientCredentialsFirebase =
      auth.ServiceAccountCredentials.fromJson(serviceAccountFirebase);
  final clientFirebase =
      await auth.clientViaServiceAccount(clientCredentialsFirebase, [
    fs.FirestoreApi.cloudPlatformScope,
  ]);
  final firestoreApi = fs.FirestoreApi(clientFirebase);
  final dynamic json = jsonDecode(serviceAccountFirebase);
  final projectId = json['project_id'] as String;
  final iapRepository = IapRepository(firestoreApi, projectId);

  return {
    'google_play': GooglePlayPurchaseHandler(
      androidPublisher,
      iapRepository,
    ),
    'app_store': AppStorePurchaseHandler(
      iapRepository,
    ),
  };
}
Verify Android purchases: Implement the purchase hander
Next, continue implementing the Google Play purchase handler.
Google already provides Dart packages for interacting with the APIs you need to verify purchases. You initialized them in the server.dart file and now use them in the GooglePlayPurchaseHandler class.
Implement the handler for non-subscription-type purchases:
lib/google_play_purchase_handler.dart
  /// Handle non-subscription purchases (one time purchases).
  ///
  /// Retrieves the purchase status from Google Play and updates
  /// the Firestore Database accordingly.
  @override
  Future<bool> handleNonSubscription({
    required String? userId,
    required ProductData productData,
    required String token,
  }) async {
    print(
      'GooglePlayPurchaseHandler.handleNonSubscription'
      '($userId, ${productData.productId}, ${token.substring(0, 5)}...)',
    );

    try {
      // Verify purchase with Google
      final response = await androidPublisher.purchases.products.get(
        androidPackageId,
        productData.productId,
        token,
      );

      print('Purchases response: ${response.toJson()}');

      // Make sure an order ID exists
      if (response.orderId == null) {
        print('Could not handle purchase without order id');
        return false;
      }
      final orderId = response.orderId!;

      final purchaseData = NonSubscriptionPurchase(
        purchaseDate: DateTime.fromMillisecondsSinceEpoch(
          int.parse(response.purchaseTimeMillis ?? '0'),
        ),
        orderId: orderId,
        productId: productData.productId,
        status: _nonSubscriptionStatusFrom(response.purchaseState),
        userId: userId,
        iapSource: IAPSource.googleplay,
      );

      // Update the database
      if (userId != null) {
        // If we know the userId,
        // update the existing purchase or create it if it does not exist.
        await iapRepository.createOrUpdatePurchase(purchaseData);
      } else {
        // If we don't know the user ID, a previous entry must already
        // exist, and thus we'll only update it.
        await iapRepository.updatePurchase(purchaseData);
      }
      return true;
    } on ap.DetailedApiRequestError catch (e) {
      print(
        'Error on handle NonSubscription: $e\n'
        'JSON: ${e.jsonResponse}',
      );
    } catch (e) {
      print('Error on handle NonSubscription: $e\n');
    }
    return false;
  }
You can update the subscription purchase handler in a similar way:
lib/google_play_purchase_handler.dart
  /// Handle subscription purchases.
  ///
  /// Retrieves the purchase status from Google Play and updates
  /// the Firestore Database accordingly.
  @override
  Future<bool> handleSubscription({
    required String? userId,
    required ProductData productData,
    required String token,
  }) async {
    print(
      'GooglePlayPurchaseHandler.handleSubscription'
      '($userId, ${productData.productId}, ${token.substring(0, 5)}...)',
    );

    try {
      // Verify purchase with Google
      final response = await androidPublisher.purchases.subscriptions.get(
        androidPackageId,
        productData.productId,
        token,
      );

      print('Subscription response: ${response.toJson()}');

      // Make sure an order ID exists
      if (response.orderId == null) {
        print('Could not handle purchase without order id');
        return false;
      }
      final orderId = extractOrderId(response.orderId!);

      final purchaseData = SubscriptionPurchase(
        purchaseDate: DateTime.fromMillisecondsSinceEpoch(
          int.parse(response.startTimeMillis ?? '0'),
        ),
        orderId: orderId,
        productId: productData.productId,
        status: _subscriptionStatusFrom(response.paymentState),
        userId: userId,
        iapSource: IAPSource.googleplay,
        expiryDate: DateTime.fromMillisecondsSinceEpoch(
          int.parse(response.expiryTimeMillis ?? '0'),
        ),
      );

      // Update the database
      if (userId != null) {
        // If we know the userId,
        // update the existing purchase or create it if it does not exist.
        await iapRepository.createOrUpdatePurchase(purchaseData);
      } else {
        // If we don't know the user ID, a previous entry must already
        // exist, and thus we'll only update it.
        await iapRepository.updatePurchase(purchaseData);
      }
      return true;
    } on ap.DetailedApiRequestError catch (e) {
      print(
        'Error on handle Subscription: $e\n'
        'JSON: ${e.jsonResponse}',
      );
    } catch (e) {
      print('Error on handle Subscription: $e\n');
    }
    return false;
  }
}
Add the following method to facilitate the parsing of order IDs, as well as two methods to parse the purchase status.
lib/google_play_purchase_handler.dart
NonSubscriptionStatus _nonSubscriptionStatusFrom(int? state) {
  return switch (state) {
    0 => NonSubscriptionStatus.completed,
    2 => NonSubscriptionStatus.pending,
    _ => NonSubscriptionStatus.cancelled,
  };
}

SubscriptionStatus _subscriptionStatusFrom(int? state) {
  return switch (state) {
    // Payment pending
    0 => SubscriptionStatus.pending,
    // Payment received
    1 => SubscriptionStatus.active,
    // Free trial
    2 => SubscriptionStatus.active,
    // Pending deferred upgrade/downgrade
    3 => SubscriptionStatus.pending,
    // Expired or cancelled
    _ => SubscriptionStatus.expired,
  };
}

/// If a subscription suffix is present (..#) extract the orderId.
String extractOrderId(String orderId) {
  final orderIdSplit = orderId.split('..');
  if (orderIdSplit.isNotEmpty) {
    orderId = orderIdSplit[0];
  }
  return orderId;
}
Your Google Play purchases should now be verified and stored in the database.
Next, move on to App Store purchases for iOS.
Verify iOS purchases: Implement the purchase handler
For verifying purchases with the App Store, a third-party Dart package exists named app_store_server_sdk that makes the process easier.
Start by creating the ITunesApi instance. Use the sandbox configuration, as well as enable logging to facilitate error debugging.
lib/app_store_purchase_handler.dart
  final _iTunesAPI = ITunesApi(
    ITunesHttpClient(ITunesEnvironment.sandbox(), loggingEnabled: true),
  );
Now, unlike the Google Play APIs, the App Store uses the same API endpoints for both subscriptions and non-subscriptions. This means that you can use the same logic for both handlers. Merge them together so they call the same implementation:
lib/app_store_purchase_handler.dart
  @override
  Future<bool> handleNonSubscription({
    required String userId,
    required ProductData productData,
    required String token,
  }) {
    return handleValidation(userId: userId, token: token);
  }

  @override
  Future<bool> handleSubscription({
    required String userId,
    required ProductData productData,
    required String token,
  }) {
    return handleValidation(userId: userId, token: token);
  }

  /// Handle purchase validation.
  Future<bool> handleValidation({
    required String userId,
    required String token,
  }) async {

    // See next step
  }
Now, implement handleValidation :
lib/app_store_purchase_handler.dart
  /// Handle purchase validation.
  Future<bool> handleValidation({
    required String userId,
    required String token,
  }) async {
    print('AppStorePurchaseHandler.handleValidation');
    final response = await _iTunesAPI.verifyReceipt(
      password: appStoreSharedSecret,
      receiptData: token,
    );
    print('response: $response');
    if (response.status == 0) {
      print('Successfully verified purchase');
      final receipts = response.latestReceiptInfo ?? [];
      for (final receipt in receipts) {
        final product = productDataMap[receipt.productId];
        if (product == null) {
          print('Error: Unknown product: ${receipt.productId}');
          continue;
        }
        switch (product.type) {
          case ProductType.nonSubscription:
            await iapRepository.createOrUpdatePurchase(
              NonSubscriptionPurchase(
                userId: userId,
                productId: receipt.productId ?? '',
                iapSource: IAPSource.appstore,
                orderId: receipt.originalTransactionId ?? '',
                purchaseDate: DateTime.fromMillisecondsSinceEpoch(
                  int.parse(receipt.originalPurchaseDateMs ?? '0'),
                ),
                type: product.type,
                status: NonSubscriptionStatus.completed,
              ),
            );
            break;
          case ProductType.subscription:
            await iapRepository.createOrUpdatePurchase(
              SubscriptionPurchase(
                userId: userId,
                productId: receipt.productId ?? '',
                iapSource: IAPSource.appstore,
                orderId: receipt.originalTransactionId ?? '',
                purchaseDate: DateTime.fromMillisecondsSinceEpoch(
                  int.parse(receipt.originalPurchaseDateMs ?? '0'),
                ),
                type: product.type,
                expiryDate: DateTime.fromMillisecondsSinceEpoch(
                  int.parse(receipt.expiresDateMs ?? '0'),
                ),
                status: SubscriptionStatus.active,
              ),
            );
            break;
        }
      }
      return true;
    } else {
      print('Error: Status: ${response.status}');
      return false;
    }
  }
Your App Store purchases should now be verified and stored in the database!
Run the backend
At this point, you can run dart bin/server.dart to serve the /verifypurchase endpoint.
$ dart bin/server.dart
Serving at http://0.0.0.0:8080
11. Keep track of purchases
The recommended way to track your users' purchases is in the backend service. This is because your backend can respond to events from the store and thus is less prone to running into outdated information due to caching, as well as being less susceptible to being tampered with.
First, set up the processing of store events on the backend with the Dart backend you've been building.
Process store events on the backend
Stores have the ability to inform your backend of any billing events that happen, such as when subscriptions renew. You can process these events in your backend to keep the purchases in your database current. In this section, set this up for both the Google Play Store and the Apple App Store.
Process Google Play billing events
Google Play provides billing events through what they call a cloud pub/sub topic . These are essentially message queues that messages can be published on, as well as consumed from.
Because this is functionality specific to Google Play, you include this functionality in the GooglePlayPurchaseHandler .
Start by opening up lib/google_play_purchase_handler.dart , and adding the PubsubApi import:
lib/google_play_purchase_handler.dart
import 'package:googleapis/pubsub/v1.dart' as pubsub;
Then, pass the PubsubApi to the GooglePlayPurchaseHandler , and modify the class constructor to create a Timer as follows:
lib/google_play_purchase_handler.dart
class GooglePlayPurchaseHandler extends PurchaseHandler {
  final ap.AndroidPublisherApi androidPublisher;
  final IapRepository iapRepository;
  final pubsub.PubsubApi pubsubApi; // new

  GooglePlayPurchaseHandler(
    this.androidPublisher,
    this.iapRepository,
    this.pubsubApi, // new
  ) {
    // Poll messages from Pub/Sub every 10 seconds
    Timer.periodic(Duration(seconds: 10), (_) {
      _pullMessageFromPubSub();
    });
  }
The Timer is configured to call the _pullMessageFromPubSub method every ten seconds. You can adjust the Duration to your own preference.
Then, create the _pullMessageFromPubSub
lib/google_play_purchase_handler.dart
  /// Process messages from Google Play
  /// Called every 10 seconds
  Future<void> _pullMessageFromPubSub() async {
    print('Polling Google Play messages');
    final request = pubsub.PullRequest(maxMessages: 1000);
    final topicName =
        'projects/$googleCloudProjectId/subscriptions/$googlePlayPubsubBillingTopic-sub';
    final pullResponse = await pubsubApi.projects.subscriptions.pull(
      request,
      topicName,
    );
    final messages = pullResponse.receivedMessages ?? [];
    for (final message in messages) {
      final data64 = message.message?.data;
      if (data64 != null) {
        await _processMessage(data64, message.ackId);
      }
    }
  }

  Future<void> _processMessage(String data64, String? ackId) async {
    final dataRaw = utf8.decode(base64Decode(data64));
    print('Received data: $dataRaw');
    final dynamic data = jsonDecode(dataRaw);
    if (data['testNotification'] != null) {
      print('Skip test messages');
      if (ackId != null) {
        await _ackMessage(ackId);
      }
      return;
    }
    final dynamic subscriptionNotification = data['subscriptionNotification'];
    final dynamic oneTimeProductNotification =
        data['oneTimeProductNotification'];
    if (subscriptionNotification != null) {
      print('Processing Subscription');
      final subscriptionId =
          subscriptionNotification['subscriptionId'] as String;
      final purchaseToken = subscriptionNotification['purchaseToken'] as String;
      final productData = productDataMap[subscriptionId]!;
      final result = await handleSubscription(
        userId: null,
        productData: productData,
        token: purchaseToken,
      );
      if (result && ackId != null) {
        await _ackMessage(ackId);
      }
    } else if (oneTimeProductNotification != null) {
      print('Processing NonSubscription');
      final sku = oneTimeProductNotification['sku'] as String;
      final purchaseToken =
          oneTimeProductNotification['purchaseToken'] as String;
      final productData = productDataMap[sku]!;
      final result = await handleNonSubscription(
        userId: null,
        productData: productData,
        token: purchaseToken,
      );
      if (result && ackId != null) {
        await _ackMessage(ackId);
      }
    } else {
      print('invalid data');
    }
  }

  /// ACK Messages from Pub/Sub
  Future<void> _ackMessage(String id) async {
    print('ACK Message');
    final request = pubsub.AcknowledgeRequest(ackIds: [id]);
    final subscriptionName =
        'projects/$googleCloudProjectId/subscriptions/$googlePlayPubsubBillingTopic-sub';
    await pubsubApi.projects.subscriptions.acknowledge(
      request,
      subscriptionName,
    );
  }
The code you just added communicates with the Pub/Sub Topic from Google Cloud every ten seconds and asks for new messages. Then, processes each message in the _processMessage method.
This method decodes the incoming messages and obtains the updated information about each purchase, both subscriptions and non-subscriptions, calling the existing handleSubscription or handleNonSubscription if necessary.
Each message needs to be acknowledged with the _askMessage method.
Next, add the required dependencies to the server.dart file. Add the PubsubApi.cloudPlatformScope to the credentials configuration:
bin/server.dart
import 'package:googleapis/pubsub/v1.dart' as pubsub;      // Add this import

  final clientGooglePlay = await auth
      .clientViaServiceAccount(clientCredentialsGooglePlay, [
        ap.AndroidPublisherApi.androidpublisherScope,
        pubsub.PubsubApi.cloudPlatformScope,               // Add this line
      ]);
Then, create the PubsubApi instance:
bin/server.dart
final pubsubApi = pubsub.PubsubApi(clientGooglePlay);
And finally, pass it to the GooglePlayPurchaseHandler constructor:
bin/server.dart
  return {
    'google_play': GooglePlayPurchaseHandler(
      androidPublisher,
      iapRepository,
      pubsubApi,                                           // Add this line
    ),
    'app_store': AppStorePurchaseHandler(
      iapRepository,
    ),
  };
Google Play setup
You've written the code to consume billing events from the pub/sub topic, but you haven't created the pub/sub topic, nor are you publishing any billing events. It's time to set this up.
First, create a pub/sub topic:
- Set the value of
googleCloudProjectIdinconstants.dartto ID of your Google Cloud Project. - Visit the Cloud Pub/Sub page on the Google Cloud Console.
- Ensure that you're on your Firebase project, and click + Create Topic .

- Give the new topic a name, identical to the value set for
googlePlayPubsubBillingTopicinconstants.dart. In this case, name itplay_billing. If you choose something else, make sure to updateconstants.dart. Create the topic.
- In the list of your pub/sub topics, click the three vertical dots for the topic you just created, and click View permissions .

- In the sidebar on the right, choose Add principal .
- Here, add
google-play-developer-notifications@system.gserviceaccount.com, and grant it the role of Pub/Sub Publisher .
- Save the permission changes.
- Copy the Topic name of the topic you've just created.
- Open the Play Console again, and choose your app from the All Apps list.
- Scroll down and go to Monetize > Monetization Setup .
- Fill in the full topic and save your changes.

All Google Play billing events will now be published on the topic.
Process App Store billing events
Next, do the same for the App Store billing events. There are two effective ways to implement handling updates in purchases for the App Store. One is by implementing a webhook that you provide to Apple and they use to communicate with your server. The second way, which is the one you will find in this codelab, is by connecting to the App Store Server API and obtaining the subscription information manually.
The reason why this codelab focuses on the second solution is because you would have to expose your server to the Internet in order to implement the webhook.
In a production environment, ideally you would like to have both. The webhook to obtain events from the App Store, and the Server API in case you missed an event or need to double check a subscription status.
Start by opening up lib/app_store_purchase_handler.dart , and adding the AppStoreServerAPI dependency:
lib/app_store_purchase_handler.dart
  final AppStoreServerAPI appStoreServerAPI;                 // Add this member

  AppStorePurchaseHandler(
    this.iapRepository,
    this.appStoreServerAPI,                                  // And this parameter
  );
Modify the constructor to add a timer that will call to the _pullStatus method. This timer will be calling the _pullStatus method every 10 seconds. You can adjust this timer duration to your needs.
lib/app_store_purchase_handler.dart
  AppStorePurchaseHandler(this.iapRepository, this.appStoreServerAPI) {
    // Poll Subscription status every 10 seconds.
    Timer.periodic(Duration(seconds: 10), (_) {
      _pullStatus();
    });
  }
Then, create the _pullStatus method as follows:
lib/app_store_purchase_handler.dart
  /// Request the App Store for the latest subscription status.
  /// Updates all App Store subscriptions in the database.
  /// NOTE: This code only handles when a subscription expires as example.
  Future<void> _pullStatus() async {
    print('Polling App Store');
    final purchases = await iapRepository.getPurchases();
    // filter for App Store subscriptions
    final appStoreSubscriptions = purchases.where(
      (element) =>
          element.type == ProductType.subscription &&
          element.iapSource == IAPSource.appstore,
    );
    for (final purchase in appStoreSubscriptions) {
      final status = await appStoreServerAPI.getAllSubscriptionStatuses(
        purchase.orderId,
      );
      // Obtain all subscriptions for the order ID.
      for (final subscription in status.data) {
        // Last transaction contains the subscription status.
        for (final transaction in subscription.lastTransactions) {
          final expirationDate = DateTime.fromMillisecondsSinceEpoch(
            transaction.transactionInfo.expiresDate ?? 0,
          );
          // Check if subscription has expired.
          final isExpired = expirationDate.isBefore(DateTime.now());
          print('Expiration Date: $expirationDate - isExpired: $isExpired');
          // Update the subscription status with the new expiration date and status.
          await iapRepository.updatePurchase(
            SubscriptionPurchase(
              userId: null,
              productId: transaction.transactionInfo.productId,
              iapSource: IAPSource.appstore,
              orderId: transaction.originalTransactionId,
              purchaseDate: DateTime.fromMillisecondsSinceEpoch(
                transaction.transactionInfo.originalPurchaseDate,
              ),
              type: ProductType.subscription,
              expiryDate: expirationDate,
              status: isExpired
                  ? SubscriptionStatus.expired
                  : SubscriptionStatus.active,
            ),
          );
        }
      }
    }
  }
This method works as follow:
- Obtains the list of active subscriptions from Firestore using the IapRepository.
- For each order, it requests the subscription status to the App Store Server API.
- Obtains the last transaction for that subscription purchase.
- Checks the expiration date.
- Updates the subscription status on Firestore, if it is expired it will be marked as such.
Finally, add all the necessary code to configure the App Store Server API access:
bin/server.dart
import 'package:app_store_server_sdk/app_store_server_sdk.dart';  // Add this import
import 'package:firebase_backend_dart/constants.dart';            // And this one.


  // add from here
  final subscriptionKeyAppStore = File(
    'assets/SubscriptionKey.p8',
  ).readAsStringSync();

  // Configure Apple Store API access
  var appStoreEnvironment = AppStoreEnvironment.sandbox(
    bundleId: bundleId,
    issuerId: appStoreIssuerId,
    keyId: appStoreKeyId,
    privateKey: subscriptionKeyAppStore,
  );

  // Stored token for Apple Store API access, if available
  final file = File('assets/appstore.token');
  String? appStoreToken;
  if (file.existsSync() && file.lengthSync() > 0) {
    appStoreToken = file.readAsStringSync();
  }

  final appStoreServerAPI = AppStoreServerAPI(
    AppStoreServerHttpClient(
      appStoreEnvironment,
      jwt: appStoreToken,
      jwtTokenUpdatedCallback: (token) {
        file.writeAsStringSync(token);
      },
    ),
  );
  // to here

  return {
    'google_play': GooglePlayPurchaseHandler(
      androidPublisher,
      iapRepository,
      pubsubApi,
    ),
    'app_store': AppStorePurchaseHandler(
      iapRepository,
      appStoreServerAPI,                                     // Add this argument
    ),
  };
App Store setup
Next, set up the App Store:
- Login to App Store Connect , and select Users and Access .
- Go to Integrations > Keys > In-App Purchase .
- Tap on the "plus" icon to add a new one.
- Give it a name, such as "Codelab key".
- Download the p8 file containing the key.
- Copy it to the assets folder, with the name
SubscriptionKey.p8. - Copy the key ID from the newly created key and set it to
appStoreKeyIdconstant in thelib/constants.dartfile. - Copy the Issuer ID right at the top of the keys list, and set it to
appStoreIssuerIdconstant in thelib/constants.dartfile.

Track purchases on the device
The most secure way to track your purchases is on the server side because the client is hard to secure, but you need to have some way to get the information back to the client so the app can act on the subscription status information. By storing the purchases in Firestore, you can sync the data to the client and keep it updated automatically.
You already included the IAPRepo in the app, which is the Firestore repository that contains all of the user's purchase data in List<PastPurchase> purchases . The repository also contains hasActiveSubscription, which is true when there is a purchase with productId storeKeySubscription with a status that is not expired. When the user isn't logged in, the list is empty.
lib/repo/iap_repo.dart
  void updatePurchases() {
    _purchaseSubscription?.cancel();
    var user = _user;
    if (user == null) {
      purchases = [];
      hasActiveSubscription = false;
      hasUpgrade = false;
      return;
    }
    var purchaseStream = _firestore
        .collection('purchases')
        .where('userId', isEqualTo: user.uid)
        .snapshots();
    _purchaseSubscription = purchaseStream.listen((snapshot) {
      purchases = snapshot.docs.map((document) {
        var data = document.data();
        return PastPurchase.fromJson(data);
      }).toList();

      hasActiveSubscription = purchases.any(
        (element) =>
            element.productId == storeKeySubscription &&
            element.status != Status.expired,
      );

      hasUpgrade = purchases.any(
        (element) => element.productId == storeKeyUpgrade,
      );

      notifyListeners();
    });
  }
All purchase logic is in the DashPurchases class and is where subscriptions should be applied or removed. So, add the iapRepo as a property in the class and assign the iapRepo in the constructor. Next, directly add a listener in the constructor, and remove the listener in the dispose() method. At first, the listener can just be an empty function. Because the IAPRepo is a ChangeNotifier and you call notifyListeners() every time the purchases in Firestore change, the purchasesUpdate() method is always called when the purchased products change.
lib/logic/dash_purchases.dart
import '../repo/iap_repo.dart';                              // Add this import

class DashPurchases extends ChangeNotifier {
  DashCounter counter;
  FirebaseNotifier firebaseNotifier;
  StoreState storeState = StoreState.loading;
  late StreamSubscription<List<PurchaseDetails>> _subscription;
  List<PurchasableProduct> products = [];
  IAPRepo iapRepo;                                           // Add this line

  bool get beautifiedDash => _beautifiedDashUpgrade;
  bool _beautifiedDashUpgrade = false;
  final iapConnection = IAPConnection.instance;

  // Add this.iapRepo as a parameter
  DashPurchases(this.counter, this.firebaseNotifier, this.iapRepo) {
    final purchaseUpdated = iapConnection.purchaseStream;
    _subscription = purchaseUpdated.listen(
      _onPurchaseUpdate,
      onDone: _updateStreamOnDone,
      onError: _updateStreamOnError,
    );
    iapRepo.addListener(purchasesUpdate);
    loadPurchases();
  }

  Future<void> loadPurchases() async {
    // Elided.
  }

  @override
  void dispose() {
    _subscription.cancel();
    iapRepo.removeListener(purchasesUpdate);                 // Add this line
    super.dispose();
  }

  void purchasesUpdate() {
    //TODO manage updates
  }
Next, supply the IAPRepo to the constructor in main.dart. You can get the repository by using context.read because it's already created in a Provider .
lib/main.dart
        ChangeNotifierProvider<DashPurchases>(
          create: (context) => DashPurchases(
            context.read<DashCounter>(),
            context.read<FirebaseNotifier>(),
            context.read<IAPRepo>(),                         // Add this line
          ),
          lazy: false,
        ),
Next, write the code for the purchaseUpdate() function. In dash_counter.dart, the applyPaidMultiplier and removePaidMultiplier methods set the multiplier to 10 or 1, respectively, so you don't have to check whether the subscription is already applied. When the subscription status changes, you also update the status of the purchasable product so you can show in the purchase page that it's already active. Set the _beautifiedDashUpgrade property based on whether the upgrade is bought.
lib/logic/dash_purchases.dart
  void purchasesUpdate() {
    var subscriptions = <PurchasableProduct>[];
    var upgrades = <PurchasableProduct>[];
    // Get a list of purchasable products for the subscription and upgrade.
    // This should be 1 per type.
    if (products.isNotEmpty) {
      subscriptions = products
          .where((element) => element.productDetails.id == storeKeySubscription)
          .toList();
      upgrades = products
          .where((element) => element.productDetails.id == storeKeyUpgrade)
          .toList();
    }

    // Set the subscription in the counter logic and show/hide purchased on the
    // purchases page.
    if (iapRepo.hasActiveSubscription) {
      counter.applyPaidMultiplier();
      for (var element in subscriptions) {
        _updateStatus(element, ProductStatus.purchased);
      }
    } else {
      counter.removePaidMultiplier();
      for (var element in subscriptions) {
        _updateStatus(element, ProductStatus.purchasable);
      }
    }

    // Set the Dash beautifier and show/hide purchased on
    // the purchases page.
    if (iapRepo.hasUpgrade != _beautifiedDashUpgrade) {
      _beautifiedDashUpgrade = iapRepo.hasUpgrade;
      for (var element in upgrades) {
        _updateStatus(
          element,
          _beautifiedDashUpgrade
              ? ProductStatus.purchased
              : ProductStatus.purchasable,
        );
      }
      notifyListeners();
    }
  }

  void _updateStatus(PurchasableProduct product, ProductStatus status) {
    if (product.status != ProductStatus.purchased) {
      product.status = ProductStatus.purchased;
      notifyListeners();
    }
  }
You have now ensured that the subscription and upgrade status is always current in the backend service and synchronized with the app. The app acts accordingly and applies the subscription and upgrade features to your Dash clicker game.
12. All done!
Congratulations!!! You have completed the codelab. You can find the completed code for this codelab in the  complete folder.
To learn more, try the other Flutter codelabs .