
1. Introduction
This codelab guides you on how to track autofill behavior on your web forms using Google Analytics 4 (GA4). It builds upon the concepts and motivation for measuring autofill discussed in articles such as Measure browser autofill on your forms on web.dev.
You'll learn how to:
- Implement JavaScript to detect autofill interactions, including when a field is filled by autofill, manually, or a combination of both.
- Define a custom GA4 event to track autofill status.
- Send autofill data as custom parameters to GA4.
- Configure custom dimensions in GA4 for reporting.
- Understand how to analyze the collected data.
This approach allows you to understand how often users rely on autofill, which fields are most frequently autofilled, and identify potential issues with form usability. This will give you insights on how to improve the user experience and increase conversions.
Prerequisites
- Basic knowledge of HTML, CSS, and JavaScript.
- A Google Analytics 4 property set up on your website.
- Familiarity with the
gtag.jslibrary for sending events to GA4. - Access to the HTML of the form you want to track.
- Basic understanding of Google Analytics 4 reports.
What you'll learn
- How to detect autofill behavior using JavaScript, considering different user interaction scenarios.
- How to create custom GA4 events with meaningful parameters.
- How to send custom event parameters to GA4, including form and field identifiers.
- How to configure custom dimensions in GA4 to analyze the collected data.
What you'll need
- A text editor or IDE.
- A web browser with developer tools.
- Your website's code.
- Your Google Analytics 4 account.
2. Implement the Autofill Detection Logic
In this step, we'll add JavaScript code to your webpage. This script will monitor your form fields to detect when they are filled using a browser's autofill feature versus manual input.
Example HTML Form Structure
First, let's look at the example HTML form we'll be working with. The key things to note are:
- The form itself has an
id(e.g.,myForm) and ideally a data-form-id attribute (e.g.,data-form-id="myForm"). - Each input field you want to track needs a unique
id(e.g.,id="name",id="email").
<form id="myForm" data-form-id="myForm" action="/submit" method="post">
    <label for="name">Name:</label>
    <input type="text" id="name" name="name"><br>

    <label for="email">Email:</label>
    <input type="email" id="email" name="email"><br>

    <label for="address">Address:</label>
    <input type="text" id="address" name="address"><br>

    <label for="city">City:</label>
    <input type="text" id="city" name="city"><br>

    <label for="zip">Zip Code:</label>
    <input type="text" id="zip" name="zip"><br>

    <button type="submit">Submit</button>
</form>

<devsite-script src="/path/to/your/static/js/autofill_tracker.js"></devsite-script>
The Autofill Tracking JavaScript
Here is the JavaScript code that performs the detection. It initializes tracking, listens for changes in specified fields, determines the autofill status, and sends an event to GA4 upon form submission.
// autofill_tracker.js
const formId = 'myForm'; // Replace with your form's ID
const fieldsToTrack = ['name', 'email', 'address', 'city', 'zip']; // Replace with your field IDs

const autofillStatuses = {};

function initializeAutofillTracking() {
    const form = document.getElementById(formId);
    if (!form) {
        console.error(`Form with ID '${formId}' not found.`);
        return;
    }

    fieldsToTrack.forEach(fieldId => {
        const field = form.querySelector(`#${fieldId}`);
        if (!field) {
          console.warn(`Field with ID '${fieldId}' not found in the form.`);
          return;
        }

        autofillStatuses[fieldId] = 'EMPTY';
        field.addEventListener('change', (event) => {
            const fieldElement = event.target;
            if (fieldElement.matches(':autofill')) {
                if (autofillStatuses[fieldId] === 'EMPTY'){
                  autofillStatuses[fieldId] = 'AUTOFILLED';
                } else if(autofillStatuses[fieldId] === 'ONLY_MANUAL'){
                    autofillStatuses[fieldId] = 'ONLY_MANUAL_THEN_AUTOFILLED';
                } else if (autofillStatuses[fieldId] === 'AUTOFILLED_THEN_MODIFIED'){
                    // keep the status
                } else {
                    autofillStatuses[fieldId] = 'AUTOFILLED';
                }
            } else {
                if (autofillStatuses[fieldId] === 'AUTOFILLED'){
                    autofillStatuses[fieldId] = 'AUTOFILLED_THEN_MODIFIED';
                } else if (autofillStatuses[fieldId] === 'ONLY_MANUAL_THEN_AUTOFILLED') {
                  autofillStatuses[fieldId] = 'ONLY_MANUAL';
                }else{
                    autofillStatuses[fieldId] = 'ONLY_MANUAL';
                }
            }
        });
    });

    form.addEventListener('submit', function(event) {
      event.preventDefault();
      const formElement = event.target;
      const formId = formElement.dataset.formId;
      fieldsToTrack.forEach(fieldId => {
        gtag('event', 'autofill_form_interaction', {
          'form_id': formId,
          'field_id': fieldId,
          'autofill_status': autofillStatuses[fieldId]
        });
      });
      formElement.submit();
    });
}

document.addEventListener('DOMContentLoaded', initializeAutofillTracking);
Configuration (Crucial!)
Before the script works correctly, you must modify these two lines within the JavaScript code:
const formId = 'myForm'; // Replace 'myForm' with the actual ID of YOUR form.
const fieldsToTrack = ['name', 'email', 'address', 'city', 'zip']; // Replace these with the actual IDs of the input fields YOU want to track.
Code Explanation:
form.dataset.formId: Gets the value of thedata-form-idattribute to use it asformIdparameter.event.preventDefault(): Prevents the default form submission, allowing us to send the event before submitting the form.gtag('event', 'autofill_form_interaction', ...): Sends the custom event with the following parameters:form_id: The ID of the form.field_id: The ID of the field.autofill_status: The current autofill status of the field.form.submit(): Submits the form after sending the event to GA4.document.addEventListener('DOMContentLoaded', ...): Ensures the script only runs after the page's HTML structure ifully loaded, preventing errors trying to find elements that don't exist yet.
3. Testing
- Submit the form in your browser.
- Use the Realtime or DebugView reports in GA4 to verify that the
autofill_form_interactionevent is being sent. - Check that the event parameters are correctly populated (e.g.,
form_id,field_id,autofill_status).
4. Configure Custom Dimensions in GA4
To use the field_id and autofill_status parameters in GA4 reports, you need to create custom dimensions:
- Go to your GA4 property.
- Navigate to "Configure" > "Custom definitions".
- Create a new custom dimension:
- Event parameter:
field_id - Dimension name:
Field ID - Scope: Event
- Event parameter:
- Create another custom dimension:
- Event parameter:
autofill_status - Dimension name:
Autofill Status - Scope: Event
- Event parameter:
- Create a third custom dimension:
- Event parameter:
form_id - Dimension name:
Form ID - Scope: Event
- Event parameter:
5. Analyze Data in GA4
After you've collected data, you can analyze it in your GA4 reports:
- Go to "Reports" > "Engagement" > "Events".
- Select your
autofill_form_interactionevent. - Use the "Secondary dimension" dropdown to select your custom dimensions (e.g., "Field ID", "Autofill Status", "Form ID").Adding "Field ID" will show which specific form fields are triggering the
autofill_form_interactionevent.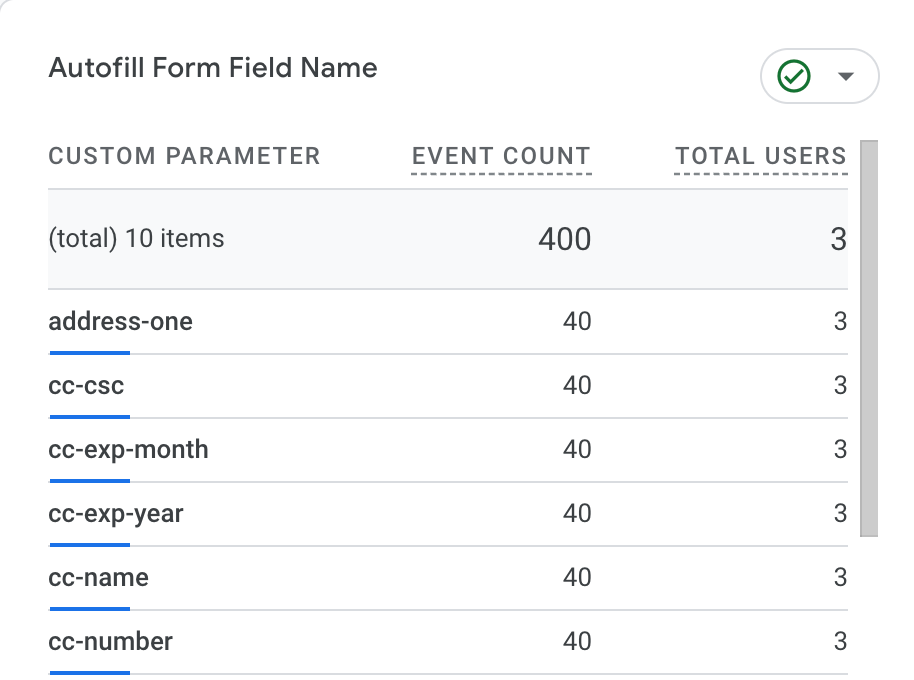 To gain deeper insights into how each field was completed, you can check "Autofill Status" as another dimension alongside "Field ID". This combination directly shows the distribution of interaction types for each field.
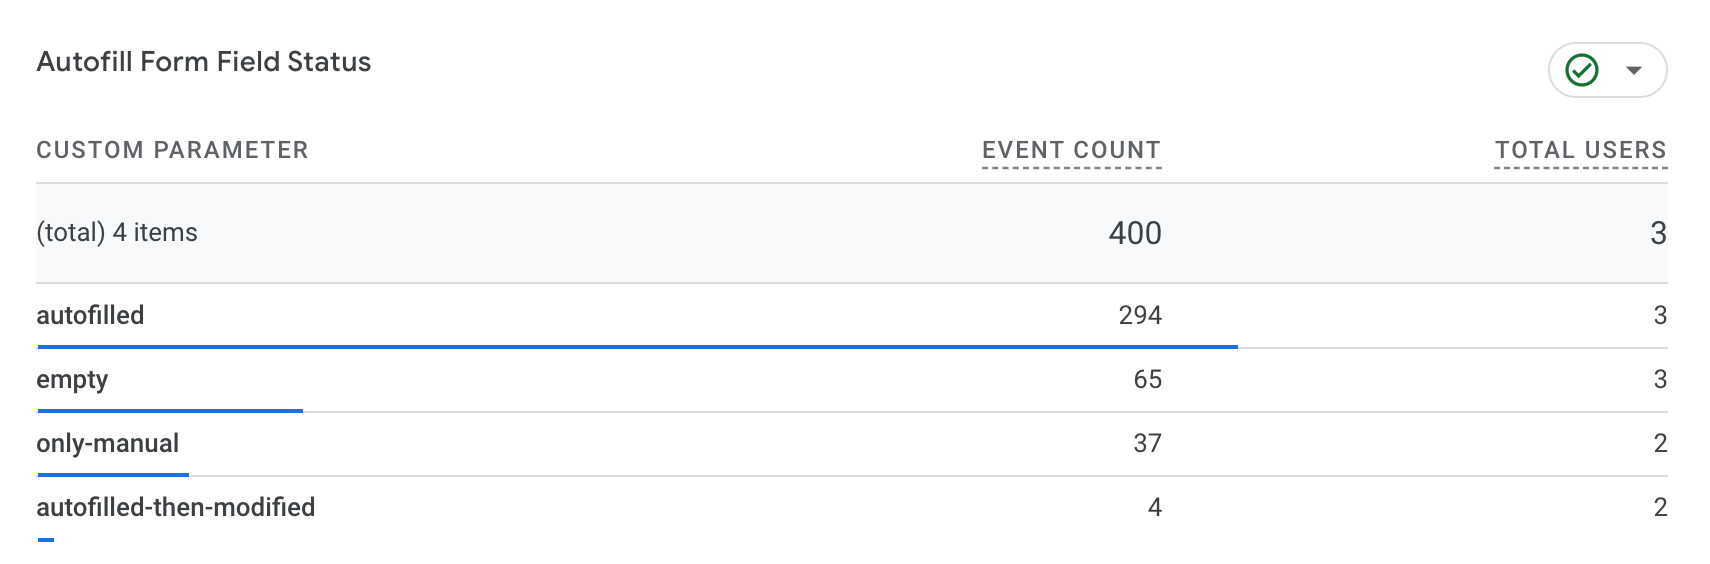
- Create Explorations to get more insights about the data. You can use different techniques, such as:
- Free Form: To explore the data and create custom visualizations.
- Table: To see the data in a table format.
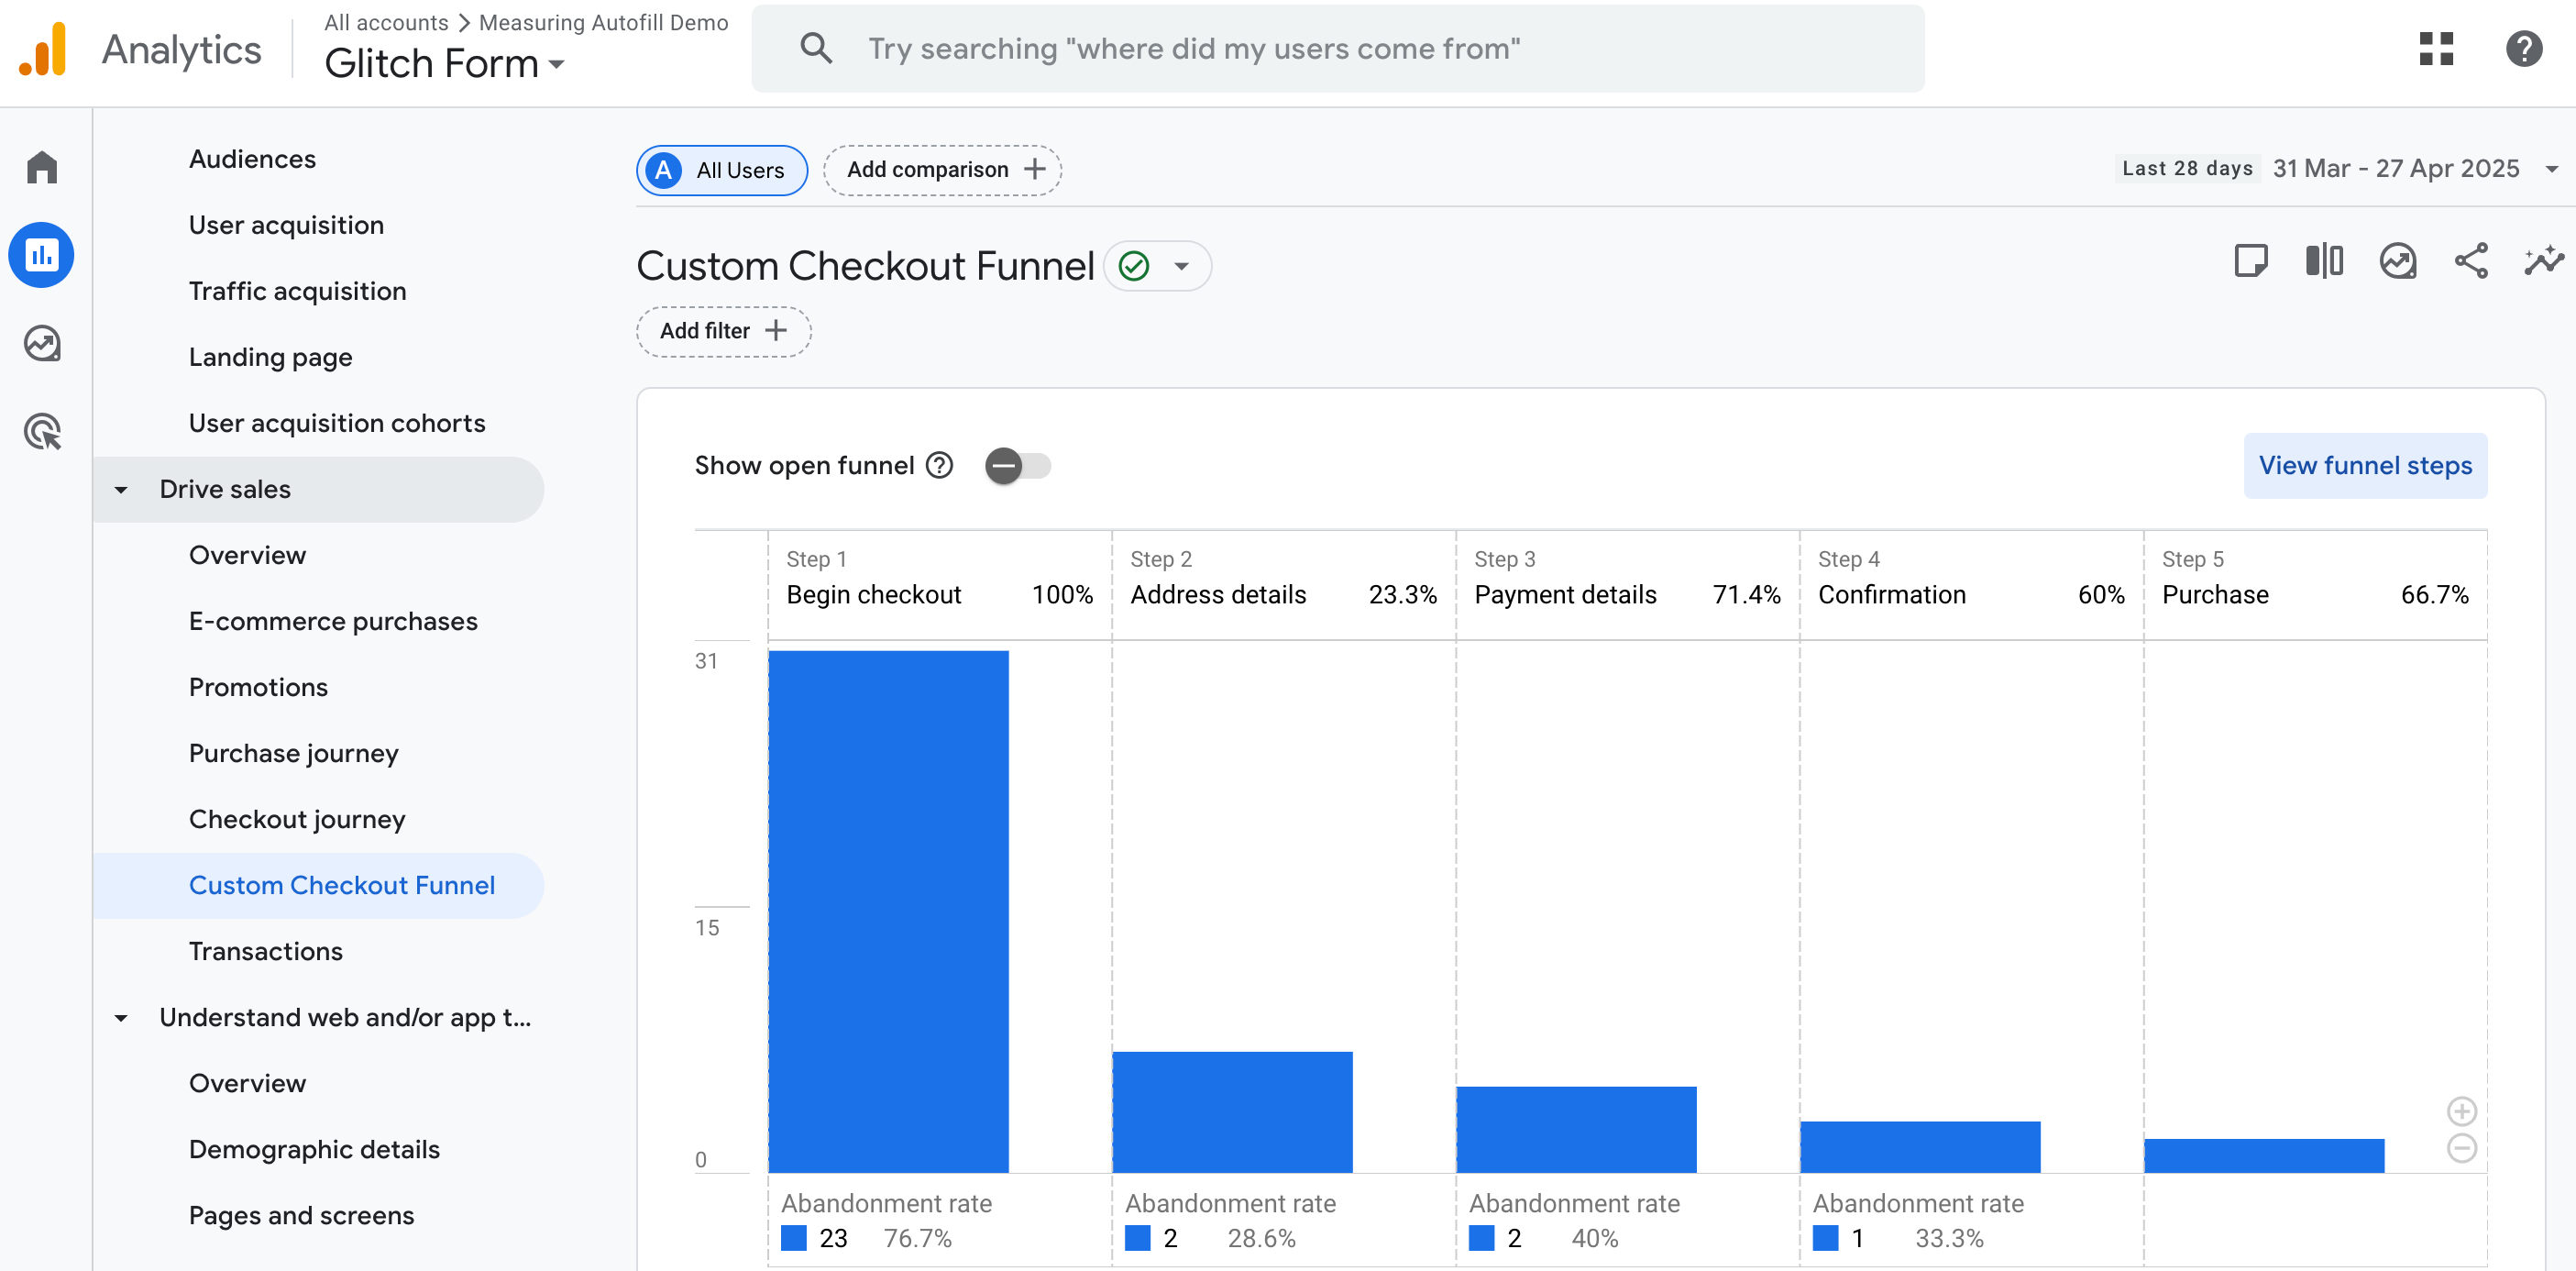
- Funnel: To analyze the user journey through the form. A funnel exploration can help visualize how users progress through a multi-step form, potentially highlighting stages where autofill behavior (or its absence) impacts progression.
Example questions you can answer with this data:
- Which fields are most frequently autofilled?
- How often do users rely on autofill?
- Are there specific fields where users tend to manually fill the information?
- Does the autofill behavior change over time?
- How does the autofill behavior change depending on the form?
6. Additional Considerations
- Form Validation: Consider how form validation impacts autofill detection. If validation fails, the change event might not be triggered correctly.
- Dynamic Forms: If you have dynamic forms, make sure your JavaScript code can handle changes to the number and IDs of fields. You might need to use
MutationObserverto track changes in the form. - Performance: Avoid adding too much JavaScript to your page. Make sure to test your code for performance impact.
- User Privacy: Be mindful of user privacy when collecting data. Avoid collecting sensitive information without proper consent.
- Event Limits: GA4 has limits on the number of events and parameters you can send. Plan your implementation accordingly.
- Multiple forms: If you have multiple forms in the same page, make sure to adapt the code to track all the forms. You will need to adapt the
formIdselector and the event listener to each form. - Accessibility: Ensure your implementation is accessible to users with disabilities.
- Testing: Thoroughly test your implementation in different browsers and devices to ensure it works as expected.
7. Conclusion
You did it! From setting up the JavaScript listeners to configuring those custom dimensions in Google Analytics 4, you've successfully navigated the steps and truly conquered autofill tracking. You're now fully equipped and ready to transform the data you collect into genuinely delightful and efficient user experiences on your forms.
Get ready to see a stream of valuable insights start rolling in! You'll be able to pinpoint exactly how users interact with each field, discover which parts of your forms benefit most from autofill, and identify any sneaky friction points that might have been previously invisible. Armed with this powerful knowledge, you can make targeted, smart tweaks, streamline the user journey, reduce form abandonment, and watch those all-important conversion rates climb even higher.
The power to continuously optimize and refine your web forms is now firmly in your hands. Think of this as not just a completed Codelab, but the beginning of an exciting, ongoing adventure in data-driven design. So go ahead, embrace your new analytical superpowers, experiment with improvements, and make your forms not just functional, but absolutely amazing for every user who interacts with them. Happy optimizing!