
1. Introduction
In this codelab, you will learn how to leverage Gemini Enterprise to automate and enhance daily workflows for Scrum Masters and Project Managers at Bumble. You will explore how to configure data connectors for Jira, Confluence, GitHub, and Google Drive, analyze sprint backlogs using Gemini Notebook, co-author architectural documents with Gemini Assistant Canvas, and build custom agents using Agent Designer and the Agent Development Kit (ADK).
What you'll do
- Setup & Personalization: Configure your assistant settings for delivery goals.
- Configure Data Connectors: Connect Gemini Enterprise to Jira Cloud, Confluence, GitHub, and Google Drive.
- Cross-Reference Documentation: Compare requirements with active ticket logs.
- Analyze Sprint Backlogs: Use Gemini Notebook to generate insights from retrospective notes.
- Explore Google-Owned Agents: Use the Deep Research and Idea Generation agents to conduct market research and brainstorm new features.
- Build Multi-Step Agents: Create a Lead Scrum Master Assistant using specialized sub-agents.
- Invoke Prebuilt Skills: Invoke the out-of-the-box Project Updates skill template to generate a project status summary.
- Co-Author ADR Documents: Collaborate with Gemini Assistant Canvas to draft ADRs and create new Confluence pages from a Canvas draft.
- Build Workflow Agents: Create a deterministic release gatekeeper using natural language.
- Challenge Lab: Build with ADK (Optional): Use the ADK Python SDK to scaffold, build, and deploy an agent with Antigravity CLI (
agy). - Challenge Lab: Publish to Gemini (Optional): Register your custom ADK agent so it appears alongside your other Bumble tools.
What you'll need
- A web browser such as Chrome
- A Google Cloud project with billing enabled (configured by Admin)
- Access to Gemini Enterprise with necessary licenses
- Accounts on Jira Cloud, Confluence, GitHub, and Google Drive with appropriate permissions.
- Credential Readiness: Ensure you have generated Atlassian API Tokens (for Jira/Confluence), GitHub App credentials, and verified Google Drive folder access before starting the Data Connector step.
Estimated Duration: 201 minutes
Cost Estimate: The resources used in this codelab are primarily software-as-a-service features and should not incur significant infrastructure costs. However, ensure you understand the billing implications of Gemini Enterprise licenses and data connector usage.
2. Set up and personalize your assistant
In this step, you will access Gemini Enterprise and customize your assistant settings to understand your delivery goals as a Scrum Master or Delivery Lead.
Navigate to Gemini Enterprise
- Open your web browser and navigate to the Gemini Enterprise app (your instructor will provide the specific URL for your environment).
- Ensure you are logged in with your provisioned Google account.
Configure Personalization
To give the assistant explicit context about your role and industry:
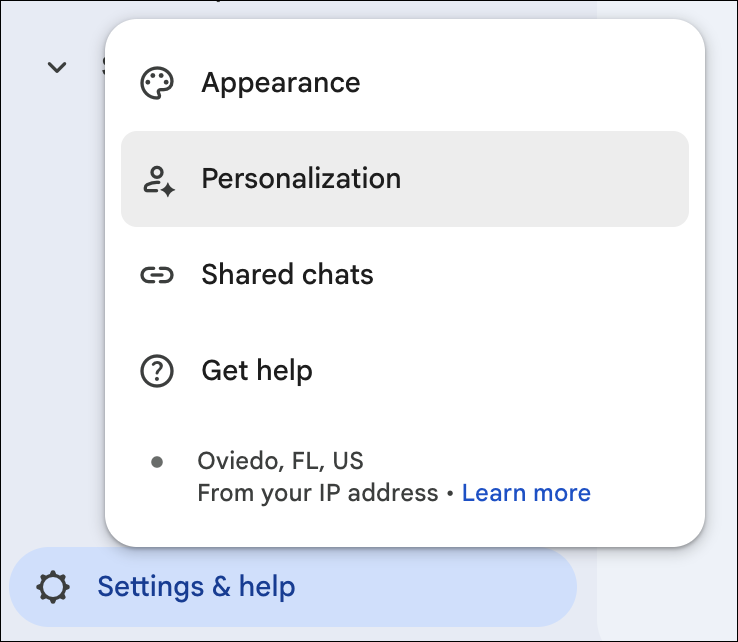
- Click the Settings (gear) icon in the bottom left corner of the interface.
- Select Personalization in the settings popup menu.
- In the Profile section, enter the following details:
- Role or job title: Select Custom from the dropdown, then type
Scrum Master / Delivery Leadin the field. - Industry: Select Custom from the dropdown, then type
Consumer Software & Mobile App Developmentin the field.
- Role or job title: Select Custom from the dropdown, then type
- Ensure the following toggles are turned on to help the assistant learn from past interactions:
- Conversation history
- Reference saved memories
- Click Save and close the settings popup.
3. Lab Environment Seeding Prerequisite
To ensure 100% execution accuracy and avoid environment drift during this workshop, you must seed your local lab environments with specific mock data packages prior to configuring data connectors. This establishes a baseline dataset for Jira, Confluence, and GitHub so that the AI assistant can run grounded analytical tasks with absolute deterministic accuracy.
1. Jira Project Data Seeding
You will create a dedicated sandbox Jira project and seed it with three baseline issues.
- Open your Atlassian Jira Cloud instance in a web browser.
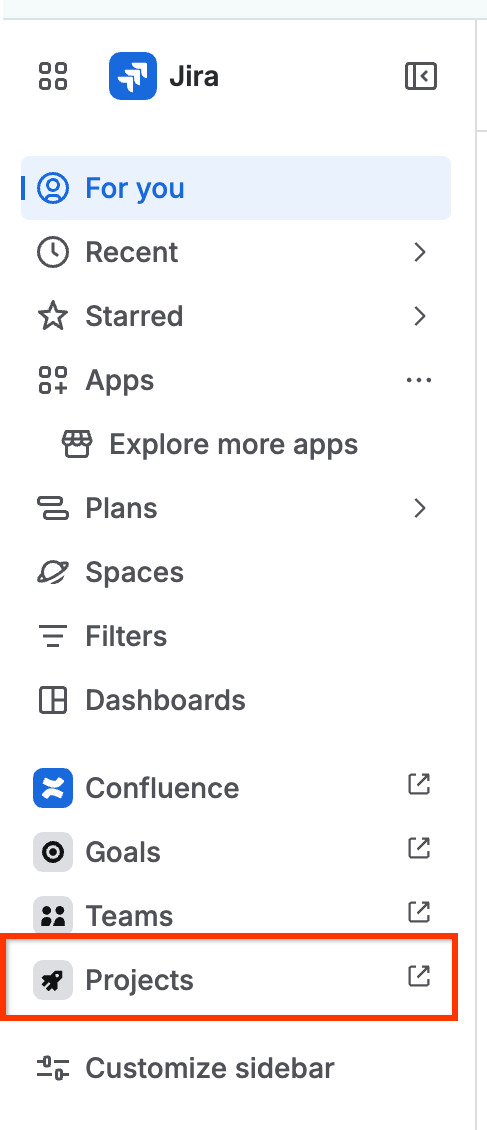
- Access Projects: Click Projects in the left side menu pane and select Create project.
- Select Scrum Template: In the project templates panel, search and select Scrum (located under the Software Development template category). Click Use template, and select Company-managed project.
 If you are using a free developer edition and cannot find the template directly, click Spaces to find templates and select the Scrum template from there.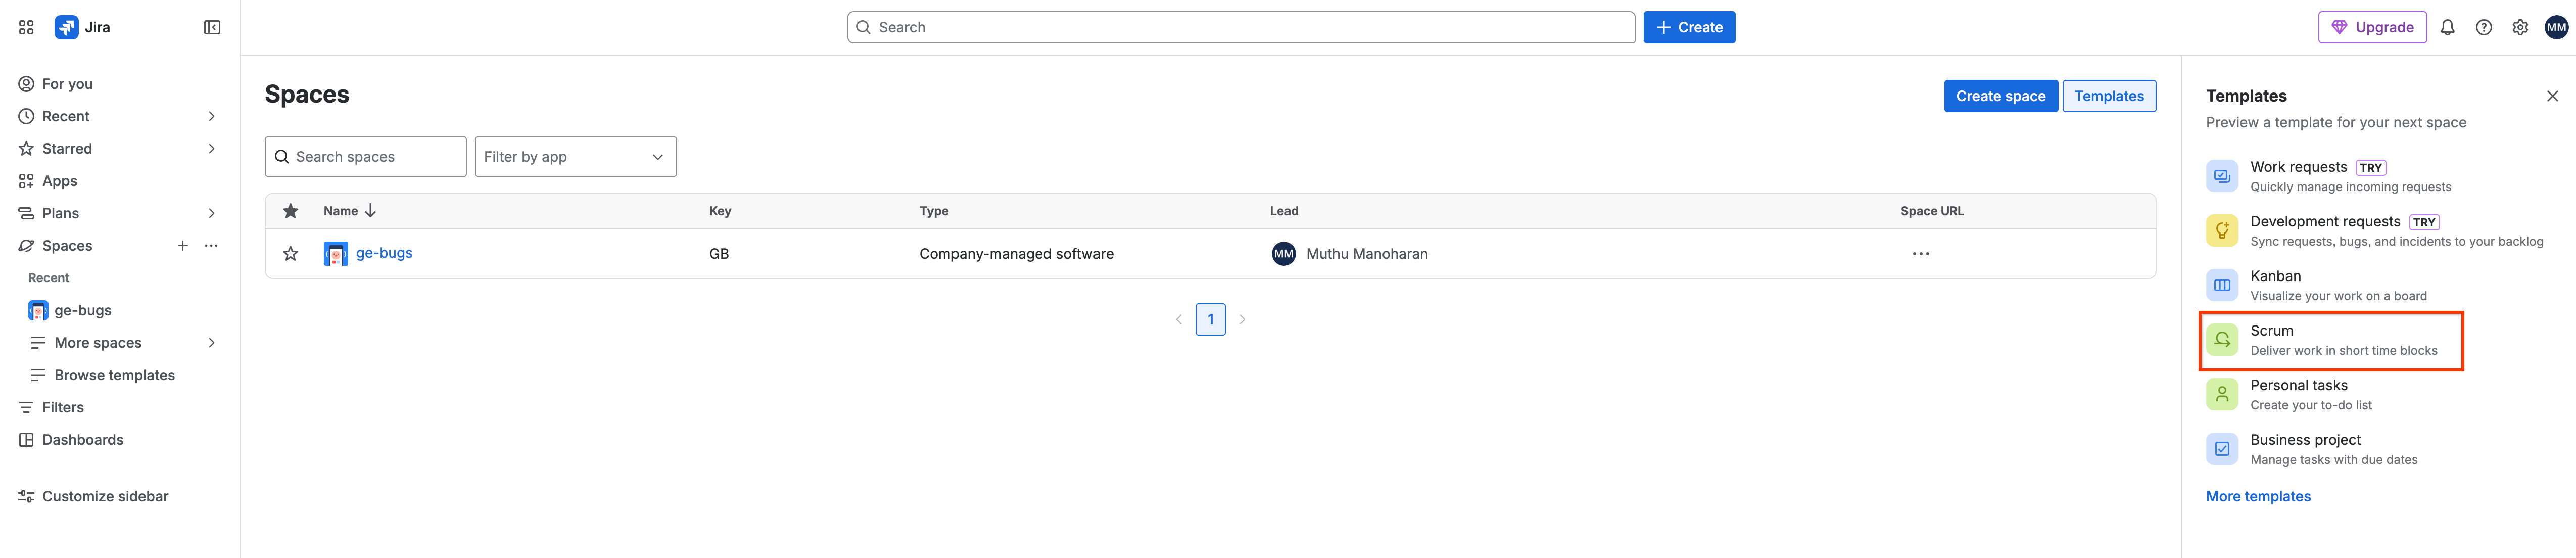
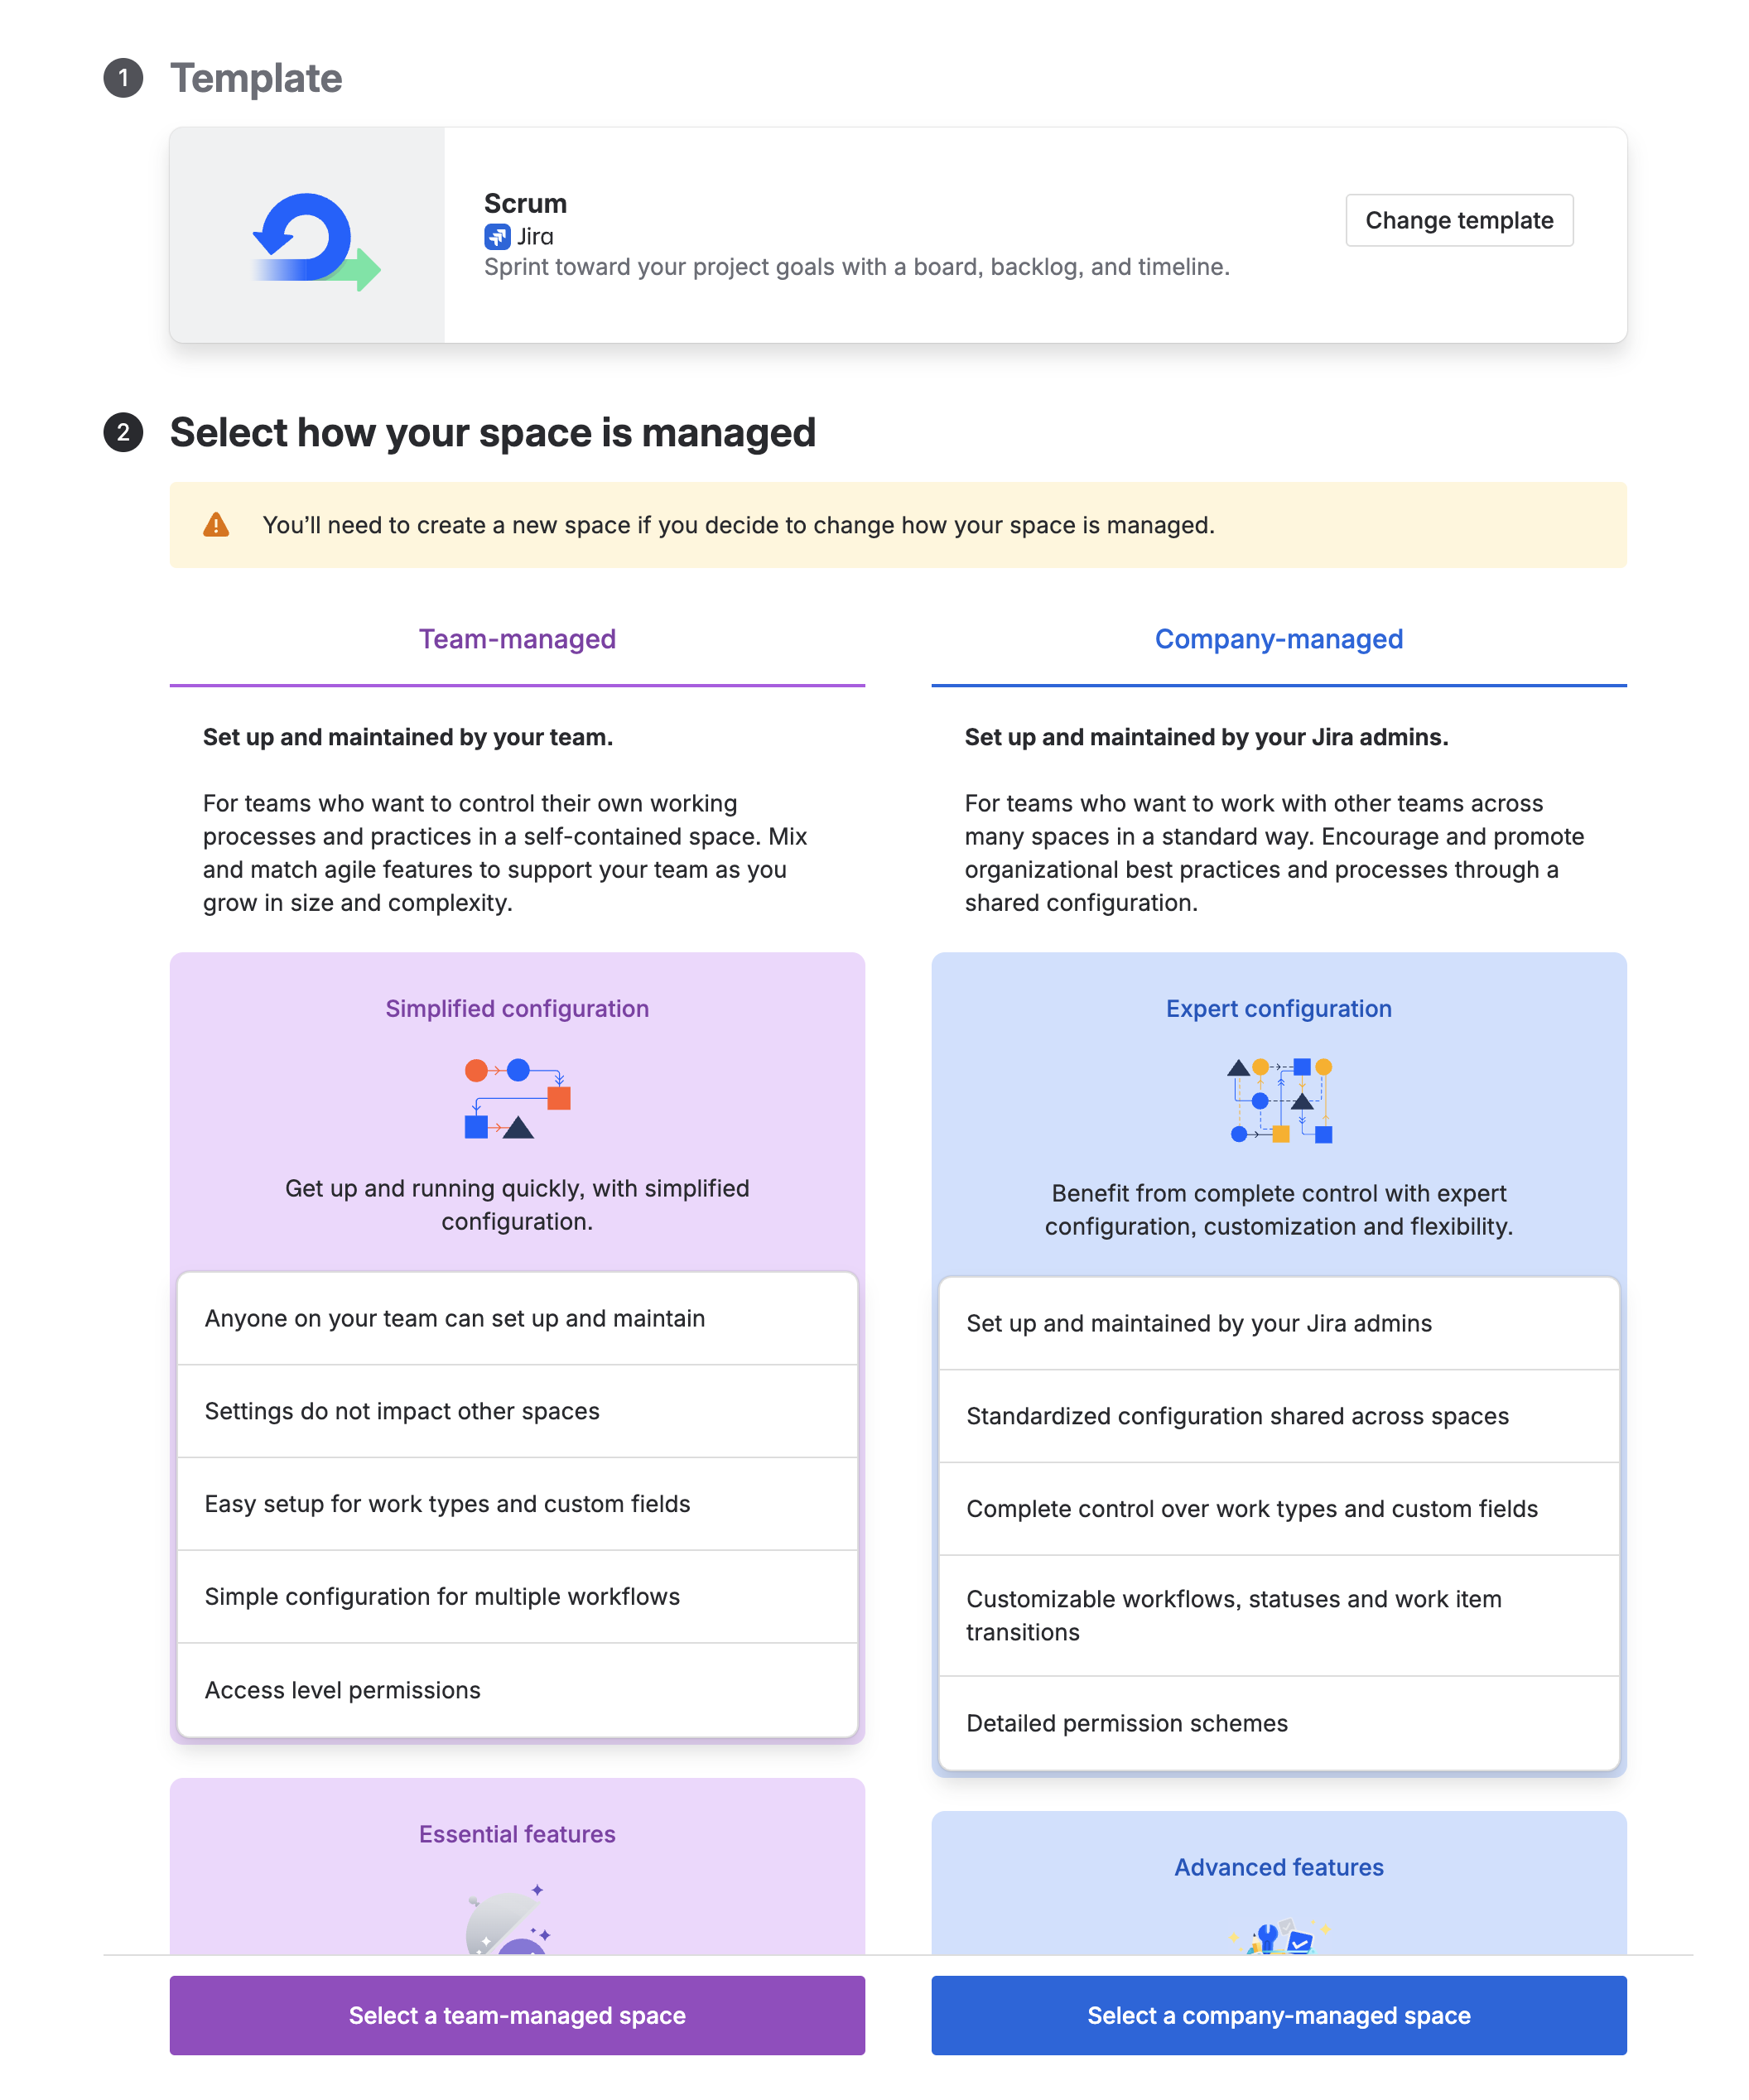
- Enter Project Details: Set the project properties:
- Name:
Bumble Lab Project - Key: Go with the auto-populated key (typically
BLP, though it may differ in your environment). Let's assume it isBLPfor the rest of this lab. Avoid hard-coding a custom key such asBMB_LAB, which throws a validation error; accepting the auto-populated key avoids namespace and validation conflicts in multi-tenant developer environments.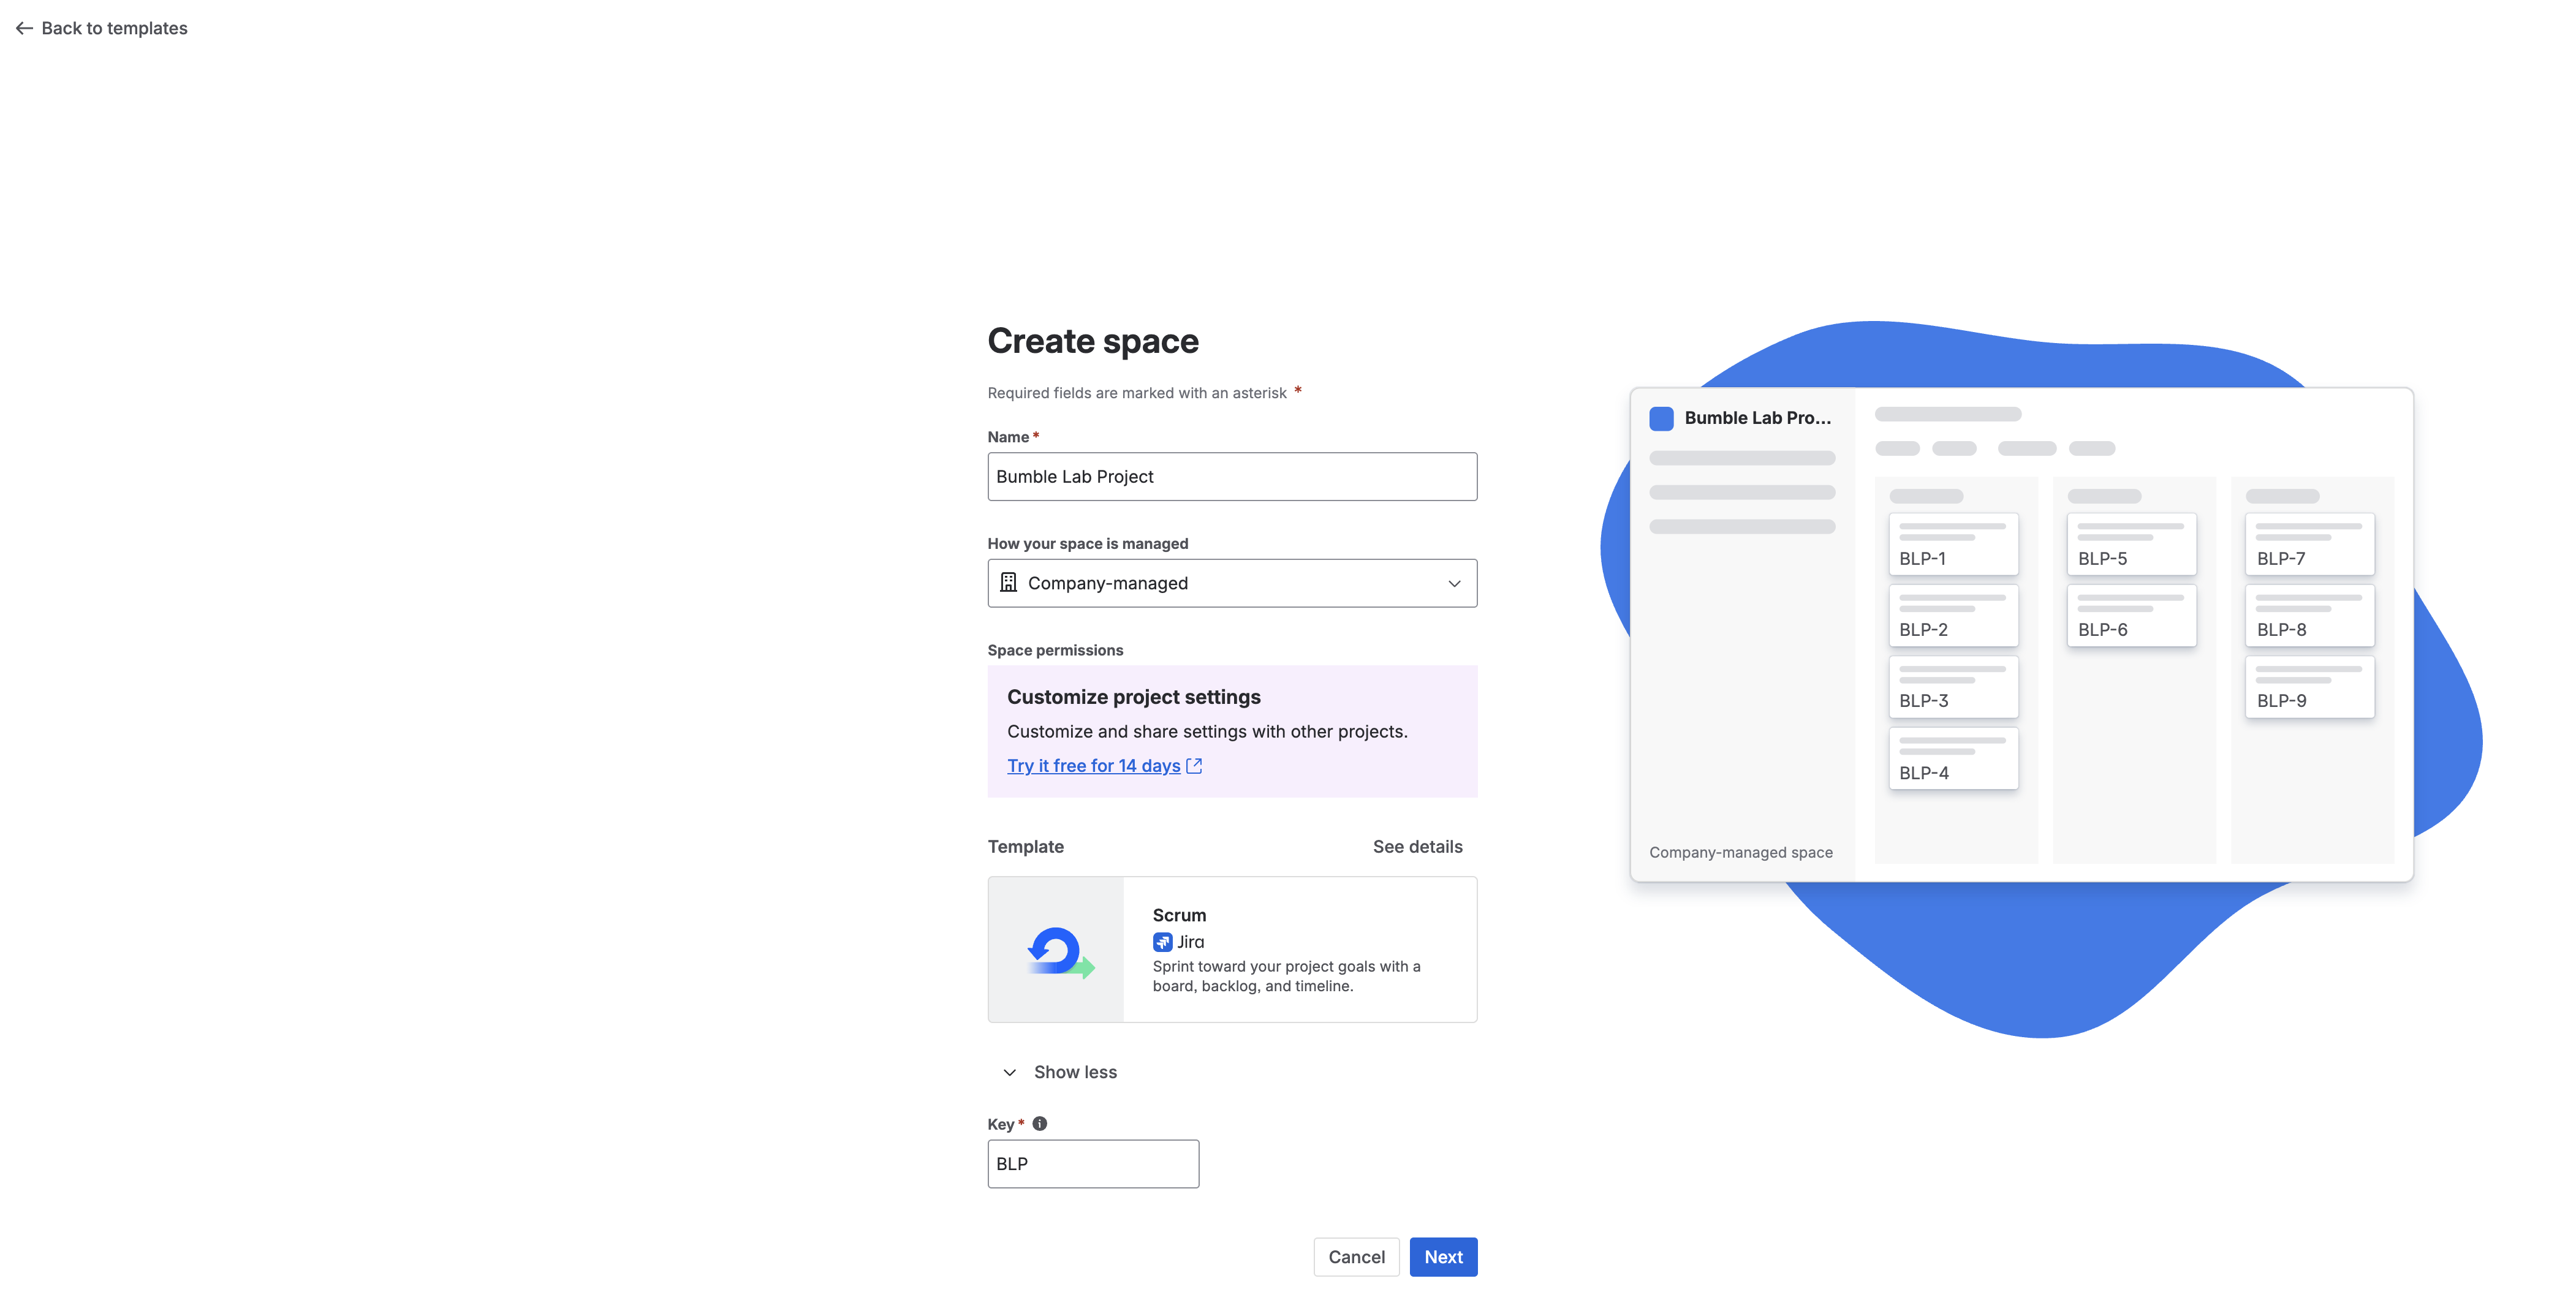
- Name:
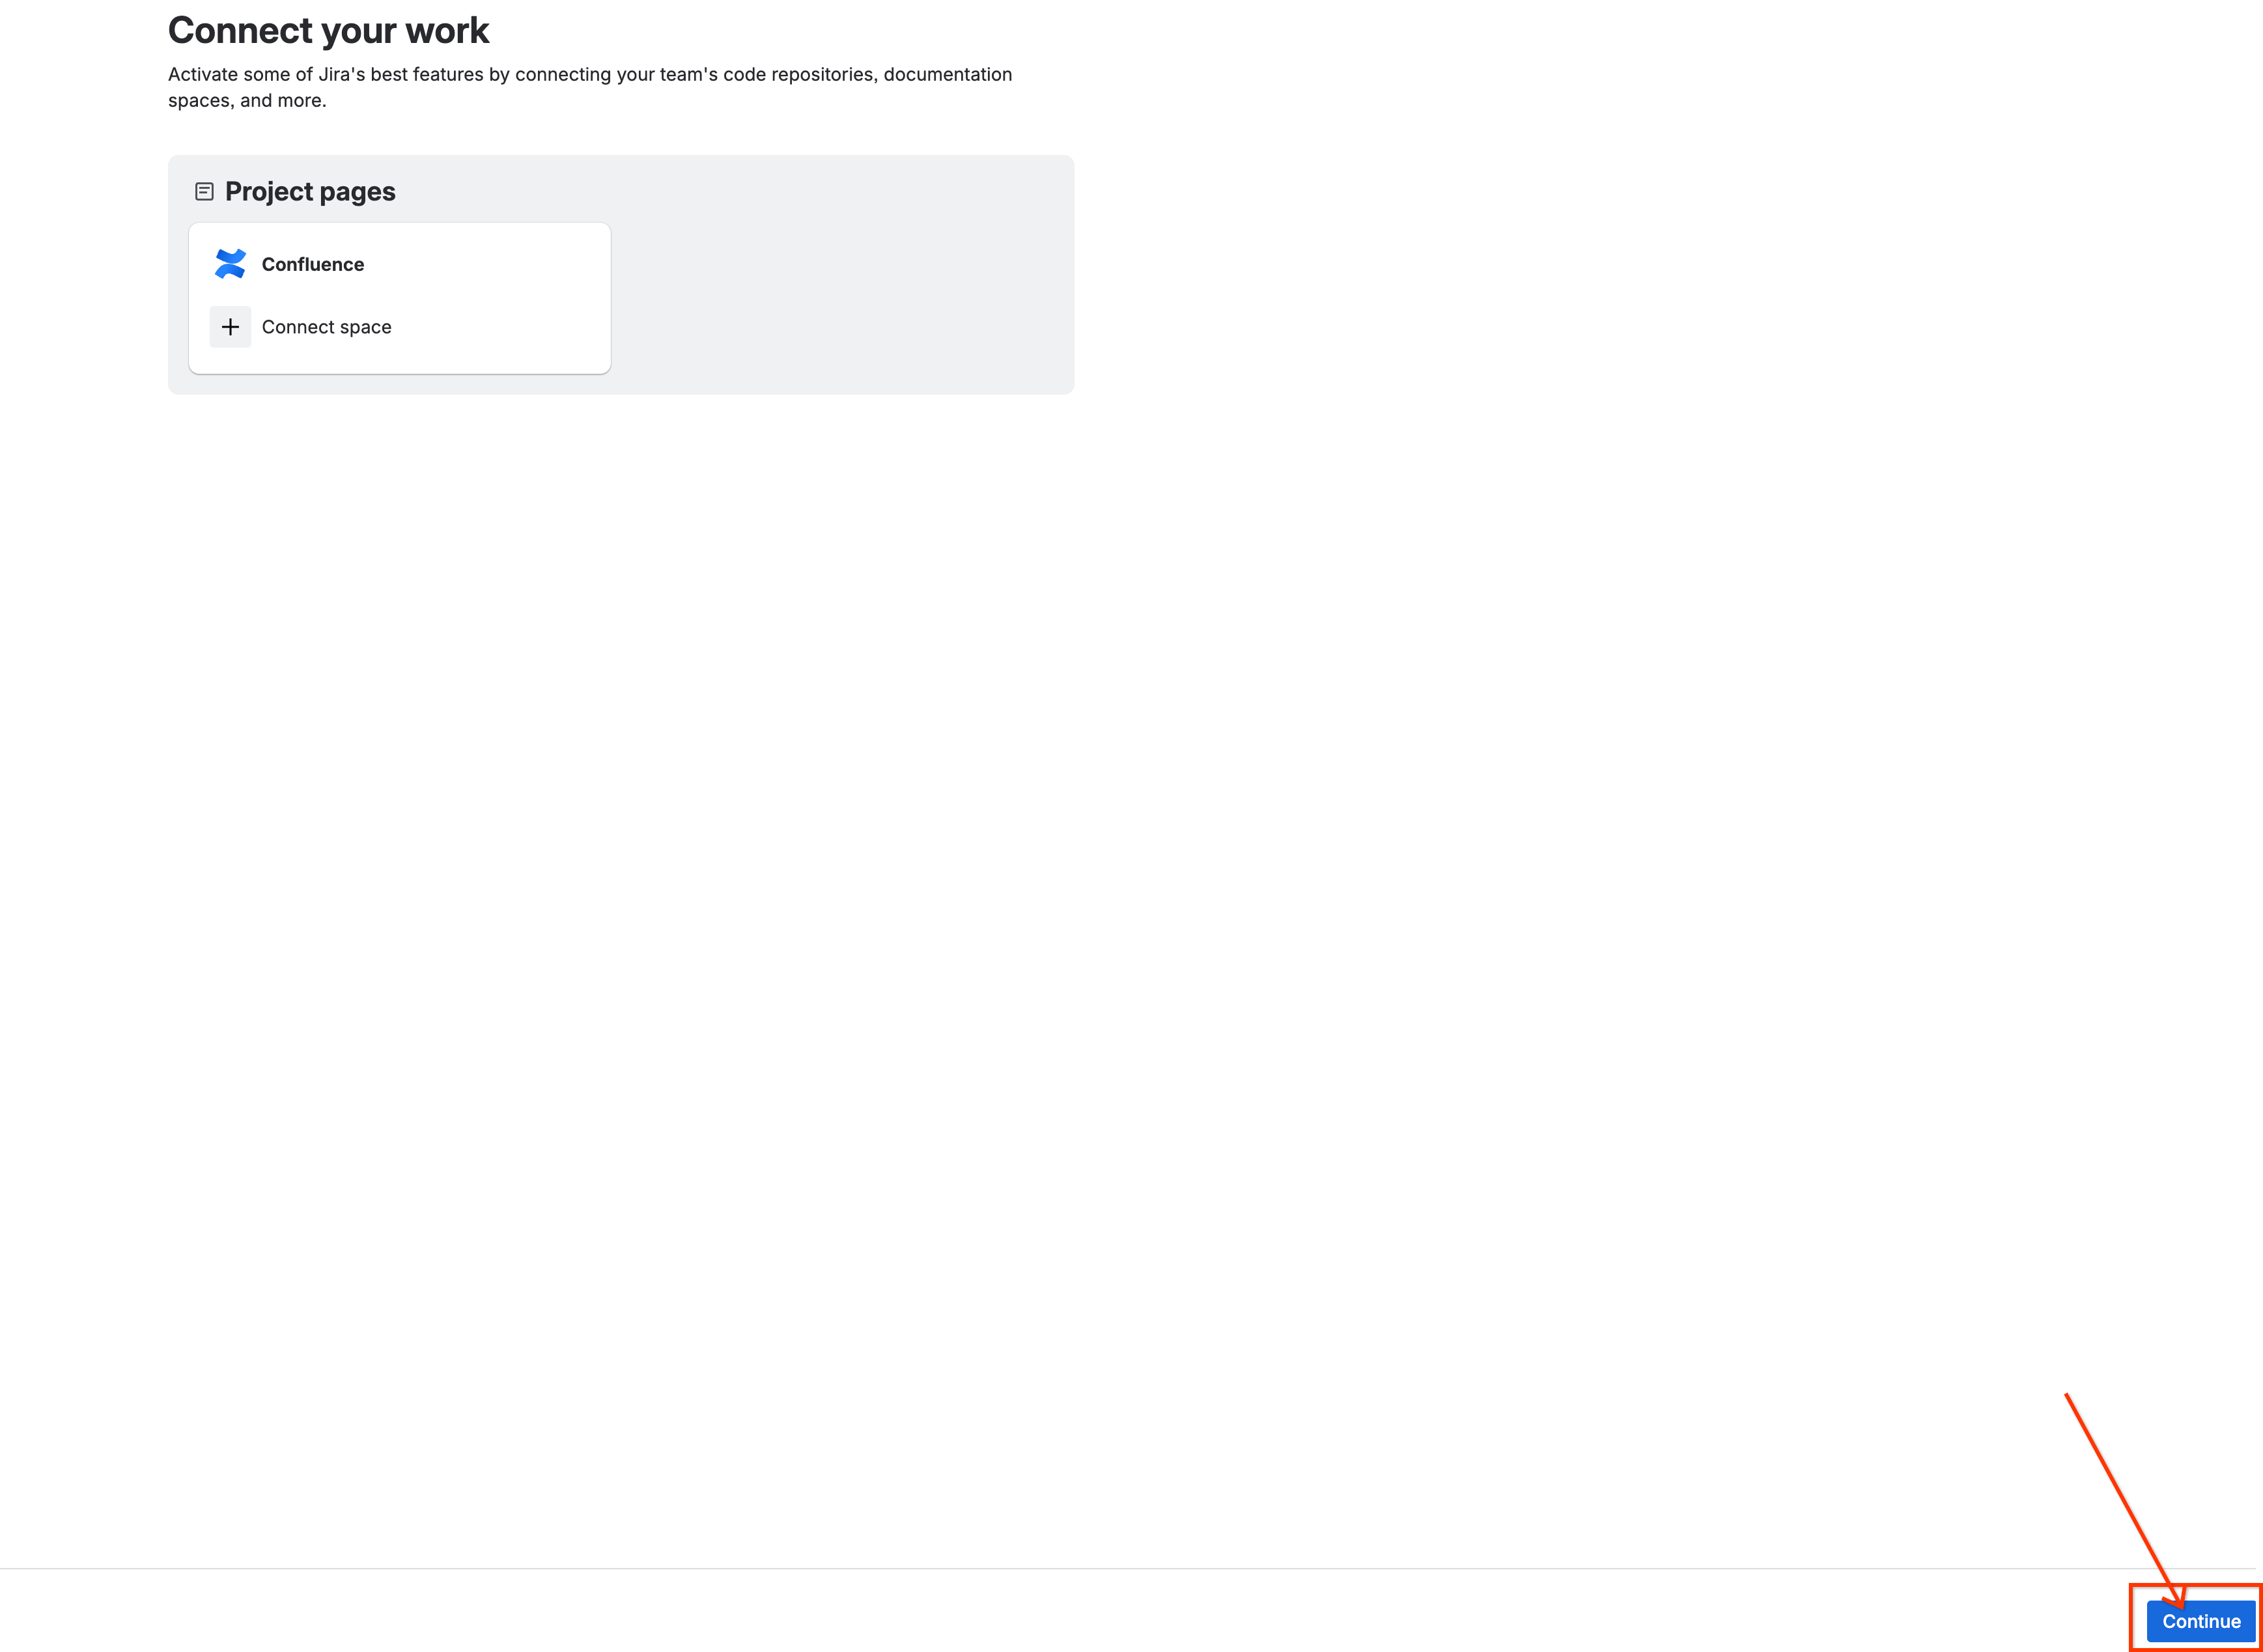
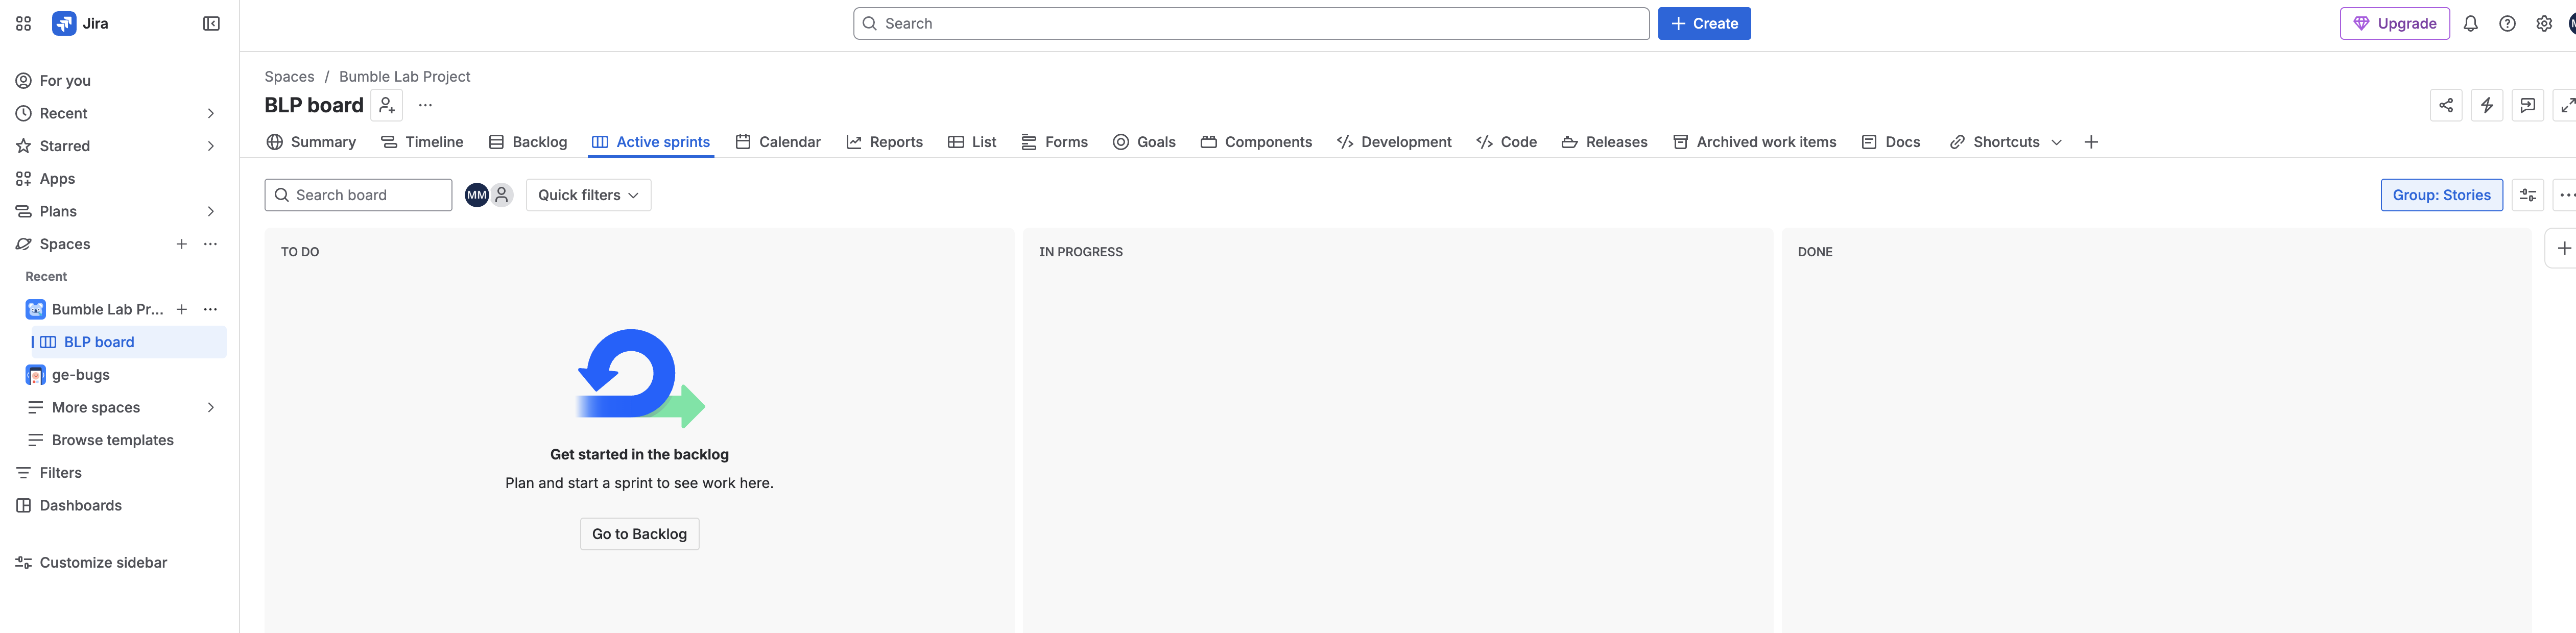
- Initialize Sandbox: There is no Create project button at this point — click Next. If you are then offered to connect a Confluence space immediately, click Continue / Skip and take care of the space creation independently in the next phase.
- Seed Baseline Issues:
- On the left-side navigation panel of your new
BLPboard, select Backlog.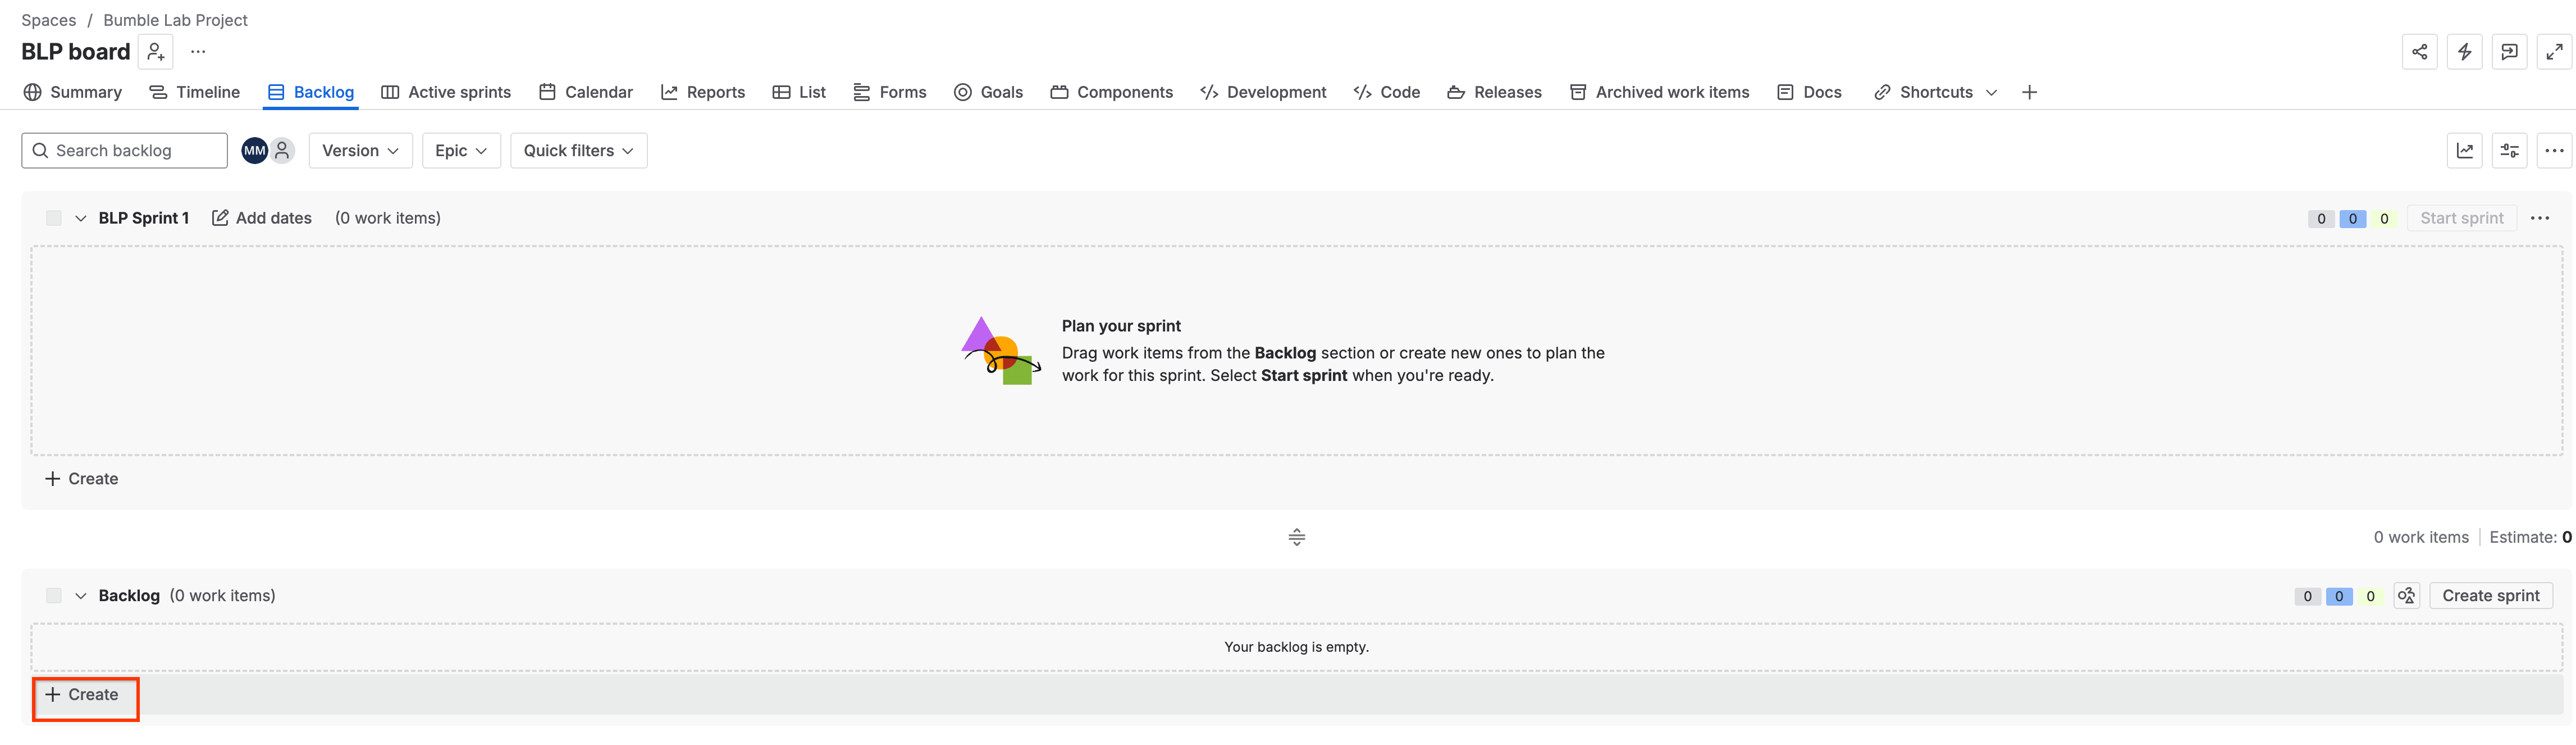
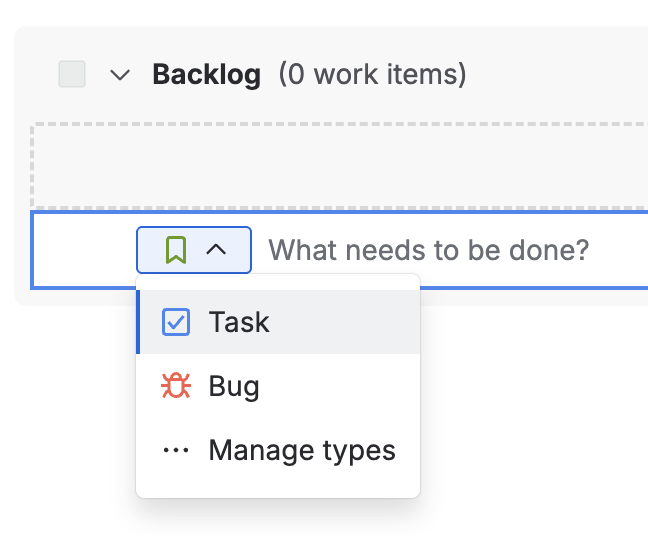
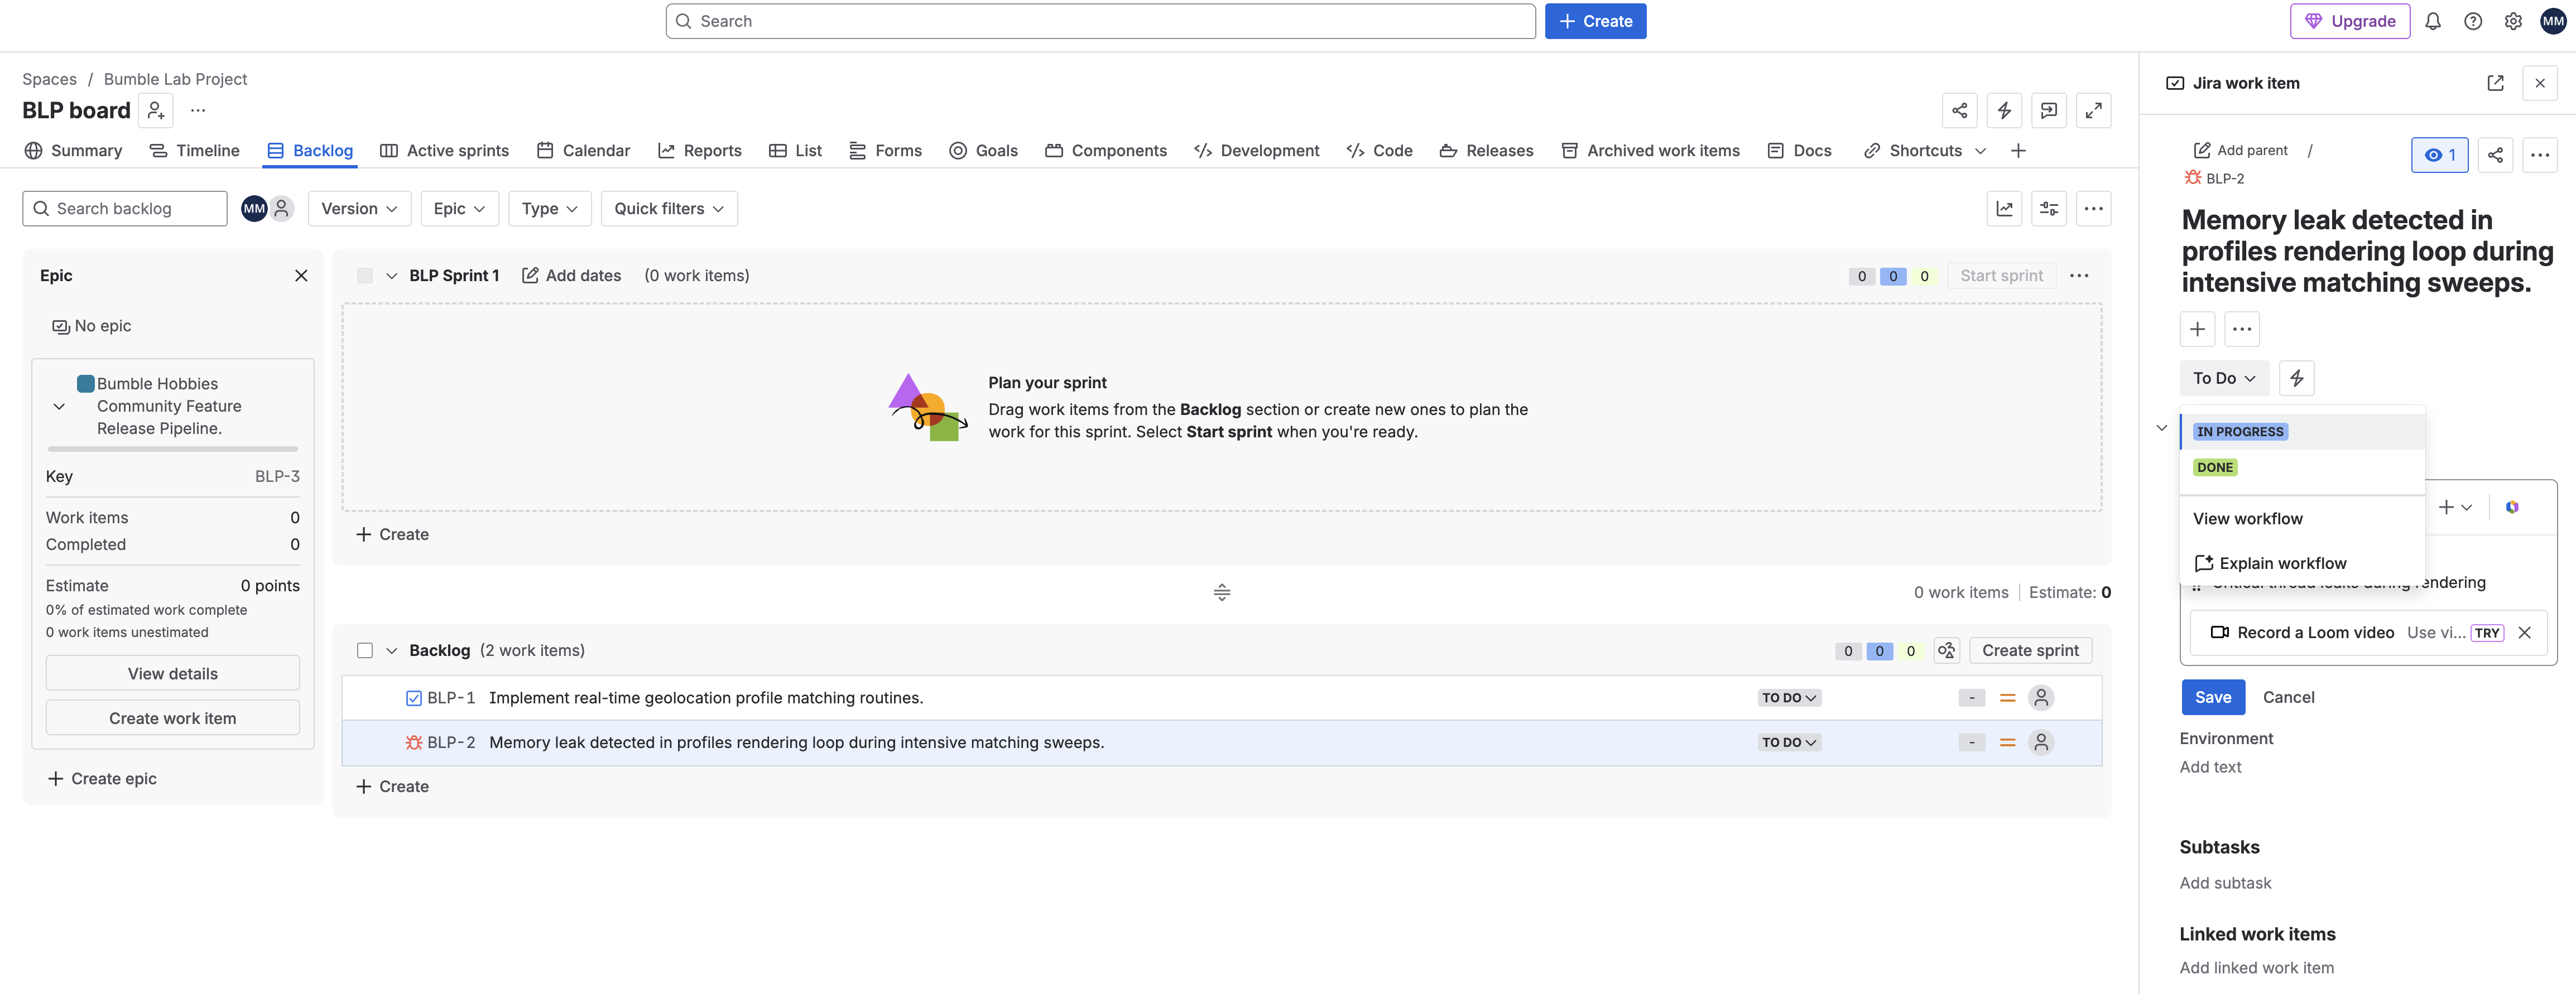
- Click the + Create button under the Backlog panel to add the Task and the Bug from the table below. After creating each one, click the ticket to open it and set the exact description, priority, and status.
- On the left-side navigation panel of your new
Issue Type | Summary | Priority | Initial Status | Description |
Task |
| Medium |
| Base routines for location metrics |
Bug |
| High (P1) |
| Critical thread leaks during rendering |
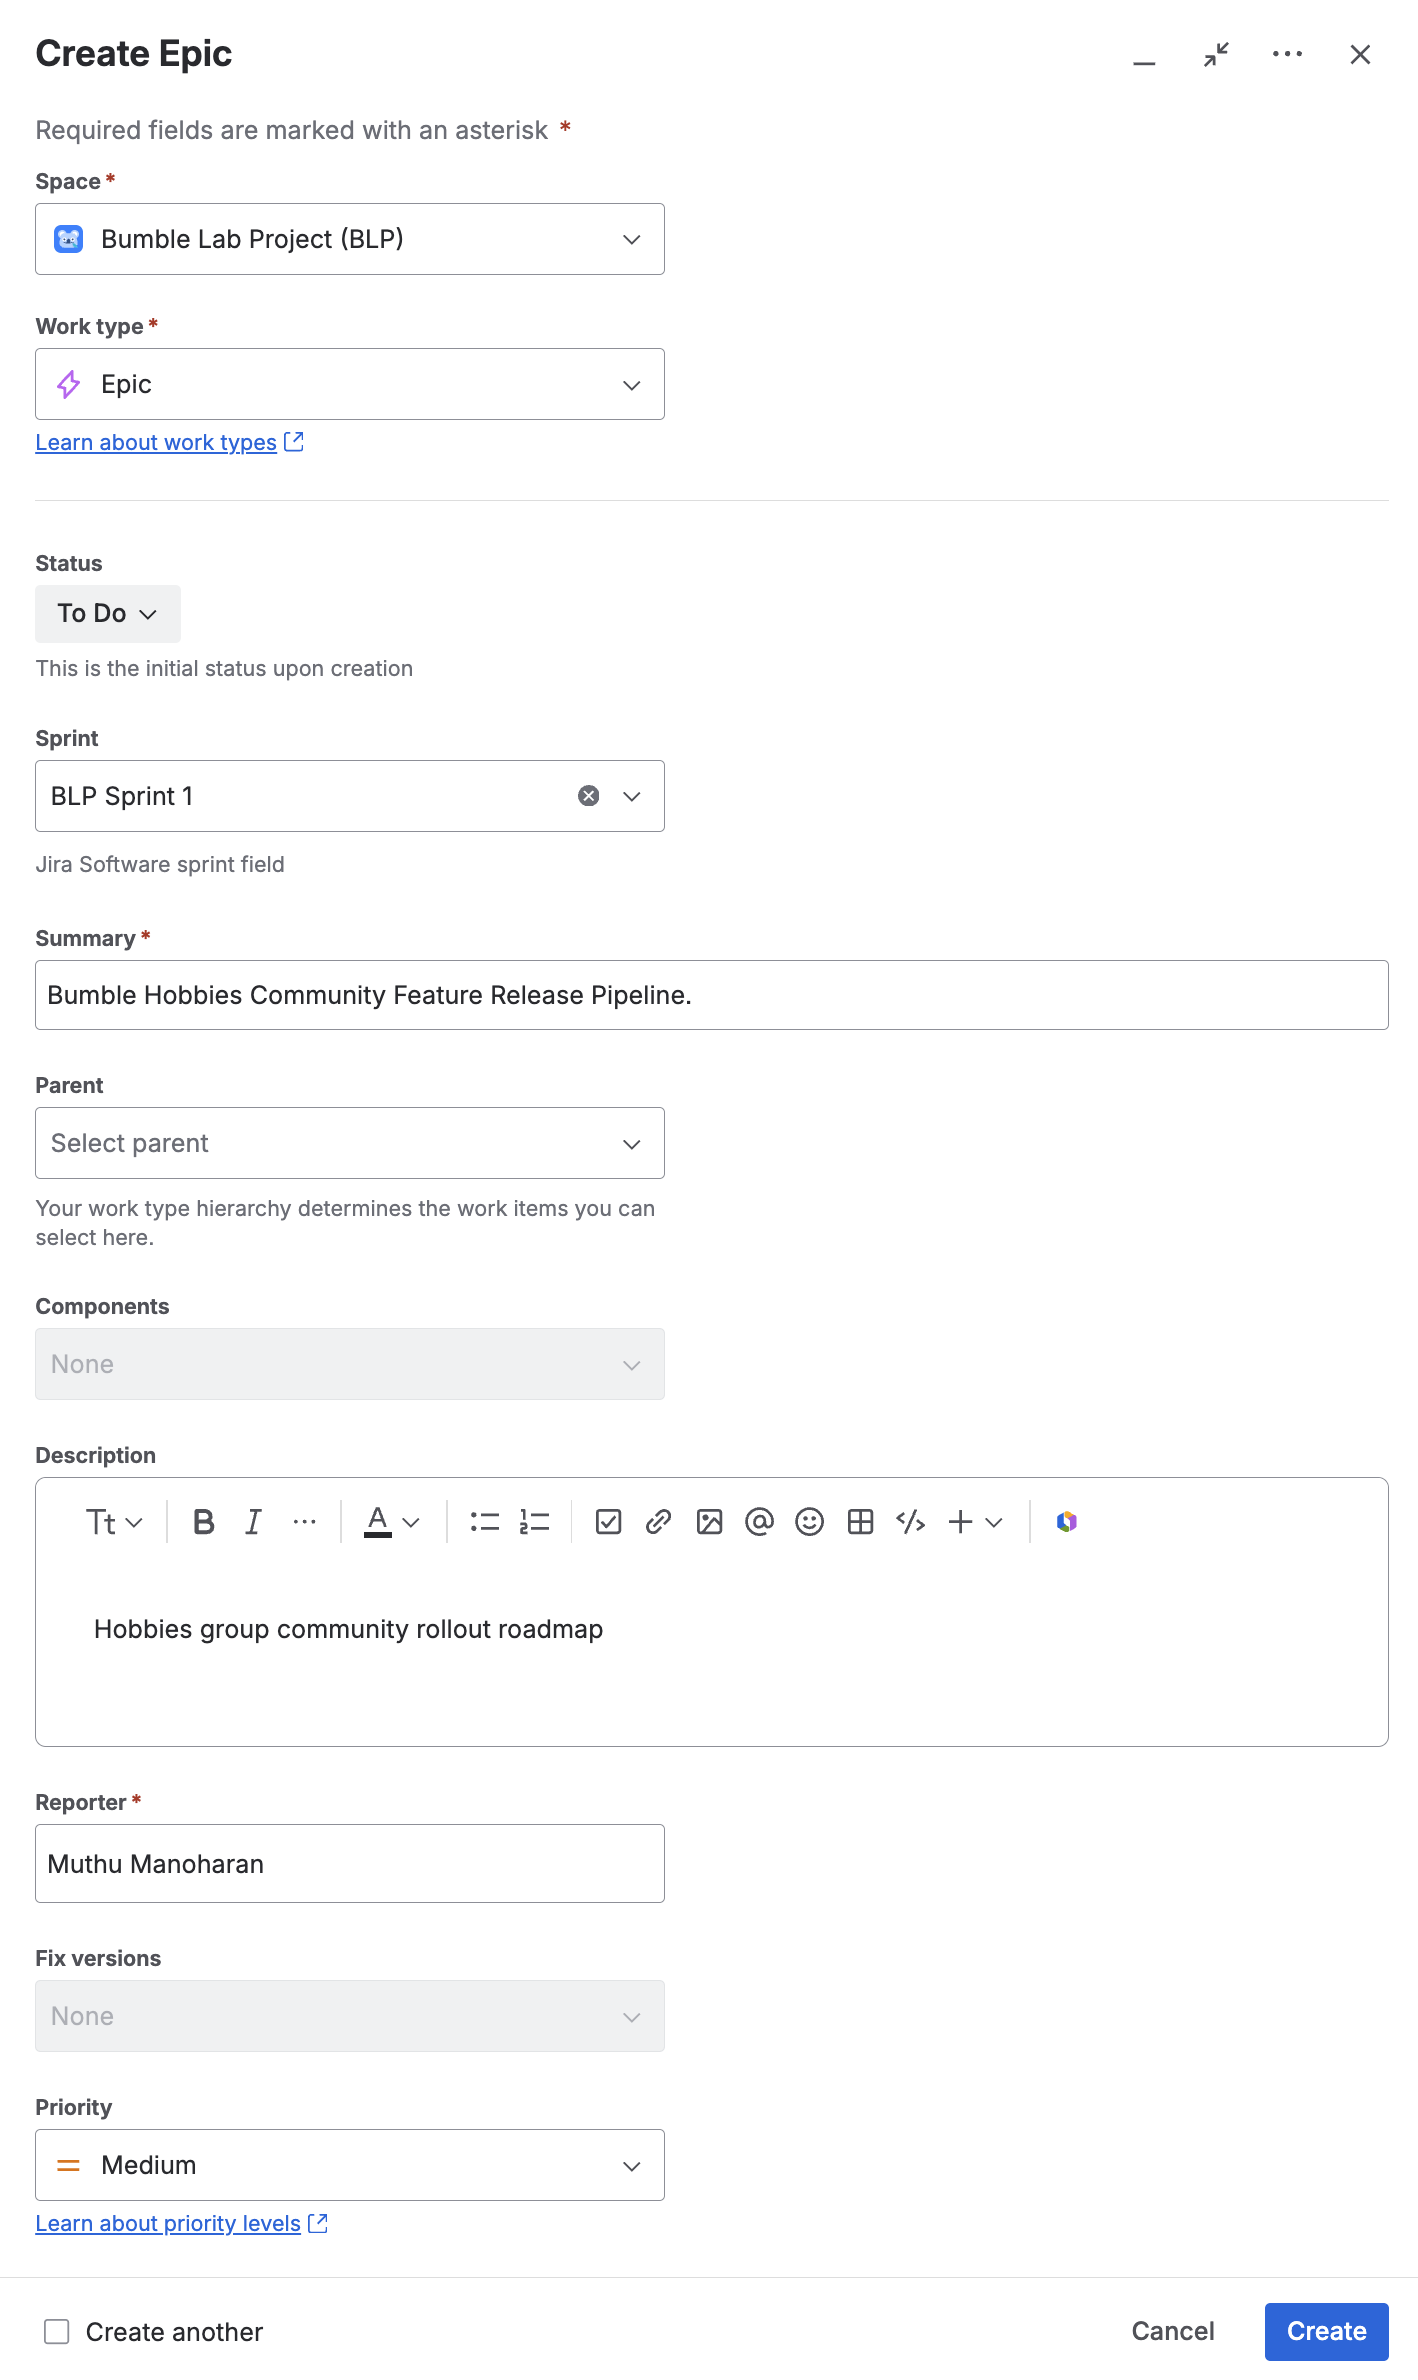
Epic |
| Medium |
| Hobbies group community rollout roadmap |


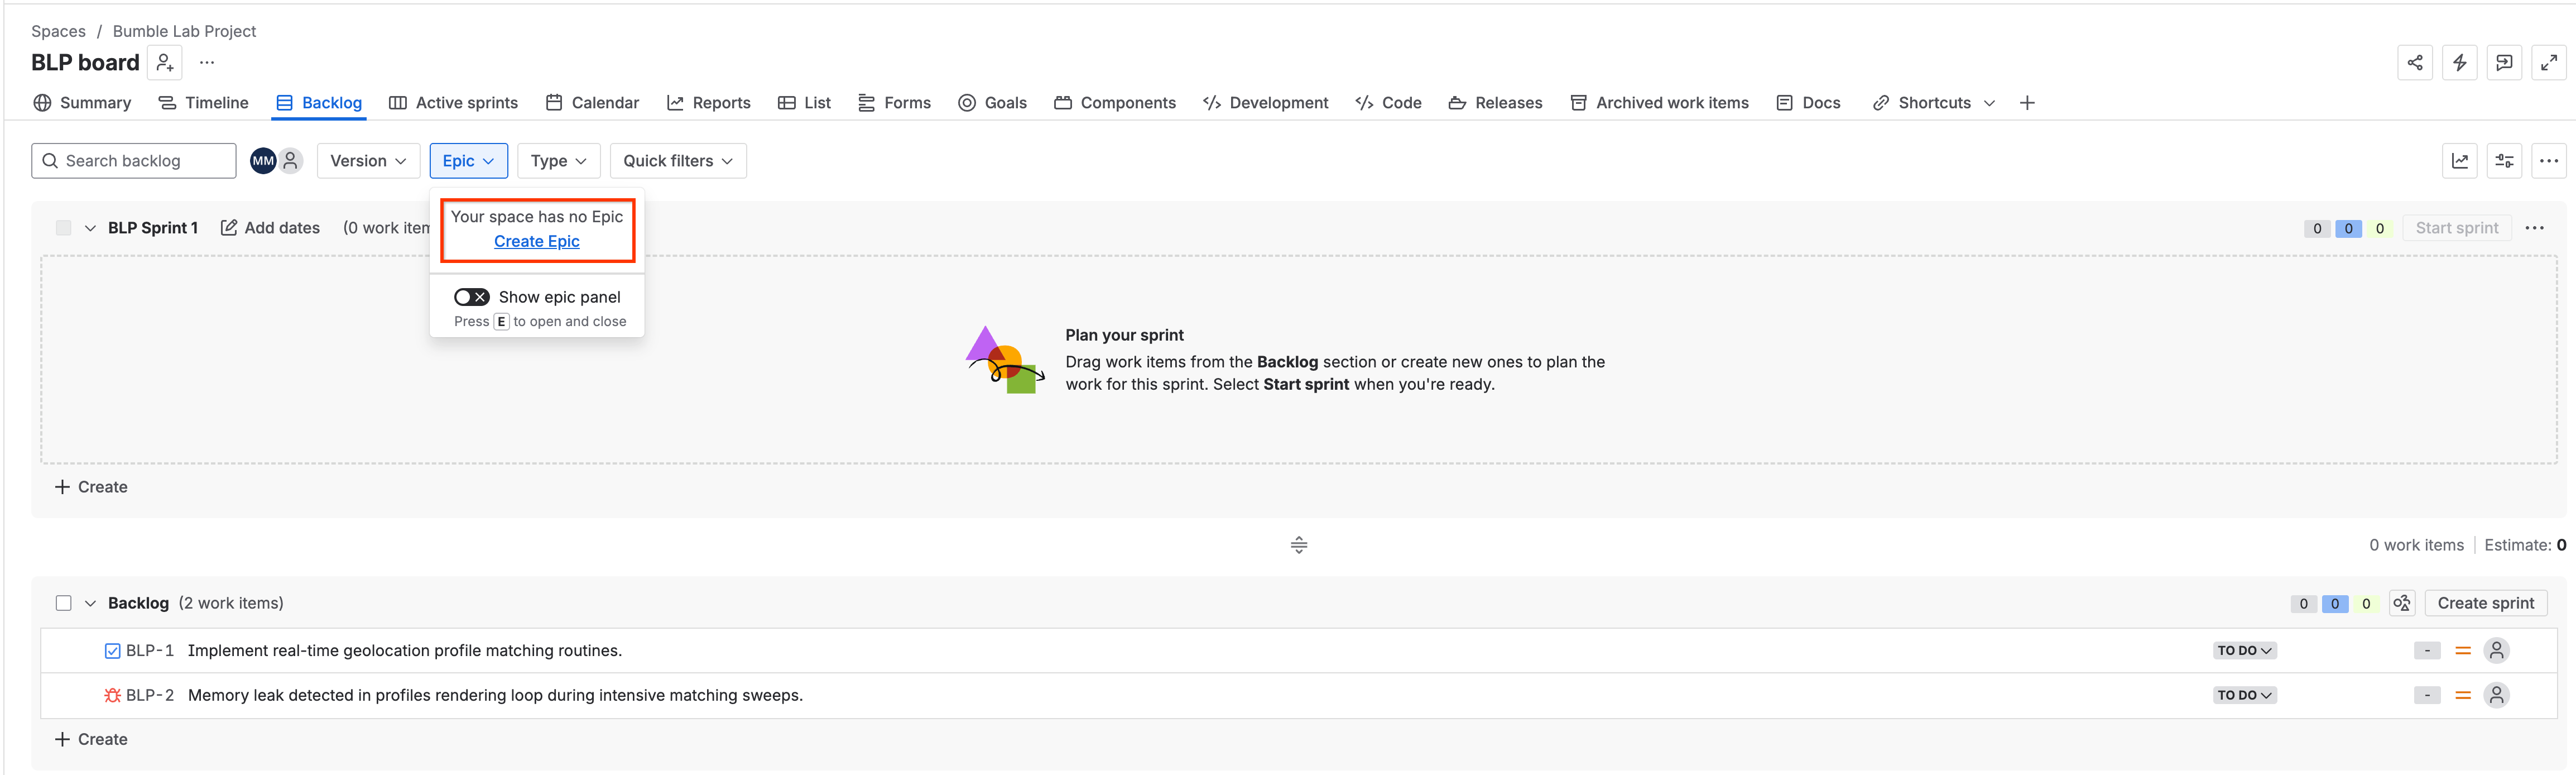
- The Epic is created through a separate flow. Use the issue-type selector to choose Epic, then open it to set its details, priority, and status as listed in the table.
2. Confluence Workspace Seeding
Establish an engineering space and create a blank page designated for dynamic documentation.
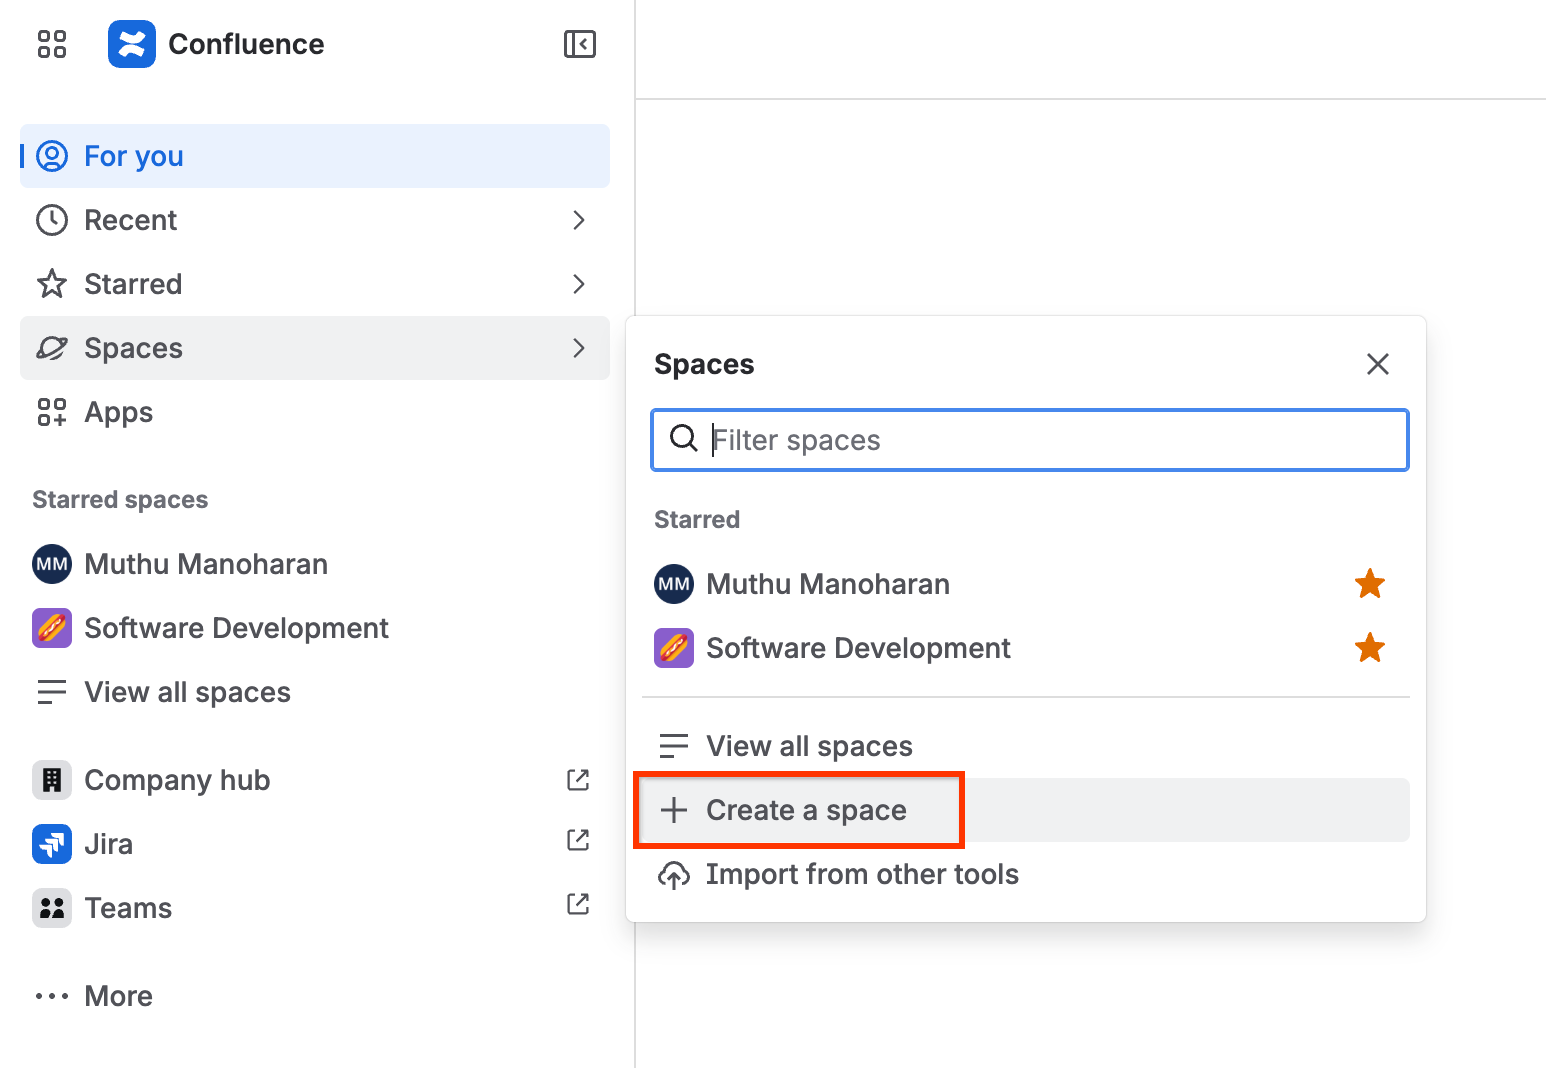
- Navigate to your Atlassian Confluence Cloud interface.
- Click Spaces in the top navigation menu and select Create space.
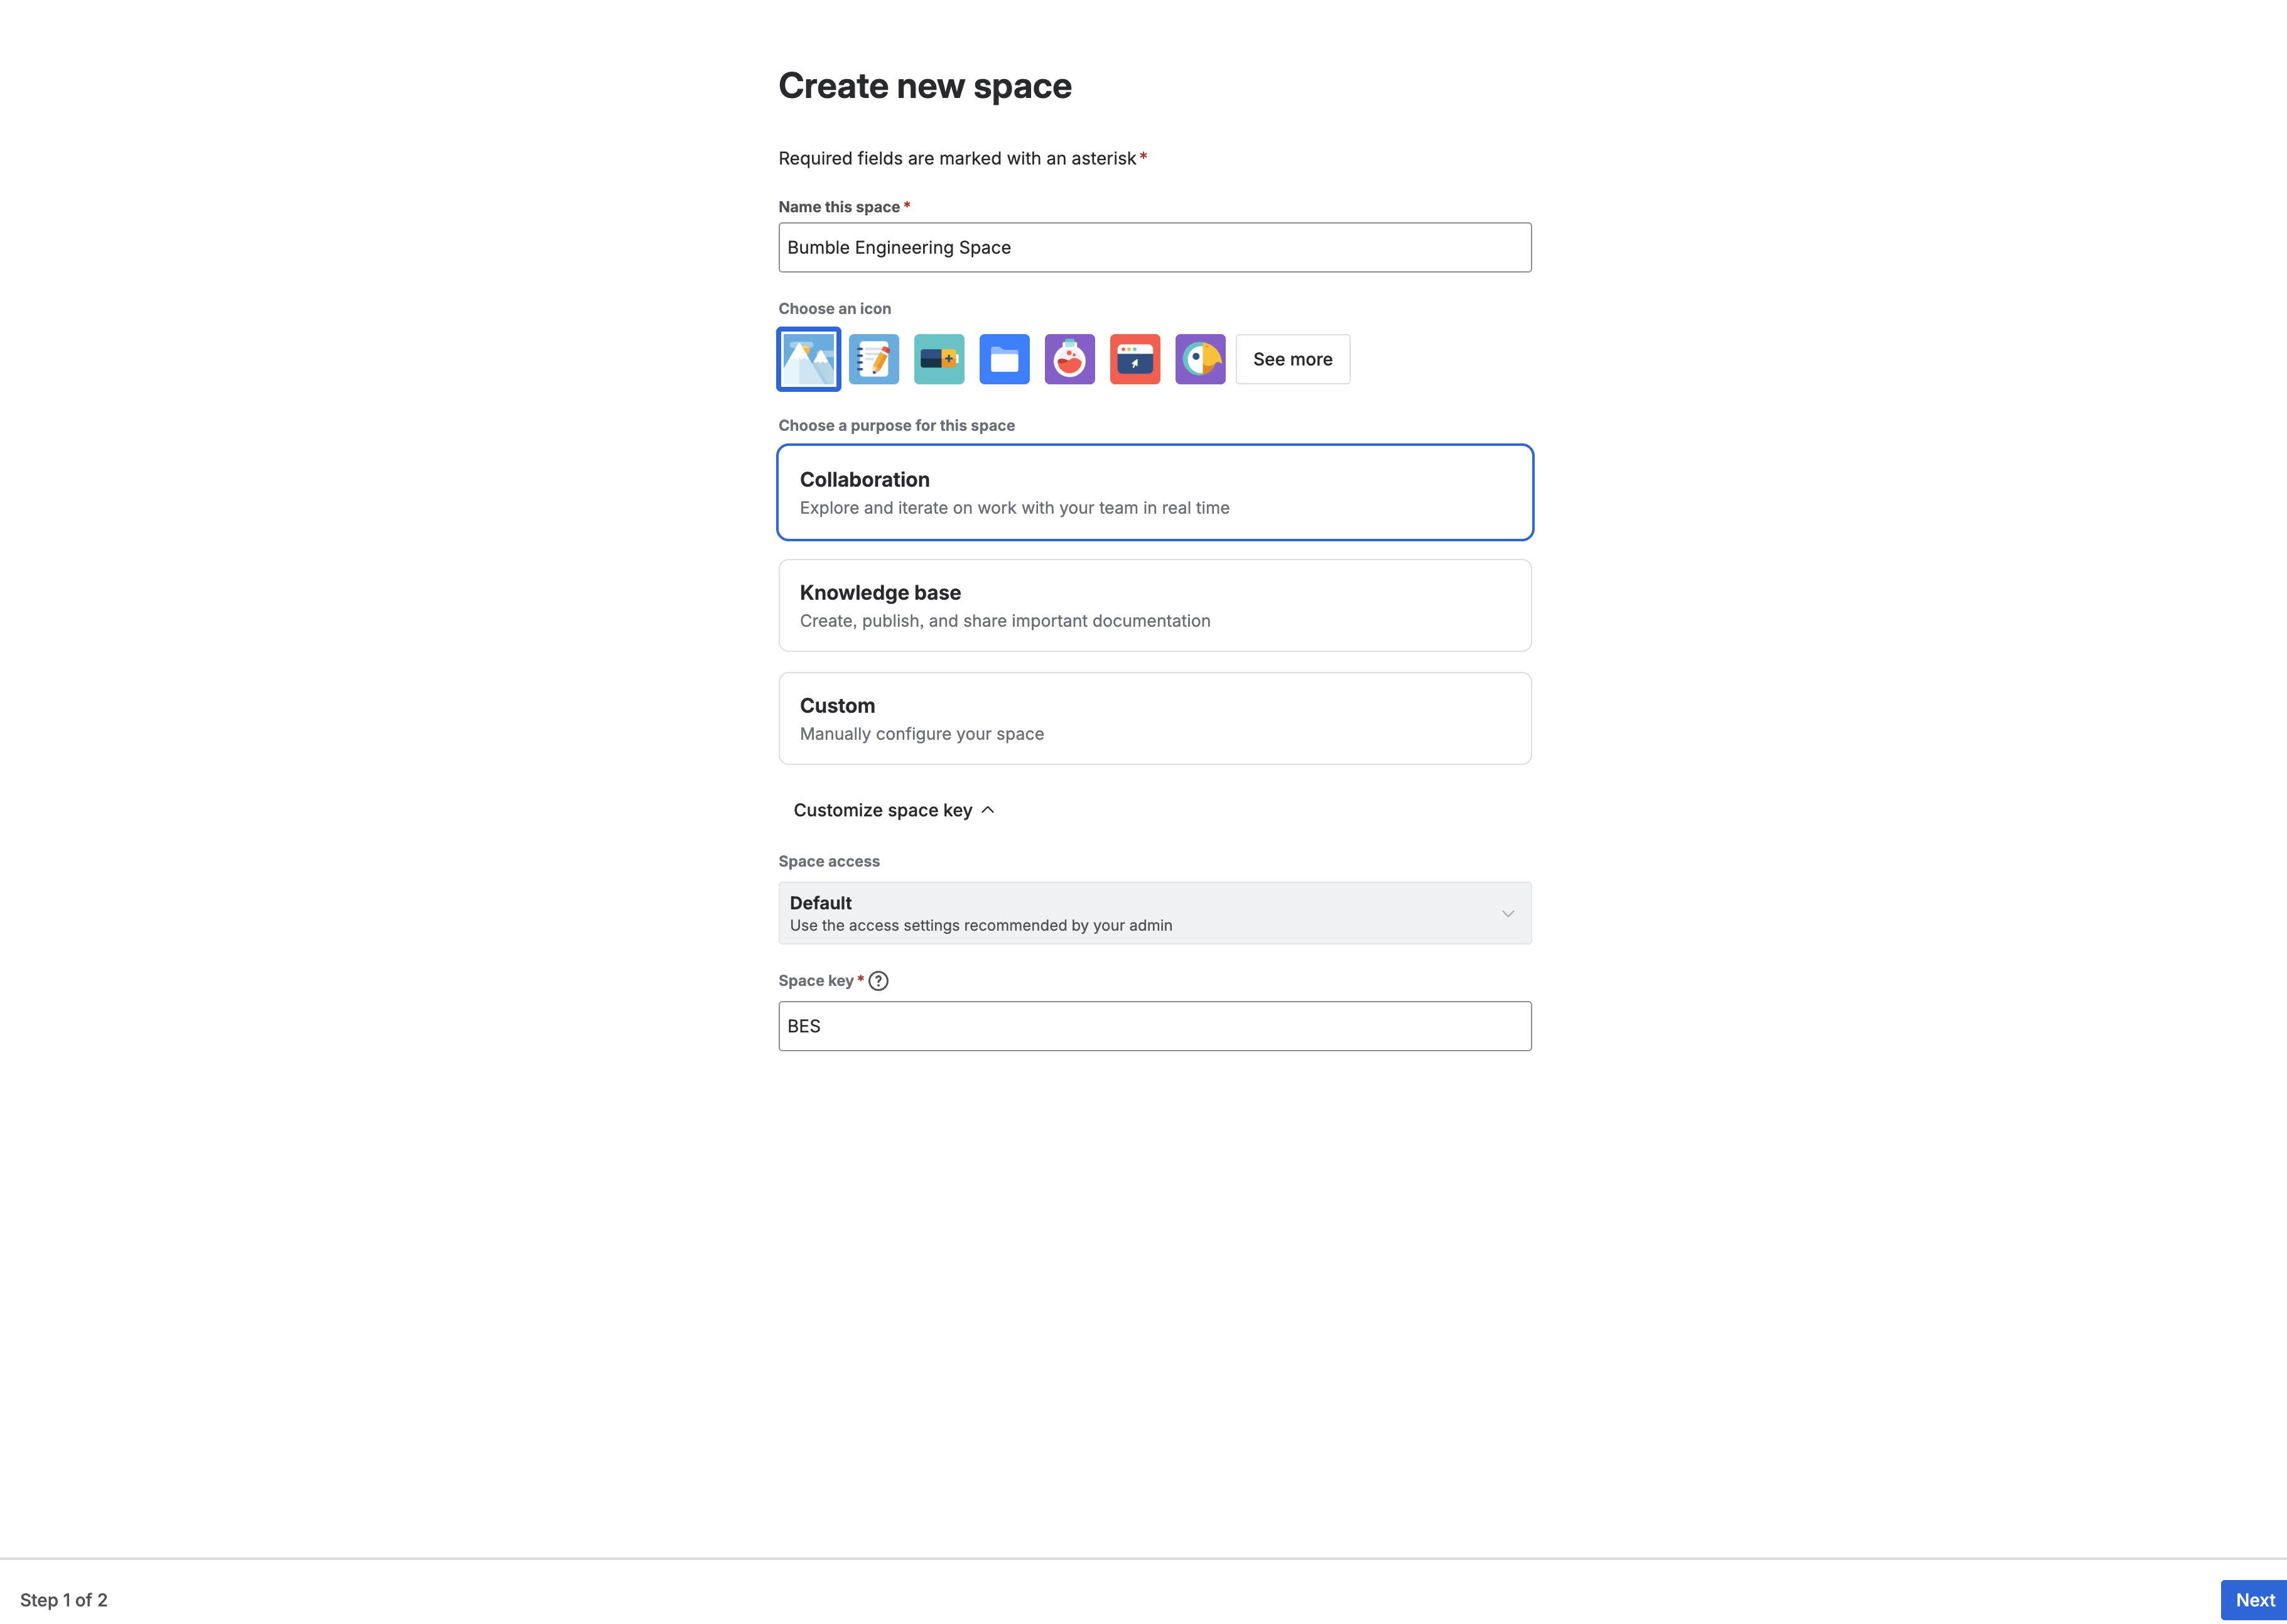
- Select Blank Space and configure:
- Space Name:
Bumble Engineering Space - Space Key: Go with the auto-populated key (typically
BMBENG, though it may differ in your environment). Let's assume it isBMBENGfor the rest of this lab.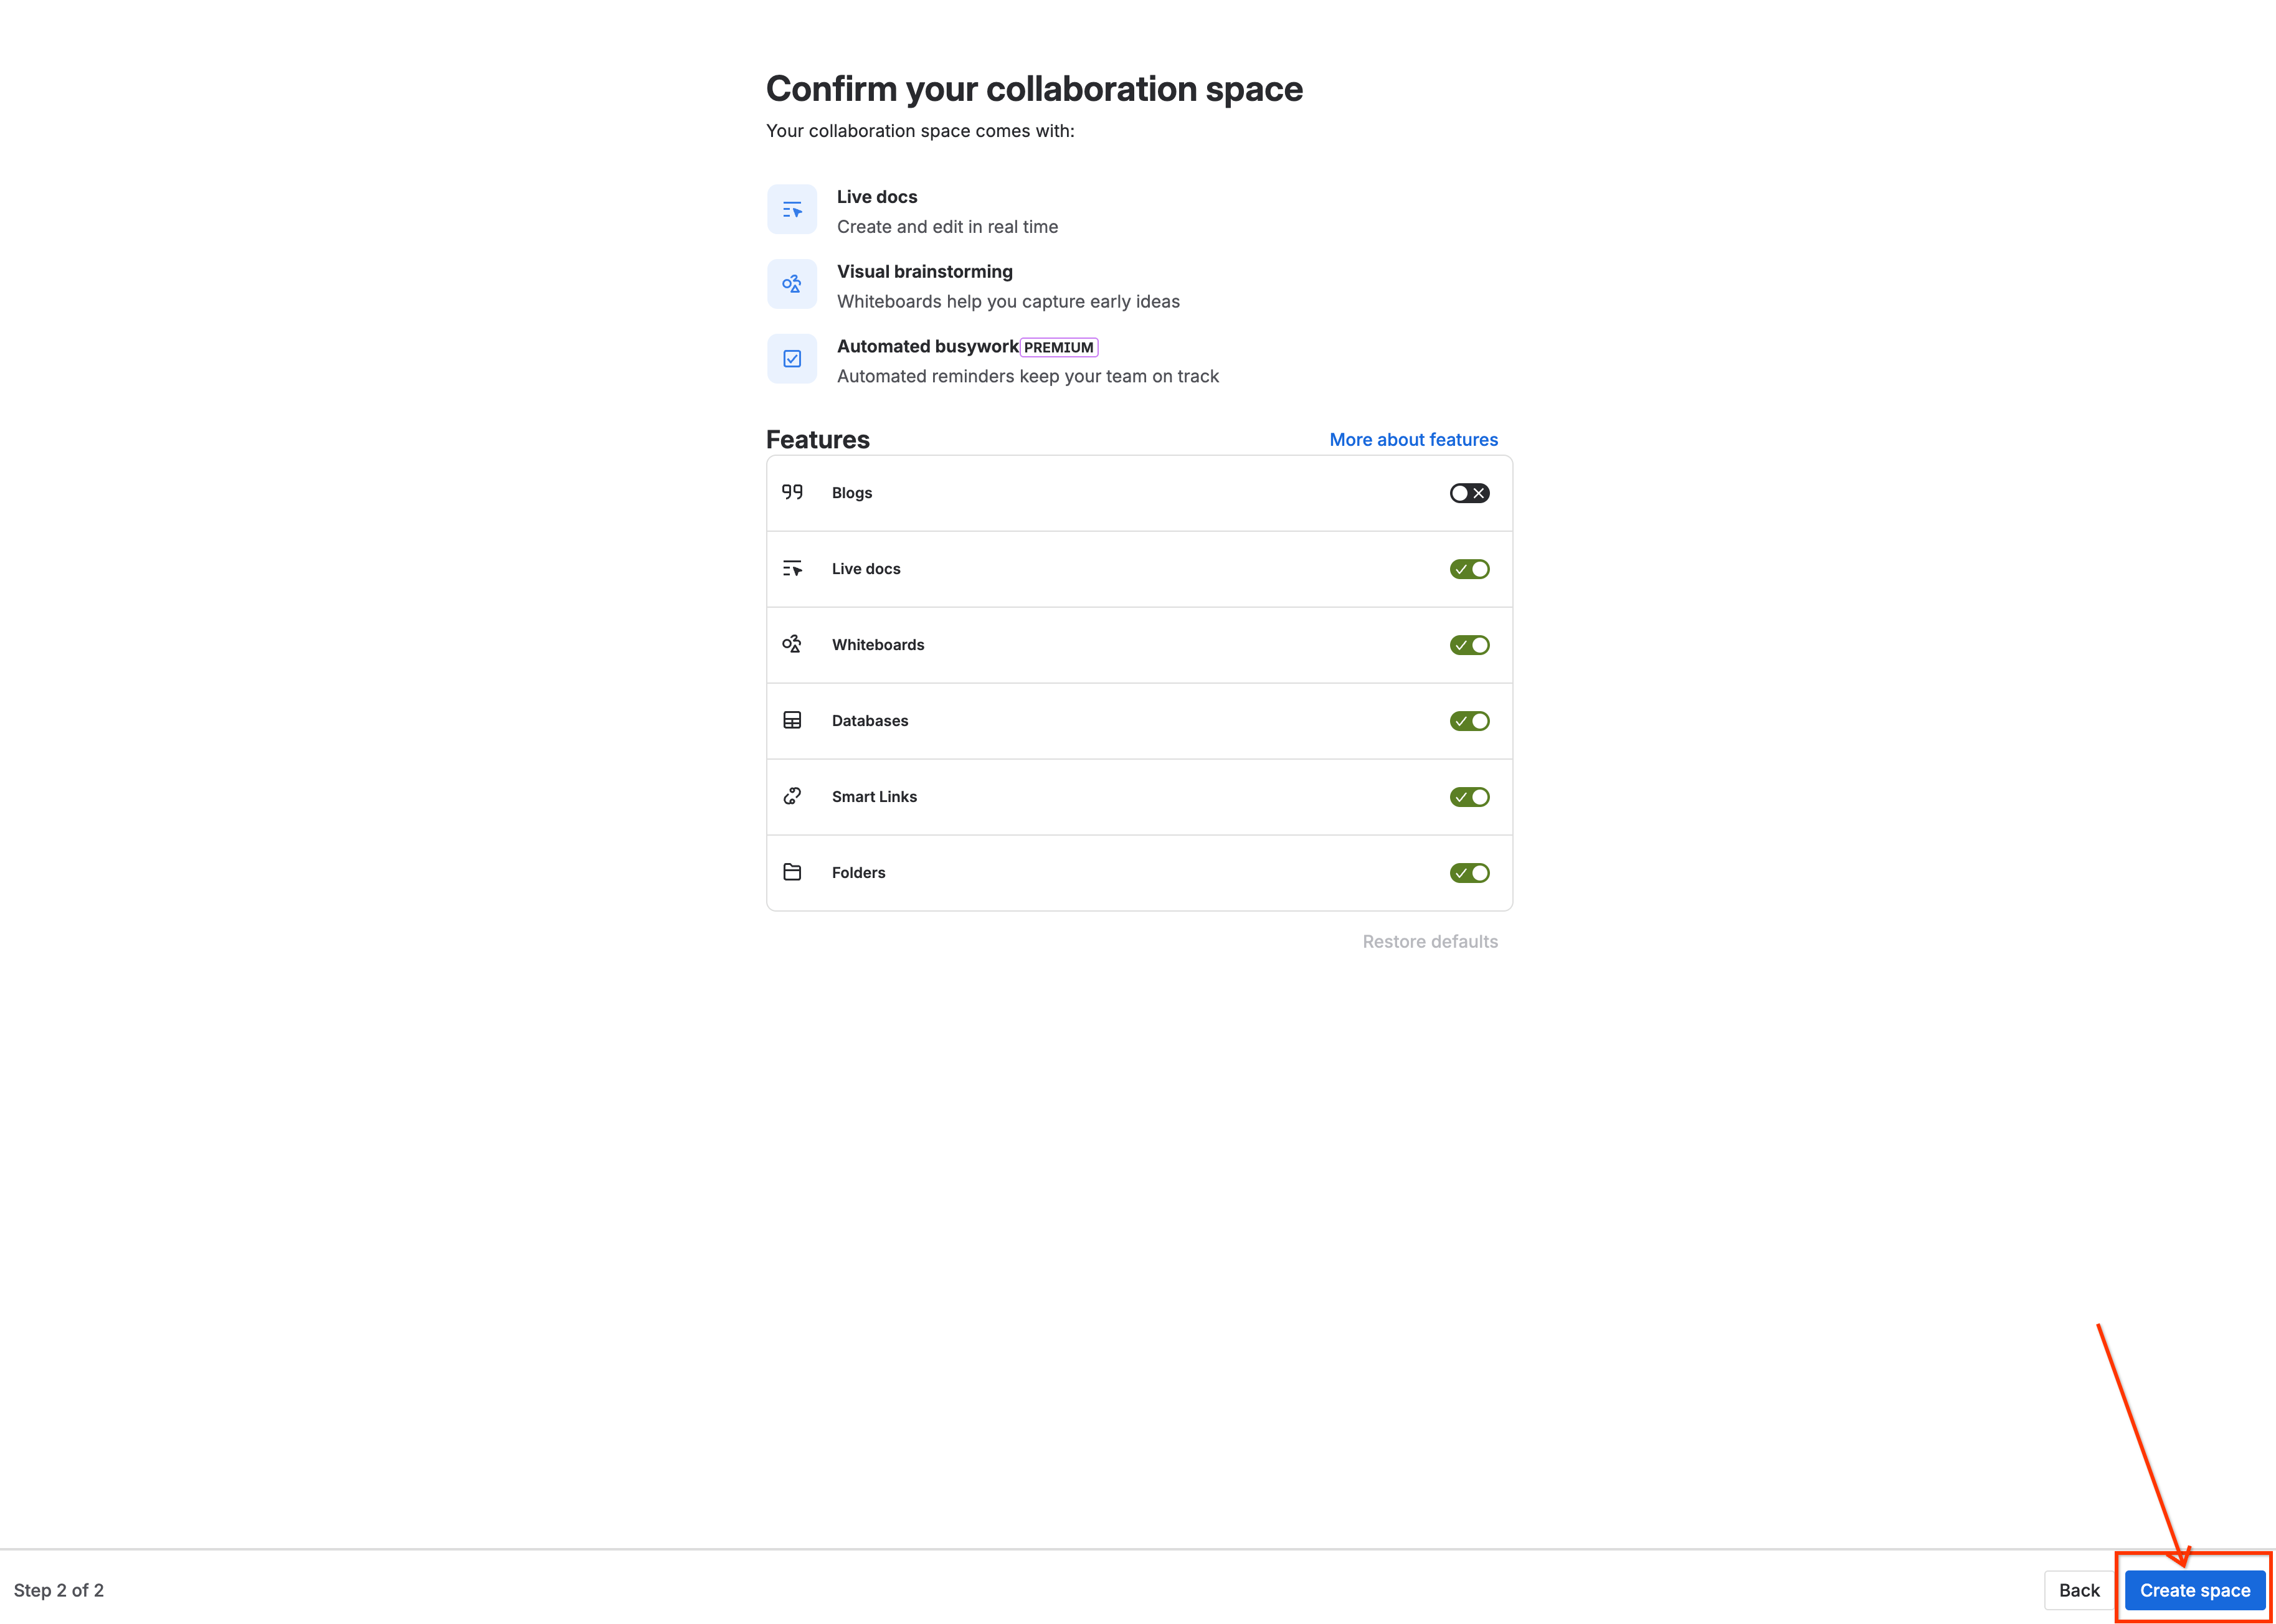
- Space Name:
- Click Create to open your blank Confluence home pane.
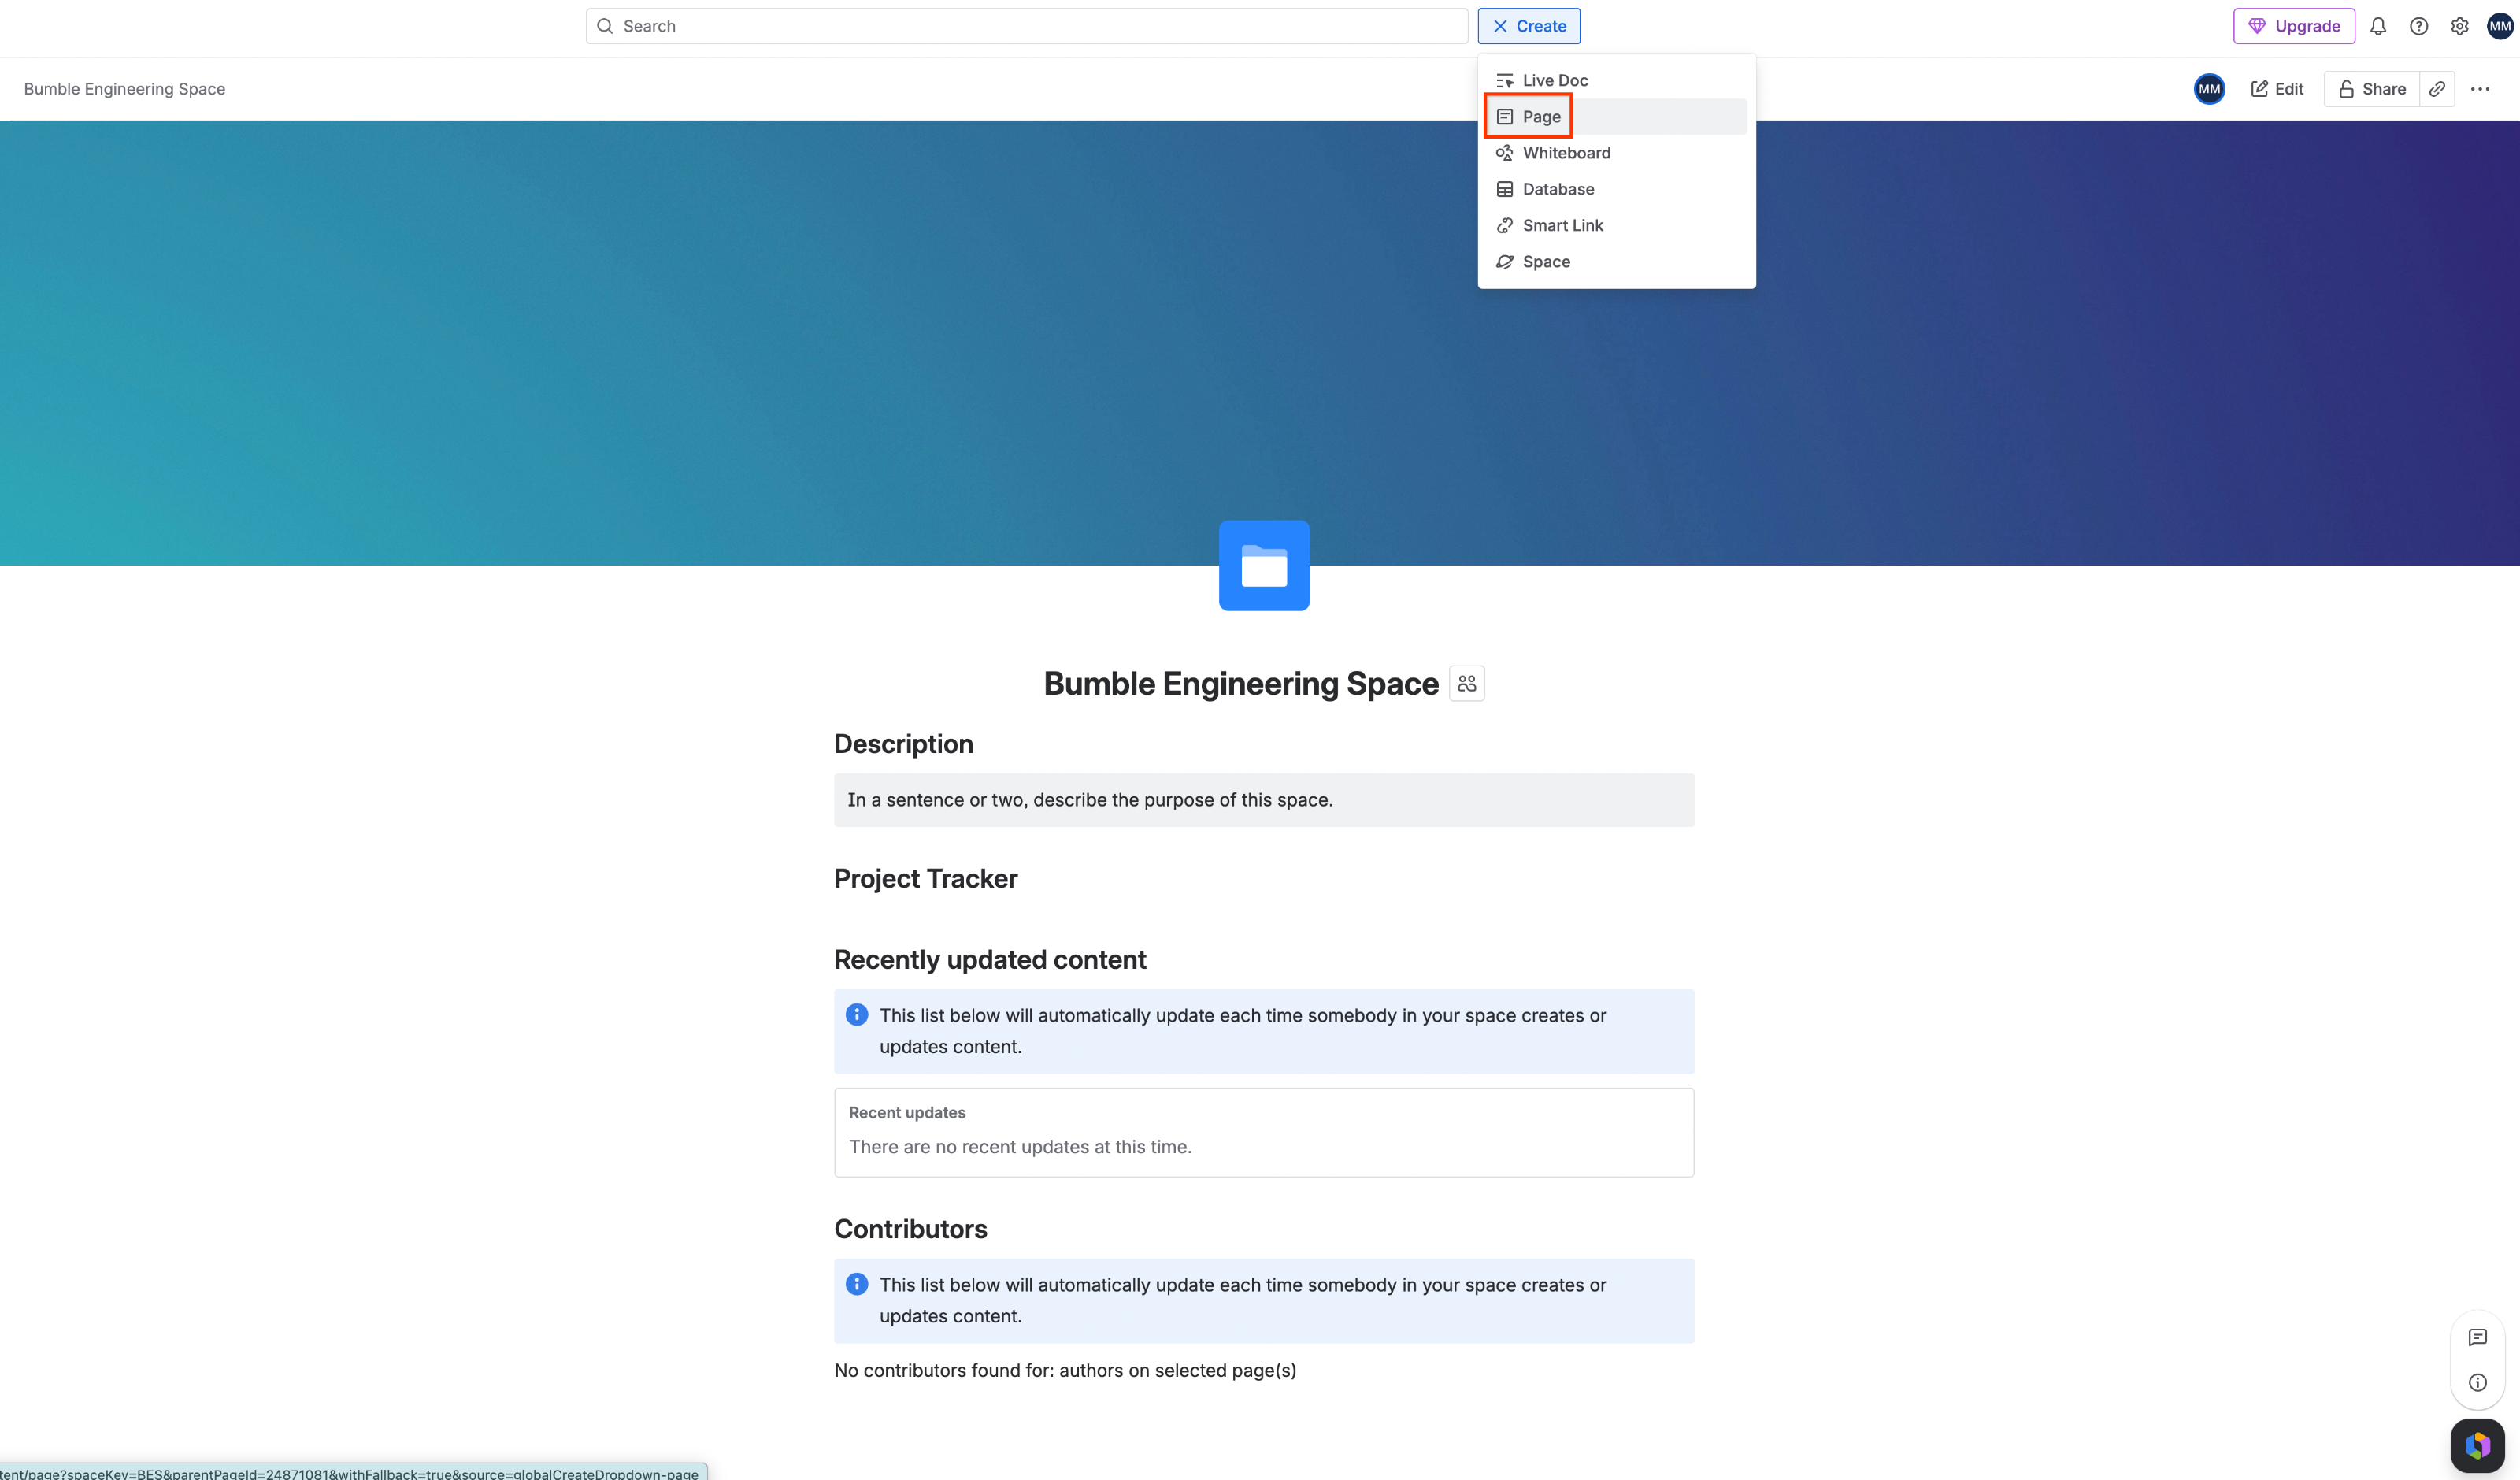
- Click the Create page button (pencil/plus icon) in the top global navigation menu.
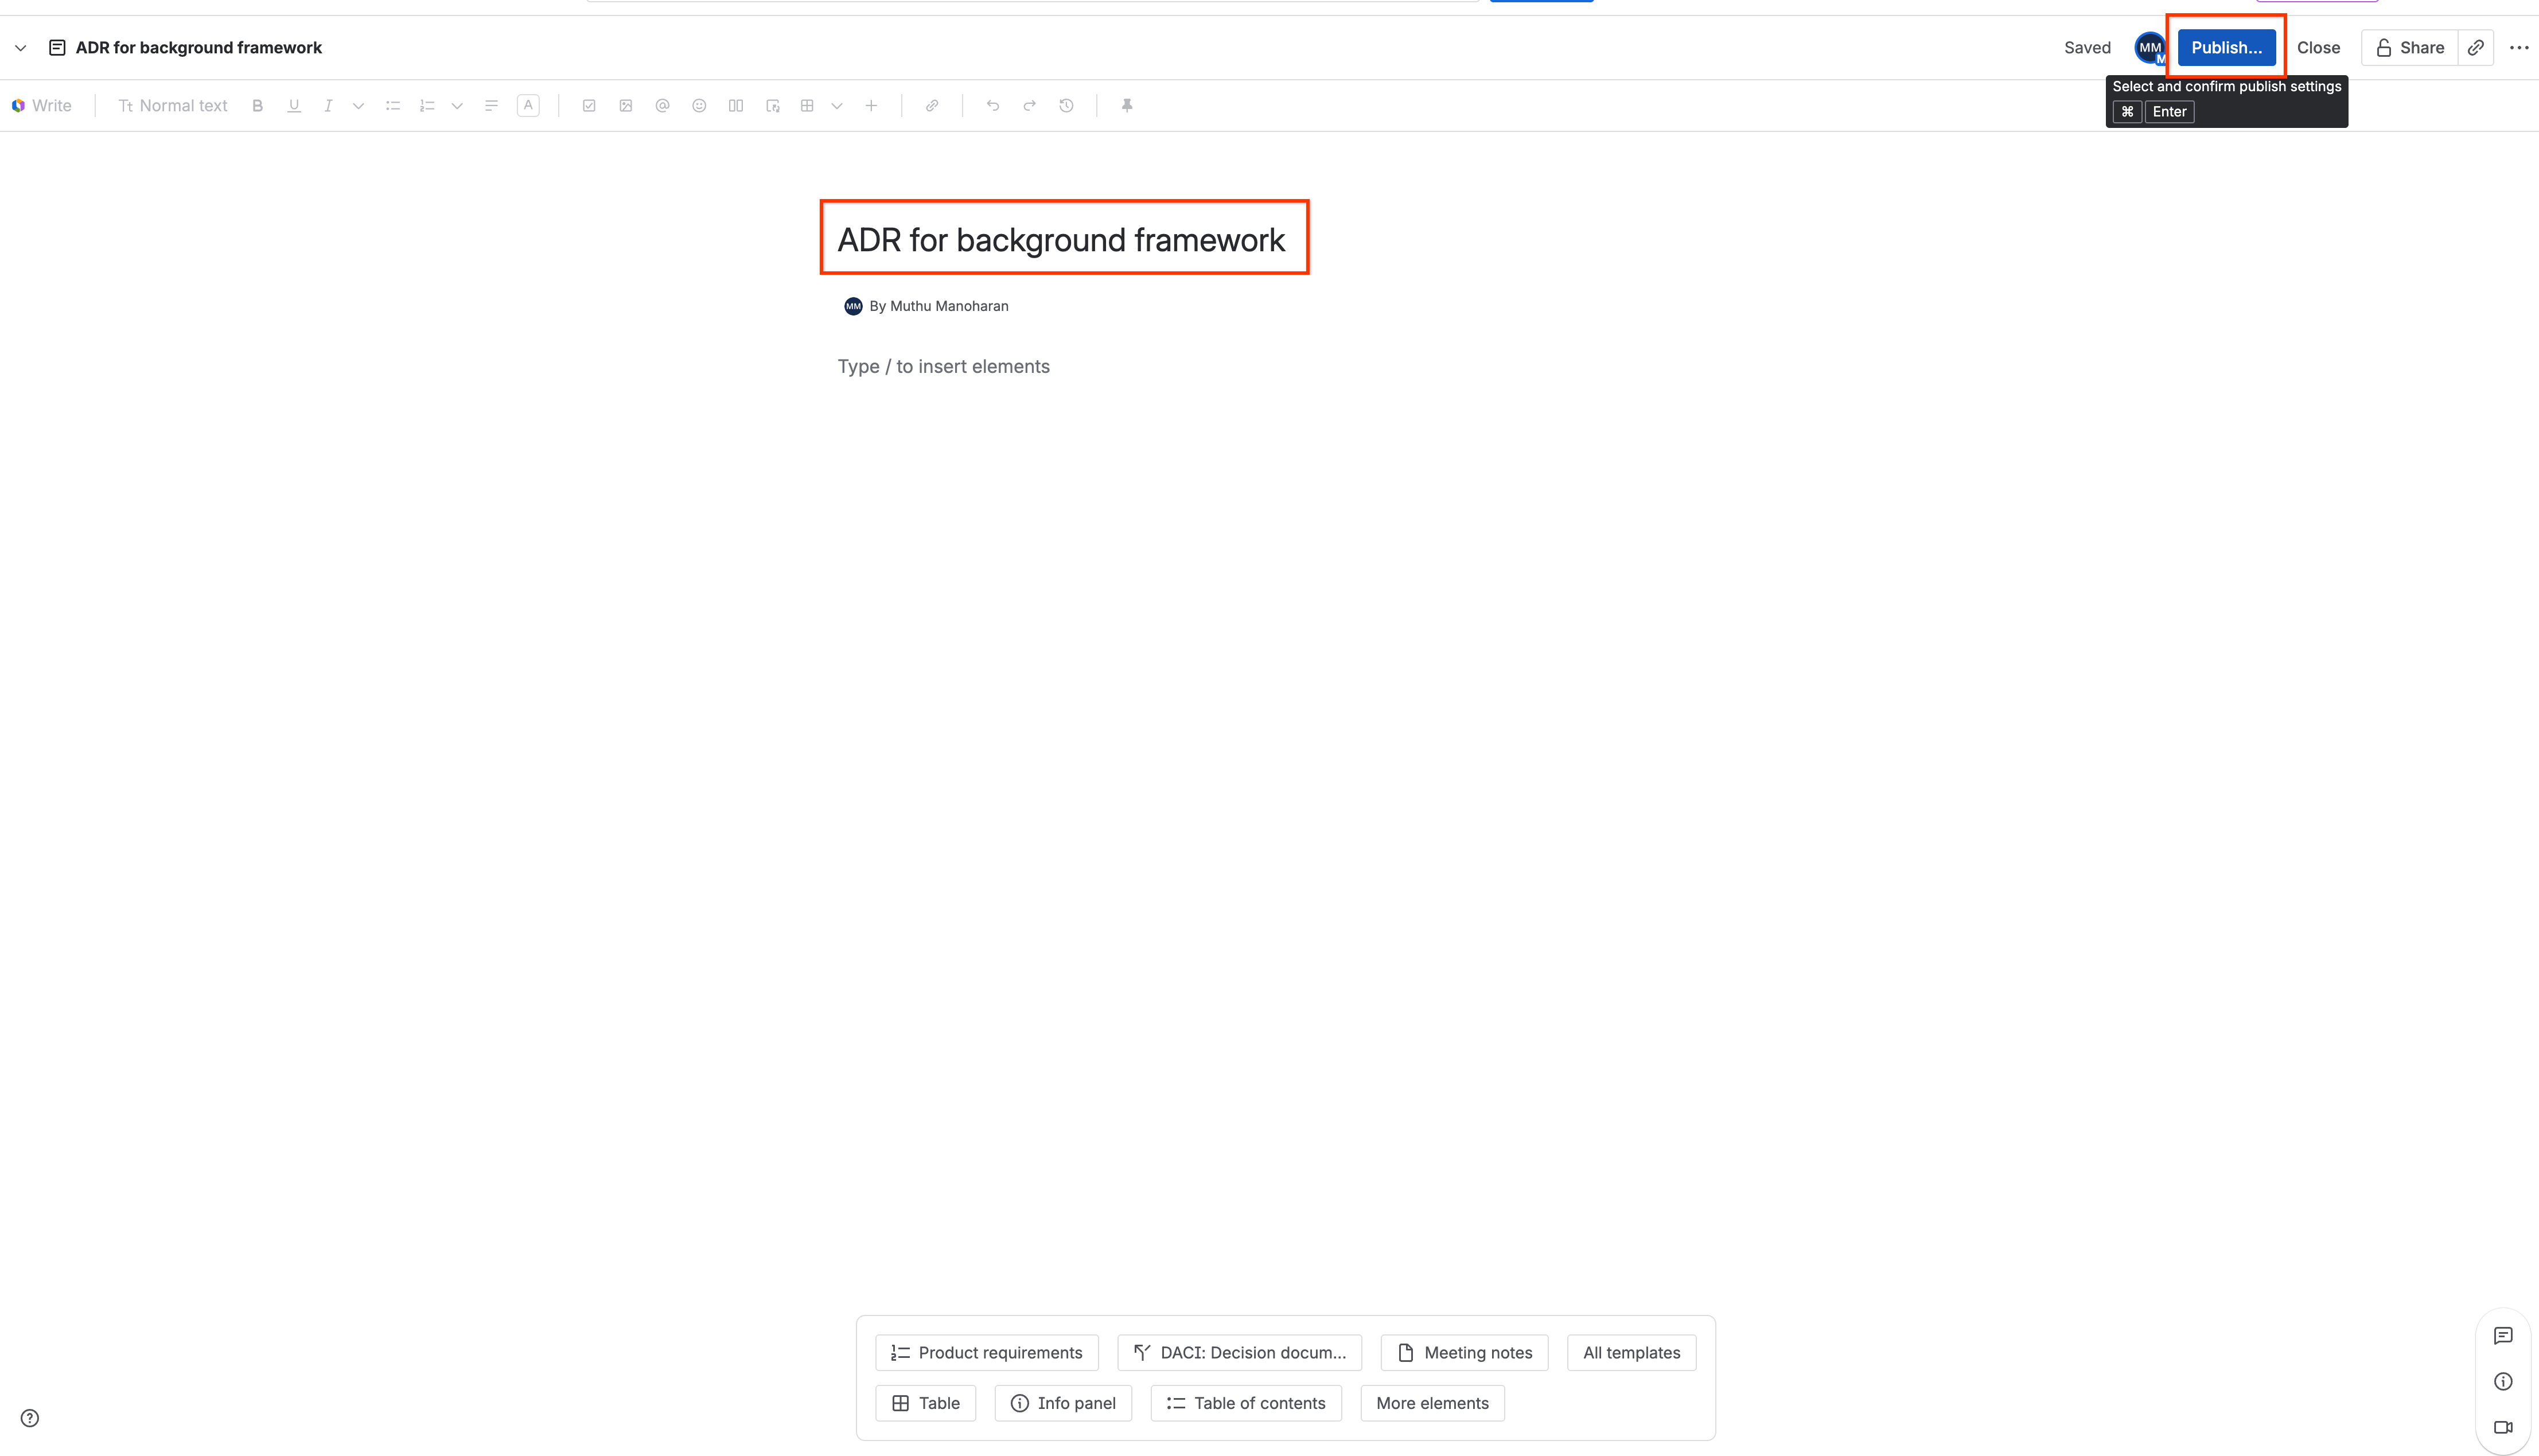
- In the page editor, set the title to
ADR for background frameworkand leave the body completely blank.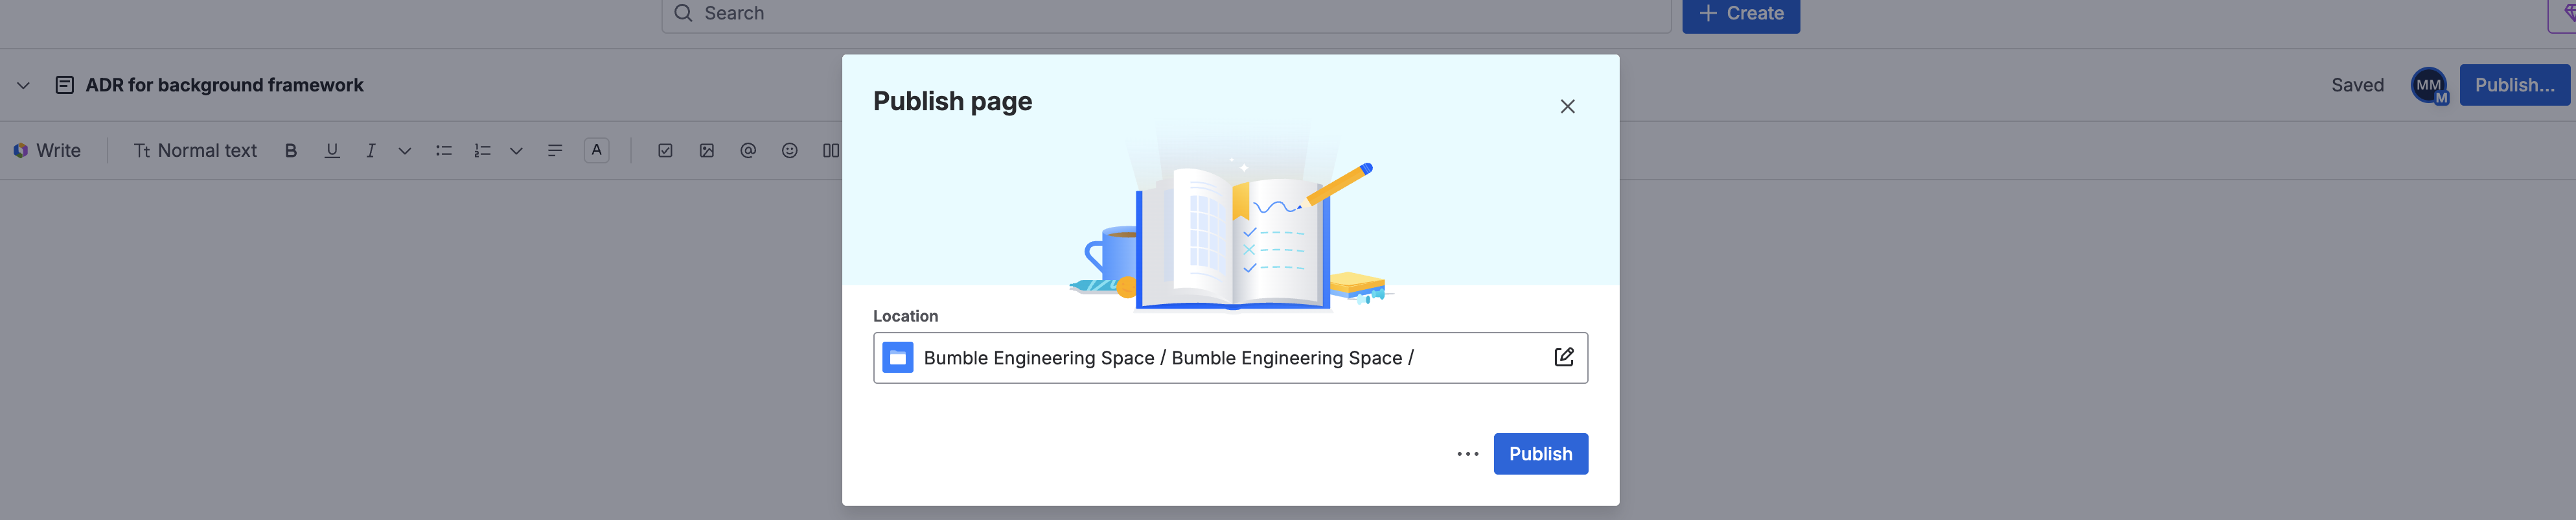
- Click Publish in the top right corner.
3. GitHub Repository Seeding
Create a test repository representing a mock production codebase.
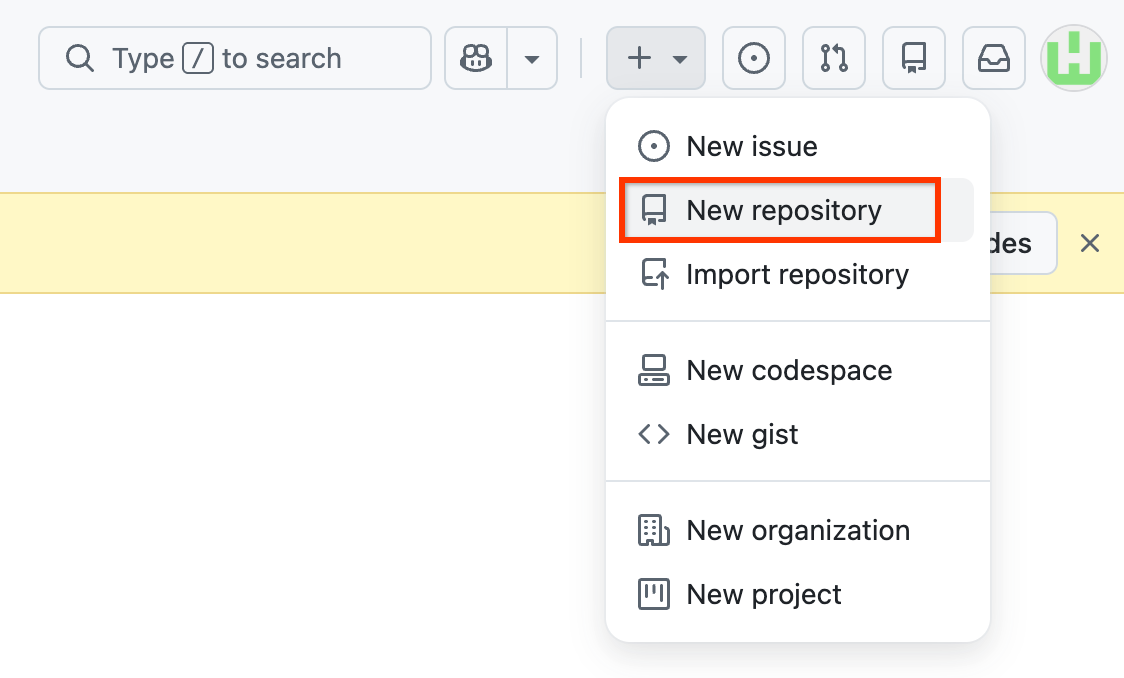
- Navigate to your GitHub account page. Click the + icon in the top-right corner and select New repository.
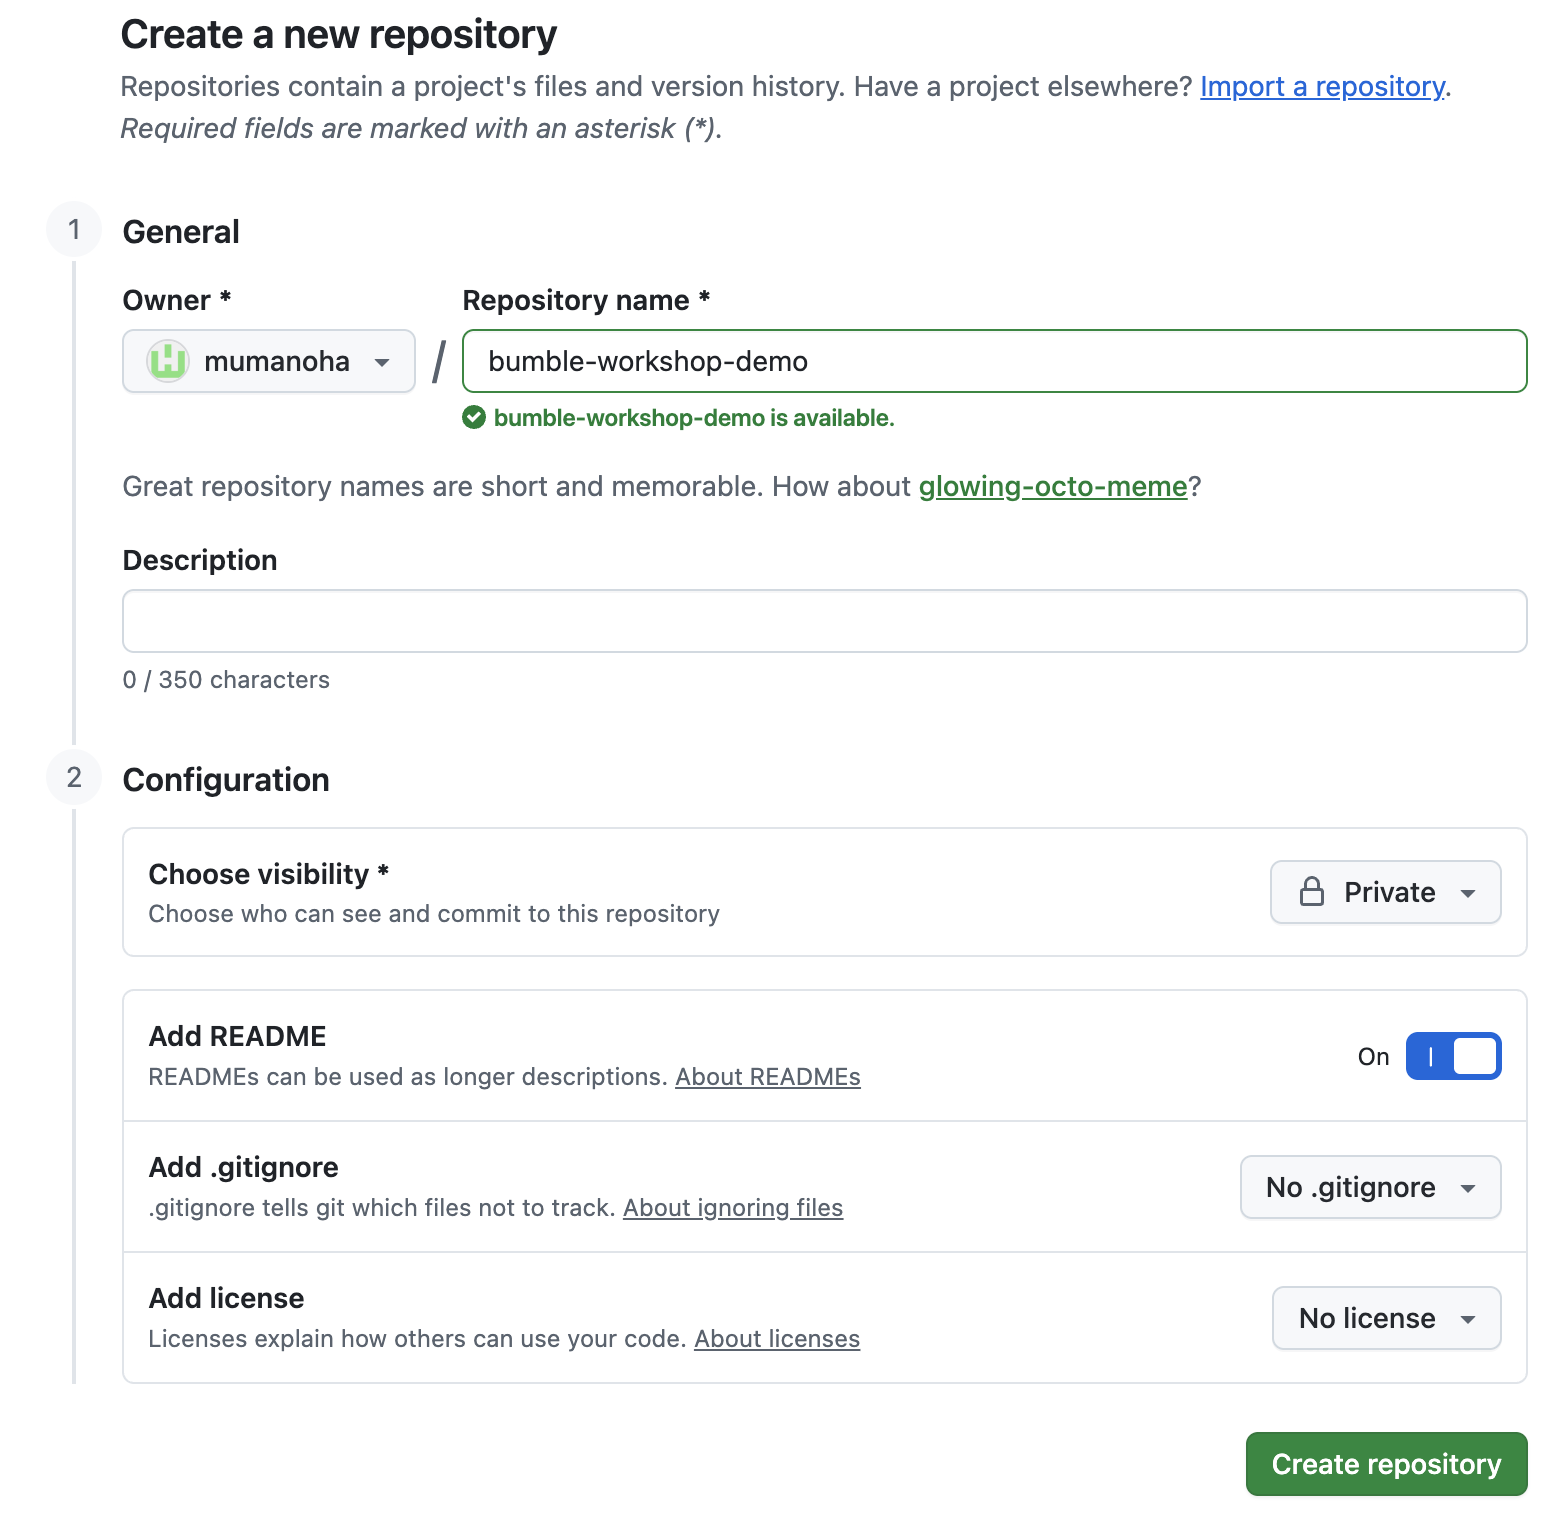
- Configure the repository settings:
- Repository name:
bumble-workshop-demo - Public/Private: Choose Private (or Public if private is restricted)
- Check the box to Add a README file.
- Repository name:
- Click Create repository to establish your new directory.
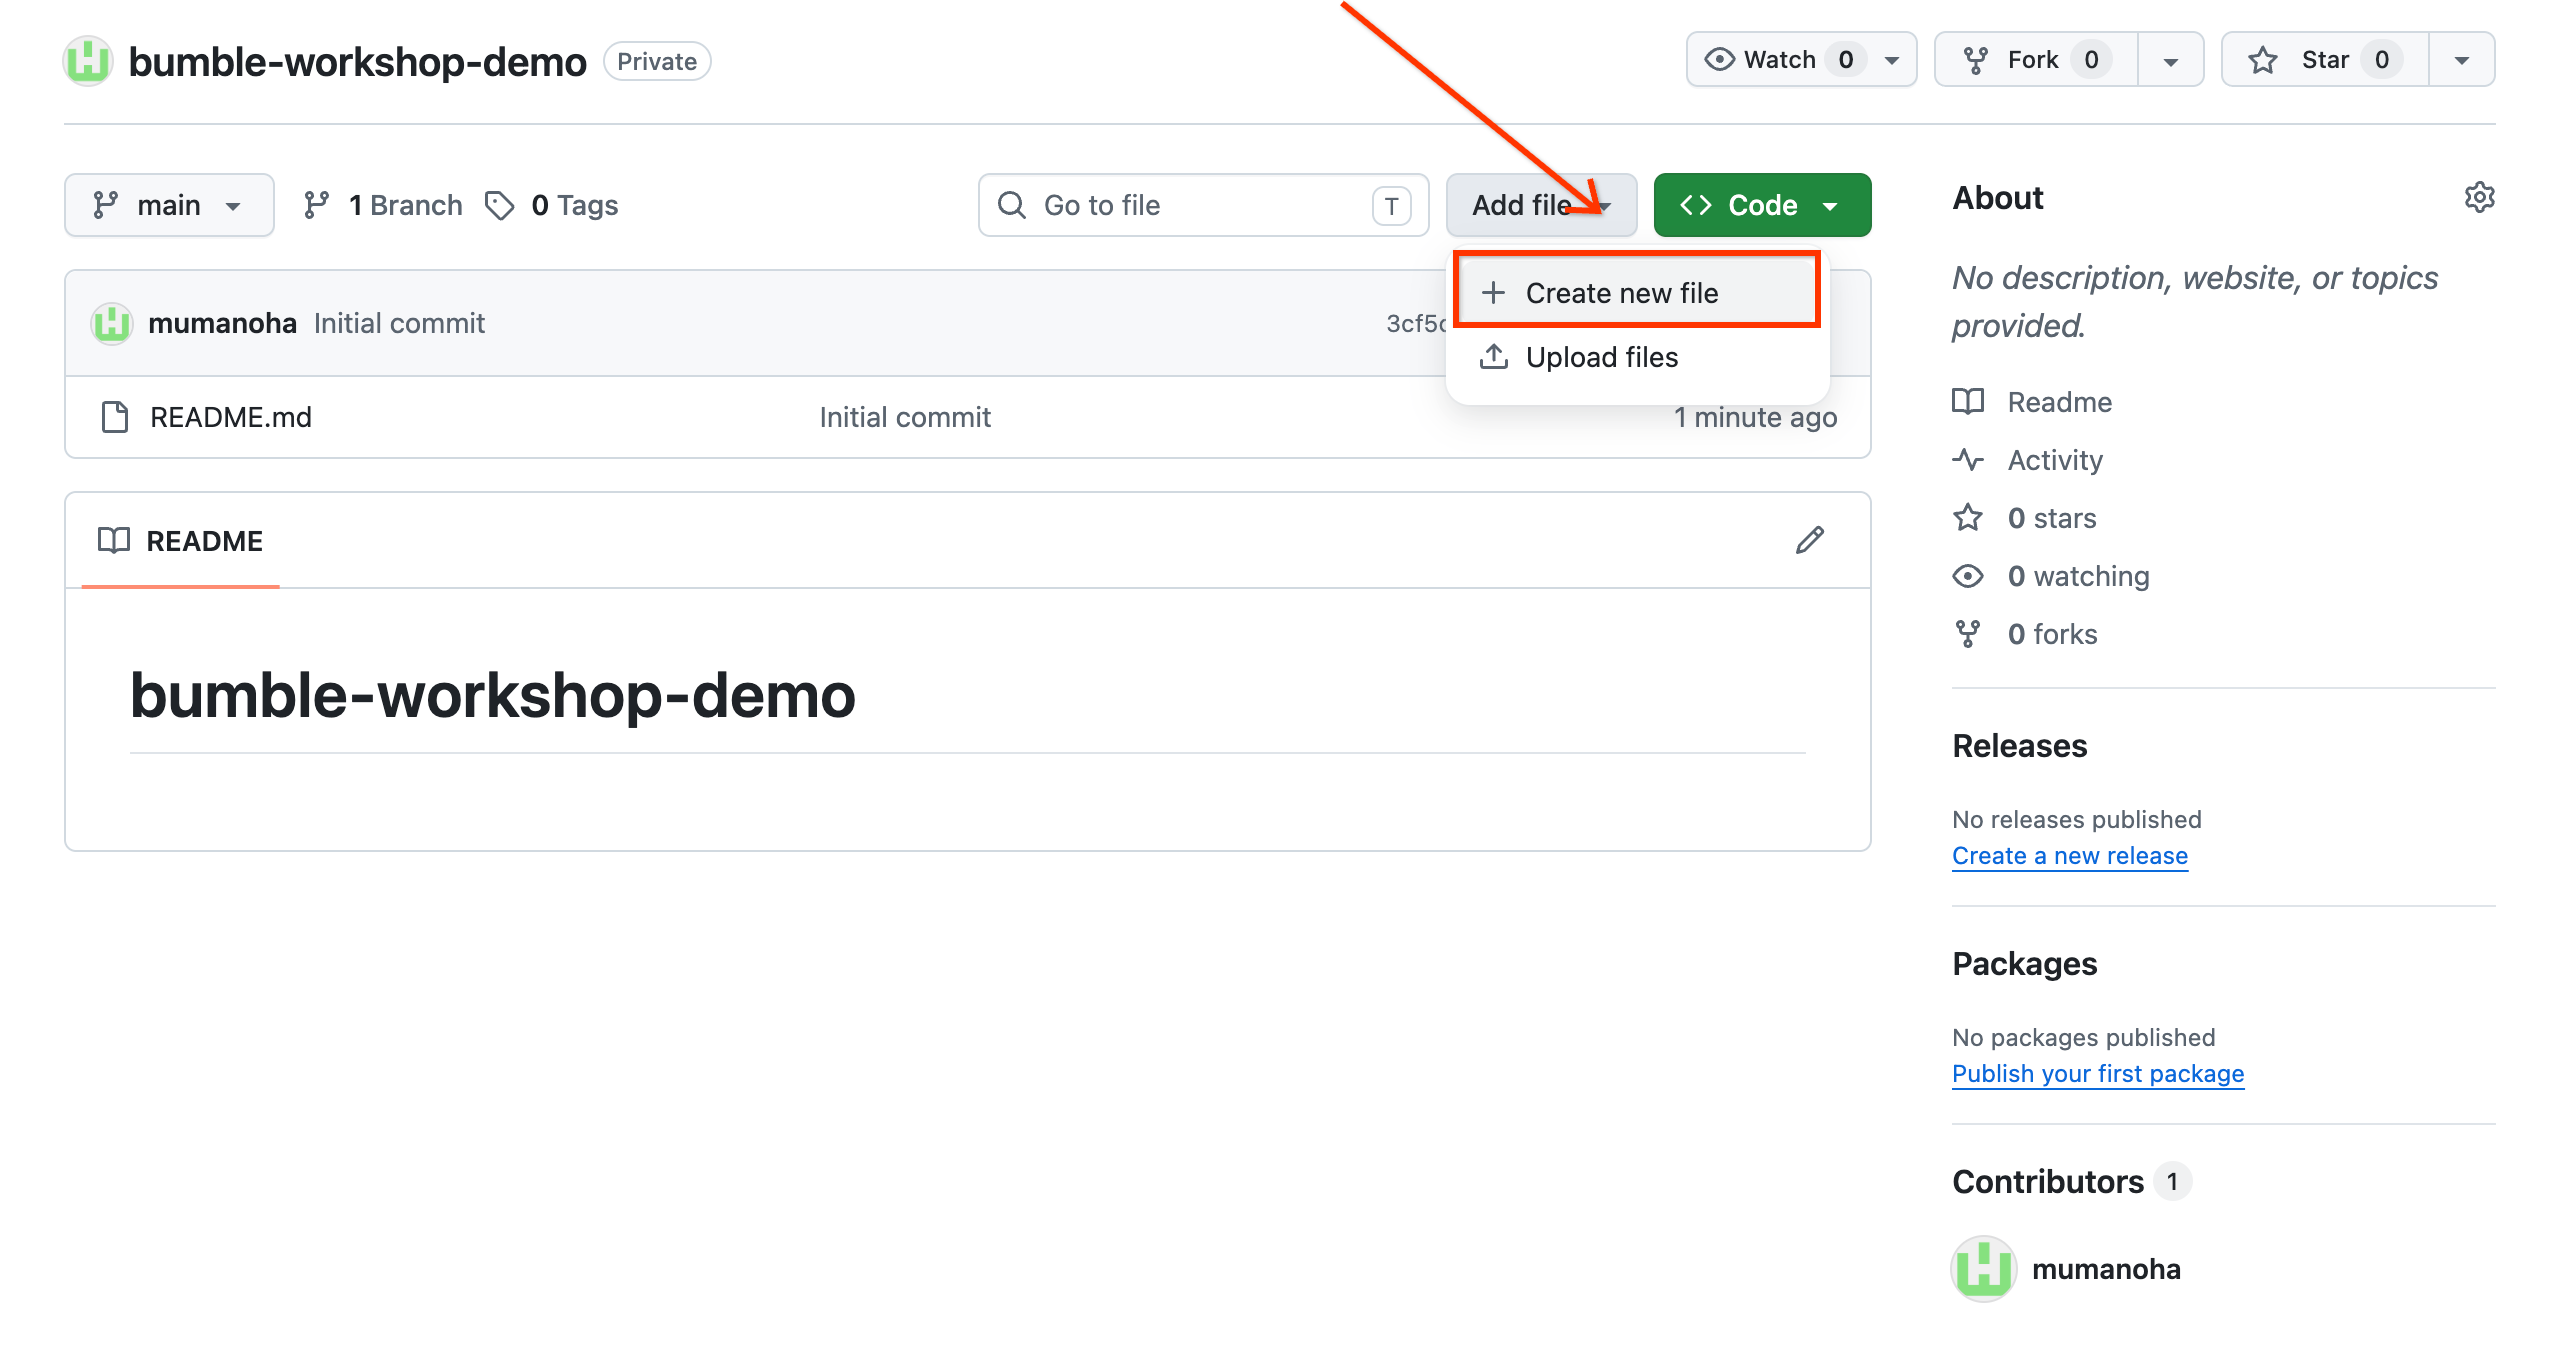
- Create a mock trunk codebase file:
- Click Add file -> Create new file.

- Name the file
main.pyand write this mock content:# Bumble Geolocation Base Service Framework.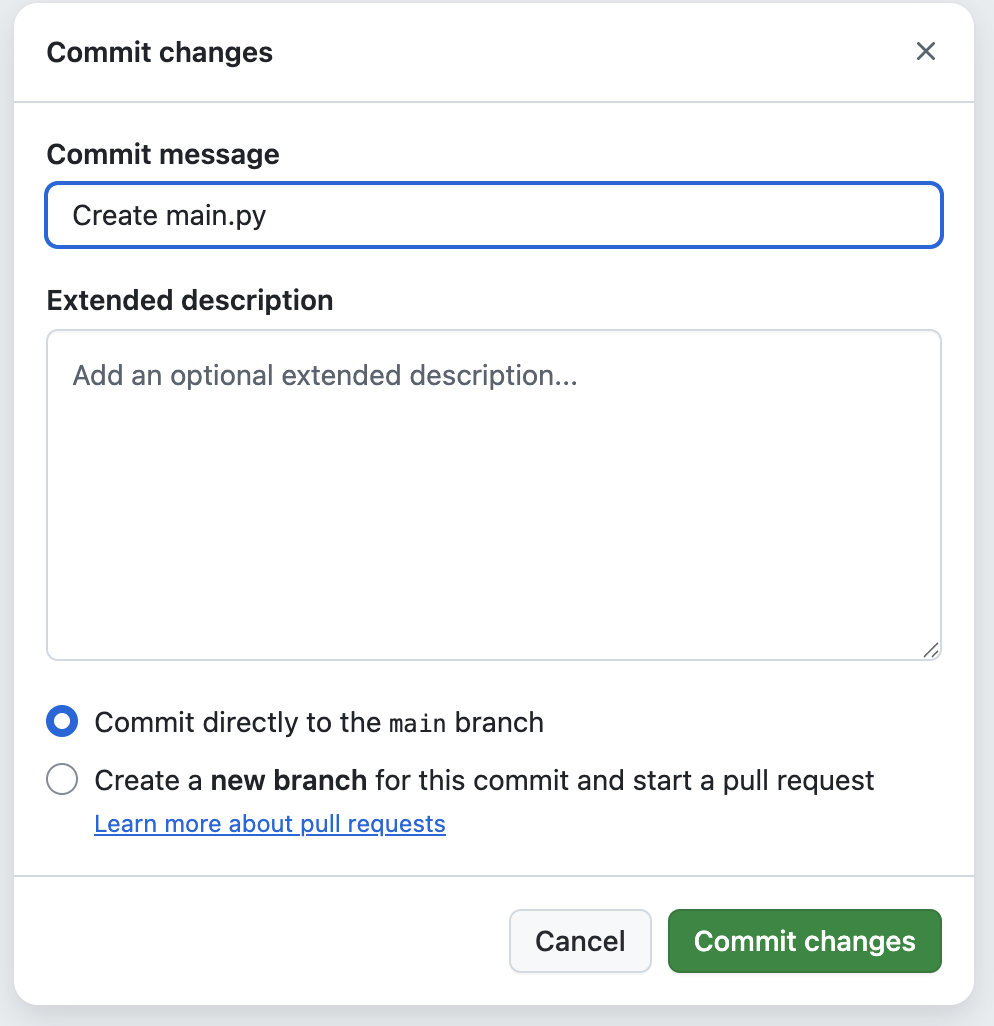
- Click Commit changes at the top right, selecting Commit directly to the main branch.
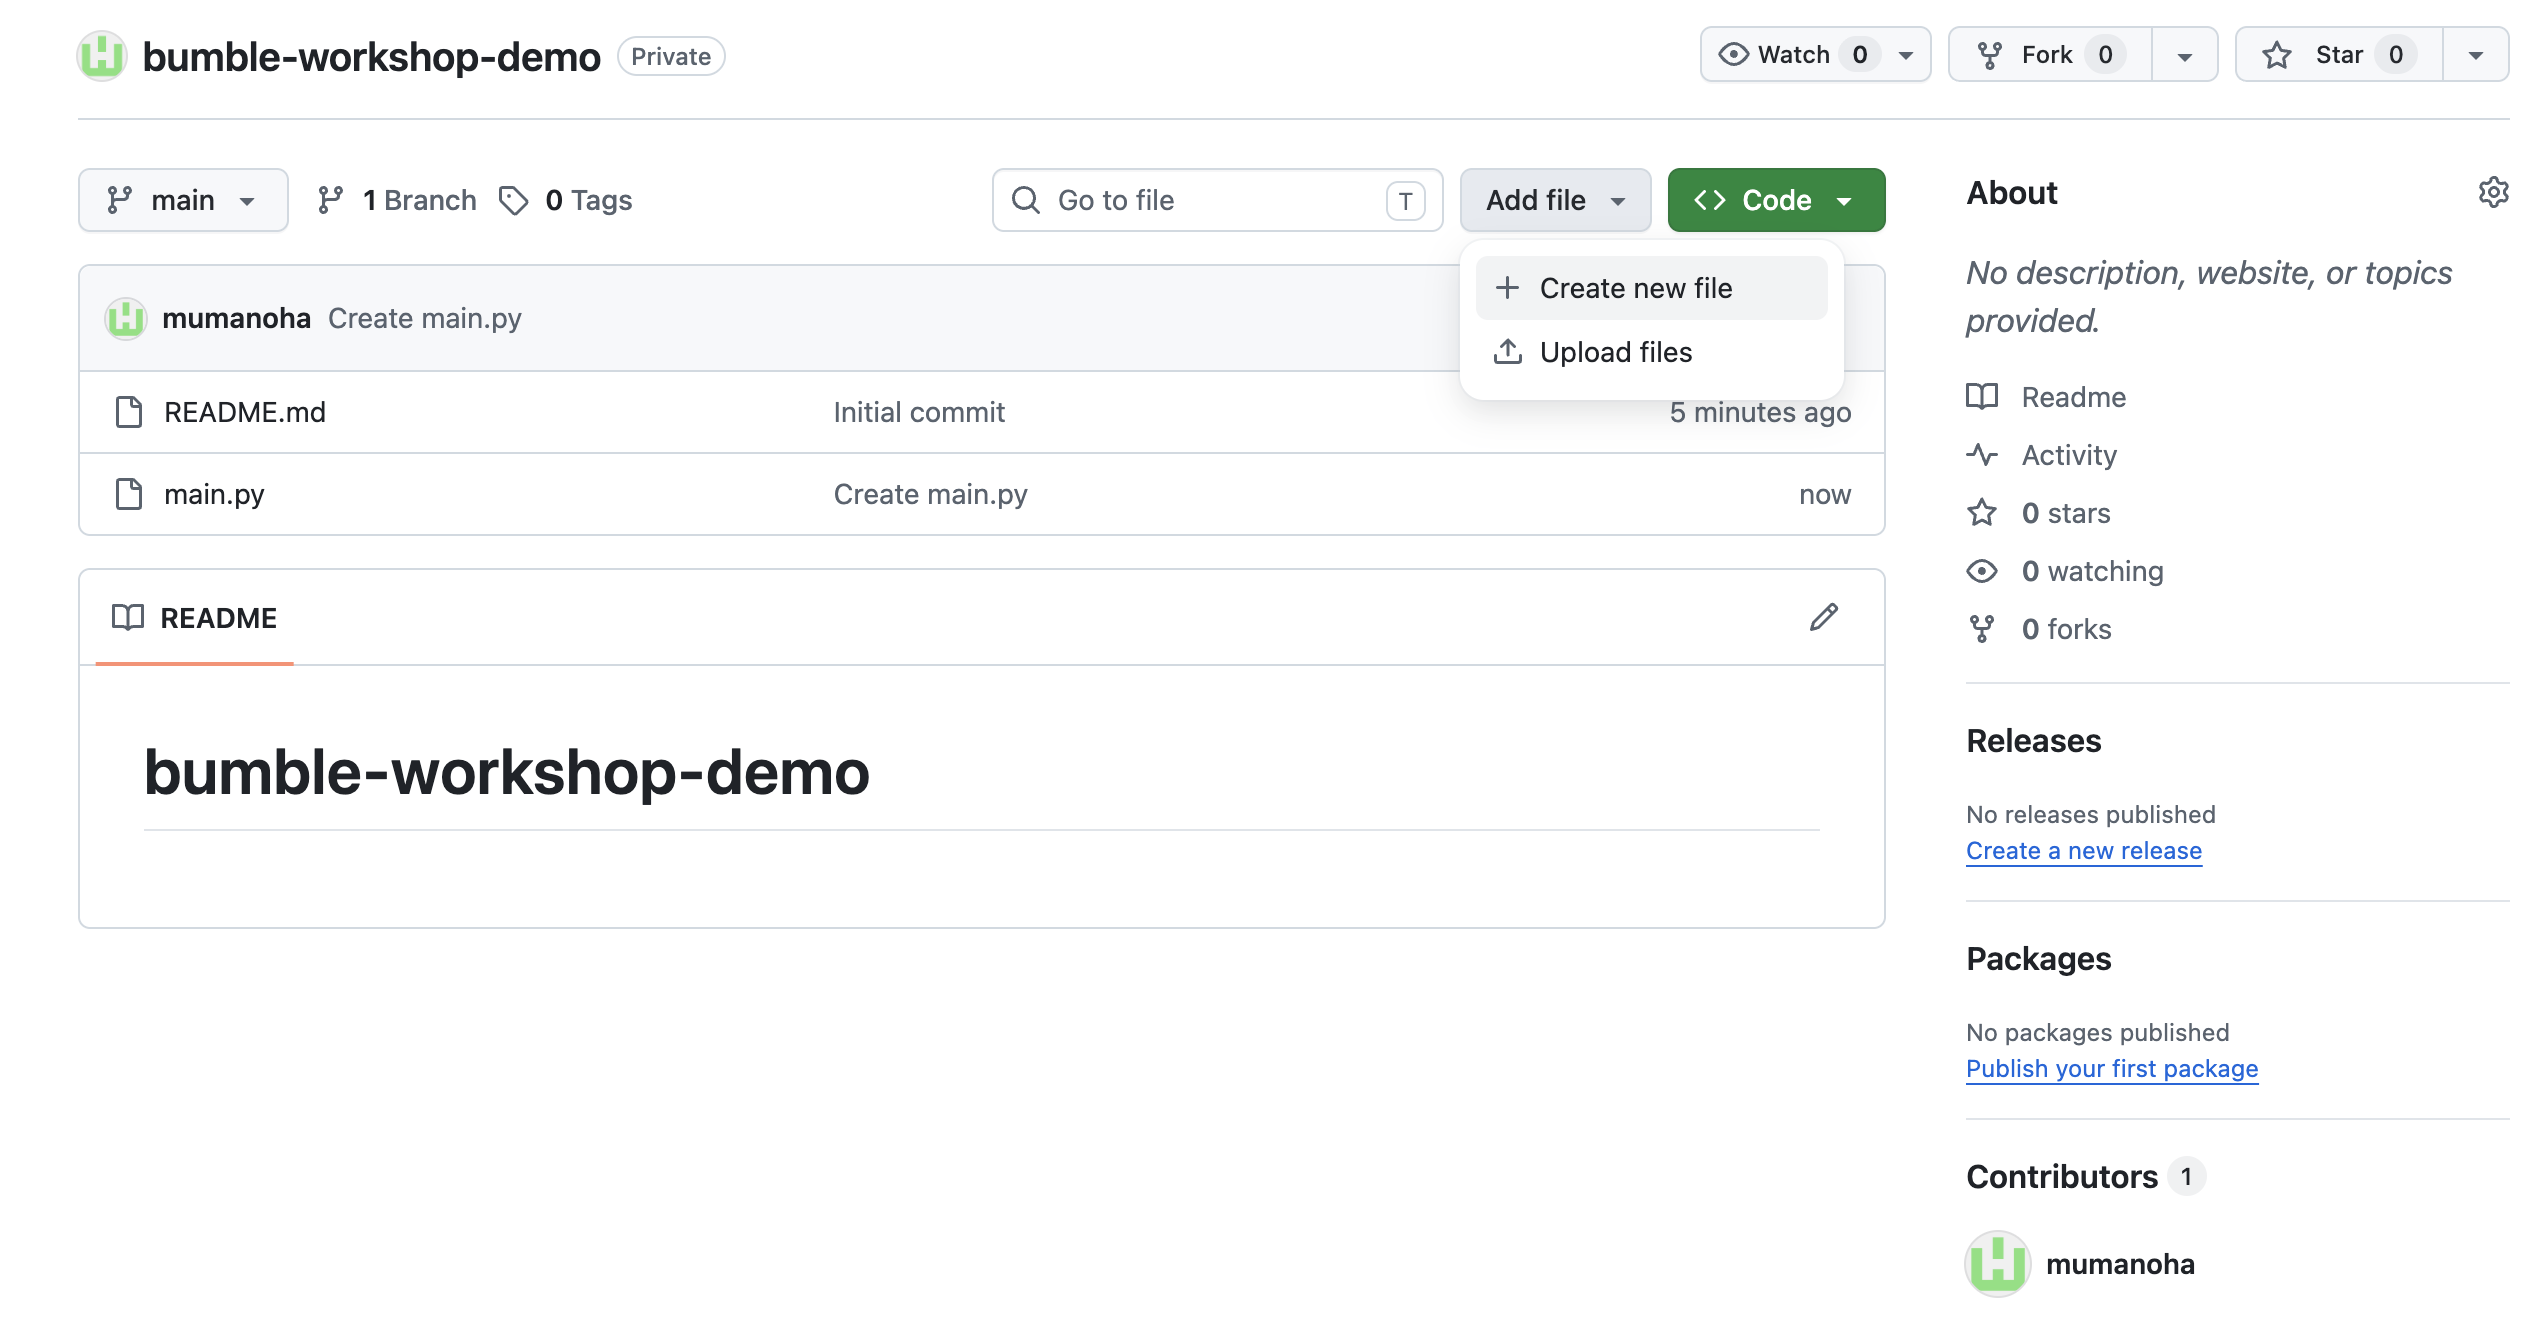
- Click Add file -> Create new file.
- Propose an active Pull Request:
- In your repository homepage, click Add file -> Create new file again.
- Name the file
cache.pyand add this mock content:# Optimize cache invalidation metrics. - Scroll down to the commit box, select Create a new branch for this commit and start a pull request. Name the branch
optimize-cacheand click Propose changes.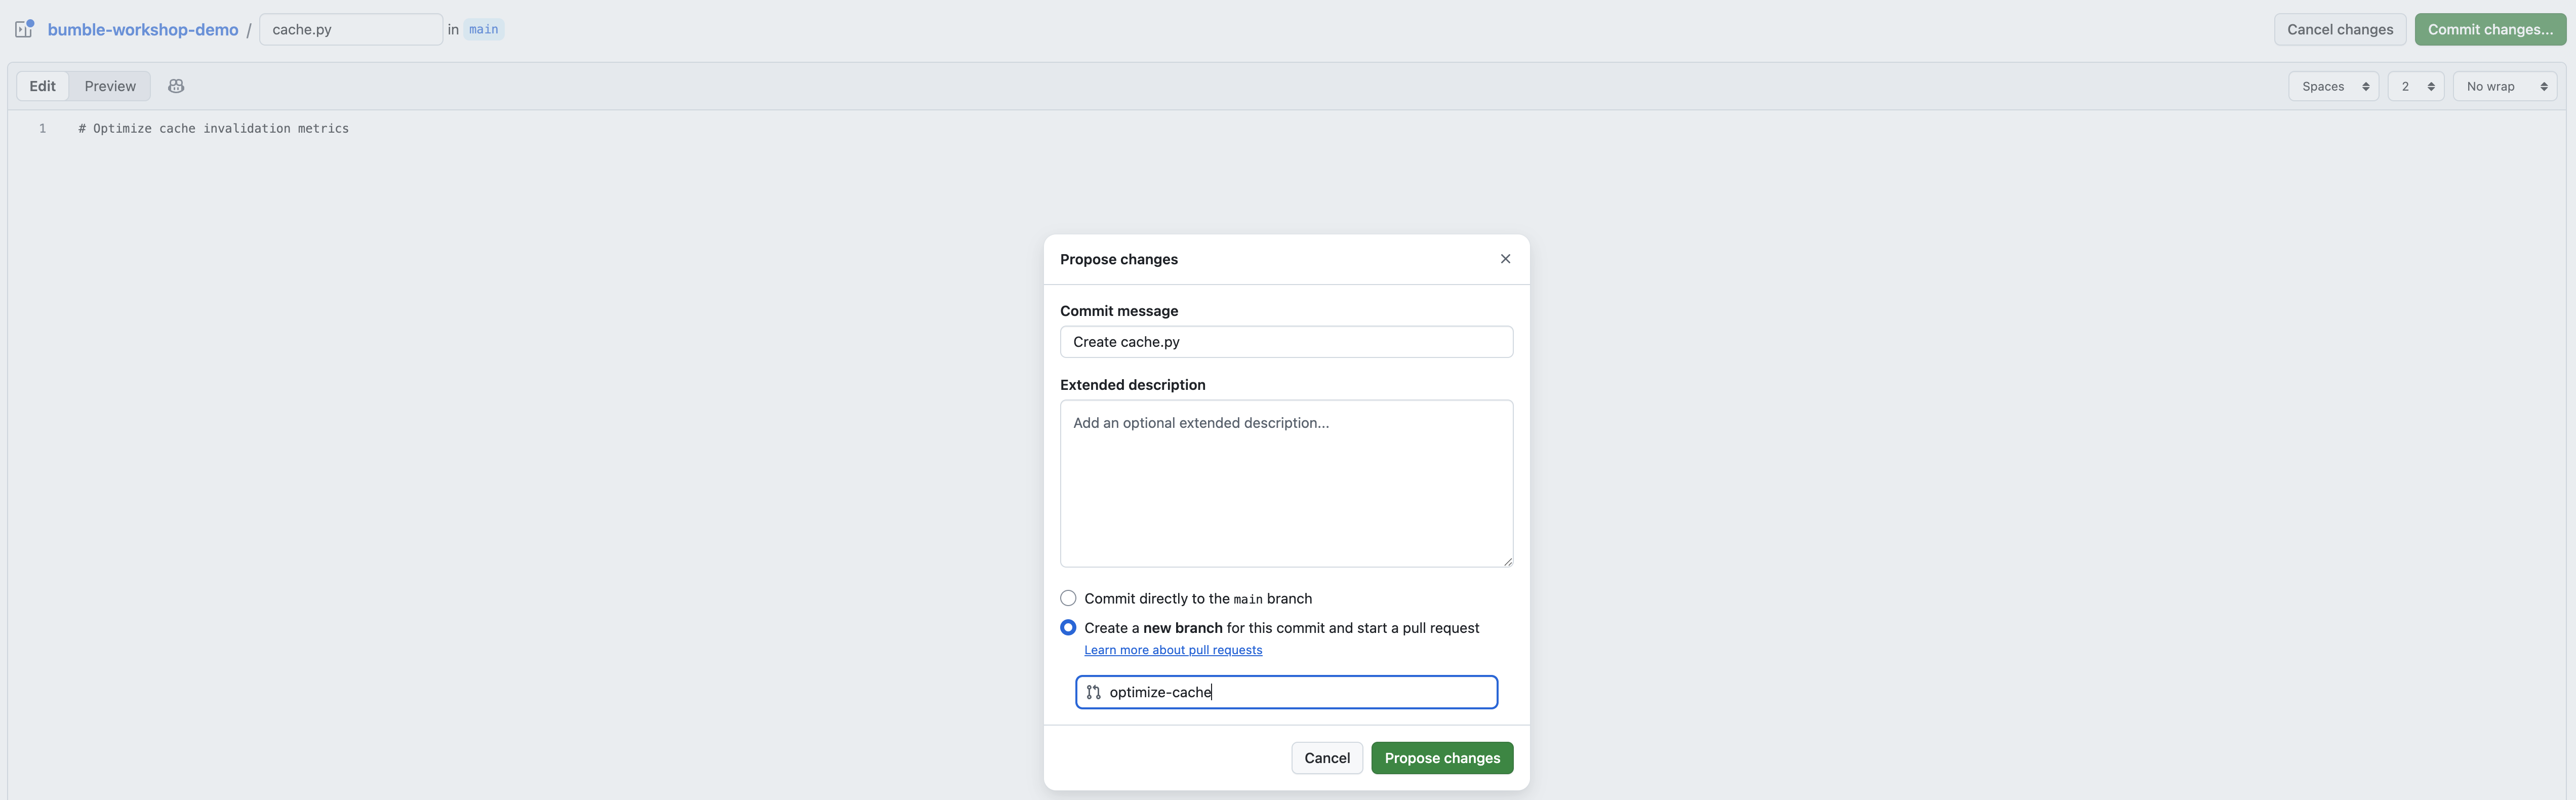
- On the Open Pull Request page, ensure the title is set to
PR #1: Optimize cache invalidation metricsand click Create pull request.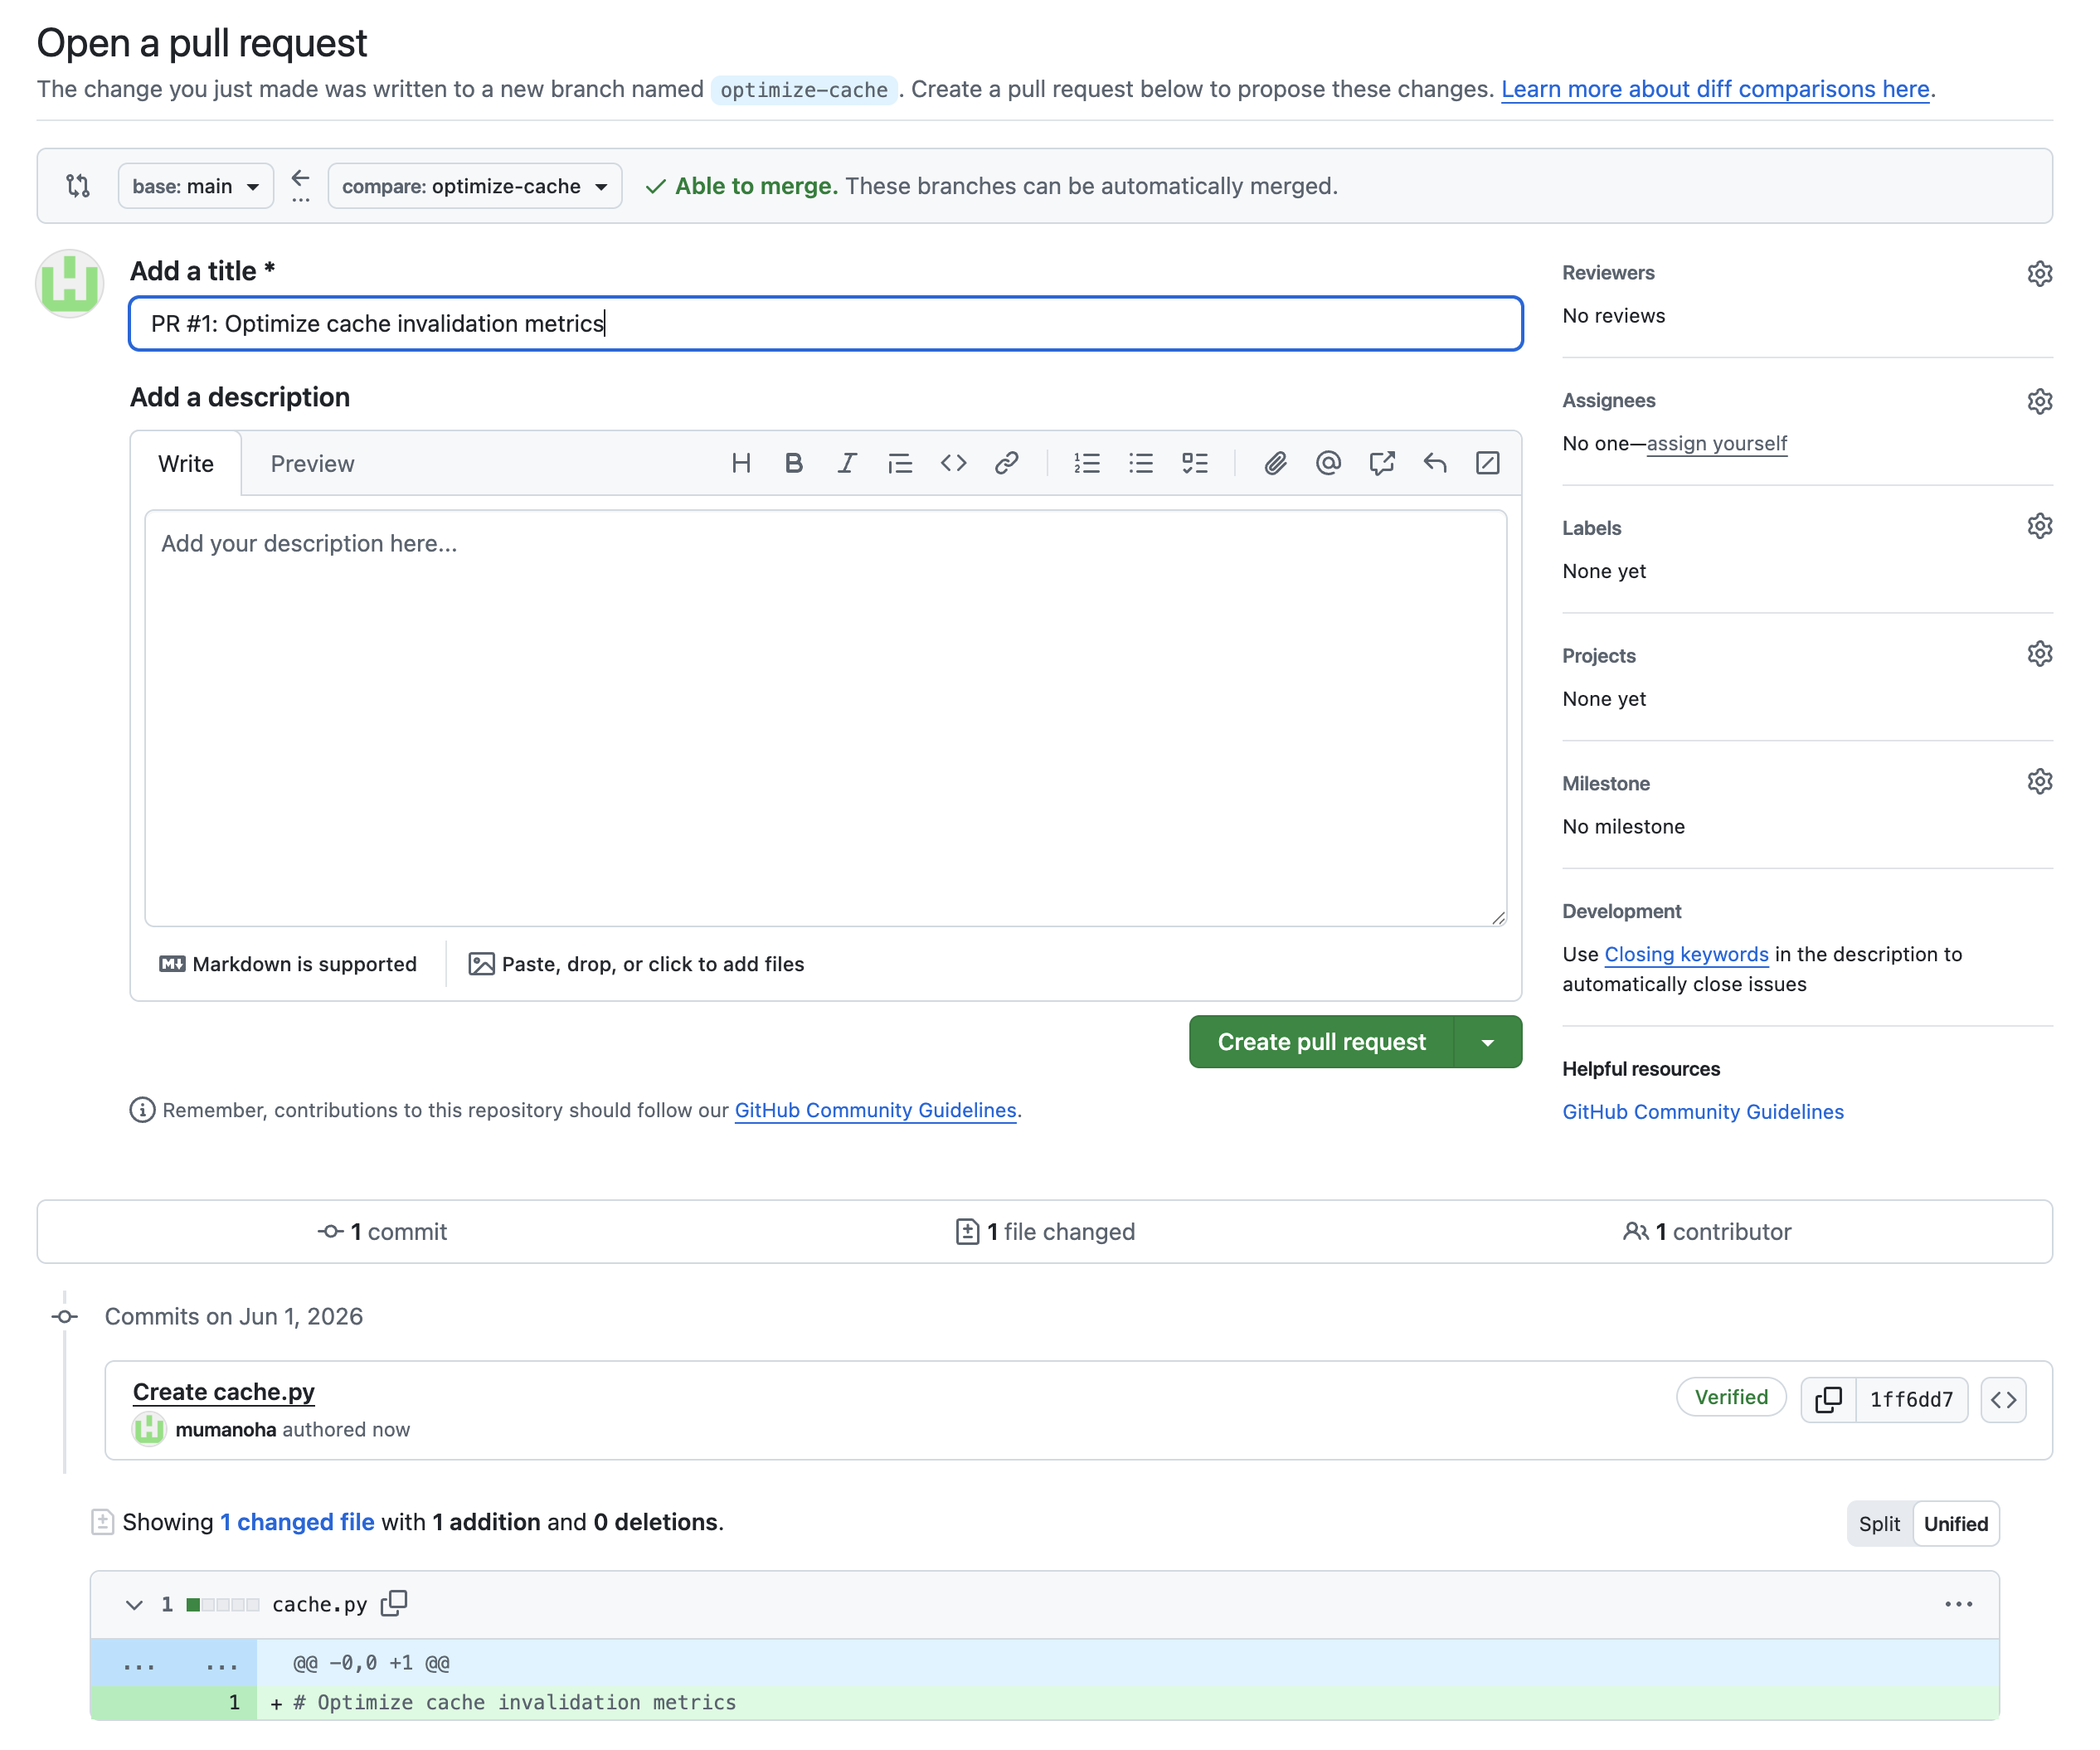
4. Configure data connectors
To enable Gemini Enterprise to access your project data, connectors for Jira Cloud, Confluence, GitHub, and Google Drive must be configured. These are set up as Data Stores in the Google Cloud Console.
[For Admins] Create a Jira Cloud Data Store
- In the Google Cloud Console, navigate to the Gemini Enterprise page (or search for it).
- Select your Google Cloud project.
- In the navigation menu, click Data stores.
- Click + Create data store.
- In the Source section, search for Jira Cloud and click Select.
- In the Data section:
- Select Federated search (best for real-time queries).
- Provide authentication details: Client ID, Client Secret, Instance URI (e.g.,
https://your-domain.atlassian.net), and Instance ID. - Note: You will need a Jira API Token generated from your Atlassian account.
- Click Login and complete the Atlassian sign-in.
- Select the entities to search (e.g., issues, projects).
- Click Continue and follow prompts to complete creation.
[For Admins] Create a Confluence Data Store
- On the Data stores page, click + Create data store again.
- In the Source section, search for Confluence and click Select.
- In the Data section:
- Select Federated search (best for real-time queries).
- Provide authentication details: Client ID, Client Secret, Instance URI (e.g.,
https://your-domain.atlassian.net), and Instance ID. - Click Login and complete the Atlassian sign-in.
- Select the entities to search (e.g., pages, spaces, blog posts).
- Click Continue and follow prompts to complete creation.
[For Admins] Create a GitHub Data Store
- On the Data stores page, click + Create data store again.
- In the Source section, search for GitHub and click Select.
- In the Data section:
- Provide Client ID and Client Secret from your GitHub App.
- Click Log in and complete the GitHub sign-in and authorization.
- In Advanced options, enter your organization name in the Owner login field.
- Select entities to search (e.g., repositories, issues, pull requests).
- Select GitHub actions to enable (e.g., Add comment, Merge PR).
- Configure location and name for the connector.
- Click Create.
[For Admins] Create a Google Drive Data Store
- On the Data stores page, click + Create data store again.
- In the Source section, search for Google Drive and click Select.
- In the Data section:
- Connect using Atlassian/Google Workspace OAuth or a service account configured by your Workspace administrator.
- Define folder scoping rules to limit indexing to relevant Bumble project folders.
- Select entities to index and search (e.g., documents, files).
- Click Create.
5. Authorize and Use Data Connectors
Before you can query your workspace tools using Gemini Enterprise, each workshop participant must explicitly Authorize their user account connections.
Step 1: Access Connectors Menu
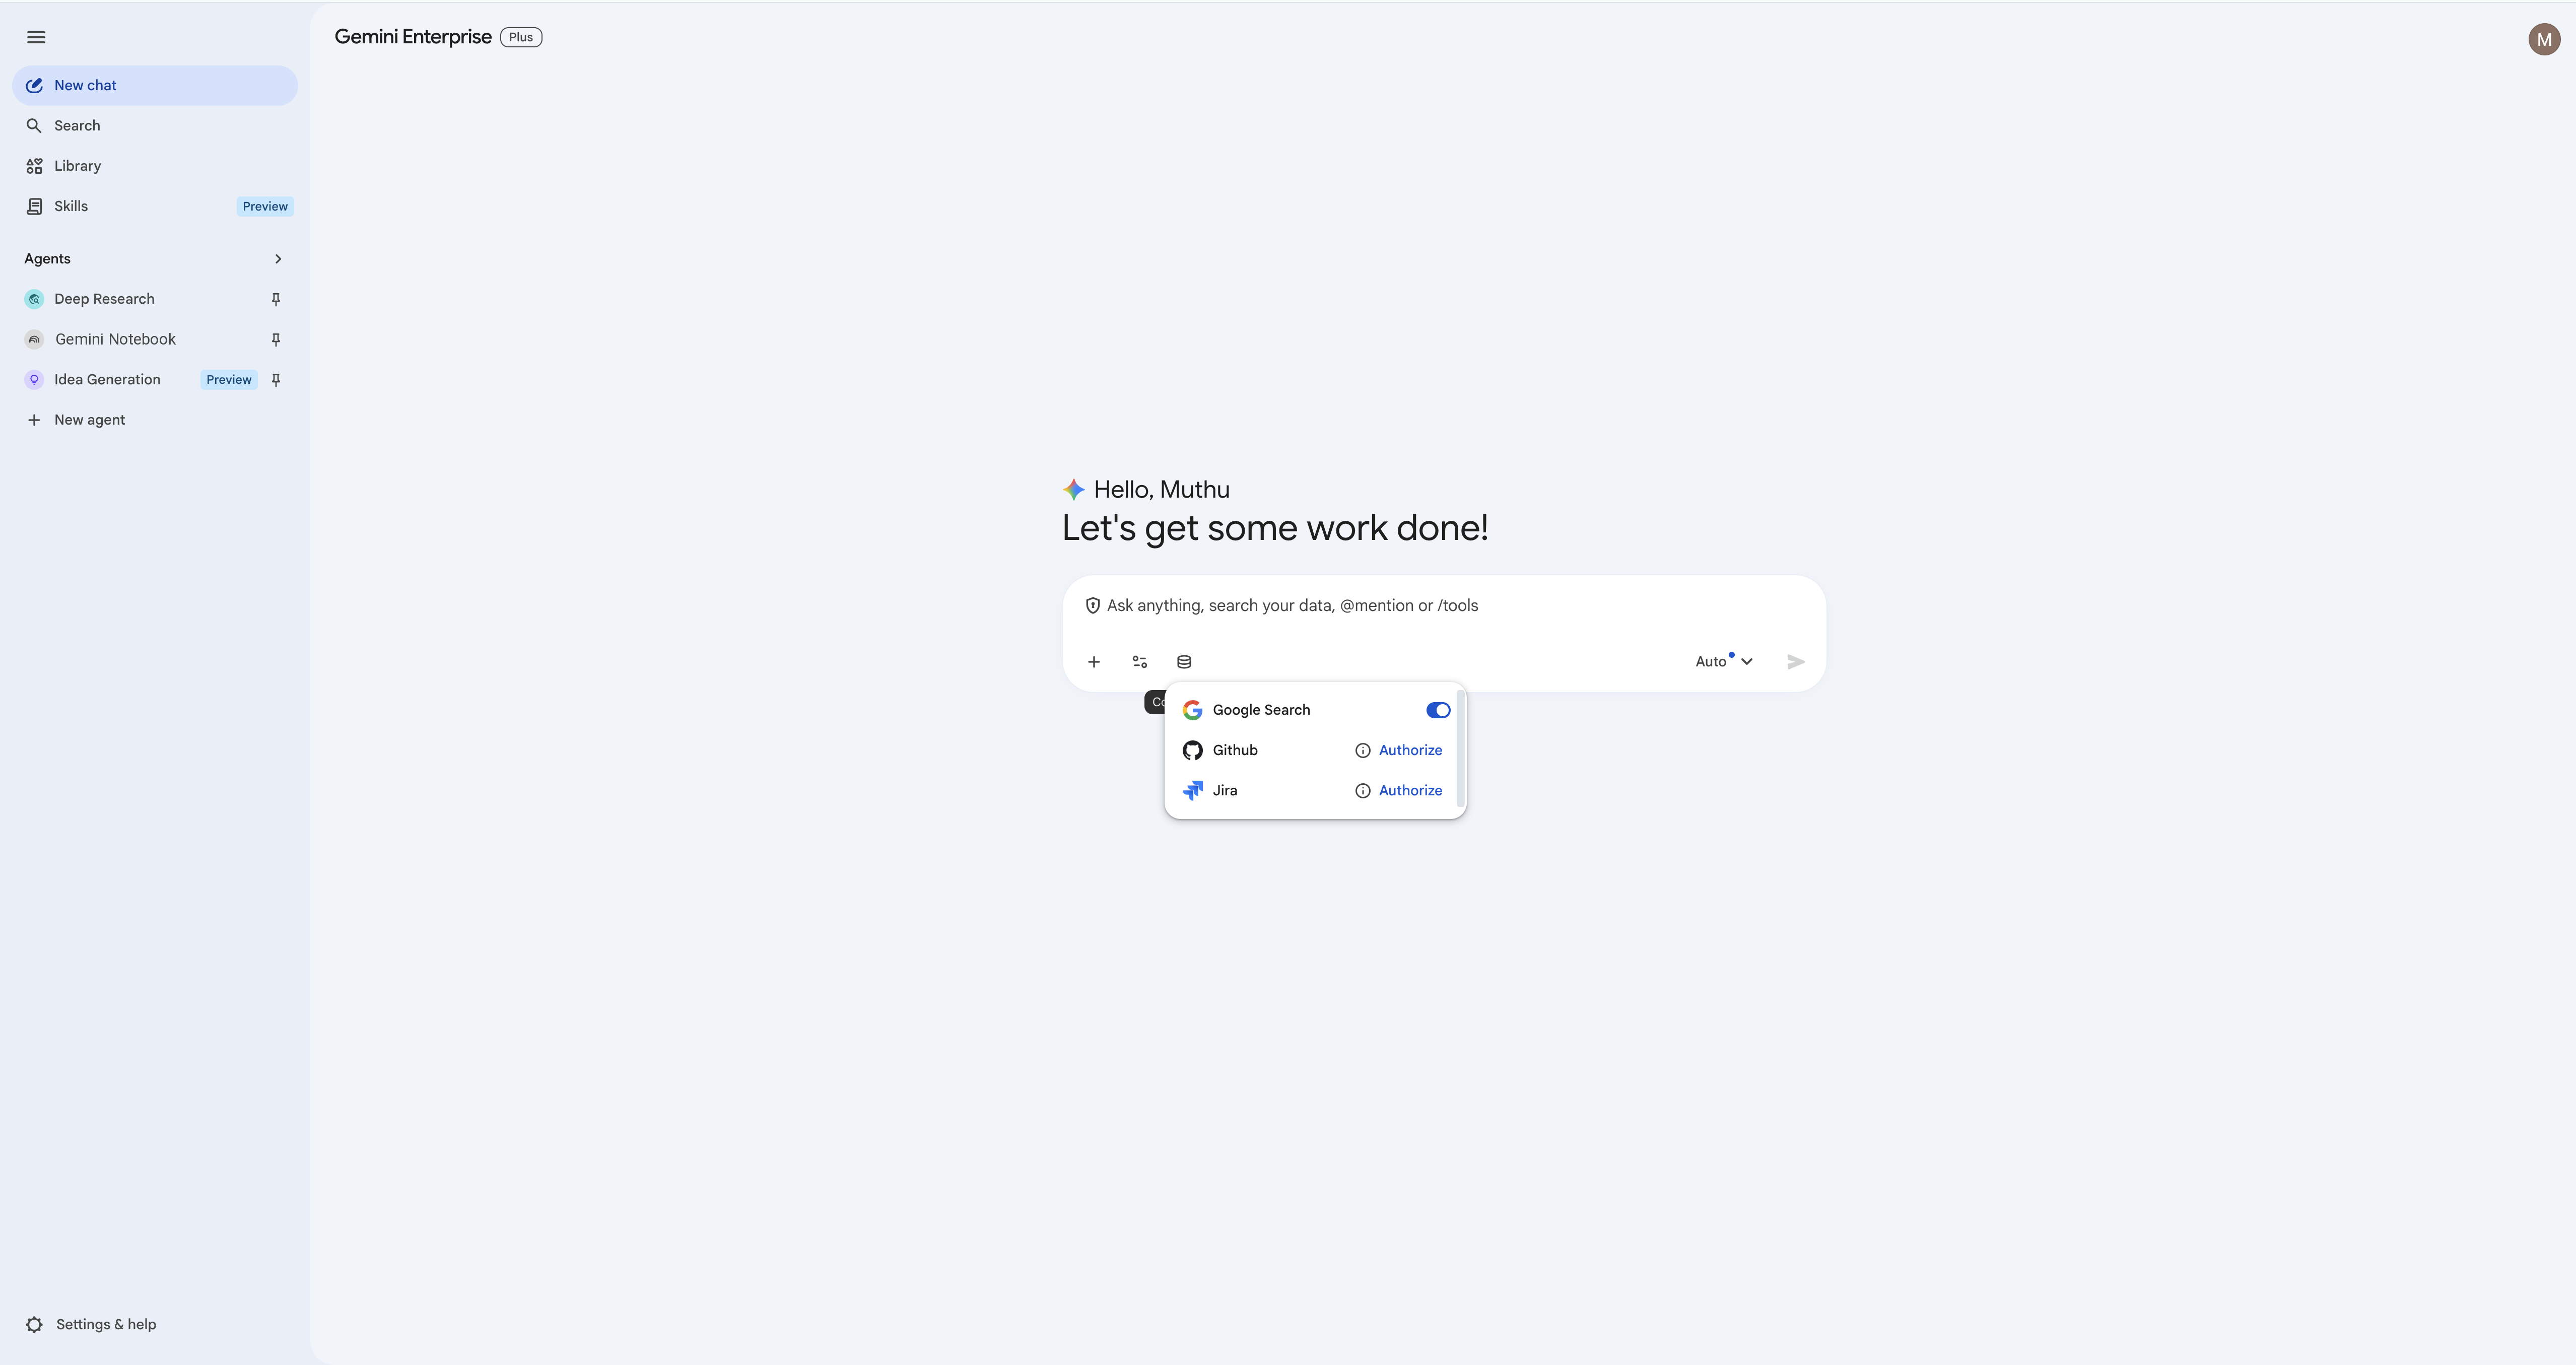
- In the main Gemini Enterprise chat interface, click the Database (Connectors) icon in the chat input box.
- You will see the list of available data stores configured by your admin (Jira, Confluence, GitHub, Google Drive, and Google Search).
Step 2: Authorize Jira Connector
- Locate the Jira connector. Click Authorize next to it.
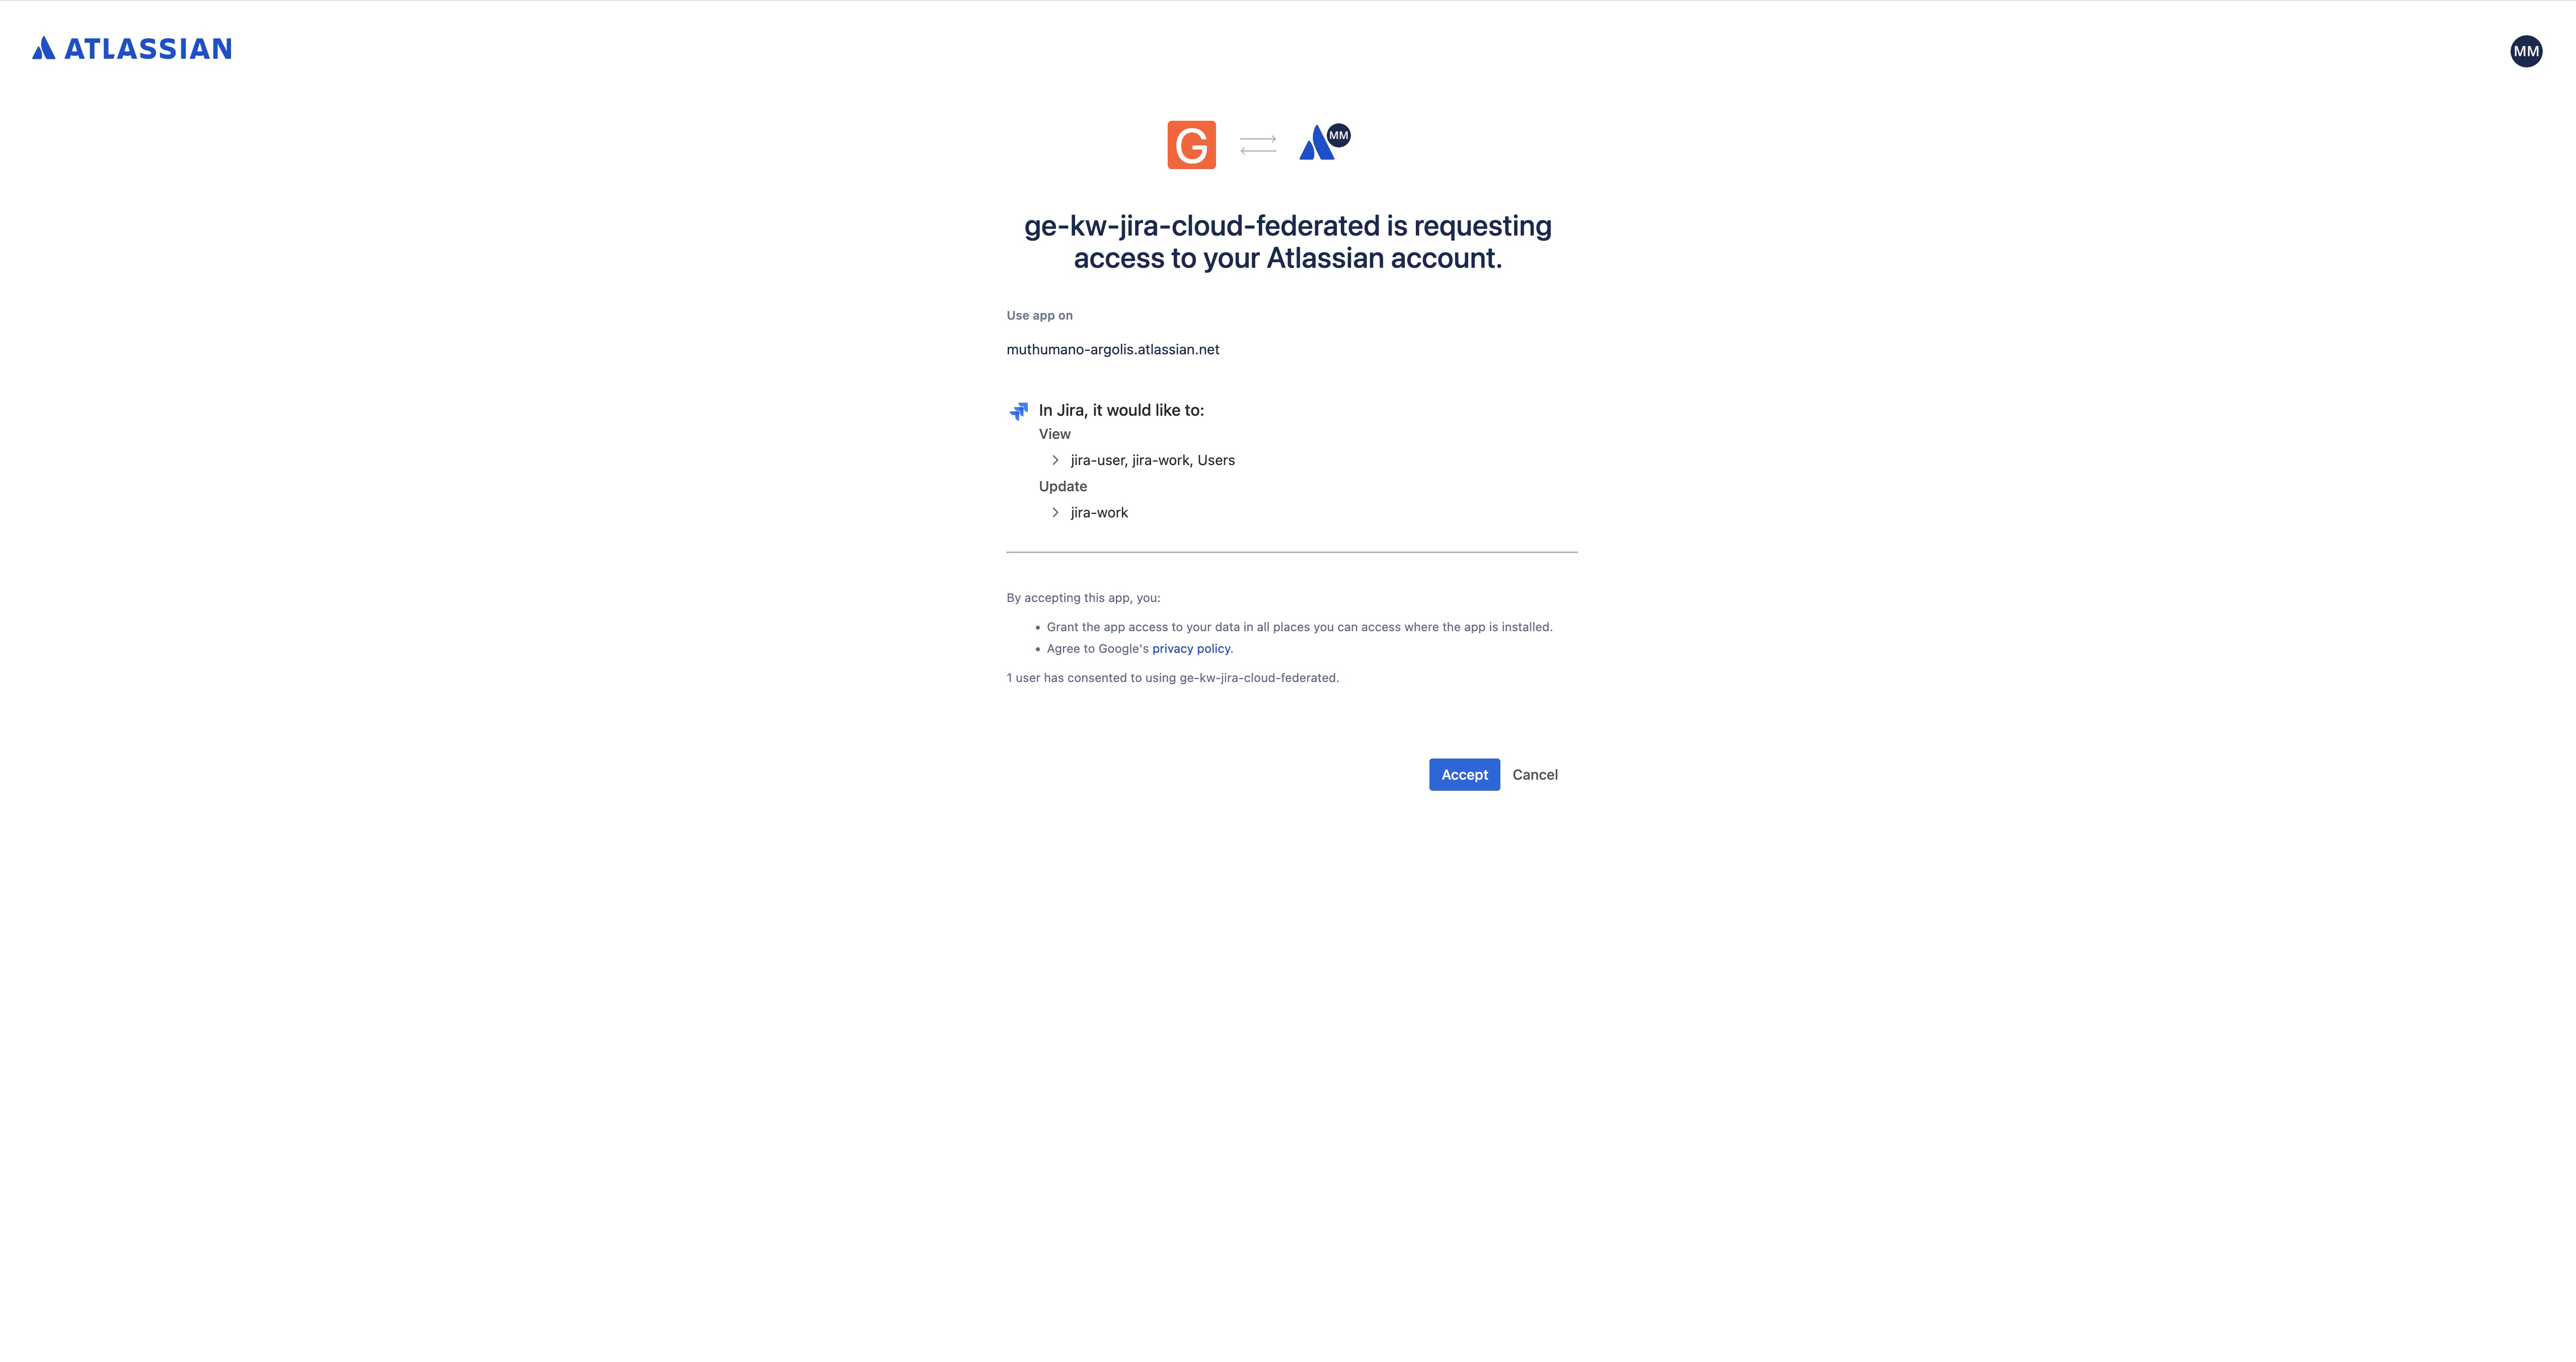
- A new browser tab will open prompting you to log into Atlassian. Complete the login and click Accept to authorize the integration.
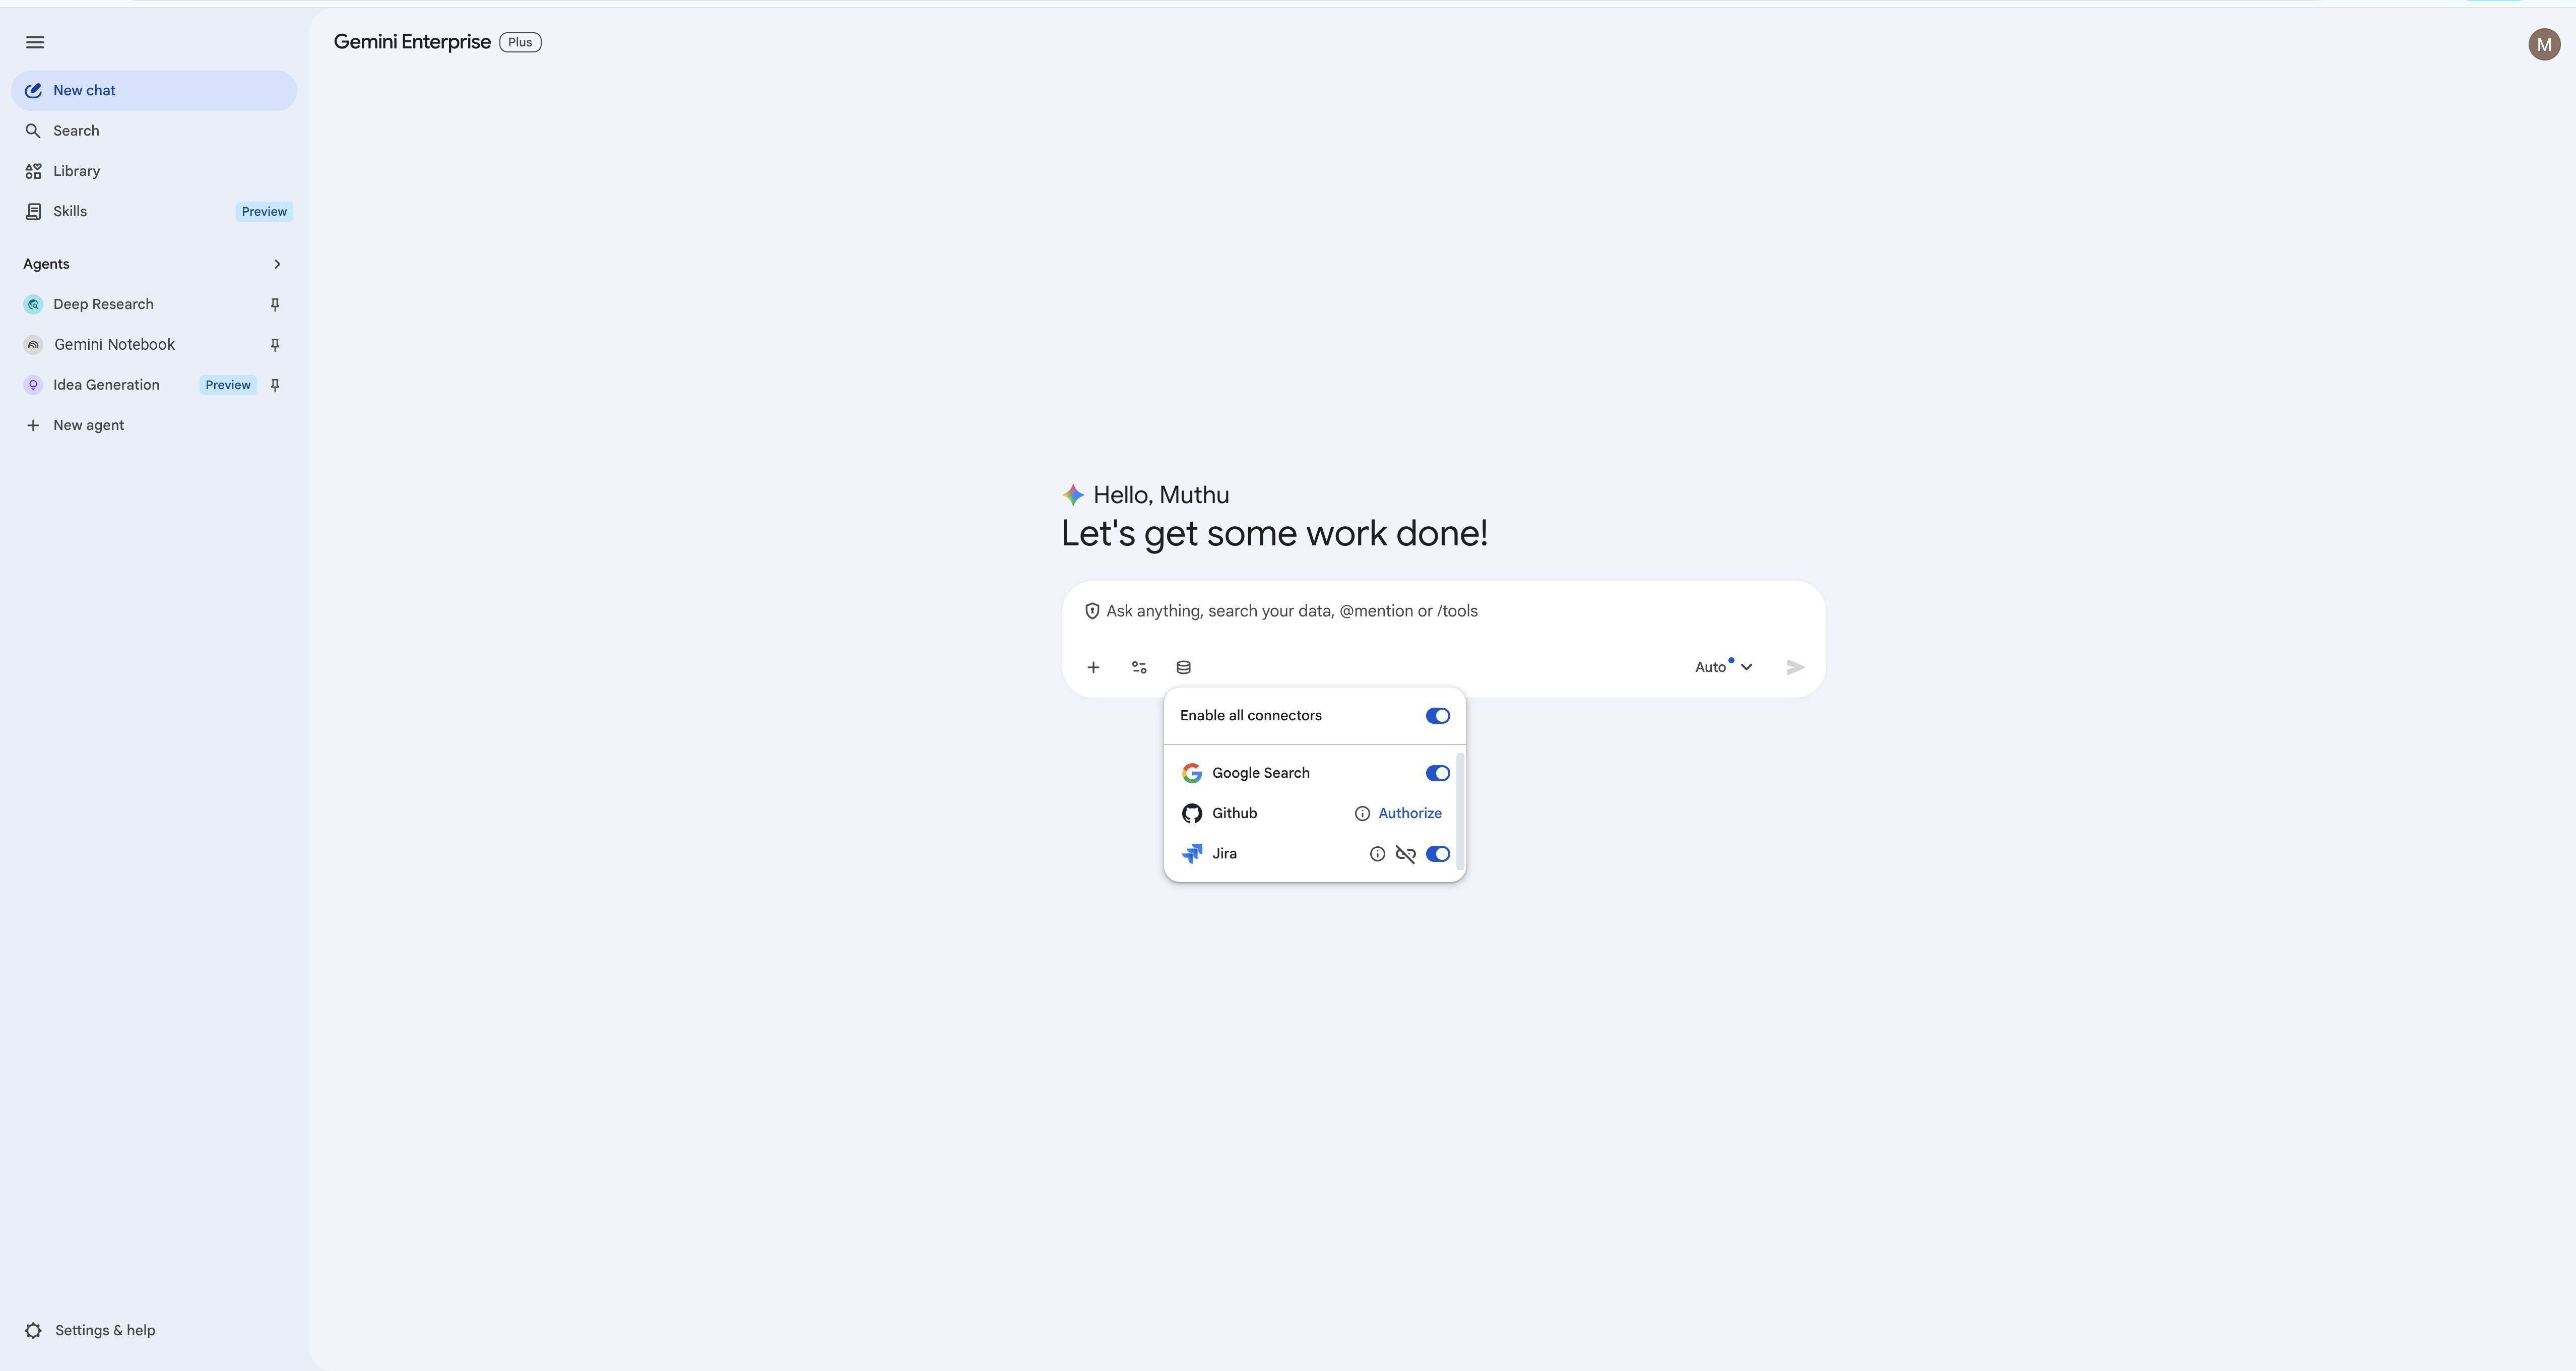
- Once authorized, the status toggle will turn blue, confirming the connector is active.
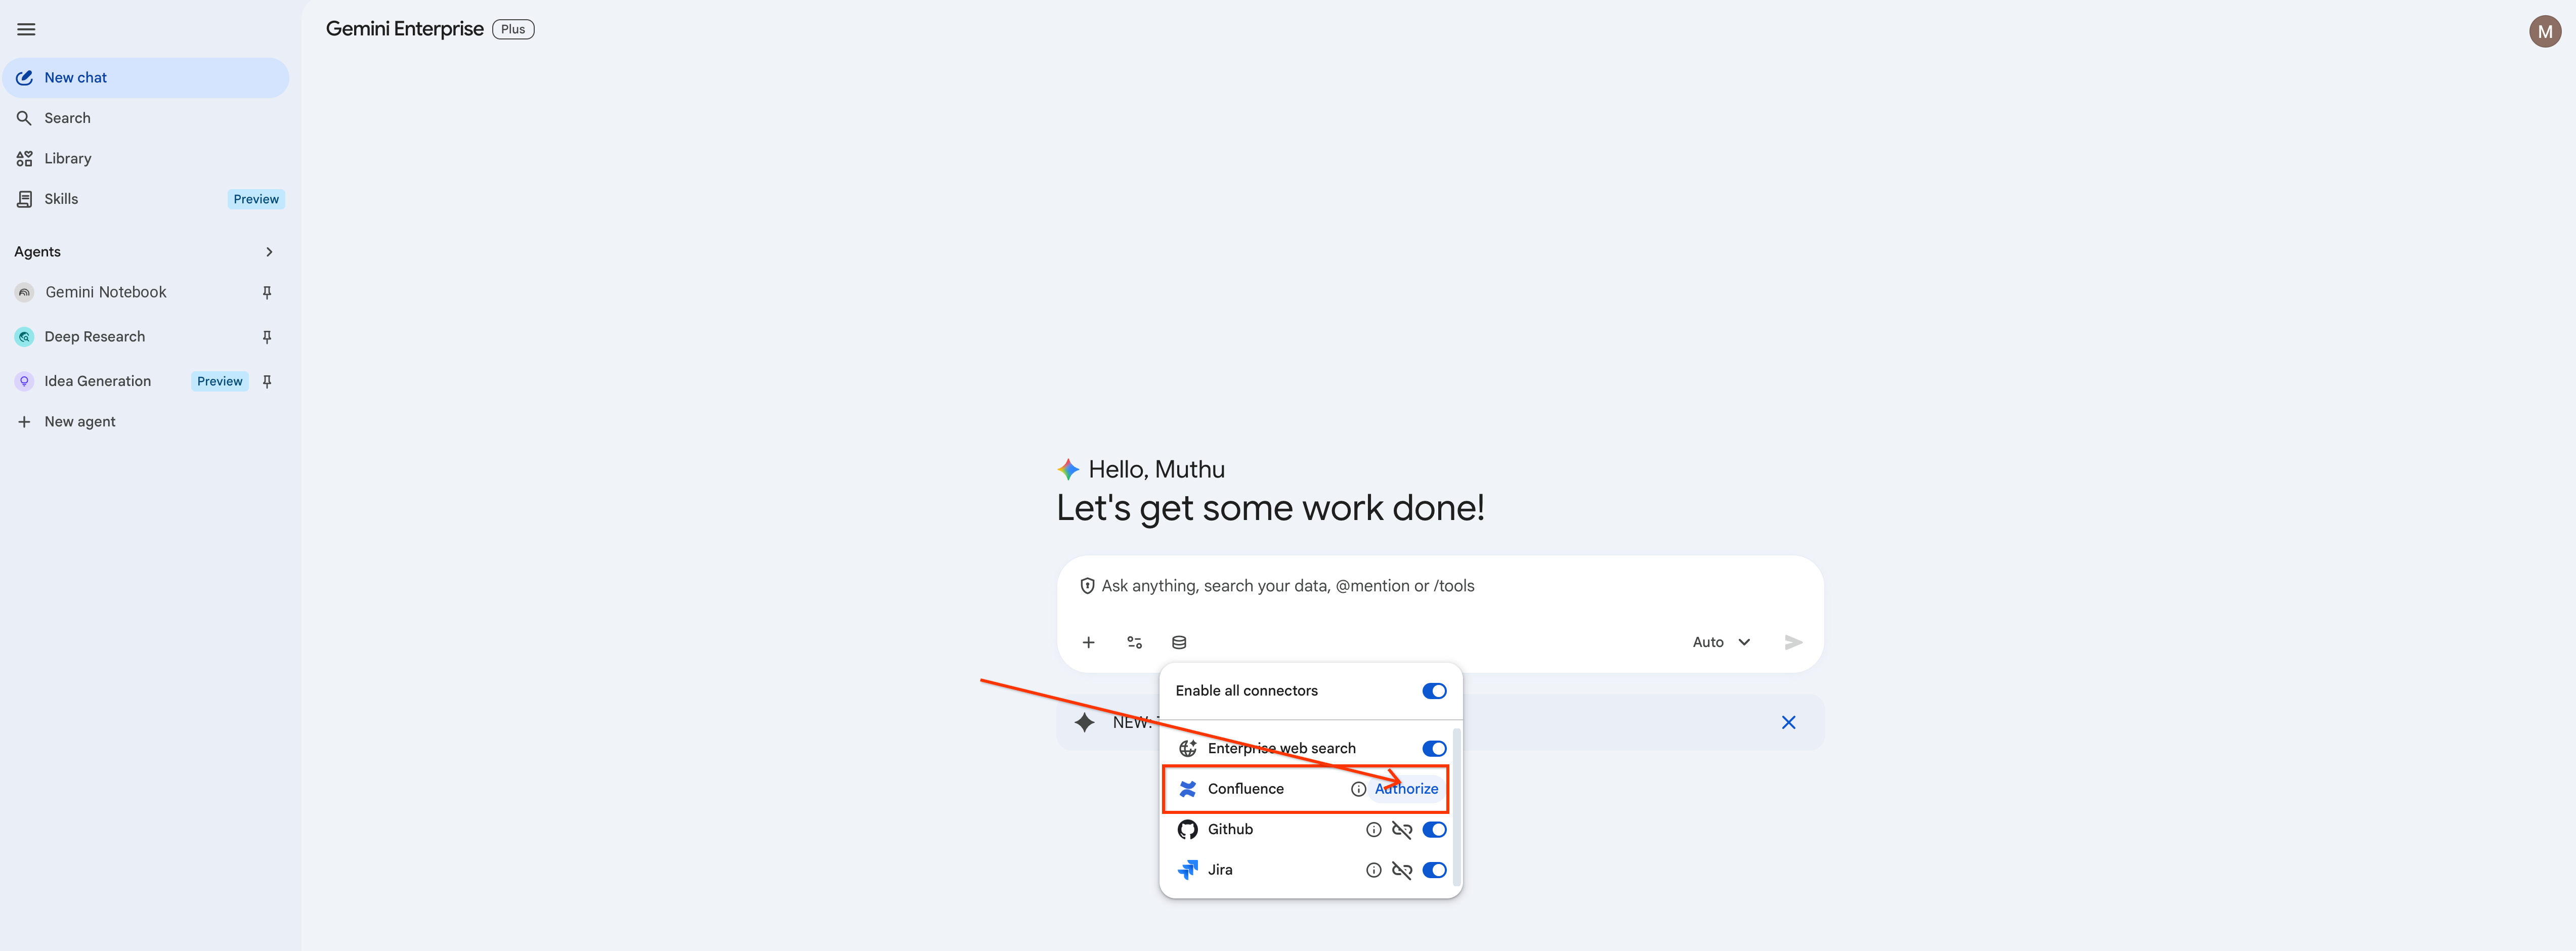
Step 3: Authorize Confluence Connector
- Locate the Confluence connector. Click Authorize next to it.
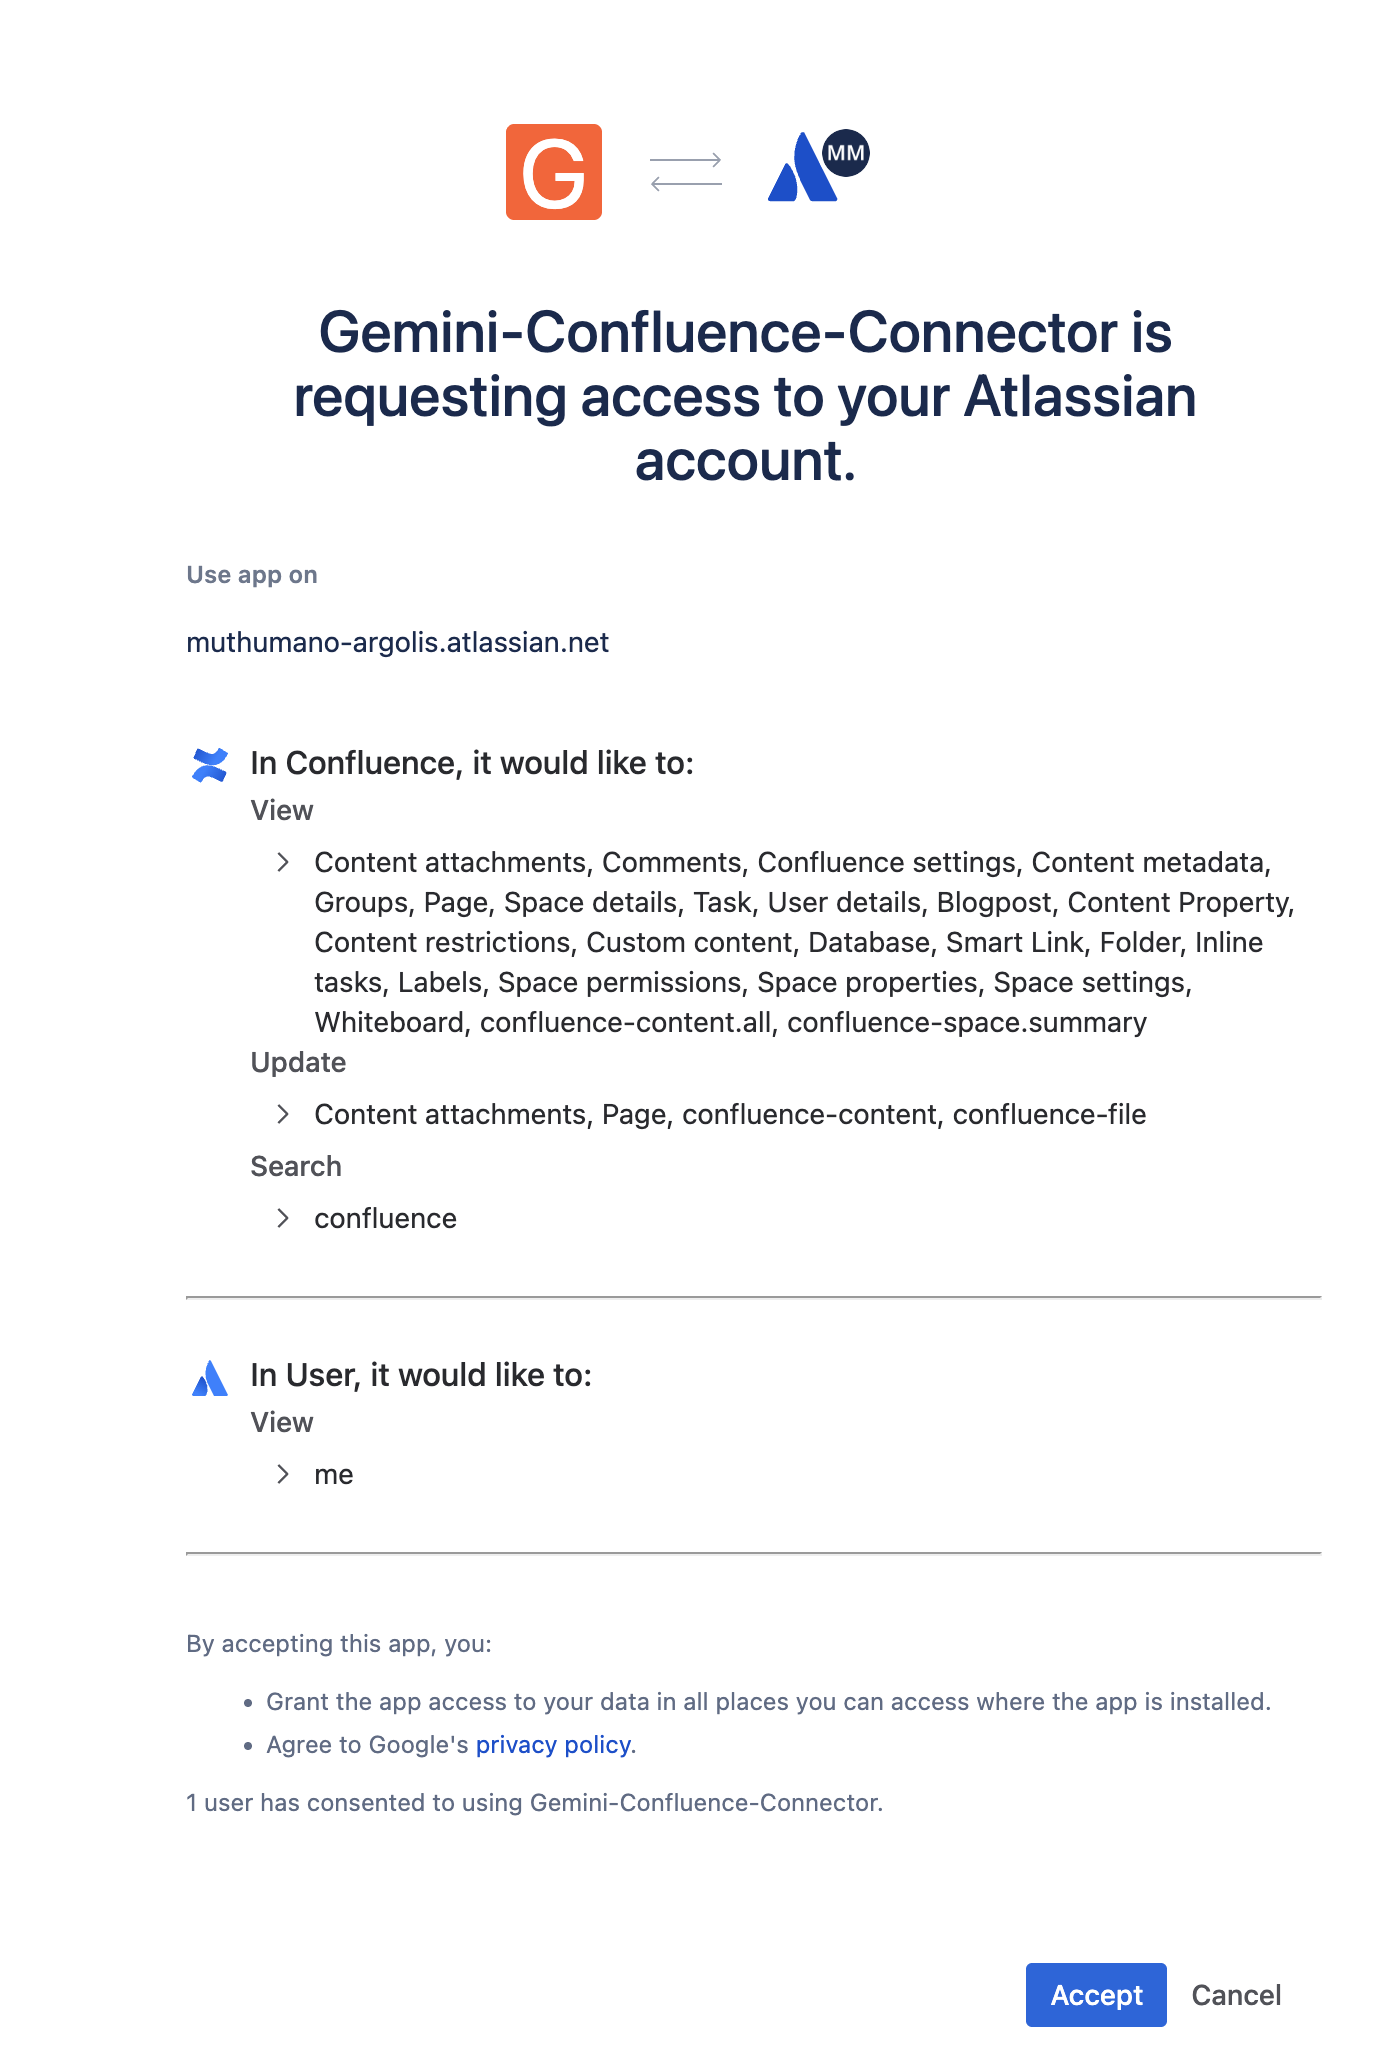
- Complete the Atlassian login and click Accept to authorize Confluence integration.
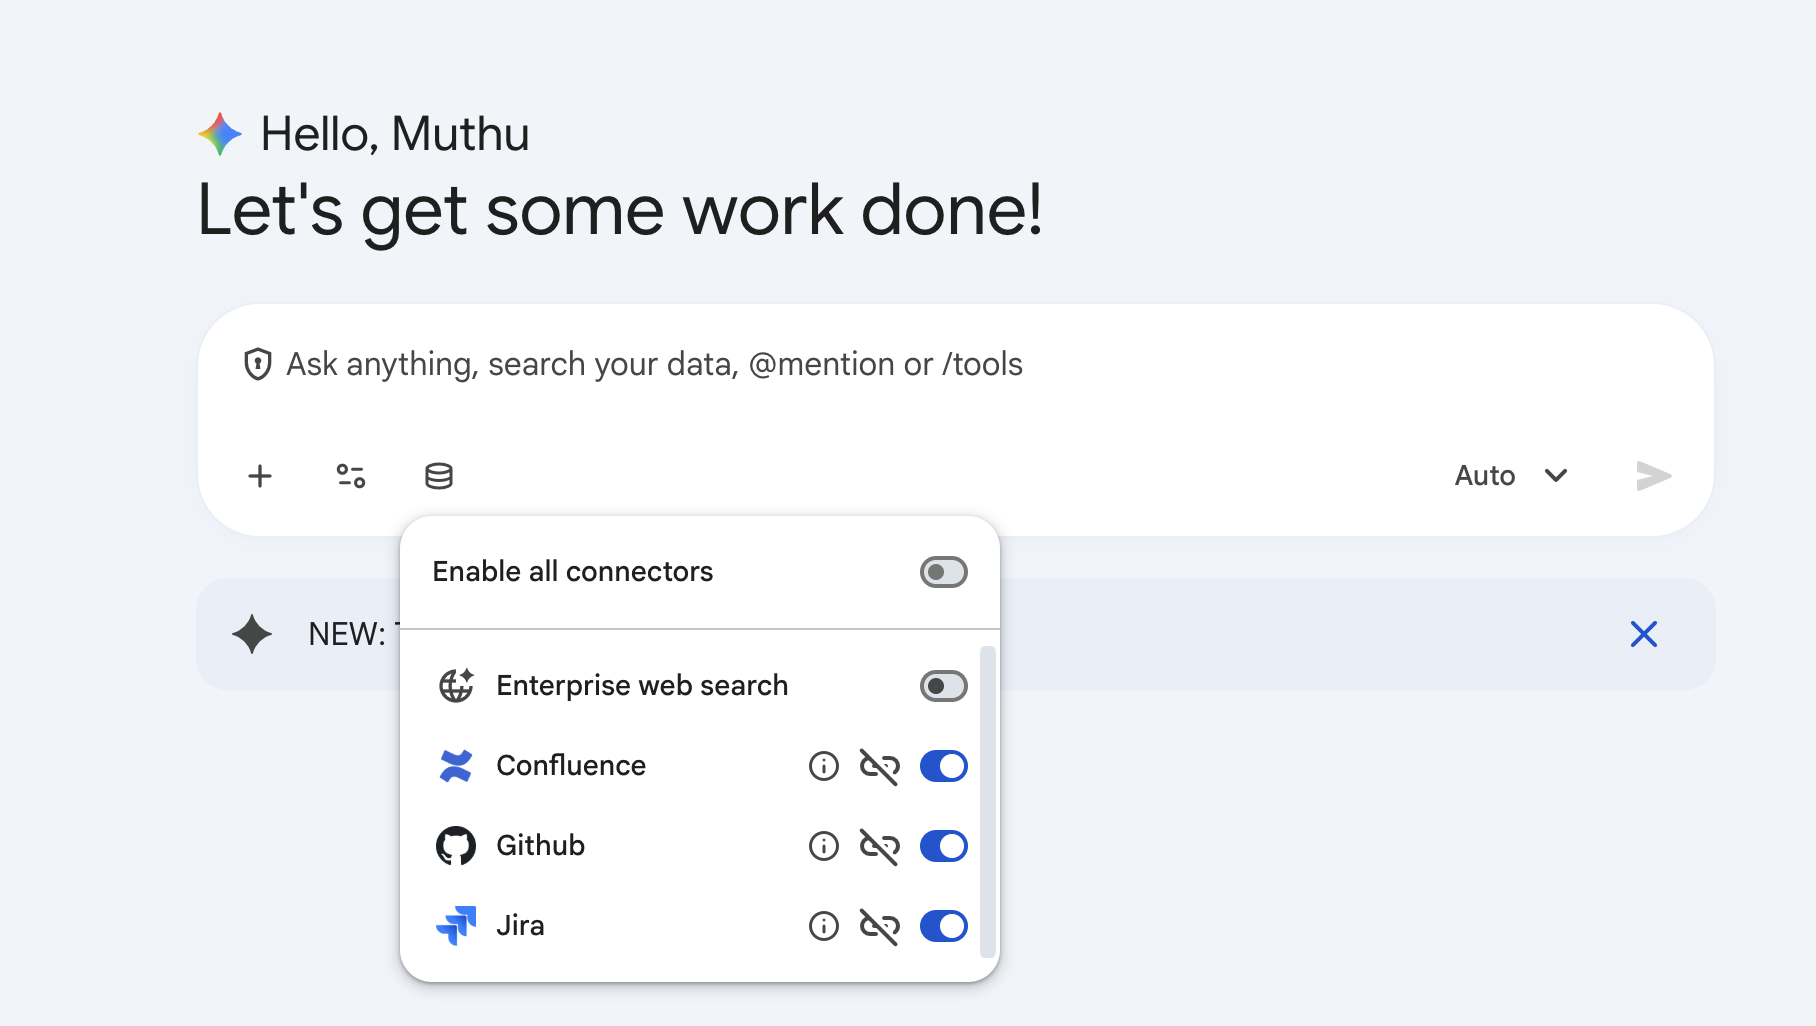
- Ensure the toggle turns blue, indicating Confluence is active.
Step 4: Authorize GitHub Connector
- Follow the exact same flow for the GitHub connector.
- Click Authorize, log into your GitHub account in the popup tab, and grant the requested permissions.
Step 5: Authorize Google Drive Connector
- Follow the same flow for the Google Drive connector.
- Click Authorize, select your workspace Google account, and grant read/write permissions to let the assistant create files in your Drive root directory.
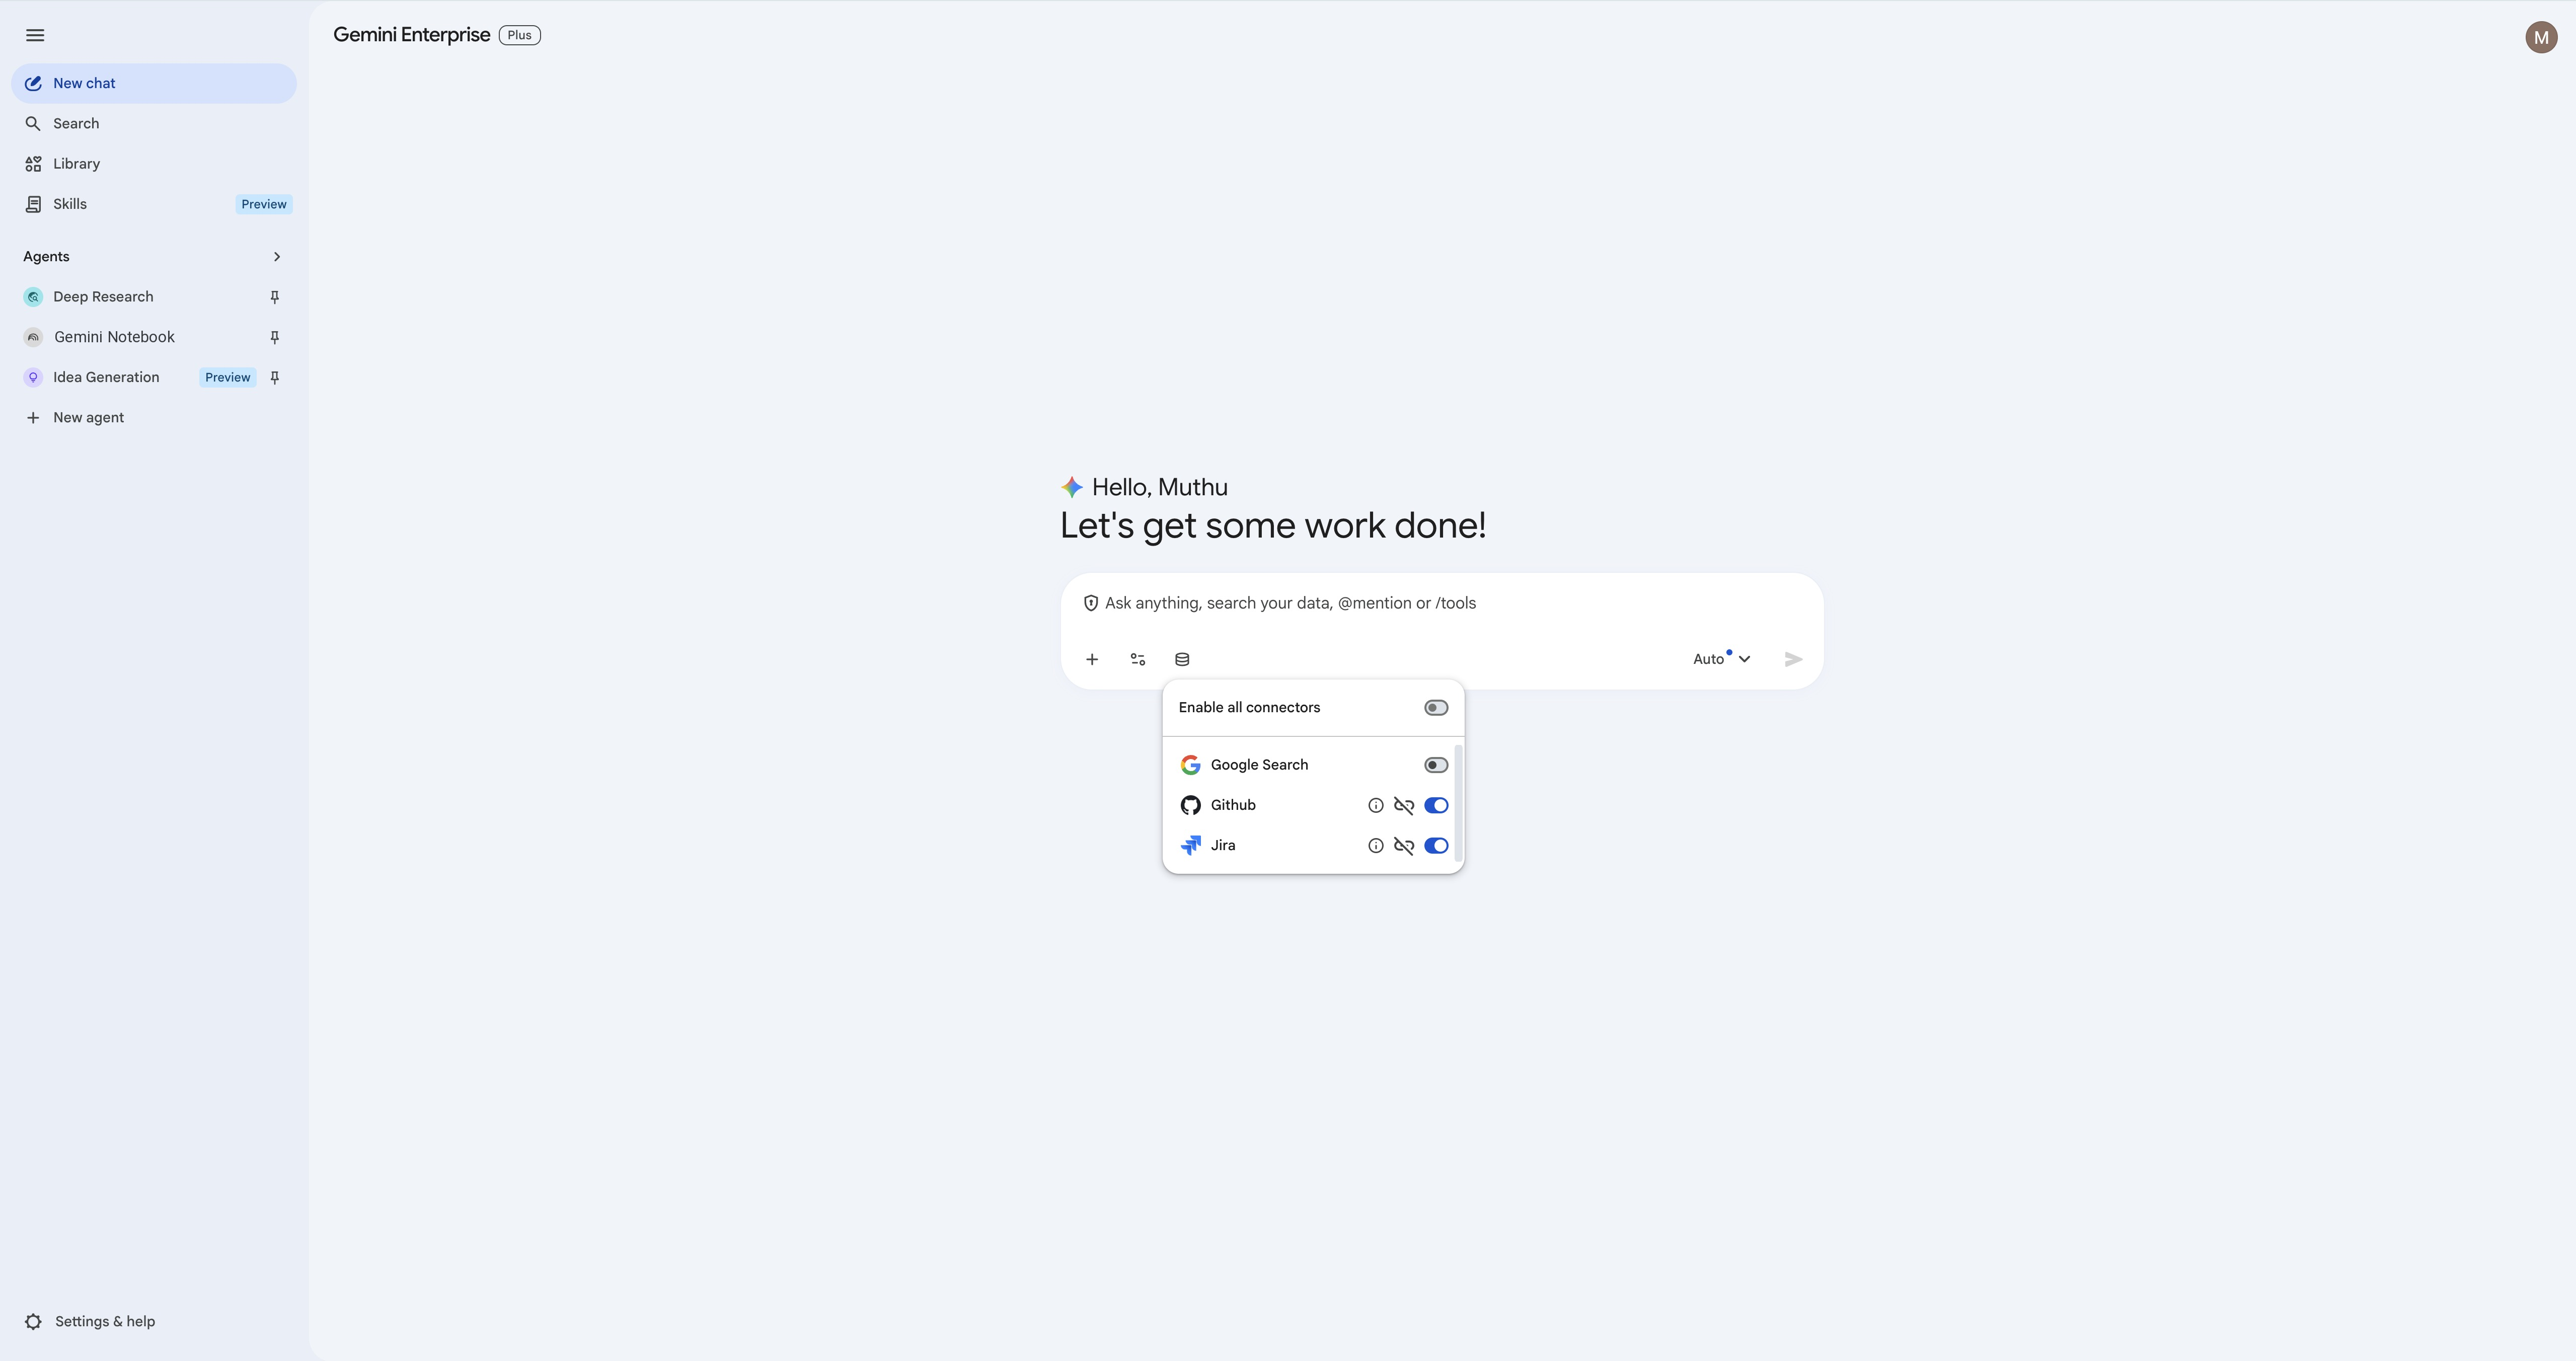
Step 6: Focus Connector Scope (Turn Off Google Search & Enterprise Search)
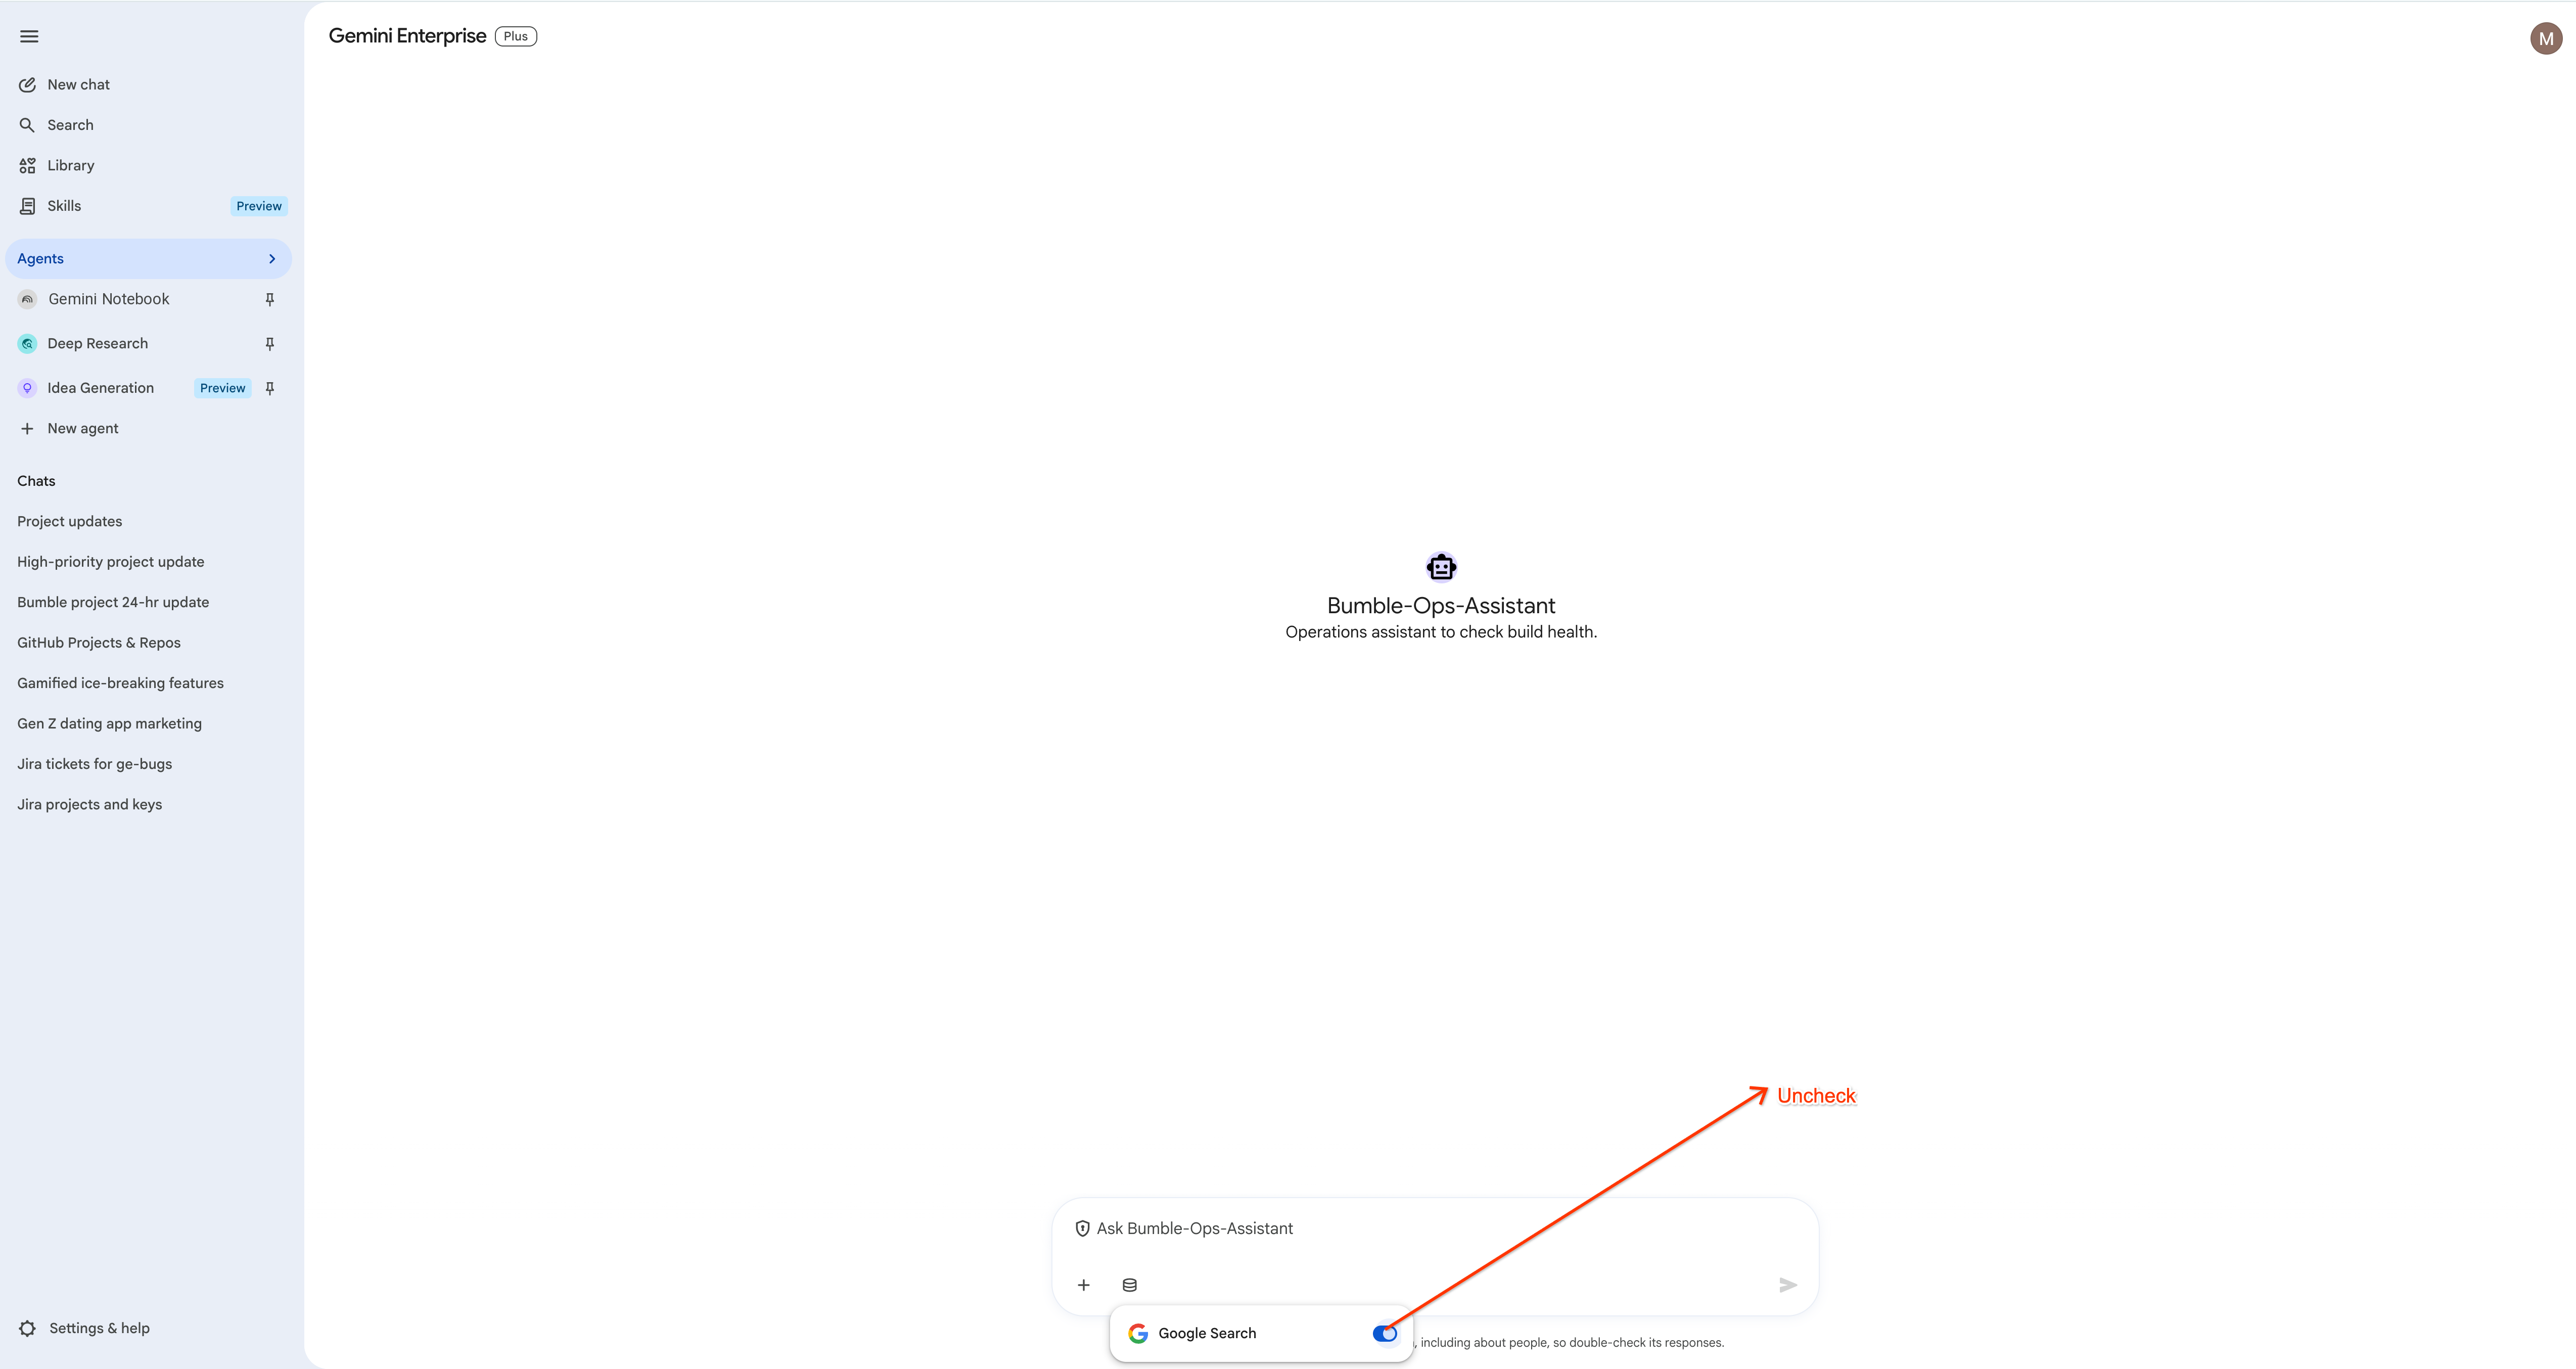
To get the most accurate results from your codebase and ticket tracker, it is best practice to turn off broad search. Depending on what is enabled in your Gemini Enterprise environment, you may see Google Search, Enterprise Search, or both — disable whichever ones are active. The labs are grounded only in the Jira, GitHub, and Confluence data you seeded earlier, so leaving any broad search on yields wrong results.
- Open the Database menu in the input box again.
- Turn off Google Search and Enterprise Search (whichever appear), keeping only Jira, Confluence, GitHub, and Google Drive active.
6. Basic Interactions with Jira Connector
In this step, you will practice performing basic ticket management tasks using natural language.
1. Find your Jira Project Key
Before creating or updating tickets, verify which project you have access to. Ask Gemini:
list the available Jira projects and their keys.
Gemini should return the exact projects connected to your data store: 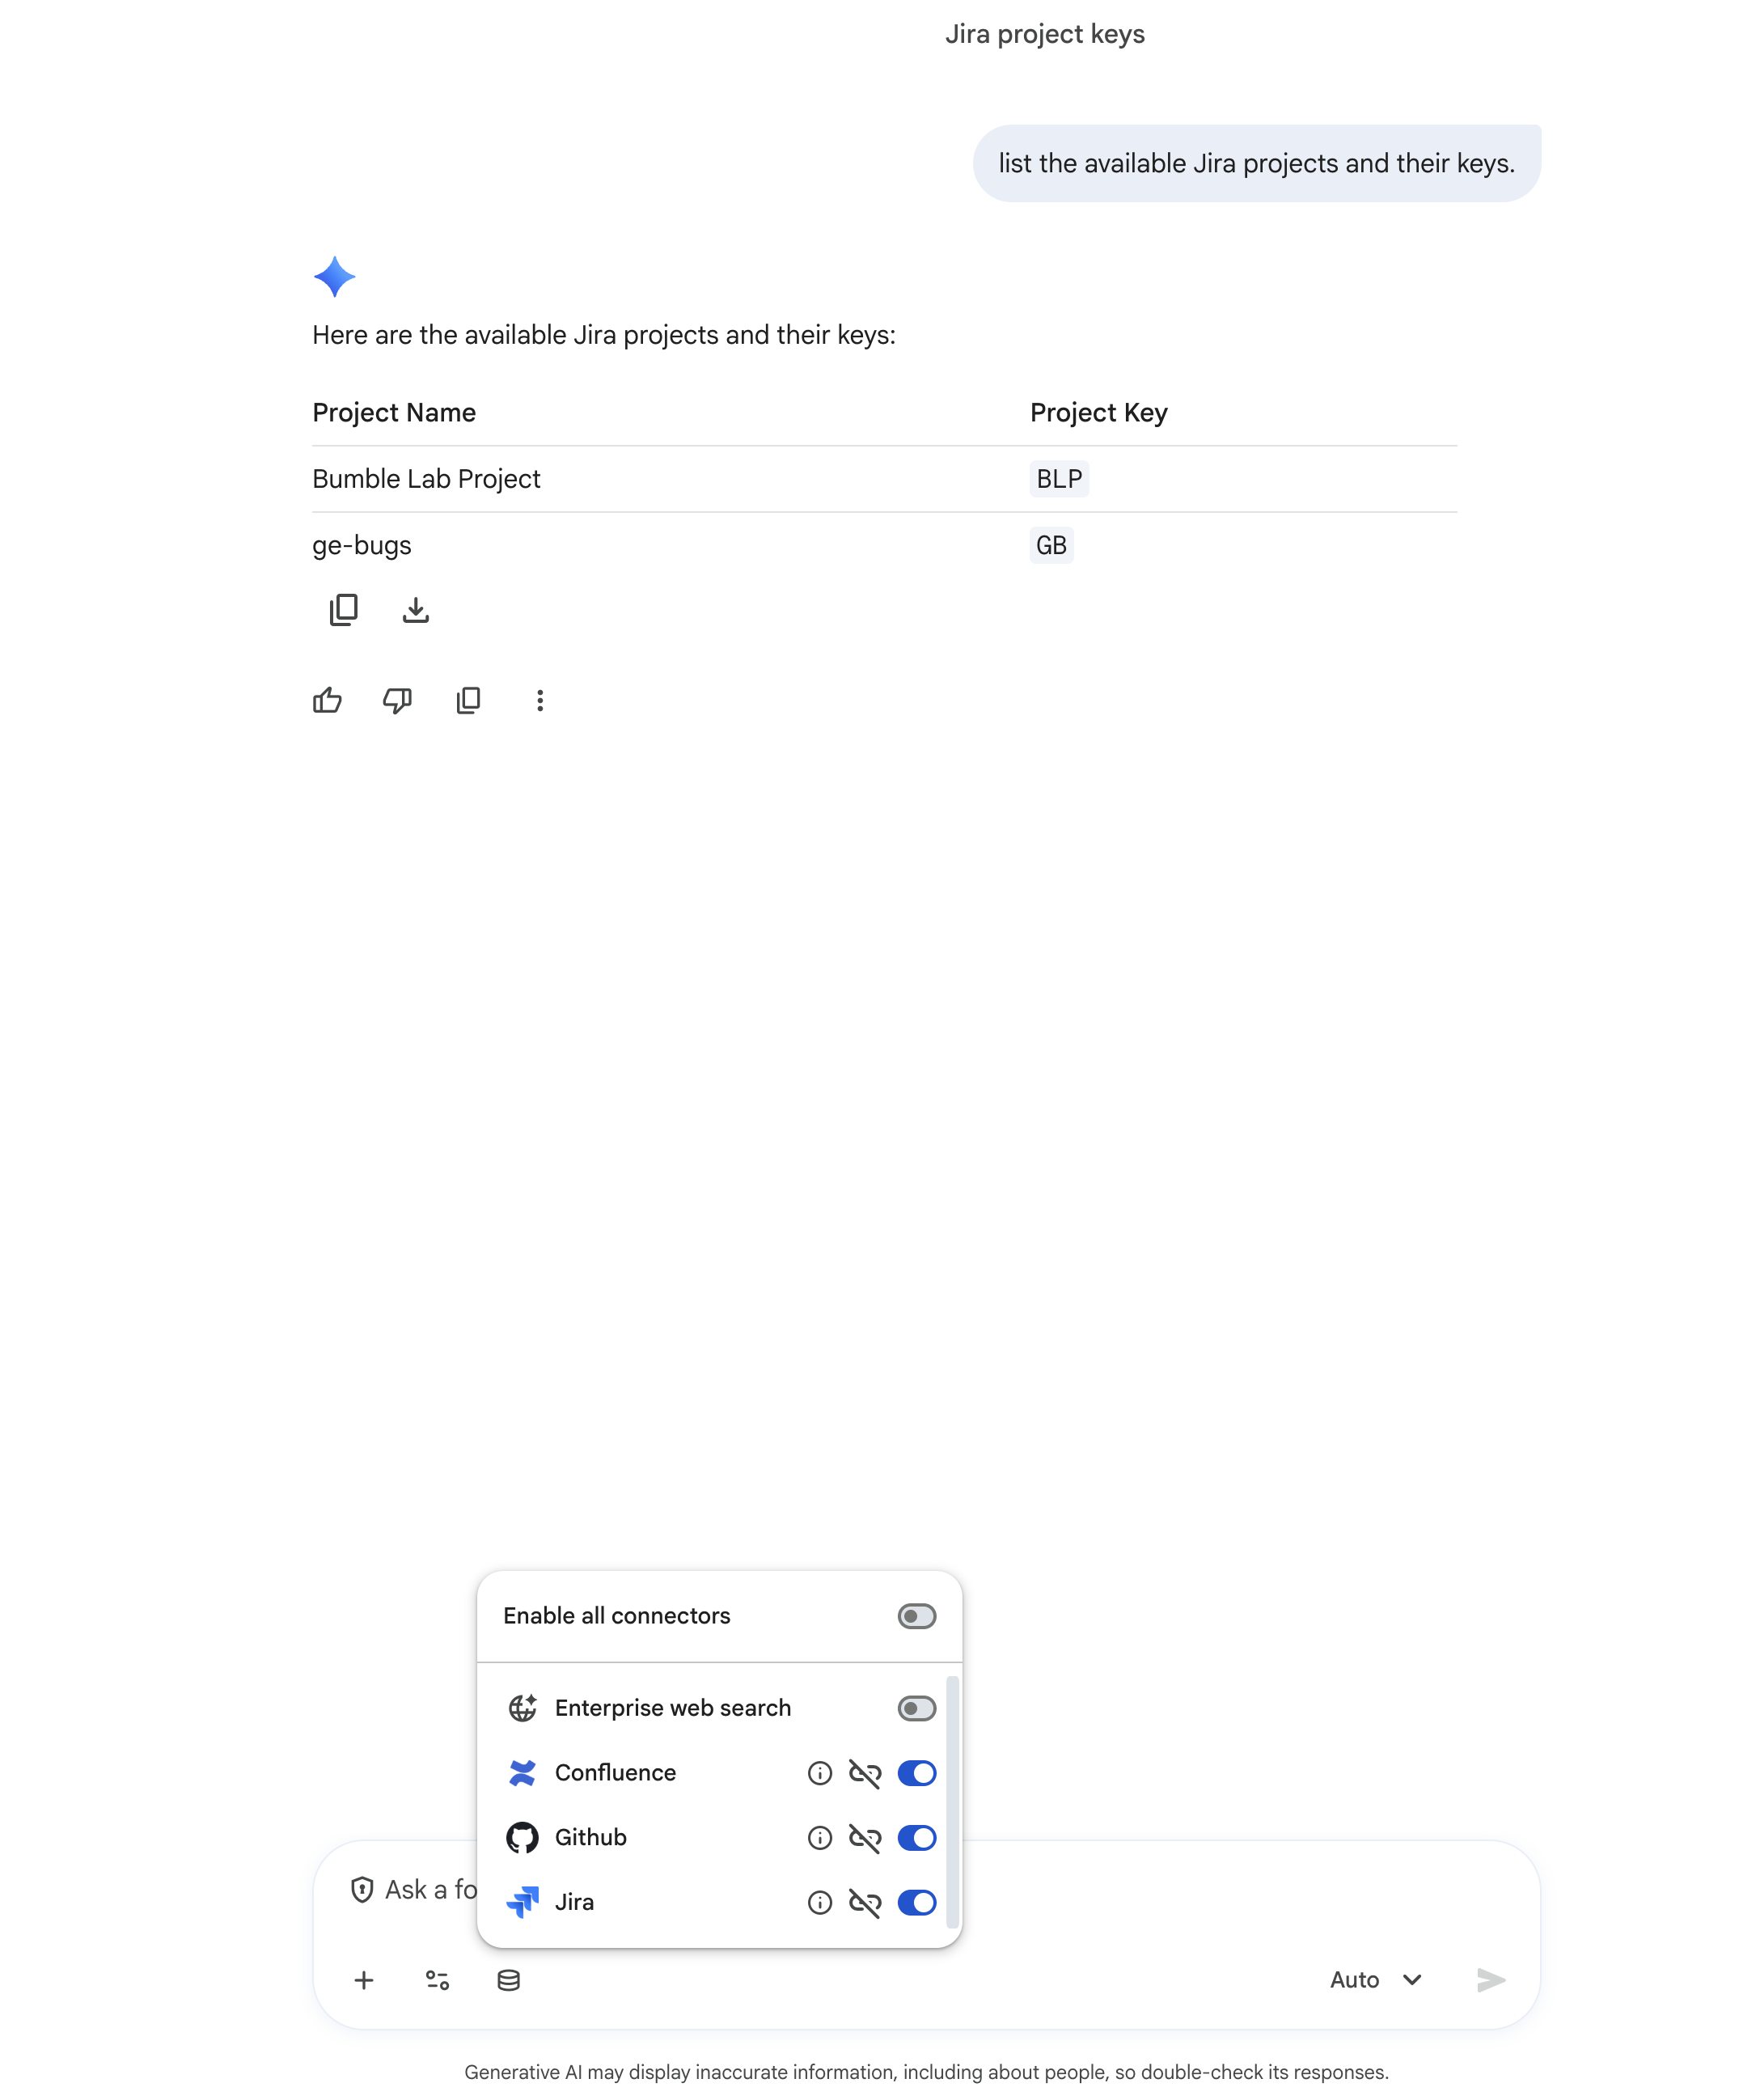
The examples below use the project key BLP. If your project auto-populated a different key earlier, replace BLP with your own key (and use the ticket key Gemini returns to you).
2. Create a Task
Ask Gemini to create a new task:
Create a new task in project BLP with summary 'Analyze user feedback for community feature' and description 'We need to summarize the feedback collected in Sprint 24'.
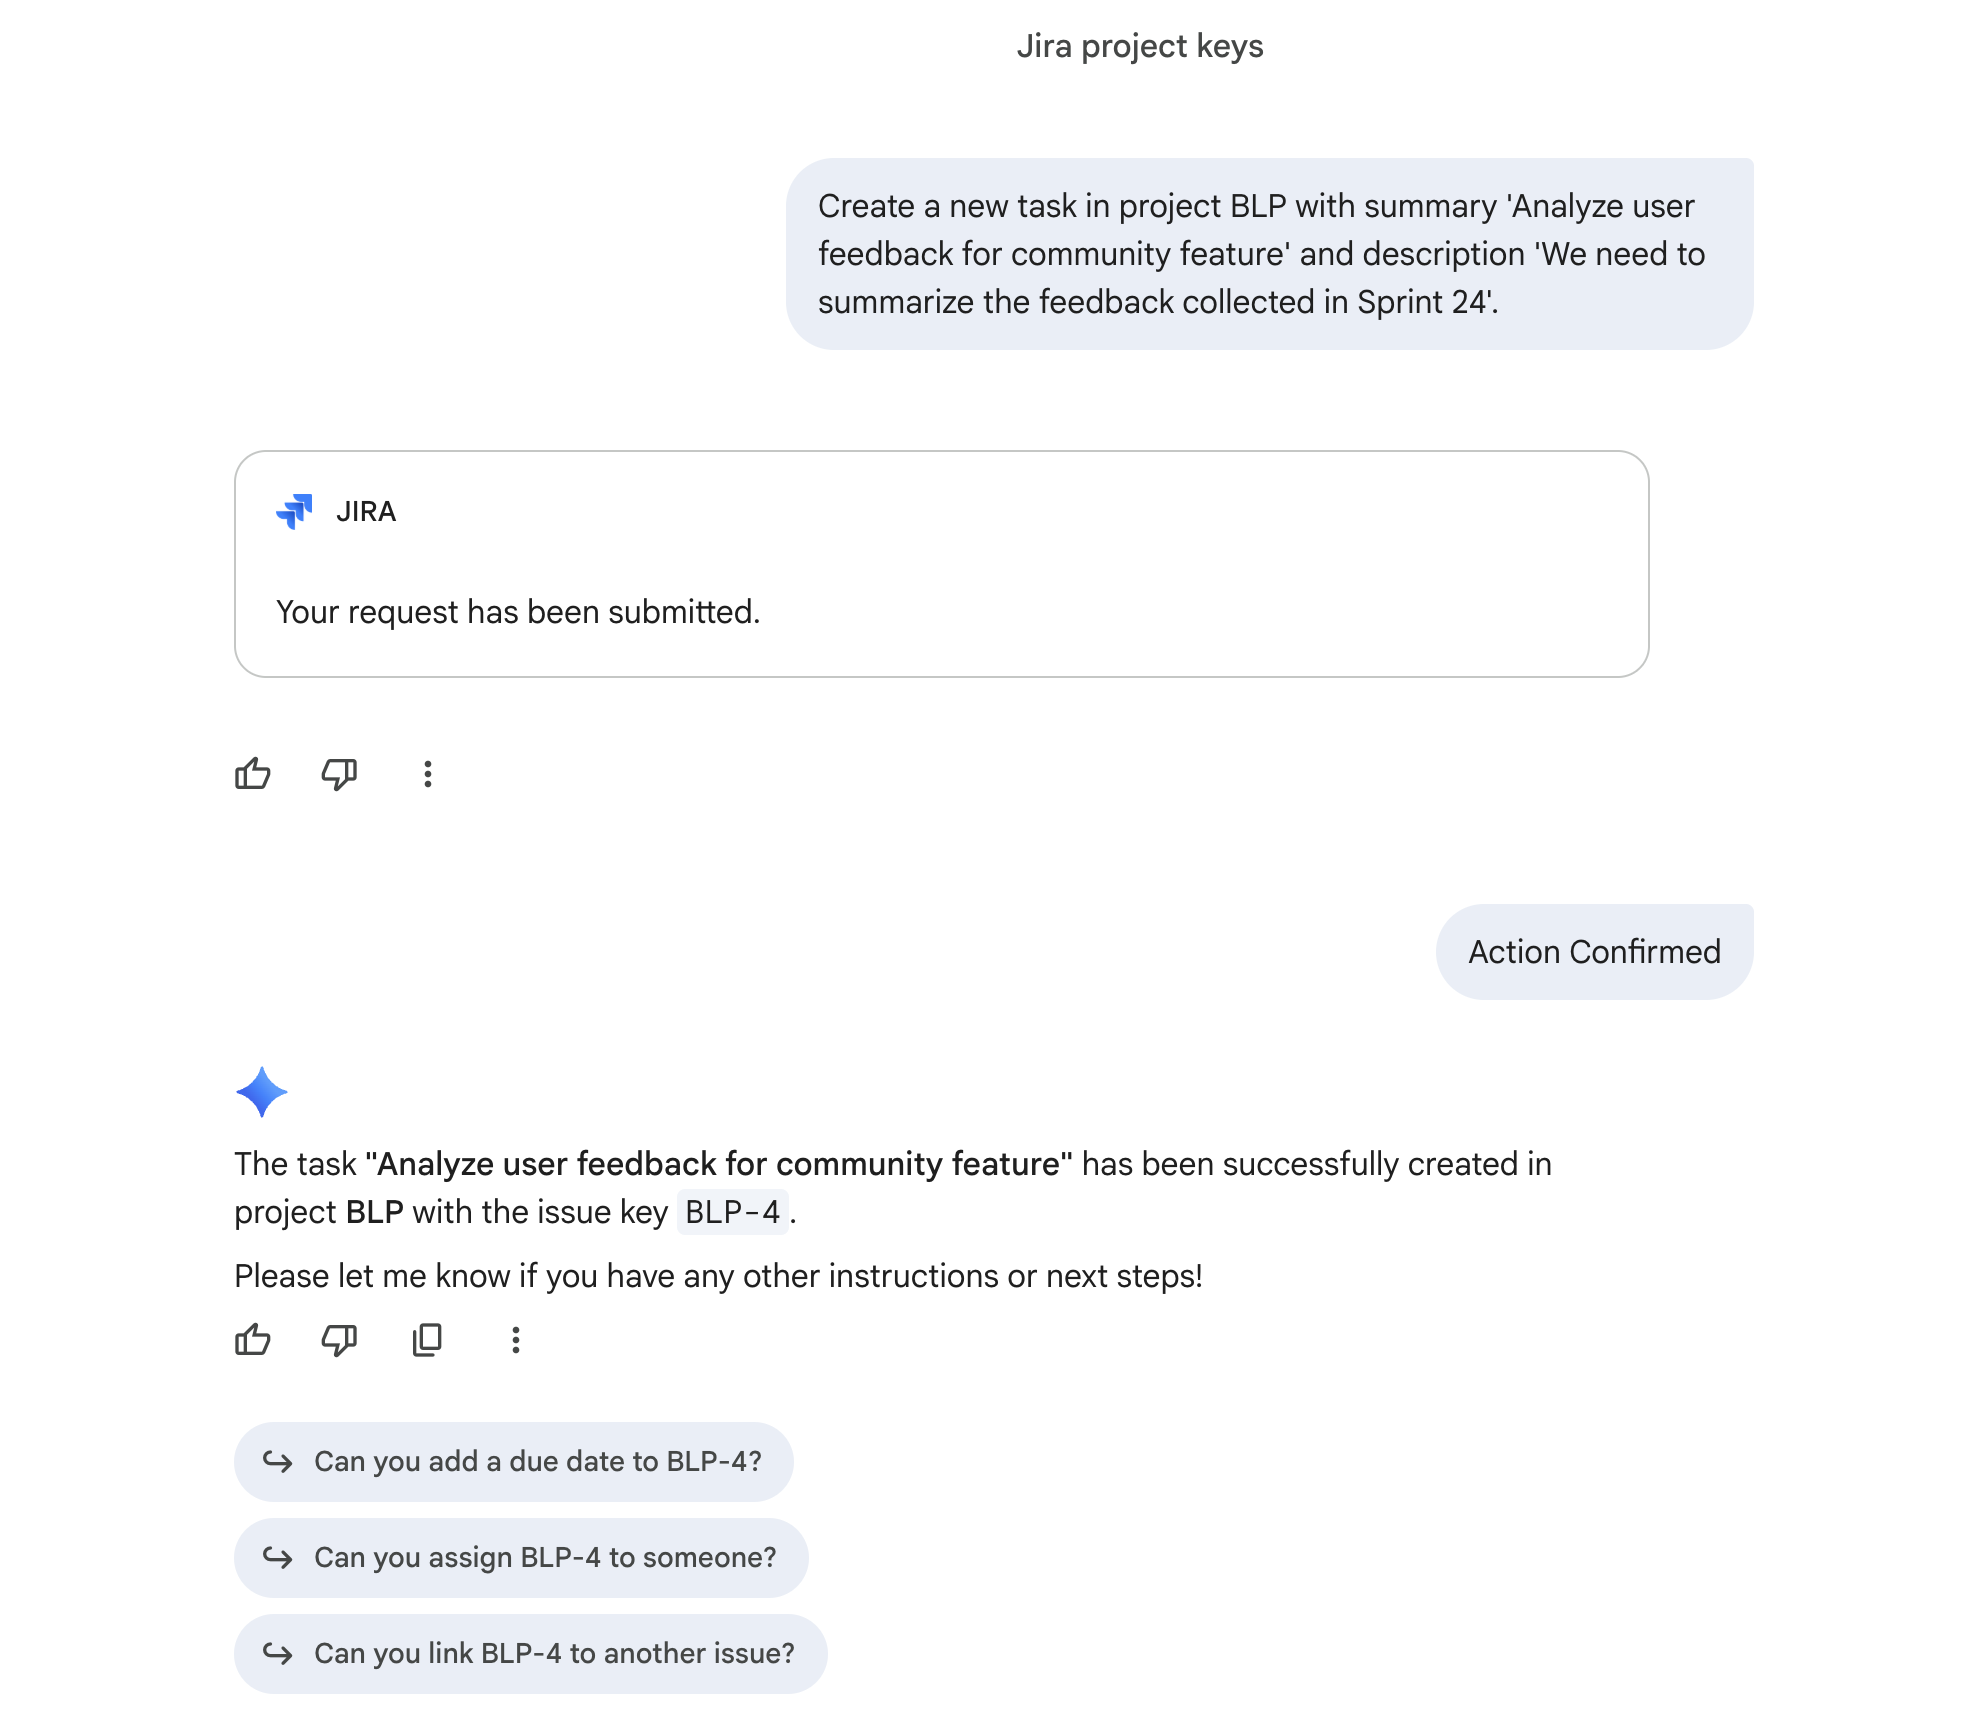
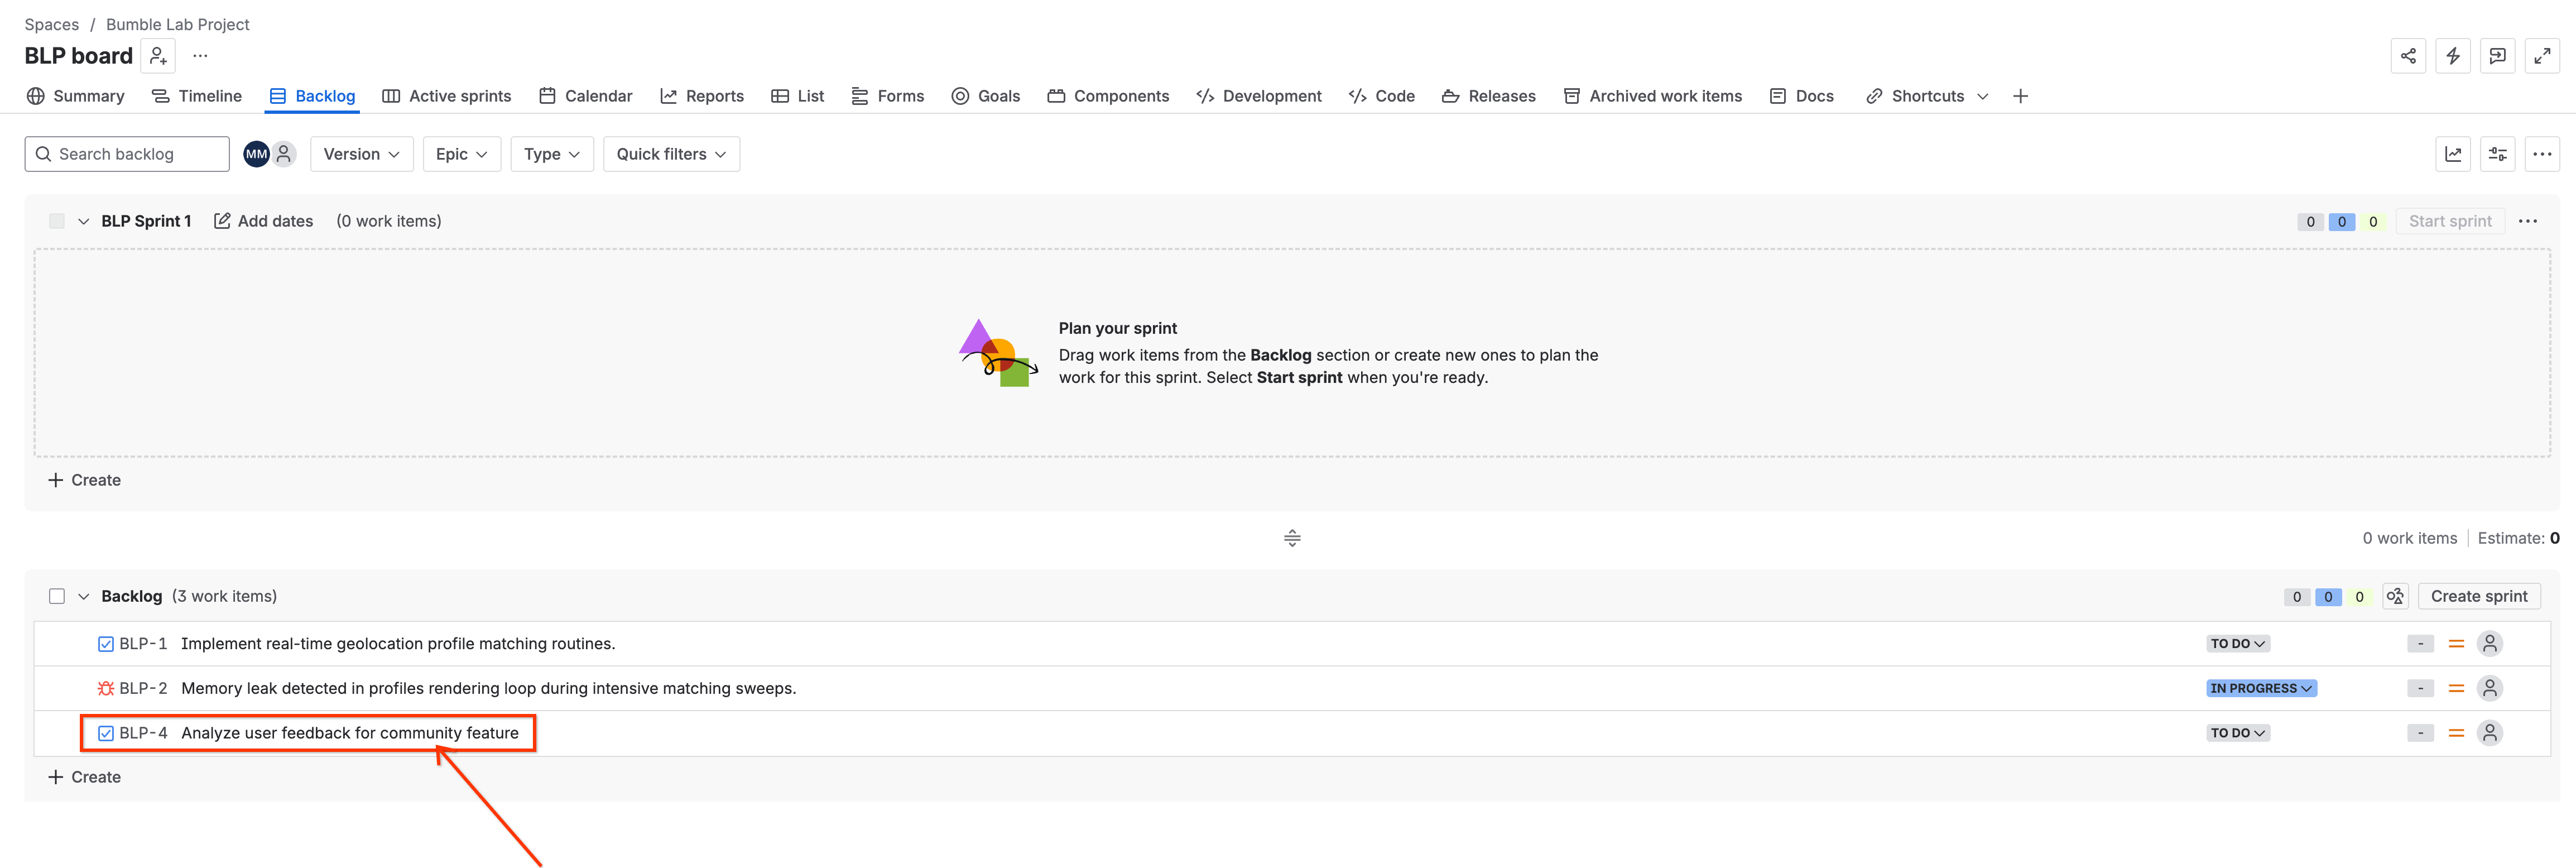
Gemini will process the request, communicate with Atlassian, and output a confirmation: 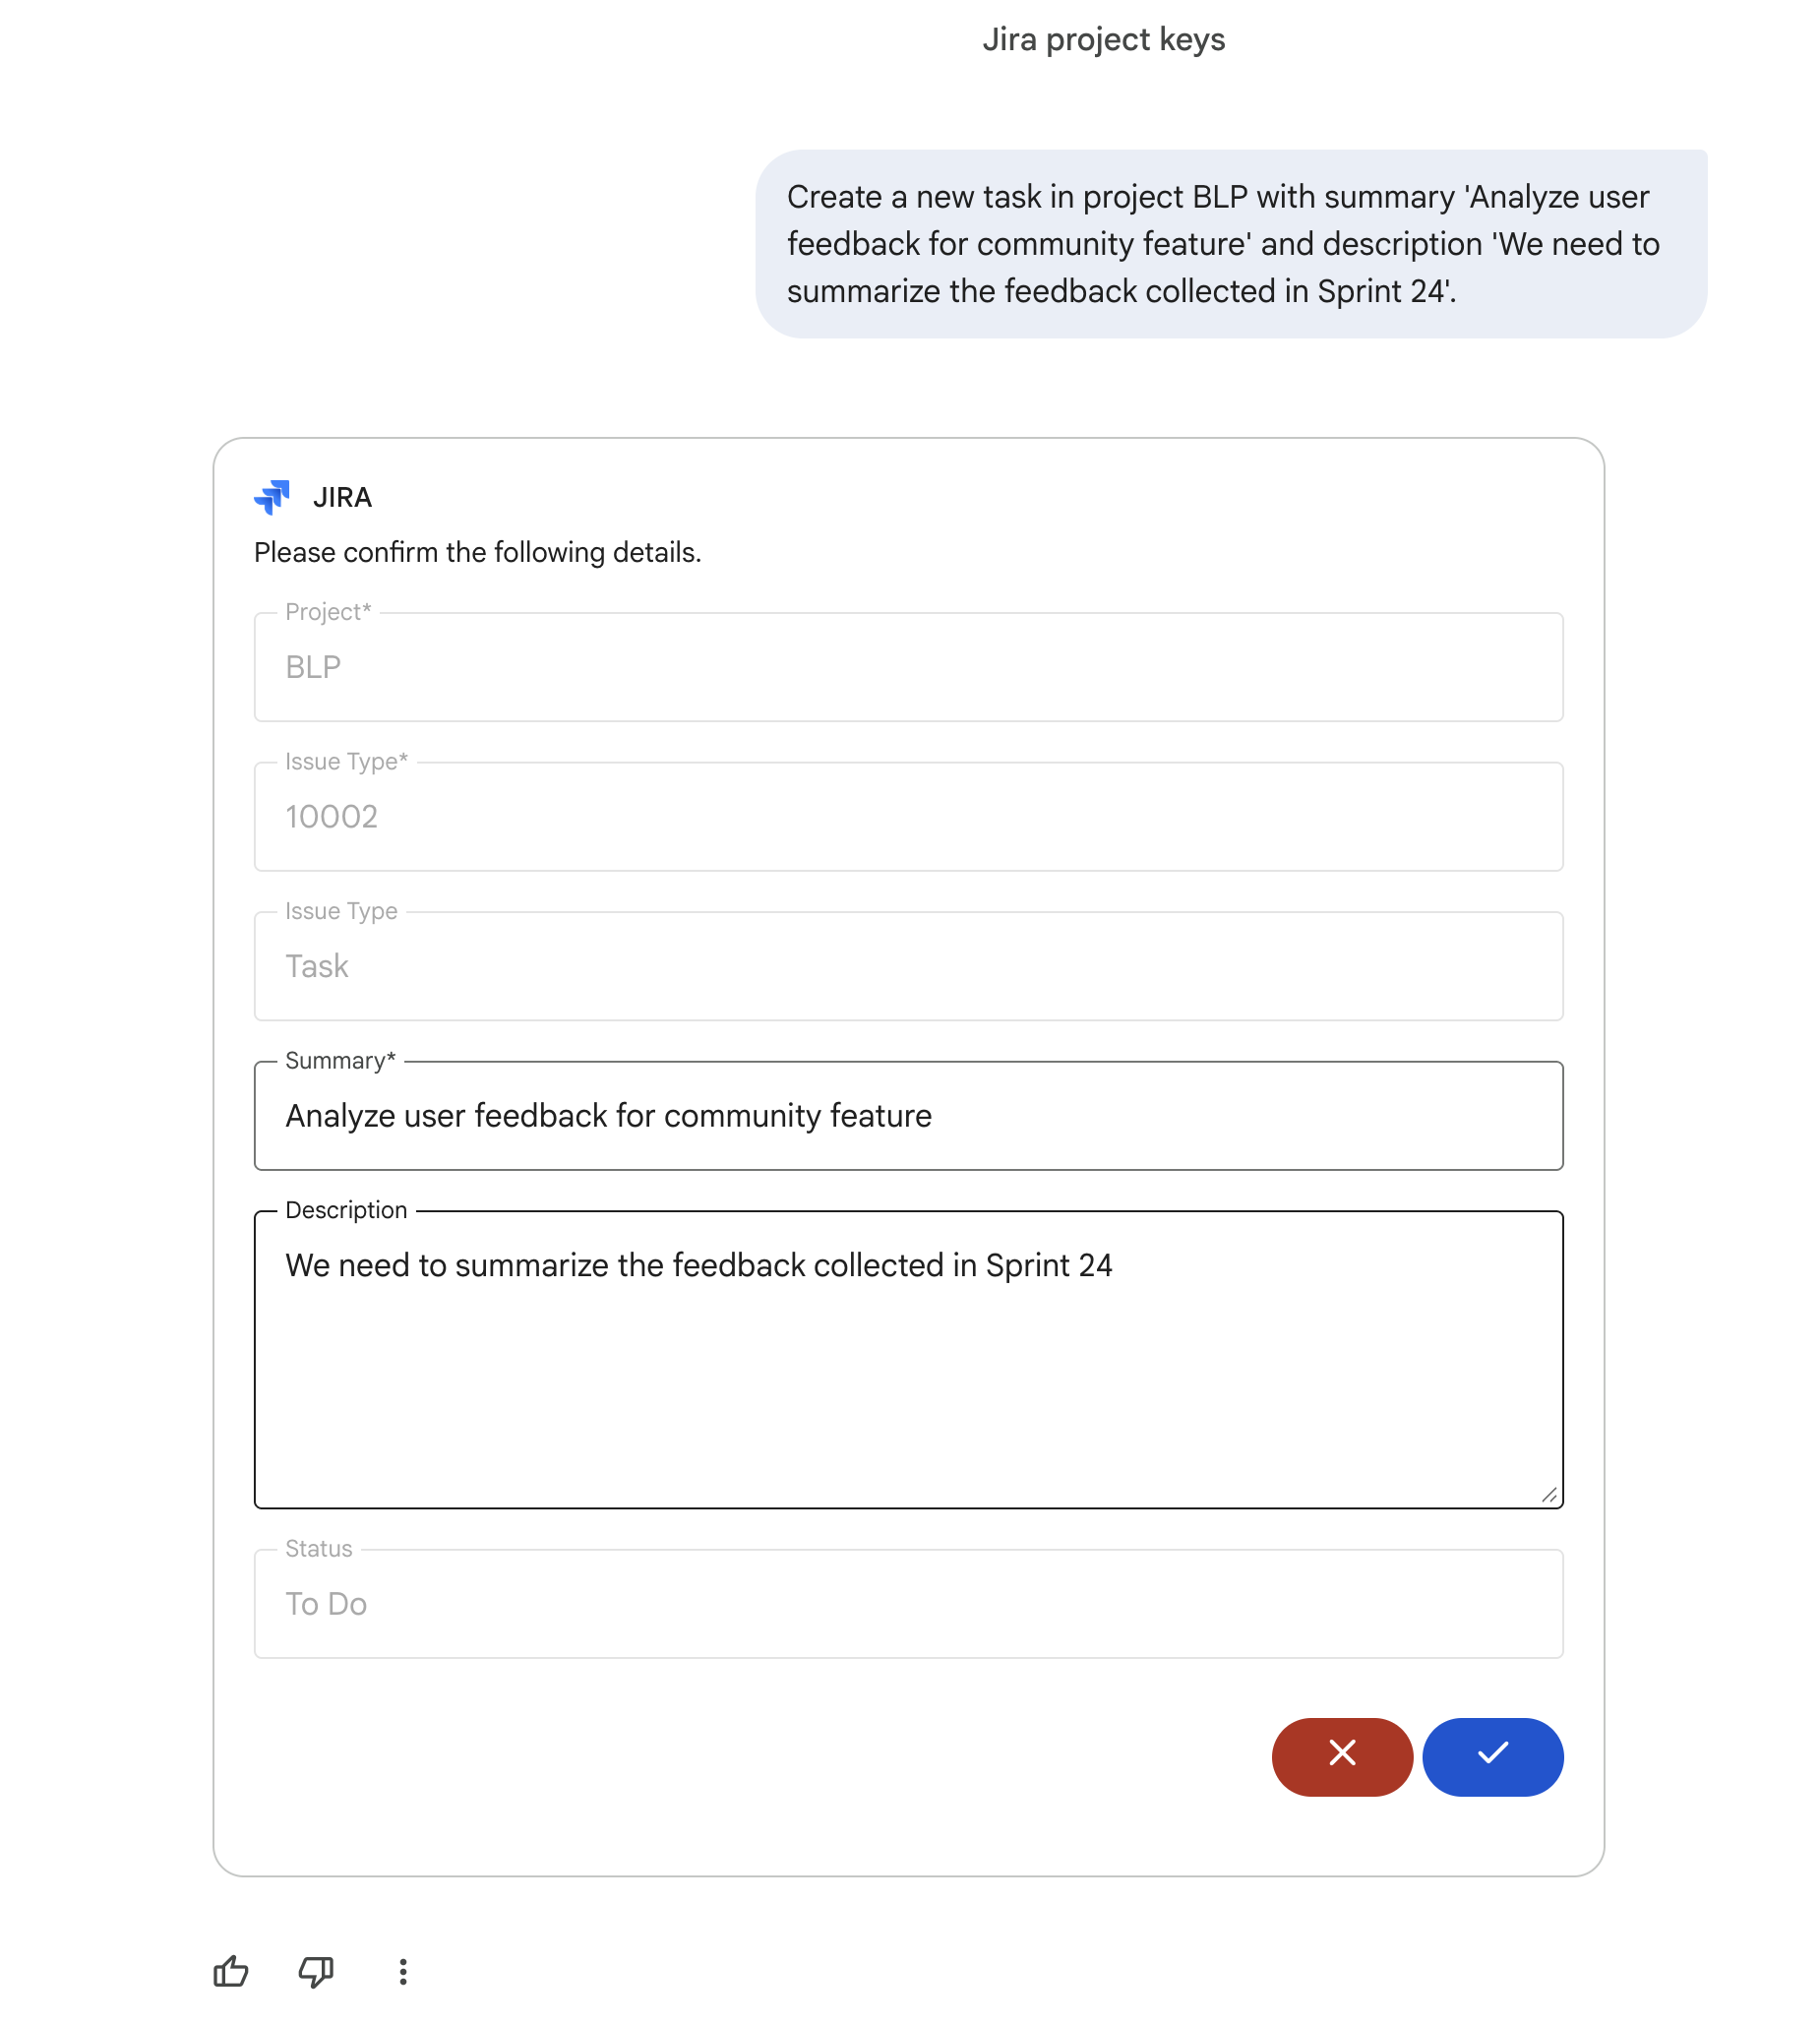
3. Add a Comment
Once the ticket is created and Gemini gives you the key (e.g., BLP-4), add a comment. Replace BLP-4 with the ticket key Gemini returned:
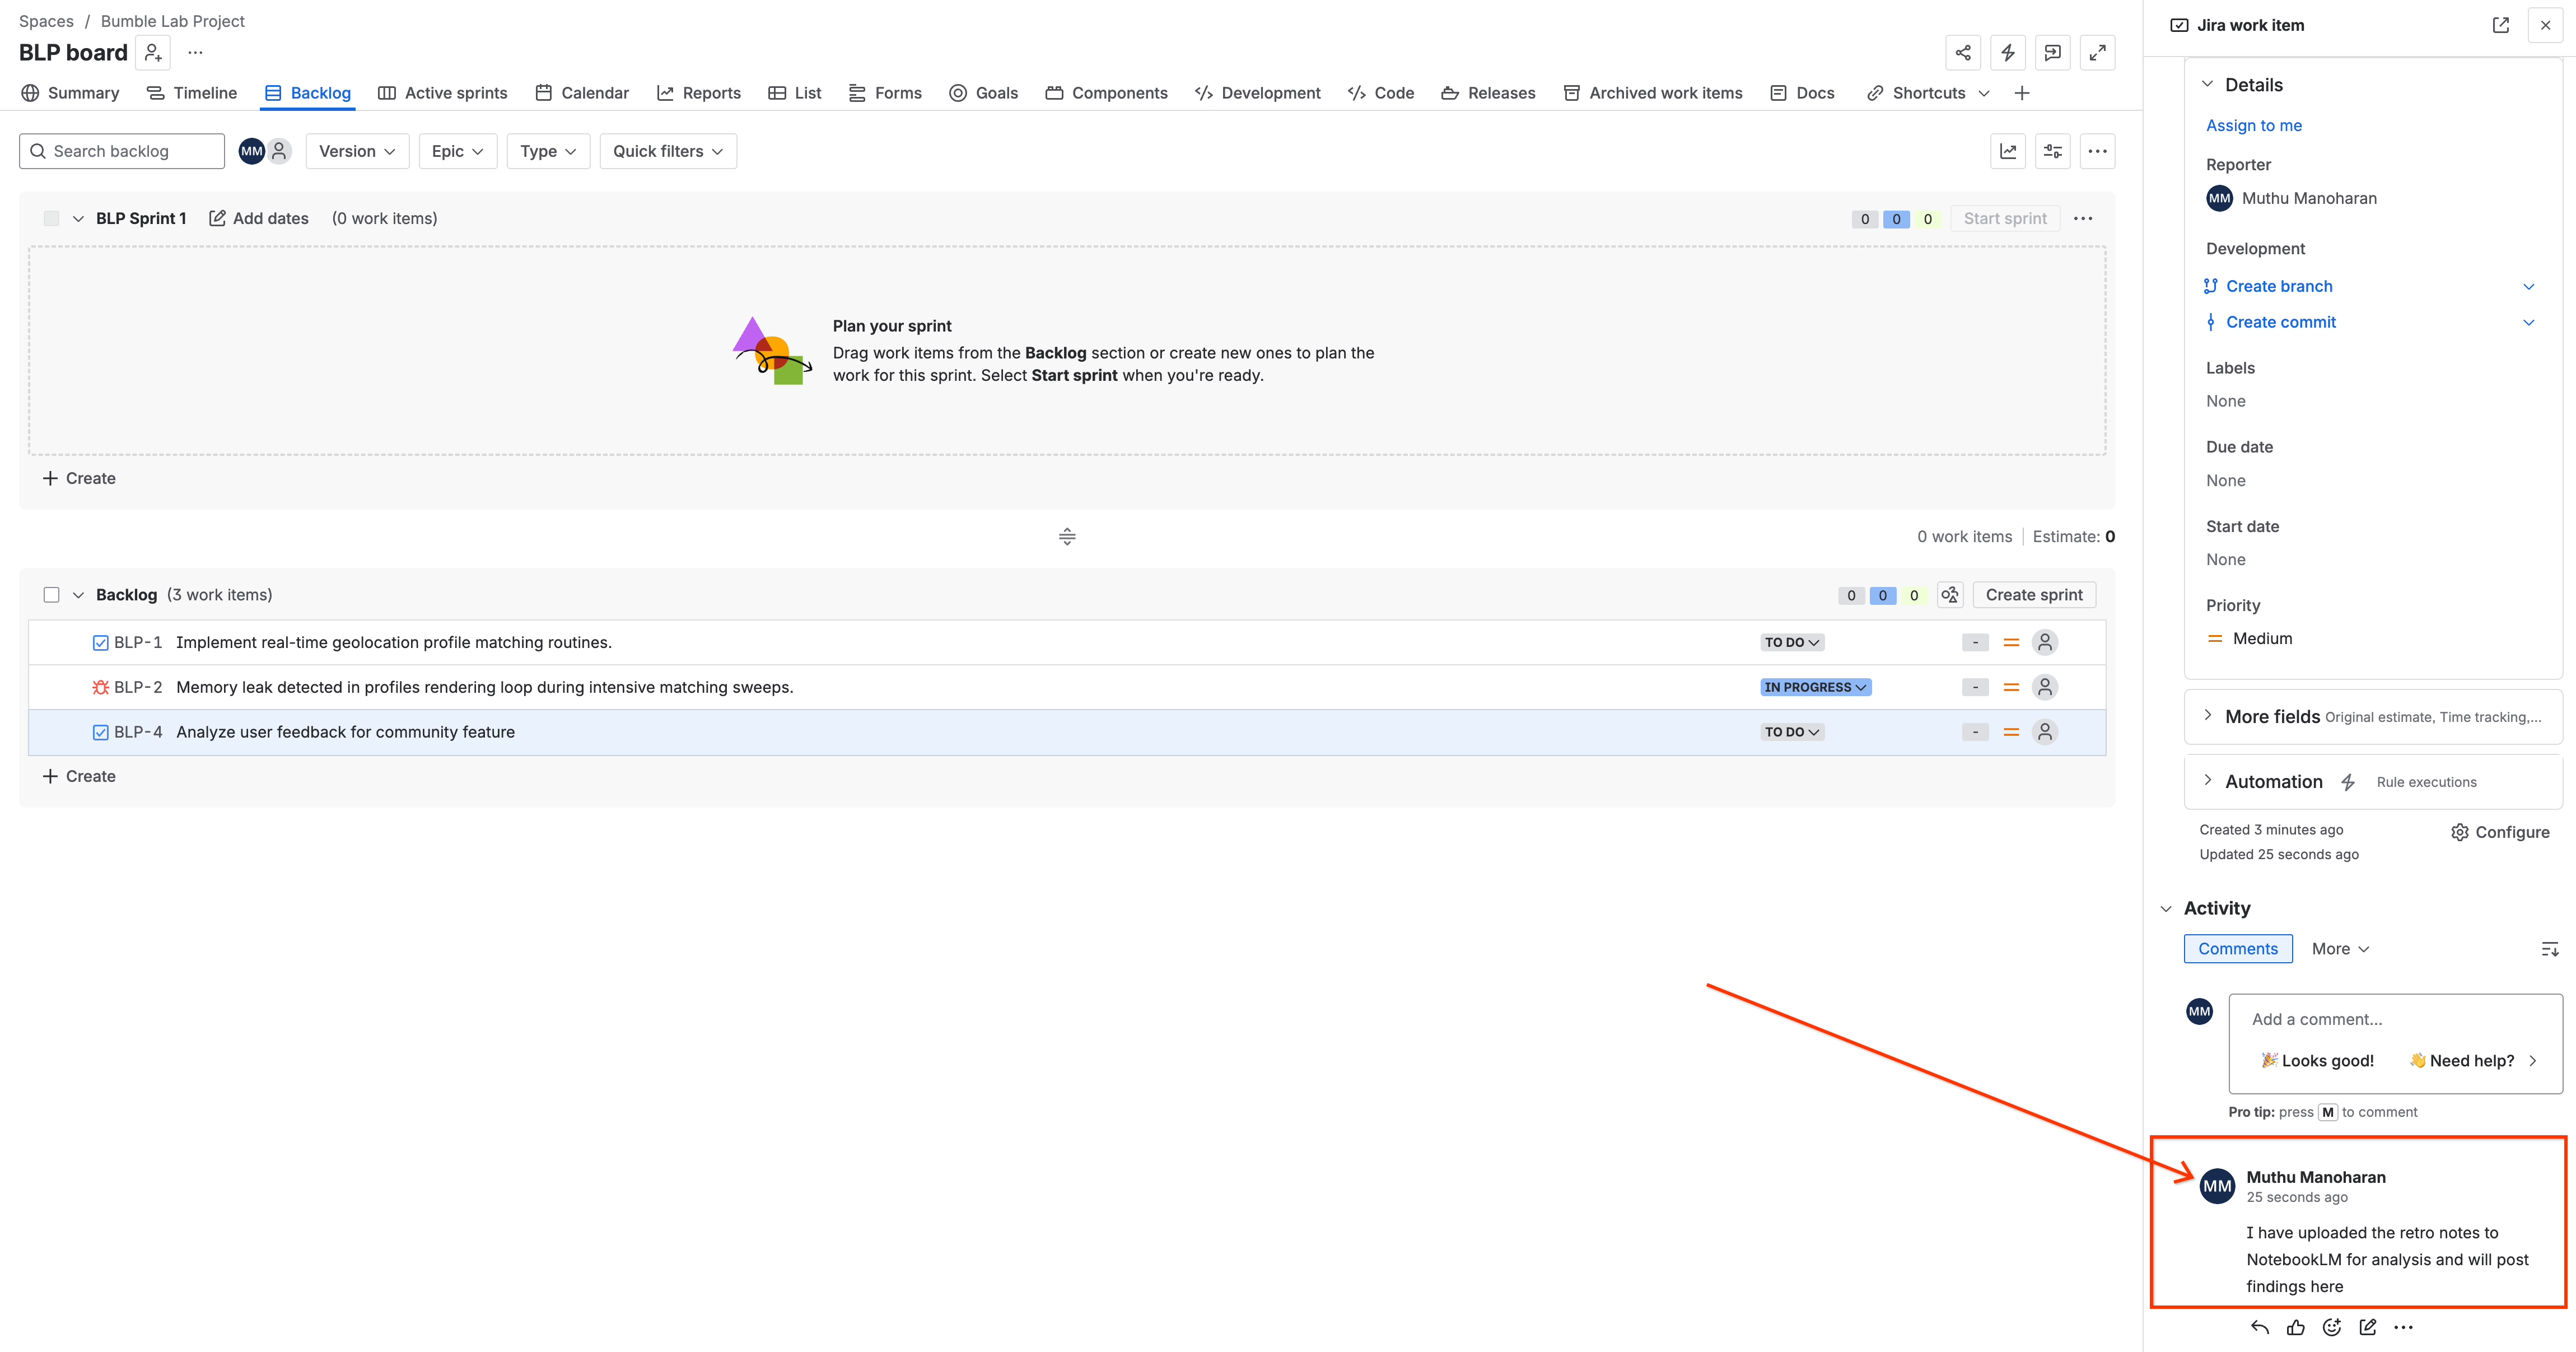
Add a comment to ticket BLP-4 saying 'I have uploaded the retro notes to Gemini Notebook for analysis and will post findings here'.
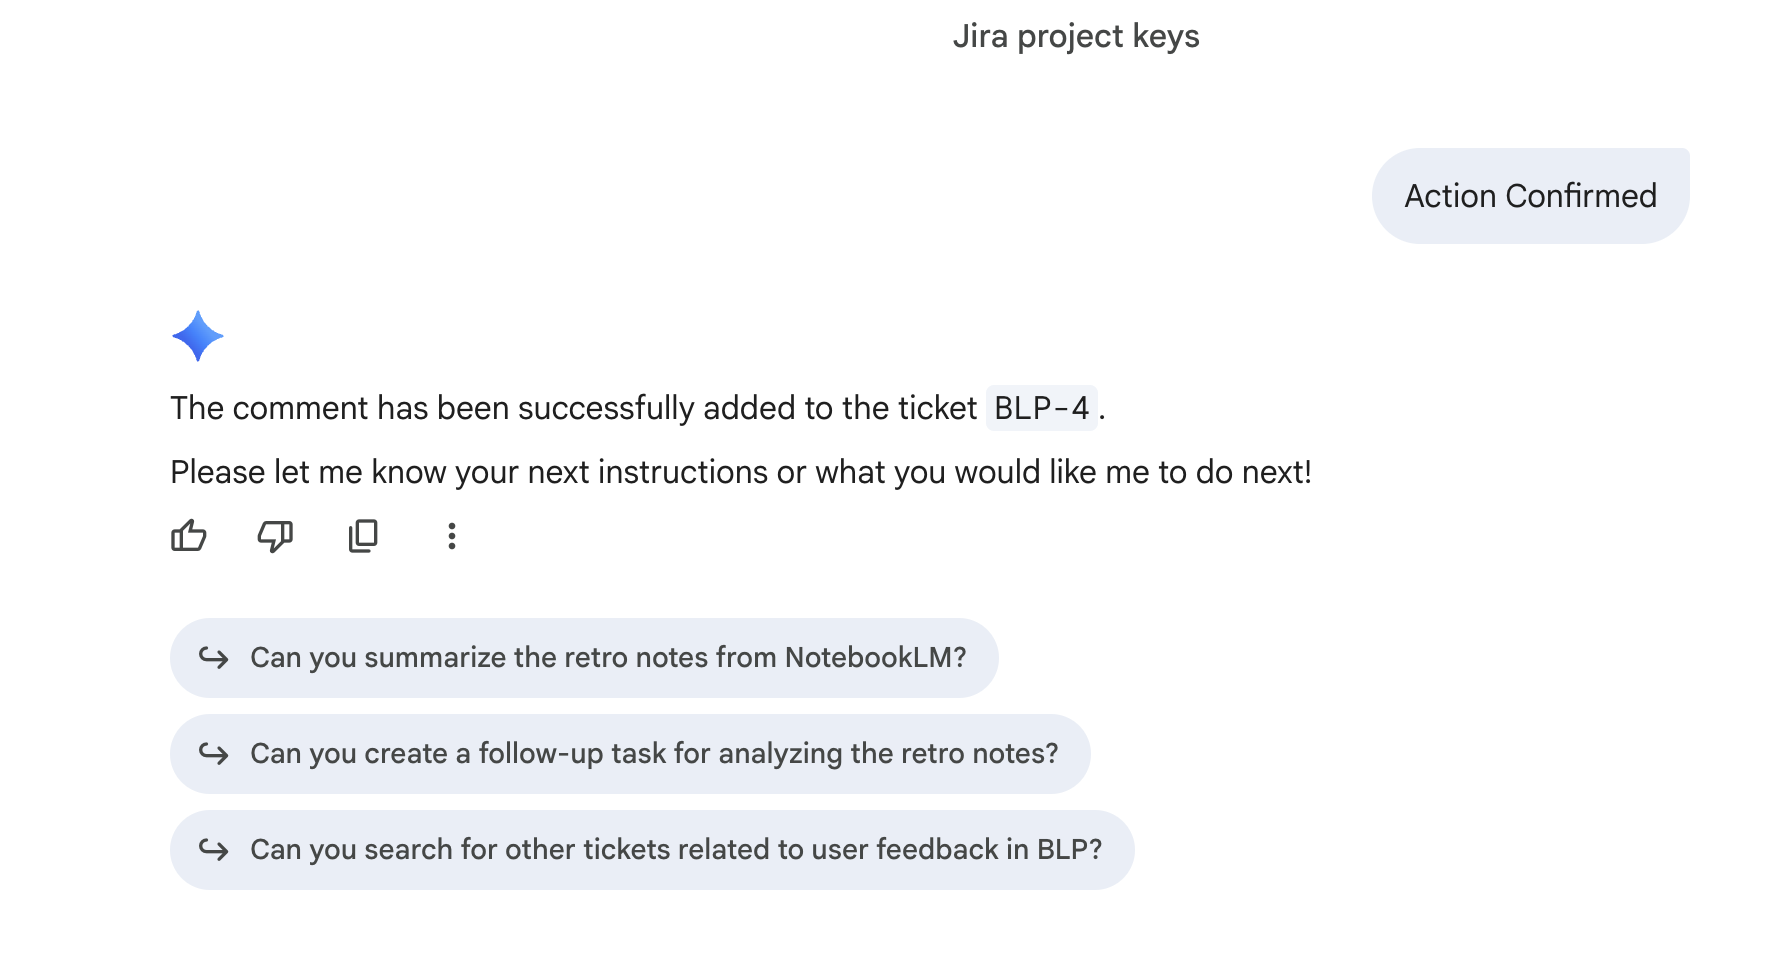
Gemini will add the comment and confirm: 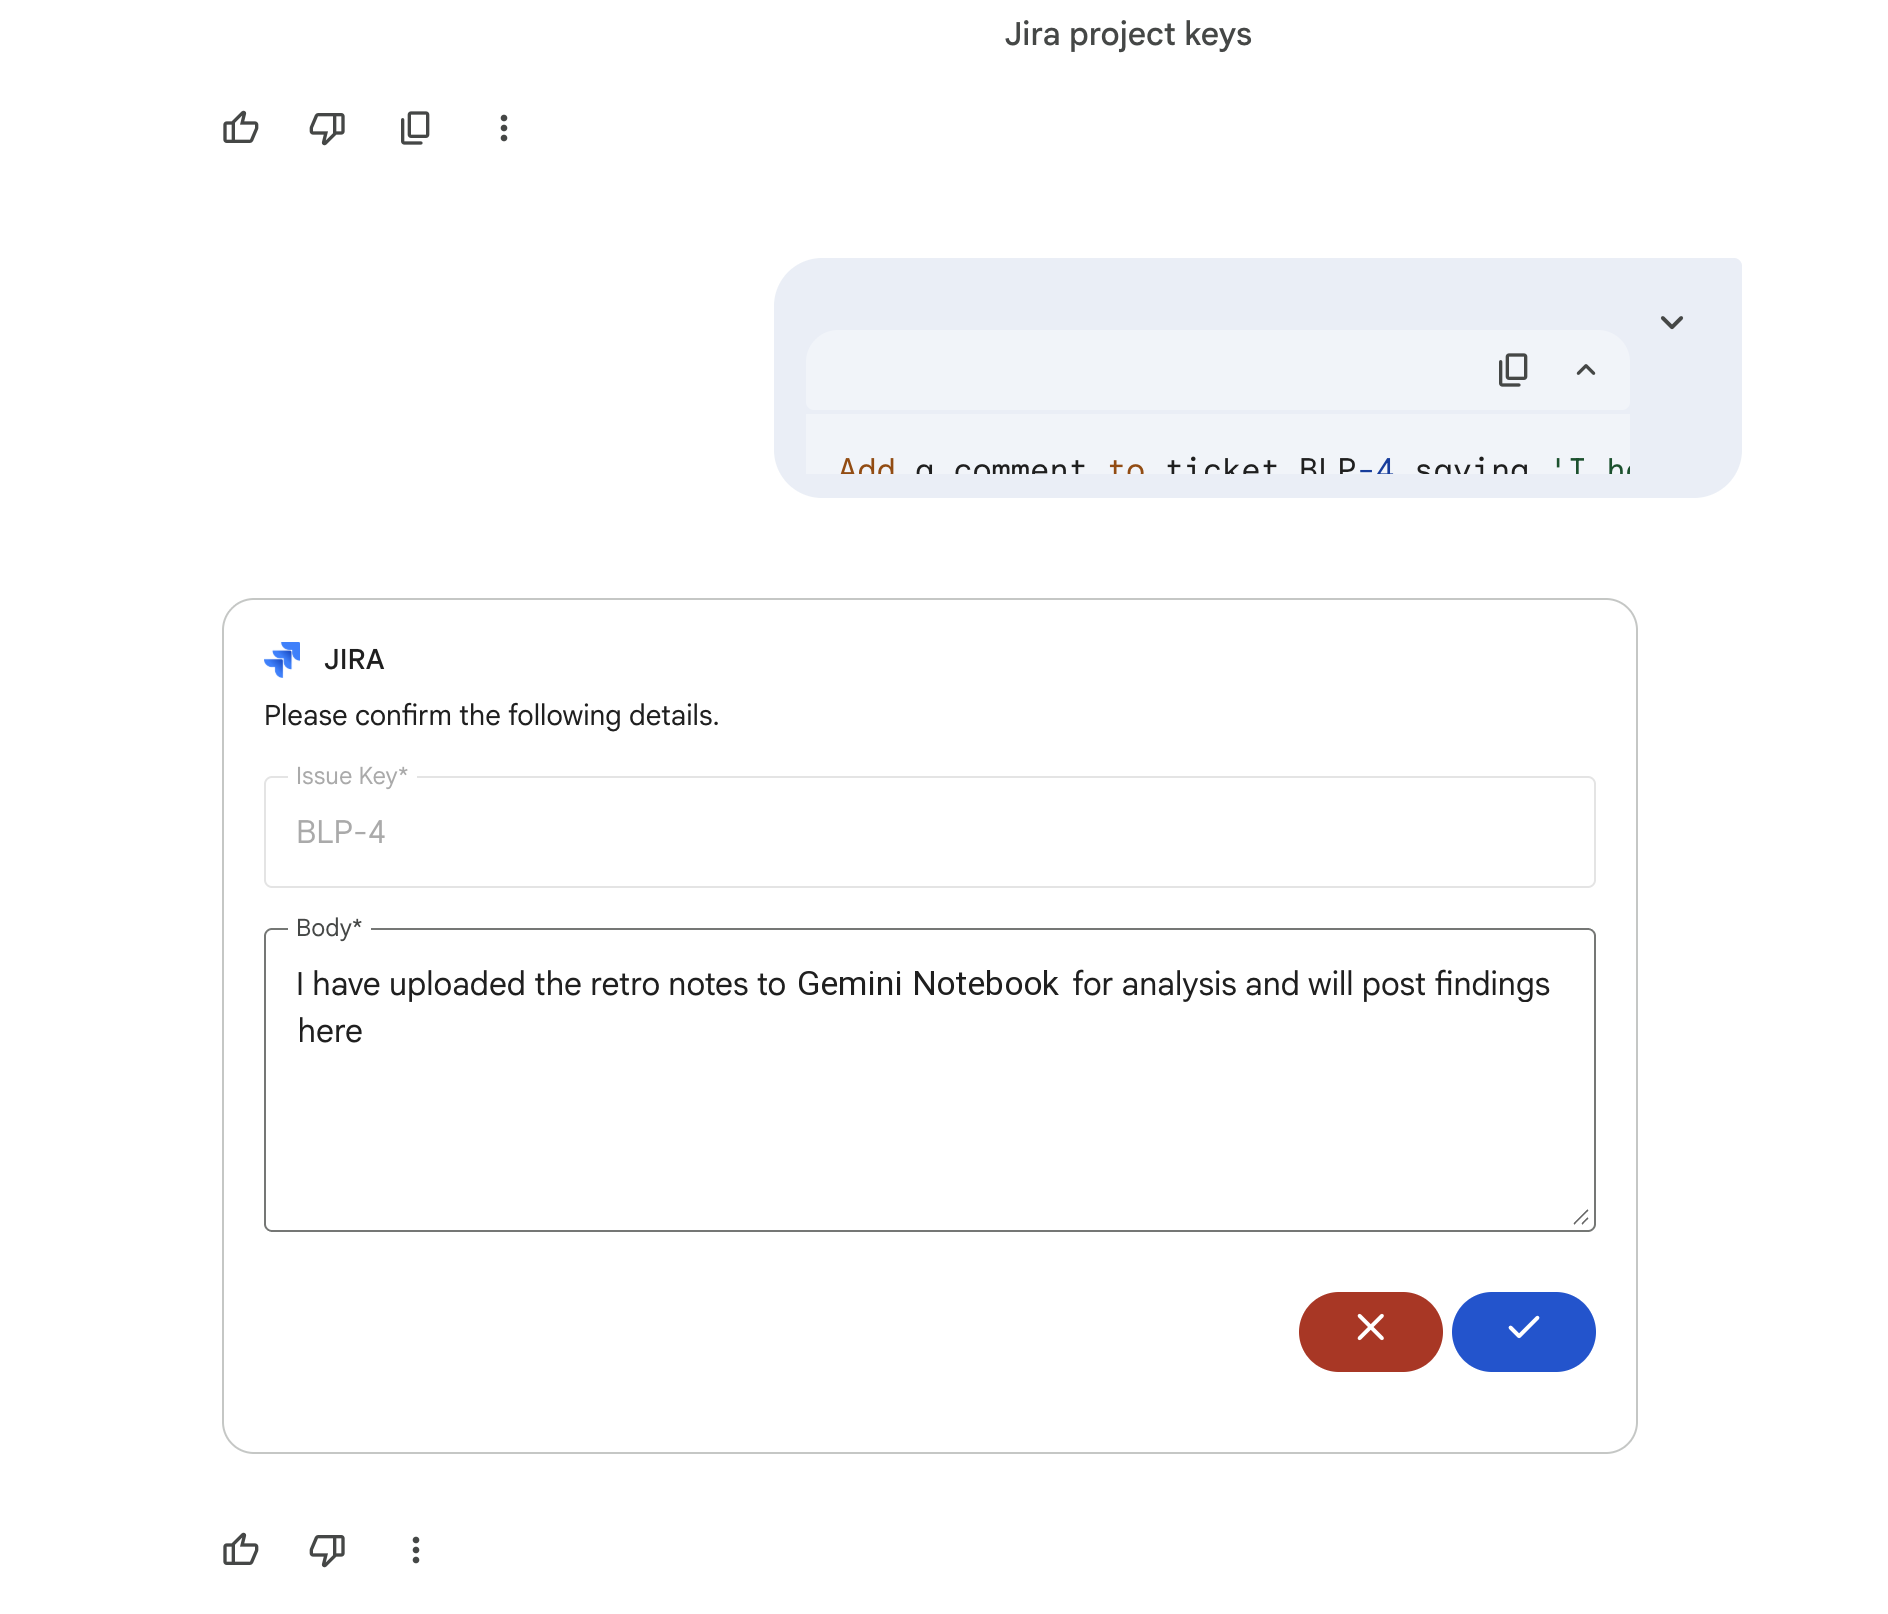
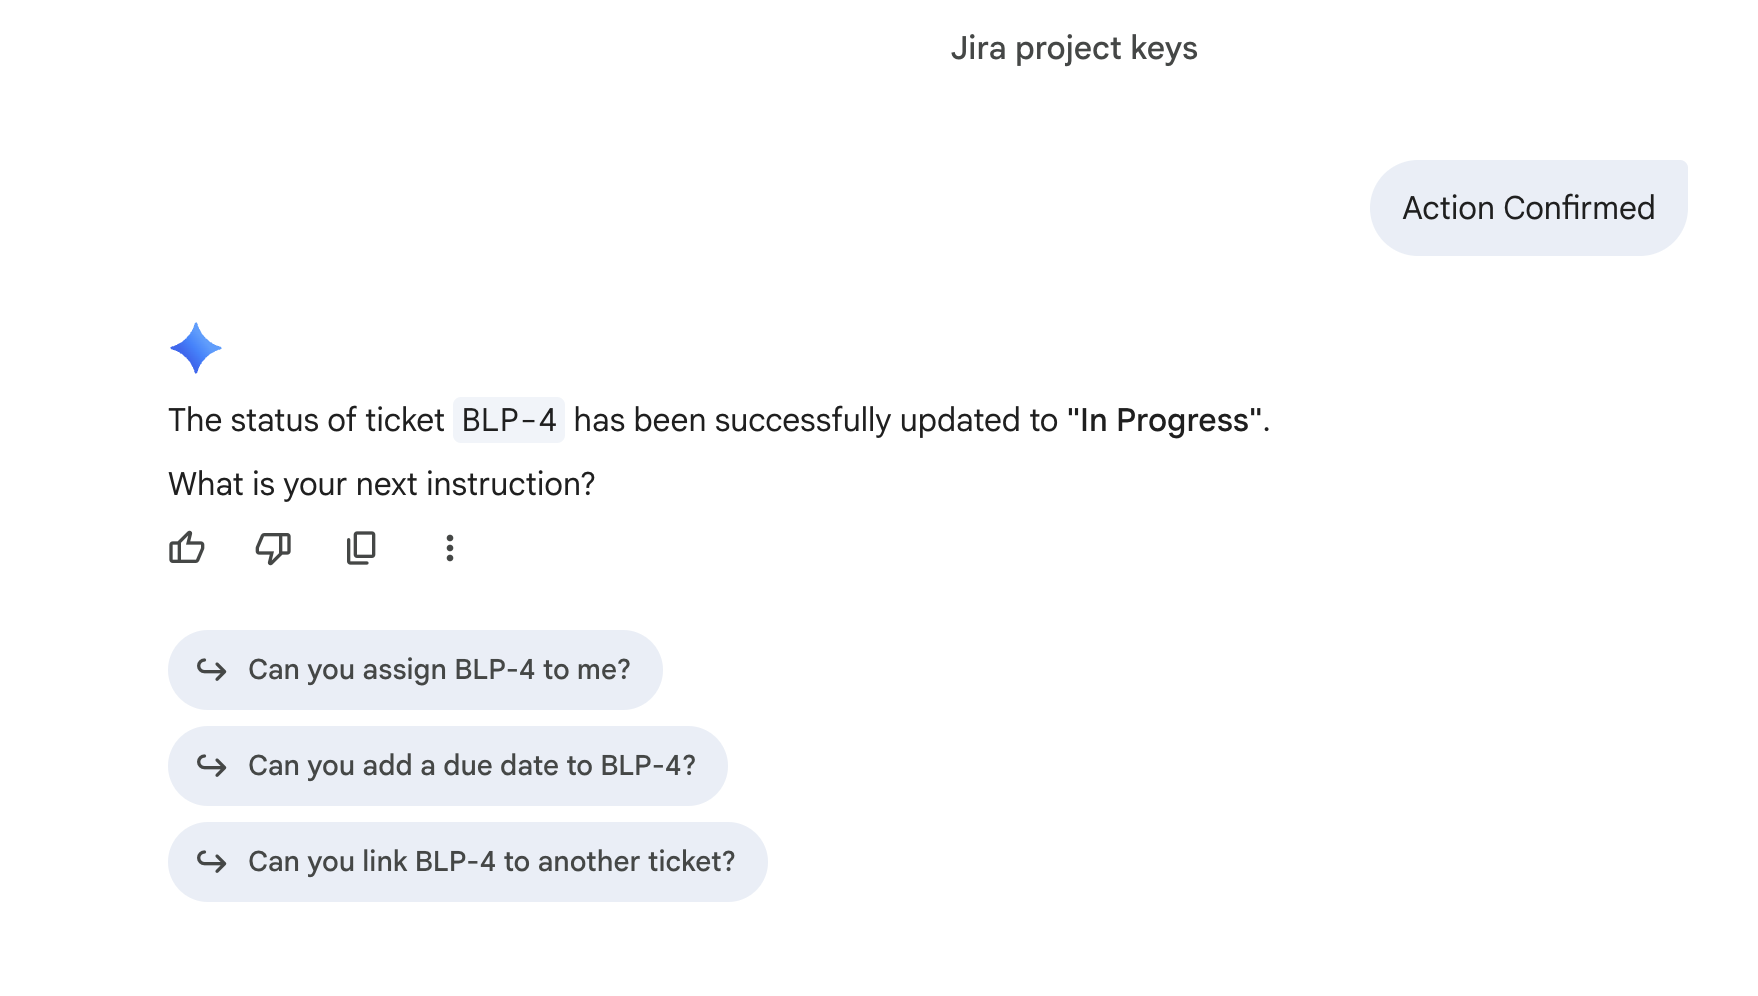
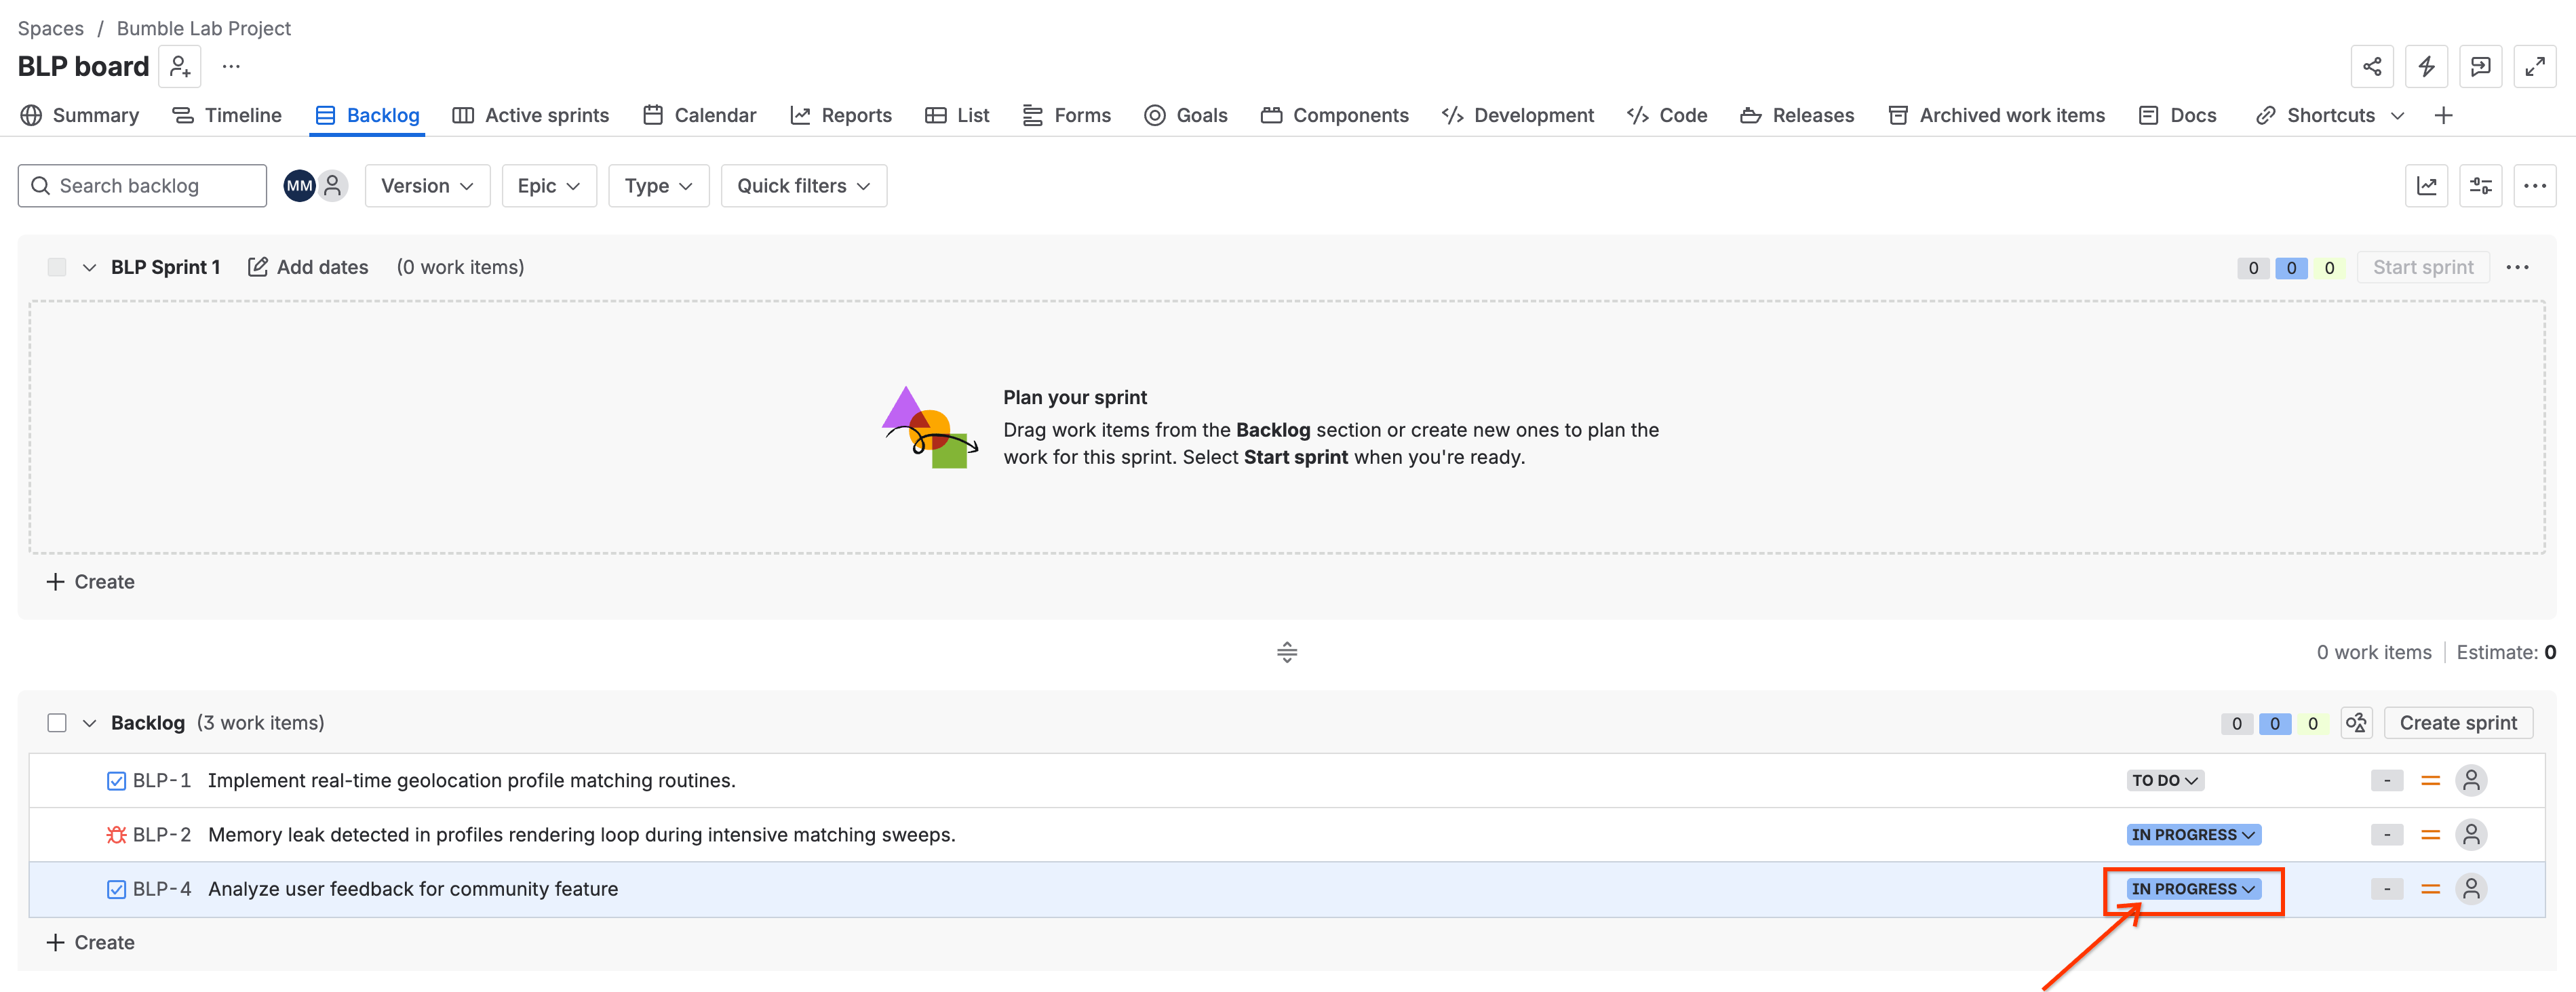
4. Update Status
Move the ticket to a new state (again using the ticket key Gemini returned):
Change the status of ticket BLP-4 to 'In Progress'.
Gemini will update the status and confirm: 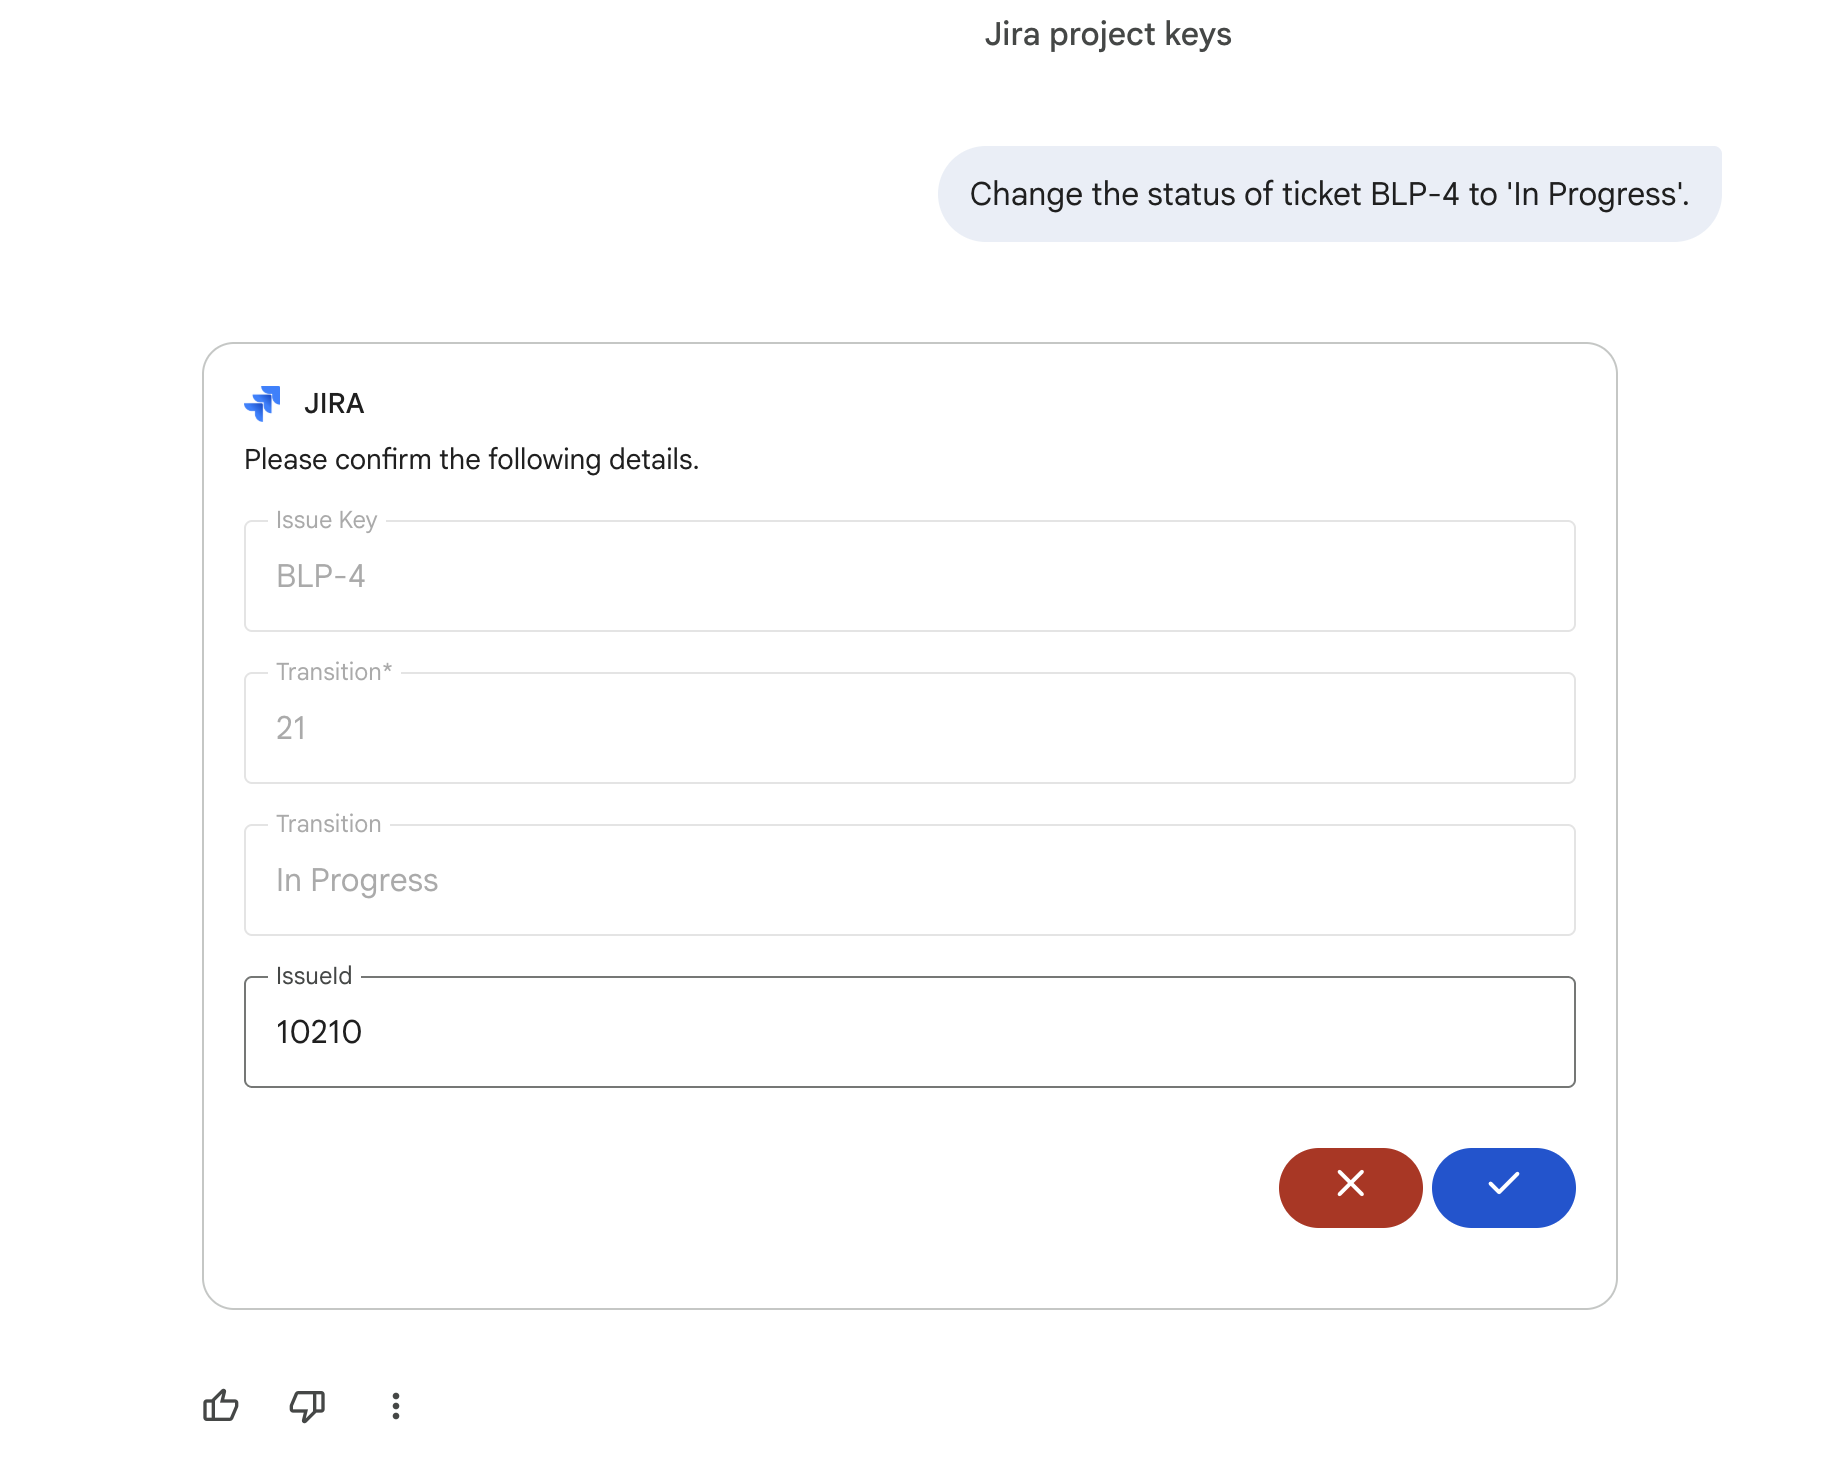
7. Basic Interactions with GitHub Connector
In this step, you will learn how to query repository activity to stay updated on developer progress.
1. List Available Repositories
To query commit logs, you need the exact repository name. Ask Gemini:
list all GitHub repositories that I have access to.
Gemini will query the connector and output the repositories you can access: 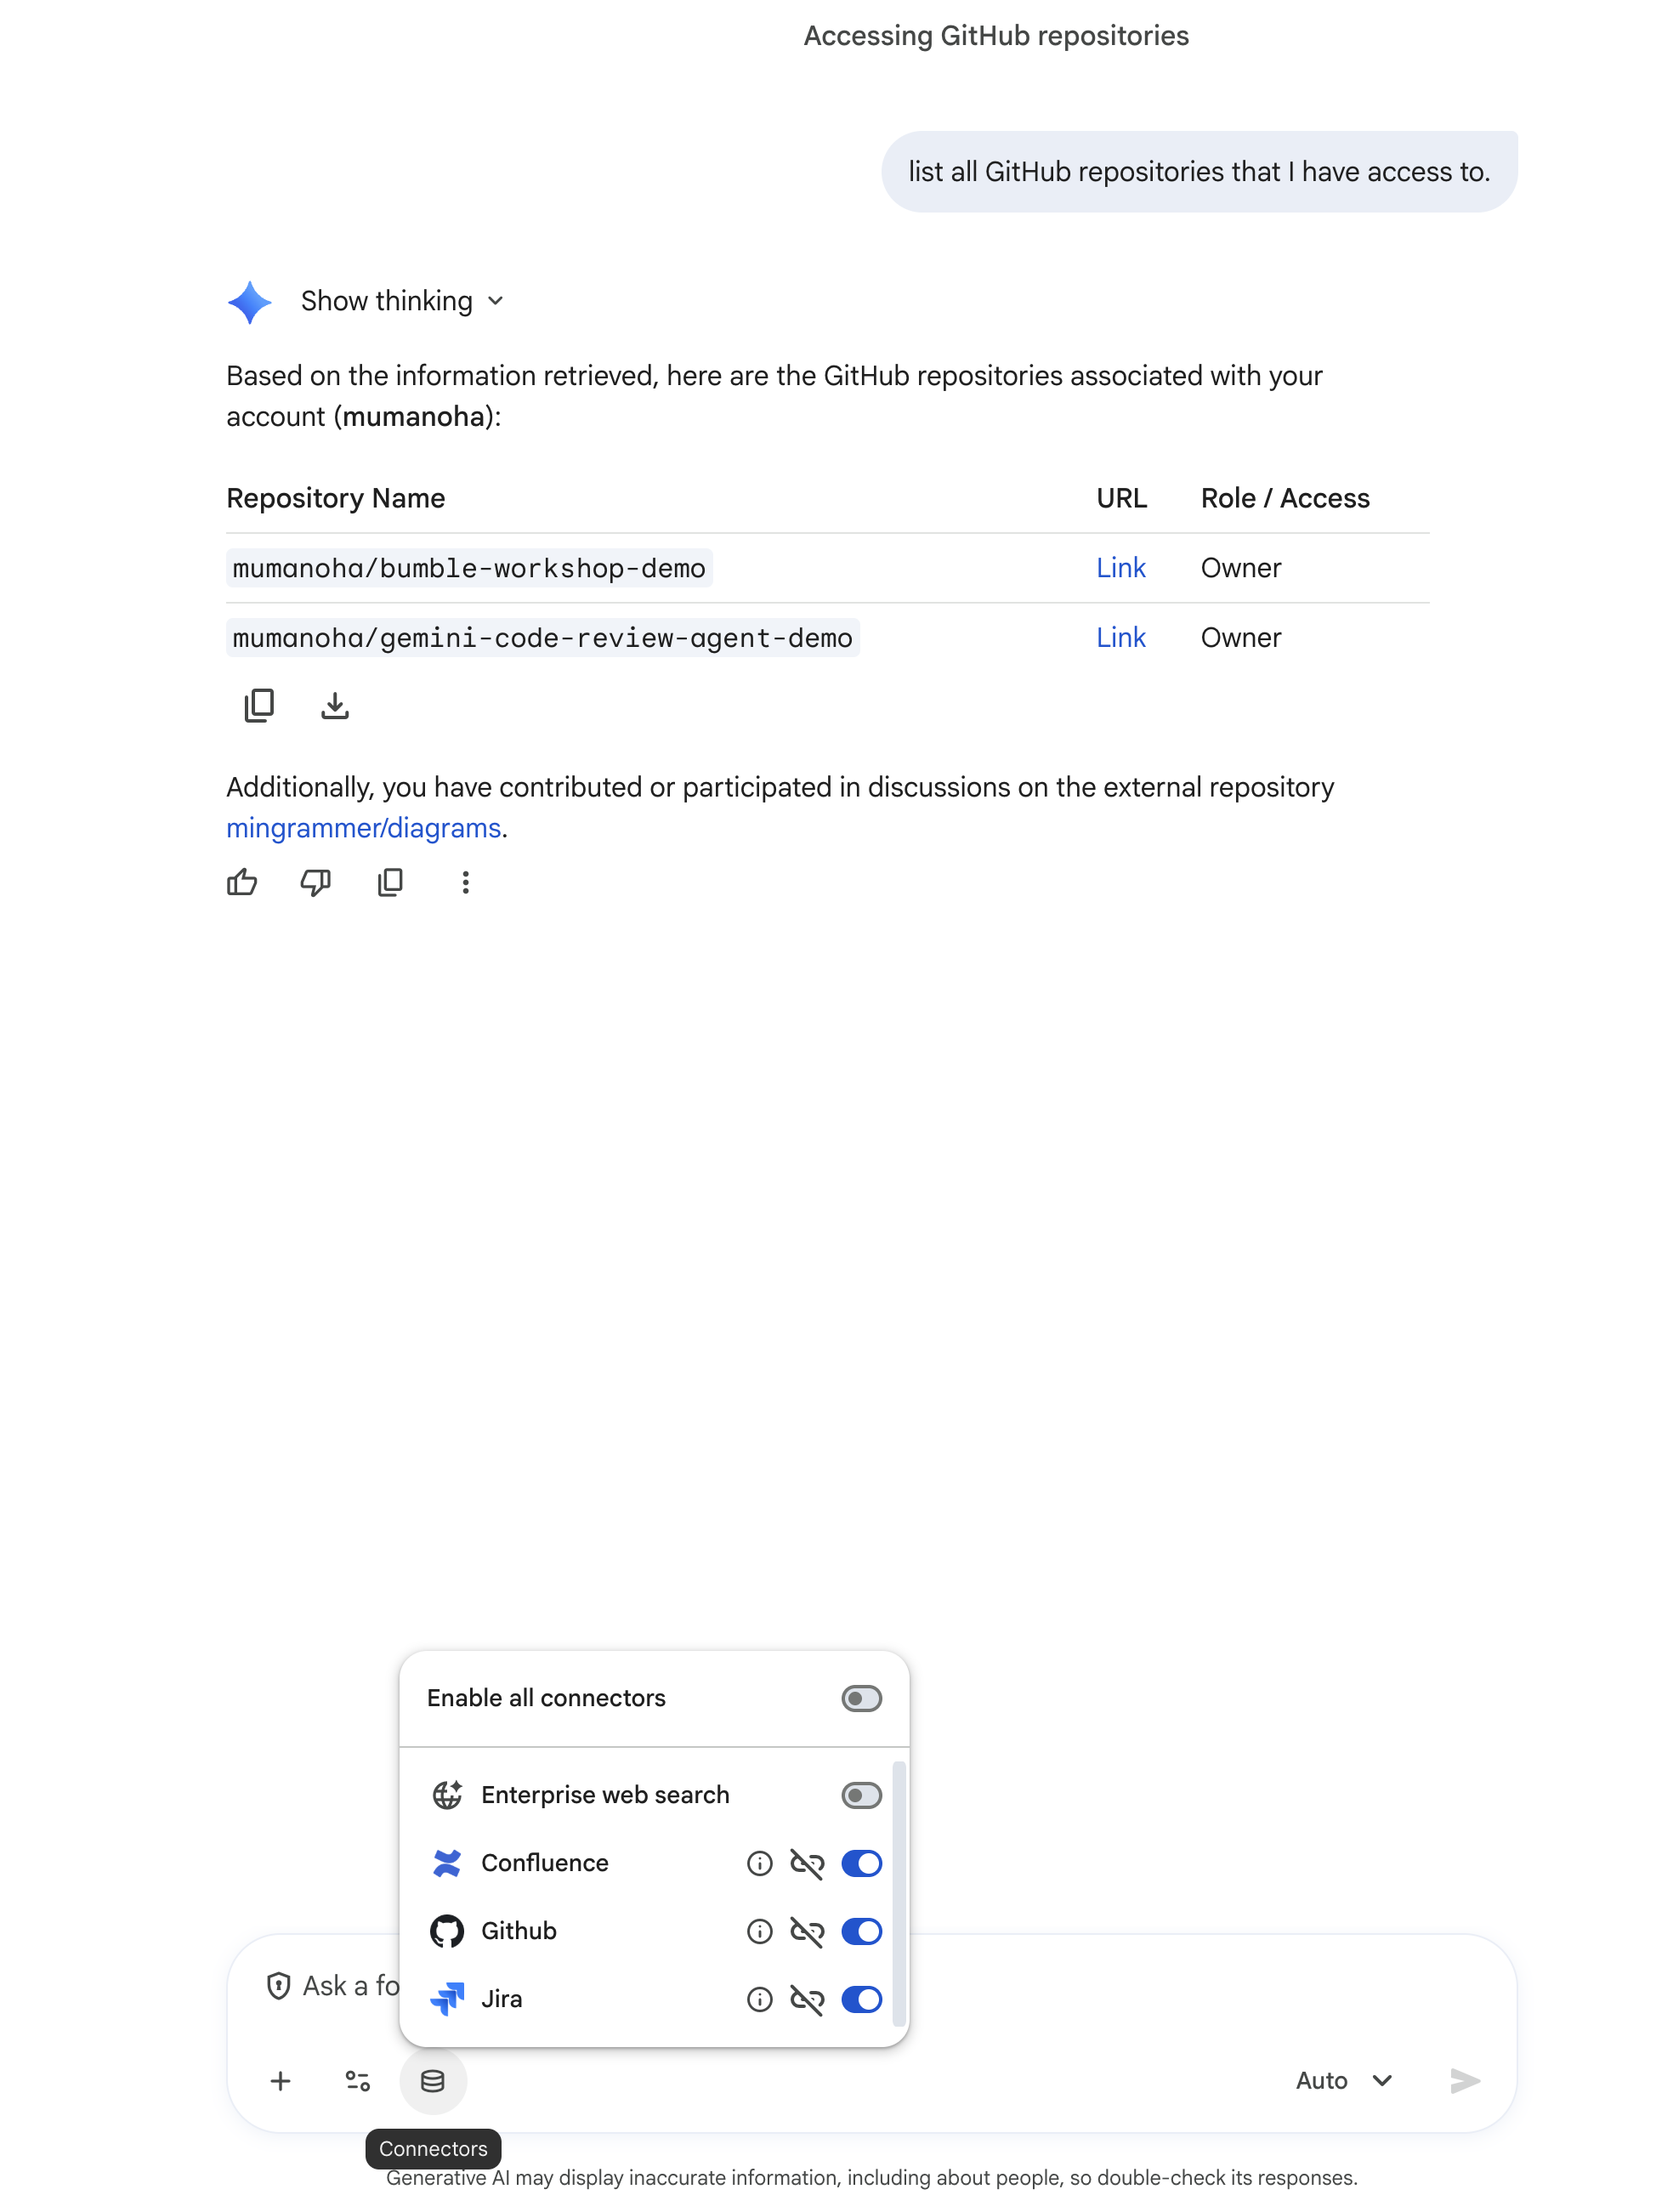
The examples below use the repository bumble-workshop-demo. Replace mumanoha/bumble-workshop-demo).
2. List Recent Commits
Ask Gemini to check for recent activity:
List the last 5 commits in repository <owner>/bumble-workshop-demo.
Gemini will fetch and list the recent commits: 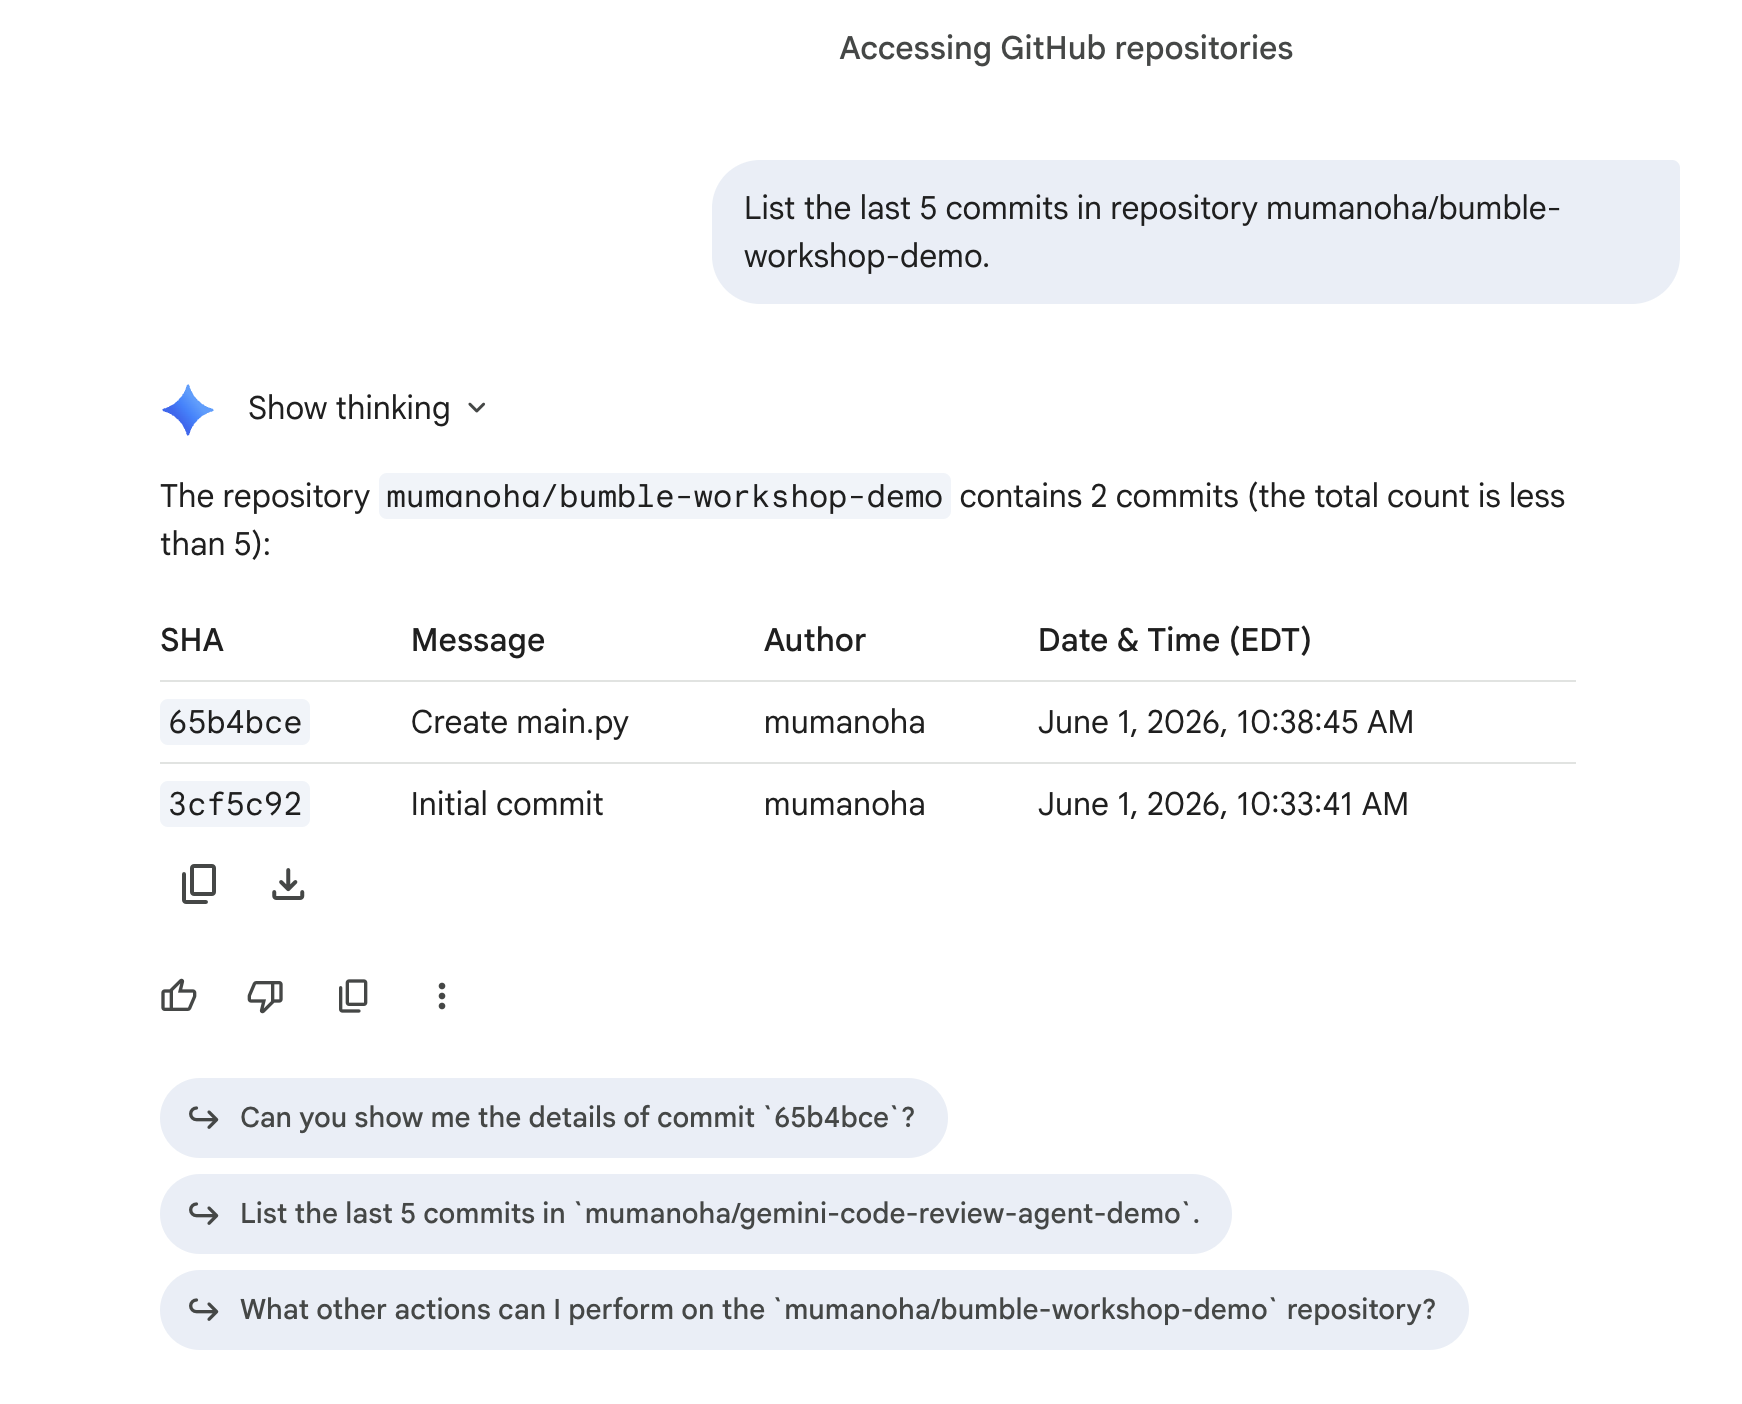
3. Check Open Pull Requests
See what code is waiting for review:
Show me all open pull requests for repository <owner>/bumble-workshop-demo.
Gemini will return the open PRs: 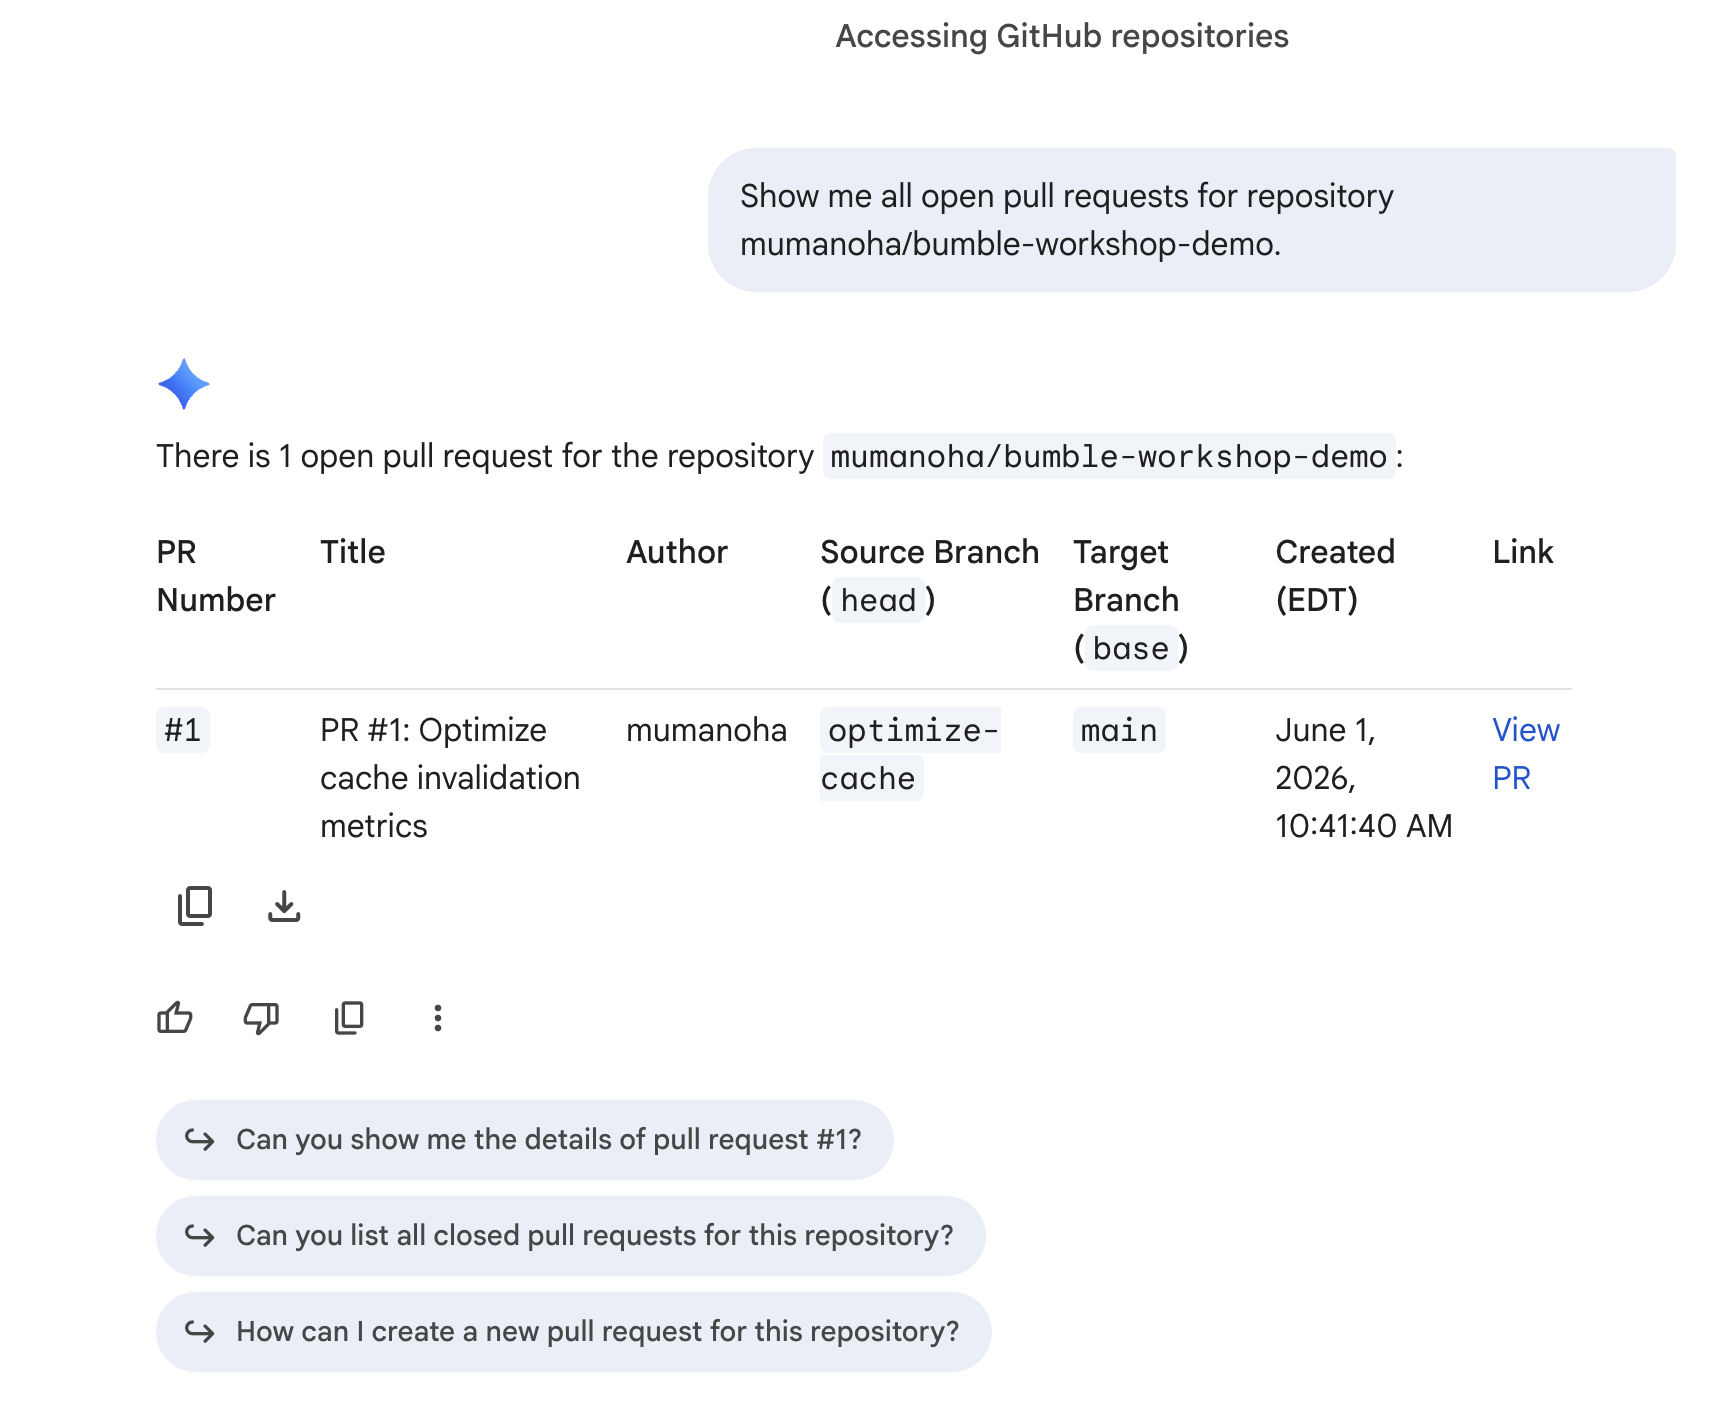
4. Summarize a Pull Request
Ask Gemini to summarize the changes in the PR (this workshop created PR #1):
Summarize the changes in pull request #1 in repository <owner>/bumble-workshop-demo.
Gemini will read the diff and return a clear description: 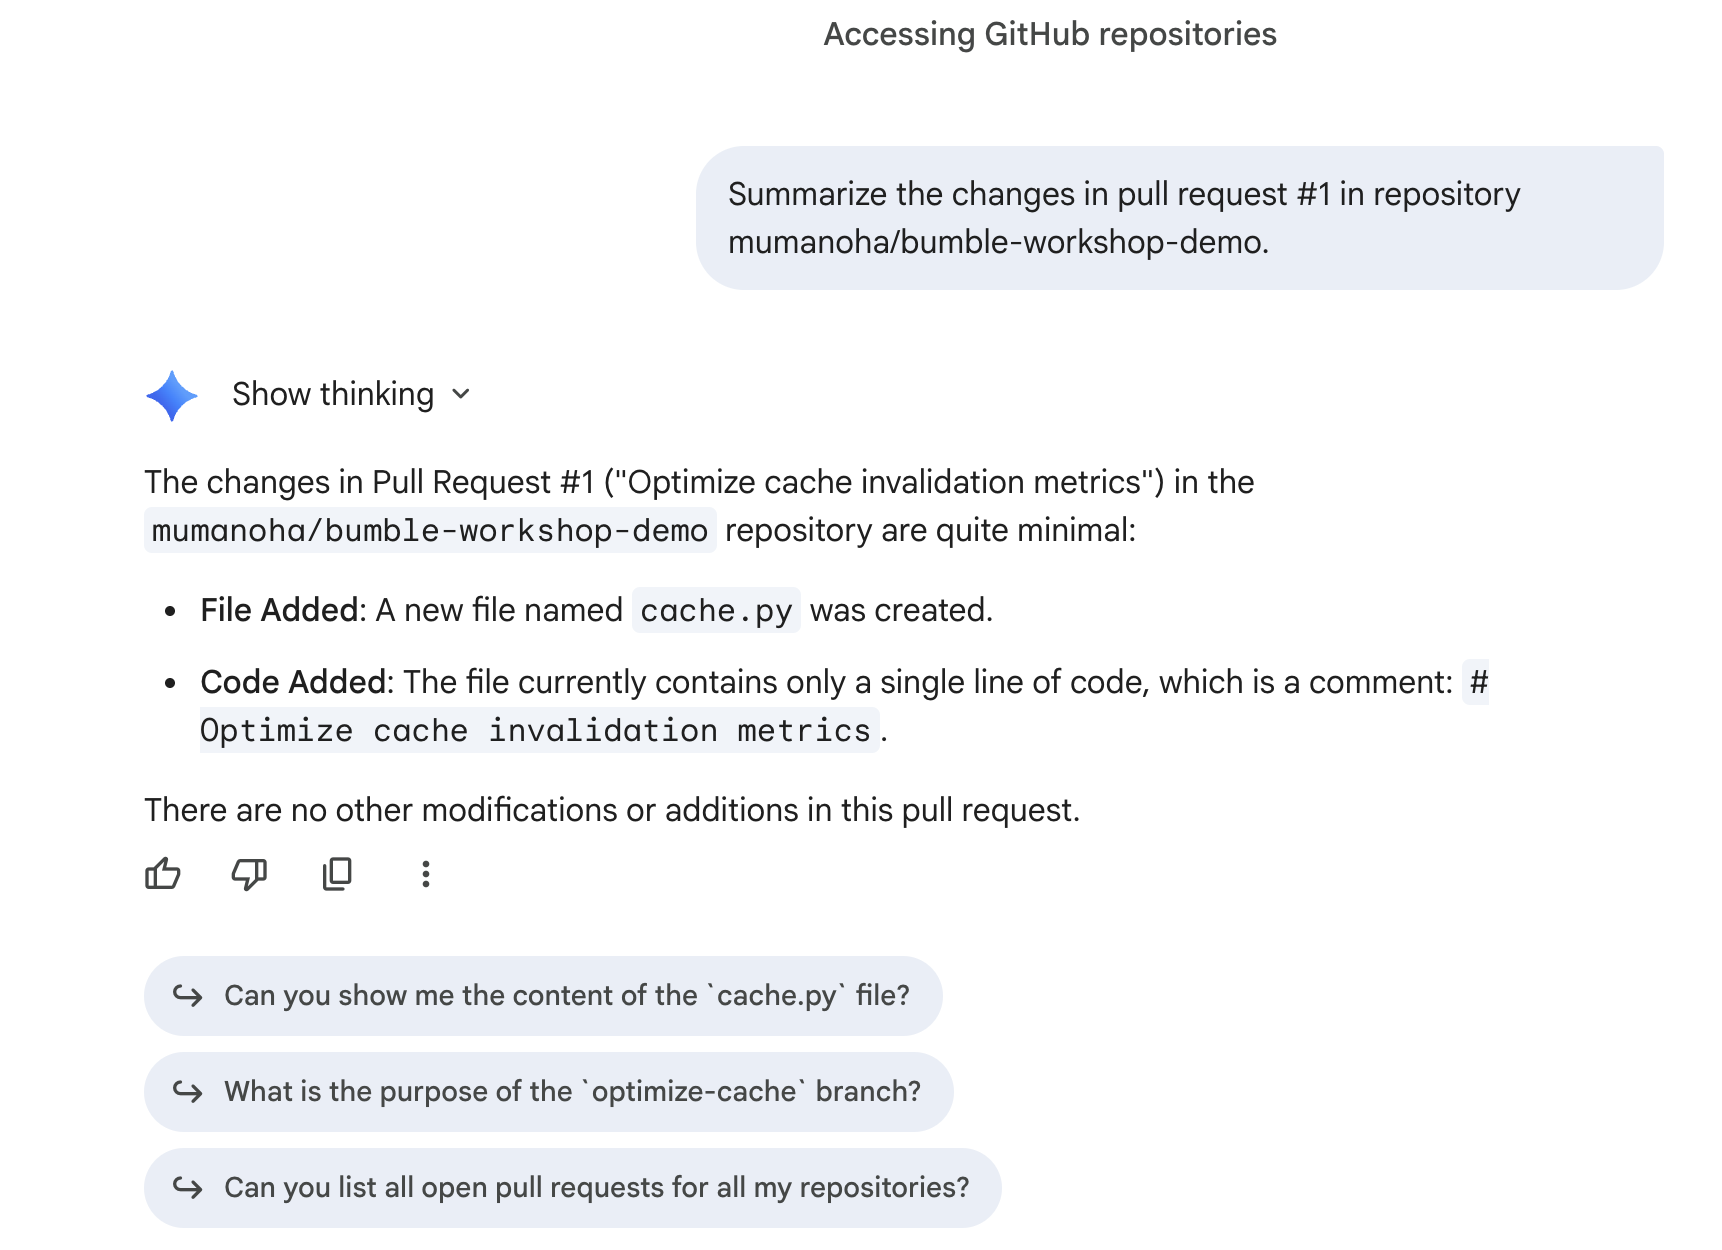
8. Basic Interactions with Confluence Connector
In this step, you will practice performing basic document lookup and management tasks using the Confluence connector.
1. Search Space Pages
Verify that Gemini can scan your new Confluence space BMBENG and locate your blank ADR document. Ask Gemini:
Search space BMBENG for the 'ADR for background framework' page and tell me if it has any content.
Gemini will communicate with Confluence, scan the space, locate the page, and confirm that it is currently blank:
- Status: Found
ADR for background frameworkpage inBMBENG. - Content: The page body is completely blank, ready for the Canvas generation lab.
9. Cross-reference documentation with execution
In this step, you will use unstructured documentation to grade structured code progress using Gemini.
Step 1: Create your Requirements Document
Before uploading, you need a local text file containing your target specifications.
- Open a plain-text editor on your local machine:
- On macOS: Open TextEdit. Go to the top menu and select Format > Make Plain Text (this is crucial to ensure it is saved without formatting metadata).
- On Windows: Open Notepad.
- Copy and paste the following text into the editor:
Project: Bumble Hobbies Community Feature

Requirements:
1. User Interface:
   - [ ] Create a "Communities" tab in the main navigation.
   - [ ] Display a list of available hobby groups.
   - [ ] Allow users to search for groups by keyword.

2. Group Functionality:
   - [ ] Users can join and leave groups.
   - [ ] Members can create new text posts.
- Save the file on your computer as
requirements.txt.
Step 2: Upload and Initialize a New Chat
- Open a New Chat window in Gemini Enterprise.
- Click the Database (Connectors) icon in the chat input box.
- Enable only Jira (turn off Google Search, Enterprise Search, GitHub, and Confluence) to focus the search context on your seeded Jira data.
- Click the + (plus) icon next to the text box (or drag and drop) and upload your
requirements.txtfile.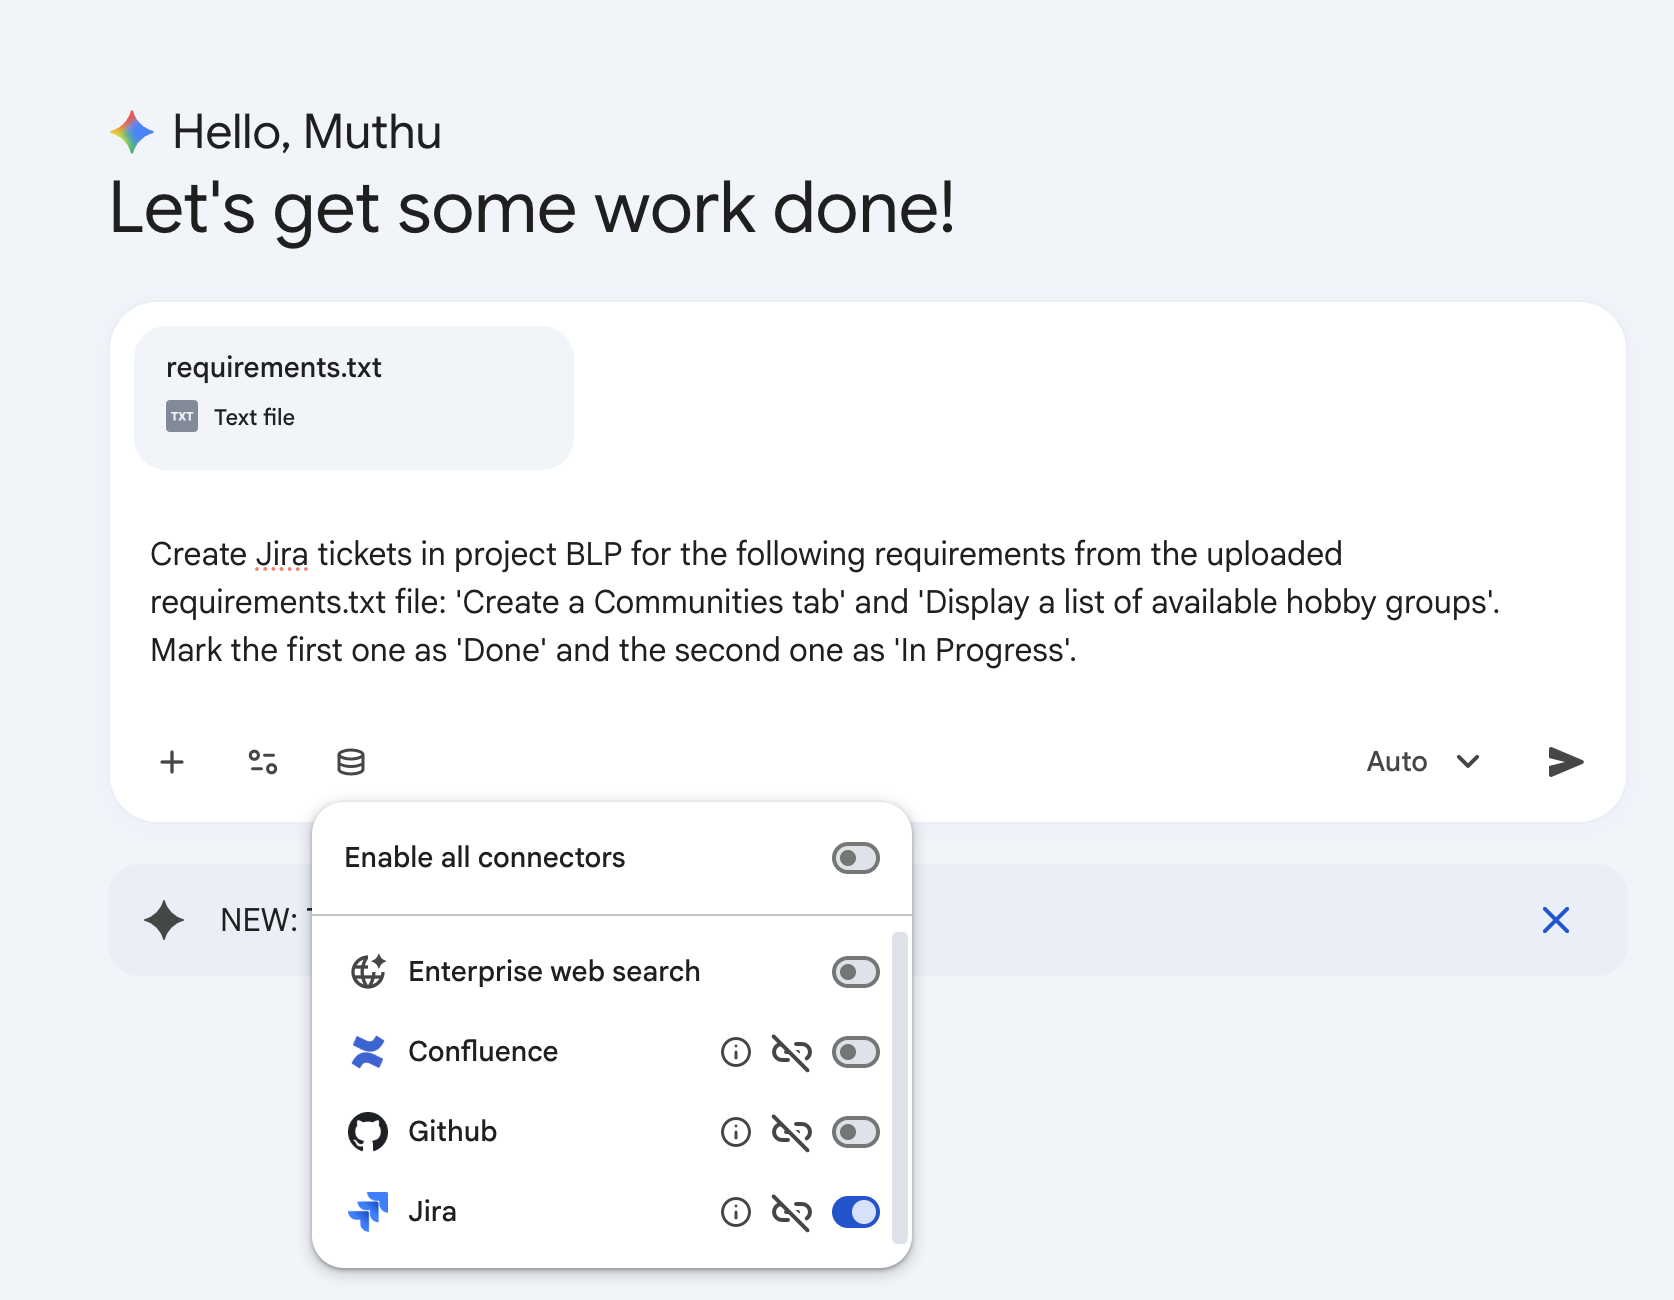
Step 3: Create Sample Data using Gemini
Let's use Gemini to populate some test tickets in Jira based on these requirements:
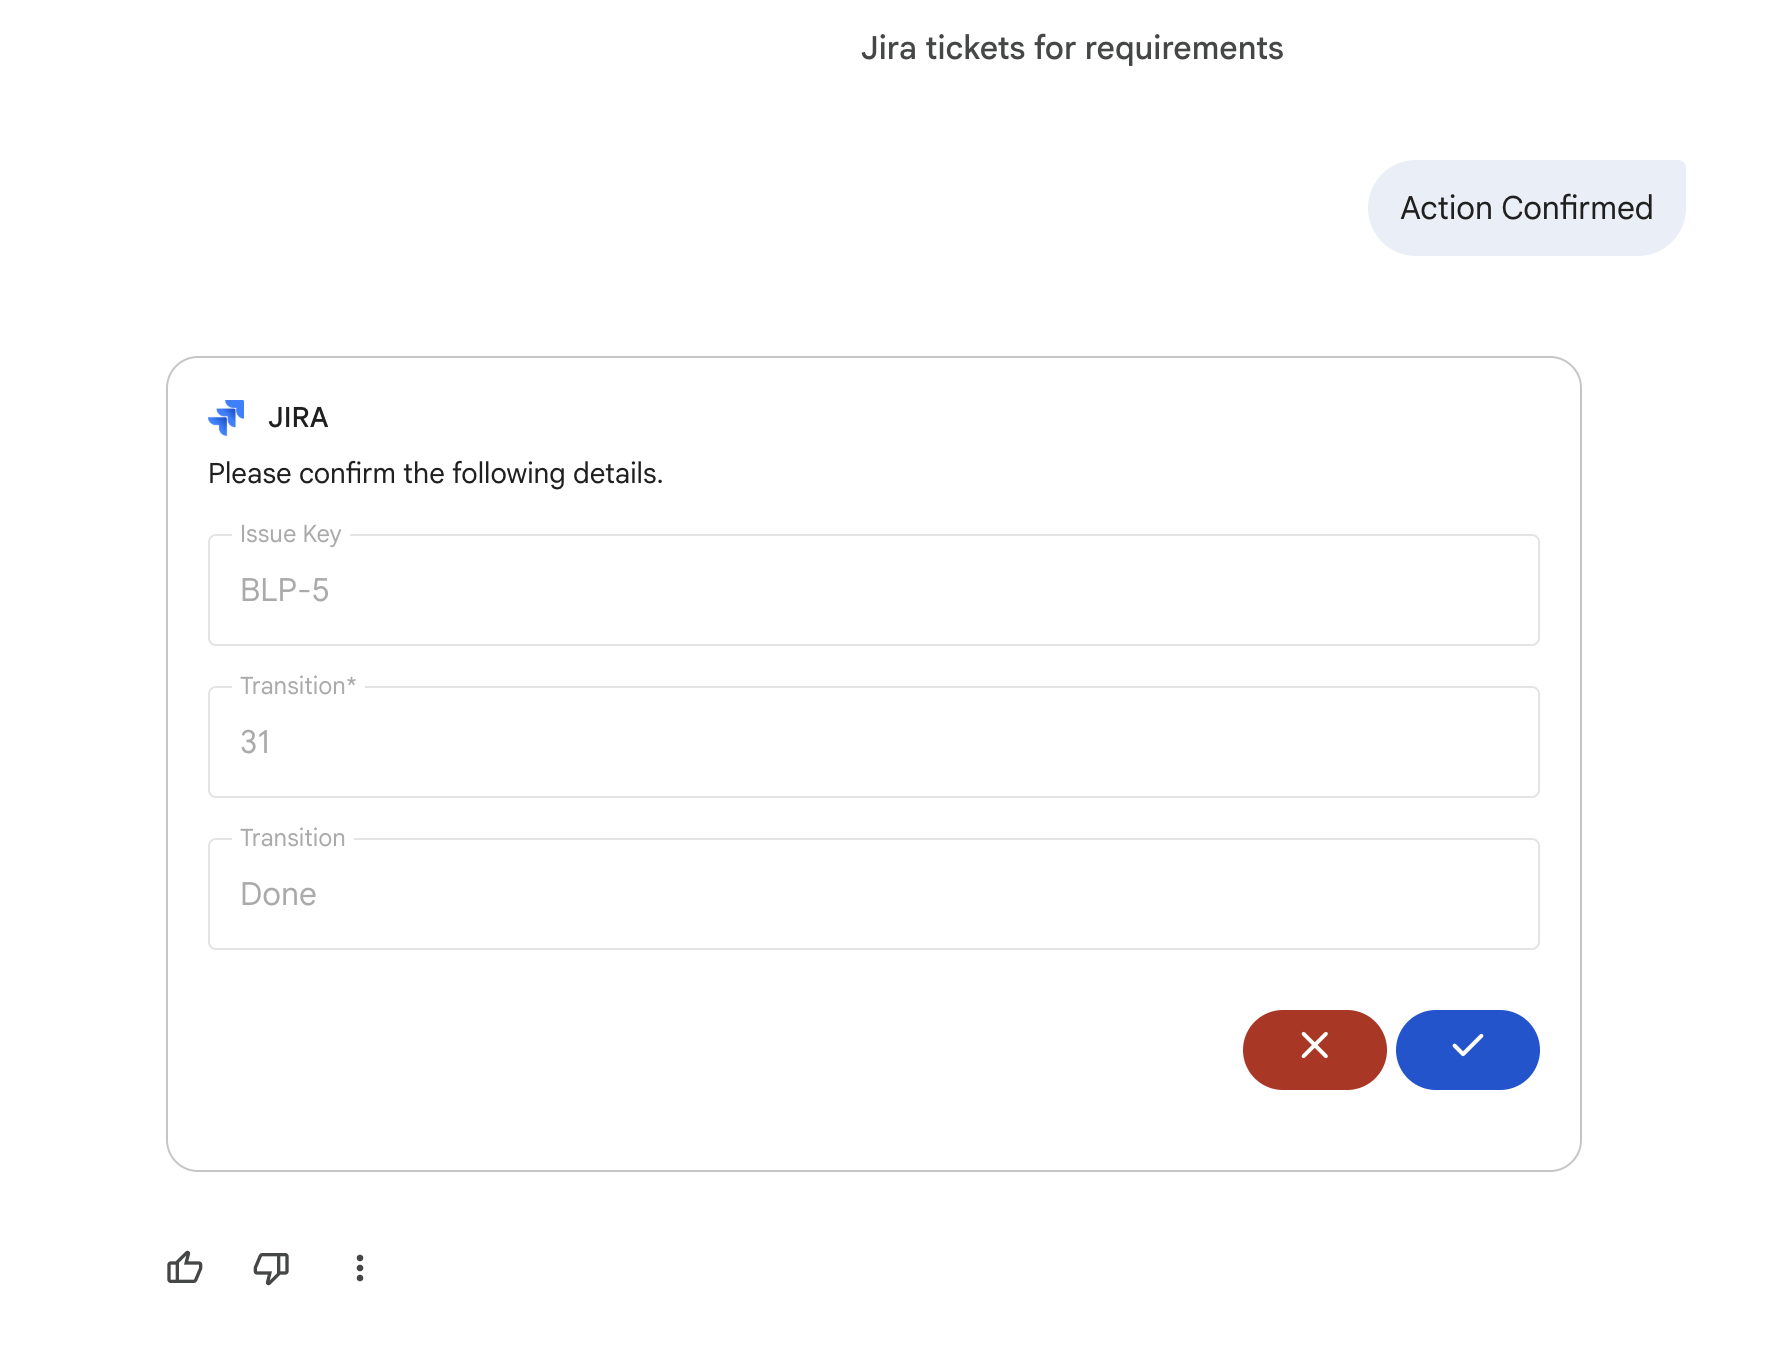
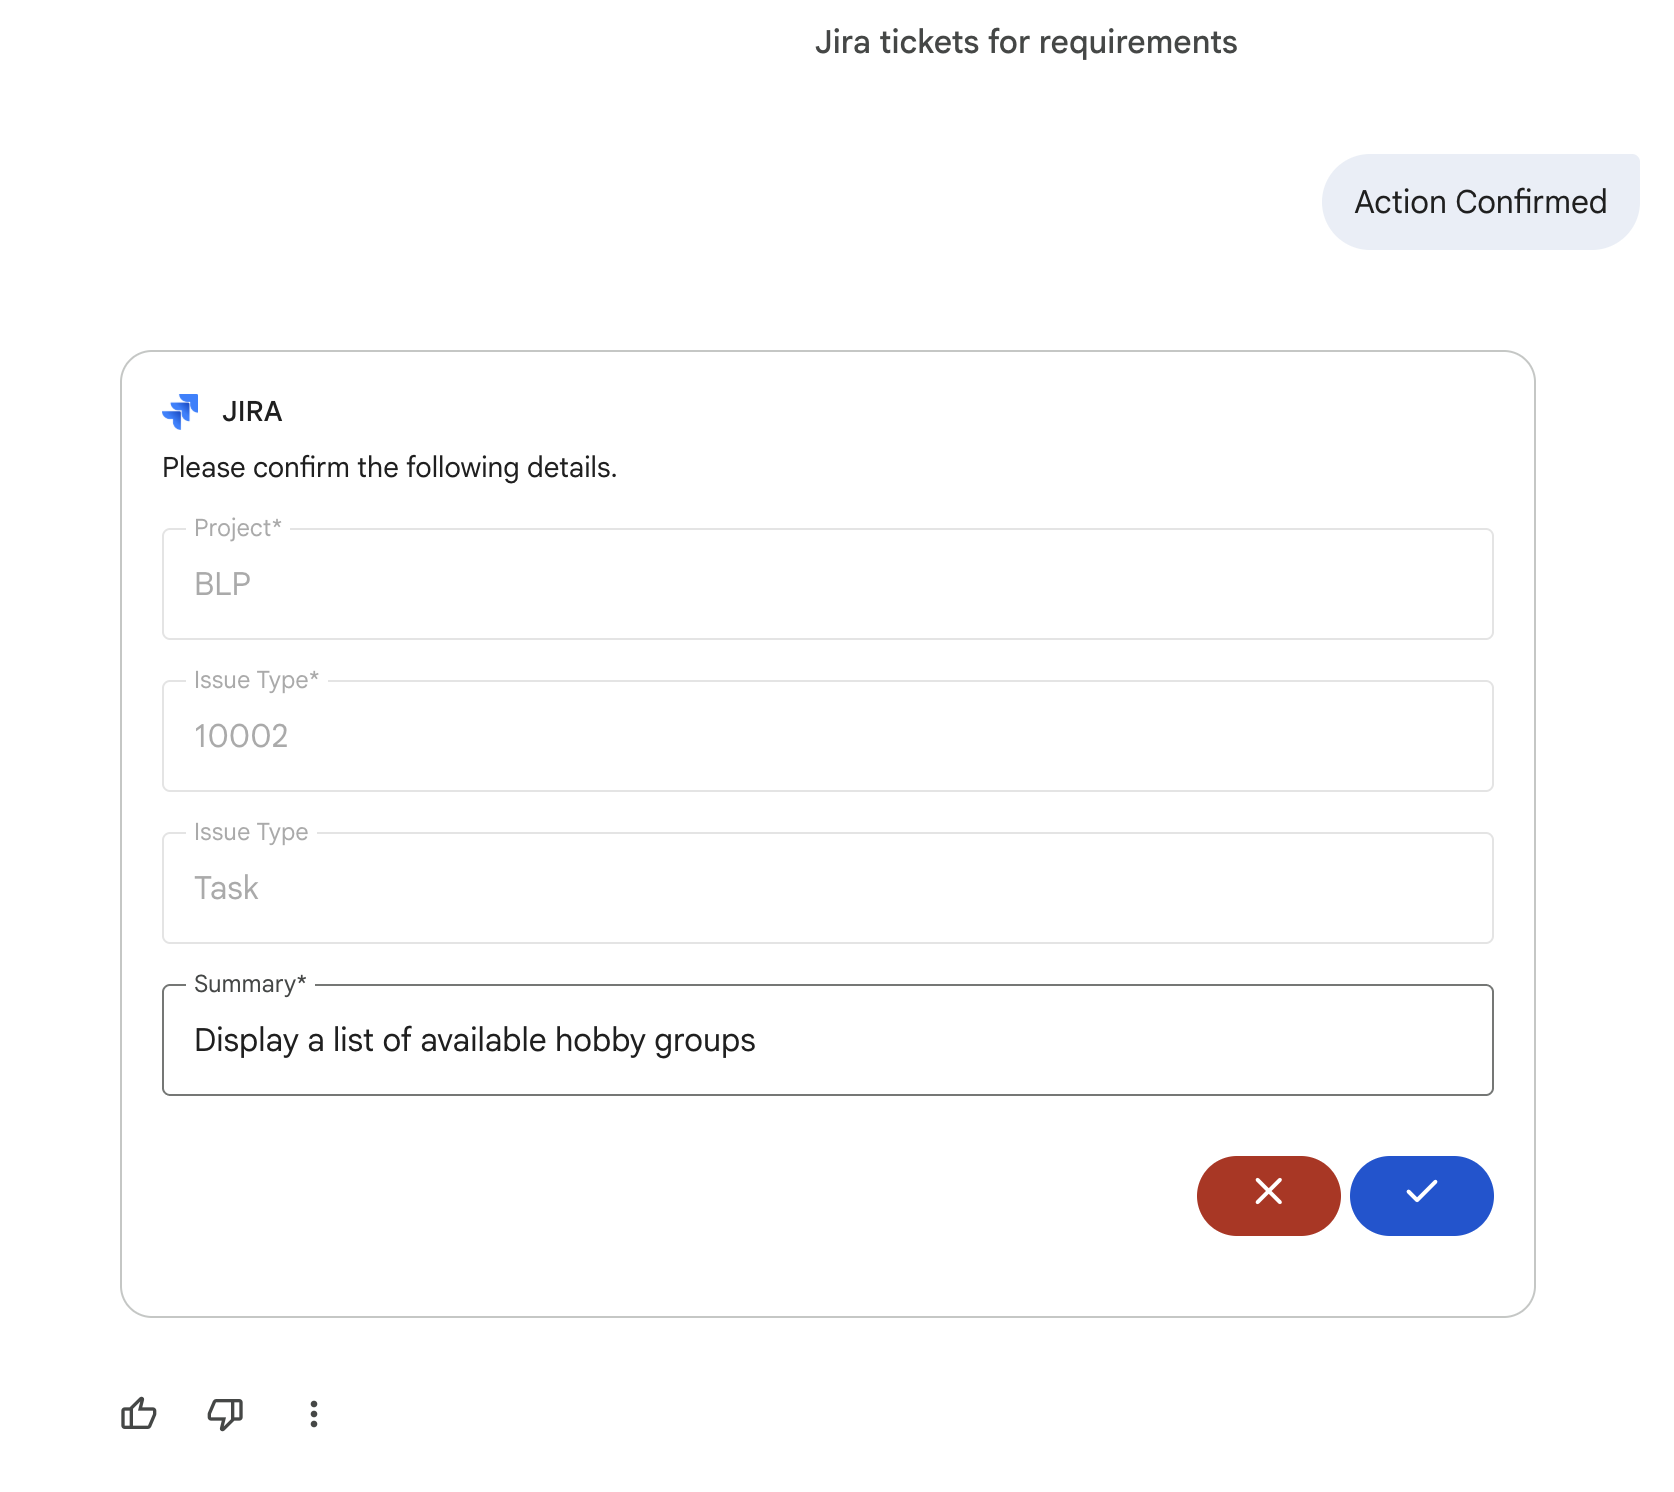
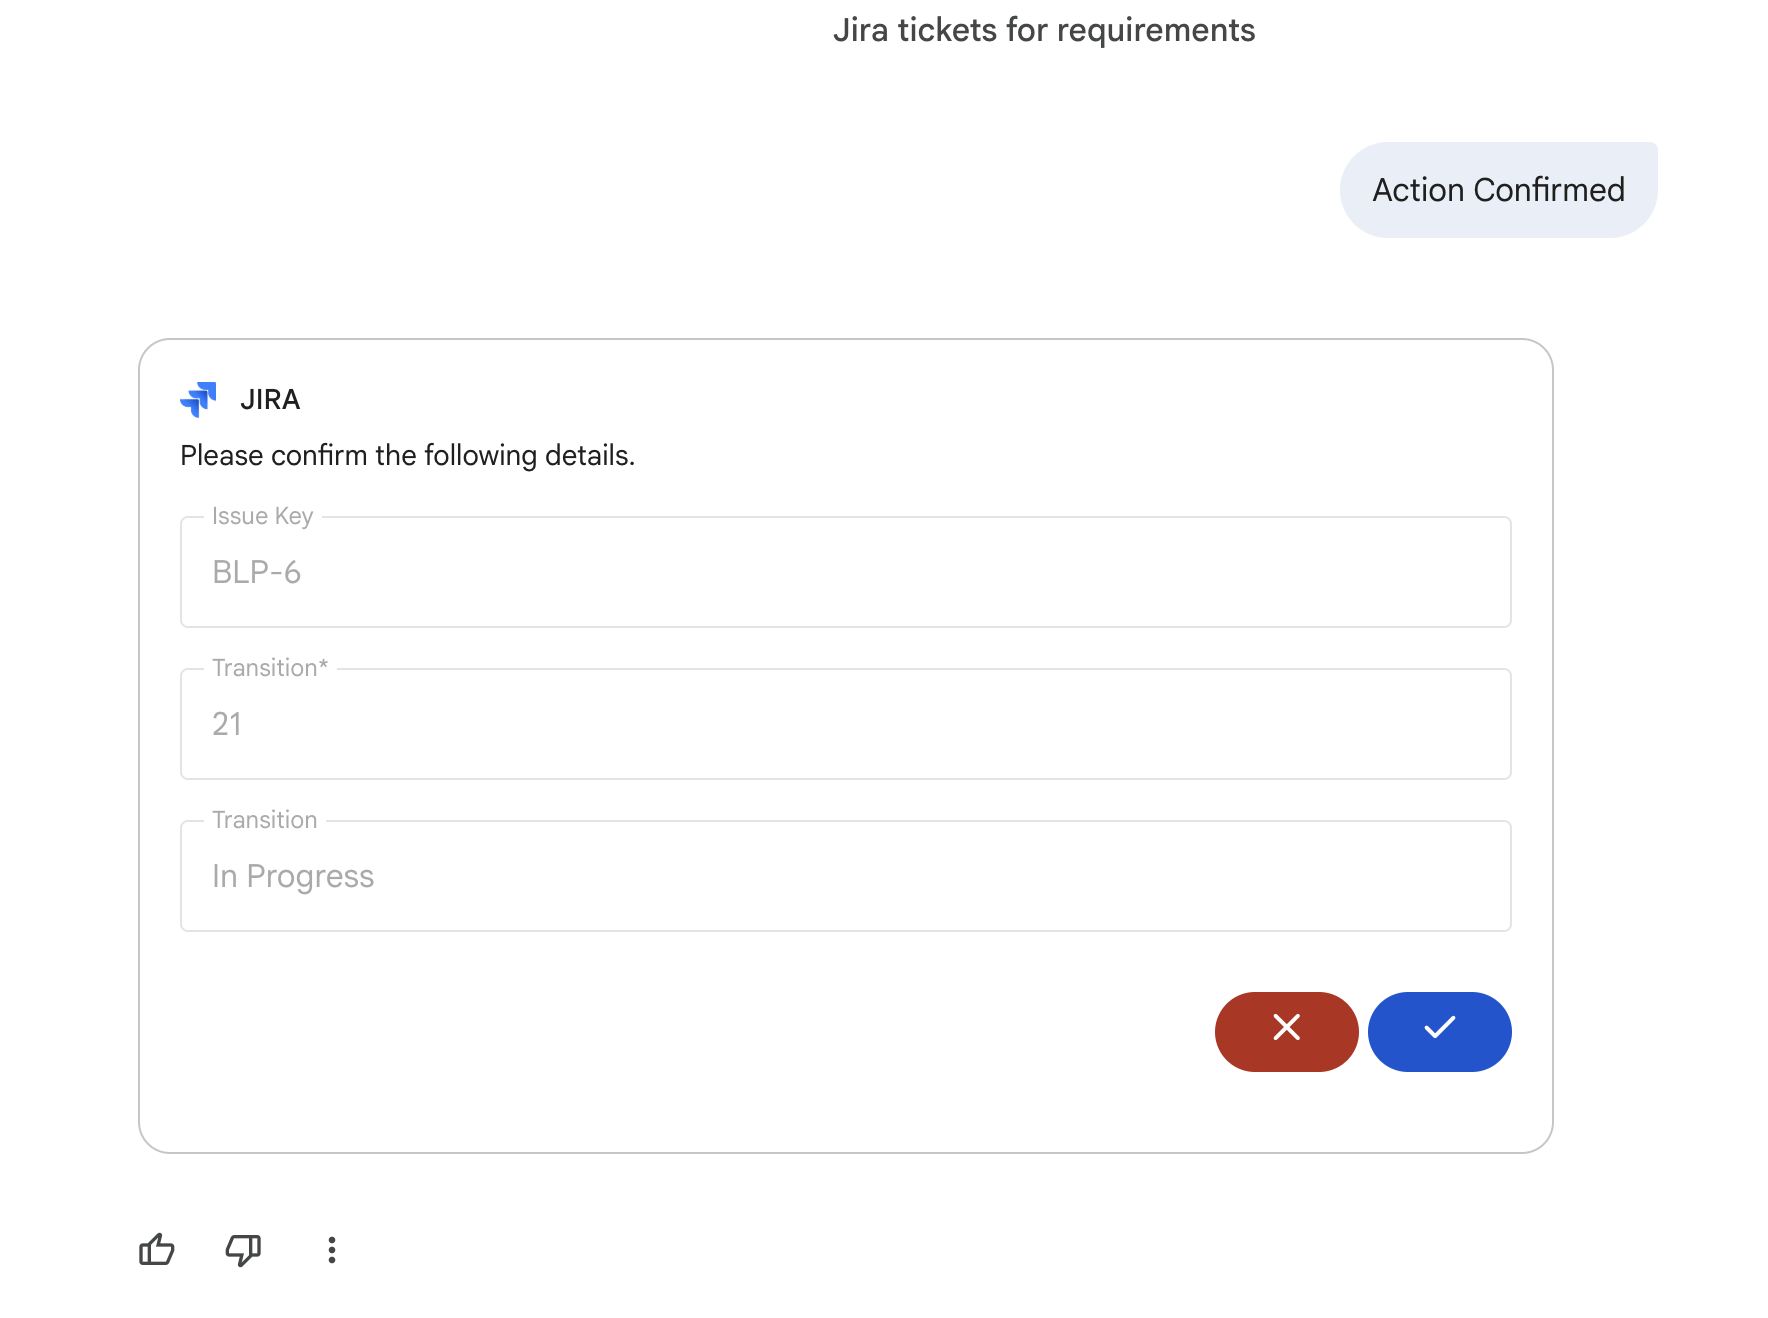
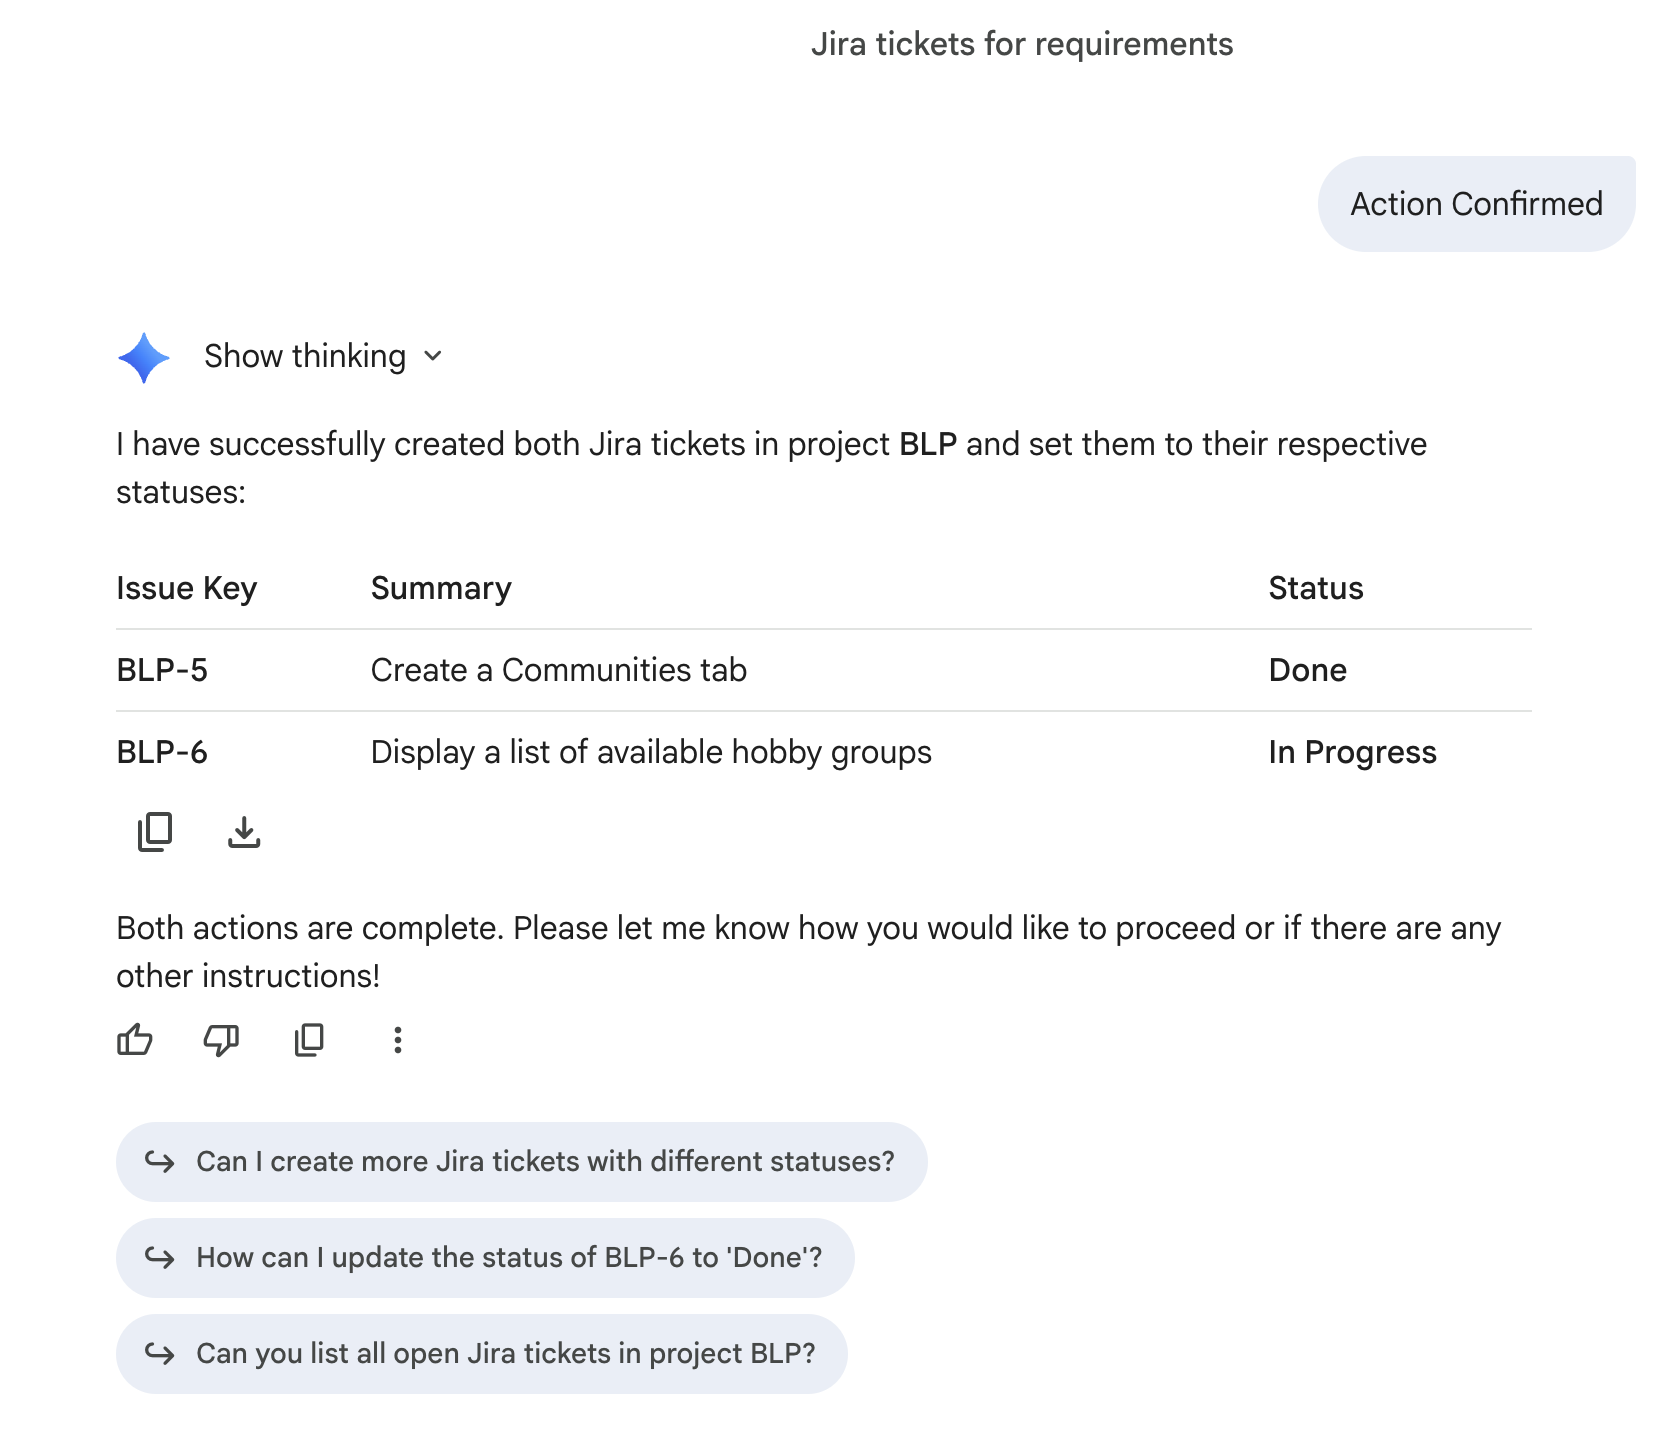
Create Jira tickets in project BLP for the following requirements from the uploaded requirements.txt file: 'Create a Communities tab' and 'Display a list of available hobby groups'. Mark the first one as 'Done' and the second one as 'In Progress'.
Gemini will communicate with Jira to create the tickets and set the specified statuses: 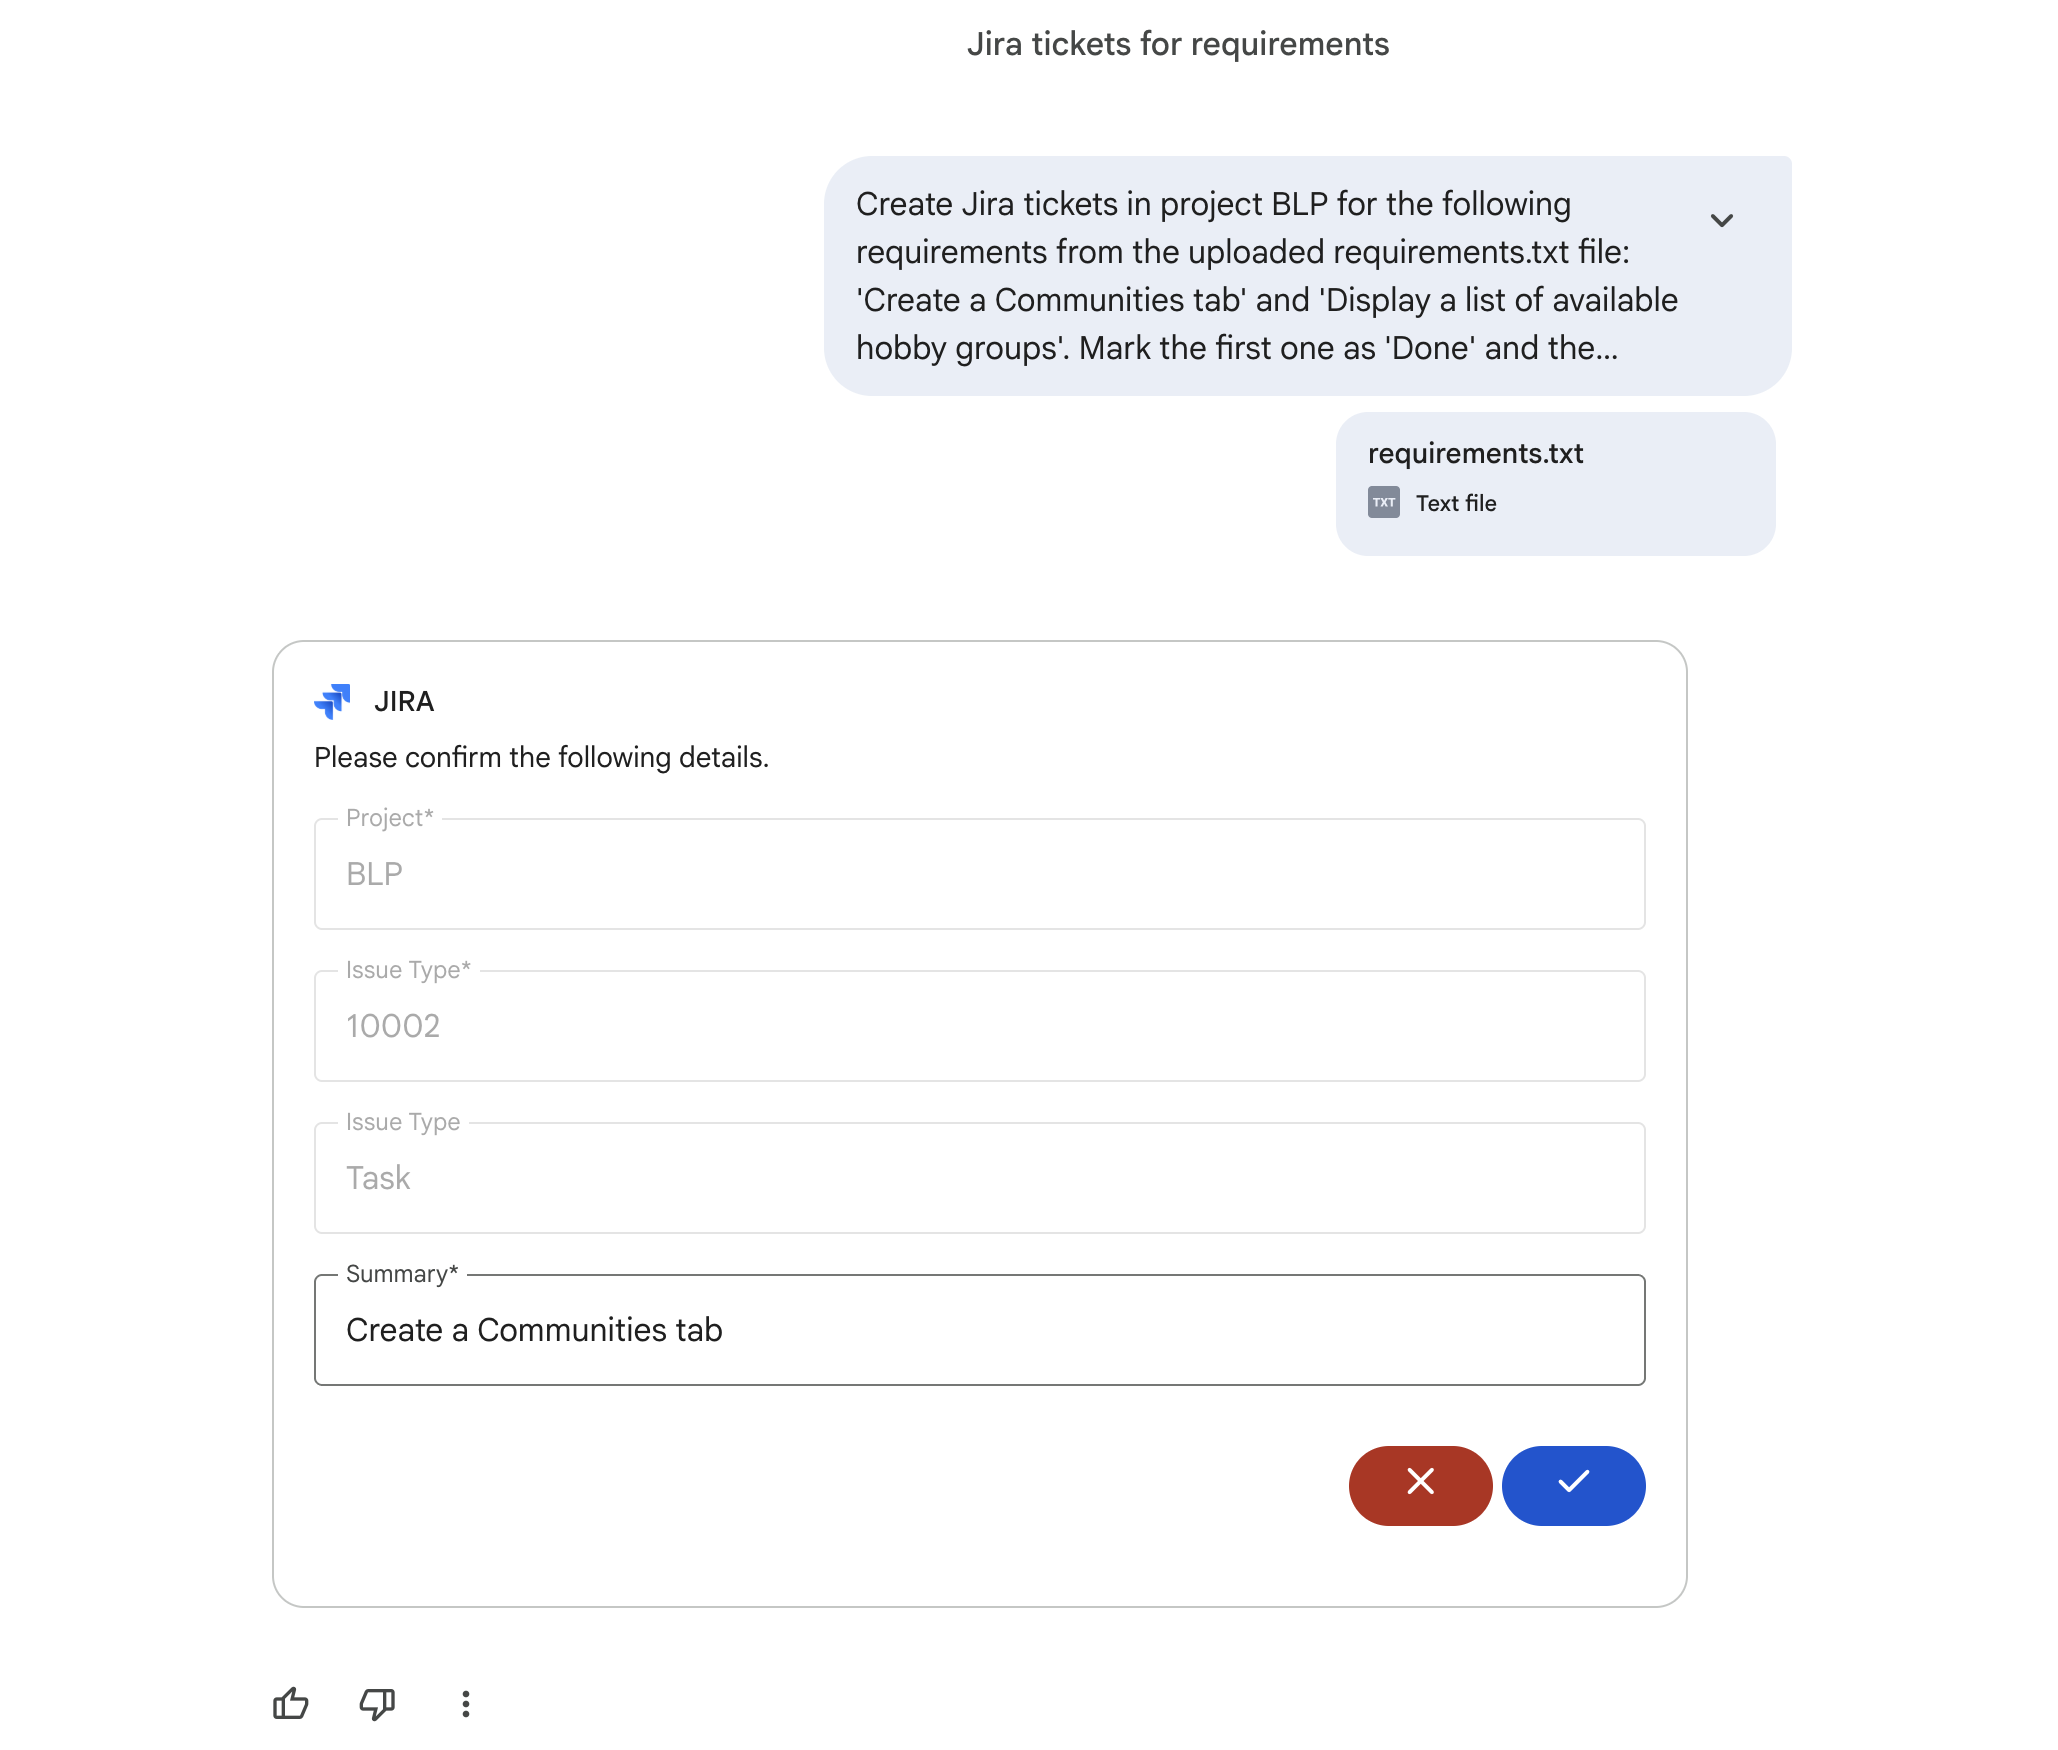
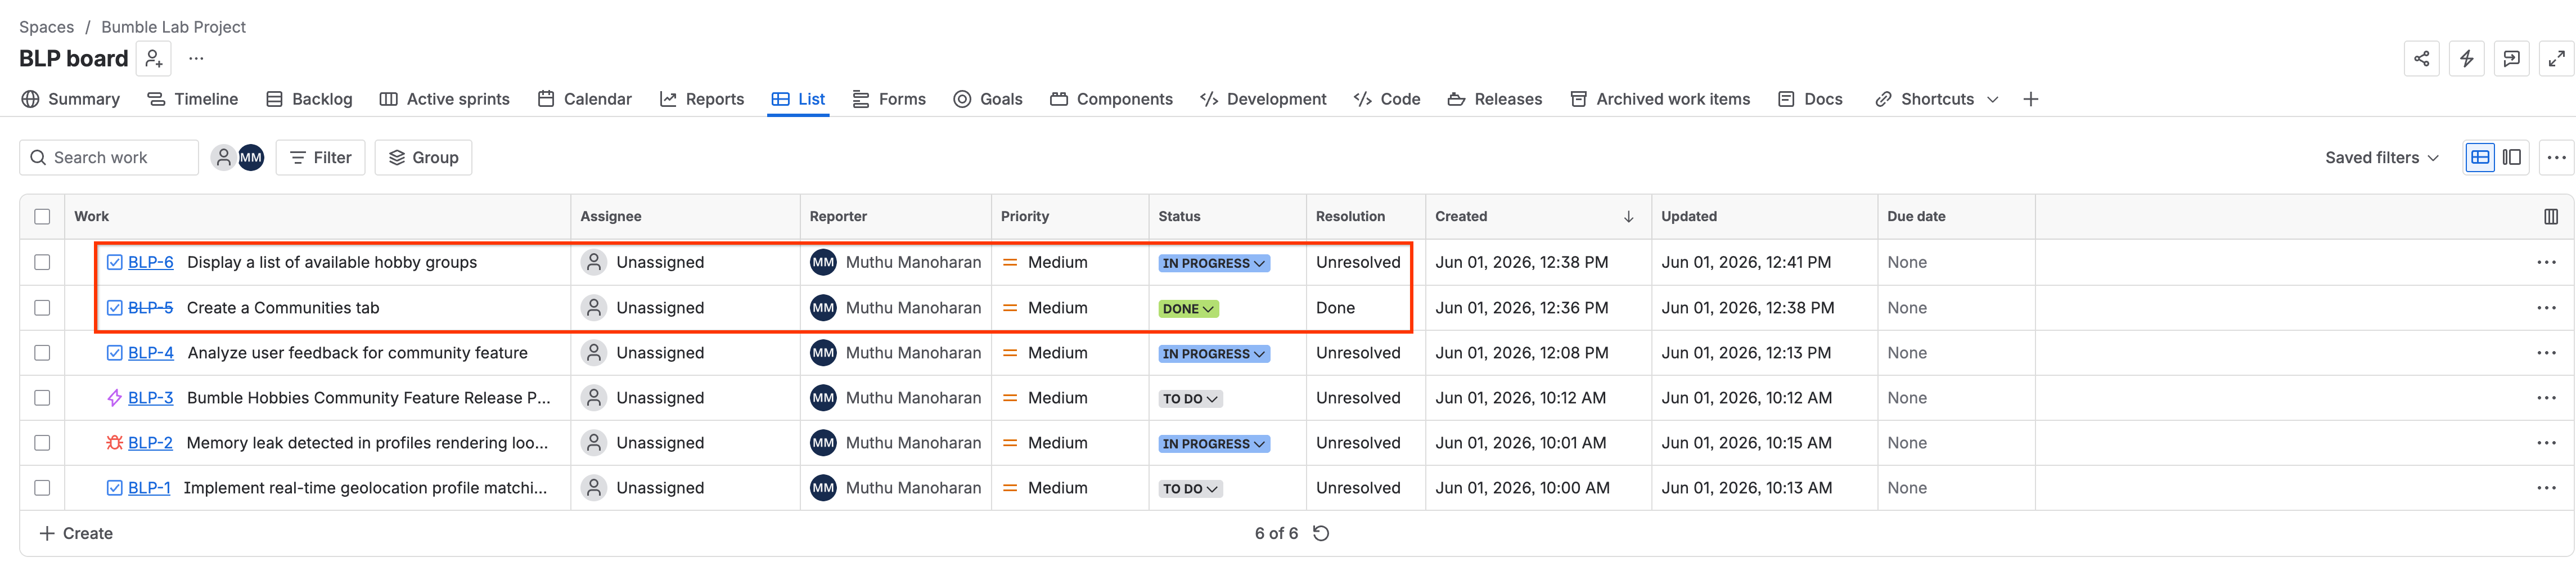
Step 4: Run the Analysis
Now, prompt Gemini to run a gap analysis between the requirements file and active Jira execution:
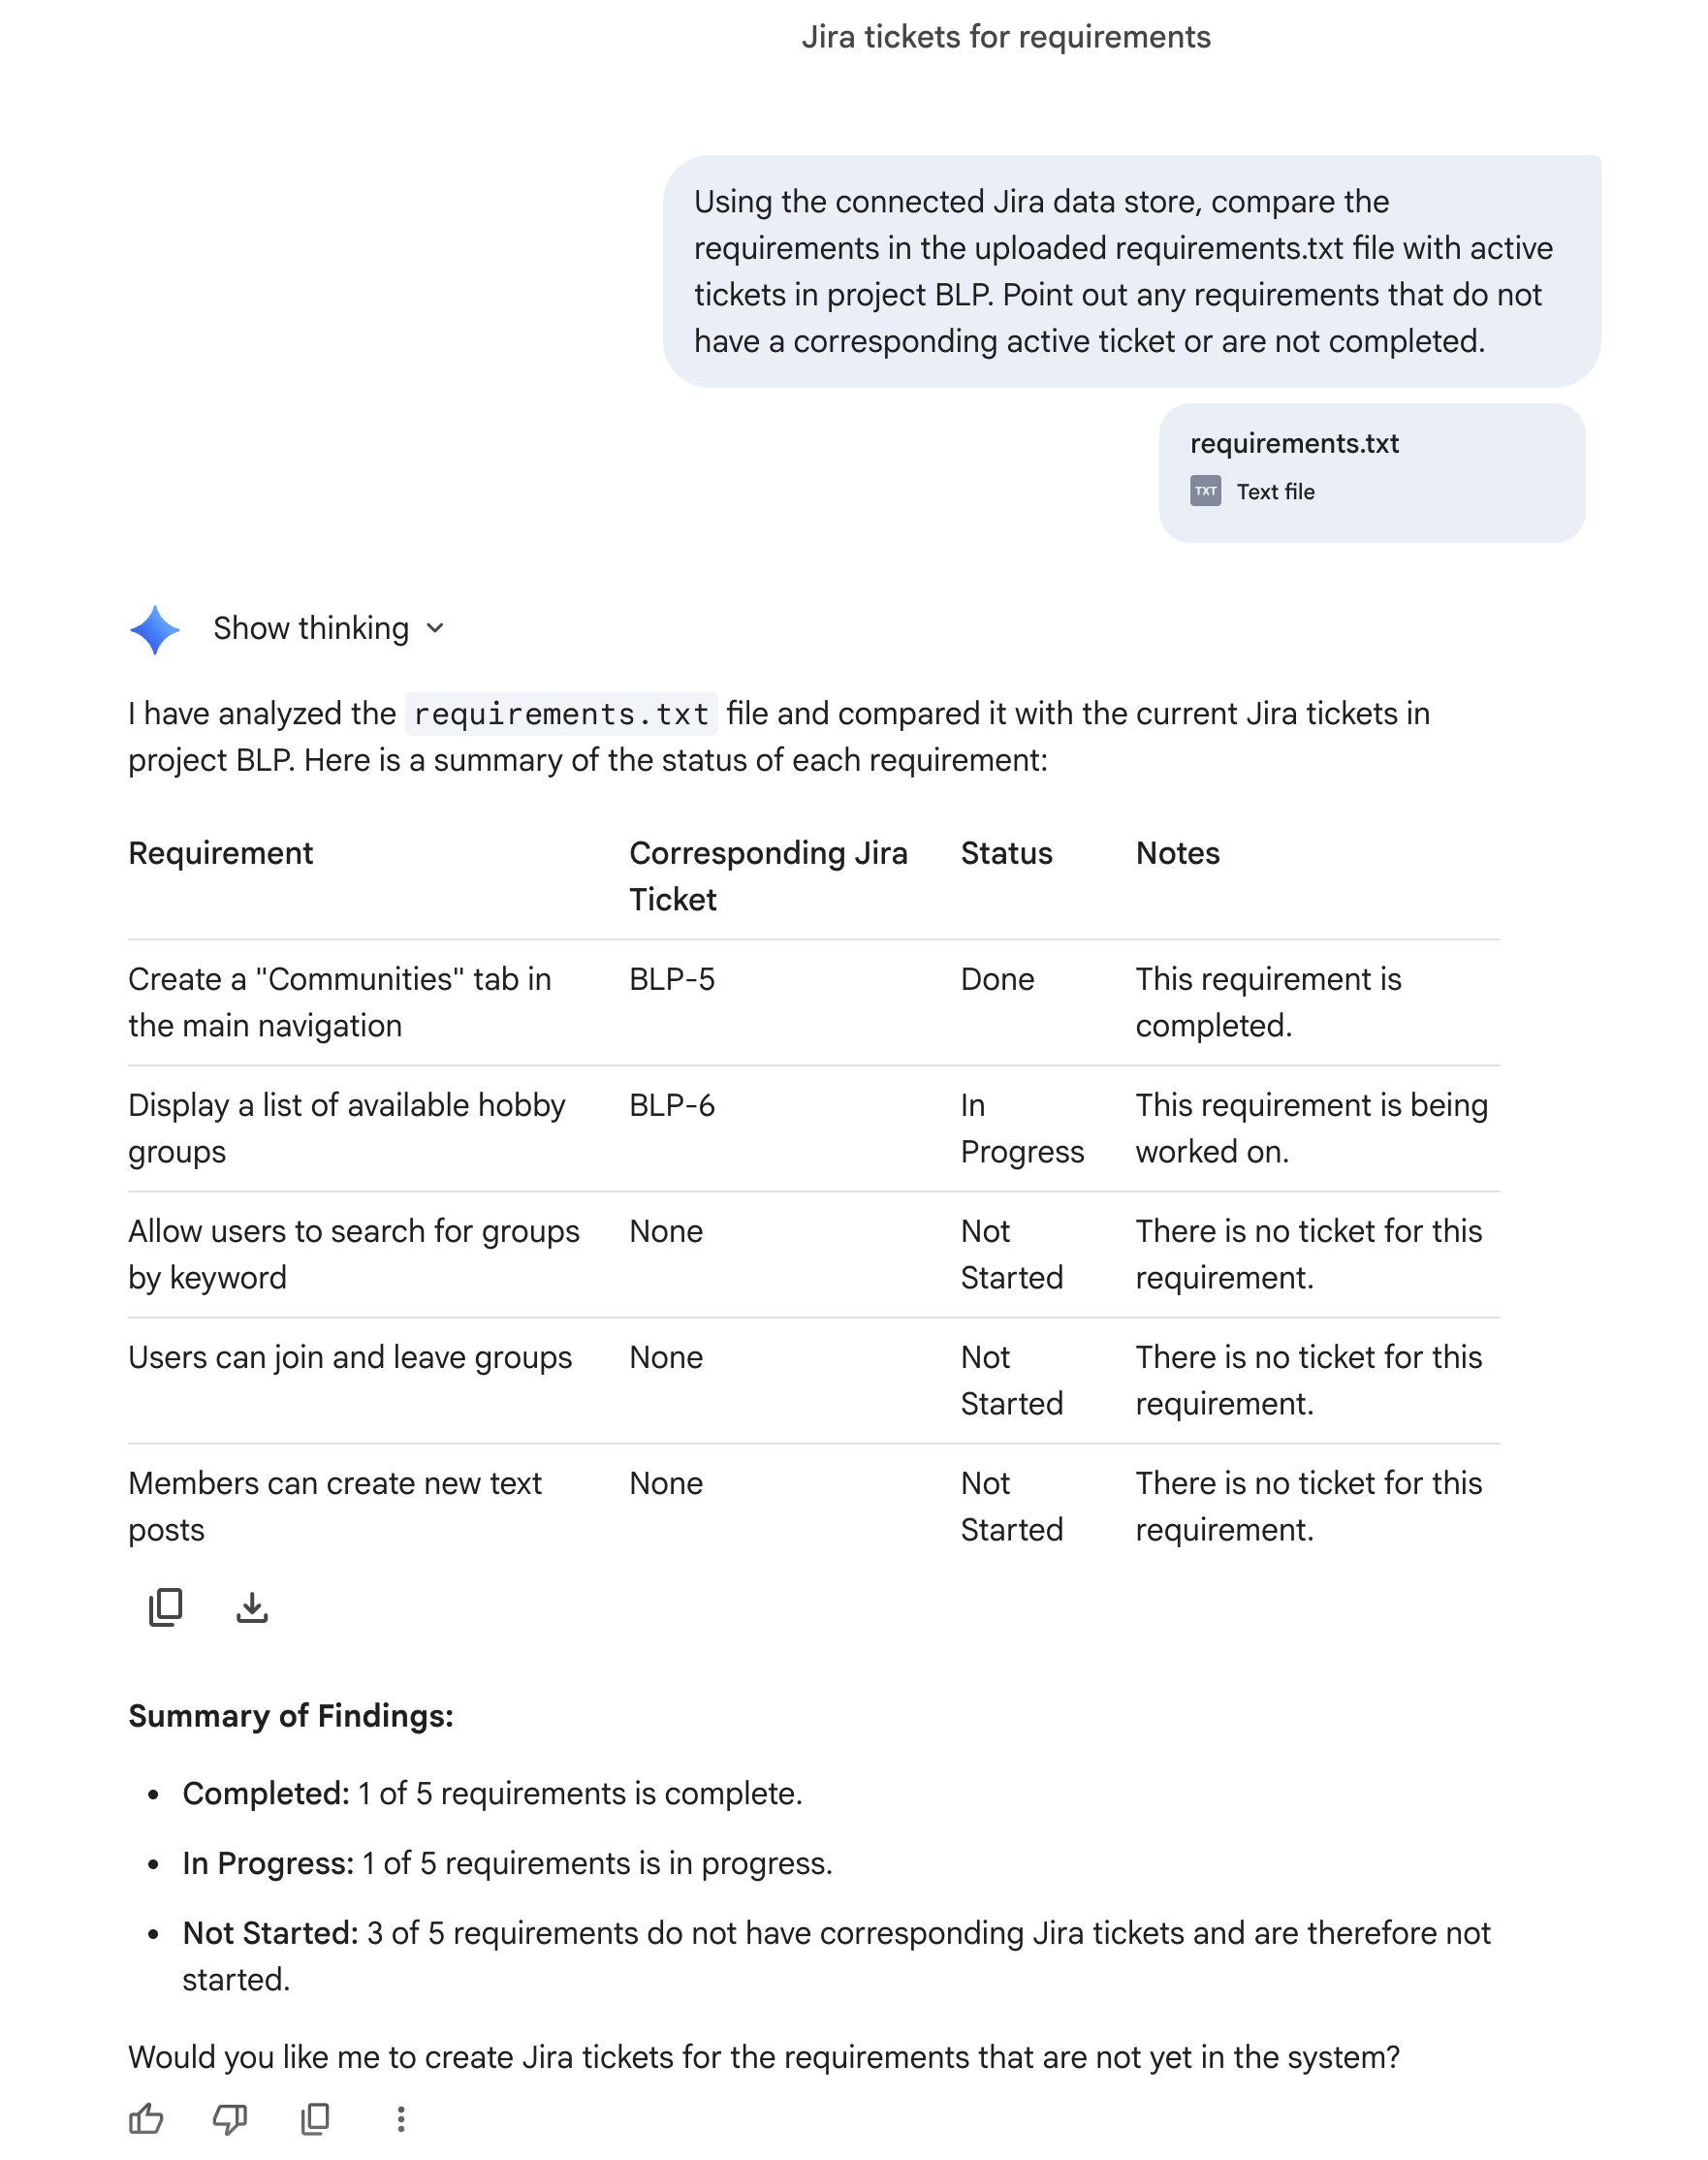
Using the connected Jira data store, compare the requirements in the uploaded requirements.txt file with active tickets in project BLP. Point out any requirements that do not have a corresponding active ticket or are not completed.
Gemini will analyze the uploaded text alongside your live Jira project data to return a clear comparison table: 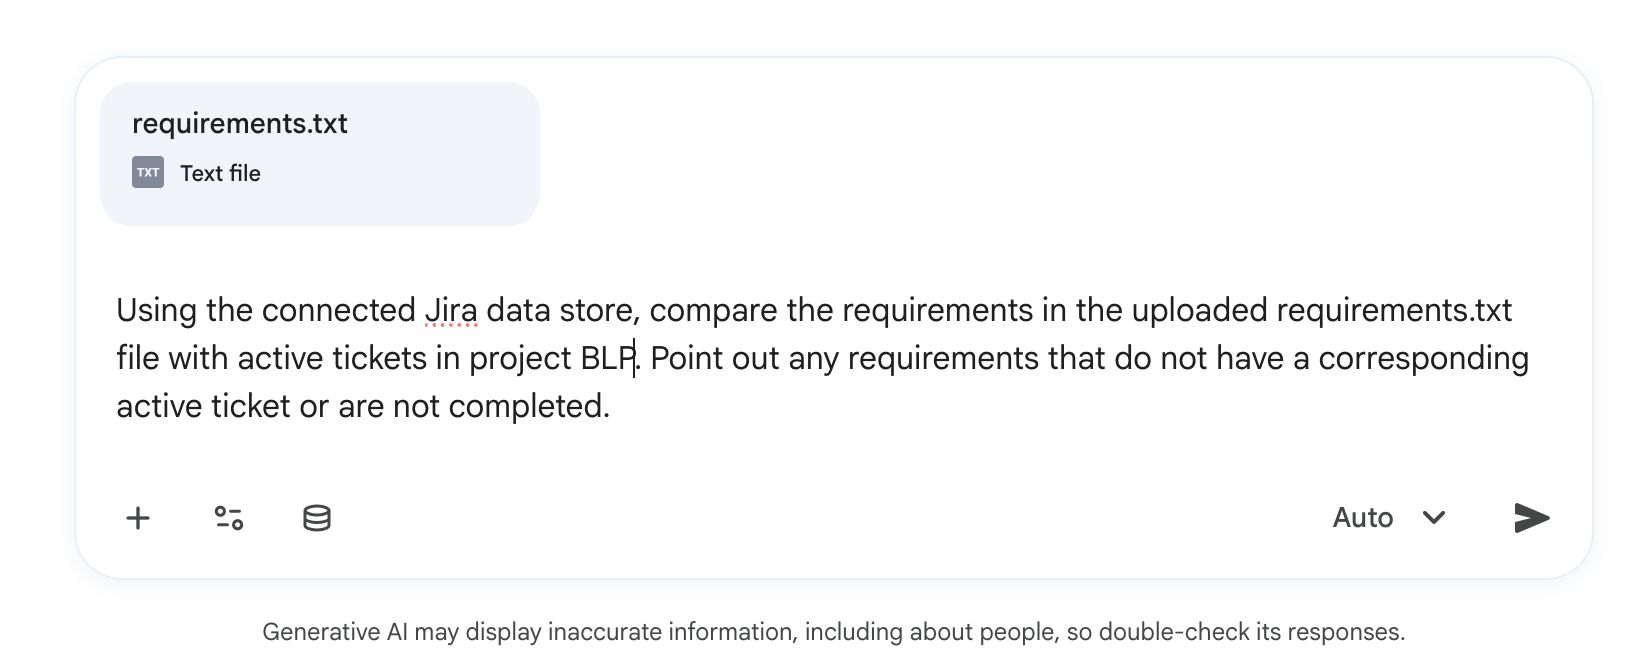
10. Analyze sprint backlogs with Gemini Notebook
In this step, you will use Gemini Notebook to analyze unstructured sprint retrospective notes and extract recurring bottlenecks.
Step 1: Create your Retrospective Document
- Open your plain-text editor (TextEdit in Plain Text mode on Mac, or Notepad on Windows).
- Copy and paste the following mock notes into the editor:
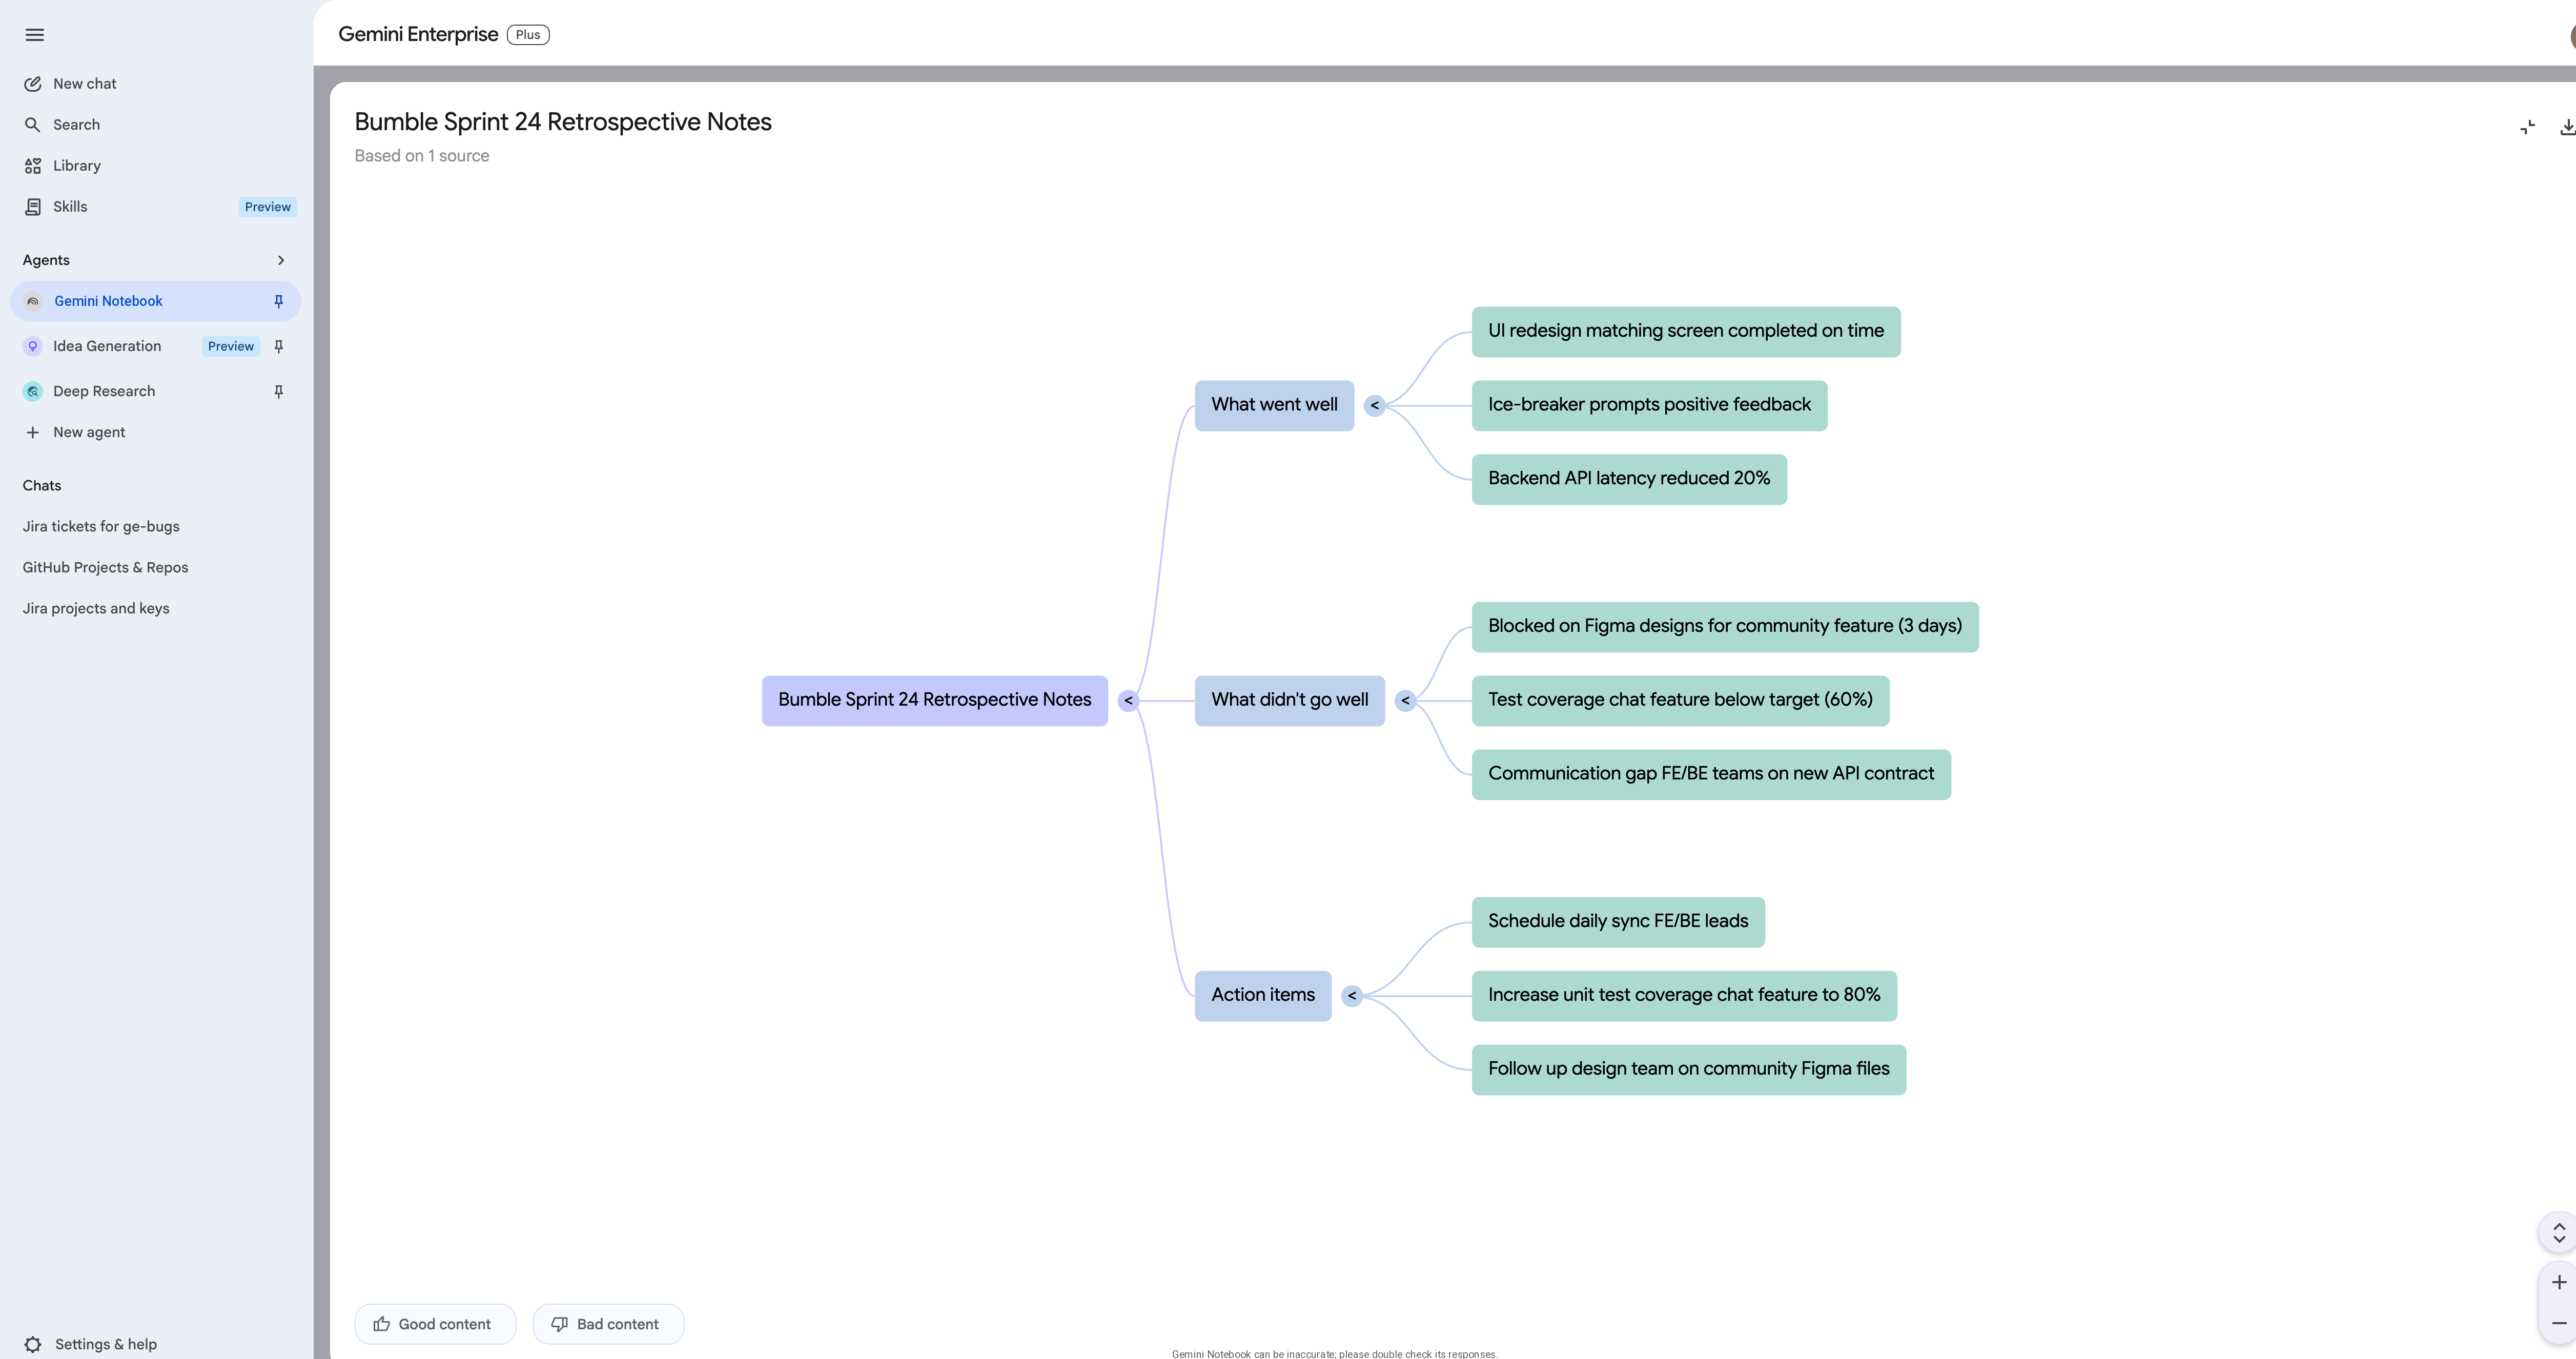
Bumble Sprint 24 Retrospective Notes
What went well:
- UI redesign of the matching screen was completed on time.
- New ice-breaker prompts received positive feedback in user testing.
- Backend API latency reduced by 20%.

What didn't go well:
- Blocked on Figma designs for the community feature for 3 days.
- Test coverage for the new chat feature is below target (60% instead of 80%).
- Communication gap between frontend and backend teams on the new API contract.

Action items:
- Schedule a daily sync between frontend and backend leads.
- Increase unit test coverage for chat feature to 80%.
- Follow up with design team on community feature Figma files.
- Save the file as
retro.txt.
Step 2: Access Gemini Notebook and Create a Notebook
- In the left Gemini Enterprise navigation panel, expand the Agents tab.
- Select Gemini Notebook.
- Click Create a new Notebook.
Step 3: Import Sources
- In the source selection popup, select Copied text or Upload files.
- Paste or upload your
retro.txtfile.
Step 4: Generate Insights
- In the chat interface at the bottom, run the following prompt:
What are the recurring bottlenecks mentioned in these retrospective notes?
Gemini will analyze the retro notes and generate a detailed summary of blockers and recommended action items: 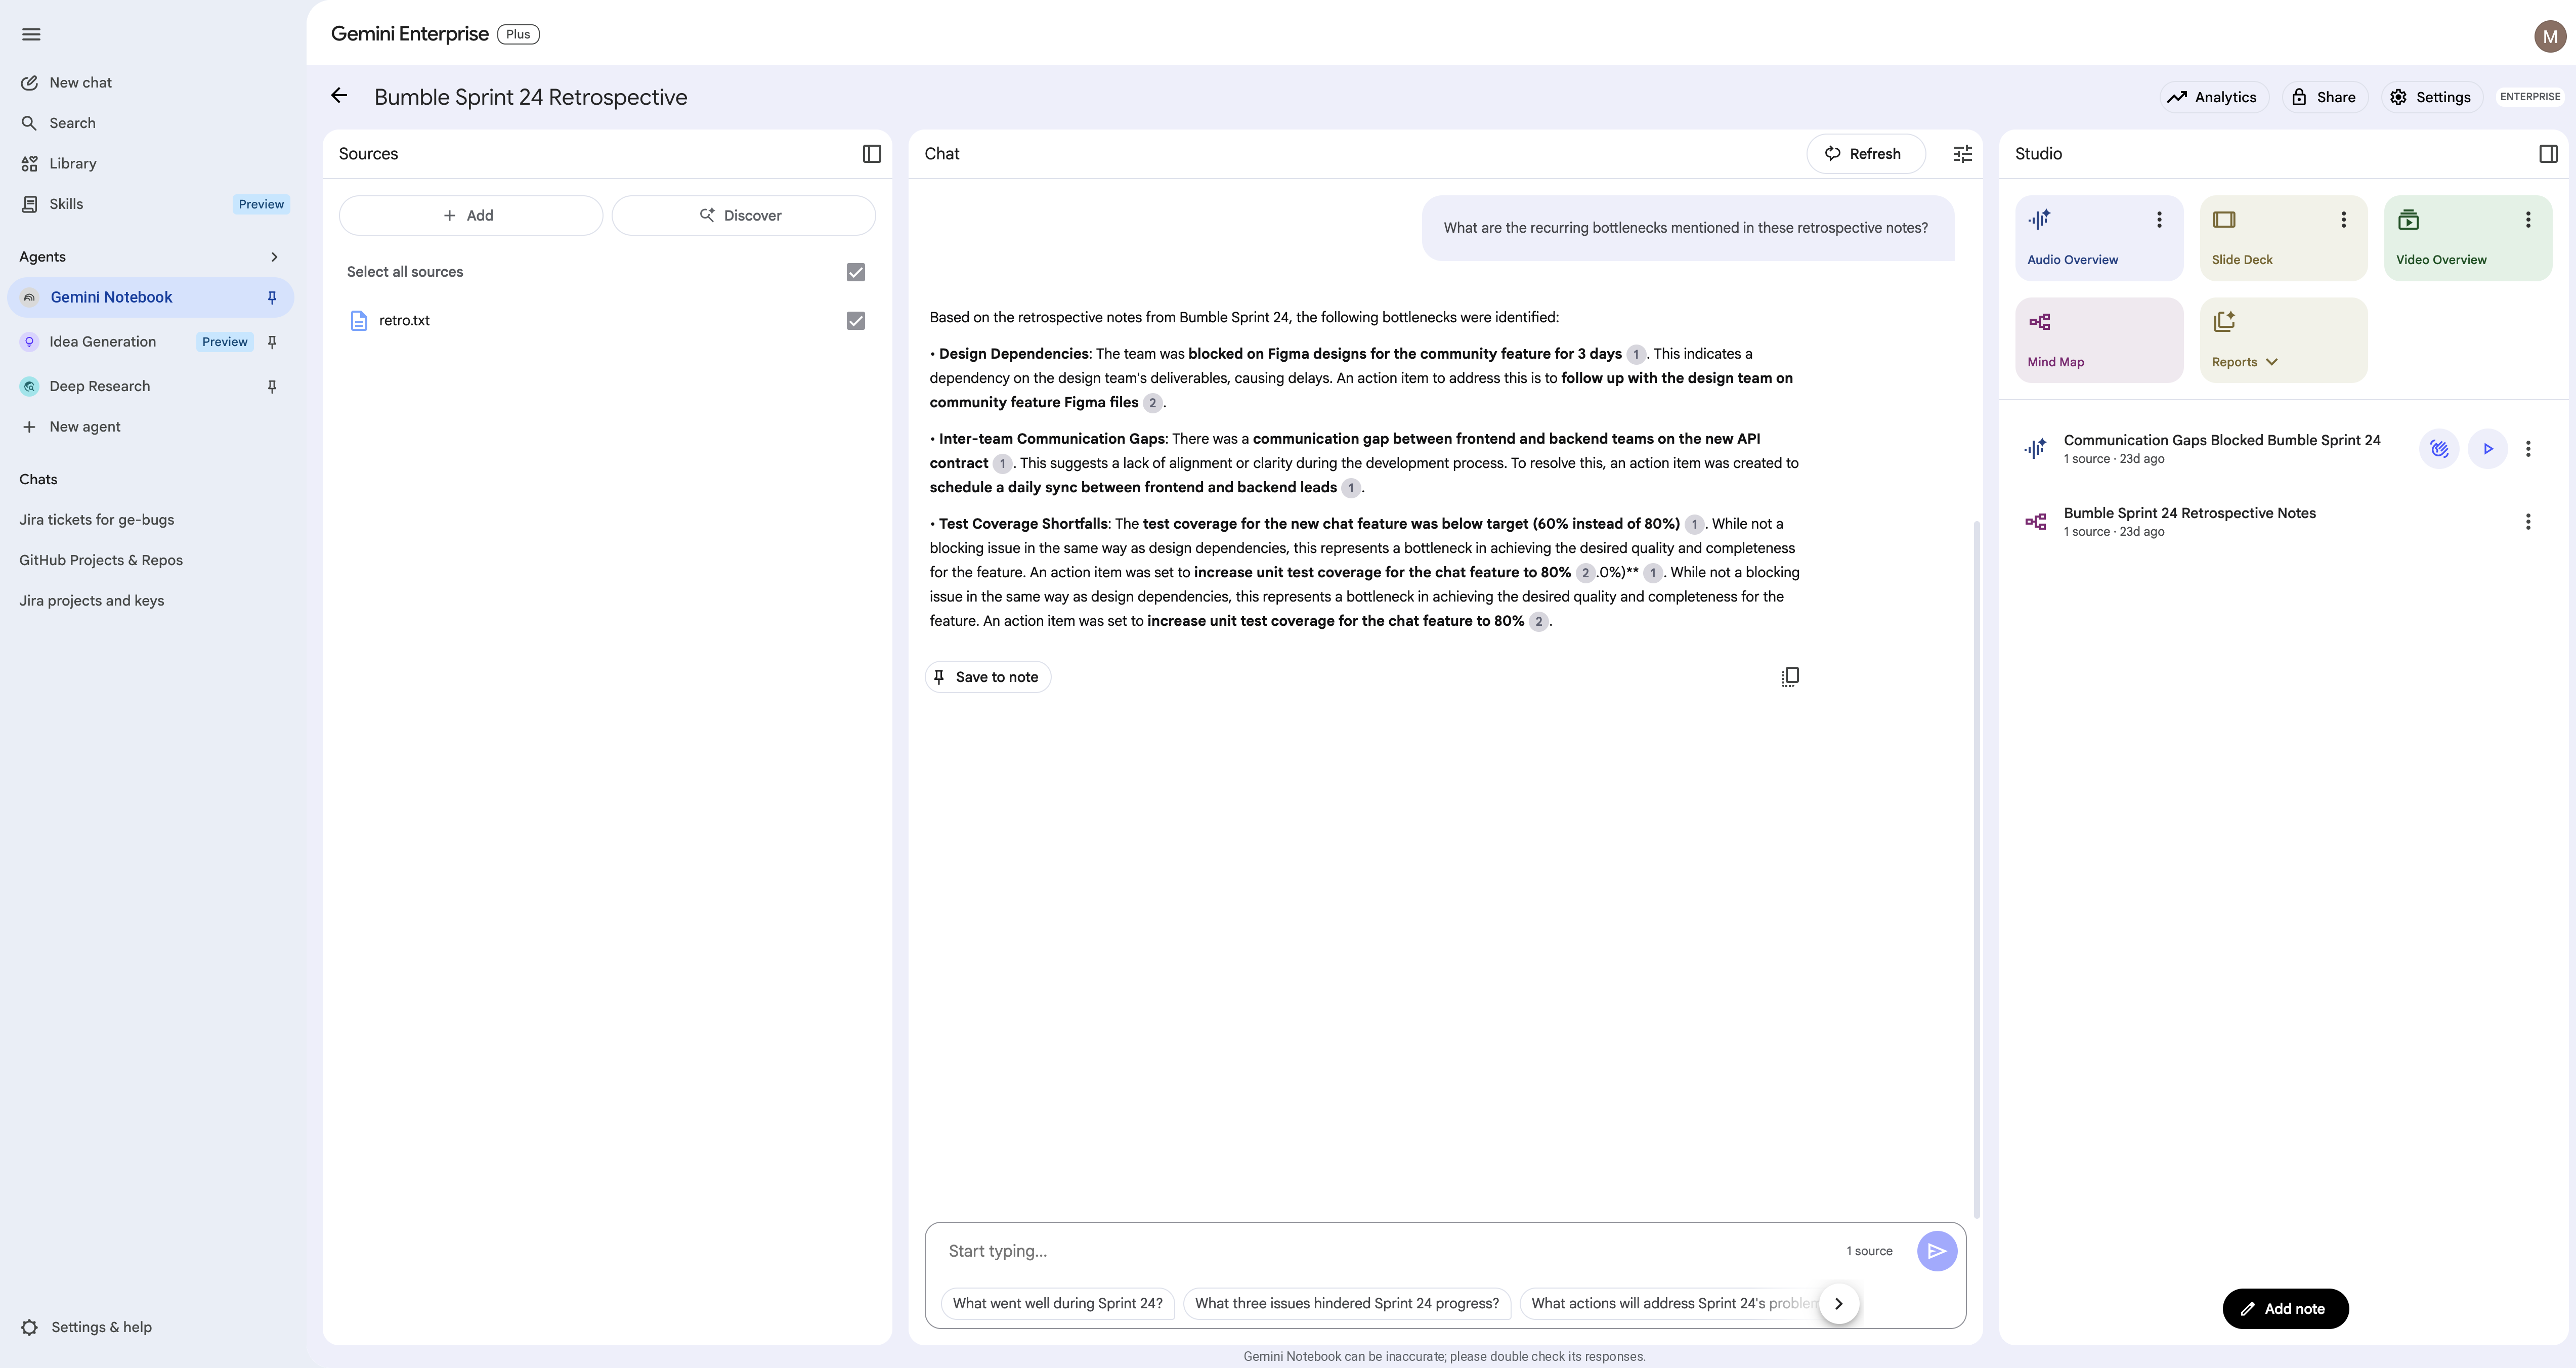
- Locate the Studio tab on the right side, and click on Mind Map to generate a visual representation of the extracted retro themes.
11. Conduct deep research on market trends
In this step, you will use the Deep Research agent to conduct extensive research on market trends relevant to Bumble, such as Gen Z preferences in dating apps.
Access Deep Research Agent
- In the Gemini Enterprise left navigation menu, select the Agents tab.
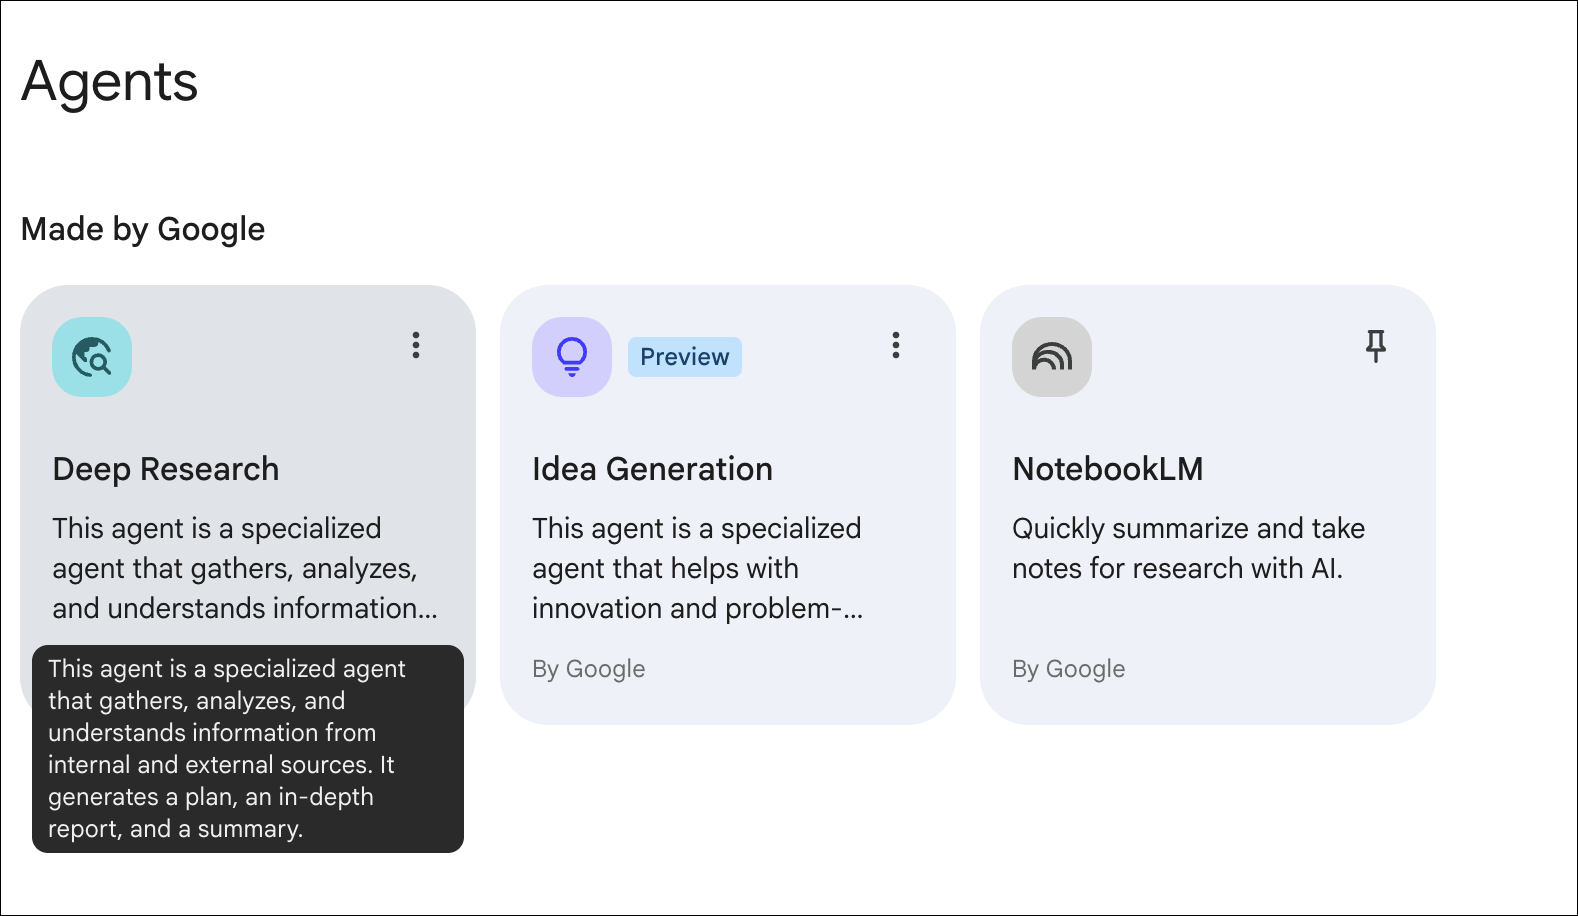
- Select the Deep Research agent.
Start Research Session
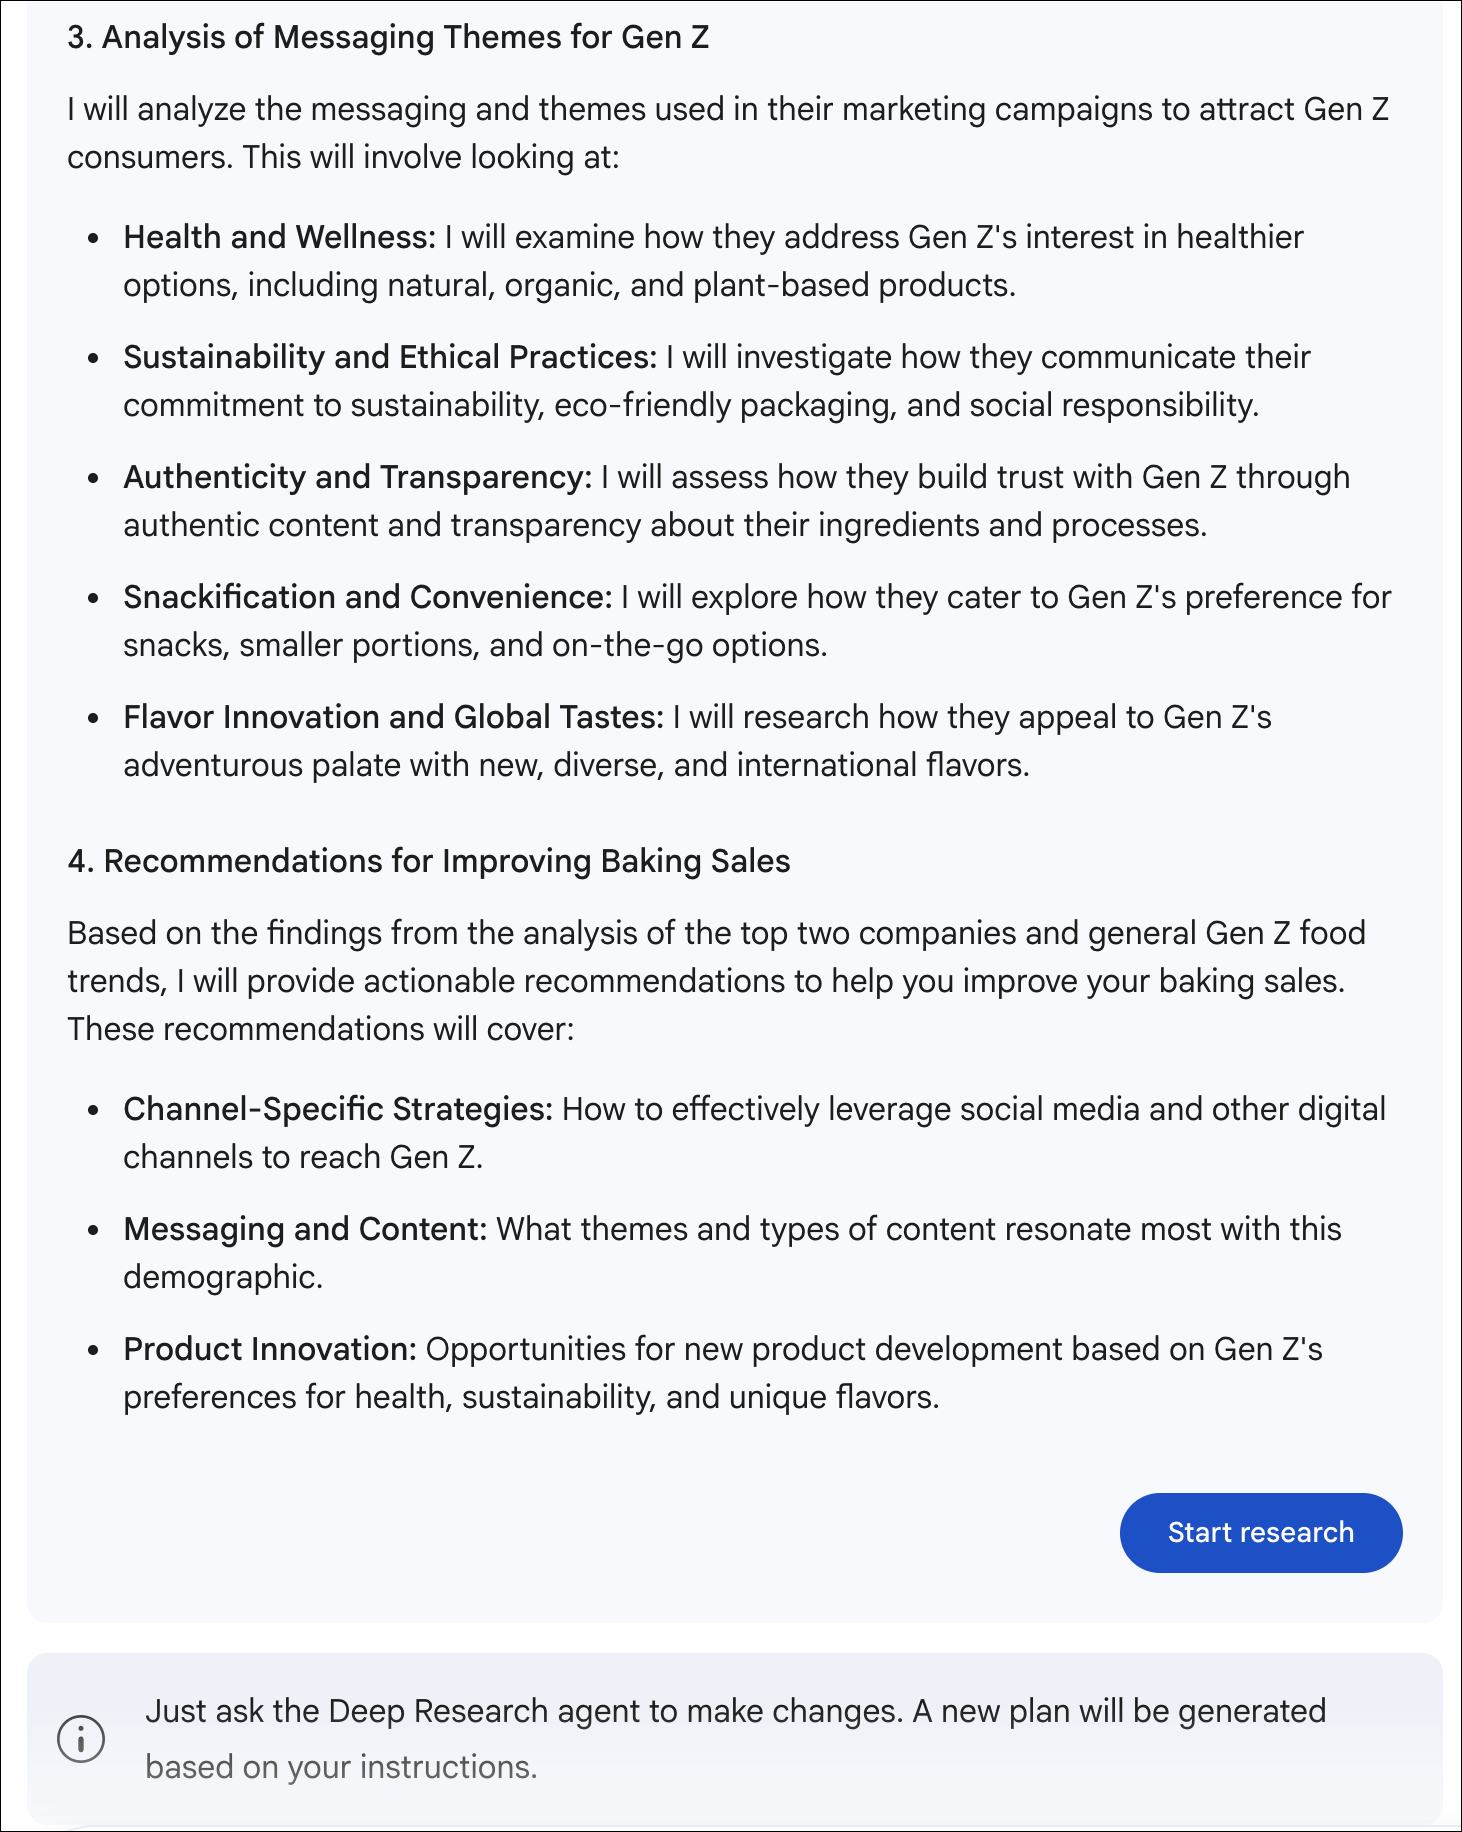
- In the input field, paste a prompt like: "Compare the effectiveness of different marketing strategies for reaching Gen Z consumers in the context of mobile dating and networking apps."
- Review Research Plan: The agent will generate a plan. Review it and click Start Research.
Expected Outcome
The agent will take a few minutes to search sources and generate a multi-page report with citations. You can continue with the next step while it runs.
12. Brainstorm with idea generation
In this step, you will use the Idea Generation agent to brainstorm new features or campaigns for Bumble, focusing on community building.
Access Idea Generation Agent
- In the Gemini Enterprise left navigation menu, select the Agents tab.
- Select the Idea Generation agent.
Start Ideation Session
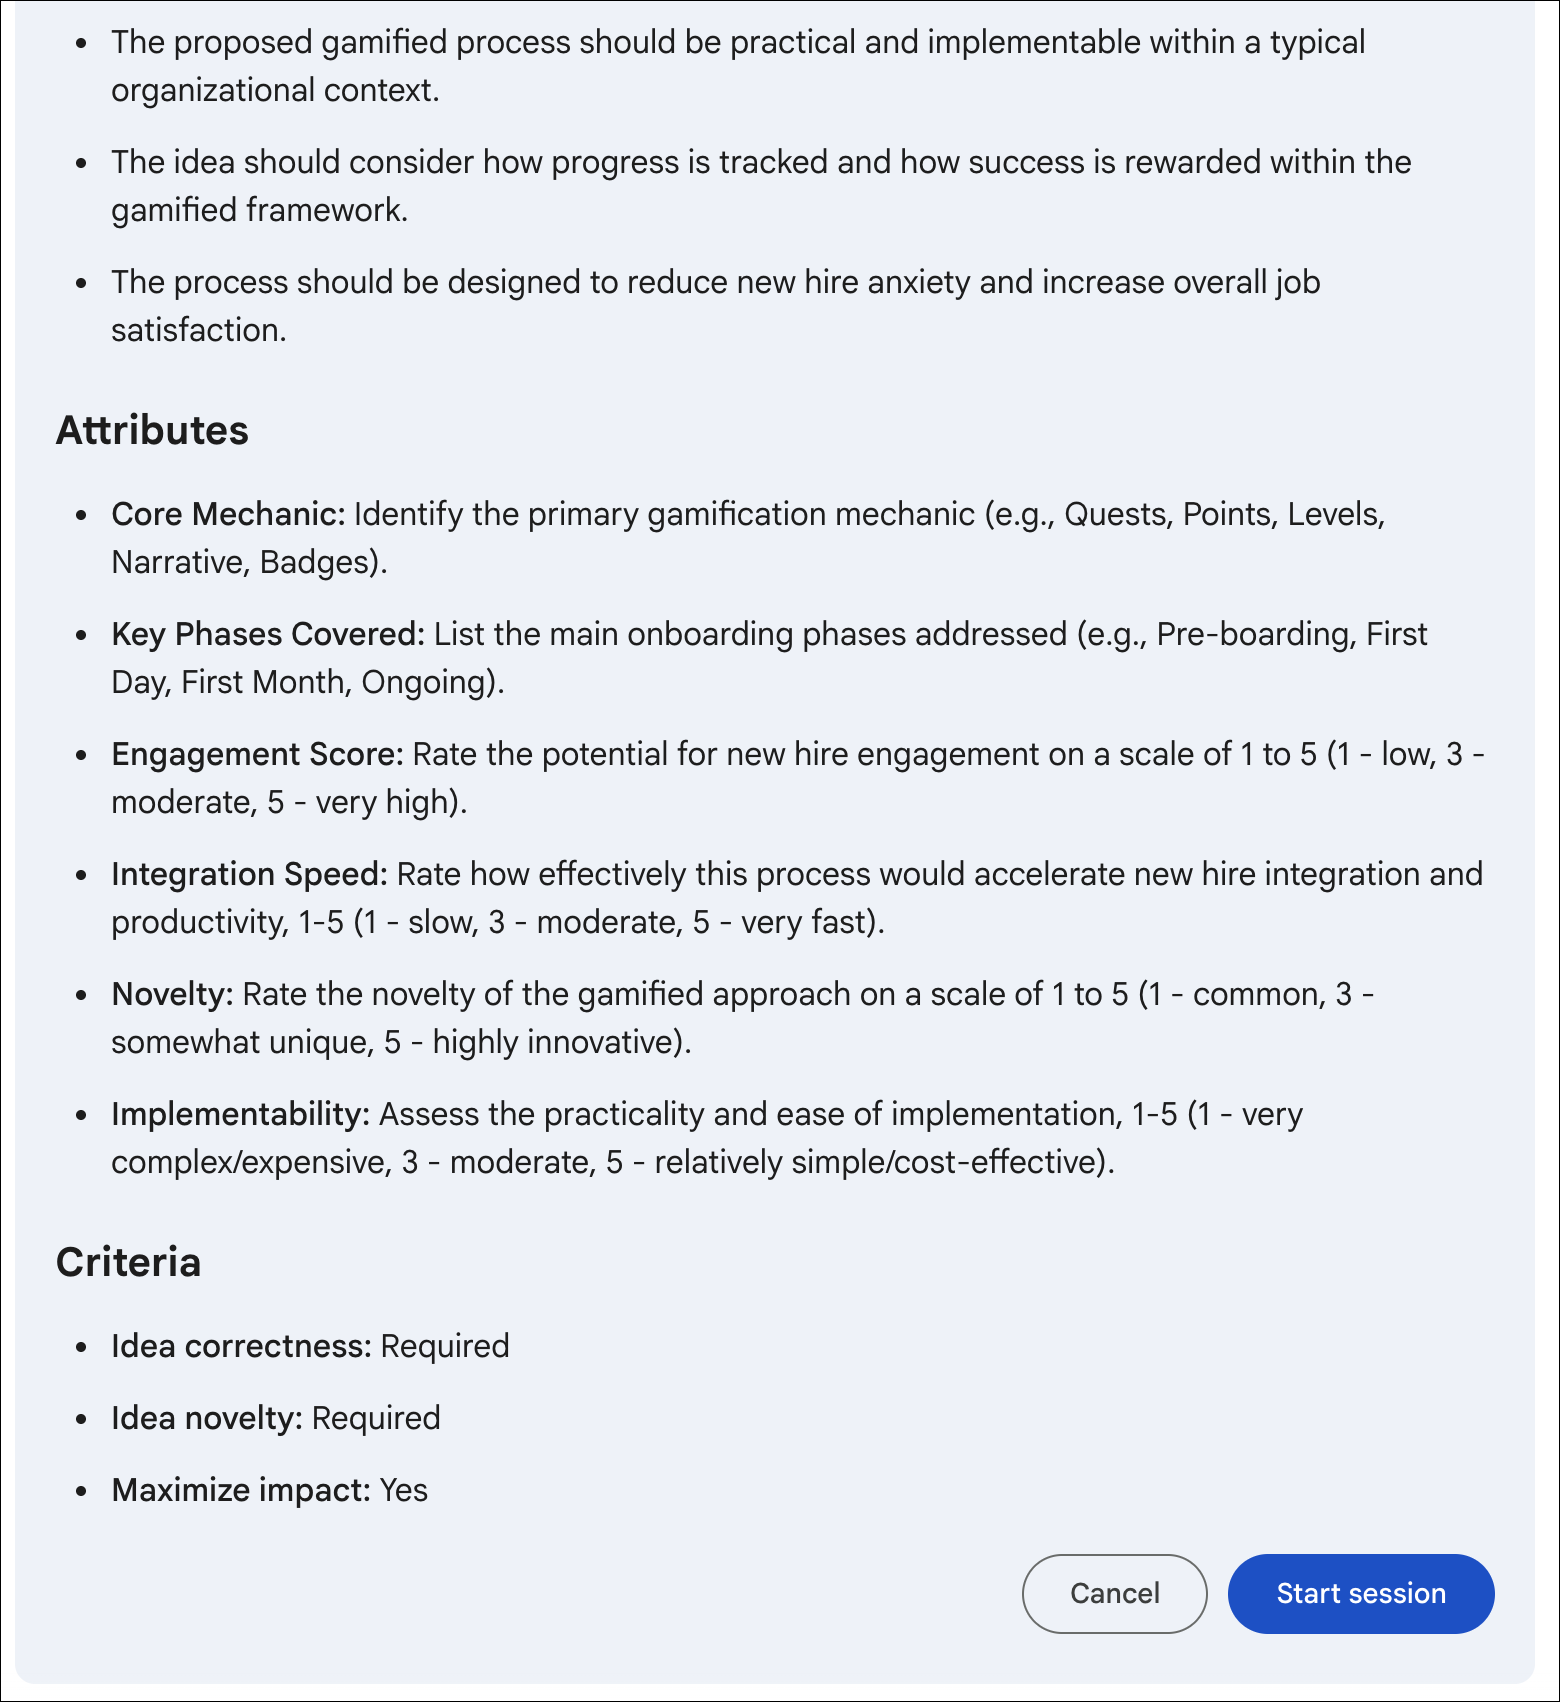
- Provide a topic to ideate around, such as: "Brainstorm a list of gamified features to encourage ice-breaking and community building among users on a networking app."
- Start the Session: Review the plan and click Start Session.
Expected Outcome
The agent will generate ideas, evaluate them, and rank them. This process will run for a long time, so do not wait for it to finish. You can let it run in the background and come back later to check the results. Please continue to the next lab.
13. Build the Multi-Step Scrum Master Assistant
Professional agents often use Sub-agents to divide complex tasks. In this step, you will build a multi-step agent using Agent Designer to delegate work to specialized Jira and GitHub sub-agents.
Step 1: Configure the Orchestrator Agent
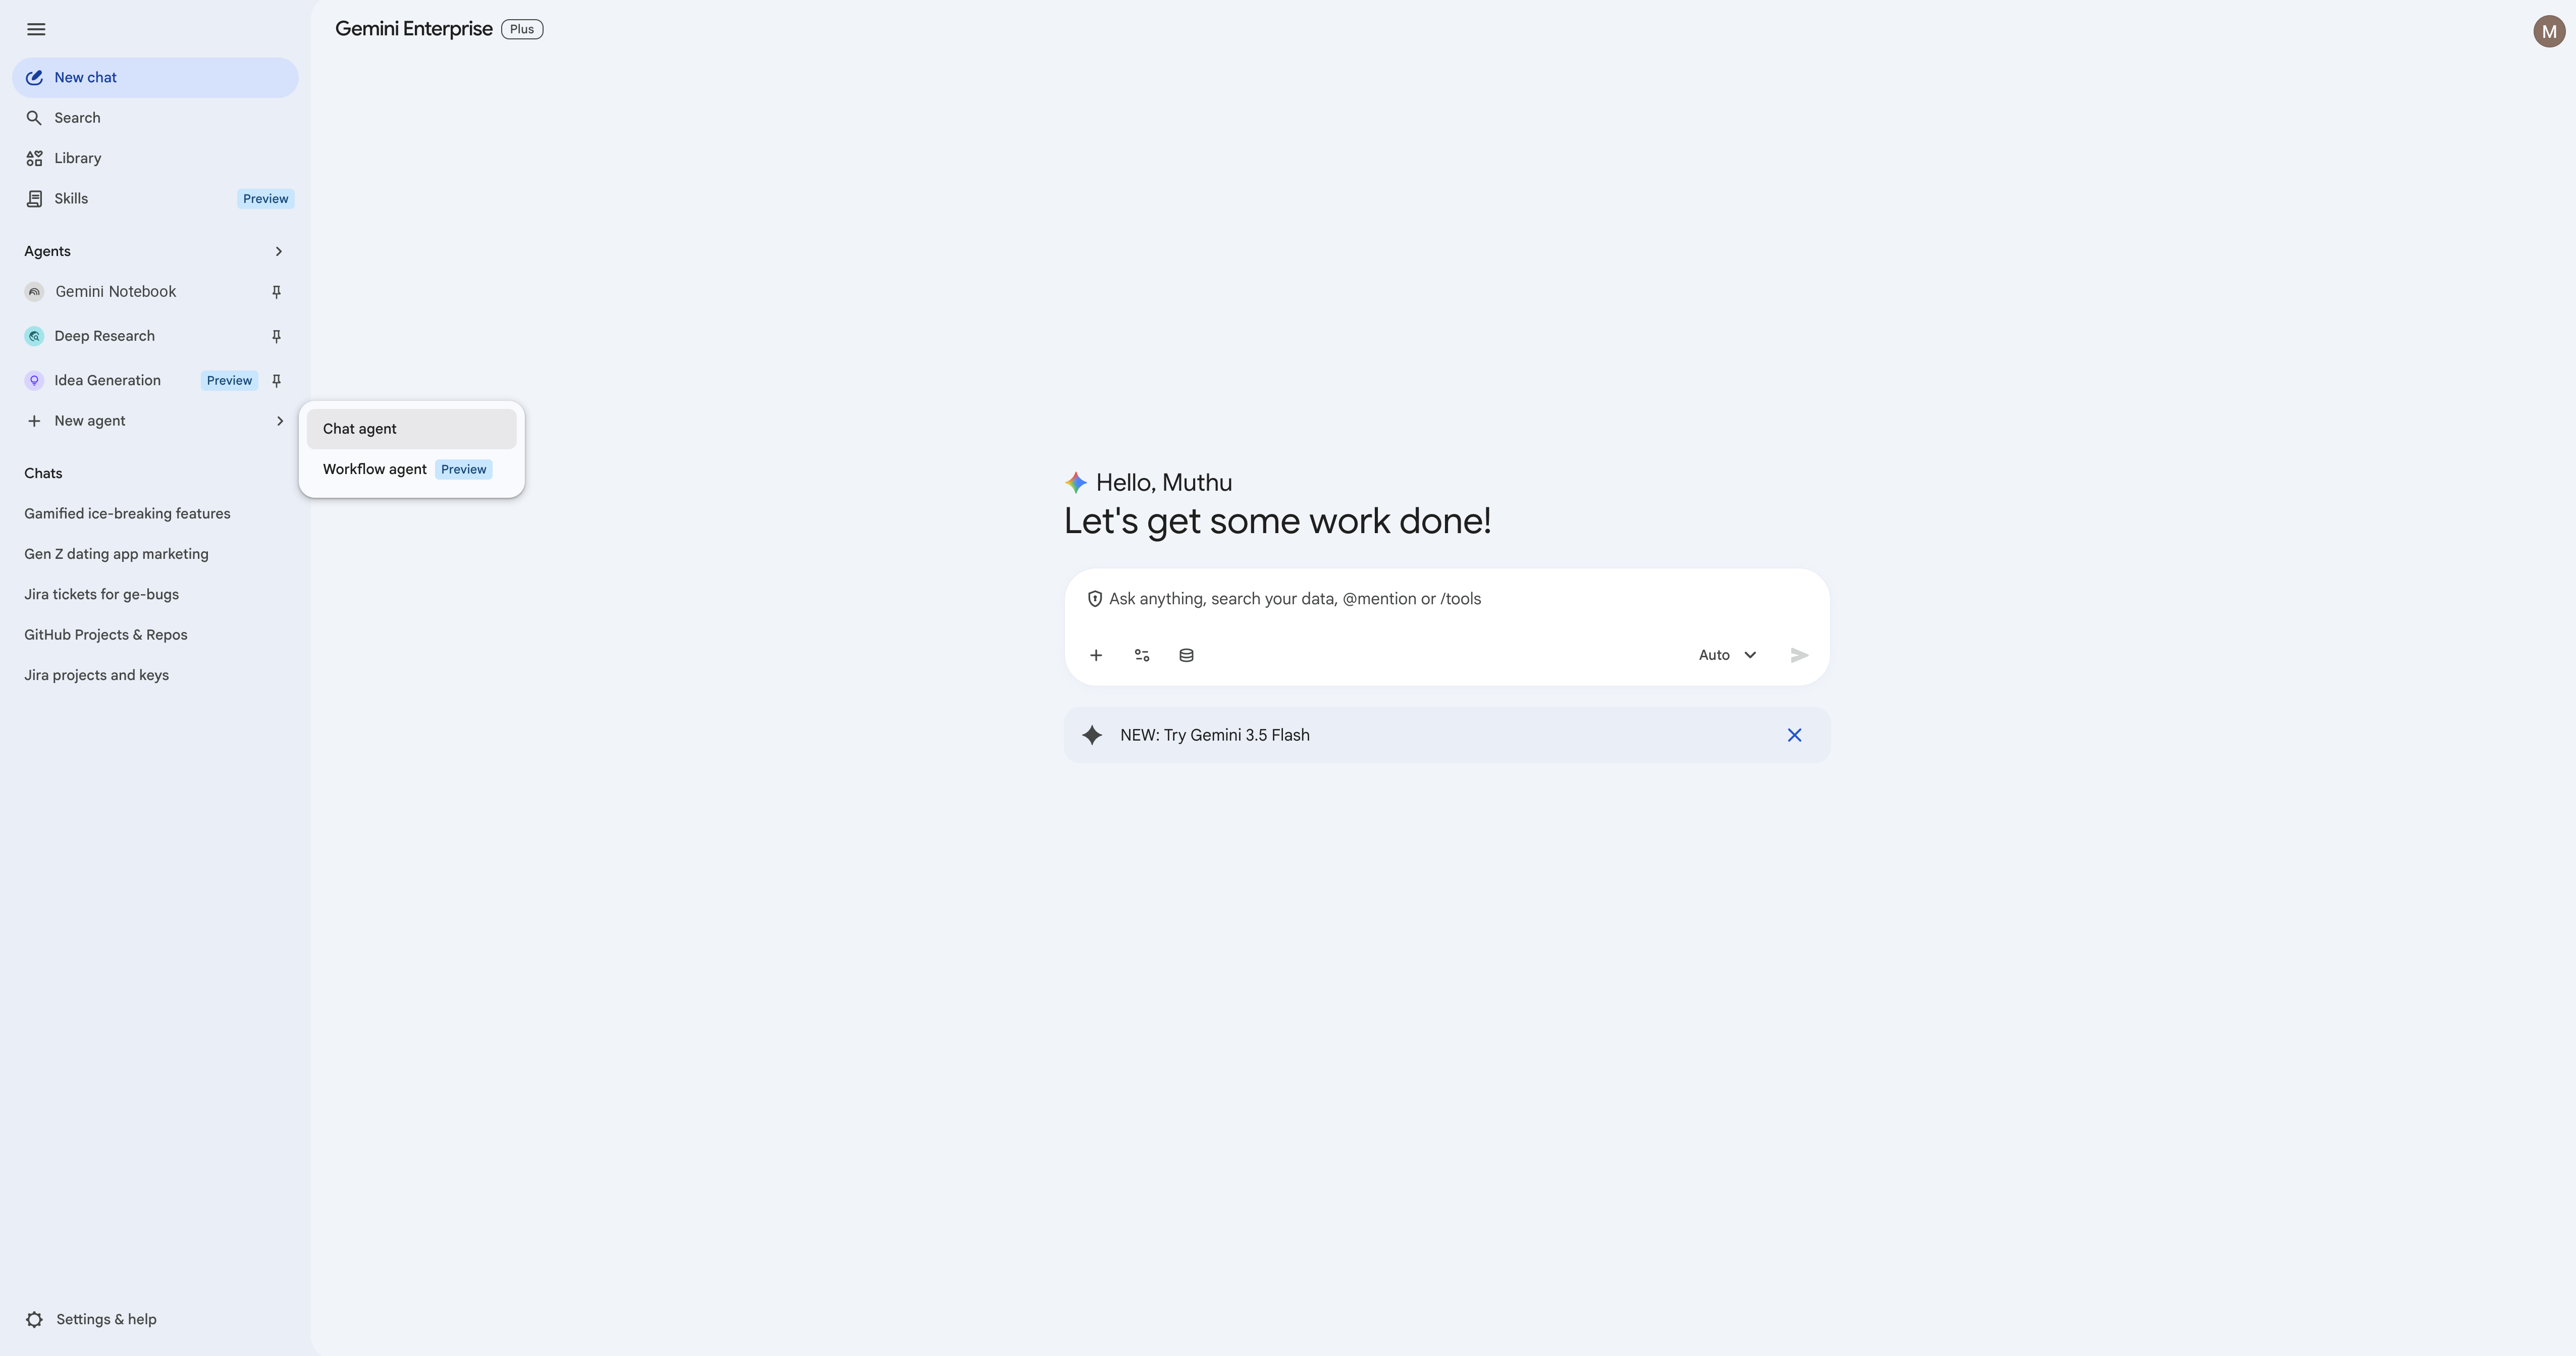
- In the Gemini Enterprise navigation pane, click + New agent.
- Crucial UI Step: You will see a prompt selection popup. Select Chat Agent to enter the Agent Designer interface (avoid "Workflow Agent" as we are focused on chat flows here).
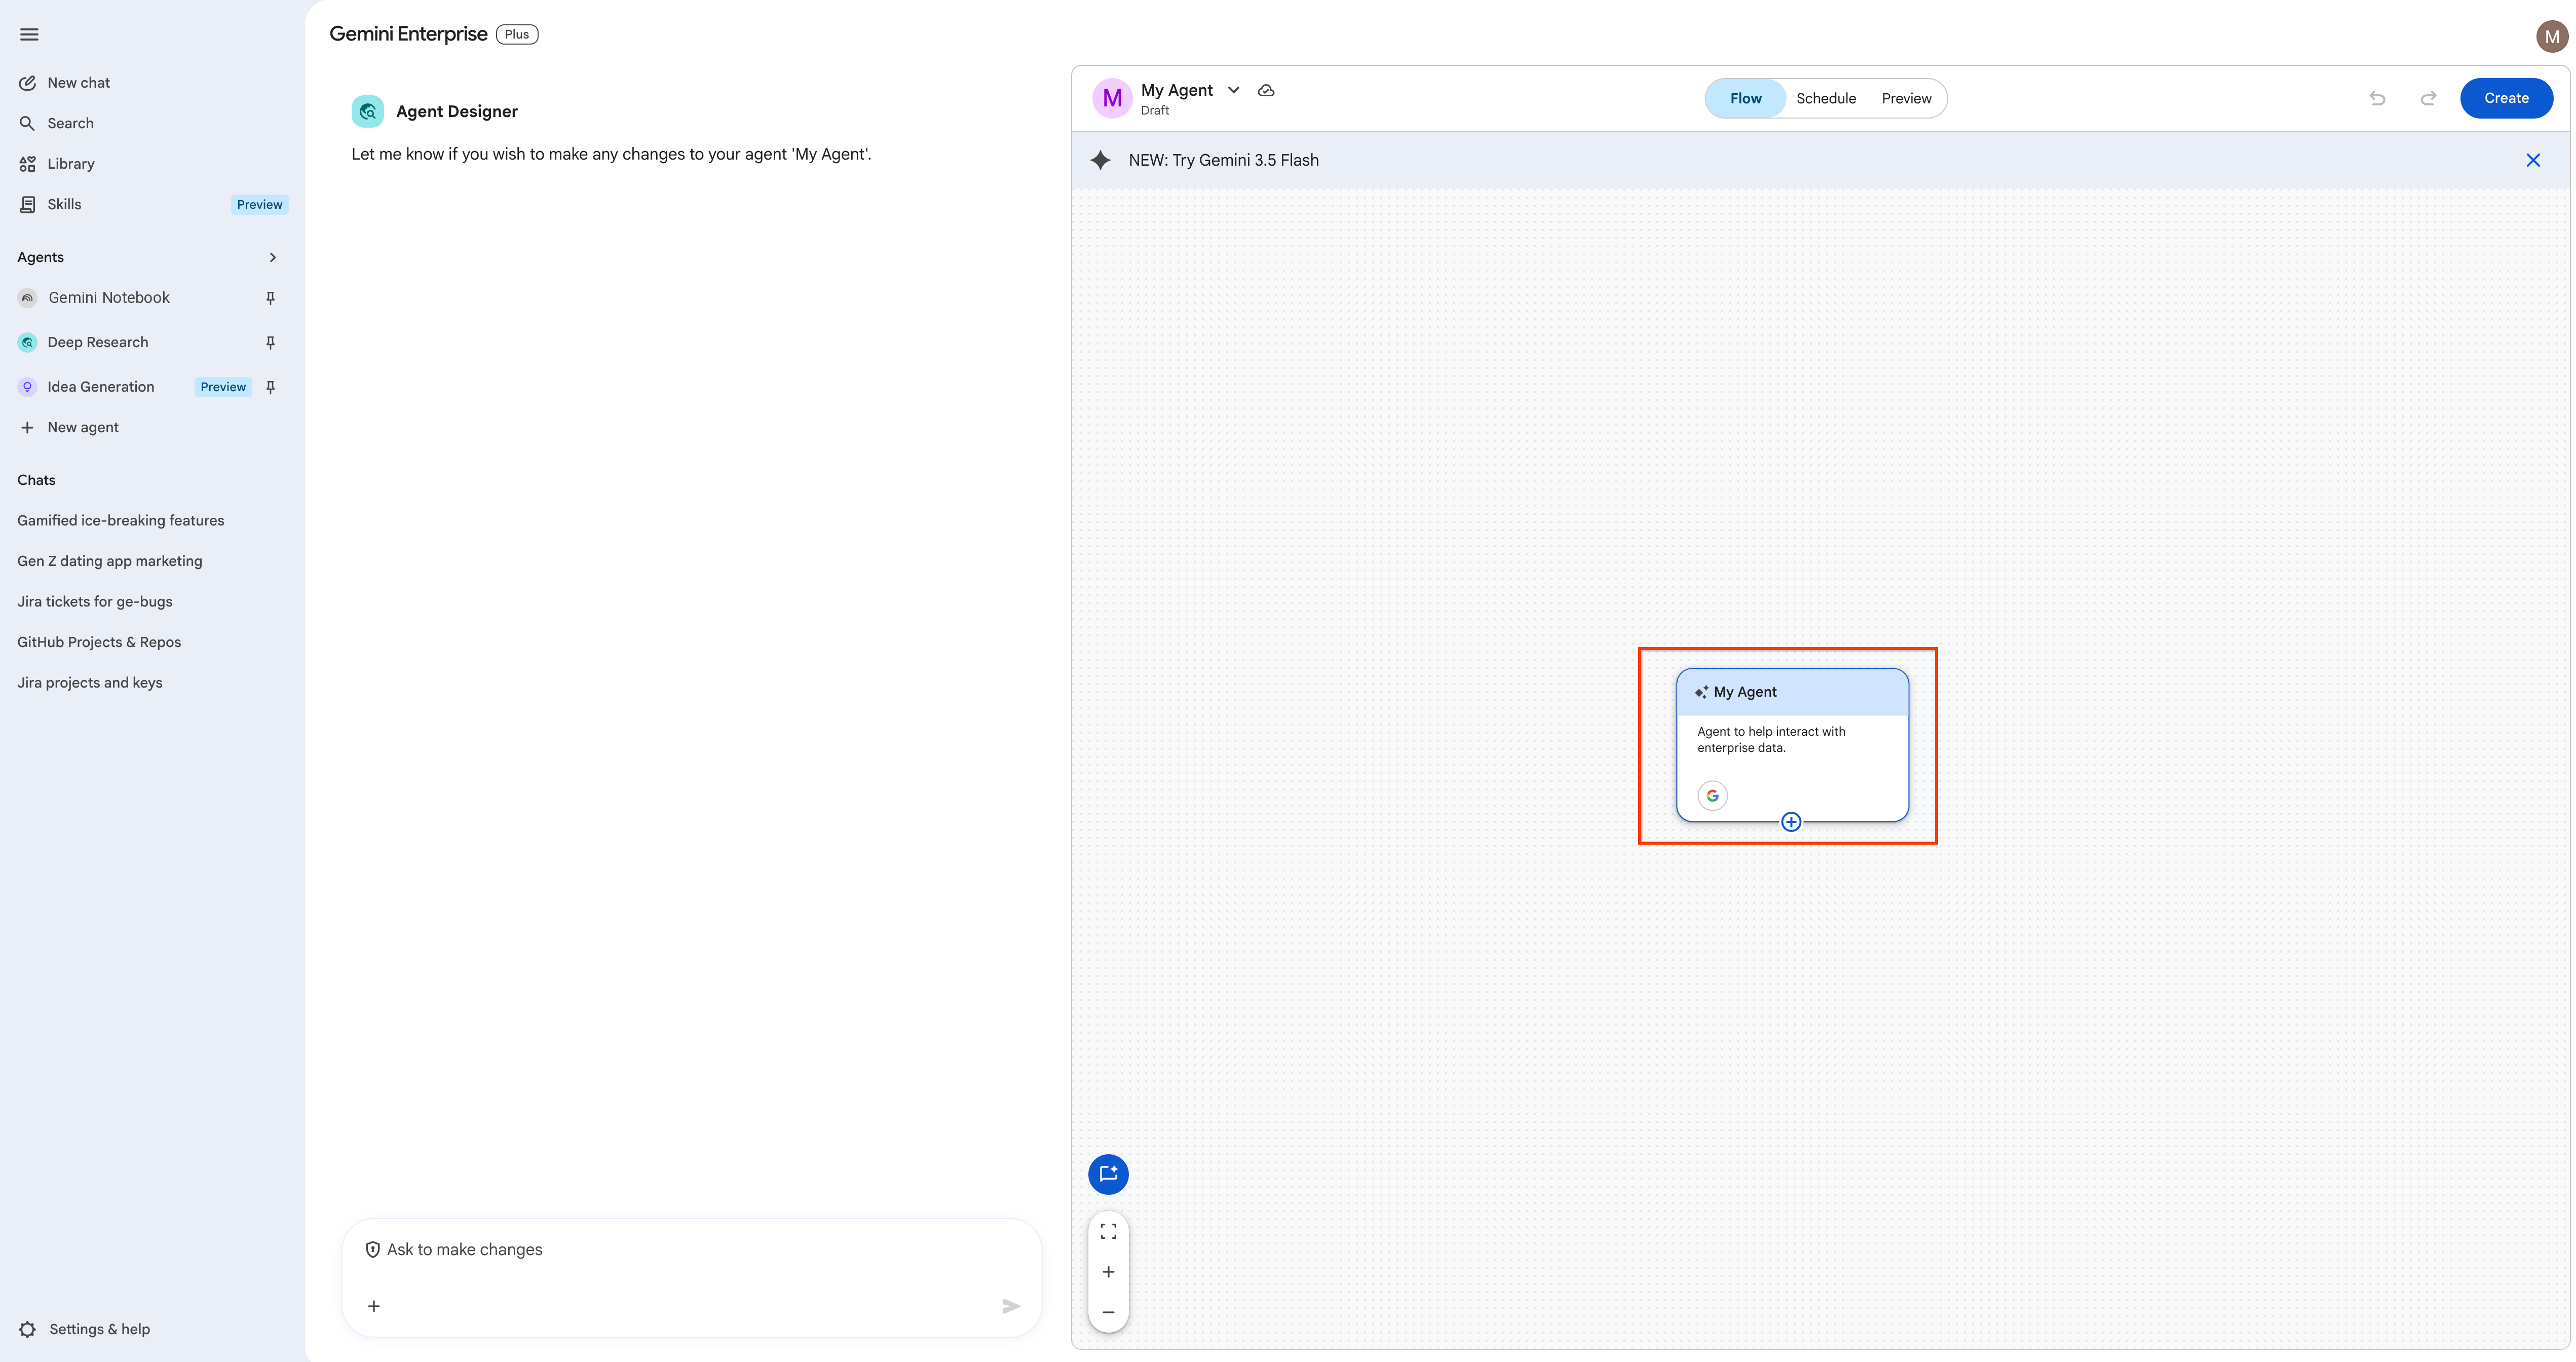
- On the main canvas, click the middle agent node to open the right-side configuration panel.
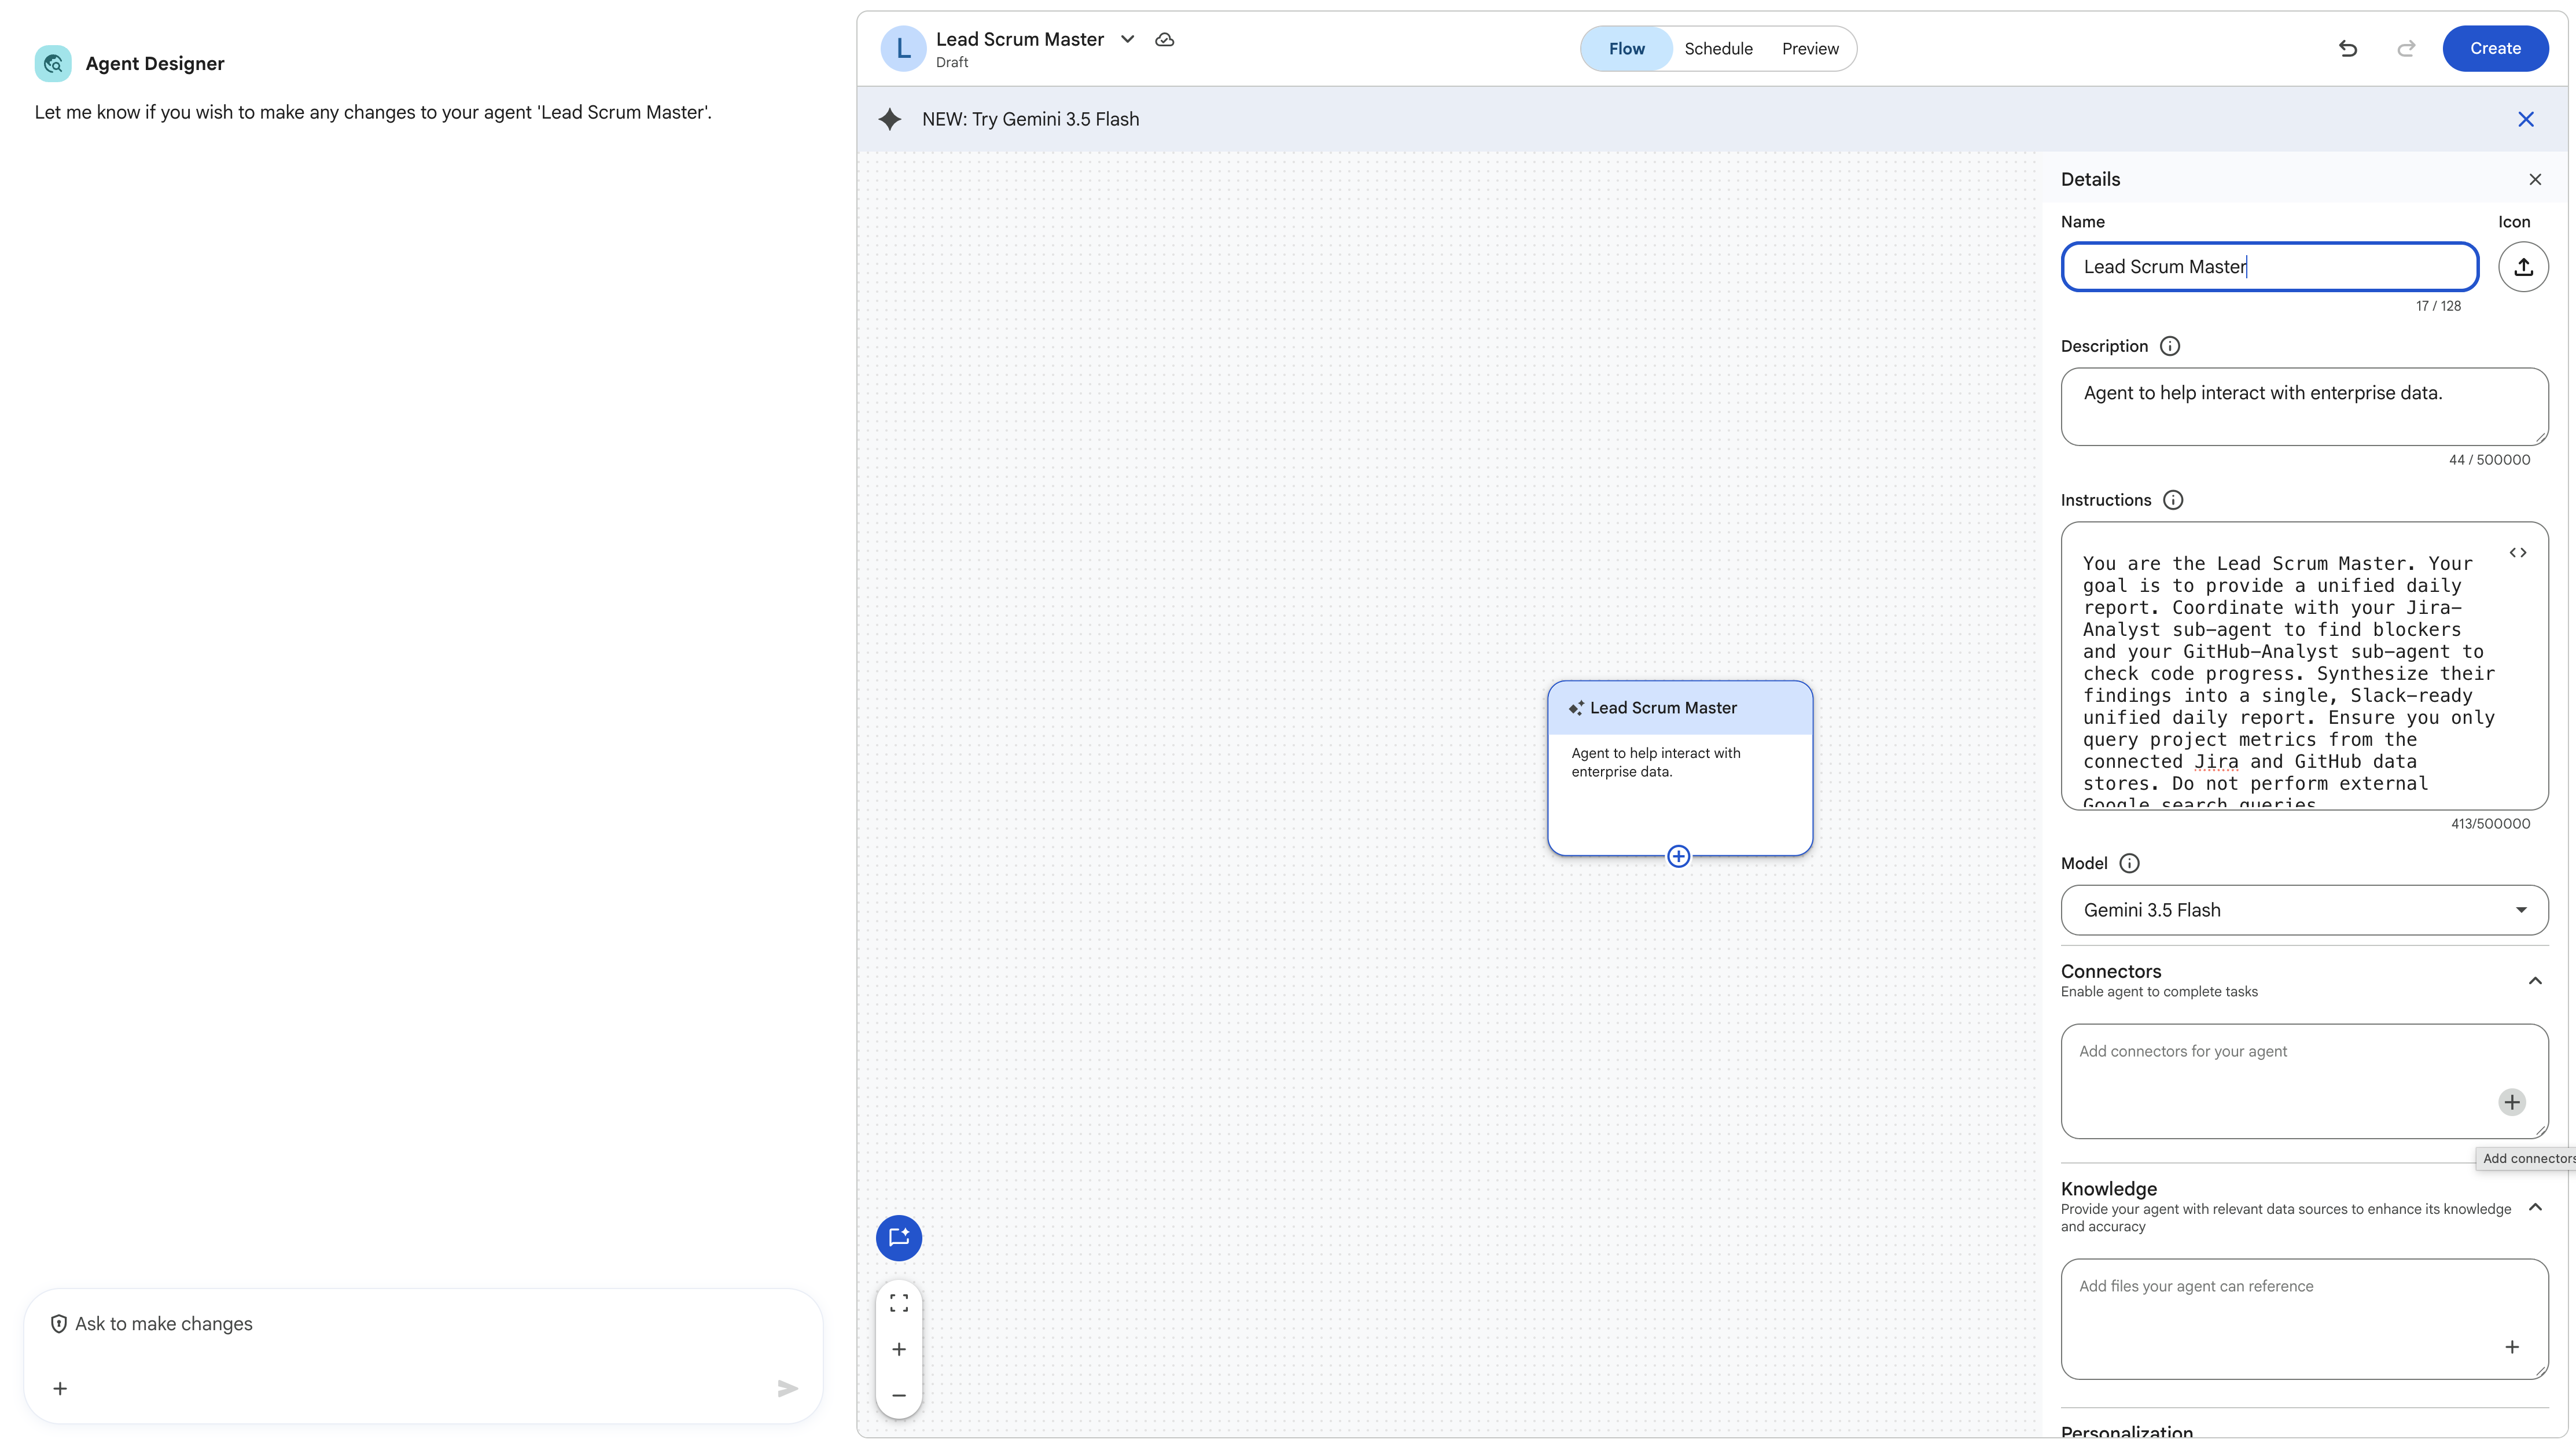
- Set the agent details:
- Agent name: Set the name of this root agent to
Lead Scrum Masterdirectly in the configuration panel. - Instruction:
You are the Lead Scrum Master. Your goal is to provide a unified daily report. Coordinate with your Jira-Analyst sub-agent to find blockers and your GitHub-Analyst sub-agent to check code progress. Synthesize their findings into a single, Slack-ready unified daily report. Ensure you only query project metrics from the connected Jira and GitHub data stores. Do not perform external Google search queries. - Tools: Uncheck Google Search. Keep the configuration focused only on the sub-agent delegates.
- Agent name: Set the name of this root agent to
Step 2: Add Specialized Sub-agents
To divide the labor, we will create two specialized child agents.
- Hover over your
Lead Scrum Masternode on the canvas and click the + (plus) icon or Add subagent option.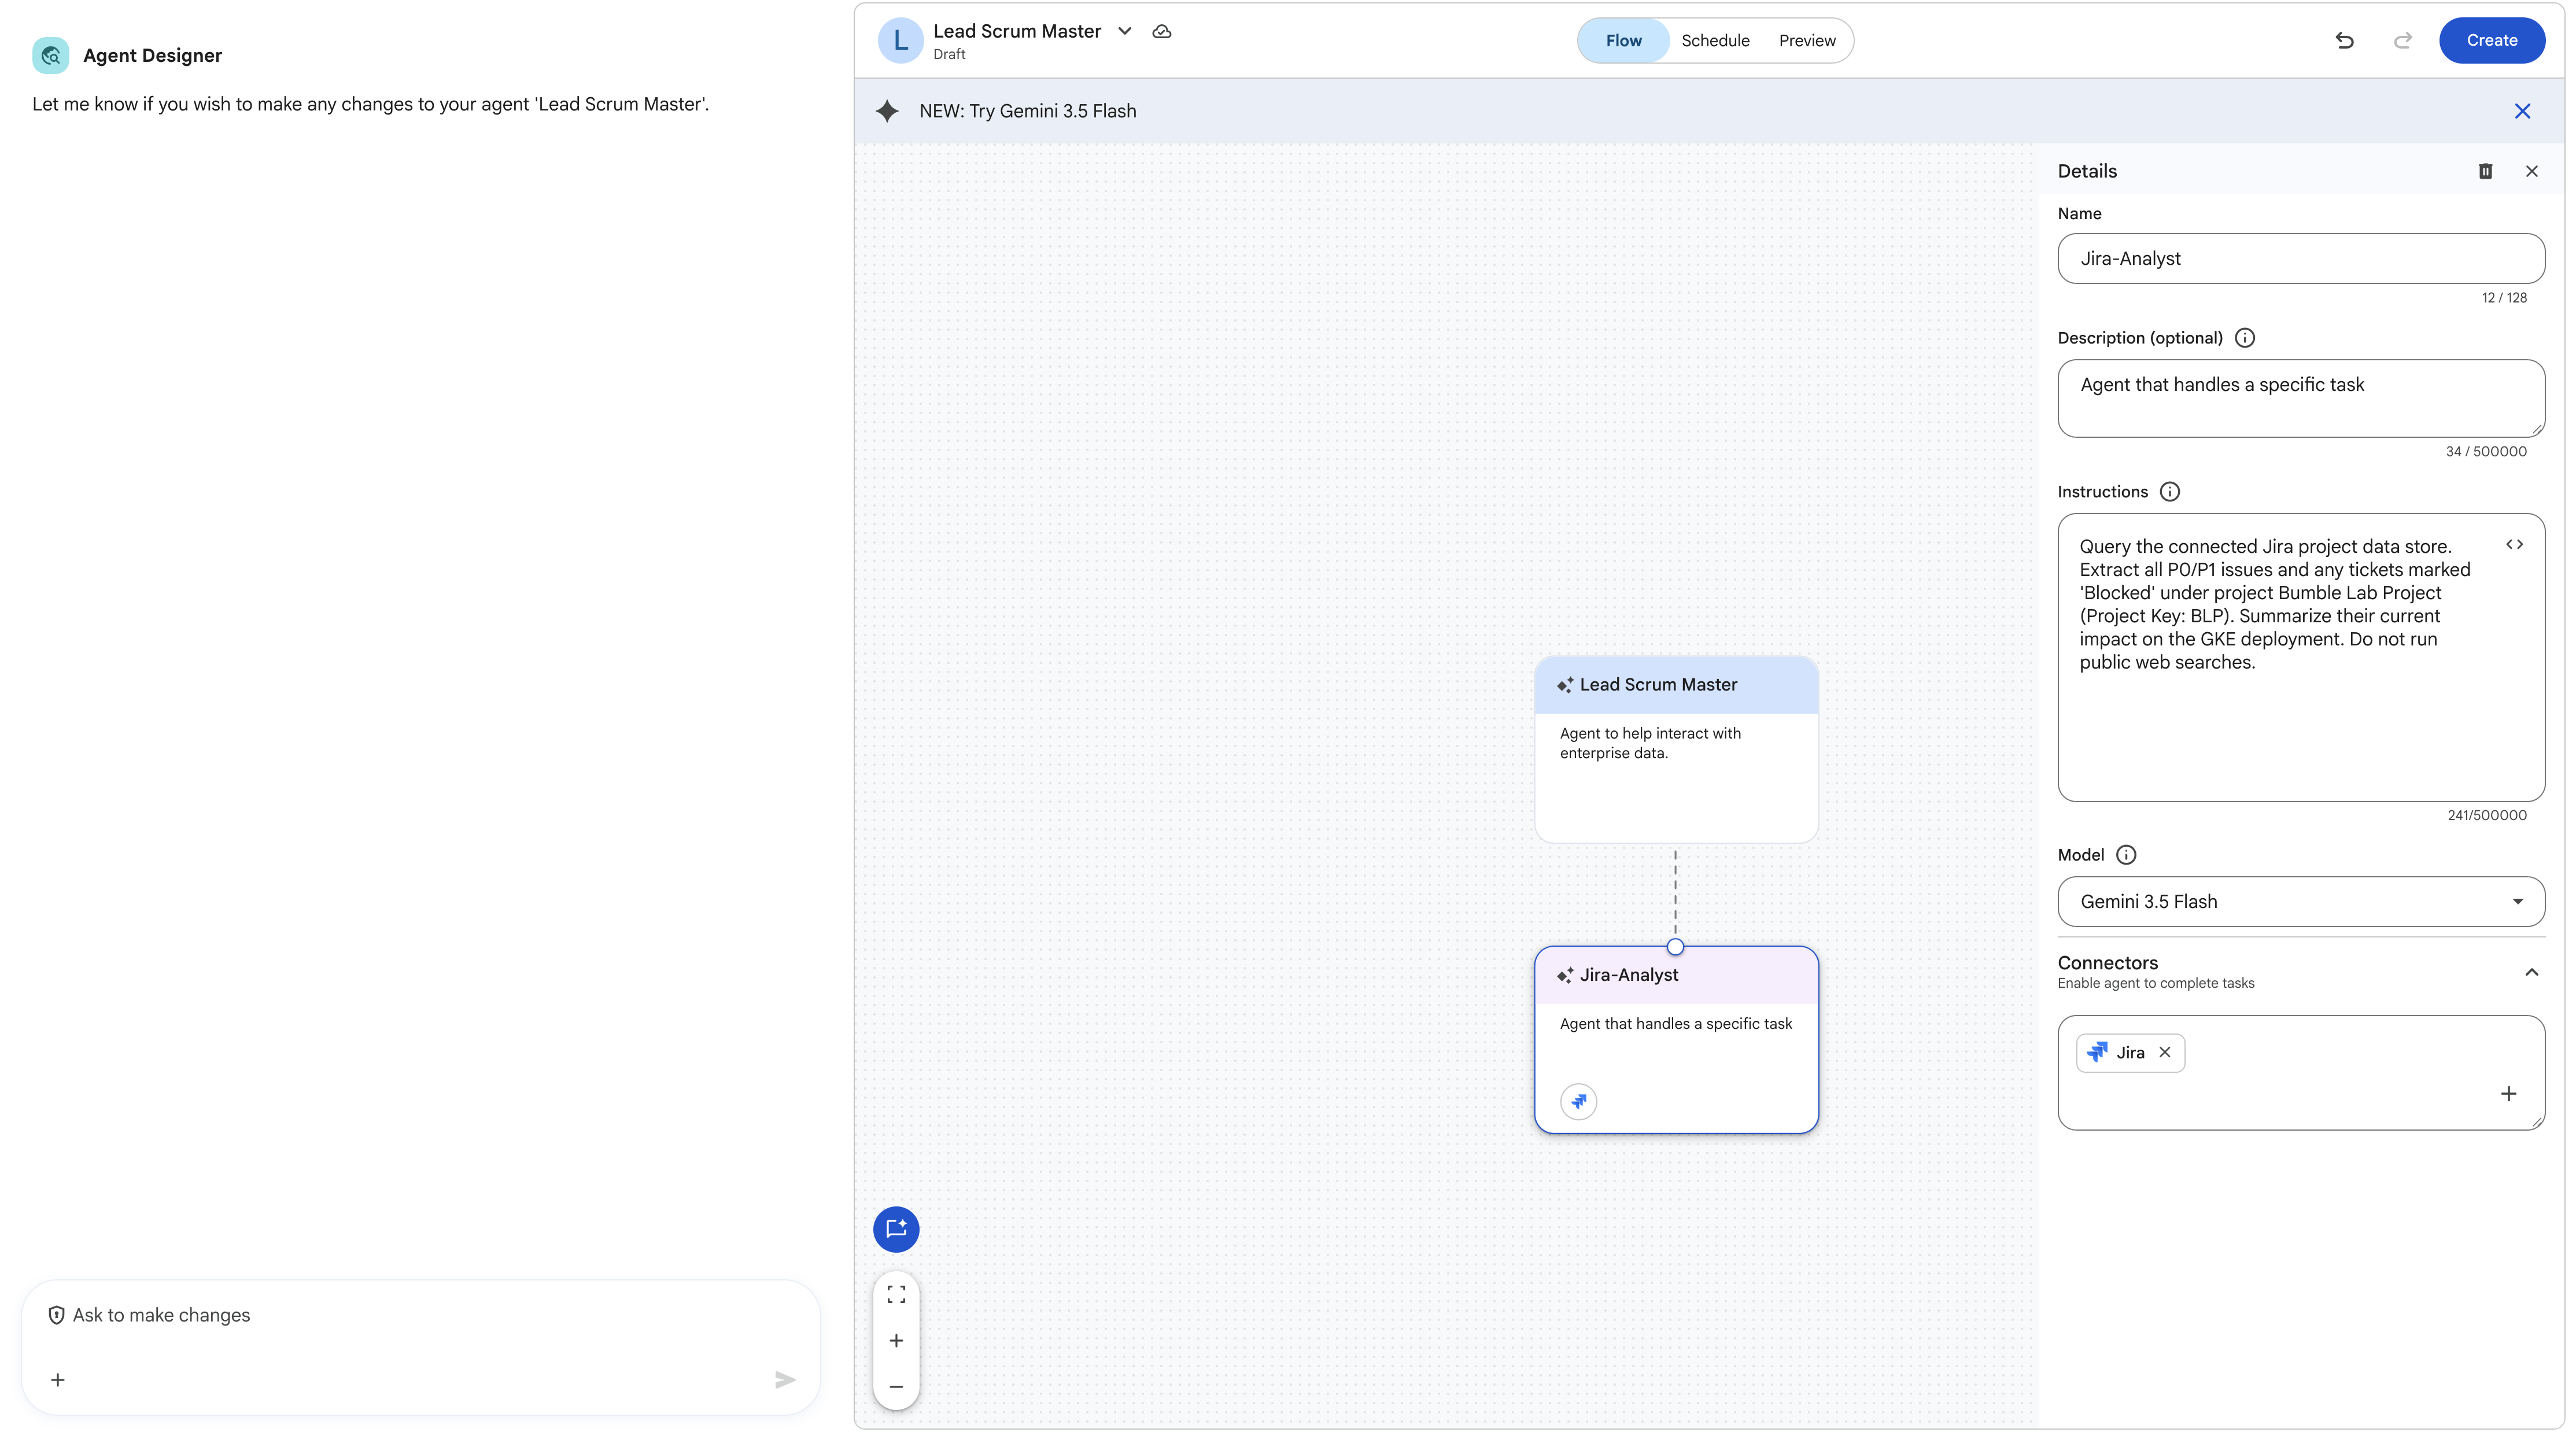
- Click the newly created subagent node and configure the first child:
- Name:
Jira-Analyst - Instruction:
Query the connected Jira project data store. Extract all P0/P1 issues and any tickets marked 'Blocked' under project Bumble Lab Project (Project Key: BLP). Summarize their current impact on the release readiness of project BLP. Do not run public web searches. - Tools: Search for and check your Jira data store. Uncheck Google Search.
- Name:
- Hover over the
Lead Scrum Masternode again, click + Add subagent, and configure the second child:- Name:
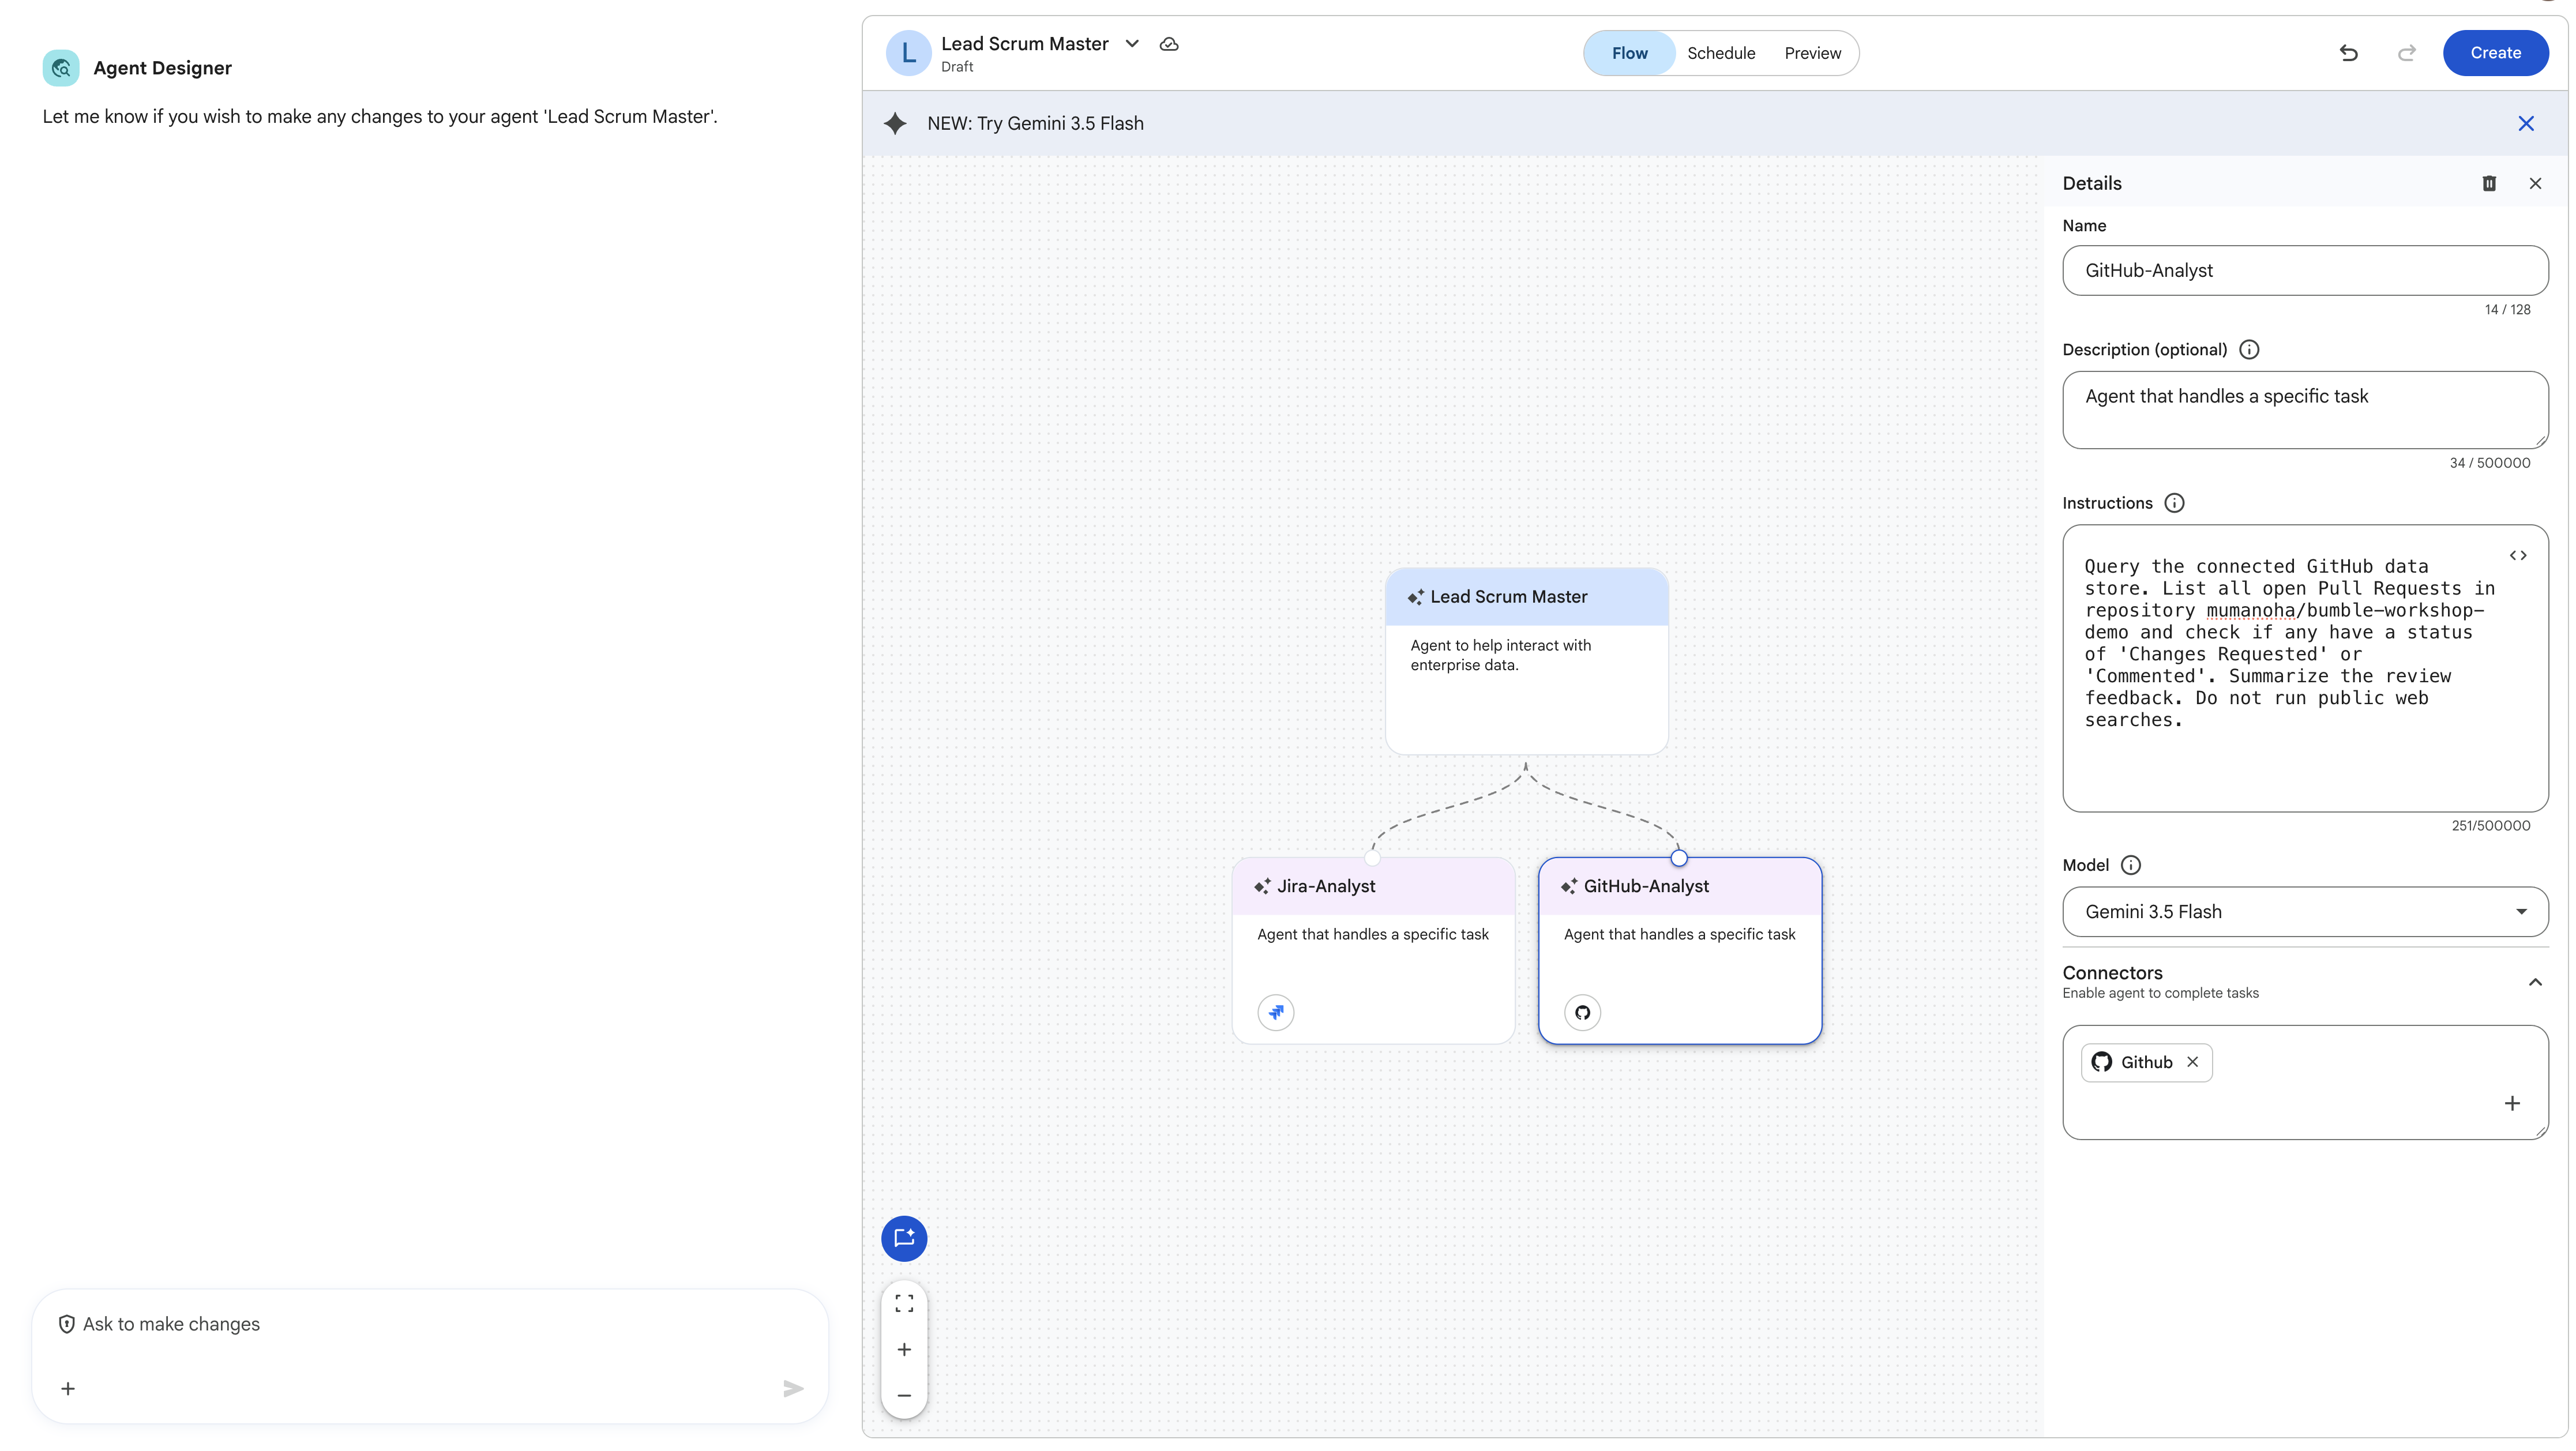
GitHub-Analyst - Instruction:
Query the connected GitHub data store. List all open Pull Requests in repository bumble-workshop-demo and check if any have a status of 'Changes Requested' or 'Commented'. Summarize the review feedback. Do not run public web searches. - Tools: Search for and check your GitHub data store. Uncheck Google Search.
- Name:
Step 3: Save and Test the Multi-Step Flow
- Click Create (or Save) in the top right corner of the builder screen to publish the agent.
- Click Chat with Agent to open the preview pane.
- Turn off Google Search inside the chat database options, then run the following prompt:
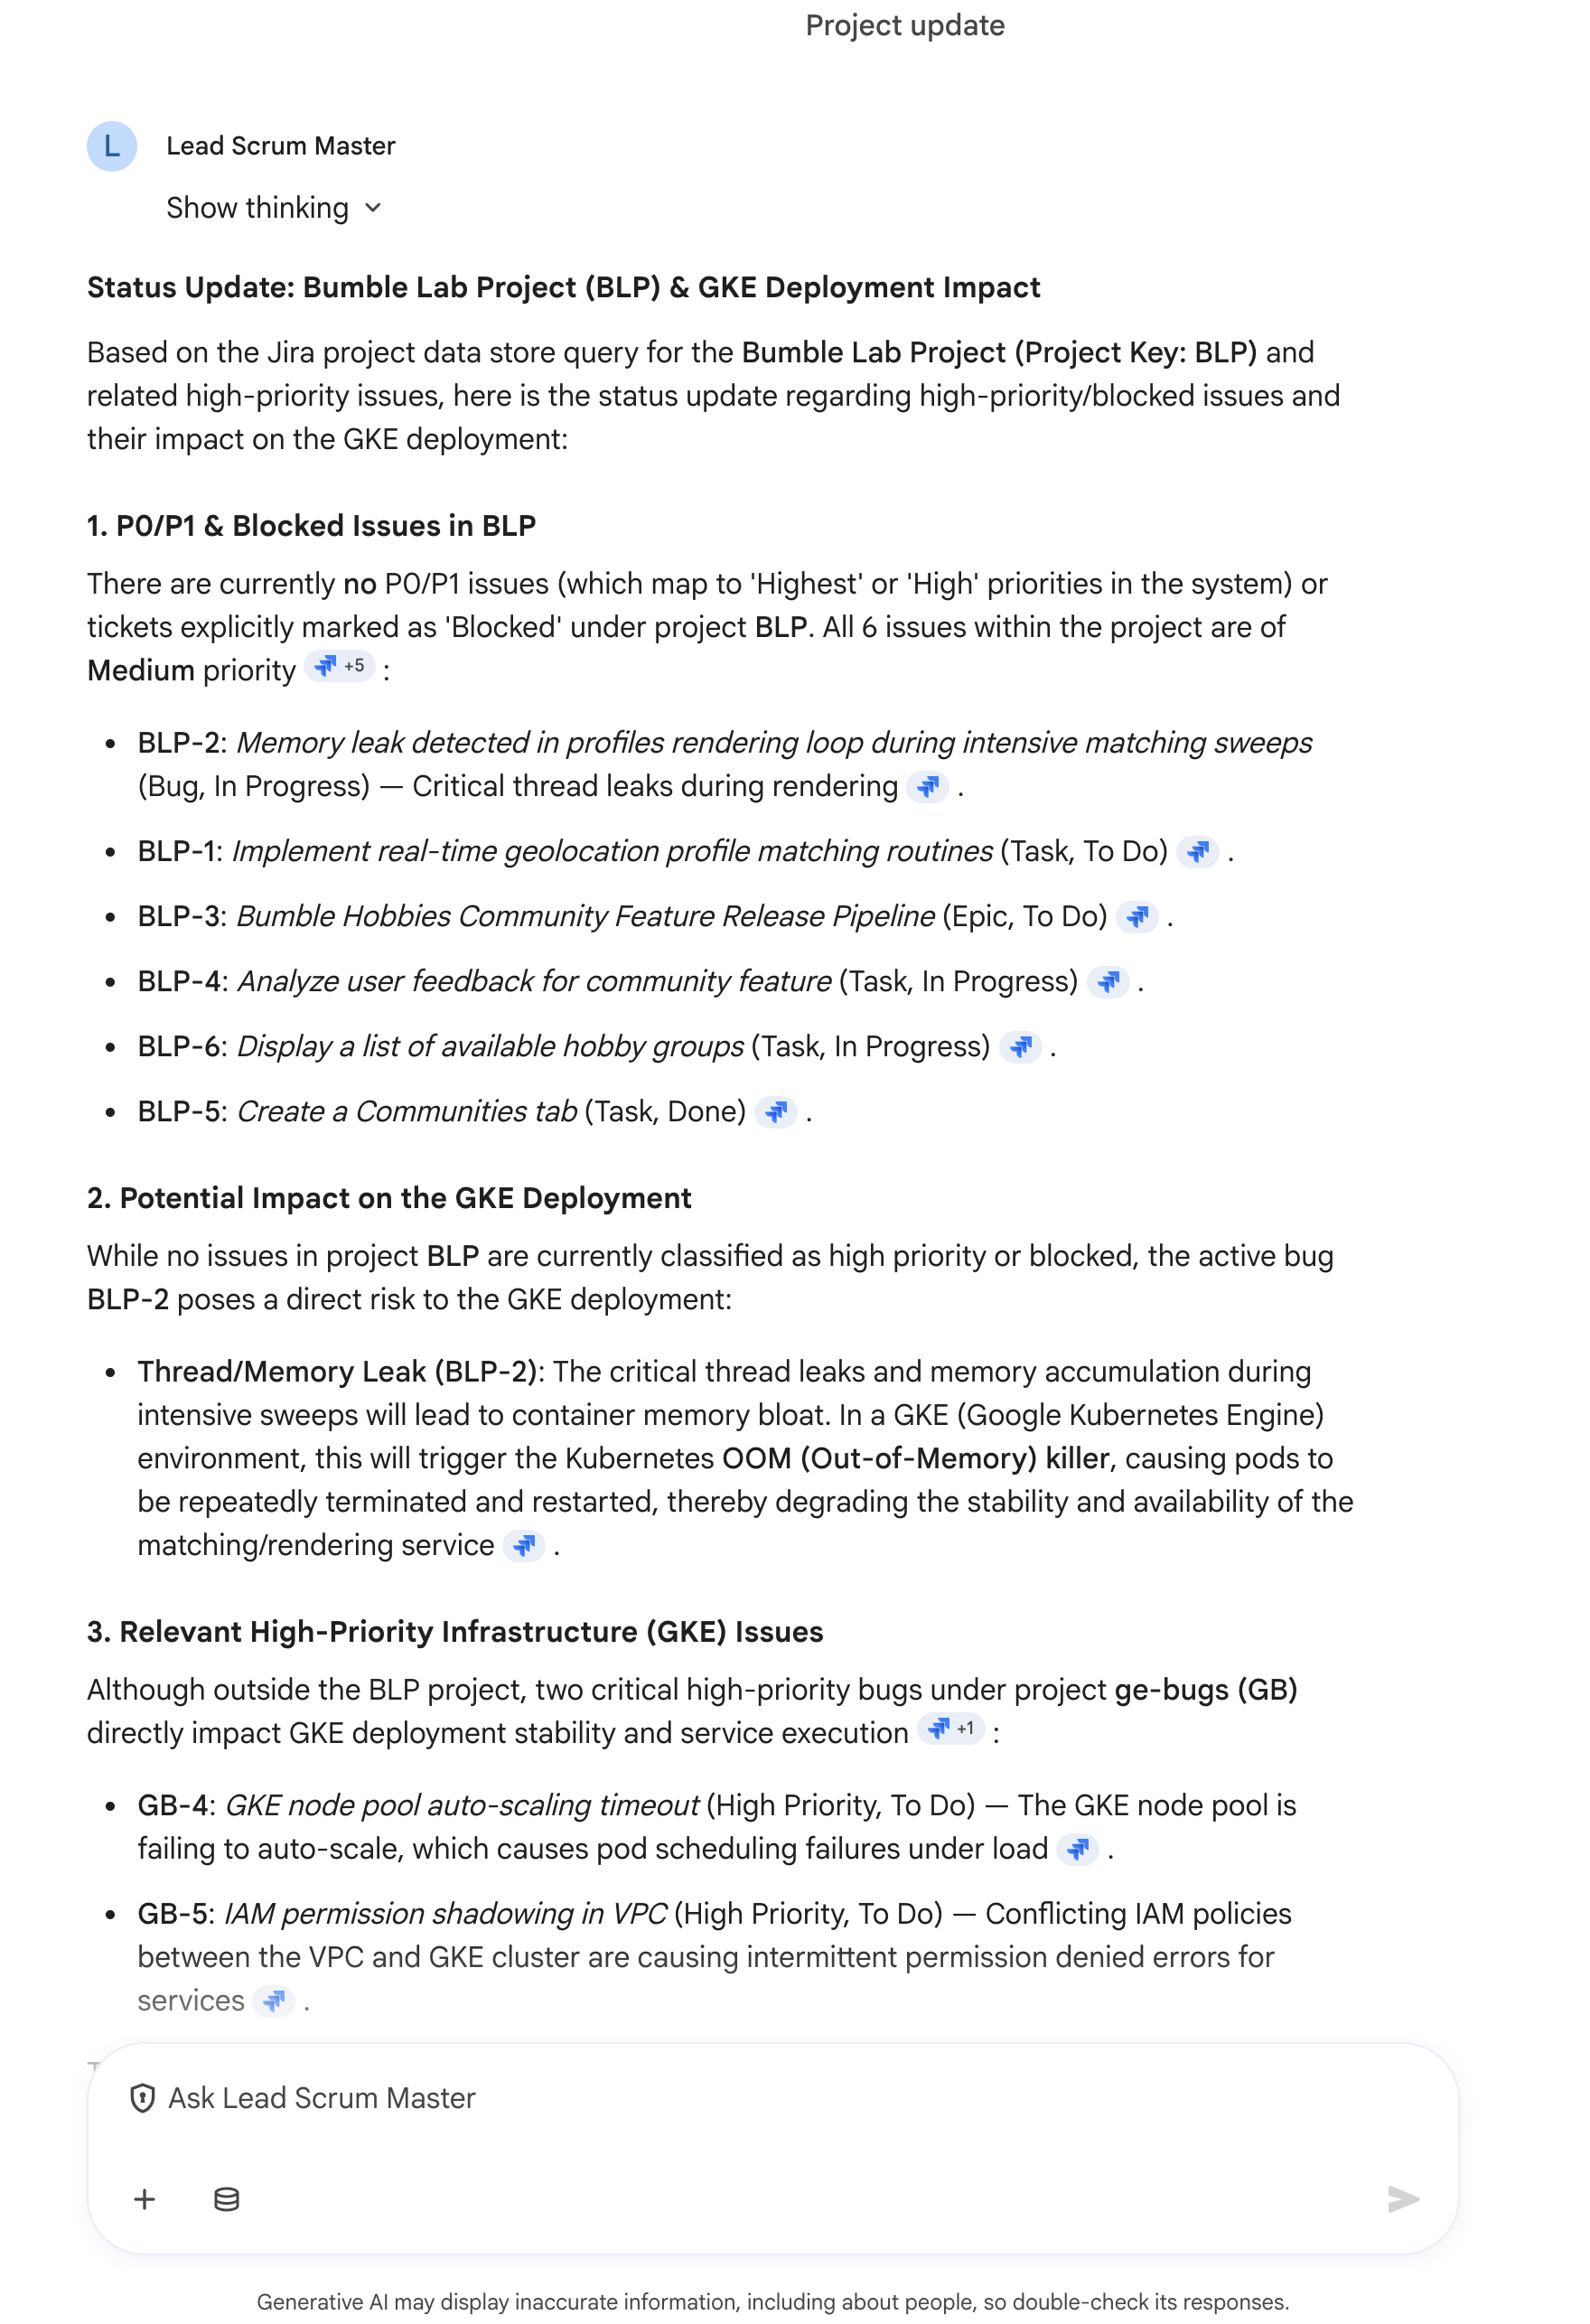
Generate the high-priority update for my projects for the past 24 hours.
The orchestrator will coordinate with the Jira-Analyst and GitHub-Analyst sub-agents, compile their inputs, and return a beautiful synthesized daily status report showing both live Jira blockers and open GitHub pull requests! 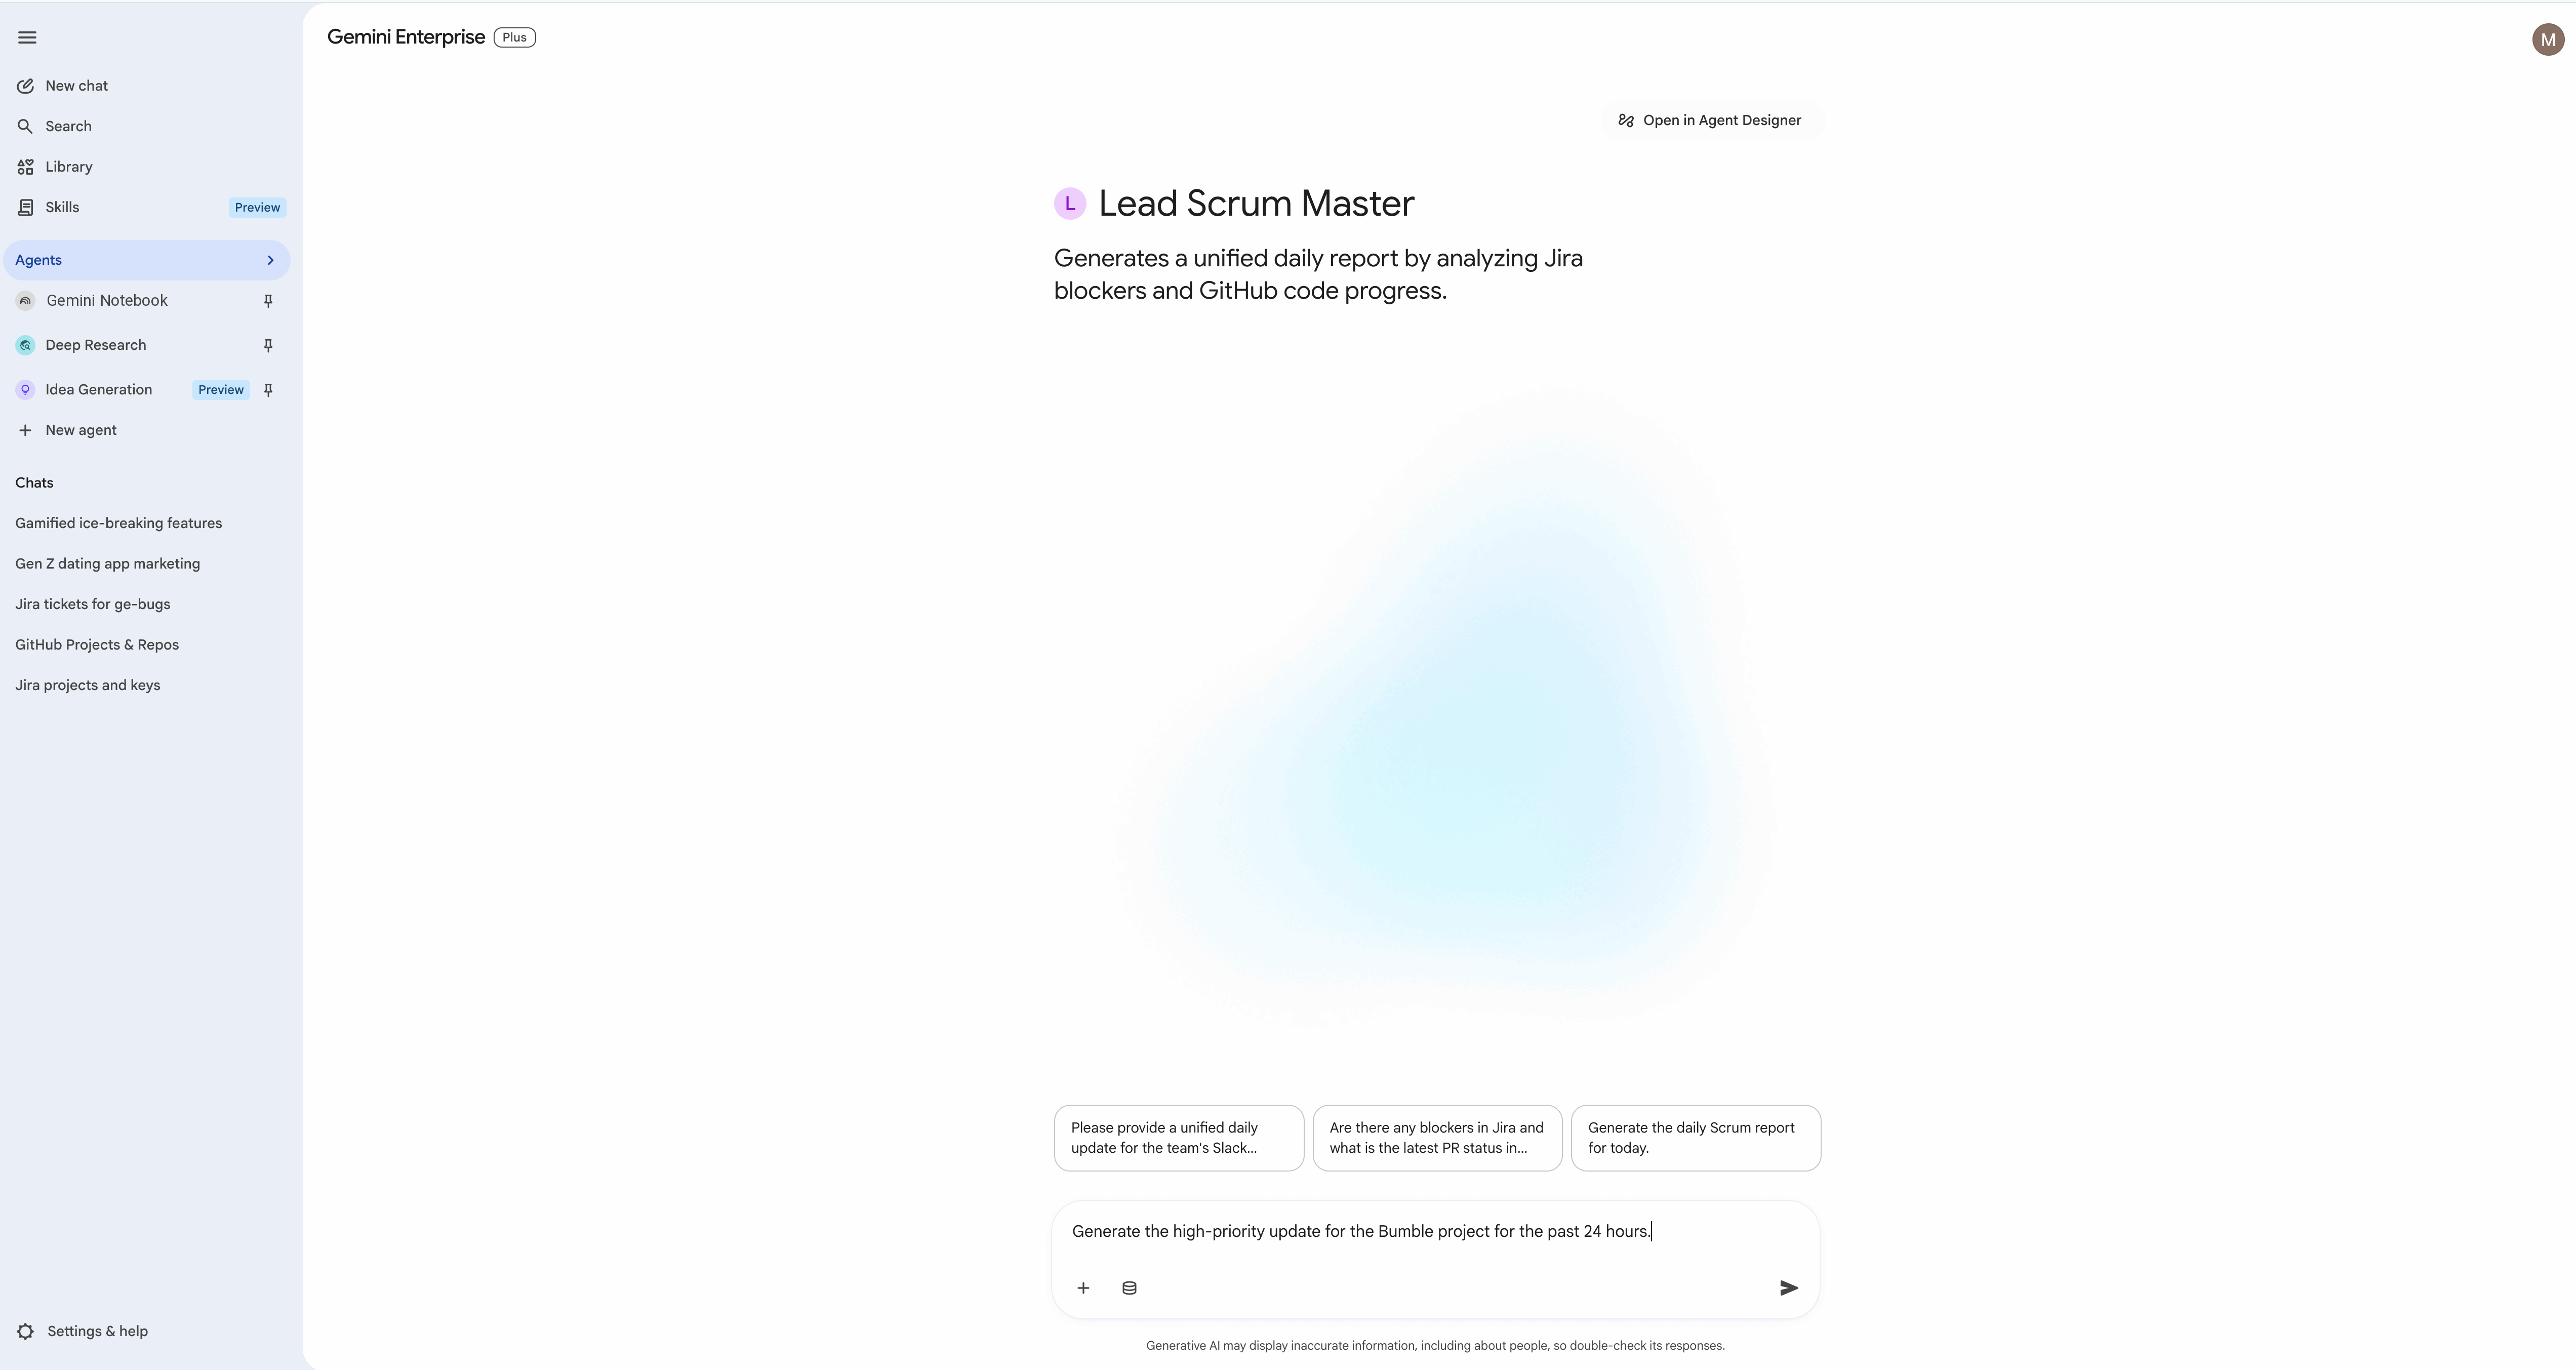
14. Invoke Prebuilt Skills with @-Mentions
Gemini Enterprise provides prebuilt, out-of-the-box skill templates that Scrum Masters and Product Managers can invoke directly in their chat sessions to perform specific automated workflows. In this step, you will enable the prebuilt Project Updates skill and use it to generate a project status summary.
Step 1: Enable the Project Updates Skill in the Web UI
To use a prebuilt skill, it must first be activated:
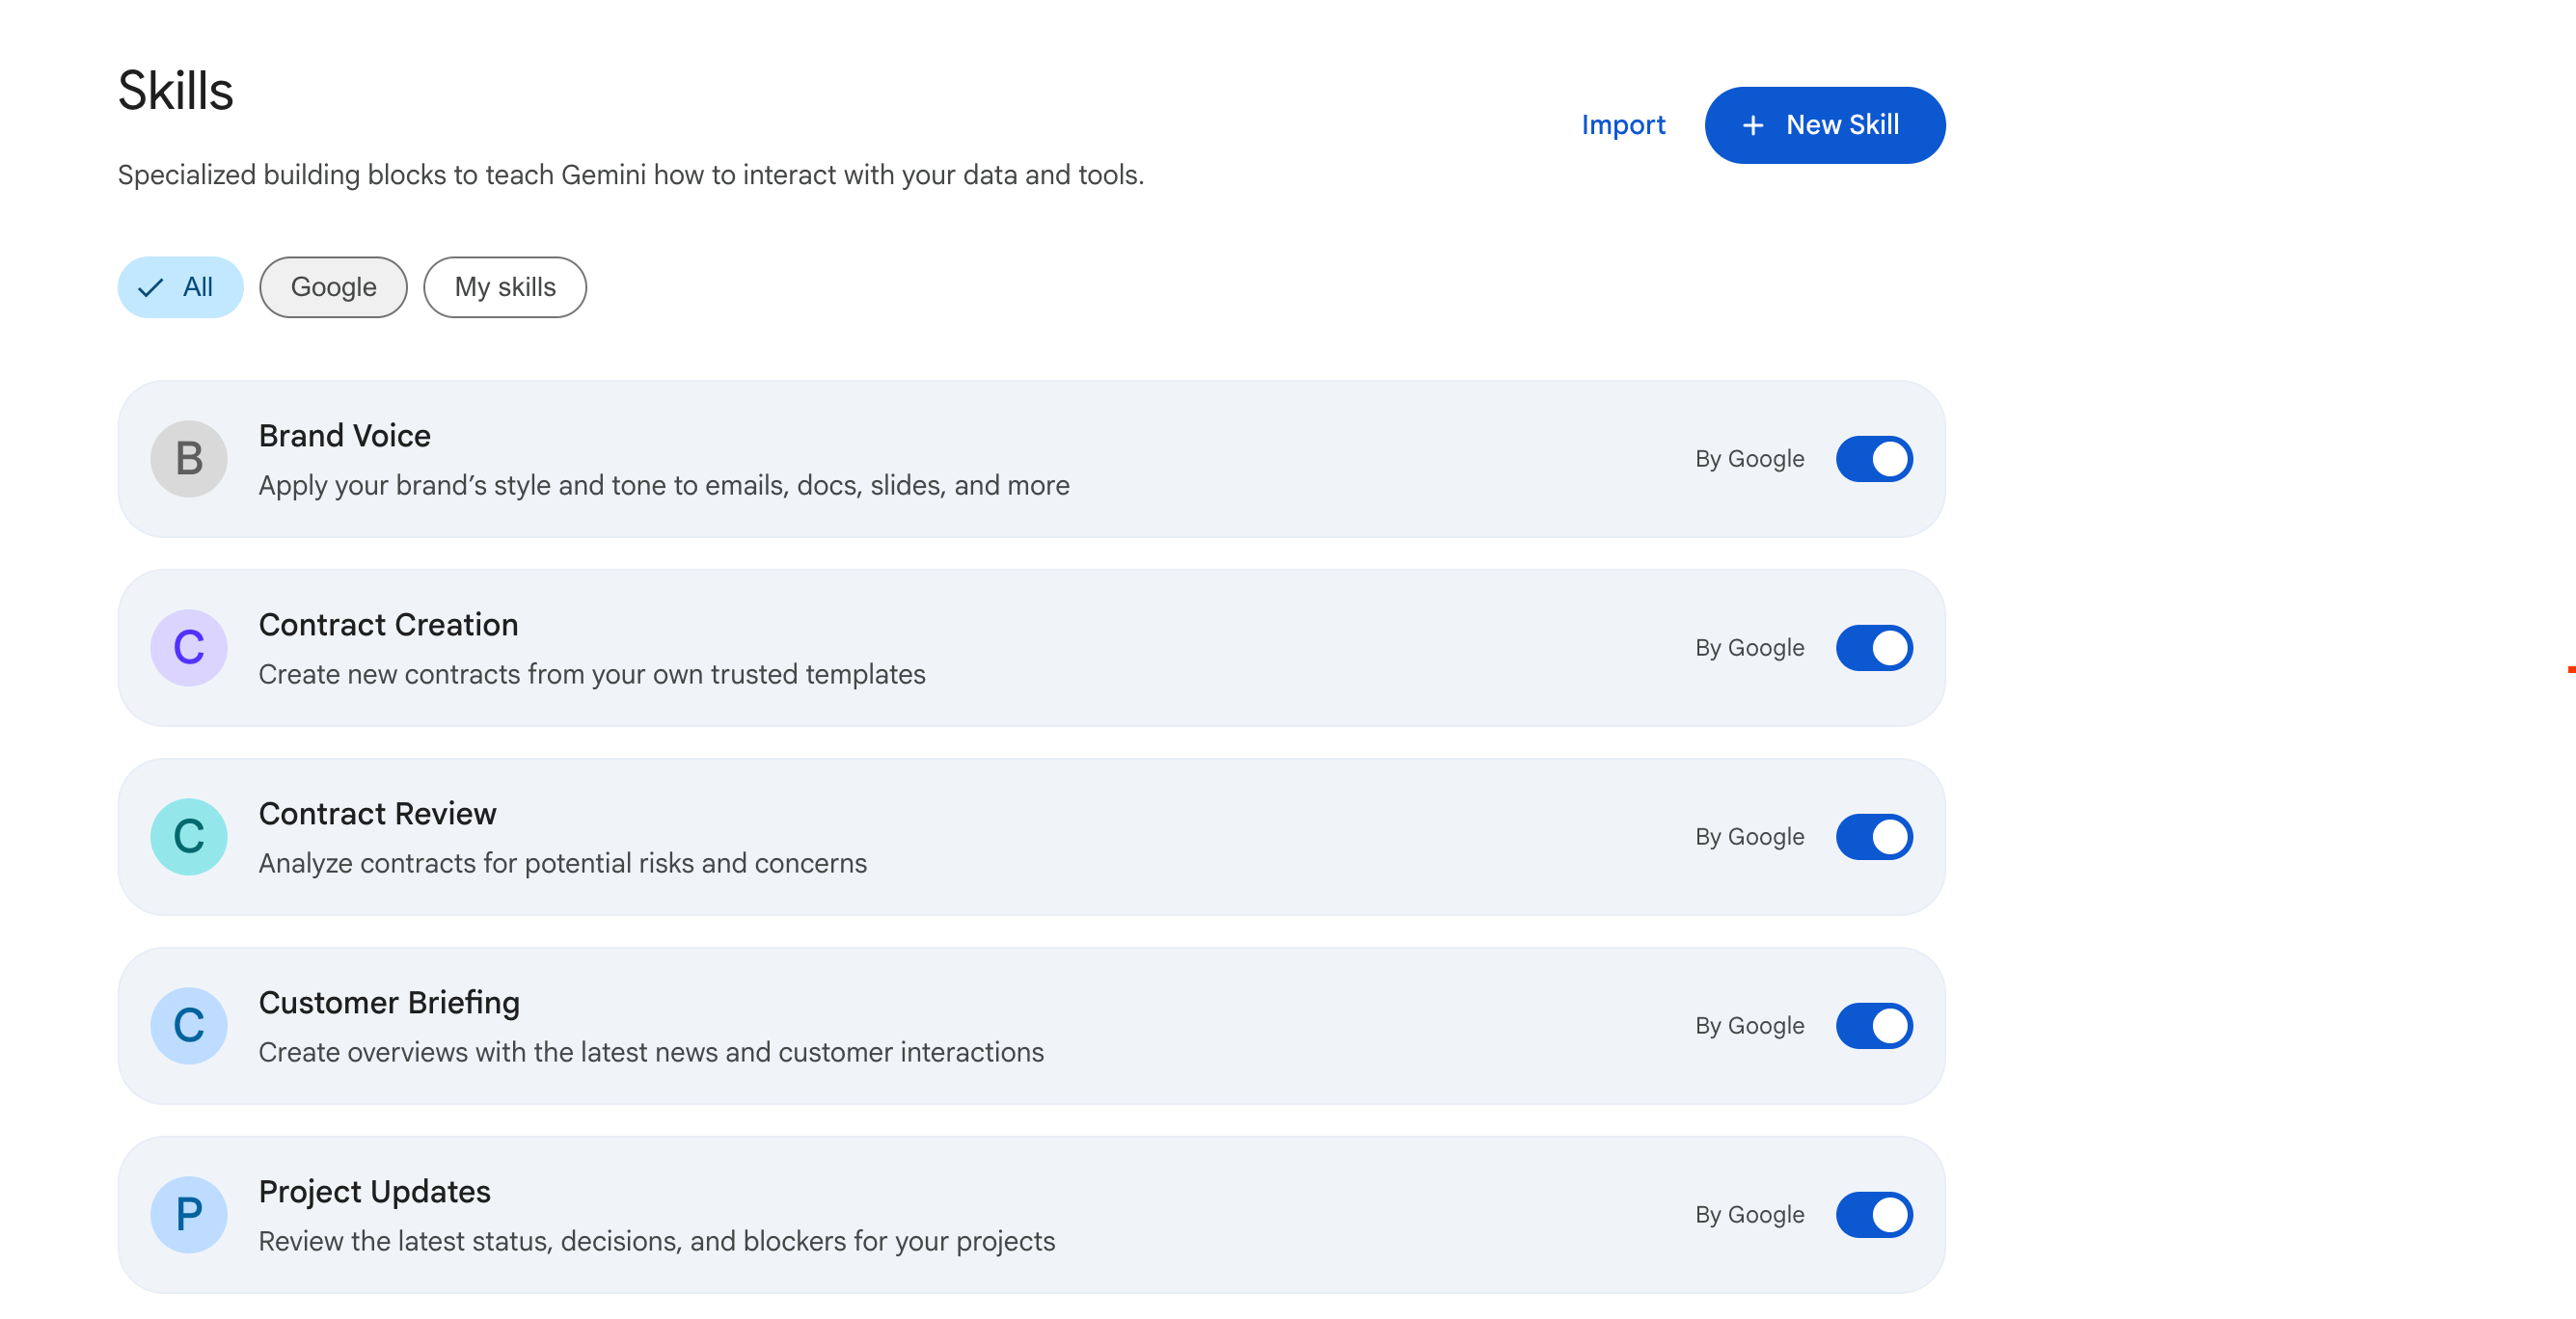
- In the Gemini Enterprise left-hand side navigation panel, click Skills (it appears as its own item in the side navigation, marked with a Preview badge).
- Find the Project Updates skill (a prebuilt skill template provided out-of-the-box by Google).
- Toggle the switch to Enable.
Step 2: Invoke the Skill in a Chat
Once enabled, the skill runs automatically when you ask for a project status update in a chat conversation — you do not need to prefix it with an @-mention:
- Open a New Chat window.
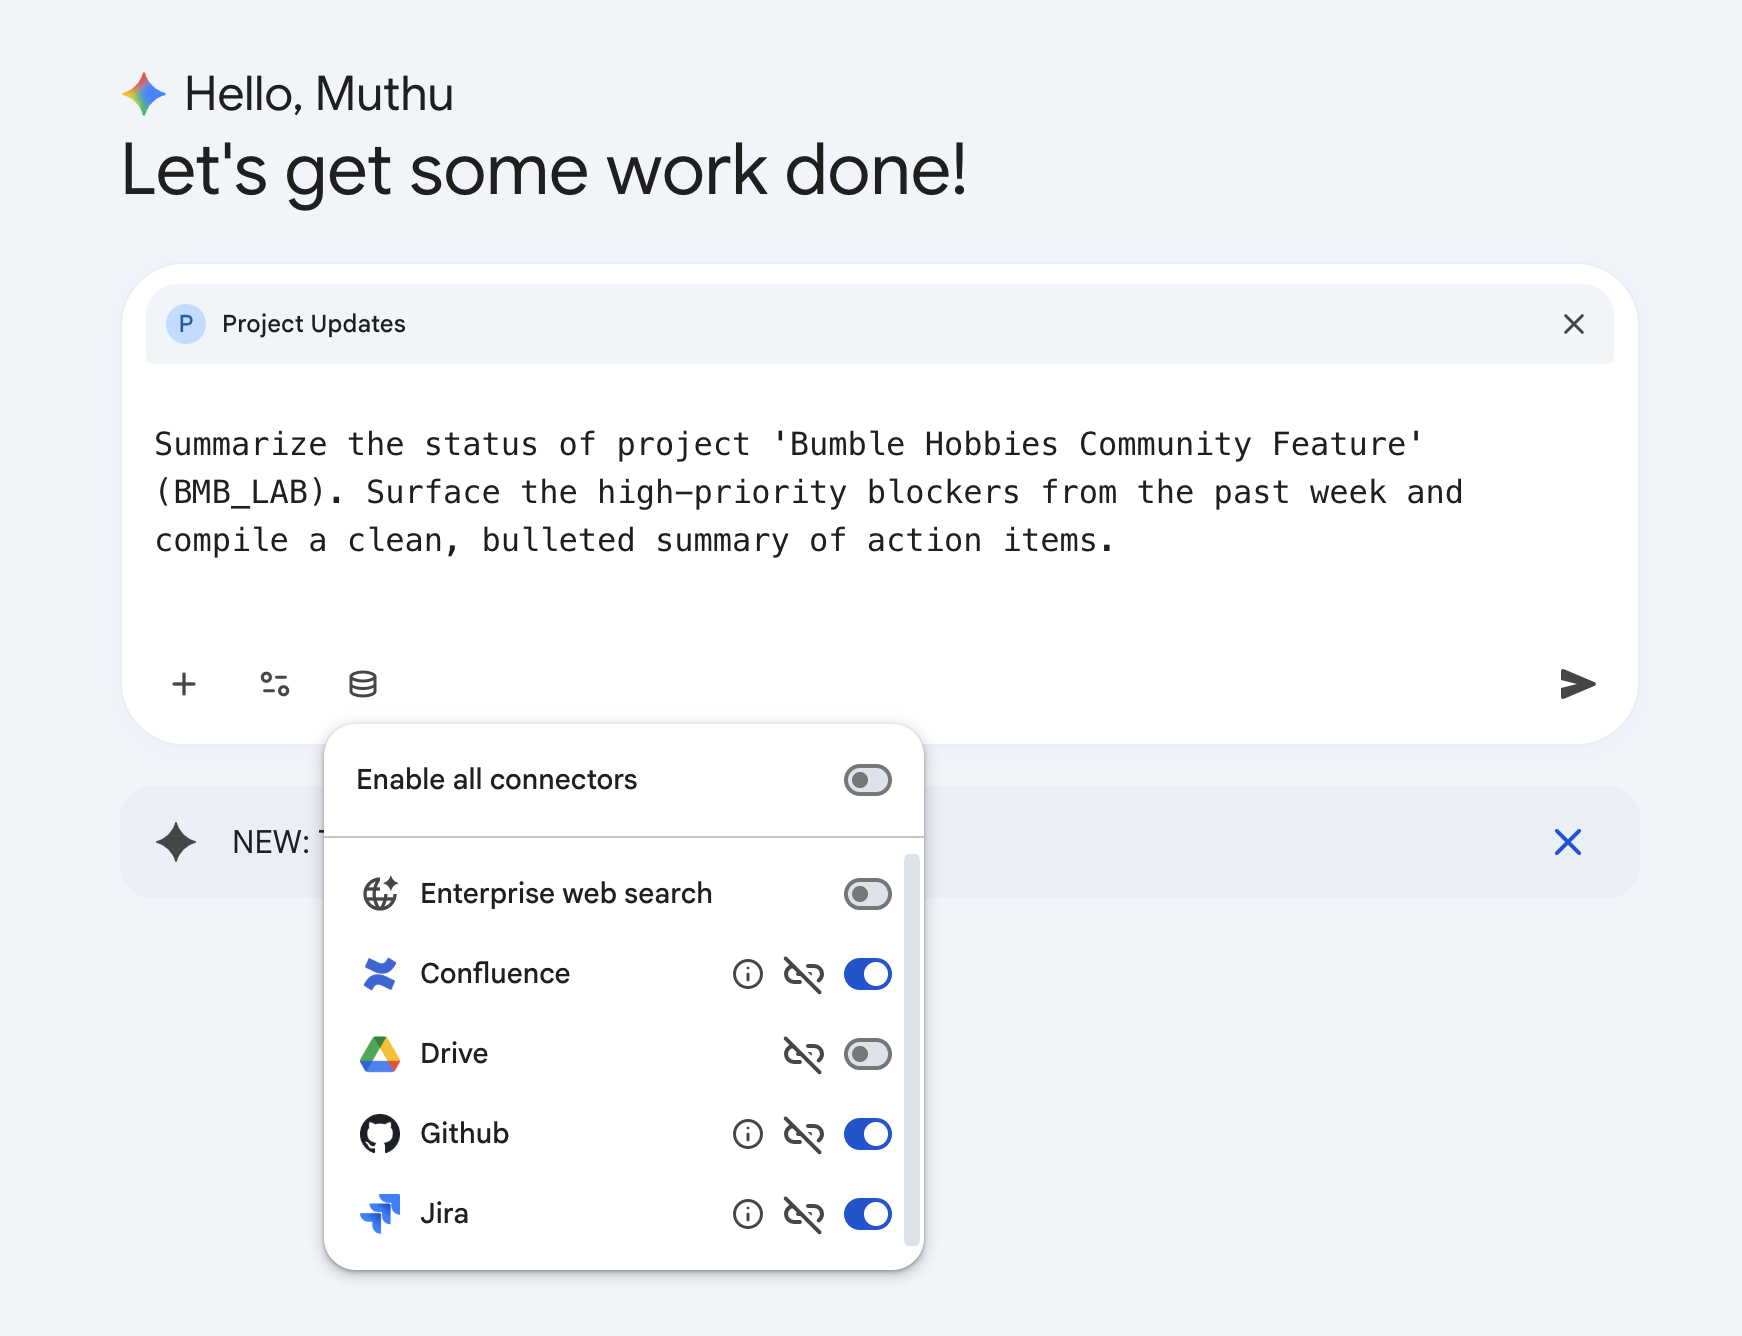
- Click the Database (Connectors) icon in the chat input box.
- Scoping Setup: Make sure to select only the necessary connectors (Jira and GitHub) and explicitly disable other connectors (such as public Google Search or generic Enterprise Search) to keep the AI grounded and avoid query noise.
- Type the following prompt to invoke the skill:
Summarize the status of project 'Bumble Hobbies Community Feature' (BLP). Surface the high-priority blockers from the past week and compile a clean, bulleted summary of action items. - Press Enter or click Submit.
Step 3: Grounded Report Ingestion & Output
The prebuilt skill will execute its optimized analytical sequence. It connects to Jira to retrieve Sprint issues, queries GitHub to trace the active pull request, and synthesizes the results into a highly professional status report: 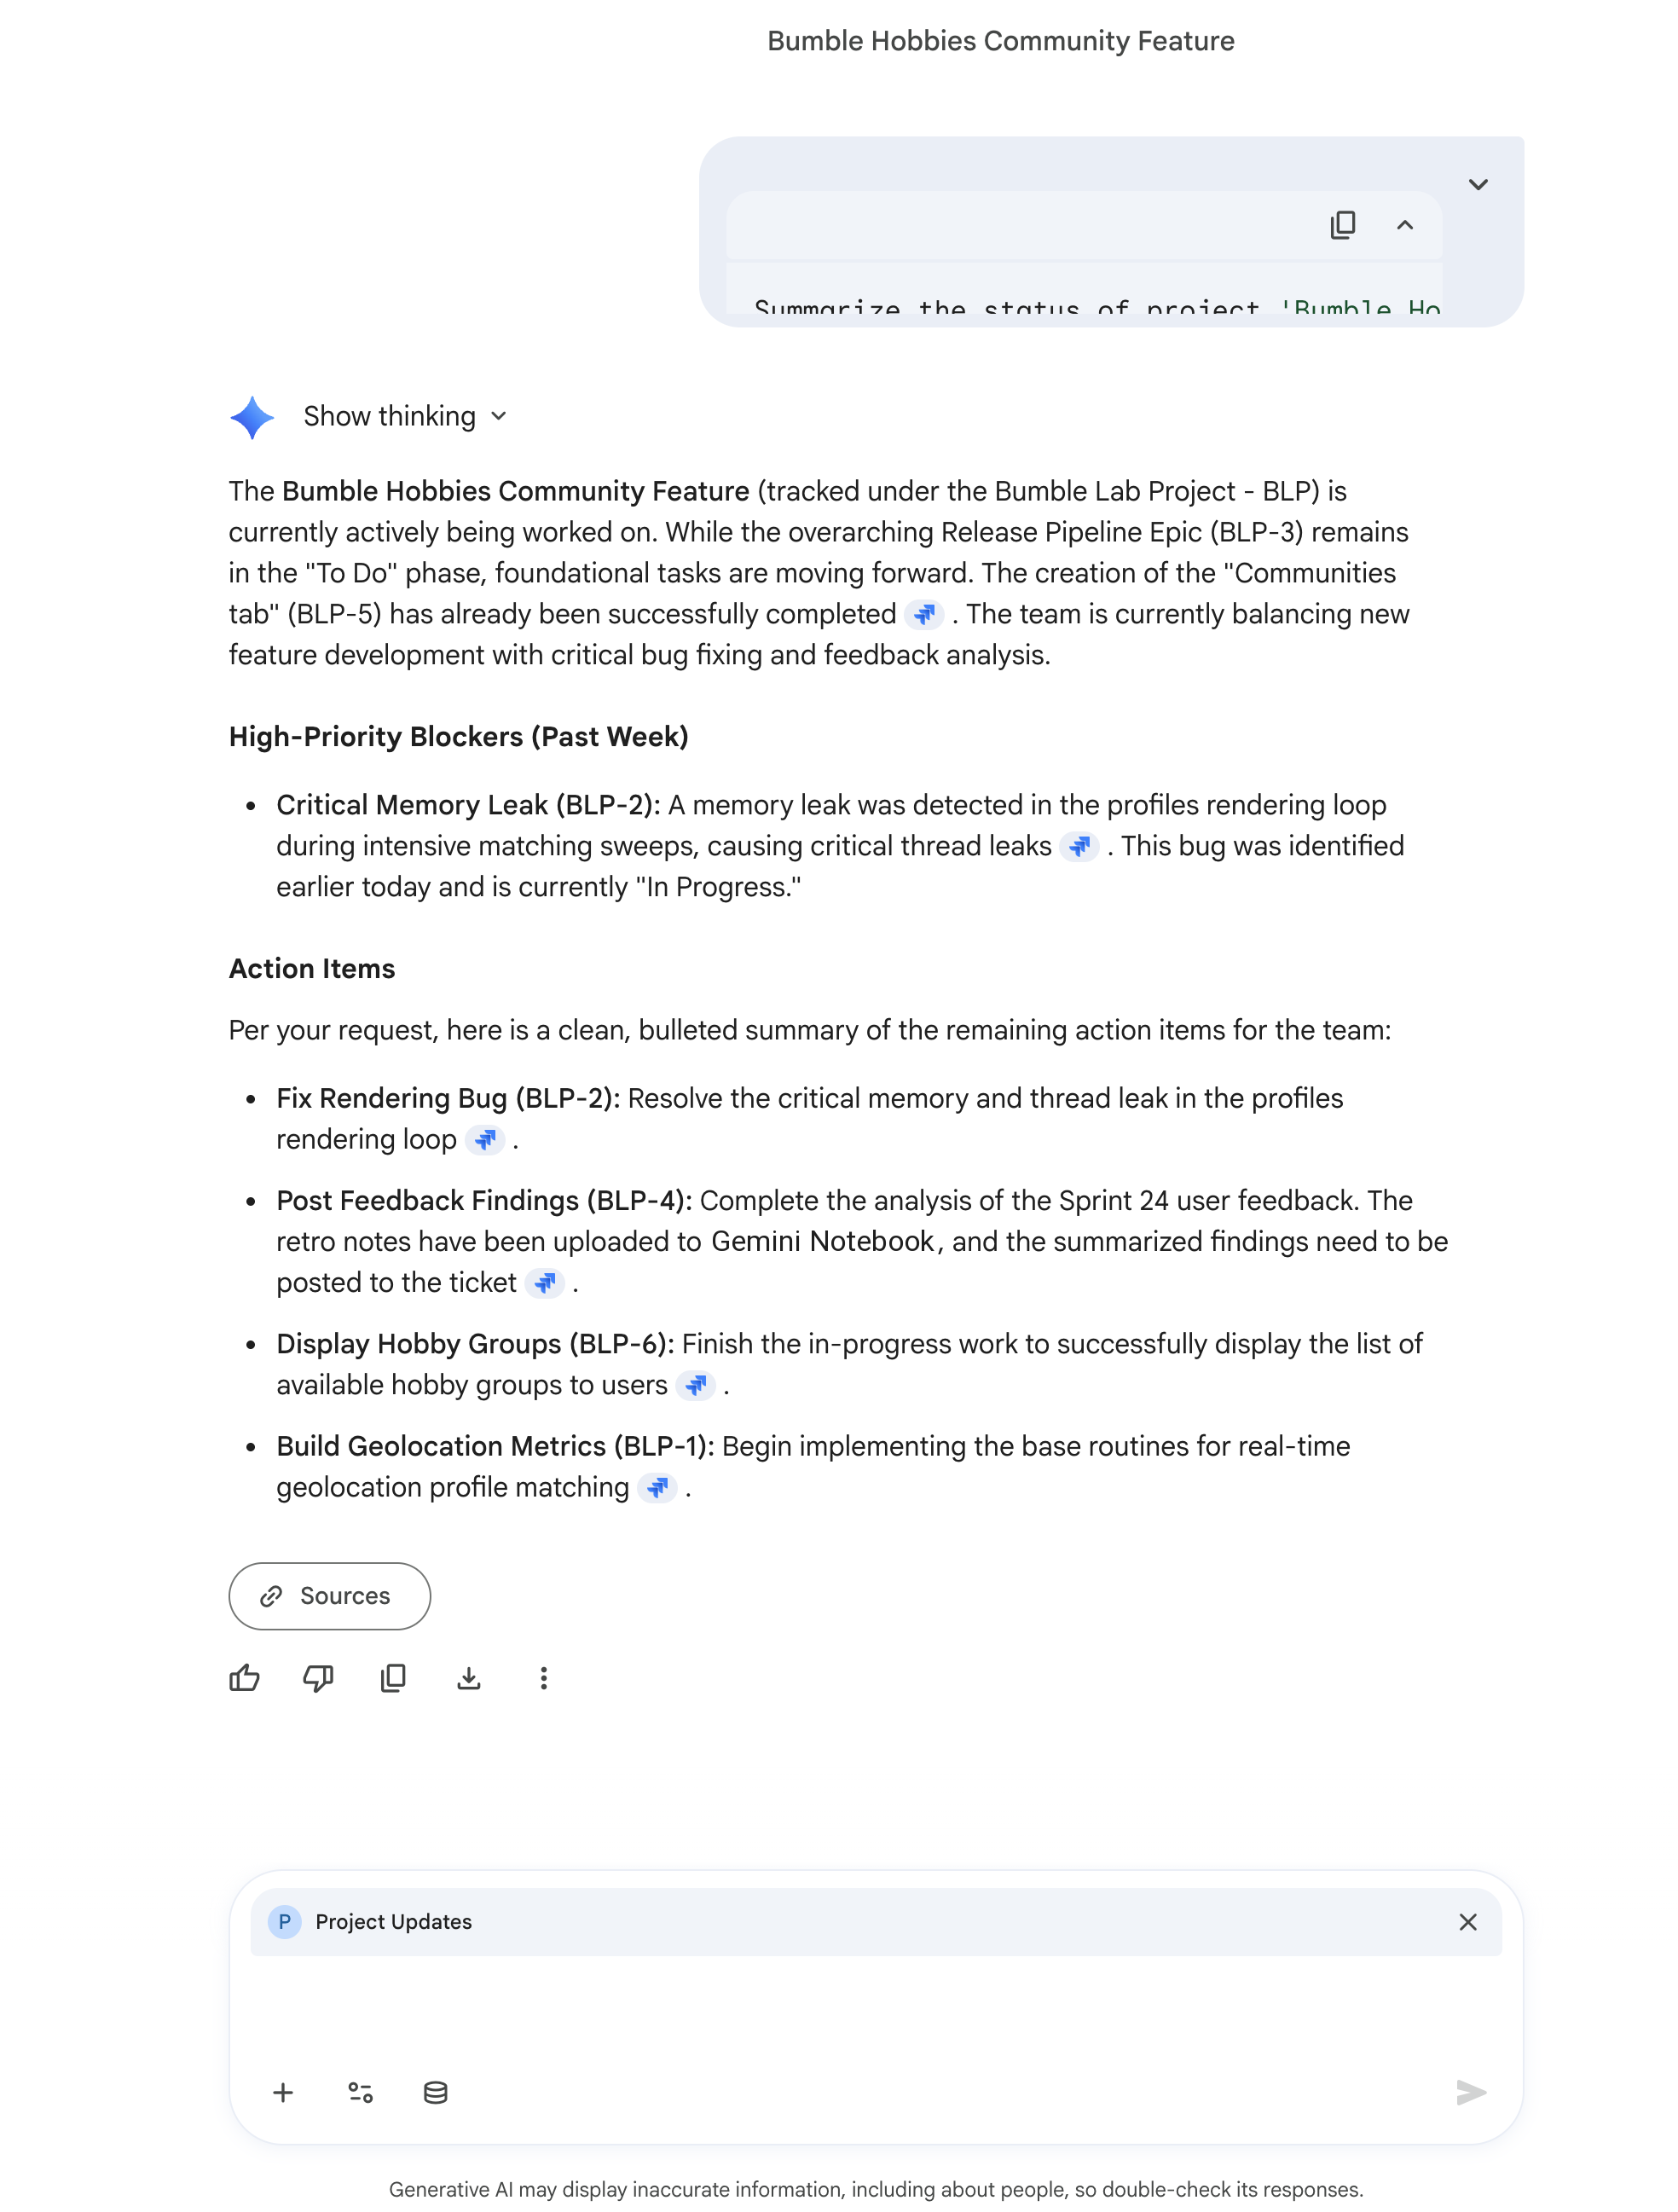
15. Interactive Artifact Co-Authoring with Gemini Assistant Canvas
In this step, you will explore a fundamental differentiator of Gemini Enterprise: Gemini Assistant Canvas. This feature shifts your workspace from a standard conversational screen to a highly productive, side-by-side, dual-panel layout where you can prompt the AI on the left and co-author persistent, editable artifacts on the right without switching apps.
UI Layout Description
When Canvas mode is activated, the user interface undergoes a distinct transition:
- Left Panel (The Conversational Chat): Retains a standard AI chat pane. It contains your prompt input line at the bottom and database connector buttons.
- Right Panel (The Document Editor Canvas): A broad, clean white document workspace occupies the right half of the screen. It displays formatted headings, bullet points, and text, working like a persistent Google Doc directly integrated into your Gemini session.
Step 1: Enable the Canvas Interface
- Sign in to your Gemini Enterprise web app.
- Click the New Chat button at the top left to start with a clean history.
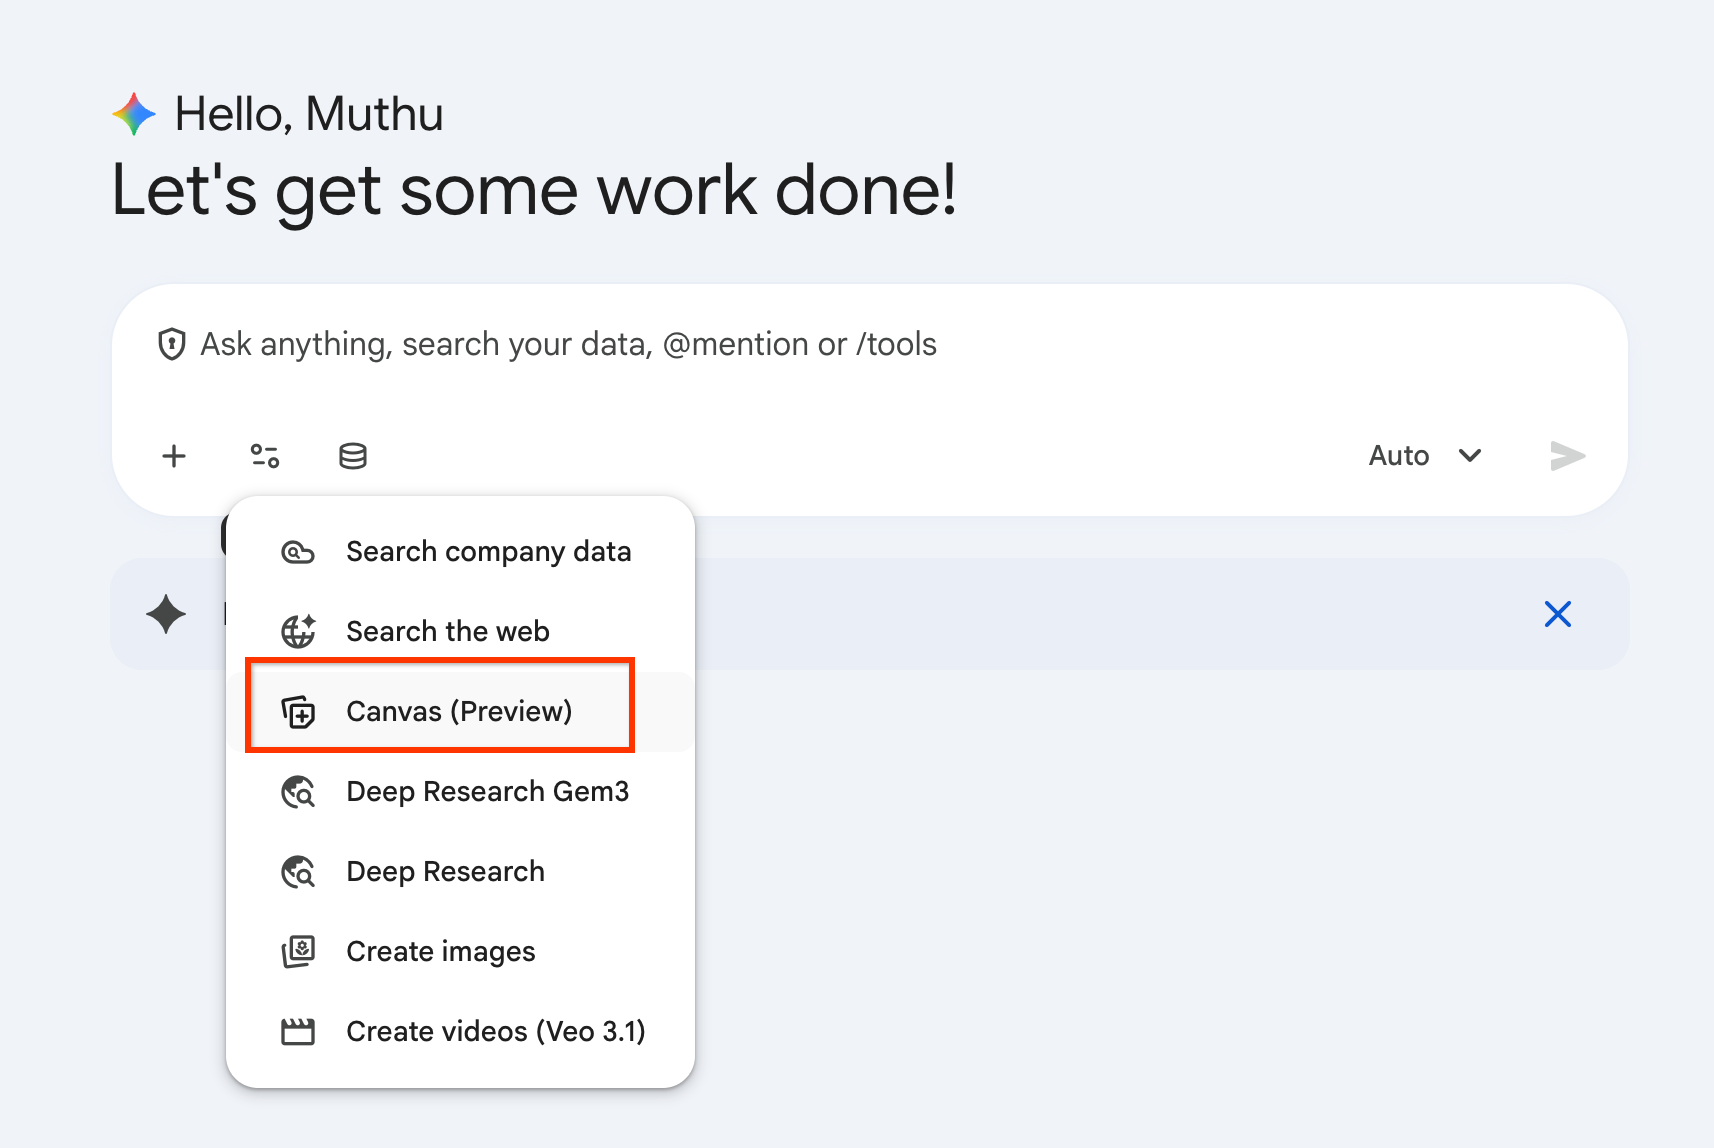
- In the prompt entry field at the bottom, click the Tools button (represented by an active slider or list icon) or type
/to open the shortcut catalog. - Select Canvas (Preview) from the list. This tells Gemini that your next prompt intends to compile a structured text document.
Step 2: Grounded Generation of an Architecture Decision Record (ADR)
We will prompt the engine to scan your seeded BLP Jira project and Confluence workspaces to construct an official Architecture Decision Record (ADR) based on live project criteria.
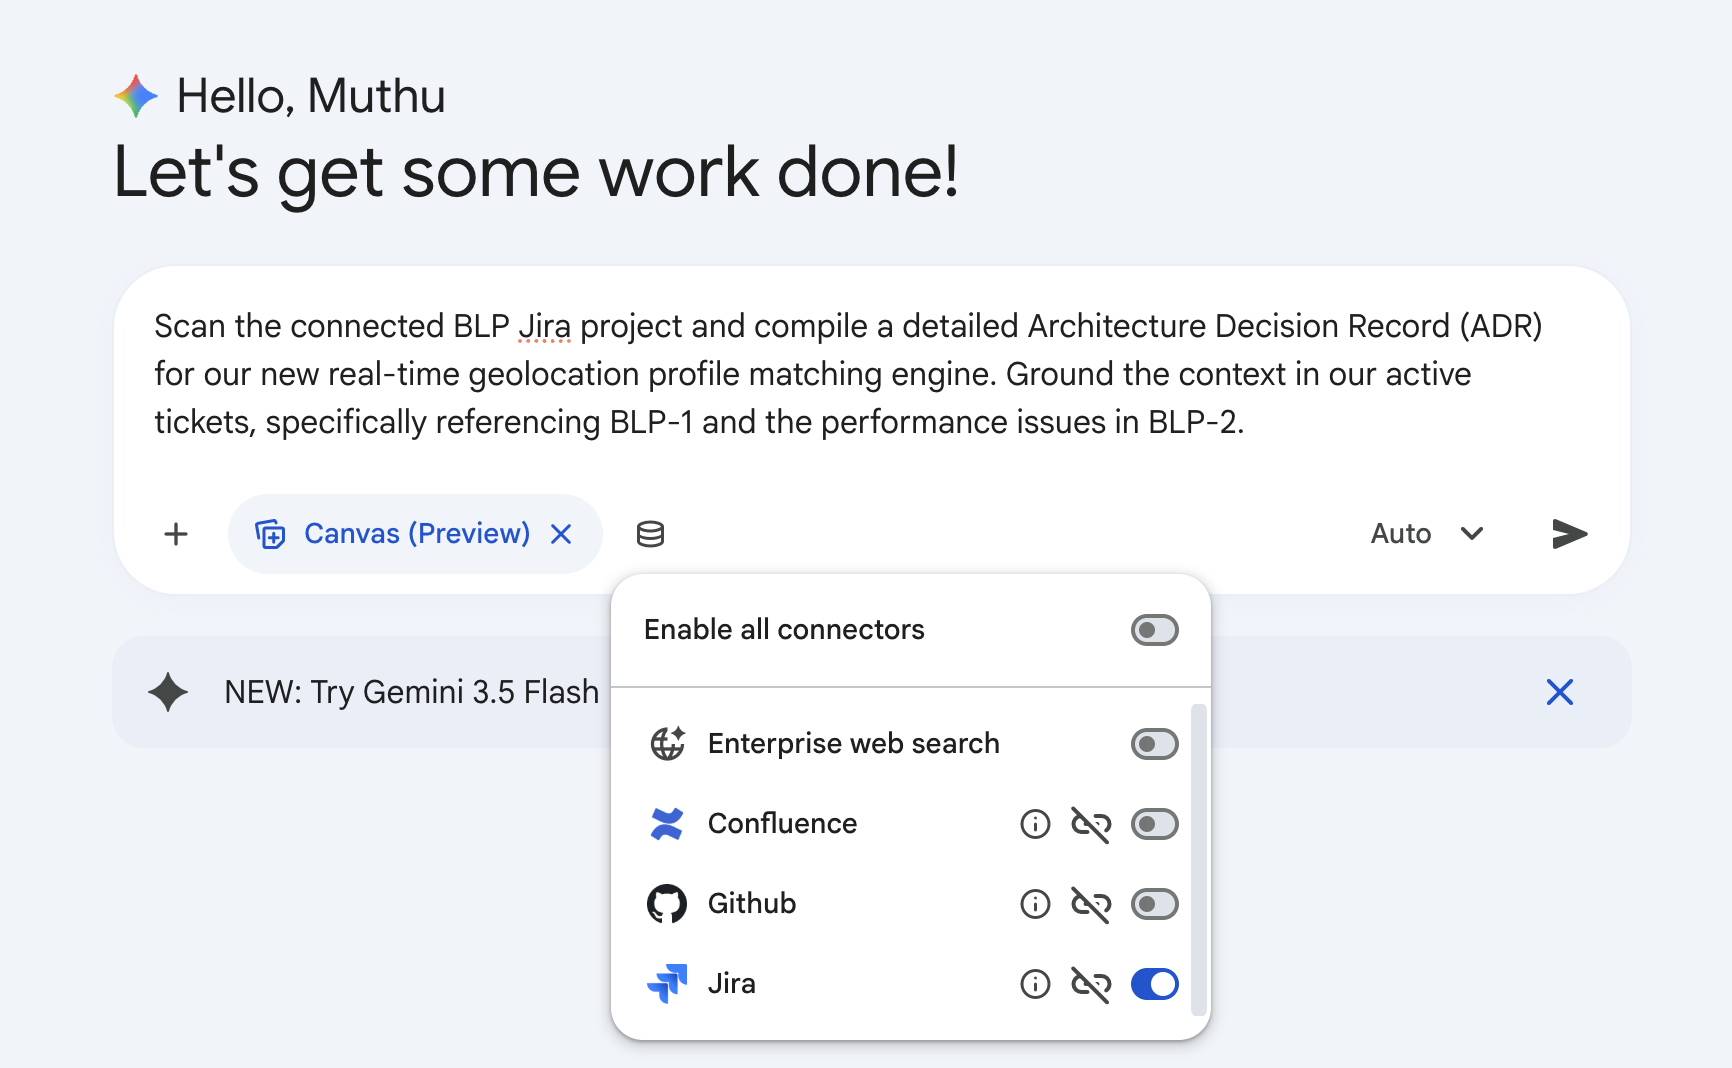
- In your active Canvas prompt field, enter the following prompt:
Scan the connected BLP Jira project and compile a detailed Architecture Decision Record (ADR) for our new real-time geolocation profile matching engine. Ground the context in our active tickets, specifically referencing BLP-1 and the performance issues in BLP-2. - Click Submit.
- Watch the workspace split into the dual-panel view. The right-side Document Editor Canvas will dynamically render a polished, professional markdown-formatted document.
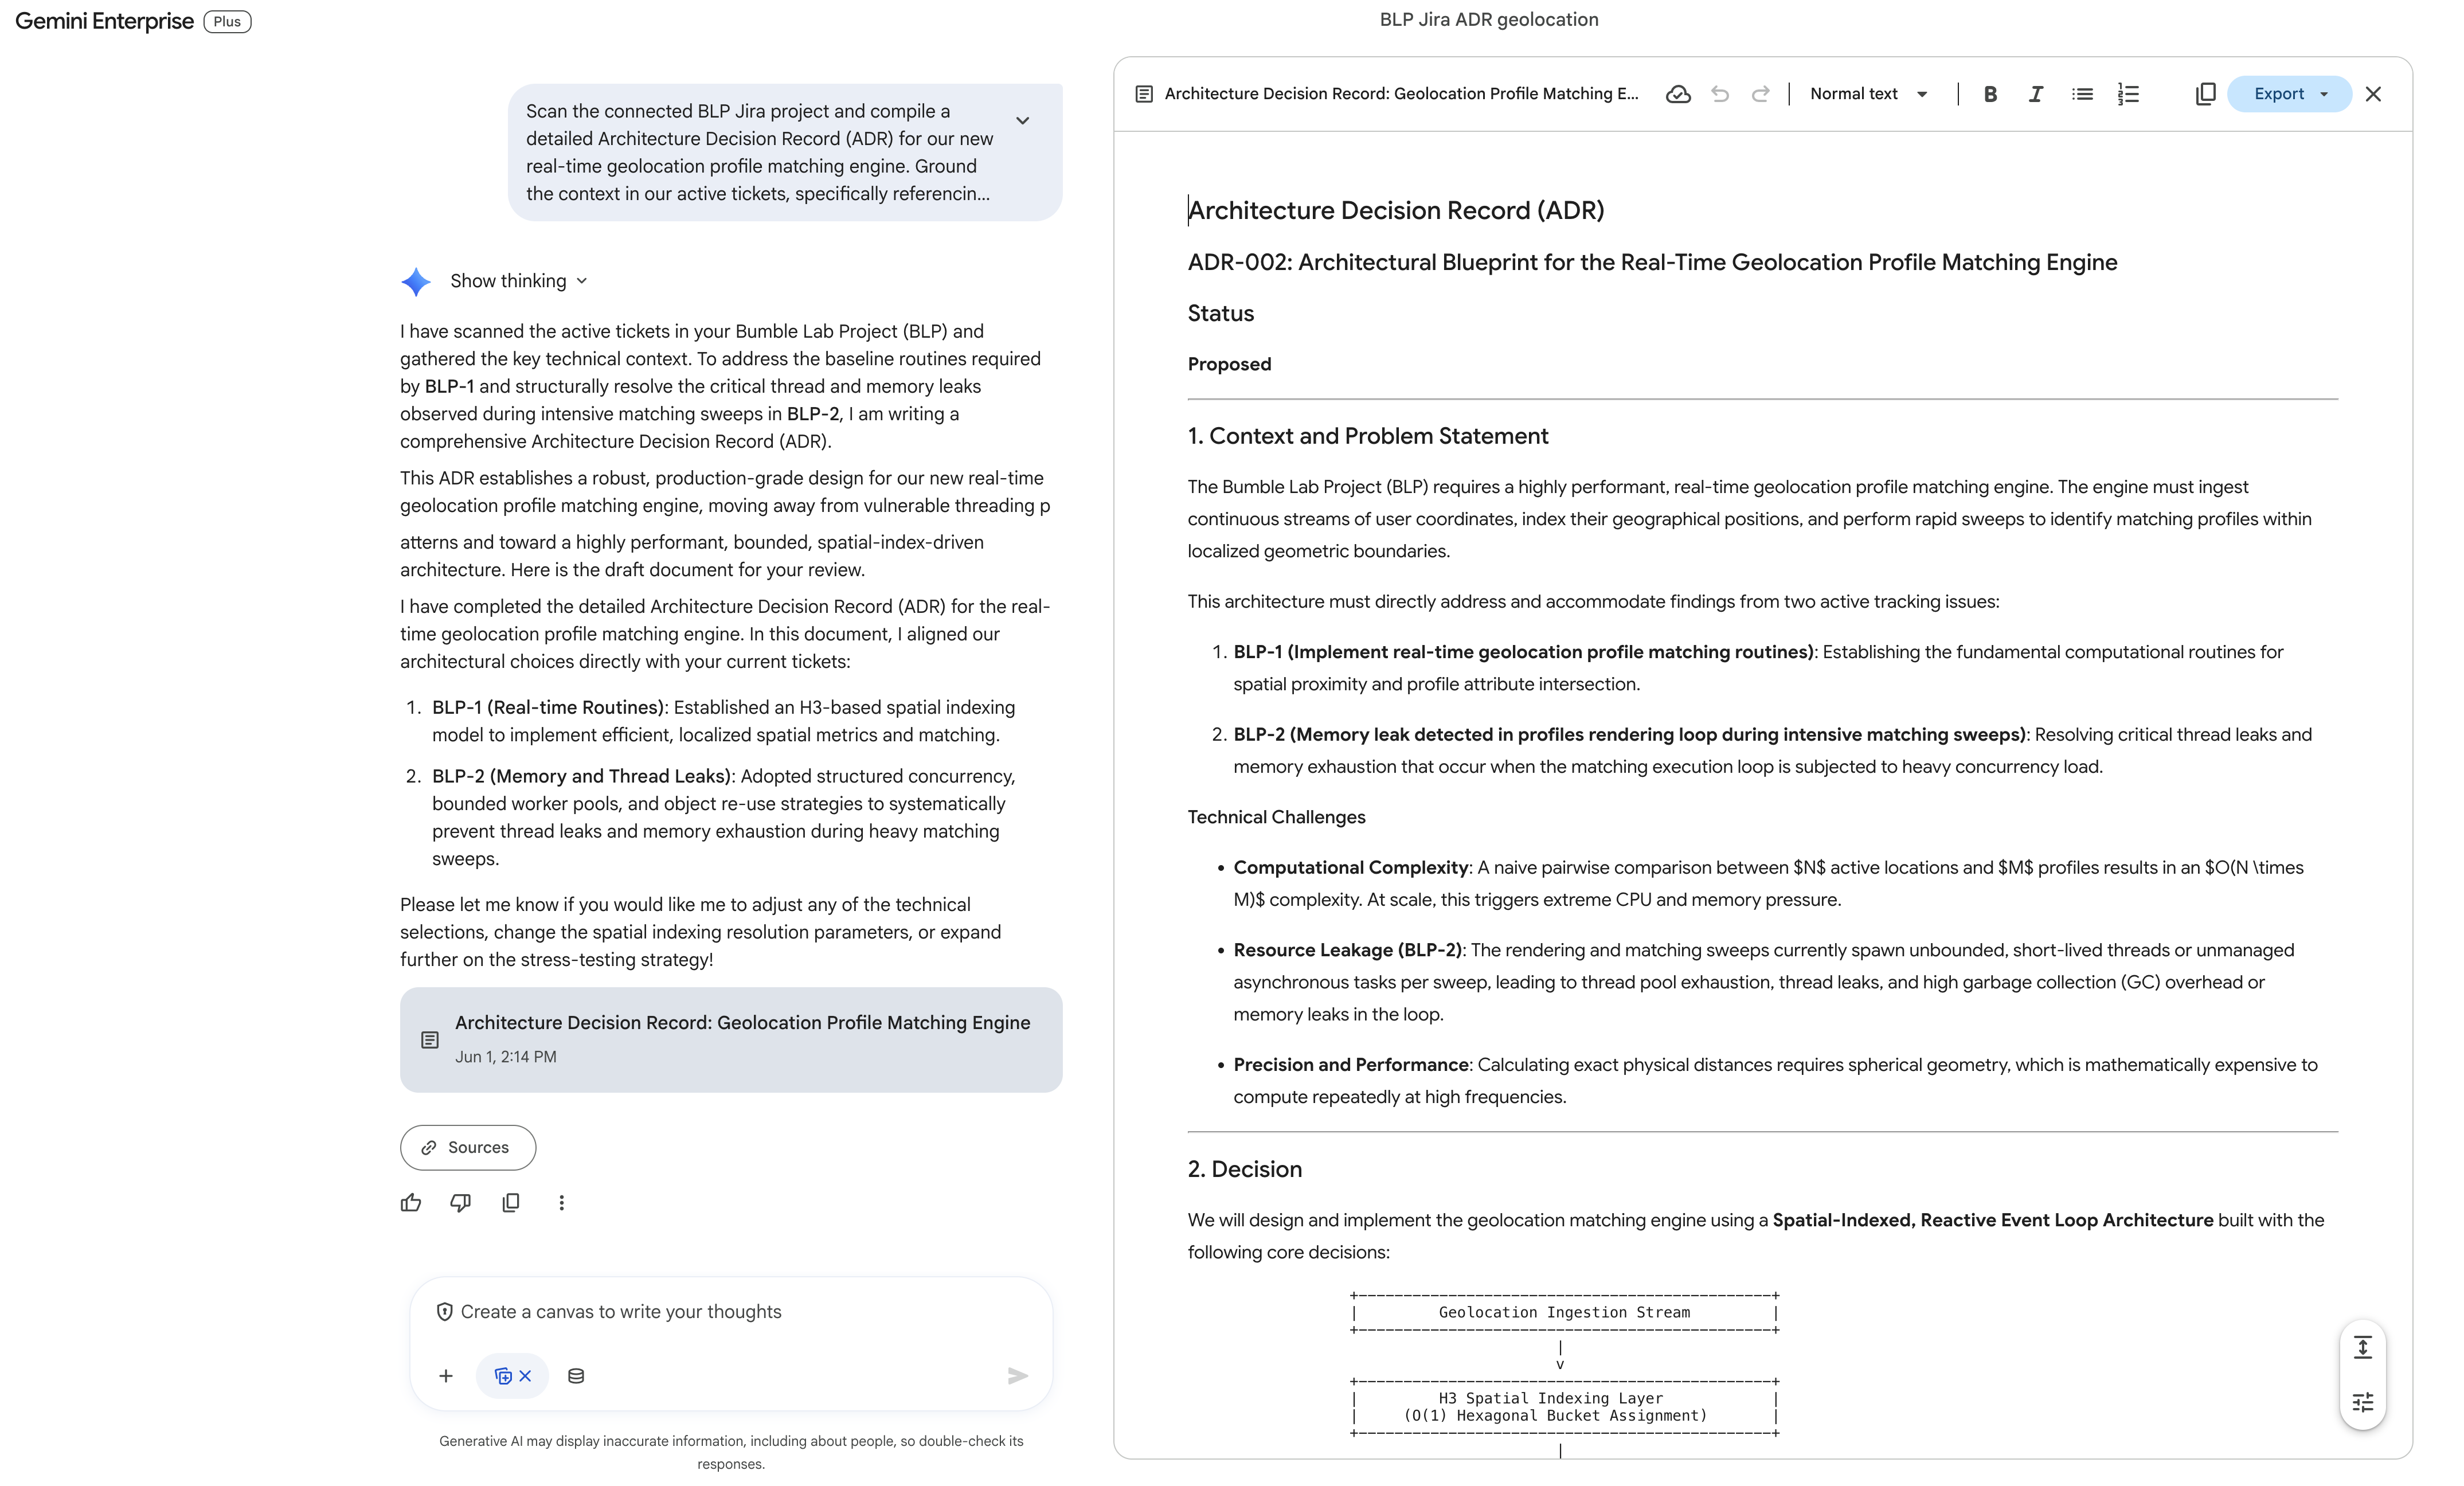
The generated ADR (titled ADR-002: Architectural Blueprint for the Real-Time Geolocation Profile Matching Engine) typically includes:
- Status: Proposed
- Context and Problem Statement: Specifically citing real-time proximity attribute matching (
BLP-1) and loop thread/memory leaks (BLP-2). - Decision (Spatial-Indexed, Reactive Event Loop): Proposing Uber's H3 Spatial Indexing System (Resolution 8 to 10 hexagonal buckets) to reduce computational complexity, and a bounded executor thread pool with backpressure (bounded blocking queues) to cap concurrency and completely resolve the thread leaks in
BLP-2. It also establishes the Haversine Formula for localized spherical-geometry distance filtering inside cells. - Alternative Solutions Considered: Traditional R-Tree/PostGIS ST_DWithin queries (Option A, rejected due to database query latency) and Unbounded Thread-per-User (Option B, rejected as it directly caused the
BLP-2thread leaks). - Consequences: Deterministic Resource Usage, Predictable Latency, Edge coordinate lookup trade-offs.
- Mapping & Next Steps for Active Tickets: Specific code pathways to resolve
BLP-1andBLP-2using structured thread pools and object pooling.
Step 3: Targeted Inline Refinement in Canvas
A major power of Canvas is targeted, local AI editing. You do not need to re-prompt the entire document in the chat window; instead, you edit inline.
- Navigate to the right-side Document Editor Canvas pane.
- Scroll down to the Decision section and select the paragraph discussing the cache invalidation strategy by highlighting it with your cursor.
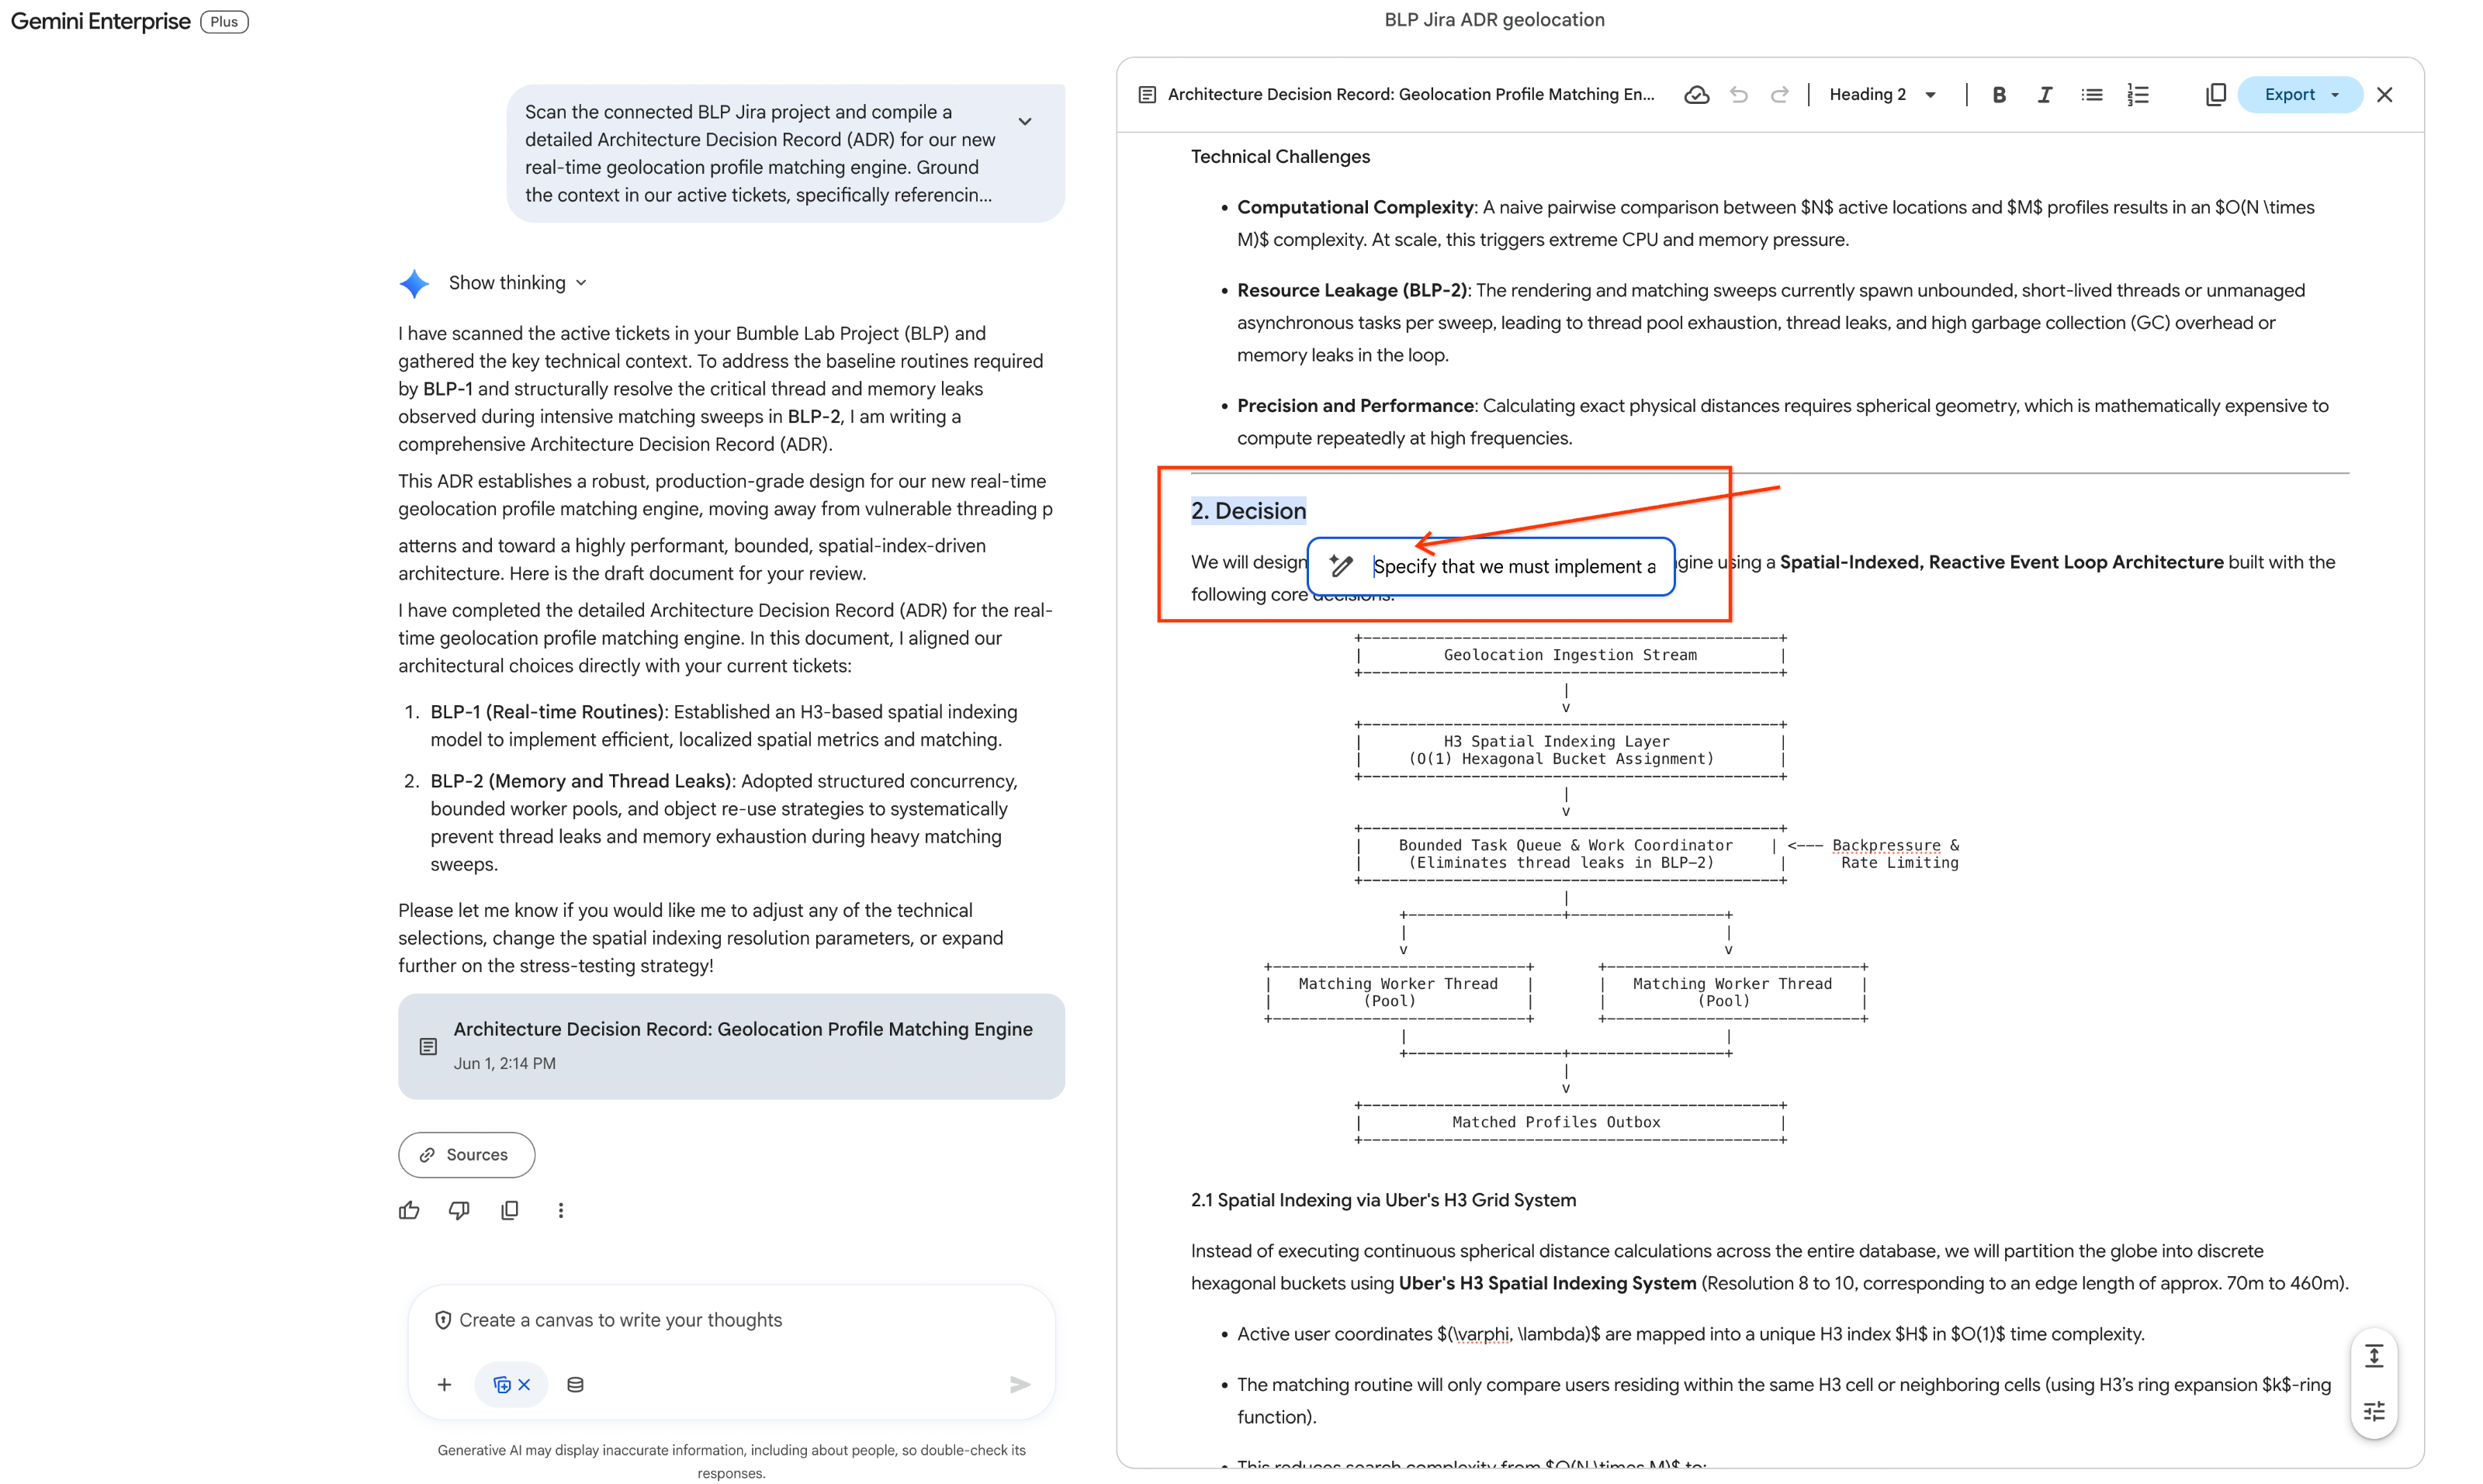
- As soon as the text is highlighted, a floating micro-toolbar immediately drops down directly above your selection. Click the Pencil Icon (inline Ask Gemini prompt option) on the toolbar. A text input bubble will pop open.
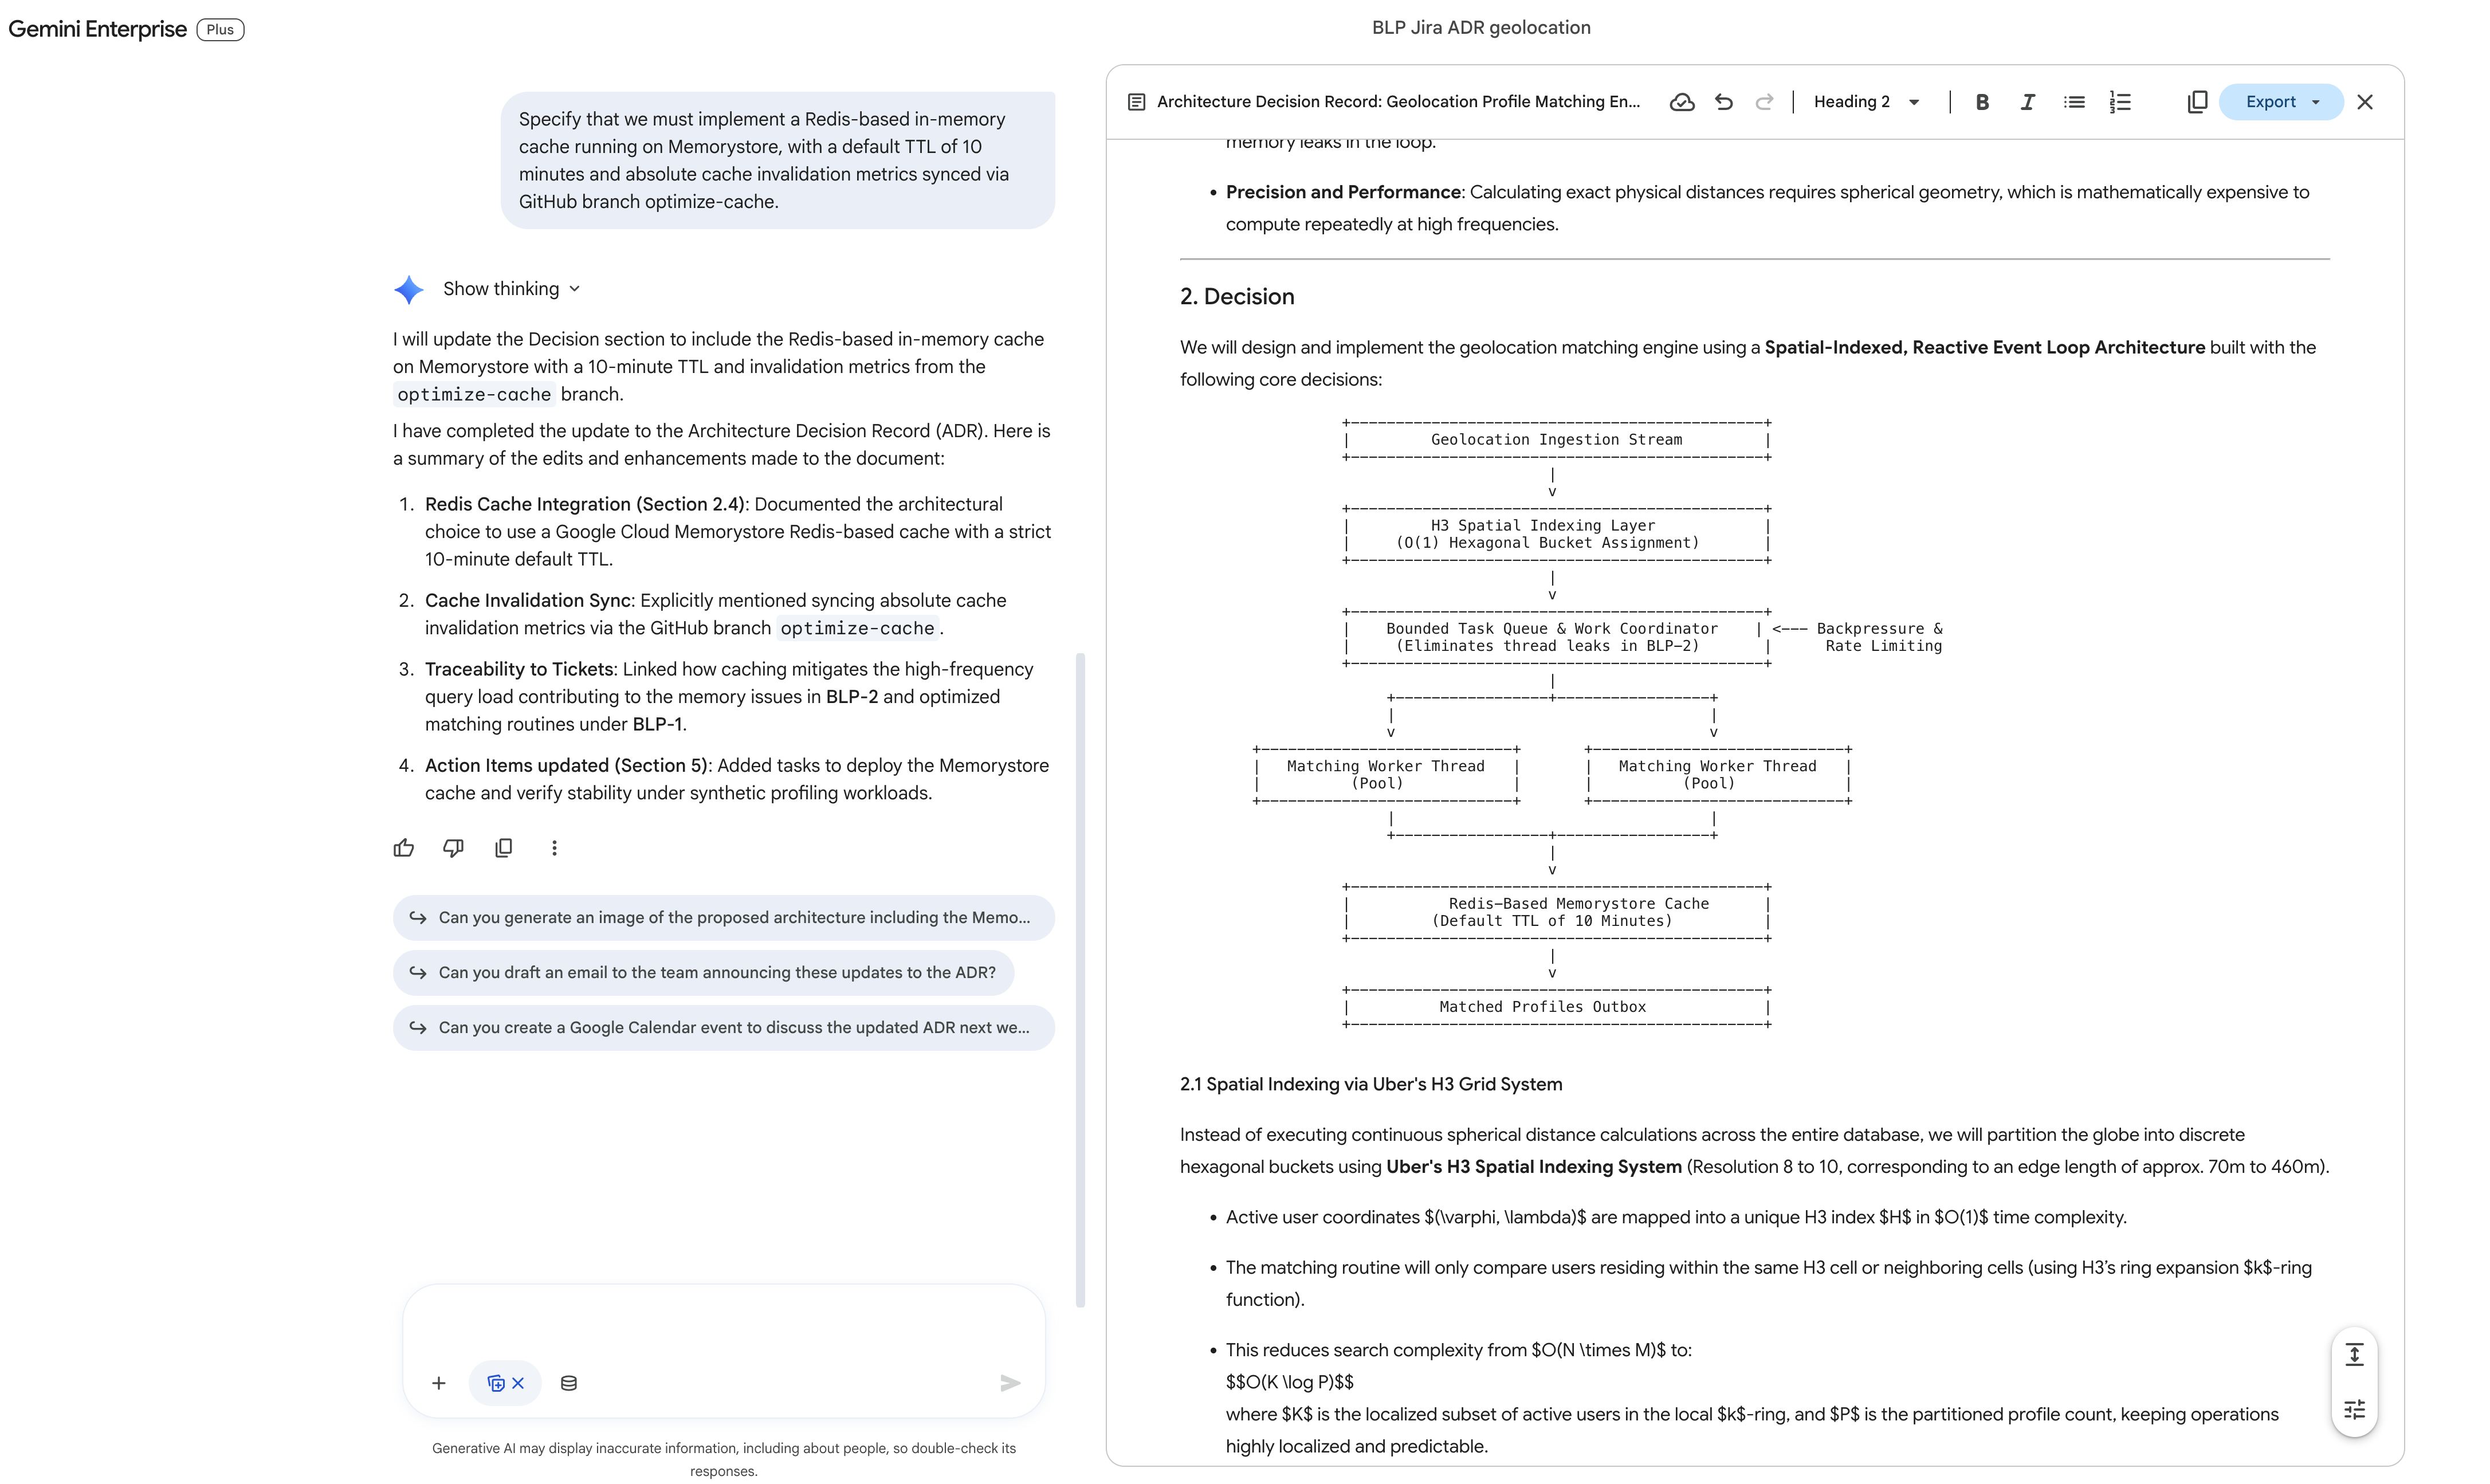
- In the input bubble, enter your precise revision instructions:
Specify that we must implement a Redis-based in-memory cache running on Memorystore, with a default TTL of 10 minutes and absolute cache invalidation metrics synced via GitHub branch optimize-cache. - Click Submit (or press Enter).
- Observe the right panel: the AI updates only that specific selected block in place, seamlessly integrating the Redis Memorystore parameters into the persistent draft.
Step 4: Direct Workspace Export to Confluence
Now that your document is polished, you will export it to your engineering Confluence space. Since direct UI export does not support updating existing empty pages, you will use the conversational interface on the left to instruct the assistant to create a new page dynamically.
- Move your attention back to the left-hand Conversational Chat pane.
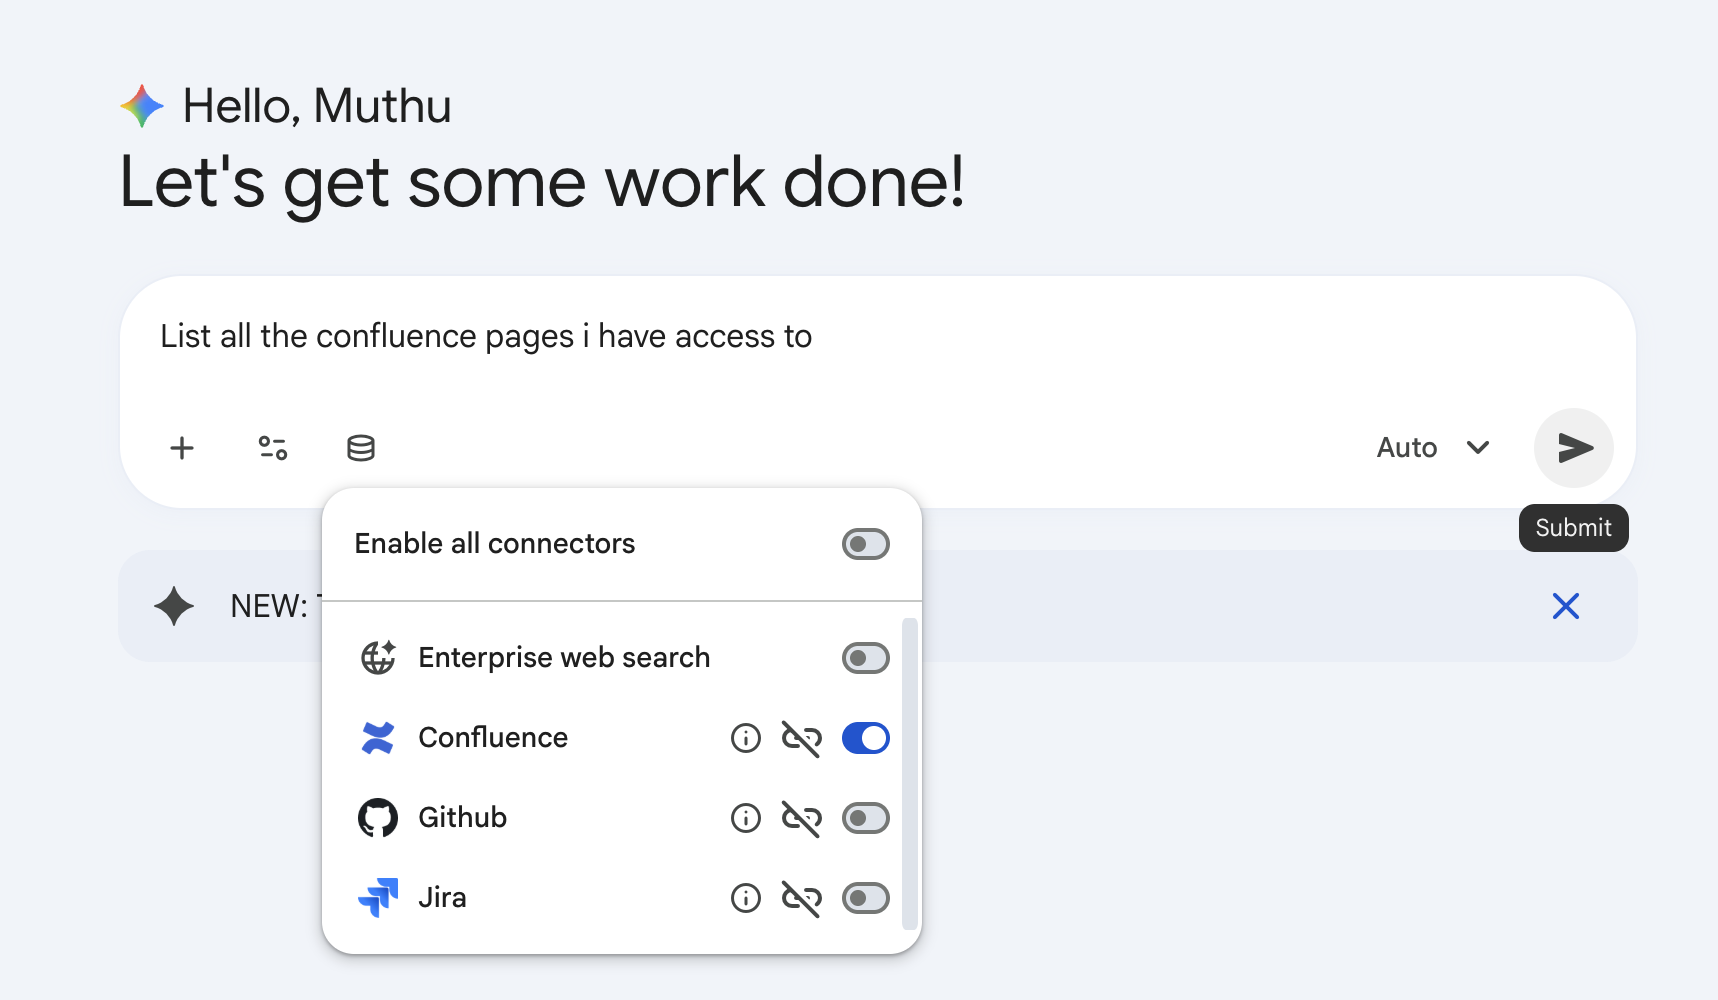
- In the prompt input box, type your publish instruction:
can you create a new Confluence page in space "Bumble Engineering Space" with this ADR? - Click Submit.
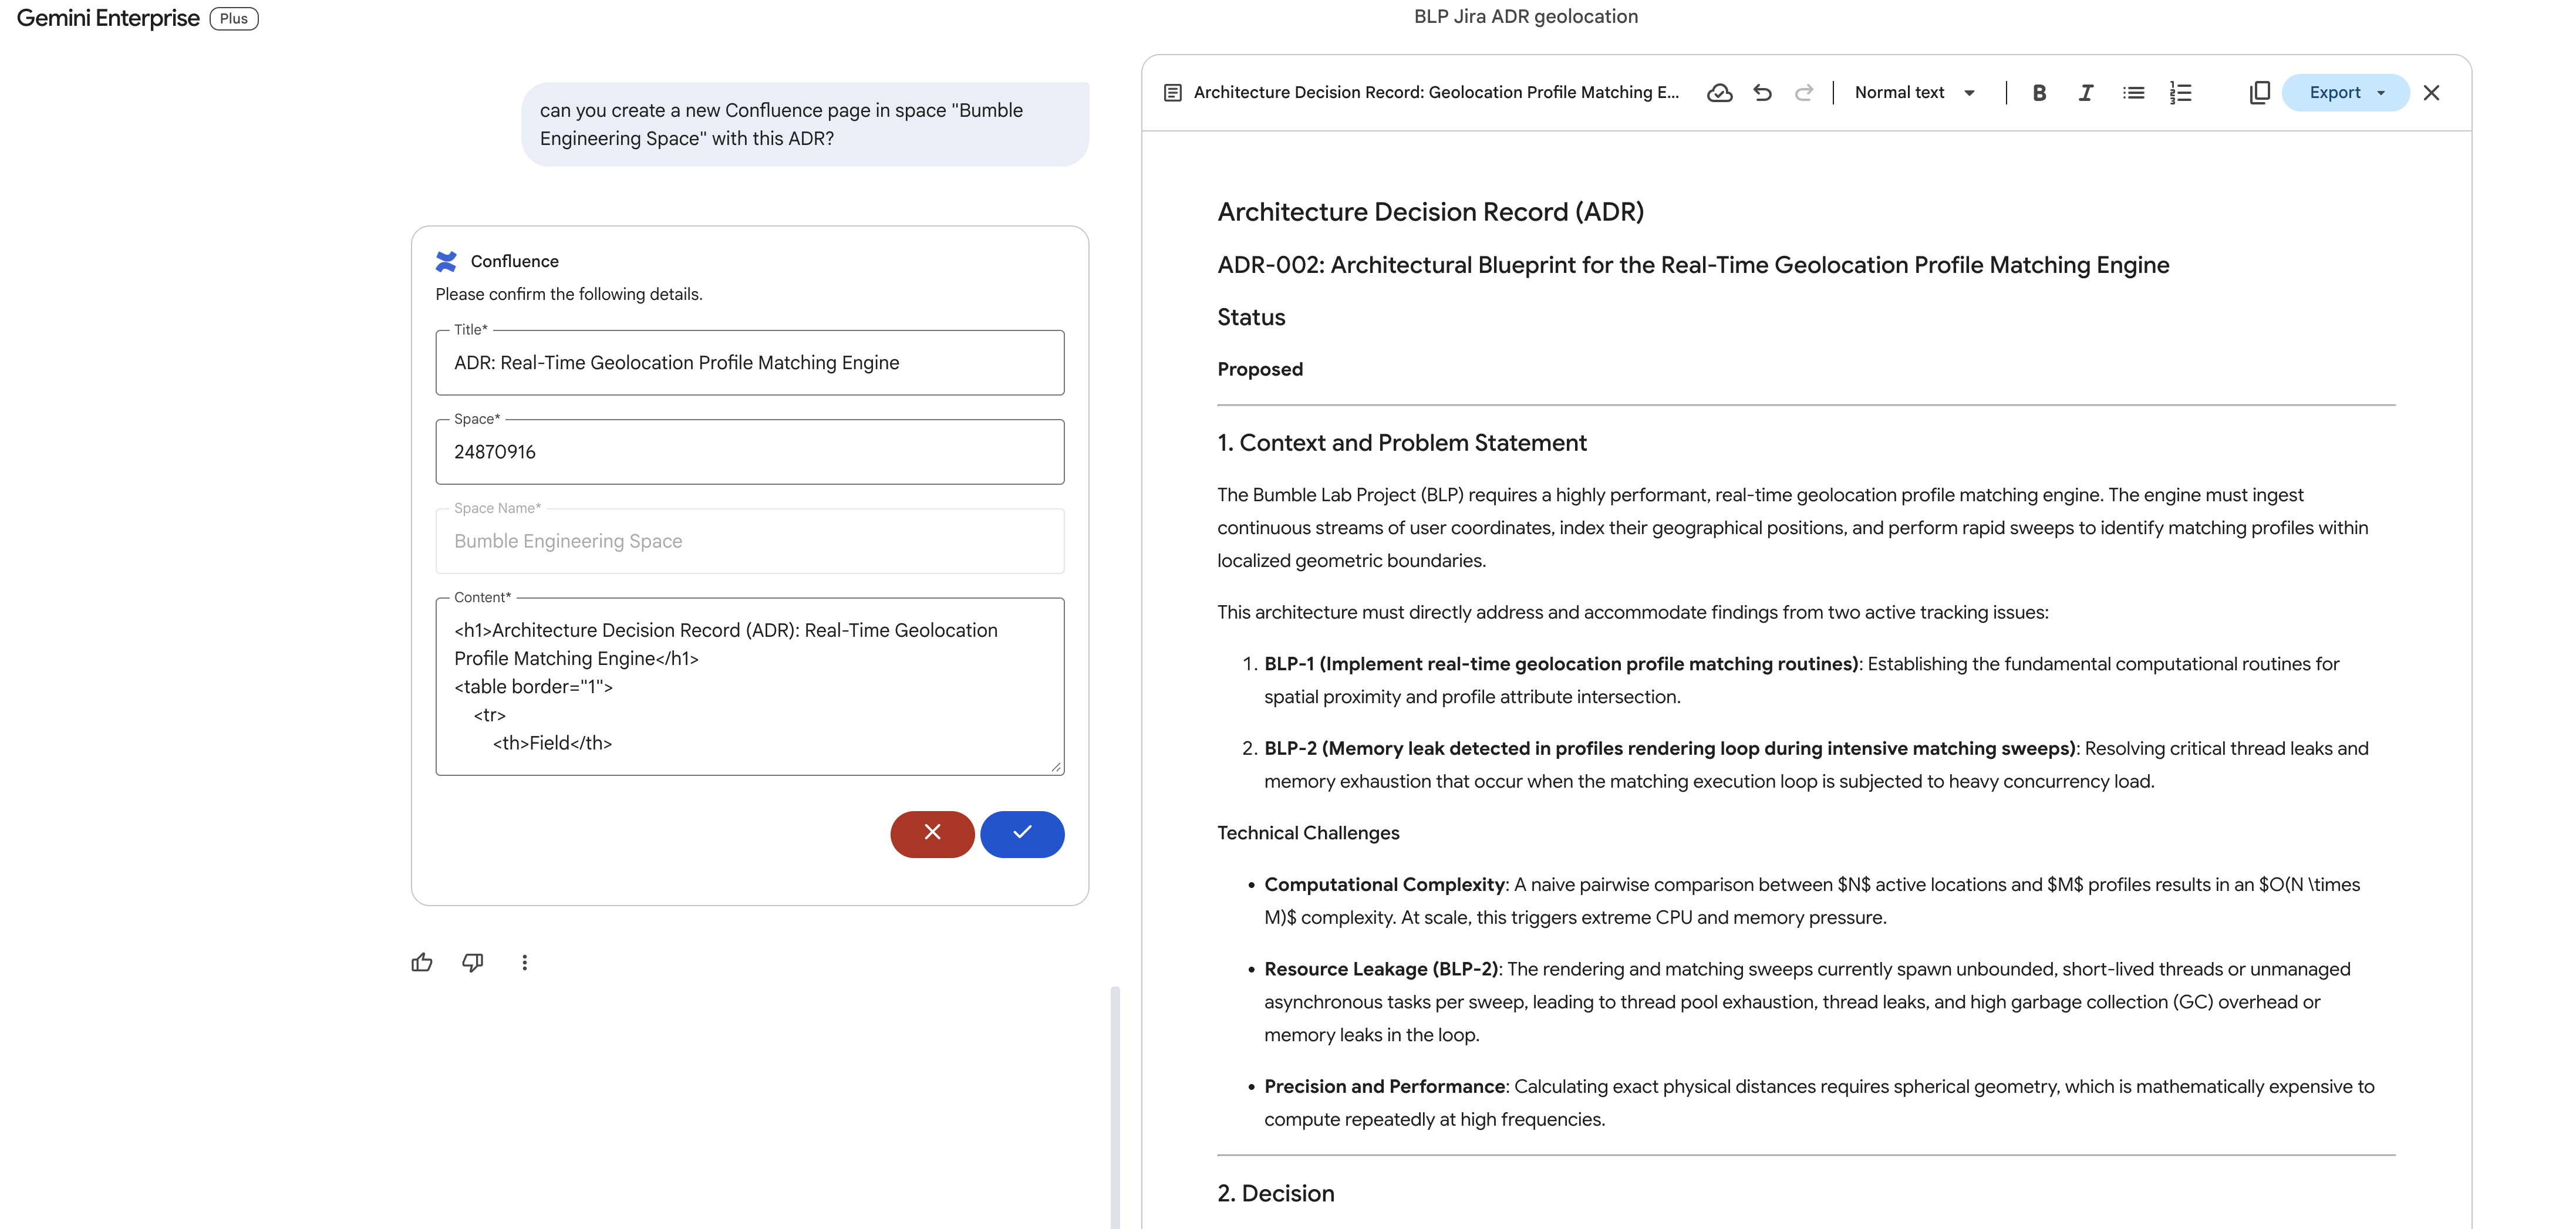
- Gemini will communicate with the Atlassian connector API, package the Canvas ADR document, and publish it as a new official page inside your Confluence workspace!
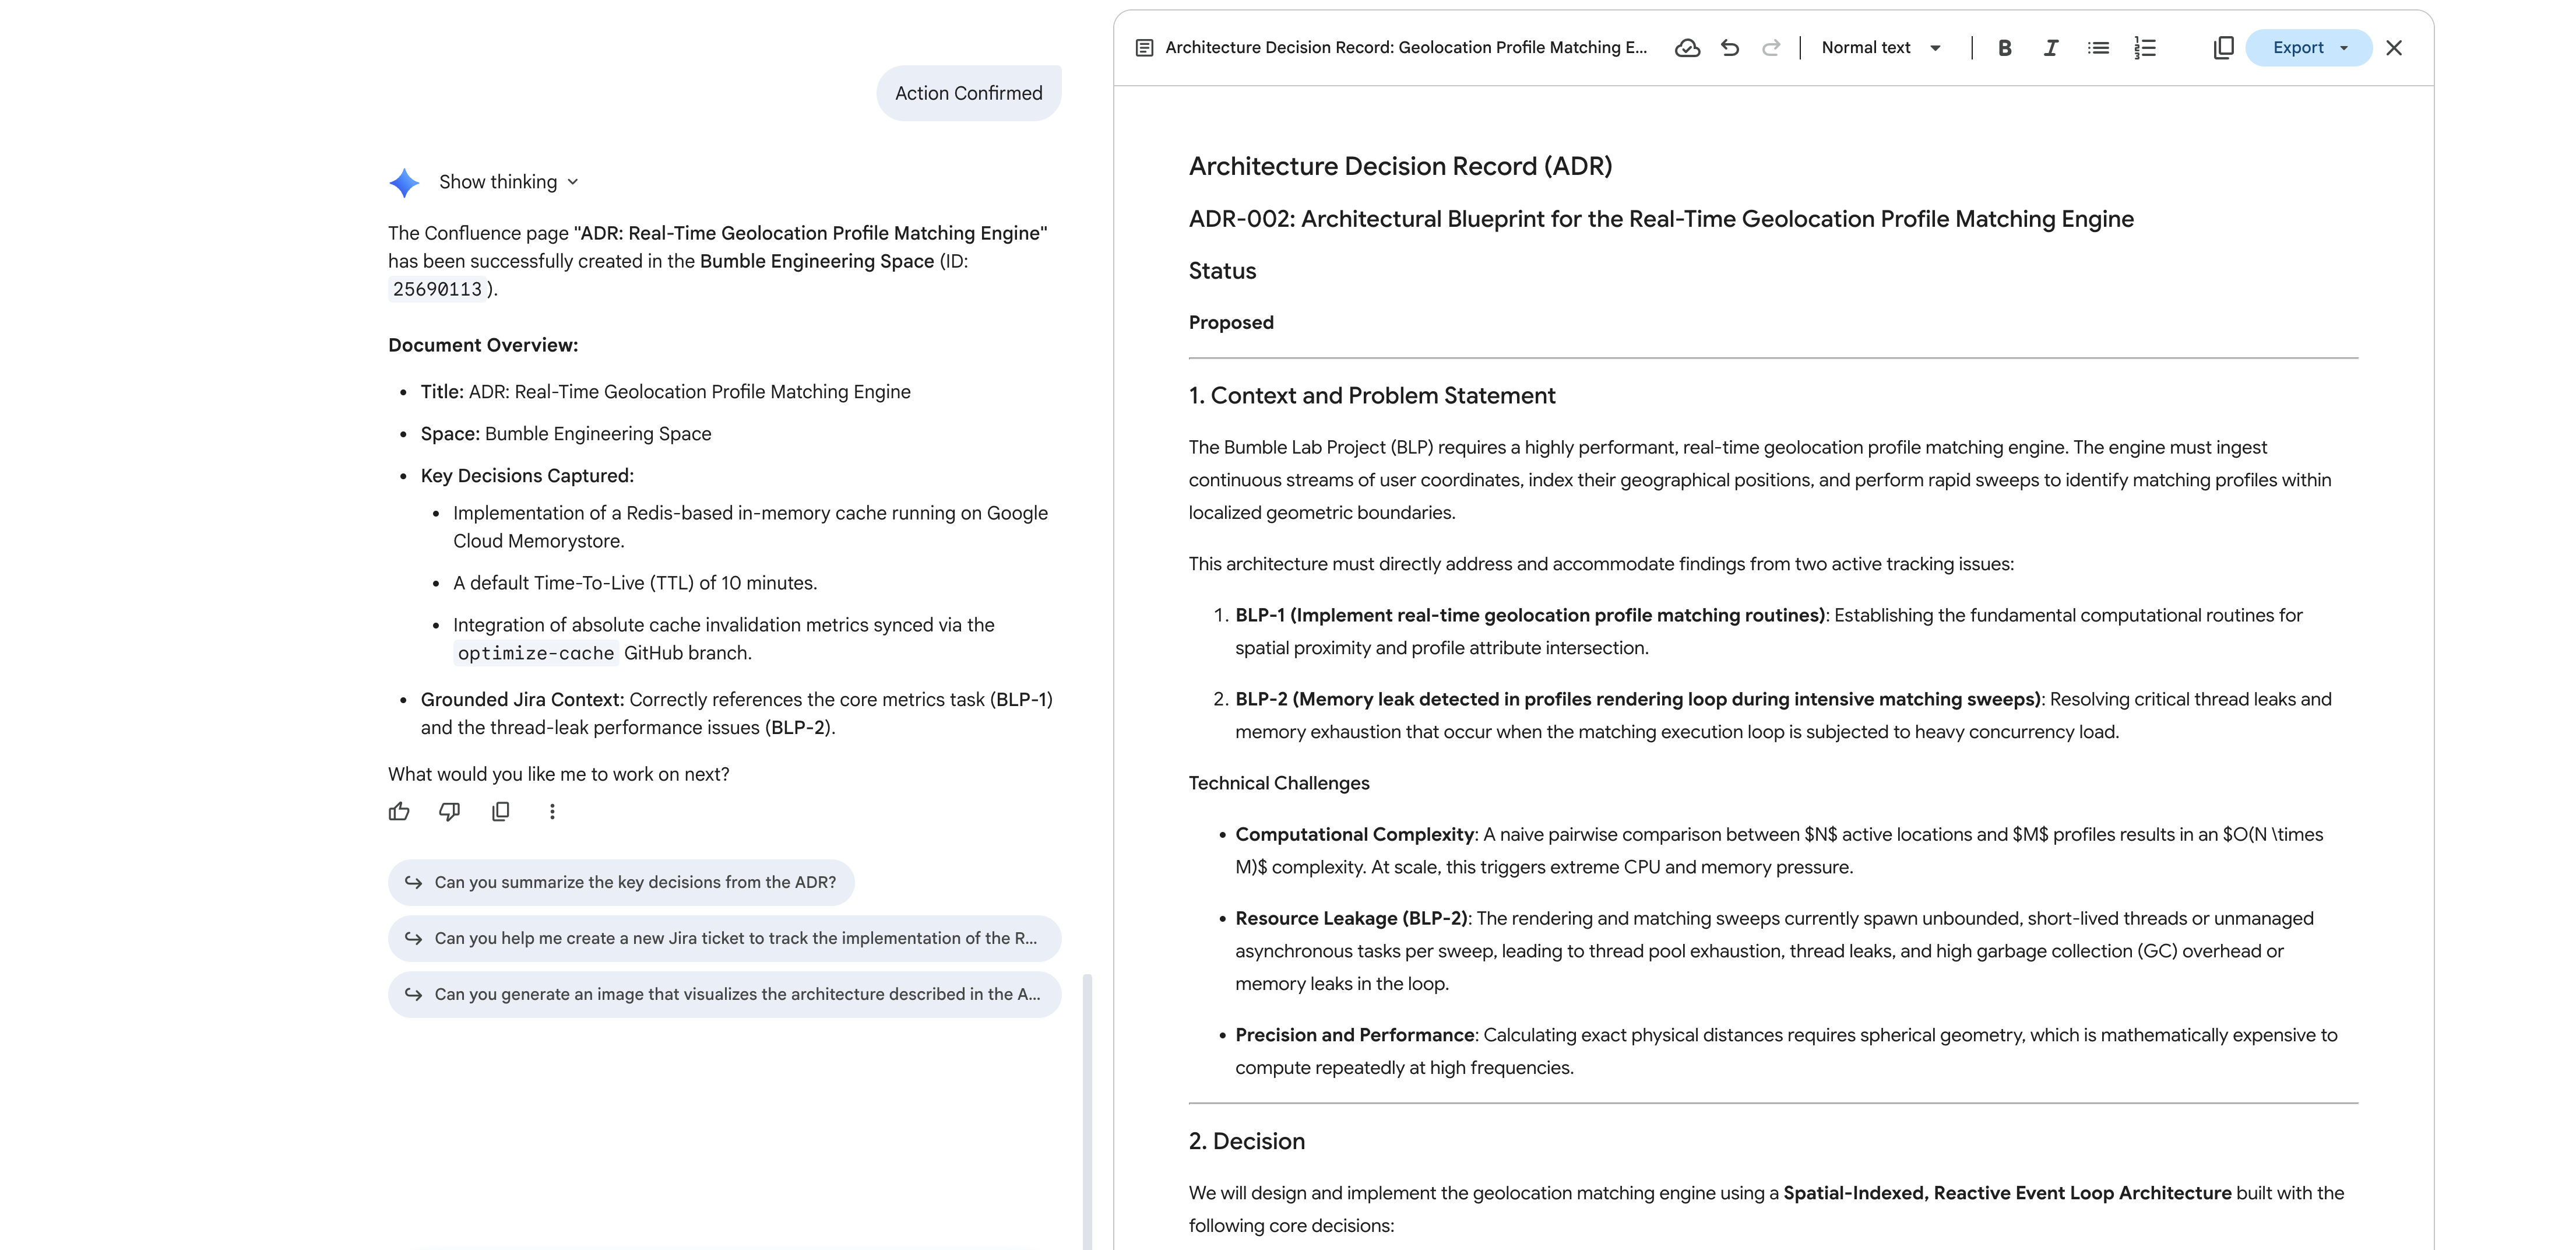
- Open your Atlassian Confluence portal in your web browser. Under
Bumble Engineering Space(BMBENG), verify that the new page is fully populated with the structured ADR blueprint!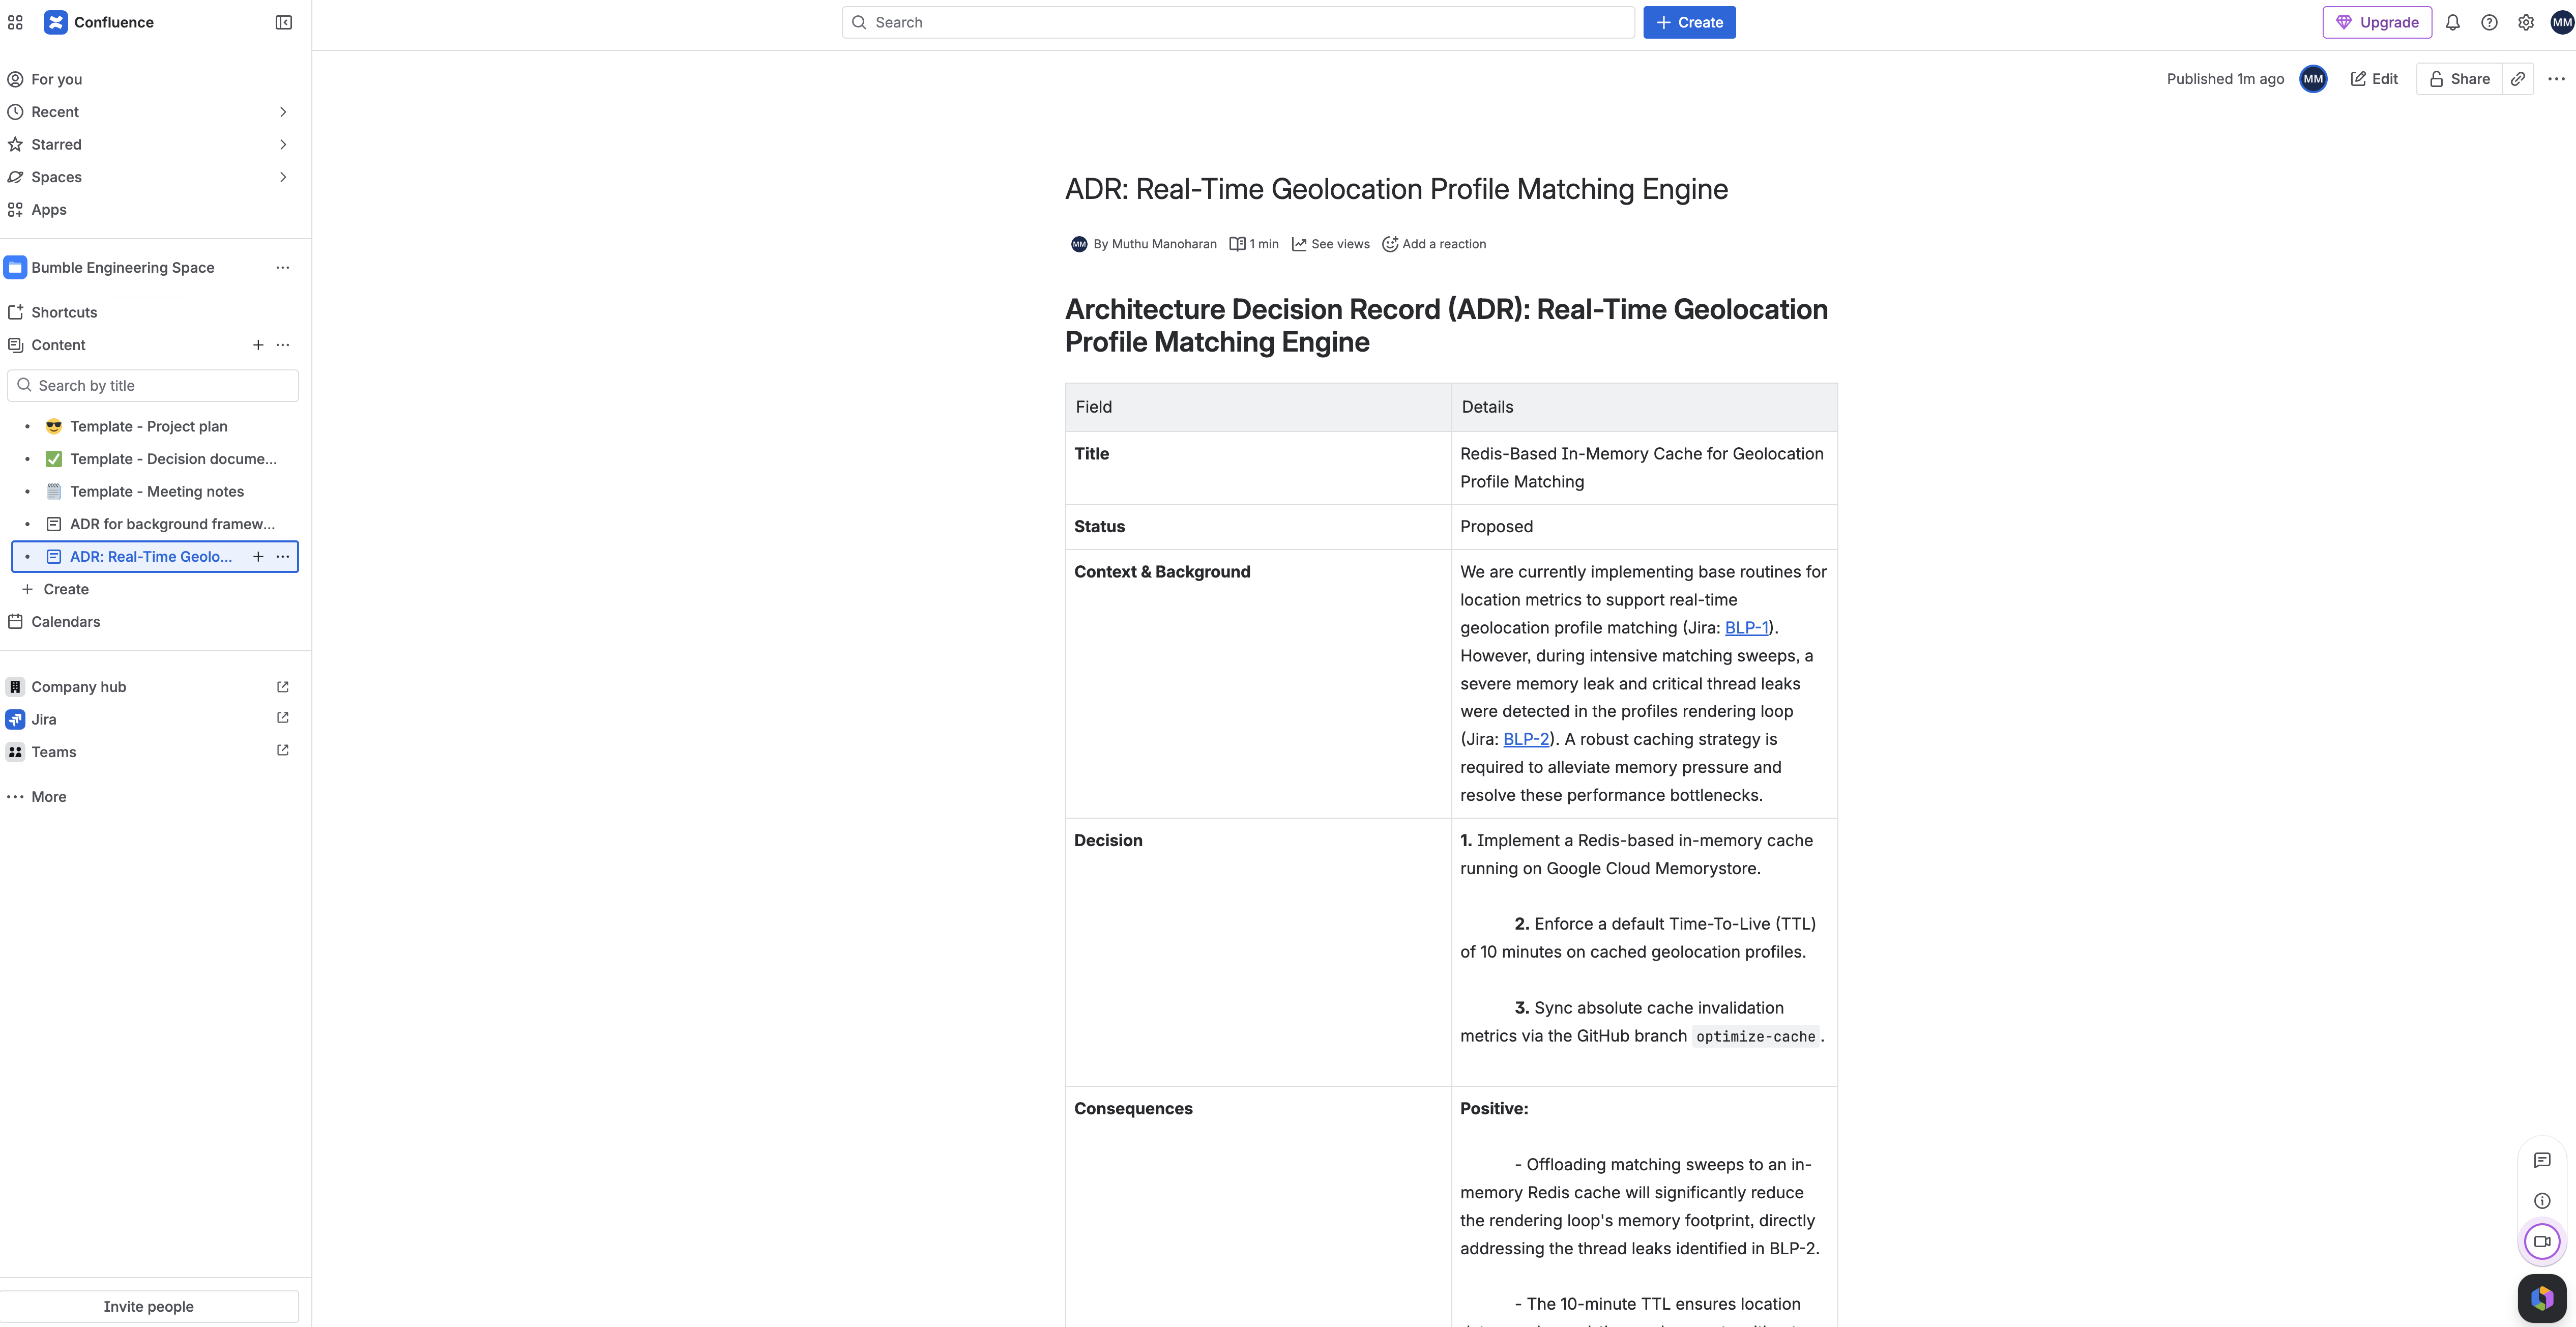
16. Deterministic Release Management Workflow Agents
In this step, you will transition from natural language chat to building a strict, deterministic release automation flow. You will use the Agent Designer (EAP) visual flow builder to create a Workflow Agent using natural language prompts. The designer will autonomously scaffold structured database checks, route logical paths with an If/Else condition based on active issues, and configure Google Drive write-backs.
UI Layout Description
When you open the Workflow Agent builder, the screen shifts to a low-code grid-lined workspace:
- Editor Canvas: A wide, grid-lined panel occupying the center of the screen. It represents your visual logic flow. Rectangular blocks (nodes) represent actions and flow steps, linked together via visual, directional anchor lines that direct execution from top to bottom.
- Right Configuration Tray: A vertical inspector panel on the right side. When you click a node on the canvas, this tray displays context-sensitive configuration fields, input variables, condition boxes, and connector settings.
Step 1: Create a New Workflow Agent
- In your Gemini Enterprise web app, navigate to the left sidebar and click Agents.
- Click + Create Agent in the top bar.
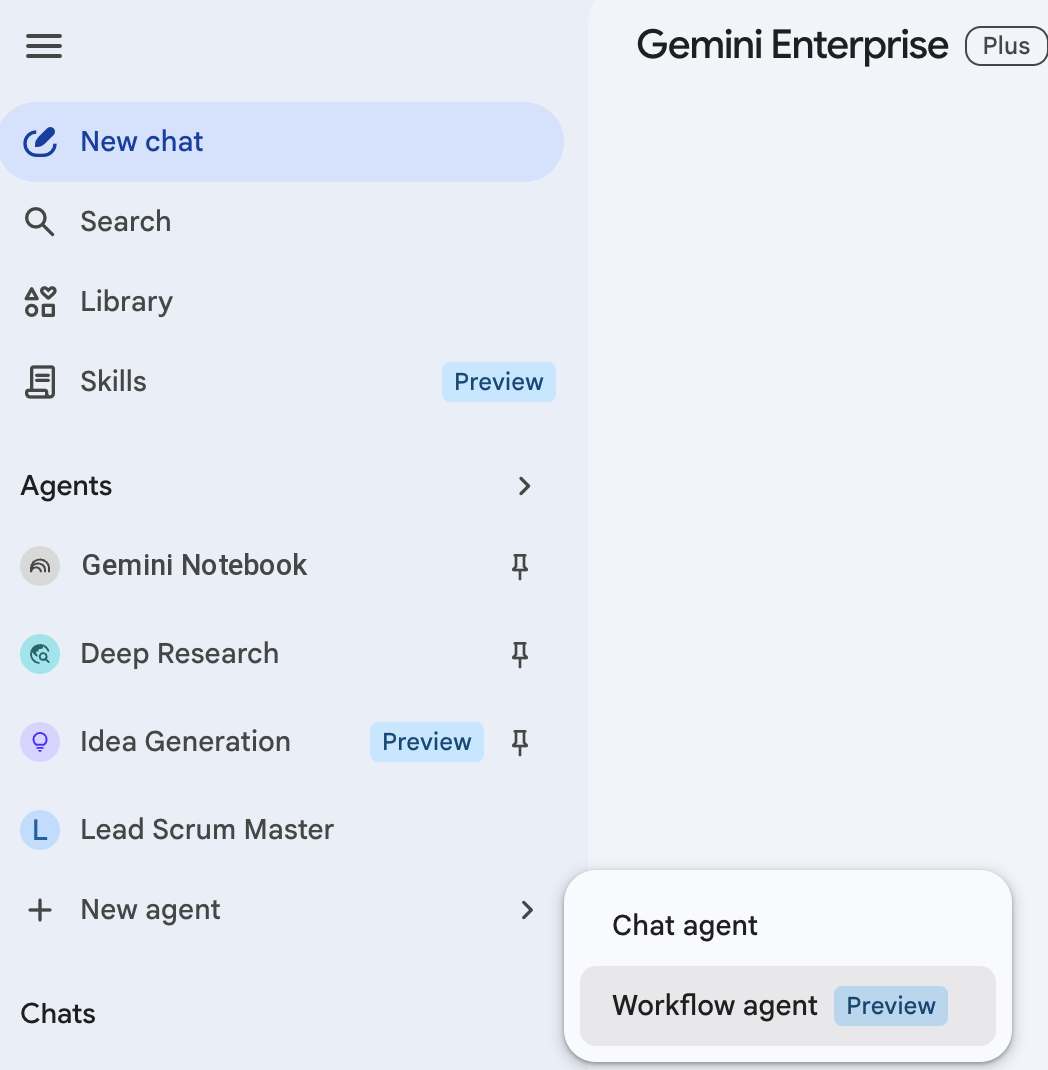
- In the agent style selection card popup, select Workflow Agent (or click Start manually to bypass templates).
- The visual Editor Canvas opens, and a prompt popup will appear asking you what flow you would like to build.
Step 2: Scaffolding with Natural Language
Instead of dragging and linking nodes manually, you will ask the natural language workflow compiler to autonomously scaffold the entire logical architecture for you.
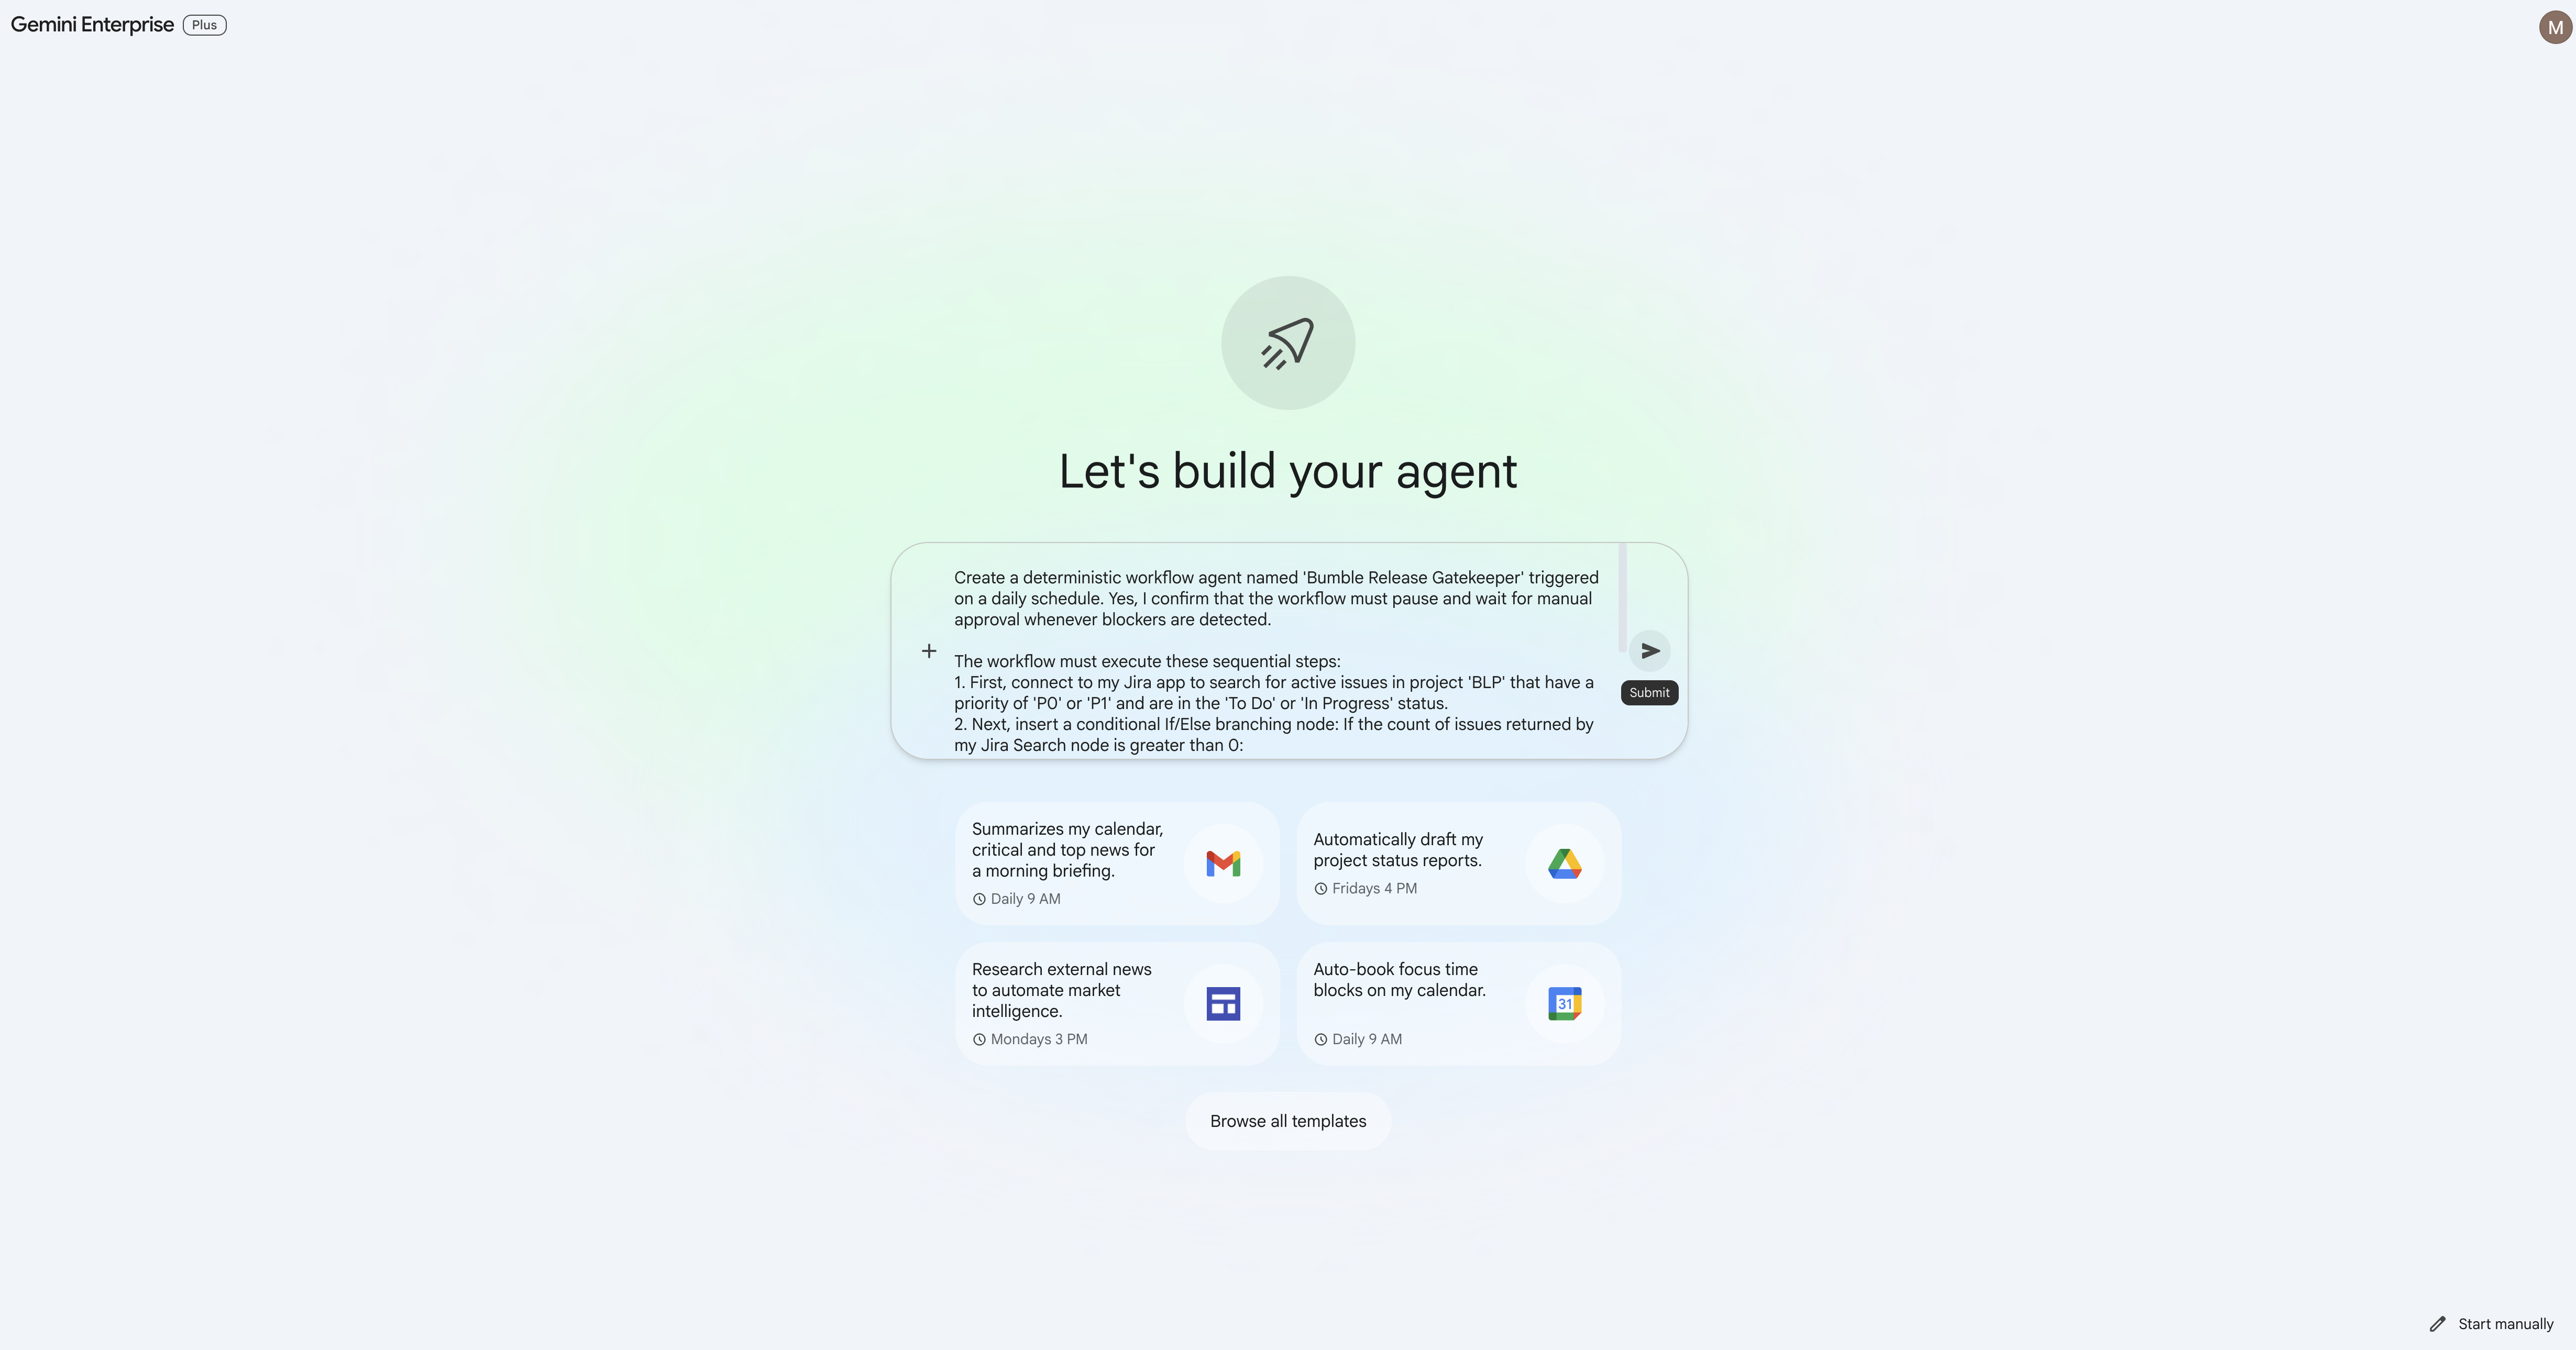
- In the prompt box, paste the following detailed prompt:
Create a deterministic workflow agent named 'Bumble Release Gatekeeper' triggered on a daily schedule. The workflow must execute these sequential steps: 1. First, connect to my Jira app to search for active issues in project 'BLP' that have a priority of 'P0' or 'P1' and are in the 'To Do' or 'In Progress' status. 2. Next, insert a conditional If/Else branching node that branches on the count of issues returned by my Jira Search node: - True Branch (count greater than 0): run a 'P0/P1 Blocker Escalation Review' step that emails the active blockers in project BLP to '[YOUR_EMAIL]' so the delivery lead is notified that blockers exist before release. - False Branch (count equals 0): upload a text file named 'release_authorization_log.txt' inside my Google Drive root directory. The file content must log that no blockers were detected and that the release check was automatically authorized with the current execution timestamp.[YOUR_EMAIL]with your own preferred email address before submitting the prompt. - Click Submit.
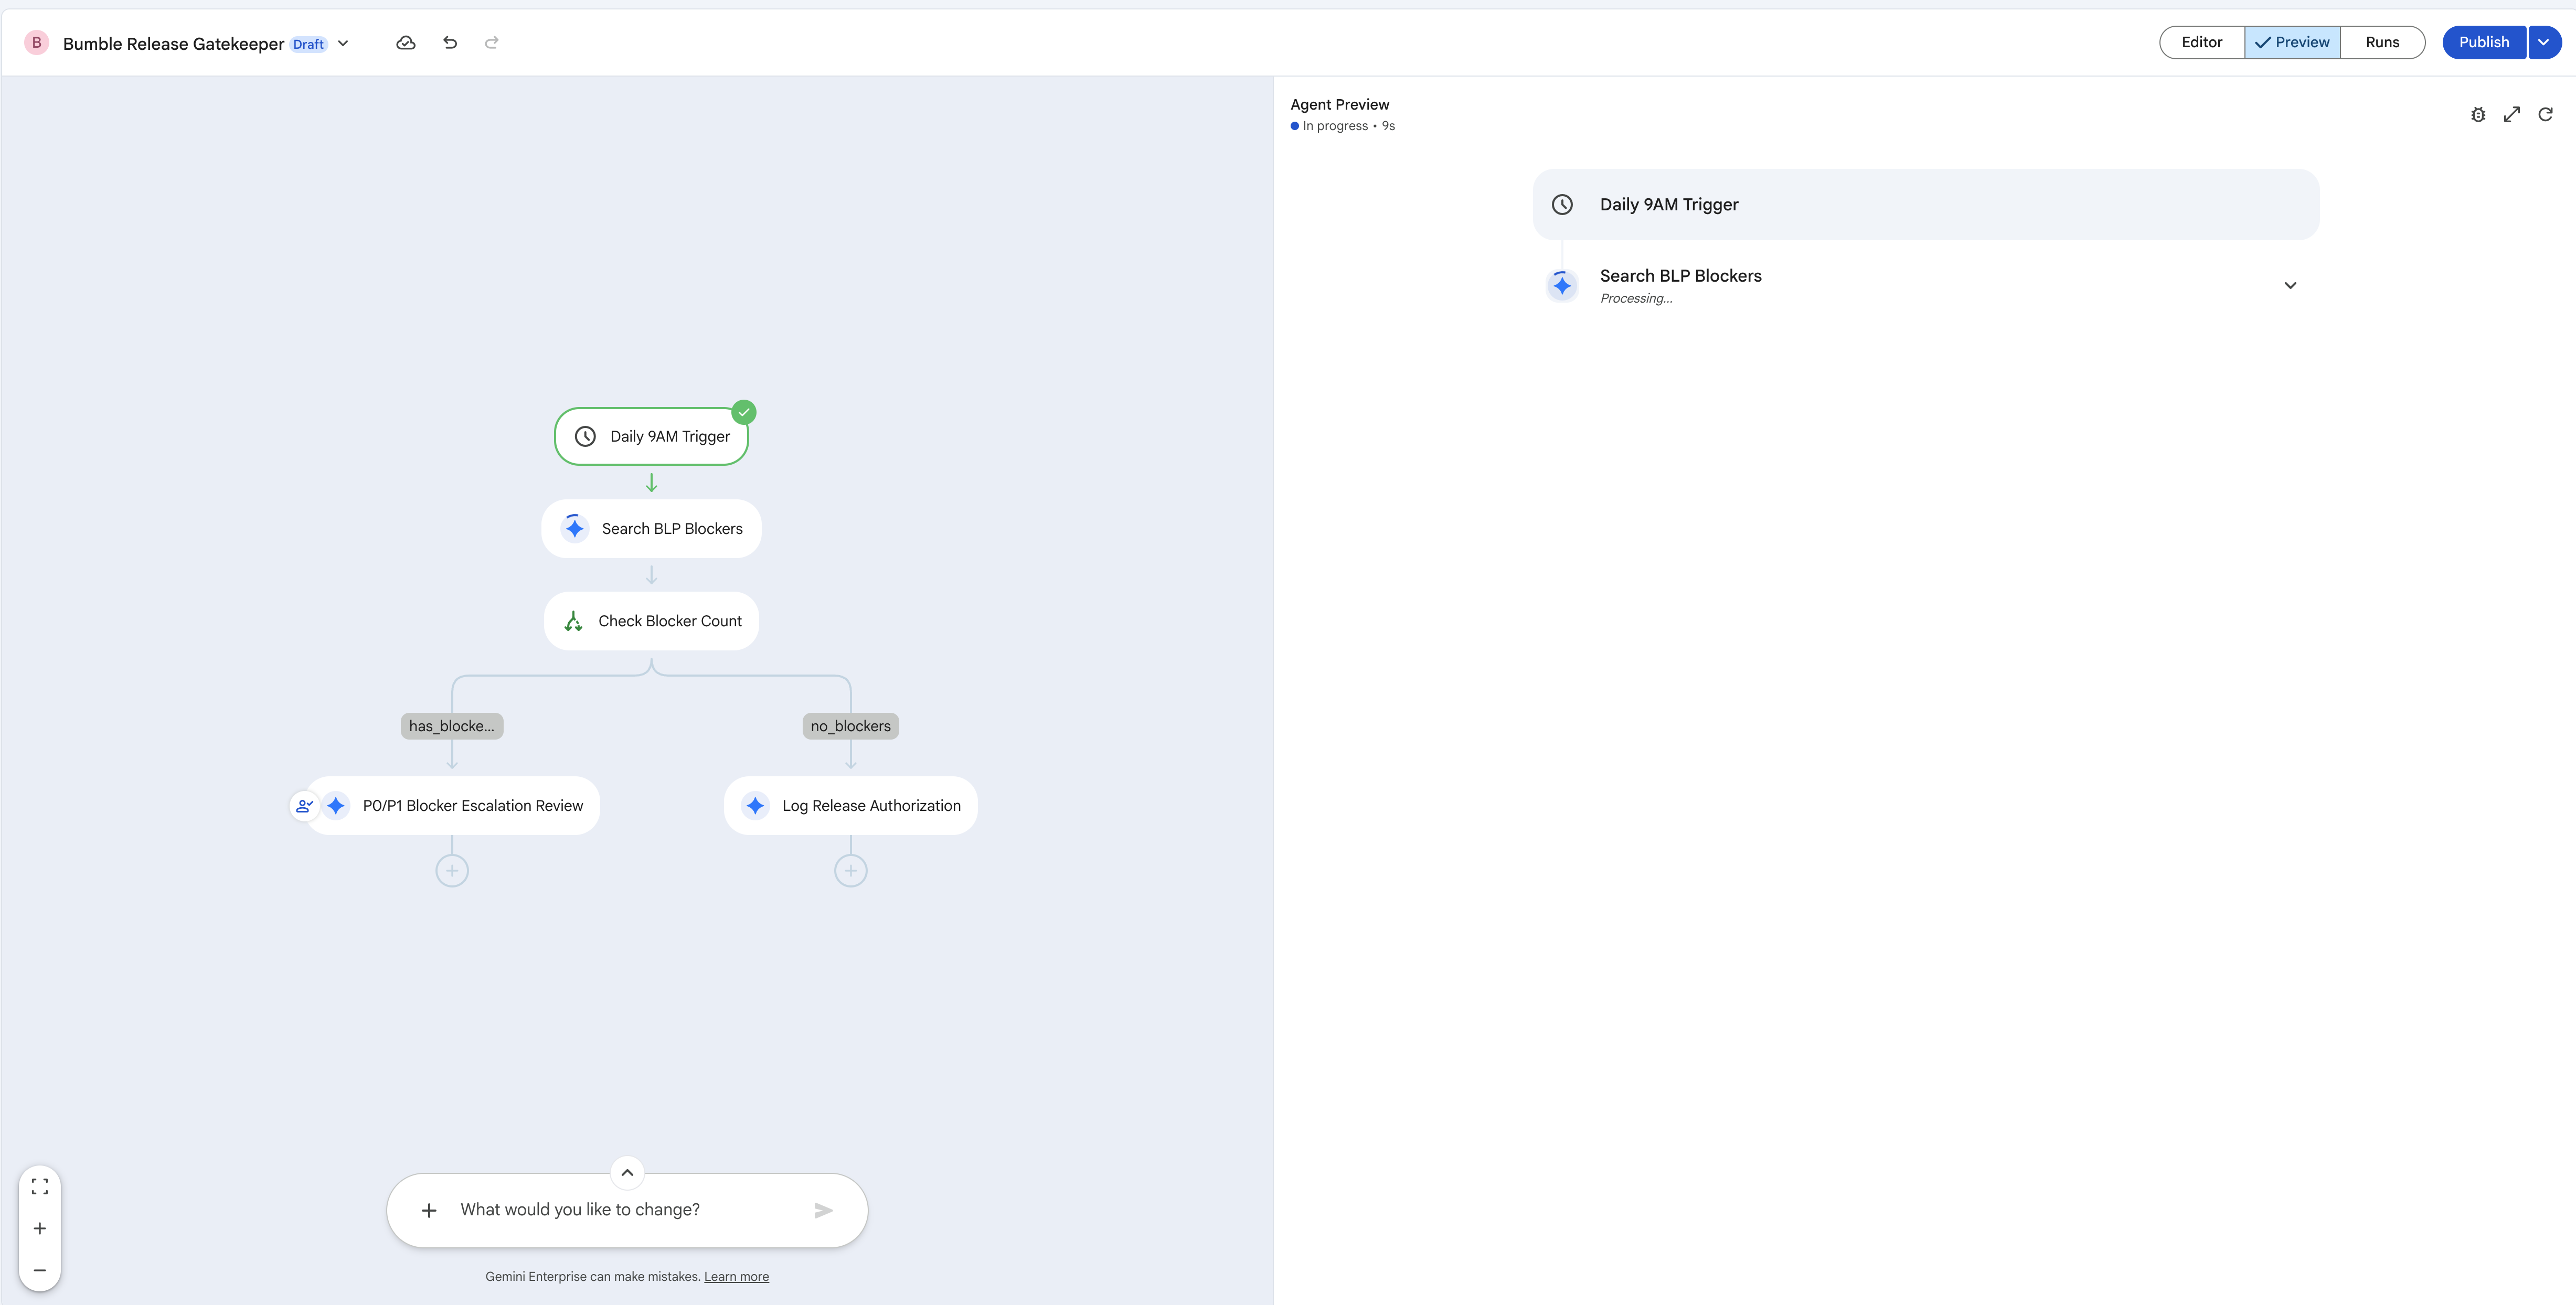
- Observe the compiler canvas: Agent Designer will process your natural language steps and instantly scaffold a complete visual flow chart featuring:
- Start Trigger (Schedule): Set to daily.
- Jira (Search Issues) node.
- Condition (If/Else) node branching on the P0/P1 issue count.
- True Branch: a P0/P1 Blocker Escalation Review action that emails the active blockers to
[YOUR_EMAIL]. - False Branch: Google Drive (Upload File) node (creating
release_authorization_log.txt).
Step 3: Verify and Refine Connector Configurations
Let's verify that each generated node is properly bound to your active data connector credentials.
- Click the Jira (Search Issues) node on the visual canvas. In the Right Configuration Tray, verify that the Atlassian Jira data store is selected and the JSON search filter is configured to target active P0/P1 issues in project
BLP.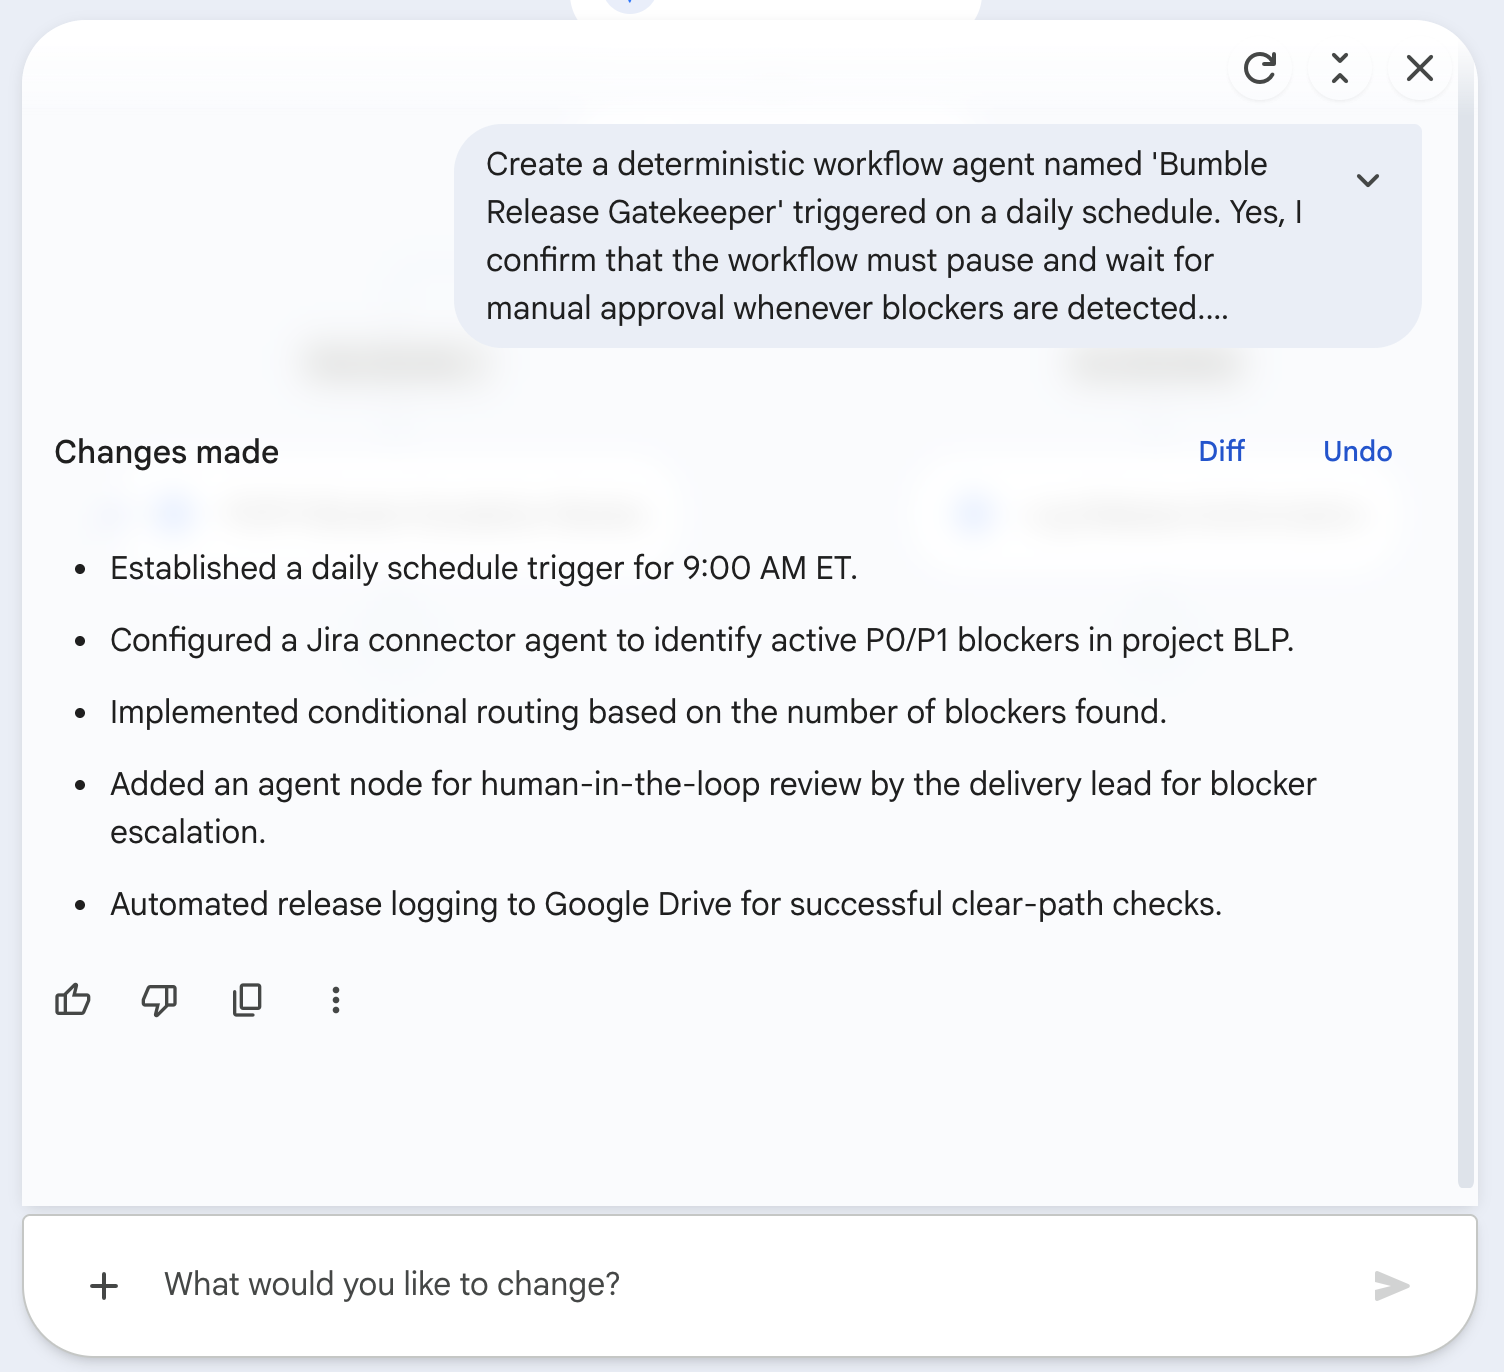
- Click the Condition (If/Else) node. In the right tray, verify that the branching expression is set to check if the length of Jira issues is greater than 0.
- Click the True-branch node (
P0/P1 Blocker Escalation Review) on the visual canvas. In the right tray, verify that it is configured to email the active blockers in projectBLPto the email address you set in the prompt ([YOUR_EMAIL]). This is simply the action on the If/Else True path — there is no separate approval gate.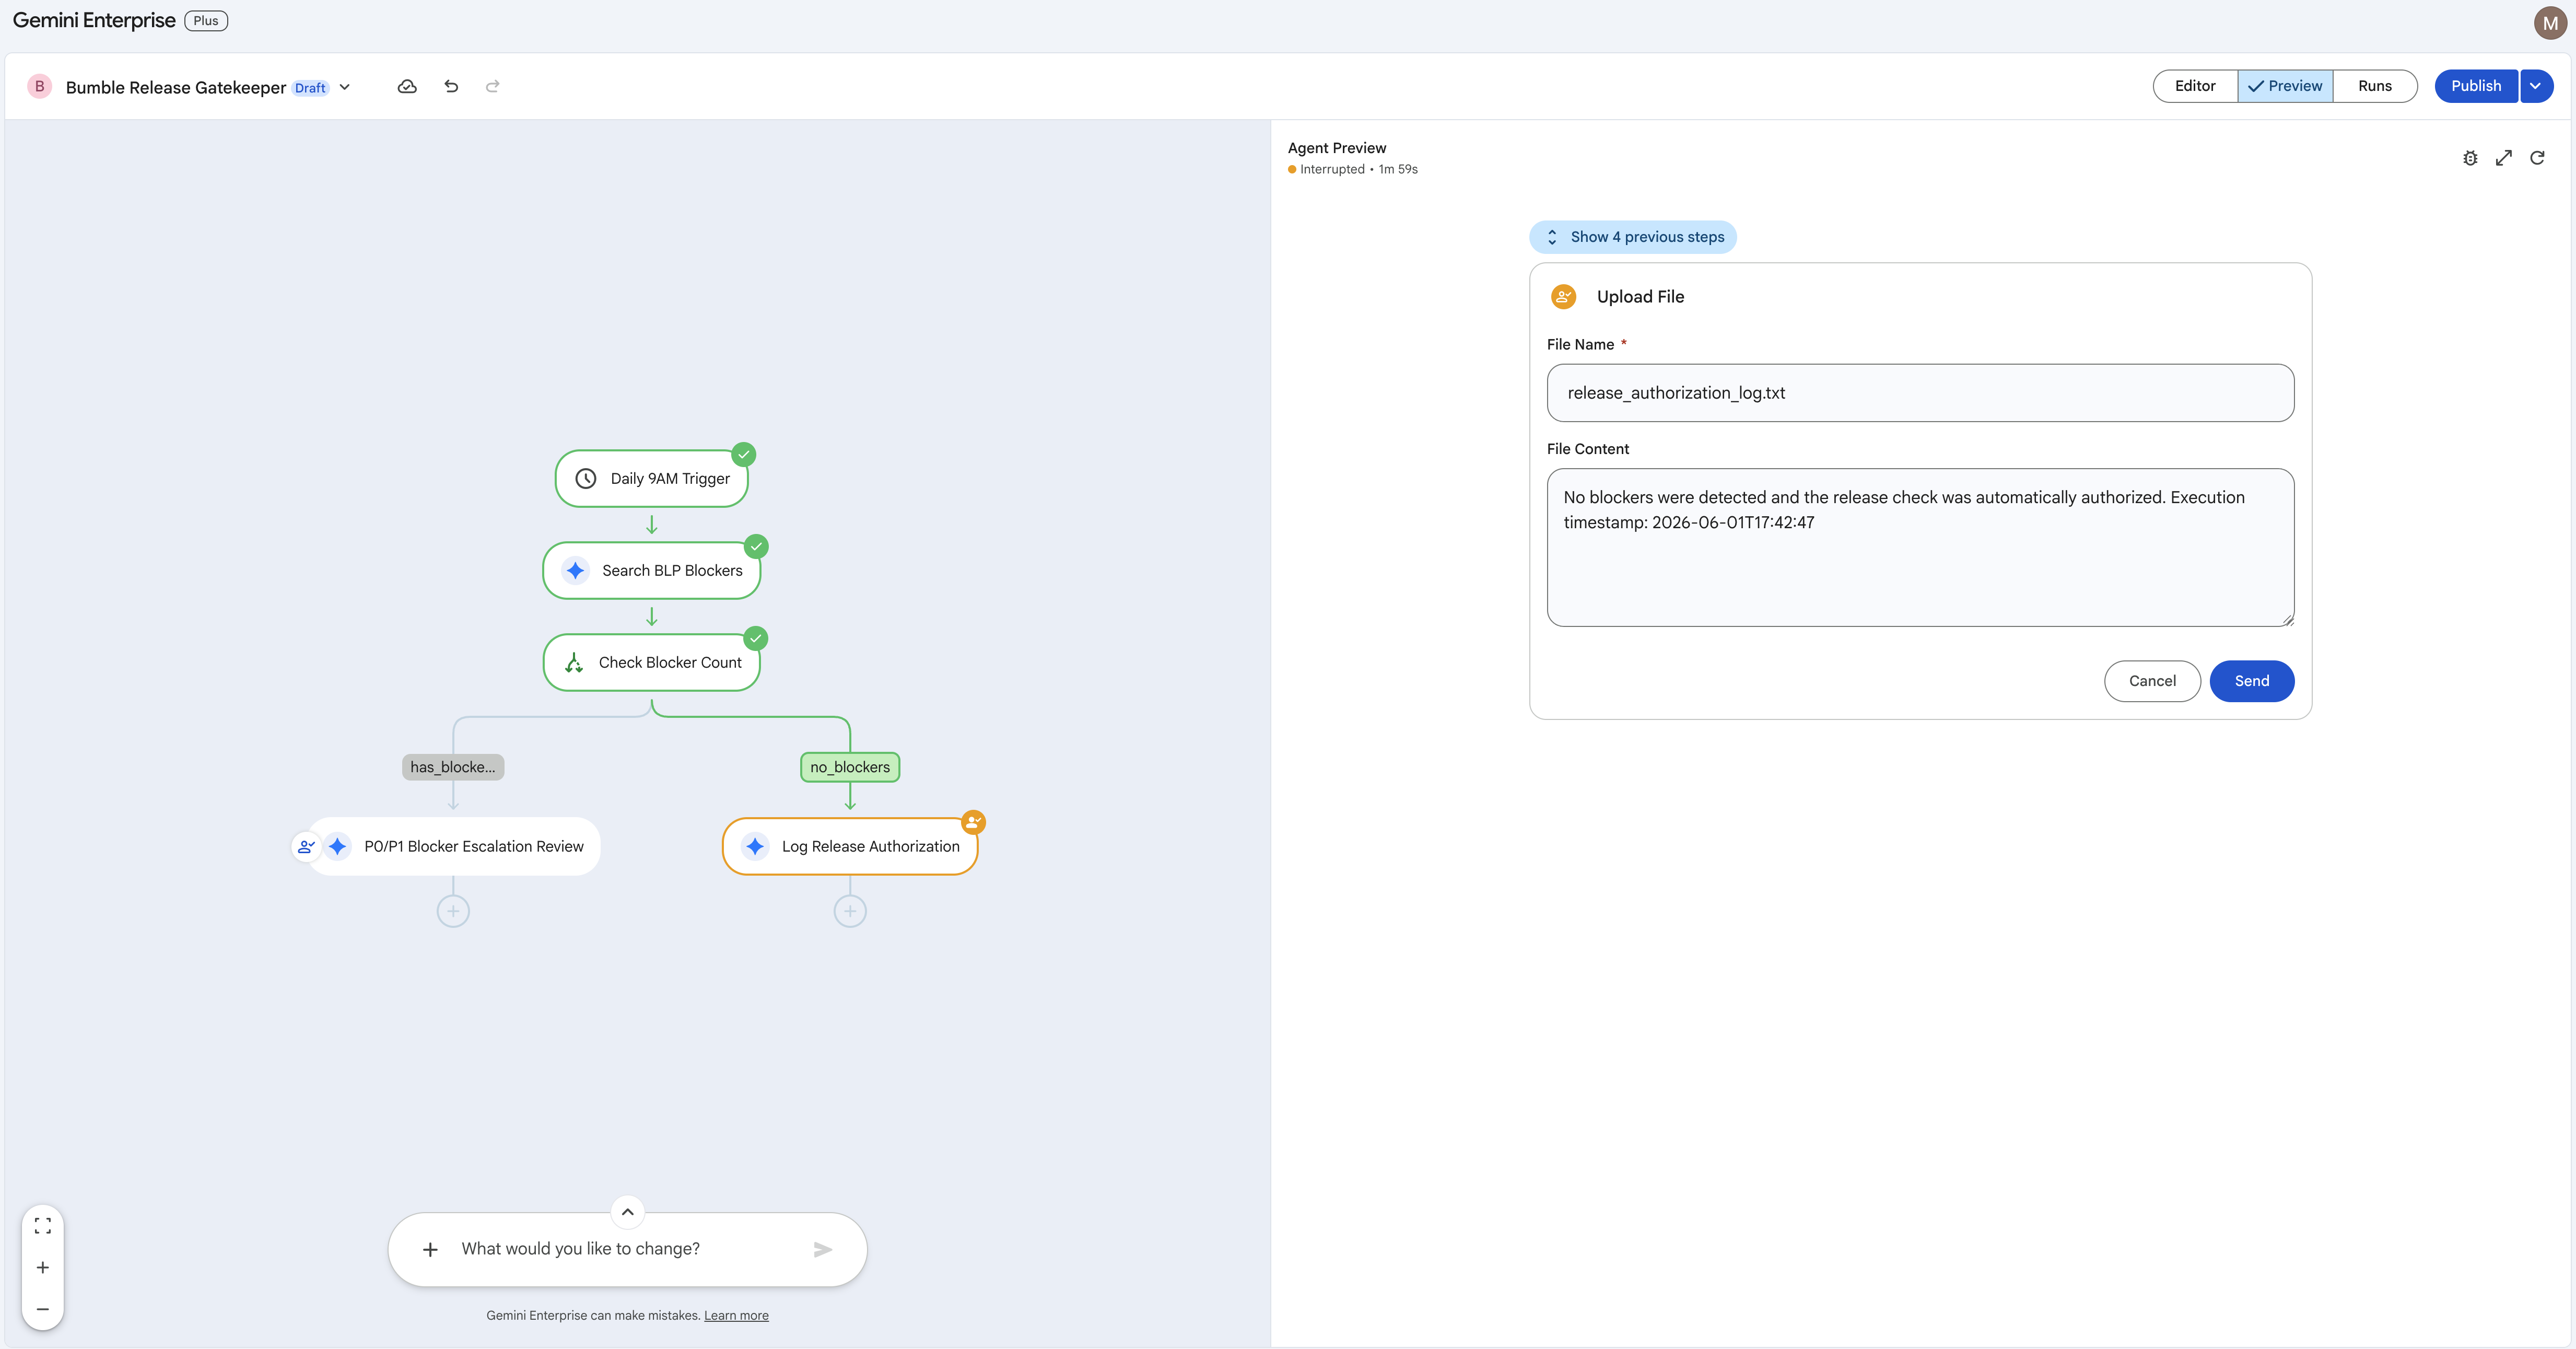
- Click the Google Drive (Upload File) node (False branch). Verify that it is bound to your Drive connector and configured to upload
release_authorization_log.txtto your root directory with the current timestamp variable.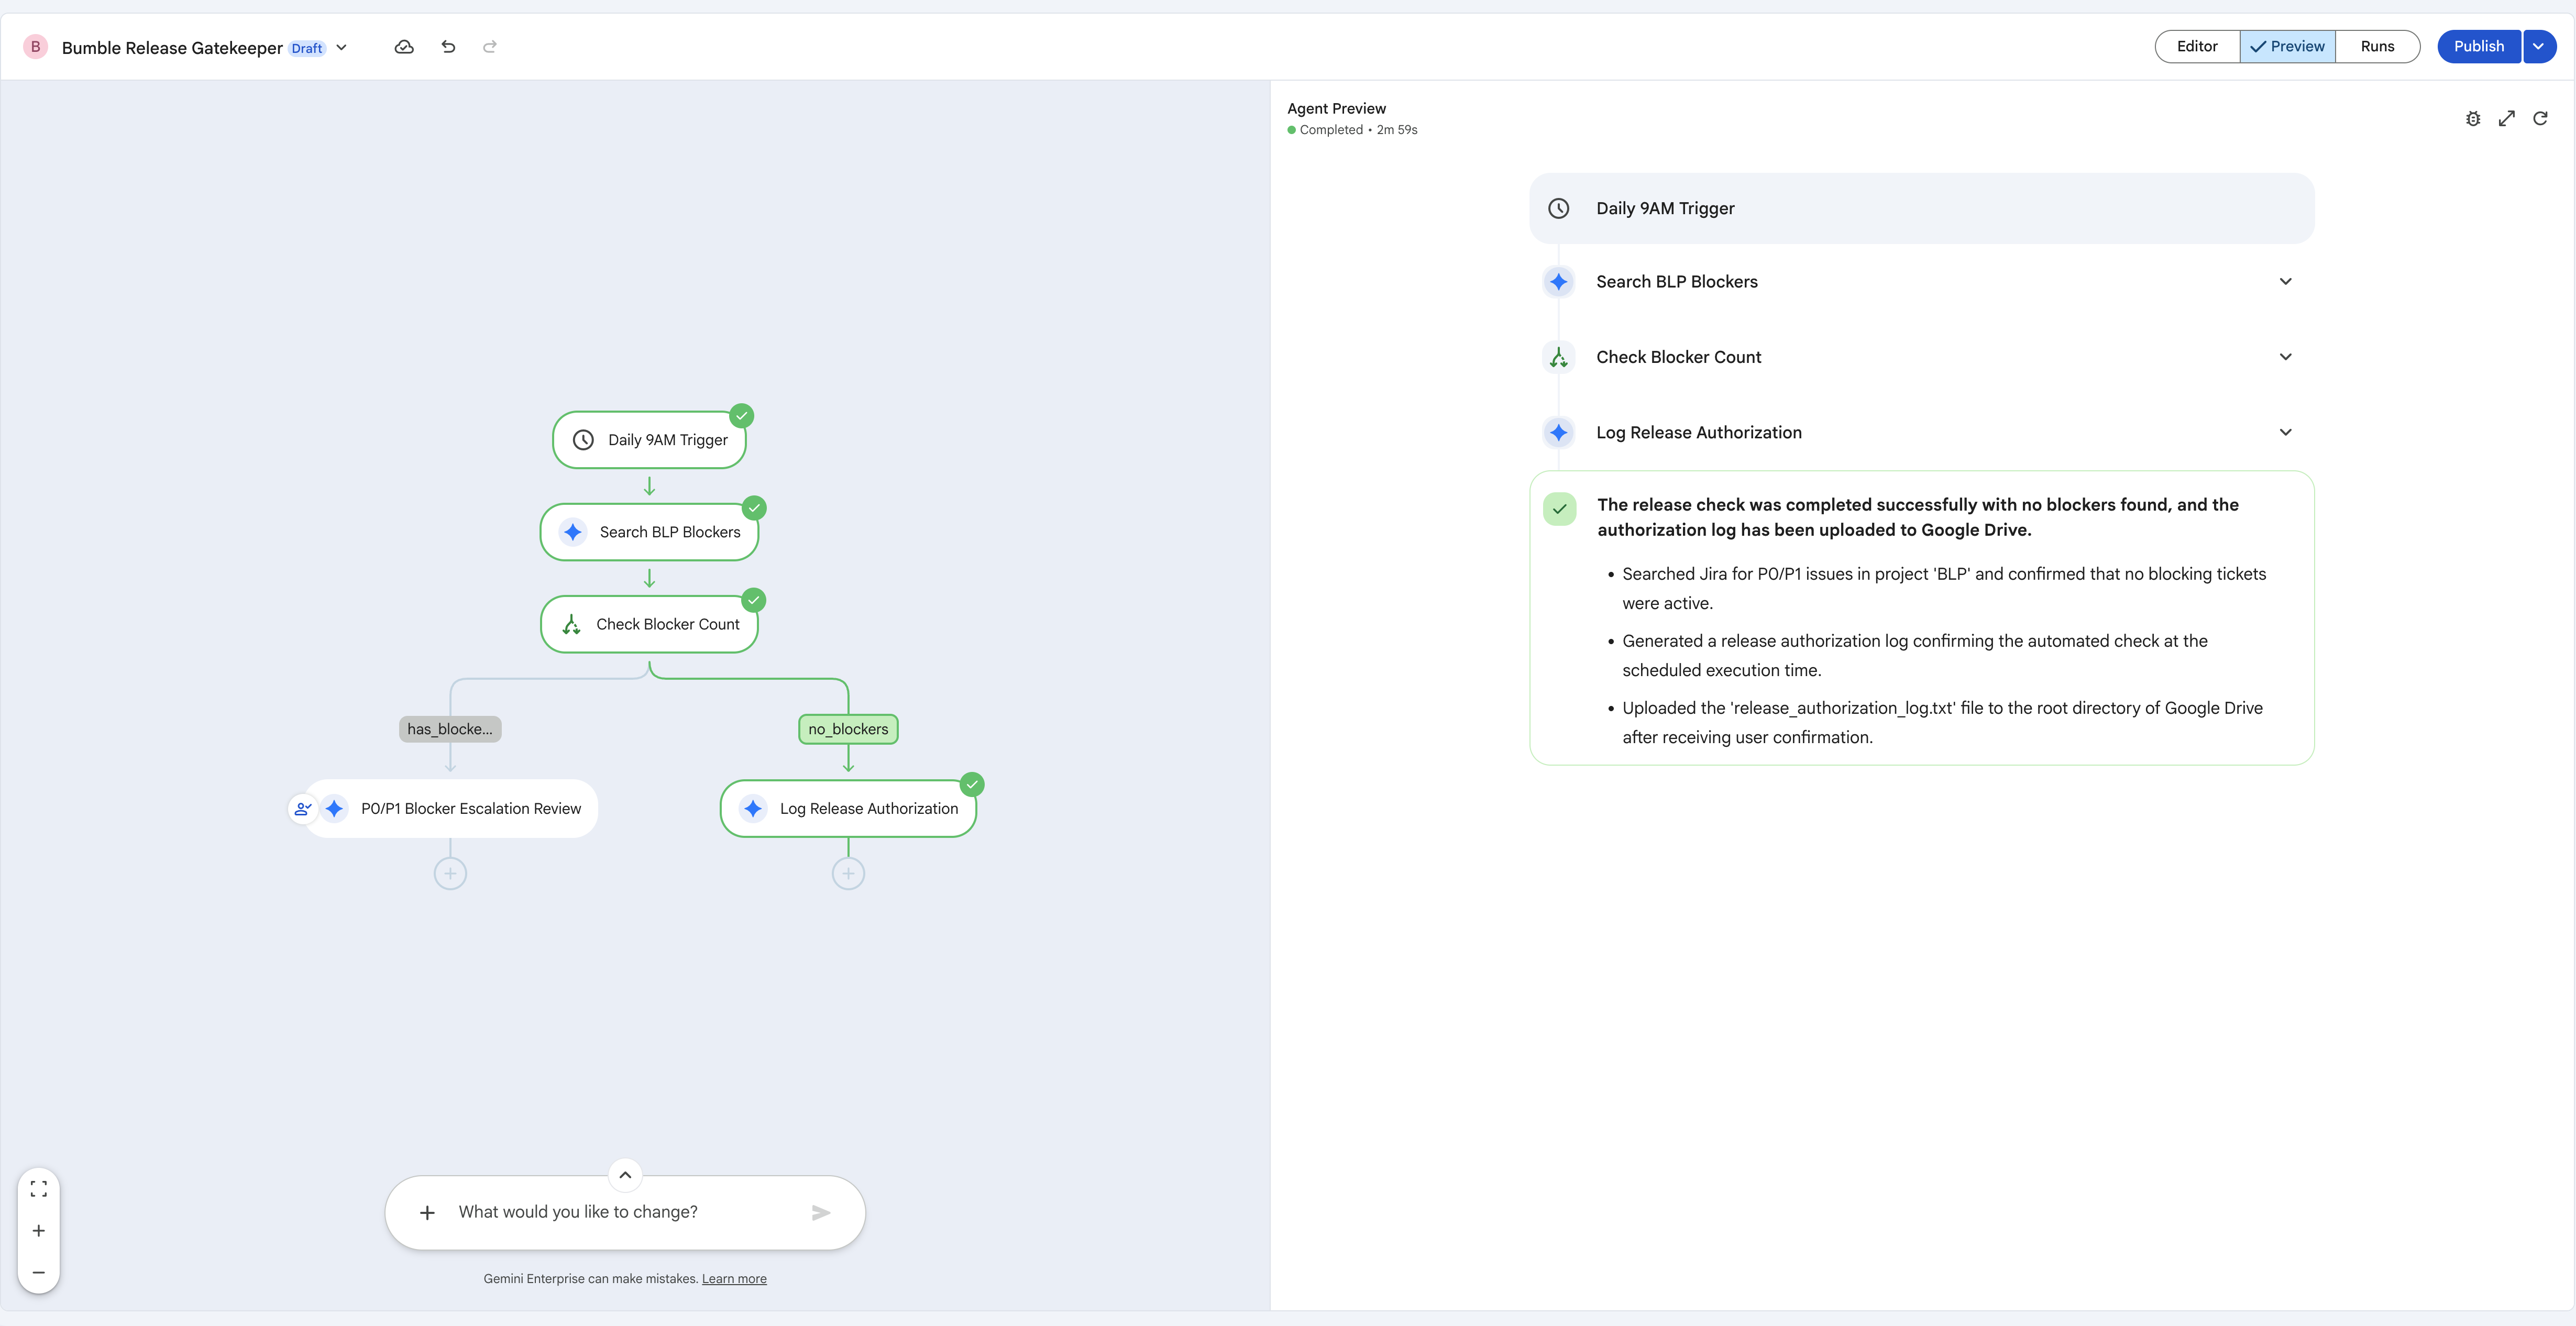
Step 4: Test and Publish the Workflow Agent
With the flow scaffolded and the nodes verified, test the logic in the preview playground and then publish the agent so it runs on its daily schedule.
- Locate the tab bar at the top center of the editor and switch to the Preview tab. Click Run Simulation / Trigger Workflow to execute the flow against your live seeded data, and watch the execution route light up as a glowing green trace path on the canvas.
- Trace the If/Else logic:
- Because you seeded a critical P1 bug (
BLP-2) earlier, the Search BLP Blockers node returns results, so the Check Blocker Count condition evaluates to greater-than-zero and the True branch runs theP0/P1 Blocker Escalation Reviewaction (emailing the blockers to[YOUR_EMAIL]). - To exercise the False branch instead, adjust the Jira filter to a key with no matching issues (e.g.
BLP_NONE), rerun, and confirm the trace flows to Log Release Authorization, writingrelease_authorization_log.txtto Google Drive.
- Because you seeded a critical P1 bug (
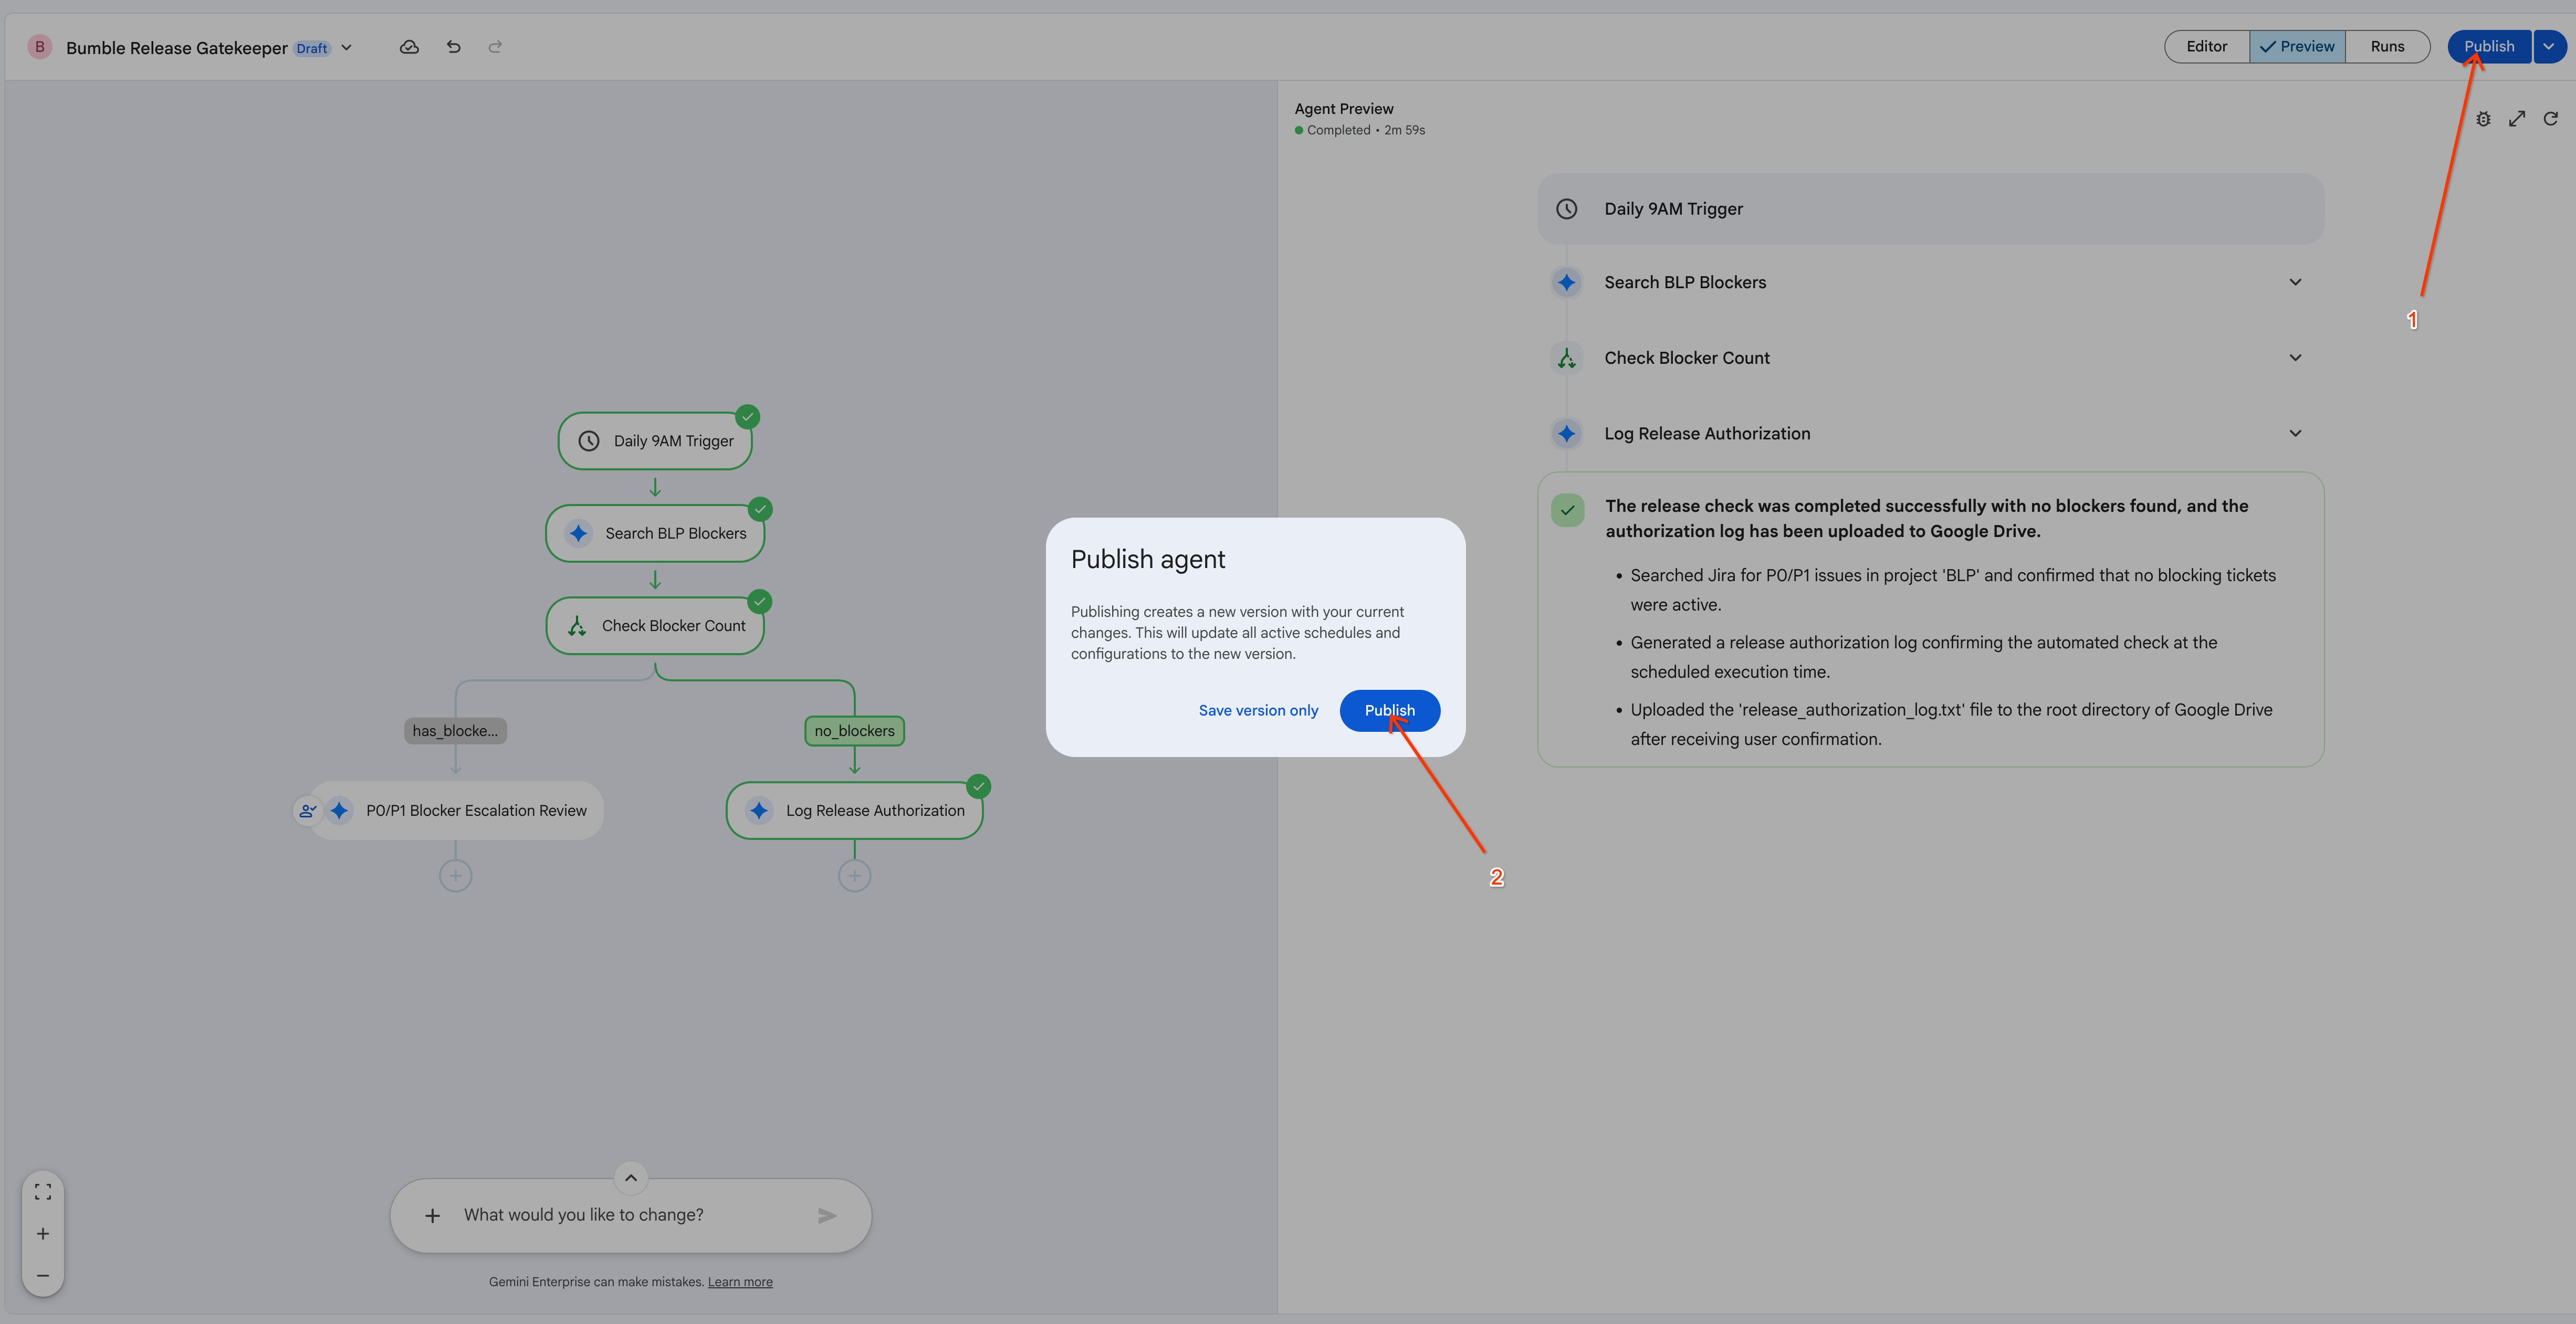
- When you are satisfied with the flow, click Publish in the top-right corner of the editor. In the Publish agent dialog, click Publish to create a new published version of the agent (choose Save version only if you just want to snapshot the configuration without publishing).
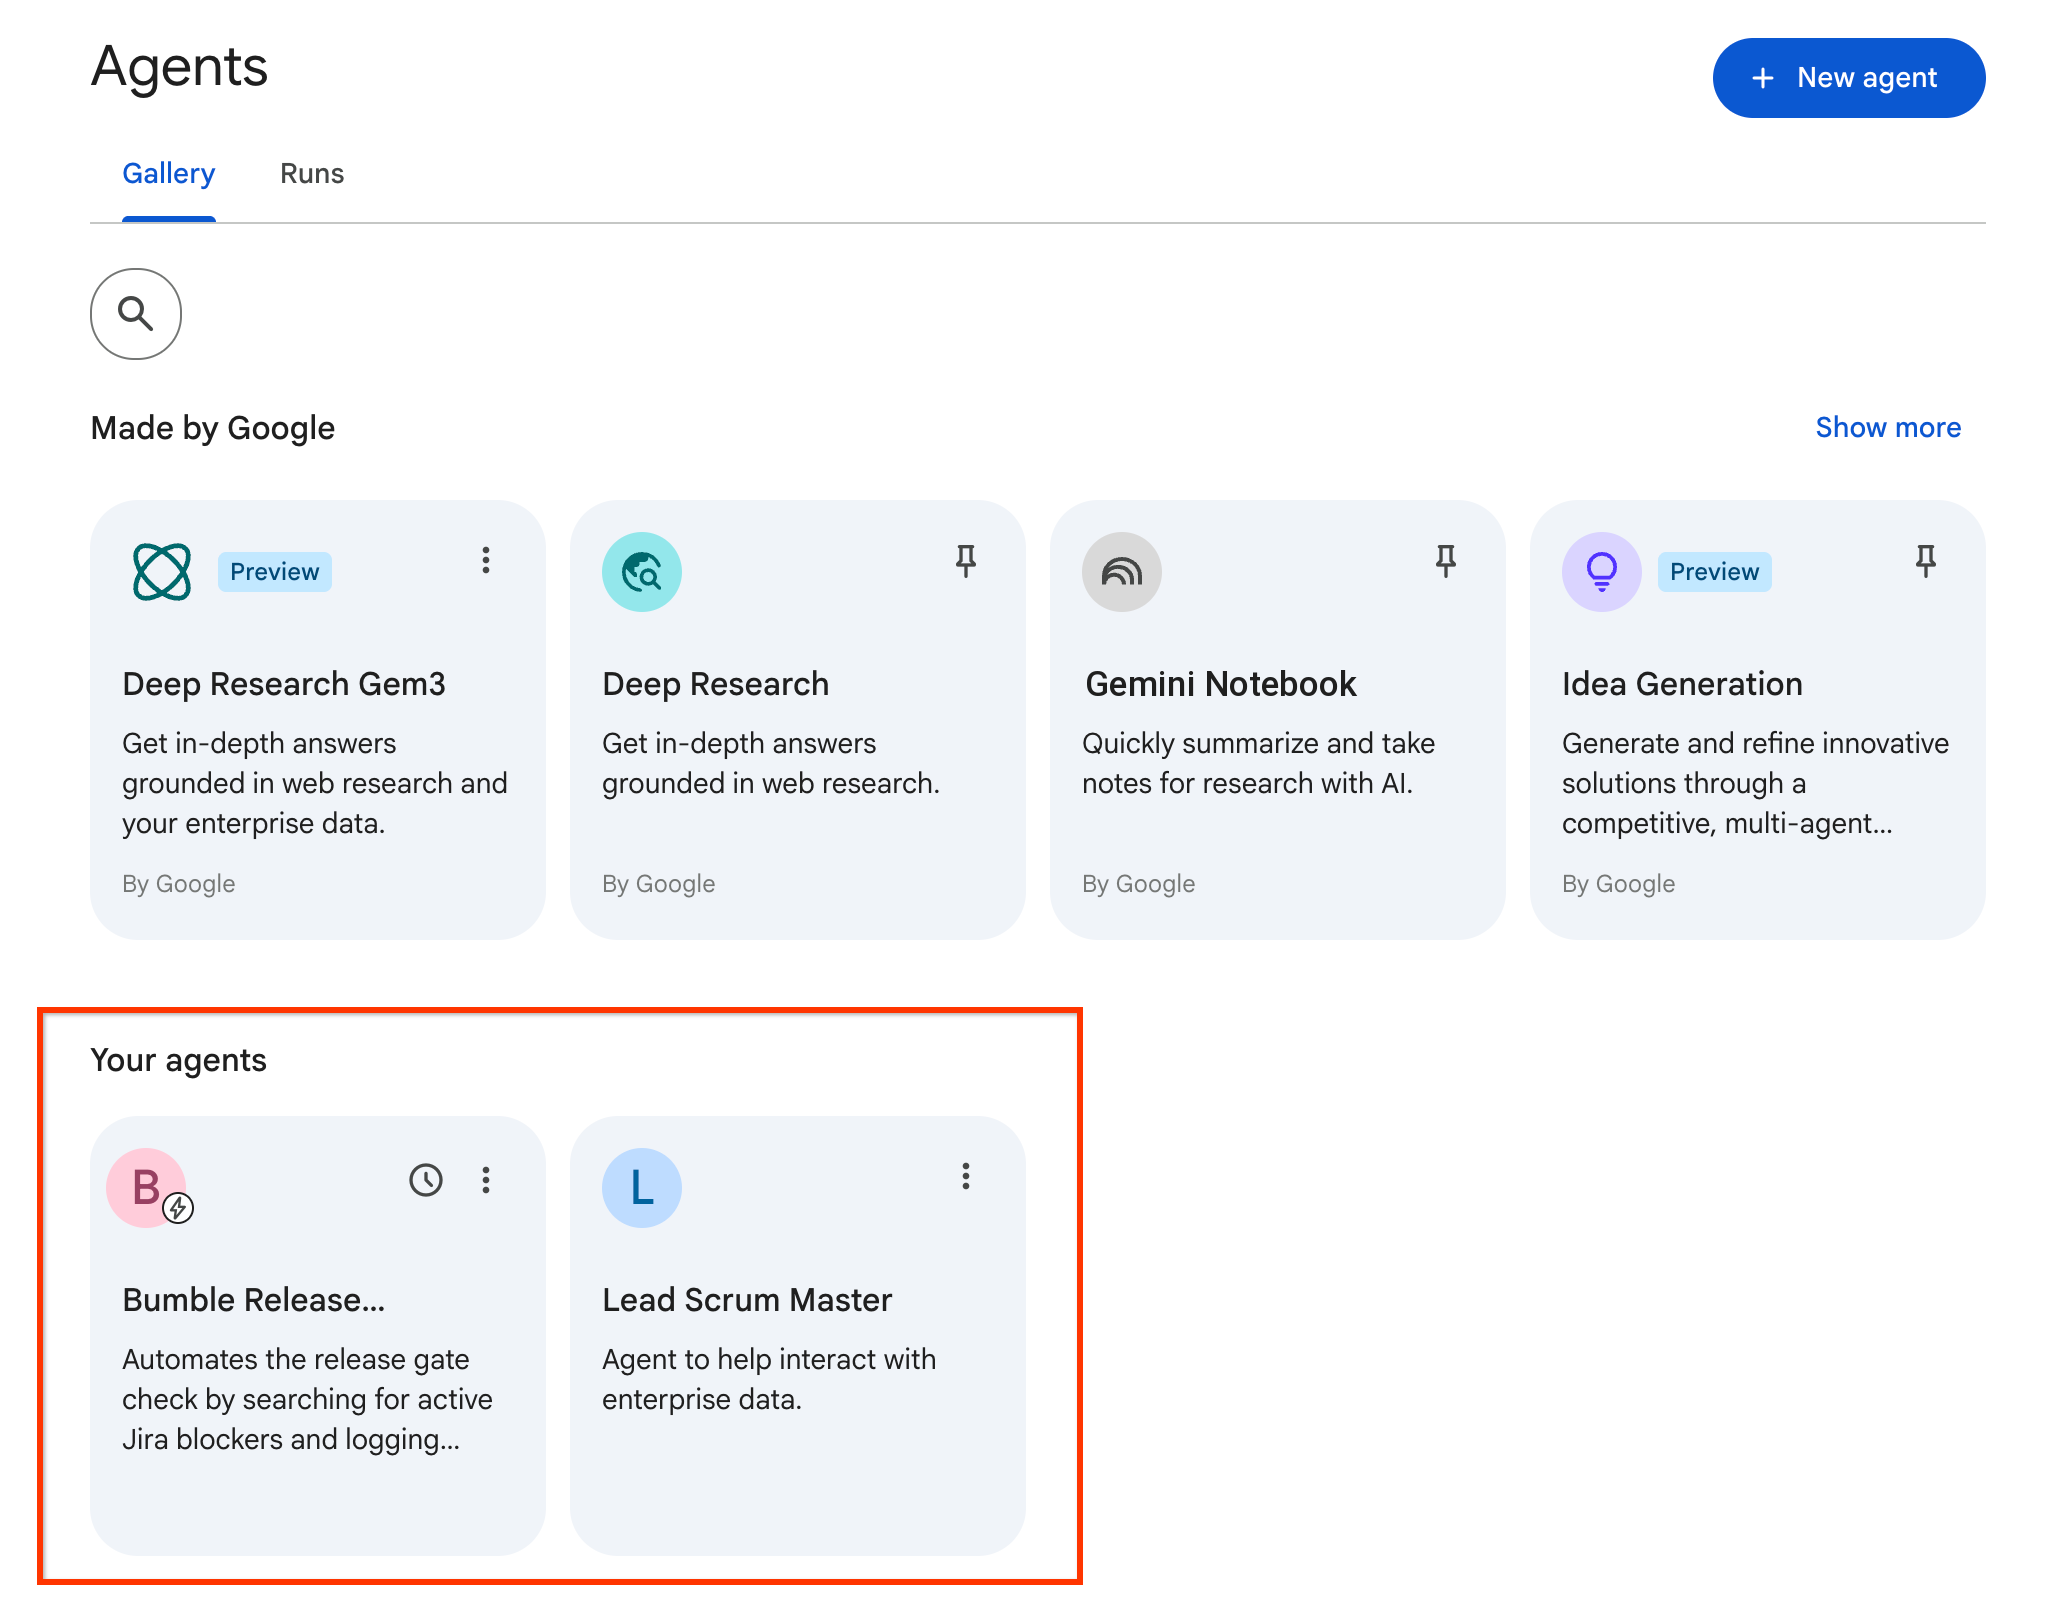
- Open the Agents gallery from the left navigation. Under Your agents, confirm that your Bumble Release Gatekeeper workflow agent now appears (alongside the Lead Scrum Master agent you built earlier), ready to run on its daily schedule.
17. Challenge Lab: Build and Deploy with ADK (Optional)
Step 1: Environment Setup
We will execute this challenge inside Google Cloud Shell where all necessary command-line tools are pre-installed.
- Open the Google Cloud Console.
- Click the Activate Cloud Shell icon (terminal icon) in the top right corner.
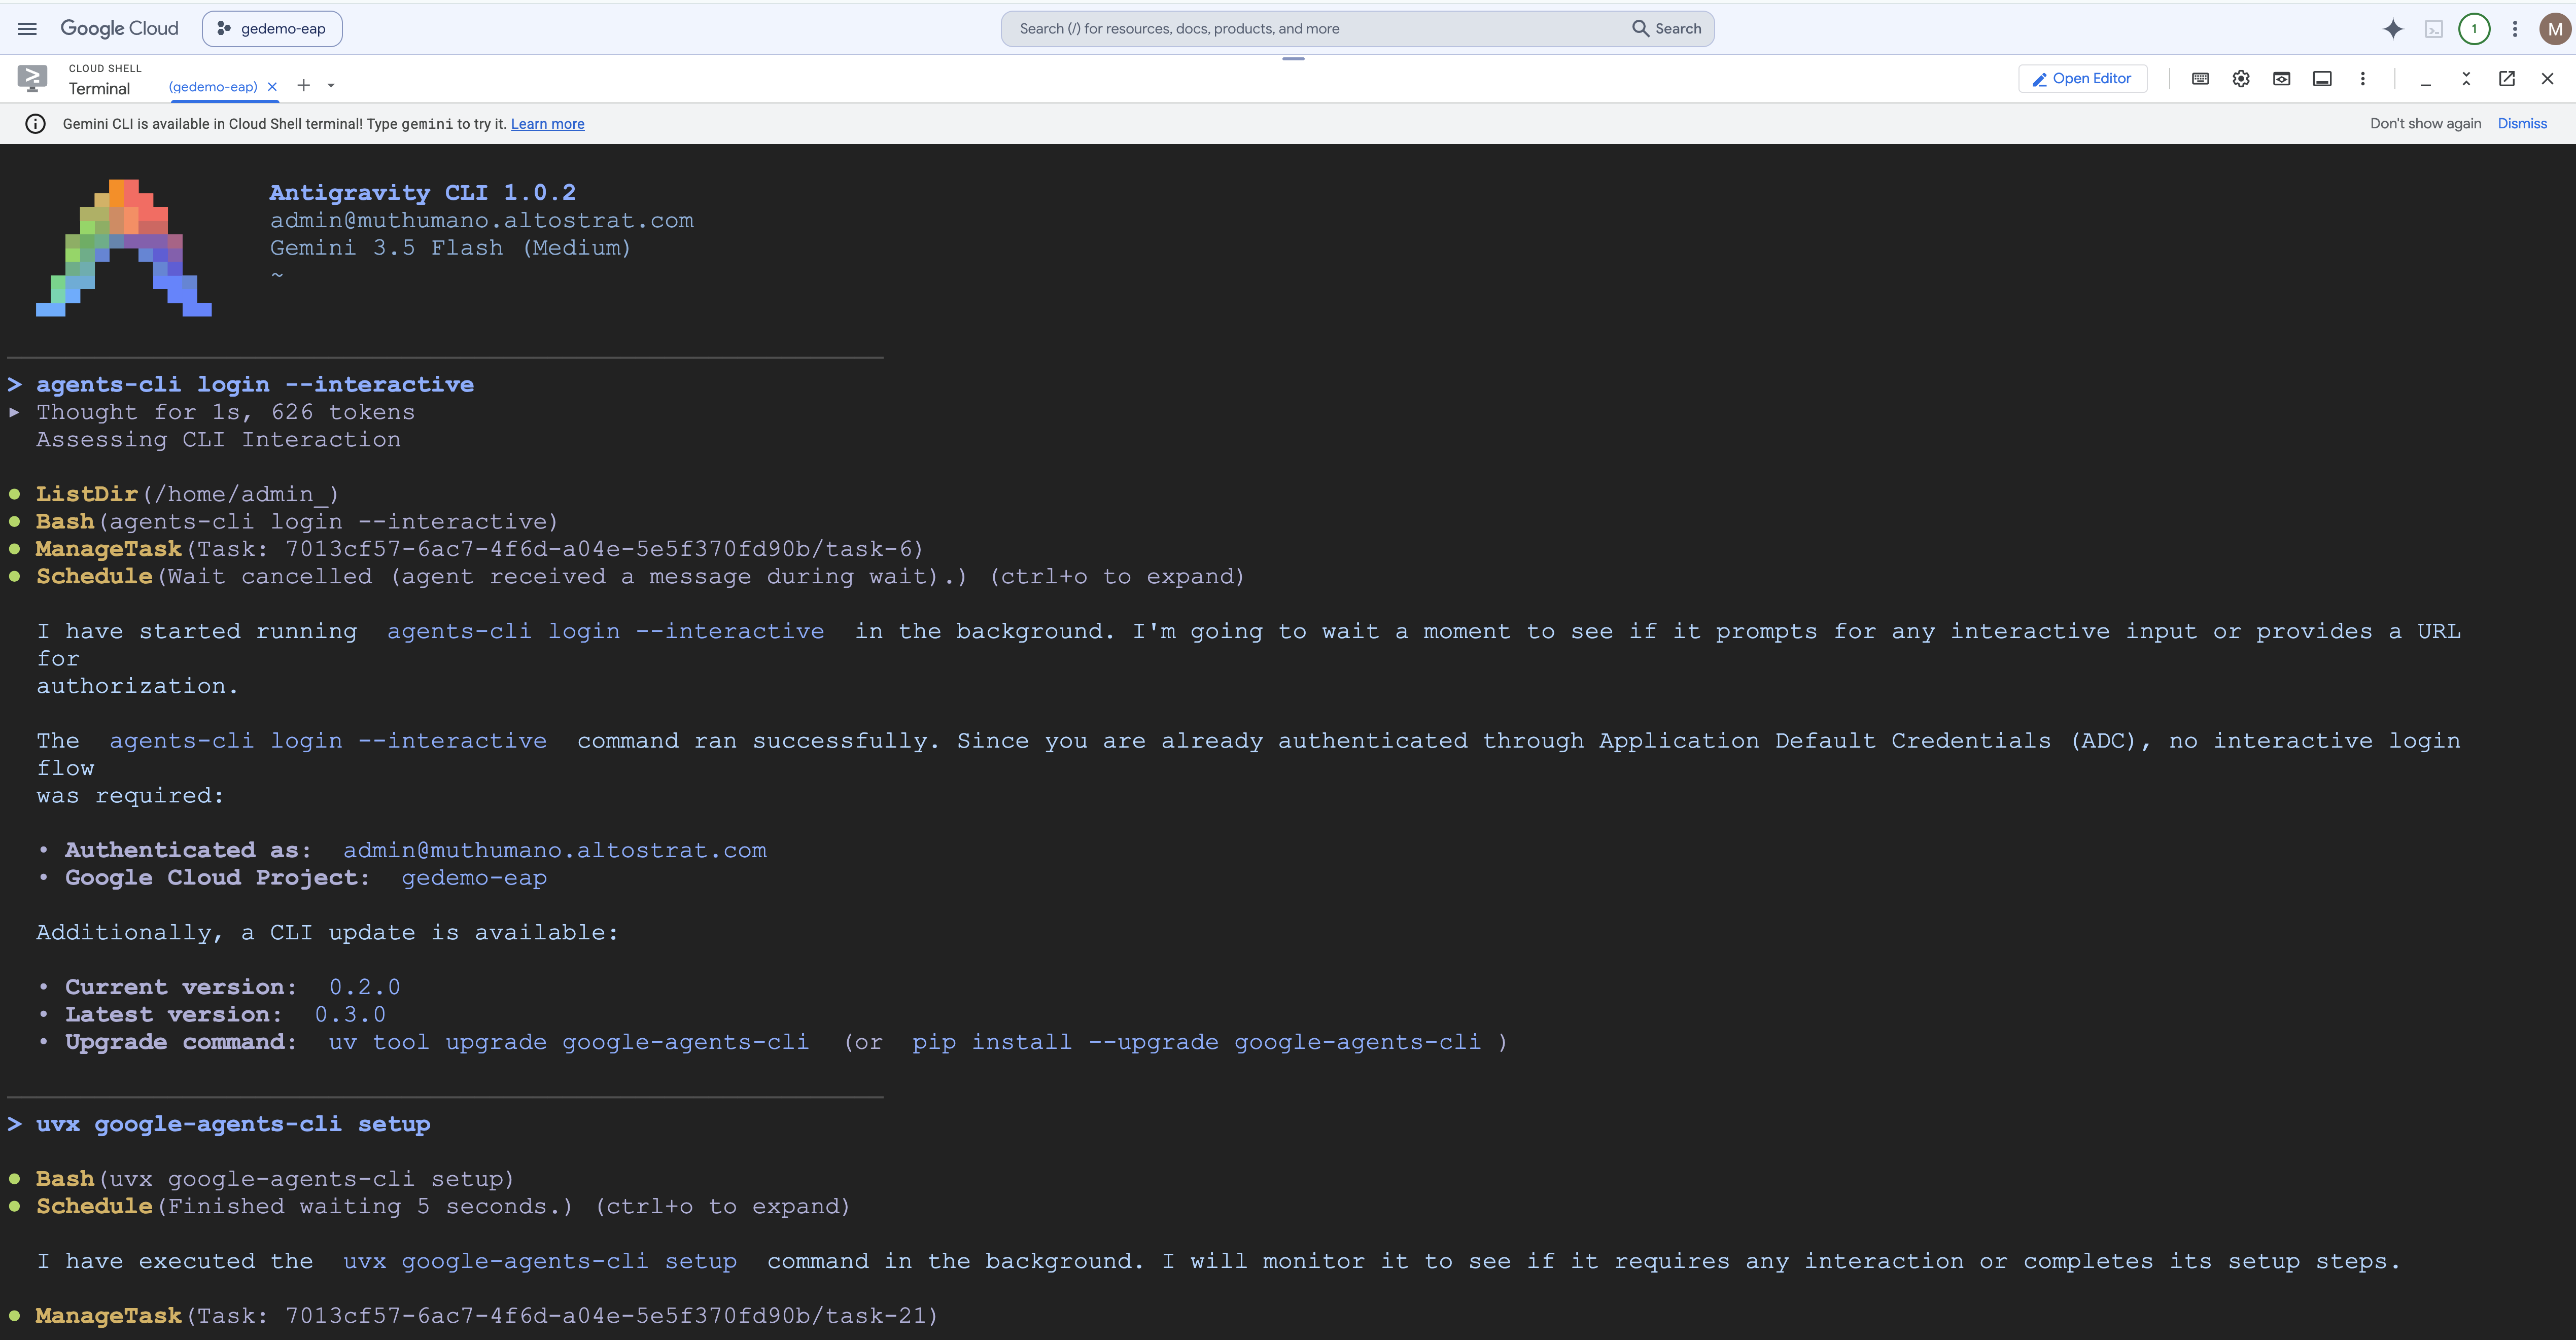
- Verify that the environment is loaded. You can inspect the tool setup:
Step 2: Authentication and Setup
Before building, you must authenticate both the general Antigravity client and the specialized Agent CLI.
- Set your project ID and log into the Antigravity CLI:
export GOOGLE_CLOUD_PROJECT=[YOUR_PROJECT_ID] agy login - Click the authorization URL provided in the terminal, authenticate with your credentials, and paste the token back into the CLI.
- Log into the Agent CLI in interactive mode:
agents-cli login --interactive - Install ADK Skills: Run the setup command to load the ADK agent libraries:
uvx google-agents-cli setup
Step 3: The Antigravity CLI Way (Natural Language Coding)
Instead of writing python code manually, we will ask the Antigravity CLI coding agent to autonomously scaffold, write, and unit test the agent for us.
- Start the Antigravity CLI session:
agy - Prompt the Coding Agent: Enter the following instruction in the prompt box:
Using the Agent Development Kit (ADK) Python SDK, build me an agent named 'Bumble-Ops-Assistant' that has a python tool function to check build health for prod and staging environments. The tool should just return a hardcoded 'GREEN' status for now. Once scaffolded and coded, run a unit test and an evaluation smoke test for me in this folder.
- Observe the Autonomous Coding: Watch the terminal logs as Antigravity CLI automatically executes the following sequence:
- Runs the
agents-cli scaffold createcommand in the background. - Writes the Python tool functions inside
app/tools.py(returning the hardcoded"GREEN"build status). - Configures the agent instructions in
app/agent.py. - Installs dependencies.
- Creates and runs unit tests inside the workspace, demonstrating a successful compile!
- Runs the
Step 4: Inspect the Created Code and Run the Playground
- Open the Cloud Shell Editor (click Open Editor in the Cloud Shell top menu).
- Navigate to the
bumble-ops-assistantfolder. Review the files created by the CLI:app/tools.py: Holds your custom python tool functions.app/agent.py: Sets the system prompts, system instructions, and tool registrations for your agent.
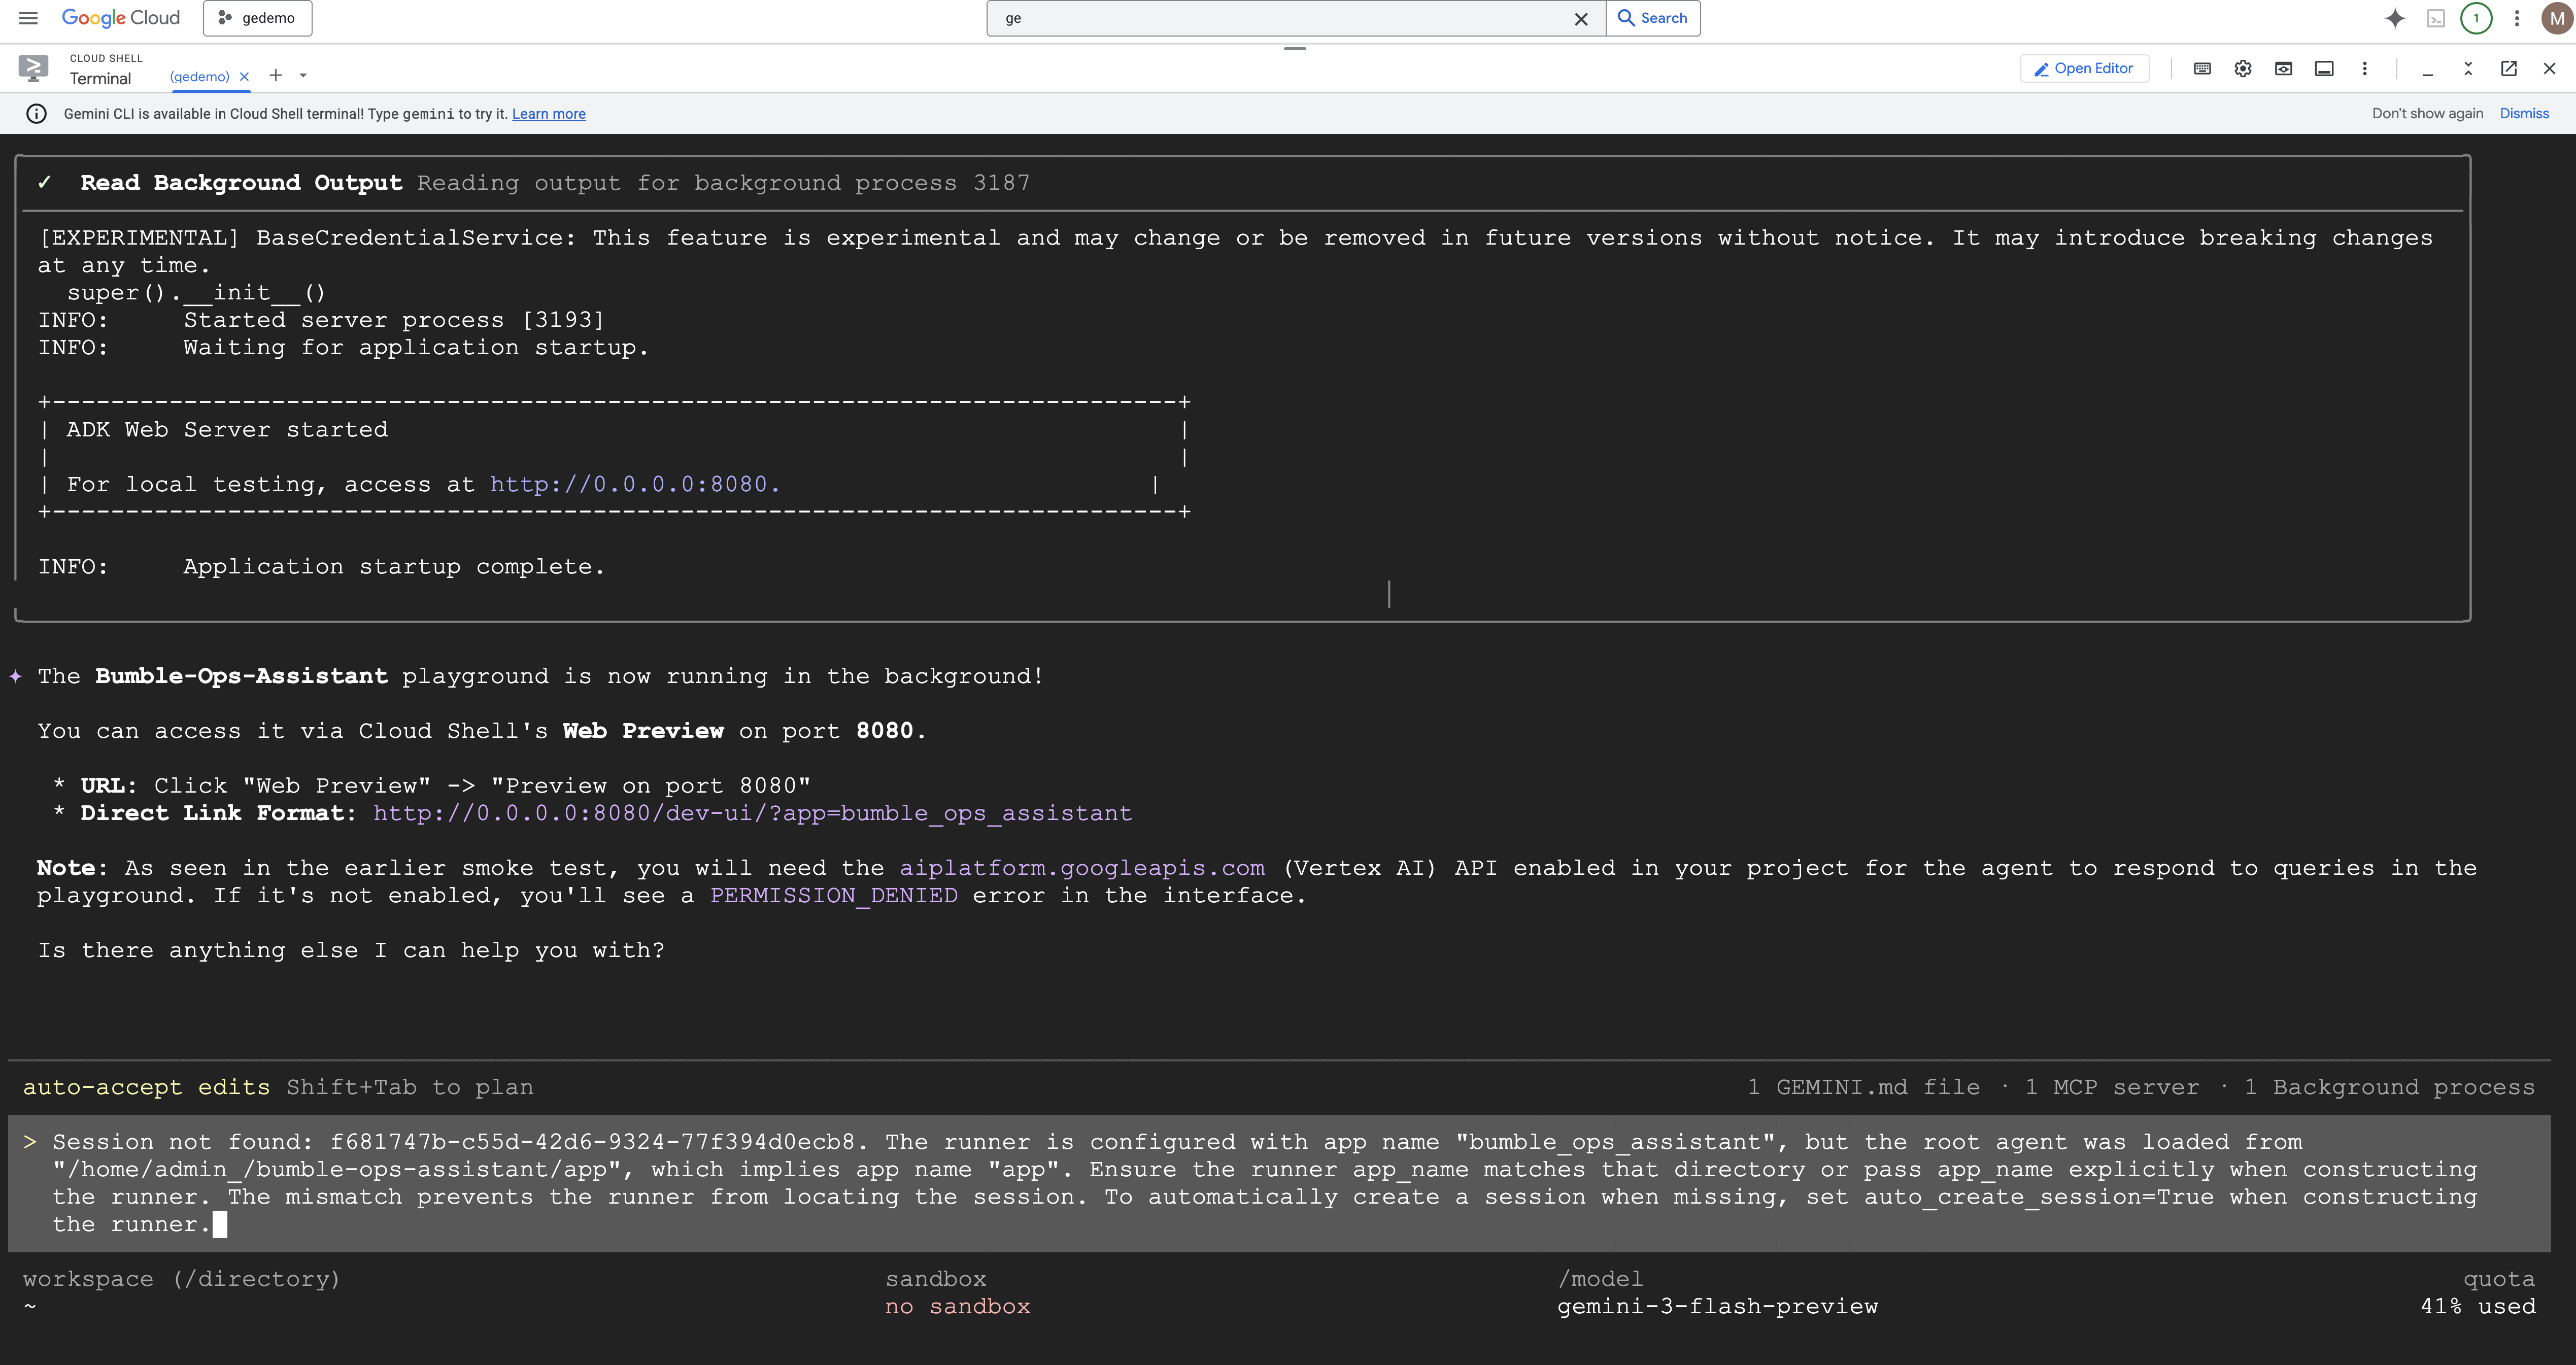
- Now let's test the agent interactively in the local terminal playground.
To run the playground:
agents-cli playground --app bumble-ops-assistant
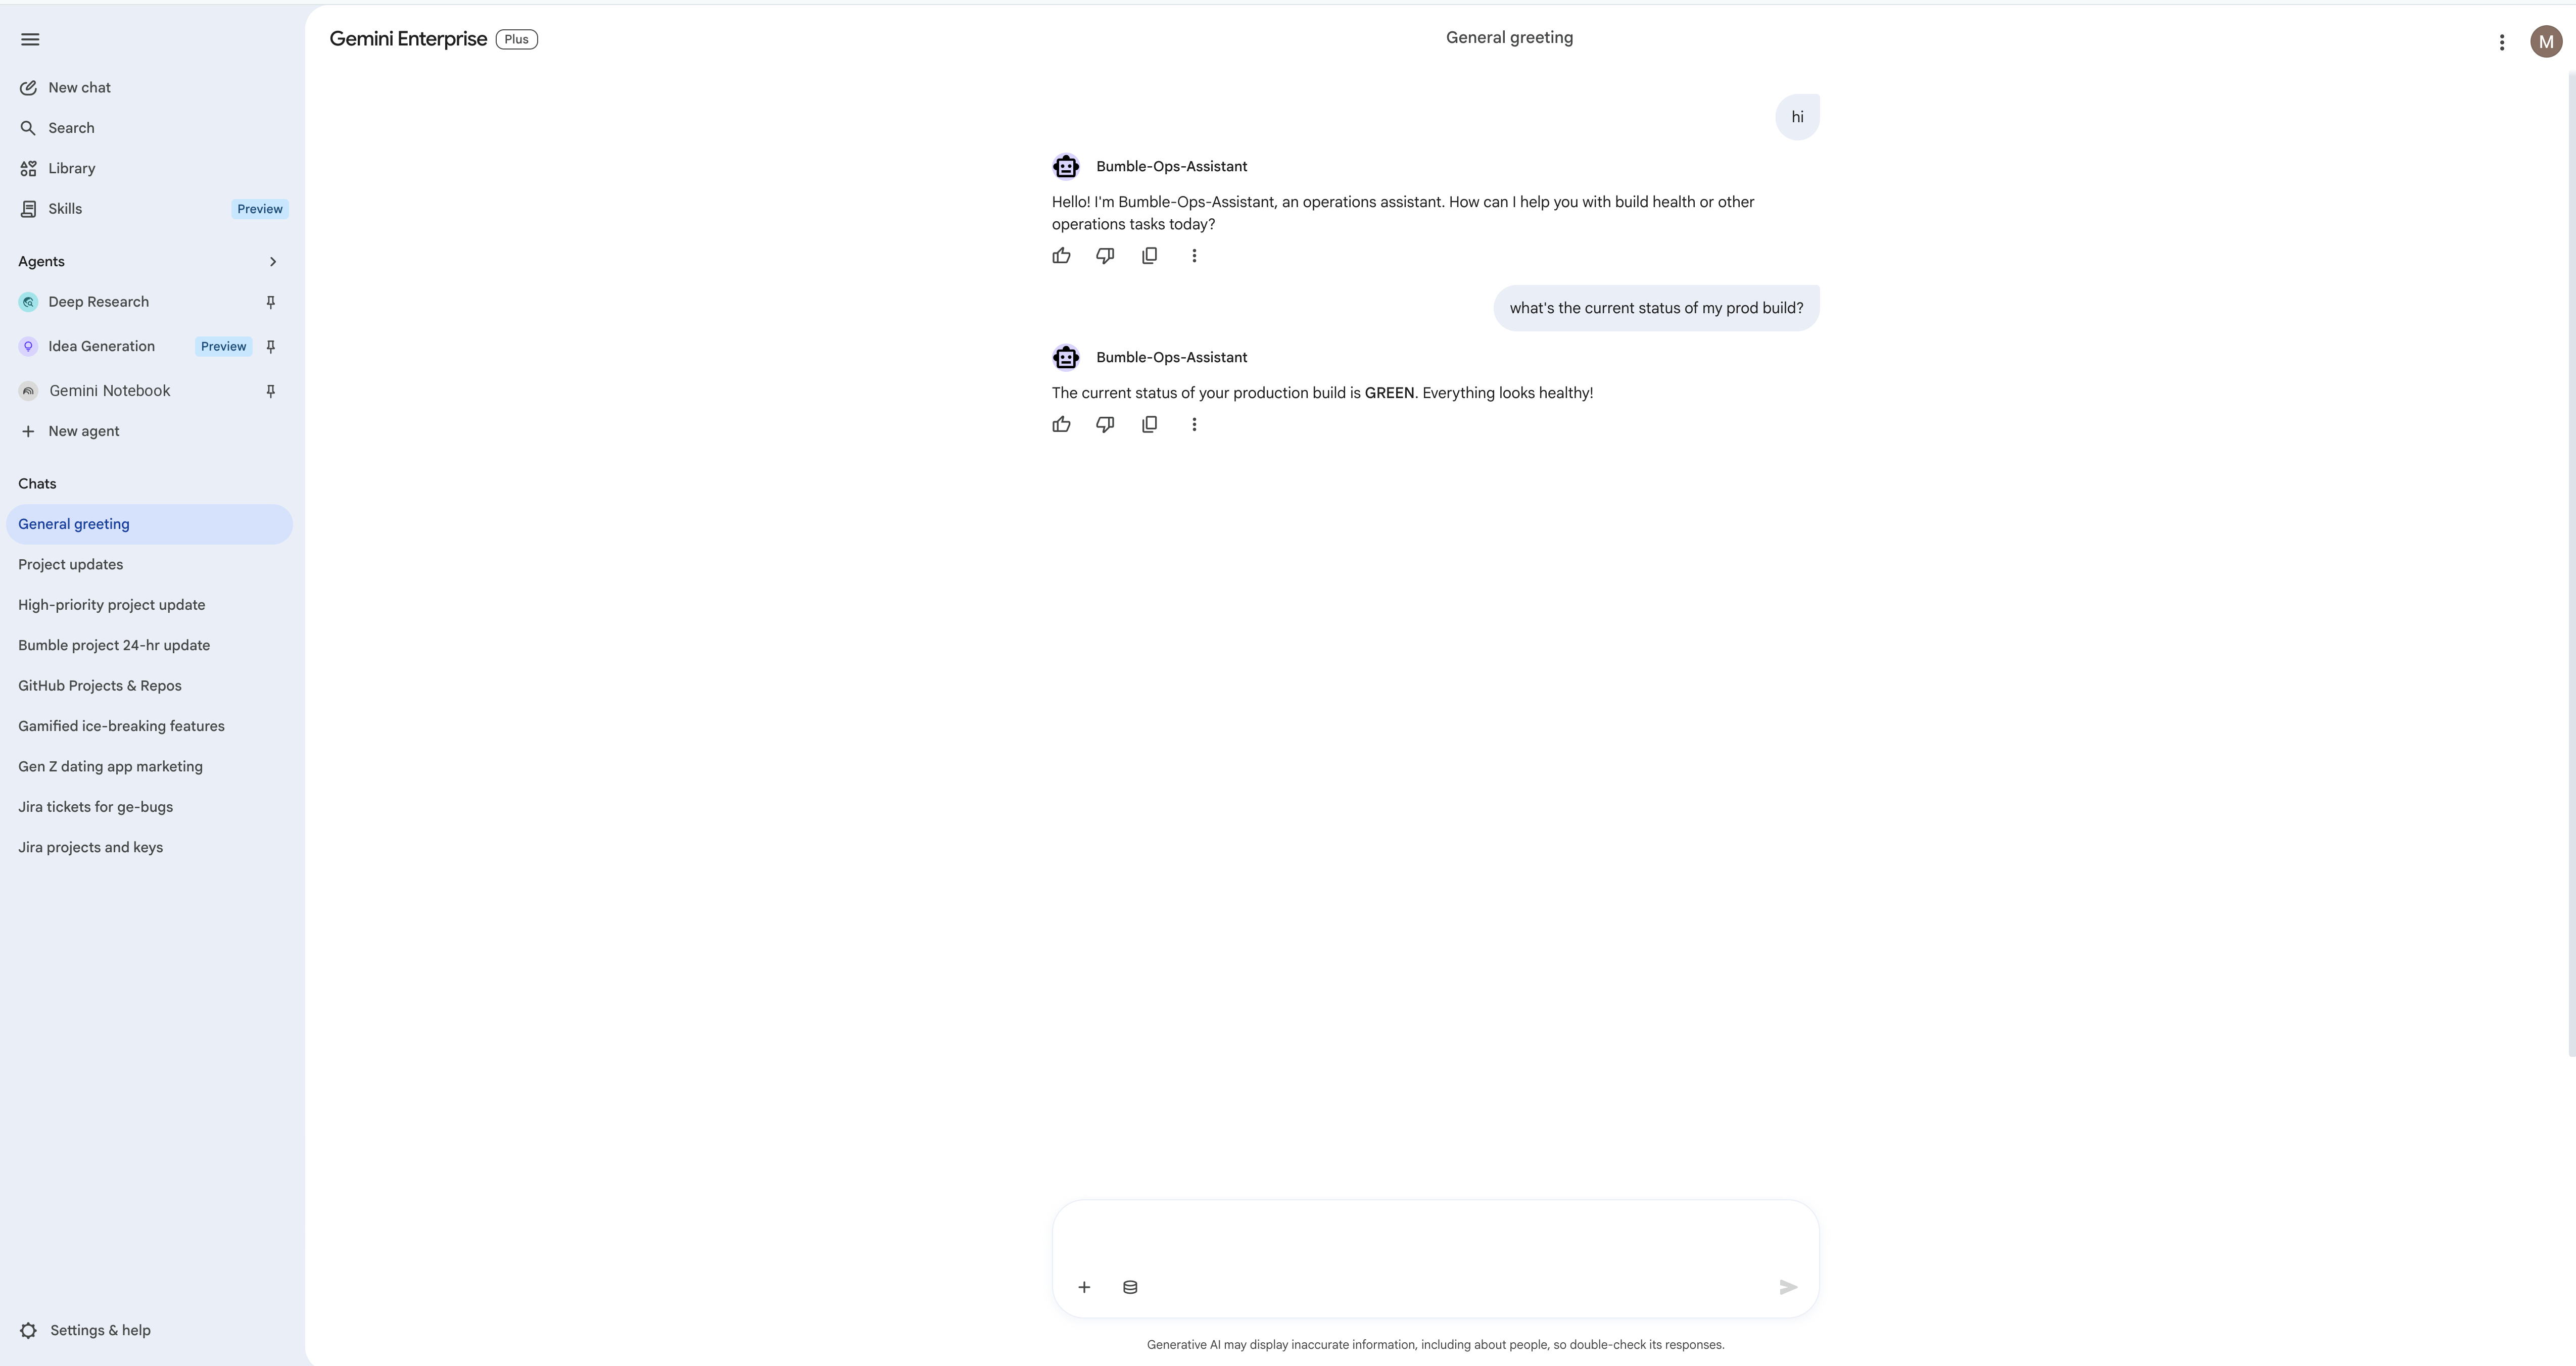
- Once the playground session starts, ask the agent:
How is the prod build environment looking?
Gemini will load the local agent, execute the Python tool function in the background, and reply with the "GREEN" status! 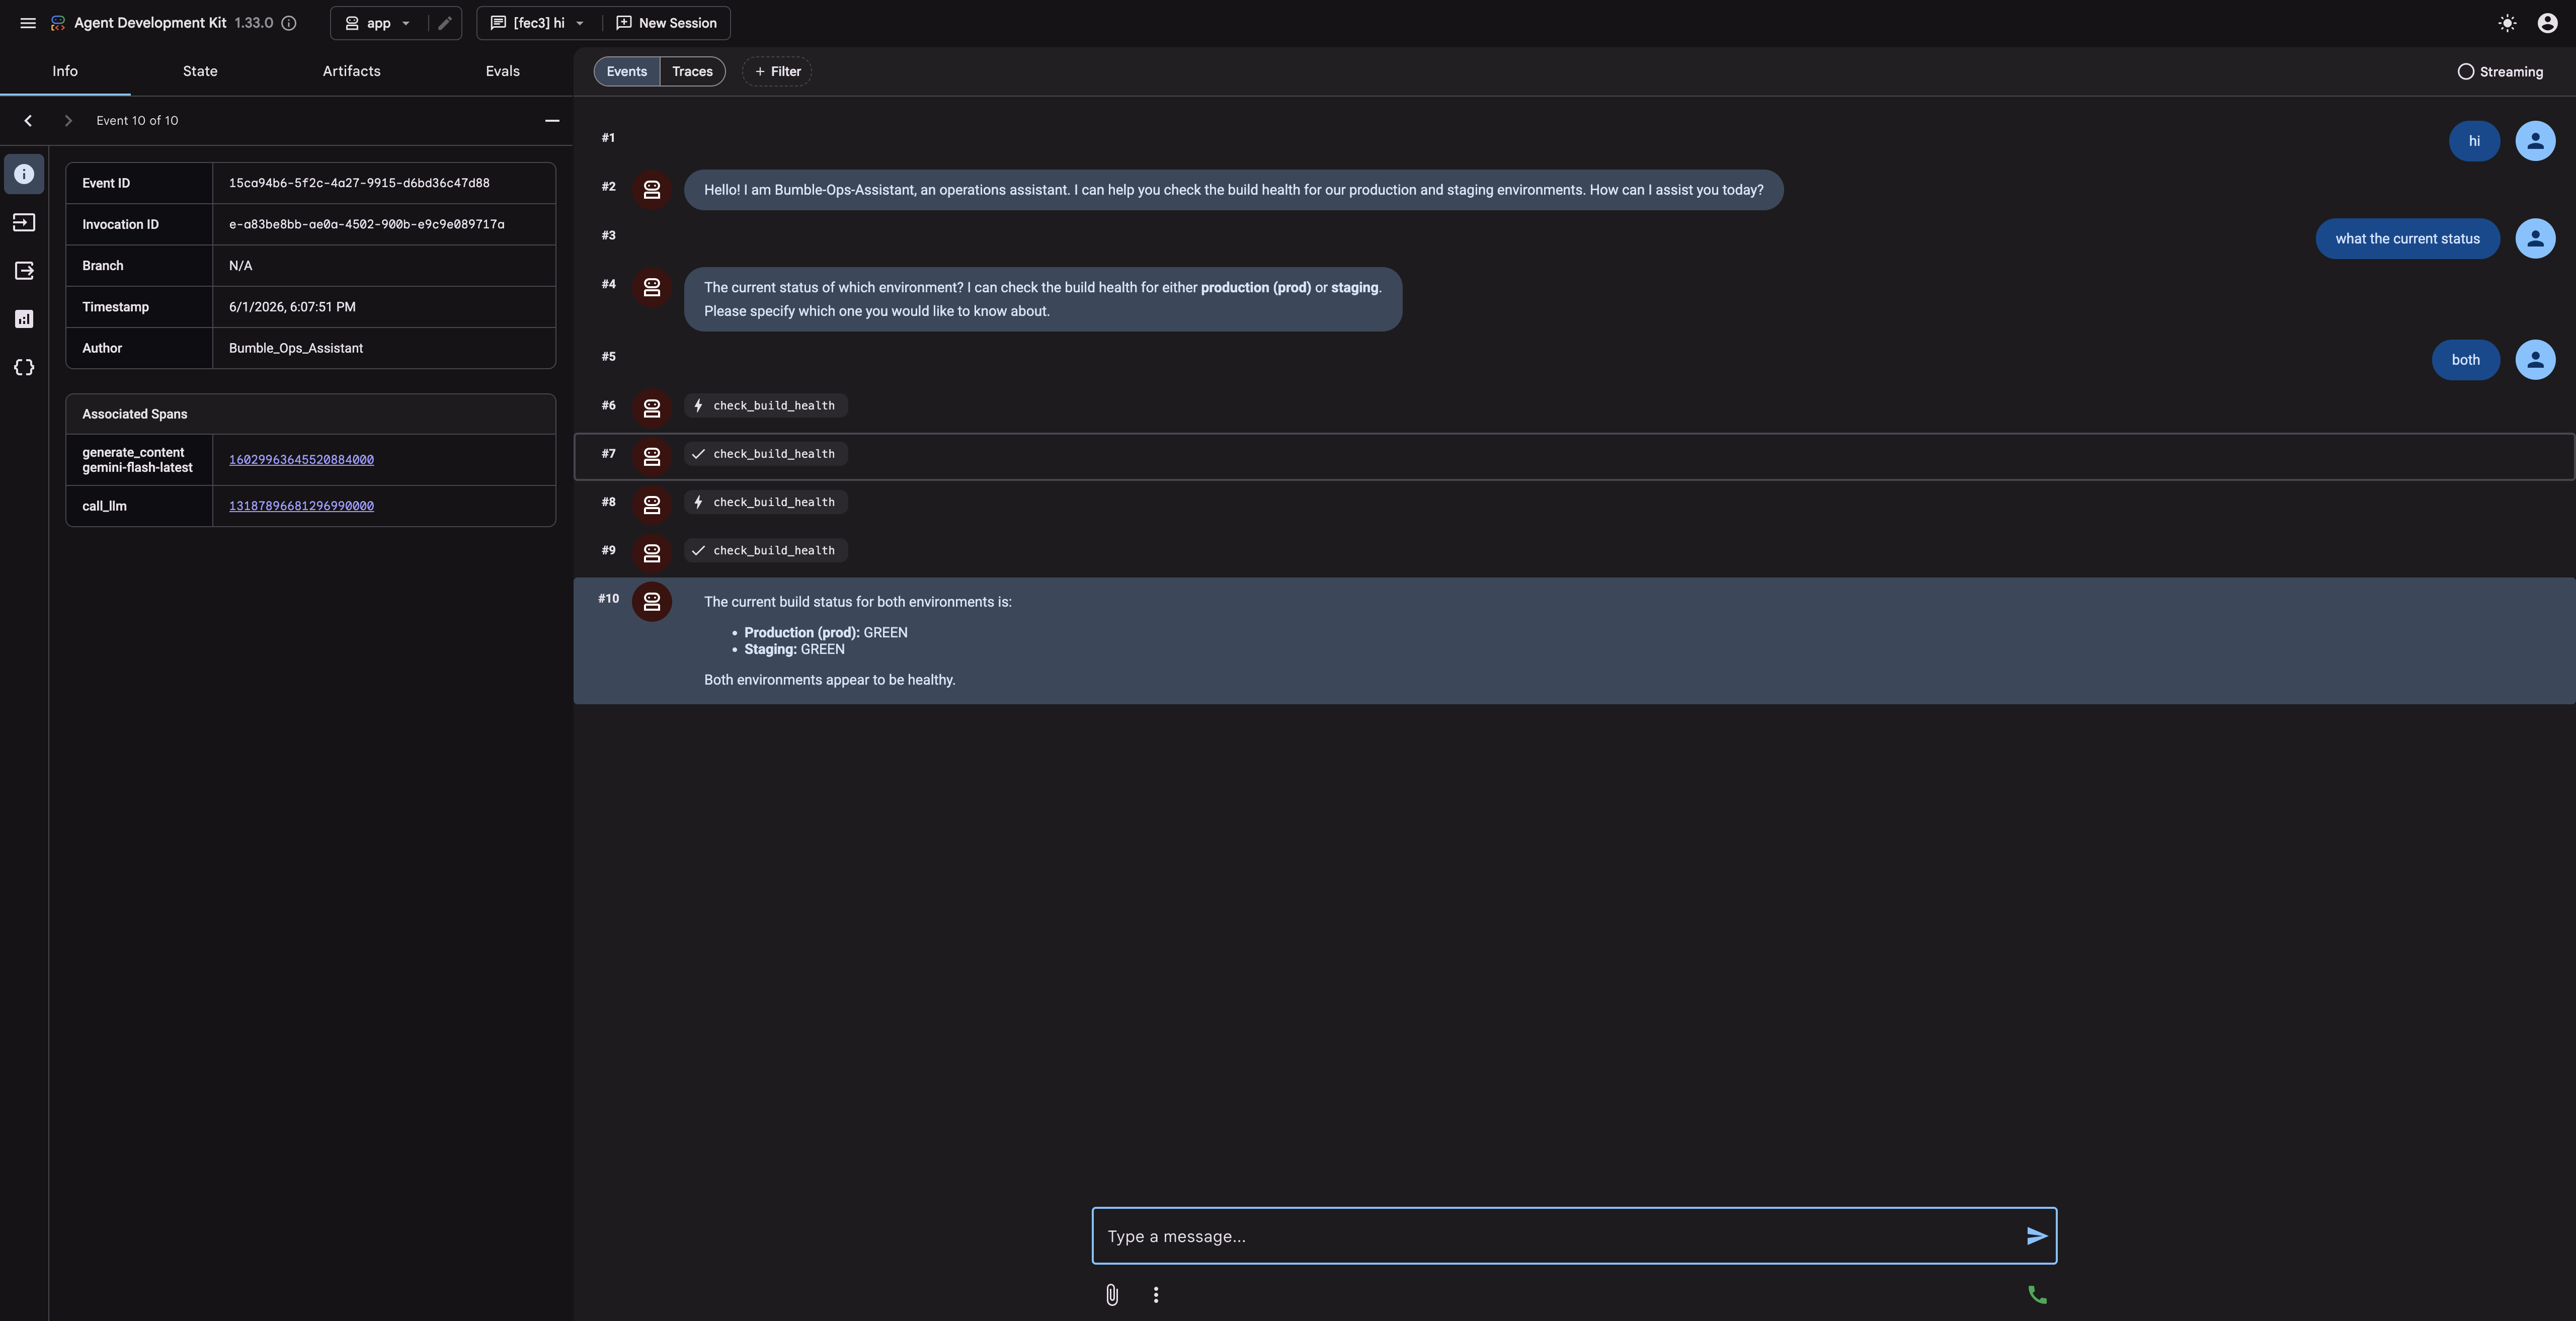
18. Challenge Lab: Publish to Gemini Enterprise (Optional)
Now that your ADK agent is compiled and tested locally, you will deploy it to the Agent Runtime and publish it to your company's Gemini Enterprise gallery so that non-technical team members can access it. Note that the exact deploy/publish experience may vary by environment.
Step 1: Deploy to Agent Runtime
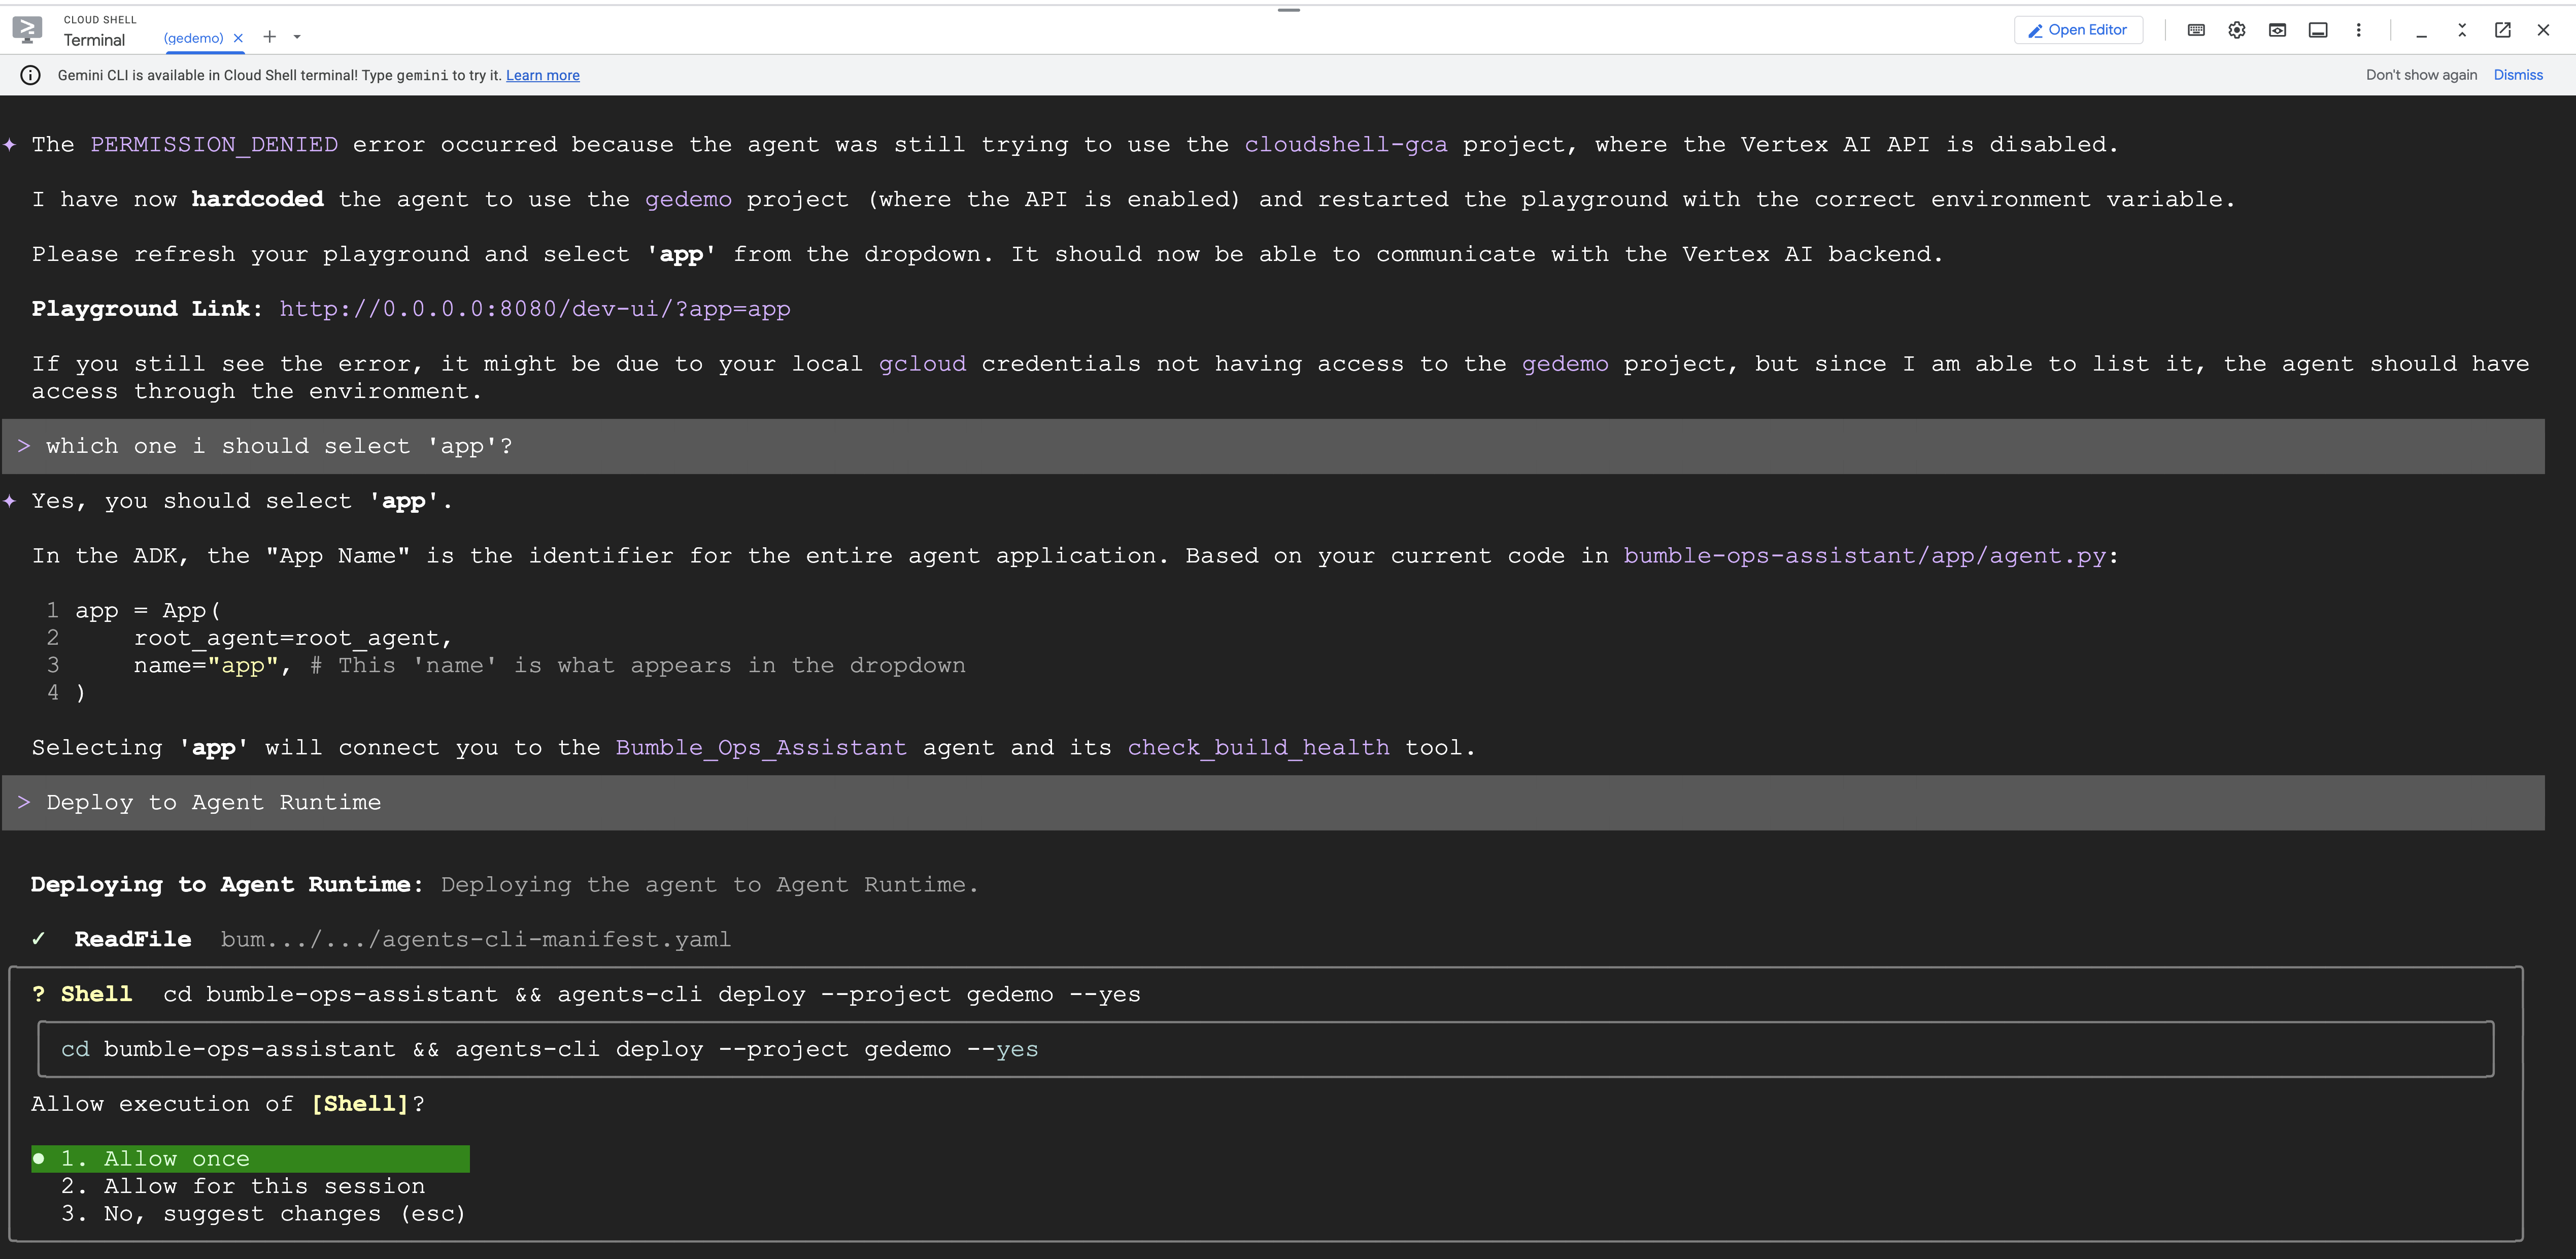
To host the agent logic securely, we deploy it to the managed runtime:
agents-cli deploy --deployment-target agent_runtime --no-confirm-project
Let's examine the CLI deployment automation sequence: 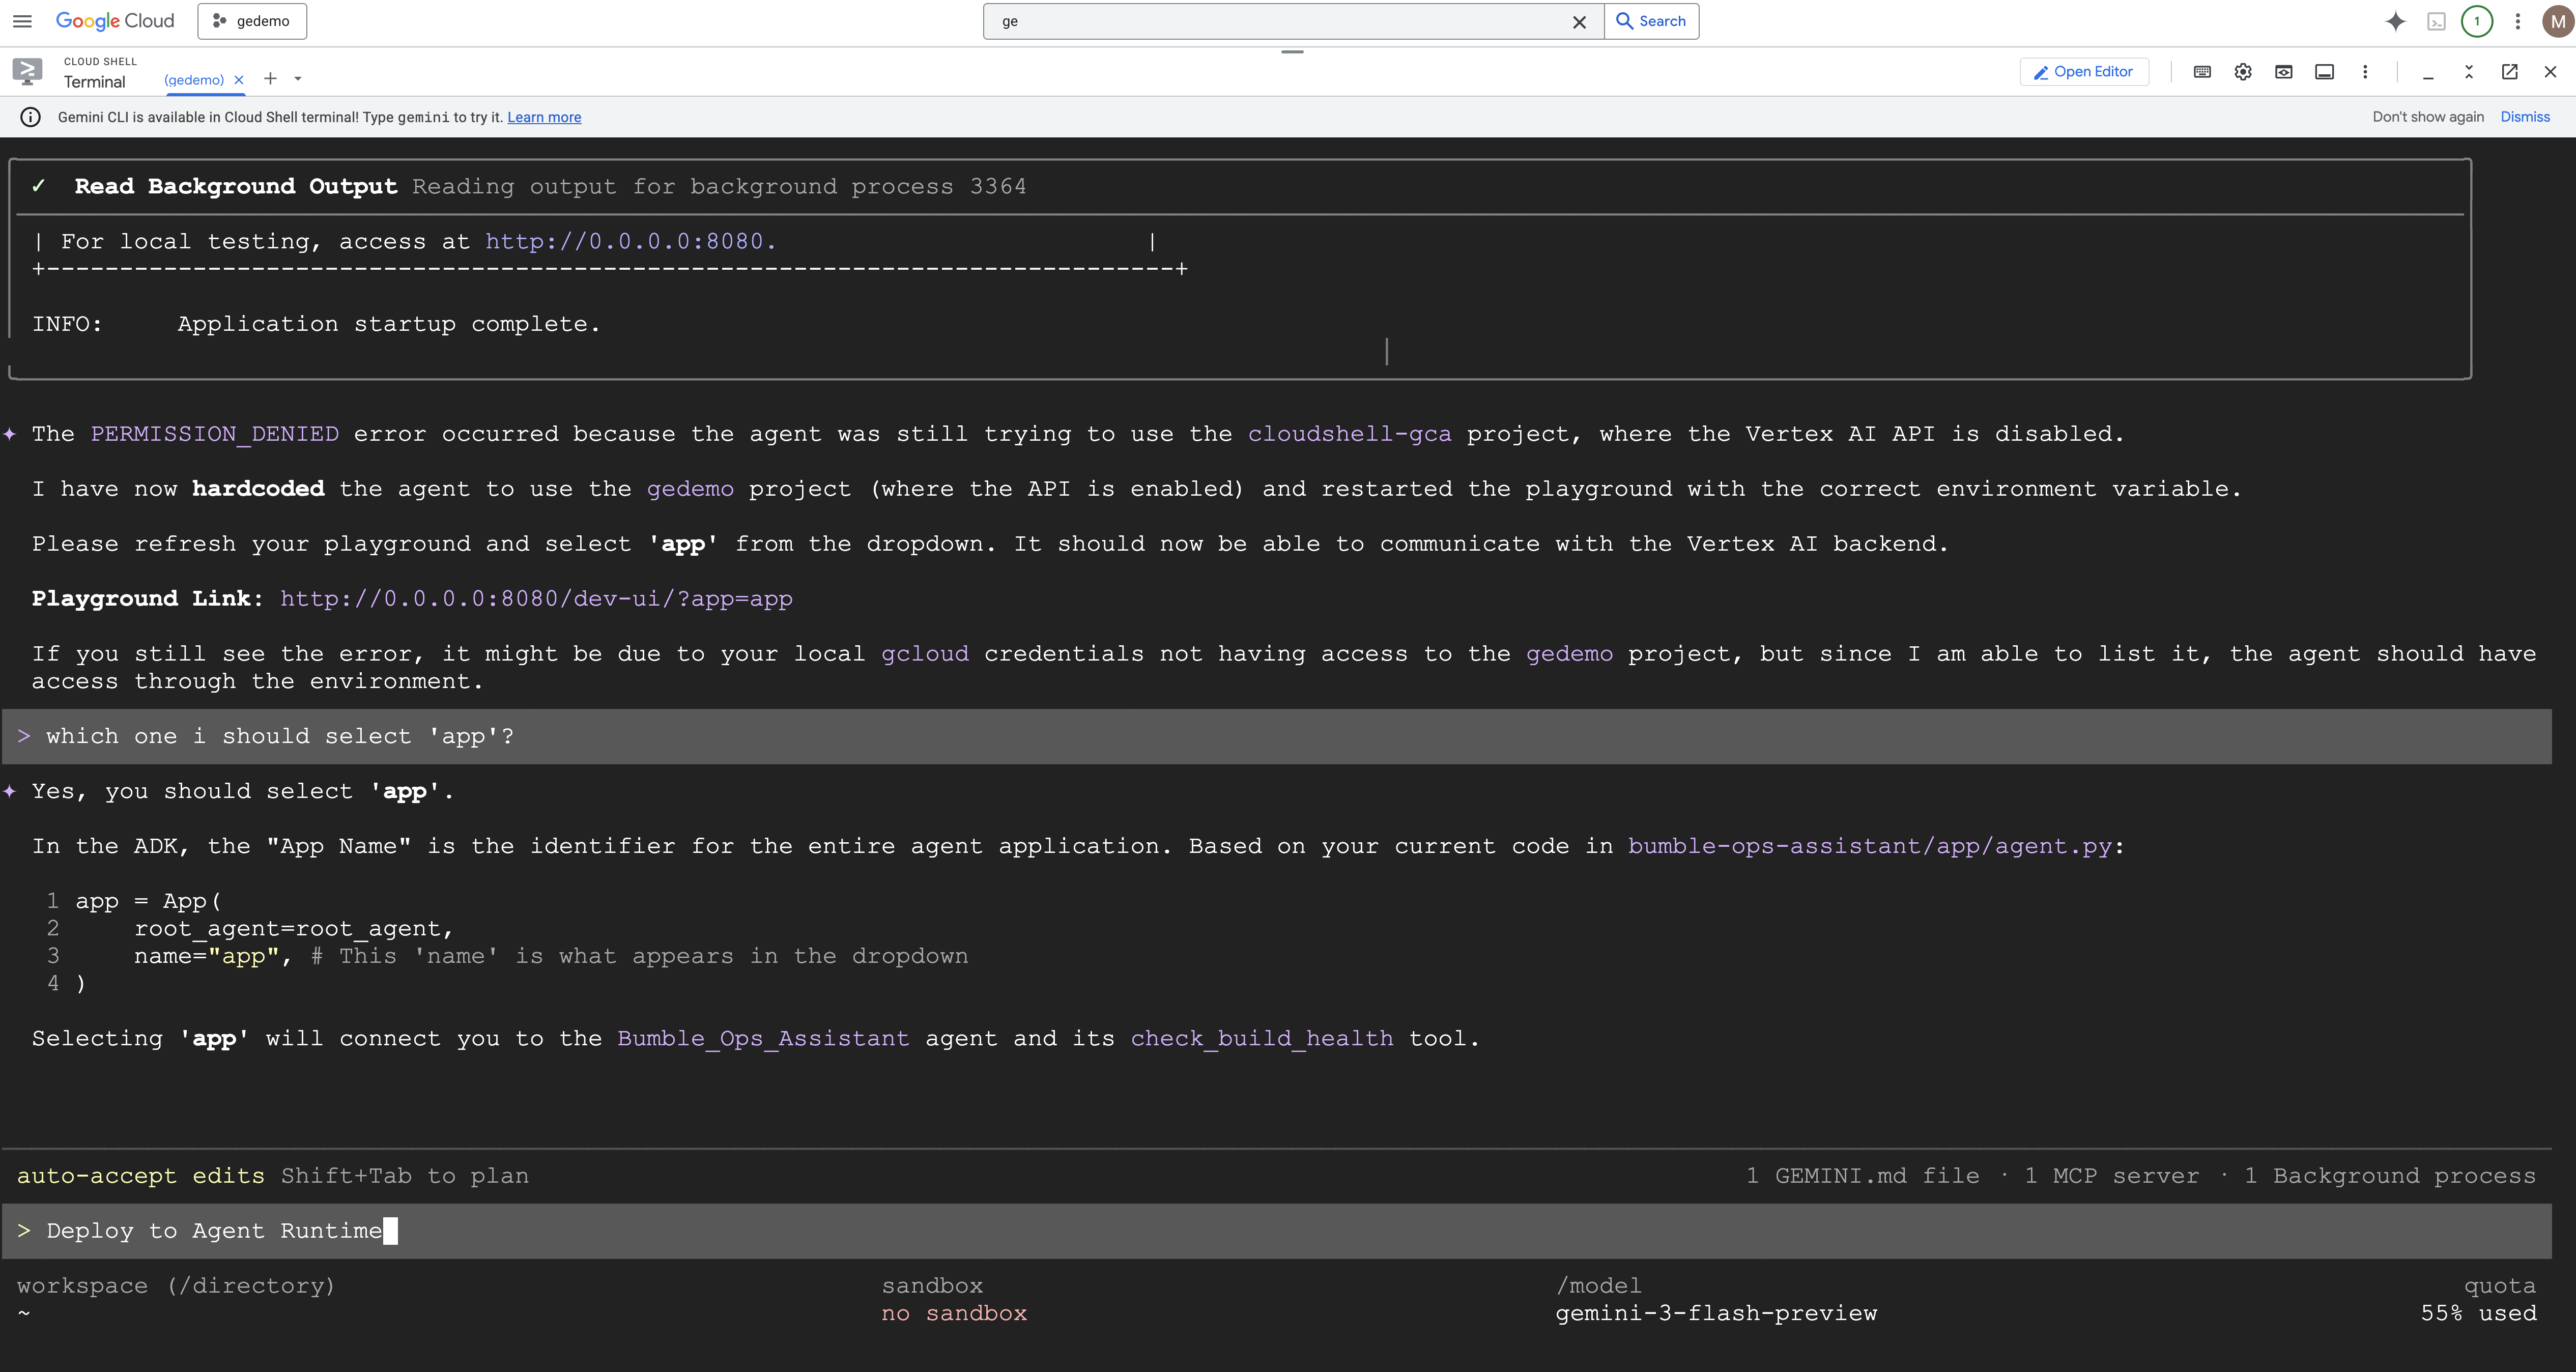
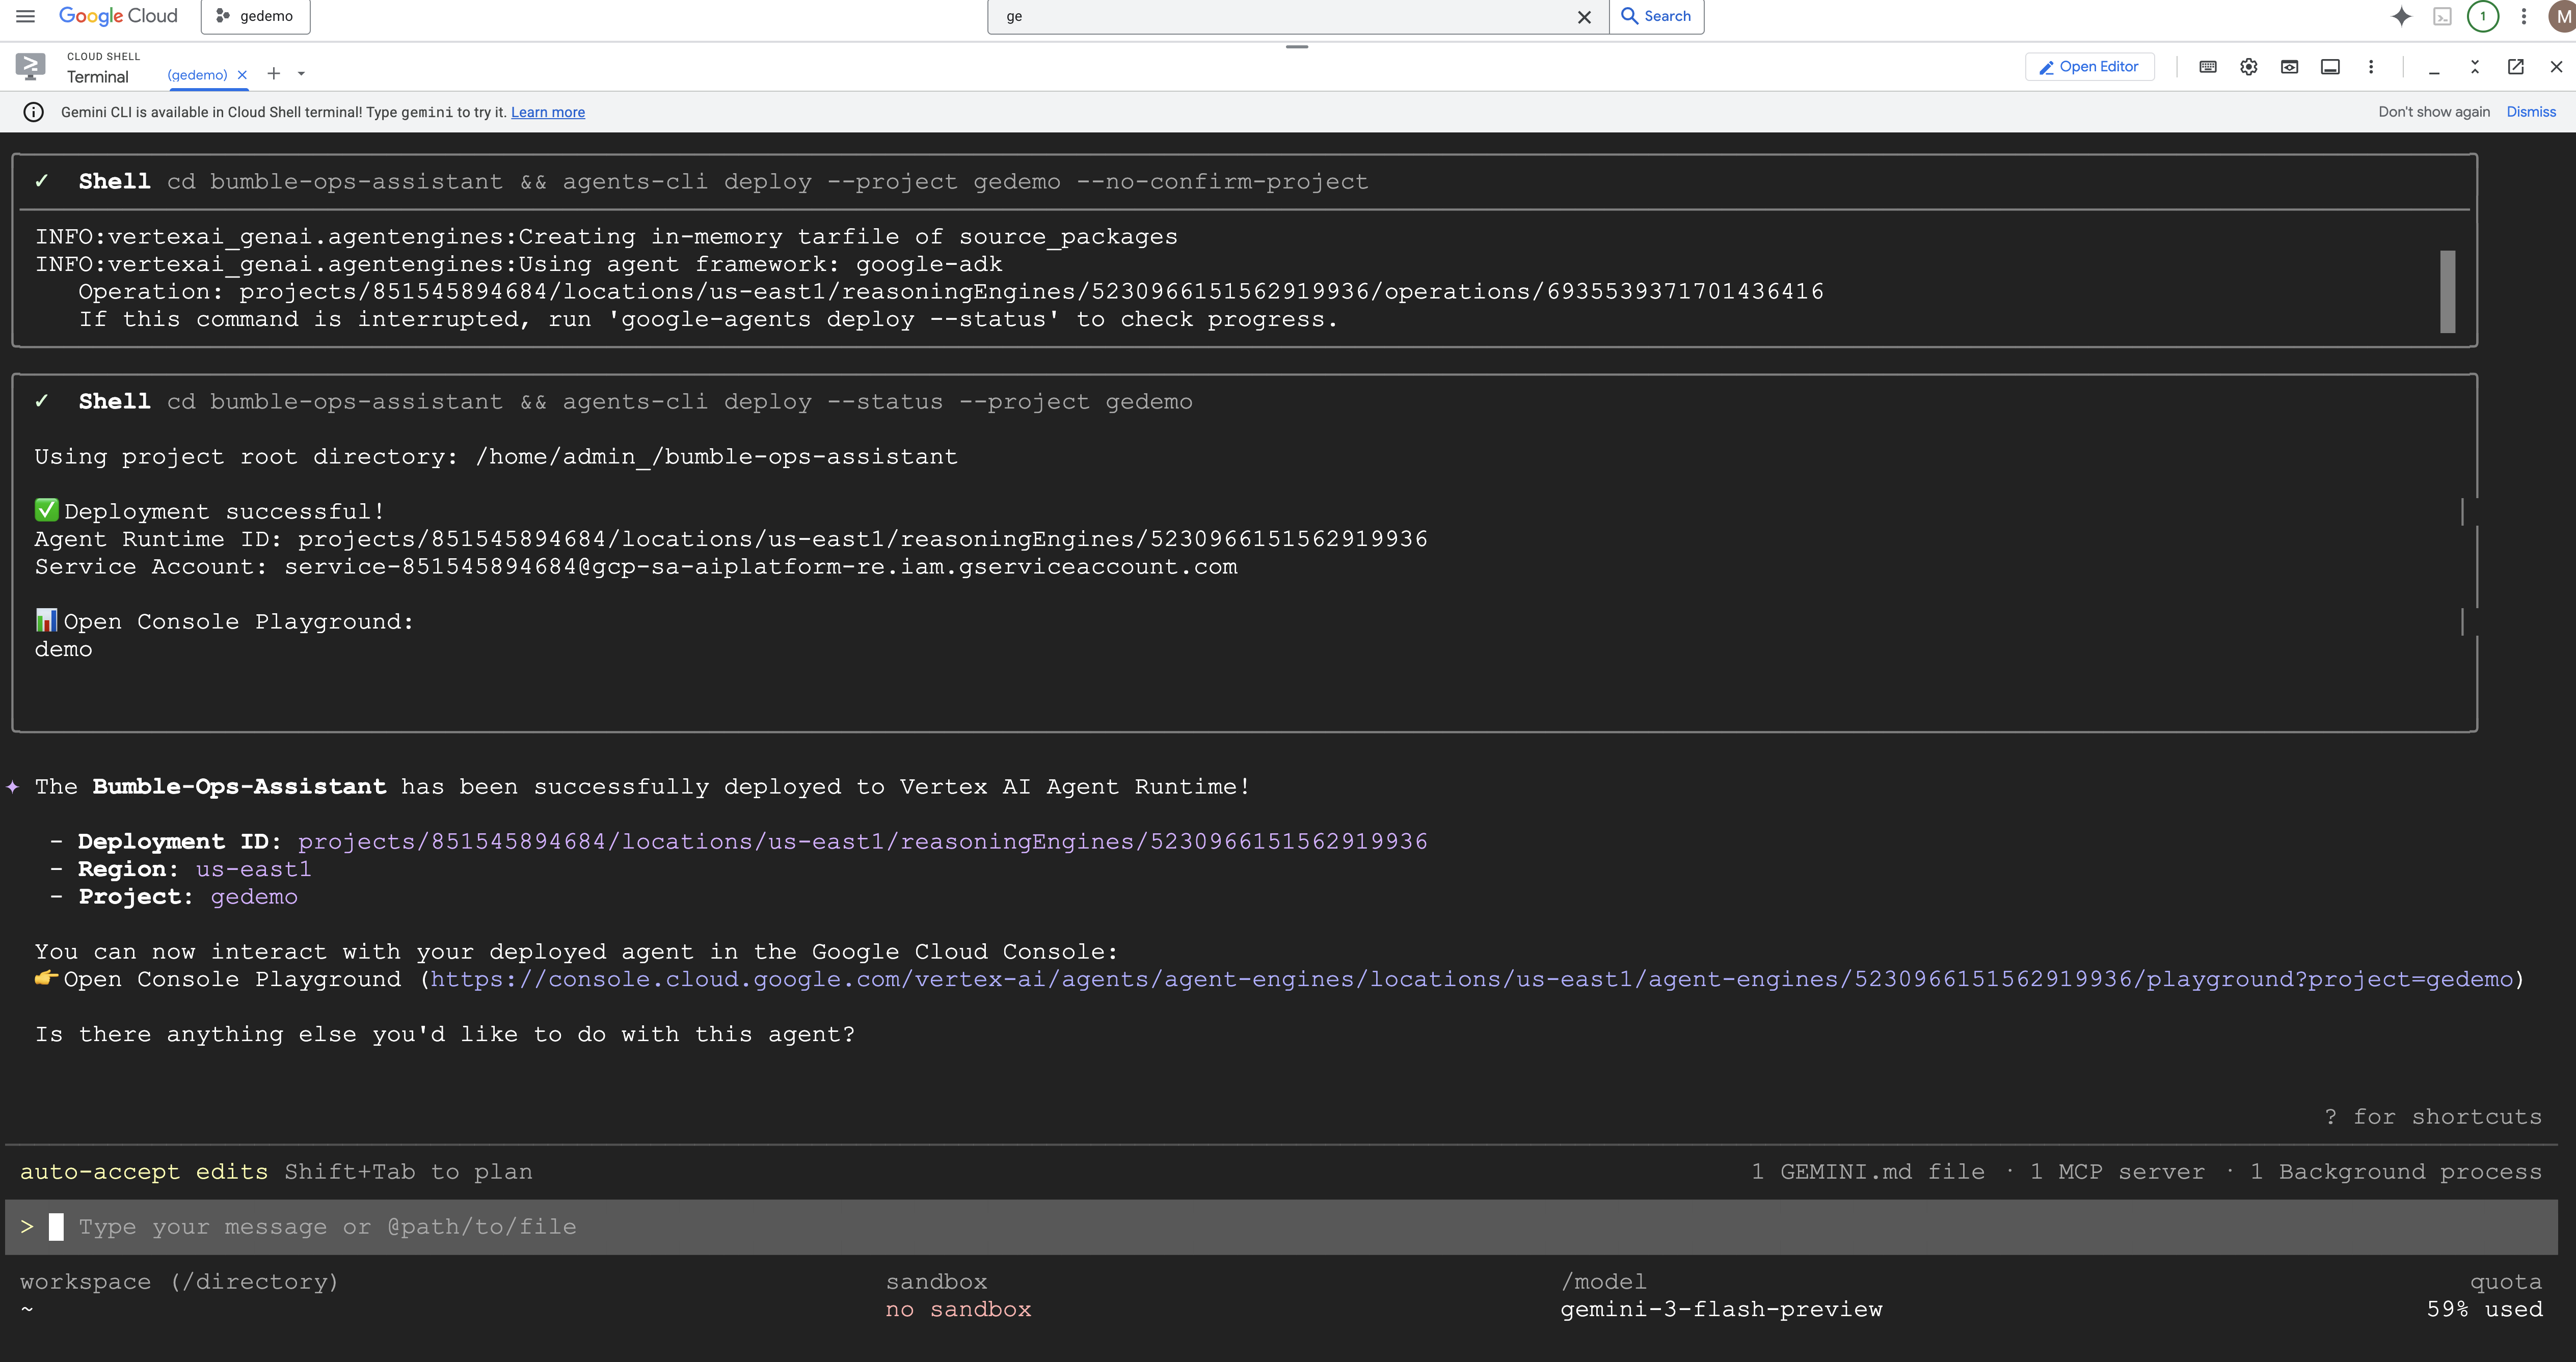
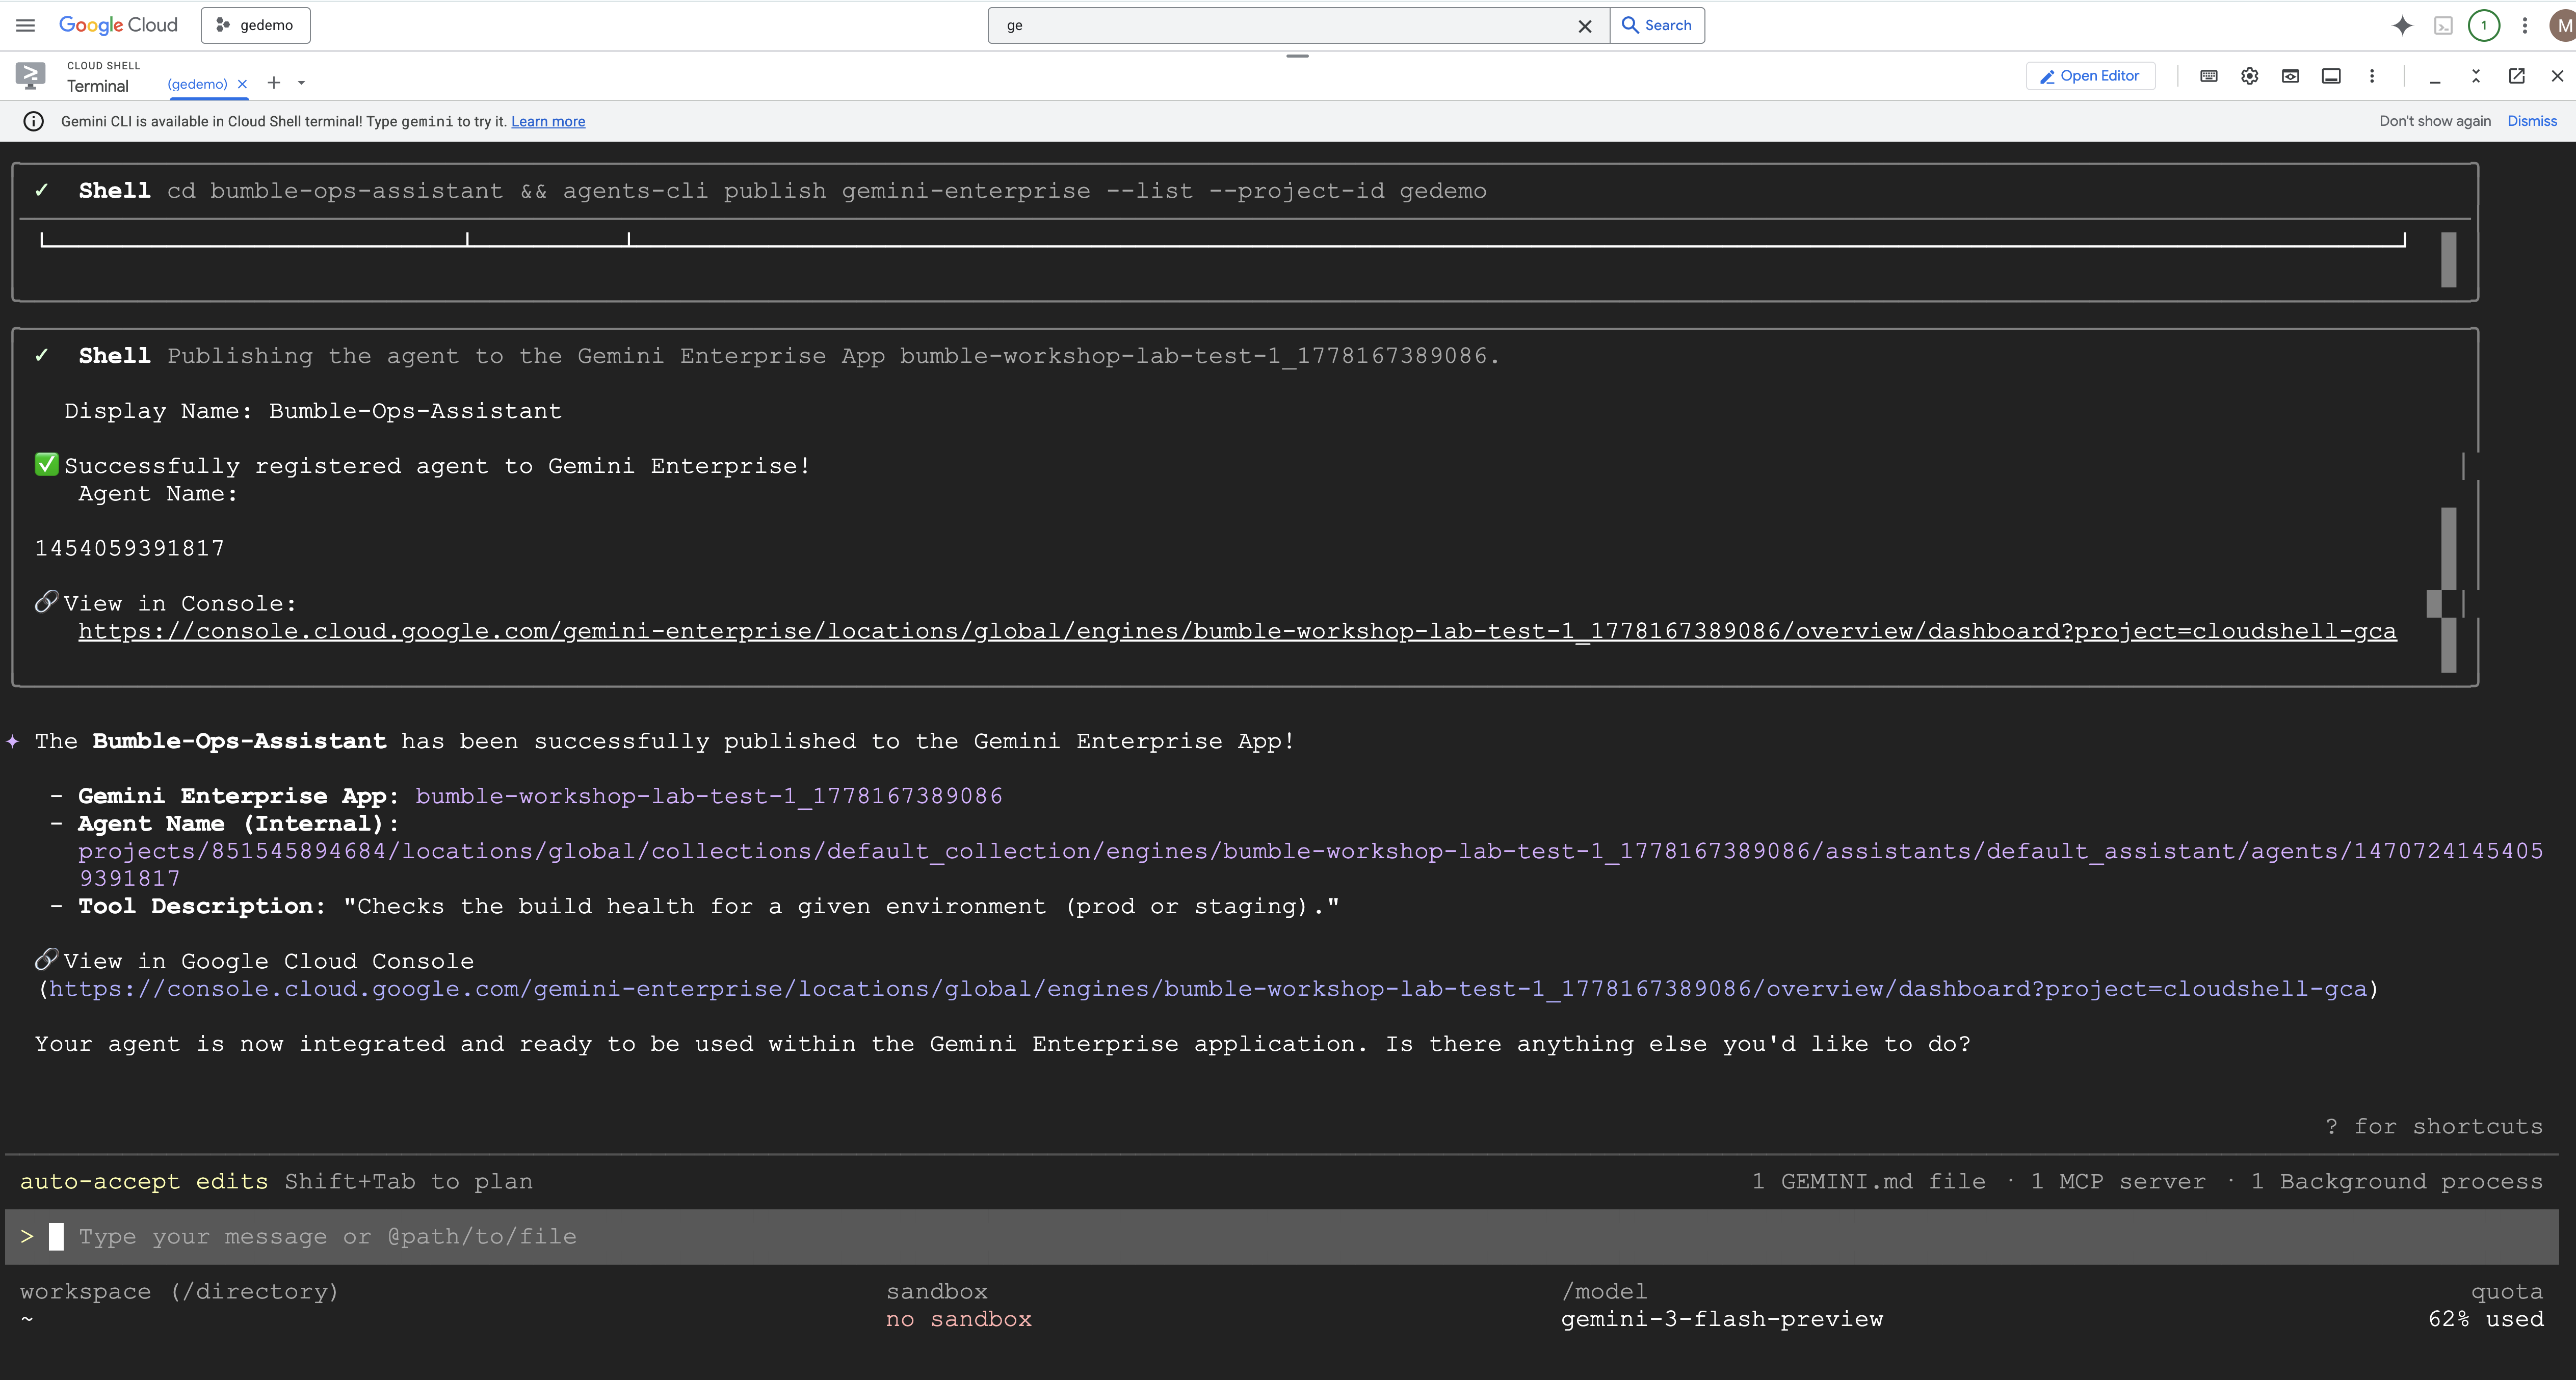
Step 2: Publish to the App Gallery
With the agent hosted on the runtime, publish it to your specific team gallery:
agents-cli publish gemini-enterprise --interactive
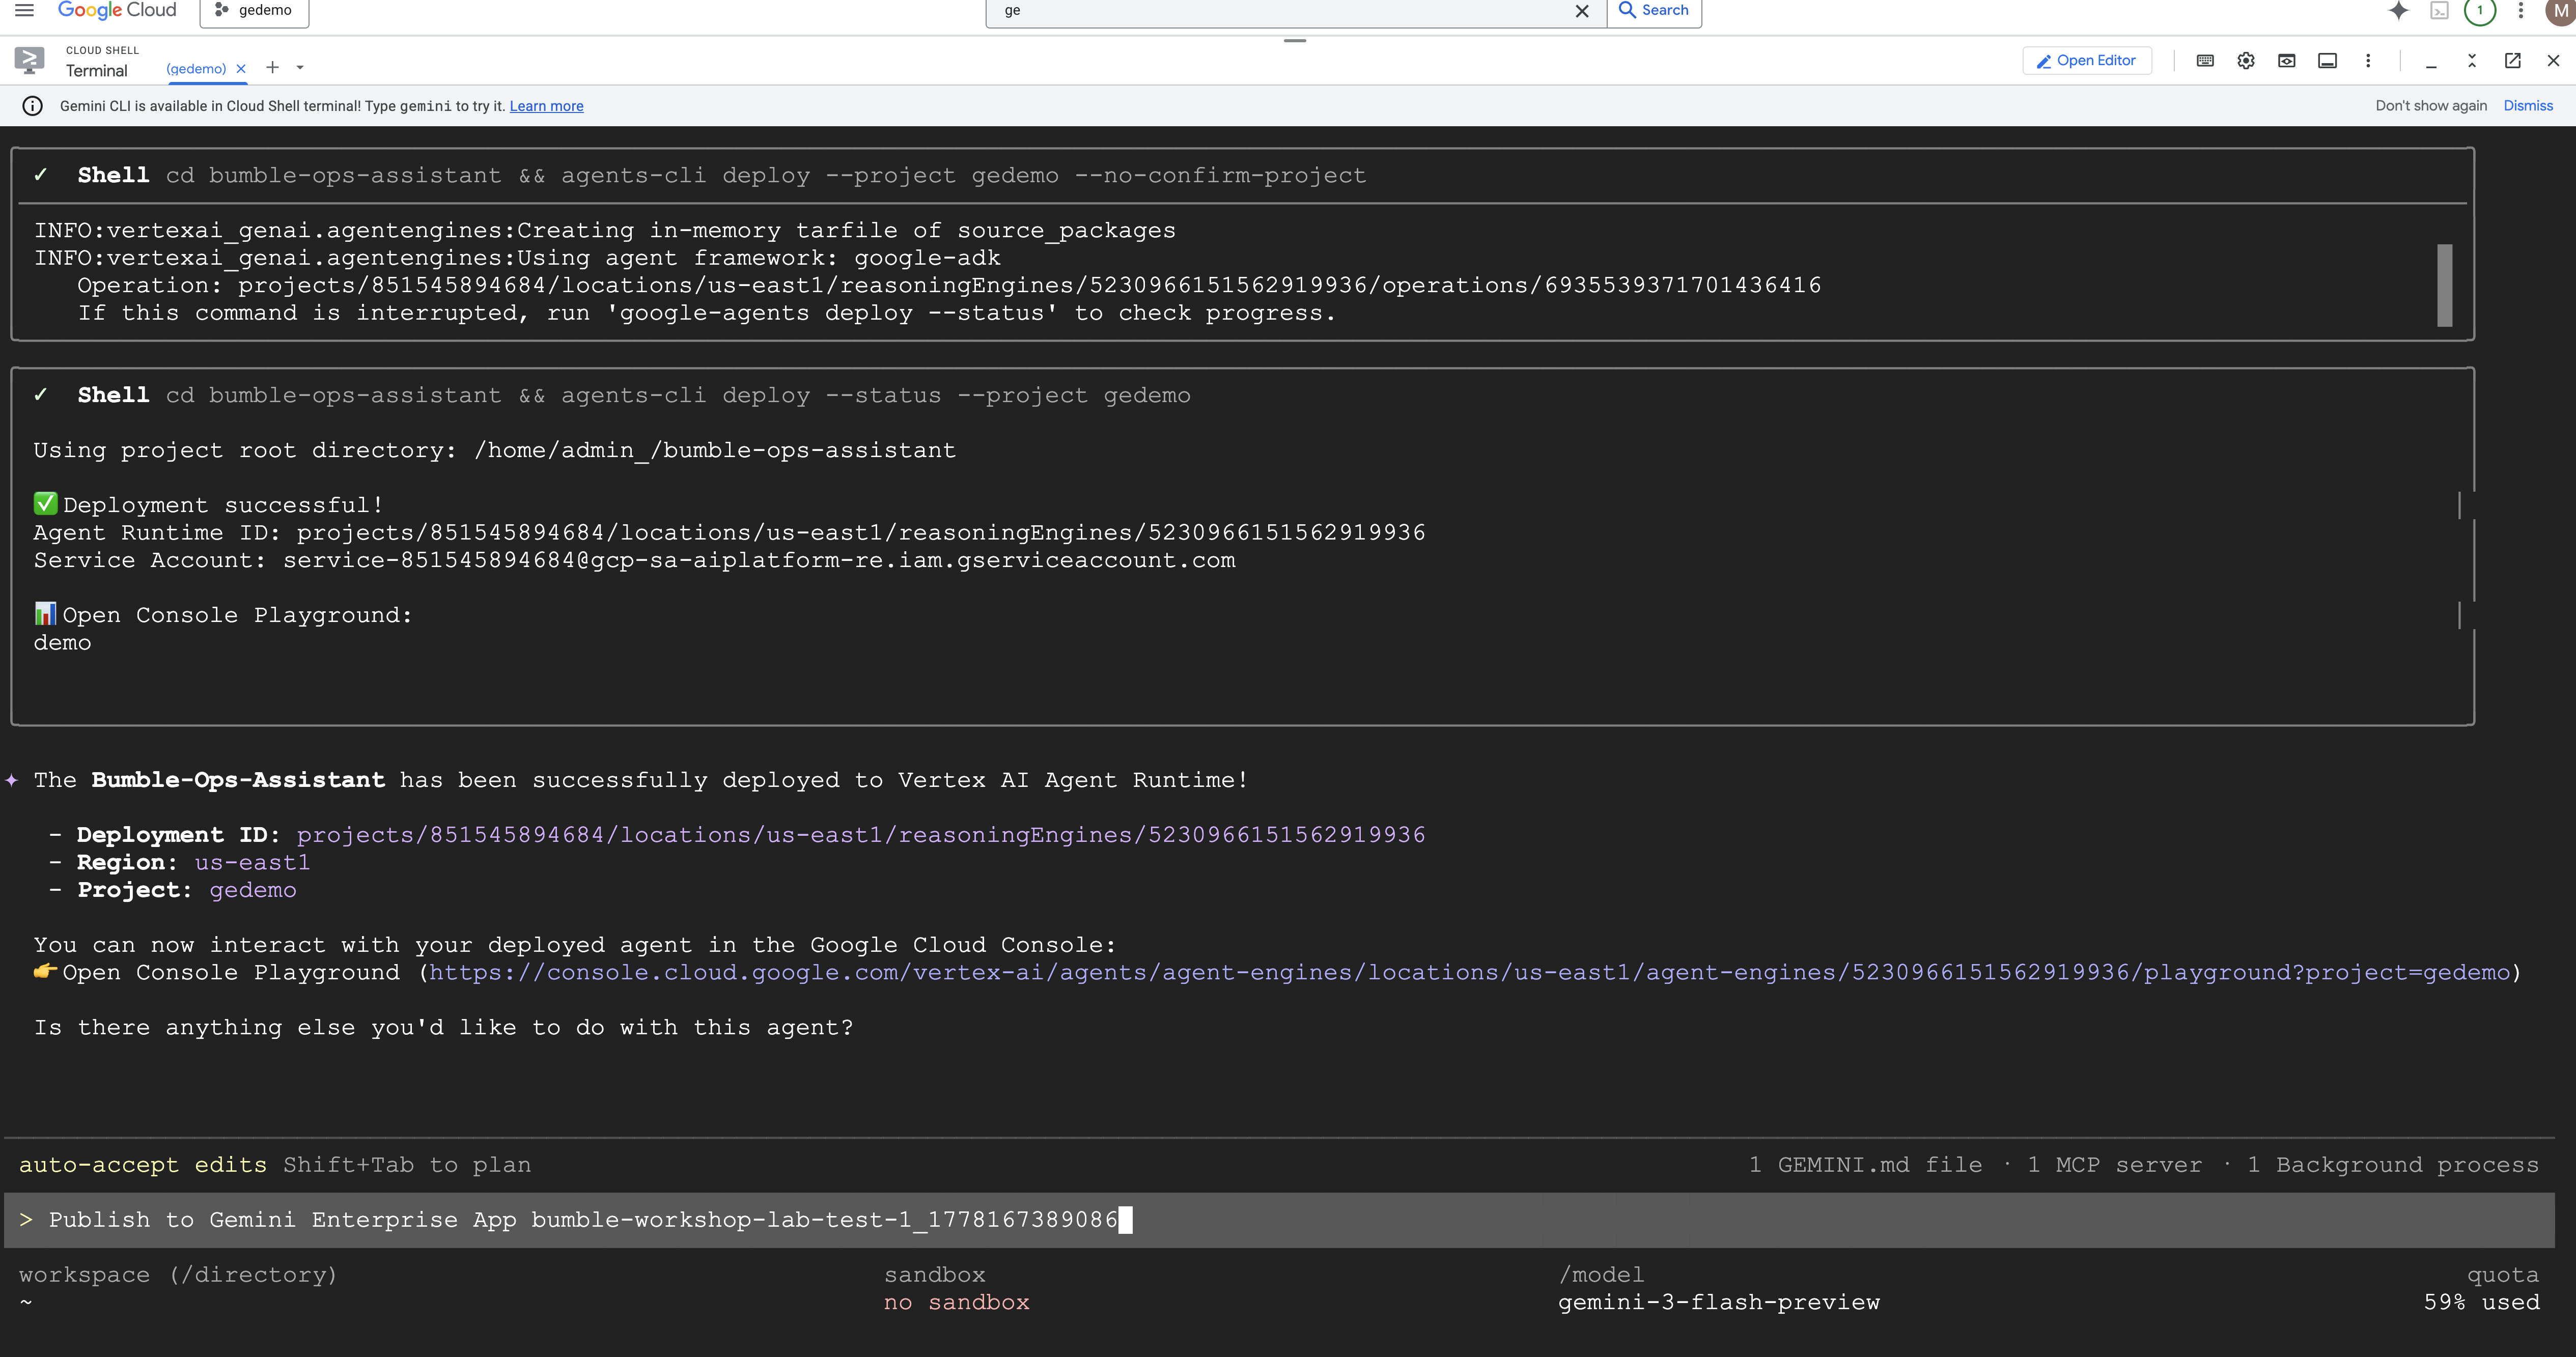
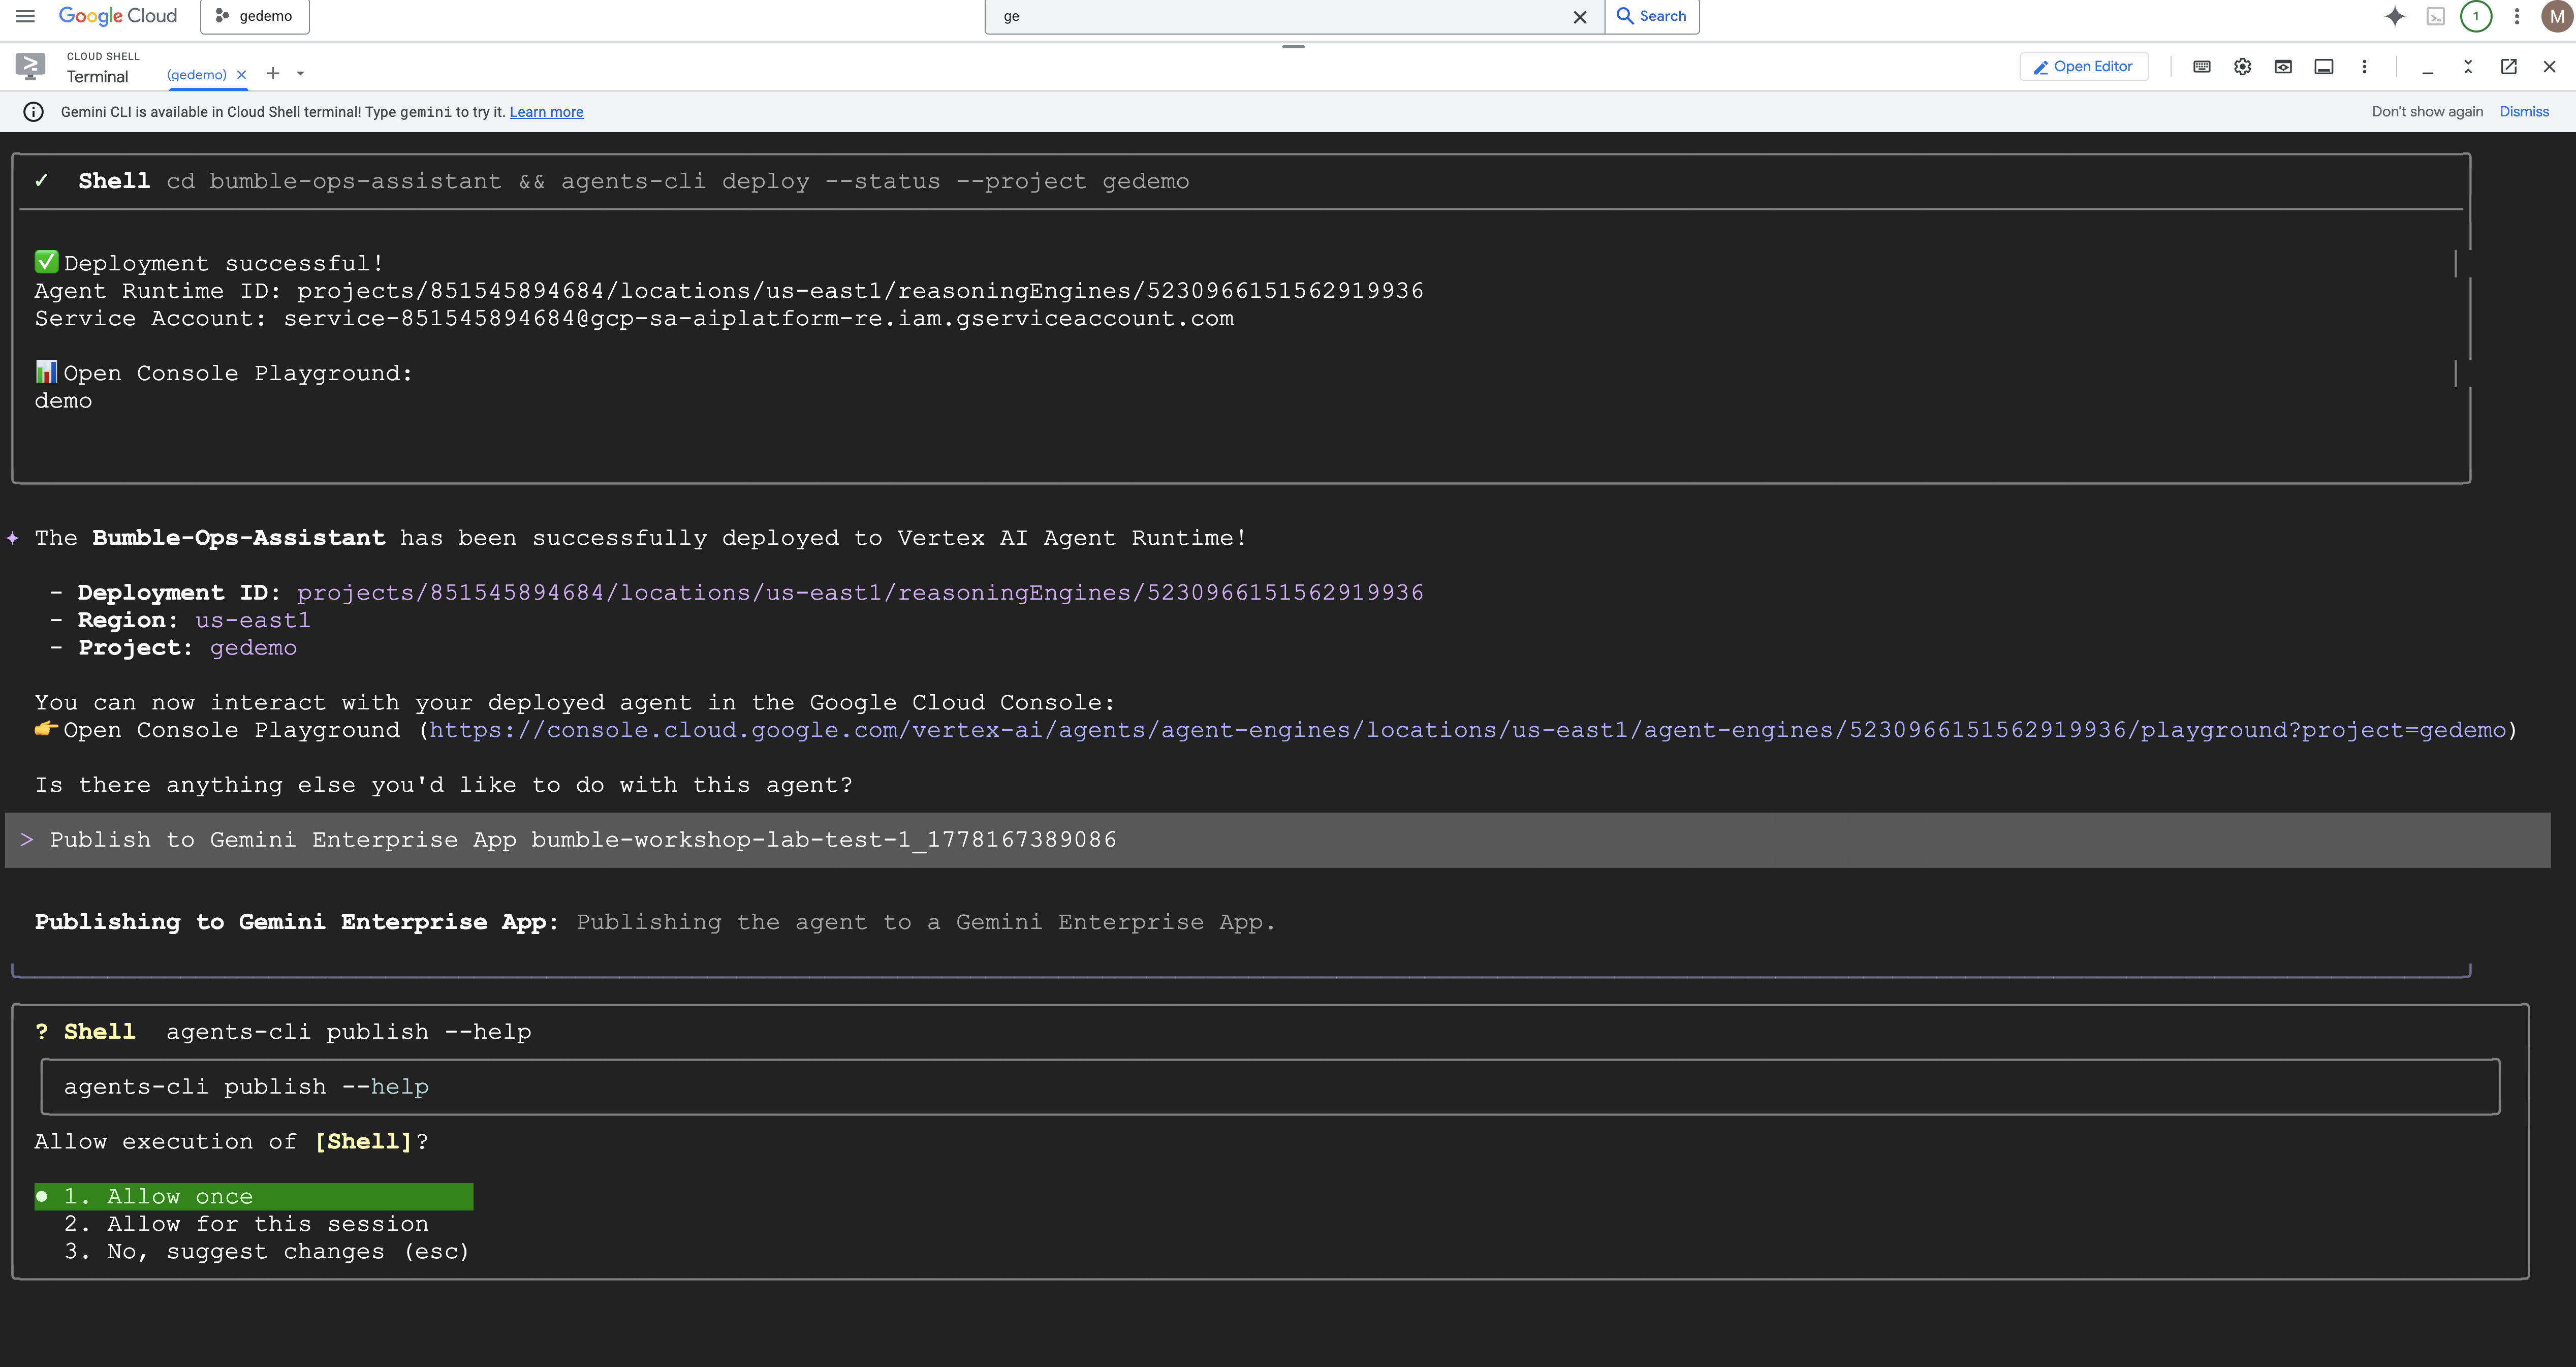
- The CLI will prompt you to select the destination Gemini Enterprise App configured in your project. Select your app.
- Set the Display Name: Type
Bumble Platform Health.
Let's examine the interactive publishing sequence: 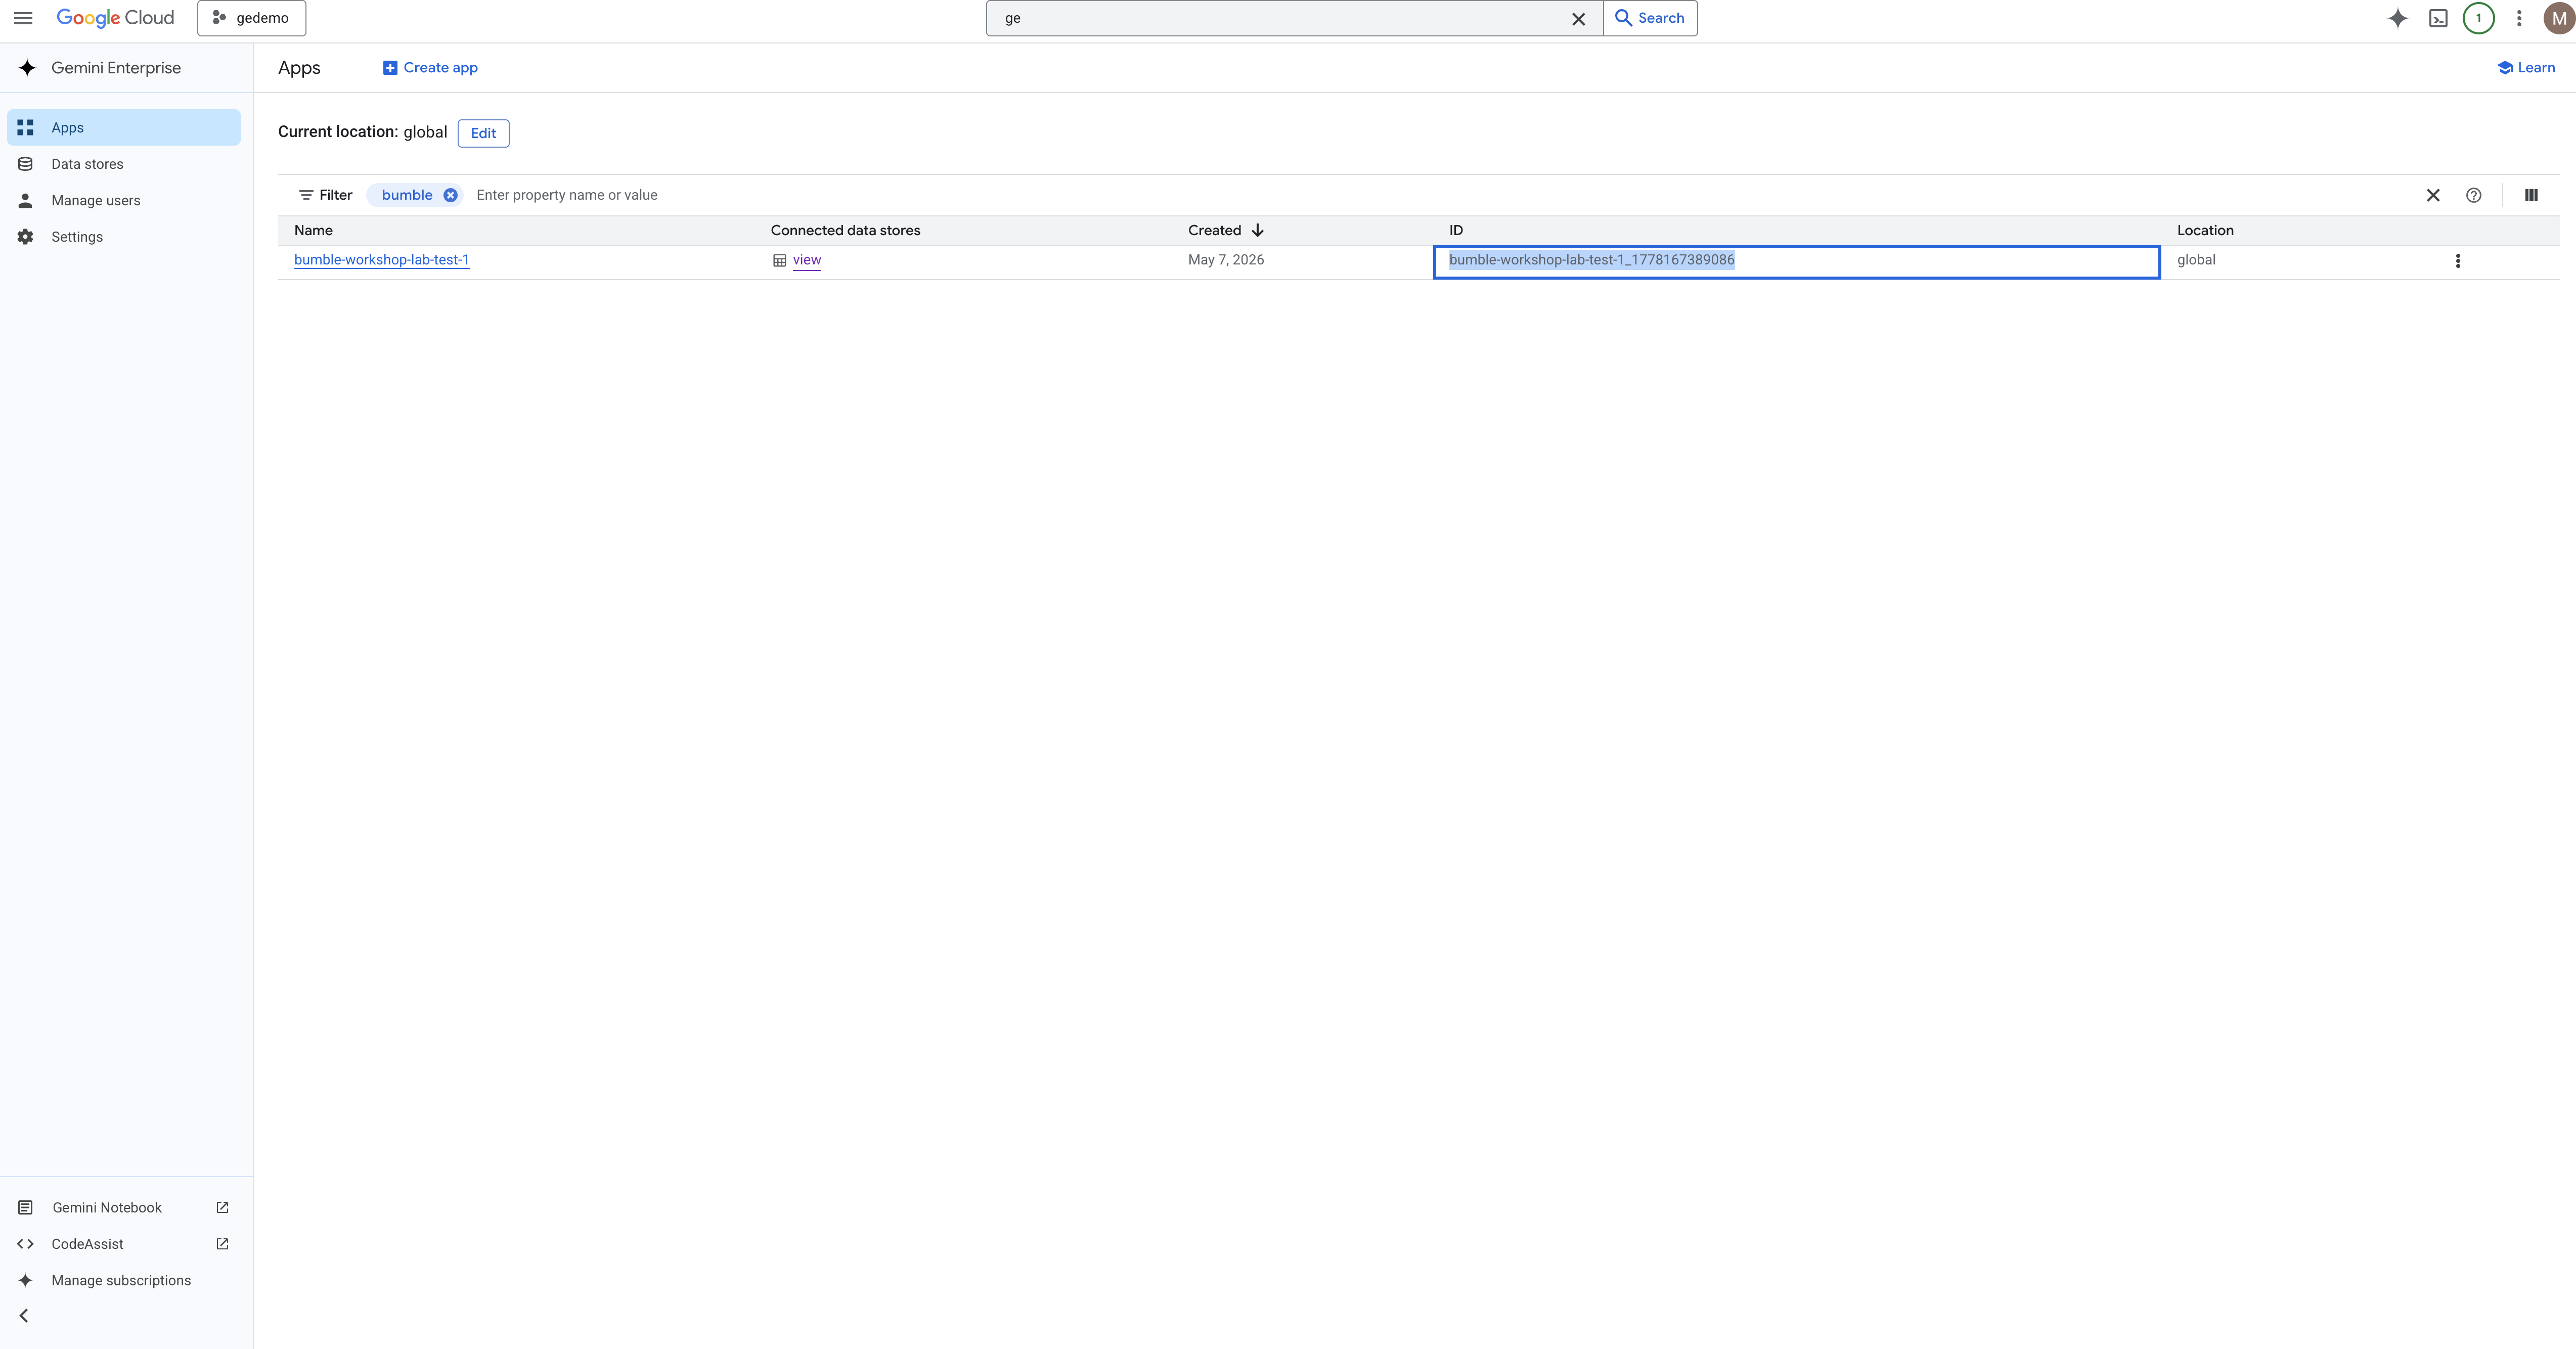
Step 3: Verification in Agent Registry
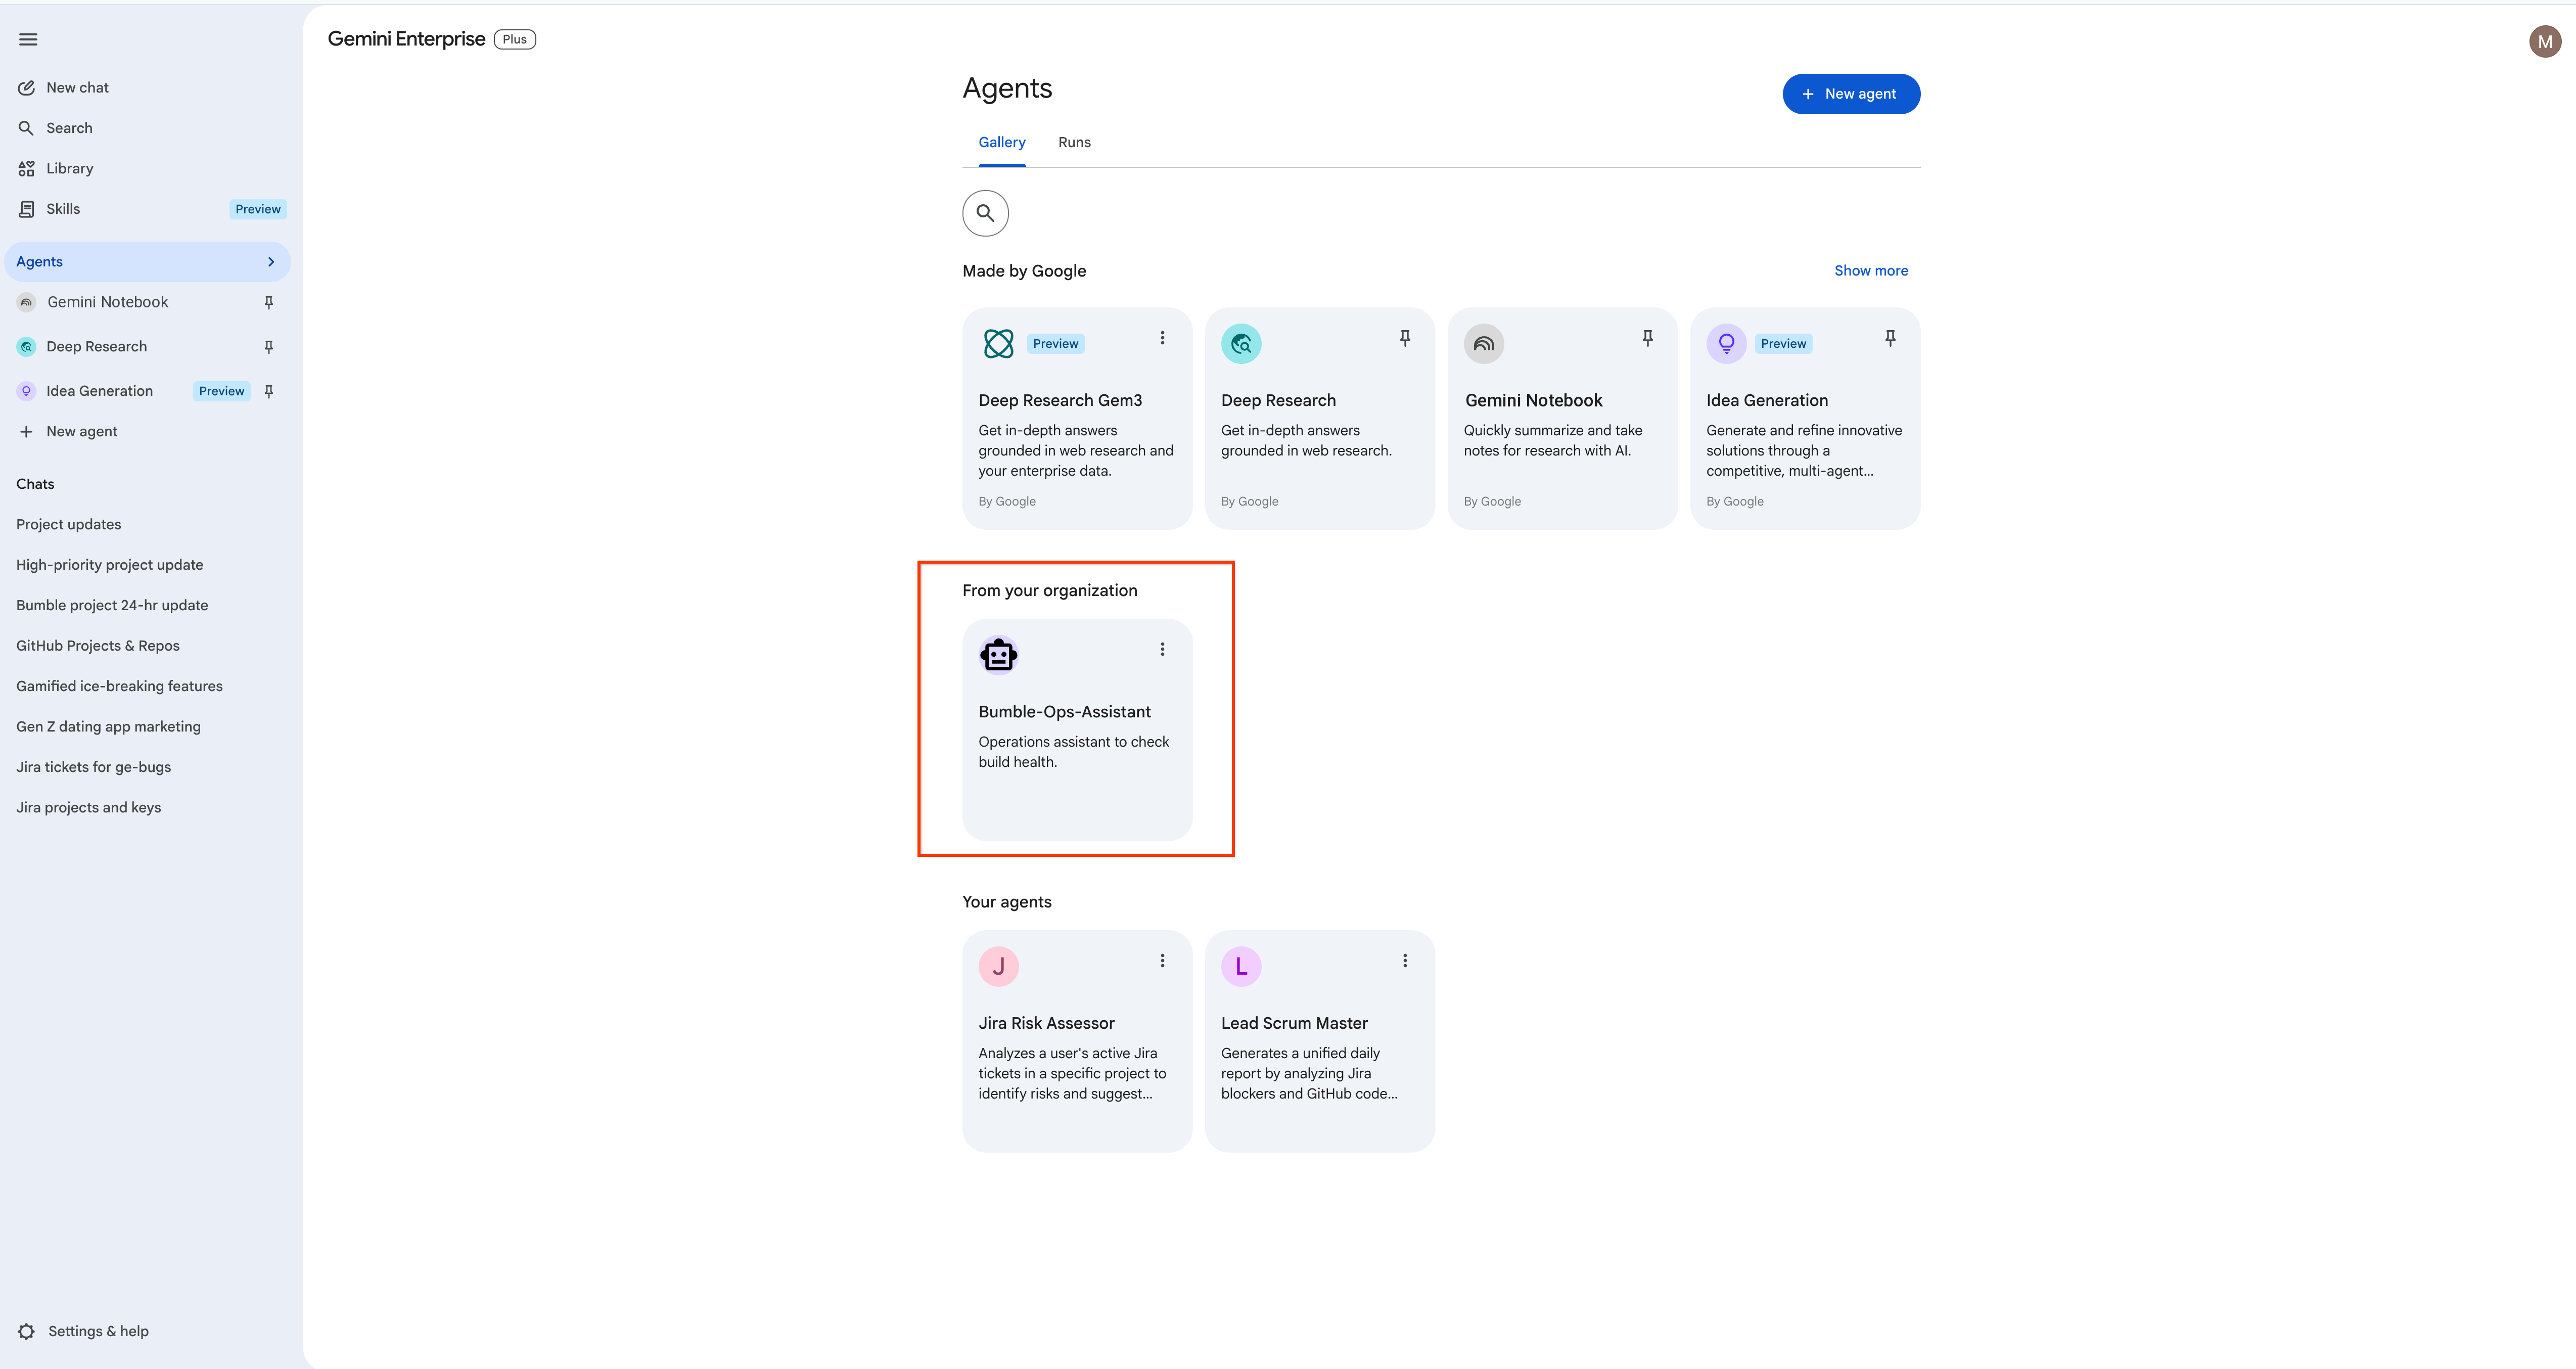
Open your Google Cloud Console. Navigate to the Gemini Enterprise Agent Platform workspace and select Agent Registry (note that this is located in the Gemini Enterprise Agent Platform registry, not the Corp Admin Console). You will see your custom Bumble Platform Health agent listed alongside all the prebuilt options, ready to be shared with the Bumble product and engineering leads!

Refer to the official developer guide for more details: Gemini Enterprise Agent Platform Runtime Docs
19. Clean Up
To avoid ongoing billing for connector syncing and resources, please clean up the provisioned assets.
- Delete the Custom Agents You Built: Remove every agent created during this workshop so none keep running:
- The Lead Scrum Master chat agent and its two sub-agents (Jira-Analyst and GitHub-Analyst) from Agent Designer.
- The Bumble Release Gatekeeper workflow agent.
- The deployed ADK agent published as Bumble Platform Health (its internal id is
Bumble-Ops-Assistant) — navigate to your Gemini Enterprise Agent Platform > Agent Registry and delete the deployment.
- Delete the Gemini Enterprise App: If you created a custom Bumble portal app, navigate to the App management page and click Delete.
- Delete Data Stores: In the Google Cloud Console Search, open Vertex AI Agent Builder > Data Stores and delete every data store you connected: Jira, Confluence, and GitHub (and the Google Drive connector, if you connected one), so nothing keeps syncing or billing.
- Delete GCP Project (Optional): If you executed this workshop inside a dedicated sandbox project, you can simply delete the entire project from the Google Cloud Resource Manager to clean up all resources at once.
caution Permanent Deletion: Deleting data stores, apps, and projects is completely permanent. Once deleted, these configurations cannot be recovered, and active workshop configurations will be immediately destroyed.
20. Congratulations
You have completed the Bumble Gemini Enterprise Day 1 Workshop!
What you've learned
- Configuring data connectors for Jira, Confluence, GitHub, and Google Drive.
- Grounding analysis in documents, workspaces, and live execution data.
- Building Multi-Step Agents with sub-agents.
- Invoking the out-of-the-box Project Updates skill template to generate a project status summary.
- Co-authoring ADRs in Gemini Assistant Canvas and creating new Confluence pages from them.
- Scaffolding deterministic workflows using the Natural Language Flow Builder.
- Developing, deploying, and publishing professional agents using the ADK and Antigravity CLI (
agy).