
1. Introduction
What You'll Build
Gemini Motion Lab is a live AI-powered kiosk experience. A user records a short dance or motion clip, and the system:
- Analyzes the movement using Gemini (body parts, phases, tempo, energy)
- Generates a stylized avatar image using Nano Banana (Gemini Flash Image)
- Creates an AI video using Veo that recreates the motion with the avatar
- Composes a side-by-side video (original + AI-generated)
- Shares the result via a QR code on a mobile-optimized page
By the end of this codelab, you'll have the full demo deployed to Google Cloud Run and understand the AI pipeline that powers it.
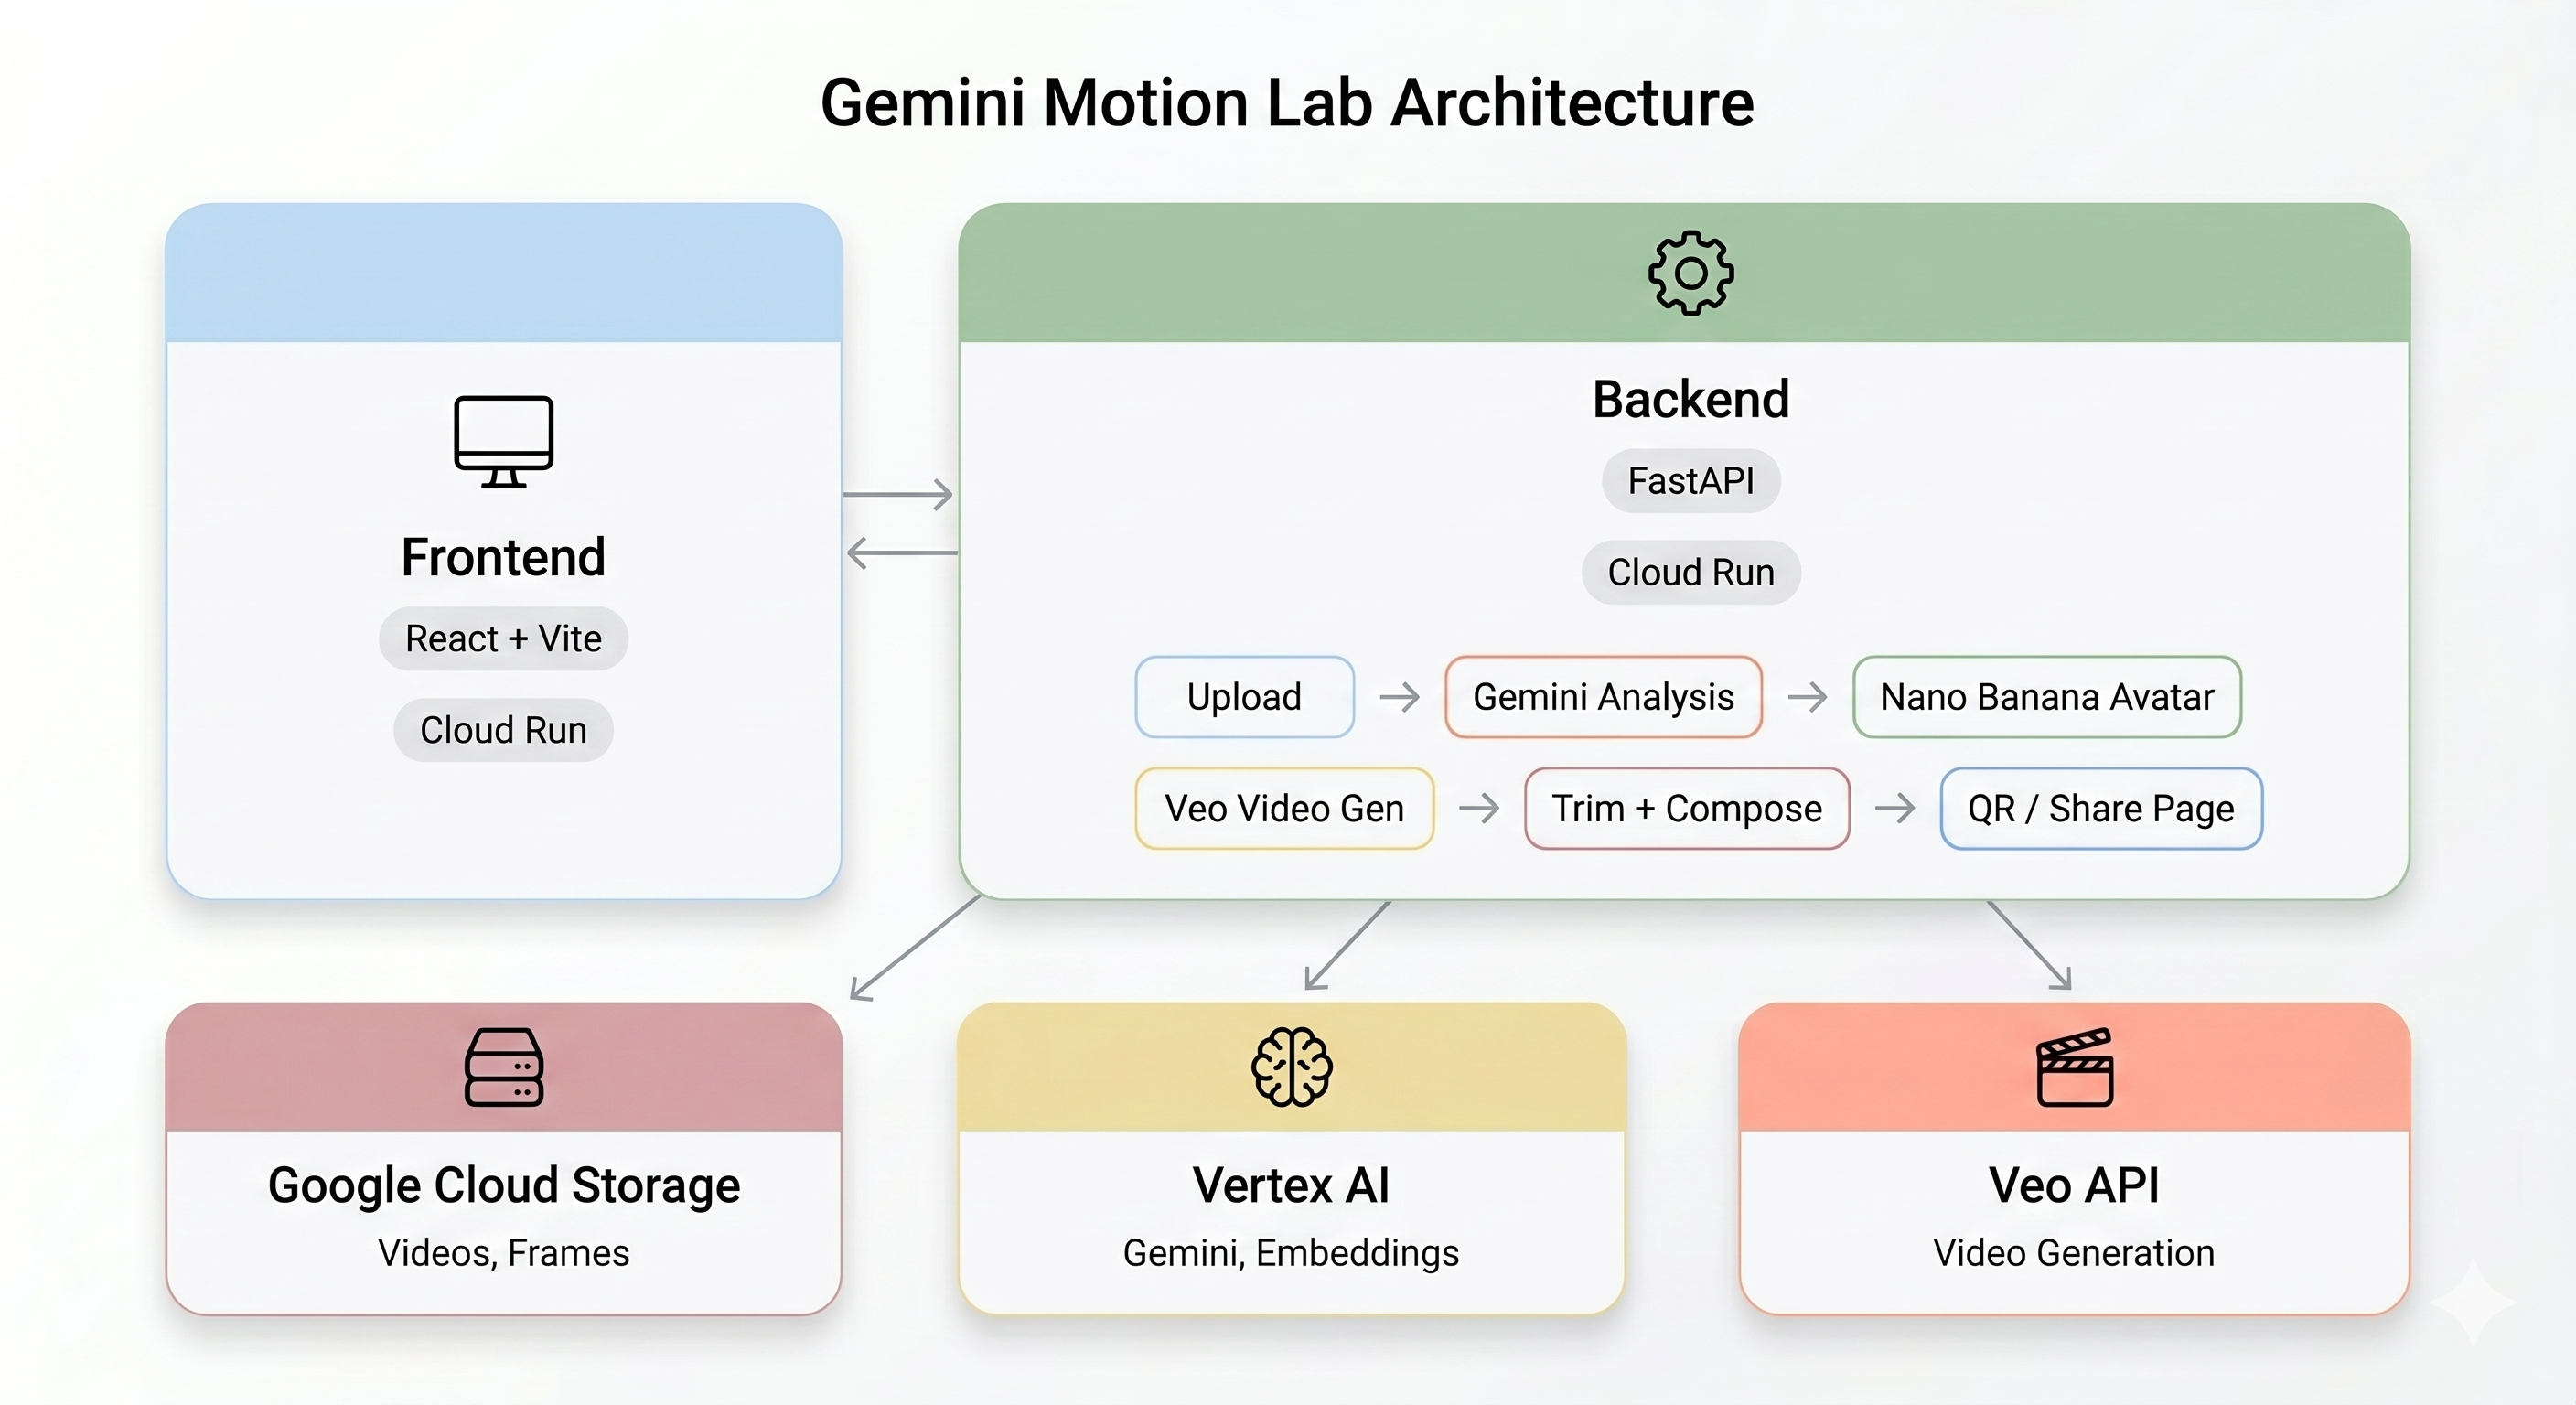
Architecture Overview
Final Demo:
Core Technologies
Component | Technology | Purpose |
Motion Analysis | Gemini Flash | Analyze video for body movement, phases, and style |
Avatar Generation | Gemini Flash Image (Nano Banana) | Generate a stylized 1024×1024 avatar from a key frame |
Video Generation | Veo 3.1 | Create an AI video from the avatar + motion prompt |
Backend | FastAPI + Python 3.11 | API server with async pipeline orchestration |
Frontend | React + Vite + TypeScript | Kiosk UI with camera recording and live status |
Hosting | Cloud Run | Serverless containerized deployment |
Storage | Google Cloud Storage | Video uploads, frames, trimmed & composed outputs |
2. 📦 Clone the Repository
1. Open Cloud Shell Editor
👉 Open Cloud Shell Editor in your browser.
If the terminal doesn't appear at the bottom of the screen:
- Click View
- Click Terminal
2. Clone the Code
👉💻 In the terminal, clone the repository:
cd ~
git clone https://github.com/cuppibla/gemini-motion-lab-starter.git
cd gemini-motion-lab-starter
3. Explore the Project Structure
Take a quick look at the repository layout:
gemini-motion-lab-starter/
├── backend/                     # FastAPI backend (Python 3.11)
│   ├── app/
│   │   ├── main.py              # FastAPI app entry point
│   │   ├── config.py            # Environment-based settings
│   │   ├── routers/             # API endpoints (upload, analyze, generate, share...)
│   │   ├── services/            # Business logic (Gemini, Veo, storage, pipeline...)
│   │   └── prompts/             # AI prompt templates
│   ├── Dockerfile
│   └── pyproject.toml
├── frontend/                    # React + Vite + TypeScript
│   ├── src/                     # React components
│   ├── public/                  # Static assets
│   ├── Dockerfile
│   └── nginx.conf
├── init.sh                      # Create GCP project & link billing
├── billing-enablement.py        # Auto-link billing account
├── setup.sh                     # Create GCS bucket, service account, .env
└── scripts/                     # Utility scripts
3. 🛠️ Claim Credits & Create GCP Project
Part 1: Claim Your Billing Credits
👉 Claim your billing account credit using your Gmail account.
Part 2: Create a New Project
👉💻 In the terminal, make the init script executable and run it:
cd ~/gemini-motion-lab-starter
chmod +x init.sh
./init.sh
The init.sh script will:
- Create a new GCP project with the prefix
gemini-motion-lab - Save the project ID to
~/project_id.txt - Install billing dependencies and automatically link your billing account
Part 3: Configure Project & Enable APIs
👉💻 Set your project ID in the terminal:
gcloud config set project $(cat ~/project_id.txt) --quiet
👉💻 Enable the Google Cloud APIs needed for this project (this takes ~1-2 minutes):
gcloud services enable \
    run.googleapis.com \
    cloudbuild.googleapis.com \
    aiplatform.googleapis.com \
    storage.googleapis.com \
    artifactregistry.googleapis.com
4. 🧠 [READ ONLY] Understanding the Architecture
This section explains how the AI pipeline works end-to-end. No action needed — just read to understand the system before deploying.
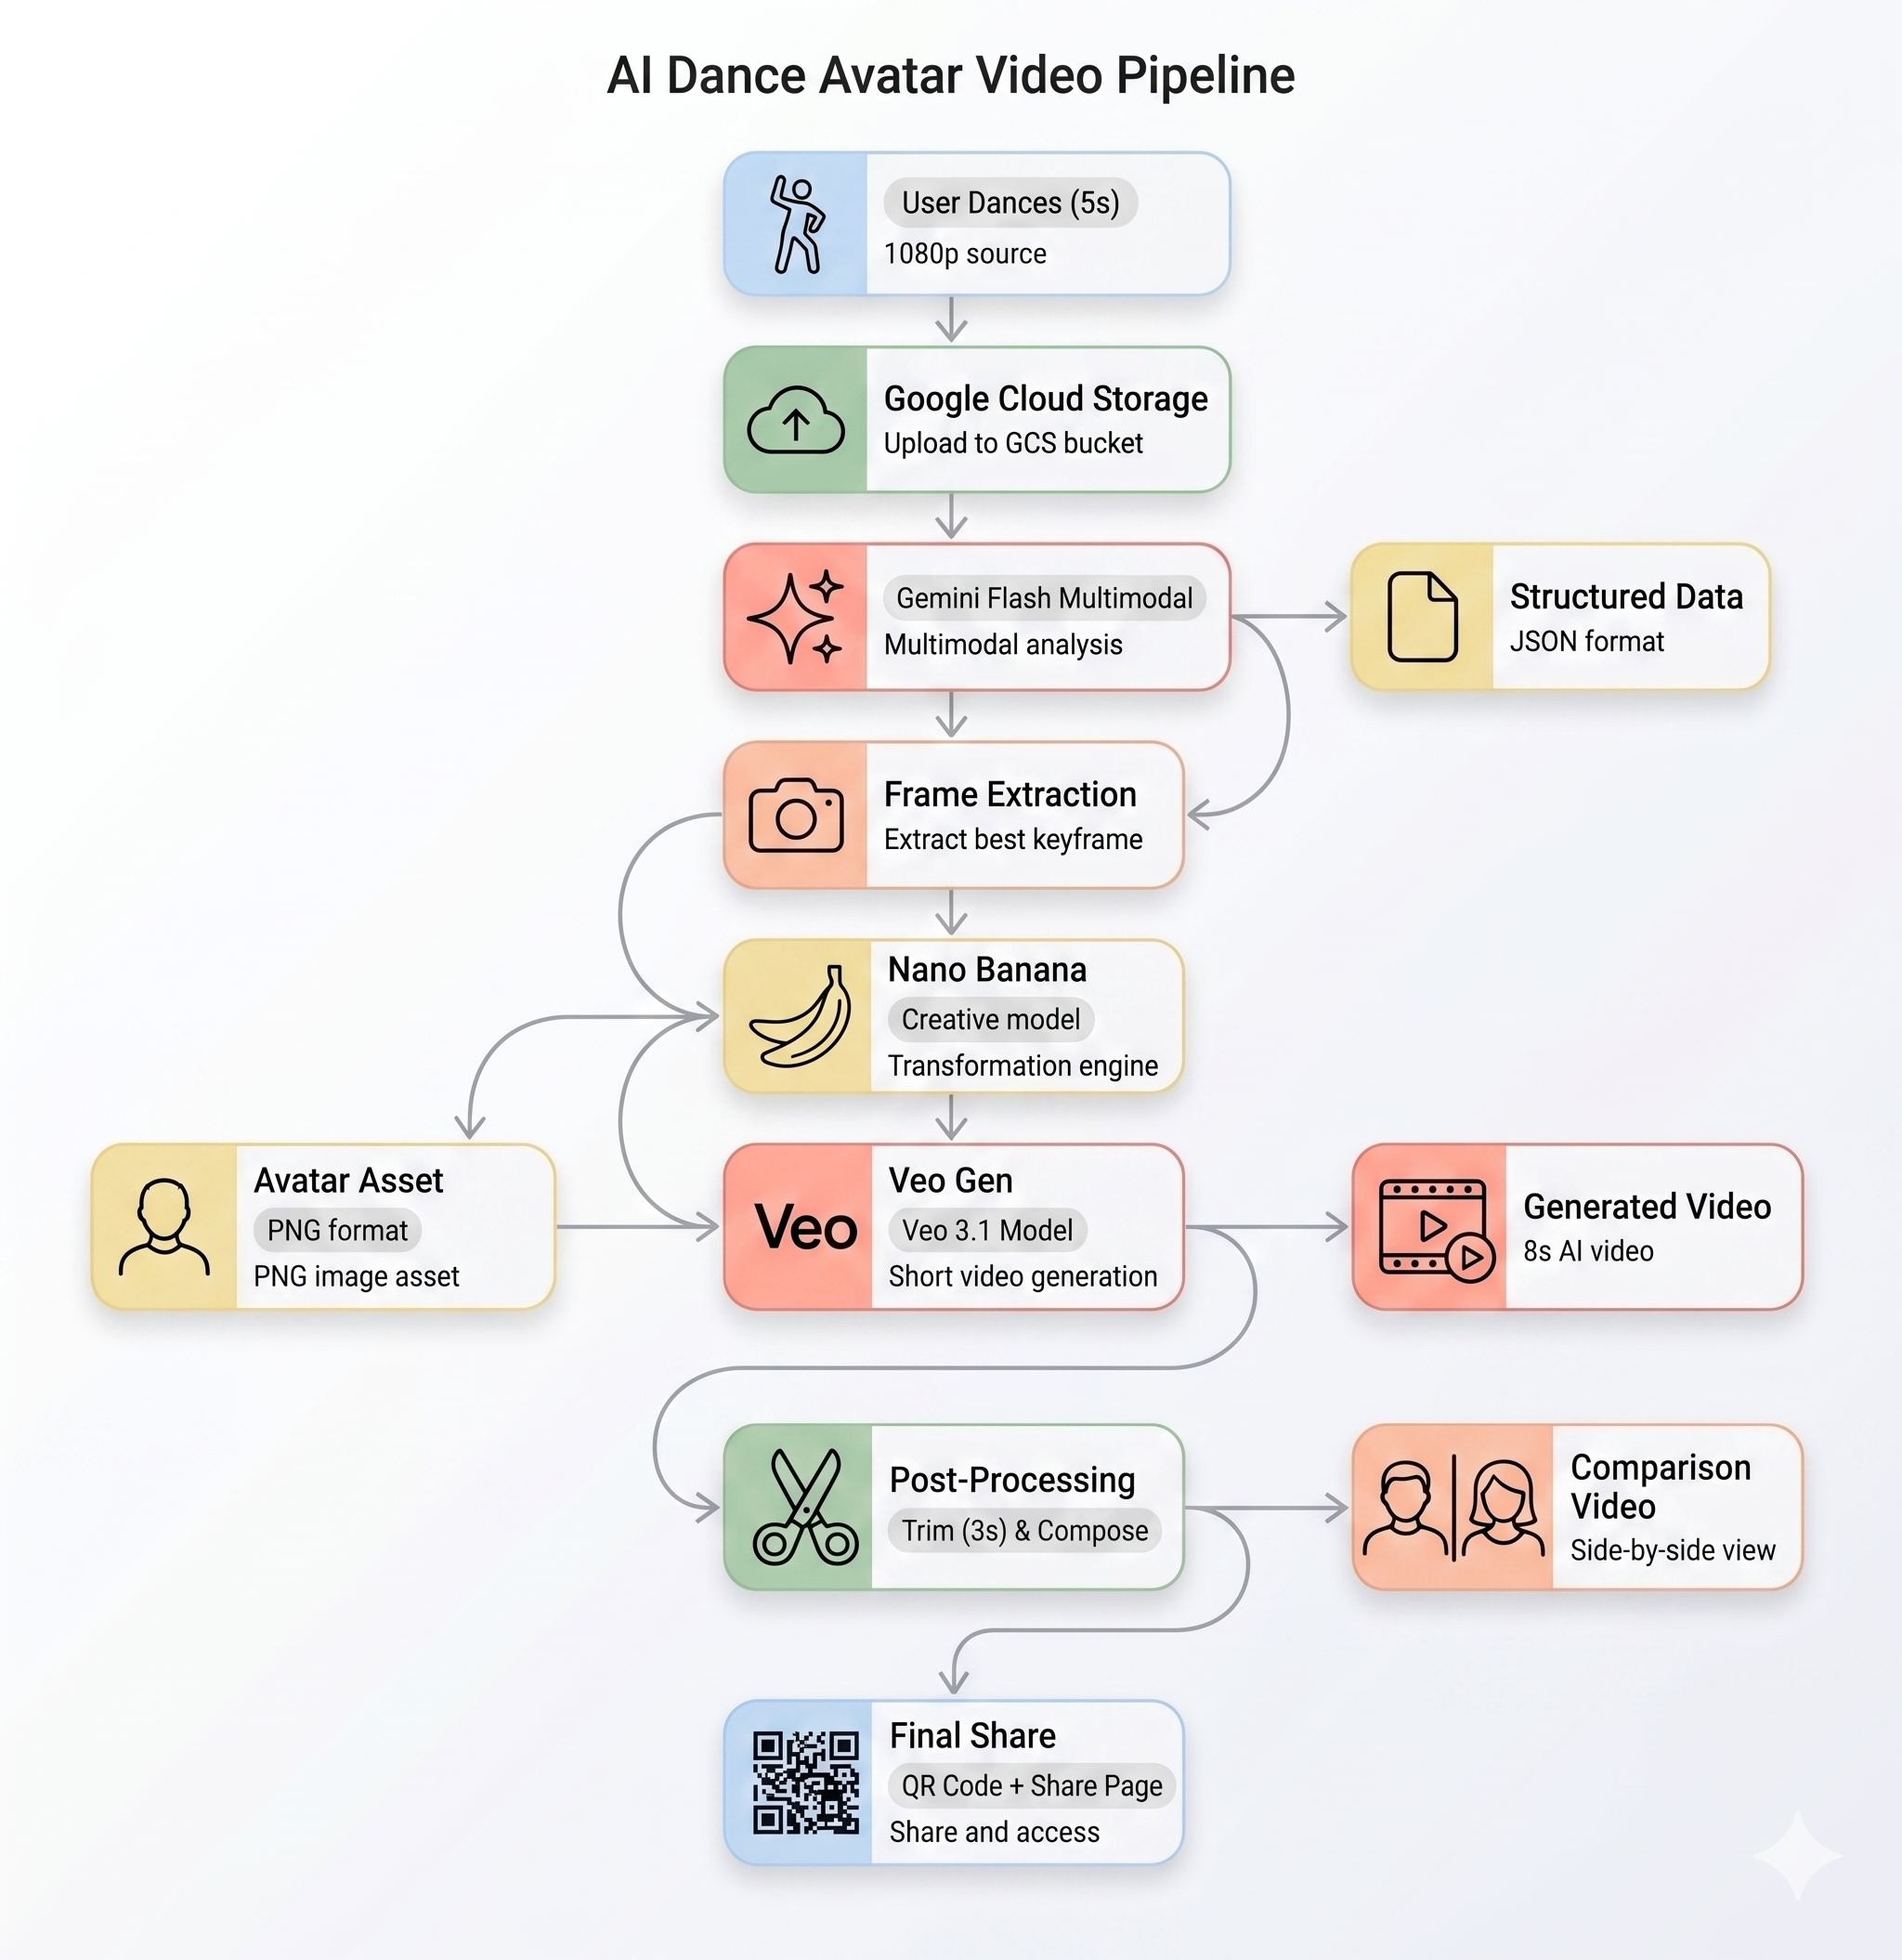
The AI Pipeline
When a user records a motion clip at the kiosk, five stages run in sequence:
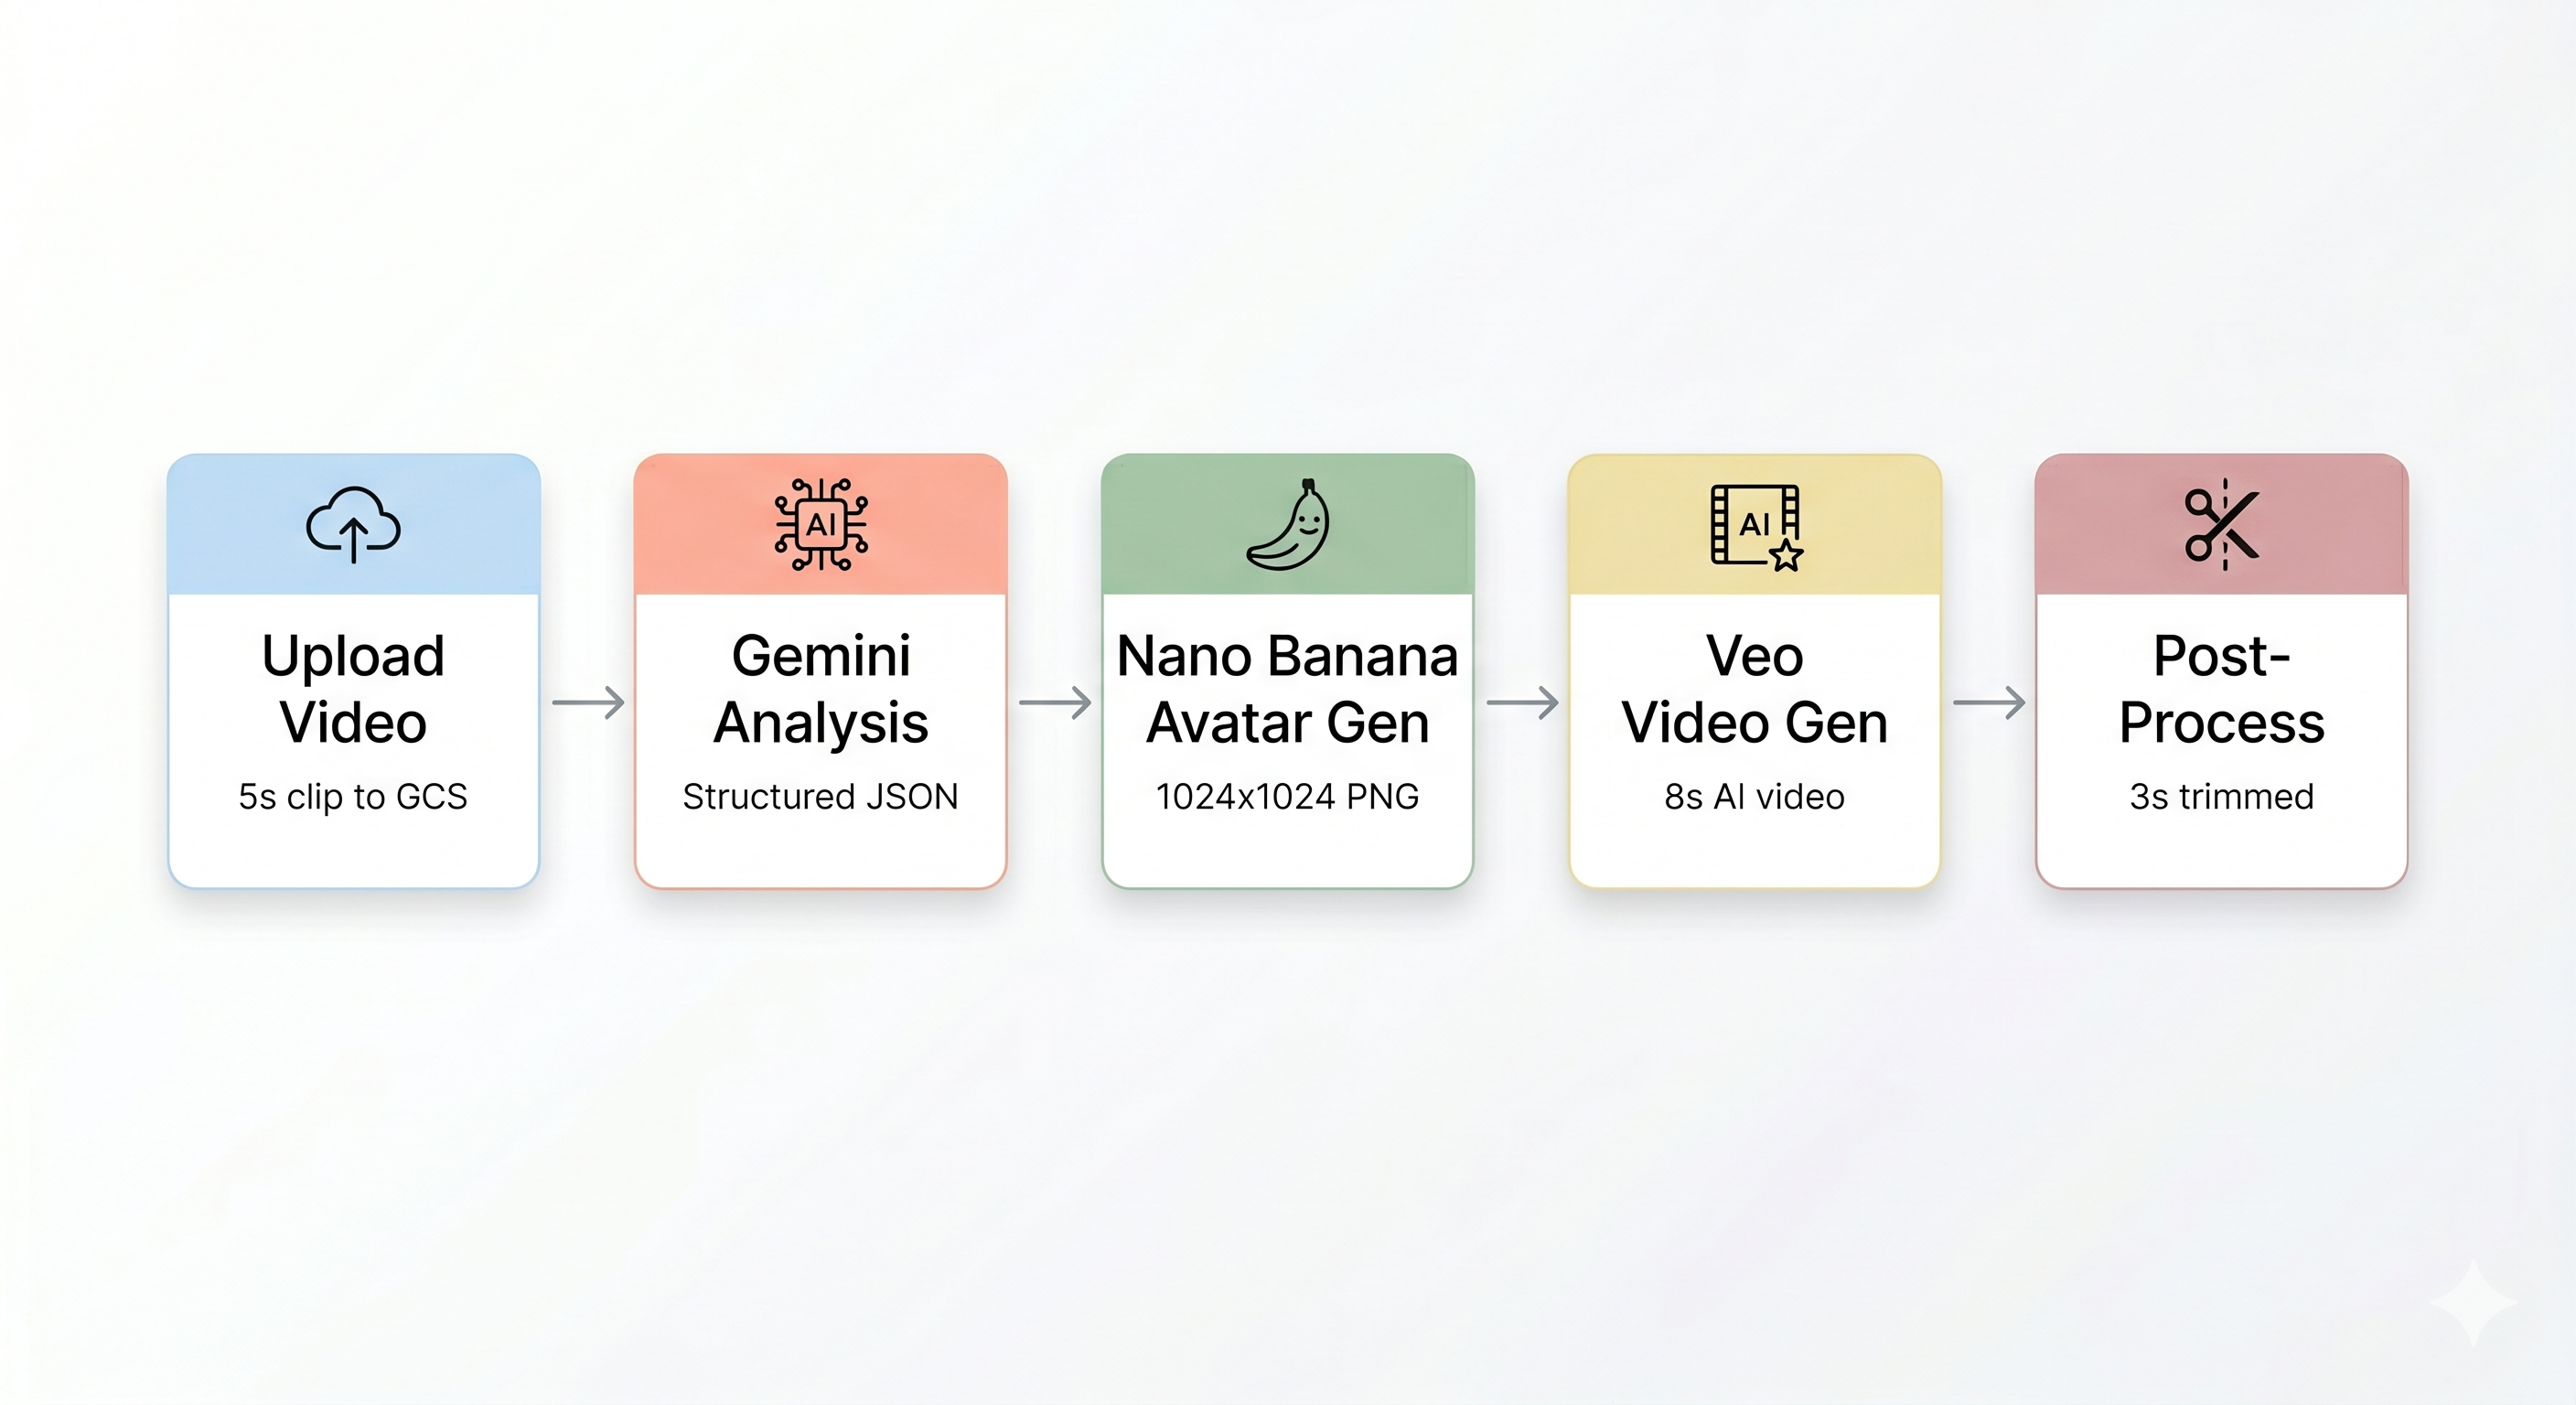
Stage 1: Video Upload
The frontend records a 5-second WebM clip from the user's camera and uploads it to Google Cloud Storage via the backend's /api/upload endpoint.
POST /api/upload/{video_id} → gs://BUCKET/uploads/{video_id}.webm
Stage 2: Gemini Motion Analysis
The backend sends the uploaded video to Gemini Flash (gemini-3-flash-preview) for structured analysis.
How it works (backend/app/services/gemini_service.py):
The service uses the Vertex AI SDK's client.models.generate_content() with the video as a Part.from_uri input and a structured prompt. The response_mime_type="application/json" ensures Gemini returns parseable JSON. The model also uses ThinkingConfig(thinking_budget=1024) for better reasoning about motion phases.
# Simplified from gemini_service.py
response = client.models.generate_content(
    model="gemini-3-flash-preview",
    contents=[
        types.Part.from_uri(file_uri=gcs_uri, mime_type="video/webm"),
        MOTION_ANALYSIS_PROMPT,  # detailed prompt template
    ],
    config=types.GenerateContentConfig(
        response_mime_type="application/json",
        thinking_config=types.ThinkingConfig(thinking_budget=1024),
    ),
)
analysis = json.loads(response.text)
Stage 3: Nano Banana Avatar Generation
Using the best frame extracted from the video, Gemini Flash Image (gemini-3.1-flash-image-preview) generates a 1024×1024 stylized avatar.
How it works (backend/app/services/nano_banana_service.py):
# Simplified from nano_banana_service.py
response = client.models.generate_content(
    model="gemini-3.1-flash-image-preview",
    contents=[
        types.Content(role="user", parts=[
            types.Part.from_bytes(data=frame_bytes, mime_type="image/png"),
            types.Part.from_text(text=avatar_prompt),
        ])
    ],
    config=types.GenerateContentConfig(
        response_modalities=["IMAGE"],
        image_config=types.ImageConfig(
            aspect_ratio="1:1",
            output_mime_type="image/png",
        ),
    ),
)
The generated avatar PNG is uploaded to GCS and passed to the next stage.
Stage 4: Veo Video Generation
The avatar image is used as a reference asset for Veo 3.1 (veo-3.1-fast-generate-001) to generate an 8-second AI video.
How it works (backend/app/services/veo_service.py):
# Simplified from veo_service.py
config = GenerateVideosConfig(
    reference_images=[
        VideoGenerationReferenceImage(
            image=Image(gcs_uri=avatar_gcs_uri, mime_type="image/png"),
            reference_type="ASSET",
        )
    ],
    aspect_ratio="16:9",
    duration_seconds=8,
    output_gcs_uri=f"gs://{BUCKET}/output/{video_id}/",
)
operation = client.models.generate_videos(
    model="veo-3.1-fast-generate-001",
    prompt=veo_prompt,
    config=config,
)
Veo generation is asynchronous — it returns an operation ID immediately. The backend polls the operation until complete (up to 10 minutes).
Stage 5: Post-Processing Pipeline
Once Veo completes, the background pipeline (backend/app/services/pipeline.py) runs automatically:
- Trim the 8s Veo output to 3 seconds
- Compose a side-by-side video (original recording on left, AI video on right)
- Upload the composed video to GCS
- Release the queue slot
This pipeline runs as a background asyncio.Task — the kiosk frontend doesn't need to wait.
The Queue System
Since Veo generation is resource-intensive, the system enforces a maximum of 3 concurrent jobs:
# backend/app/routers/queue.py
MAX_CONCURRENT_JOBS = 3

@router.get("/queue/status")
async def queue_status():
    return {
        "active_jobs": len(_active_jobs),
        "max_jobs": MAX_CONCURRENT_JOBS,
        "available": len(_active_jobs) < MAX_CONCURRENT_JOBS,
    }
The frontend checks GET /api/queue/status before letting a new user start a session. When a pipeline completes and calls complete(video_id), the slot opens for the next user.
Cloud Run — Serverless Containers
Both the backend and frontend are deployed as Cloud Run services:
Service | Purpose | Key Config |
Backend | FastAPI API server | 2 GiB memory (for video processing via ffmpeg) |
Frontend | Static React app served by Nginx | Default memory |
5. ⚙️ Run Setup Script
1. Run the Automated Setup
The setup.sh script creates the required cloud resources and generates your .env file.
👉💻 Make the script executable and run it:
cd ~/gemini-motion-lab-starter
chmod +x setup.sh
./setup.sh
2. Grant IAM Roles
Now grant the required permissions to the service account.
👉💻 Run the following commands to set your project ID and grant all three roles:
export PROJECT_ID=$(cat ~/project_id.txt)

# 1. Storage Admin — upload/download videos and frames
gcloud projects add-iam-policy-binding $PROJECT_ID \
  --member="serviceAccount:gemini-motion-lab-sa@${PROJECT_ID}.iam.gserviceaccount.com" \
  --role="roles/storage.admin"

# 2. Vertex AI User — call Gemini and Veo models
gcloud projects add-iam-policy-binding $PROJECT_ID \
  --member="serviceAccount:gemini-motion-lab-sa@${PROJECT_ID}.iam.gserviceaccount.com" \
  --role="roles/aiplatform.user"

# 3. Service Account Token Creator — generate signed URLs for GCS
PROJECT_NUMBER=$(gcloud projects describe $PROJECT_ID --format="value(projectNumber)")
COMPUTE_SA="${PROJECT_NUMBER}-compute@developer.gserviceaccount.com"

gcloud iam service-accounts add-iam-policy-binding \
  gemini-motion-lab-sa@${PROJECT_ID}.iam.gserviceaccount.com \
  --project=$PROJECT_ID \
  --member="serviceAccount:${COMPUTE_SA}" \
  --role="roles/iam.serviceAccountTokenCreator"
3. Verify Your .env File
👉💻 Check the generated .env file:
cat .env
You should see:
GOOGLE_CLOUD_PROJECT=your-project-id
GOOGLE_CLOUD_LOCATION=us-central1
GCS_BUCKET=gemini-motion-lab-your-project-id
GCS_SIGNING_SA=gemini-motion-lab-sa@your-project-id.iam.gserviceaccount.com
GOOGLE_GENAI_USE_VERTEXAI=true
MOCK_AI=false
6. 🚀 Deploy the Backend
1. Understand the Backend Dockerfile
Before deploying, let's understand what the container looks like:
# backend/Dockerfile
FROM python:3.11-slim                           # Python base image
RUN apt-get update && apt-get install -y \
    ffmpeg libgl1 libglib2.0-0 \                # ffmpeg for video processing
    && rm -rf /var/lib/apt/lists/*
WORKDIR /app
COPY pyproject.toml .
RUN pip install --no-cache-dir .                # Install Python dependencies
COPY app/ ./app/                                # Copy application code
EXPOSE 8080
CMD ["uvicorn", "app.main:app", "--host", "0.0.0.0", "--port", "8080"]
2. Deploy to Cloud Run
👉💻 Load your environment variables and deploy:
source .env

cd ~/gemini-motion-lab-starter/backend

gcloud run deploy gemini-motion-lab-backend \
  --source . \
  --region us-central1 \
  --allow-unauthenticated \
  --min-instances 1 \
  --max-instances 3 \
  --memory 2Gi \
  --port 8080 \
  --project $GOOGLE_CLOUD_PROJECT \
  --set-env-vars "GOOGLE_CLOUD_PROJECT=$GOOGLE_CLOUD_PROJECT,GOOGLE_CLOUD_LOCATION=$GOOGLE_CLOUD_LOCATION,GCS_BUCKET=$GCS_BUCKET,GCS_SIGNING_SA=$GCS_SIGNING_SA,GOOGLE_GENAI_USE_VERTEXAI=$GOOGLE_GENAI_USE_VERTEXAI,MOCK_AI=$MOCK_AI"
This takes about 3-5 minutes. Cloud Build will:
- Upload your source code
- Build the Docker image
- Push it to Artifact Registry
- Deploy it to Cloud Run
3. Save the Backend URL
👉💻 Once deployed, save the backend URL:
BACKEND_URL=$(gcloud run services describe gemini-motion-lab-backend \
  --region us-central1 \
  --format="value(status.url)" \
  --project $GOOGLE_CLOUD_PROJECT)

echo "Backend URL: $BACKEND_URL"
4. Update the Backend Share URL
The backend generates QR codes so users can download their videos. It needs to know its own public URL to do this.
👉💻 Update the backend configuration with its own URL:
gcloud run services update gemini-motion-lab-backend \
  --region us-central1 \
  --update-env-vars PUBLIC_BASE_URL=$BACKEND_URL \
  --project $GOOGLE_CLOUD_PROJECT
5. Verify the Backend
👉💻 Test the health endpoint:
curl $BACKEND_URL/api/health
Expected output:
{"status":"ok"}
👉💻 Check the queue status:
curl $BACKEND_URL/api/queue/status
Expected output:
{"active_jobs":0,"max_jobs":3,"available":true}
7. 🎨 Deploy the Frontend
1. Understand the Frontend Dockerfile
The frontend uses a multi-stage build — first building the React app, then serving it with Nginx:
# frontend/Dockerfile
FROM node:20-alpine AS builder               # Stage 1: Build
WORKDIR /app
COPY package*.json ./
RUN npm ci
COPY . .
ARG VITE_API_BASE=https://...                # Backend URL baked at build time
ENV VITE_API_BASE=$VITE_API_BASE
RUN npm run build                            # Produces static files in /app/dist

FROM nginx:alpine                            # Stage 2: Serve
COPY --from=builder /app/dist /usr/share/nginx/html
COPY nginx.conf /etc/nginx/conf.d/default.conf
EXPOSE 8080
2. Deploy to Cloud Run
👉💻 First, write the backend URL into a .env file so Vite can bake it in at build time:
cd ~/gemini-motion-lab-starter/frontend
echo "VITE_API_BASE=$BACKEND_URL" > .env
👉💻 Now deploy the frontend:
gcloud run deploy gemini-motion-lab-frontend \
  --source . \
  --region us-central1 \
  --allow-unauthenticated \
  --min-instances 1 \
  --max-instances 3 \
  --port 8080 \
  --project $GOOGLE_CLOUD_PROJECT
This takes about 2-3 minutes.
3. Get the Frontend URL
👉💻 Retrieve and open the frontend URL:
FRONTEND_URL=$(gcloud run services describe gemini-motion-lab-frontend \
  --region us-central1 \
  --format="value(status.url)" \
  --project $GOOGLE_CLOUD_PROJECT)

echo "🎬 Your Gemini Motion Lab is live at: $FRONTEND_URL"
👉 Open the URL in your browser — you should see the Gemini Motion Lab kiosk interface!
8. 🎮 [OPTIONAL] Play With the Demo
1. Record a Motion
- Open the Frontend URL in your browser (preferably Chrome for best camera support)
- Click Start to begin recording
- Dance or move for about 5 seconds — big arm movements and dynamic poses work best
- The recording will automatically stop and upload
2. Watch the AI Pipeline
After uploading, you'll see the pipeline run in real time:
Phase | What's Happening | Duration |
Analyzing... | Gemini Flash analyzes your video for movement patterns | ~5-10s |
Generating Avatar... | Nano Banana creates a stylized avatar from your best frame | ~8-12s |
Creating Video... | Veo 3.1 generates an AI video from the avatar + motion prompt | ~60-120s |
Composing... | ffmpeg trims and creates a side-by-side comparison | ~5-10s |
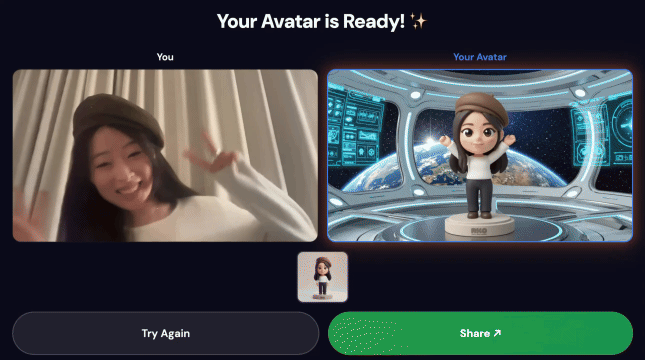
3. Share Your Creation
Once the pipeline completes:
- A QR code appears on the kiosk screen
- Scan the QR code with your phone
- You'll see a mobile-optimized share page with your composed video
4. Check the Backend Logs
👉💻 View what happened behind the scenes:
gcloud logging read \
  "resource.type=cloud_run_revision AND resource.labels.service_name=gemini-motion-lab-backend" \
  --limit=30 \
  --project $GOOGLE_CLOUD_PROJECT \
  --format="value(timestamp,textPayload)" \
  --freshness=10m
You'll see log lines tracing the pipeline:
Pipeline started for video_id=abc123
Gemini model used: gemini-3-flash-preview
Avatar generated: style=pixel-hero size=450KB time=8.2s
Veo model used: veo-3.1-fast-generate-001
Pipeline: Veo complete for video_id=abc123
Pipeline: trimmed video uploaded
Pipeline: composed video uploaded
Pipeline complete for video_id=abc123
5. Monitor the Queue
👉💻 Check how many jobs are running:
curl $BACKEND_URL/api/queue/status
If 3 sessions are active simultaneously, the response will show:
{"active_jobs":3,"max_jobs":3,"available":false}
New users will be asked to wait until a slot opens.
9. 🎉 Conclusion
What You've Built
✅ AI Motion Analysis — Gemini Flash analyzes video for movement, tempo, and style
✅ Avatar Generation — Nano Banana creates stylized avatars from video frames
✅ AI Video Creation — Veo 3.1 generates new videos matching the user's motion
✅ Async Pipeline — Background processing with queue management (max 3 concurrent)
✅ Side-by-Side Composition — ffmpeg-powered video compositing
✅ Cloud Run Deployment — Serverless, auto-scaling, no server management
Key Concepts You Learned
- Gemini Multimodal — Sending video as input and receiving structured JSON analysis
- Nano Banana (Gemini Image Generation) — Using reference images + style prompts to generate avatars
- Veo 3.1 — Asynchronous video generation with reference assets and text prompts
- Cloud Run — Deploying containers with environment variables and auto-scaling
- Async Pipeline Pattern — Fire-and-forget background tasks with
asyncio.Taskfor long-running AI operations - Queue Management — Rate-limiting concurrent AI jobs to control costs and API quotas
Architecture Recap
What's Next?
- Add more avatar styles — Edit
backend/app/prompts/avatar_generation.py - Customize the Veo prompt — Edit
backend/app/prompts/video_generation.py - Run locally in mock mode — Set
MOCK_AI=truein.envfor development without API calls - Scale for events — Increase
--max-instancesandMAX_CONCURRENT_JOBS