
1. Introduction
In this codelab, you will build a task list app using Flutter, Firebase AI Logic, and the new genui package. You'll start with a text-based chat app, upgrade it with GenUI to give the agent the power to create its own UI, and finally build your own custom, interactive UI component that you and the agent can manipulate directly.
What you'll do
- Build a basic chat interface using Flutter and Firebase AI Logic
- Integrate the
genuipackage to generate AI-driven surfaces - Add a progress bar to indicate when the app is waiting for a response from the agent
- Create a named surface and show it in a dedicated spot in the UI.
- Build a custom GenUI catalog component that gives you control over how tasks are presented
What you'll need
- A web browser, such as Chrome
- The Flutter SDK installed locally
- The Firebase CLI installed and configured
This codelab is for intermediate Flutter developers.
2. Before you begin
Set up the Flutter project
- If you haven't already, install the Flutter SDK locally.
- Open your terminal and run
flutter createto make a new project:flutter create intro_to_genui cd intro_to_genui - Add the necessary dependencies to your Flutter project:
flutter pub add firebase_core firebase_ai genui json_schema_builderdependenciessection should look like this (version numbers may vary slightly):dependencies: flutter: sdk: flutter cupertino_icons: ^1.0.8 firebase_core: ^4.9.0 firebase_ai: ^3.12.1 genui: ^0.9.0 json_schema_builder: ^0.1.3 - Run
flutter pub getto download all packages.
Set up a Firebase project
- If you haven't already, install the Firebase CLI.
- Log into Firebase using your Google Account:
firebase login - Install the FlutterFire CLI:
dart pub global activate flutterfire_cli - From your Flutter project directory, run the following command to configure your Flutter project to use Firebase:
flutterfire configure- Ask you if you want to use an existing Firebase project or create a new Firebase project. Select Create a new Firebase project.
- Ask you which platform (iOS, Android, Web) you want to target for your Flutter app. For now, select Web.
The flutterfire configure command automatically creates a Firebase project and a new Firebase Web App in that Firebase project. The command then creates a Firebase configuration file (firebase_options.dart) and automatically adds it to the lib/ directory of your Flutter project.
Note that the app for this codelab works with just the Flutter SDK and Chrome installed on your machine (that is, it builds as a web app). Because this app is built with Flutter, though, it will work on other platforms as well! So at the end of the codelab, try rerunning flutterfire configure to add support for iOS, Android, or another platform, and then rebuilding the app on that platform.
For more information, check out the instructions for adding Firebase to a Flutter app.
Set up Firebase AI Logic
- Sign into the Firebase console. Use the same Google Account that you used to log into the Firebase CLI.
- Select the Firebase project that you just created using the FlutterFire CLI.
- From the left-navigation menu, select AI Services > AI Logic.
- Click Get started to launch the guided workflow.
- Select to start with the Gemini Developer API, and follow the on-screen prompts to set up Firebase AI Logic.
You already have the required FlutterFire plugins to use Firebase AI Logic from the "Set up a Flutter project" section. You're ready to jump into coding your app in the next step!
3. Scaffold a basic chat interface
Before introducing Generative UI, your app needs a foundation: a basic text-based chat application powered by Firebase AI Logic. To get started quickly, you'll copy-paste the entire setup for the chat interface.
Create the message bubble widget
To display text messages from the user and the agent, your app needs a widget. Create a new file named lib/message_bubble.dart and add the following class:
import 'package:flutter/material.dart';

class MessageBubble extends StatelessWidget {
  final String text;
  final bool isUser;

  const MessageBubble({super.key, required this.text, required this.isUser});

  @override
  Widget build(BuildContext context) {
    final theme = Theme.of(context);
    final colorScheme = theme.colorScheme;

    final bubbleColor = isUser
        ? colorScheme.primary
        : colorScheme.surfaceContainerHighest;

    final textColor = isUser
        ? colorScheme.onPrimary
        : colorScheme.onSurfaceVariant;

    return Padding(
      padding: const EdgeInsets.symmetric(vertical: 6.0, horizontal: 8.0),
      child: Column(
        crossAxisAlignment: isUser
            ? CrossAxisAlignment.end
            : CrossAxisAlignment.start,
        children: [
          Row(
            mainAxisAlignment: isUser
                ? MainAxisAlignment.end
                : MainAxisAlignment.start,
            children: [
              Flexible(
                child: Container(
                  padding: const EdgeInsets.symmetric(
                    horizontal: 16.0,
                    vertical: 12.0,
                  ),
                  decoration: BoxDecoration(
                    color: bubbleColor,
                    borderRadius: BorderRadius.only(
                      topLeft: const Radius.circular(20),
                      topRight: const Radius.circular(20),
                      bottomLeft: Radius.circular(isUser ? 20 : 0),
                      bottomRight: Radius.circular(isUser ? 0 : 20),
                    ),
                    boxShadow: [
                      BoxShadow(
                        color: Colors.black.withAlpha(20),
                        blurRadius: 4,
                        offset: const Offset(0, 2),
                      ),
                    ],
                    gradient: isUser
                        ? LinearGradient(
                            colors: [
                              colorScheme.primary,
                              colorScheme.primary.withAlpha(200),
                            ],
                            begin: Alignment.topLeft,
                            end: Alignment.bottomRight,
                          )
                        : null,
                  ),
                  child: Text(
                    text,
                    style: theme.textTheme.bodyLarge?.copyWith(
                      color: textColor,
                      height: 1.3,
                    ),
                  ),
                ),
              ),
            ],
          ),
          const SizedBox(height: 2),
        ],
      ),
    );
  }
}
MessageBubble is a StatelessWidget that displays a single chat message. It will be used later in this codelab to show messages from both you and the agent, but it's mostly just a fancy Text widget.
Implement the Chat UI in main.dart
Replace the entire contents of lib/main.dart with this complete text chatbot implementation:
import 'package:flutter/material.dart';
import 'package:firebase_core/firebase_core.dart';
import 'package:firebase_ai/firebase_ai.dart';
import 'package:intro_to_genui/message_bubble.dart';
import 'firebase_options.dart';

Future<void> main() async {
  WidgetsFlutterBinding.ensureInitialized();
  await Firebase.initializeApp(options: DefaultFirebaseOptions.currentPlatform);
  runApp(const MyApp());
}

class MyApp extends StatelessWidget {
  const MyApp({super.key});

  @override
  Widget build(BuildContext context) {
    return MaterialApp(
      title: 'Just Today',
      theme: ThemeData(
        colorScheme: ColorScheme.fromSeed(seedColor: Colors.blue),
      ),
      home: const MyHomePage(),
    );
  }
}

class MyHomePage extends StatefulWidget {
  const MyHomePage({super.key});

  @override
  State<MyHomePage> createState() => _MyHomePageState();
}

sealed class ConversationItem {}

class TextItem extends ConversationItem {
  final String text;
  final bool isUser;
  TextItem({required this.text, this.isUser = false});
}

class _MyHomePageState extends State<MyHomePage> {
  final List<ConversationItem> _items = [];
  final _textController = TextEditingController();
  final _scrollController = ScrollController();
  late final ChatSession _chatSession;

  @override
  void initState() {
    super.initState();
    final model = FirebaseAI.googleAI().generativeModel(
      model: 'gemini-3.5-flash',
    );
    _chatSession = model.startChat();
    _chatSession.sendMessage(Content.text(systemInstruction));
  }

  void _scrollToBottom() {
    WidgetsBinding.instance.addPostFrameCallback((_) {
      if (_scrollController.hasClients) {
        _scrollController.animateTo(
          _scrollController.position.maxScrollExtent,
          duration: const Duration(milliseconds: 300),
          curve: Curves.easeOut,
        );
      }
    });
  }

  @override
  void dispose() {
    _textController.dispose();
    _scrollController.dispose();
    super.dispose();
  }

  Future<void> _addMessage() async {
    final text = _textController.text;

    if (text.trim().isEmpty) {
      return;
    }
    _textController.clear();

    setState(() {
      _items.add(TextItem(text: text, isUser: true));
    });

    _scrollToBottom();

    final response = await _chatSession.sendMessage(Content.text(text));

    if (response.text?.isNotEmpty ?? false) {
      setState(() {
        _items.add(TextItem(text: response.text!, isUser: false));
      });
      _scrollToBottom();
    }
  }

  @override
  Widget build(BuildContext context) {
    return Scaffold(
      appBar: AppBar(
        backgroundColor: Theme.of(context).colorScheme.inversePrimary,
        title: const Text('Just Today'),
      ),
      body: Column(
        children: [
          Expanded(
            child: ListView(
              controller: _scrollController,
              padding: const EdgeInsets.all(16),
              children: [
                for (final item in _items)
                  switch (item) {
                    TextItem() => MessageBubble(
                          text: item.text,
                          isUser: item.isUser,
                        ),
                  },
              ],
            ),
          ),
          SafeArea(
            child: Padding(
              padding: const EdgeInsets.symmetric(horizontal: 16.0),
              child: Row(
                children: [
                  Expanded(
                    child: TextField(
                      controller: _textController,
                      onSubmitted: (_) => _addMessage(),
                      decoration: const InputDecoration(
                        hintText: 'Enter a message',
                      ),
                    ),
                  ),
                  const SizedBox(width: 8),
                  ElevatedButton(
                    onPressed: _addMessage,
                    child: const Text('Send'),
                  ),
                ],
              ),
            ),
          ),
        ],
      ),
    );
  }
}

const systemInstruction = '''
  ## PERSONA
  You are an expert task planner.

  ## GOAL
  Work with me to produce a list of tasks that I should do today, and then track
  the completion status of each one.

  ## RULES
  Talk with me only about tasks that I should do today.
  Do not engage in conversation about any other topic.
  Do not offer suggestions unless I ask for them.
  Do not offer encouragement unless I ask for it.
  Do not offer advice unless I ask for it.
  Do not offer opinions unless I ask for them.

  ## PROCESS
  ### Planning
  *   Ask me for information about tasks that I should do today.
  *   Synthesize a list of tasks from that information.
  *   Ask clarifying questions if you need to.
  *   When you have a list of tasks that you think I should do today, present it
    to me for review.
  *   Respond to my suggestions for changes, if I have any, until I accept the
    list.

  ### Tracking
  *   Once the list is accepted, ask me to let you know when individual tasks are
    complete.
  *   If I tell you a task is complete, mark it as complete.
  *   Once all tasks are complete, send a message acknowledging that, and then
    end the conversation.
''';
The main.dart file you just copy-pasted sets up a basic ChatSession using Firebase AI Logic and the prompt in systemInstruction. It manages conversation turns by maintaining a list of TextItem elements and displaying them alongside user queries using the MessageBubble widget you created earlier.
Here are a few things to check out before moving on:
- The
initStatemethod is where the connection to Firebase AI Logic is set up. - The app offers a
TextFieldand a button to send messages to the agent. - The
_addMessagemethod is where the user's message is sent to the agent. - The
_itemslist is where the conversation history is stored. - Messages are displayed in a
ListViewusing theMessageBubblewidget.
Test the app
With this in place, you can now run the app and test it.
flutter run -d chrome
Try chatting with the agent about some tasks you'd like to get done today. While a purely text-based UI can get the job done, GenUI can make the experience easier and faster.
4. Integrate the GenUI package
Now it's time to upgrade from plain text to Generative UI. You'll swap out the basic Firebase messaging loop for GenUI Conversation, Catalog, and SurfaceController objects. This allows the AI model to instantiate actual Flutter widgets within the chat stream.
The genui package provides five classes you'll use throughout this codelab:
SurfaceControllermaps UI generated by the model to the screen.A2uiTransportAdapterbridges internal GenUI requests with any external language model.Conversationwraps the controller and transport adapter with a single, unified API for your Flutter app.Catalogdescribes the widgets and properties available to the language model.Surfaceis a widget that displays UI generated by the model.
Get ready to display a generated Surface
The existing code includes a TextItem class that represents a single text message within the conversation. Add another class to represent a Surface created by the agent:
class SurfaceItem extends ConversationItem {
  final String surfaceId;
  SurfaceItem({required this.surfaceId});
}
Initialize GenUI building blocks
At the top of lib/main.dart, import the genui library:
import 'package:genui/genui.dart' hide TextPart;
import 'package:genui/genui.dart' as genui;
Both the genui package and the firebase_ai package include a TextPart class. By importing genui this way, you're namespacing its version of TextPart as genui.TextPart, avoiding a name collision.
Declare the core functional controllers in _MyHomePageState after _chatSession:
class _MyHomePageState extends State<MyHomePage> {
  // ... existing members
  late final ChatSession _chatSession;

  // Add GenUI controllers
  late final SurfaceController _controller;
  late final A2uiTransportAdapter _transport;
  late final Conversation _conversation;
  late final Catalog catalog;
Next, update initState to prepare the GenUI library's controllers.
Remove this line from initState:
_chatSession.sendMessage(Content.text(systemInstruction));
Then, add the following code:
@override
void initState() {
  // ... existing code ...

  // Initialize the GenUI Catalog.
  // The genui package provides a default set of primitive widgets (like text
  // and basic buttons) out of the box using this class.
  catalog = BasicCatalogItems.asCatalog();

  // Create a SurfaceController to manage the state of generated surfaces.
  _controller = SurfaceController(catalogs: [catalog]);

  // Create a transport adapter that will process messages to and from the
  // agent, looking for A2UI messages.
  _transport = A2uiTransportAdapter(onSend: _sendAndReceive);

  // Link the transport and SurfaceController together in a Conversation,
  // which provides your app a unified API for interacting with the agent.
  _conversation = Conversation(
    controller: _controller,
    transport: _transport,
  );
}
This code creates a Conversation facade that manages the controller and adapter. That conversation offers your app a stream of events it can use to keep up with what the agent is creating, as well as a method to send messages to the agent.
Next, create a listener for conversation events. These include surface-related events as well as those for text messages and errors:
@override
void initState() {
  // ... existing code ...

  // Listen to GenUI stream events to update the UI
  _conversation.events.listen((event) {
    setState(() {
      switch (event) {
        case ConversationSurfaceAdded added:
          _items.add(SurfaceItem(surfaceId: added.surfaceId));
          _scrollToBottom();
        case ConversationSurfaceRemoved removed:
          _items.removeWhere(
            (item) =>
                item is SurfaceItem && item.surfaceId == removed.surfaceId,
          );
        case ConversationContentReceived content:
          _items.add(TextItem(text: content.text, isUser: false));
          _scrollToBottom();
        case ConversationError error:
          debugPrint('GenUI Error: ${error.error}');
        default:
      }
    });
  });
}
Finally, create the system prompt and send it off to the agent:
  @override
  void initState() {
    // ... existing code ...

    // Create the system prompt for the agent, which will include this app's
    // system instruction as well as the schema for the catalog.
    final promptBuilder = PromptBuilder.chat(
      catalog: catalog,
      systemPromptFragments: [systemInstruction],
    );

    // Send the prompt into the Conversation, which will subsequently route it
    // to Firebase using the transport mechanism.
    _conversation.sendRequest(
      ChatMessage.system(promptBuilder.systemPromptJoined()),
    );
  }
Display Surfaces
Next, update the ListView's build method to display the SurfaceItems in the _items list:
Expanded(
  child: ListView(
    controller: _scrollController,
    padding: const EdgeInsets.all(16),
    children: [
      for (final item in _items)
        switch (item) {
          TextItem() => MessageBubble(
            text: item.text,
            isUser: item.isUser,
          ),
          // New!
          SurfaceItem() => Surface(
            surfaceContext: _controller.contextFor(
              item.surfaceId,
            ),
          ),
        },
    ],
  ),
),
The constructor for the Surface widget takes a surfaceContext that tells it which surface it's responsible for displaying. The SurfaceController created earlier, _controller, provides the definition and state for each surface, and makes sure it rebuilds when there's an update.
Connect GenUI to Firebase AI Logic
The genui package uses a "Bring Your Own Model" approach, meaning you control which LLM powers your experience. In this case, you're using Firebase AI Logic, but the package is built to work with a variety of agents and providers.
That freedom results in a bit of extra responsibility: you need to take the messages generated by the genui package and send them to your chosen agent, and you need to take the agent's responses and send them back into genui.
To do that, you'll define the _sendAndReceive method referenced in the code for the previous step. Add this code to MyHomePageState:
  Future<void> _sendAndReceive(ChatMessage msg) async {
    final buffer = StringBuffer();

    // Reconstruct the message part fragments
    for (final part in msg.parts) {
      if (part.isUiInteractionPart) {
        buffer.write(part.asUiInteractionPart!.interaction);
      } else if (part is genui.TextPart) {
        buffer.write(part.text);
      }
    }

    if (buffer.isEmpty) {
      return;
    }

    final text = buffer.toString();

    // Send the string to Firebase AI Logic.
    final response = await _chatSession.sendMessage(Content.text(text));

    if (response.text?.isNotEmpty ?? false) {
      // Feed the response back into GenUI's transportation layer
      _transport.addChunk(response.text!);
    }
  }
This method will be called by the genui package whenever it needs to send a message to the agent. The call to addChunk at the end of the method feeds the agent's response back into the genui package, allowing it to process the response and generate UI.
Finally, replace your existing _addMessage method entirely with this new version, so it routes messages into the Conversation instead of Firebase directly:
  Future<void> _addMessage() async {
    final text = _textController.text;

    if (text.trim().isEmpty) {
      return;
    }

    _textController.clear();

    setState(() {
      _items.add(TextItem(text: text, isUser: true));
    });

    _scrollToBottom();

    // Send the user's input through GenUI instead of directly to Firebase.
    await _conversation.sendRequest(ChatMessage.user(text));
  }
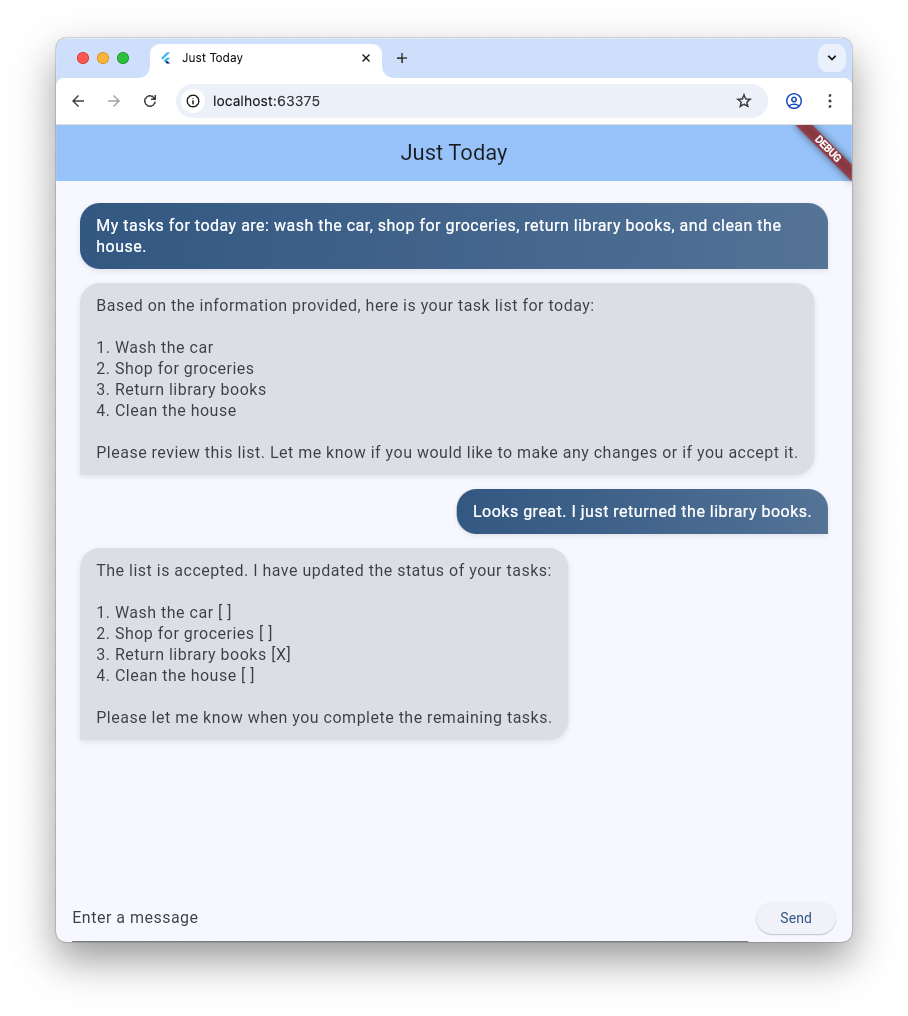
That's it! Try running the app again. In addition to text messages, you'll see the agent generating UI surfaces like buttons, text widgets, and more.
You can even try asking the agent to display the UI in a particular way. For example, try a message like "Show me my tasks in a column, with a button to mark each one complete."
5. Add waiting state
LLM generation is asynchronous. While waiting for a response, the chat interface needs to disable input buttons and display a progress indicator so the user knows GenUI is creating content. Fortunately, the genui package provides a Listenable you can use to track the state of the conversation. That ConversationState value includes an isWaiting property to determine if the model is generating content.
Wrap the input controls with a ValueListenableBuilder
Create a ValueListenableBuilder that wraps the Row (which contains your TextField and ElevatedButton) at the bottom of lib/main.dart to listen to the _conversation.state. By inspecting state.isWaiting, you can disable input while the model is generating content.
ValueListenableBuilder<ConversationState>(
  valueListenable: _conversation.state,
  builder: (context, state, child) {
    return Row(
      children: [
        Expanded(
          child: TextField(
            controller: _textController,
            // Also disable the Enter key submission when waiting!
            onSubmitted: state.isWaiting ? null : (_) => _addMessage(),
            decoration: const InputDecoration(
              hintText: 'Enter a message',
            ),
          ),
        ),
        const SizedBox(width: 8),
        ElevatedButton(
          // Disable the send button when the model is generating
          onPressed: state.isWaiting ? null : _addMessage,
          child: const Text('Send'),
        ),
      ],
    );
  },
),
Add a progress bar
Wrap the main Column widget inside a Stack, and add the LinearProgressIndicator as a second child of that stack, anchored to the bottom. When you're finished, the body of your Scaffold should look like this:
body: Stack( // New!
  children: [
    Column(
      children: [
        Expanded(
          child: ListView(
            controller: _scrollController,
            padding: const EdgeInsets.all(16),
            children: [
              for (final item in _items)
                switch (item) {
                  TextItem() => MessageBubble(
                    text: item.text,
                    isUser: item.isUser,
                  ),
                  SurfaceItem() => Surface(
                    surfaceContext: _controller.contextFor(
                      item.surfaceId,
                    ),
                  ),
                },
            ],
          ),
        ),
        SafeArea(
          child: Padding(
            padding: const EdgeInsets.symmetric(horizontal: 16.0),
            child: ValueListenableBuilder<ConversationState>(
              valueListenable: _conversation.state,
              builder: (context, state, child) {
                return Row(
                  children: [
                    Expanded(
                      child: TextField(
                        controller: _textController,
                        onSubmitted:
                            state.isWaiting ? null : (_) => _addMessage(),
                        decoration: const InputDecoration(
                          hintText: 'Enter a message',
                        ),
                      ),
                    ),
                    const SizedBox(width: 8),
                    ElevatedButton(
                      onPressed: state.isWaiting ? null : _addMessage,
                      child: const Text('Send'),
                    ),
                  ],
                );
              },
            ),
          ),
        ),
      ],
    ),
    // Listen to the state again, this time to render a progress indicator
    ValueListenableBuilder<ConversationState>(
      valueListenable: _conversation.state,
      builder: (context, state, child) {
        if (state.isWaiting) {
          return const LinearProgressIndicator();
        }
        return const SizedBox.shrink();
      },
    ),
  ],
),
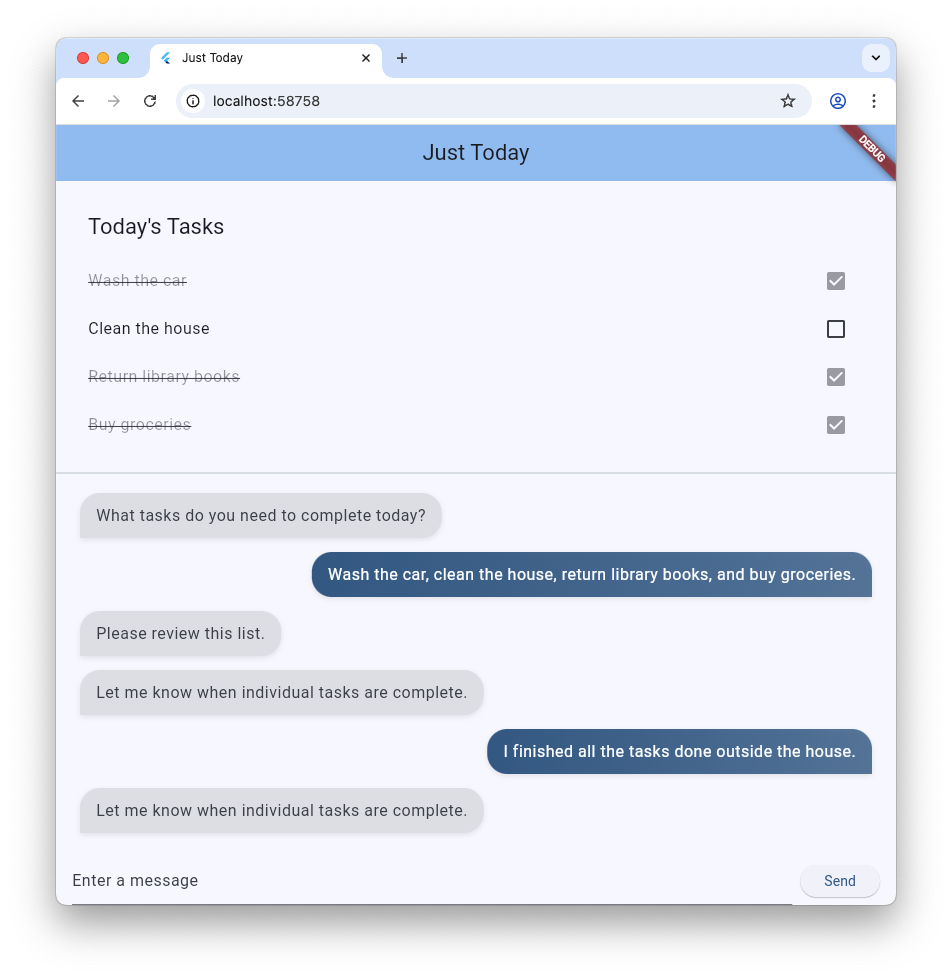
6. Persist a GenUI Surface
So far, the task list has been rendered in the scrolling chat stream, with each new message or surface appended to the list as it arrives. In the next step, you'll see how to name a surface and display it in a specific location within the UI.
First, at the top of main.dart, before void main(), declare a constant to use as a surface ID:
const taskDisplaySurfaceId = 'task_display';
Second, update the switch statement in the Conversation listener to make sure any surface with that ID isn't added to _items:
case ConversationSurfaceAdded added:
  if (added.surfaceId != taskDisplaySurfaceId) {
    _items.add(SurfaceItem(surfaceId: added.surfaceId));
    _scrollToBottom();
  }
Next, open up your widget tree's layout structure to create a space for the pinned surface immediately above your chat log. Add these two widgets as the first children of the main Column:
AnimatedSize(
  duration: const Duration(milliseconds: 300),
  child: Container(
    padding: const EdgeInsets.all(16),
    alignment: Alignment.topLeft,
    child: Surface(
      surfaceContext: _controller.contextFor(
        taskDisplaySurfaceId,
      ),
    ),
  ),
),
const Divider(),
So far, your agent has had free rein to create and use surfaces as it saw fit. In order to give it more specific instructions, you need to revisit the system prompt. Add the following ## USER INTERFACE section to the end of the prompt stored in the systemInstruction constant:
const systemInstruction = '''
  // ... existing prompt content ...

  ## USER INTERFACE
  *   To display the list of tasks create one and only one instance of the
    TaskDisplay catalog item. Use "$taskDisplaySurfaceId" as its surface ID.
  *   Update $taskDisplaySurfaceId as necessary when the list changes.
  *   $taskDisplaySurfaceId must include a button for each task that I can use
    to mark it complete. When I use that button to mark a task complete, it
    should send you a message indicating what I've done.
  *   Avoid repeating the same information in a single message.
  *   When responding with text, rather than A2UI messages, be brief.
''';
It's important to give your agent clear instructions about when and how to use UI surfaces. By telling the agent to use a specific catalog item and surface ID (and to reuse a single instance), you can help make sure it creates the interface you want to see.
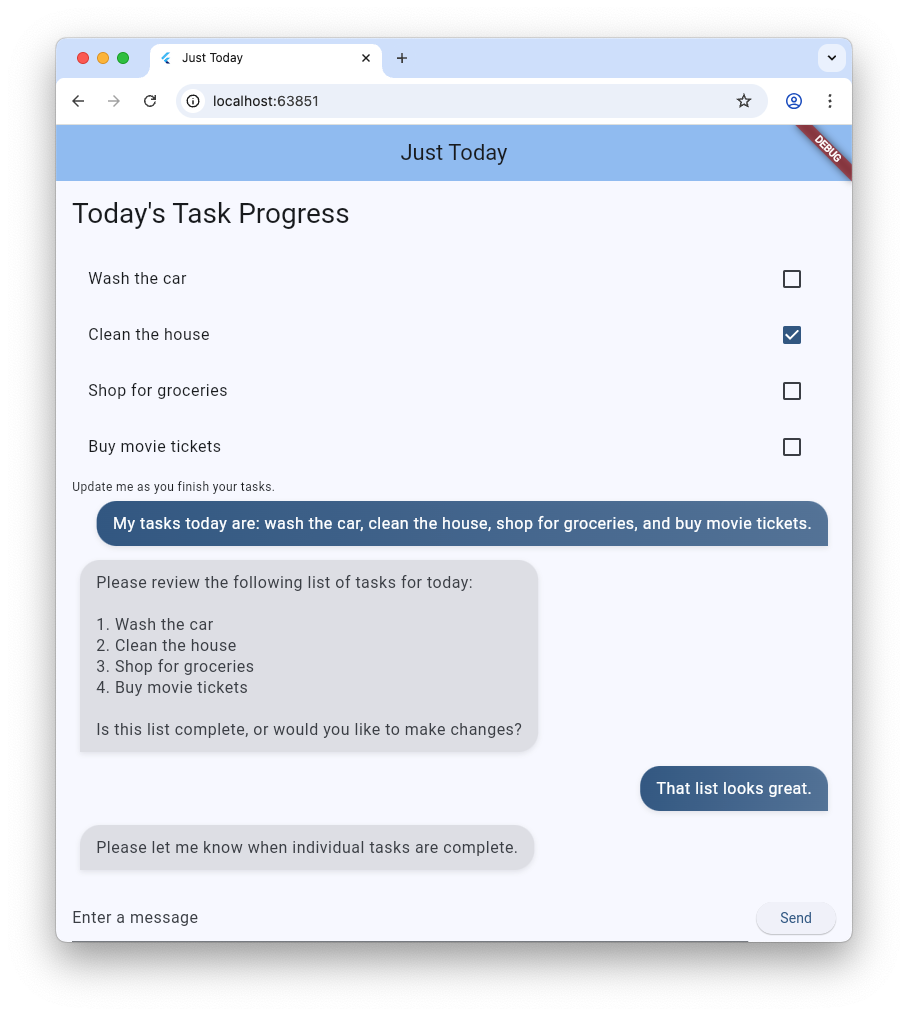
There's more work to do, but you can try running your app again to see the agent create the task display surface at the top of the UI.
7. Build your custom catalog widget
At this point, the TaskDisplay catalog item doesn't exist. In the next few steps, you'll fix that by creating a data schema, a class to parse that schema, a widget, and the catalog item that puts everything together.
First, create a file named task_display.dart and add the following imports:
import 'package:flutter/material.dart';
import 'package:genui/genui.dart';
import 'package:json_schema_builder/json_schema_builder.dart';
Create the data schema
Next, define the data schema that the agent will provide when it wants to create a task display. The process uses some fancy constructors from the json_schema_builder package, but essentially you're just defining a JSON schema used in messages to and from the agent.
Start with a basic S.object referencing the component name:
final taskDisplaySchema = S.object(
  properties: {
    'component': S.string(enumValues: ['TaskDisplay']),
  },
);
Next, add title, tasks, name, isCompleted, and completeAction to the schema properties.
final taskDisplaySchema = S.object(
  properties: {
    'component': S.string(enumValues: ['TaskDisplay']),
    'title': S.string(description: 'The title of the task list'),
    'tasks': S.list(
      description: 'A list of tasks to be completed today',
      items: S.object(
        properties: {
          'name': S.string(description: 'The name of the task to be completed'),
          'isCompleted': S.boolean(
            description: 'Whether the task is completed',
          ),
          'completeAction': A2uiSchemas.action(
            description:
                'The action performed when the user has completed the task.',
          ),
        },
      ),
    ),
  },
);
Take a look at the completeAction property. It's created with A2uiSchemas.action, the constructor for a schema property that represents an A2UI Action. By adding an action to the schema, the app is essentially telling the agent, "Hey, when you give me a task, also provide the name and metadata for an action that I can use to tell you that task is completed." Later, the app will invoke that action when the user taps on a checkbox.
Next, add required fields to the schema. These instruct the agent to populate certain properties every time. In this case, every property is required!
final taskDisplaySchema = S.object(
  properties: {
    'component': S.string(enumValues: ['TaskDisplay']),
    'title': S.string(description: 'The title of the task list'),
    'tasks': S.list(
      description: 'A list of tasks to be completed today',
      items: S.object(
        properties: {
          'name': S.string(description: 'The name of the task to be completed'),
          'isCompleted': S.boolean(
            description: 'Whether the task is completed',
          ),
          'completeAction': A2uiSchemas.action(
            description:
                'The action performed when the user has completed the task.',
          ),
        },
        // New!
        required: ['name', 'isCompleted', 'completeAction'],
      ),
    ),
  },
  // New!
  required: ['title', 'tasks'],
);
Create data parsing classes
When creating instances of this component, the agent will send data matching the schema. Add two classes to parse that incoming JSON into strongly-typed Dart objects. Notice how _TaskDisplayData handles the root structure, while delegating the inner array parsing to _TaskData.
class _TaskData {
  final String name;
  final bool isCompleted;
  final String actionName;
  final JsonMap actionContext;

  _TaskData({
    required this.name,
    required this.isCompleted,
    required this.actionName,
    required this.actionContext,
  });

  factory _TaskData.fromJson(Map<String, Object?> json) {
    try {
      final action = json['completeAction']! as JsonMap;
      final event = action['event']! as JsonMap;

      return _TaskData(
        name: json['name'] as String,
        isCompleted: json['isCompleted'] as bool,
        actionName: event['name'] as String,
        actionContext: event['context'] as JsonMap,
      );
    } catch (e) {
      throw Exception('Invalid JSON for _TaskData: $e');
    }
  }
}

class _TaskDisplayData {
  final String title;
  final List<_TaskData> tasks;

  _TaskDisplayData({required this.title, required this.tasks});

  factory _TaskDisplayData.fromJson(Map<String, Object?> json) {
    try {
      return _TaskDisplayData(
        title: (json['title'] as String?) ?? 'Tasks',
        tasks: (json['tasks'] as List<Object?>)
            .map((e) => _TaskData.fromJson(e as Map<String, Object?>))
            .toList(),
      );
    } catch (e) {
      throw Exception('Invalid JSON for _TaskDisplayData: $e');
    }
  }
}
If you've built with Flutter before, these classes are probably similar to ones you've created. They accept a JsonMap and return a strongly-typed object containing data parsed from JSON.
Take a look at the actionName and actionContext fields in _TaskData. They're extracted from the completeAction property of the JSON and contain the name of the action and its data context (a reference to the action's location in GenUI's data model). These will be used later to create a UserActionEvent.
The data model is a centralized, observable store for all dynamic UI state, maintained by the genui library. When the agent creates a UI component from the catalog, it also creates a data object that matches the component's schema. This data object is stored in the data model in the client, so that it can be used to build widgets and referenced in later messages to the agent (like the completeAction you're about to wire up to a widget).
Add the widget
Now, create a widget to display the list. It should accept an instance of the _TaskDisplayData class and a callback to invoke when a task is completed.
class _TaskDisplay extends StatelessWidget {
  final _TaskDisplayData data;
  final void Function(_TaskData) onCompleteTask;

  const _TaskDisplay({required this.data, required this.onCompleteTask});

  @override
  Widget build(BuildContext context) {
    return Column(
      crossAxisAlignment: CrossAxisAlignment.start,
      mainAxisSize: MainAxisSize.min,
      children: [
        Padding(
          padding: const EdgeInsets.all(16.0),
          child: Text(
            data.title,
            style: Theme.of(context).textTheme.titleLarge,
          ),
        ),
        ...data.tasks.map(
          (task) => CheckboxListTile(
            title: Text(
              task.name,
              style: TextStyle(
                decoration: task.isCompleted
                    ? TextDecoration.lineThrough
                    : TextDecoration.none,
              ),
            ),
            value: task.isCompleted,
            onChanged: task.isCompleted
                ? null
                : (val) {
                    if (val == true) {
                      onCompleteTask(task);
                    }
                  },
          ),
        ),
      ],
    );
  }
}
Create the CatalogItem
With the schema, parser, and widget created, you can now create a CatalogItem to tie them all together.
At the bottom of task_display.dart, create taskDisplay as a top-level variable, use _TaskDisplayData to parse the incoming JSON, and build an instance of the _TaskDisplay widget.
final taskDisplay = CatalogItem(
  name: 'TaskDisplay',
  dataSchema: taskDisplaySchema,
  widgetBuilder: (itemContext) {
    final json = itemContext.data as Map<String, Object?>;
    final data = _TaskDisplayData.fromJson(json);

    return _TaskDisplay(
      data: data,
      onCompleteTask: (task) async {
        // We will implement this next!
      },
    );
  },
);
Implement onCompleteTask
For the widget to work, it needs to communicate back to the agent when a task is completed. Replace the empty onCompleteTask placeholder with the following code to create and dispatch an event using the completeAction from the task data.
onCompleteTask: (task) async {
  // A data context is a reference to a location in the data model. This line
  // turns that reference into a concrete data object that the agent can use.
  // It's kind of like taking a pointer and replacing it with the value it
  // points to.
  final JsonMap resolvedContext = await resolveContext(
    itemContext.dataContext,
    task.actionContext,
  );

  // Dispatch an event back to the agent, letting it know a task was completed.
  // This will be sent to the agent in an A2UI message that includes the name
  // of the action, the surface ID, and the resolved data context.
  itemContext.dispatchEvent(
    UserActionEvent(
      name: task.actionName,
      sourceComponentId: itemContext.id,
      context: resolvedContext,
    ),
  );
}
Register catalog item
Last, open main.dart, import the new file, and register it along with the other catalog items.
Add this import to the top of lib/main.dart:
import 'task_display.dart';
Replace catalog = BasicCatalogItems.asCatalog(); in your initState() function with:
// The Catalog is immutable, so use copyWith to create a new version
// that includes our custom catalog item along with the basics.
catalog = BasicCatalogItems.asCatalog().copyWith(newItems: [taskDisplay]);
You're done! Hot restart the app to see the changes.
8. Experiment with different ways to interact with the agent
Now that you've added the new widget to the Catalog and made a space for it in the app's UI, it's time to have some fun working with the agent. One of the main benefits to GenUI is that it offers two ways to interact with your data: through application UI like buttons and checkboxes, and through an agent that understands natural language and can reason about the data. Try experimenting with both!
- Use the text field to describe three or four tasks, and watch them appear in the list.
- Use a checkbox to toggle a task as complete or incomplete.
- Create a list of 5-6 tasks, then tell the agent to remove the ones that require you to drive somewhere.
- Tell the agent to create a repetitive list of tasks as individual items ("I need to buy a holiday card for Mom, Dad, and Grandma. Make separate tasks for those.").
- Tell the agent to mark all of the tasks as finished or unfinished, or to check off the first two or three.
9. Congratulations
Congratulations! You've built an AI-powered task tracking app using Generative UI and Flutter.
What you've learned
- Interacting with Google's foundation models using the Flutter Firebase SDK
- Rendering interactive surfaces generated by Gemini utilizing GenUI
- Pinning surfaces in layouts using pre-determined static rendering IDs
- Designing custom schemas and widget catalogs for robust interaction loops