
1. はじめに
この Codelab では、Flutter、Firebase AI Logic、新しい genui パッケージを使用して、タスクリスト
アプリを作成します。テキストベースのチャットアプリから始め、GenUI でアップグレードしてエージェントに独自の UI
を作成する機能を追加し、最後にユーザーとエージェントが直接操作できるカスタムのインタラクティブな UI コンポーネントを構築します。
演習内容
- Flutter と Firebase AI Logic を使用して基本的なチャット インターフェースを構築する
genuiパッケージを統合して、AI を活用したサーフェスを生成する- アプリがエージェントからのレスポンスを待機しているときに示す進行状況バーを追加する
- 名前付きサーフェスを作成し、UI の専用スポットに表示する。
- タスクの表示方法を制御できるカスタムの GenUI カタログ コンポーネントを構築する
必要なもの
- ウェブブラウザ(Chrome など)
- ローカルにインストールされた Flutter SDK
- インストールおよび構成済みの Firebase CLI
この Codelab は、中級の Flutter デベロッパーを対象としています。
2. 始める前に
Flutter プロジェクトをセットアップする
- まだインストールしていない場合は、Flutter SDK をローカルにインストールします。
- ターミナルを開き、
flutter createを実行して新しいプロジェクトを作成します。flutter create intro_to_genui cd intro_to_genui - 必要な依存関係を Flutter プロジェクトに追加します。
flutter pub add firebase_core firebase_ai genui json_schema_builderdependenciesセクションは次のようになります(バージョン番号は若干異なる場合があります)。dependencies: flutter: sdk: flutter cupertino_icons: ^1.0.8 firebase_core: ^4.9.0 firebase_ai: ^3.12.1 genui: ^0.9.0 json_schema_builder: ^0.1.3 flutter pub getを実行して、すべてのパッケージをダウンロードします。
Firebase プロジェクトをセットアップする
- まだインストールしていない場合は、Firebase CLI をインストールします。
- Google アカウントを使用して Firebase にログインします。
firebase login - FlutterFire CLI をインストールします。
dart pub global activate flutterfire_cli - Flutter プロジェクト ディレクトリで次のコマンドを実行して、Firebase を使用するように Flutter プロジェクトを構成します。
flutterfire configure- 既存の Firebase プロジェクトを使用するか、新しい Firebase プロジェクトを作成するかを確認します。[新しい Firebase プロジェクトを作成] を選択します。
- Flutter アプリのターゲットとするプラットフォーム(iOS、Android、ウェブ)を選択します。ここでは [ウェブ] を選択します。
flutterfire configure コマンドは、Firebase プロジェクトと、その Firebase プロジェクトに新しい Firebase ウェブアプリを自動的に作成します。次に、Firebase 構成ファイル(firebase_options.dart)を作成し、Flutter プロジェクトの lib/ ディレクトリに自動的に追加します。
この Codelab のアプリは、マシンにインストールされた Flutter SDK と Chrome のみで動作します(つまり、ウェブアプリとしてビルドされます)。ただし、このアプリは Flutter で構築されているため、他のプラットフォームでも動作します。Codelab の最後に、flutterfire configure を再実行して iOS、Android、または別のプラットフォームのサポートを追加し、そのプラットフォームでアプリを再ビルドしてみてください。
詳しくは、Firebase を Flutter アプリに追加するの手順をご覧ください。
Firebase AI Logic を設定する
- Firebase コンソールにログインします。Firebase CLI へのログインに使用したのと同じ Google アカウントを使用します。
- FlutterFire CLI を使用して作成した Firebase プロジェクトを選択します。
- 左側のナビゲーション メニューで、[AI サービス] > [AI Logic] を選択します。
- [使ってみる] をクリックして、ガイド付きワークフローを起動します。
- [Gemini Developer API] を選択して開始し、画面の指示に沿って Firebase AI Logic を設定します。
Firebase AI Logic を使用するために必要な FlutterFire プラグインは、「Flutter プロジェクトをセットアップする」セクションでインストール済みです。次のステップでアプリのコーディングを開始できます。
3. 基本的なチャット インターフェースのスケルトンを作成する
生成 UI を導入する前に、アプリには基盤が必要です。Firebase AI Logic を活用した基本的なテキストベースのチャット アプリケーションです。すぐに開始できるように、チャット インターフェースの設定全体をコピーして貼り付けます。
メッセージ バブル ウィジェットを作成する
ユーザーとエージェントからのテキスト メッセージを表示するには、アプリにウィジェットが必要です。lib/message_bubble.dart
という名前の新しいファイルを作成し、次のクラスを追加します。
import 'package:flutter/material.dart';

class MessageBubble extends StatelessWidget {
  final String text;
  final bool isUser;

  const MessageBubble({super.key, required this.text, required this.isUser});

  @override
  Widget build(BuildContext context) {
    final theme = Theme.of(context);
    final colorScheme = theme.colorScheme;

    final bubbleColor = isUser
        ? colorScheme.primary
        : colorScheme.surfaceContainerHighest;

    final textColor = isUser
        ? colorScheme.onPrimary
        : colorScheme.onSurfaceVariant;

    return Padding(
      padding: const EdgeInsets.symmetric(vertical: 6.0, horizontal: 8.0),
      child: Column(
        crossAxisAlignment: isUser
            ? CrossAxisAlignment.end
            : CrossAxisAlignment.start,
        children: [
          Row(
            mainAxisAlignment: isUser
                ? MainAxisAlignment.end
                : MainAxisAlignment.start,
            children: [
              Flexible(
                child: Container(
                  padding: const EdgeInsets.symmetric(
                    horizontal: 16.0,
                    vertical: 12.0,
                  ),
                  decoration: BoxDecoration(
                    color: bubbleColor,
                    borderRadius: BorderRadius.only(
                      topLeft: const Radius.circular(20),
                      topRight: const Radius.circular(20),
                      bottomLeft: Radius.circular(isUser ? 20 : 0),
                      bottomRight: Radius.circular(isUser ? 0 : 20),
                    ),
                    boxShadow: [
                      BoxShadow(
                        color: Colors.black.withAlpha(20),
                        blurRadius: 4,
                        offset: const Offset(0, 2),
                      ),
                    ],
                    gradient: isUser
                        ? LinearGradient(
                            colors: [
                              colorScheme.primary,
                              colorScheme.primary.withAlpha(200),
                            ],
                            begin: Alignment.topLeft,
                            end: Alignment.bottomRight,
                          )
                        : null,
                  ),
                  child: Text(
                    text,
                    style: theme.textTheme.bodyLarge?.copyWith(
                      color: textColor,
                      height: 1.3,
                    ),
                  ),
                ),
              ),
            ],
          ),
          const SizedBox(height: 2),
        ],
      ),
    );
  }
}
MessageBubble は、1 つのチャット メッセージを表示する StatelessWidget です。この
Codelab の後半で、ユーザーとエージェントからのメッセージを表示するために使用しますが、ほとんどは高度な Text ウィジェットです。
main.dart にチャット UI を実装する
lib/main.dart の内容全体を、次の完全なテキスト chatbot 実装に置き換えます。
import 'package:flutter/material.dart';
import 'package:firebase_core/firebase_core.dart';
import 'package:firebase_ai/firebase_ai.dart';
import 'package:intro_to_genui/message_bubble.dart';
import 'firebase_options.dart';

Future<void> main() async {
  WidgetsFlutterBinding.ensureInitialized();
  await Firebase.initializeApp(options: DefaultFirebaseOptions.currentPlatform);
  runApp(const MyApp());
}

class MyApp extends StatelessWidget {
  const MyApp({super.key});

  @override
  Widget build(BuildContext context) {
    return MaterialApp(
      title: 'Just Today',
      theme: ThemeData(
        colorScheme: ColorScheme.fromSeed(seedColor: Colors.blue),
      ),
      home: const MyHomePage(),
    );
  }
}

class MyHomePage extends StatefulWidget {
  const MyHomePage({super.key});

  @override
  State<MyHomePage> createState() => _MyHomePageState();
}

sealed class ConversationItem {}

class TextItem extends ConversationItem {
  final String text;
  final bool isUser;
  TextItem({required this.text, this.isUser = false});
}

class _MyHomePageState extends State<MyHomePage> {
  final List<ConversationItem> _items = [];
  final _textController = TextEditingController();
  final _scrollController = ScrollController();
  late final ChatSession _chatSession;

  @override
  void initState() {
    super.initState();
    final model = FirebaseAI.googleAI().generativeModel(
      model: 'gemini-3.5-flash',
    );
    _chatSession = model.startChat();
    _chatSession.sendMessage(Content.text(systemInstruction));
  }

  void _scrollToBottom() {
    WidgetsBinding.instance.addPostFrameCallback((_) {
      if (_scrollController.hasClients) {
        _scrollController.animateTo(
          _scrollController.position.maxScrollExtent,
          duration: const Duration(milliseconds: 300),
          curve: Curves.easeOut,
        );
      }
    });
  }

  @override
  void dispose() {
    _textController.dispose();
    _scrollController.dispose();
    super.dispose();
  }

  Future<void> _addMessage() async {
    final text = _textController.text;

    if (text.trim().isEmpty) {
      return;
    }
    _textController.clear();

    setState(() {
      _items.add(TextItem(text: text, isUser: true));
    });

    _scrollToBottom();

    final response = await _chatSession.sendMessage(Content.text(text));

    if (response.text?.isNotEmpty ?? false) {
      setState(() {
        _items.add(TextItem(text: response.text!, isUser: false));
      });
      _scrollToBottom();
    }
  }

  @override
  Widget build(BuildContext context) {
    return Scaffold(
      appBar: AppBar(
        backgroundColor: Theme.of(context).colorScheme.inversePrimary,
        title: const Text('Just Today'),
      ),
      body: Column(
        children: [
          Expanded(
            child: ListView(
              controller: _scrollController,
              padding: const EdgeInsets.all(16),
              children: [
                for (final item in _items)
                  switch (item) {
                    TextItem() => MessageBubble(
                          text: item.text,
                          isUser: item.isUser,
                        ),
                  },
              ],
            ),
          ),
          SafeArea(
            child: Padding(
              padding: const EdgeInsets.symmetric(horizontal: 16.0),
              child: Row(
                children: [
                  Expanded(
                    child: TextField(
                      controller: _textController,
                      onSubmitted: (_) => _addMessage(),
                      decoration: const InputDecoration(
                        hintText: 'Enter a message',
                      ),
                    ),
                  ),
                  const SizedBox(width: 8),
                  ElevatedButton(
                    onPressed: _addMessage,
                    child: const Text('Send'),
                  ),
                ],
              ),
            ),
          ),
        ],
      ),
    );
  }
}

const systemInstruction = '''
  ## PERSONA
  You are an expert task planner.

  ## GOAL
  Work with me to produce a list of tasks that I should do today, and then track
  the completion status of each one.

  ## RULES
  Talk with me only about tasks that I should do today.
  Do not engage in conversation about any other topic.
  Do not offer suggestions unless I ask for them.
  Do not offer encouragement unless I ask for it.
  Do not offer advice unless I ask for it.
  Do not offer opinions unless I ask for them.

  ## PROCESS
  ### Planning
  *   Ask me for information about tasks that I should do today.
  *   Synthesize a list of tasks from that information.
  *   Ask clarifying questions if you need to.
  *   When you have a list of tasks that you think I should do today, present it
    to me for review.
  *   Respond to my suggestions for changes, if I have any, until I accept the
    list.

  ### Tracking
  *   Once the list is accepted, ask me to let you know when individual tasks are
    complete.
  *   If I tell you a task is complete, mark it as complete.
  *   Once all tasks are complete, send a message acknowledging that, and then
    end the conversation.
''';
コピーして貼り付けた main.dart ファイルは、Firebase AI Logic と systemInstruction
のプロンプトを使用して基本的な ChatSession を設定します。TextItem
要素のリストを保持し、以前に作成した MessageBubble ウィジェットを使用してユーザー クエリとともに表示することで、会話のターンを管理します。
次に進む前に、次の点を確認してください。
initStateメソッドは、Firebase AI Logic への接続を設定する場所です。- アプリには、エージェントにメッセージを送信するための
TextFieldとボタンがあります。 _addMessageメソッドは、ユーザーのメッセージがエージェントに送信される場所です。_itemsリストは、会話履歴が保存される場所です。- メッセージは、
MessageBubbleウィジェットを使用してListViewに表示されます。
アプリをテストする
これで、アプリを実行してテストできます。
flutter run -d chrome
今日完了したいタスクについて、エージェントとチャットしてみてください。純粋なテキストベースの UI でもタスクを完了できますが、GenUI を使用すると、より簡単かつ迅速にタスクを完了できます。
4. GenUI パッケージを統合する
プレーン テキストから生成 UI にアップグレードします。基本的な Firebase メッセージ ループを GenUI
のConversation、Catalog、SurfaceController オブジェクトに置き換えます。これにより、AI
モデルはチャット ストリーム内に実際の Flutter ウィジェットをインスタンス化できます。
genui パッケージには、この Codelab で使用する 5 つのクラスが用意されています。
SurfaceControllerは、モデルによって生成された UI を画面にマッピングします。A2uiTransportAdapterは、内部 GenUI リクエストを外部言語モデルとブリッジします。Conversationは、コントローラとトランスポート アダプターを Flutter アプリ用の単一の統合 API でラップします。Catalogは、言語モデルで使用できるウィジェットとプロパティを記述します。Surfaceは、モデルによって生成された UI を表示するウィジェットです。
生成された Surface を表示する準備をする
既存のコードには、会話内の 1 つのテキスト メッセージを表す TextItem クラスが含まれています。エージェントによって作成された
Surface を表す別のクラスを追加します。
class SurfaceItem extends ConversationItem {
  final String surfaceId;
  SurfaceItem({required this.surfaceId});
}
GenUI ビルディング ブロックを初期化する
lib/main.dart の先頭に、genui ライブラリをインポートします。
import 'package:genui/genui.dart' hide TextPart;
import 'package:genui/genui.dart' as genui;
genui パッケージと firebase_ai パッケージの両方に TextPart クラスが含まれています。このように genui をインポートすると、TextPart のバージョンが genui.TextPart として名前空間化され、名前の衝突を回避できます。
_chatSession の後に、_MyHomePageState でコア機能コントローラを宣言します。
class _MyHomePageState extends State<MyHomePage> {
  // ... existing members
  late final ChatSession _chatSession;

  // Add GenUI controllers
  late final SurfaceController _controller;
  late final A2uiTransportAdapter _transport;
  late final Conversation _conversation;
  late final Catalog catalog;
次に、GenUI ライブラリのコントローラを準備するように initState を更新します。
initState からこの行を削除します。
_chatSession.sendMessage(Content.text(systemInstruction));
次のコードを追加します。
@override
void initState() {
  // ... existing code ...

  // Initialize the GenUI Catalog.
  // The genui package provides a default set of primitive widgets (like text
  // and basic buttons) out of the box using this class.
  catalog = BasicCatalogItems.asCatalog();

  // Create a SurfaceController to manage the state of generated surfaces.
  _controller = SurfaceController(catalogs: [catalog]);

  // Create a transport adapter that will process messages to and from the
  // agent, looking for A2UI messages.
  _transport = A2uiTransportAdapter(onSend: _sendAndReceive);

  // Link the transport and SurfaceController together in a Conversation,
  // which provides your app a unified API for interacting with the agent.
  _conversation = Conversation(
    controller: _controller,
    transport: _transport,
  );
}
このコードは、コントローラとアダプターを管理する Conversation ファサードを作成します。この会話では、エージェントが作成している内容を把握するために使用できるイベントのストリームと、エージェントにメッセージを送信するメソッドがアプリに提供されます。
次に、会話イベントのリスナーを作成します。これには、サーフェス関連のイベントと、テキスト メッセージとエラーのイベントが含まれます。
@override
void initState() {
  // ... existing code ...

  // Listen to GenUI stream events to update the UI
  _conversation.events.listen((event) {
    setState(() {
      switch (event) {
        case ConversationSurfaceAdded added:
          _items.add(SurfaceItem(surfaceId: added.surfaceId));
          _scrollToBottom();
        case ConversationSurfaceRemoved removed:
          _items.removeWhere(
            (item) =>
                item is SurfaceItem && item.surfaceId == removed.surfaceId,
          );
        case ConversationContentReceived content:
          _items.add(TextItem(text: content.text, isUser: false));
          _scrollToBottom();
        case ConversationError error:
          debugPrint('GenUI Error: ${error.error}');
        default:
      }
    });
  });
}
最後に、システム プロンプトを作成してエージェントに送信します。
  @override
  void initState() {
    // ... existing code ...

    // Create the system prompt for the agent, which will include this app's
    // system instruction as well as the schema for the catalog.
    final promptBuilder = PromptBuilder.chat(
      catalog: catalog,
      systemPromptFragments: [systemInstruction],
    );

    // Send the prompt into the Conversation, which will subsequently route it
    // to Firebase using the transport mechanism.
    _conversation.sendRequest(
      ChatMessage.system(promptBuilder.systemPromptJoined()),
    );
  }
サーフェスを表示する
次に、ListView の build メソッドを更新して、_items リストに SurfaceItem を表示します。
Expanded(
  child: ListView(
    controller: _scrollController,
    padding: const EdgeInsets.all(16),
    children: [
      for (final item in _items)
        switch (item) {
          TextItem() => MessageBubble(
            text: item.text,
            isUser: item.isUser,
          ),
          // New!
          SurfaceItem() => Surface(
            surfaceContext: _controller.contextFor(
              item.surfaceId,
            ),
          ),
        },
    ],
  ),
),
Surface ウィジェットのコンストラクタは、表示を担当するサーフェスを示す surfaceContext を受け取ります。以前に作成した
SurfaceController(_controller)は、各サーフェスの定義と状態を提供し、更新時に再ビルドされるようにします。
GenUI を Firebase AI Logic に接続する
genui パッケージは「Bring Your Own Model」アプローチを使用します。つまり、エクスペリエンスを強化する LLM
を制御します。この場合、Firebase AI Logic を使用しますが、このパッケージはさまざまなエージェントとプロバイダで動作するように構築されています。
この自由度により、少し責任が増えます。genui
パッケージによって生成されたメッセージを選択したエージェントに送信し、エージェントのレスポンスを受け取って genui に送信する必要があります。
そのためには、前のステップのコードで参照されている _sendAndReceive メソッドを定義します。次のコードを
MyHomePageState に追加します。
  Future<void> _sendAndReceive(ChatMessage msg) async {
    final buffer = StringBuffer();

    // Reconstruct the message part fragments
    for (final part in msg.parts) {
      if (part.isUiInteractionPart) {
        buffer.write(part.asUiInteractionPart!.interaction);
      } else if (part is genui.TextPart) {
        buffer.write(part.text);
      }
    }

    if (buffer.isEmpty) {
      return;
    }

    final text = buffer.toString();

    // Send the string to Firebase AI Logic.
    final response = await _chatSession.sendMessage(Content.text(text));

    if (response.text?.isNotEmpty ?? false) {
      // Feed the response back into GenUI's transportation layer
      _transport.addChunk(response.text!);
    }
  }
このメソッドは、エージェントにメッセージを送信する必要があるたびに genui
パッケージによって呼び出されます。メソッドの最後にある addChunk
の呼び出しにより、エージェントのレスポンスが genui パッケージにフィードバックされ、レスポンスを処理して UI を生成できます。
最後に、既存の _addMessage メソッドをこの新しいバージョンに完全に置き換えて、メッセージを Firebase
に直接ではなく Conversation にルーティングします。
  Future<void> _addMessage() async {
    final text = _textController.text;

    if (text.trim().isEmpty) {
      return;
    }

    _textController.clear();

    setState(() {
      _items.add(TextItem(text: text, isUser: true));
    });

    _scrollToBottom();

    // Send the user's input through GenUI instead of directly to Firebase.
    await _conversation.sendRequest(ChatMessage.user(text));
  }
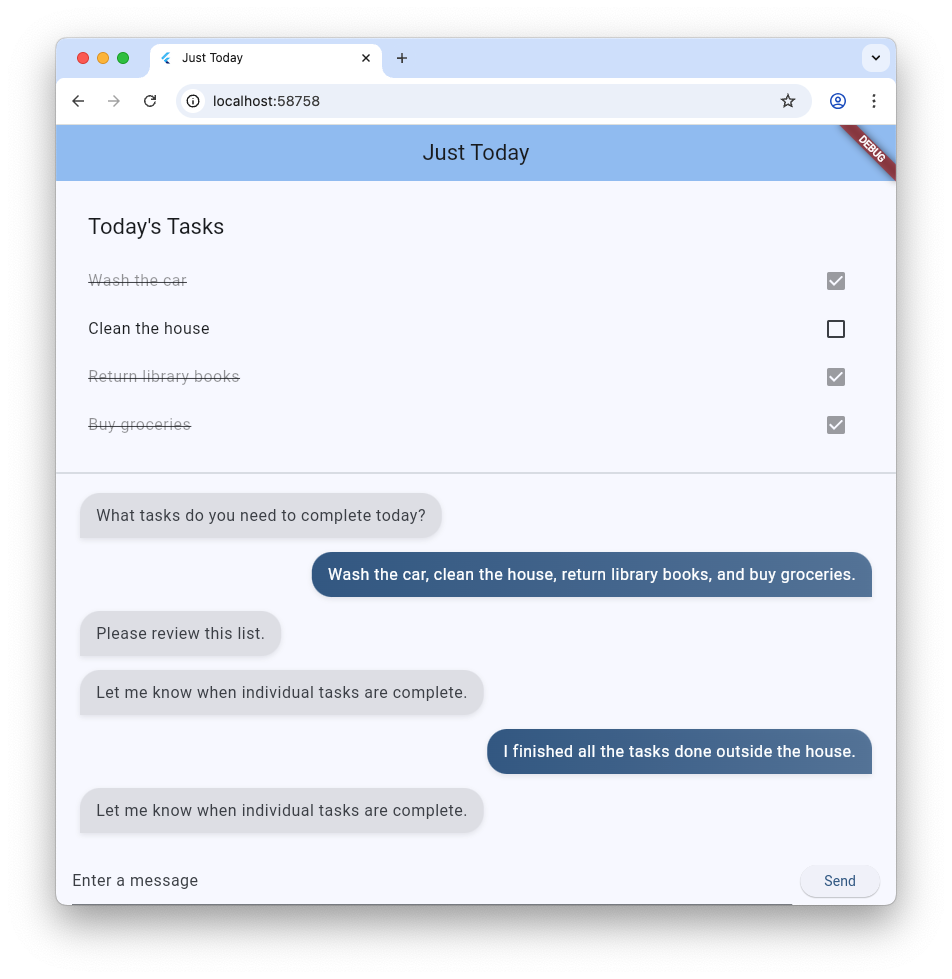
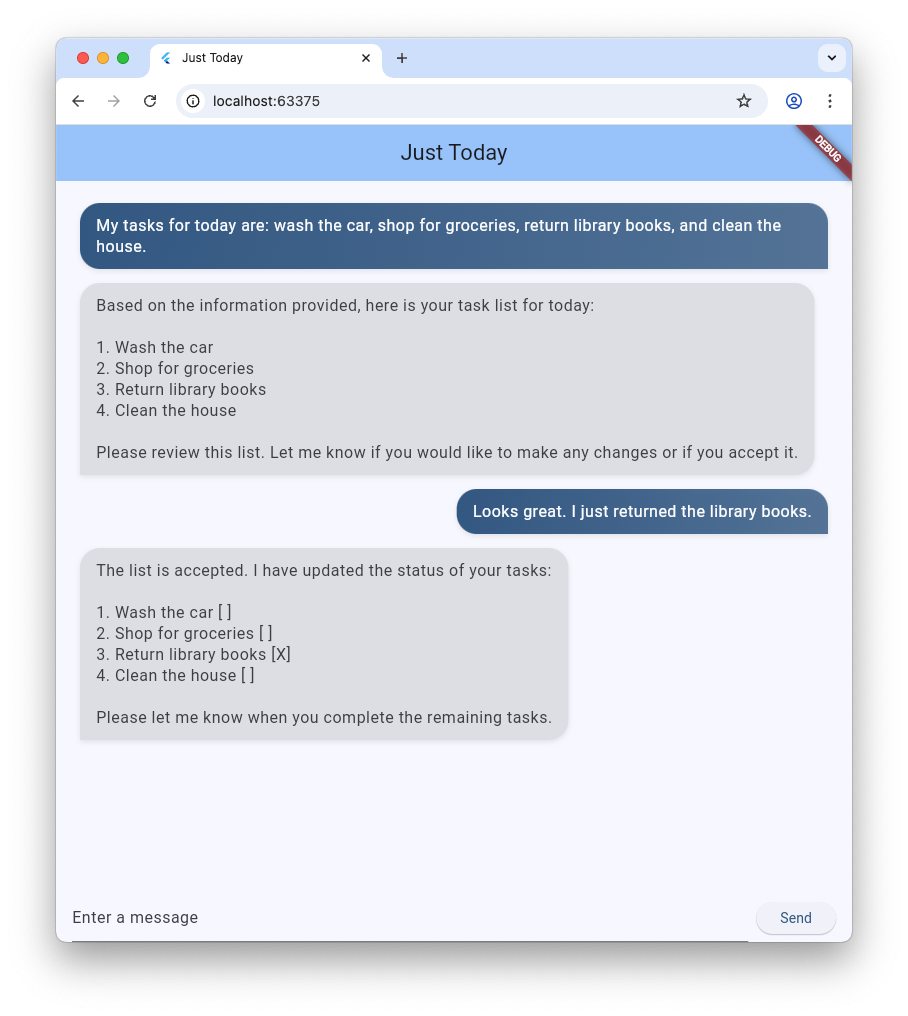
これで完了です。アプリを再実行してみてください。テキスト メッセージに加えて、エージェントがボタンやテキスト ウィジェットなどの UI サーフェスを生成していることがわかります。
エージェントに特定の形式で UI を表示するように依頼することもできます。たとえば、「各タスクを完了するためのボタンを含む列にタスクを表示して」のようなメッセージを試してみてください。
5. 待機状態を追加する
LLM の生成は非同期です。レスポンスを待機している間、チャット インターフェースでは入力ボタンを無効にし、進行状況インジケーターを表示して、GenUI
がコンテンツを作成していることをユーザーに知らせる必要があります。genui
パッケージには、会話の状態を追跡するために使用できる Listenable が用意されています。この
ConversationState 値には、モデルがコンテンツを生成しているかどうかを判断する isWaiting プロパティが含まれています。
入力コントロールを ValueListenableBuilder でラップする
lib/main.dart の下部にある Row(TextField と ElevatedButton を含む)をラップする
ValueListenableBuilder を作成して、_conversation.state をリッスンします。state.isWaiting
を検査することで、モデルがコンテンツを生成している間に入力を無効にできます。
ValueListenableBuilder<ConversationState>(
  valueListenable: _conversation.state,
  builder: (context, state, child) {
    return Row(
      children: [
        Expanded(
          child: TextField(
            controller: _textController,
            // Also disable the Enter key submission when waiting!
            onSubmitted: state.isWaiting ? null : (_) => _addMessage(),
            decoration: const InputDecoration(
              hintText: 'Enter a message',
            ),
          ),
        ),
        const SizedBox(width: 8),
        ElevatedButton(
          // Disable the send button when the model is generating
          onPressed: state.isWaiting ? null : _addMessage,
          child: const Text('Send'),
        ),
      ],
    );
  },
),
進行状況バーを追加する
メインの Column ウィジェットを Stack でラップし、そのスタックの 2 番目の子として、下部に固定された
LinearProgressIndicator を追加します。完了すると、Scaffold の body
は次のようになります。
body: Stack( // New!
  children: [
    Column(
      children: [
        Expanded(
          child: ListView(
            controller: _scrollController,
            padding: const EdgeInsets.all(16),
            children: [
              for (final item in _items)
                switch (item) {
                  TextItem() => MessageBubble(
                    text: item.text,
                    isUser: item.isUser,
                  ),
                  SurfaceItem() => Surface(
                    surfaceContext: _controller.contextFor(
                      item.surfaceId,
                    ),
                  ),
                },
            ],
          ),
        ),
        SafeArea(
          child: Padding(
            padding: const EdgeInsets.symmetric(horizontal: 16.0),
            child: ValueListenableBuilder<ConversationState>(
              valueListenable: _conversation.state,
              builder: (context, state, child) {
                return Row(
                  children: [
                    Expanded(
                      child: TextField(
                        controller: _textController,
                        onSubmitted:
                            state.isWaiting ? null : (_) => _addMessage(),
                        decoration: const InputDecoration(
                          hintText: 'Enter a message',
                        ),
                      ),
                    ),
                    const SizedBox(width: 8),
                    ElevatedButton(
                      onPressed: state.isWaiting ? null : _addMessage,
                      child: const Text('Send'),
                    ),
                  ],
                );
              },
            ),
          ),
        ),
      ],
    ),
    // Listen to the state again, this time to render a progress indicator
    ValueListenableBuilder<ConversationState>(
      valueListenable: _conversation.state,
      builder: (context, state, child) {
        if (state.isWaiting) {
          return const LinearProgressIndicator();
        }
        return const SizedBox.shrink();
      },
    ),
  ],
),
6. GenUI サーフェスを永続化する
これまでのところ、タスクリストはスクロール可能なチャット ストリームにレンダリングされ、新しいメッセージやサーフェスが到着するたびにリストに追加されています。次のステップでは、サーフェスに名前を付けて、UI 内の特定の場所に表示する方法について説明します。
まず、main.dart の先頭の void main() の前に、サーフェス ID として使用する定数を宣言します。
const taskDisplaySurfaceId = 'task_display';
次に、Conversation リスナーの switch ステートメントを更新して、その ID のサーフェスが _items
に追加されないようにします。
case ConversationSurfaceAdded added:
  if (added.surfaceId != taskDisplaySurfaceId) {
    _items.add(SurfaceItem(surfaceId: added.surfaceId));
    _scrollToBottom();
  }
次に、ウィジェット ツリーのレイアウト構造を開いて、チャットログのすぐ上に固定サーフェスのスペースを作成します。次の 2
つのウィジェットをメインの Column の最初の子として追加します。
AnimatedSize(
  duration: const Duration(milliseconds: 300),
  child: Container(
    padding: const EdgeInsets.all(16),
    alignment: Alignment.topLeft,
    child: Surface(
      surfaceContext: _controller.contextFor(
        taskDisplaySurfaceId,
      ),
    ),
  ),
),
const Divider(),
これまでのところ、エージェントはサーフェスを自由に作成して使用できます。より具体的な指示を出すには、システム
プロンプトを再確認する必要があります。systemInstruction 定数に保存されているプロンプトの末尾に、次の
## USER INTERFACE セクションを追加します。
const systemInstruction = '''
  // ... existing prompt content ...

  ## USER INTERFACE
  *   To display the list of tasks create one and only one instance of the
    TaskDisplay catalog item. Use "$taskDisplaySurfaceId" as its surface ID.
  *   Update $taskDisplaySurfaceId as necessary when the list changes.
  *   $taskDisplaySurfaceId must include a button for each task that I can use
    to mark it complete. When I use that button to mark a task complete, it
    should send you a message indicating what I've done.
  *   Avoid repeating the same information in a single message.
  *   When responding with text, rather than A2UI messages, be brief.
''';
UI サーフェスの使用時期と使用方法について、エージェントに明確な指示を出すことが重要です。特定の商品とサーフェス ID を使用するようにエージェントに指示することで(単一のインスタンスを再利用するように)、目的のインターフェースを作成できます。
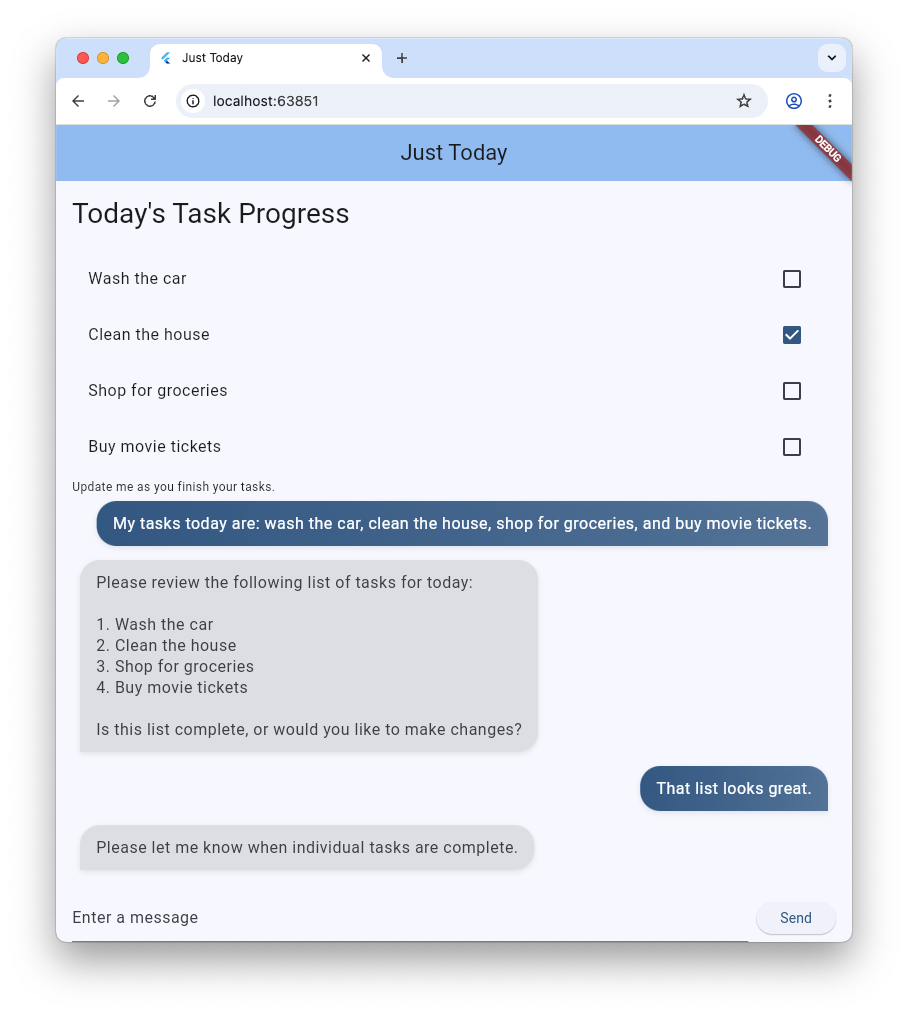
作業はまだありますが、アプリを再実行して、エージェントが UI の上部にタスク表示サーフェスを作成していることを確認できます。
7. カスタム カタログ ウィジェットを構築する
現時点では、TaskDisplay カタログ アイテムは存在しません。次の手順では、データ
スキーマ、そのスキーマを解析するクラス、ウィジェット、すべてをまとめるカタログ アイテムを作成して、この問題を解決します。
まず、task_display.dart という名前のファイルを作成し、次のインポートを追加します。
import 'package:flutter/material.dart';
import 'package:genui/genui.dart';
import 'package:json_schema_builder/json_schema_builder.dart';
データスキーマを作成する
次に、タスク表示を作成するときにエージェントが提供するデータ スキーマを定義します。このプロセスでは、json_schema_builder
パッケージの高度なコンストラクタを使用しますが、基本的にはエージェントとの間で送受信されるメッセージで使用される JSON
スキーマを定義するだけです。
まず、コンポーネント名を参照する基本的な S.object から始めます。
final taskDisplaySchema = S.object(
  properties: {
    'component': S.string(enumValues: ['TaskDisplay']),
  },
);
次に、title、tasks、name、isCompleted、completeAction をスキーマ
プロパティに追加します。
final taskDisplaySchema = S.object(
  properties: {
    'component': S.string(enumValues: ['TaskDisplay']),
    'title': S.string(description: 'The title of the task list'),
    'tasks': S.list(
      description: 'A list of tasks to be completed today',
      items: S.object(
        properties: {
          'name': S.string(description: 'The name of the task to be completed'),
          'isCompleted': S.boolean(
            description: 'Whether the task is completed',
          ),
          'completeAction': A2uiSchemas.action(
            description:
                'The action performed when the user has completed the task.',
          ),
        },
      ),
    ),
  },
);
completeAction プロパティを見てみましょう。これは、A2UI アクションを表すスキーマ
プロパティのコンストラクタである A2uiSchemas.action で作成されます。スキーマにアクションを追加することで、アプリはエージェントに「タスクを送信するときは、タスクが完了したことを伝えるために使用できるアクションの名前とメタデータも提供してください」と伝えます。後で、ユーザーがチェックボックスをタップすると、アプリはそのアクションを呼び出します。
次に、スキーマに required
フィールドを追加します。これにより、エージェントは毎回特定のプロパティを設定します。この場合、すべてのプロパティが必要です。
final taskDisplaySchema = S.object(
  properties: {
    'component': S.string(enumValues: ['TaskDisplay']),
    'title': S.string(description: 'The title of the task list'),
    'tasks': S.list(
      description: 'A list of tasks to be completed today',
      items: S.object(
        properties: {
          'name': S.string(description: 'The name of the task to be completed'),
          'isCompleted': S.boolean(
            description: 'Whether the task is completed',
          ),
          'completeAction': A2uiSchemas.action(
            description:
                'The action performed when the user has completed the task.',
          ),
        },
        // New!
        required: ['name', 'isCompleted', 'completeAction'],
      ),
    ),
  },
  // New!
  required: ['title', 'tasks'],
);
データ解析クラスを作成する
このコンポーネントのインスタンスを作成すると、エージェントはスキーマに一致するデータを送信します。受信した JSON を厳密に型指定された
Dart オブジェクトに解析する 2 つのクラスを追加します。_TaskDisplayData
がルート構造を処理し、内部配列の解析を _TaskData に委任する方法に注目してください。
class _TaskData {
  final String name;
  final bool isCompleted;
  final String actionName;
  final JsonMap actionContext;

  _TaskData({
    required this.name,
    required this.isCompleted,
    required this.actionName,
    required this.actionContext,
  });

  factory _TaskData.fromJson(Map<String, Object?> json) {
    try {
      final action = json['completeAction']! as JsonMap;
      final event = action['event']! as JsonMap;

      return _TaskData(
        name: json['name'] as String,
        isCompleted: json['isCompleted'] as bool,
        actionName: event['name'] as String,
        actionContext: event['context'] as JsonMap,
      );
    } catch (e) {
      throw Exception('Invalid JSON for _TaskData: $e');
    }
  }
}

class _TaskDisplayData {
  final String title;
  final List<_TaskData> tasks;

  _TaskDisplayData({required this.title, required this.tasks});

  factory _TaskDisplayData.fromJson(Map<String, Object?> json) {
    try {
      return _TaskDisplayData(
        title: (json['title'] as String?) ?? 'Tasks',
        tasks: (json['tasks'] as List<Object?>)
            .map((e) => _TaskData.fromJson(e as Map<String, Object?>))
            .toList(),
      );
    } catch (e) {
      throw Exception('Invalid JSON for _TaskDisplayData: $e');
    }
  }
}
Flutter でビルドしたことがある場合、これらのクラスは作成したクラスと似ている可能性があります。これらは
JsonMap を受け取り、JSON から解析されたデータを含む厳密に型指定されたオブジェクトを返します。
_TaskData の actionName フィールドと actionContext
フィールドを見てみましょう。これらは JSON の completeAction
プロパティから抽出され、アクションの名前とそのデータ コンテキスト(GenUI のデータモデル内のアクションの場所への参照)が含まれています。これらは、後で
UserActionEvent を作成するために使用されます。
データモデルは、genui ライブラリによって維持される、すべての動的 UI
状態の一元化されたオブザーバブルなストアです。エージェントがカタログから UI
コンポーネントを作成すると、コンポーネントのスキーマに一致するデータ オブジェクトも作成されます。このデータ
オブジェクトはクライアントのデータモデルに保存されるため、ウィジェットの構築に使用したり、エージェントへの後続のメッセージ(ウィジェットに接続する
completeAction など)で参照したりできます。
ウィジェットを追加します
次に、リストを表示するウィジェットを作成します。これは、_TaskDisplayData
クラスのインスタンスと、タスクが完了したときに呼び出すコールバックを受け取る必要があります。
class _TaskDisplay extends StatelessWidget {
  final _TaskDisplayData data;
  final void Function(_TaskData) onCompleteTask;

  const _TaskDisplay({required this.data, required this.onCompleteTask});

  @override
  Widget build(BuildContext context) {
    return Column(
      crossAxisAlignment: CrossAxisAlignment.start,
      mainAxisSize: MainAxisSize.min,
      children: [
        Padding(
          padding: const EdgeInsets.all(16.0),
          child: Text(
            data.title,
            style: Theme.of(context).textTheme.titleLarge,
          ),
        ),
        ...data.tasks.map(
          (task) => CheckboxListTile(
            title: Text(
              task.name,
              style: TextStyle(
                decoration: task.isCompleted
                    ? TextDecoration.lineThrough
                    : TextDecoration.none,
              ),
            ),
            value: task.isCompleted,
            onChanged: task.isCompleted
                ? null
                : (val) {
                    if (val == true) {
                      onCompleteTask(task);
                    }
                  },
          ),
        ),
      ],
    );
  }
}
CatalogItem を作成する
スキーマ、パーサー、ウィジェットを作成したら、CatalogItem を作成してすべてを関連付けます。
task_display.dart の下部に、トップレベル変数として taskDisplay を作成し、_TaskDisplayData を使用して受信した JSON を解析し、_TaskDisplay ウィジェットのインスタンスを構築します。
final taskDisplay = CatalogItem(
  name: 'TaskDisplay',
  dataSchema: taskDisplaySchema,
  widgetBuilder: (itemContext) {
    final json = itemContext.data as Map<String, Object?>;
    final data = _TaskDisplayData.fromJson(json);

    return _TaskDisplay(
      data: data,
      onCompleteTask: (task) async {
        // We will implement this next!
      },
    );
  },
);
onCompleteTask を実装する
ウィジェットが機能するには、タスクが完了したときにエージェントに通知する必要があります。空の onCompleteTask
プレースホルダを次のコードに置き換えて、タスクデータから completeAction を使用してイベントを作成してディスパッチします。
onCompleteTask: (task) async {
  // A data context is a reference to a location in the data model. This line
  // turns that reference into a concrete data object that the agent can use.
  // It's kind of like taking a pointer and replacing it with the value it
  // points to.
  final JsonMap resolvedContext = await resolveContext(
    itemContext.dataContext,
    task.actionContext,
  );

  // Dispatch an event back to the agent, letting it know a task was completed.
  // This will be sent to the agent in an A2UI message that includes the name
  // of the action, the surface ID, and the resolved data context.
  itemContext.dispatchEvent(
    UserActionEvent(
      name: task.actionName,
      sourceComponentId: itemContext.id,
      context: resolvedContext,
    ),
  );
}
カタログ アイテムを登録する
最後に、main.dart を開き、新しいファイルをインポートして、他のカタログ アイテムとともに登録します。
次のインポートを lib/main.dart の先頭に追加します。
import 'task_display.dart';
initState() 関数内の catalog = BasicCatalogItems.asCatalog(); を次のように置き換えます。
// The Catalog is immutable, so use copyWith to create a new version
// that includes our custom catalog item along with the basics.
catalog = BasicCatalogItems.asCatalog().copyWith(newItems: [taskDisplay]);
これで完了となります。アプリをホット再起動して変更を確認します。
8. エージェントを操作するさまざまな方法を試す
新しいウィジェットをカタログに追加し、アプリの UI にスペースを作成したので、エージェントとの連携を楽しみましょう。GenUI の主なメリットの 1 つは、ボタンやチェックボックスなどのアプリケーション UI を介して、自然言語を理解し、データを推論できるエージェントを介して、データの操作方法が 2 つあることです。両方を試してみてください。
- テキスト フィールドを使用して 3 つまたは 4 つのタスクを記述すると、リストに表示されます。
- チェックボックスを使用して、タスクを完了または未完了に切り替えます。
- 5 ~ 6 個のタスクのリストを作成し、どこかに移動する必要があるタスクを削除するようにエージェントに指示します。
- エージェントに、タスクの繰り返しリストを個別のアイテムとして作成するように指示します(「母、父、祖母にホリデーカードを購入する必要があります。個別のタスクを作成してください。」)。
- エージェントに、すべてのタスクを完了または未完了としてマークするか、最初の 2 つまたは 3 つをチェックするように指示します。
9. 完了
おめでとうございます!生成 UI と Flutter を使用して、AI を活用したタスク トラッキング アプリを構築しました。
学習した内容
- Flutter Firebase SDK を使用して Google の基盤モデルとやり取りする
- GenUI を利用して Gemini によって生成されたインタラクティブなサーフェスをレンダリングする
- 事前に決定された静的レンダリング ID を使用してレイアウトにサーフェスを固定する
- 堅牢なインタラクション ループ用のカスタム スキーマとウィジェット カタログを設計する