
1. บทนำ
ใน Codelab นี้ คุณจะได้สร้างแอปรายการงานโดยใช้ Flutter, Firebase AI Logic และแพ็กเกจ genui ใหม่ คุณจะเริ่มต้นด้วยแอปแชทแบบข้อความ อัปเกรดด้วย GenUI เพื่อให้ Agent มีสิทธิ์สร้าง UI ของตัวเอง และสุดท้ายคือสร้างคอมโพเนนต์ UI แบบอินเทอร์แอกทีฟที่กำหนดเองซึ่งคุณและ Agent สามารถจัดการได้โดยตรง
สิ่งที่คุณต้องทำ
- สร้างอินเทอร์เฟซแชทพื้นฐานโดยใช้ Flutter และ Firebase AI Logic
- ผสานรวม
genuiแพ็กเกจเพื่อสร้างแพลตฟอร์มที่ทำงานด้วยระบบ AI - เพิ่มแถบความคืบหน้าเพื่อระบุเมื่อแอปกำลังรอการตอบกลับจากตัวแทน
- สร้างแพลตฟอร์มที่มีชื่อและแสดงในจุดที่กำหนดใน UI
- สร้างคอมโพเนนต์แคตตาล็อก GenUI ที่กำหนดเองซึ่งช่วยให้คุณควบคุมวิธีนำเสนองานได้
สิ่งที่คุณต้องมี
- เว็บเบราว์เซอร์ เช่น Chrome
- Flutter SDK ที่ติดตั้งในเครื่อง
- ติดตั้งและกำหนดค่า Firebase CLI แล้ว
Codelab นี้มีไว้สำหรับนักพัฒนา Flutter ระดับกลาง
2. ก่อนเริ่มต้น
ตั้งค่าโปรเจ็กต์ Flutter
- หากยังไม่ได้ดำเนินการ ให้ติดตั้ง Flutter SDK ในเครื่อง
- เปิดเทอร์มินัลแล้วเรียกใช้
flutter createเพื่อสร้างโปรเจ็กต์ใหม่flutter create intro_to_genui cd intro_to_genui - เพิ่มทรัพยากร Dependency ที่จำเป็นลงในโปรเจ็กต์ Flutter
flutter pub add firebase_core firebase_ai genui json_schema_builderdependenciesสุดท้ายควรมีลักษณะดังนี้ (หมายเลขเวอร์ชันอาจแตกต่างกันเล็กน้อย)dependencies: flutter: sdk: flutter cupertino_icons: ^1.0.8 firebase_core: ^4.9.0 firebase_ai: ^3.12.1 genui: ^0.9.0 json_schema_builder: ^0.1.3 - เรียกใช้
flutter pub getเพื่อดาวน์โหลดแพ็กเกจทั้งหมด
ตั้งค่าโปรเจ็กต์ Firebase
- ติดตั้ง Firebase CLI หากยังไม่ได้ติดตั้ง
- เข้าสู่ระบบ Firebase โดยใช้บัญชี Google โดยทำดังนี้
firebase login - ติดตั้ง FlutterFire CLI โดยทำดังนี้
dart pub global activate flutterfire_cli - จากไดเรกทอรีโปรเจ็กต์ Flutter ให้เรียกใช้คำสั่งต่อไปนี้เพื่อกำหนดค่าโปรเจ็กต์ Flutter ให้ใช้ Firebase
flutterfire configure- ถามว่าคุณต้องการใช้โปรเจ็กต์ Firebase ที่มีอยู่หรือสร้างโปรเจ็กต์ Firebase ใหม่ เลือกสร้างโปรเจ็กต์ Firebase ใหม่
- ถามว่าคุณต้องการกำหนดเป้าหมายแพลตฟอร์มใด (iOS, Android, เว็บ) สำหรับแอป Flutter ในตอนนี้ ให้เลือกเว็บ
คำสั่ง flutterfire configure จะสร้างโปรเจ็กต์ Firebase และ Firebase Web App ใหม่ในโปรเจ็กต์ Firebase นั้นโดยอัตโนมัติ จากนั้นคำสั่งจะสร้างไฟล์กำหนดค่า Firebase (firebase_options.dart) และเพิ่มลงในไดเรกทอรี lib/ ของโปรเจ็กต์ Flutter โดยอัตโนมัติ
โปรดทราบว่าแอปสำหรับโค้ดแล็บนี้จะทำงานได้เมื่อติดตั้ง Flutter SDK และ Chrome ในเครื่องของคุณเท่านั้น (กล่าวคือ แอปจะสร้างเป็นเว็บแอป) อย่างไรก็ตาม เนื่องจากแอปนี้สร้างขึ้นด้วย Flutter จึงจะทำงานบนแพลตฟอร์มอื่นๆ ได้ด้วย ดังนั้นเมื่อสิ้นสุด Codelab แล้ว ให้ลองเรียกใช้ flutterfire configure อีกครั้งเพื่อเพิ่มการรองรับ iOS, Android หรือแพลตฟอร์มอื่น แล้วสร้างแอปใหม่ในแพลตฟอร์มนั้น
ดูข้อมูลเพิ่มเติมได้ที่วิธีการเพิ่ม Firebase ลงในแอป Flutter
ตั้งค่า Firebase AI Logic
- ลงชื่อเข้าใช้คอนโซล Firebase ใช้บัญชี Google เดียวกับที่ใช้เพื่อเข้าสู่ระบบ Firebase CLI
- เลือกโปรเจ็กต์ Firebase ที่คุณเพิ่งสร้างโดยใช้ FlutterFire CLI
- เลือกบริการ AI > ตรรกะ AI จากเมนูการนำทางด้านซ้าย
- คลิกเริ่มต้นใช้งานเพื่อเปิดเวิร์กโฟลว์แบบมีคำแนะนำ
- เลือกเพื่อเริ่มต้นด้วย Gemini Developer API แล้วทำตามข้อความแจ้งบนหน้าจอเพื่อตั้งค่า Firebase AI Logic
คุณมีปลั๊กอิน FlutterFire ที่จำเป็นอยู่แล้วเพื่อใช้ Firebase AI Logic จากส่วน "ตั้งค่าโปรเจ็กต์ Flutter" คุณพร้อมที่จะเริ่มเขียนโค้ดแอปในขั้นตอนถัดไปแล้ว
3. สร้างอินเทอร์เฟซแชทพื้นฐาน
ก่อนที่จะเปิดตัว Generative UI แอปของคุณต้องมีพื้นฐาน ซึ่งก็คือแอปพลิเคชันแชทแบบข้อความพื้นฐานที่ขับเคลื่อนโดย Firebase AI Logic หากต้องการเริ่มต้นอย่างรวดเร็ว ให้คัดลอกและวางการตั้งค่าทั้งหมดสำหรับอินเทอร์เฟซแชท
สร้างวิดเจ็ตบับเบิลข้อความ
หากต้องการแสดงข้อความจากผู้ใช้และตัวแทน แอปของคุณต้องมีวิดเจ็ต สร้างไฟล์ใหม่ชื่อ lib/message_bubble.dart แล้วเพิ่มคลาสต่อไปนี้
import 'package:flutter/material.dart';

class MessageBubble extends StatelessWidget {
  final String text;
  final bool isUser;

  const MessageBubble({super.key, required this.text, required this.isUser});

  @override
  Widget build(BuildContext context) {
    final theme = Theme.of(context);
    final colorScheme = theme.colorScheme;

    final bubbleColor = isUser
        ? colorScheme.primary
        : colorScheme.surfaceContainerHighest;

    final textColor = isUser
        ? colorScheme.onPrimary
        : colorScheme.onSurfaceVariant;

    return Padding(
      padding: const EdgeInsets.symmetric(vertical: 6.0, horizontal: 8.0),
      child: Column(
        crossAxisAlignment: isUser
            ? CrossAxisAlignment.end
            : CrossAxisAlignment.start,
        children: [
          Row(
            mainAxisAlignment: isUser
                ? MainAxisAlignment.end
                : MainAxisAlignment.start,
            children: [
              Flexible(
                child: Container(
                  padding: const EdgeInsets.symmetric(
                    horizontal: 16.0,
                    vertical: 12.0,
                  ),
                  decoration: BoxDecoration(
                    color: bubbleColor,
                    borderRadius: BorderRadius.only(
                      topLeft: const Radius.circular(20),
                      topRight: const Radius.circular(20),
                      bottomLeft: Radius.circular(isUser ? 20 : 0),
                      bottomRight: Radius.circular(isUser ? 0 : 20),
                    ),
                    boxShadow: [
                      BoxShadow(
                        color: Colors.black.withAlpha(20),
                        blurRadius: 4,
                        offset: const Offset(0, 2),
                      ),
                    ],
                    gradient: isUser
                        ? LinearGradient(
                            colors: [
                              colorScheme.primary,
                              colorScheme.primary.withAlpha(200),
                            ],
                            begin: Alignment.topLeft,
                            end: Alignment.bottomRight,
                          )
                        : null,
                  ),
                  child: Text(
                    text,
                    style: theme.textTheme.bodyLarge?.copyWith(
                      color: textColor,
                      height: 1.3,
                    ),
                  ),
                ),
              ),
            ],
          ),
          const SizedBox(height: 2),
        ],
      ),
    );
  }
}
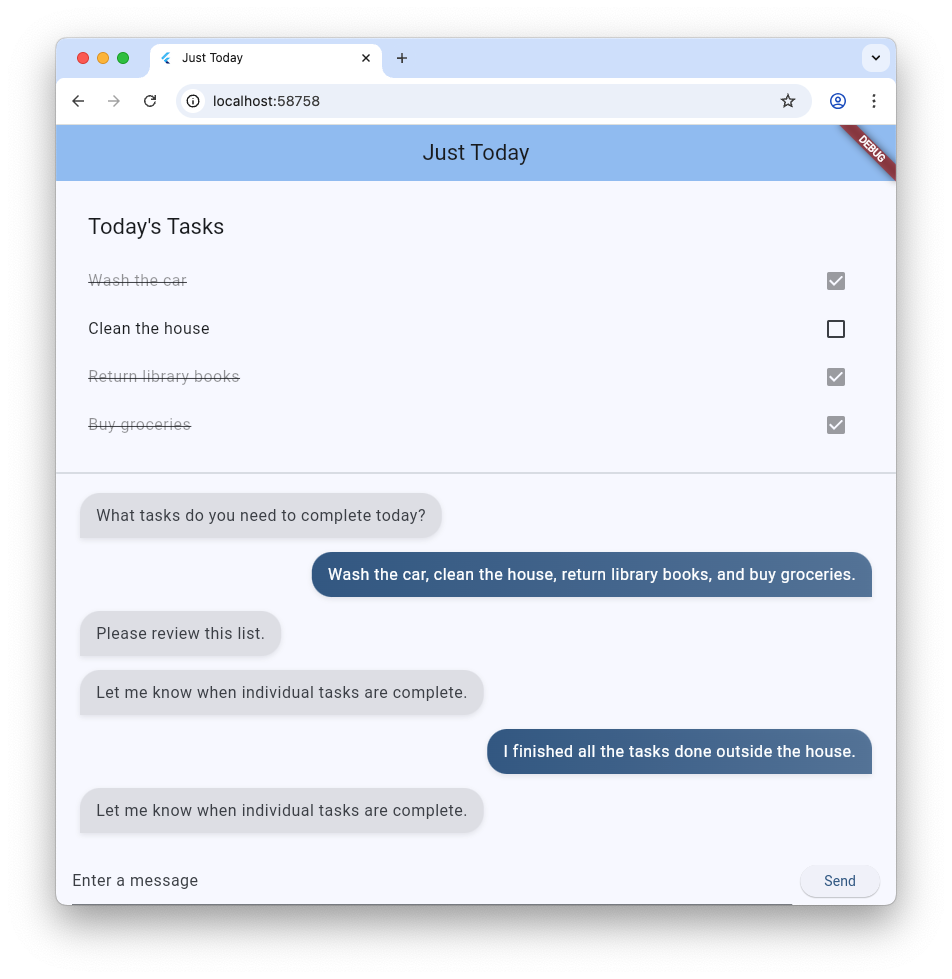
MessageBubble คือ StatelessWidget ที่แสดงข้อความแชทเดียว โดยจะใช้ใน Codelab นี้ในภายหลังเพื่อแสดงข้อความจากทั้งคุณและตัวแทน แต่ส่วนใหญ่จะเป็นเพียงวิดเจ็ต Text ที่ดูดี
ใช้ UI ของ Chat ใน main.dart
แทนที่เนื้อหาทั้งหมดของ lib/main.dart ด้วยการติดตั้งใช้งานแชทบอทข้อความที่สมบูรณ์นี้
import 'package:flutter/material.dart';
import 'package:firebase_core/firebase_core.dart';
import 'package:firebase_ai/firebase_ai.dart';
import 'package:intro_to_genui/message_bubble.dart';
import 'firebase_options.dart';

Future<void> main() async {
  WidgetsFlutterBinding.ensureInitialized();
  await Firebase.initializeApp(options: DefaultFirebaseOptions.currentPlatform);
  runApp(const MyApp());
}

class MyApp extends StatelessWidget {
  const MyApp({super.key});

  @override
  Widget build(BuildContext context) {
    return MaterialApp(
      title: 'Just Today',
      theme: ThemeData(
        colorScheme: ColorScheme.fromSeed(seedColor: Colors.blue),
      ),
      home: const MyHomePage(),
    );
  }
}

class MyHomePage extends StatefulWidget {
  const MyHomePage({super.key});

  @override
  State<MyHomePage> createState() => _MyHomePageState();
}

sealed class ConversationItem {}

class TextItem extends ConversationItem {
  final String text;
  final bool isUser;
  TextItem({required this.text, this.isUser = false});
}

class _MyHomePageState extends State<MyHomePage> {
  final List<ConversationItem> _items = [];
  final _textController = TextEditingController();
  final _scrollController = ScrollController();
  late final ChatSession _chatSession;

  @override
  void initState() {
    super.initState();
    final model = FirebaseAI.googleAI().generativeModel(
      model: 'gemini-3.5-flash',
    );
    _chatSession = model.startChat();
    _chatSession.sendMessage(Content.text(systemInstruction));
  }

  void _scrollToBottom() {
    WidgetsBinding.instance.addPostFrameCallback((_) {
      if (_scrollController.hasClients) {
        _scrollController.animateTo(
          _scrollController.position.maxScrollExtent,
          duration: const Duration(milliseconds: 300),
          curve: Curves.easeOut,
        );
      }
    });
  }

  @override
  void dispose() {
    _textController.dispose();
    _scrollController.dispose();
    super.dispose();
  }

  Future<void> _addMessage() async {
    final text = _textController.text;

    if (text.trim().isEmpty) {
      return;
    }
    _textController.clear();

    setState(() {
      _items.add(TextItem(text: text, isUser: true));
    });

    _scrollToBottom();

    final response = await _chatSession.sendMessage(Content.text(text));

    if (response.text?.isNotEmpty ?? false) {
      setState(() {
        _items.add(TextItem(text: response.text!, isUser: false));
      });
      _scrollToBottom();
    }
  }

  @override
  Widget build(BuildContext context) {
    return Scaffold(
      appBar: AppBar(
        backgroundColor: Theme.of(context).colorScheme.inversePrimary,
        title: const Text('Just Today'),
      ),
      body: Column(
        children: [
          Expanded(
            child: ListView(
              controller: _scrollController,
              padding: const EdgeInsets.all(16),
              children: [
                for (final item in _items)
                  switch (item) {
                    TextItem() => MessageBubble(
                          text: item.text,
                          isUser: item.isUser,
                        ),
                  },
              ],
            ),
          ),
          SafeArea(
            child: Padding(
              padding: const EdgeInsets.symmetric(horizontal: 16.0),
              child: Row(
                children: [
                  Expanded(
                    child: TextField(
                      controller: _textController,
                      onSubmitted: (_) => _addMessage(),
                      decoration: const InputDecoration(
                        hintText: 'Enter a message',
                      ),
                    ),
                  ),
                  const SizedBox(width: 8),
                  ElevatedButton(
                    onPressed: _addMessage,
                    child: const Text('Send'),
                  ),
                ],
              ),
            ),
          ),
        ],
      ),
    );
  }
}

const systemInstruction = '''
  ## PERSONA
  You are an expert task planner.

  ## GOAL
  Work with me to produce a list of tasks that I should do today, and then track
  the completion status of each one.

  ## RULES
  Talk with me only about tasks that I should do today.
  Do not engage in conversation about any other topic.
  Do not offer suggestions unless I ask for them.
  Do not offer encouragement unless I ask for it.
  Do not offer advice unless I ask for it.
  Do not offer opinions unless I ask for them.

  ## PROCESS
  ### Planning
  *   Ask me for information about tasks that I should do today.
  *   Synthesize a list of tasks from that information.
  *   Ask clarifying questions if you need to.
  *   When you have a list of tasks that you think I should do today, present it
    to me for review.
  *   Respond to my suggestions for changes, if I have any, until I accept the
    list.

  ### Tracking
  *   Once the list is accepted, ask me to let you know when individual tasks are
    complete.
  *   If I tell you a task is complete, mark it as complete.
  *   Once all tasks are complete, send a message acknowledging that, and then
    end the conversation.
''';
ไฟล์ main.dart ที่คุณเพิ่งคัดลอกและวางจะตั้งค่า ChatSession พื้นฐานโดยใช้ Firebase AI Logic และพรอมต์ใน systemInstruction โดยจะจัดการการสนทนาด้วยการดูแลรายการองค์ประกอบ TextItem และแสดงองค์ประกอบเหล่านั้นควบคู่ไปกับคำค้นหาของผู้ใช้โดยใช้วิดเจ็ต MessageBubble ที่คุณสร้างไว้ก่อนหน้านี้
โปรดตรวจสอบสิ่งต่อไปนี้ก่อนดำเนินการต่อ
initStateเป็นวิธีที่ใช้ตั้งค่าการเชื่อมต่อกับ Firebase AI Logic- แอปมี
TextFieldและปุ่มสำหรับส่งข้อความถึงตัวแทน _addMessageวิธีนี้คือการส่งข้อความของผู้ใช้ไปยังตัวแทน- รายการ
_itemsคือที่เก็บประวัติการสนทนา - ข้อความจะแสดงใน
ListViewโดยใช้วิดเจ็ตMessageBubble
ทดสอบแอป
เมื่อตั้งค่าเรียบร้อยแล้ว คุณจะเรียกใช้แอปและทดสอบได้
flutter run -d chrome
ลองแชทกับตัวแทนเกี่ยวกับงานบางอย่างที่คุณต้องการทำให้เสร็จในวันนี้ แม้ว่า UI ที่เป็นข้อความอย่างเดียวจะทำงานได้ แต่ GenUI จะช่วยให้ประสบการณ์การใช้งานง่ายและรวดเร็วขึ้น
4. ผสานรวมแพ็กเกจ GenUI
ตอนนี้ก็ถึงเวลาอัปเกรดจากข้อความธรรมดาเป็น Generative UI แล้ว คุณจะสลับลูปการรับส่งข้อความ Firebase พื้นฐานกับออบเจ็กต์ GenUI Conversation, Catalog และ SurfaceController ซึ่งจะช่วยให้โมเดล AI สร้างอินสแตนซ์วิดเจ็ต Flutter จริงๆ ภายในสตรีมแชทได้
genui แพ็กเกจมีคลาส 5 คลาสที่คุณจะใช้ตลอดทั้งโค้ดแล็บนี้
SurfaceControllerUI ของ Maps ที่โมเดลสร้างขึ้นไปยังหน้าจอA2uiTransportAdapterเชื่อมต่อคำขอ GenUI ภายในกับโมเดลภาษาภายนอกConversationจะห่อหุ้มตัวควบคุมและอแดปเตอร์การรับส่งด้วย API เดียวแบบรวมเป็นหนึ่งเดียวสำหรับแอป FlutterCatalogอธิบายวิดเจ็ตและพร็อพเพอร์ตี้ที่พร้อมใช้งานสำหรับโมเดลภาษาSurfaceเป็นวิดเจ็ตที่แสดง UI ที่โมเดลสร้างขึ้น
เตรียมพร้อมที่จะแสดง Surface ที่สร้างขึ้น
โค้ดที่มีอยู่ประกอบด้วยคลาส TextItem ที่แสดงถึงข้อความเดียวในการสนทนา เพิ่มชั้นเรียนอื่นเพื่อแสดงถึงSurfaceที่สร้างโดยตัวแทน
class SurfaceItem extends ConversationItem {
  final String surfaceId;
  SurfaceItem({required this.surfaceId});
}
เริ่มต้นองค์ประกอบที่ใช้สร้างสรรค์ของ GenUI
ที่ด้านบนของ lib/main.dart ให้นำเข้าไลบรารี genui ดังนี้
import 'package:genui/genui.dart' hide TextPart;
import 'package:genui/genui.dart' as genui;
ทั้งแพ็กเกจ genui และแพ็กเกจ firebase_ai มีคลาส TextPart การนำเข้า genui ด้วยวิธีนี้จะช่วยให้คุณตั้งชื่อเวอร์ชันของ TextPart เป็น genui.TextPart ได้โดยไม่เกิดการตั้งชื่อซ้ำ
ประกาศตัวควบคุมฟังก์ชันหลักใน _MyHomePageState หลังจาก _chatSession ดังนี้
class _MyHomePageState extends State<MyHomePage> {
  // ... existing members
  late final ChatSession _chatSession;

  // Add GenUI controllers
  late final SurfaceController _controller;
  late final A2uiTransportAdapter _transport;
  late final Conversation _conversation;
  late final Catalog catalog;
จากนั้นอัปเดต initState เพื่อเตรียมตัวควบคุมของไลบรารี GenUI
นำบรรทัดนี้ออกจาก initState
_chatSession.sendMessage(Content.text(systemInstruction));
จากนั้นเพิ่มโค้ดต่อไปนี้
@override
void initState() {
  // ... existing code ...

  // Initialize the GenUI Catalog.
  // The genui package provides a default set of primitive widgets (like text
  // and basic buttons) out of the box using this class.
  catalog = BasicCatalogItems.asCatalog();

  // Create a SurfaceController to manage the state of generated surfaces.
  _controller = SurfaceController(catalogs: [catalog]);

  // Create a transport adapter that will process messages to and from the
  // agent, looking for A2UI messages.
  _transport = A2uiTransportAdapter(onSend: _sendAndReceive);

  // Link the transport and SurfaceController together in a Conversation,
  // which provides your app a unified API for interacting with the agent.
  _conversation = Conversation(
    controller: _controller,
    transport: _transport,
  );
}
โค้ดนี้จะสร้างConversation Facade ที่จัดการคอนโทรลเลอร์และอแดปเตอร์ การสนทนานั้นจะให้สตรีมเหตุการณ์แก่แอปของคุณ ซึ่งแอปสามารถใช้เพื่อติดตามสิ่งที่เอเจนต์สร้างขึ้น รวมถึงวิธีการส่งข้อความไปยังเอเจนต์
จากนั้นสร้าง Listener สำหรับเหตุการณ์การสนทนา ซึ่งรวมถึงเหตุการณ์ที่เกี่ยวข้องกับพื้นผิว รวมถึงเหตุการณ์สำหรับข้อความและข้อผิดพลาด
@override
void initState() {
  // ... existing code ...

  // Listen to GenUI stream events to update the UI
  _conversation.events.listen((event) {
    setState(() {
      switch (event) {
        case ConversationSurfaceAdded added:
          _items.add(SurfaceItem(surfaceId: added.surfaceId));
          _scrollToBottom();
        case ConversationSurfaceRemoved removed:
          _items.removeWhere(
            (item) =>
                item is SurfaceItem && item.surfaceId == removed.surfaceId,
          );
        case ConversationContentReceived content:
          _items.add(TextItem(text: content.text, isUser: false));
          _scrollToBottom();
        case ConversationError error:
          debugPrint('GenUI Error: ${error.error}');
        default:
      }
    });
  });
}
สุดท้าย ให้สร้างพรอมต์ของระบบและส่งไปยังเอเจนต์
  @override
  void initState() {
    // ... existing code ...

    // Create the system prompt for the agent, which will include this app's
    // system instruction as well as the schema for the catalog.
    final promptBuilder = PromptBuilder.chat(
      catalog: catalog,
      systemPromptFragments: [systemInstruction],
    );

    // Send the prompt into the Conversation, which will subsequently route it
    // to Firebase using the transport mechanism.
    _conversation.sendRequest(
      ChatMessage.system(promptBuilder.systemPromptJoined()),
    );
  }
แพลตฟอร์ม Display
จากนั้น อัปเดตเมธอด build ของ ListView เพื่อแสดง SurfaceItem ในรายการ _items ดังนี้
Expanded(
  child: ListView(
    controller: _scrollController,
    padding: const EdgeInsets.all(16),
    children: [
      for (final item in _items)
        switch (item) {
          TextItem() => MessageBubble(
            text: item.text,
            isUser: item.isUser,
          ),
          // New!
          SurfaceItem() => Surface(
            surfaceContext: _controller.contextFor(
              item.surfaceId,
            ),
          ),
        },
    ],
  ),
),
ตัวสร้างสำหรับวิดเจ็ต Surface จะใช้ surfaceContext ที่บอกว่าวิดเจ็ตมีหน้าที่แสดงพื้นผิวใด SurfaceControllerที่สร้างไว้ก่อนหน้านี้_controllerจะให้คำจำกัดความและสถานะสำหรับแต่ละพื้นผิว และตรวจสอบว่ามีการสร้างใหม่เมื่อมีการอัปเดต
เชื่อมต่อ GenUI กับ Firebase AI Logic
genui แพ็กเกจนี้ใช้แนวทาง "นำโมเดลของคุณเองมาใช้" ซึ่งหมายความว่าคุณจะควบคุมได้ว่า LLM ใดที่ขับเคลื่อนประสบการณ์การใช้งานของคุณ ในกรณีนี้ คุณใช้ Firebase AI Logic แต่แพ็กเกจนี้สร้างขึ้นมาเพื่อทำงานร่วมกับ Agent และผู้ให้บริการที่หลากหลาย
อิสระดังกล่าวมาพร้อมกับความรับผิดชอบที่เพิ่มขึ้นเล็กน้อย นั่นคือคุณต้องนำข้อความที่สร้างโดยแพ็กเกจ genui ไปส่งให้เอเจนต์ที่คุณเลือก และต้องนำคำตอบของเอเจนต์กลับมาส่งให้ genui
โดยคุณจะต้องกำหนดเมธอด _sendAndReceive ที่อ้างอิงในโค้ดสำหรับขั้นตอนก่อนหน้า เพิ่มรหัสนี้ไปยัง MyHomePageState
  Future<void> _sendAndReceive(ChatMessage msg) async {
    final buffer = StringBuffer();

    // Reconstruct the message part fragments
    for (final part in msg.parts) {
      if (part.isUiInteractionPart) {
        buffer.write(part.asUiInteractionPart!.interaction);
      } else if (part is genui.TextPart) {
        buffer.write(part.text);
      }
    }

    if (buffer.isEmpty) {
      return;
    }

    final text = buffer.toString();

    // Send the string to Firebase AI Logic.
    final response = await _chatSession.sendMessage(Content.text(text));

    if (response.text?.isNotEmpty ?? false) {
      // Feed the response back into GenUI's transportation layer
      _transport.addChunk(response.text!);
    }
  }
แพ็กเกจ genui จะเรียกใช้เมธอดนี้เมื่อใดก็ตามที่ต้องการส่งข้อความไปยังตัวแทน การเรียกใช้ addChunk ที่ส่วนท้ายของเมธอดจะส่งคำตอบของเอเจนต์กลับไปยังแพ็กเกจ genui ซึ่งจะช่วยให้แพ็กเกจประมวลผลคำตอบและสร้าง UI ได้
สุดท้าย ให้แทนที่เมธอด _addMessage ที่มีอยู่ทั้งหมดด้วยเวอร์ชันใหม่นี้ เพื่อให้ระบบกำหนดเส้นทางข้อความไปยัง Conversation แทนที่จะเป็น Firebase โดยตรง
  Future<void> _addMessage() async {
    final text = _textController.text;

    if (text.trim().isEmpty) {
      return;
    }

    _textController.clear();

    setState(() {
      _items.add(TextItem(text: text, isUser: true));
    });

    _scrollToBottom();

    // Send the user's input through GenUI instead of directly to Firebase.
    await _conversation.sendRequest(ChatMessage.user(text));
  }
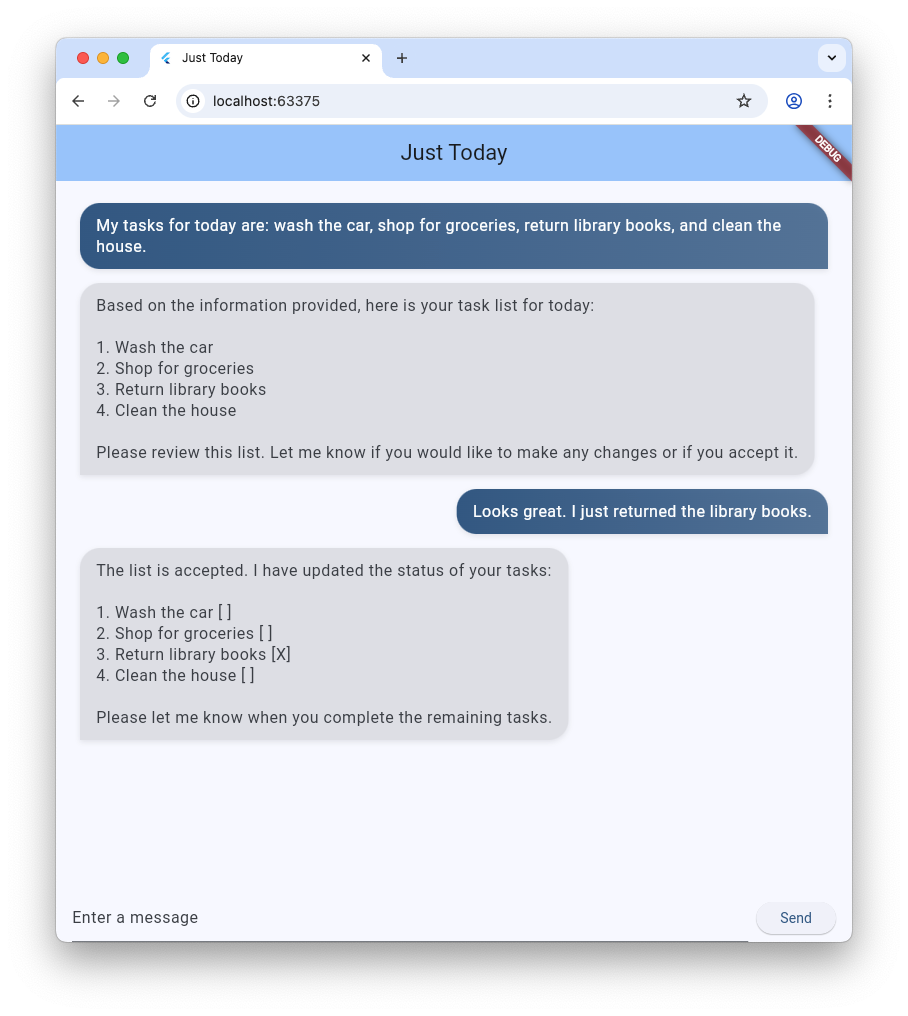
เท่านี้ก็เรียบร้อย ลองเรียกใช้แอปอีกครั้ง นอกจากข้อความแล้ว คุณจะเห็นเอเจนต์สร้างพื้นผิว UI เช่น ปุ่ม วิดเจ็ตข้อความ และอื่นๆ
คุณยังลองขอให้เอเจนต์แสดง UI ในลักษณะที่เฉพาะเจาะจงได้ด้วย เช่น ลองใช้ข้อความอย่าง "แสดงงานของฉันในคอลัมน์ โดยมีปุ่มทำเครื่องหมายแต่ละงานว่าเสร็จแล้ว"
5. เพิ่มสถานะรอ
การสร้าง LLM เป็นแบบอะซิงโครนัส ขณะรอการตอบกลับ อินเทอร์เฟซแชทต้องปิดใช้ปุ่มป้อนข้อมูลและแสดงตัวบ่งชี้ความคืบหน้าเพื่อให้ผู้ใช้ทราบว่า GenUI กำลังสร้างเนื้อหา โชคดีที่genuiแพ็กเกจมีListenableที่คุณใช้ติดตามสถานะของการสนทนาได้ ConversationState ค่าดังกล่าวมีพร็อพเพอร์ตี้ isWaiting เพื่อพิจารณาว่าโมเดลกำลังสร้างเนื้อหาหรือไม่
ห่อหุ้มตัวควบคุมอินพุตด้วย ValueListenableBuilder
สร้าง ValueListenableBuilder ที่ครอบ Row (ซึ่งมี TextField และ ElevatedButton) ที่ด้านล่างของ lib/main.dart เพื่อฟัง _conversation.state การตรวจสอบ state.isWaiting จะช่วยให้คุณปิดใช้การป้อนข้อมูลขณะที่โมเดลสร้างเนื้อหาได้
ValueListenableBuilder<ConversationState>(
  valueListenable: _conversation.state,
  builder: (context, state, child) {
    return Row(
      children: [
        Expanded(
          child: TextField(
            controller: _textController,
            // Also disable the Enter key submission when waiting!
            onSubmitted: state.isWaiting ? null : (_) => _addMessage(),
            decoration: const InputDecoration(
              hintText: 'Enter a message',
            ),
          ),
        ),
        const SizedBox(width: 8),
        ElevatedButton(
          // Disable the send button when the model is generating
          onPressed: state.isWaiting ? null : _addMessage,
          child: const Text('Send'),
        ),
      ],
    );
  },
),
เพิ่มแถบความคืบหน้า
วางColumnวิดเจ็ตหลักไว้ภายใน Stack แล้วเพิ่ม LinearProgressIndicator เป็นองค์ประกอบย่อยที่ 2 ของสแต็กนั้น โดยยึดไว้ที่ด้านล่าง เมื่อเสร็จแล้ว bodyของScaffoldควรมีลักษณะดังนี้
body: Stack( // New!
  children: [
    Column(
      children: [
        Expanded(
          child: ListView(
            controller: _scrollController,
            padding: const EdgeInsets.all(16),
            children: [
              for (final item in _items)
                switch (item) {
                  TextItem() => MessageBubble(
                    text: item.text,
                    isUser: item.isUser,
                  ),
                  SurfaceItem() => Surface(
                    surfaceContext: _controller.contextFor(
                      item.surfaceId,
                    ),
                  ),
                },
            ],
          ),
        ),
        SafeArea(
          child: Padding(
            padding: const EdgeInsets.symmetric(horizontal: 16.0),
            child: ValueListenableBuilder<ConversationState>(
              valueListenable: _conversation.state,
              builder: (context, state, child) {
                return Row(
                  children: [
                    Expanded(
                      child: TextField(
                        controller: _textController,
                        onSubmitted:
                            state.isWaiting ? null : (_) => _addMessage(),
                        decoration: const InputDecoration(
                          hintText: 'Enter a message',
                        ),
                      ),
                    ),
                    const SizedBox(width: 8),
                    ElevatedButton(
                      onPressed: state.isWaiting ? null : _addMessage,
                      child: const Text('Send'),
                    ),
                  ],
                );
              },
            ),
          ),
        ),
      ],
    ),
    // Listen to the state again, this time to render a progress indicator
    ValueListenableBuilder<ConversationState>(
      valueListenable: _conversation.state,
      builder: (context, state, child) {
        if (state.isWaiting) {
          return const LinearProgressIndicator();
        }
        return const SizedBox.shrink();
      },
    ),
  ],
),
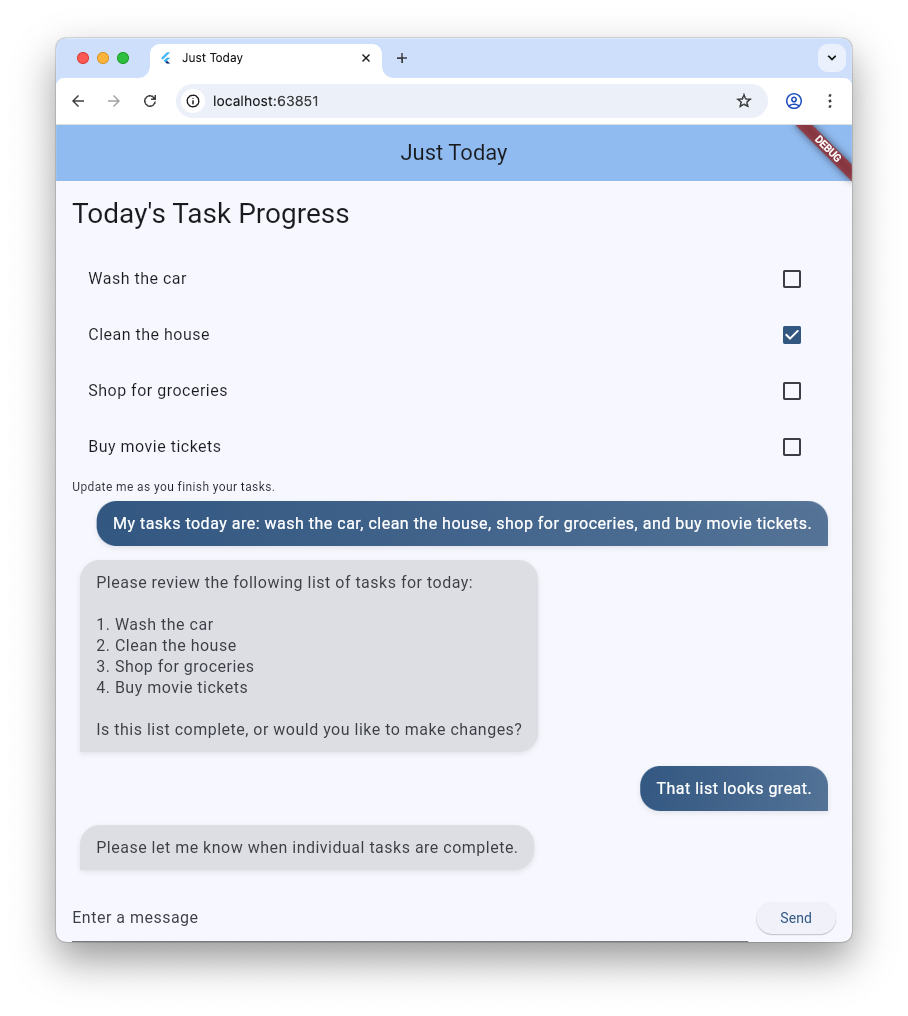
6. คงสถานะพื้นผิว GenUI
ที่ผ่านมา ระบบแสดงรายการงานในสตรีมแชทแบบเลื่อน โดยจะเพิ่มข้อความหรือแพลตฟอร์มใหม่ๆ ลงในรายการเมื่อมาถึง ในขั้นตอนถัดไป คุณจะเห็นวิธีตั้งชื่อพื้นผิวและแสดงในตำแหน่งที่เฉพาะเจาะจงภายใน UI
ก่อนอื่น ที่ด้านบนของ main.dart ก่อน void main() ให้ประกาศค่าคงที่เพื่อใช้เป็นรหัสแพลตฟอร์ม
const taskDisplaySurfaceId = 'task_display';
ประการที่ 2 ให้อัปเดตคำสั่ง switch ในเครื่องมือฟัง Conversation เพื่อให้แน่ใจว่าจะไม่มีการเพิ่มพื้นผิวที่มีรหัสดังกล่าวลงใน _items
case ConversationSurfaceAdded added:
  if (added.surfaceId != taskDisplaySurfaceId) {
    _items.add(SurfaceItem(surfaceId: added.surfaceId));
    _scrollToBottom();
  }
จากนั้นเปิดโครงสร้างเลย์เอาต์ของแผนผังวิดเจ็ตเพื่อสร้างพื้นที่สำหรับพื้นผิวที่ปักหมุดไว้เหนือบันทึกการแชททันที เพิ่มวิดเจ็ต 2 รายการนี้เป็นองค์ประกอบย่อยแรกของ Column หลัก
AnimatedSize(
  duration: const Duration(milliseconds: 300),
  child: Container(
    padding: const EdgeInsets.all(16),
    alignment: Alignment.topLeft,
    child: Surface(
      surfaceContext: _controller.contextFor(
        taskDisplaySurfaceId,
      ),
    ),
  ),
),
const Divider(),
ที่ผ่านมา Agent ของคุณมีอิสระในการสร้างและใช้แพลตฟอร์มตามที่เห็นสมควร หากต้องการให้คำสั่งที่เฉพาะเจาะจงมากขึ้น คุณต้องกลับไปดูพรอมต์ของระบบ เพิ่มส่วน ## USER INTERFACE ต่อไปนี้ที่ท้ายพรอมต์ที่จัดเก็บไว้ในค่าคงที่ systemInstruction
const systemInstruction = '''
  // ... existing prompt content ...

  ## USER INTERFACE
  *   To display the list of tasks create one and only one instance of the
    TaskDisplay catalog item. Use "$taskDisplaySurfaceId" as its surface ID.
  *   Update $taskDisplaySurfaceId as necessary when the list changes.
  *   $taskDisplaySurfaceId must include a button for each task that I can use
    to mark it complete. When I use that button to mark a task complete, it
    should send you a message indicating what I've done.
  *   Avoid repeating the same information in a single message.
  *   When responding with text, rather than A2UI messages, be brief.
''';
คุณควรให้วิธีการที่ชัดเจนแก่ตัวแทนเกี่ยวกับเวลาและวิธีใช้แพลตฟอร์ม UI การบอกให้ตัวแทนใช้รายการแคตตาล็อกและรหัสพื้นผิวที่เฉพาะเจาะจง (และใช้ซ้ำอินสแตนซ์เดียว) จะช่วยให้มั่นใจได้ว่าตัวแทนจะสร้างอินเทอร์เฟซที่คุณต้องการเห็น
เรายังต้องดำเนินการอีกมาก แต่คุณลองเรียกใช้แอปอีกครั้งเพื่อดูว่าเอเจนต์สร้างพื้นผิวการแสดงงานที่ด้านบนของ UI หรือไม่
7. สร้างวิดเจ็ตแคตตาล็อกที่กำหนดเอง
ในตอนนี้ยังไม่มีสินค้า TaskDisplay ในแคตตาล็อก ในอีกไม่กี่ขั้นตอน คุณจะแก้ไขปัญหานี้ได้โดยการสร้างสคีมาข้อมูล คลาสเพื่อแยกวิเคราะห์สคีมานั้น วิดเจ็ต และสินค้าในแคตตาล็อกที่รวมทุกอย่างเข้าด้วยกัน
ก่อนอื่นให้สร้างไฟล์ชื่อ task_display.dart แล้วเพิ่มการนำเข้าต่อไปนี้
import 'package:flutter/material.dart';
import 'package:genui/genui.dart';
import 'package:json_schema_builder/json_schema_builder.dart';
สร้างสคีมาข้อมูล
จากนั้นกําหนดสคีมาข้อมูลที่เอเจนต์จะให้เมื่อต้องการสร้างการแสดงงาน กระบวนการนี้ใช้ตัวสร้างที่ซับซ้อนบางอย่างจากแพ็กเกจ json_schema_builder แต่โดยพื้นฐานแล้วคุณเพียงแค่กำหนดสคีมา JSON ที่ใช้ในข้อความที่ส่งไปยังและจากเอเจนต์
เริ่มต้นด้วย S.object พื้นฐานโดยอ้างอิงชื่อคอมโพเนนต์
final taskDisplaySchema = S.object(
  properties: {
    'component': S.string(enumValues: ['TaskDisplay']),
  },
);
จากนั้นเพิ่ม title, tasks, name, isCompleted และ completeAction ลงในพร็อพเพอร์ตี้สคีมา
final taskDisplaySchema = S.object(
  properties: {
    'component': S.string(enumValues: ['TaskDisplay']),
    'title': S.string(description: 'The title of the task list'),
    'tasks': S.list(
      description: 'A list of tasks to be completed today',
      items: S.object(
        properties: {
          'name': S.string(description: 'The name of the task to be completed'),
          'isCompleted': S.boolean(
            description: 'Whether the task is completed',
          ),
          'completeAction': A2uiSchemas.action(
            description:
                'The action performed when the user has completed the task.',
          ),
        },
      ),
    ),
  },
);
ดูพร็อพเพอร์ตี้ completeAction สร้างขึ้นด้วย A2uiSchemas.action ซึ่งเป็นตัวสร้างสำหรับพร็อพเพอร์ตี้สคีมาที่แสดงถึงการดำเนินการ A2UI การเพิ่มการดำเนินการลงในสคีมาเป็นการบอกเอเจนต์ว่า "เมื่อคุณมอบหมายงานให้ฉัน โปรดระบุชื่อและข้อมูลเมตาของการดำเนินการที่ฉันใช้เพื่อบอกคุณว่างานนั้นเสร็จสมบูรณ์แล้วด้วย" จากนั้นแอปจะเรียกใช้การดำเนินการดังกล่าวเมื่อผู้ใช้แตะช่องทําเครื่องหมาย
จากนั้นเพิ่มrequiredลงในสคีมา ซึ่งจะสั่งให้ Agent ป้อนข้อมูลพร็อพเพอร์ตี้บางอย่างทุกครั้ง ในกรณีนี้ คุณต้องระบุพร็อพเพอร์ตี้ทุกรายการ
final taskDisplaySchema = S.object(
  properties: {
    'component': S.string(enumValues: ['TaskDisplay']),
    'title': S.string(description: 'The title of the task list'),
    'tasks': S.list(
      description: 'A list of tasks to be completed today',
      items: S.object(
        properties: {
          'name': S.string(description: 'The name of the task to be completed'),
          'isCompleted': S.boolean(
            description: 'Whether the task is completed',
          ),
          'completeAction': A2uiSchemas.action(
            description:
                'The action performed when the user has completed the task.',
          ),
        },
        // New!
        required: ['name', 'isCompleted', 'completeAction'],
      ),
    ),
  },
  // New!
  required: ['title', 'tasks'],
);
สร้างคลาสการแยกวิเคราะห์ข้อมูล
เมื่อสร้างอินสแตนซ์ของคอมโพเนนต์นี้ เอเจนต์จะส่งข้อมูลที่ตรงกับสคีมา เพิ่ม 2 คลาสเพื่อแยกวิเคราะห์ JSON ที่เข้ามาเป็นออบเจ็กต์ Dart ที่มีการพิมพ์อย่างเข้มงวด สังเกตว่า _TaskDisplayData จัดการโครงสร้างรูทอย่างไรในขณะที่มอบหมายการแยกวิเคราะห์อาร์เรย์ด้านในให้กับ _TaskData
class _TaskData {
  final String name;
  final bool isCompleted;
  final String actionName;
  final JsonMap actionContext;

  _TaskData({
    required this.name,
    required this.isCompleted,
    required this.actionName,
    required this.actionContext,
  });

  factory _TaskData.fromJson(Map<String, Object?> json) {
    try {
      final action = json['completeAction']! as JsonMap;
      final event = action['event']! as JsonMap;

      return _TaskData(
        name: json['name'] as String,
        isCompleted: json['isCompleted'] as bool,
        actionName: event['name'] as String,
        actionContext: event['context'] as JsonMap,
      );
    } catch (e) {
      throw Exception('Invalid JSON for _TaskData: $e');
    }
  }
}

class _TaskDisplayData {
  final String title;
  final List<_TaskData> tasks;

  _TaskDisplayData({required this.title, required this.tasks});

  factory _TaskDisplayData.fromJson(Map<String, Object?> json) {
    try {
      return _TaskDisplayData(
        title: (json['title'] as String?) ?? 'Tasks',
        tasks: (json['tasks'] as List<Object?>)
            .map((e) => _TaskData.fromJson(e as Map<String, Object?>))
            .toList(),
      );
    } catch (e) {
      throw Exception('Invalid JSON for _TaskDisplayData: $e');
    }
  }
}
หากเคยสร้างแอปด้วย Flutter มาก่อน คลาสเหล่านี้อาจคล้ายกับคลาสที่คุณเคยสร้าง โดยจะรับ JsonMap และส่งคืนออบเจ็กต์ที่มีการพิมพ์อย่างเข้มงวดซึ่งมีข้อมูลที่แยกวิเคราะห์จาก JSON
ดูฟิลด์ actionName และ actionContext ใน _TaskData โดยจะดึงข้อมูลจากพร็อพเพอร์ตี้ completeAction ของ JSON และมีชื่อของการดำเนินการและบริบทข้อมูล (การอ้างอิงถึงตำแหน่งของการดำเนินการในโมเดลข้อมูลของ GenUI) ระบบจะใช้ข้อมูลเหล่านี้ในภายหลังเพื่อสร้าง UserActionEvent
โมเดลข้อมูลคือที่เก็บแบบรวมศูนย์ที่สังเกตได้สำหรับสถานะ UI แบบไดนามิกทั้งหมด ซึ่งดูแลโดยไลบรารี genui เมื่อ Agent สร้างคอมโพเนนต์ UI จากแคตตาล็อก Agent จะสร้างออบเจ็กต์ข้อมูลที่ตรงกับสคีมาของคอมโพเนนต์ด้วย ระบบจะจัดเก็บออบเจ็กต์ข้อมูลนี้ไว้ในโมเดลข้อมูลในไคลเอ็นต์ เพื่อให้ใช้สร้างวิดเจ็ตและอ้างอิงในข้อความในภายหลังถึงตัวแทนได้ (เช่น completeActionที่คุณกำลังจะเชื่อมต่อกับวิดเจ็ต)
เพิ่มวิดเจ็ต
ตอนนี้ให้สร้างวิดเจ็ตเพื่อแสดงรายการ โดยควรยอมรับอินสแตนซ์ของคลาส _TaskDisplayData และ Callback ที่จะเรียกใช้เมื่อดำเนินการเสร็จสมบูรณ์
class _TaskDisplay extends StatelessWidget {
  final _TaskDisplayData data;
  final void Function(_TaskData) onCompleteTask;

  const _TaskDisplay({required this.data, required this.onCompleteTask});

  @override
  Widget build(BuildContext context) {
    return Column(
      crossAxisAlignment: CrossAxisAlignment.start,
      mainAxisSize: MainAxisSize.min,
      children: [
        Padding(
          padding: const EdgeInsets.all(16.0),
          child: Text(
            data.title,
            style: Theme.of(context).textTheme.titleLarge,
          ),
        ),
        ...data.tasks.map(
          (task) => CheckboxListTile(
            title: Text(
              task.name,
              style: TextStyle(
                decoration: task.isCompleted
                    ? TextDecoration.lineThrough
                    : TextDecoration.none,
              ),
            ),
            value: task.isCompleted,
            onChanged: task.isCompleted
                ? null
                : (val) {
                    if (val == true) {
                      onCompleteTask(task);
                    }
                  },
          ),
        ),
      ],
    );
  }
}
สร้าง CatalogItem
เมื่อสร้างสคีมา ตัวแยกวิเคราะห์ และวิดเจ็ตแล้ว ตอนนี้คุณก็สร้าง CatalogItem เพื่อเชื่อมโยงทั้งหมดเข้าด้วยกันได้
ที่ด้านล่างของ task_display.dart ให้สร้าง taskDisplay เป็นตัวแปรระดับบนสุด ใช้ _TaskDisplayData เพื่อแยกวิเคราะห์ JSON ที่เข้ามา และสร้างอินสแตนซ์ของวิดเจ็ต _TaskDisplay
final taskDisplay = CatalogItem(
  name: 'TaskDisplay',
  dataSchema: taskDisplaySchema,
  widgetBuilder: (itemContext) {
    final json = itemContext.data as Map<String, Object?>;
    final data = _TaskDisplayData.fromJson(json);

    return _TaskDisplay(
      data: data,
      onCompleteTask: (task) async {
        // We will implement this next!
      },
    );
  },
);
ใช้งาน onCompleteTask
วิดเจ็ตต้องสื่อสารกลับไปยังตัวแทนเมื่อดำเนินการเสร็จสิ้นจึงจะทำงานได้ แทนที่ตัวยึดตำแหน่ง onCompleteTask ที่ว่างด้วยโค้ดต่อไปนี้เพื่อสร้างและส่งเหตุการณ์โดยใช้ completeAction จากข้อมูลงาน
onCompleteTask: (task) async {
  // A data context is a reference to a location in the data model. This line
  // turns that reference into a concrete data object that the agent can use.
  // It's kind of like taking a pointer and replacing it with the value it
  // points to.
  final JsonMap resolvedContext = await resolveContext(
    itemContext.dataContext,
    task.actionContext,
  );

  // Dispatch an event back to the agent, letting it know a task was completed.
  // This will be sent to the agent in an A2UI message that includes the name
  // of the action, the surface ID, and the resolved data context.
  itemContext.dispatchEvent(
    UserActionEvent(
      name: task.actionName,
      sourceComponentId: itemContext.id,
      context: resolvedContext,
    ),
  );
}
ลงทะเบียนสินค้าในแคตตาล็อก
สุดท้าย ให้เปิด main.dart นำเข้าไฟล์ใหม่ และลงทะเบียนไฟล์พร้อมกับรายการอื่นๆ ในแคตตาล็อก
เพิ่มการนำเข้านี้ที่ด้านบนของ lib/main.dart
import 'task_display.dart';
แทนที่ catalog = BasicCatalogItems.asCatalog(); ในฟังก์ชัน initState() ด้วย
// The Catalog is immutable, so use copyWith to create a new version
// that includes our custom catalog item along with the basics.
catalog = BasicCatalogItems.asCatalog().copyWith(newItems: [taskDisplay]);
เท่านี้ก็เรียบร้อย รีสตาร์ทแอปอย่างรวดเร็วเพื่อดูการเปลี่ยนแปลง
8. ทดลองวิธีต่างๆ ในการโต้ตอบกับตัวแทน
ตอนนี้คุณได้เพิ่มวิดเจ็ตใหม่ลงในแคตตาล็อกและสร้างพื้นที่สำหรับวิดเจ็ตใน UI ของแอปแล้ว ก็ถึงเวลาสนุกกับการทำงานร่วมกับเอเจนต์ ข้อดีหลักอย่างหนึ่งของ GenUI คือมี 2 วิธีในการโต้ตอบกับข้อมูล ได้แก่ ผ่าน UI ของแอปพลิเคชัน เช่น ปุ่มและช่องทําเครื่องหมาย และผ่านเอเจนต์ที่เข้าใจภาษามนุษย์และสามารถให้เหตุผลเกี่ยวกับข้อมูลได้ ลองทดสอบทั้ง 2 อย่าง
- ใช้ช่องข้อความเพื่ออธิบายงาน 3-4 อย่าง แล้วดูงานเหล่านั้นปรากฏในรายการ
- ใช้ช่องทําเครื่องหมายเพื่อสลับสถานะของงานเป็นเสร็จแล้วหรือยังไม่เสร็จ
- สร้างรายการงาน 5-6 รายการ แล้วบอกให้เอเจนต์นำงานที่ต้องขับรถไปทำออก
- บอกตัวแทนให้สร้างรายการงานที่ต้องทำซ้ำๆ เป็นรายการแต่ละรายการ ("ฉันต้องซื้อการ์ดวันหยุดให้แม่ พ่อ และย่า สร้างงานแยกต่างหากสำหรับรายการเหล่านั้น")
- บอกตัวแทนให้ทำเครื่องหมายงานทั้งหมดว่าเสร็จแล้วหรือยังไม่เสร็จ หรือให้ทำเครื่องหมาย 2-3 งานแรก
9. ขอแสดงความยินดี
ยินดีด้วย คุณได้สร้างแอปติดตามงานที่ทำงานด้วยระบบ AI โดยใช้ Generative UI และ Flutter
สิ่งที่คุณได้เรียนรู้
- การโต้ตอบกับโมเดลพื้นฐานของ Google โดยใช้ Flutter Firebase SDK
- การแสดงผลแพลตฟอร์มแบบอินเทอร์แอกทีฟที่ Gemini สร้างขึ้นโดยใช้ GenUI
- การปักหมุดพื้นผิวในเลย์เอาต์โดยใช้รหัสการแสดงผลแบบคงที่ที่กำหนดไว้ล่วงหน้า
- การออกแบบสคีมาที่กำหนดเองและแคตตาล็อกวิดเจ็ตสำหรับลูปการโต้ตอบที่แข็งแกร่ง