
1. 简介
在此 Codelab 中,您将使用 Flutter、Firebase AI Logic 和新的 genui 软件包构建一个任务列表应用。您将从基于文本的聊天应用开始,使用 GenUI 对其进行升级,使智能体能够创建自己的界面,最后构建您自己的自定义互动式界面组件,您和智能体可以直接操作该组件。
您将执行的操作
- 使用 Flutter 和 Firebase AI Logic 构建基本聊天界面
- 集成
genui软件包以生成 AI 驱动的界面 - 添加进度条以指示应用何时在等待代理的响应
- 创建命名 surface,并在界面中的专用位置显示该 surface。
- 构建自定义 GenUI 目录组件,以便控制任务的呈现方式
所需条件
- 网络浏览器,例如 Chrome
- 本地安装的 Flutter SDK
- 已安装并配置 Firebase CLI
此 Codelab 适合中级 Flutter 开发者。
2. 准备工作
设置 Flutter 项目
- 如果您尚未安装 Flutter SDK,请在本地安装。
- 打开终端并运行
flutter create以创建新项目:flutter create intro_to_genui cd intro_to_genui - 向 Flutter 项目添加必要的依赖项:
flutter pub add firebase_core firebase_ai genui json_schema_builderdependencies部分应如下所示(版本号可能略有不同):dependencies: flutter: sdk: flutter cupertino_icons: ^1.0.8 firebase_core: ^4.9.0 firebase_ai: ^3.12.1 genui: ^0.9.0 json_schema_builder: ^0.1.3 - 运行
flutter pub get下载所有软件包。
设置 Firebase 项目
- 如果您尚未安装 Firebase CLI,请先安装。
- 使用您的 Google 账号登录 Firebase:
firebase login - 安装 FlutterFire CLI:
dart pub global activate flutterfire_cli - 在 Flutter 项目目录中运行以下命令,以将 Flutter 项目配置为使用 Firebase:
flutterfire configure- 询问您是否要使用现有的 Firebase 项目或创建新的 Firebase 项目。选择创建新的 Firebase 项目。
- 询问您希望 Flutter 应用面向哪个平台(iOS、Android、Web)。目前,请选择 Web。
flutterfire configure 命令会自动创建一个 Firebase 项目,并在该 Firebase 项目中创建一个新的 Firebase Web 应用。然后,该命令会创建一个 Firebase 配置文件 (firebase_options.dart),并自动将其添加到 Flutter 项目的 lib/ 目录中。
请注意,此 Codelab 的应用仅在您的计算机上安装了 Flutter SDK 和 Chrome 的情况下才能正常运行(即,它会构建为 Web 应用)。不过,由于此应用是使用 Flutter 构建的,因此它也可以在其他平台上运行!因此,在完成此 Codelab 后,请尝试重新运行 flutterfire configure 以添加对 iOS、Android 或其他平台的支持,然后在相应平台上重新构建应用。
如需了解详情,请参阅将 Firebase 添加到 Flutter 应用的说明。
设置 Firebase AI Logic
- 登录 Firebase 控制台。使用您登录 Firebase CLI 时所用的 Google 账号。
- 选择您刚刚使用 FlutterFire CLI 创建的 Firebase 项目。
- 在左侧导航菜单中,依次选择 AI 服务 > AI 逻辑。
- 点击开始以启动引导式工作流程。
- 选择从 Gemini Developer API 开始,然后按照屏幕上的提示设置 Firebase AI Logic。
您已在“设置 Flutter 项目”部分中获取了使用 Firebase AI Logic 所需的 FlutterFire 插件。您已准备好在下一步中开始编码应用!
3. 搭建基本聊天界面
在引入生成式界面之前,您的应用需要一个基础:一个由 Firebase AI Logic 提供支持的基本的基于文本的聊天应用。为了快速开始,您需要复制并粘贴聊天界面的整个设置。
创建消息气泡 widget
如需显示用户和客服人员发送的短信,您的应用需要一个 widget。创建名为 lib/message_bubble.dart 的新文件,并添加以下类:
import 'package:flutter/material.dart';

class MessageBubble extends StatelessWidget {
  final String text;
  final bool isUser;

  const MessageBubble({super.key, required this.text, required this.isUser});

  @override
  Widget build(BuildContext context) {
    final theme = Theme.of(context);
    final colorScheme = theme.colorScheme;

    final bubbleColor = isUser
        ? colorScheme.primary
        : colorScheme.surfaceContainerHighest;

    final textColor = isUser
        ? colorScheme.onPrimary
        : colorScheme.onSurfaceVariant;

    return Padding(
      padding: const EdgeInsets.symmetric(vertical: 6.0, horizontal: 8.0),
      child: Column(
        crossAxisAlignment: isUser
            ? CrossAxisAlignment.end
            : CrossAxisAlignment.start,
        children: [
          Row(
            mainAxisAlignment: isUser
                ? MainAxisAlignment.end
                : MainAxisAlignment.start,
            children: [
              Flexible(
                child: Container(
                  padding: const EdgeInsets.symmetric(
                    horizontal: 16.0,
                    vertical: 12.0,
                  ),
                  decoration: BoxDecoration(
                    color: bubbleColor,
                    borderRadius: BorderRadius.only(
                      topLeft: const Radius.circular(20),
                      topRight: const Radius.circular(20),
                      bottomLeft: Radius.circular(isUser ? 20 : 0),
                      bottomRight: Radius.circular(isUser ? 0 : 20),
                    ),
                    boxShadow: [
                      BoxShadow(
                        color: Colors.black.withAlpha(20),
                        blurRadius: 4,
                        offset: const Offset(0, 2),
                      ),
                    ],
                    gradient: isUser
                        ? LinearGradient(
                            colors: [
                              colorScheme.primary,
                              colorScheme.primary.withAlpha(200),
                            ],
                            begin: Alignment.topLeft,
                            end: Alignment.bottomRight,
                          )
                        : null,
                  ),
                  child: Text(
                    text,
                    style: theme.textTheme.bodyLarge?.copyWith(
                      color: textColor,
                      height: 1.3,
                    ),
                  ),
                ),
              ),
            ],
          ),
          const SizedBox(height: 2),
        ],
      ),
    );
  }
}
MessageBubble 是用于显示单条聊天消息的 StatelessWidget。它将在本 Codelab 的后面部分用于显示您和代理发来的消息,但它基本上只是一个精美的 Text widget。
在 main.dart 中实现聊天界面
将 lib/main.dart 的全部内容替换为以下完整的文本聊天机器人实现:
import 'package:flutter/material.dart';
import 'package:firebase_core/firebase_core.dart';
import 'package:firebase_ai/firebase_ai.dart';
import 'package:intro_to_genui/message_bubble.dart';
import 'firebase_options.dart';

Future<void> main() async {
  WidgetsFlutterBinding.ensureInitialized();
  await Firebase.initializeApp(options: DefaultFirebaseOptions.currentPlatform);
  runApp(const MyApp());
}

class MyApp extends StatelessWidget {
  const MyApp({super.key});

  @override
  Widget build(BuildContext context) {
    return MaterialApp(
      title: 'Just Today',
      theme: ThemeData(
        colorScheme: ColorScheme.fromSeed(seedColor: Colors.blue),
      ),
      home: const MyHomePage(),
    );
  }
}

class MyHomePage extends StatefulWidget {
  const MyHomePage({super.key});

  @override
  State<MyHomePage> createState() => _MyHomePageState();
}

sealed class ConversationItem {}

class TextItem extends ConversationItem {
  final String text;
  final bool isUser;
  TextItem({required this.text, this.isUser = false});
}

class _MyHomePageState extends State<MyHomePage> {
  final List<ConversationItem> _items = [];
  final _textController = TextEditingController();
  final _scrollController = ScrollController();
  late final ChatSession _chatSession;

  @override
  void initState() {
    super.initState();
    final model = FirebaseAI.googleAI().generativeModel(
      model: 'gemini-3.5-flash',
    );
    _chatSession = model.startChat();
    _chatSession.sendMessage(Content.text(systemInstruction));
  }

  void _scrollToBottom() {
    WidgetsBinding.instance.addPostFrameCallback((_) {
      if (_scrollController.hasClients) {
        _scrollController.animateTo(
          _scrollController.position.maxScrollExtent,
          duration: const Duration(milliseconds: 300),
          curve: Curves.easeOut,
        );
      }
    });
  }

  @override
  void dispose() {
    _textController.dispose();
    _scrollController.dispose();
    super.dispose();
  }

  Future<void> _addMessage() async {
    final text = _textController.text;

    if (text.trim().isEmpty) {
      return;
    }
    _textController.clear();

    setState(() {
      _items.add(TextItem(text: text, isUser: true));
    });

    _scrollToBottom();

    final response = await _chatSession.sendMessage(Content.text(text));

    if (response.text?.isNotEmpty ?? false) {
      setState(() {
        _items.add(TextItem(text: response.text!, isUser: false));
      });
      _scrollToBottom();
    }
  }

  @override
  Widget build(BuildContext context) {
    return Scaffold(
      appBar: AppBar(
        backgroundColor: Theme.of(context).colorScheme.inversePrimary,
        title: const Text('Just Today'),
      ),
      body: Column(
        children: [
          Expanded(
            child: ListView(
              controller: _scrollController,
              padding: const EdgeInsets.all(16),
              children: [
                for (final item in _items)
                  switch (item) {
                    TextItem() => MessageBubble(
                          text: item.text,
                          isUser: item.isUser,
                        ),
                  },
              ],
            ),
          ),
          SafeArea(
            child: Padding(
              padding: const EdgeInsets.symmetric(horizontal: 16.0),
              child: Row(
                children: [
                  Expanded(
                    child: TextField(
                      controller: _textController,
                      onSubmitted: (_) => _addMessage(),
                      decoration: const InputDecoration(
                        hintText: 'Enter a message',
                      ),
                    ),
                  ),
                  const SizedBox(width: 8),
                  ElevatedButton(
                    onPressed: _addMessage,
                    child: const Text('Send'),
                  ),
                ],
              ),
            ),
          ),
        ],
      ),
    );
  }
}

const systemInstruction = '''
  ## PERSONA
  You are an expert task planner.

  ## GOAL
  Work with me to produce a list of tasks that I should do today, and then track
  the completion status of each one.

  ## RULES
  Talk with me only about tasks that I should do today.
  Do not engage in conversation about any other topic.
  Do not offer suggestions unless I ask for them.
  Do not offer encouragement unless I ask for it.
  Do not offer advice unless I ask for it.
  Do not offer opinions unless I ask for them.

  ## PROCESS
  ### Planning
  *   Ask me for information about tasks that I should do today.
  *   Synthesize a list of tasks from that information.
  *   Ask clarifying questions if you need to.
  *   When you have a list of tasks that you think I should do today, present it
    to me for review.
  *   Respond to my suggestions for changes, if I have any, until I accept the
    list.

  ### Tracking
  *   Once the list is accepted, ask me to let you know when individual tasks are
    complete.
  *   If I tell you a task is complete, mark it as complete.
  *   Once all tasks are complete, send a message acknowledging that, and then
    end the conversation.
''';
您刚刚复制粘贴的 main.dart 文件使用 Firebase AI Logic 和 systemInstruction 中的提示设置了一个基本的 ChatSession。它通过维护 TextItem 元素的列表来管理对话轮次,并使用您之前创建的 MessageBubble widget 将这些元素与用户查询一起显示。
在继续操作之前,请先检查以下几点:
initState方法用于设置与 Firebase AI Logic 的连接。- 该应用提供
TextField和一个用于向代理发送消息的按钮。 _addMessage方法用于将用户的消息发送给代理。_items列表用于存储对话记录。- 消息会使用
MessageBubblewidget 显示在ListView中。
测试应用
完成此操作后,您现在可以运行应用并对其进行测试。
flutter run -d chrome
不妨与智能体聊聊您今天想完成的一些任务。虽然纯文本界面也能完成任务,但 GenUI 可以让体验更轻松、更快捷。
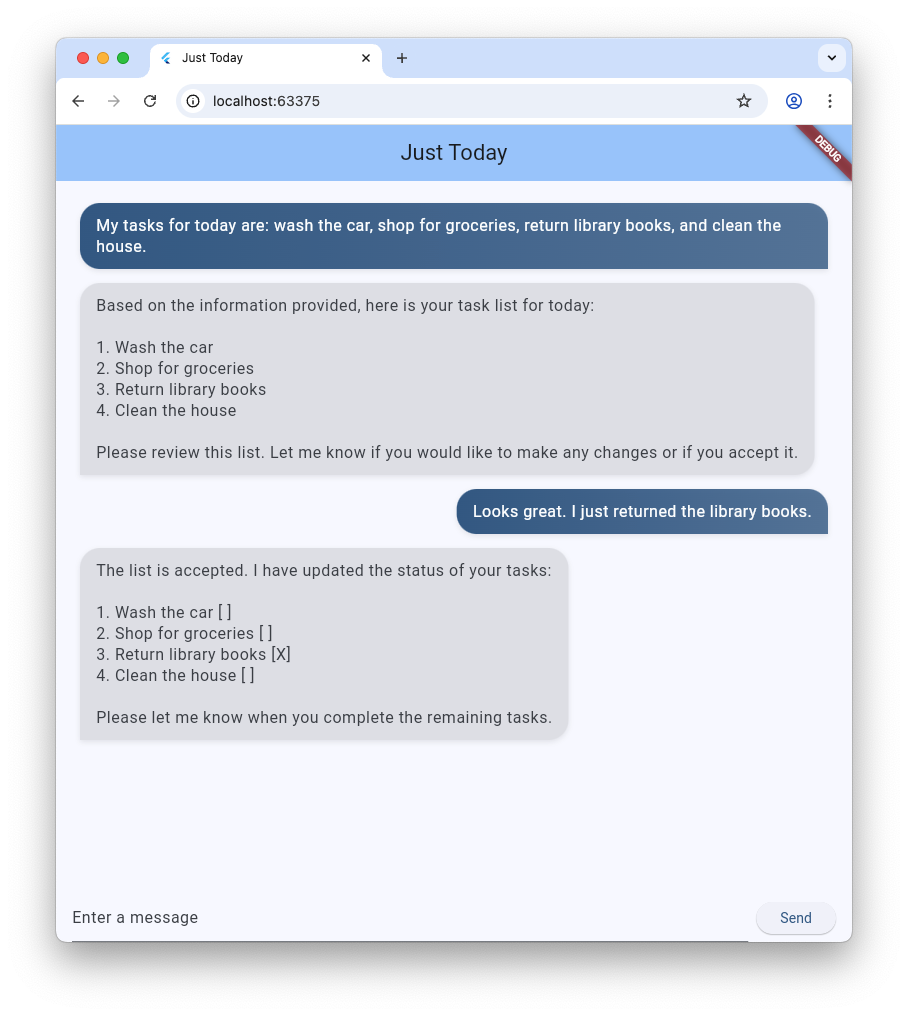
4. 集成 GenUI 软件包
现在,您可以从纯文本升级到生成式界面了。您将使用 GenUI Conversation、Catalog 和 SurfaceController 对象替换基本的 Firebase 消息传递循环。这使得 AI 模型能够在聊天信息流中实例化实际的 Flutter widget。
genui 软件包提供了五个类,您将在整个 Codelab 中使用这些类:
SurfaceController将模型生成的界面映射到屏幕。A2uiTransportAdapter可将内部 GenUI 请求与任何外部语言模型相关联。Conversation使用单个统一的 API 为您的 Flutter 应用封装控制器和传输适配器。Catalog描述了语言模型可用的 widget 和属性。Surface是一个用于显示模型生成的界面的 widget。
准备好显示生成的 Surface
现有代码包含一个 TextItem 类,用于表示对话中的单条文本消息。添加另一个类来表示由代理创建的 Surface:
class SurfaceItem extends ConversationItem {
  final String surfaceId;
  SurfaceItem({required this.surfaceId});
}
初始化 GenUI 组成要素
在 lib/main.dart 的顶部,导入 genui 库:
import 'package:genui/genui.dart' hide TextPart;
import 'package:genui/genui.dart' as genui;
genui 软件包和 firebase_ai 软件包都包含 TextPart 类。通过这种方式导入 genui,您可以将 genui 的 TextPart 版本命名空间化为 genui.TextPart,从而避免名称冲突。
在 _chatSession 之后,在 _MyHomePageState 中声明核心功能控制器:
class _MyHomePageState extends State<MyHomePage> {
  // ... existing members
  late final ChatSession _chatSession;

  // Add GenUI controllers
  late final SurfaceController _controller;
  late final A2uiTransportAdapter _transport;
  late final Conversation _conversation;
  late final Catalog catalog;
接下来,更新 initState 以准备 GenUI 库的控制器。
从 initState 中移除此行:
_chatSession.sendMessage(Content.text(systemInstruction));
然后,添加以下代码:
@override
void initState() {
  // ... existing code ...

  // Initialize the GenUI Catalog.
  // The genui package provides a default set of primitive widgets (like text
  // and basic buttons) out of the box using this class.
  catalog = BasicCatalogItems.asCatalog();

  // Create a SurfaceController to manage the state of generated surfaces.
  _controller = SurfaceController(catalogs: [catalog]);

  // Create a transport adapter that will process messages to and from the
  // agent, looking for A2UI messages.
  _transport = A2uiTransportAdapter(onSend: _sendAndReceive);

  // Link the transport and SurfaceController together in a Conversation,
  // which provides your app a unified API for interacting with the agent.
  _conversation = Conversation(
    controller: _controller,
    transport: _transport,
  );
}
此代码创建了一个用于管理控制器和适配器的 Conversation facade。该对话为应用提供了一个事件流,应用可使用该事件流来了解智能体正在创建的内容,以及一种向智能体发送消息的方法。
接下来,为对话事件创建监听器。这些事件包括与界面相关的事件,以及与短信和错误相关的事件:
@override
void initState() {
  // ... existing code ...

  // Listen to GenUI stream events to update the UI
  _conversation.events.listen((event) {
    setState(() {
      switch (event) {
        case ConversationSurfaceAdded added:
          _items.add(SurfaceItem(surfaceId: added.surfaceId));
          _scrollToBottom();
        case ConversationSurfaceRemoved removed:
          _items.removeWhere(
            (item) =>
                item is SurfaceItem && item.surfaceId == removed.surfaceId,
          );
        case ConversationContentReceived content:
          _items.add(TextItem(text: content.text, isUser: false));
          _scrollToBottom();
        case ConversationError error:
          debugPrint('GenUI Error: ${error.error}');
        default:
      }
    });
  });
}
最后,创建系统提示并将其发送给代理:
  @override
  void initState() {
    // ... existing code ...

    // Create the system prompt for the agent, which will include this app's
    // system instruction as well as the schema for the catalog.
    final promptBuilder = PromptBuilder.chat(
      catalog: catalog,
      systemPromptFragments: [systemInstruction],
    );

    // Send the prompt into the Conversation, which will subsequently route it
    // to Firebase using the transport mechanism.
    _conversation.sendRequest(
      ChatMessage.system(promptBuilder.systemPromptJoined()),
    );
  }
展示平台
接下来,更新 ListView 的 build 方法,以在 _items 列表中显示 SurfaceItem:
Expanded(
  child: ListView(
    controller: _scrollController,
    padding: const EdgeInsets.all(16),
    children: [
      for (final item in _items)
        switch (item) {
          TextItem() => MessageBubble(
            text: item.text,
            isUser: item.isUser,
          ),
          // New!
          SurfaceItem() => Surface(
            surfaceContext: _controller.contextFor(
              item.surfaceId,
            ),
          ),
        },
    ],
  ),
),
Surface widget 的构造函数接受一个 surfaceContext,用于告知 widget 它负责显示哪个界面。之前创建的 SurfaceController,即 _controller,可为每个界面提供定义和状态,并确保在有更新时进行重建。
将 GenUI 连接到 Firebase AI Logic
genui 软件包采用“自带模型”方法,这意味着您可以控制为您的体验提供支持的 LLM。在本例中,您使用的是 Firebase AI Logic,但该软件包旨在与各种智能体和提供方搭配使用。
这种自由也带来了一些额外的责任:您需要获取 genui 软件包生成的消息并将其发送给所选代理,还需要获取代理的响应并将其发送回 genui。
为此,您需要定义上一步代码中引用的 _sendAndReceive 方法。将以下代码添加到 MyHomePageState:
  Future<void> _sendAndReceive(ChatMessage msg) async {
    final buffer = StringBuffer();

    // Reconstruct the message part fragments
    for (final part in msg.parts) {
      if (part.isUiInteractionPart) {
        buffer.write(part.asUiInteractionPart!.interaction);
      } else if (part is genui.TextPart) {
        buffer.write(part.text);
      }
    }

    if (buffer.isEmpty) {
      return;
    }

    final text = buffer.toString();

    // Send the string to Firebase AI Logic.
    final response = await _chatSession.sendMessage(Content.text(text));

    if (response.text?.isNotEmpty ?? false) {
      // Feed the response back into GenUI's transportation layer
      _transport.addChunk(response.text!);
    }
  }
每当 genui 软件包需要向代理发送消息时,就会调用此方法。方法末尾对 addChunk 的调用会将智能体的回答反馈到 genui 软件包中,以便该软件包处理回答并生成界面。
最后,将现有的 _addMessage 方法完全替换为此新版本,以便将消息路由到 Conversation 而不是直接路由到 Firebase:
  Future<void> _addMessage() async {
    final text = _textController.text;

    if (text.trim().isEmpty) {
      return;
    }

    _textController.clear();

    setState(() {
      _items.add(TextItem(text: text, isUser: true));
    });

    _scrollToBottom();

    // Send the user's input through GenUI instead of directly to Firebase.
    await _conversation.sendRequest(ChatMessage.user(text));
  }
大功告成!尝试再次运行该应用。除了文本消息之外,您还会看到智能体生成按钮、文本 widget 等界面。
您甚至可以尝试要求智能体以特定方式显示界面。例如,您可以尝试以下消息:“以列的形式显示我的任务,并提供一个按钮来将每个任务标记为已完成。”
5. 添加等待状态
LLM 生成是异步的。在等待回答时,聊天界面需要停用输入按钮并显示进度指示器,以便用户知道 GenUI 正在创建内容。幸运的是,genui 软件包提供了一个 Listenable,您可以使用它来跟踪对话的状态。该 ConversationState 值包含一个 isWaiting 属性,用于确定模型是否正在生成内容。
使用 ValueListenableBuilder 封装输入控件
创建一个 ValueListenableBuilder,用于封装 lib/main.dart 底部的 Row(其中包含 TextField 和 ElevatedButton),以监听 _conversation.state。通过检查 state.isWaiting,您可以在模型生成内容时停用输入。
ValueListenableBuilder<ConversationState>(
  valueListenable: _conversation.state,
  builder: (context, state, child) {
    return Row(
      children: [
        Expanded(
          child: TextField(
            controller: _textController,
            // Also disable the Enter key submission when waiting!
            onSubmitted: state.isWaiting ? null : (_) => _addMessage(),
            decoration: const InputDecoration(
              hintText: 'Enter a message',
            ),
          ),
        ),
        const SizedBox(width: 8),
        ElevatedButton(
          // Disable the send button when the model is generating
          onPressed: state.isWaiting ? null : _addMessage,
          child: const Text('Send'),
        ),
      ],
    );
  },
),
添加进度条
将主 Column widget 封装在 Stack 内,并将 LinearProgressIndicator 添加为该堆栈的第二个子级,并锚定到底部。完成后,Scaffold 的 body 应如下所示:
body: Stack( // New!
  children: [
    Column(
      children: [
        Expanded(
          child: ListView(
            controller: _scrollController,
            padding: const EdgeInsets.all(16),
            children: [
              for (final item in _items)
                switch (item) {
                  TextItem() => MessageBubble(
                    text: item.text,
                    isUser: item.isUser,
                  ),
                  SurfaceItem() => Surface(
                    surfaceContext: _controller.contextFor(
                      item.surfaceId,
                    ),
                  ),
                },
            ],
          ),
        ),
        SafeArea(
          child: Padding(
            padding: const EdgeInsets.symmetric(horizontal: 16.0),
            child: ValueListenableBuilder<ConversationState>(
              valueListenable: _conversation.state,
              builder: (context, state, child) {
                return Row(
                  children: [
                    Expanded(
                      child: TextField(
                        controller: _textController,
                        onSubmitted:
                            state.isWaiting ? null : (_) => _addMessage(),
                        decoration: const InputDecoration(
                          hintText: 'Enter a message',
                        ),
                      ),
                    ),
                    const SizedBox(width: 8),
                    ElevatedButton(
                      onPressed: state.isWaiting ? null : _addMessage,
                      child: const Text('Send'),
                    ),
                  ],
                );
              },
            ),
          ),
        ),
      ],
    ),
    // Listen to the state again, this time to render a progress indicator
    ValueListenableBuilder<ConversationState>(
      valueListenable: _conversation.state,
      builder: (context, state, child) {
        if (state.isWaiting) {
          return const LinearProgressIndicator();
        }
        return const SizedBox.shrink();
      },
    ),
  ],
),
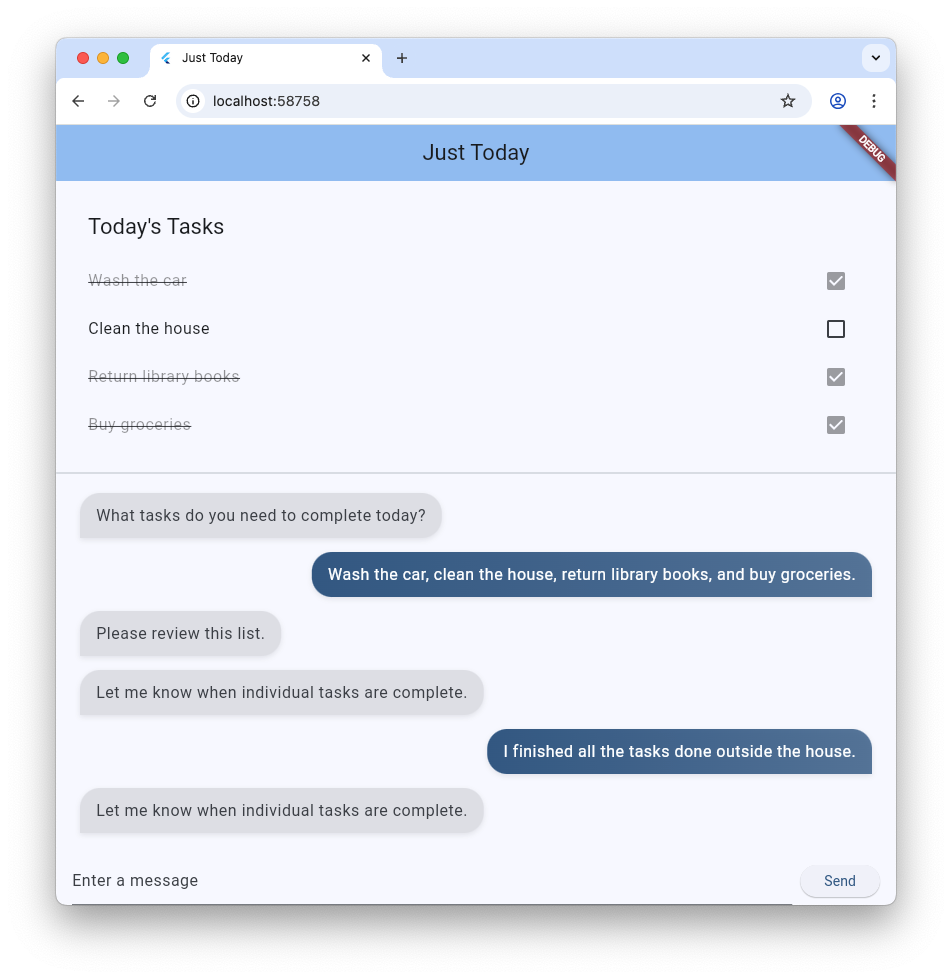
6. 保留 GenUI Surface
到目前为止,任务列表已在滚动聊天信息流中呈现,每当有新消息或界面到达时,系统都会将其附加到列表中。在下一步中,您将了解如何为界面命名,以及如何在界面中的特定位置显示界面。
首先,在 main.dart 的顶部(在 void main() 之前)声明一个常量,用作界面 ID:
const taskDisplaySurfaceId = 'task_display';
其次,更新 Conversation 监听器中的 switch 语句,以确保不会将具有相应 ID 的任何界面添加到 _items:
case ConversationSurfaceAdded added:
  if (added.surfaceId != taskDisplaySurfaceId) {
    _items.add(SurfaceItem(surfaceId: added.surfaceId));
    _scrollToBottom();
  }
接下来,打开 widget 树的布局结构,在聊天记录正上方创建一个空间来放置固定界面。将这两个 widget 添加为主要 Column 的第一个子级:
AnimatedSize(
  duration: const Duration(milliseconds: 300),
  child: Container(
    padding: const EdgeInsets.all(16),
    alignment: Alignment.topLeft,
    child: Surface(
      surfaceContext: _controller.contextFor(
        taskDisplaySurfaceId,
      ),
    ),
  ),
),
const Divider(),
到目前为止,您的代理可以自由创建和使用 surface。为了向其提供更具体的指令,您需要重新访问系统提示。将以下 ## USER INTERFACE 部分添加到存储在 systemInstruction 常量中的提示的末尾:
const systemInstruction = '''
  // ... existing prompt content ...

  ## USER INTERFACE
  *   To display the list of tasks create one and only one instance of the
    TaskDisplay catalog item. Use "$taskDisplaySurfaceId" as its surface ID.
  *   Update $taskDisplaySurfaceId as necessary when the list changes.
  *   $taskDisplaySurfaceId must include a button for each task that I can use
    to mark it complete. When I use that button to mark a task complete, it
    should send you a message indicating what I've done.
  *   Avoid repeating the same information in a single message.
  *   When responding with text, rather than A2UI messages, be brief.
''';
请务必为智能体提供有关何时以及如何使用界面表面的明确指令。通过告知代理使用特定的目录项和界面 ID(并重用单个实例),您可以帮助确保代理创建您想要看到的界面。
虽然还有更多工作要做,但您可以尝试再次运行应用,看看代理是否会在界面顶部创建任务显示界面。
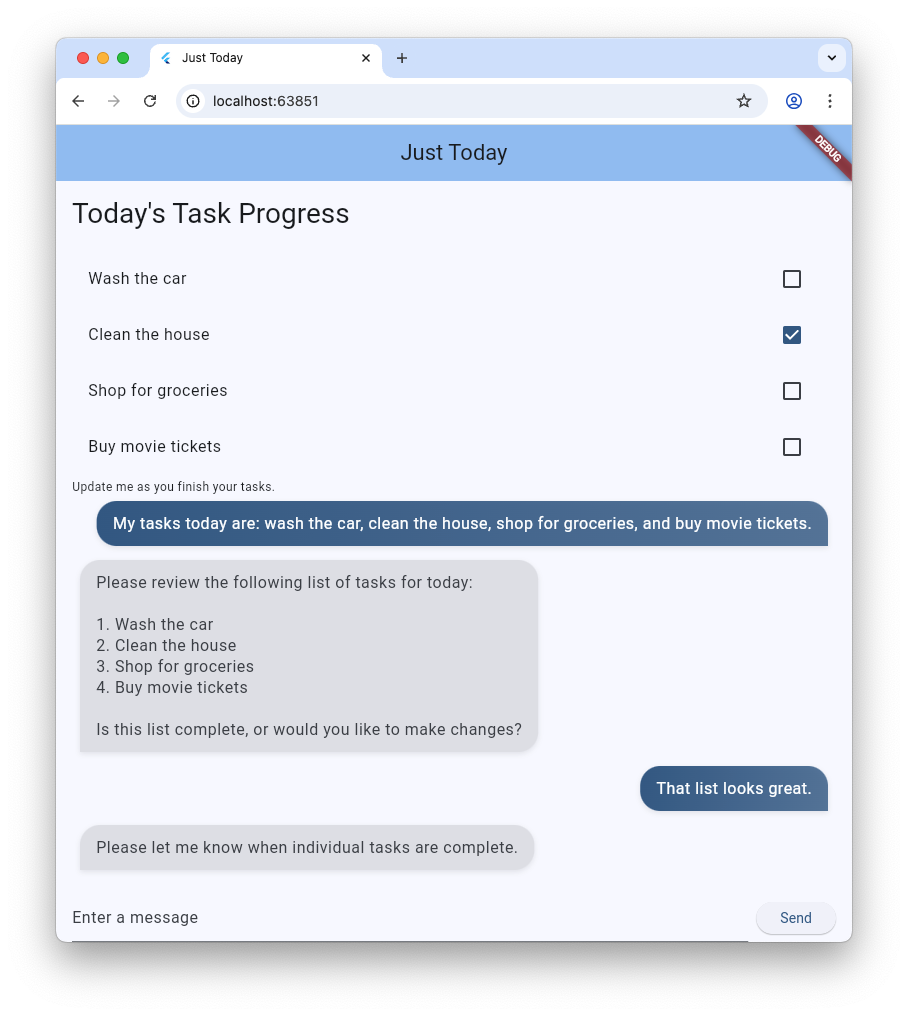
7. 构建自定义目录 widget
此时,TaskDisplay 目录项不存在。在接下来的几个步骤中,您将通过创建数据架构、用于解析该架构的类、微件以及将所有内容整合在一起的目录项来解决此问题。
首先,创建一个名为 task_display.dart 的文件,并添加以下导入项:
import 'package:flutter/material.dart';
import 'package:genui/genui.dart';
import 'package:json_schema_builder/json_schema_builder.dart';
创建数据架构
接下来,定义代理在想要创建任务显示时将提供的数据架构。该流程使用 json_schema_builder 软件包中的一些高级构造函数,但从本质上讲,您只是在定义代理与用户之间消息中使用的 JSON 架构。
首先,从引用组件名称的基本 S.object 开始:
final taskDisplaySchema = S.object(
  properties: {
    'component': S.string(enumValues: ['TaskDisplay']),
  },
);
接下来,将 title、tasks、name、isCompleted 和 completeAction 添加到架构属性中。
final taskDisplaySchema = S.object(
  properties: {
    'component': S.string(enumValues: ['TaskDisplay']),
    'title': S.string(description: 'The title of the task list'),
    'tasks': S.list(
      description: 'A list of tasks to be completed today',
      items: S.object(
        properties: {
          'name': S.string(description: 'The name of the task to be completed'),
          'isCompleted': S.boolean(
            description: 'Whether the task is completed',
          ),
          'completeAction': A2uiSchemas.action(
            description:
                'The action performed when the user has completed the task.',
          ),
        },
      ),
    ),
  },
);
查看 completeAction 属性。它是使用 A2uiSchemas.action 创建的,后者是表示 A2UI 操作的架构属性的构造函数。通过向架构添加操作,应用实际上是在告诉代理:“嘿,当你给我任务时,还要提供一个操作的名称和元数据,我可以使用该操作来告诉你任务已完成。”稍后,当用户点按复选框时,应用将调用该操作。
接下来,向架构添加 required 字段。这些指令会指示代理每次都填充某些属性。在这种情况下,每个属性都是必需的!
final taskDisplaySchema = S.object(
  properties: {
    'component': S.string(enumValues: ['TaskDisplay']),
    'title': S.string(description: 'The title of the task list'),
    'tasks': S.list(
      description: 'A list of tasks to be completed today',
      items: S.object(
        properties: {
          'name': S.string(description: 'The name of the task to be completed'),
          'isCompleted': S.boolean(
            description: 'Whether the task is completed',
          ),
          'completeAction': A2uiSchemas.action(
            description:
                'The action performed when the user has completed the task.',
          ),
        },
        // New!
        required: ['name', 'isCompleted', 'completeAction'],
      ),
    ),
  },
  // New!
  required: ['title', 'tasks'],
);
创建数据解析类
创建此组件的实例时,代理将发送与架构匹配的数据。添加两个类,用于将传入的 JSON 解析为强类型 Dart 对象。请注意,_TaskDisplayData 如何处理根结构,同时将内部数组解析委托给 _TaskData。
class _TaskData {
  final String name;
  final bool isCompleted;
  final String actionName;
  final JsonMap actionContext;

  _TaskData({
    required this.name,
    required this.isCompleted,
    required this.actionName,
    required this.actionContext,
  });

  factory _TaskData.fromJson(Map<String, Object?> json) {
    try {
      final action = json['completeAction']! as JsonMap;
      final event = action['event']! as JsonMap;

      return _TaskData(
        name: json['name'] as String,
        isCompleted: json['isCompleted'] as bool,
        actionName: event['name'] as String,
        actionContext: event['context'] as JsonMap,
      );
    } catch (e) {
      throw Exception('Invalid JSON for _TaskData: $e');
    }
  }
}

class _TaskDisplayData {
  final String title;
  final List<_TaskData> tasks;

  _TaskDisplayData({required this.title, required this.tasks});

  factory _TaskDisplayData.fromJson(Map<String, Object?> json) {
    try {
      return _TaskDisplayData(
        title: (json['title'] as String?) ?? 'Tasks',
        tasks: (json['tasks'] as List<Object?>)
            .map((e) => _TaskData.fromJson(e as Map<String, Object?>))
            .toList(),
      );
    } catch (e) {
      throw Exception('Invalid JSON for _TaskDisplayData: $e');
    }
  }
}
如果您之前使用过 Flutter 进行构建,那么这些类可能与您创建的类类似。它们接受 JsonMap 并返回一个包含从 JSON 解析的数据的强类型对象。
查看 _TaskData 中的 actionName 和 actionContext 字段。它们是从 JSON 的 completeAction 属性中提取的,包含操作的名称及其数据上下文(对操作在 GenUI 数据模型中的位置的引用)。这些变量稍后将用于创建 UserActionEvent。
数据模型是一个集中式、可观测的存储区,用于存储所有动态界面状态,由 genui 库维护。当代理从目录中创建界面组件时,还会创建一个与该组件的架构匹配的数据对象。此数据对象存储在客户端的数据模型中,以便用于构建 widget,并在后续发送给代理的消息中引用(例如您即将连接到 widget 的 completeAction)。
添加 widget
现在,创建一个 widget 来显示列表。它应接受 _TaskDisplayData 类的实例以及在任务完成时调用的回调。
class _TaskDisplay extends StatelessWidget {
  final _TaskDisplayData data;
  final void Function(_TaskData) onCompleteTask;

  const _TaskDisplay({required this.data, required this.onCompleteTask});

  @override
  Widget build(BuildContext context) {
    return Column(
      crossAxisAlignment: CrossAxisAlignment.start,
      mainAxisSize: MainAxisSize.min,
      children: [
        Padding(
          padding: const EdgeInsets.all(16.0),
          child: Text(
            data.title,
            style: Theme.of(context).textTheme.titleLarge,
          ),
        ),
        ...data.tasks.map(
          (task) => CheckboxListTile(
            title: Text(
              task.name,
              style: TextStyle(
                decoration: task.isCompleted
                    ? TextDecoration.lineThrough
                    : TextDecoration.none,
              ),
            ),
            value: task.isCompleted,
            onChanged: task.isCompleted
                ? null
                : (val) {
                    if (val == true) {
                      onCompleteTask(task);
                    }
                  },
          ),
        ),
      ],
    );
  }
}
创建 CatalogItem
创建了架构、解析器和 widget 后,您现在可以创建 CatalogItem 将它们全部关联起来。
在 task_display.dart 的底部,创建 taskDisplay 作为顶级变量,使用 _TaskDisplayData 解析传入的 JSON,并构建 _TaskDisplay widget 的实例。
final taskDisplay = CatalogItem(
  name: 'TaskDisplay',
  dataSchema: taskDisplaySchema,
  widgetBuilder: (itemContext) {
    final json = itemContext.data as Map<String, Object?>;
    final data = _TaskDisplayData.fromJson(json);

    return _TaskDisplay(
      data: data,
      onCompleteTask: (task) async {
        // We will implement this next!
      },
    );
  },
);
实现 onCompleteTask
为了使 widget 正常运行,当任务完成时,它需要与代理进行通信。将空的 onCompleteTask 占位符替换为以下代码,以使用任务数据中的 completeAction 创建并调度事件。
onCompleteTask: (task) async {
  // A data context is a reference to a location in the data model. This line
  // turns that reference into a concrete data object that the agent can use.
  // It's kind of like taking a pointer and replacing it with the value it
  // points to.
  final JsonMap resolvedContext = await resolveContext(
    itemContext.dataContext,
    task.actionContext,
  );

  // Dispatch an event back to the agent, letting it know a task was completed.
  // This will be sent to the agent in an A2UI message that includes the name
  // of the action, the surface ID, and the resolved data context.
  itemContext.dispatchEvent(
    UserActionEvent(
      name: task.actionName,
      sourceComponentId: itemContext.id,
      context: resolvedContext,
    ),
  );
}
注册目录项
最后,打开 main.dart,导入新文件,并将其与其他目录项一起注册。
将此导入项添加到 lib/main.dart 的顶部:
import 'task_display.dart';
将 initState() 函数中的 catalog = BasicCatalogItems.asCatalog(); 替换为:
// The Catalog is immutable, so use copyWith to create a new version
// that includes our custom catalog item along with the basics.
catalog = BasicCatalogItems.asCatalog().copyWith(newItems: [taskDisplay]);
大功告成!热重启应用以查看更改。
8. 尝试以不同方式与智能体互动
现在,您已将新 widget 添加到目录中,并在应用的界面中为其预留了空间,接下来可以开始与代理互动了。GenUI 的主要优势之一在于,它提供了两种与数据交互的方式:通过按钮和复选框等应用界面,以及通过能够理解自然语言并对数据进行推理的代理。不妨尝试一下这两种方法!
- 使用文本字段描述三到四项任务,然后观看它们显示在列表中。
- 使用复选框将任务切换为已完成或未完成。
- 创建包含 5-6 项任务的列表,然后让智能体移除需要您开车前往某处的任务。
- 让代理将重复性任务列表创建为单独的项目(“我需要为妈妈、爸爸和奶奶购买节日贺卡。请为这些内容分别创建单独的任务。”
- 让代理将所有任务标记为已完成或未完成,或者勾选前两项或三项任务。
9. 恭喜
恭喜!您已使用生成式界面和 Flutter 构建了一个 AI 赋能的任务跟踪应用。
您学到的内容
- 使用 Flutter Firebase SDK 与 Google 的基础模型互动
- 利用 GenUI 渲染由 Gemini 生成的互动式界面
- 使用预先确定的静态渲染 ID 将布局中的界面固定
- 设计自定义架构和 widget 目录,以实现强大的互动循环