
1. Overview
This lab introduces you to AI Infrastructure that can be used for running AI workloads. You will be working with the following:
Google Kubernetes Engine (GKE) - The foundational container orchestration platform.
GKE managed DRANET - Dynamic Resource Allocation networking that directly assigns high-speed interconnect fabrics to your TPU pods.
Tensor Processing Unit (TPU) - Google's custom-built accelerator chips.
To configure you are going to deploy a custom VPC, and an autopilot GKE cluster. To enable managed DRANET you will create a ComputeClass and a Resource Claim Template. You will then deploy a workload that uses vLLM, Hugging Face, ComputeClass and resource claim template. Finally you will test the networking setup and connectivity to the Gemma 4 model.
The configurations will use a combination of Terraform, gcloud, and kubectl.
In this lab you will learn how to perform the following task:
- Set up a VPC network
- Set up a GKE autopilot cluster
- Create ComputeClass and ResourceClaimTemplate.
- Create a deployment that runs, TPUs, vLLM, monitoring and Gemma 4 via Hugging Face
- Test connectivity to the LLM
In this lab, you're going to be creating the following pattern.
Figure1. 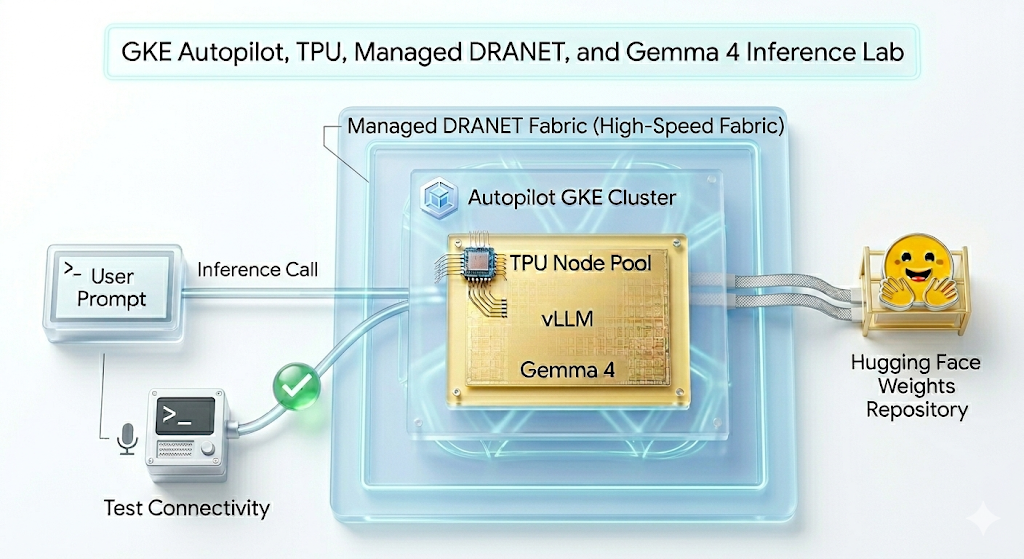
2. Google Cloud services setup
Self-paced environment setup
- Sign-in to the Google Cloud Console and create a new project or reuse an existing one. If you don't already have a Gmail or Google Workspace account, you must create one.


- The Project name is the display name for this project's participants. It is a character string not used by Google APIs. You can always update it.
- The Project ID is unique across all Google Cloud projects and is immutable (cannot be changed after it has been set). The Cloud Console auto-generates a unique string; usually you don't care what it is. In most codelabs, you'll need to reference your Project ID (typically identified as
PROJECT_ID). If you don't like the generated ID, you might generate another random one. Alternatively, you can try your own, and see if it's available. It can't be changed after this step and remains for the duration of the project. - For your information, there is a third value, a Project Number, which some APIs use. Learn more about all three of these values in the documentation.
- Next, you'll need to enable billing in the Cloud Console to use Cloud resources/APIs. Running through this codelab won't cost much, if anything at all. To shut down resources to avoid incurring billing beyond this tutorial, you can delete the resources you created or delete the project. New Google Cloud users are eligible for the $300 USD Free Trial program.
Start Cloud Shell
While Google Cloud can be operated remotely from your laptop, in this codelab you will be using Google Cloud Shell, a command line environment running in the Cloud.
From the Google Cloud Console, click the Cloud Shell icon on the top right toolbar:

It should only take a few moments to provision and connect to the environment. When it is finished, you should see something like this:

This virtual machine is loaded with all the development tools you'll need. It offers a persistent 5GB home directory, and runs on Google Cloud, greatly enhancing network performance and authentication. All of your work in this codelab can be done within a browser. You do not need to install anything.
3. Setup environment with Terraform
To do this lab you need access to TPUs. The exact version used is TPU v6e.
- You should follow the TPU plan doc and enable TPU quota to get access.
- We are using a small deployment requiring 4 TPU v6e chips (
ct6e-standard-4t)which will be a 2x2 slice in a single region. - Hugging Face Token: An Access Token is needed to download the Gemma model weights
We will create a custom VPC with firewall rules, a subnet and then an autopilot cluster. Open the cloud console and select the project you will be using.
- Open Cloud Shell located at the top of your console on the right, ensure you see the correct project id in Cloud Shell, confirm any prompts to allow access.

- Create a folder called
gke-auto-tpuand move to the folder
mkdir -p gke-auto-tpu && cd gke-auto-tpu
export PROJECT_ID=$(gcloud config get-value project)
echo $PROJECT_ID
- Now add some configuration files. These will create the following terraform.tfvars , variables.tf, net.tf file.
cat << EOF > terraform.tfvars
project_id = "${PROJECT_ID}"
EOF

cat << 'EOF' > variables.tf
variable "project_id" {
  type = string
}

variable "region" {
  type    = string
  default = "us-east5"
}

variable "network_name" {
  type    = string
  default = "tpu-gke-vpc"
}

variable "subnet_name" {
  type    = string
  default = "tpu-sub1"
}

variable "cluster_name" {
  type    = string
  default = "tpu-auto-dra-cluster"
}
EOF

cat << 'EOF' > net.tf
terraform {
  required_version = ">= 1.5.0"
  required_providers {
    google = {
      source  = "hashicorp/google"
      version = "~> 7.32.0"
    }
  }
}

provider "google" {
  project = var.project_id
  region  = var.region
}

resource "google_compute_network" "tpu_vpc" {
  project                 = var.project_id
  name                    = var.network_name
  auto_create_subnetworks = false
  mtu                     = 8896
}

resource "google_compute_subnetwork" "tpu_subnet" {
  project       = var.project_id
  name          = var.subnet_name
  ip_cidr_range = "192.168.100.0/24"
  region        = var.region
  network       = google_compute_network.tpu_vpc.id
}

resource "google_compute_firewall" "allow_ssh" {
  project     = var.project_id
  name        = "${var.network_name}-allow-ssh"
  network     = google_compute_network.tpu_vpc.id
  direction   = "INGRESS"
  priority    = 1000

  allow {
    protocol = "tcp"
    ports    = ["22"]
  }

  source_ranges = ["0.0.0.0/0"]
}

resource "google_compute_firewall" "allow_internal" {
  project     = var.project_id
  name        = "${var.network_name}-allow-internal"
  network     = google_compute_network.tpu_vpc.id
  direction   = "INGRESS"
  priority    = 1000

  allow {
    protocol = "all"
  }

  source_ranges = ["172.16.0.0/12", "192.168.0.0/16"]
}

resource "google_container_cluster" "tpu_autopilot" {
  project  = var.project_id
  name     = var.cluster_name
  location = var.region

  enable_autopilot = true

  network    = google_compute_network.tpu_vpc.id
  subnetwork = google_compute_subnetwork.tpu_subnet.id

  release_channel {
    channel = "RAPID"
  }

  ip_allocation_policy {}

  deletion_protection = false
}
EOF
- Make sure you are in the gke-auto-tpu directory and run the following commands
terraform initInitializes the working directory. This is the first step and it downloads the providers required for the given configuration.terraform plan -outgenerates an execution plan, showing what actions Terraform will take to deploy your infrastructure. The-outallows you to save the execution plan to a named binary. You can see what will happen without making any changes.terraform applyruns the updates.
terraform init
terraform plan -out vpc
- Now run the deployment after you run
terraform apply, since you are applying the saved execution plan, it will execute immediately without prompting for confirmation (This may take between 6 -10 mins)
terraform apply vpc
- Verify the set up
echo -e "\n=== Verifying GKE Autopilot Cluster ==="
gcloud container clusters list --filter="name:tpu-auto-dra-cluster" --project=$PROJECT_ID

echo -e "\n=== Verifying VPC Network ==="
gcloud compute networks list --filter="name:tpu-gke-vpc" --project=$PROJECT_ID

echo -e "\n=== Verifying Subnetwork ==="
gcloud compute networks subnets list --filter="name:tpu-sub1" --project=$PROJECT_ID

echo -e "\n=== Verifying Firewall Rules ==="
gcloud compute firewall-rules list --filter="name~tpu-gke-vpc-allow" --project=$PROJECT_ID
4. Create Compute Class and Resource Claim Template
We need to create a custom ComputeClass resource to define the configuration for the node pool. In our case we will be using the TPU v6e chips (ct6e-standard-4t) and managed DRANET networks.
- Connect to the cluster you created. (p.s. change the region to the region you deployed your cluster to.)
gcloud container clusters get-credentials tpu-auto-dra-cluster --region us-east5 --project=$PROJECT_ID
- Make sure you are in the
gke-auto-tpudirectory and run the following commands. This creates the ComputeClass manifest. Please note if you used a different region you need to change the zone information to a zone within the region of your cluster
cat << 'EOF' > computeclass.yaml
apiVersion: cloud.google.com/v1
kind: ComputeClass
metadata:
  name: dranet-auto
spec:
  nodePoolAutoCreation:
    enabled: true
  nodePoolConfig:
    dra:
      networking:
        enabled: true
  priorities:
  - tpu:
      type: tpu-v6e-slice
      count: 4
      topology: "2x2"
    acceleratorNetworkProfile: auto
    location:
      zones:
      - us-east5-b
EOF
- Now create the ComputeClass.
kubectl apply -f computeclass.yaml

kubectl describe computeclass dranet-auto
- In the
gke-auto-tpudirectory run the following commands below. This creates the ResourceClaimTemplate manifest which supports non-RDMA network devices.
cat << 'EOF' > resourceclaimtpu.yaml
apiVersion: resource.k8s.io/v1
kind: ResourceClaimTemplate
metadata:
  name: all-netdev
spec:
  spec:
    devices:
      requests:
      - name: req-netdev
        exactly:
          deviceClassName: netdev.google.com
          allocationMode: All
EOF
- Now create the ResourceClaimTemplate.
kubectl apply -f resourceclaimtpu.yaml

kubectl describe resourceclaimtemplate all-netdev
Create your secret
- This lab uses google/gemma-4-31B-it so you would need to create a HF token. Replace
YOUR_ACTUAL_HUGGING_FACE_TOKENbelow with your actual token.
export HF_TOKEN="YOUR_ACTUAL_HUGGING_FACE_TOKEN"
- Make sure you are in the
gke-auto-tpudirectory and run the following commands.
kubectl create secret generic hf-secret --from-literal=hf_token=${HF_TOKEN}

kubectl get secrets hf-secret
5. Deploy Workload vLLM and Gemma
This setup uses the ComputeClass to automatically provision the required hardware and networking (TPU v6e and managed DRANET). It uses the ResourceClaimTemplate to define a blueprint for requesting access to that high-speed network, and a deployment that binds them together by generating individual network claims for each pod as they scale.
- Make sure you are in the
gke-auto-tpudirectory and run the following.
cat << 'EOF' > gem4-auto-dra-tpu.yaml
apiVersion: apps/v1
kind: Deployment
metadata:
  name: gem4-dra-auto
spec:
  replicas: 1
  selector:
    matchLabels:
      app: gemma4-tpu
  template:
    metadata:
      labels:
        app: gemma4-tpu
        ai.gke.io/model: gemma-4-31b-it
        ai.gke.io/inference-server: vllm-tpu
    spec:
      dnsPolicy: Default
      resourceClaims:
      - name: netdev-claim
        resourceClaimTemplateName: all-netdev
      containers:
      - name: vllm-tpu-inference
        image: vllm/vllm-tpu:latest
        resources:
          requests:
            cpu: "30"
            memory: "240Gi"
            ephemeral-storage: "100Gi"
            google.com/tpu: "4"
          limits:
            cpu: "30"
            memory: "240Gi"
            ephemeral-storage: "100Gi"
            google.com/tpu: "4"
          claims:
          - name: netdev-claim
        command: ["python3", "-m", "vllm.entrypoints.openai.api_server"]
        args:
        - --model=$(MODEL_ID)
        - --tensor-parallel-size=4
        - --host=0.0.0.0
        - --port=8000
        - --max-model-len=32768
        - --max-num-batched-tokens=8192
        env:
        - name: MODEL_ID
          value: google/gemma-4-31B-it
        - name: HUGGING_FACE
          valueFrom:
            secretKeyRef:
              name: hf-secret
              key: hf_token
        - name: HF_TOKEN
          valueFrom:
            secretKeyRef:
              name: hf-secret
              key: hf_token
        volumeMounts:
        - mountPath: /dev/shm
          name: dshm
        startupProbe:
          httpGet:
            path: /health
            port: 8000
          failureThreshold: 240
          periodSeconds: 10
        livenessProbe:
          httpGet:
            path: /health
            port: 8000
          periodSeconds: 10
        readinessProbe:
          httpGet:
            path: /health
            port: 8000
          periodSeconds: 5
      volumes:
      - name: dshm
        emptyDir:
          medium: Memory
      nodeSelector:
        cloud.google.com/compute-class: dranet-auto
---
apiVersion: v1
kind: Service
metadata:
  name: gem4-dra-service
spec:
  selector:
    app: gemma4-tpu
  type: ClusterIP
  ports:
    - protocol: TCP
      port: 8000
      targetPort: 8000
---
apiVersion: monitoring.googleapis.com/v1
kind: PodMonitoring
metadata:
  name: gem4-monitoring
spec:
  selector:
    matchLabels:
      app: gemma4-tpu
  endpoints:
  - port: 8000
    path: /metrics
    interval: 30s
EOF
- Create the deployment.
kubectl apply -f gem4-auto-dra-tpu.yaml
- To monitor the completion status, run the following commands. The pods will wait until the node is provisioned before it can proceed, this may take 13+ minutes.
kubectl get pods

kubectl get deployments

kubectl describe pods -l app=gemma4-tpu

echo "       __|__"
echo "  --@--(_|_)--@--"
echo ""
echo "Waiting for Autopilot to register the TPU node (this takes a few minutes)..."

until kubectl get nodes -l gke.networks.io/accelerator-network-profile=auto -o name | grep -q "node/"; do
  sleep 60
done

echo "TPU Node detected in cluster! Waiting for hardware to provision and become Ready..."

kubectl wait --for=condition=Ready nodes -l gke.networks.io/accelerator-network-profile=auto --timeout=900s
- After the node is created and the pod is scheduled you can run the command to see the logs of the pods. (p.s. You can add the **
-f** flag for streaming). This will take up to 15+ minutes to complete if you are watching the logs when you see the string(APIServer pid=1) INFO: 169.254.4.6:44290 - "GET /health HTTP/1.1" 200 OKthe model is ready to serve.
kubectl logs -l app=gemma4-tpu -f | sed -u '\,"GET /health HTTP/1.1" 200 OK,q'
- Once the deployment is available, you can verify that the high-speed networking is properly attached to your TPU pods. Run the following command:
for pod in $(kubectl get pods -l app=gemma4-tpu -o name); do
  echo "=== Checking Networking for $pod ==="
  kubectl exec $pod -- ls /sys/class/net
  echo ""
done
What to look for: You should see standard eth0 alongside extra interfaces like eth1 through ethxx.
These additional interfaces confirm that the high-speed managed DRANET fabric is successfully attached to your pod.
6. Interact with AI model using curl
To verify the gemma-4-31B model that you deployed, set up port forwarding from the service to your local machine.
- Run this in your current Cloud Shell:
kubectl port-forward service/gem4-dra-service 8000:8000 &
- Now, open an additional Cloud Shell window for the same project to chat with your model by using
curl. This command sends a prompt and streams the output directly to your terminal.
time curl -sN http://127.0.0.1:8000/v1/chat/completions \
  -X POST \
  -H "Content-Type: application/json" \
  -d '{
    "model": "google/gemma-4-31B-it",
    "messages": [
      {
        "role": "user",
        "content": "How can GKE help deployment of AI workloads? Provide concise information. Keep the explanation under 300 words."
      }
    ],
    "max_tokens": 1024,
    "temperature": 0.7,
    "stream": true,
    "stream_options": {"include_usage": true}
  }' | grep '^data:' | sed 's/^data: //' | grep -v '\[DONE\]' | jq --unbuffered -j '
    (.choices[0].delta.content // empty),
    if .usage then "\n\n--- Usage ---\nPrompt: \(.usage.prompt_tokens)\nCompletion: \(.usage.completion_tokens)\nTotal: \(.usage.total_tokens)\n" else empty end
  '
- Check out the response from your model
Observability
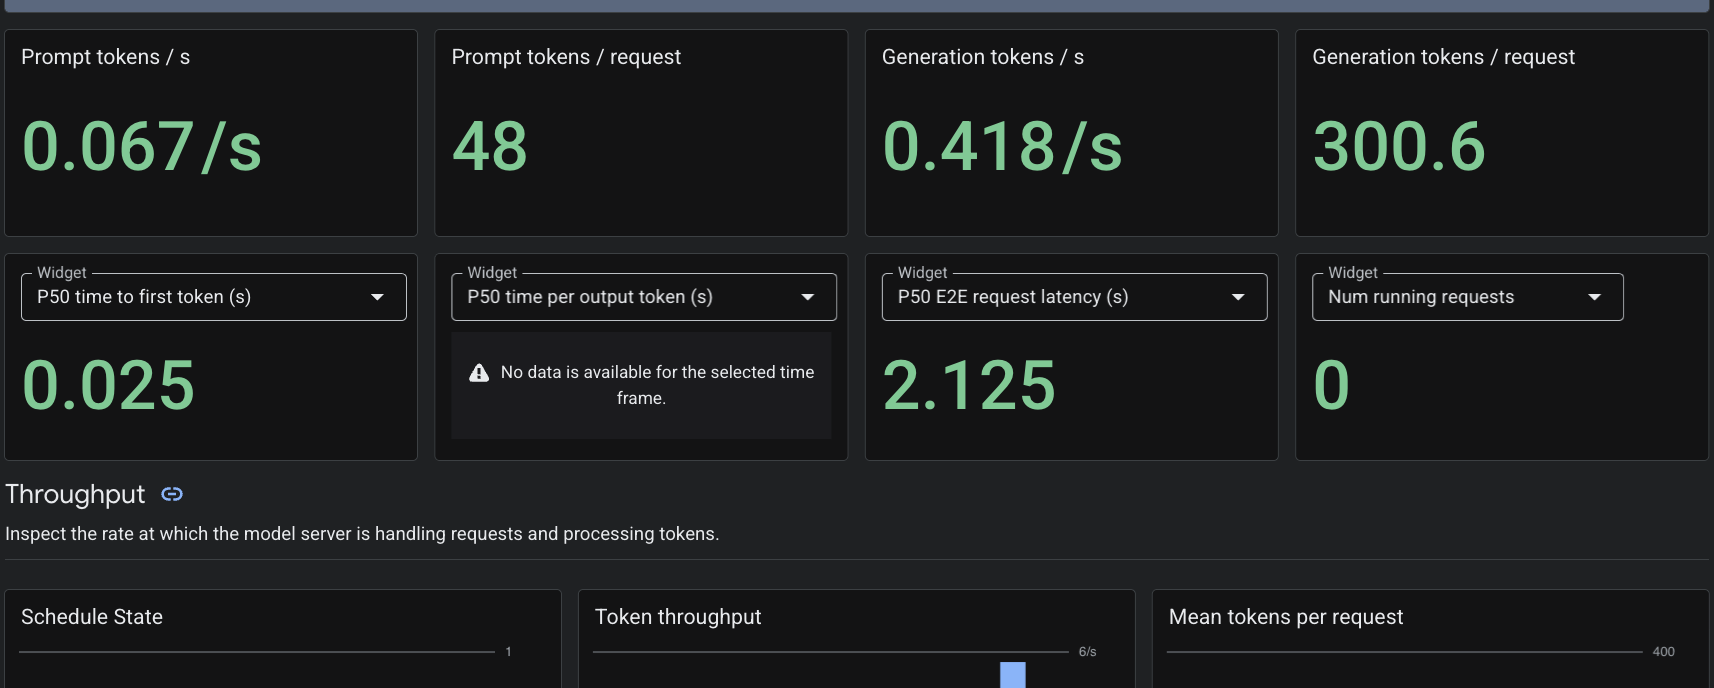
Since we applied the PodMonitoring custom resource, Cloud Monitoring will scrape metrics from the vLLM container on port 8000. You can navigate to the Google Cloud Console Monitoring -> Dashboards to view metrics such as token generation latency, queue length, and KV cache usage natively.
7. Clean up
- Delete the resources by running the following.
cd ~/gke-auto-tpu

kubectl delete -f gem4-auto-dra-tpu.yaml
kubectl delete -f resourceclaimtpu.yaml
kubectl delete -f computeclass.yaml
kubectl delete secret hf-secret
- Clean up the infrastructure by the following command, type
yesto confirm
terraform destroy
8. Congratulations
You have successfully deployed a managed DRANET environment on GKE Autopilot, provisioned TPU v6e hardware dynamically, and served the massive 31-billion parameter Gemma 4 model using vLLM.
By using GKE Autopilot, you allow Kubernetes to handle the underlying node provisioning and infrastructure management, letting you focus entirely on deploying your AI workload.
Next steps / Learn more
You can read more about GKE networking
Take your next lab
Continue your quest with Google Cloud, and check out these other Google Cloud labs: