
1. 개요
이 실습에서는 AI 워크로드를 실행하는 데 사용할 수 있는 AI 인프라를 소개합니다. 다음과 같은 항목을 사용하게 됩니다.
Google Kubernetes Engine (GKE) - 기본 컨테이너 오케스트레이션 플랫폼입니다.
GKE 관리 DRANET - 고속 상호 연결 패브릭을 TPU 포드에 직접 할당하는 동적 리소스 할당 네트워킹입니다.
Tensor Processing Unit (TPU) - Google의 맞춤형 가속기 칩입니다.
커스텀 VPC와 Autopilot GKE 클러스터를 배포하도록 구성합니다. 관리형 DRANET을 사용 설정하려면 ComputeClass와 리소스 요청 템플릿을 만듭니다. 그런 다음 vLLM, Hugging Face, ComputeClass, 리소스 요청 템플릿을 사용하는 워크로드를 배포합니다. 마지막으로 네트워킹 설정과 Gemma 4 모델과의 연결을 테스트합니다.
구성에서는 Terraform, gcloud, kubectl를 조합하여 사용합니다.
이 실습에서는 다음 작업을 수행하는 방법을 알아봅니다.
- VPC 네트워크 설정
- GKE Autopilot 클러스터 설정
- ComputeClass 및 ResourceClaimTemplate을 만듭니다.
- Hugging Face를 통해 TPU, vLLM, 모니터링, Gemma 4를 실행하는 배포 만들기
- LLM 연결 테스트
이 실습에서는 다음 패턴을 만듭니다.
그림 1. 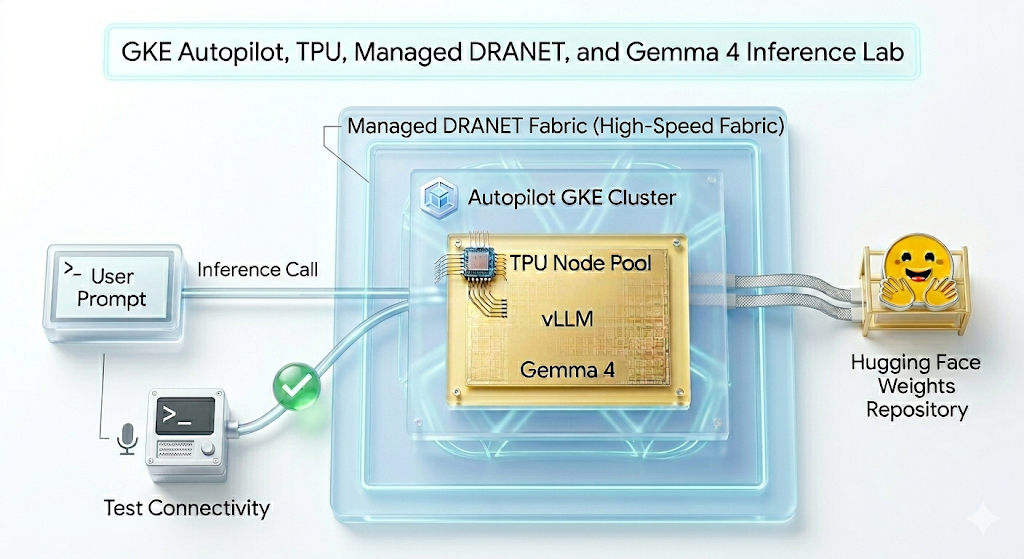
2. Google Cloud 서비스 설정
자습형 환경 설정
- Google Cloud Console에 로그인하여 새 프로젝트를 만들거나 기존 프로젝트를 재사용합니다. 아직 Gmail이나 Google Workspace 계정이 없는 경우 계정을 만들어야 합니다.


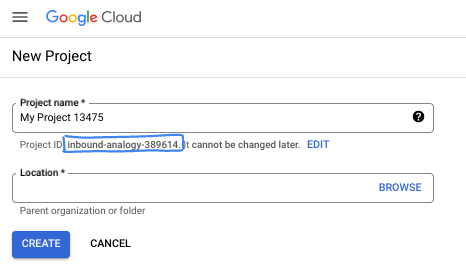
- 프로젝트 이름은 이 프로젝트 참가자의 표시 이름입니다. 이는 Google API에서 사용하지 않는 문자열이며 언제든지 업데이트할 수 있습니다.
- 프로젝트 ID는 모든 Google Cloud 프로젝트에서 고유하며, 변경할 수 없습니다(설정된 후에는 변경할 수 없음). Cloud 콘솔은 고유한 문자열을 자동으로 생성합니다. 일반적으로는 신경 쓰지 않아도 됩니다. 대부분의 Codelab에서는 프로젝트 ID (일반적으로
PROJECT_ID로 식별됨)를 참조해야 합니다. 생성된 ID가 마음에 들지 않으면 다른 임의 ID를 생성할 수 있습니다. 또는 직접 시도해 보고 사용 가능한지 확인할 수도 있습니다. 이 단계 이후에는 변경할 수 없으며 프로젝트 기간 동안 유지됩니다. - 참고로 세 번째 값은 일부 API에서 사용하는 프로젝트 번호입니다. 이 세 가지 값에 대한 자세한 내용은 문서를 참고하세요.
- 다음으로 Cloud 리소스/API를 사용하려면 Cloud 콘솔에서 결제를 사용 설정해야 합니다. 이 Codelab 실행에는 많은 비용이 들지 않습니다. 이 튜토리얼이 끝난 후에 요금이 청구되지 않도록 리소스를 종료하려면 만든 리소스 또는 프로젝트를 삭제하면 됩니다. Google Cloud 신규 사용자는 300달러(USD) 상당의 무료 체험판 프로그램에 참여할 수 있습니다.
Cloud Shell 시작
Google Cloud를 노트북에서 원격으로 실행할 수 있지만, 이 Codelab에서는 Cloud에서 실행되는 명령줄 환경인 Google Cloud Shell을 사용합니다.
Google Cloud Console의 오른쪽 상단 툴바에 있는 Cloud Shell 아이콘을 클릭합니다.
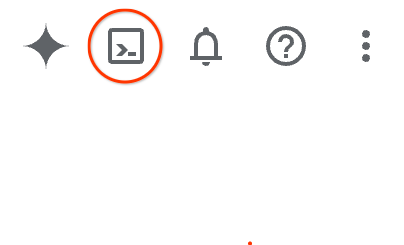
환경을 프로비저닝하고 연결하는 데 몇 분 정도 소요됩니다. 완료되면 다음과 같이 표시됩니다.

가상 머신에는 필요한 개발 도구가 모두 들어있습니다. 영구적인 5GB 홈 디렉터리를 제공하고 Google Cloud에서 실행되므로 네트워크 성능과 인증이 크게 개선됩니다. 이 Codelab의 모든 작업은 브라우저 내에서 수행할 수 있습니다. 아무것도 설치할 필요가 없습니다.
3. Terraform으로 환경 설정
이 실습을 진행하려면 TPU에 액세스할 수 있어야 합니다. 사용된 정확한 버전은 TPU v6e입니다.
- 액세스 권한을 얻으려면 TPU 계획 문서를 따르고 TPU 할당량을 사용 설정해야 합니다.
- 4개의 TPU v6e 칩이 필요한 소규모 배포를 사용하고 있습니다 (
ct6e-standard-4t)단일 리전의 2x2 슬라이스). - Hugging Face 토큰: Gemma 모델 가중치를 다운로드하려면 액세스 토큰이 필요합니다.
방화벽 규칙, 서브넷, Autopilot 클러스터가 있는 커스텀 VPC를 만듭니다. Cloud 콘솔을 열고 사용할 프로젝트를 선택합니다.
- 콘솔 오른쪽 상단에 있는 Cloud Shell을 열고 Cloud Shell에 올바른 프로젝트 ID가 표시되는지 확인하고 액세스를 허용하라는 메시지가 표시되면 확인합니다.

gke-auto-tpu라는 폴더를 만들고 해당 폴더로 이동합니다.
mkdir -p gke-auto-tpu && cd gke-auto-tpu
export PROJECT_ID=$(gcloud config get-value project)
echo $PROJECT_ID
- 이제 구성 파일을 추가합니다. 이렇게 하면 terraform.tfvars , variables.tf, net.tf 파일이 생성됩니다.
cat << EOF > terraform.tfvars
project_id = "${PROJECT_ID}"
EOF

cat << 'EOF' > variables.tf
variable "project_id" {
  type = string
}

variable "region" {
  type    = string
  default = "us-east5"
}

variable "network_name" {
  type    = string
  default = "tpu-gke-vpc"
}

variable "subnet_name" {
  type    = string
  default = "tpu-sub1"
}

variable "cluster_name" {
  type    = string
  default = "tpu-auto-dra-cluster"
}
EOF

cat << 'EOF' > net.tf
terraform {
  required_version = ">= 1.5.0"
  required_providers {
    google = {
      source  = "hashicorp/google"
      version = "~> 7.32.0"
    }
  }
}

provider "google" {
  project = var.project_id
  region  = var.region
}

resource "google_compute_network" "tpu_vpc" {
  project                 = var.project_id
  name                    = var.network_name
  auto_create_subnetworks = false
  mtu                     = 8896
}

resource "google_compute_subnetwork" "tpu_subnet" {
  project       = var.project_id
  name          = var.subnet_name
  ip_cidr_range = "192.168.100.0/24"
  region        = var.region
  network       = google_compute_network.tpu_vpc.id
}

resource "google_compute_firewall" "allow_ssh" {
  project     = var.project_id
  name        = "${var.network_name}-allow-ssh"
  network     = google_compute_network.tpu_vpc.id
  direction   = "INGRESS"
  priority    = 1000

  allow {
    protocol = "tcp"
    ports    = ["22"]
  }

  source_ranges = ["0.0.0.0/0"]
}

resource "google_compute_firewall" "allow_internal" {
  project     = var.project_id
  name        = "${var.network_name}-allow-internal"
  network     = google_compute_network.tpu_vpc.id
  direction   = "INGRESS"
  priority    = 1000

  allow {
    protocol = "all"
  }

  source_ranges = ["172.16.0.0/12", "192.168.0.0/16"]
}

resource "google_container_cluster" "tpu_autopilot" {
  project  = var.project_id
  name     = var.cluster_name
  location = var.region

  enable_autopilot = true

  network    = google_compute_network.tpu_vpc.id
  subnetwork = google_compute_subnetwork.tpu_subnet.id

  release_channel {
    channel = "RAPID"
  }

  ip_allocation_policy {}

  deletion_protection = false
}
EOF
- gke-auto-tpu 디렉터리에 있는지 확인하고 다음 명령어를 실행합니다.
terraform init작업 디렉터리를 초기화합니다. 이는 첫 번째 단계로, 지정된 구성에 필요한 제공업체를 다운로드합니다.terraform plan -out은 Terraform이 인프라를 배포하기 위해 취할 조치를 보여주는 실행 계획을 생성합니다.-out를 사용하면 실행 계획을 이름이 지정된 바이너리에 저장할 수 있습니다. 변경사항을 적용하지 않고 어떤 결과가 나오는지 확인할 수 있습니다.terraform apply를 실행하면 업데이트가 실행됩니다.
terraform init
terraform plan -out vpc
- 이제
terraform apply를 실행한 후 배포를 실행합니다. 저장된 실행 계획을 적용하므로 확인 메시지가 표시되지 않고 즉시 실행됩니다. (6~10분 정도 걸릴 수 있음)
terraform apply vpc
- 설정 확인
echo -e "\n=== Verifying GKE Autopilot Cluster ==="
gcloud container clusters list --filter="name:tpu-auto-dra-cluster" --project=$PROJECT_ID

echo -e "\n=== Verifying VPC Network ==="
gcloud compute networks list --filter="name:tpu-gke-vpc" --project=$PROJECT_ID

echo -e "\n=== Verifying Subnetwork ==="
gcloud compute networks subnets list --filter="name:tpu-sub1" --project=$PROJECT_ID

echo -e "\n=== Verifying Firewall Rules ==="
gcloud compute firewall-rules list --filter="name~tpu-gke-vpc-allow" --project=$PROJECT_ID
4. 컴퓨팅 클래스 및 리소스 요청 템플릿 만들기
노드 풀의 구성을 정의하려면 맞춤 ComputeClass 리소스를 만들어야 합니다. 이 경우 TPU v6e 칩 (ct6e-standard-4t))과 관리형 DRANET 네트워크를 사용합니다.
- 생성한 클러스터에 연결합니다. (p.s. 리전을 클러스터를 배포한 리전으로 변경하세요.)
gcloud container clusters get-credentials tpu-auto-dra-cluster --region us-east5 --project=$PROJECT_ID
gke-auto-tpu디렉터리에 있는지 확인하고 다음 명령어를 실행합니다. 이렇게 하면 ComputeClass 매니페스트가 생성됩니다. 다른 리전을 사용한 경우 영역 정보를 클러스터의 리전 내 영역으로 변경해야 합니다.
cat << 'EOF' > computeclass.yaml
apiVersion: cloud.google.com/v1
kind: ComputeClass
metadata:
  name: dranet-auto
spec:
  nodePoolAutoCreation:
    enabled: true
  nodePoolConfig:
    dra:
      networking:
        enabled: true
  priorities:
  - tpu:
      type: tpu-v6e-slice
      count: 4
      topology: "2x2"
    acceleratorNetworkProfile: auto
    location:
      zones:
      - us-east5-b
EOF
- 이제 ComputeClass를 만듭니다.
kubectl apply -f computeclass.yaml

kubectl describe computeclass dranet-auto
gke-auto-tpu디렉터리에서 아래 명령어를 실행합니다. 이렇게 하면 비 RDMA 네트워크 기기를 지원하는 ResourceClaimTemplate 매니페스트가 생성됩니다.
cat << 'EOF' > resourceclaimtpu.yaml
apiVersion: resource.k8s.io/v1
kind: ResourceClaimTemplate
metadata:
  name: all-netdev
spec:
  spec:
    devices:
      requests:
      - name: req-netdev
        exactly:
          deviceClassName: netdev.google.com
          allocationMode: All
EOF
- 이제 ResourceClaimTemplate을 만듭니다.
kubectl apply -f resourceclaimtpu.yaml

kubectl describe resourceclaimtemplate all-netdev
보안 비밀 만들기
- 이 실습에서는 google/gemma-4-31B-it 을 사용하므로 HF 토큰을 만들어야 합니다. 아래의
YOUR_ACTUAL_HUGGING_FACE_TOKEN을 실제 토큰으로 바꿉니다.
export HF_TOKEN="YOUR_ACTUAL_HUGGING_FACE_TOKEN"
gke-auto-tpu디렉터리에 있는지 확인하고 다음 명령어를 실행합니다.
kubectl create secret generic hf-secret --from-literal=hf_token=${HF_TOKEN}

kubectl get secrets hf-secret
5. 워크로드 vLLM 및 Gemma 배포
이 설정은 ComputeClass를 사용하여 필요한 하드웨어와 네트워킹 (TPU v6e 및 관리형 DRANET)을 자동으로 프로비저닝합니다. ResourceClaimTemplate를 사용하여 해당 고속 네트워크에 대한 액세스를 요청하는 청사진과 확장될 때 각 포드에 대한 개별 네트워크 클레임을 생성하여 이를 함께 바인딩하는 배포를 사용합니다.
gke-auto-tpu디렉터리에 있는지 확인하고 다음을 실행합니다.
cat << 'EOF' > gem4-auto-dra-tpu.yaml
apiVersion: apps/v1
kind: Deployment
metadata:
  name: gem4-dra-auto
spec:
  replicas: 1
  selector:
    matchLabels:
      app: gemma4-tpu
  template:
    metadata:
      labels:
        app: gemma4-tpu
        ai.gke.io/model: gemma-4-31b-it
        ai.gke.io/inference-server: vllm-tpu
    spec:
      dnsPolicy: Default
      resourceClaims:
      - name: netdev-claim
        resourceClaimTemplateName: all-netdev
      containers:
      - name: vllm-tpu-inference
        image: vllm/vllm-tpu:latest
        resources:
          requests:
            cpu: "30"
            memory: "240Gi"
            ephemeral-storage: "100Gi"
            google.com/tpu: "4"
          limits:
            cpu: "30"
            memory: "240Gi"
            ephemeral-storage: "100Gi"
            google.com/tpu: "4"
          claims:
          - name: netdev-claim
        command: ["python3", "-m", "vllm.entrypoints.openai.api_server"]
        args:
        - --model=$(MODEL_ID)
        - --tensor-parallel-size=4
        - --host=0.0.0.0
        - --port=8000
        - --max-model-len=32768
        - --max-num-batched-tokens=8192
        env:
        - name: MODEL_ID
          value: google/gemma-4-31B-it
        - name: HUGGING_FACE
          valueFrom:
            secretKeyRef:
              name: hf-secret
              key: hf_token
        - name: HF_TOKEN
          valueFrom:
            secretKeyRef:
              name: hf-secret
              key: hf_token
        volumeMounts:
        - mountPath: /dev/shm
          name: dshm
        startupProbe:
          httpGet:
            path: /health
            port: 8000
          failureThreshold: 240
          periodSeconds: 10
        livenessProbe:
          httpGet:
            path: /health
            port: 8000
          periodSeconds: 10
        readinessProbe:
          httpGet:
            path: /health
            port: 8000
          periodSeconds: 5
      volumes:
      - name: dshm
        emptyDir:
          medium: Memory
      nodeSelector:
        cloud.google.com/compute-class: dranet-auto
---
apiVersion: v1
kind: Service
metadata:
  name: gem4-dra-service
spec:
  selector:
    app: gemma4-tpu
  type: ClusterIP
  ports:
    - protocol: TCP
      port: 8000
      targetPort: 8000
---
apiVersion: monitoring.googleapis.com/v1
kind: PodMonitoring
metadata:
  name: gem4-monitoring
spec:
  selector:
    matchLabels:
      app: gemma4-tpu
  endpoints:
  - port: 8000
    path: /metrics
    interval: 30s
EOF
- 배포를 만듭니다.
kubectl apply -f gem4-auto-dra-tpu.yaml
- 완료 상태를 모니터링하려면 다음 명령어를 실행합니다. 포드는 노드가 프로비저닝될 때까지 기다린 후 진행할 수 있으며, 이 작업은 13분 이상 걸릴 수 있습니다.
kubectl get pods

kubectl get deployments

kubectl describe pods -l app=gemma4-tpu

echo "       __|__"
echo "  --@--(_|_)--@--"
echo ""
echo "Waiting for Autopilot to register the TPU node (this takes a few minutes)..."

until kubectl get nodes -l gke.networks.io/accelerator-network-profile=auto -o name | grep -q "node/"; do
  sleep 60
done

echo "TPU Node detected in cluster! Waiting for hardware to provision and become Ready..."

kubectl wait --for=condition=Ready nodes -l gke.networks.io/accelerator-network-profile=auto --timeout=900s
- 노드가 생성되고 포드가 예약된 후 명령어를 실행하여 포드의 로그를 볼 수 있습니다. (p.s. 스트리밍을 위해 **
-f** **플래그를 추가할 수 있습니다**).(APIServer pid=1) INFO: 169.254.4.6:44290 - "GET /health HTTP/1.1" 200 OK문자열이 표시될 때 로그를 확인하는 경우 모델이 제공될 준비가 되면 완료하는 데 최대 **15분 이상** 걸립니다.
kubectl logs -l app=gemma4-tpu -f | sed -u '\,"GET /health HTTP/1.1" 200 OK,q'
- 배포가 완료되면 고속 네트워킹이 TPU Pod에 올바르게 연결되었는지 확인할 수 있습니다. 다음 명령어를 실행합니다.
for pod in $(kubectl get pods -l app=gemma4-tpu -o name); do
  echo "=== Checking Networking for $pod ==="
  kubectl exec $pod -- ls /sys/class/net
  echo ""
done
확인할 사항: eth1~ethxx과 같은 추가 인터페이스와 함께 표준 eth0이 표시됩니다.
이러한 추가 인터페이스는 고속 관리 DRANET 패브릭이 포드에 성공적으로 연결되었음을 확인합니다.
6. curl을 사용하여 AI 모델과 상호작용
배포한 gemma-4-31B 모델을 확인하려면 서비스에서 로컬 머신으로 포트 전달을 설정합니다.
- 현재 Cloud Shell에서 다음을 실행합니다.
kubectl port-forward service/gem4-dra-service 8000:8000 &
- 이제 동일한 프로젝트에 대해 추가 Cloud Shell 창을 열어
curl를 사용하여 모델과 채팅합니다. 이 명령어는 프롬프트를 전송하고 출력을 터미널로 직접 스트리밍합니다.
time curl -sN http://127.0.0.1:8000/v1/chat/completions \
  -X POST \
  -H "Content-Type: application/json" \
  -d '{
    "model": "google/gemma-4-31B-it",
    "messages": [
      {
        "role": "user",
        "content": "How can GKE help deployment of AI workloads? Provide concise information. Keep the explanation under 300 words."
      }
    ],
    "max_tokens": 1024,
    "temperature": 0.7,
    "stream": true,
    "stream_options": {"include_usage": true}
  }' | grep '^data:' | sed 's/^data: //' | grep -v '\[DONE\]' | jq --unbuffered -j '
    (.choices[0].delta.content // empty),
    if .usage then "\n\n--- Usage ---\nPrompt: \(.usage.prompt_tokens)\nCompletion: \(.usage.completion_tokens)\nTotal: \(.usage.total_tokens)\n" else empty end
  '
- 모델의 대답 확인하기
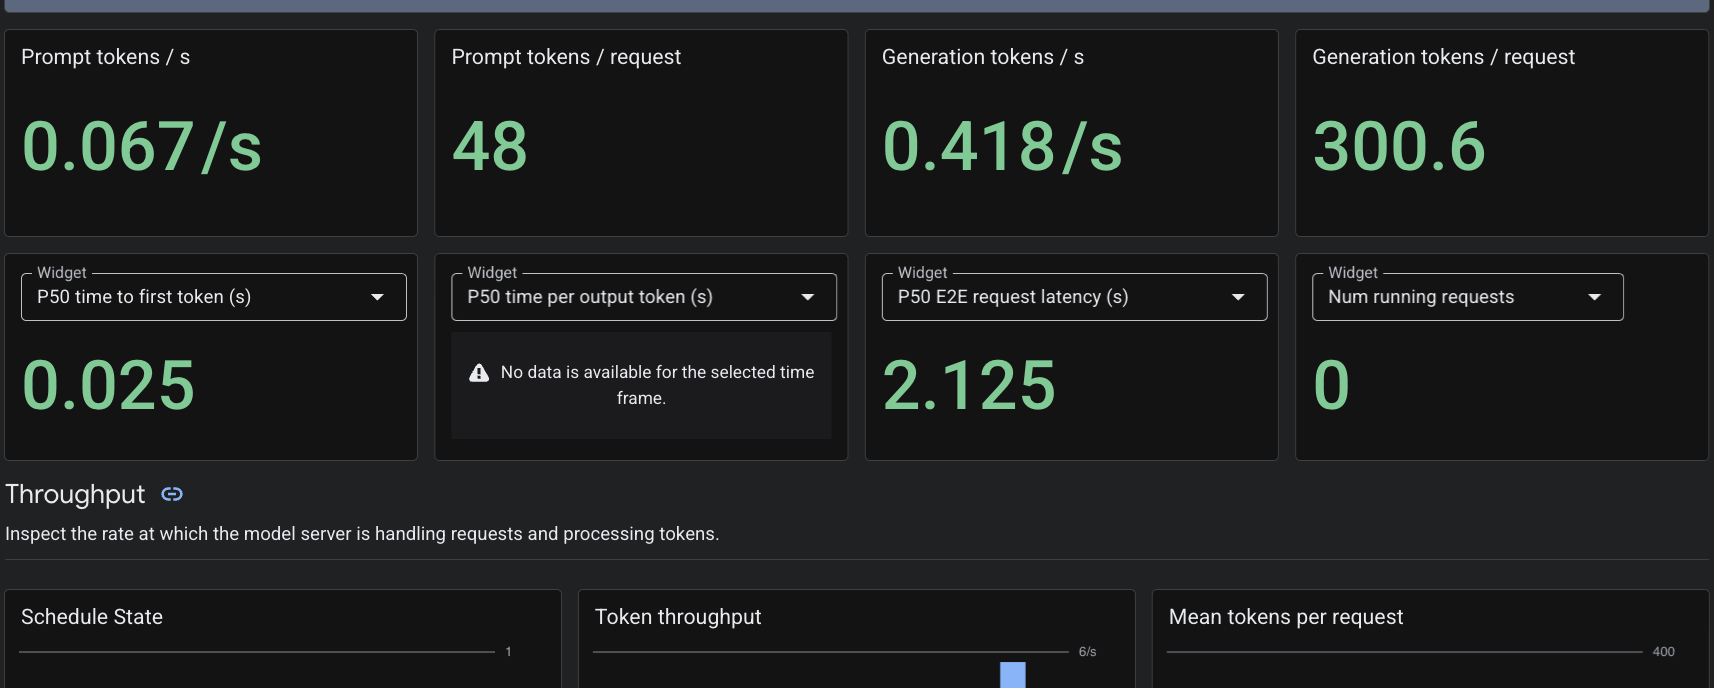
관측 가능성
PodMonitoring 커스텀 리소스를 적용했으므로 Cloud Monitoring은 포트 8000의 vLLM 컨테이너에서 측정항목을 스크랩합니다. Google Cloud 콘솔 모니터링 -> 대시보드로 이동하여 토큰 생성 지연 시간, 대기열 길이, KV 캐시 사용량과 같은 측정항목을 기본적으로 확인할 수 있습니다.
7. 삭제
- 다음을 실행하여 리소스를 삭제합니다.
cd ~/gke-auto-tpu

kubectl delete -f gem4-auto-dra-tpu.yaml
kubectl delete -f resourceclaimtpu.yaml
kubectl delete -f computeclass.yaml
kubectl delete secret hf-secret
- 다음 명령어로 인프라를 정리하고
yes를 입력하여 확인합니다.
terraform destroy
8. 축하합니다
GKE Autopilot에 관리형 DRANET 환경을 성공적으로 배포하고, TPU v6e 하드웨어를 동적으로 프로비저닝하고, vLLM을 사용하여 310억 개의 매개변수가 있는 대규모 Gemma 4 모델을 제공했습니다.
GKE Autopilot을 사용하면 Kubernetes에서 기본 노드 프로비저닝 및 인프라 관리를 처리하므로 AI 워크로드 배포에만 집중할 수 있습니다.
다음 단계/더 학습하기
GKE 네트워킹에 대해 자세히 알아볼 수 있습니다.
다음 실습 참여하기
Google Cloud로 퀘스트를 계속 진행하고 다음 Google Cloud 실습을 확인하세요.