
1. Panoramica
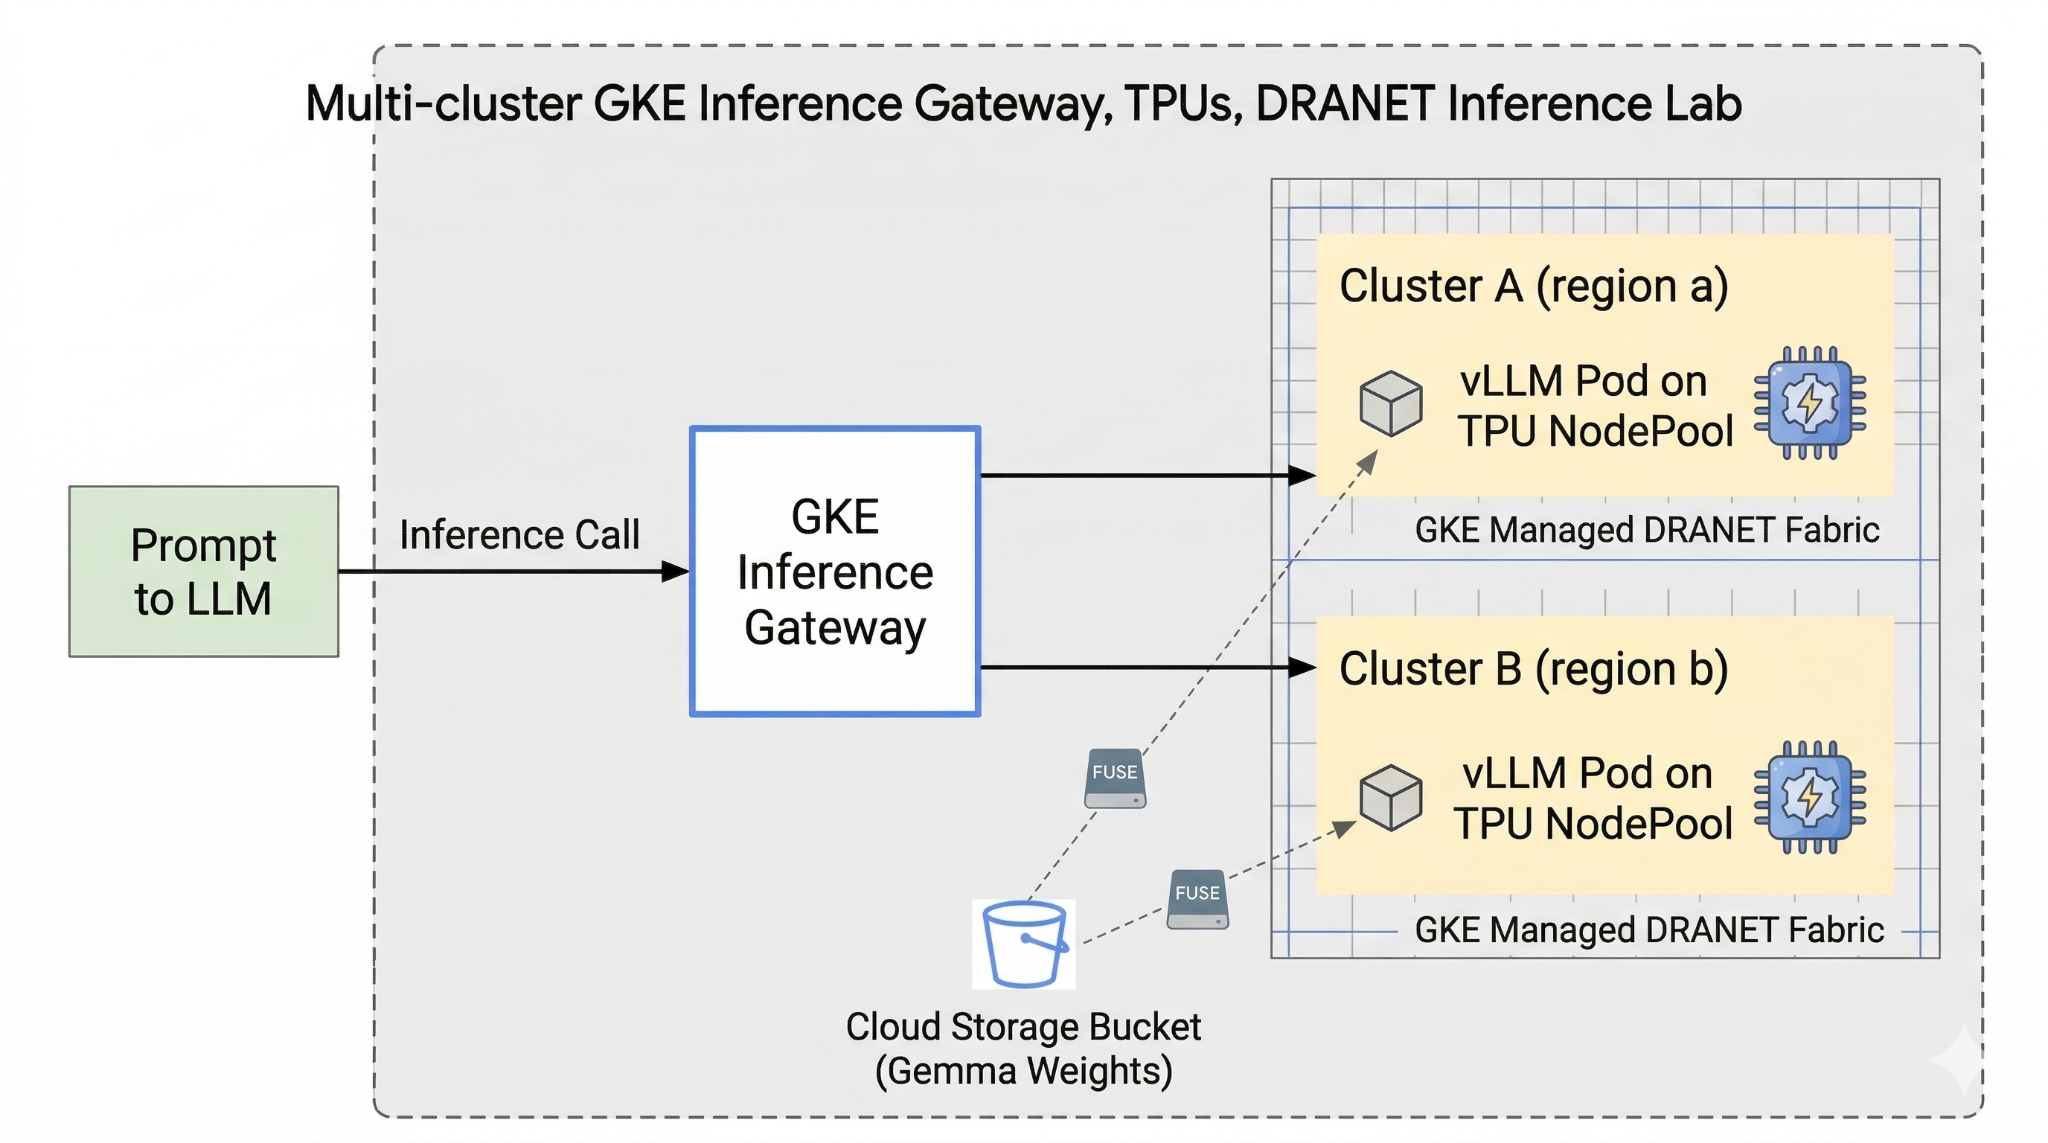
Questo lab introduce l'infrastruttura AI che può essere utilizzata per l'esecuzione di carichi di lavoro AI. Lavorerai con quanto segue:
Google Kubernetes Engine (GKE): la piattaforma di orchestrazione dei container di base.
GKE managed DRANET: rete di allocazione dinamica delle risorse che assegna direttamente le strutture di interconnessione ad alta velocità ai tuoi pod TPU.
GKE Inference Gateway: si tratta di un oggetto gateway gestito di Google Cloud adattato per l'inferenza. In questo caso utilizzeremo le funzionalità multi-cluster.
Tensor Processing Unit (TPU): chip di accelerazione personalizzati di Google.
Cloud Storage FUSE: un'interfaccia di archiviazione che consente ai pod di montare direttamente i bucket Cloud Storage, consentendo il caricamento istantaneo di pesi del modello massicci.
Per la configurazione, devi eseguire il deployment di un VPC personalizzato, un bucket Cloud Storage e due cluster in regioni diverse. Ogni cluster avrà un nodepool TPU che utilizza DRANET gestito per la rete. Dopo aver aggiunto i cluster a un parco risorse, memorizzerai nella cache i pesi del modello Gemma nel bucket e implementerai un carico di lavoro vLLM che monta questi pesi istantaneamente tramite Cloud Storage FUSE. Infine, GKE Inference Gateway verrà configurato per instradare il traffico, consentendoti di eseguire un test di failover cross-region live.
Le configurazioni utilizzeranno una combinazione di Terraform, gcloud e kubectl.
In questo lab imparerai a svolgere la seguente attività:
- Configura VPC, reti e spazio di archiviazione
- Configura il cluster GKE in modalità standard
- Crea un pool di nodi TPU e utilizza DRANET gestito
- Aggiungi cluster al parco risorse
- Memorizzare nella cache i pesi del modello
- Configura il gateway di inferenza GKE multi-cluster e testa il failover
In questo lab creerai il seguente pattern.
Figura 1.
2. Configurazione dei servizi Google Cloud
Configurazione dell'ambiente autonomo
- Accedi alla console Google Cloud e crea un nuovo progetto o riutilizzane uno esistente. Se non hai ancora un account Gmail o Google Workspace, devi crearne uno.

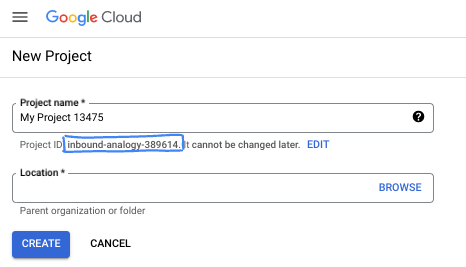
- Il nome del progetto è il nome visualizzato per i partecipanti a questo progetto. È una stringa di caratteri non utilizzata dalle API di Google. Puoi sempre aggiornarlo.
- L'ID progetto è univoco in tutti i progetti Google Cloud ed è immutabile (non può essere modificato dopo l'impostazione). La console Cloud genera automaticamente una stringa univoca, di solito non ti interessa di cosa si tratta. Nella maggior parte dei codelab, dovrai fare riferimento all'ID progetto (in genere identificato come
PROJECT_ID). Se l'ID generato non ti piace, puoi generarne un altro casuale. In alternativa, puoi provare a crearne uno e vedere se è disponibile. Non può essere modificato dopo questo passaggio e rimane per tutta la durata del progetto. - Per tua informazione, esiste un terzo valore, un numero di progetto, utilizzato da alcune API. Scopri di più su tutti e tre questi valori nella documentazione.
- Successivamente, devi abilitare la fatturazione in Cloud Console per utilizzare le risorse/API Cloud. Completare questo codelab non costa molto, se non nulla. Per arrestare le risorse ed evitare addebiti oltre a quelli previsti in questo tutorial, puoi eliminare le risorse che hai creato o il progetto. I nuovi utenti di Google Cloud possono beneficiare del programma prova senza costi di 300$.
Avvia Cloud Shell
Sebbene Google Cloud possa essere gestito da remoto dal tuo laptop, in questo codelab utilizzerai Google Cloud Shell, un ambiente a riga di comando in esecuzione nel cloud.
Nella console Google Cloud, fai clic sull'icona di Cloud Shell nella barra degli strumenti in alto a destra:

Bastano pochi istanti per eseguire il provisioning e connettersi all'ambiente. Al termine, dovresti vedere un risultato simile a questo:

Questa macchina virtuale è caricata con tutti gli strumenti per sviluppatori di cui avrai bisogno. Offre una home directory permanente da 5 GB e viene eseguita su Google Cloud, migliorando notevolmente le prestazioni e l'autenticazione della rete. Tutto il lavoro in questo codelab può essere svolto all'interno di un browser. Non devi installare nulla.
3. Configura l'ambiente con Terraform
Per svolgere questo lab, devi avere accesso alle TPU. La versione esatta utilizzata è TPU v6e.
- Per ottenere l'accesso, devi seguire il documento relativo al piano TPU e abilitare la quota TPU.
- Utilizziamo un piccolo deployment che richiede 4 chip TPU v6e (
ct6e-standard-4t)che sarà una slice 2x2 in due regioni diverse. - Token Hugging Face: è necessario un token di accesso per scaricare i pesi del modello Gemma
Creeremo un VPC personalizzato con regole firewall, spazio di archiviazione e subnet. Apri la console Cloud e seleziona il progetto che utilizzerai.
- Apri Cloud Shell, che si trova in alto a destra nella console, assicurati di visualizzare l'ID progetto corretto in Cloud Shell e conferma le richieste di autorizzazione dell'accesso.

- Crea una cartella denominata
gke-tfe spostati al suo interno
mkdir -p gke-tf && cd gke-tf
PROJECT_ID=$(gcloud config get-value project)
- Ora aggiungi alcuni file di configurazione. Verranno creati i seguenti file network.tf, variable.tf, providers.tf e fuse.tf.
cat <<EOF > terraform.tfvars
project_id = "${PROJECT_ID}"
EOF

cat <<EOF > variables.tf
variable "project_id" { type = string }
variable "network_prefix" { default = "tpu-gke-dranet" }
variable "regions" { default = ["europe-west4", "us-east5"] }
variable "region_to_tpu_zone" {
  default = {
    "europe-west4" = "europe-west4-a"
    "us-east5"     = "us-east5-b"
  }
}
EOF

cat <<EOF > providers.tf
terraform {
  required_version = ">= 1.5.7"
  required_providers {
    google-beta = { source = "hashicorp/google-beta", version = "~> 7.0" }
    time = { source = "hashicorp/time", version = "~> 0.11.0" }
  }
}
provider "google-beta" { project = var.project_id }

resource "google_project_service" "base_apis" {
  for_each = toset([
    "compute.googleapis.com",
    "container.googleapis.com",
    "cloudresourcemanager.googleapis.com",
    "storage.googleapis.com"
  ])
  project            = var.project_id
  service            = each.value
  disable_on_destroy = false
}
EOF

cat <<EOF > network.tf
resource "google_compute_network" "vpc" {
  name                    = "\${var.network_prefix}-vpc"
  auto_create_subnetworks = false
  mtu                     = 8896
  depends_on              = [google_project_service.base_apis]
}
resource "google_compute_subnetwork" "subnets" {
  for_each      = toset(var.regions)
  name          = "\${var.network_prefix}-node-subnet"
  region        = each.value
  network       = google_compute_network.vpc.id
  ip_cidr_range = each.value == "europe-west4" ? "10.0.1.0/24" : "10.0.2.0/24"
}
resource "google_compute_subnetwork" "proxy_subnets" {
  for_each      = toset(var.regions)
  name          = "\${var.network_prefix}-proxy-subnet-\${each.value}"
  region        = each.value
  network       = google_compute_network.vpc.id
  ip_cidr_range = each.value == "europe-west4" ? "10.1.1.0/24" : "10.1.2.0/24"
  purpose       = "GLOBAL_MANAGED_PROXY"
  role          = "ACTIVE"
}
resource "google_compute_address" "gateway_ips" {
  for_each     = toset(var.regions)
  name         = "gemma-gateway-ip-\${each.value}"
  region       = each.value
  subnetwork   = google_compute_subnetwork.subnets[each.value].id
  address_type = "INTERNAL"
}
resource "google_compute_firewall" "allow_internal" {
  name    = "\${var.network_prefix}-allow-internal"
  network = google_compute_network.vpc.name
  allow { protocol = "all" }
  source_ranges = ["10.0.0.0/8", "10.1.0.0/16"]
}
resource "google_compute_firewall" "allow_health_checks" {
  name    = "\${var.network_prefix}-allow-hc"
  network = google_compute_network.vpc.name
  allow {
    protocol = "tcp"
    ports    = ["8000"]
  }
  source_ranges = ["130.211.0.0/22", "35.191.0.0/16"]
}
EOF

cat <<EOF > fuse.tf
resource "google_storage_bucket" "model_bucket" {
  name          = "\${var.project_id}-gemma-weights"
  location      = "US"
  force_destroy = true
  uniform_bucket_level_access = true
  depends_on    = [google_project_service.base_apis]
}

resource "google_service_account" "gcs_fuse_sa" {
  account_id   = "gcs-fuse-sa"
  display_name = "Service Account for GCS FUSE"
}

resource "google_storage_bucket_iam_member" "gcs_fuse_sa_admin" {
  bucket = google_storage_bucket.model_bucket.name
  role   = "roles/storage.objectAdmin"
  member = "serviceAccount:\${google_service_account.gcs_fuse_sa.email}"
}

resource "google_project_iam_binding" "workload_identity_binding" {
  project = var.project_id
  role    = "roles/iam.workloadIdentityUser"
  members = ["serviceAccount:\${var.project_id}.svc.id.goog[default/gemma-ksa]"]
}
EOF
I file variable.tf aggiungono il nome del progetto, le regioni e le informazioni sulla zona. P.S. Aggiorna la variabile "regions", default = ["europe-west4", "us-east5"] con le regioni in cui hai la quota TPU. Per ulteriori informazioni, consulta il documento "Convalida della disponibilità di TPU in GKE".
network.tf aggiunge un nuovo VPC al tuo progetto con subnet in due zone diverse, subnet solo proxy e regole firewall.
provider.tf aggiunge il provider pertinente per supportare Terraform
fuse.tf aggiunge il bucket Cloud Storage alla cache per memorizzare i pesi del modello e fornisce un service account IAM con autorizzazioni objectAdmin. Collega questo account a Workload Identity di GKE
- Assicurati di trovarti nella directory gke-tf ed esegui i seguenti comandi
terraform init -Inizializza la directory di lavoro. Questo passaggio scarica i provider richiesti per la configurazione specificata.terraform plan -Genera un piano di esecuzione, che mostra le azioni che Terraform eseguirà per eseguire il deployment dell'infrastruttura.terraform apply –auto-approveesegue gli aggiornamenti e li approva automaticamente.
terraform init
terraform plan
- Ora esegui il deployment (l'operazione potrebbe richiedere 3-5 minuti)
terraform apply -auto-approve
- Nella stessa cartella
gke-tf, crea il seguente file gke.tf.
cat <<EOF > gke.tf
resource "google_container_cluster" "clusters" {
  provider = google-beta
  for_each = toset(var.regions)
  name     = "gke-\${each.value}"
  location = var.region_to_tpu_zone[each.value]
  deletion_protection = false
  network             = google_compute_network.vpc.id
  subnetwork          = google_compute_subnetwork.subnets[each.value].id
  release_channel { channel = "RAPID" }
  datapath_provider = "ADVANCED_DATAPATH"
  networking_mode   = "VPC_NATIVE"

  gateway_api_config { channel = "CHANNEL_STANDARD" }

  ip_allocation_policy {
    cluster_ipv4_cidr_block  = ""
    services_ipv4_cidr_block = ""
  }

  workload_identity_config { workload_pool = "\${var.project_id}.svc.id.goog" }

  addons_config {
    gcs_fuse_csi_driver_config { enabled = true }
  }

  initial_node_count = 1
  node_config {
    machine_type = "e2-standard-16"
    oauth_scopes = ["https://www.googleapis.com/auth/cloud-platform"]
    workload_metadata_config { mode = "GKE_METADATA" }
  }
}

resource "google_container_node_pool" "tpu_pools" {
  provider = google-beta
  for_each = toset(var.regions)
  name     = "tpu-v6e-pool"
  location = var.region_to_tpu_zone[each.value]
  cluster  = google_container_cluster.clusters[each.value].name
  node_count = 1

  network_config { accelerator_network_profile = "auto" }

  node_config {
    machine_type = "ct6e-standard-4t"
    oauth_scopes = ["https://www.googleapis.com/auth/cloud-platform"]
    labels = { "cloud.google.com/gke-networking-dra-driver" = "true" }
    workload_metadata_config { mode = "GKE_METADATA" }
  }

  lifecycle { ignore_changes = [node_config[0].labels] }
}
EOF
gke.tf aggiunge due cluster in regioni diverse e crea due nodepool TPU che eseguono TPU v6e con 4 chip e assegna DRANET gestito ai nodepool.
- Ora esegui il deployment (l'operazione potrebbe richiedere 10-15 minuti)
terraform apply -auto-approve
- Verifica
echo -e "\n=== Verifying GKE Clusters ==="
gcloud container clusters list --filter="name:gke-europe-west4 OR name:gke-us-east5" --project=$PROJECT_ID

echo -e "\n=== Verifying VPC Network ==="
gcloud compute networks list --filter="name:tpu-gke-dranet-vpc" --project=$PROJECT_ID

echo -e "\n=== Verifying Reserved Static IPs for Gateway ==="
gcloud compute addresses list --filter="name~gemma-gateway-ip" --project=$PROJECT_ID

echo -e "\n=== Verifying GCS Bucket ==="
gcloud storage ls | grep "${PROJECT_ID}-gemma-weights"

echo -e "\n=== Verifying GCS FUSE Service Account ==="
gcloud iam service-accounts list --filter="email:gcs-fuse-sa@${PROJECT_ID}.iam.gserviceaccount.com" --project=$PROJECT_ID
4. Registrazione del parco risorse
Dobbiamo registrare il cluster in un parco risorse.
- Assicurati di trovarti nella directory
gke-tfed esegui i seguenti comandi.
cat <<EOF > fleet.tf
data "google_project" "project" {
  project_id = var.project_id
}

resource "google_project_service" "fleet_apis" {
  for_each = toset([
    "gkehub.googleapis.com",
    "multiclusterservicediscovery.googleapis.com",
    "multiclusteringress.googleapis.com",
    "trafficdirector.googleapis.com"
  ])
  project            = var.project_id
  service            = each.value
  disable_on_destroy = false
}

resource "google_project_service_identity" "mci_sa" {
  provider = google-beta
  project  = var.project_id
  service  = "multiclusteringress.googleapis.com"
  depends_on = [google_project_service.fleet_apis]
}

resource "time_sleep" "wait_for_apis" {
  create_duration = "60s"
  depends_on      = [google_project_service.fleet_apis]
}

resource "google_project_iam_member" "mci_sa_admin" {
  project    = var.project_id
  role       = "roles/container.admin"
  member     = "serviceAccount:\${google_project_service_identity.mci_sa.email}"
  depends_on = [google_project_service_identity.mci_sa, time_sleep.wait_for_apis]
}

resource "google_gke_hub_membership" "memberships" {
  provider      = google-beta
  for_each      = toset(var.regions)
  project       = var.project_id
  membership_id = "gke-\${each.value}"
  endpoint {
    gke_cluster { resource_link = "//container.googleapis.com/\${google_container_cluster.clusters[each.value].id}" }
  }
  depends_on = [time_sleep.wait_for_apis, google_container_cluster.clusters]
}

resource "google_gke_hub_feature" "mcs" {
  provider   = google-beta
  name       = "multiclusterservicediscovery"
  location   = "global"
  project    = var.project_id
  depends_on = [time_sleep.wait_for_apis]
}

resource "google_gke_hub_feature" "ingress" {
  provider   = google-beta
  name       = "multiclusteringress"
  location   = "global"
  project    = var.project_id
  depends_on = [google_gke_hub_membership.memberships, google_project_iam_member.mci_sa_admin]
  spec {
    multiclusteringress { config_membership = "projects/\${var.project_id}/locations/global/memberships/gke-us-east5" }
  }
}
EOF
Il file fleet.tf registra entrambi i cluster in un parco risorse GKE globale e abilita Service Discovery e Ingress multi-cluster. Designa il cluster statunitense come cluster di configurazione centrale, consentendo all'API Gateway di monitorare e instradare il traffico.
- Nella cartella
gke-tfed esegui (l'operazione dovrebbe richiedere dai 3 ai 5 minuti)
terraform plan
terraform apply -auto-approve
- Convalidare la registrazione del parco risorse
gcloud container fleet memberships list --project=$PROJECT_ID
5. Memorizza nella cache i pesi del modello in FUSE
Eseguiamo un job Kubernetes temporaneo nel cluster Stati Uniti per scaricare in modo sicuro il modello Gemma tramite uno script Python direttamente nel bucket Cloud Storage montato con FUSE.
- Crea le seguenti variabili
export CTX_EU="gke_${PROJECT_ID}_europe-west4-a_gke-europe-west4"
export CTX_US="gke_${PROJECT_ID}_us-east5-b_gke-us-east5"
- Questo utilizza il modello google/gemma-3-27b-it, quindi devi creare un token HF. Sostituisci
YOUR_ACTUAL_HUGGING_FACE_TOKENdi seguito con il tuo token effettivo.
export HF_TOKEN="YOUR_ACTUAL_HUGGING_FACE_TOKEN"
- Assicurati di trovarti nella directory
gke-tfed esegui i seguenti comandi.
gcloud container clusters get-credentials gke-us-east5 --zone us-east5-b --project=$PROJECT_ID

cat <<EOF > ksa.yaml
apiVersion: v1
kind: ServiceAccount
metadata:
  name: gemma-ksa
  namespace: default
  annotations:
    iam.gke.io/gcp-service-account: "gcs-fuse-sa@${PROJECT_ID}.iam.gserviceaccount.com"
EOF

kubectl apply -f ksa.yaml --context=$CTX_US
kubectl delete secret hf-secret --context=$CTX_US --ignore-not-found
kubectl create secret generic hf-secret --from-literal=hf_token=${HF_TOKEN} --context=$CTX_US

cat <<EOF > download-job.yaml
apiVersion: batch/v1
kind: Job
metadata:
  name: model-downloader
  namespace: default
spec:
  backoffLimit: 1
  template:
    metadata:
      annotations:
        gke-gcsfuse/volumes: "true"
    spec:
      serviceAccountName: gemma-ksa
      restartPolicy: Never
      containers:
      - name: downloader
        image: python:3.11-slim
        env:
        - name: HF_TOKEN
          valueFrom:
            secretKeyRef:
              name: hf-secret
              key: hf_token
        command:
        - bash
        - -c
        - |
          pip install -U huggingface_hub
          echo "Downloading Gemma 3 directly to GCS bucket..."
          python3 -c "from huggingface_hub import snapshot_download; import os; snapshot_download(repo_id='google/gemma-3-27b-it', local_dir='/data/gemma-weights', token=os.environ['HF_TOKEN'])"
          echo "Download complete! Safe to proceed."
        volumeMounts:
        - name: gcs-fuse-volume
          mountPath: /data/gemma-weights
      volumes:
      - name: gcs-fuse-volume
        csi:
          driver: gcsfuse.csi.storage.gke.io
          volumeAttributes:
            bucketName: "${PROJECT_ID}-gemma-weights"
EOF

kubectl apply -f download-job.yaml --context=$CTX_US
- Attendi il completamento del download prima di procedere (l'operazione dovrebbe richiedere 5-10 minuti a seconda delle dimensioni del modello)
kubectl logs -f job/model-downloader --context=$CTX_US
(Premi Ctrl+C per uscire dai log una volta visualizzato il messaggio "Download completato")
6. Esegui il deployment di vLLM e Gemma per il workload
- Assicurati di trovarti nella directory
gke-tfed esegui i seguenti comandi.
cat <<EOF > workload.yaml
apiVersion: v1
kind: ServiceAccount
metadata:
  name: gemma-ksa
  namespace: default
  annotations:
    iam.gke.io/gcp-service-account: "gcs-fuse-sa@${PROJECT_ID}.iam.gserviceaccount.com"
---
apiVersion: resource.k8s.io/v1
kind: ResourceClaimTemplate
metadata:
  name: all-netdev
  namespace: default
spec:
  spec:
    devices:
      requests:
      - name: req-netdev
        exactly:
          deviceClassName: netdev.google.com
          allocationMode: All
---
apiVersion: apps/v1
kind: Deployment
metadata:
  name: vllm-gemma
  namespace: default
  labels:
    app: gemma-server
spec:
  replicas: 1
  selector:
    matchLabels:
      app: gemma-server
  template:
    metadata:
      labels:
        app: gemma-server
      annotations:
        gke-gcsfuse/volumes: "true"
    spec:
      serviceAccountName: gemma-ksa
      nodeSelector:
        cloud.google.com/gke-tpu-accelerator: tpu-v6e-slice
        cloud.google.com/gke-tpu-topology: 2x2
      resourceClaims:
      - name: netdev
        resourceClaimTemplateName: all-netdev
      containers:
      - name: vllm-tpu
        image: vllm/vllm-tpu:latest
        command:
        - bash
        - -c
        - |
          export PYTHONUNBUFFERED=1
          echo "Booting vLLM instantly from local GCS FUSE mount..."

          python3 -m vllm.entrypoints.openai.api_server \
            --model /data/gemma-weights \
            --tensor-parallel-size 4 \
            --port 8000
        ports:
        - containerPort: 8000
        resources:
          requests:
            google.com/tpu: 4
          limits:
            google.com/tpu: 4
          claims:
          - name: netdev
        volumeMounts:
        - name: dshm
          mountPath: /dev/shm
        - name: gcs-fuse-volume
          mountPath: /data/gemma-weights
          readOnly: true
      volumes:
      - name: dshm
        emptyDir:
          medium: Memory
      - name: gcs-fuse-volume
        csi:
          driver: gcsfuse.csi.storage.gke.io
          readOnly: true
          volumeAttributes:
            bucketName: "${PROJECT_ID}-gemma-weights"
            mountOptions: "implicit-dirs"
            fileCacheCapacity: "100Gi"
            fileCacheForRangeRead: "true"
---
apiVersion: v1
kind: Service
metadata:
  name: vllm-gemma-service
  namespace: default
spec:
  selector:
    app: gemma-server
  ports:
  - protocol: TCP
    port: 8000
    targetPort: 8000
  type: ClusterIP
---
apiVersion: monitoring.googleapis.com/v1
kind: PodMonitoring
metadata:
  name: vllm-gemma-monitoring
  namespace: default
spec:
  selector:
    matchLabels:
      app: gemma-server
  endpoints:
  - port: 8000
    interval: 15s
    path: /metrics
EOF
- Ora esegui lo script seguente (il completamento richiede 5-10 minuti perché viene eseguito il deployment in due regioni)
for CTX in $CTX_EU $CTX_US; do
  ZONE=$(echo $CTX | cut -d_ -f3)
  CLUSTER=$(echo $CTX | cut -d_ -f4)
  gcloud container clusters get-credentials $CLUSTER --zone $ZONE --project=$PROJECT_ID

  kubectl delete secret hf-secret --ignore-not-found --context=$CTX
  kubectl create secret generic hf-secret --from-literal=hf_token=${HF_TOKEN} --context=$CTX
  kubectl apply -f workload.yaml --context=$CTX
done
- Conferma il deployment
for CTX in $CTX_EU $CTX_US; do kubectl rollout status deployment/vllm-gemma --timeout=15m --context=$CTX; done
- Una volta completata l'operazione, puoi verificare che il networking DRANET gestito sia stato assegnato ai pod eseguendo.
for CTX in $CTX_EU $CTX_US; do
  echo "Checking DRA network interfaces on $CTX..."
  kubectl --context=$CTX exec deployment/vllm-gemma -c vllm-tpu -- ls /sys/class/net
  echo "----------------------------------------"
done
Vedrai interfacce di rete aggiuntive eth0 per il networking dei pod standard, insieme alle interfacce secondarie che rappresentano il fabric TPU dedicato eth1, eth2 e così via.
7. Configurazione dell'API Inference e del gateway
Ora creerai InferenceObjective (gemma-objective), AutoscalingMetric (tpu-cache) e Inference Pool(gemma-pool). Il pool di inferenza viene creato utilizzando un grafico Helm. e installa e convalida la creazione.
- Assicurati di trovarti nella directory
gke-tfed esegui i seguenti comandi. Verrà eseguito il deployment dell'oggetto e verrà eseguita una convalida.
cat <<EOF > inference-objective.yaml
apiVersion: inference.networking.x-k8s.io/v1alpha2
kind: InferenceObjective
metadata:
  name: gemma-objective
  namespace: default
spec:
  priority: 10
  poolRef:
    name: gemma-pool
    group: "inference.networking.k8s.io"
EOF

cat <<EOF > metrics.yaml
apiVersion: autoscaling.gke.io/v1beta1
kind: AutoscalingMetric
metadata:
  name: tpu-cache
  namespace: default
spec:
  selector:
    matchLabels:
      app: gemma-server
  endpoints:
  - port: 8000
    path: /metrics
    metrics:
    - name: vllm:kv_cache_usage_perc
      exportName: tpu-cache
EOF

for CTX in $CTX_EU $CTX_US; do
  kubectl apply -f https://raw.githubusercontent.com/kubernetes-sigs/gateway-api-inference-extension/v1.1.0/config/crd/bases/inference.networking.x-k8s.io_inferenceobjectives.yaml --context=$CTX
  kubectl apply -f inference-objective.yaml --context=$CTX
  kubectl apply -f metrics.yaml --context=$CTX
done

helm install gemma-pool --kube-context $CTX_EU \
  --set inferencePool.modelServers.matchLabels.app=gemma-server \
  --set provider.name=gke \
  --version v1.1.0 \
  oci://registry.k8s.io/gateway-api-inference-extension/charts/inferencepool

helm install gemma-pool --kube-context $CTX_US \
  --set inferencePool.modelServers.matchLabels.app=gemma-server \
  --set provider.name=gke \
  --set inferenceExtension.monitoring.gke.enabled=true \
  --version v1.1.0 \
  oci://registry.k8s.io/gateway-api-inference-extension/charts/inferencepool

for CTX in $CTX_EU $CTX_US; do
  kubectl annotate inferencepool gemma-pool networking.gke.io/export="True" --context=$CTX
done

for CTX in $CTX_EU $CTX_US; do
  echo "Verifying Inference API resources on $CTX..."
  kubectl get inferencepools --context=$CTX
  kubectl get autoscalingmetrics tpu-cache --context=$CTX
done
8. Configurazione del gateway
Ora creerai la configurazione del gateway cross-region. Gateway(cross-region-gateway), HTTPRoute (gemma-route), HealthCheckPolicy(gemma-health-check)and GCPBackendPolicy(gemma-backend-policy. Il pool di inferenza viene creato utilizzando un grafico Helm. e installa e convalida la creazione. (occorreranno 8-10 minuti prima che il gateway diventi attivo)
cat <<EOF > config-cluster.yaml
apiVersion: gateway.networking.k8s.io/v1
kind: Gateway
metadata:
  name: cross-region-gateway
  namespace: default
spec:
  gatewayClassName: gke-l7-cross-regional-internal-managed-mc
  addresses:
  - type: networking.gke.io/named-address-with-region
    value: "regions/europe-west4/addresses/gemma-gateway-ip-europe-west4"
  - type: networking.gke.io/named-address-with-region
    value: "regions/us-east5/addresses/gemma-gateway-ip-us-east5"
  listeners:
  - name: http
    protocol: HTTP
    port: 80
---
apiVersion: gateway.networking.k8s.io/v1
kind: HTTPRoute
metadata:
  name: gemma-route
  namespace: default
spec:
  parentRefs:
  - name: cross-region-gateway
    kind: Gateway
  rules:
  - backendRefs:
    - group: networking.gke.io
      kind: GCPInferencePoolImport
      name: gemma-pool
      port: 8000
---
apiVersion: networking.gke.io/v1
kind: HealthCheckPolicy
metadata:
  name: gemma-health-check
  namespace: default
spec:
  targetRef:
    group: networking.gke.io
    kind: GCPInferencePoolImport
    name: gemma-pool
  default:
    config:
      type: HTTP
      httpHealthCheck:
        requestPath: /health
        port: 8000
---
apiVersion: networking.gke.io/v1
kind: GCPBackendPolicy
metadata:
  name: gemma-backend-policy
  namespace: default
spec:
  targetRef:
    group: networking.gke.io
    kind: GCPInferencePoolImport
    name: gemma-pool
  default:
    timeoutSec: 100
    balancingMode: CUSTOM_METRICS
    trafficDuration: LONG
    customMetrics:
      - name: gke.named_metrics.tpu-cache
        dryRun: false
        maxUtilizationPercent: 60
EOF

echo -e "\n=== Creating Cross-Regional Gateway Resources ==="
kubectl apply -f config-cluster.yaml --context=$CTX_US

echo -e "\n=== Provisioning Global Load Balancer (This takes 5-10 minutes) ==="
echo "Working on the Gateway... waiting for Google Cloud to assign IPs and program routes..."

# The script will hold here until the gateway is officially ready
kubectl wait --for=condition=programmed gateway/cross-region-gateway --timeout=10m --context=$CTX_US

echo -e "\n=== SUCCESS: Gateway is fully provisioned and ready! ==="
Pool di inferenza (Helm): raggruppa i server dei modelli di entrambe le regioni in un unico backend logico.
Gateway e HTTPRoute: crea il bilanciatore del carico interno globale effettivo e definisce le regole per l'instradamento dei prompt AI in entrata ai tuoi modelli.
Controlli di integrità e criteri di backend: garantisce che le richieste vengano inviate solo ai pod integri e consente una distribuzione intelligente del traffico basata sulle metriche (impedendo il sovraccarico delle TPU).
Convalida: lo script si interrompe per assicurarsi che Google Cloud abbia eseguito il provisioning completo degli indirizzi IP interni prima di procedere.
9. Test di failover
Ora passiamo alla parte migliore del lab: testare l'alta affidabilità dell'architettura.
Ecco cosa farà esattamente questo test automatizzato:
- Test di base: il nostro utente simulato invia un prompt di inferenza ("Qual è la capitale della Francia?"). Poiché l'utente si trova nella regione primaria, il gateway indirizza la richiesta a queste TPU locali per ottenere la latenza più bassa possibile.
- Il disastro:simuliamo un'interruzione catastrofica del data center eliminando tutti i pod TPU nella regione principale (
replicas=0). - Il rilevamento:attendiamo 45 secondi. Durante questa finestra, i controlli di integrità del gateway non riescono, il gateway si rende conto che il backend principale è completamente offline e aggiorna dinamicamente le tabelle di routing globali.
- Failover:l'utente invia un secondo prompt ("Qual è la capitale della Germania?"). L'utente non sa che si è verificato un'interruzione. Il gateway intercetta la richiesta e la reindirizza immediatamente in tutto il mondo alle TPU secondarie integre.
- Il recupero: ripristiniamo le TPU principali, riportando la tua architettura globale alla piena funzionalità.
- Apri Cloud Shell ed esegui il comando seguente:
cat << 'EOF' > failover-test.sh
#!/bin/bash
# Multi-Cluster Inference Failover Test

export PROJECT_ID=$(gcloud config get-value project)
export CTX_EU="gke_${PROJECT_ID}_europe-west4-a_gke-europe-west4"
export CTX_US="gke_${PROJECT_ID}_us-east5-b_gke-us-east5"

echo -e "\n=== PHASE 1: VERIFYING CURRENT STATE (BOTH CLUSTERS UP) ==="
echo "Checking US Cluster (Primary):"
kubectl get pods -l app=gemma-server --context=$CTX_US
echo "Checking EU Cluster (Secondary):"
kubectl get pods -l app=gemma-server --context=$CTX_EU

echo -e "\nDeploying Test Client in US..."
export GATEWAY_IP_US=$(gcloud compute addresses describe gemma-gateway-ip-us-east5 --region=us-east5 --project=$PROJECT_ID --format="value(address)")

kubectl run curl-test --image=curlimages/curl --restart=Never --context=$CTX_US -- sleep 3600
kubectl wait --for=condition=ready pod/curl-test --context=$CTX_US --timeout=60s

echo -e "\n=== PHASE 2: BASELINE TEST (US Client -> US TPUs) ==="
echo "Prompting the AI: 'What is the capital of France?'"
echo "Expect to see the full JSON response including token usage..."
kubectl exec curl-test --context=$CTX_US -- curl -s -X POST http://$GATEWAY_IP_US/v1/chat/completions \
  -H "Content-Type: application/json" \
  -d '{
    "model": "/data/gemma-weights",
    "messages": [{"role": "user", "content": "What is the capital of France?"}],
    "max_tokens": 100
  }' | jq .

echo -e "\n=== PHASE 3: SIMULATING REGIONAL OUTAGE (Scaling US to 0) ==="
kubectl scale deployment vllm-gemma --replicas=0 --context=$CTX_US
echo "Waiting 20 seconds for pods to begin terminating..."
sleep 20

echo -e "\n=== PHASE 4: CONFIRMING STATE (PODS TERMINATING) ==="
echo "Checking US Cluster (Should be terminating):"
kubectl get pods -l app=gemma-server --context=$CTX_US
echo "Checking EU Cluster (Should still be running):"
kubectl get pods -l app=gemma-server --context=$CTX_EU

echo -e "\nWaiting 45 seconds for Gateway health checks to update global routing tables..."
sleep 45

echo -e "\n=== PHASE 5: CONFIRMING COMPLETE DOWN AND EURO UP ==="
echo "Checking US Cluster (Should be completely empty now):"
kubectl get pods -l app=gemma-server --context=$CTX_US
echo "Checking EU Cluster (Should still be running):"
kubectl get pods -l app=gemma-server --context=$CTX_EU

echo -e "\n=== PHASE 6: FAILOVER TEST (US Client -> EU TPUs) ==="
echo "Prompting the AI: 'What is the capital of Germany?'"
echo "Request is actively being rerouted to Europe. Expecting full JSON response..."
kubectl exec curl-test --context=$CTX_US -- curl -s -X POST http://$GATEWAY_IP_US/v1/chat/completions \
  -H "Content-Type: application/json" \
  -d '{
    "model": "/data/gemma-weights",
    "messages": [{"role": "user", "content": "What is the capital of Germany?"}],
    "max_tokens": 100
  }' | jq .

echo -e "\n=== PHASE 7: RESTORING INFRASTRUCTURE (Scaling US to 1) ==="
kubectl scale deployment vllm-gemma --replicas=1 --context=$CTX_US
echo "Waiting for US pods to boot and mount FUSE..."
kubectl rollout status deployment/vllm-gemma --timeout=15m --context=$CTX_US

echo -e "\n=== PHASE 8: CONFIRMING BOTH SYSTEMS ARE BACK UP ==="
echo "Checking US Cluster (Restored):"
kubectl get pods -l app=gemma-server --context=$CTX_US
echo "Checking EU Cluster (Still Healthy):"
kubectl get pods -l app=gemma-server --context=$CTX_EU

echo -e "\n=== PHASE 9: CLEANUP ==="
kubectl delete pod curl-test --context=$CTX_US
echo "Failover lab complete."
EOF

chmod +x failover-test.sh
./failover-test.sh
- Una volta completato il test, puoi liberare spazio.
10. Esegui la pulizia
- Libera spazio nel workload
#!/bin/bash
echo "=== PART 1: Kubernetes & Workload Cleanup ==="
export PROJECT_ID=$(gcloud config get-value project)
export CTX_EU="gke_${PROJECT_ID}_europe-west4-a_gke-europe-west4"
export CTX_US="gke_${PROJECT_ID}_us-east5-b_gke-us-east5"

echo "Deleting Gateway resources..."
for CTX in $CTX_EU $CTX_US; do
  kubectl delete gateways,httproutes,healthcheckpolicies,gcpbackendpolicies --all --context=$CTX --ignore-not-found
done

echo "Waiting 60 seconds for the external Load Balancer to detach..."
sleep 60

echo "Cleaning up workloads and custom resources..."
for CTX in $CTX_EU $CTX_US; do
  helm uninstall gemma-pool --kube-context=$CTX || true
  kubectl delete job model-downloader --context=$CTX --ignore-not-found
  kubectl delete all -l app=gemma-server --context=$CTX --ignore-not-found
  kubectl delete inferenceobjectives,autoscalingmetrics --all --context=$CTX --ignore-not-found
  kubectl delete serviceaccount gemma-ksa --context=$CTX --ignore-not-found
  kubectl delete -f https://raw.githubusercontent.com/kubernetes-sigs/gateway-api-inference-extension/v1.1.0/config/crd/bases/inference.networking.x-k8s.io_inferenceobjectives.yaml --context=$CTX --ignore-not-found
done

echo -e "\n=== Part 1 Complete! Safe to proceed to Terraform Teardown. ==="
- Libera spazio nell'infrastruttura. Assicurati di trovarti nella cartella
gke-tf.
cat << 'EOF' > cleanup-tf.sh
#!/bin/bash
echo "=== PART 2: Infrastructure & Terraform Teardown ==="
export PROJECT_ID=$(gcloud config get-value project)
export LAB_NETWORK="tpu-gke-dranet-vpc"

echo "Destroying GKE Fleet Features to prevent firewall resurrection..."
terraform destroy -target=google_gke_hub_feature.mcs -target=google_gke_hub_feature.ingress -auto-approve

echo "Waiting 30 seconds for the self-healing controllers to spin down..."
sleep 30

echo "Hunting down orphaned auto-generated firewall rules strictly on the lab network..."
GHOST_RULES=$(gcloud compute firewall-rules list --filter="network~${LAB_NETWORK} AND (name~mcsd OR name~k8s-fw-l7)" --format="value(name)" --project=$PROJECT_ID)

if [ ! -z "$GHOST_RULES" ]; then
  for rule in $GHOST_RULES; do
    echo "Deleting ghost rule: $rule"
    gcloud compute firewall-rules delete $rule --project=$PROJECT_ID --quiet
  done
else
  echo "No ghost rules found on ${LAB_NETWORK}."
fi

echo "=== Controllers and Firewalls dead. Destroying remaining Base Infrastructure. ==="

MAX_RETRIES=3
RETRY_COUNT=0
SUCCESS=false

while [ $RETRY_COUNT -lt $MAX_RETRIES ]; do
  # Run the destroy command. If it succeeds (exit code 0), break the loop.
  if terraform destroy -auto-approve; then
    SUCCESS=true
    break
  else
    RETRY_COUNT=$((RETRY_COUNT+1))
    echo -e "\n[WARNING] Terraform destroy encountered an error (likely a GCP resource lock)."

    if [ $RETRY_COUNT -lt $MAX_RETRIES ]; then
      echo "Waiting 30 seconds before retry $RETRY_COUNT of $MAX_RETRIES..."
      sleep 30
    fi
  fi
done

if [ "$SUCCESS" = true ]; then
  echo -e "\n=== Lab Cleanup Successfully Completed! ==="
else
  echo -e "\n[ERROR] Lab Cleanup failed after $MAX_RETRIES attempts."
  echo "Some resources may still be locked. Run 'terraform destroy -auto-approve' manually later to finish."
  exit 1
fi
EOF

chmod +x cleanup-tf.sh
./cleanup-tf.sh
Se riscontri problemi durante l'eliminazione delle risorse specifiche, esegui di nuovo lo script di comando terraform destroy ./cleanup-tf.sh
11. Complimenti
Complimenti! Hai eseguito correttamente il deployment di un gateway di inferenza GKE multicluster ad alta affidabilità, di un'architettura di inferenza AI cross-region utilizzando GKE e di acceleratori DRANET e TPU v6e gestiti.
Combinando Cloud Storage FUSE per il caricamento istantaneo dei modelli e l'API Inference Gateway per il routing multicluster sensibile alla latenza, hai creato un backend resiliente in grado di sopravvivere a un'interruzione completa del data center regionale senza interrompere il traffico degli utenti interni.
Prossimi passi/Scopri di più
Puoi scoprire di più sul networking GKE.
Segui il prossimo lab
Continua la Quest con Google Cloud e dai un'occhiata a questi altri lab Google Cloud: