
1. 概要
このラボでは、AI ワークロードの実行に使用できる AI インフラストラクチャについて説明します。次のものを使用します。
**Google Kubernetes Engine(GKE)** - 基盤となるコンテナ オーケストレーション プラットフォーム。
GKE マネージド DRANET - 高速インターコネクト ファブリックを TPU Pod に直接割り当てる動的リソース割り当てネットワーキング。
GKE Inference Gateway - 推論用に調整された Google Cloud のマネージド Gateway オブジェクト。ここでは、マルチクラスタ機能を使用します。
Tensor Processing Unit(TPU) - Google がカスタムビルドしたアクセラレータ チップ。
Cloud Storage FUSE - Pod が Cloud Storage バケットを直接マウントできるようにするストレージ インターフェース。これにより、大規模なモデルの重みを即座に読み込むことができます。
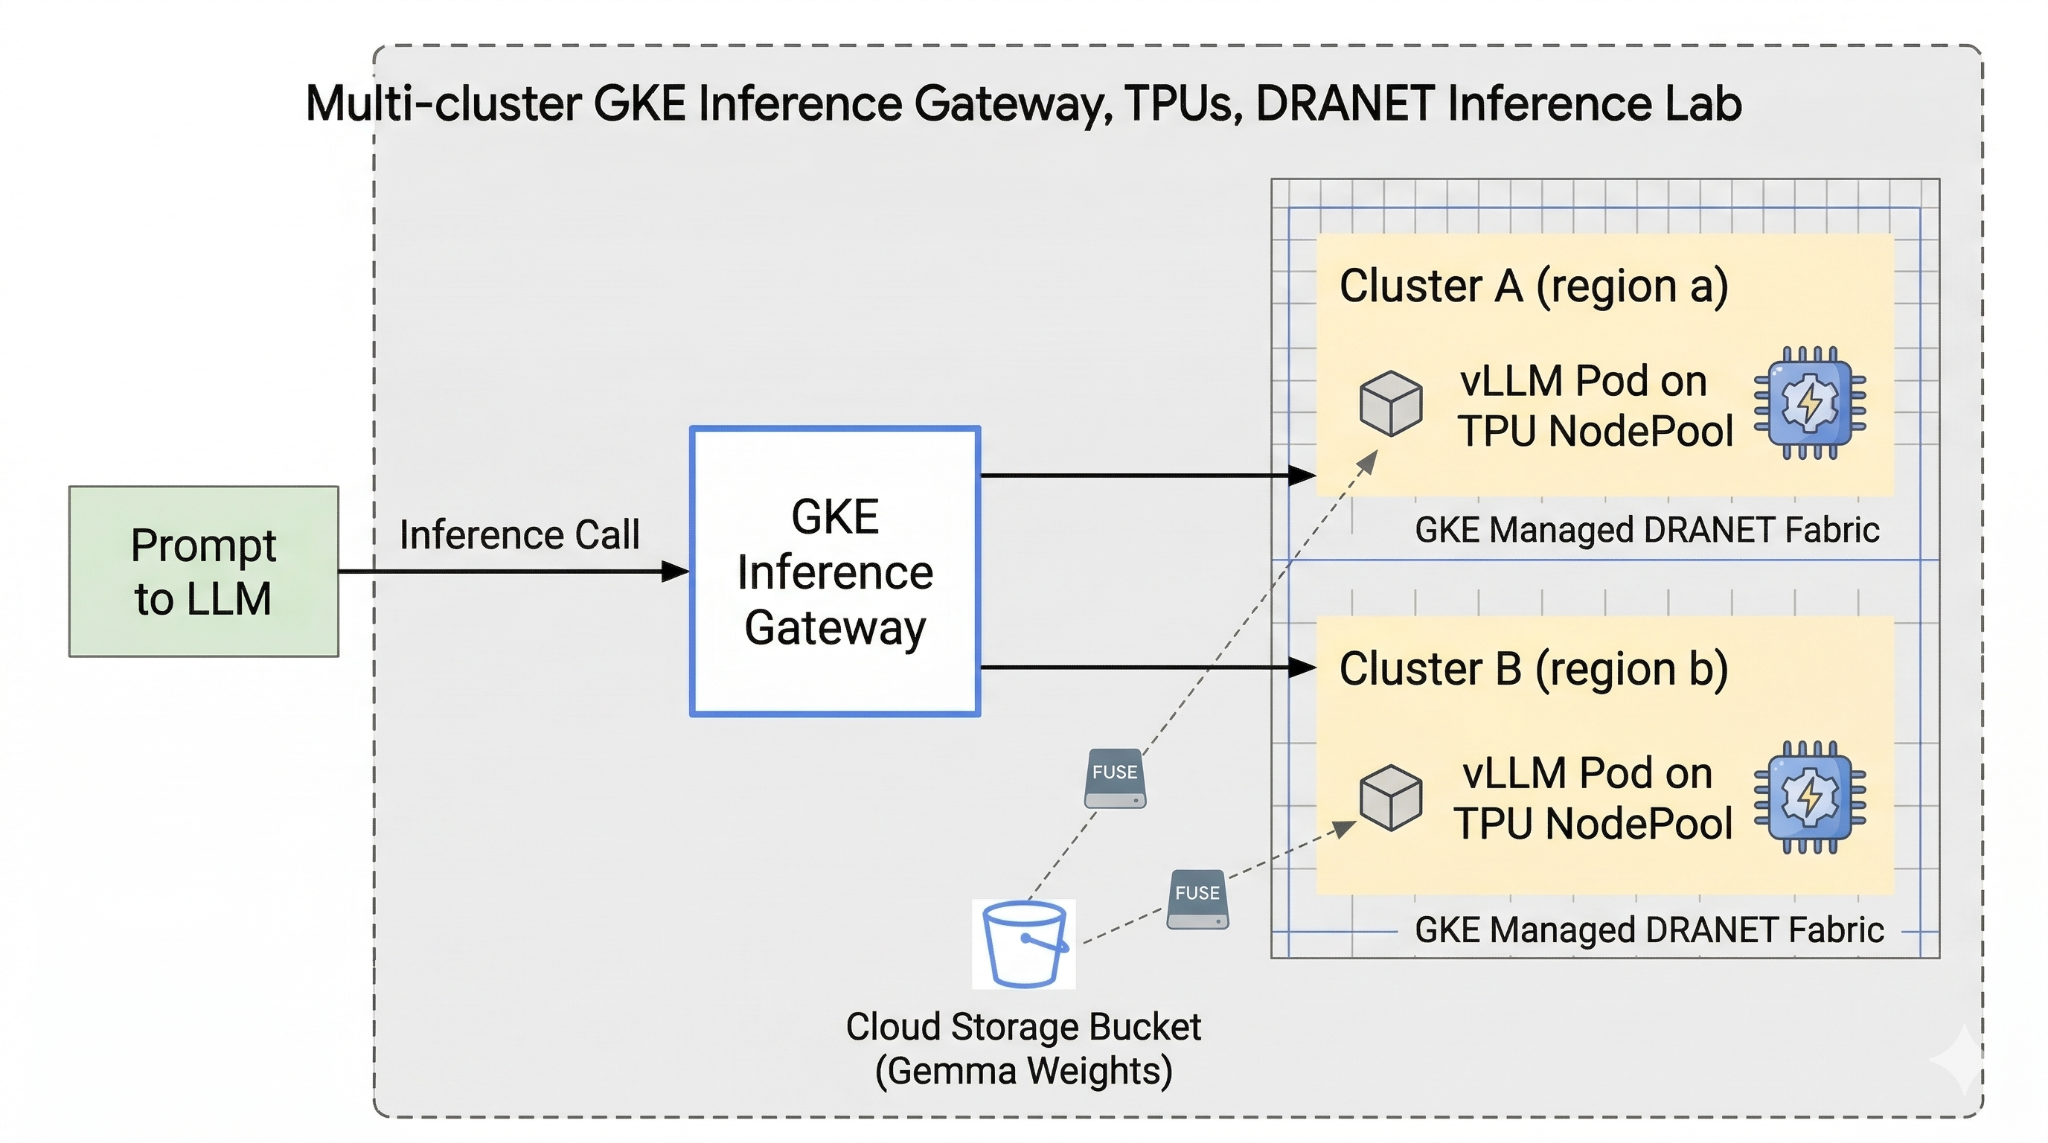
を構成するには、カスタム VPC、Cloud Storage バケット、2 つのクラスタを異なるリージョンにデプロイします。各クラスタには、ネットワーキングにマネージド DRANET を使用する TPU ノードプールがあります。クラスタを フリート に追加したら、Gemma モデルの重みをバケットにキャッシュし、Cloud Storage FUSE を介してこれらの重みを即座にマウントする vLLM ワークロードをデプロイします。最後に、GKE Inference Gateway を構成してトラフィックをルーティングし、リージョン間のライブ フェイルオーバー テストを実行できるようにします。
構成では、Terraform、gcloud、kubectl を組み合わせて使用します。
このラボでは、次のタスクを行う方法について説明します。
- VPC、ネットワーク、ストレージを設定する
- Standard モードで GKE クラスタを設定する
- TPU ノードプールを作成してマネージド DRANET を使用する
- クラスタをフリートに追加する
- モデルの重みをキャッシュする
- マルチクラスタ GKE Inference Gateway を設定してフェイルオーバーをテストする
このラボでは、次のパターンを作成します。
図 1.
2. Google Cloud サービスのセットアップ
セルフペース型の環境設定
- Google Cloud Console にログインして、プロジェクトを新規作成するか、既存のプロジェクトを再利用します。Gmail アカウントも Google Workspace アカウントもまだお持ちでない場合は、アカウントを作成してください。


- プロジェクト名 は、このプロジェクトの参加者に表示される名称です。Google API では使用されない文字列です。いつでも更新できます。
- プロジェクト ID は、すべての Google Cloud プロジェクトにおいて一意でなければならず、不変です(設定後は変更できません)。Cloud コンソールでは一意の文字列が自動生成されます。通常は、この内容を意識する必要はありません。ほとんどの Codelab では、プロジェクト ID(通常は
PROJECT_IDと識別されます)を参照する必要があります。生成された ID が好みではない場合は、ランダムに別の ID を生成できます。または、ご自身で試して、利用可能かどうかを確認することもできます。このステップ以降は変更できず、プロジェクトを通して同じ ID になります。 - なお、3 つ目の値として、一部の API が使用するプロジェクト番号があります。これら 3 つの値について詳しくは、こちらのドキュメントをご覧ください。
- 次に、Cloud のリソースや API を使用するために、Cloud コンソールで課金を有効にする必要があります。この Codelab の操作をすべて行って、費用が生じたとしても、少額です。このチュートリアルの終了後に請求が発生しないようにリソースをシャットダウンするには、作成したリソースを削除するか、プロジェクトを削除します。Google Cloud の新規ユーザーは、300 米ドル分の無料トライアル プログラムをご利用いただけます。
Cloud Shell を起動する
Google Cloud はノートパソコンからリモートで操作できますが、この Codelab では、Google Cloud Shell(Cloud 上で動作するコマンドライン環境)を使用します。
Google Cloud コンソール で、右上のツールバーにある Cloud Shell アイコンをクリックします。

プロビジョニングと環境への接続にはそれほど時間はかかりません。完了すると、次のように表示されます。

この仮想マシンには、必要な開発ツールがすべて用意されています。永続的なホーム ディレクトリが 5 GB 用意されており、Google Cloud で稼働します。そのため、ネットワークのパフォーマンスと認証機能が大幅に向上しています。この Codelab での作業はすべて、ブラウザ内から実行できます。インストールは不要です。
3. Terraform を使用して環境を設定する
このラボを行うには、TPU にアクセスする必要があります。使用する正確なバージョンは TPU v6e です。
- TPU プランのドキュメントに沿って、TPU 割り当てを有効にしてアクセス権を取得する必要があります。
- ここでは、4 つの TPU v6e チップを必要とする小規模なデプロイを使用します(
ct6e-standard-4t)これは、2 つの異なるリージョンで 2x2 スライス になります。 - Hugging Face トークン: Gemma モデルの重みをダウンロードするには、アクセス トークンが必要です。
ファイアウォール ルール、ストレージ、サブネットを含むカスタム VPC を作成します。Cloud コンソールを開き、使用するプロジェクトを選択します。
- コンソールの右上の Cloud Shell を開き、Cloud Shell に正しいプロジェクト ID が表示されていることを確認し、アクセスを許可するプロンプトを確認します。

gke-tfという名前のフォルダを作成し、そのフォルダに移動します。
mkdir -p gke-tf && cd gke-tf
PROJECT_ID=$(gcloud config get-value project)
- 構成ファイルを追加します。これにより、次の network.tf 、variable.tf、providers.tf、fuse.tf ファイルが作成されます。
cat <<EOF > terraform.tfvars
project_id = "${PROJECT_ID}"
EOF

cat <<EOF > variables.tf
variable "project_id" { type = string }
variable "network_prefix" { default = "tpu-gke-dranet" }
variable "regions" { default = ["europe-west4", "us-east5"] }
variable "region_to_tpu_zone" {
  default = {
    "europe-west4" = "europe-west4-a"
    "us-east5"     = "us-east5-b"
  }
}
EOF

cat <<EOF > providers.tf
terraform {
  required_version = ">= 1.5.7"
  required_providers {
    google-beta = { source = "hashicorp/google-beta", version = "~> 7.0" }
    time = { source = "hashicorp/time", version = "~> 0.11.0" }
  }
}
provider "google-beta" { project = var.project_id }

resource "google_project_service" "base_apis" {
  for_each = toset([
    "compute.googleapis.com",
    "container.googleapis.com",
    "cloudresourcemanager.googleapis.com",
    "storage.googleapis.com"
  ])
  project            = var.project_id
  service            = each.value
  disable_on_destroy = false
}
EOF

cat <<EOF > network.tf
resource "google_compute_network" "vpc" {
  name                    = "\${var.network_prefix}-vpc"
  auto_create_subnetworks = false
  mtu                     = 8896
  depends_on              = [google_project_service.base_apis]
}
resource "google_compute_subnetwork" "subnets" {
  for_each      = toset(var.regions)
  name          = "\${var.network_prefix}-node-subnet"
  region        = each.value
  network       = google_compute_network.vpc.id
  ip_cidr_range = each.value == "europe-west4" ? "10.0.1.0/24" : "10.0.2.0/24"
}
resource "google_compute_subnetwork" "proxy_subnets" {
  for_each      = toset(var.regions)
  name          = "\${var.network_prefix}-proxy-subnet-\${each.value}"
  region        = each.value
  network       = google_compute_network.vpc.id
  ip_cidr_range = each.value == "europe-west4" ? "10.1.1.0/24" : "10.1.2.0/24"
  purpose       = "GLOBAL_MANAGED_PROXY"
  role          = "ACTIVE"
}
resource "google_compute_address" "gateway_ips" {
  for_each     = toset(var.regions)
  name         = "gemma-gateway-ip-\${each.value}"
  region       = each.value
  subnetwork   = google_compute_subnetwork.subnets[each.value].id
  address_type = "INTERNAL"
}
resource "google_compute_firewall" "allow_internal" {
  name    = "\${var.network_prefix}-allow-internal"
  network = google_compute_network.vpc.name
  allow { protocol = "all" }
  source_ranges = ["10.0.0.0/8", "10.1.0.0/16"]
}
resource "google_compute_firewall" "allow_health_checks" {
  name    = "\${var.network_prefix}-allow-hc"
  network = google_compute_network.vpc.name
  allow {
    protocol = "tcp"
    ports    = ["8000"]
  }
  source_ranges = ["130.211.0.0/22", "35.191.0.0/16"]
}
EOF

cat <<EOF > fuse.tf
resource "google_storage_bucket" "model_bucket" {
  name          = "\${var.project_id}-gemma-weights"
  location      = "US"
  force_destroy = true
  uniform_bucket_level_access = true
  depends_on    = [google_project_service.base_apis]
}

resource "google_service_account" "gcs_fuse_sa" {
  account_id   = "gcs-fuse-sa"
  display_name = "Service Account for GCS FUSE"
}

resource "google_storage_bucket_iam_member" "gcs_fuse_sa_admin" {
  bucket = google_storage_bucket.model_bucket.name
  role   = "roles/storage.objectAdmin"
  member = "serviceAccount:\${google_service_account.gcs_fuse_sa.email}"
}

resource "google_project_iam_binding" "workload_identity_binding" {
  project = var.project_id
  role    = "roles/iam.workloadIdentityUser"
  members = ["serviceAccount:\${var.project_id}.svc.id.goog[default/gemma-ksa]"]
}
EOF
variable.tf ファイルには、プロジェクト名、リージョン、ゾーン情報が追加されます。注: 変数「regions」 default = ["europe-west4", "us-east5"] を、TPU 割り当てがあるリージョンで更新します。詳細については、「GKE での TPU の可用性を検証する」をご覧ください。
network.tf は、2 つの異なるゾーンのサブネット、プロキシ専用サブネット、ファイアウォール ルールを使用して、プロジェクトに新しい VPC を追加します。
provider.tf は、Terraform をサポートする関連プロバイダを追加します。
fuse.tf は、モデルの重みをキャッシュする Cloud Storage バケットを追加し、objectAdmin 権限を持つ IAM サービス アカウントをプロビジョニングします。このアカウントを GKE Workload Identity にバインドします。
- gke-tf ディレクトリに移動し、次のコマンドを実行します。
terraform init -作業ディレクトリを初期化します。このステップでは、指定された構成に必要なプロバイダがダウンロードされます。terraform plan -実行プランを生成し、Terraform がインフラストラクチャをデプロイするために行うアクションを示します。terraform apply –auto-approveは更新を実行し、自動的に承認します。
terraform init
terraform plan
- デプロイを実行します(3 ~ 5 分ほどかかることがあります) 。
terraform apply -auto-approve
- 同じ
gke-tfフォルダに、次の gke.tf ファイルを作成します。
cat <<EOF > gke.tf
resource "google_container_cluster" "clusters" {
  provider = google-beta
  for_each = toset(var.regions)
  name     = "gke-\${each.value}"
  location = var.region_to_tpu_zone[each.value]
  deletion_protection = false
  network             = google_compute_network.vpc.id
  subnetwork          = google_compute_subnetwork.subnets[each.value].id
  release_channel { channel = "RAPID" }
  datapath_provider = "ADVANCED_DATAPATH"
  networking_mode   = "VPC_NATIVE"

  gateway_api_config { channel = "CHANNEL_STANDARD" }

  ip_allocation_policy {
    cluster_ipv4_cidr_block  = ""
    services_ipv4_cidr_block = ""
  }

  workload_identity_config { workload_pool = "\${var.project_id}.svc.id.goog" }

  addons_config {
    gcs_fuse_csi_driver_config { enabled = true }
  }

  initial_node_count = 1
  node_config {
    machine_type = "e2-standard-16"
    oauth_scopes = ["https://www.googleapis.com/auth/cloud-platform"]
    workload_metadata_config { mode = "GKE_METADATA" }
  }
}

resource "google_container_node_pool" "tpu_pools" {
  provider = google-beta
  for_each = toset(var.regions)
  name     = "tpu-v6e-pool"
  location = var.region_to_tpu_zone[each.value]
  cluster  = google_container_cluster.clusters[each.value].name
  node_count = 1

  network_config { accelerator_network_profile = "auto" }

  node_config {
    machine_type = "ct6e-standard-4t"
    oauth_scopes = ["https://www.googleapis.com/auth/cloud-platform"]
    labels = { "cloud.google.com/gke-networking-dra-driver" = "true" }
    workload_metadata_config { mode = "GKE_METADATA" }
  }

  lifecycle { ignore_changes = [node_config[0].labels] }
}
EOF
gke.tf は、異なるリージョンに 2 つのクラスタを追加し、4 つのチップで TPU v6e を実行する 2 つの TPU ノードプールを作成して、マネージド DRANET をノードプールに割り当てます。
- デプロイを実行します(10 ~ 15 分ほどかかることがあります) 。
terraform apply -auto-approve
- 確認
echo -e "\n=== Verifying GKE Clusters ==="
gcloud container clusters list --filter="name:gke-europe-west4 OR name:gke-us-east5" --project=$PROJECT_ID

echo -e "\n=== Verifying VPC Network ==="
gcloud compute networks list --filter="name:tpu-gke-dranet-vpc" --project=$PROJECT_ID

echo -e "\n=== Verifying Reserved Static IPs for Gateway ==="
gcloud compute addresses list --filter="name~gemma-gateway-ip" --project=$PROJECT_ID

echo -e "\n=== Verifying GCS Bucket ==="
gcloud storage ls | grep "${PROJECT_ID}-gemma-weights"

echo -e "\n=== Verifying GCS FUSE Service Account ==="
gcloud iam service-accounts list --filter="email:gcs-fuse-sa@${PROJECT_ID}.iam.gserviceaccount.com" --project=$PROJECT_ID
4. フリート登録
クラスタをフリートに登録する必要があります。
gke-tfディレクトリに移動し、次のコマンドを実行します。
cat <<EOF > fleet.tf
data "google_project" "project" {
  project_id = var.project_id
}

resource "google_project_service" "fleet_apis" {
  for_each = toset([
    "gkehub.googleapis.com",
    "multiclusterservicediscovery.googleapis.com",
    "multiclusteringress.googleapis.com",
    "trafficdirector.googleapis.com"
  ])
  project            = var.project_id
  service            = each.value
  disable_on_destroy = false
}

resource "google_project_service_identity" "mci_sa" {
  provider = google-beta
  project  = var.project_id
  service  = "multiclusteringress.googleapis.com"
  depends_on = [google_project_service.fleet_apis]
}

resource "time_sleep" "wait_for_apis" {
  create_duration = "60s"
  depends_on      = [google_project_service.fleet_apis]
}

resource "google_project_iam_member" "mci_sa_admin" {
  project    = var.project_id
  role       = "roles/container.admin"
  member     = "serviceAccount:\${google_project_service_identity.mci_sa.email}"
  depends_on = [google_project_service_identity.mci_sa, time_sleep.wait_for_apis]
}

resource "google_gke_hub_membership" "memberships" {
  provider      = google-beta
  for_each      = toset(var.regions)
  project       = var.project_id
  membership_id = "gke-\${each.value}"
  endpoint {
    gke_cluster { resource_link = "//container.googleapis.com/\${google_container_cluster.clusters[each.value].id}" }
  }
  depends_on = [time_sleep.wait_for_apis, google_container_cluster.clusters]
}

resource "google_gke_hub_feature" "mcs" {
  provider   = google-beta
  name       = "multiclusterservicediscovery"
  location   = "global"
  project    = var.project_id
  depends_on = [time_sleep.wait_for_apis]
}

resource "google_gke_hub_feature" "ingress" {
  provider   = google-beta
  name       = "multiclusteringress"
  location   = "global"
  project    = var.project_id
  depends_on = [google_gke_hub_membership.memberships, google_project_iam_member.mci_sa_admin]
  spec {
    multiclusteringress { config_membership = "projects/\${var.project_id}/locations/global/memberships/gke-us-east5" }
  }
}
EOF
fleet.tf ファイルは、両方のクラスタをグローバル GKE フリートに登録し、マルチクラスタ サービス ディスカバリと Ingress を有効にします。米国クラスタを中央構成クラスタとして指定し、Gateway API がトラフィックをモニタリングしてルーティングできるようにします。
gke-tfフォルダに移動して実行します(3 ~ 5 分ほどかかります) 。
terraform plan
terraform apply -auto-approve
- フリート登録を検証する
gcloud container fleet memberships list --project=$PROJECT_ID
5. モデルの重みを FUSE にキャッシュする
米国クラスタで一時的な Kubernetes ジョブを実行して、Python スクリプトを使用して Gemma モデルを FUSE マウントされた Cloud Storage バケットに直接安全にダウンロードします。
- 次の変数を作成します。
export CTX_EU="gke_${PROJECT_ID}_europe-west4-a_gke-europe-west4"
export CTX_US="gke_${PROJECT_ID}_us-east5-b_gke-us-east5"
- google/gemma-3-27b-it モデルを使用するため、HF トークンを作成する必要があります。下記の
YOUR_ACTUAL_HUGGING_FACE_TOKENは、実際のトークンに置き換えます。
export HF_TOKEN="YOUR_ACTUAL_HUGGING_FACE_TOKEN"
gke-tfディレクトリに移動し、次のコマンドを実行します。
gcloud container clusters get-credentials gke-us-east5 --zone us-east5-b --project=$PROJECT_ID

cat <<EOF > ksa.yaml
apiVersion: v1
kind: ServiceAccount
metadata:
  name: gemma-ksa
  namespace: default
  annotations:
    iam.gke.io/gcp-service-account: "gcs-fuse-sa@${PROJECT_ID}.iam.gserviceaccount.com"
EOF

kubectl apply -f ksa.yaml --context=$CTX_US
kubectl delete secret hf-secret --context=$CTX_US --ignore-not-found
kubectl create secret generic hf-secret --from-literal=hf_token=${HF_TOKEN} --context=$CTX_US

cat <<EOF > download-job.yaml
apiVersion: batch/v1
kind: Job
metadata:
  name: model-downloader
  namespace: default
spec:
  backoffLimit: 1
  template:
    metadata:
      annotations:
        gke-gcsfuse/volumes: "true"
    spec:
      serviceAccountName: gemma-ksa
      restartPolicy: Never
      containers:
      - name: downloader
        image: python:3.11-slim
        env:
        - name: HF_TOKEN
          valueFrom:
            secretKeyRef:
              name: hf-secret
              key: hf_token
        command:
        - bash
        - -c
        - |
          pip install -U huggingface_hub
          echo "Downloading Gemma 3 directly to GCS bucket..."
          python3 -c "from huggingface_hub import snapshot_download; import os; snapshot_download(repo_id='google/gemma-3-27b-it', local_dir='/data/gemma-weights', token=os.environ['HF_TOKEN'])"
          echo "Download complete! Safe to proceed."
        volumeMounts:
        - name: gcs-fuse-volume
          mountPath: /data/gemma-weights
      volumes:
      - name: gcs-fuse-volume
        csi:
          driver: gcsfuse.csi.storage.gke.io
          volumeAttributes:
            bucketName: "${PROJECT_ID}-gemma-weights"
EOF

kubectl apply -f download-job.yaml --context=$CTX_US
- ダウンロードが完了するまで待ってから続行します(モデルのサイズに応じて 5 ~ 10 分ほどかかります) 。
kubectl logs -f job/model-downloader --context=$CTX_US
(「Download complete!」と表示されたら、Ctrl+C を押してログを終了します)
6. ワークロード vLLM と Gemma をデプロイする
gke-tfディレクトリに移動し、次のコマンドを実行します。
cat <<EOF > workload.yaml
apiVersion: v1
kind: ServiceAccount
metadata:
  name: gemma-ksa
  namespace: default
  annotations:
    iam.gke.io/gcp-service-account: "gcs-fuse-sa@${PROJECT_ID}.iam.gserviceaccount.com"
---
apiVersion: resource.k8s.io/v1
kind: ResourceClaimTemplate
metadata:
  name: all-netdev
  namespace: default
spec:
  spec:
    devices:
      requests:
      - name: req-netdev
        exactly:
          deviceClassName: netdev.google.com
          allocationMode: All
---
apiVersion: apps/v1
kind: Deployment
metadata:
  name: vllm-gemma
  namespace: default
  labels:
    app: gemma-server
spec:
  replicas: 1
  selector:
    matchLabels:
      app: gemma-server
  template:
    metadata:
      labels:
        app: gemma-server
      annotations:
        gke-gcsfuse/volumes: "true"
    spec:
      serviceAccountName: gemma-ksa
      nodeSelector:
        cloud.google.com/gke-tpu-accelerator: tpu-v6e-slice
        cloud.google.com/gke-tpu-topology: 2x2
      resourceClaims:
      - name: netdev
        resourceClaimTemplateName: all-netdev
      containers:
      - name: vllm-tpu
        image: vllm/vllm-tpu:latest
        command:
        - bash
        - -c
        - |
          export PYTHONUNBUFFERED=1
          echo "Booting vLLM instantly from local GCS FUSE mount..."

          python3 -m vllm.entrypoints.openai.api_server \
            --model /data/gemma-weights \
            --tensor-parallel-size 4 \
            --port 8000
        ports:
        - containerPort: 8000
        resources:
          requests:
            google.com/tpu: 4
          limits:
            google.com/tpu: 4
          claims:
          - name: netdev
        volumeMounts:
        - name: dshm
          mountPath: /dev/shm
        - name: gcs-fuse-volume
          mountPath: /data/gemma-weights
          readOnly: true
      volumes:
      - name: dshm
        emptyDir:
          medium: Memory
      - name: gcs-fuse-volume
        csi:
          driver: gcsfuse.csi.storage.gke.io
          readOnly: true
          volumeAttributes:
            bucketName: "${PROJECT_ID}-gemma-weights"
            mountOptions: "implicit-dirs"
            fileCacheCapacity: "100Gi"
            fileCacheForRangeRead: "true"
---
apiVersion: v1
kind: Service
metadata:
  name: vllm-gemma-service
  namespace: default
spec:
  selector:
    app: gemma-server
  ports:
  - protocol: TCP
    port: 8000
    targetPort: 8000
  type: ClusterIP
---
apiVersion: monitoring.googleapis.com/v1
kind: PodMonitoring
metadata:
  name: vllm-gemma-monitoring
  namespace: default
spec:
  selector:
    matchLabels:
      app: gemma-server
  endpoints:
  - port: 8000
    interval: 15s
    path: /metrics
EOF
- 次のスクリプトを実行します(2 つのリージョンにデプロイするため、完了までに 5 ~ 10 分ほどかかります) 。
for CTX in $CTX_EU $CTX_US; do
  ZONE=$(echo $CTX | cut -d_ -f3)
  CLUSTER=$(echo $CTX | cut -d_ -f4)
  gcloud container clusters get-credentials $CLUSTER --zone $ZONE --project=$PROJECT_ID

  kubectl delete secret hf-secret --ignore-not-found --context=$CTX
  kubectl create secret generic hf-secret --from-literal=hf_token=${HF_TOKEN} --context=$CTX
  kubectl apply -f workload.yaml --context=$CTX
done
- デプロイの確認
for CTX in $CTX_EU $CTX_US; do kubectl rollout status deployment/vllm-gemma --timeout=15m --context=$CTX; done
- 完了したら、次のコマンドを実行して、マネージド DRANET ネットワーキングが Pod に割り当てられたことを確認できます。
for CTX in $CTX_EU $CTX_US; do
  echo "Checking DRA network interfaces on $CTX..."
  kubectl --context=$CTX exec deployment/vllm-gemma -c vllm-tpu -- ls /sys/class/net
  echo "----------------------------------------"
done
標準の Pod ネットワーキング用の追加のネットワーク インターフェース eth0 と、専用の TPU ファブリック eth1、eth2 などを表すセカンダリ インターフェースが表示されます。
7. Inference API と Gateway の構成
次に、InferenceObjective (gemma-objective), AutoscalingMetric (tpu-cache) と Inference Pool(gemma-pool) を作成します。Inference プールは Helm チャートを使用して作成されます。 はインストールして作成を検証します。
gke-tfディレクトリに移動し、次のコマンドを実行します。これにより、オブジェクトがデプロイされ、検証が実行されます。
cat <<EOF > inference-objective.yaml
apiVersion: inference.networking.x-k8s.io/v1alpha2
kind: InferenceObjective
metadata:
  name: gemma-objective
  namespace: default
spec:
  priority: 10
  poolRef:
    name: gemma-pool
    group: "inference.networking.k8s.io"
EOF

cat <<EOF > metrics.yaml
apiVersion: autoscaling.gke.io/v1beta1
kind: AutoscalingMetric
metadata:
  name: tpu-cache
  namespace: default
spec:
  selector:
    matchLabels:
      app: gemma-server
  endpoints:
  - port: 8000
    path: /metrics
    metrics:
    - name: vllm:kv_cache_usage_perc
      exportName: tpu-cache
EOF

for CTX in $CTX_EU $CTX_US; do
  kubectl apply -f https://raw.githubusercontent.com/kubernetes-sigs/gateway-api-inference-extension/v1.1.0/config/crd/bases/inference.networking.x-k8s.io_inferenceobjectives.yaml --context=$CTX
  kubectl apply -f inference-objective.yaml --context=$CTX
  kubectl apply -f metrics.yaml --context=$CTX
done

helm install gemma-pool --kube-context $CTX_EU \
  --set inferencePool.modelServers.matchLabels.app=gemma-server \
  --set provider.name=gke \
  --version v1.1.0 \
  oci://registry.k8s.io/gateway-api-inference-extension/charts/inferencepool

helm install gemma-pool --kube-context $CTX_US \
  --set inferencePool.modelServers.matchLabels.app=gemma-server \
  --set provider.name=gke \
  --set inferenceExtension.monitoring.gke.enabled=true \
  --version v1.1.0 \
  oci://registry.k8s.io/gateway-api-inference-extension/charts/inferencepool

for CTX in $CTX_EU $CTX_US; do
  kubectl annotate inferencepool gemma-pool networking.gke.io/export="True" --context=$CTX
done

for CTX in $CTX_EU $CTX_US; do
  echo "Verifying Inference API resources on $CTX..."
  kubectl get inferencepools --context=$CTX
  kubectl get autoscalingmetrics tpu-cache --context=$CTX
done
8. ゲートウェイの構成
次に、クロスリージョン Gateway 構成を作成します。Gateway(cross-region-gateway), HTTPRoute (gemma-route), HealthCheckPolicy(gemma-health-check)and GCPBackendPolicy(gemma-backend-policy. Inference プールは Helm チャートを使用して作成されます。 はインストールして作成を検証します。(Gateway がアクティブになるまでに 8 ~ 10 分ほどかかります)
cat <<EOF > config-cluster.yaml
apiVersion: gateway.networking.k8s.io/v1
kind: Gateway
metadata:
  name: cross-region-gateway
  namespace: default
spec:
  gatewayClassName: gke-l7-cross-regional-internal-managed-mc
  addresses:
  - type: networking.gke.io/named-address-with-region
    value: "regions/europe-west4/addresses/gemma-gateway-ip-europe-west4"
  - type: networking.gke.io/named-address-with-region
    value: "regions/us-east5/addresses/gemma-gateway-ip-us-east5"
  listeners:
  - name: http
    protocol: HTTP
    port: 80
---
apiVersion: gateway.networking.k8s.io/v1
kind: HTTPRoute
metadata:
  name: gemma-route
  namespace: default
spec:
  parentRefs:
  - name: cross-region-gateway
    kind: Gateway
  rules:
  - backendRefs:
    - group: networking.gke.io
      kind: GCPInferencePoolImport
      name: gemma-pool
      port: 8000
---
apiVersion: networking.gke.io/v1
kind: HealthCheckPolicy
metadata:
  name: gemma-health-check
  namespace: default
spec:
  targetRef:
    group: networking.gke.io
    kind: GCPInferencePoolImport
    name: gemma-pool
  default:
    config:
      type: HTTP
      httpHealthCheck:
        requestPath: /health
        port: 8000
---
apiVersion: networking.gke.io/v1
kind: GCPBackendPolicy
metadata:
  name: gemma-backend-policy
  namespace: default
spec:
  targetRef:
    group: networking.gke.io
    kind: GCPInferencePoolImport
    name: gemma-pool
  default:
    timeoutSec: 100
    balancingMode: CUSTOM_METRICS
    trafficDuration: LONG
    customMetrics:
      - name: gke.named_metrics.tpu-cache
        dryRun: false
        maxUtilizationPercent: 60
EOF

echo -e "\n=== Creating Cross-Regional Gateway Resources ==="
kubectl apply -f config-cluster.yaml --context=$CTX_US

echo -e "\n=== Provisioning Global Load Balancer (This takes 5-10 minutes) ==="
echo "Working on the Gateway... waiting for Google Cloud to assign IPs and program routes..."

# The script will hold here until the gateway is officially ready
kubectl wait --for=condition=programmed gateway/cross-region-gateway --timeout=10m --context=$CTX_US

echo -e "\n=== SUCCESS: Gateway is fully provisioned and ready! ==="
Inference プール(Helm): 両方のリージョンのモデルサーバーを 1 つの論理バックエンドにグループ化します。
Gateway と HTTPRoute: 実際のグローバル内部ロードバランサを作成し、受信した AI プロンプトをモデルにルーティングするルールを定義します。
ヘルスチェックとバックエンド ポリシー: リクエストが正常な Pod にのみ送信されるようにし、指標ベースのスマートなトラフィック分配を有効にします(TPU の過負荷を防ぎます)。
検証: スクリプトは一時停止し、Google Cloud が内部 IP アドレスを完全にプロビジョニングしてから続行します。
9. フェイルオーバー テスト
ラボの最も重要な部分である、アーキテクチャの高可用性をテストします。
この自動テストの具体的な内容は次のとおりです。
- ベースライン テスト: シミュレートされたユーザーが推論プロンプト(「フランスの首都はどこですか?」)を送信します。ユーザーはプライマリ リージョンにいるため、Gateway はリクエストをローカル TPU にルーティングして、レイテンシを最小限に抑えます。
- 障害: プライマリ リージョンのすべての TPU Pod を強制終了して(
replicas=0)、壊滅的なデータセンターの停止をシミュレートします。 - 検出: 45 秒間待ちます。この期間中、Gateway のヘルスチェックが失敗し、プライマリ バックエンドが完全にオフラインになっていることが認識され、グローバル ルーティング テーブルが動的に更新されます。
- フェイルオーバー: ユーザーが 2 つ目のプロンプト(「ドイツの首都はどこですか?」)を送信します。ユーザーは停止していることを認識していません。Gateway はリクエストをインターセプトし、グローバルに正常なセカンダリ TPU に即座に再ルーティングします。
- 復旧: プライマリ TPU を復元し、グローバル アーキテクチャを完全に正常な状態に戻します。
- Cloud Shell を開き、次のコマンドを実行します。
cat << 'EOF' > failover-test.sh
#!/bin/bash
# Multi-Cluster Inference Failover Test

export PROJECT_ID=$(gcloud config get-value project)
export CTX_EU="gke_${PROJECT_ID}_europe-west4-a_gke-europe-west4"
export CTX_US="gke_${PROJECT_ID}_us-east5-b_gke-us-east5"

echo -e "\n=== PHASE 1: VERIFYING CURRENT STATE (BOTH CLUSTERS UP) ==="
echo "Checking US Cluster (Primary):"
kubectl get pods -l app=gemma-server --context=$CTX_US
echo "Checking EU Cluster (Secondary):"
kubectl get pods -l app=gemma-server --context=$CTX_EU

echo -e "\nDeploying Test Client in US..."
export GATEWAY_IP_US=$(gcloud compute addresses describe gemma-gateway-ip-us-east5 --region=us-east5 --project=$PROJECT_ID --format="value(address)")

kubectl run curl-test --image=curlimages/curl --restart=Never --context=$CTX_US -- sleep 3600
kubectl wait --for=condition=ready pod/curl-test --context=$CTX_US --timeout=60s

echo -e "\n=== PHASE 2: BASELINE TEST (US Client -> US TPUs) ==="
echo "Prompting the AI: 'What is the capital of France?'"
echo "Expect to see the full JSON response including token usage..."
kubectl exec curl-test --context=$CTX_US -- curl -s -X POST http://$GATEWAY_IP_US/v1/chat/completions \
  -H "Content-Type: application/json" \
  -d '{
    "model": "/data/gemma-weights",
    "messages": [{"role": "user", "content": "What is the capital of France?"}],
    "max_tokens": 100
  }' | jq .

echo -e "\n=== PHASE 3: SIMULATING REGIONAL OUTAGE (Scaling US to 0) ==="
kubectl scale deployment vllm-gemma --replicas=0 --context=$CTX_US
echo "Waiting 20 seconds for pods to begin terminating..."
sleep 20

echo -e "\n=== PHASE 4: CONFIRMING STATE (PODS TERMINATING) ==="
echo "Checking US Cluster (Should be terminating):"
kubectl get pods -l app=gemma-server --context=$CTX_US
echo "Checking EU Cluster (Should still be running):"
kubectl get pods -l app=gemma-server --context=$CTX_EU

echo -e "\nWaiting 45 seconds for Gateway health checks to update global routing tables..."
sleep 45

echo -e "\n=== PHASE 5: CONFIRMING COMPLETE DOWN AND EURO UP ==="
echo "Checking US Cluster (Should be completely empty now):"
kubectl get pods -l app=gemma-server --context=$CTX_US
echo "Checking EU Cluster (Should still be running):"
kubectl get pods -l app=gemma-server --context=$CTX_EU

echo -e "\n=== PHASE 6: FAILOVER TEST (US Client -> EU TPUs) ==="
echo "Prompting the AI: 'What is the capital of Germany?'"
echo "Request is actively being rerouted to Europe. Expecting full JSON response..."
kubectl exec curl-test --context=$CTX_US -- curl -s -X POST http://$GATEWAY_IP_US/v1/chat/completions \
  -H "Content-Type: application/json" \
  -d '{
    "model": "/data/gemma-weights",
    "messages": [{"role": "user", "content": "What is the capital of Germany?"}],
    "max_tokens": 100
  }' | jq .

echo -e "\n=== PHASE 7: RESTORING INFRASTRUCTURE (Scaling US to 1) ==="
kubectl scale deployment vllm-gemma --replicas=1 --context=$CTX_US
echo "Waiting for US pods to boot and mount FUSE..."
kubectl rollout status deployment/vllm-gemma --timeout=15m --context=$CTX_US

echo -e "\n=== PHASE 8: CONFIRMING BOTH SYSTEMS ARE BACK UP ==="
echo "Checking US Cluster (Restored):"
kubectl get pods -l app=gemma-server --context=$CTX_US
echo "Checking EU Cluster (Still Healthy):"
kubectl get pods -l app=gemma-server --context=$CTX_EU

echo -e "\n=== PHASE 9: CLEANUP ==="
kubectl delete pod curl-test --context=$CTX_US
echo "Failover lab complete."
EOF

chmod +x failover-test.sh
./failover-test.sh
- テストが完了したら、クリーンアップできます。
10. クリーンアップ
- ワークロードをクリーンアップする
#!/bin/bash
echo "=== PART 1: Kubernetes & Workload Cleanup ==="
export PROJECT_ID=$(gcloud config get-value project)
export CTX_EU="gke_${PROJECT_ID}_europe-west4-a_gke-europe-west4"
export CTX_US="gke_${PROJECT_ID}_us-east5-b_gke-us-east5"

echo "Deleting Gateway resources..."
for CTX in $CTX_EU $CTX_US; do
  kubectl delete gateways,httproutes,healthcheckpolicies,gcpbackendpolicies --all --context=$CTX --ignore-not-found
done

echo "Waiting 60 seconds for the external Load Balancer to detach..."
sleep 60

echo "Cleaning up workloads and custom resources..."
for CTX in $CTX_EU $CTX_US; do
  helm uninstall gemma-pool --kube-context=$CTX || true
  kubectl delete job model-downloader --context=$CTX --ignore-not-found
  kubectl delete all -l app=gemma-server --context=$CTX --ignore-not-found
  kubectl delete inferenceobjectives,autoscalingmetrics --all --context=$CTX --ignore-not-found
  kubectl delete serviceaccount gemma-ksa --context=$CTX --ignore-not-found
  kubectl delete -f https://raw.githubusercontent.com/kubernetes-sigs/gateway-api-inference-extension/v1.1.0/config/crd/bases/inference.networking.x-k8s.io_inferenceobjectives.yaml --context=$CTX --ignore-not-found
done

echo -e "\n=== Part 1 Complete! Safe to proceed to Terraform Teardown. ==="
- インフラストラクチャをクリーンアップします。
gke-tfフォルダ内にいることを確認します。
cat << 'EOF' > cleanup-tf.sh
#!/bin/bash
echo "=== PART 2: Infrastructure & Terraform Teardown ==="
export PROJECT_ID=$(gcloud config get-value project)
export LAB_NETWORK="tpu-gke-dranet-vpc"

echo "Destroying GKE Fleet Features to prevent firewall resurrection..."
terraform destroy -target=google_gke_hub_feature.mcs -target=google_gke_hub_feature.ingress -auto-approve

echo "Waiting 30 seconds for the self-healing controllers to spin down..."
sleep 30

echo "Hunting down orphaned auto-generated firewall rules strictly on the lab network..."
GHOST_RULES=$(gcloud compute firewall-rules list --filter="network~${LAB_NETWORK} AND (name~mcsd OR name~k8s-fw-l7)" --format="value(name)" --project=$PROJECT_ID)

if [ ! -z "$GHOST_RULES" ]; then
  for rule in $GHOST_RULES; do
    echo "Deleting ghost rule: $rule"
    gcloud compute firewall-rules delete $rule --project=$PROJECT_ID --quiet
  done
else
  echo "No ghost rules found on ${LAB_NETWORK}."
fi

echo "=== Controllers and Firewalls dead. Destroying remaining Base Infrastructure. ==="

MAX_RETRIES=3
RETRY_COUNT=0
SUCCESS=false

while [ $RETRY_COUNT -lt $MAX_RETRIES ]; do
  # Run the destroy command. If it succeeds (exit code 0), break the loop.
  if terraform destroy -auto-approve; then
    SUCCESS=true
    break
  else
    RETRY_COUNT=$((RETRY_COUNT+1))
    echo -e "\n[WARNING] Terraform destroy encountered an error (likely a GCP resource lock)."

    if [ $RETRY_COUNT -lt $MAX_RETRIES ]; then
      echo "Waiting 30 seconds before retry $RETRY_COUNT of $MAX_RETRIES..."
      sleep 30
    fi
  fi
done

if [ "$SUCCESS" = true ]; then
  echo -e "\n=== Lab Cleanup Successfully Completed! ==="
else
  echo -e "\n[ERROR] Lab Cleanup failed after $MAX_RETRIES attempts."
  echo "Some resources may still be locked. Run 'terraform destroy -auto-approve' manually later to finish."
  exit 1
fi
EOF

chmod +x cleanup-tf.sh
./cleanup-tf.sh
特定のリソースの削除で問題が発生した場合は、terraform destroy コマンド スクリプト ./cleanup-tf.sh を再実行してください。
11. 完了
おめでとうございます!GKE、マネージド DRANET、TPU v6e アクセラレータを使用して、高可用性のマルチクラスタ GKE Inference Gateway、クロスリージョン AI 推論アーキテクチャを正常にデプロイしました。
Cloud Storage FUSE を使用してモデルを即座に読み込み、Inference Gateway API を使用してレイテンシを考慮したマルチクラスタ ルーティングを行うことで、内部ユーザー トラフィックをドロップせずにリージョン データセンターの完全な停止を回避できる復元力のあるバックエンドを構築しました。
次のステップと詳細情報
GKE ネットワーキングの詳細を確認する
次のラボを受講する
Google Cloud でクエストを続け、その他の Google Cloud ラボをご確認ください。