
1. 總覽
本實驗室將介紹可用於執行 AI 工作負載的 AI 基礎架構。您會使用下列項目:
Google Kubernetes Engine (GKE):基礎容器自動化調度管理平台。
GKE 管理的 DRANET - 動態資源分配網路,可直接將高速互連結構指派給 TPU Pod。
GKE Inference Gateway - 這是 Google Cloud 提供的受管理 Gateway 物件,適用於推論作業。在本例中,我們將使用多叢集功能。
Tensor Processing Unit (TPU):Google 自行打造的加速器晶片。
Cloud Storage FUSE:儲存介面,可讓 Pod 直接掛接 Cloud Storage bucket,即時載入大量模型權重。
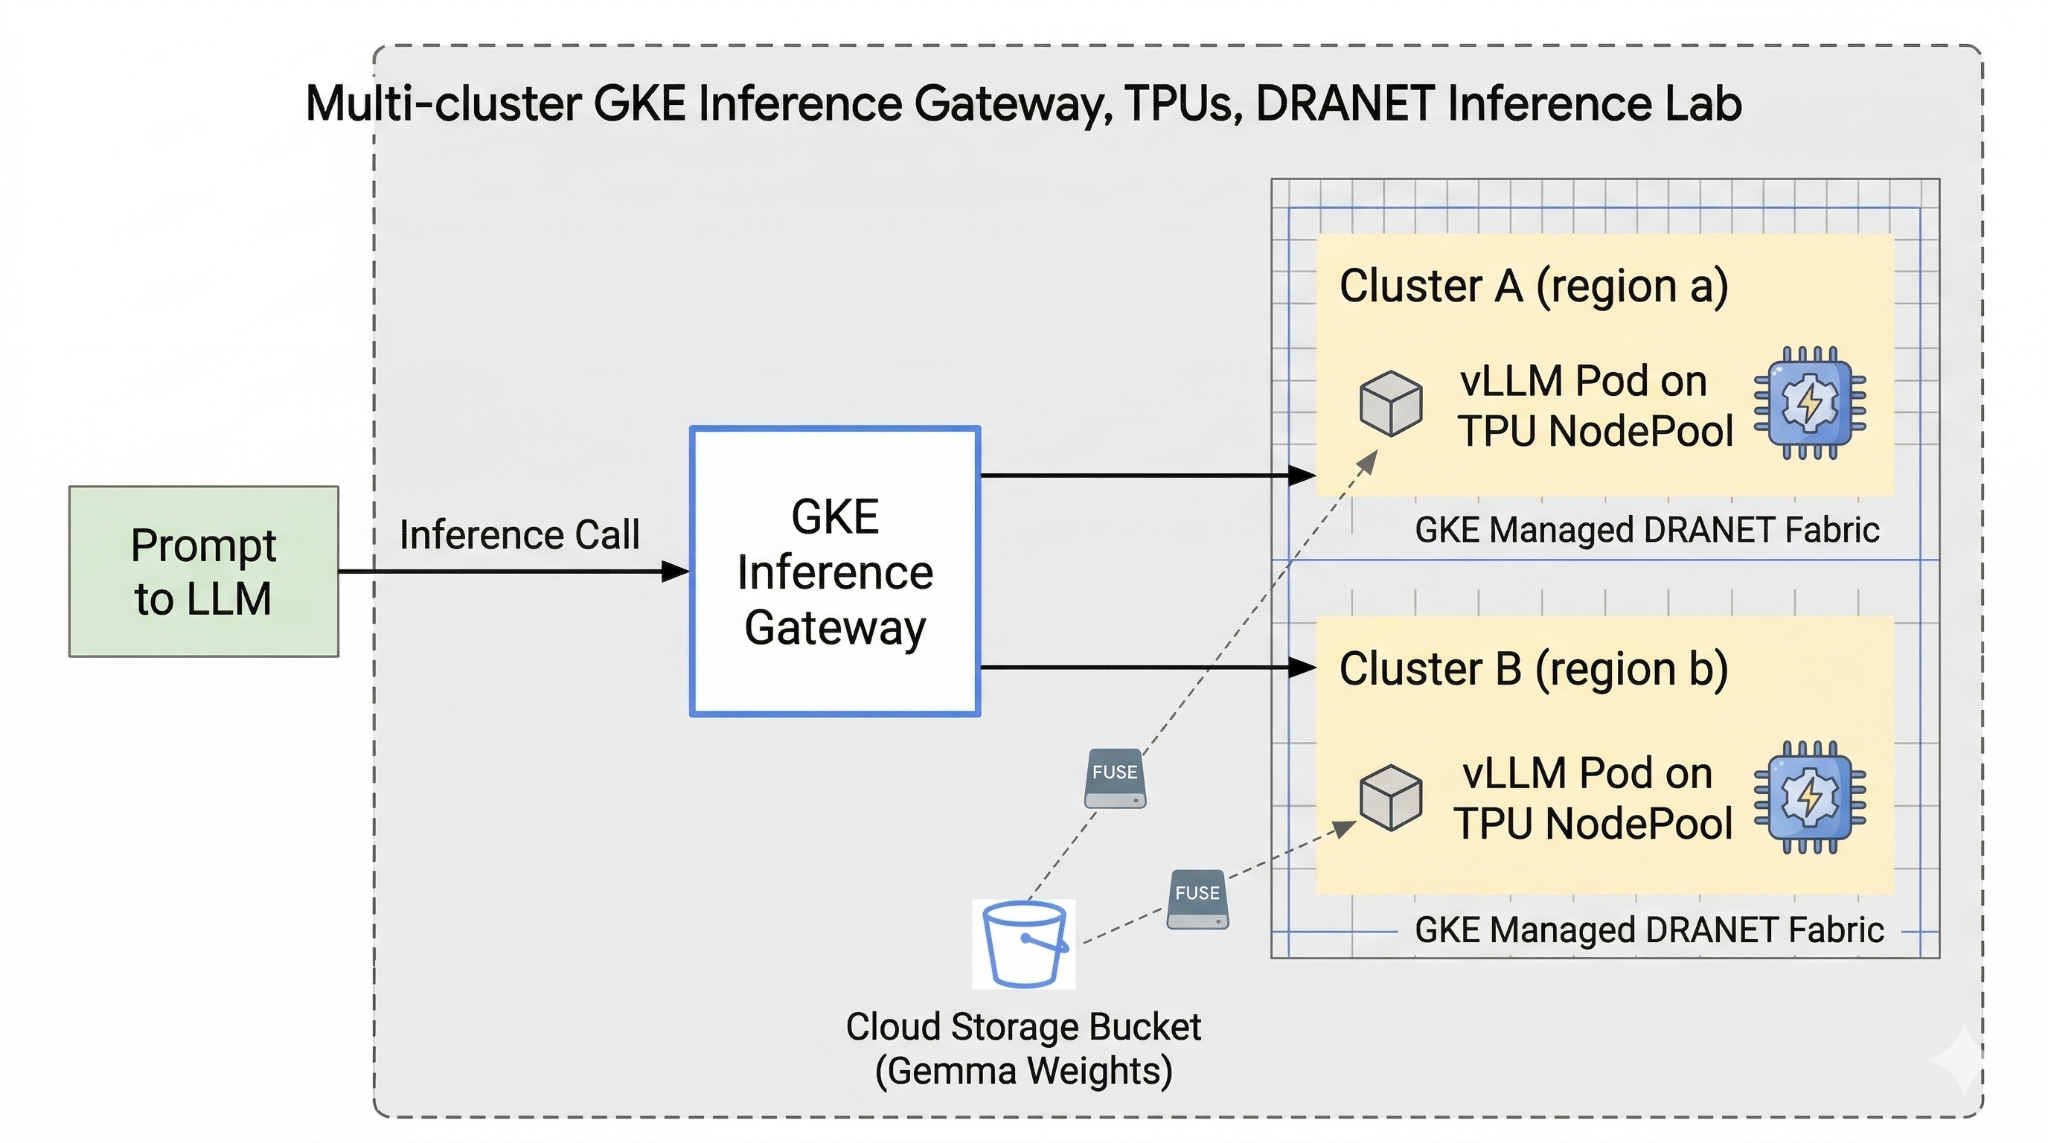
如要設定,您將部署自訂 VPC、Cloud Storage bucket,以及位於不同區域的兩個叢集。每個叢集都會有一個 TPU 節點集區,並使用受管理 DRANET 進行網路連線。將叢集加入機群後,您會在 bucket 中快取 Gemma 模型權重,並部署 vLLM 工作負載,透過 Cloud Storage FUSE 即時掛接這些權重。最後,系統會設定 GKE Inference Gateway 來轉送流量,讓您執行即時跨區域容錯移轉測試。
設定會使用 Terraform、gcloud 和 kubectl 的組合。
在本實驗室中,您將瞭解如何執行下列工作:
- 設定虛擬私有雲、網路、儲存空間
- 在標準模式中設定 GKE 叢集
- 建立 TPU 節點集區並使用受管理 DRANET
- 將叢集新增至機群
- 快取模型權重
- 設定多叢集 GKE Inference Gateway 並測試容錯移轉
在本實驗室中,您將建立下列模式。
圖 1。
2. 設定 Google Cloud 服務
自修實驗室環境設定
- 登入 Google Cloud 控制台,然後建立新專案或重複使用現有專案。如果沒有 Gmail 或 Google Workspace 帳戶,請先建立帳戶。


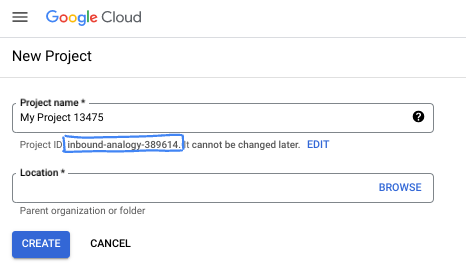
- 專案名稱是這個專案參與者的顯示名稱。這是 Google API 未使用的字元字串。你隨時可以更新。
- 專案 ID 在所有 Google Cloud 專案中都是不重複的,而且設定後即無法變更。Cloud 控制台會自動產生專屬字串,通常您不需要在意該字串為何。在大多數程式碼研究室中,您需要參照專案 ID (通常標示為
PROJECT_ID)。如果您不喜歡產生的 ID,可以產生另一個隨機 ID。你也可以嘗試使用自己的名稱,看看是否可用。完成這個步驟後就無法變更,且專案期間會維持不變。 - 請注意,有些 API 會使用第三個值,也就是「專案編號」。如要進一步瞭解這三種值,請參閱說明文件。
- 接著,您需要在 Cloud 控制台中啟用帳單,才能使用 Cloud 資源/API。完成這個程式碼研究室的費用不高,甚至可能完全免費。如要關閉資源,避免在本教學課程結束後繼續產生費用,請刪除您建立的資源或專案。Google Cloud 新使用者可參加價值$300 美元的免費試用計畫。
啟動 Cloud Shell
雖然可以透過筆電遠端操作 Google Cloud,但在本程式碼研究室中,您將使用 Google Cloud Shell,這是可在雲端執行的指令列環境。
在 Google Cloud 控制台中,點選右上工具列的 Cloud Shell 圖示:

佈建並連線至環境的作業需要一些時間才能完成。完成後,您應該會看到如下的內容:

這部虛擬機器搭載各種您需要的開發工具,並提供永久的 5GB 主目錄,而且可在 Google Cloud 運作,大幅提升網路效能並強化驗證功能。您可以在瀏覽器中完成本程式碼研究室的所有作業。您不需要安裝任何軟體。
3. 使用 Terraform 設定環境
如要完成這個實驗室,您必須有權存取 TPU。使用的確切版本為 TPU v6e。
- 請按照 TPU 計畫文件操作,並啟用 TPU 配額,即可取得存取權。
- 我們使用的小型部署作業需要 4 個 TPU v6e 晶片 (
ct6e-standard-4t)這會是兩個不同區域中的 2x2 切片)。 - Hugging Face 權杖:下載 Gemma 模型權重時,需要存取權杖
我們會建立含有防火牆規則、儲存空間和子網路的自訂 VPC。開啟 Cloud 控制台,然後選取要使用的專案。
- 開啟控制台右上方的 Cloud Shell,確認 Cloud Shell 中顯示的專案 ID 正確無誤,並確認允許存取的任何提示。

- 建立名為
gke-tf的資料夾,然後移至該資料夾
mkdir -p gke-tf && cd gke-tf
PROJECT_ID=$(gcloud config get-value project)
- 現在新增一些設定檔。這些指令會建立下列 network.tf、variable.tf、providers.tf、fuse.tf 檔案。
cat <<EOF > terraform.tfvars
project_id = "${PROJECT_ID}"
EOF

cat <<EOF > variables.tf
variable "project_id" { type = string }
variable "network_prefix" { default = "tpu-gke-dranet" }
variable "regions" { default = ["europe-west4", "us-east5"] }
variable "region_to_tpu_zone" {
  default = {
    "europe-west4" = "europe-west4-a"
    "us-east5"     = "us-east5-b"
  }
}
EOF

cat <<EOF > providers.tf
terraform {
  required_version = ">= 1.5.7"
  required_providers {
    google-beta = { source = "hashicorp/google-beta", version = "~> 7.0" }
    time = { source = "hashicorp/time", version = "~> 0.11.0" }
  }
}
provider "google-beta" { project = var.project_id }

resource "google_project_service" "base_apis" {
  for_each = toset([
    "compute.googleapis.com",
    "container.googleapis.com",
    "cloudresourcemanager.googleapis.com",
    "storage.googleapis.com"
  ])
  project            = var.project_id
  service            = each.value
  disable_on_destroy = false
}
EOF

cat <<EOF > network.tf
resource "google_compute_network" "vpc" {
  name                    = "\${var.network_prefix}-vpc"
  auto_create_subnetworks = false
  mtu                     = 8896
  depends_on              = [google_project_service.base_apis]
}
resource "google_compute_subnetwork" "subnets" {
  for_each      = toset(var.regions)
  name          = "\${var.network_prefix}-node-subnet"
  region        = each.value
  network       = google_compute_network.vpc.id
  ip_cidr_range = each.value == "europe-west4" ? "10.0.1.0/24" : "10.0.2.0/24"
}
resource "google_compute_subnetwork" "proxy_subnets" {
  for_each      = toset(var.regions)
  name          = "\${var.network_prefix}-proxy-subnet-\${each.value}"
  region        = each.value
  network       = google_compute_network.vpc.id
  ip_cidr_range = each.value == "europe-west4" ? "10.1.1.0/24" : "10.1.2.0/24"
  purpose       = "GLOBAL_MANAGED_PROXY"
  role          = "ACTIVE"
}
resource "google_compute_address" "gateway_ips" {
  for_each     = toset(var.regions)
  name         = "gemma-gateway-ip-\${each.value}"
  region       = each.value
  subnetwork   = google_compute_subnetwork.subnets[each.value].id
  address_type = "INTERNAL"
}
resource "google_compute_firewall" "allow_internal" {
  name    = "\${var.network_prefix}-allow-internal"
  network = google_compute_network.vpc.name
  allow { protocol = "all" }
  source_ranges = ["10.0.0.0/8", "10.1.0.0/16"]
}
resource "google_compute_firewall" "allow_health_checks" {
  name    = "\${var.network_prefix}-allow-hc"
  network = google_compute_network.vpc.name
  allow {
    protocol = "tcp"
    ports    = ["8000"]
  }
  source_ranges = ["130.211.0.0/22", "35.191.0.0/16"]
}
EOF

cat <<EOF > fuse.tf
resource "google_storage_bucket" "model_bucket" {
  name          = "\${var.project_id}-gemma-weights"
  location      = "US"
  force_destroy = true
  uniform_bucket_level_access = true
  depends_on    = [google_project_service.base_apis]
}

resource "google_service_account" "gcs_fuse_sa" {
  account_id   = "gcs-fuse-sa"
  display_name = "Service Account for GCS FUSE"
}

resource "google_storage_bucket_iam_member" "gcs_fuse_sa_admin" {
  bucket = google_storage_bucket.model_bucket.name
  role   = "roles/storage.objectAdmin"
  member = "serviceAccount:\${google_service_account.gcs_fuse_sa.email}"
}

resource "google_project_iam_binding" "workload_identity_binding" {
  project = var.project_id
  role    = "roles/iam.workloadIdentityUser"
  members = ["serviceAccount:\${var.project_id}.svc.id.goog[default/gemma-ksa]"]
}
EOF
variable.tf 檔案會新增專案名稱、區域和可用區資訊。附註:請使用您有 TPU 配額的區域,更新變數「regions」 default = ["europe-west4", "us-east5"]。詳情請參閱「在 GKE 中驗證 TPU 可用性」一文。
network.tf 會在專案中新增虛擬私有雲,其中包含兩個不同可用區的子網路、僅限 Proxy 的子網路和防火牆規則。
provider.tf 會新增相關供應商,以支援 Terraform
fuse.tf 會將 Cloud Storage bucket 新增至模型權重快取,並佈建具備 objectAdmin 權限的 IAM 服務帳戶。並將這個帳戶繫結至 GKE Workload Identity
- 確認您位於 gke-tf 目錄,然後執行下列指令
terraform init -初始化工作目錄。這個步驟會下載指定設定所需的供應商。terraform plan -產生執行計畫,顯示 Terraform 將採取哪些動作來部署基礎架構。terraform apply –auto-approve執行更新並自動核准。
terraform init
terraform plan
- 現在執行部署作業 (可能需要 3 到 5 分鐘)
terraform apply -auto-approve
- 在同一個
gke-tf資料夾中,建立下列 gke.tf 檔案。
cat <<EOF > gke.tf
resource "google_container_cluster" "clusters" {
  provider = google-beta
  for_each = toset(var.regions)
  name     = "gke-\${each.value}"
  location = var.region_to_tpu_zone[each.value]
  deletion_protection = false
  network             = google_compute_network.vpc.id
  subnetwork          = google_compute_subnetwork.subnets[each.value].id
  release_channel { channel = "RAPID" }
  datapath_provider = "ADVANCED_DATAPATH"
  networking_mode   = "VPC_NATIVE"

  gateway_api_config { channel = "CHANNEL_STANDARD" }

  ip_allocation_policy {
    cluster_ipv4_cidr_block  = ""
    services_ipv4_cidr_block = ""
  }

  workload_identity_config { workload_pool = "\${var.project_id}.svc.id.goog" }

  addons_config {
    gcs_fuse_csi_driver_config { enabled = true }
  }

  initial_node_count = 1
  node_config {
    machine_type = "e2-standard-16"
    oauth_scopes = ["https://www.googleapis.com/auth/cloud-platform"]
    workload_metadata_config { mode = "GKE_METADATA" }
  }
}

resource "google_container_node_pool" "tpu_pools" {
  provider = google-beta
  for_each = toset(var.regions)
  name     = "tpu-v6e-pool"
  location = var.region_to_tpu_zone[each.value]
  cluster  = google_container_cluster.clusters[each.value].name
  node_count = 1

  network_config { accelerator_network_profile = "auto" }

  node_config {
    machine_type = "ct6e-standard-4t"
    oauth_scopes = ["https://www.googleapis.com/auth/cloud-platform"]
    labels = { "cloud.google.com/gke-networking-dra-driver" = "true" }
    workload_metadata_config { mode = "GKE_METADATA" }
  }

  lifecycle { ignore_changes = [node_config[0].labels] }
}
EOF
gke.tf 會在不同區域新增兩個叢集,並建立兩個執行 TPU v6e (含 4 個晶片) 的 TPU 節點集區,然後將受管理 DRANET 指派給節點集區。
- 現在執行部署作業 (可能需要 10 到 15 分鐘)
terraform apply -auto-approve
- 驗證
echo -e "\n=== Verifying GKE Clusters ==="
gcloud container clusters list --filter="name:gke-europe-west4 OR name:gke-us-east5" --project=$PROJECT_ID

echo -e "\n=== Verifying VPC Network ==="
gcloud compute networks list --filter="name:tpu-gke-dranet-vpc" --project=$PROJECT_ID

echo -e "\n=== Verifying Reserved Static IPs for Gateway ==="
gcloud compute addresses list --filter="name~gemma-gateway-ip" --project=$PROJECT_ID

echo -e "\n=== Verifying GCS Bucket ==="
gcloud storage ls | grep "${PROJECT_ID}-gemma-weights"

echo -e "\n=== Verifying GCS FUSE Service Account ==="
gcloud iam service-accounts list --filter="email:gcs-fuse-sa@${PROJECT_ID}.iam.gserviceaccount.com" --project=$PROJECT_ID
4. 機群註冊
我們需要向機群註冊叢集。
- 確認您位於
gke-tf目錄,然後執行下列指令。
cat <<EOF > fleet.tf
data "google_project" "project" {
  project_id = var.project_id
}

resource "google_project_service" "fleet_apis" {
  for_each = toset([
    "gkehub.googleapis.com",
    "multiclusterservicediscovery.googleapis.com",
    "multiclusteringress.googleapis.com",
    "trafficdirector.googleapis.com"
  ])
  project            = var.project_id
  service            = each.value
  disable_on_destroy = false
}

resource "google_project_service_identity" "mci_sa" {
  provider = google-beta
  project  = var.project_id
  service  = "multiclusteringress.googleapis.com"
  depends_on = [google_project_service.fleet_apis]
}

resource "time_sleep" "wait_for_apis" {
  create_duration = "60s"
  depends_on      = [google_project_service.fleet_apis]
}

resource "google_project_iam_member" "mci_sa_admin" {
  project    = var.project_id
  role       = "roles/container.admin"
  member     = "serviceAccount:\${google_project_service_identity.mci_sa.email}"
  depends_on = [google_project_service_identity.mci_sa, time_sleep.wait_for_apis]
}

resource "google_gke_hub_membership" "memberships" {
  provider      = google-beta
  for_each      = toset(var.regions)
  project       = var.project_id
  membership_id = "gke-\${each.value}"
  endpoint {
    gke_cluster { resource_link = "//container.googleapis.com/\${google_container_cluster.clusters[each.value].id}" }
  }
  depends_on = [time_sleep.wait_for_apis, google_container_cluster.clusters]
}

resource "google_gke_hub_feature" "mcs" {
  provider   = google-beta
  name       = "multiclusterservicediscovery"
  location   = "global"
  project    = var.project_id
  depends_on = [time_sleep.wait_for_apis]
}

resource "google_gke_hub_feature" "ingress" {
  provider   = google-beta
  name       = "multiclusteringress"
  location   = "global"
  project    = var.project_id
  depends_on = [google_gke_hub_membership.memberships, google_project_iam_member.mci_sa_admin]
  spec {
    multiclusteringress { config_membership = "projects/\${var.project_id}/locations/global/memberships/gke-us-east5" }
  }
}
EOF
fleet.tf 檔案會將兩個叢集註冊至全域 GKE 機群,並啟用多叢集服務探索和 Ingress。這會將美國叢集指定為中央設定叢集,讓 Gateway API 監控及轉送流量。
- 在
gke-tf資料夾中執行 (這項作業可能需要 3 至 5 分鐘)
terraform plan
terraform apply -auto-approve
- 驗證機群註冊
gcloud container fleet memberships list --project=$PROJECT_ID
5. 將模型權重快取至 FUSE
我們會在美國叢集中執行暫時的 Kubernetes 工作,透過 Python 指令碼將 Gemma 模型安全地直接下載到 FUSE 掛接的 Cloud Storage bucket。
- 建立下列變數
export CTX_EU="gke_${PROJECT_ID}_europe-west4-a_gke-europe-west4"
export CTX_US="gke_${PROJECT_ID}_us-east5-b_gke-us-east5"
- 這會使用 google/gemma-3-27b-it 模型,因此您需要建立 HF 權杖。請將下方的
YOUR_ACTUAL_HUGGING_FACE_TOKEN替換成實際權杖。
export HF_TOKEN="YOUR_ACTUAL_HUGGING_FACE_TOKEN"
- 確認您位於
gke-tf目錄,然後執行下列指令。
gcloud container clusters get-credentials gke-us-east5 --zone us-east5-b --project=$PROJECT_ID

cat <<EOF > ksa.yaml
apiVersion: v1
kind: ServiceAccount
metadata:
  name: gemma-ksa
  namespace: default
  annotations:
    iam.gke.io/gcp-service-account: "gcs-fuse-sa@${PROJECT_ID}.iam.gserviceaccount.com"
EOF

kubectl apply -f ksa.yaml --context=$CTX_US
kubectl delete secret hf-secret --context=$CTX_US --ignore-not-found
kubectl create secret generic hf-secret --from-literal=hf_token=${HF_TOKEN} --context=$CTX_US

cat <<EOF > download-job.yaml
apiVersion: batch/v1
kind: Job
metadata:
  name: model-downloader
  namespace: default
spec:
  backoffLimit: 1
  template:
    metadata:
      annotations:
        gke-gcsfuse/volumes: "true"
    spec:
      serviceAccountName: gemma-ksa
      restartPolicy: Never
      containers:
      - name: downloader
        image: python:3.11-slim
        env:
        - name: HF_TOKEN
          valueFrom:
            secretKeyRef:
              name: hf-secret
              key: hf_token
        command:
        - bash
        - -c
        - |
          pip install -U huggingface_hub
          echo "Downloading Gemma 3 directly to GCS bucket..."
          python3 -c "from huggingface_hub import snapshot_download; import os; snapshot_download(repo_id='google/gemma-3-27b-it', local_dir='/data/gemma-weights', token=os.environ['HF_TOKEN'])"
          echo "Download complete! Safe to proceed."
        volumeMounts:
        - name: gcs-fuse-volume
          mountPath: /data/gemma-weights
      volumes:
      - name: gcs-fuse-volume
        csi:
          driver: gcsfuse.csi.storage.gke.io
          volumeAttributes:
            bucketName: "${PROJECT_ID}-gemma-weights"
EOF

kubectl apply -f download-job.yaml --context=$CTX_US
- 等待下載完成後再繼續操作(視模型大小而定,這項作業應需要 5 到 10 分鐘)
kubectl logs -f job/model-downloader --context=$CTX_US
(如果系統顯示「Download complete!」(下載完成!),請按 Ctrl+C 鍵結束記錄)。
6. 部署工作負載 vLLM 和 Gemma
- 確認您位於
gke-tf目錄,然後執行下列指令。
cat <<EOF > workload.yaml
apiVersion: v1
kind: ServiceAccount
metadata:
  name: gemma-ksa
  namespace: default
  annotations:
    iam.gke.io/gcp-service-account: "gcs-fuse-sa@${PROJECT_ID}.iam.gserviceaccount.com"
---
apiVersion: resource.k8s.io/v1
kind: ResourceClaimTemplate
metadata:
  name: all-netdev
  namespace: default
spec:
  spec:
    devices:
      requests:
      - name: req-netdev
        exactly:
          deviceClassName: netdev.google.com
          allocationMode: All
---
apiVersion: apps/v1
kind: Deployment
metadata:
  name: vllm-gemma
  namespace: default
  labels:
    app: gemma-server
spec:
  replicas: 1
  selector:
    matchLabels:
      app: gemma-server
  template:
    metadata:
      labels:
        app: gemma-server
      annotations:
        gke-gcsfuse/volumes: "true"
    spec:
      serviceAccountName: gemma-ksa
      nodeSelector:
        cloud.google.com/gke-tpu-accelerator: tpu-v6e-slice
        cloud.google.com/gke-tpu-topology: 2x2
      resourceClaims:
      - name: netdev
        resourceClaimTemplateName: all-netdev
      containers:
      - name: vllm-tpu
        image: vllm/vllm-tpu:latest
        command:
        - bash
        - -c
        - |
          export PYTHONUNBUFFERED=1
          echo "Booting vLLM instantly from local GCS FUSE mount..."

          python3 -m vllm.entrypoints.openai.api_server \
            --model /data/gemma-weights \
            --tensor-parallel-size 4 \
            --port 8000
        ports:
        - containerPort: 8000
        resources:
          requests:
            google.com/tpu: 4
          limits:
            google.com/tpu: 4
          claims:
          - name: netdev
        volumeMounts:
        - name: dshm
          mountPath: /dev/shm
        - name: gcs-fuse-volume
          mountPath: /data/gemma-weights
          readOnly: true
      volumes:
      - name: dshm
        emptyDir:
          medium: Memory
      - name: gcs-fuse-volume
        csi:
          driver: gcsfuse.csi.storage.gke.io
          readOnly: true
          volumeAttributes:
            bucketName: "${PROJECT_ID}-gemma-weights"
            mountOptions: "implicit-dirs"
            fileCacheCapacity: "100Gi"
            fileCacheForRangeRead: "true"
---
apiVersion: v1
kind: Service
metadata:
  name: vllm-gemma-service
  namespace: default
spec:
  selector:
    app: gemma-server
  ports:
  - protocol: TCP
    port: 8000
    targetPort: 8000
  type: ClusterIP
---
apiVersion: monitoring.googleapis.com/v1
kind: PodMonitoring
metadata:
  name: vllm-gemma-monitoring
  namespace: default
spec:
  selector:
    matchLabels:
      app: gemma-server
  endpoints:
  - port: 8000
    interval: 15s
    path: /metrics
EOF
- 現在請執行下列指令碼 (這項作業會在兩個區域中部署,因此需要 5 到 10 分鐘才能完成)
for CTX in $CTX_EU $CTX_US; do
  ZONE=$(echo $CTX | cut -d_ -f3)
  CLUSTER=$(echo $CTX | cut -d_ -f4)
  gcloud container clusters get-credentials $CLUSTER --zone $ZONE --project=$PROJECT_ID

  kubectl delete secret hf-secret --ignore-not-found --context=$CTX
  kubectl create secret generic hf-secret --from-literal=hf_token=${HF_TOKEN} --context=$CTX
  kubectl apply -f workload.yaml --context=$CTX
done
- 確認部署作業
for CTX in $CTX_EU $CTX_US; do kubectl rollout status deployment/vllm-gemma --timeout=15m --context=$CTX; done
- 完成後,您可以執行下列指令,驗證受管理的 DRANET 網路是否已指派給 Pod。
for CTX in $CTX_EU $CTX_US; do
  echo "Checking DRA network interfaces on $CTX..."
  kubectl --context=$CTX exec deployment/vllm-gemma -c vllm-tpu -- ls /sys/class/net
  echo "----------------------------------------"
done
您會看到標準 Pod 網路的額外網路介面 eth0,以及代表專屬 TPU 網狀架構的次要介面 eth1、eth2 等。
7. 推論 API 和閘道設定
您現在要建立 InferenceObjective (gemma-objective), AutoscalingMetric (tpu-cache) 和 Inference Pool(gemma-pool)。推論集區是使用 Helm chart 建立。並安裝及驗證建立作業。
- 確認您位於
gke-tf目錄,然後執行下列指令。系統會部署物件並執行驗證。
cat <<EOF > inference-objective.yaml
apiVersion: inference.networking.x-k8s.io/v1alpha2
kind: InferenceObjective
metadata:
  name: gemma-objective
  namespace: default
spec:
  priority: 10
  poolRef:
    name: gemma-pool
    group: "inference.networking.k8s.io"
EOF

cat <<EOF > metrics.yaml
apiVersion: autoscaling.gke.io/v1beta1
kind: AutoscalingMetric
metadata:
  name: tpu-cache
  namespace: default
spec:
  selector:
    matchLabels:
      app: gemma-server
  endpoints:
  - port: 8000
    path: /metrics
    metrics:
    - name: vllm:kv_cache_usage_perc
      exportName: tpu-cache
EOF

for CTX in $CTX_EU $CTX_US; do
  kubectl apply -f https://raw.githubusercontent.com/kubernetes-sigs/gateway-api-inference-extension/v1.1.0/config/crd/bases/inference.networking.x-k8s.io_inferenceobjectives.yaml --context=$CTX
  kubectl apply -f inference-objective.yaml --context=$CTX
  kubectl apply -f metrics.yaml --context=$CTX
done

helm install gemma-pool --kube-context $CTX_EU \
  --set inferencePool.modelServers.matchLabels.app=gemma-server \
  --set provider.name=gke \
  --version v1.1.0 \
  oci://registry.k8s.io/gateway-api-inference-extension/charts/inferencepool

helm install gemma-pool --kube-context $CTX_US \
  --set inferencePool.modelServers.matchLabels.app=gemma-server \
  --set provider.name=gke \
  --set inferenceExtension.monitoring.gke.enabled=true \
  --version v1.1.0 \
  oci://registry.k8s.io/gateway-api-inference-extension/charts/inferencepool

for CTX in $CTX_EU $CTX_US; do
  kubectl annotate inferencepool gemma-pool networking.gke.io/export="True" --context=$CTX
done

for CTX in $CTX_EU $CTX_US; do
  echo "Verifying Inference API resources on $CTX..."
  kubectl get inferencepools --context=$CTX
  kubectl get autoscalingmetrics tpu-cache --context=$CTX
done
8. 閘道設定
現在請建立跨區域閘道設定。Gateway(cross-region-gateway), HTTPRoute (gemma-route), HealthCheckPolicy(gemma-health-check)and GCPBackendPolicy(gemma-backend-policy. 推論集區是使用 Helm chart 建立。並安裝及驗證建立作業。(閘道需要 8 到 10 分鐘才能啟用)
cat <<EOF > config-cluster.yaml
apiVersion: gateway.networking.k8s.io/v1
kind: Gateway
metadata:
  name: cross-region-gateway
  namespace: default
spec:
  gatewayClassName: gke-l7-cross-regional-internal-managed-mc
  addresses:
  - type: networking.gke.io/named-address-with-region
    value: "regions/europe-west4/addresses/gemma-gateway-ip-europe-west4"
  - type: networking.gke.io/named-address-with-region
    value: "regions/us-east5/addresses/gemma-gateway-ip-us-east5"
  listeners:
  - name: http
    protocol: HTTP
    port: 80
---
apiVersion: gateway.networking.k8s.io/v1
kind: HTTPRoute
metadata:
  name: gemma-route
  namespace: default
spec:
  parentRefs:
  - name: cross-region-gateway
    kind: Gateway
  rules:
  - backendRefs:
    - group: networking.gke.io
      kind: GCPInferencePoolImport
      name: gemma-pool
      port: 8000
---
apiVersion: networking.gke.io/v1
kind: HealthCheckPolicy
metadata:
  name: gemma-health-check
  namespace: default
spec:
  targetRef:
    group: networking.gke.io
    kind: GCPInferencePoolImport
    name: gemma-pool
  default:
    config:
      type: HTTP
      httpHealthCheck:
        requestPath: /health
        port: 8000
---
apiVersion: networking.gke.io/v1
kind: GCPBackendPolicy
metadata:
  name: gemma-backend-policy
  namespace: default
spec:
  targetRef:
    group: networking.gke.io
    kind: GCPInferencePoolImport
    name: gemma-pool
  default:
    timeoutSec: 100
    balancingMode: CUSTOM_METRICS
    trafficDuration: LONG
    customMetrics:
      - name: gke.named_metrics.tpu-cache
        dryRun: false
        maxUtilizationPercent: 60
EOF

echo -e "\n=== Creating Cross-Regional Gateway Resources ==="
kubectl apply -f config-cluster.yaml --context=$CTX_US

echo -e "\n=== Provisioning Global Load Balancer (This takes 5-10 minutes) ==="
echo "Working on the Gateway... waiting for Google Cloud to assign IPs and program routes..."

# The script will hold here until the gateway is officially ready
kubectl wait --for=condition=programmed gateway/cross-region-gateway --timeout=10m --context=$CTX_US

echo -e "\n=== SUCCESS: Gateway is fully provisioned and ready! ==="
推論集區 (Helm):將兩個區域的模型伺服器分組為單一邏輯後端。
閘道和 HTTPRoute:建立實際的全球內部負載平衡器,並定義將傳入的 AI 提示轉送至模型的規則。
健康狀態檢查和後端政策:確保要求只會傳送至健康狀態良好的 Pod,並根據指標進行智慧型流量分配 (避免 TPU 負載過重)。
驗證:指令碼會暫停,確保 Google Cloud 已完全佈建內部 IP 位址,再繼續執行。
9. 容錯移轉測試
現在要進行本實驗室最精彩的部分:測試架構的高可用性。
這項自動測試的具體做法如下:
- 基準測試:模擬使用者傳送推論提示 (「法國的首都在哪裡?」)。由於使用者位於主要區域,閘道會將要求轉送至這些本機 TPU,盡可能縮短延遲時間。
- 災難:我們模擬災難性資料中心服務中斷,方法是終止主要區域 (
replicas=0) 中的所有 TPU Pod。 - 偵測:等待 45 秒。在這段期間,閘道的健康狀態檢查會失敗,並發現主要後端完全離線,因此動態更新全域路由表。
- 容錯移轉:使用者傳送第二個提示 (「德國的首都為何?」)。使用者完全不知道有服務中斷情形。閘道會攔截要求,並立即將要求重新導向至全球各地運作正常的次要 TPU。
- 復原:我們將還原主要 TPU,讓全球架構恢復正常運作。
- 打開 Cloud Shell 並執行下列指令:
cat << 'EOF' > failover-test.sh
#!/bin/bash
# Multi-Cluster Inference Failover Test

export PROJECT_ID=$(gcloud config get-value project)
export CTX_EU="gke_${PROJECT_ID}_europe-west4-a_gke-europe-west4"
export CTX_US="gke_${PROJECT_ID}_us-east5-b_gke-us-east5"

echo -e "\n=== PHASE 1: VERIFYING CURRENT STATE (BOTH CLUSTERS UP) ==="
echo "Checking US Cluster (Primary):"
kubectl get pods -l app=gemma-server --context=$CTX_US
echo "Checking EU Cluster (Secondary):"
kubectl get pods -l app=gemma-server --context=$CTX_EU

echo -e "\nDeploying Test Client in US..."
export GATEWAY_IP_US=$(gcloud compute addresses describe gemma-gateway-ip-us-east5 --region=us-east5 --project=$PROJECT_ID --format="value(address)")

kubectl run curl-test --image=curlimages/curl --restart=Never --context=$CTX_US -- sleep 3600
kubectl wait --for=condition=ready pod/curl-test --context=$CTX_US --timeout=60s

echo -e "\n=== PHASE 2: BASELINE TEST (US Client -> US TPUs) ==="
echo "Prompting the AI: 'What is the capital of France?'"
echo "Expect to see the full JSON response including token usage..."
kubectl exec curl-test --context=$CTX_US -- curl -s -X POST http://$GATEWAY_IP_US/v1/chat/completions \
  -H "Content-Type: application/json" \
  -d '{
    "model": "/data/gemma-weights",
    "messages": [{"role": "user", "content": "What is the capital of France?"}],
    "max_tokens": 100
  }' | jq .

echo -e "\n=== PHASE 3: SIMULATING REGIONAL OUTAGE (Scaling US to 0) ==="
kubectl scale deployment vllm-gemma --replicas=0 --context=$CTX_US
echo "Waiting 20 seconds for pods to begin terminating..."
sleep 20

echo -e "\n=== PHASE 4: CONFIRMING STATE (PODS TERMINATING) ==="
echo "Checking US Cluster (Should be terminating):"
kubectl get pods -l app=gemma-server --context=$CTX_US
echo "Checking EU Cluster (Should still be running):"
kubectl get pods -l app=gemma-server --context=$CTX_EU

echo -e "\nWaiting 45 seconds for Gateway health checks to update global routing tables..."
sleep 45

echo -e "\n=== PHASE 5: CONFIRMING COMPLETE DOWN AND EURO UP ==="
echo "Checking US Cluster (Should be completely empty now):"
kubectl get pods -l app=gemma-server --context=$CTX_US
echo "Checking EU Cluster (Should still be running):"
kubectl get pods -l app=gemma-server --context=$CTX_EU

echo -e "\n=== PHASE 6: FAILOVER TEST (US Client -> EU TPUs) ==="
echo "Prompting the AI: 'What is the capital of Germany?'"
echo "Request is actively being rerouted to Europe. Expecting full JSON response..."
kubectl exec curl-test --context=$CTX_US -- curl -s -X POST http://$GATEWAY_IP_US/v1/chat/completions \
  -H "Content-Type: application/json" \
  -d '{
    "model": "/data/gemma-weights",
    "messages": [{"role": "user", "content": "What is the capital of Germany?"}],
    "max_tokens": 100
  }' | jq .

echo -e "\n=== PHASE 7: RESTORING INFRASTRUCTURE (Scaling US to 1) ==="
kubectl scale deployment vllm-gemma --replicas=1 --context=$CTX_US
echo "Waiting for US pods to boot and mount FUSE..."
kubectl rollout status deployment/vllm-gemma --timeout=15m --context=$CTX_US

echo -e "\n=== PHASE 8: CONFIRMING BOTH SYSTEMS ARE BACK UP ==="
echo "Checking US Cluster (Restored):"
kubectl get pods -l app=gemma-server --context=$CTX_US
echo "Checking EU Cluster (Still Healthy):"
kubectl get pods -l app=gemma-server --context=$CTX_EU

echo -e "\n=== PHASE 9: CLEANUP ==="
kubectl delete pod curl-test --context=$CTX_US
echo "Failover lab complete."
EOF

chmod +x failover-test.sh
./failover-test.sh
- 測試完成後,即可進行清理。
10. 清理
- 清理工作負載
#!/bin/bash
echo "=== PART 1: Kubernetes & Workload Cleanup ==="
export PROJECT_ID=$(gcloud config get-value project)
export CTX_EU="gke_${PROJECT_ID}_europe-west4-a_gke-europe-west4"
export CTX_US="gke_${PROJECT_ID}_us-east5-b_gke-us-east5"

echo "Deleting Gateway resources..."
for CTX in $CTX_EU $CTX_US; do
  kubectl delete gateways,httproutes,healthcheckpolicies,gcpbackendpolicies --all --context=$CTX --ignore-not-found
done

echo "Waiting 60 seconds for the external Load Balancer to detach..."
sleep 60

echo "Cleaning up workloads and custom resources..."
for CTX in $CTX_EU $CTX_US; do
  helm uninstall gemma-pool --kube-context=$CTX || true
  kubectl delete job model-downloader --context=$CTX --ignore-not-found
  kubectl delete all -l app=gemma-server --context=$CTX --ignore-not-found
  kubectl delete inferenceobjectives,autoscalingmetrics --all --context=$CTX --ignore-not-found
  kubectl delete serviceaccount gemma-ksa --context=$CTX --ignore-not-found
  kubectl delete -f https://raw.githubusercontent.com/kubernetes-sigs/gateway-api-inference-extension/v1.1.0/config/crd/bases/inference.networking.x-k8s.io_inferenceobjectives.yaml --context=$CTX --ignore-not-found
done

echo -e "\n=== Part 1 Complete! Safe to proceed to Terraform Teardown. ==="
- 清理基礎架構。確認您位於
gke-tf資料夾。
cat << 'EOF' > cleanup-tf.sh
#!/bin/bash
echo "=== PART 2: Infrastructure & Terraform Teardown ==="
export PROJECT_ID=$(gcloud config get-value project)
export LAB_NETWORK="tpu-gke-dranet-vpc"

echo "Destroying GKE Fleet Features to prevent firewall resurrection..."
terraform destroy -target=google_gke_hub_feature.mcs -target=google_gke_hub_feature.ingress -auto-approve

echo "Waiting 30 seconds for the self-healing controllers to spin down..."
sleep 30

echo "Hunting down orphaned auto-generated firewall rules strictly on the lab network..."
GHOST_RULES=$(gcloud compute firewall-rules list --filter="network~${LAB_NETWORK} AND (name~mcsd OR name~k8s-fw-l7)" --format="value(name)" --project=$PROJECT_ID)

if [ ! -z "$GHOST_RULES" ]; then
  for rule in $GHOST_RULES; do
    echo "Deleting ghost rule: $rule"
    gcloud compute firewall-rules delete $rule --project=$PROJECT_ID --quiet
  done
else
  echo "No ghost rules found on ${LAB_NETWORK}."
fi

echo "=== Controllers and Firewalls dead. Destroying remaining Base Infrastructure. ==="

MAX_RETRIES=3
RETRY_COUNT=0
SUCCESS=false

while [ $RETRY_COUNT -lt $MAX_RETRIES ]; do
  # Run the destroy command. If it succeeds (exit code 0), break the loop.
  if terraform destroy -auto-approve; then
    SUCCESS=true
    break
  else
    RETRY_COUNT=$((RETRY_COUNT+1))
    echo -e "\n[WARNING] Terraform destroy encountered an error (likely a GCP resource lock)."

    if [ $RETRY_COUNT -lt $MAX_RETRIES ]; then
      echo "Waiting 30 seconds before retry $RETRY_COUNT of $MAX_RETRIES..."
      sleep 30
    fi
  fi
done

if [ "$SUCCESS" = true ]; then
  echo -e "\n=== Lab Cleanup Successfully Completed! ==="
else
  echo -e "\n[ERROR] Lab Cleanup failed after $MAX_RETRIES attempts."
  echo "Some resources may still be locked. Run 'terraform destroy -auto-approve' manually later to finish."
  exit 1
fi
EOF

chmod +x cleanup-tf.sh
./cleanup-tf.sh
如果刪除特定資源時遇到任何問題,請重新執行 terraform destroy 指令碼 ./cleanup-tf.sh
11. 恭喜
恭喜!您已成功部署高可用性多叢集 GKE Inference Gateway,並使用 GKE、代管 DRANET 和 TPU v6e 加速器,建構跨區域 AI 推論架構。
結合 Cloud Storage FUSE 即可立即載入模型,並透過 Inference Gateway API 進行延遲感知多叢集路由,您已建構出具備復原力的後端,即使區域資料中心全面服務中斷,也能繼續運作,不會遺失內部使用者流量。
後續步驟/瞭解詳情
您可以進一步瞭解 GKE 網路
挑戰下一個實驗室
繼續完成 Google Cloud 任務,或查看下列其他 Google Cloud 實驗室: