1. Introduzione
GCP supporta da tempo più interfacce a livello di istanza VM. Con più interfacce, una VM può connettere fino a 7 nuove interfacce (predefinite + 7 interfacce) a VPC diversi. Il networking GKE ora estende questo comportamento ai pod in esecuzione sui nodi. Prima di questa funzionalità, i cluster GKE consentivano a tutti i NodePool di avere una sola interfaccia e quindi di essere mappati a un singolo VPC. Con la funzionalità di networking multiplo sui pod, un utente può ora abilitare più di una singola interfaccia sui nodi e per i pod in un cluster GKE.
Cosa creerai
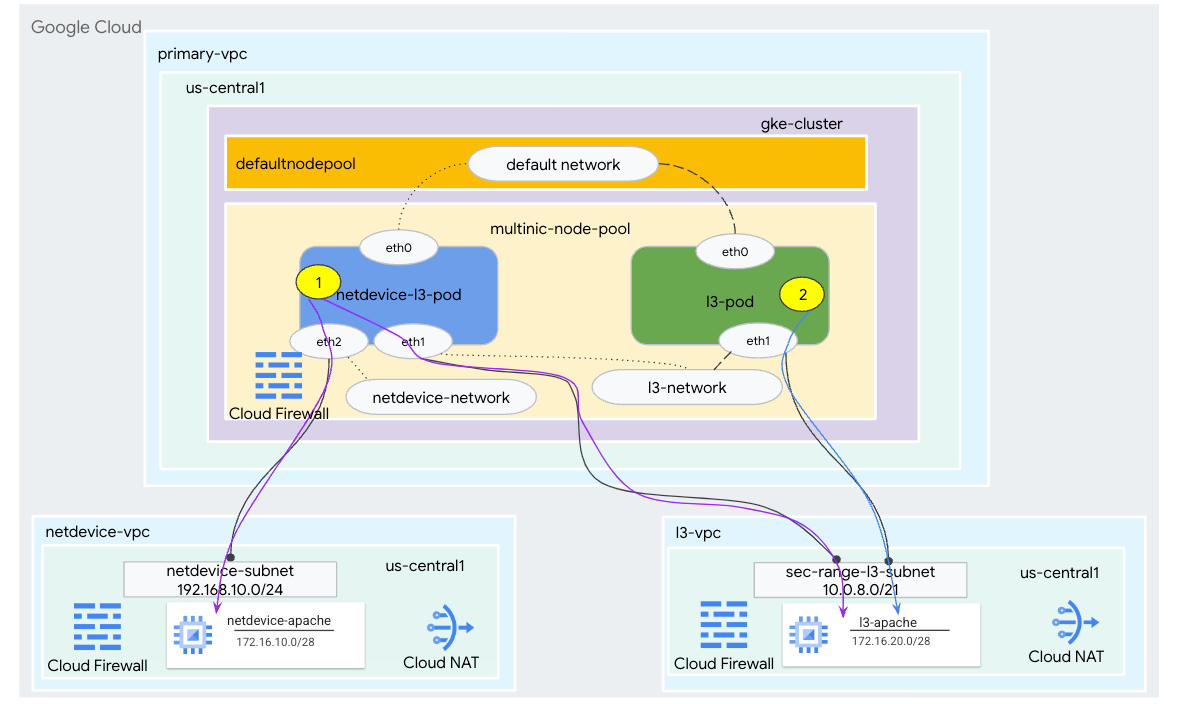
In questo tutorial, creerai un ambiente multinic GKE completo che illustra i casi d'uso illustrati nella Figura 1.
- Crea netdevice-l3-pod utilizzando busybox per:
- Esegui un PING e wget -S sull'istanza netdevice-apache in netdevice-vpc su eth2
- Esegui un PING e wget -S sull'istanza l3-apache in l3-vpc su eth1
- Crea un pod l3 che utilizza busybox per eseguire un PING e wget -S sull'istanza l3-apache su eth1
In entrambi i casi d'uso, l'interfaccia eth0 del pod è connessa alla rete predefinita.
Figura 1
Cosa imparerai a fare
- Come creare una subnet di tipo L3
- Come creare una subnet di tipo netdevice
- Come stabilire un node pool GKE multi-nic
- Come creare un pod con funzionalità netdevice e L3
- Come creare un pod con funzionalità L3
- Come creare e convalidare la rete di oggetti GKE
- Come convalidare la connettività ai server Apache remoti utilizzando PING, wget e i log del firewall
Che cosa ti serve
- Progetto Google Cloud
2. Terminologia e concetti
VPC principale: la VPC principale è una VPC preconfigurata con un insieme di impostazioni e risorse predefinite. Il cluster GKE viene creato in questo VPC.
Subnet: in Google Cloud, una subnet è il modo per creare CIDR (Classless Inter-Domain Routing) con maschere di rete in un VPC. Una subnet ha un singolo intervallo di indirizzi IP principale assegnato ai nodi e può avere più intervalli secondari che possono appartenere a pod e servizi.
Rete del nodo: la rete del nodo si riferisce a una combinazione dedicata di una coppia di rete VPC e subnet. All'interno di questa rete di nodi, ai nodi appartenenti al pool di nodi vengono allocati indirizzi IP dall'intervallo di indirizzi IP primario.
Intervallo secondario: un intervallo secondario di Google Cloud è un CIDR e una maschera di rete appartenenti a una regione in un VPC. GKE lo utilizza come rete di pod di livello 3. Un VPC può avere più intervalli secondari e un pod può connettersi a più reti di pod.
Rete (L3 o dispositivo): un oggetto di rete che funge da punto di connessione per i pod. Nel tutorial le reti sono l3-network e netdevice-network, dove il dispositivo può essere netdevice o dpdk. La rete predefinita è obbligatoria e viene creata al momento della creazione del cluster in base alla subnet del pool di nodi predefinito.
Le reti di livello 3 corrispondono a un intervallo secondario di una subnet, rappresentato come:
VPC -> Nome subnet -> Nome intervallo secondario
La rete del dispositivo corrisponde a una subnet su un VPC, rappresentata come:
VPC -> Subnet Name
Rete di pod predefinita: Google Cloud crea una rete di pod predefinita durante la creazione del cluster. La rete pod predefinita utilizza il VPC principale come rete dei nodi. La rete pod predefinita è disponibile su tutti i nodi e i pod del cluster per impostazione predefinita.
Pod con più interfacce: i pod con più interfacce in GKE non possono connettersi alla stessa rete di pod perché ogni interfaccia del pod deve essere connessa a una rete unica.
Aggiorna il progetto per supportare il codelab
Questo Codelab utilizza le variabili $per facilitare l'implementazione della configurazione gcloud in Cloud Shell.
In Cloud Shell, esegui le seguenti operazioni:
gcloud config list project
gcloud config set project [YOUR-PROJECT-NAME]
projectid=YOUR-PROJECT-NAME
echo $projectid
3. Configurazione VPC principale
Crea il VPC principale
In Cloud Shell, esegui le seguenti operazioni:
gcloud compute networks create primary-vpc --project=$projectid --subnet-mode=custom
Crea il nodo e le subnet secondarie
In Cloud Shell, esegui le seguenti operazioni:
gcloud compute networks subnets create primary-node-subnet --project=$projectid --range=192.168.0.0/24 --network=primary-vpc --region=us-central1 --enable-private-ip-google-access --secondary-range=sec-range-primay-vpc=10.0.0.0/21
4. Creazione del cluster GKE
Crea il cluster GKE privato specificando le subnet primary-vpc per creare il nodepool predefinito con i flag richiesti –enable-multi-networking e –enable-dataplane-v2 per supportare i nodepool multi-nic.
In Cloud Shell, crea il cluster GKE:
gcloud container clusters create multinic-gke \
    --zone "us-central1-a" \
    --enable-dataplane-v2 \
    --enable-ip-alias \
    --enable-multi-networking \
    --network "primary-vpc" --subnetwork "primary-node-subnet" \
    --num-nodes=2 \
    --max-pods-per-node=32 \
    --cluster-secondary-range-name=sec-range-primay-vpc \
    --no-enable-master-authorized-networks \
    --release-channel "regular" \
    --enable-private-nodes --master-ipv4-cidr "100.100.10.0/28" \
    --enable-ip-alias
Convalida del cluster multinic-gke
In Cloud Shell, esegui l'autenticazione sul cluster:
gcloud container clusters get-credentials multinic-gke --zone us-central1-a --project $projectid
In Cloud Shell, verifica che siano stati generati due nodi da default-pool:
kubectl get nodes
Esempio:
user@$ kubectl get nodes
NAME                                          STATUS   ROLES    AGE    VERSION
gke-multinic-gke-default-pool-3d419e48-1k2p   Ready    <none>   2m4s   v1.27.3-gke.100
gke-multinic-gke-default-pool-3d419e48-xckb   Ready    <none>   2m4s   v1.27.3-gke.100
5. Configurazione di netdevice-vpc
Crea la rete netdevice-vpc
In Cloud Shell, esegui le seguenti operazioni:
gcloud compute networks create netdevice-vpc --project=$projectid --subnet-mode=custom
Crea le subnet netdevice-vpc
In Cloud Shell, crea la subnet utilizzata per la rete netdevice multinic:
gcloud compute networks subnets create netdevice-subnet --project=$projectid --range=192.168.10.0/24 --network=netdevice-vpc --region=us-central1 --enable-private-ip-google-access
In Cloud Shell, crea una subnet per l'istanza netdevice-apache:
gcloud compute networks subnets create netdevice-apache --project=$projectid --range=172.16.10.0/28 --network=netdevice-vpc --region=us-central1 --enable-private-ip-google-access
Configurazione di Cloud Router e NAT
Cloud NAT viene utilizzato nel tutorial per l'installazione del pacchetto software poiché l'istanza VM non ha un indirizzo IP esterno.
In Cloud Shell, crea il router Cloud.
gcloud compute routers create netdevice-cr --network netdevice-vpc --region us-central1
In Cloud Shell, crea il gateway NAT.
gcloud compute routers nats create cloud-nat-netdevice --router=netdevice-cr --auto-allocate-nat-external-ips --nat-all-subnet-ip-ranges --region us-central1
Crea l'istanza netdevice-apache
Nella sezione seguente creerai l'istanza netdevice-apache.
In Cloud Shell, crea l'istanza:
gcloud compute instances create netdevice-apache \
    --project=$projectid \
    --machine-type=e2-micro \
    --image-family debian-11 \
    --no-address \
    --image-project debian-cloud \
    --zone us-central1-a \
    --subnet=netdevice-apache \
    --metadata startup-script="#! /bin/bash
      sudo apt-get update
      sudo apt-get install apache2 -y
      sudo service apache2 restart
      echo 'Welcome to the netdevice-apache instance !!' | tee /var/www/html/index.html
      EOF"
6. l3-vpc setup
Crea la rete l3-vpc
In Cloud Shell, esegui le seguenti operazioni:
gcloud compute networks create l3-vpc --project=$projectid --subnet-mode=custom
Crea le subnet l3-vpc
In Cloud Shell, crea una subnet con intervallo primario e secondario. L'intervallo secondario(sec-range-l3-subnet) viene utilizzato per la rete L3 multinic:
gcloud compute networks subnets create l3-subnet --project=$projectid --range=192.168.20.0/24 --network=l3-vpc --region=us-central1 --enable-private-ip-google-access --secondary-range=sec-range-l3-subnet=10.0.8.0/21
In Cloud Shell, crea una subnet per l'istanza l3-apache:
gcloud compute networks subnets create l3-apache --project=$projectid --range=172.16.20.0/28 --network=l3-vpc --region=us-central1 --enable-private-ip-google-access
Configurazione di Cloud Router e NAT
Cloud NAT viene utilizzato nel tutorial per l'installazione del pacchetto software poiché l'istanza VM non ha un indirizzo IP esterno.
In Cloud Shell, crea il router Cloud.
gcloud compute routers create l3-cr --network l3-vpc --region us-central1
In Cloud Shell, crea il gateway NAT.
gcloud compute routers nats create cloud-nat-l3 --router=l3-cr --auto-allocate-nat-external-ips --nat-all-subnet-ip-ranges --region us-central1
Crea l'istanza l3-apache
Nella sezione seguente creerai l'istanza l3-apache.
In Cloud Shell, crea l'istanza:
gcloud compute instances create l3-apache \
    --project=$projectid \
    --machine-type=e2-micro \
    --image-family debian-11 \
    --no-address \
    --image-project debian-cloud \
    --zone us-central1-a \
    --subnet=l3-apache \
    --metadata startup-script="#! /bin/bash
      sudo apt-get update
      sudo apt-get install apache2 -y
      sudo service apache2 restart
      echo 'Welcome to the l3-apache instance !!' | tee /var/www/html/index.html
      EOF"
7. Crea il node pool multinic
Nella sezione seguente, creerai un nodepool multinic composto dai seguenti flag:
–additional-node-network (obbligatorio per le interfacce di tipo Dispositivo)
Esempio:
--additional-node-network network=netdevice-vpc,subnetwork=netdevice-subnet
–additional-node-network e –additional-pod-network ( obbligatori per le interfacce di tipo L3)
Esempio:
--additional-node-network network=l3-vpc,subnetwork=l3-subnet --additional-pod-network subnetwork=l3-subnet,pod-ipv4-range=sec-range-l3-subnet,max-pods-per-node=8
Tipo di macchina: quando esegui il deployment del pool di nodi, considera la dipendenza del tipo di macchina. Ad esempio, un tipo di macchina come "e2-standard-4" con 4 vCPU può supportare fino a 4 VPC in totale. Ad esempio, netdevice-l3-pod avrà un totale di 3 interfacce (default, netdevice e l3), pertanto il tipo di macchina utilizzato nel tutorial è e2-standard-4.
In Cloud Shell, crea il pool di nodi costituito da un dispositivo di tipo e L3:
gcloud container --project "$projectid" node-pools create "multinic-node-pool" --cluster "multinic-gke" --zone "us-central1-a" --additional-node-network network=netdevice-vpc,subnetwork=netdevice-subnet --additional-node-network network=l3-vpc,subnetwork=l3-subnet --additional-pod-network subnetwork=l3-subnet,pod-ipv4-range=sec-range-l3-subnet,max-pods-per-node=8 --machine-type "e2-standard-4"
8. Convalida il pool di nodi multinic
In Cloud Shell, verifica che siano stati generati tre nodi dal pool di nodi multinic:
kubectl get nodes
Esempio:
user@$ kubectl get nodes
NAME                                                STATUS   ROLES    AGE     VERSION
gke-multinic-gke-default-pool-3d419e48-1k2p         Ready    <none>   15m     v1.27.3-gke.100
gke-multinic-gke-default-pool-3d419e48-xckb         Ready    <none>   15m     v1.27.3-gke.100
gke-multinic-gke-multinic-node-pool-135699a1-0tfx   Ready    <none>   3m51s   v1.27.3-gke.100
gke-multinic-gke-multinic-node-pool-135699a1-86gz   Ready    <none>   3m51s   v1.27.3-gke.100
gke-multinic-gke-multinic-node-pool-135699a1-t66p   Ready    <none>   3m51s   v1.27.3-gke.100
9. Crea la rete netdevice
Nei passaggi successivi genererai un oggetto Kubernetes Network e GKENetworkParamSet per creare la rete netdevice che verrà utilizzata per associare i pod nei passaggi successivi.
Crea l'oggetto netdevice-network
In Cloud Shell, crea l'oggetto di rete YAML netdevice-network.yaml utilizzando l'editor VI o nano. Tieni presente che "routes to" è la subnet 172.16.10.0/28 (netdevice-apache) in netdevice-vpc.
apiVersion: networking.gke.io/v1
kind: Network
metadata:
    name: netdevice-network
spec:
    type: "Device"
    parametersRef:
      group: networking.gke.io
      kind: GKENetworkParamSet
      name: "netdevice"
    routes:
    - to: "172.16.10.0/28"
In Cloud Shell, applica netdevice-network.yaml:
kubectl apply -f netdevice-network.yaml
In Cloud Shell, verifica che il tipo di stato di netdevice-network sia Pronto.
kubectl describe networks netdevice-network
Esempio:
user@$ kubectl describe networks netdevice-network
Name:         netdevice-network
Namespace:
Labels:       <none>
Annotations:  networking.gke.io/in-use: false
API Version:  networking.gke.io/v1
Kind:         Network
Metadata:
  Creation Timestamp:  2023-07-30T22:37:38Z
  Generation:          1
  Resource Version:    1578594
  UID:                 46d75374-9fcc-42be-baeb-48e074747052
Spec:
  Parameters Ref:
    Group:  networking.gke.io
    Kind:   GKENetworkParamSet
    Name:   netdevice
  Routes:
    To:  172.16.10.0/28
  Type:  Device
Status:
  Conditions:
    Last Transition Time:  2023-07-30T22:37:38Z
    Message:               GKENetworkParamSet resource was deleted: netdevice
    Reason:                GNPDeleted
    Status:                False
    Type:                  ParamsReady
    Last Transition Time:  2023-07-30T22:37:38Z
    Message:               Resource referenced by params is not ready
    Reason:                ParamsNotReady
    Status:                False
    Type:                  Ready
Events:                    <none>
Crea GKENetworkParamSet
In Cloud Shell, crea l'oggetto di rete YAML netdevice-network-parm.yaml utilizzando l'editor VI o nano. La specifica viene mappata al deployment della subnet netdevice-vpc.
apiVersion: networking.gke.io/v1
kind: GKENetworkParamSet
metadata:
    name: "netdevice"
spec:
    vpc: "netdevice-vpc"
    vpcSubnet: "netdevice-subnet"
    deviceMode: "NetDevice"
In Cloud Shell, applica netdevice-network-parm.yaml
kubectl apply -f netdevice-network-parm.yaml
In Cloud Shell, convalida i valori di Status Reason GNPParmsReady e NetworkReady di netdevice-network:
kubectl describe networks netdevice-network
Esempio:
user@$ kubectl describe networks netdevice-network
Name:         netdevice-network
Namespace:
Labels:       <none>
Annotations:  networking.gke.io/in-use: false
API Version:  networking.gke.io/v1
Kind:         Network
Metadata:
  Creation Timestamp:  2023-07-30T22:37:38Z
  Generation:          1
  Resource Version:    1579791
  UID:                 46d75374-9fcc-42be-baeb-48e074747052
Spec:
  Parameters Ref:
    Group:  networking.gke.io
    Kind:   GKENetworkParamSet
    Name:   netdevice
  Routes:
    To:  172.16.10.0/28
  Type:  Device
Status:
  Conditions:
    Last Transition Time:  2023-07-30T22:39:44Z
    Message:
    Reason:                GNPParamsReady
    Status:                True
    Type:                  ParamsReady
    Last Transition Time:  2023-07-30T22:39:44Z
    Message:
    Reason:                NetworkReady
    Status:                True
    Type:                  Ready
Events:                    <none>
All'interno di Cloud Shell, convalida il blocco CIDR gkenetworkparamset 192.168.10.0/24 utilizzato per l'interfaccia dei pod in un passaggio successivo.
kubectl describe gkenetworkparamsets.networking.gke.io netdevice
Esempio:
user@$ kubectl describe gkenetworkparamsets.networking.gke.io netdevice
Name:         netdevice
Namespace:
Labels:       <none>
Annotations:  <none>
API Version:  networking.gke.io/v1
Kind:         GKENetworkParamSet
Metadata:
  Creation Timestamp:  2023-07-30T22:39:43Z
  Finalizers:
    networking.gke.io/gnp-controller
    networking.gke.io/high-perf-finalizer
  Generation:        1
  Resource Version:  1579919
  UID:               6fe36b0c-0091-4b6a-9d28-67596cbce845
Spec:
  Device Mode:  NetDevice
  Vpc:          netdevice-vpc
  Vpc Subnet:   netdevice-subnet
Status:
  Conditions:
    Last Transition Time:  2023-07-30T22:39:43Z
    Message:
    Reason:                GNPReady
    Status:                True
    Type:                  Ready
  Network Name:            netdevice-network
  Pod CID Rs:
    Cidr Blocks:
      192.168.10.0/24
Events:  <none>
10. Crea le reti L3
Nei passaggi successivi genererai un oggetto Kubernetes Network e GKENetworkParamSet per creare la rete L3 che verrà utilizzata per associare i pod nei passaggi successivi.
Crea l'oggetto di rete L3
In Cloud Shell, crea l'oggetto di rete YAML l3-network.yaml utilizzando l'editor VI o nano. Tieni presente che "routes to" è la subnet 172.16.20.0/28 (l3-apache) in l3-vpc.
apiVersion: networking.gke.io/v1
kind: Network
metadata:
  name: l3-network
spec:
  type: "L3"
  parametersRef:
    group: networking.gke.io
    kind: GKENetworkParamSet
    name: "l3-network"
  routes:
  - to: "172.16.20.0/28"
In Cloud Shell, applica l3-network.yaml:
kubectl apply -f l3-network.yaml
In Cloud Shell, verifica che il tipo di stato della rete L3 sia Pronto.
kubectl describe networks l3-network
Esempio:
user@$ kubectl describe networks l3-network
Name:         l3-network
Namespace:
Labels:       <none>
Annotations:  networking.gke.io/in-use: false
API Version:  networking.gke.io/v1
Kind:         Network
Metadata:
  Creation Timestamp:  2023-07-30T22:43:54Z
  Generation:          1
  Resource Version:    1582307
  UID:                 426804be-35c9-4cc5-bd26-00b94be2ef9a
Spec:
  Parameters Ref:
    Group:  networking.gke.io
    Kind:   GKENetworkParamSet
    Name:   l3-network
  Routes:
  to:  172.16.20.0/28
  Type:  L3
Status:
  Conditions:
    Last Transition Time:  2023-07-30T22:43:54Z
    Message:               GKENetworkParamSet resource was deleted: l3-network
    Reason:                GNPDeleted
    Status:                False
    Type:                  ParamsReady
    Last Transition Time:  2023-07-30T22:43:54Z
    Message:               Resource referenced by params is not ready
    Reason:                ParamsNotReady
    Status:                False
    Type:                  Ready
Events:                    <none>
Crea GKENetworkParamSet
In Cloud Shell, crea l'oggetto di rete YAML l3-network-parm.yaml utilizzando l'editor VI o nano. Tieni presente che le specifiche vengono mappate al deployment della subnet l3-vpc.
apiVersion: networking.gke.io/v1
kind: GKENetworkParamSet
metadata:
  name: "l3-network"
spec:
  vpc: "l3-vpc"
  vpcSubnet: "l3-subnet"
  podIPv4Ranges:
    rangeNames:
    - "sec-range-l3-subnet"
In Cloud Shell, applica l3-network-parm.yaml
kubectl apply -f l3-network-parm.yaml
In Cloud Shell, verifica che il motivo dello stato di l3-network sia GNPParmsReady e NetworkReady:
kubectl describe networks l3-network
Esempio:
user@$ kubectl describe networks l3-network
Name:         l3-network
Namespace:
Labels:       <none>
Annotations:  networking.gke.io/in-use: false
API Version:  networking.gke.io/v1
Kind:         Network
Metadata:
  Creation Timestamp:  2023-07-30T22:43:54Z
  Generation:          1
  Resource Version:    1583647
  UID:                 426804be-35c9-4cc5-bd26-00b94be2ef9a
Spec:
  Parameters Ref:
    Group:  networking.gke.io
    Kind:   GKENetworkParamSet
    Name:   l3-network
  Routes:
    To:  172.16.20.0/28
  Type:  L3
Status:
  Conditions:
    Last Transition Time:  2023-07-30T22:46:14Z
    Message:
    Reason:                GNPParamsReady
    Status:                True
    Type:                  ParamsReady
    Last Transition Time:  2023-07-30T22:46:14Z
    Message:
    Reason:                NetworkReady
    Status:                True
    Type:                  Ready
Events:                    <none>
In Cloud Shell, convalida il CIDR di rete L3 10.0.8.0/21 di gkenetworkparamset utilizzato per creare l'interfaccia del pod.
kubectl describe gkenetworkparamsets.networking.gke.io l3-network
Esempio:
user@$ kubectl describe gkenetworkparamsets.networking.gke.io l3-network
Name:         l3-network
Namespace:
Labels:       <none>
Annotations:  <none>
API Version:  networking.gke.io/v1
Kind:         GKENetworkParamSet
Metadata:
  Creation Timestamp:  2023-07-30T22:46:14Z
  Finalizers:
    networking.gke.io/gnp-controller
  Generation:        1
  Resource Version:  1583656
  UID:               4c1f521b-0088-4005-b000-626ca5205326
Spec:
  podIPv4Ranges:
    Range Names:
      sec-range-l3-subnet
  Vpc:         l3-vpc
  Vpc Subnet:  l3-subnet
Status:
  Conditions:
    Last Transition Time:  2023-07-30T22:46:14Z
    Message:
    Reason:                GNPReady
    Status:                True
    Type:                  Ready
  Network Name:            l3-network
  Pod CID Rs:
    Cidr Blocks:
      10.0.8.0/21
Events:  <none>
11. Crea netdevice-l3-pod
Nella sezione seguente, creerai netdevice-l3-pod che esegue busybox, noto come "coltellino svizzero" che supporta più di 300 comandi comuni. Il pod è configurato per comunicare con l3-vpc utilizzando eth1 e netdevice-vpc utilizzando eth2.
In Cloud Shell, crea il contenitore busy box denominato netdevice-l3-pod.yaml utilizzando l'editor VI o nano.
apiVersion: v1
kind: Pod
metadata:
  name: netdevice-l3-pod
  annotations:
    networking.gke.io/default-interface: 'eth0'
    networking.gke.io/interfaces: |
      [
      {"interfaceName":"eth0","network":"default"},
      {"interfaceName":"eth1","network":"l3-network"},
      {"interfaceName":"eth2","network":"netdevice-network"}
      ]
spec:
  containers:
  - name: netdevice-l3-pod
    image: busybox
    command: ["sleep", "10m"]
    ports:
    - containerPort: 80
  restartPolicy: Always
In Cloud Shell, applica netdevice-l3-pod.yaml
kubectl apply -f netdevice-l3-pod.yaml
Convalida la creazione di netdevice-l3-pod
In Cloud Shell, verifica che netdevice-l3-pod sia in esecuzione:
kubectl get pods netdevice-l3-pod
Esempio:
user@$ kubectl get pods netdevice-l3-pod
NAME               READY   STATUS    RESTARTS   AGE
netdevice-l3-pod   1/1     Running   0          74s
In Cloud Shell, convalida gli indirizzi IP assegnati alle interfacce del pod.
kubectl get pods netdevice-l3-pod -o yaml
Nell'esempio fornito, il campo networking.gke.io/pod-ips contiene gli indirizzi IP associati alle interfacce del pod dalle reti l3-network e netdevice-network. L'indirizzo IP di rete predefinito 10.0.1.22 è descritto in dettaglio in podIPs:
user@$ kubectl get pods netdevice-l3-pod -o yaml
apiVersion: v1
kind: Pod
metadata:
  annotations:
    kubectl.kubernetes.io/last-applied-configuration: |
      {"apiVersion":"v1","kind":"Pod","metadata":{"annotations":{"networking.gke.io/default-interface":"eth0","networking.gke.io/interfaces":"[\n{\"interfaceName\":\"eth0\",\"network\":\"default\"},\n{\"interfaceName\":\"eth1\",\"network\":\"l3-network\"},\n{\"interfaceName\":\"eth2\",\"network\":\"netdevice-network\"}\n]\n"},"name":"netdevice-l3-pod","namespace":"default"},"spec":{"containers":[{"command":["sleep","10m"],"image":"busybox","name":"netdevice-l3-pod","ports":[{"containerPort":80}]}],"restartPolicy":"Always"}}
    networking.gke.io/default-interface: eth0
    networking.gke.io/interfaces: |
      [
      {"interfaceName":"eth0","network":"default"},
      {"interfaceName":"eth1","network":"l3-network"},
      {"interfaceName":"eth2","network":"netdevice-network"}
      ]
    networking.gke.io/pod-ips: '[{"networkName":"l3-network","ip":"10.0.8.4"},{"networkName":"netdevice-network","ip":"192.168.10.2"}]'
  creationTimestamp: "2023-07-30T22:49:27Z"
  name: netdevice-l3-pod
  namespace: default
  resourceVersion: "1585567"
  uid: d9e43c75-e0d1-4f31-91b0-129bc53bbf64
spec:
  containers:
  - command:
    - sleep
    - 10m
    image: busybox
    imagePullPolicy: Always
    name: netdevice-l3-pod
    ports:
    - containerPort: 80
      protocol: TCP
    resources:
      limits:
        networking.gke.io.networks/l3-network.IP: "1"
        networking.gke.io.networks/netdevice-network: "1"
        networking.gke.io.networks/netdevice-network.IP: "1"
      requests:
        networking.gke.io.networks/l3-network.IP: "1"
        networking.gke.io.networks/netdevice-network: "1"
        networking.gke.io.networks/netdevice-network.IP: "1"
    terminationMessagePath: /dev/termination-log
    terminationMessagePolicy: File
    volumeMounts:
    - mountPath: /var/run/secrets/kubernetes.io/serviceaccount
      name: kube-api-access-f2wpb
      readOnly: true
  dnsPolicy: ClusterFirst
  enableServiceLinks: true
  nodeName: gke-multinic-gke-multinic-node-pool-135699a1-86gz
  preemptionPolicy: PreemptLowerPriority
  priority: 0
  restartPolicy: Always
  schedulerName: default-scheduler
  securityContext: {}
  serviceAccount: default
  serviceAccountName: default
  terminationGracePeriodSeconds: 30
  tolerations:
  - effect: NoExecute
    key: node.kubernetes.io/not-ready
    operator: Exists
    tolerationSeconds: 300
  - effect: NoExecute
    key: node.kubernetes.io/unreachable
    operator: Exists
    tolerationSeconds: 300
  - effect: NoSchedule
    key: networking.gke.io.networks/l3-network.IP
    operator: Exists
  - effect: NoSchedule
    key: networking.gke.io.networks/netdevice-network
    operator: Exists
  - effect: NoSchedule
    key: networking.gke.io.networks/netdevice-network.IP
    operator: Exists
  volumes:
  - name: kube-api-access-f2wpb
    projected:
      defaultMode: 420
      sources:
      - serviceAccountToken:
          expirationSeconds: 3607
          path: token
      - configMap:
          items:
          - key: ca.crt
            path: ca.crt
          name: kube-root-ca.crt
      - downwardAPI:
          items:
          - fieldRef:
              apiVersion: v1
              fieldPath: metadata.namespace
            path: namespace
status:
  conditions:
  - lastProbeTime: null
    lastTransitionTime: "2023-07-30T22:49:28Z"
    status: "True"
    type: Initialized
  - lastProbeTime: null
    lastTransitionTime: "2023-07-30T22:49:33Z"
    status: "True"
    type: Ready
  - lastProbeTime: null
    lastTransitionTime: "2023-07-30T22:49:33Z"
    status: "True"
    type: ContainersReady
  - lastProbeTime: null
    lastTransitionTime: "2023-07-30T22:49:28Z"
    status: "True"
    type: PodScheduled
  containerStatuses:
  - containerID: containerd://dcd9ead2f69824ccc37c109a47b1f3f5eb7b3e60ce3865e317dd729685b66a5c
    image: docker.io/library/busybox:latest
    imageID: docker.io/library/busybox@sha256:3fbc632167424a6d997e74f52b878d7cc478225cffac6bc977eedfe51c7f4e79
    lastState: {}
    name: netdevice-l3-pod
    ready: true
    restartCount: 0
    started: true
    state:
      running:
        startedAt: "2023-07-30T22:49:32Z"
  hostIP: 192.168.0.4
  phase: Running
  podIP: 10.0.1.22
  podIPs:
  - ip: 10.0.1.22
  qosClass: BestEffort
  startTime: "2023-07-30T22:49:28Z"
Convalida delle route netdevice-l3-pod
In Cloud Shell, convalida le route a netdevice-vpc e l3-vpc da netdevice-l3-pod:
kubectl exec --stdin --tty netdevice-l3-pod -- /bin/sh
Forma l'istanza, convalida le interfacce del pod:
ifconfig
Nell'esempio, eth0 è connesso alla rete predefinita, eth1 è connesso alla rete l3 e eth2 è connesso alla rete netdevice.
/ # ifconfig
eth0      Link encap:Ethernet  HWaddr 26:E3:1B:14:6E:0C
          inet addr:10.0.1.22  Bcast:10.0.1.255  Mask:255.255.255.0
          UP BROADCAST RUNNING MULTICAST  MTU:1460  Metric:1
          RX packets:5 errors:0 dropped:0 overruns:0 frame:0
          TX packets:7 errors:0 dropped:0 overruns:0 carrier:0
          collisions:0 txqueuelen:0
          RX bytes:446 (446.0 B)  TX bytes:558 (558.0 B)

eth1      Link encap:Ethernet  HWaddr 92:78:4E:CB:F2:D4
          inet addr:10.0.8.4  Bcast:0.0.0.0  Mask:255.255.255.255
          UP BROADCAST RUNNING MULTICAST  MTU:1460  Metric:1
          RX packets:5 errors:0 dropped:0 overruns:0 frame:0
          TX packets:6 errors:0 dropped:0 overruns:0 carrier:0
          collisions:0 txqueuelen:1000
          RX bytes:446 (446.0 B)  TX bytes:516 (516.0 B)

eth2      Link encap:Ethernet  HWaddr 42:01:C0:A8:0A:02
          inet addr:192.168.10.2  Bcast:0.0.0.0  Mask:255.255.255.255
          UP BROADCAST RUNNING MULTICAST  MTU:1460  Metric:1
          RX packets:73 errors:0 dropped:0 overruns:0 frame:0
          TX packets:50581 errors:0 dropped:0 overruns:0 carrier:0
          collisions:0 txqueuelen:1000
          RX bytes:26169 (25.5 KiB)  TX bytes:2148170 (2.0 MiB)

lo        Link encap:Local Loopback
          inet addr:127.0.0.1  Mask:255.0.0.0
          UP LOOPBACK RUNNING  MTU:65536  Metric:1
          RX packets:0 errors:0 dropped:0 overruns:0 frame:0
          TX packets:0 errors:0 dropped:0 overruns:0 carrier:0
          collisions:0 txqueuelen:1000
          RX bytes:0 (0.0 B)  TX bytes:0 (0.0 B)
Da netdevice-l3-pod, convalida le route a netdevice-vpc (172.16.10.0/28) e l3-vpc (172.16.20.0/28).
Crea l'istanza, convalida le route del pod:
ip route
Esempio:
/ # ip route
default via 10.0.1.1 dev eth0 #primary-vpc
10.0.1.0/24 via 10.0.1.1 dev eth0  src 10.0.1.22
10.0.1.1 dev eth0 scope link  src 10.0.1.22
10.0.8.0/21 via 10.0.8.1 dev eth1 #l3-vpc (sec-range-l3-subnet)
10.0.8.1 dev eth1 scope link
172.16.10.0/28 via 192.168.10.1 dev eth2 #netdevice-vpc (netdevice-apache subnet)
172.16.20.0/28 via 10.0.8.1 dev eth1 #l3-vpc (l3-apache subnet)
192.168.10.0/24 via 192.168.10.1 dev eth2 #pod interface subnet
192.168.10.1 dev eth2 scope link
Per tornare a Cloud Shell, esci dal pod dall'istanza.
exit
12. Crea l3-pod
Nella sezione seguente creerai il pod l3 che esegue busybox, noto come "coltellino svizzero" che supporta più di 300 comandi comuni. Il pod è configurato per comunicare con l3-vpc utilizzando solo eth1.
In Cloud Shell, crea il container busy box denominato l3-pod.yaml utilizzando l'editor VI o nano.
apiVersion: v1
kind: Pod
metadata:
  name: l3-pod
  annotations:
    networking.gke.io/default-interface: 'eth0'
    networking.gke.io/interfaces: |
      [
      {"interfaceName":"eth0","network":"default"},
      {"interfaceName":"eth1","network":"l3-network"}
      ]
spec:
  containers:
  - name: l3-pod
    image: busybox
    command: ["sleep", "10m"]
    ports:
    - containerPort: 80
  restartPolicy: Always
In Cloud Shell, applica l3-pod.yaml
kubectl apply -f l3-pod.yaml
Convalida la creazione di l3-pod
In Cloud Shell, verifica che netdevice-l3-pod sia in esecuzione:
kubectl get pods l3-pod
Esempio:
user@$ kubectl get pods l3-pod
NAME     READY   STATUS    RESTARTS   AGE
l3-pod   1/1     Running   0          52s
In Cloud Shell, convalida gli indirizzi IP assegnati alle interfacce del pod.
kubectl get pods l3-pod -o yaml
Nell'esempio fornito, il campo networking.gke.io/pod-ips contiene gli indirizzi IP associati alle interfacce pod della rete L3. L'indirizzo IP di rete predefinito 10.0.2.12 è descritto in dettaglio in podIPs:
user@$ kubectl get pods l3-pod -o yaml
apiVersion: v1
kind: Pod
metadata:
  annotations:
    kubectl.kubernetes.io/last-applied-configuration: |
      {"apiVersion":"v1","kind":"Pod","metadata":{"annotations":{"networking.gke.io/default-interface":"eth0","networking.gke.io/interfaces":"[\n{\"interfaceName\":\"eth0\",\"network\":\"default\"},\n{\"interfaceName\":\"eth1\",\"network\":\"l3-network\"}\n]\n"},"name":"l3-pod","namespace":"default"},"spec":{"containers":[{"command":["sleep","10m"],"image":"busybox","name":"l3-pod","ports":[{"containerPort":80}]}],"restartPolicy":"Always"}}
    networking.gke.io/default-interface: eth0
    networking.gke.io/interfaces: |
      [
      {"interfaceName":"eth0","network":"default"},
      {"interfaceName":"eth1","network":"l3-network"}
      ]
    networking.gke.io/pod-ips: '[{"networkName":"l3-network","ip":"10.0.8.22"}]'
  creationTimestamp: "2023-07-30T23:22:29Z"
  name: l3-pod
  namespace: default
  resourceVersion: "1604447"
  uid: 79a86afd-2a50-433d-9d48-367acb82c1d0
spec:
  containers:
  - command:
    - sleep
    - 10m
    image: busybox
    imagePullPolicy: Always
    name: l3-pod
    ports:
    - containerPort: 80
      protocol: TCP
    resources:
      limits:
        networking.gke.io.networks/l3-network.IP: "1"
      requests:
        networking.gke.io.networks/l3-network.IP: "1"
    terminationMessagePath: /dev/termination-log
    terminationMessagePolicy: File
    volumeMounts:
    - mountPath: /var/run/secrets/kubernetes.io/serviceaccount
      name: kube-api-access-w9d24
      readOnly: true
  dnsPolicy: ClusterFirst
  enableServiceLinks: true
  nodeName: gke-multinic-gke-multinic-node-pool-135699a1-t66p
  preemptionPolicy: PreemptLowerPriority
  priority: 0
  restartPolicy: Always
  schedulerName: default-scheduler
  securityContext: {}
  serviceAccount: default
  serviceAccountName: default
  terminationGracePeriodSeconds: 30
  tolerations:
  - effect: NoExecute
    key: node.kubernetes.io/not-ready
    operator: Exists
    tolerationSeconds: 300
  - effect: NoExecute
    key: node.kubernetes.io/unreachable
    operator: Exists
    tolerationSeconds: 300
  - effect: NoSchedule
    key: networking.gke.io.networks/l3-network.IP
    operator: Exists
  volumes:
  - name: kube-api-access-w9d24
    projected:
      defaultMode: 420
      sources:
      - serviceAccountToken:
          expirationSeconds: 3607
          path: token
      - configMap:
          items:
          - key: ca.crt
            path: ca.crt
          name: kube-root-ca.crt
      - downwardAPI:
          items:
          - fieldRef:
              apiVersion: v1
              fieldPath: metadata.namespace
            path: namespace
status:
  conditions:
  - lastProbeTime: null
    lastTransitionTime: "2023-07-30T23:22:29Z"
    status: "True"
    type: Initialized
  - lastProbeTime: null
    lastTransitionTime: "2023-07-30T23:22:35Z"
    status: "True"
    type: Ready
  - lastProbeTime: null
    lastTransitionTime: "2023-07-30T23:22:35Z"
    status: "True"
    type: ContainersReady
  - lastProbeTime: null
    lastTransitionTime: "2023-07-30T23:22:29Z"
    status: "True"
    type: PodScheduled
  containerStatuses:
  - containerID: containerd://1d5fe2854bba0a0d955c157a58bcfd4e34cecf8837edfd7df2760134f869e966
    image: docker.io/library/busybox:latest
    imageID: docker.io/library/busybox@sha256:3fbc632167424a6d997e74f52b878d7cc478225cffac6bc977eedfe51c7f4e79
    lastState: {}
    name: l3-pod
    ready: true
    restartCount: 0
    started: true
    state:
      running:
        startedAt: "2023-07-30T23:22:35Z"
  hostIP: 192.168.0.5
  phase: Running
  podIP: 10.0.2.12
  podIPs:
  - ip: 10.0.2.12
  qosClass: BestEffort
  startTime: "2023-07-30T23:22:29Z"
Convalidare le route l3-pod
In Cloud Shell, convalida le route a l3-vpc da netdevice-l3-pod:
kubectl exec --stdin --tty l3-pod -- /bin/sh
Forma l'istanza, convalida le interfacce del pod:
ifconfig
Nell'esempio, eth0 è connesso alla rete predefinita, eth1 è connesso alla rete l3.
/ # ifconfig
eth0      Link encap:Ethernet  HWaddr 22:29:30:09:6B:58
          inet addr:10.0.2.12  Bcast:10.0.2.255  Mask:255.255.255.0
          UP BROADCAST RUNNING MULTICAST  MTU:1460  Metric:1
          RX packets:5 errors:0 dropped:0 overruns:0 frame:0
          TX packets:7 errors:0 dropped:0 overruns:0 carrier:0
          collisions:0 txqueuelen:0
          RX bytes:446 (446.0 B)  TX bytes:558 (558.0 B)

eth1      Link encap:Ethernet  HWaddr 6E:6D:FC:C3:FF:AF
          inet addr:10.0.8.22  Bcast:0.0.0.0  Mask:255.255.255.255
          UP BROADCAST RUNNING MULTICAST  MTU:1460  Metric:1
          RX packets:5 errors:0 dropped:0 overruns:0 frame:0
          TX packets:6 errors:0 dropped:0 overruns:0 carrier:0
          collisions:0 txqueuelen:1000
          RX bytes:446 (446.0 B)  TX bytes:516 (516.0 B)

lo        Link encap:Local Loopback
          inet addr:127.0.0.1  Mask:255.0.0.0
          UP LOOPBACK RUNNING  MTU:65536  Metric:1
          RX packets:0 errors:0 dropped:0 overruns:0 frame:0
          TX packets:0 errors:0 dropped:0 overruns:0 carrier:0
          collisions:0 txqueuelen:1000
          RX bytes:0 (0.0 B)  TX bytes:0 (0.0 B)
Dal pod l3, convalida le route al VPC l3 (172.16.20.0/28).
Crea l'istanza, convalida le route del pod:
ip route
Esempio:
/ # ip route
default via 10.0.2.1 dev eth0 #primary-vpc
10.0.2.0/24 via 10.0.2.1 dev eth0  src 10.0.2.12
10.0.2.1 dev eth0 scope link  src 10.0.2.12
10.0.8.0/21 via 10.0.8.17 dev eth1 #l3-vpc (sec-range-l3-subnet)
10.0.8.17 dev eth1 scope link #pod interface subnet
172.16.20.0/28 via 10.0.8.17 dev eth1 #l3-vpc (l3-apache subnet)
Per tornare a Cloud Shell, esci dal pod dall'istanza.
exit
13. Aggiornamenti del firewall
Per consentire la connettività dal pool multicnic di GKE a netdevice-vpc, sono necessarie regole firewall in entrata l3-vpc. Creerai regole firewall che specificano l'intervallo di origine come la subnet di rete del pod, ad esempio netdevice-subnet, sec-range-l3-subnet.
Ad esempio, il container creato di recente, l3-pod, l'interfaccia eth2 10.0.8.22 (allocata da sec-range-l3-subnet) è l'indirizzo IP di origine quando ci si connette all'istanza l3-apache in l3-vpc.
netdevice-vpc: Allow from netdevice-subnet to netdevice-apache
In Cloud Shell, crea la regola firewall in netdevice-vpc che consente l'accesso di netdevice-subnet all'istanza netdevice-apache.
gcloud compute --project=$projectid firewall-rules create allow-ingress-from-netdevice-network-to-all-vpc-instances --direction=INGRESS --priority=1000 --network=netdevice-vpc --action=ALLOW --rules=all --source-ranges=192.168.10.0/24 --enable-logging
l3-vpc: Allow from sec-range-l3-subnet to l3-apache
In Cloud Shell, crea la regola firewall in l3-vpc che consente l'accesso di sec-range-l3-subnet all'istanza l3-apache.
gcloud compute --project=$projectid firewall-rules create allow-ingress-from-l3-network-to-all-vpc-instances --direction=INGRESS --priority=1000 --network=l3-vpc --action=ALLOW --rules=all --source-ranges=10.0.8.0/21 --enable-logging
14. Convalida la connettività dei pod
Nella sezione seguente, verificherai la connettività alle istanze Apache da netdevice-l3-pod e l3-pod accedendo ai pod ed eseguendo un comando wget -S che convalida il download della home page dei server Apache. Poiché netdevice-l3-pod è configurato con interfacce di netdevice-network e l3-network, è possibile la connettività ai server Apache in netdevice-vpc e l3-vpc.
Al contrario, quando esegui un wget -S dal pod l3, la connettività al server Apache in netdevice-vpc non è possibile perché il pod l3 è configurato solo con un'interfaccia della rete l3.
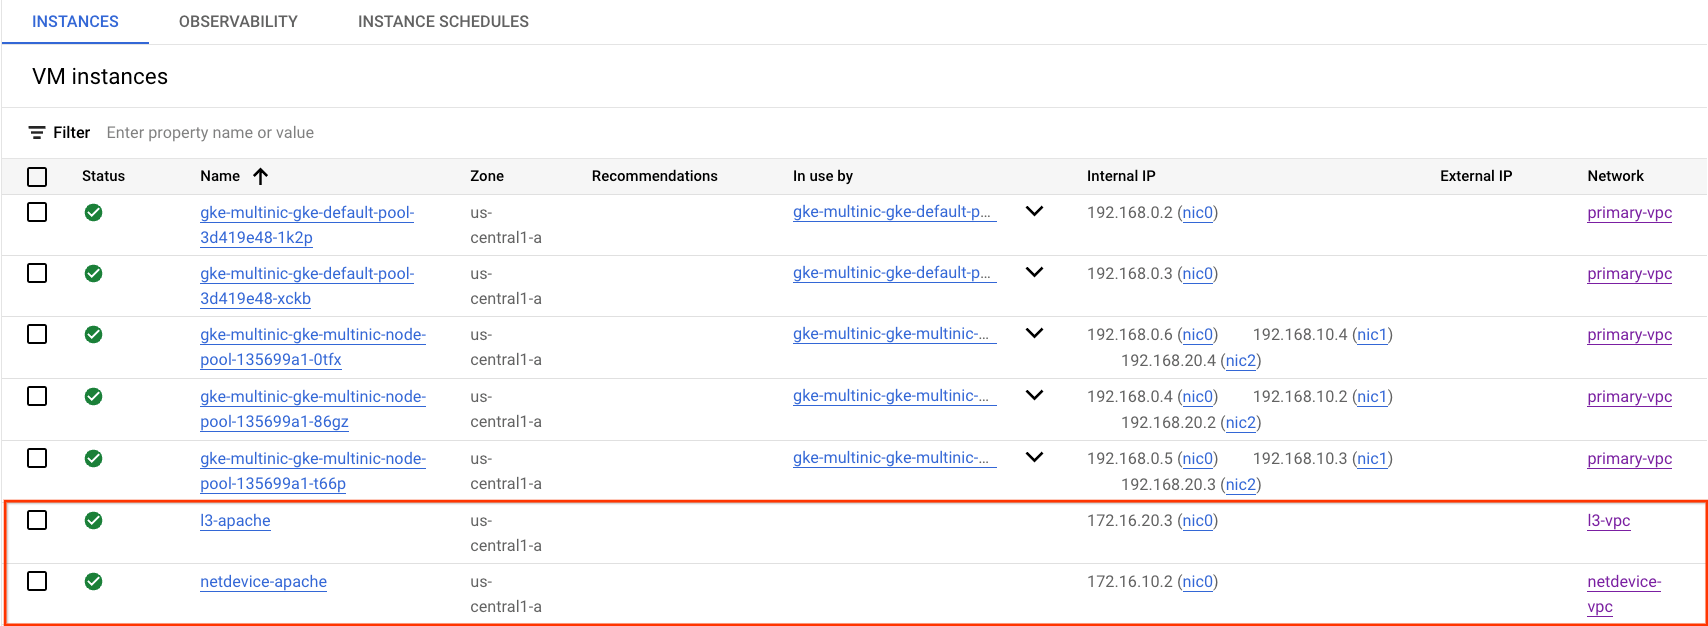
Ottenere l'indirizzo IP del server Apache
Da Cloud Console, ottieni l'indirizzo IP dei server Apache andando a Compute Engine → Istanze VM.
Test di connettività da netdevice-l3-pod a netdevice-apache
In Cloud Shell, accedi a netdevice-l3-pod:
kubectl exec --stdin --tty netdevice-l3-pod -- /bin/sh
Dal container, esegui il ping dell'istanza netdevice-apache in base all'indirizzo IP ottenuto nel passaggio precedente.
ping <insert-your-ip> -c 4
Esempio:
/ #  ping 172.16.10.2 -c 4
PING 172.16.10.2 (172.16.10.2): 56 data bytes
64 bytes from 172.16.10.2: seq=0 ttl=64 time=1.952 ms
64 bytes from 172.16.10.2: seq=1 ttl=64 time=0.471 ms
64 bytes from 172.16.10.2: seq=2 ttl=64 time=0.446 ms
64 bytes from 172.16.10.2: seq=3 ttl=64 time=0.505 ms

--- 172.16.10.2 ping statistics ---
4 packets transmitted, 4 packets received, 0% packet loss
round-trip min/avg/max = 0.446/0.843/1.952 ms
/ #
In Cloud Shell, esegui un comando wget -S sull'istanza netdevice-apache in base all'indirizzo IP ottenuto dal passaggio precedente. 200 OK indica che il download della pagina web è andato a buon fine.
wget -S <insert-your-ip>
Esempio:
/ # wget -S 172.16.10.2
Connecting to 172.16.10.2 (172.16.10.2:80)
  HTTP/1.1 200 OK
  Date: Mon, 31 Jul 2023 03:12:58 GMT
  Server: Apache/2.4.56 (Debian)
  Last-Modified: Sat, 29 Jul 2023 00:32:44 GMT
  ETag: "2c-6019555f54266"
  Accept-Ranges: bytes
  Content-Length: 44
  Connection: close
  Content-Type: text/html

saving to 'index.html'
index.html           100% |********************************|    44  0:00:00 ETA
'index.html' saved
/ #
Test di connettività da netdevice-l3-pod a l3-apache
In Cloud Shell, esegui il ping dell'istanza l3-apache in base all'indirizzo IP ottenuto nel passaggio precedente.
ping <insert-your-ip> -c 4
Esempio:
/ # ping 172.16.20.3 -c 4
PING 172.16.20.3 (172.16.20.3): 56 data bytes
64 bytes from 172.16.20.3: seq=0 ttl=63 time=2.059 ms
64 bytes from 172.16.20.3: seq=1 ttl=63 time=0.533 ms
64 bytes from 172.16.20.3: seq=2 ttl=63 time=0.485 ms
64 bytes from 172.16.20.3: seq=3 ttl=63 time=0.462 ms

--- 172.16.20.3 ping statistics ---
4 packets transmitted, 4 packets received, 0% packet loss
round-trip min/avg/max = 0.462/0.884/2.059 ms
/ #
In Cloud Shell, elimina il file index.html precedente ed esegui un comando wget -S sull'istanza l3-apache in base all'indirizzo IP ottenuto nel passaggio precedente. 200 OK indica che il download della pagina web è andato a buon fine.
rm index.html
wget -S <insert-your-ip>
Esempio:
/ # rm index.html
/ # wget -S 172.16.20.3
Connecting to 172.16.20.3 (172.16.20.3:80)
  HTTP/1.1 200 OK
  Date: Mon, 31 Jul 2023 03:41:32 GMT
  Server: Apache/2.4.56 (Debian)
  Last-Modified: Mon, 31 Jul 2023 03:24:21 GMT
  ETag: "25-601bff76f04b7"
  Accept-Ranges: bytes
  Content-Length: 37
  Connection: close
  Content-Type: text/html

saving to 'index.html'
index.html           100% |*******************************************************************************************************|    37  0:00:00 ETA
'index.html' saved
Per tornare a Cloud Shell, esci dal pod dall'istanza.
exit
Test di connettività da l3-pod a netdevice-apache
In Cloud Shell, accedi a l3-pod:
kubectl exec --stdin --tty l3-pod -- /bin/sh
Dal container, esegui il ping dell'istanza netdevice-apache in base all'indirizzo IP ottenuto nel passaggio precedente. Poiché l3-pod non ha un'interfaccia associata a netdevice-network, il ping non andrà a buon fine.
ping <insert-your-ip> -c 4
Esempio:
/ # ping 172.16.10.2 -c 4
PING 172.16.10.2 (172.16.10.2): 56 data bytes


--- 172.16.10.2 ping statistics ---
4 packets transmitted, 0 packets received, 100% packet loss
(Facoltativo) In Cloud Shell, esegui un wget -S sull'istanza netdevice-apache in base all'indirizzo IP ottenuto dal passaggio precedente che andrà in timeout.
wget -S <insert-your-ip>
Esempio:
/ # wget -S 172.16.10.2
Connecting to 172.16.10.2 (172.16.10.2:80)
wget: can't connect to remote host (172.16.10.2): Connection timed out
Test di connettività da l3-pod a l3-apache
In Cloud Shell, esegui il ping dell'istanza l3-apache in base all'indirizzo IP ottenuto nel passaggio precedente.
ping <insert-your-ip> -c 4
Esempio:
/ # ping 172.16.20.3 -c 4
PING 172.16.20.3 (172.16.20.3): 56 data bytes
64 bytes from 172.16.20.3: seq=0 ttl=63 time=1.824 ms
64 bytes from 172.16.20.3: seq=1 ttl=63 time=0.513 ms
64 bytes from 172.16.20.3: seq=2 ttl=63 time=0.482 ms
64 bytes from 172.16.20.3: seq=3 ttl=63 time=0.532 ms

--- 172.16.20.3 ping statistics ---
4 packets transmitted, 4 packets received, 0% packet loss
round-trip min/avg/max = 0.482/0.837/1.824 ms
/ #
In Cloud Shell, esegui un comando wget -S sull'istanza l3-apache in base all'indirizzo IP ottenuto nel passaggio precedente. Il codice 200 OK indica che il download della pagina web è andato a buon fine.
wget -S <insert-your-ip>
Esempio:
/ # wget -S 172.16.20.3
Connecting to 172.16.20.3 (172.16.20.3:80)
  HTTP/1.1 200 OK
  Date: Mon, 31 Jul 2023 03:52:08 GMT
  Server: Apache/2.4.56 (Debian)
  Last-Modified: Mon, 31 Jul 2023 03:24:21 GMT
  ETag: "25-601bff76f04b7"
  Accept-Ranges: bytes
  Content-Length: 37
  Connection: close
  Content-Type: text/html

saving to 'index.html'
index.html           100% |*******************************************************************************************************|    37  0:00:00 ETA
'index.html' saved
/ #
15. Log dei firewall
Il logging delle regole del firewall consente di controllare, verificare e analizzare gli effetti delle regole del firewall. Ad esempio, puoi determinare se una regola firewall progettata per negare il traffico funziona come previsto. Il logging delle regole firewall è utile anche se devi determinare quante connessioni sono interessate da una determinata regola firewall.
Nel tutorial hai abilitato il logging del firewall durante la creazione delle regole firewall in entrata. Diamo un'occhiata alle informazioni ottenute dai log.
Dalla console Cloud, vai a Logging → Esplora log.
Inserisci la query riportata di seguito in base allo screenshot e seleziona Esegui query jsonPayload.rule_details.reference:("network:l3-vpc/firewall:allow-ingress-from-l3-network-to-all-vpc-instances")
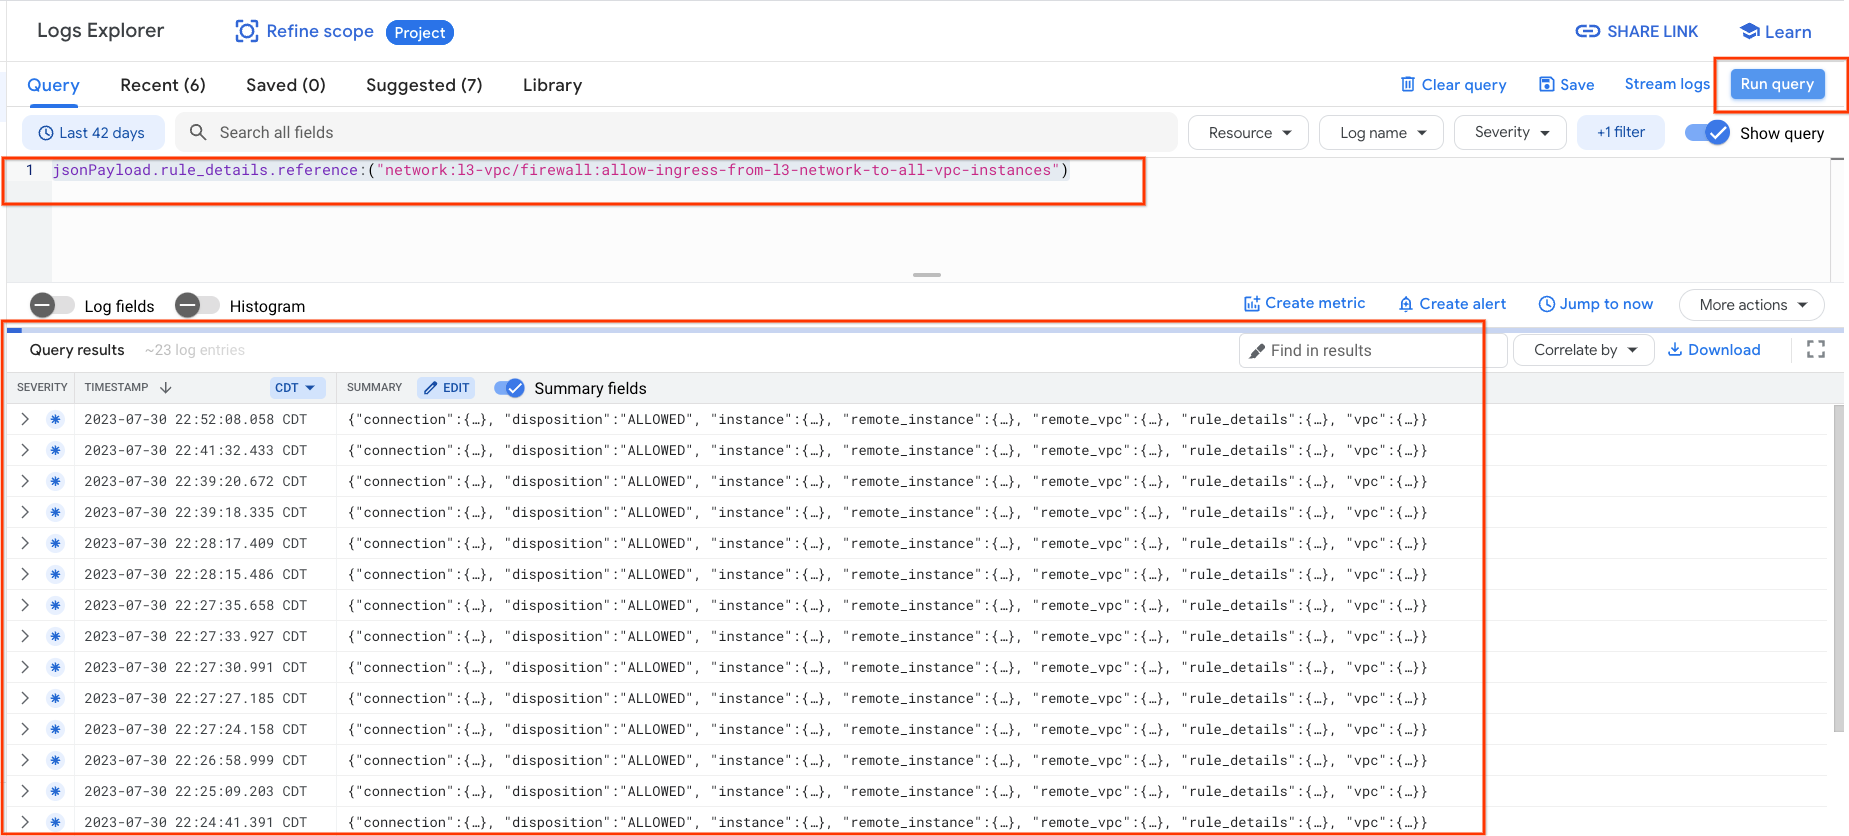
Un'analisi più approfondita di un'acquisizione fornisce elementi informativi per gli amministratori della sicurezza, che vanno dall'indirizzo IP di origine e di destinazione, alla porta, al protocollo e al nome del pool di nodi.
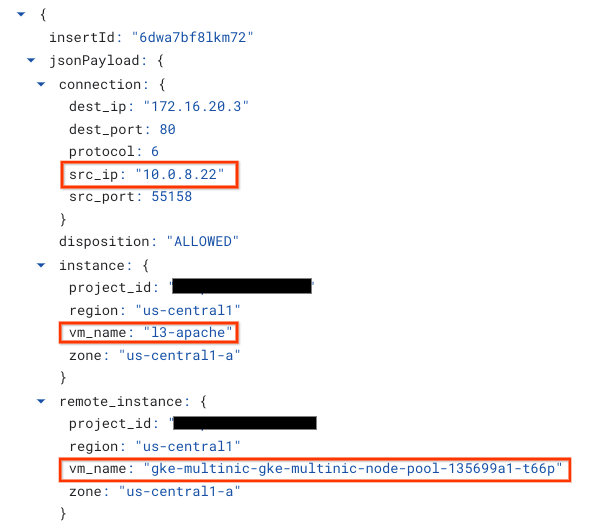
Per esplorare ulteriormente i log firewall, vai a Rete VPC → Firewall → allow-ingress-from-netdevice-network-to-all-vpc-instances, quindi seleziona Visualizza in Esplora log.
16. Esegui la pulizia
Da Cloud Shell, elimina i componenti del tutorial.
gcloud compute instances delete l3-apache netdevice-apache --zone=us-central1-a --quiet

gcloud compute routers delete l3-cr netdevice-cr --region=us-central1 --quiet

gcloud container clusters delete multinic-gke --zone=us-central1-a --quiet

gcloud compute firewall-rules delete allow-ingress-from-l3-network-to-all-vpc-instances allow-ingress-from-netdevice-network-to-all-vpc-instances --quiet

gcloud compute networks subnets delete l3-apache l3-subnet netdevice-apache netdevice-subnet primary-node-subnet --region=us-central1 --quiet

gcloud compute networks delete l3-vpc netdevice-vpc primary-vpc --quiet
17. Complimenti
Congratulazioni, hai configurato e convalidato correttamente la creazione di un nodepool multinic e la creazione di pod che eseguono busybox per convalidare la connettività di livello 3 e del tipo di dispositivo ai server Apache utilizzando PING e wget.
Hai anche imparato a utilizzare i log del firewall per esaminare i pacchetti di origine e di destinazione tra i container dei pod e i server Apache.
Cosmopup pensa che i tutorial siano fantastici.