1. Giriş
GCP, uzun süredir sanal makine örneği düzeyinde birden fazla arayüzü desteklemektedir. Birden çok arayüzle bir sanal makine, farklı VPC'lere en fazla 7 yeni arayüz (varsayılan + 7 arayüz) bağlayabilir. GKE Ağ İletişimi artık bu davranışı düğümlerde çalışan kapsüllere de uyguluyor. Bu özellikten önce GKE kümeleri, tüm NodePool'ların yalnızca tek bir arayüze sahip olmasına ve bu nedenle tek bir VPC ile eşlenmesine izin veriyordu. Kapsüllerde Çoklu Ağ özelliği sayesinde kullanıcılar artık bir GKE kümesindeki düğümlerde ve kapsüllerde birden fazla arayüzü etkinleştirebilir.
Ne oluşturacaksınız?
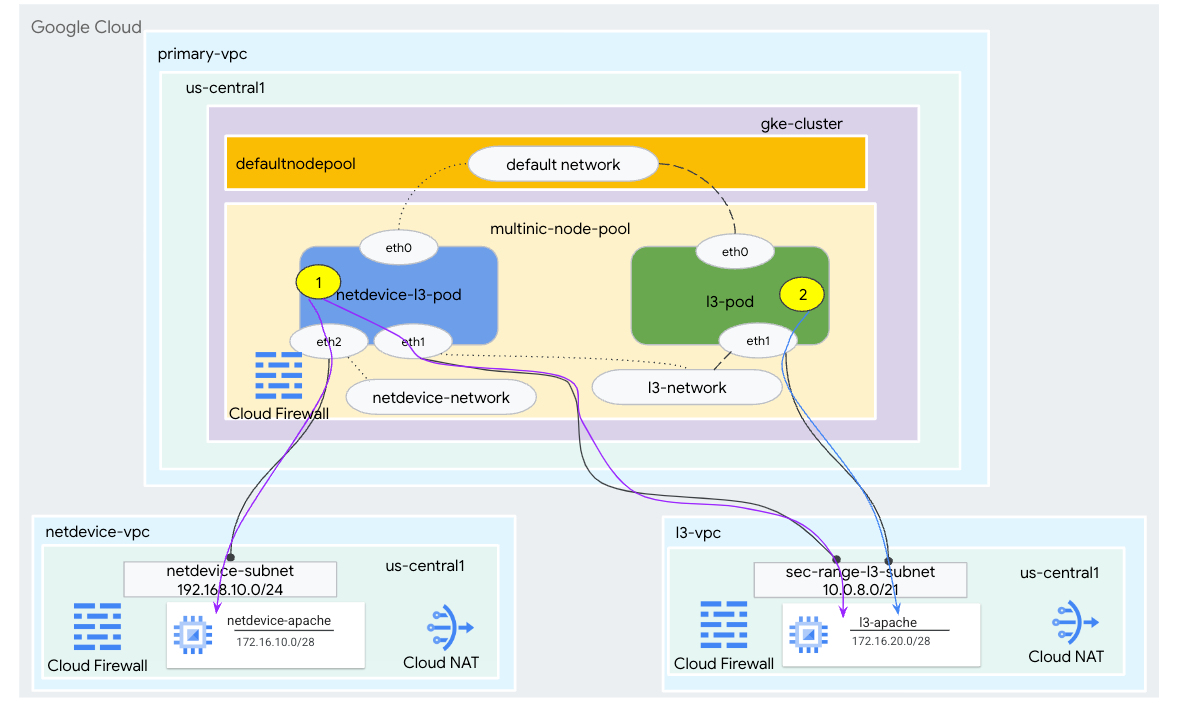
Bu eğitimde, Şekil 1'de gösterilen kullanım alanlarını gösteren kapsamlı bir GKE çoklu NIC ortamı oluşturacaksınız.
- Aşağıdaki işlemleri yapmak için busybox'tan yararlanarak netdevice-l3-pod oluşturun:
- eth2 üzerinden netdevice-vpc'deki netdevice-apache örneğine PING ve wget -S komutunu uygulayın.
- eth1 üzerinden l3-vpc'deki l3-apache örneğine PING ve wget -S komutunu uygulayın.
- eth1 üzerinden l3-apache örneğine PING ve wget -S gerçekleştirmek için busybox'tan yararlanan bir l3-pod oluşturun
Her iki kullanım alanında da pod'un eth0 arayüzü varsayılan ağa bağlıdır.
Şekil 1
Neler öğreneceksiniz?
- L3 türünde alt ağ oluşturma
- Netdevice türünde alt ağ oluşturma
- Çok NIC'li GKE düğüm havuzu oluşturma
- Netdevice ve l3 özelliklerine sahip bir pod oluşturma
- l3 özelliklerine sahip bir pod oluşturma
- GKE nesne ağı oluşturma ve doğrulama
- PING, wget ve güvenlik duvarı günlüklerini kullanarak uzak Apache sunucularına bağlantıyı doğrulama
Gerekenler
- Google Cloud projesi
2. Terminoloji ve Kavramlar
Birincil VPC: Birincil VPC, bir dizi varsayılan ayar ve kaynakla birlikte gelen önceden yapılandırılmış bir VPC'dir. GKE kümesi bu VPC'de oluşturulur.
Alt ağ: Google Cloud'da alt ağ, bir VPC'de ağ maskeleriyle Sınıfsız Alanlar Arası Yönlendirme (CIDR) oluşturmanın yoludur. Bir alt ağın, düğümlere atanan tek bir birincil IP adresi aralığı vardır. Ayrıca, Pod'lara ve Hizmetlere ait olabilecek birden fazla ikincil aralığı olabilir.
Düğüm ağı: Düğüm ağı, VPC ve alt ağ çiftinin özel bir kombinasyonunu ifade eder. Bu düğüm ağında, düğüm havuzuna ait düğümlere birincil IP adresi aralığından IP adresleri atanır.
İkincil aralık: Google Cloud ikincil aralığı, bir VPC'deki bir bölgeye ait bir CIDR ve ağ maskesidir. GKE bunu 3. Katman Pod ağı olarak kullanır. Bir VPC'de birden fazla ikincil aralık olabilir ve bir Pod birden fazla Pod ağına bağlanabilir.
Ağ (L3 veya cihaz): Kapsüller için bağlantı noktası görevi gören bir Ağ nesnesi. Eğitimde ağlar l3-network ve netdevice-network olarak adlandırılır. Cihaz ise netdevice veya dpdk olabilir. Varsayılan ağ zorunludur ve küme oluşturulurken varsayılan düğüm havuzu alt ağına göre oluşturulur.
Katman 3 ağları, bir alt ağdaki ikincil aralığa karşılık gelir ve şu şekilde gösterilir:
VPC -> Alt Ağ Adı -> İkincil Aralık Adı
Cihaz ağı, bir VPC'deki alt ağa karşılık gelir ve şu şekilde gösterilir:
VPC -> Alt Ağ Adı
Varsayılan kapsül ağı: Google Cloud, küme oluşturma sırasında varsayılan bir kapsül ağı oluşturur. Varsayılan Pod ağı, birincil VPC'yi düğüm ağı olarak kullanır. Varsayılan pod ağı, varsayılan olarak tüm küme düğümlerinde ve pod'lerde kullanılabilir.
Birden fazla arayüzü olan kapsüller: GKE'de birden fazla arayüzü olan kapsüller aynı kapsül ağına bağlanamaz. Bunun nedeni, kapsülün her arayüzünün benzersiz bir ağa bağlı olması gerektiğidir.
Projeyi Codelab'i destekleyecek şekilde güncelleme
Bu Codelab'de, Cloud Shell'de gcloud yapılandırmasının uygulanmasına yardımcı olmak için $variables kullanılır.
Cloud Shell'de aşağıdakileri yapın:
gcloud config list project
gcloud config set project [YOUR-PROJECT-NAME]
projectid=YOUR-PROJECT-NAME
echo $projectid
3. Birincil VPC kurulumu
Birincil VPC'yi oluşturma
Cloud Shell'de aşağıdakileri yapın:
gcloud compute networks create primary-vpc --project=$projectid --subnet-mode=custom
Düğümü ve ikincil alt ağları oluşturma
Cloud Shell'de aşağıdakileri yapın:
gcloud compute networks subnets create primary-node-subnet --project=$projectid --range=192.168.0.0/24 --network=primary-vpc --region=us-central1 --enable-private-ip-google-access --secondary-range=sec-range-primay-vpc=10.0.0.0/21
4. GKE kümesi oluşturma
Çoklu NIC düğüm havuzlarını desteklemek için gerekli işaretler olan –enable-multi-networking ve –enable-dataplane-v2 ile varsayılan düğüm havuzunu oluşturmak üzere birincil VPC alt ağlarını belirterek özel GKE kümesini oluşturun.
Cloud Shell'de GKE kümesini oluşturun:
gcloud container clusters create multinic-gke \
    --zone "us-central1-a" \
    --enable-dataplane-v2 \
    --enable-ip-alias \
    --enable-multi-networking \
    --network "primary-vpc" --subnetwork "primary-node-subnet" \
    --num-nodes=2 \
    --max-pods-per-node=32 \
    --cluster-secondary-range-name=sec-range-primay-vpc \
    --no-enable-master-authorized-networks \
    --release-channel "regular" \
    --enable-private-nodes --master-ipv4-cidr "100.100.10.0/28" \
    --enable-ip-alias
multinic-gke kümesini doğrulama
Cloud Shell'de kümeyle kimlik doğrulayın:
gcloud container clusters get-credentials multinic-gke --zone us-central1-a --project $projectid
Cloud Shell'de, default-pool'dan iki düğüm oluşturulduğunu doğrulayın:
kubectl get nodes
Örnek:
user@$ kubectl get nodes
NAME                                          STATUS   ROLES    AGE    VERSION
gke-multinic-gke-default-pool-3d419e48-1k2p   Ready    <none>   2m4s   v1.27.3-gke.100
gke-multinic-gke-default-pool-3d419e48-xckb   Ready    <none>   2m4s   v1.27.3-gke.100
5. netdevice-vpc kurulumu
netdevice-vpc ağını oluşturma
Cloud Shell'de aşağıdakileri yapın:
gcloud compute networks create netdevice-vpc --project=$projectid --subnet-mode=custom
netdevice-vpc alt ağlarını oluşturma
Cloud Shell'de, çok NIC'li netdevice-network için kullanılan alt ağı oluşturun:
gcloud compute networks subnets create netdevice-subnet --project=$projectid --range=192.168.10.0/24 --network=netdevice-vpc --region=us-central1 --enable-private-ip-google-access
Cloud Shell'de netdevice-apache örneği için bir alt ağ oluşturun:
gcloud compute networks subnets create netdevice-apache --project=$projectid --range=172.16.10.0/28 --network=netdevice-vpc --region=us-central1 --enable-private-ip-google-access
Cloud Router ve NAT yapılandırması
Sanal makine örneğinde harici IP adresi olmadığından, yazılım paketi yükleme işlemi için eğitimde Cloud NAT kullanılır.
Cloud Shell'de bulut yönlendiricisini oluşturun.
gcloud compute routers create netdevice-cr --network netdevice-vpc --region us-central1
Cloud Shell'de NAT ağ geçidini oluşturun.
gcloud compute routers nats create cloud-nat-netdevice --router=netdevice-cr --auto-allocate-nat-external-ips --nat-all-subnet-ip-ranges --region us-central1
netdevice-apache örneğini oluşturma
Aşağıdaki bölümde netdevice-apache örneğini oluşturacaksınız.
Cloud Shell'de örneği oluşturun:
gcloud compute instances create netdevice-apache \
    --project=$projectid \
    --machine-type=e2-micro \
    --image-family debian-11 \
    --no-address \
    --image-project debian-cloud \
    --zone us-central1-a \
    --subnet=netdevice-apache \
    --metadata startup-script="#! /bin/bash
      sudo apt-get update
      sudo apt-get install apache2 -y
      sudo service apache2 restart
      echo 'Welcome to the netdevice-apache instance !!' | tee /var/www/html/index.html
      EOF"
6. l3-vpc kurulumu
l3-vpc ağını oluşturma
Cloud Shell'de aşağıdakileri yapın:
gcloud compute networks create l3-vpc --project=$projectid --subnet-mode=custom
l3-vpc alt ağlarını oluşturma
Cloud Shell'de birincil ve ikincil aralık alt ağı oluşturun. İkincil aralık(sec-range-l3-subnet), çoklu NIC L3 ağı için kullanılır:
gcloud compute networks subnets create l3-subnet --project=$projectid --range=192.168.20.0/24 --network=l3-vpc --region=us-central1 --enable-private-ip-google-access --secondary-range=sec-range-l3-subnet=10.0.8.0/21
Cloud Shell'de l3-apache örneği için bir alt ağ oluşturun:
gcloud compute networks subnets create l3-apache --project=$projectid --range=172.16.20.0/28 --network=l3-vpc --region=us-central1 --enable-private-ip-google-access
Cloud Router ve NAT yapılandırması
Sanal makine örneğinde harici IP adresi olmadığından, yazılım paketi yükleme işlemi için eğitimde Cloud NAT kullanılır.
Cloud Shell'de bulut yönlendiricisini oluşturun.
gcloud compute routers create l3-cr --network l3-vpc --region us-central1
Cloud Shell'de NAT ağ geçidini oluşturun.
gcloud compute routers nats create cloud-nat-l3 --router=l3-cr --auto-allocate-nat-external-ips --nat-all-subnet-ip-ranges --region us-central1
l3-apache örneğini oluşturma
Aşağıdaki bölümde l3-apache örneğini oluşturacaksınız.
Cloud Shell'de örneği oluşturun:
gcloud compute instances create l3-apache \
    --project=$projectid \
    --machine-type=e2-micro \
    --image-family debian-11 \
    --no-address \
    --image-project debian-cloud \
    --zone us-central1-a \
    --subnet=l3-apache \
    --metadata startup-script="#! /bin/bash
      sudo apt-get update
      sudo apt-get install apache2 -y
      sudo service apache2 restart
      echo 'Welcome to the l3-apache instance !!' | tee /var/www/html/index.html
      EOF"
7. Çok NIC'li düğüm havuzunu oluşturma
Aşağıdaki bölümde, aşağıdaki işaretlerden oluşan bir çoklu NIC düğüm havuzu oluşturacaksınız:
–additional-node-network (Cihaz türü arayüzleri için zorunludur)
Örnek:
--additional-node-network network=netdevice-vpc,subnetwork=netdevice-subnet
–additional-node-network ve –additional-pod-network ( L3 türü arayüzler için gereklidir)
Örnek:
--additional-node-network network=l3-vpc,subnetwork=l3-subnet --additional-pod-network subnetwork=l3-subnet,pod-ipv4-range=sec-range-l3-subnet,max-pods-per-node=8
Makine türü: Düğüm havuzunu dağıtırken makine türü bağımlılığını göz önünde bulundurun. Örneğin, 4 vCPU'lu "e2-standard-4" gibi bir makine türü toplamda 4 VPC'yi destekleyebilir. Örneğin, netdevice-l3-pod'da toplam 3 arayüz (varsayılan, netdevice ve l3) bulunur. Bu nedenle, eğitimde kullanılan makine türü e2-standard-4'tür.
Cloud Shell'de, Type Device ve L3'ten oluşan nodepool'u oluşturun:
gcloud container --project "$projectid" node-pools create "multinic-node-pool" --cluster "multinic-gke" --zone "us-central1-a" --additional-node-network network=netdevice-vpc,subnetwork=netdevice-subnet --additional-node-network network=l3-vpc,subnetwork=l3-subnet --additional-pod-network subnetwork=l3-subnet,pod-ipv4-range=sec-range-l3-subnet,max-pods-per-node=8 --machine-type "e2-standard-4"
8. multnic-node-pool'u doğrulayın
Cloud Shell'de, multinic-node-pool'dan üç düğüm oluşturulduğunu doğrulayın:
kubectl get nodes
Örnek:
user@$ kubectl get nodes
NAME                                                STATUS   ROLES    AGE     VERSION
gke-multinic-gke-default-pool-3d419e48-1k2p         Ready    <none>   15m     v1.27.3-gke.100
gke-multinic-gke-default-pool-3d419e48-xckb         Ready    <none>   15m     v1.27.3-gke.100
gke-multinic-gke-multinic-node-pool-135699a1-0tfx   Ready    <none>   3m51s   v1.27.3-gke.100
gke-multinic-gke-multinic-node-pool-135699a1-86gz   Ready    <none>   3m51s   v1.27.3-gke.100
gke-multinic-gke-multinic-node-pool-135699a1-t66p   Ready    <none>   3m51s   v1.27.3-gke.100
9. netdevice-network ağını oluşturma
Aşağıdaki adımlarda, sonraki adımlarda Pod'leri ilişkilendirmek için kullanılacak netdevice-network'ü oluşturmak üzere bir Network ve GKENetworkParamSet Kubernetes nesnesi oluşturacaksınız.
netdevice-network nesnesini oluşturma
Cloud Shell'de VI düzenleyiciyi veya nano'yu kullanarak netdevice-network.yaml adlı ağ nesnesi YAML'sini oluşturun. "Şuraya yönlendirilir"in, netdevice-vpc'deki 172.16.10.0/28 alt ağı (netdevice-apache) olduğunu unutmayın.
apiVersion: networking.gke.io/v1
kind: Network
metadata:
    name: netdevice-network
spec:
    type: "Device"
    parametersRef:
      group: networking.gke.io
      kind: GKENetworkParamSet
      name: "netdevice"
    routes:
    - to: "172.16.10.0/28"
Cloud Shell'de netdevice-network.yaml dosyasını uygulayın:
kubectl apply -f netdevice-network.yaml
Cloud Shell'de netdevice-network Status Type'ın Ready (Hazır) olduğunu doğrulayın.
kubectl describe networks netdevice-network
Örnek:
user@$ kubectl describe networks netdevice-network
Name:         netdevice-network
Namespace:
Labels:       <none>
Annotations:  networking.gke.io/in-use: false
API Version:  networking.gke.io/v1
Kind:         Network
Metadata:
  Creation Timestamp:  2023-07-30T22:37:38Z
  Generation:          1
  Resource Version:    1578594
  UID:                 46d75374-9fcc-42be-baeb-48e074747052
Spec:
  Parameters Ref:
    Group:  networking.gke.io
    Kind:   GKENetworkParamSet
    Name:   netdevice
  Routes:
    To:  172.16.10.0/28
  Type:  Device
Status:
  Conditions:
    Last Transition Time:  2023-07-30T22:37:38Z
    Message:               GKENetworkParamSet resource was deleted: netdevice
    Reason:                GNPDeleted
    Status:                False
    Type:                  ParamsReady
    Last Transition Time:  2023-07-30T22:37:38Z
    Message:               Resource referenced by params is not ready
    Reason:                ParamsNotReady
    Status:                False
    Type:                  Ready
Events:                    <none>
GKENetworkParamSet'i oluşturma
Cloud Shell'de VI düzenleyiciyi veya nano'yu kullanarak netdevice-network-parm.yaml adlı ağ nesnesi YAML'sini oluşturun. Spesifikasyon, netdevice-vpc alt ağ dağıtımıyla eşlenir.
apiVersion: networking.gke.io/v1
kind: GKENetworkParamSet
metadata:
    name: "netdevice"
spec:
    vpc: "netdevice-vpc"
    vpcSubnet: "netdevice-subnet"
    deviceMode: "NetDevice"
Cloud Shell'de netdevice-network-parm.yaml dosyasını uygulayın.
kubectl apply -f netdevice-network-parm.yaml
Cloud Shell'de netdevice-network Status Reason GNPParmsReady ve NetworkReady'yi doğrulayın:
kubectl describe networks netdevice-network
Örnek:
user@$ kubectl describe networks netdevice-network
Name:         netdevice-network
Namespace:
Labels:       <none>
Annotations:  networking.gke.io/in-use: false
API Version:  networking.gke.io/v1
Kind:         Network
Metadata:
  Creation Timestamp:  2023-07-30T22:37:38Z
  Generation:          1
  Resource Version:    1579791
  UID:                 46d75374-9fcc-42be-baeb-48e074747052
Spec:
  Parameters Ref:
    Group:  networking.gke.io
    Kind:   GKENetworkParamSet
    Name:   netdevice
  Routes:
    To:  172.16.10.0/28
  Type:  Device
Status:
  Conditions:
    Last Transition Time:  2023-07-30T22:39:44Z
    Message:
    Reason:                GNPParamsReady
    Status:                True
    Type:                  ParamsReady
    Last Transition Time:  2023-07-30T22:39:44Z
    Message:
    Reason:                NetworkReady
    Status:                True
    Type:                  Ready
Events:                    <none>
Cloud Shell'de, sonraki bir adımda Pod'lerin arayüzü için kullanılan gkenetworkparamset CIDR bloğu 192.168.10.0/24'ü doğrulayın.
kubectl describe gkenetworkparamsets.networking.gke.io netdevice
Örnek:
user@$ kubectl describe gkenetworkparamsets.networking.gke.io netdevice
Name:         netdevice
Namespace:
Labels:       <none>
Annotations:  <none>
API Version:  networking.gke.io/v1
Kind:         GKENetworkParamSet
Metadata:
  Creation Timestamp:  2023-07-30T22:39:43Z
  Finalizers:
    networking.gke.io/gnp-controller
    networking.gke.io/high-perf-finalizer
  Generation:        1
  Resource Version:  1579919
  UID:               6fe36b0c-0091-4b6a-9d28-67596cbce845
Spec:
  Device Mode:  NetDevice
  Vpc:          netdevice-vpc
  Vpc Subnet:   netdevice-subnet
Status:
  Conditions:
    Last Transition Time:  2023-07-30T22:39:43Z
    Message:
    Reason:                GNPReady
    Status:                True
    Type:                  Ready
  Network Name:            netdevice-network
  Pod CID Rs:
    Cidr Blocks:
      192.168.10.0/24
Events:  <none>
10. L3 ağlarını oluşturma
Aşağıdaki adımlarda, sonraki adımlarda Pod'leri ilişkilendirmek için kullanılacak L3 ağını oluşturmak üzere bir Network ve GKENetworkParamSet Kubernetes nesnesi oluşturacaksınız.
L3 ağı nesnesini oluşturma
Cloud Shell'de VI düzenleyiciyi veya nano'yu kullanarak l3-network.yaml adlı ağ nesnesi YAML'sini oluşturun. "Şuraya yönlendirir"in, l3-vpc'deki 172.16.20.0/28 (l3-apache) alt ağı olduğunu unutmayın.
apiVersion: networking.gke.io/v1
kind: Network
metadata:
  name: l3-network
spec:
  type: "L3"
  parametersRef:
    group: networking.gke.io
    kind: GKENetworkParamSet
    name: "l3-network"
  routes:
  - to: "172.16.20.0/28"
Cloud Shell'de l3-network.yaml dosyasını uygulayın:
kubectl apply -f l3-network.yaml
Cloud Shell'de l3-network Status Type'ın Ready (Hazır) olduğunu doğrulayın.
kubectl describe networks l3-network
Örnek:
user@$ kubectl describe networks l3-network
Name:         l3-network
Namespace:
Labels:       <none>
Annotations:  networking.gke.io/in-use: false
API Version:  networking.gke.io/v1
Kind:         Network
Metadata:
  Creation Timestamp:  2023-07-30T22:43:54Z
  Generation:          1
  Resource Version:    1582307
  UID:                 426804be-35c9-4cc5-bd26-00b94be2ef9a
Spec:
  Parameters Ref:
    Group:  networking.gke.io
    Kind:   GKENetworkParamSet
    Name:   l3-network
  Routes:
  to:  172.16.20.0/28
  Type:  L3
Status:
  Conditions:
    Last Transition Time:  2023-07-30T22:43:54Z
    Message:               GKENetworkParamSet resource was deleted: l3-network
    Reason:                GNPDeleted
    Status:                False
    Type:                  ParamsReady
    Last Transition Time:  2023-07-30T22:43:54Z
    Message:               Resource referenced by params is not ready
    Reason:                ParamsNotReady
    Status:                False
    Type:                  Ready
Events:                    <none>
GKENetworkParamSet'i oluşturun
Cloud Shell'de VI düzenleyiciyi veya nano'yu kullanarak l3-network-parm.yaml adlı ağ nesnesi YAML'sini oluşturun. Özelliklerin, l3-vpc alt ağ dağıtımıyla eşlendiğini unutmayın.
apiVersion: networking.gke.io/v1
kind: GKENetworkParamSet
metadata:
  name: "l3-network"
spec:
  vpc: "l3-vpc"
  vpcSubnet: "l3-subnet"
  podIPv4Ranges:
    rangeNames:
    - "sec-range-l3-subnet"
Cloud Shell'de l3-network-parm.yaml dosyasını uygulayın.
kubectl apply -f l3-network-parm.yaml
Cloud Shell'de l3-network Status Reason'ın GNPParmsReady ve NetworkReady olduğunu doğrulayın:
kubectl describe networks l3-network
Örnek:
user@$ kubectl describe networks l3-network
Name:         l3-network
Namespace:
Labels:       <none>
Annotations:  networking.gke.io/in-use: false
API Version:  networking.gke.io/v1
Kind:         Network
Metadata:
  Creation Timestamp:  2023-07-30T22:43:54Z
  Generation:          1
  Resource Version:    1583647
  UID:                 426804be-35c9-4cc5-bd26-00b94be2ef9a
Spec:
  Parameters Ref:
    Group:  networking.gke.io
    Kind:   GKENetworkParamSet
    Name:   l3-network
  Routes:
    To:  172.16.20.0/28
  Type:  L3
Status:
  Conditions:
    Last Transition Time:  2023-07-30T22:46:14Z
    Message:
    Reason:                GNPParamsReady
    Status:                True
    Type:                  ParamsReady
    Last Transition Time:  2023-07-30T22:46:14Z
    Message:
    Reason:                NetworkReady
    Status:                True
    Type:                  Ready
Events:                    <none>
Cloud Shell'de, pod arayüzünü oluşturmak için kullanılan gkenetworkparamset l3-network CIDR 10.0.8.0/21'i doğrulayın.
kubectl describe gkenetworkparamsets.networking.gke.io l3-network
Örnek:
user@$ kubectl describe gkenetworkparamsets.networking.gke.io l3-network
Name:         l3-network
Namespace:
Labels:       <none>
Annotations:  <none>
API Version:  networking.gke.io/v1
Kind:         GKENetworkParamSet
Metadata:
  Creation Timestamp:  2023-07-30T22:46:14Z
  Finalizers:
    networking.gke.io/gnp-controller
  Generation:        1
  Resource Version:  1583656
  UID:               4c1f521b-0088-4005-b000-626ca5205326
Spec:
  podIPv4Ranges:
    Range Names:
      sec-range-l3-subnet
  Vpc:         l3-vpc
  Vpc Subnet:  l3-subnet
Status:
  Conditions:
    Last Transition Time:  2023-07-30T22:46:14Z
    Message:
    Reason:                GNPReady
    Status:                True
    Type:                  Ready
  Network Name:            l3-network
  Pod CID Rs:
    Cidr Blocks:
      10.0.8.0/21
Events:  <none>
11. netdevice-l3-pod'u oluşturma
Aşağıdaki bölümde, 300'den fazla yaygın komutu destekleyen ve "İsviçre çakısı" olarak bilinen busybox'ı çalıştıran netdevice-l3-pod'u oluşturacaksınız. Pod, eth1 kullanarak l3-vpc ile ve eth2 kullanarak netdevice-vpc ile iletişim kuracak şekilde yapılandırılmıştır.
Cloud Shell'de VI düzenleyiciyi veya nano'yu kullanarak netdevice-l3-pod.yaml adlı busy box kapsayıcısını oluşturun.
apiVersion: v1
kind: Pod
metadata:
  name: netdevice-l3-pod
  annotations:
    networking.gke.io/default-interface: 'eth0'
    networking.gke.io/interfaces: |
      [
      {"interfaceName":"eth0","network":"default"},
      {"interfaceName":"eth1","network":"l3-network"},
      {"interfaceName":"eth2","network":"netdevice-network"}
      ]
spec:
  containers:
  - name: netdevice-l3-pod
    image: busybox
    command: ["sleep", "10m"]
    ports:
    - containerPort: 80
  restartPolicy: Always
Cloud Shell'de netdevice-l3-pod.yaml dosyasını uygulayın.
kubectl apply -f netdevice-l3-pod.yaml
netdevice-l3-pod oluşturma işlemini doğrulama
Cloud Shell'de netdevice-l3-pod'un çalıştığını doğrulayın:
kubectl get pods netdevice-l3-pod
Örnek:
user@$ kubectl get pods netdevice-l3-pod
NAME               READY   STATUS    RESTARTS   AGE
netdevice-l3-pod   1/1     Running   0          74s
Cloud Shell'de, Pod arayüzlerine atanan IP adreslerini doğrulayın.
kubectl get pods netdevice-l3-pod -o yaml
Sağlanan örnekte, networking.gke.io/pod-ips alanı, l3-network ve netdevice-network'teki pod arayüzleriyle ilişkili IP adreslerini içerir. Varsayılan ağ IP adresi 10.0.1.22, podIPs altında ayrıntılı olarak açıklanmıştır:
user@$ kubectl get pods netdevice-l3-pod -o yaml
apiVersion: v1
kind: Pod
metadata:
  annotations:
    kubectl.kubernetes.io/last-applied-configuration: |
      {"apiVersion":"v1","kind":"Pod","metadata":{"annotations":{"networking.gke.io/default-interface":"eth0","networking.gke.io/interfaces":"[\n{\"interfaceName\":\"eth0\",\"network\":\"default\"},\n{\"interfaceName\":\"eth1\",\"network\":\"l3-network\"},\n{\"interfaceName\":\"eth2\",\"network\":\"netdevice-network\"}\n]\n"},"name":"netdevice-l3-pod","namespace":"default"},"spec":{"containers":[{"command":["sleep","10m"],"image":"busybox","name":"netdevice-l3-pod","ports":[{"containerPort":80}]}],"restartPolicy":"Always"}}
    networking.gke.io/default-interface: eth0
    networking.gke.io/interfaces: |
      [
      {"interfaceName":"eth0","network":"default"},
      {"interfaceName":"eth1","network":"l3-network"},
      {"interfaceName":"eth2","network":"netdevice-network"}
      ]
    networking.gke.io/pod-ips: '[{"networkName":"l3-network","ip":"10.0.8.4"},{"networkName":"netdevice-network","ip":"192.168.10.2"}]'
  creationTimestamp: "2023-07-30T22:49:27Z"
  name: netdevice-l3-pod
  namespace: default
  resourceVersion: "1585567"
  uid: d9e43c75-e0d1-4f31-91b0-129bc53bbf64
spec:
  containers:
  - command:
    - sleep
    - 10m
    image: busybox
    imagePullPolicy: Always
    name: netdevice-l3-pod
    ports:
    - containerPort: 80
      protocol: TCP
    resources:
      limits:
        networking.gke.io.networks/l3-network.IP: "1"
        networking.gke.io.networks/netdevice-network: "1"
        networking.gke.io.networks/netdevice-network.IP: "1"
      requests:
        networking.gke.io.networks/l3-network.IP: "1"
        networking.gke.io.networks/netdevice-network: "1"
        networking.gke.io.networks/netdevice-network.IP: "1"
    terminationMessagePath: /dev/termination-log
    terminationMessagePolicy: File
    volumeMounts:
    - mountPath: /var/run/secrets/kubernetes.io/serviceaccount
      name: kube-api-access-f2wpb
      readOnly: true
  dnsPolicy: ClusterFirst
  enableServiceLinks: true
  nodeName: gke-multinic-gke-multinic-node-pool-135699a1-86gz
  preemptionPolicy: PreemptLowerPriority
  priority: 0
  restartPolicy: Always
  schedulerName: default-scheduler
  securityContext: {}
  serviceAccount: default
  serviceAccountName: default
  terminationGracePeriodSeconds: 30
  tolerations:
  - effect: NoExecute
    key: node.kubernetes.io/not-ready
    operator: Exists
    tolerationSeconds: 300
  - effect: NoExecute
    key: node.kubernetes.io/unreachable
    operator: Exists
    tolerationSeconds: 300
  - effect: NoSchedule
    key: networking.gke.io.networks/l3-network.IP
    operator: Exists
  - effect: NoSchedule
    key: networking.gke.io.networks/netdevice-network
    operator: Exists
  - effect: NoSchedule
    key: networking.gke.io.networks/netdevice-network.IP
    operator: Exists
  volumes:
  - name: kube-api-access-f2wpb
    projected:
      defaultMode: 420
      sources:
      - serviceAccountToken:
          expirationSeconds: 3607
          path: token
      - configMap:
          items:
          - key: ca.crt
            path: ca.crt
          name: kube-root-ca.crt
      - downwardAPI:
          items:
          - fieldRef:
              apiVersion: v1
              fieldPath: metadata.namespace
            path: namespace
status:
  conditions:
  - lastProbeTime: null
    lastTransitionTime: "2023-07-30T22:49:28Z"
    status: "True"
    type: Initialized
  - lastProbeTime: null
    lastTransitionTime: "2023-07-30T22:49:33Z"
    status: "True"
    type: Ready
  - lastProbeTime: null
    lastTransitionTime: "2023-07-30T22:49:33Z"
    status: "True"
    type: ContainersReady
  - lastProbeTime: null
    lastTransitionTime: "2023-07-30T22:49:28Z"
    status: "True"
    type: PodScheduled
  containerStatuses:
  - containerID: containerd://dcd9ead2f69824ccc37c109a47b1f3f5eb7b3e60ce3865e317dd729685b66a5c
    image: docker.io/library/busybox:latest
    imageID: docker.io/library/busybox@sha256:3fbc632167424a6d997e74f52b878d7cc478225cffac6bc977eedfe51c7f4e79
    lastState: {}
    name: netdevice-l3-pod
    ready: true
    restartCount: 0
    started: true
    state:
      running:
        startedAt: "2023-07-30T22:49:32Z"
  hostIP: 192.168.0.4
  phase: Running
  podIP: 10.0.1.22
  podIPs:
  - ip: 10.0.1.22
  qosClass: BestEffort
  startTime: "2023-07-30T22:49:28Z"
netdevice-l3-pod rotalarını doğrulama
Cloud Shell'de netdevice-l3-pod'dan netdevice-vpc ve l3-vpc'ye giden rotaları doğrulayın:
kubectl exec --stdin --tty netdevice-l3-pod -- /bin/sh
Örneği oluşturun, pod arayüzlerini doğrulayın:
ifconfig
Örnekte eth0 varsayılan ağa, eth1 l3-network'e ve eth2 netdevice-network'e bağlıdır.
/ # ifconfig
eth0      Link encap:Ethernet  HWaddr 26:E3:1B:14:6E:0C
          inet addr:10.0.1.22  Bcast:10.0.1.255  Mask:255.255.255.0
          UP BROADCAST RUNNING MULTICAST  MTU:1460  Metric:1
          RX packets:5 errors:0 dropped:0 overruns:0 frame:0
          TX packets:7 errors:0 dropped:0 overruns:0 carrier:0
          collisions:0 txqueuelen:0
          RX bytes:446 (446.0 B)  TX bytes:558 (558.0 B)

eth1      Link encap:Ethernet  HWaddr 92:78:4E:CB:F2:D4
          inet addr:10.0.8.4  Bcast:0.0.0.0  Mask:255.255.255.255
          UP BROADCAST RUNNING MULTICAST  MTU:1460  Metric:1
          RX packets:5 errors:0 dropped:0 overruns:0 frame:0
          TX packets:6 errors:0 dropped:0 overruns:0 carrier:0
          collisions:0 txqueuelen:1000
          RX bytes:446 (446.0 B)  TX bytes:516 (516.0 B)

eth2      Link encap:Ethernet  HWaddr 42:01:C0:A8:0A:02
          inet addr:192.168.10.2  Bcast:0.0.0.0  Mask:255.255.255.255
          UP BROADCAST RUNNING MULTICAST  MTU:1460  Metric:1
          RX packets:73 errors:0 dropped:0 overruns:0 frame:0
          TX packets:50581 errors:0 dropped:0 overruns:0 carrier:0
          collisions:0 txqueuelen:1000
          RX bytes:26169 (25.5 KiB)  TX bytes:2148170 (2.0 MiB)

lo        Link encap:Local Loopback
          inet addr:127.0.0.1  Mask:255.0.0.0
          UP LOOPBACK RUNNING  MTU:65536  Metric:1
          RX packets:0 errors:0 dropped:0 overruns:0 frame:0
          TX packets:0 errors:0 dropped:0 overruns:0 carrier:0
          collisions:0 txqueuelen:1000
          RX bytes:0 (0.0 B)  TX bytes:0 (0.0 B)
netdevice-l3-pod'dan netdevice-vpc (172.16.10.0/28) ve l3-vpc (172.16.20.0/28) rotalarını doğrulayın.
Örneği oluşturun, pod rotalarını doğrulayın:
ip route
Örnek:
/ # ip route
default via 10.0.1.1 dev eth0 #primary-vpc
10.0.1.0/24 via 10.0.1.1 dev eth0  src 10.0.1.22
10.0.1.1 dev eth0 scope link  src 10.0.1.22
10.0.8.0/21 via 10.0.8.1 dev eth1 #l3-vpc (sec-range-l3-subnet)
10.0.8.1 dev eth1 scope link
172.16.10.0/28 via 192.168.10.1 dev eth2 #netdevice-vpc (netdevice-apache subnet)
172.16.20.0/28 via 10.0.8.1 dev eth1 #l3-vpc (l3-apache subnet)
192.168.10.0/24 via 192.168.10.1 dev eth2 #pod interface subnet
192.168.10.1 dev eth2 scope link
Cloud Shell'e dönmek için örneğin pod'undan çıkın.
exit
12. l3-pod'u oluşturun
Aşağıdaki bölümde, 300'den fazla yaygın komutu destekleyen ve "İsviçre çakısı" olarak bilinen busybox'ı çalıştıran l3-pod'u oluşturacaksınız. Pod, yalnızca eth1 kullanarak l3-vpc ile iletişim kuracak şekilde yapılandırılır.
Cloud Shell'de VI düzenleyiciyi veya nano'yu kullanarak l3-pod.yaml adlı busy box kapsayıcısını oluşturun.
apiVersion: v1
kind: Pod
metadata:
  name: l3-pod
  annotations:
    networking.gke.io/default-interface: 'eth0'
    networking.gke.io/interfaces: |
      [
      {"interfaceName":"eth0","network":"default"},
      {"interfaceName":"eth1","network":"l3-network"}
      ]
spec:
  containers:
  - name: l3-pod
    image: busybox
    command: ["sleep", "10m"]
    ports:
    - containerPort: 80
  restartPolicy: Always
Cloud Shell'de l3-pod.yaml dosyasını uygulayın.
kubectl apply -f l3-pod.yaml
l3-pod oluşturma işlemini doğrulama
Cloud Shell'de netdevice-l3-pod'un çalıştığını doğrulayın:
kubectl get pods l3-pod
Örnek:
user@$ kubectl get pods l3-pod
NAME     READY   STATUS    RESTARTS   AGE
l3-pod   1/1     Running   0          52s
Cloud Shell'de, Pod arayüzlerine atanan IP adreslerini doğrulayın.
kubectl get pods l3-pod -o yaml
Sağlanan örnekte, networking.gke.io/pod-ips alanı, l3-network'teki pod arayüzleriyle ilişkili IP adreslerini içerir. Varsayılan ağ IP adresi 10.0.2.12, podIPs altında ayrıntılı olarak açıklanmıştır:
user@$ kubectl get pods l3-pod -o yaml
apiVersion: v1
kind: Pod
metadata:
  annotations:
    kubectl.kubernetes.io/last-applied-configuration: |
      {"apiVersion":"v1","kind":"Pod","metadata":{"annotations":{"networking.gke.io/default-interface":"eth0","networking.gke.io/interfaces":"[\n{\"interfaceName\":\"eth0\",\"network\":\"default\"},\n{\"interfaceName\":\"eth1\",\"network\":\"l3-network\"}\n]\n"},"name":"l3-pod","namespace":"default"},"spec":{"containers":[{"command":["sleep","10m"],"image":"busybox","name":"l3-pod","ports":[{"containerPort":80}]}],"restartPolicy":"Always"}}
    networking.gke.io/default-interface: eth0
    networking.gke.io/interfaces: |
      [
      {"interfaceName":"eth0","network":"default"},
      {"interfaceName":"eth1","network":"l3-network"}
      ]
    networking.gke.io/pod-ips: '[{"networkName":"l3-network","ip":"10.0.8.22"}]'
  creationTimestamp: "2023-07-30T23:22:29Z"
  name: l3-pod
  namespace: default
  resourceVersion: "1604447"
  uid: 79a86afd-2a50-433d-9d48-367acb82c1d0
spec:
  containers:
  - command:
    - sleep
    - 10m
    image: busybox
    imagePullPolicy: Always
    name: l3-pod
    ports:
    - containerPort: 80
      protocol: TCP
    resources:
      limits:
        networking.gke.io.networks/l3-network.IP: "1"
      requests:
        networking.gke.io.networks/l3-network.IP: "1"
    terminationMessagePath: /dev/termination-log
    terminationMessagePolicy: File
    volumeMounts:
    - mountPath: /var/run/secrets/kubernetes.io/serviceaccount
      name: kube-api-access-w9d24
      readOnly: true
  dnsPolicy: ClusterFirst
  enableServiceLinks: true
  nodeName: gke-multinic-gke-multinic-node-pool-135699a1-t66p
  preemptionPolicy: PreemptLowerPriority
  priority: 0
  restartPolicy: Always
  schedulerName: default-scheduler
  securityContext: {}
  serviceAccount: default
  serviceAccountName: default
  terminationGracePeriodSeconds: 30
  tolerations:
  - effect: NoExecute
    key: node.kubernetes.io/not-ready
    operator: Exists
    tolerationSeconds: 300
  - effect: NoExecute
    key: node.kubernetes.io/unreachable
    operator: Exists
    tolerationSeconds: 300
  - effect: NoSchedule
    key: networking.gke.io.networks/l3-network.IP
    operator: Exists
  volumes:
  - name: kube-api-access-w9d24
    projected:
      defaultMode: 420
      sources:
      - serviceAccountToken:
          expirationSeconds: 3607
          path: token
      - configMap:
          items:
          - key: ca.crt
            path: ca.crt
          name: kube-root-ca.crt
      - downwardAPI:
          items:
          - fieldRef:
              apiVersion: v1
              fieldPath: metadata.namespace
            path: namespace
status:
  conditions:
  - lastProbeTime: null
    lastTransitionTime: "2023-07-30T23:22:29Z"
    status: "True"
    type: Initialized
  - lastProbeTime: null
    lastTransitionTime: "2023-07-30T23:22:35Z"
    status: "True"
    type: Ready
  - lastProbeTime: null
    lastTransitionTime: "2023-07-30T23:22:35Z"
    status: "True"
    type: ContainersReady
  - lastProbeTime: null
    lastTransitionTime: "2023-07-30T23:22:29Z"
    status: "True"
    type: PodScheduled
  containerStatuses:
  - containerID: containerd://1d5fe2854bba0a0d955c157a58bcfd4e34cecf8837edfd7df2760134f869e966
    image: docker.io/library/busybox:latest
    imageID: docker.io/library/busybox@sha256:3fbc632167424a6d997e74f52b878d7cc478225cffac6bc977eedfe51c7f4e79
    lastState: {}
    name: l3-pod
    ready: true
    restartCount: 0
    started: true
    state:
      running:
        startedAt: "2023-07-30T23:22:35Z"
  hostIP: 192.168.0.5
  phase: Running
  podIP: 10.0.2.12
  podIPs:
  - ip: 10.0.2.12
  qosClass: BestEffort
  startTime: "2023-07-30T23:22:29Z"
l3-pod rotalarını doğrulama
Cloud Shell'de, netdevice-l3-pod'dan l3-vpc'ye giden rotaları doğrulayın:
kubectl exec --stdin --tty l3-pod -- /bin/sh
Örneği oluşturun, pod arayüzlerini doğrulayın:
ifconfig
Örnekte eth0 varsayılan ağa, eth1 ise l3-network'e bağlıdır.
/ # ifconfig
eth0      Link encap:Ethernet  HWaddr 22:29:30:09:6B:58
          inet addr:10.0.2.12  Bcast:10.0.2.255  Mask:255.255.255.0
          UP BROADCAST RUNNING MULTICAST  MTU:1460  Metric:1
          RX packets:5 errors:0 dropped:0 overruns:0 frame:0
          TX packets:7 errors:0 dropped:0 overruns:0 carrier:0
          collisions:0 txqueuelen:0
          RX bytes:446 (446.0 B)  TX bytes:558 (558.0 B)

eth1      Link encap:Ethernet  HWaddr 6E:6D:FC:C3:FF:AF
          inet addr:10.0.8.22  Bcast:0.0.0.0  Mask:255.255.255.255
          UP BROADCAST RUNNING MULTICAST  MTU:1460  Metric:1
          RX packets:5 errors:0 dropped:0 overruns:0 frame:0
          TX packets:6 errors:0 dropped:0 overruns:0 carrier:0
          collisions:0 txqueuelen:1000
          RX bytes:446 (446.0 B)  TX bytes:516 (516.0 B)

lo        Link encap:Local Loopback
          inet addr:127.0.0.1  Mask:255.0.0.0
          UP LOOPBACK RUNNING  MTU:65536  Metric:1
          RX packets:0 errors:0 dropped:0 overruns:0 frame:0
          TX packets:0 errors:0 dropped:0 overruns:0 carrier:0
          collisions:0 txqueuelen:1000
          RX bytes:0 (0.0 B)  TX bytes:0 (0.0 B)
l3-pod'dan l3-vpc'ye (172.16.20.0/28) giden rotaları doğrulayın.
Örneği oluşturun, pod rotalarını doğrulayın:
ip route
Örnek:
/ # ip route
default via 10.0.2.1 dev eth0 #primary-vpc
10.0.2.0/24 via 10.0.2.1 dev eth0  src 10.0.2.12
10.0.2.1 dev eth0 scope link  src 10.0.2.12
10.0.8.0/21 via 10.0.8.17 dev eth1 #l3-vpc (sec-range-l3-subnet)
10.0.8.17 dev eth1 scope link #pod interface subnet
172.16.20.0/28 via 10.0.8.17 dev eth1 #l3-vpc (l3-apache subnet)
Cloud Shell'e dönmek için örneğin pod'undan çıkın.
exit
13. Güvenlik duvarı güncellemeleri
GKE multicnic-pool'dan netdevice-vpc'ye bağlantıya izin vermek için l3-vpc giriş güvenlik duvarı kuralları gerekir. Kaynak aralığını pod ağı alt ağı olarak belirten güvenlik duvarı kuralları oluşturacaksınız (ör. netdevice-subnet, sec-range-l3-subnet).
Örneğin, yakın zamanda oluşturulan l3-pod adlı kapsayıcı, l3-vpc'deki l3-apache örneğine bağlanırken kaynak IP adresi olan 10.0.8.22 (sec-range-l3-subnet'ten ayrılan) eth2 arayüzünü kullanır.
netdevice-vpc: Allow from netdevice-subnet to netdevice-apache
Cloud Shell'de, netdevice-subnet'in netdevice-apache örneğine erişmesine izin veren netdevice-vpc'de güvenlik duvarı kuralını oluşturun.
gcloud compute --project=$projectid firewall-rules create allow-ingress-from-netdevice-network-to-all-vpc-instances --direction=INGRESS --priority=1000 --network=netdevice-vpc --action=ALLOW --rules=all --source-ranges=192.168.10.0/24 --enable-logging
l3-vpc: sec-range-l3-subnet'ten l3-apache'ye izin ver
Cloud Shell'de, l3-vpc içinde güvenlik duvarı kuralını oluşturarak sec-range-l3-subnet'in l3-apache örneğine erişmesine izin verin.
gcloud compute --project=$projectid firewall-rules create allow-ingress-from-l3-network-to-all-vpc-instances --direction=INGRESS --priority=1000 --network=l3-vpc --action=ALLOW --rules=all --source-ranges=10.0.8.0/21 --enable-logging
14. Pod bağlantısını doğrulama
Aşağıdaki bölümde, kapsüllere giriş yaparak ve Apache sunucularının Ana Sayfasının indirilmesini doğrulayan bir wget -S komutu çalıştırarak netdevice-l3-pod ve l3-pod'dan Apache örneklerine bağlantıyı doğrulayacaksınız. netdevice-l3-pod, netdevice-network ve l3-network'teki arayüzlerle yapılandırıldığından netdevice-vpc ve l3-vpc'deki Apache sunucularına bağlantı mümkündür.
Buna karşılık, l3-pod'dan wget -S işlemi gerçekleştirilirken l3-pod yalnızca l3-network'ten bir arayüzle yapılandırıldığından netdevice-vpc'deki Apache sunucusuna bağlantı mümkün değildir.
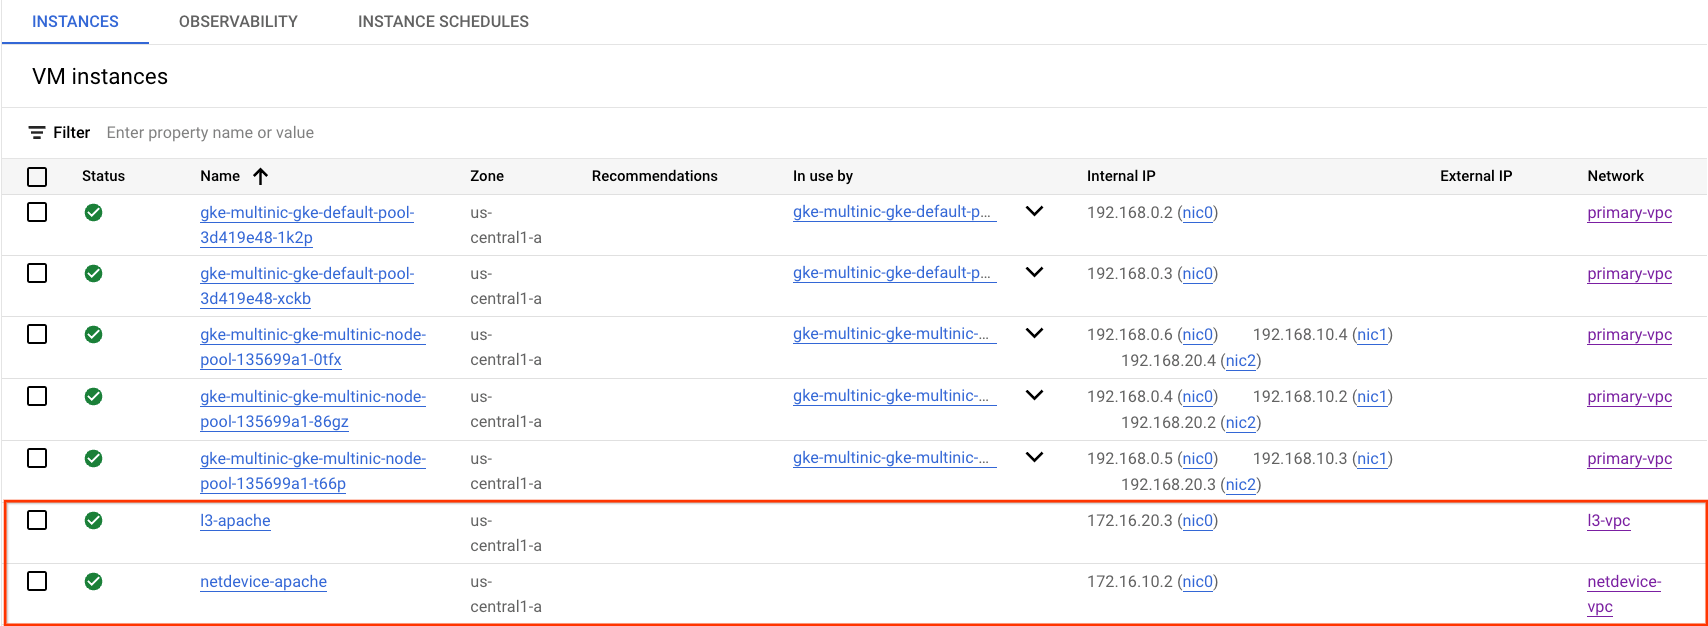
Apache sunucusunun IP adresini alma
Cloud Console'dan Compute Engine → VM instances'a (Sanal makine örnekleri) giderek Apache sunucularının IP adresini alın.
netdevice-l3-pod ile netdevice-apache arasındaki bağlantı testi
Cloud Shell'de netdevice-l3-pod'a giriş yapın:
kubectl exec --stdin --tty netdevice-l3-pod -- /bin/sh
Kapsayıcıdan, önceki adımda elde edilen IP adresine göre netdevice-apache örneğine ping işlemi uygulayın.
ping <insert-your-ip> -c 4
Örnek:
/ #  ping 172.16.10.2 -c 4
PING 172.16.10.2 (172.16.10.2): 56 data bytes
64 bytes from 172.16.10.2: seq=0 ttl=64 time=1.952 ms
64 bytes from 172.16.10.2: seq=1 ttl=64 time=0.471 ms
64 bytes from 172.16.10.2: seq=2 ttl=64 time=0.446 ms
64 bytes from 172.16.10.2: seq=3 ttl=64 time=0.505 ms

--- 172.16.10.2 ping statistics ---
4 packets transmitted, 4 packets received, 0% packet loss
round-trip min/avg/max = 0.446/0.843/1.952 ms
/ #
Cloud Shell'de, önceki adımda elde edilen IP adresine göre netdevice-apache örneğine wget -S komutunu uygulayın. 200 OK, web sayfasının başarıyla indirildiğini gösterir.
wget -S <insert-your-ip>
Örnek:
/ # wget -S 172.16.10.2
Connecting to 172.16.10.2 (172.16.10.2:80)
  HTTP/1.1 200 OK
  Date: Mon, 31 Jul 2023 03:12:58 GMT
  Server: Apache/2.4.56 (Debian)
  Last-Modified: Sat, 29 Jul 2023 00:32:44 GMT
  ETag: "2c-6019555f54266"
  Accept-Ranges: bytes
  Content-Length: 44
  Connection: close
  Content-Type: text/html

saving to 'index.html'
index.html           100% |********************************|    44  0:00:00 ETA
'index.html' saved
/ #
netdevice-l3-pod ile l3-apache arasındaki bağlantı testi
Cloud Shell'de, önceki adımdan elde edilen IP adresine göre l3-apache örneğine ping işlemi uygulayın.
ping <insert-your-ip> -c 4
Örnek:
/ # ping 172.16.20.3 -c 4
PING 172.16.20.3 (172.16.20.3): 56 data bytes
64 bytes from 172.16.20.3: seq=0 ttl=63 time=2.059 ms
64 bytes from 172.16.20.3: seq=1 ttl=63 time=0.533 ms
64 bytes from 172.16.20.3: seq=2 ttl=63 time=0.485 ms
64 bytes from 172.16.20.3: seq=3 ttl=63 time=0.462 ms

--- 172.16.20.3 ping statistics ---
4 packets transmitted, 4 packets received, 0% packet loss
round-trip min/avg/max = 0.462/0.884/2.059 ms
/ #
Cloud Shell'de önceki index.html dosyasını silin ve önceki adımda elde edilen IP adresine göre l3-apache örneğine wget -S komutunu uygulayın. 200 OK, web sayfasının başarıyla indirildiğini gösterir.
rm index.html
wget -S <insert-your-ip>
Örnek:
/ # rm index.html
/ # wget -S 172.16.20.3
Connecting to 172.16.20.3 (172.16.20.3:80)
  HTTP/1.1 200 OK
  Date: Mon, 31 Jul 2023 03:41:32 GMT
  Server: Apache/2.4.56 (Debian)
  Last-Modified: Mon, 31 Jul 2023 03:24:21 GMT
  ETag: "25-601bff76f04b7"
  Accept-Ranges: bytes
  Content-Length: 37
  Connection: close
  Content-Type: text/html

saving to 'index.html'
index.html           100% |*******************************************************************************************************|    37  0:00:00 ETA
'index.html' saved
Cloud Shell'e dönmek için örneğin pod'undan çıkın.
exit
l3-pod ile netdevice-apache arasındaki bağlantı testi
Cloud Shell'de l3-pod'a giriş yapın:
kubectl exec --stdin --tty l3-pod -- /bin/sh
Kapsayıcıdan, önceki adımda elde edilen IP adresine göre netdevice-apache örneğine ping işlemi uygulayın. l3-pod, netdevice-network ile ilişkili bir arayüze sahip olmadığından ping işlemi başarısız olur.
ping <insert-your-ip> -c 4
Örnek:
/ # ping 172.16.10.2 -c 4
PING 172.16.10.2 (172.16.10.2): 56 data bytes


--- 172.16.10.2 ping statistics ---
4 packets transmitted, 0 packets received, 100% packet loss
İsteğe bağlı: Cloud Shell'de, önceki adımda elde edilen ve zaman aşımına uğrayacak IP adresine göre netdevice-apache örneğine wget -S komutunu uygulayın.
wget -S <insert-your-ip>
Örnek:
/ # wget -S 172.16.10.2
Connecting to 172.16.10.2 (172.16.10.2:80)
wget: can't connect to remote host (172.16.10.2): Connection timed out
l3-pod ile l3-apache arasındaki bağlantı testi
Cloud Shell'de, önceki adımdan elde edilen IP adresine göre l3-apache örneğine ping işlemi uygulayın.
ping <insert-your-ip> -c 4
Örnek:
/ # ping 172.16.20.3 -c 4
PING 172.16.20.3 (172.16.20.3): 56 data bytes
64 bytes from 172.16.20.3: seq=0 ttl=63 time=1.824 ms
64 bytes from 172.16.20.3: seq=1 ttl=63 time=0.513 ms
64 bytes from 172.16.20.3: seq=2 ttl=63 time=0.482 ms
64 bytes from 172.16.20.3: seq=3 ttl=63 time=0.532 ms

--- 172.16.20.3 ping statistics ---
4 packets transmitted, 4 packets received, 0% packet loss
round-trip min/avg/max = 0.482/0.837/1.824 ms
/ #
Cloud Shell'de, önceki adımdan elde edilen IP adresine göre l3-apache örneğine wget -S komutunu uygulayın. 200 OK, web sayfasının başarılı bir şekilde indirildiğini gösterir.
wget -S <insert-your-ip>
Örnek:
/ # wget -S 172.16.20.3
Connecting to 172.16.20.3 (172.16.20.3:80)
  HTTP/1.1 200 OK
  Date: Mon, 31 Jul 2023 03:52:08 GMT
  Server: Apache/2.4.56 (Debian)
  Last-Modified: Mon, 31 Jul 2023 03:24:21 GMT
  ETag: "25-601bff76f04b7"
  Accept-Ranges: bytes
  Content-Length: 37
  Connection: close
  Content-Type: text/html

saving to 'index.html'
index.html           100% |*******************************************************************************************************|    37  0:00:00 ETA
'index.html' saved
/ #
15. Güvenlik duvarı günlük kayıtları
Güvenlik Duvarı Kuralları Kaydı, güvenlik duvarı kurallarınızın etkilerini denetlemenizi, doğrulamanızı ve analiz etmenizi sağlar. Örneğin, trafiği reddetmek için tasarlanmış bir güvenlik duvarı kuralının amaçlandığı şekilde çalışıp çalışmadığını belirleyebilirsiniz. Belirli bir güvenlik duvarı kuralından kaç bağlantının etkilendiğini belirlemeniz gerektiğinde de Güvenlik Duvarı Kuralları Günlük Kaydı'ndan yararlanabilirsiniz.
Eğitimde, giriş güvenlik duvarı kurallarını oluştururken güvenlik duvarı günlük kaydını etkinleştirdiniz. Günlüklerden elde edilen bilgilere göz atalım.
Cloud Console'dan Logging → Logs Explorer'a (Günlük Kaydı → Günlük Gezgini) gidin.
Aşağıdaki sorguyu ekran görüntüsüne göre ekleyin ve Run query jsonPayload.rule_details.reference:("network:l3-vpc/firewall:allow-ingress-from-l3-network-to-all-vpc-instances") seçeneğini belirleyin.
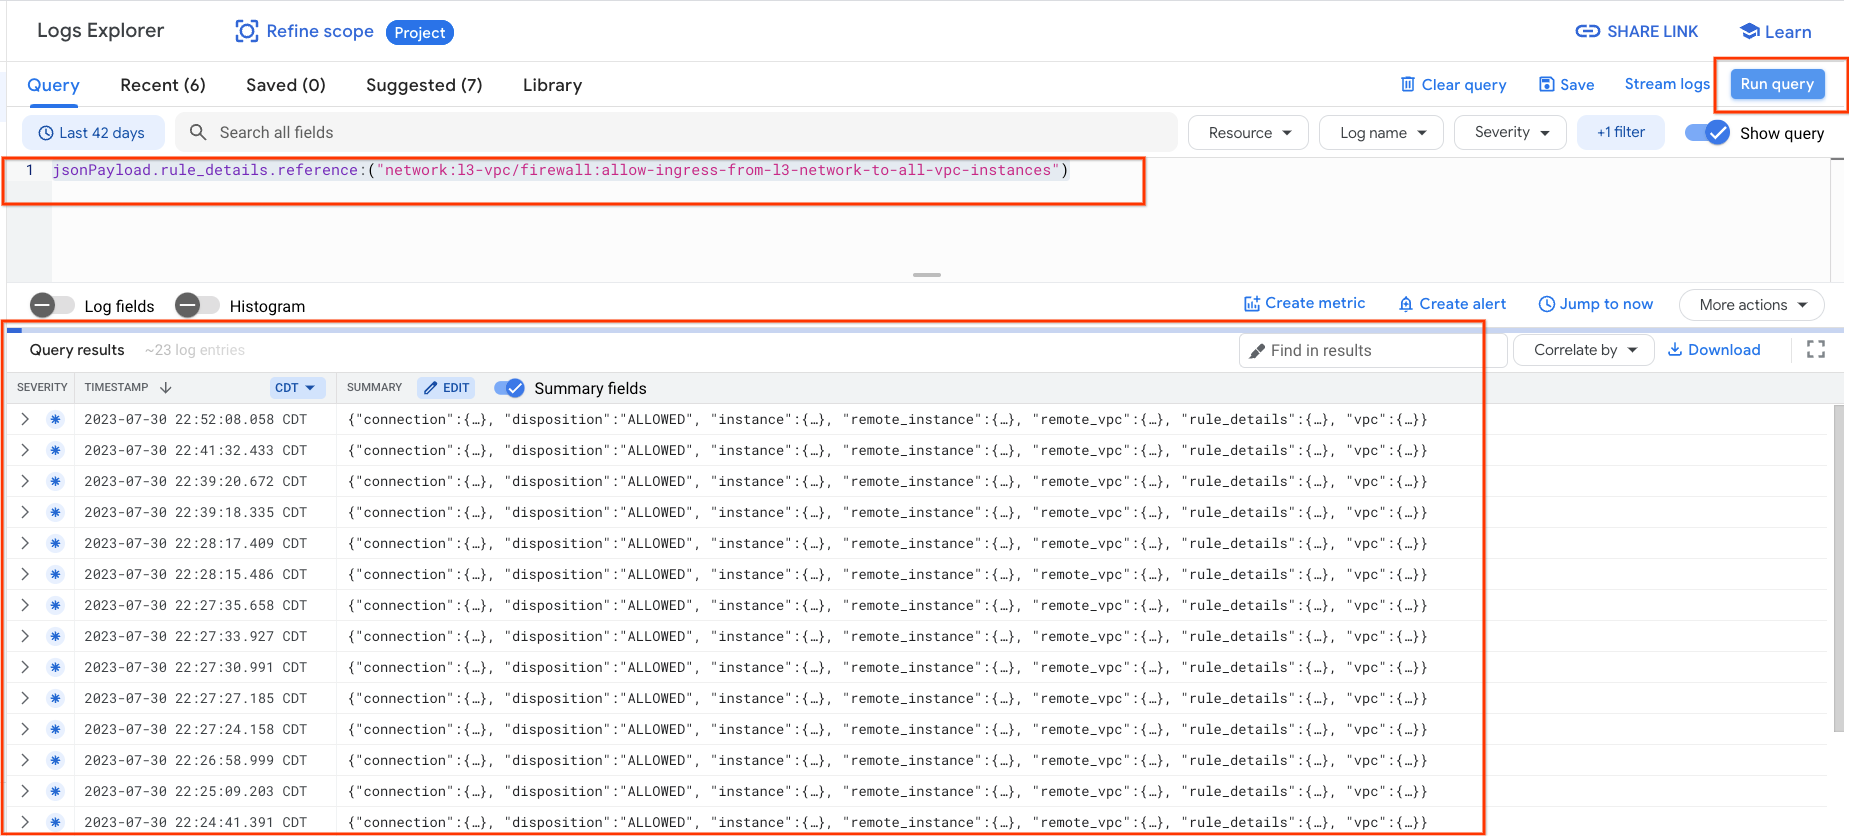
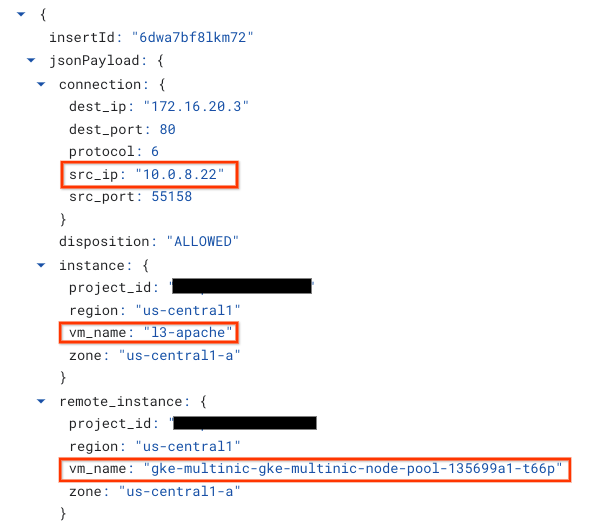
Bir yakalamayı daha yakından incelemek, güvenlik yöneticileri için kaynak ve hedef IP adresi, bağlantı noktası, protokol ve düğüm havuzu adı gibi bilgi öğeleri sağlar.
Diğer güvenlik duvarı günlüklerini incelemek için VPC Ağı → Güvenlik Duvarı → allow-ingress-from-netdevice-network-to-all-vpc-instances'a gidin ve Günlük Gezgini'nde görüntüle'yi seçin.
16. Temizleme
Cloud Shell'den eğitim bileşenlerini silin.
gcloud compute instances delete l3-apache netdevice-apache --zone=us-central1-a --quiet

gcloud compute routers delete l3-cr netdevice-cr --region=us-central1 --quiet

gcloud container clusters delete multinic-gke --zone=us-central1-a --quiet

gcloud compute firewall-rules delete allow-ingress-from-l3-network-to-all-vpc-instances allow-ingress-from-netdevice-network-to-all-vpc-instances --quiet

gcloud compute networks subnets delete l3-apache l3-subnet netdevice-apache netdevice-subnet primary-node-subnet --region=us-central1 --quiet

gcloud compute networks delete l3-vpc netdevice-vpc primary-vpc --quiet
17. Tebrikler
Tebrikler. Çoklu ağ arayüzü olan bir düğüm havuzu oluşturmayı ve PING ile wget kullanarak Apache sunucularına L3 ve cihaz türü bağlantısını doğrulamak için busybox çalıştıran pod'lar oluşturmayı başarıyla yapılandırdınız ve doğruladınız.
Ayrıca, Pod kapsayıcıları ile Apache sunucuları arasındaki kaynak ve hedef paketlerini incelemek için güvenlik duvarı günlüklerinden nasıl yararlanacağınızı da öğrendiniz.
Cosmopup, eğitici içeriklerin harika olduğunu düşünüyor.