
1. Introduction
This lab focuses on the development and security of AI agents that execute dynamic code within a production environment. As AI applications move beyond simple chat interfaces, they often require the ability to perform complex logic—such as data analysis, mathematical modeling, or file processing—by generating and running code in real-time. This lab demonstrates how to use the Agent Development Kit (ADK) to build reasoning agents and the GKE Agent Sandbox to ensure that any code generated by the AI is executed in a highly isolated, secure environment.
The Technical Challenge of Untrusted Code
When an AI agent generates and executes code (like Python), it essentially runs an untrusted workload on your infrastructure. If the agent is compromised or instructed to perform malicious actions, it could attempt to access sensitive environment variables, scan your internal network, or exploit the underlying host node. Traditional container isolation is often insufficient for these dynamic workloads. To address this, platform engineers must implement multi-layered security that includes kernel-level isolation and restricted network egress.
Core Concepts
- Agent Development Kit (ADK): ADK is a framework used to build applications that can reason about tasks. It manages a "reasoning loop" where the AI receives a prompt, plans a series of actions, calls specific tools, and then summarizes the final output. In this workflow, ADK acts as the orchestrator that identifies when a user request requires code execution.
- GKE Agent Sandbox: This security feature utilizes gVisor, an open-source container runtime that provides a specialized guest kernel for each container. By intercepting system calls (syscalls) between the application and the host kernel, GKE Agent Sandbox prevents untrusted code from interacting directly with the node. This ensures that a security breach within the container cannot escalate to the rest of the cluster.
- Model Context Protocol (MCP) & Tools: This protocol establishes a standard way for AI models to interact with external tools. In this lab, the agent is configured with a "Code Execution" tool that communicates with a specialized sandbox controller to run Python scripts.
Lab Objectives
By the end of this session, you will be able to:
- Develop an Agent: Configure an ADK-based agent designed for data analysis tasks.
- Configure Kernel Isolation: Set up GKE Agent Sandbox with specialized RuntimeClasses.
- Optimize Performance: Implement a "Warm Pool" of sandboxes to minimize the time spent starting new execution environments.
- Enforce Security Boundaries: Apply Network Policies to prevent unauthorized egress from the execution environment.
2. Project Set-up
A properly configured environment is essential before you begin building agentic applications. In this section, you will access the necessary tools and ensure your Google Cloud project is ready to host both the AI agent and its secure execution environment.
Open Cloud Shell
For this lab, we will use Cloud Shell, a browser-based terminal environment provided by Google Cloud. Cloud Shell comes pre-configured with the Google Cloud CLI (gcloud), kubectl, and the Docker environment required for building and deploying your application.
- Go to the Google Cloud Console.
- Click the Activate Cloud Shell button in the top right header (the
>_icon). - Once the terminal opens at the bottom of your browser, click Continue if prompted.
Select a Project
You must ensure your shell is pointed at the correct Google Cloud project to avoid deploying resources to the wrong environment.
👉💻 Identify your Project ID from the console dashboard, and run the following command to set the project in your current shell:
gcloud config set project [YOUR_PROJECT_ID]
Enable APIs
Building and deploying agents requires several specialized APIs for container builds, image hosting, and generative model access.
👉💻 Run the following command to initialize these services:
gcloud services enable \
    cloudbuild.googleapis.com \
    artifactregistry.googleapis.com \
    container.googleapis.com \
    aiplatform.googleapis.com
- cloudbuild.googleapis.com: Automates the creation of container images from your source code.
- artifactregistry.googleapis.com: Provides a secure, private registry for your agent images.
- container.googleapis.com: Manages the life cycle of the GKE cluster and its security features.
- aiplatform.googleapis.com: Provides access to Vertex AI services, including Gemini models for reasoning and code generation.
Cluster Creation
This lab requires a GKE cluster with the Agent Sandbox feature enabled. Using GKE Autopilot is the most efficient way to get started, as it automatically handles node management while supporting the security features needed for isolated code execution.
👉💻 Run the following commands to create the GKE cluster:
export PROJECT_ID=$(gcloud config get-value project)

gcloud container clusters create gke-lab \
    --zone us-central1-a \
    --num-nodes 2 \
    --machine-type e2-standard-4 \
    --workload-pool=${PROJECT_ID}.svc.id.goog

gcloud container node-pools create sandboxed-pool \
    --cluster gke-lab \
    --zone us-central1-a \
    --num-nodes 1 \
    --machine-type e2-standard-4 \
    --image-type cos_containerd \
    --sandbox type=gvisor
Note: Provisioning a new cluster typically takes 8–10 minutes. You can proceed to enable APIs in a new tab or while the command processes.
Configure kubectl Access
Once your cluster is provisioned, you need to configure kubectl to communicate with it.
👉💻 The following command retrieves cluster credentials and updates your local kubeconfig file, allowing you to run commands against your new GKE cluster from Cloud Shell:
gcloud container clusters get-credentials gke-lab --zone us-central1-a
With this, kubectl commands will now target the gke-lab cluster by default.
Allow GKE Access to Vertex AI
To allow the agent running on GKE to access Vertex AI services for model inference, you need to configure Workload Identity. This allows you to bind a Kubernetes service account to a Google Cloud IAM role, granting pods running as that service account the necessary permissions without needing to manage service account keys.
👉💻 First, create the Kubernetes service account that the agent pods will use:
kubectl create serviceaccount adk-agent-sa
Next, grant this service account the Vertex AI User role by adding an IAM policy binding.
👉💻 This command binds the adk-agent-sa Kubernetes service account in the default namespace to the IAM role roles/aiplatform.user for your project's Workload Identity pool.
export PROJECT_ID=$(gcloud config get-value project)
export PROJECT_NUMBER=$(gcloud projects describe ${PROJECT_ID} --format="value(projectNumber)")

gcloud projects add-iam-policy-binding projects/${PROJECT_ID} \
    --role=roles/aiplatform.user \
    --member=principal://iam.googleapis.com/projects/${PROJECT_NUMBER}/locations/global/workloadIdentityPools/${PROJECT_ID}.svc.id.goog/subject/ns/default/sa/adk-agent-sa \
    --condition=None
3. Building the ADK Agent
In this section, you will define the logic for your agent. The agent acts as a data specialist that can write Python code to process files. This reasoning logic allows the agent to recognize when a user's natural language request requires a mathematical or data-driven calculation that is best handled by code.
Create the Agent Directory
👉💻 Create a directory for the lab, and a subdirectory for the agent source code:
mkdir -p ~/gke-sandbox-lab/root_agent
cd ~/gke-sandbox-lab
Define the ADK Agent
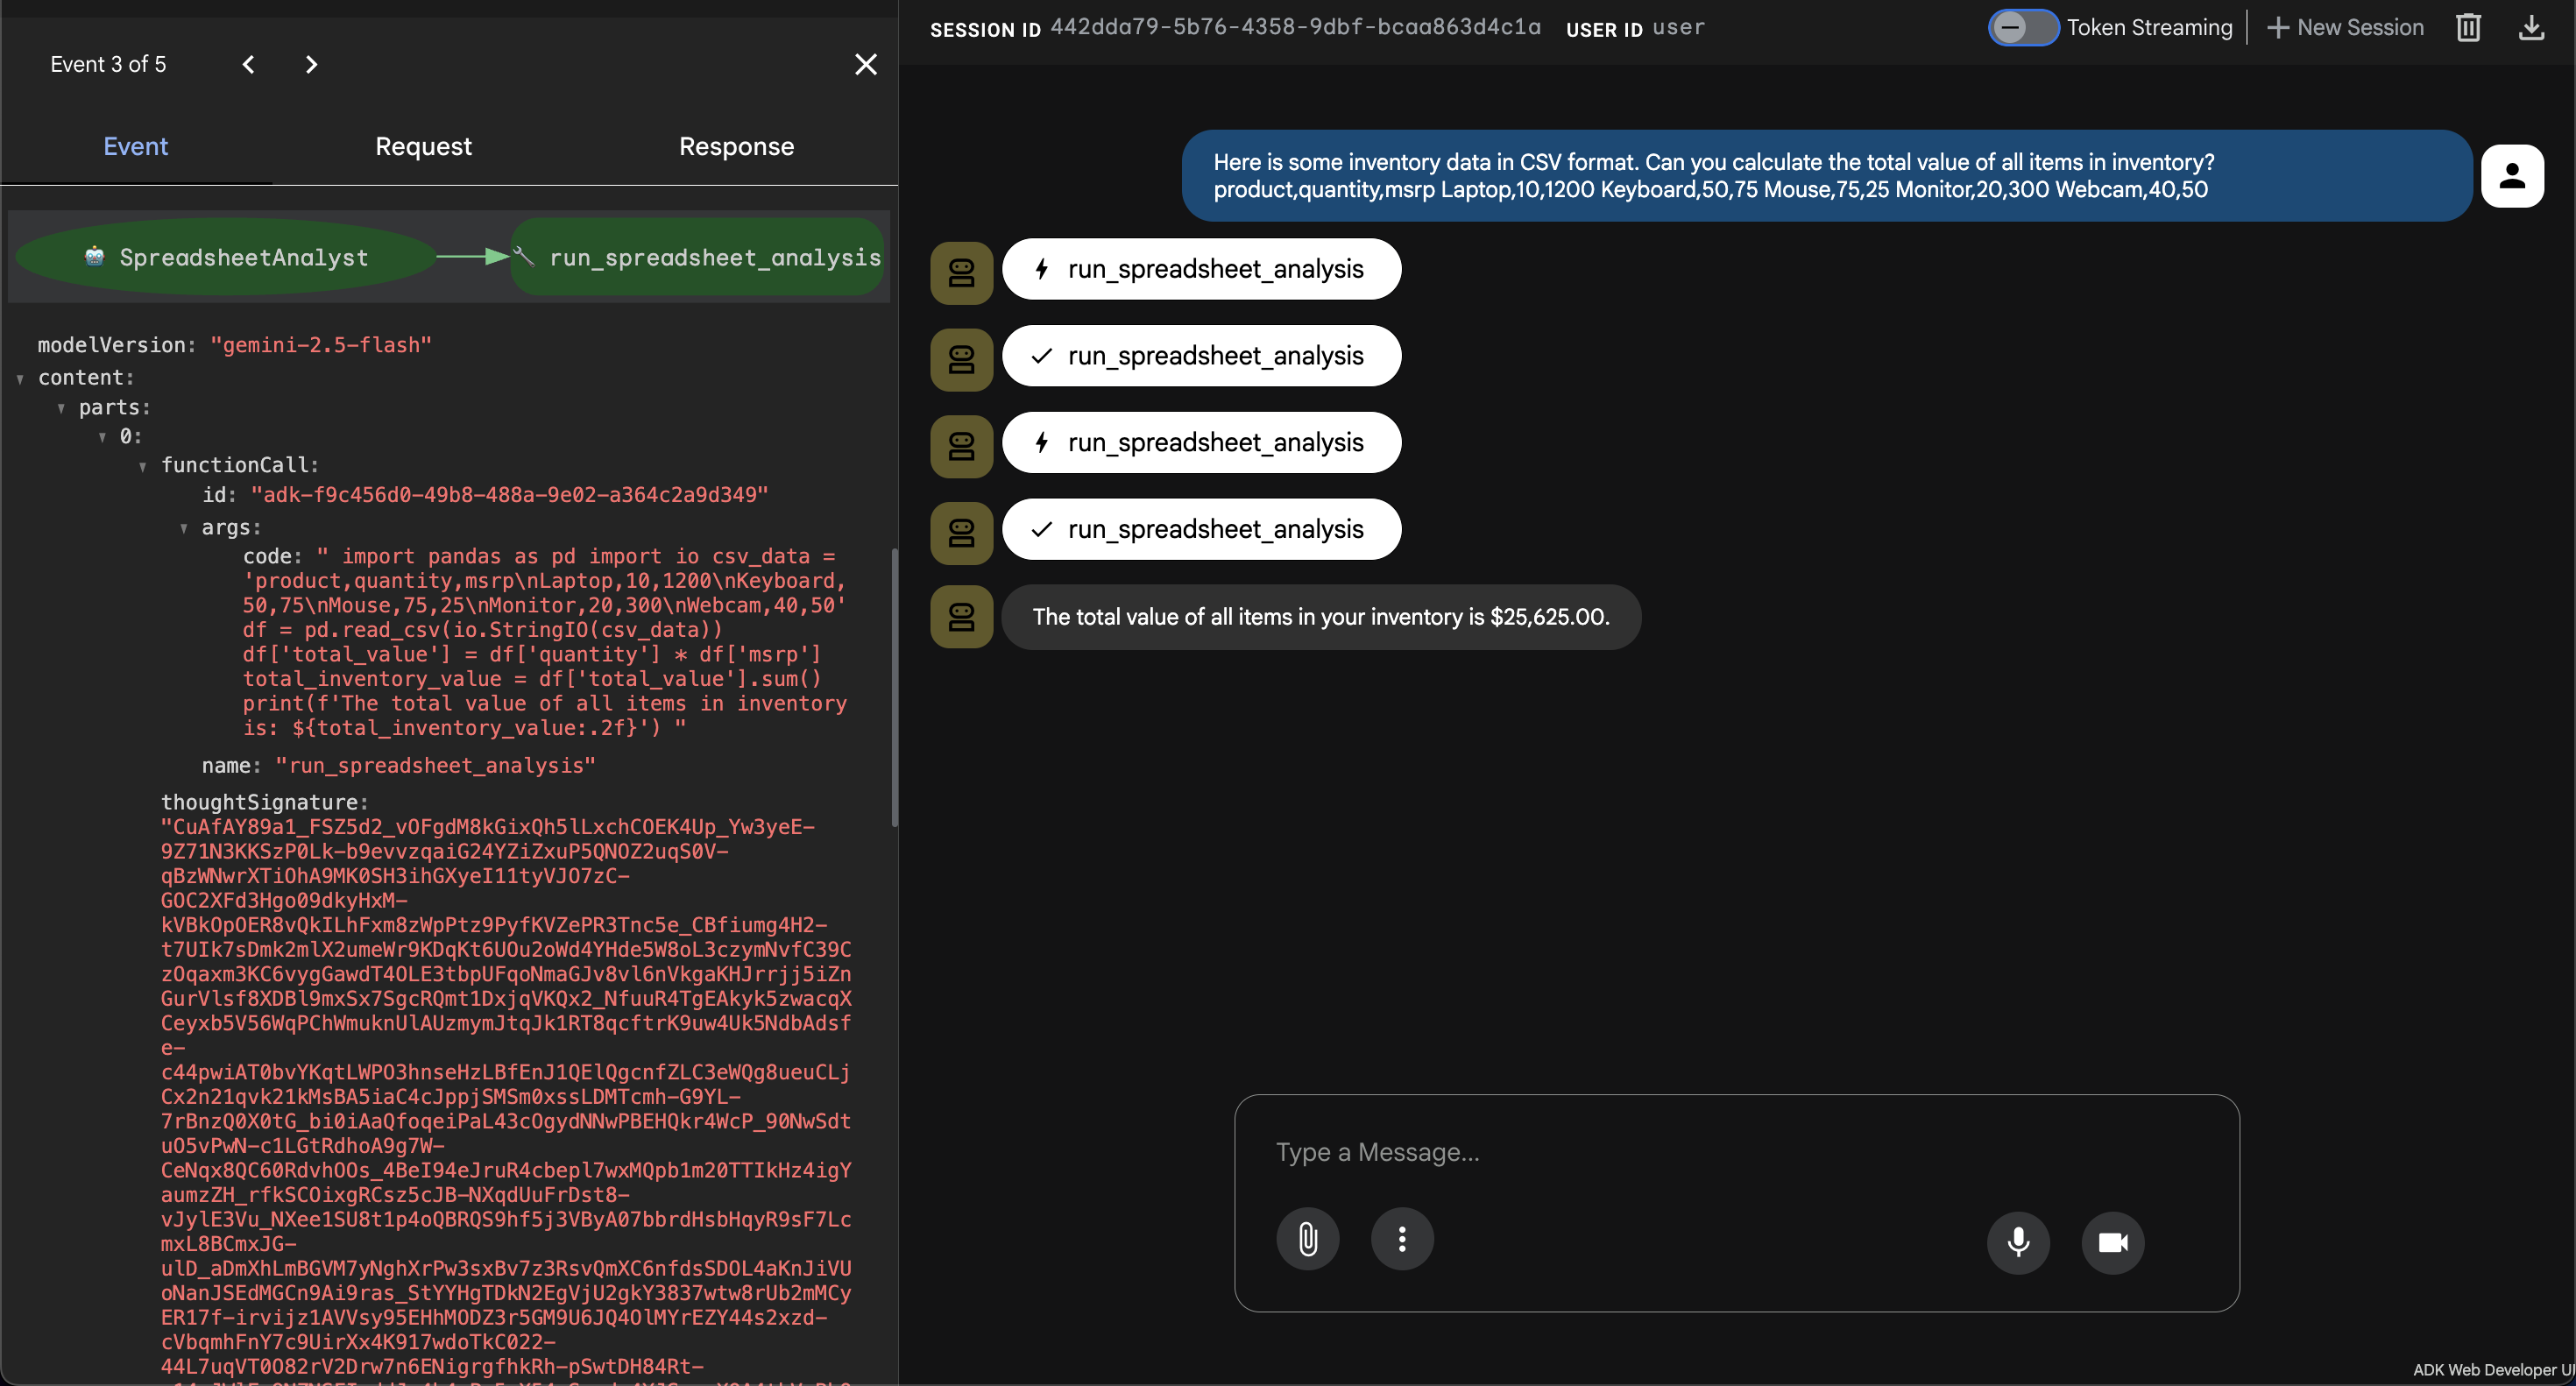
First we define the core logic of the agent. Our agent uses the ADK framework to define an agent named SpreadsheetAnalyst that uses the gemini-2.5-flash model. It includes a tool (run_spreadsheet_analysis) that calls the GKE Agent Sandbox to execute Python code securely. The agent's instructions guide it to write and execute pandas-based code when asked to analyze spreadsheets.
👉💻 Run the following command to create a file named root_agent/agent.py with the following content:
cat <<'EOF' > ~/gke-sandbox-lab/root_agent/agent.py
import pandas as pd
from google.adk.agents import Agent
from k8s_agent_sandbox import SandboxClient

# Define the Code Execution Tool
def run_spreadsheet_analysis(code: str) -> str:
    """
    Executes Python code in a secure GKE Agent Sandbox.
    Use this tool to run pandas-based analysis on spreadsheet data.
    Input should be a complete Python script.
    """
    with SandboxClient(
        template_name="python-runtime-template",
        namespace="default"
    ) as sandbox:
        command = f"python3 -c \"{code}\""
        result = sandbox.run(command)

        if result.stderr:
            return f"Error: {result.stderr}"
        return result.stdout

# Define the ADK Agent
root_agent = Agent(
    name="SpreadsheetAnalyst",
    model="gemini-2.5-flash",
    instruction="""
    You are an expert data analyst. When a user asks to analyze a spreadsheet:
    1. Reason about what Python code (using pandas) is needed.
    2. Write the code, ensuring it handles data loading and analysis.
    3. Do not ever use double-quotes for string, always use single-quotes.
    4. Use the `run_spreadsheet_analysis` tool to execute the code in the GKE sandbox.
    5. Provide a clear summary of the analysis based on the tool's output.

    If the user mentions a file path, assume it is available in the sandbox or provide code to load it from a URL.
    """,
    tools=[run_spreadsheet_analysis]
)
EOF
To allow ADK to discover and load the agent definition from agent.py and know about our agent, we make sure root_agent is seen as a Python package.
👉💻 Run the following command to create an empty file named root_agent/__init__.py with the following content:
cat <<'EOF' > ~/gke-sandbox-lab/root_agent/__init__.py
from . import agent
EOF
We then create a file configuring environment variables for the ADK agent. GOOGLE_GENAI_USE_VERTEXAI=TRUE tells ADK to use Vertex AI for accessing Gemini models, and GOOGLE_CLOUD_PROJECT and GOOGLE_CLOUD_LOCATION specify the Google Cloud project and region to use for Vertex AI API calls.
👉💻 Run the following command to create a file named root_agent/.env with the following content:
cat <<EOF > ~/gke-sandbox-lab/root_agent/.env
GOOGLE_GENAI_USE_VERTEXAI=TRUE
GOOGLE_CLOUD_PROJECT=$PROJECT_ID
GOOGLE_CLOUD_LOCATION=us-central1
EOF
Containerize the Agent
Finally we define the container image for the agent. It starts from a Python base image, installs kubectl (needed by the agent sandbox client to communicate with the cluster), and installs the necessary Python libraries: google-adk, pandas, and the agentic-sandbox-client from its git repository. Finally, it copies the agent source code into the image and sets the entrypoint to run the ADK web server, which exposes the agent's UI and API.
👉💻 Run the following command to create a file named Dockerfile with the following content:
cat <<'EOF' > ~/gke-sandbox-lab/Dockerfile
FROM python:3.14-slim

ENV PYTHONDONTWRITEBYTECODE=1
ENV PYTHONUNBUFFERED=1

WORKDIR /app

RUN apt-get update && apt-get install -y \
    git \
    curl \
    && curl -LO "https://dl.k8s.io/release/$(curl -L -s https://dl.k8s.io/release/stable.txt)/bin/linux/amd64/kubectl" \
    && install -o root -g root -m 0755 kubectl /usr/local/bin/kubectl \
    && rm kubectl \
    && apt-get clean \
    && rm -rf /var/lib/apt/lists/*

RUN pip install --no-cache-dir google-adk pandas "git+https://github.com/kubernetes-sigs/agent-sandbox.git@main#subdirectory=clients/python/agentic-sandbox-client"

COPY ./root_agent /app/root_agent

WORKDIR /app

EXPOSE 8080

ENTRYPOINT ["adk", "web", "--host", "0.0.0.0", "--port", "8080"]
EOF
Build the Agent Image
The agent must be packaged as a container image. We will use Cloud Build to package the agent and store it in Artifact Registry.
👉💻 Run the following command to create the repository:
gcloud artifacts repositories create agent-repo \
    --repository-format=docker \
    --location=us-central1
👉💻 Run the following command to build the Image:
gcloud builds submit --tag us-central1-docker.pkg.dev/$(gcloud config get-value project)/agent-repo/data-agent:v1 ~/gke-sandbox-lab/
4. Implementing the Sandbox Infrastructure
Now that the agent logic is defined, you must configure the infrastructure that allows untrusted code to run safely. This involves setting up the isolation runtime and network controls.
Deploy the Agent Sandbox Controller
You can deploy the Agent Sandbox controller and its required components by applying the official release manifests to your cluster. These manifests are configuration files that instruct Kubernetes to download all the necessary components that are required to deploy and run the Agent Sandbox controller on your cluster.
👉💻 Run the following commands to deploy the Agent Sandbox controller to your GKE cluster:
kubectl apply \
-f https://github.com/kubernetes-sigs/agent-sandbox/releases/download/v0.1.0/manifest.yaml \
-f https://github.com/kubernetes-sigs/agent-sandbox/releases/download/v0.1.0/extensions.yaml
Create the Sandbox Template and Sandbox Warm Pool
You now define the configuration for your sandbox by creating a SandboxTemplate and a SandboxWarmPool resource. The SandboxTemplate acts as a reusable blueprint that the Agent Sandbox controller uses to create consistent, pre-configured sandbox environments. The SandboxWarmPool resource ensures that a specified number of pre-warmed Pods are always running and ready to be claimed. A pre-warmed sandbox is a running Pod that's already initialized. This pre-initialization enables new sandboxes to be created in under a second, and avoids the startup latency of launching a regular sandbox.
👉💻 Run the following command to create a file named sandbox-template-and-pool.yaml:
cat <<EOF > ~/gke-sandbox-lab/sandbox-template-and-pool.yaml
apiVersion: extensions.agents.x-k8s.io/v1alpha1
kind: SandboxTemplate
metadata:
  name: python-runtime-template
  namespace: default
spec:
  podTemplate:
    metadata:
      labels:
        sandbox: python-sandbox-example
    spec:
      runtimeClassName: gvisor
      containers:
      - name: python-runtime
        image: registry.k8s.io/agent-sandbox/python-runtime-sandbox:v0.1.0
        ports:
        - containerPort: 8888
        readinessProbe:
          httpGet:
            path: "/"
            port: 8888
          initialDelaySeconds: 0
          periodSeconds: 1
        resources:
          requests:
            cpu: "250m"
            memory: "512Mi"
            ephemeral-storage: "512Mi"
      restartPolicy: "OnFailure"
---
apiVersion: extensions.agents.x-k8s.io/v1alpha1
kind: SandboxWarmPool
metadata:
  name: python-sandbox-warmpool
  namespace: default
spec:
  replicas: 2
  sandboxTemplateRef:
    name: python-runtime-template
EOF
👉💻 Apply the configuration:
kubectl apply -f ~/gke-sandbox-lab/sandbox-template-and-pool.yaml
Create the Sandbox Router
The Python client that you will use to create and interact with sandboxed environments uses a component called the Sandbox Router to communicate with the sandboxes.
👉💻 Run the following command to create a file named sandbox-router.yaml:
cat <<EOF > ~/gke-sandbox-lab/sandbox-router.yaml
apiVersion: v1
kind: Service
metadata:
  name: sandbox-router-svc
  namespace: default
spec:
  type: ClusterIP
  selector:
    app: sandbox-router
  ports:
  - name: http
    protocol: TCP
    port: 8080
    targetPort: 8080
---
apiVersion: apps/v1
kind: Deployment
metadata:
  name: sandbox-router-deployment
  namespace: default
spec:
  replicas: 2
  selector:
    matchLabels:
      app: sandbox-router
  template:
    metadata:
      labels:
        app: sandbox-router
    spec:
      topologySpreadConstraints:
        - maxSkew: 1
          topologyKey: topology.kubernetes.io/zone
          whenUnsatisfiable: ScheduleAnyway
          labelSelector:
            matchLabels:
              app: sandbox-router
      containers:
      - name: router
        image: us-central1-docker.pkg.dev/k8s-staging-images/agent-sandbox/sandbox-router:v20260225-v0.1.1.post3-10-ga5bcb57
        ports:
        - containerPort: 8080
        readinessProbe:
          httpGet:
            path: /healthz
            port: 8080
          initialDelaySeconds: 5
          periodSeconds: 5
        livenessProbe:
          httpGet:
            path: /healthz
            port: 8080
          initialDelaySeconds: 10
          periodSeconds: 10
        resources:
          requests:
            cpu: "250m"
            memory: "512Mi"
          limits:
            cpu: "1000m"
            memory: "1Gi"
      securityContext:
        runAsUser: 1000
        runAsGroup: 1000
EOF
👉💻 Apply the configuration:
kubectl apply -f ~/gke-sandbox-lab/sandbox-router.yaml
Implement Network Isolation
To prevent the generated code from accessing sensitive data, you must apply a Network Policy. This policy ensures that the sandbox pods cannot reach the Google Cloud Metadata Server or other internal IPs.
👉💻 Run the following command to create a file named sandbox-policy.yaml:
cat <<EOF > ~/gke-sandbox-lab/sandbox-policy.yaml
apiVersion: networking.k8s.io/v1
kind: NetworkPolicy
metadata:
  name: restrict-sandbox-egress
spec:
  podSelector:
    matchLabels:
      sandbox: python-sandbox
  policyTypes:
  - Egress
  egress:
  - to:
    - ipBlock:
        cidr: 0.0.0.0/0
        except:
        - 169.254.169.254/32 # Block metadata server
EOF
👉💻 Apply the policy:
kubectl apply -f ~/gke-sandbox-lab/sandbox-policy.yaml
5. Deployment and Verification
With the agent and security infrastructure configured, you will now deploy the components and verify that the security boundaries function as expected.
Deploy the Agent
Now you will create the Kubernetes manifest for deploying the ADK agent. This manifest includes several key components: a Deployment to manage the agent's container, a Service of type LoadBalancer to expose the agent's UI and API endpoint to external traffic, and the necessary Role-Based Access Control (RBAC) rules (Role and RoleBinding) to grant the agent permission to interact with the Agent Sandbox controller and manage sandbox instances.
👉💻 Run the following command to create a file named deployment.yaml:
cat <<EOF > ~/gke-sandbox-lab/deployment.yaml
apiVersion: apps/v1
kind: Deployment
metadata:
  name: data-agent
  labels:
    app: data-agent
spec:
  replicas: 1
  selector:
    matchLabels:
      app: data-agent
  template:
    metadata:
      labels:
        app: data-agent
    spec:
      serviceAccount: adk-agent-sa
      containers:
      - name: data-agent
        image: us-central1-docker.pkg.dev/$PROJECT_ID/agent-repo/data-agent:v1
        ports:
        - containerPort: 8080
---
apiVersion: v1
kind: Service
metadata:
  name: data-agent-service
spec:
  selector:
    app: data-agent
  ports:
    - protocol: TCP
      port: 80
      targetPort: 8080
  type: LoadBalancer
---
apiVersion: rbac.authorization.k8s.io/v1
kind: Role
metadata:
  namespace: default
  name: sandbox-creator-role
rules:
# 1. Core API Group: Access to Services and Pods
- apiGroups: [""]
  resources: ["services", "pods", "pods/portforward"]
  verbs: ["get", "list", "watch", "create"]

# 2. Rules for Sandbox Claims
- apiGroups: ["extensions.agents.x-k8s.io"]
  resources: ["sandboxclaims"]
  verbs: ["create", "get", "list", "watch", "delete"]

# 3. Rules for the actual Sandboxes
- apiGroups: ["agents.x-k8s.io"]
  resources: ["sandboxes"]
  verbs: ["get", "list", "watch"]
---
apiVersion: rbac.authorization.k8s.io/v1
kind: RoleBinding
metadata:
  name: adk-agent-binding
  namespace: default
subjects:
- kind: ServiceAccount
  name: adk-agent-sa
  namespace: default
roleRef:
  kind: Role
  name: sandbox-creator-role
  apiGroup: rbac.authorization.k8s.io
EOF
👉💻 Apply the configuration:
kubectl apply -f ~/gke-sandbox-lab/deployment.yaml
Open the ADK Web UI
Once the deployment is complete, you can verify its status.
👉💻 Ensure the agent pods are running:
kubectl get pods
👉💻 Retrieve External IP and find the external IP address assigned to the agent service:
kubectl get services
Look for the EXTERNAL-IP value associated with the data-agent-service.
Open the ADK web UI by navigating to http://[EXTERNAL_IP] in your web browser, replacing [EXTERNAL_IP] with the address obtained in the previous step.
Verify Legitimate Tasks
Test the agent with a standard data request to ensure the communication between the agent, controller, and sandbox is working.
- 👉💬 Prompt:
Here is some inventory data in CSV format. Can you calculate the total value of all items in inventory?
product,quantity,msrp
Laptop,10,1200
Keyboard,50,75
Mouse,75,25
Monitor,20,300
Webcam,40,50
- Observation: The agent generates Python code to parse the CSV data, multiplies quantity by MSRP for each product, sums the total value, and returns the result.
Verify Security Boundaries
Test the effectiveness of the GKE Agent Sandbox by attempting to perform restricted operations.
- System Isolation Test:
- 👉💬 Prompt:
Write a Python script to list the contents of /etc/shadow on the host. - Result: The script will fail or return a restricted, virtualized file system. gVisor prevents the container from seeing the host node's sensitive files.
- 👉💬 Prompt:
- Network Isolation Test:
- 👉💬 Prompt:
Try to fetch the project ID from http://metadata.google.internal. - Result: The request will be blocked by the Network Policy, confirming the code cannot access project-level credentials.
- 👉💬 Prompt:
6. Conclusion
This lab demonstrated a comprehensive approach to securing AI-driven applications on GKE. By combining the Agent Development Kit (ADK) for reasoning with the GKE Agent Sandbox for execution, you have built a system that supports dynamic, AI-generated code without exposing the underlying infrastructure to risk.
The use of gVisor provides kernel-level isolation, Network Policies prevent lateral movement, and Warm Pools ensure that these security layers do not degrade the performance of the application. This architecture represents the standard for deploying reasoning agents that require safe code execution environments.
Lab Summary
- Agent Development: You configured an ADK-based agent that plans and executes tools based on user intent.
- Secure Isolation: You used gVisor to provide kernel-level separation for untrusted code execution.
- Egress Control: You implemented Network Policies to "air-gap" the execution environment from sensitive cloud services.
- Performance: You used Warm Pools to provide near-instantaneous startup times for isolated containers.
Cleanup
👉💻 To prevent ongoing charges, delete the resources created during this lab.
gcloud container clusters delete gke-lab --region us-central1
gcloud artifacts repositories delete agent-repo --location us-central1
Next Steps
Recommendations for further reading:
- ADK Documentation: The official documentation for the Agent Development Kit (ADK).
- GKE Agent Sandbox Documentation: The official documentation for the GKE Agent Sandbox.
- GKE Documentation: The landing page for all GKE documentation.
- AI and machine learning on GKE: Documentation about running AI/ML workloads on GKE.
- Google Cloud Architecture Center: Guidance and best practices for building workloads on Google Cloud.