
1. はじめに
Google Chat アプリは、サービスやリソースを Google Chat で直接利用できるため、ユーザーは会話から離れることなく情報を入手し、迅速に操作できます。
この Codelab では、Node.js と Cloud Functions を使用してアンケート アプリをビルドしてデプロイする方法について学びます。
学習内容
- Cloud Shell を使用する
- Cloud Functions へのデプロイ
- スラッシュ コマンドとダイアログでユーザー入力を取得する
- インタラクティブなカードを作成する
2. 設定と要件
Google Cloud プロジェクトを作成し、Chat アプリで使用する API とサービスを有効にします
前提条件
Google Chat アプリを開発するには、Google Chat にアクセスできる Google Workspace アカウントが必要です。Google Workspace アカウントをまだお持ちでない場合は、この Codelab に進む前に Google Workspace アカウントを作成してログインしてください。
セルフペース型の環境設定
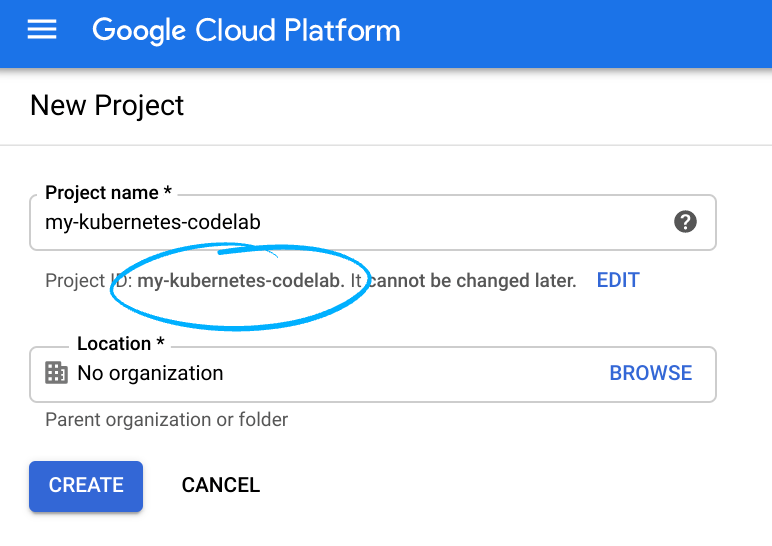
- Google Cloud Console を開き、プロジェクトを作成します。
すべての Google Cloud プロジェクトに共通する、一意のプロジェクト ID を覚えておいてください(上記の名前はすでに使われており、正しく機能しません)。以降、この Codelab ではPROJECT_IDと呼びます。

![[New Project] ボタン](https://lh4.googleusercontent.com/lMRhd6IHUnUIoHLvfFhT3cFIZUeFBlydTk2qP4IkA9or1nqO1Xi7QLiL7Q3r0pLG4uOLr_P1CABHIOk07z6TRw-G0JRPz8JiFzsPcU_e73BY0BPmVNSWvM3DYvCcty-SvuEBTpr1Ig)
- 次に、Google Cloud リソースを使用するために、Cloud Console で課金を有効にします。
このコードラボを実行しても、費用はほとんどかからないはずです。このチュートリアル以降の課金が発生しないように、Codelab の最後にある「クリーンアップ」セクションの手順でリソースをシャットダウンする方法を確認してください。Google Cloud の新規ユーザーは $300 の無料トライアル プログラムをご利用いただけます。
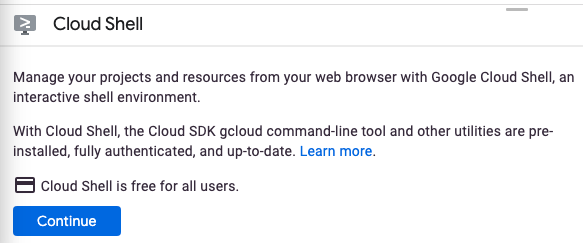
Google Cloud Shell
Google Cloud はノートパソコンからリモートで操作できますが、この Codelab では Google Cloud で実行されるコマンドライン環境である Google Cloud Shell を使用します。
Cloud Shell をアクティブにする
- Cloud Console で、Cloud Shell をアクティブにする アイコン
をクリックします。
Cloud Shell を初めて開くと、わかりやすいウェルカム メッセージが表示されます。ウェルカム メッセージが表示されたら、[続行] をクリックします。ウェルカム メッセージは再度表示されません。ウェルカム メッセージが表示されます。
プロビジョニングと Cloud Shell への接続にはそれほど時間はかかりません。接続後、Cloud Shell ターミナルが表示されます。
この仮想マシンには、必要な開発ツールがすべて読み込まれています。5 GB の永続ホーム ディレクトリが用意されており、Google Cloud で稼働するため、ネットワーク パフォーマンスが充実しており認証もスムーズです。この Codelab では、すべての作業をブラウザまたは Chromebook で行うことができます。Cloud Shell に接続されると、すでに認証されており、プロジェクトがプロジェクト ID をすでに設定していることがわかります。 - Cloud Shell で次のコマンドを実行して、認証されたことを確認します。
gcloud auth list
GCP API 呼び出しの Cloud Shell の承認を求められたら、[承認] をクリックします。
コマンドの出力Credentialed Accounts ACTIVE ACCOUNT * <my_account>@<my_domain.com>
アカウントがデフォルトで選択されていない場合は、次のコマンドを実行します。$ gcloud config set account <ACCOUNT>


- 正しいプロジェクトが選択されていることを確認します。Cloud Shell で、次のコマンドを実行します。
gcloud config list project
コマンド出力[core] project = <PROJECT_ID>
正しいプロジェクトが返されない場合は、次のコマンドでプロジェクトを設定できます。gcloud config set project <PROJECT_ID>
コマンド出力Updated property [core/project].
この Codelab を完了したら、コマンドライン操作とファイルの編集を使用します。ファイルを編集する場合は、Cloud Shell ツールバーの右側にある [エディタを開く] をクリックすると、Cloud Shell に組み込まれているコードエディタである Cloud Shell エディタを使用できます。Cloud Shell では、Vim や Emacs などの人気のエディタも使用できます。
3. Cloud Functions、Cloud Build、Google Chat API を有効にする
Cloud Shell で、次の API とサービスを有効にします。
gcloud services enable \
  cloudfunctions \
  cloudbuild.googleapis.com \
  chat.googleapis.com
このオペレーションには数分かかることがあります。
完了すると、次のような成功メッセージが表示されます。
Operation "operations/acf.cc11852d-40af-47ad-9d59-477a12847c9e" finished successfully.
4.最初の Chat アプリを作成する
プロジェクトの初期化
まず、シンプルな「Hello World」アプリを作成してデプロイします。 Chat アプリは、https リクエストと JSON ペイロードで応答するウェブサービスです。このアプリでは、Node.js と Cloud Functions を使用します。
Cloud Shell で、poll-app という名前の新しいディレクトリを作成し、そのディレクトリに移動します。
mkdir ~/poll-app
cd ~/poll-app
Codelab の残りの作業と、これから作成するファイルはすべて、このディレクトリに配置されます。
Node.js プロジェクトを初期化します。
npm init
NPM は、プロジェクトの構成(名前やバージョンなど)についていくつか質問します。各質問で ENTER キーを押すと、デフォルト値をそのまま使用できます。デフォルトのエントリ ポイントは、次に作成する index.js という名前のファイルです。
Chat アプリのバックエンドを作成する
アプリの作成を開始しましょう。次の内容のファイルを index.js という名前で作成します。
/**
 * App entry point.
 */
exports.app = async (req, res) => {
  if (!(req.method === 'POST' && req.body)) {
      res.status(400).send('')
  }
  const event = req.body;
  let reply = {};
  if (event.type === 'MESSAGE') {
    reply = {
        text: `Hello ${event.user.displayName}`
    };
  }
  res.json(reply)
}
アプリはまだあまり動作しませんが、問題ありません。今後、さらに機能を追加していく予定です。
アプリをデプロイする
「Hello World」アプリをデプロイするには、Cloud Functions の関数をデプロイし、Google Cloud Console で Chat アプリを構成して、アプリにテスト メッセージを送信してデプロイを確認します。
Cloud Function のデプロイ
「Hello World」アプリの Cloud Functions の関数をデプロイするには、次のコマンドを入力します。
gcloud functions deploy app --trigger-http --security-level=secure-always --allow-unauthenticated --runtime nodejs14
完了すると、出力は次のようになります。
availableMemoryMb: 256
buildId: 993b2ca9-2719-40af-86e4-42c8e4563a4b
buildName: projects/595241540133/locations/us-central1/builds/993b2ca9-2719-40af-86e4-42c8e4563a4b
entryPoint: app
httpsTrigger:
  securityLevel: SECURE_ALWAYS
  url: https://us-central1-poll-app-codelab.cloudfunctions.net/app
ingressSettings: ALLOW_ALL
labels:
  deployment-tool: cli-gcloud
name: projects/poll-app-codelab/locations/us-central1/functions/app
runtime: nodejs14
serviceAccountEmail: poll-app-codelab@appspot.gserviceaccount.com
sourceUploadUrl: https://storage.googleapis.com/gcf-upload-us-central1-66a01777-67f0-46d7-a941-079c24414822/94057943-2b7c-4b4c-9a21-bb3acffc84c6.zip
status: ACTIVE
timeout: 60s
updateTime: '2021-09-17T19:30:33.694Z'
versionId: '1'
httpsTrigger.url プロパティで、デプロイされた関数の URL をメモします。次のステップでこれを使用します。
アプリの構成
アプリを構成するには、Cloud Console の [チャットの設定] ページ([API とサービス] > [ダッシュボード] > [Hangouts Chat API])に移動します。 3} > [設定])。
- [アプリ名] に「PollCodelab」と入力します。
- [アバターの URL] に「
https://raw.githubusercontent.com/google/material-design-icons/master/png/social/poll/materialicons/24dp/2x/baseline_poll_black_24dp.png」と入力します。 - [Description] に「Poll app for Codelab」と入力します。
- [機能] で [アプリは直接メッセージを送信できます] と [アプリは複数のユーザーが使用するスペースで動作します] を選択します。
- [接続設定] で [アプリの URL] を選択し、Cloud Functions の関数の URL(最後のセクションの
httpsTrigger.urlプロパティ)を貼り付けます。 - [権限] で [ドメイン内のユーザーとグループ] を選択し、メールアドレスを入力します。
- [保存] をクリックします。
これで、アプリでメッセージを送信できます。
アプリをテストする
次に進む前に、Google Chat のスペースにアプリを追加して、アプリが機能していることを確認してください。
- Google Chat に移動します。
- [Chat] の横にある [+] > [アプリを探す] をクリックします。
- 「PollCodelab」と入力します。
- [チャット] をクリックします。
- アプリにメッセージを送信するには、「Hello」と入力して Enter キーを押します。
アプリは短い「hello」メッセージを返します。
基本的なスケルトンを作成したら、さらに役立つものに仕上げましょう。
5. アンケート機能を作成する
アプリの仕組みの概要
アプリは主に次の 2 つの部分で構成されます。
- アンケートを設定するためのダイアログを表示するスラッシュ コマンド。
- 投票と結果の表示を行うためのインタラクティブ カード。
アプリには、アンケートの設定と結果を保存する状態も必要です。これは、Firestore や他のデータベースを使用して行えます。また、状態をアプリ メッセージ自体に保存することもできます。このアプリは、チームに関する非公式なアンケートをすばやく行えるようにすることが目的なので、このユースケースにはアプリ メッセージに状態を保存することをおすすめします。
アプリのデータモデル(Typescript で表現)は次のとおりです。
interface Poll {
  /* Question/topic of poll */
  topic: string;
  /** User that submitted the poll */
  author: {
    /** Unique resource name of user */
    name: string;
    /** Display name */
    displayName: string;
  };
  /** Available choices to present to users */
  choices: string[];
  /** Map of user ids to the index of their selected choice */
  votes: { [key: string]: number };
}
トピックまたは質問、選択肢のリストのほかに、投稿者の ID と名前、記録された投票が含まれます。ユーザーが複数回投票するのを防ぐために、投票は、ユーザー ID と選択した選択肢のインデックスのマップとして保存されます。
もちろん、さまざまなアプローチがありますが、スペースで簡単なアンケートを行うための出発点として使用できます。
ポーリング構成コマンドを実装する
ユーザーがアンケートを開始して設定できるようにするには、ダイアログを開くスラッシュ コマンドを設定します。これは複数のステップで構成されるプロセスです。
- アンケートを開始するスラッシュ コマンドを登録します。
- アンケートを設定するダイアログを作成します。
- アプリがスラッシュ コマンドを認識して処理できるようにします。
- アンケートでの投票に役立つインタラクティブなカードを作成します。
- アプリがアンケートを実行するためのコードを実装します。
- Cloud Functions の関数を再デプロイする。
スラッシュ コマンドを登録する
スラッシュ コマンドを登録するには、チャットの設定コンソール内のAPI とサービス>ダッシュボード>Hangouts Chat API >構成)。
- [スラッシュ コマンド] で、[Add slash command] をクリックします。
- [名前] に「/poll」と入力します。
- [Command id] に「1」と入力します。
- [説明] に「アンケートを開始」と入力します。
- [ダイアログを開く] を選択します。
- [完了] をクリックします。
- [保存] をクリックします。
アプリが /poll コマンドを認識し、ダイアログが開きます。次に、ダイアログを構成しましょう。
設定フォームをダイアログとして作成する
スラッシュ コマンドは、ダイアログを開いてアンケートのトピックや選択肢を指定します。次の内容のファイルを、config-form.js という名前で新たに作成します。
/** Upper bounds on number of choices to present. */
const MAX_NUM_OF_OPTIONS = 5;

/**
 * Build widget with instructions on how to use form.
 *
 * @returns {object} card widget
 */
function helpText() {
  return {
    textParagraph: {
      text: 'Enter the poll topic and up to 5 choices in the poll. Blank options will be omitted.',
    },
  };
}

/**
 * Build the text input for a choice.
 *
 * @param {number} index - Index to identify the choice
 * @param {string|undefined} value - Initial value to render (optional)
 * @returns {object} card widget
 */
function optionInput(index, value) {
  return {
    textInput: {
      label: `Option ${index + 1}`,
      type: 'SINGLE_LINE',
      name: `option${index}`,
      value: value || '',
    },
  };
}

/**
 * Build the text input for the poll topic.
 *
 * @param {string|undefined} topic - Initial value to render (optional)
 * @returns {object} card widget
 */
function topicInput(topic) {
  return {
    textInput: {
      label: 'Topic',
      type: 'MULTIPLE_LINE',
      name: 'topic',
      value: topic || '',
    },
  };
}

/**
 * Build the buttons/actions for the form.
 *
 * @returns {object} card widget
 */
function buttons() {
  return {
    buttonList: {
      buttons: [
        {
          text: 'Submit',
          onClick: {
            action: {
              function: 'start_poll',
            },
          },
        },
      ],
    },
  };
}

/**
 * Build the configuration form.
 *
 * @param {object} options - Initial state to render with form
 * @param {string|undefined} options.topic - Topic of poll (optional)
 * @param {string[]|undefined} options.choices - Text of choices to display to users (optional)
 * @returns {object} card
 */
function buildConfigurationForm(options) {
  const widgets = [];
  widgets.push(helpText());
  widgets.push(topicInput(options.topic));
  for (let i = 0; i < MAX_NUM_OF_OPTIONS; ++i) {
    const choice = options?.choices?.[i];
    widgets.push(optionInput(i, choice));
  }
  widgets.push(buttons());

  // Assemble the card
  return {
    sections: [
      {
        widgets,
      },
    ],
  };
}

exports.MAX_NUM_OF_OPTIONS = MAX_NUM_OF_OPTIONS;
exports.buildConfigurationForm = buildConfigurationForm;
このコードは、ユーザーがアンケートを設定するためのダイアログ フォームを生成します。また、質問の選択肢の最大数を示す定数もエクスポートされます。UI マークアップの構築をステートレス関数に分離し、任意の状態をパラメータとして渡すことをおすすめします。流用が容易になり、後でさまざまなコンテキストでこのカードにレンダリングされます。
この実装では、カードをより小さなユニットまたはコンポーネントに分解します。この手法は必須ではありませんが、複雑なインターフェースを構築する際に読みやすく保守しやすい傾向があるため、ベスト プラクティスとなっています。
構築済みの完全な JSON のサンプルは、Card Builder ツールでご確認ください。
スラッシュ コマンドの処理
スラッシュ コマンドは、アプリへの送信時に MESSAGE イベントとして表示されます。 index.js を更新して、MESSAGE イベントを介してスラッシュ コマンドの有無を確認し、ダイアログで応答するようにします。index.js を次のように置き換えます。
const { buildConfigurationForm, MAX_NUM_OF_OPTIONS } = require('./config-form');

/**
 * App entry point.
 */
exports.app = async (req, res) => {
  if (!(req.method === 'POST' && req.body)) {
      res.status(400).send('')
  }
  const event = req.body;
  let reply = {};
  // Dispatch slash and action events
  if (event.type === 'MESSAGE') {
    const message = event.message;
    if (message.slashCommand?.commandId === '1') {
      reply = showConfigurationForm(event);
    }
  } else if (event.type === 'CARD_CLICKED') {
    if (event.action?.actionMethodName === 'start_poll') {
      reply = await startPoll(event);
    }
  }
  res.json(reply);
}

/**
 * Handles the slash command to display the config form.
 *
 * @param {object} event - chat event
 * @returns {object} Response to send back to Chat
 */
function showConfigurationForm(event) {
  // Seed the topic with any text after the slash command
  const topic = event.message?.argumentText?.trim();
  const dialog = buildConfigurationForm({
    topic,
    choices: [],
  });
  return {
    actionResponse: {
      type: 'DIALOG',
      dialogAction: {
        dialog: {
          body: dialog,
        },
      },
    },
  };
}

/**
 * Handle the custom start_poll action.
 *
 * @param {object} event - chat event
 * @returns {object} Response to send back to Chat
 */
function startPoll(event) {
  // Not fully implemented yet -- just close the dialog
  return {
    actionResponse: {
      type: 'DIALOG',
      dialogAction: {
        actionStatus: {
          statusCode: 'OK',
          userFacingMessage: 'Poll started.',
        },
      },
    },
  }
}
これで、/poll コマンドが呼び出されると、アプリにダイアログが表示されます。Cloud Shell で Cloud Functions の関数を赤色にして、インタラクションをテストします。
gcloud functions deploy app --trigger-http --security-level=secure-always
Cloud Functions の関数がデプロイされたら、/poll コマンドを使用してアプリにメッセージを送信し、スラッシュ コマンドとダイアログをテストします。ダイアログからカスタム アクション start_poll とともに CARD_CLICKED イベントが送信されます。このイベントは更新されたエントリ ポイントで処理され、startPoll メソッドを呼び出します。ここでは、ダイアログを閉じるために startPoll メソッドをスタブします。次のセクションでは、投票機能を実装し、すべての要素をつなぎ合わせます。
投票カードを実装する
アプリの投票機能を実装するには、まず、投票を行うためのインターフェースを提供するインタラクティブ カードを定義します。
投票インターフェースを実装する
次の内容で vote-card.js という名前のファイルを作成します。
/**
 * Creates a small progress bar to show percent of votes for an option. Since
 * width is limited, the percentage is scaled to 20 steps (5% increments).
 *
 * @param {number} voteCount - Number of votes for this option
 * @param {number} totalVotes - Total votes cast in the poll
 * @returns {string} Text snippet with bar and vote totals
 */
function progressBarText(voteCount, totalVotes) {
  if (voteCount === 0 || totalVotes === 0) {
    return '';
  }

  // For progress bar, calculate share of votes and scale it
  const percentage = (voteCount * 100) / totalVotes;
  const progress = Math.round((percentage / 100) * 20);
  return '▀'.repeat(progress);
}

/**
 * Builds a line in the card for a single choice, including
 * the current totals and voting action.
 *
 * @param {number} index - Index to identify the choice
 * @param {string|undefined} value - Text of the choice
 * @param {number} voteCount - Current number of votes cast for this item
 * @param {number} totalVotes - Total votes cast in poll
 * @param {string} state - Serialized state to send in events
 * @returns {object} card widget
 */
function choice(index, text, voteCount, totalVotes, state) {
  const progressBar = progressBarText(voteCount, totalVotes);
  return {
    keyValue: {
      bottomLabel: `${progressBar} ${voteCount}`,
      content: text,
      button: {
        textButton: {
          text: 'vote',
          onClick: {
            action: {
              actionMethodName: 'vote',
              parameters: [
                {
                  key: 'state',
                  value: state,
                },
                {
                  key: 'index',
                  value: index.toString(10),
                },
              ],
            },
          },
        },
      },
    },
  };
}

/**
 * Builds the card header including the question and author details.
 *
 * @param {string} topic - Topic of the poll
 * @param {string} author - Display name of user that created the poll
 * @returns {object} card widget
 */
function header(topic, author) {
  return {
    title: topic,
    subtitle: `Posted by ${author}`,
    imageUrl:
      'https://raw.githubusercontent.com/google/material-design-icons/master/png/social/poll/materialicons/24dp/2x/baseline_poll_black_24dp.png',
    imageStyle: 'AVATAR',
  };
}

/**
 * Builds the configuration form.
 *
 * @param {object} poll - Current state of poll
 * @param {object} poll.author - User that submitted the poll
 * @param {string} poll.topic - Topic of poll
 * @param {string[]} poll.choices - Text of choices to display to users
 * @param {object} poll.votes - Map of cast votes keyed by user ids
 * @returns {object} card
 */
function buildVoteCard(poll) {
  const widgets = [];
  const state = JSON.stringify(poll);
  const totalVotes = Object.keys(poll.votes).length;

  for (let i = 0; i < poll.choices.length; ++i) {
    // Count votes for this choice
    const votes = Object.values(poll.votes).reduce((sum, vote) => {
      if (vote === i) {
        return sum + 1;
      }
      return sum;
    }, 0);
    widgets.push(choice(i, poll.choices[i], votes, totalVotes, state));
  }

  return {
    header: header(poll.topic, poll.author.displayName),
    sections: [
      {
        widgets,
      },
    ],
  };
}

exports.buildVoteCard = buildVoteCard;
この実装はダイアログのアプローチと似ていますが、インタラクティブ カードのマークアップはダイアログとは若干異なります。以前と同様に、生成されたカードのサンプルを Card Builder ツールで確認できます。
投票アクションを実装する
投票カードには、各選択肢のボタンが含まれています。選択したインデックスが、アンケートのシリアル化された状態とともにボタンに追加されます。アプリは、アクション vote を含む CARD_CLICKED を、パラメータとしてボタンに添付されたデータとともに受け取ります。
次のコマンドで index.js を更新します。
const { buildConfigurationForm, MAX_NUM_OF_OPTIONS } = require('./config-form');
const { buildVoteCard } = require('./vote-card');

/**
 * App entry point.
 */
exports.app = async (req, res) => {
  if (!(req.method === 'POST' && req.body)) {
      res.status(400).send('')
  }
  const event = req.body;
  let reply = {};
  // Dispatch slash and action events
  if (event.type === 'MESSAGE') {
    const message = event.message;
    if (message.slashCommand?.commandId === '1') {
      reply = showConfigurationForm(event);
    }
  } else if (event.type === 'CARD_CLICKED') {
    if (event.action?.actionMethodName === 'start_poll') {
      reply = await startPoll(event);
    } else if (event.action?.actionMethodName === 'vote') {
        reply = recordVote(event);
    }
  }
  res.json(reply);
}

/**
 * Handles the slash command to display the config form.
 *
 * @param {object} event - chat event
 * @returns {object} Response to send back to Chat
 */
function showConfigurationForm(event) {
  // Seed the topic with any text after the slash command
  const topic = event.message?.argumentText?.trim();
  const dialog = buildConfigurationForm({
    topic,
    choices: [],
  });
  return {
    actionResponse: {
      type: 'DIALOG',
      dialogAction: {
        dialog: {
          body: dialog,
        },
      },
    },
  };
}

/**
 * Handle the custom start_poll action.
 *
 * @param {object} event - chat event
 * @returns {object} Response to send back to Chat
 */
function startPoll(event) {
  // Not fully implemented yet -- just close the dialog
  return {
    actionResponse: {
      type: 'DIALOG',
      dialogAction: {
        actionStatus: {
          statusCode: 'OK',
          userFacingMessage: 'Poll started.',
        },
      },
    },
  }
}

/**
 * Handle the custom vote action. Updates the state to record
 * the user's vote then rerenders the card.
 *
 * @param {object} event - chat event
 * @returns {object} Response to send back to Chat
 */
function recordVote(event) {
  const parameters = event.common?.parameters;

  const choice = parseInt(parameters['index']);
  const userId = event.user.name;
  const state = JSON.parse(parameters['state']);

  // Add or update the user's selected option
  state.votes[userId] = choice;

  const card = buildVoteCard(state);
  return {
    thread: event.message.thread,
    actionResponse: {
      type: 'UPDATE_MESSAGE',
    },
    cards: [card],
  }
}
recordVote メソッドは、保存された状態を解析し、ユーザーの投票によってステータスを更新してから、カードを再レンダリングします。アンケート結果はカードが更新されるたびにシリアル化され、カードに保存されます。
ピースを接続する
アプリの準備はあと少しで完了します。投票と一緒にスラッシュ コマンドを実装すると、最後に startPoll メソッドを終了します。
しかし、落とし穴があります。
アンケートの設定を送信すると、アプリは次の 2 つのアクションを実行する必要があります。
- ダイアログを閉じます。
- 投票カードを使用してスペースに新しいメッセージを投稿する。
残念ながら、HTTP リクエストへの直接返信は 1 つのみであり、最初のリクエストである必要があります。投票カードを送信するには、Chat API を使用して新しいメッセージを非同期に作成する必要があります。
クライアント ライブラリの追加
次のコマンドを実行して、Node.js 用 Google API クライアントが含まれるようにアプリの依存関係を更新します。
npm install --save googleapis
アンケートを開始する
index.js を以下の最終バージョンに更新します。
const { buildConfigurationForm, MAX_NUM_OF_OPTIONS } = require('./config-form');
const { buildVoteCard } = require('./vote-card');
const {google} = require('googleapis');

/**
 * App entry point.
 */
exports.app = async (req, res) => {
  if (!(req.method === 'POST' && req.body)) {
      res.status(400).send('')
  }
  const event = req.body;
  let reply = {};
  // Dispatch slash and action events
  if (event.type === 'MESSAGE') {
    const message = event.message;
    if (message.slashCommand?.commandId === '1') {
      reply = showConfigurationForm(event);
    }
  } else if (event.type === 'CARD_CLICKED') {
    if (event.action?.actionMethodName === 'start_poll') {
      reply = await startPoll(event);
    } else if (event.action?.actionMethodName === 'vote') {
        reply = recordVote(event);
    }
  }
  res.json(reply);
}

/**
 * Handles the slash command to display the config form.
 *
 * @param {object} event - chat event
 * @returns {object} Response to send back to Chat
 */
function showConfigurationForm(event) {
  // Seed the topic with any text after the slash command
  const topic = event.message?.argumentText?.trim();
  const dialog = buildConfigurationForm({
    topic,
    choices: [],
  });
  return {
    actionResponse: {
      type: 'DIALOG',
      dialogAction: {
        dialog: {
          body: dialog,
        },
      },
    },
  };
}

/**
 * Handle the custom start_poll action.
 *
 * @param {object} event - chat event
 * @returns {object} Response to send back to Chat
 */
async function startPoll(event) {
  // Get the form values
  const formValues = event.common?.formInputs;
  const topic = formValues?.['topic']?.stringInputs.value[0]?.trim();
  const choices = [];
  for (let i = 0; i < MAX_NUM_OF_OPTIONS; ++i) {
    const choice = formValues?.[`option${i}`]?.stringInputs.value[0]?.trim();
    if (choice) {
      choices.push(choice);
    }
  }

  if (!topic || choices.length === 0) {
    // Incomplete form submitted, rerender
    const dialog = buildConfigurationForm({
      topic,
      choices,
    });
    return {
      actionResponse: {
        type: 'DIALOG',
        dialogAction: {
          dialog: {
            body: dialog,
          },
        },
      },
    };
  }

  // Valid configuration, build the voting card to display
  // in the space
  const pollCard = buildVoteCard({
    topic: topic,
    author: event.user,
    choices: choices,
    votes: {},
  });
  const message = {
    cards: [pollCard],
  };
  const request = {
    parent: event.space.name,
    requestBody: message,
  };
  // Use default credentials (service account)
  const credentials = new google.auth.GoogleAuth({
    scopes: ['https://www.googleapis.com/auth/chat.bot'],
  });
  const chatApi = google.chat({
    version: 'v1',
    auth: credentials,
  });
  await chatApi.spaces.messages.create(request);

  // Close dialog
  return {
    actionResponse: {
      type: 'DIALOG',
      dialogAction: {
        actionStatus: {
          statusCode: 'OK',
          userFacingMessage: 'Poll started.',
        },
      },
    },
  };
}

/**
 * Handle the custom vote action. Updates the state to record
 * the user's vote then rerenders the card.
 *
 * @param {object} event - chat event
 * @returns {object} Response to send back to Chat
 */
function recordVote(event) {
  const parameters = event.common?.parameters;

  const choice = parseInt(parameters['index']);
  const userId = event.user.name;
  const state = JSON.parse(parameters['state']);

  // Add or update the user's selected option
  state.votes[userId] = choice;

  const card = buildVoteCard(state);
  return {
    thread: event.message.thread,
    actionResponse: {
      type: 'UPDATE_MESSAGE',
    },
    cards: [card],
  }
}
関数を再デプロイします。
gcloud functions deploy app --trigger-http --security-level=secure-always
これでアプリを完全に操作できます。 /poll コマンドを呼び出して、いくつかの質問を指定します。送信すると、アンケート カードが表示されます。
投票して、結果を確認しましょう。
もちろん、アンケートはそれほど役立ちません。友だちや同僚を招待して、お試しください。
6. 完了
これで、Cloud Functions を使用して Google Chat アプリを作成し、デプロイしました。Codelab はアプリ作成の中心となるコンセプトの多くをカバーしてきましたが、他にも多くの発見があります。以下のリソースを確認し、追加料金が発生しないようにプロジェクトを必ずクリーンアップしてください。
その他のアクティビティ
Chat プラットフォームとこのアプリについて詳しく知りたい場合は、以下の方法をお試しください。
- アプリに @ メンションするとどうなりますか?動作を改善するためにアプリを更新してみてください。
- カード内のアンケートの状態のシリアル化は小規模なスペースでは問題ありませんが、制限があります。よりよいオプションに切り替えてみてください。
- 作成者がアンケートの編集、または新しい投票の停止を希望する場合はどうすればよいですか?これらの機能をどのように実装しますか。
- アプリ エンドポイントはまだ保護されていません。Google Chat からのリクエストであることを確認するために、確認機能を追加してみてください。
上記は、アプリを改善する方法のほんの一例です。想像力を発揮して楽しみましょう!
クリーンアップ
このチュートリアルで使用したリソースについて、Google Cloud Platform アカウントに課金されないようにする手順は次のとおりです。
- Cloud Console で [リソースの管理] ページに移動します。左上の メニュー アイコン
 > [ IAM と管理] > [リソースの管理] の順にクリックします。
- プロジェクト リストでプロジェクトを選択し、[削除] をクリックします。
- ダイアログでプロジェクト ID を入力し、[シャットダウン] をクリックしてプロジェクトを削除します。
詳細
Chat アプリの開発について詳しくは、以下をご覧ください。
Google Cloud Console での開発の詳細については、以下をご覧ください。