
1. 소개
Flutter는 iOS 및 Android에서 빠른 속도로 고품질 네이티브 환경을 제작할 수 있는 Google의 모바일 앱 SDK입니다.
Google 지도 Flutter 플러그인을 사용하면 Google 지도 데이터에 기반한 지도를 애플리케이션에 추가할 수 있습니다. SDK는 Google 지도 서버 액세스, 지도 표시 및 사용자 동작(예: 클릭 및 드래그)에 대한 응답을 자동으로 처리합니다. 지도에 마커를 추가할 수도 있습니다. 이러한 객체는 지도 위치에 대한 추가 정보를 제공하고 사용자가 지도와 상호작용할 수 있도록 합니다.
빌드할 내용
이 Codelab에서는 Flutter SDK를 사용하여 Google 지도가 포함된 모바일 앱을 빌드합니다. 이 앱에는 아래의 기능이 있습니다.
|
|
Flutter란 무엇인가요?
Flutter에는 세 가지 핵심 기능이 있습니다.
- 빠른 개발: 스테이트풀(Stateful) 핫 리로드를 사용하여 Android 및 iOS 애플리케이션을 순식간에 빌드할 수 있습니다.
- 표현력이 우수하고 유연함: 기본 최종 사용자 환경에 초점을 맞춰 기능을 신속하게 제공할 수 있습니다.
- iOS 및 Android의 기본 성능: Flutter의 위젯은 스크롤, 탐색, 아이콘, 글꼴과 같은 모든 중요한 플랫폼 차이를 통합하여 완전한 기본 성능을 제공합니다.
Google 지도에서는 다음 기능을 제공합니다.
- 전 세계 99%의 노출 범위: 200개 이상의 국가 및 지역을 아우르는 신뢰성 높고 종합적인 데이터를 바탕으로 앱을 제작하세요.
- 매일 2,500만 건의 업데이트: 정확한 실시간 위치 정보를 활용할 수 있습니다.
- 월 10억 명의 활성 사용자: Google 지도의 인프라를 기반으로 안심하고 확장할 수 있습니다.
이 Codelab은 iOS 및 Android용 Flutter 앱에서 Google 지도 환경을 만드는 방법을 안내합니다.
과정 내용
- 새 Flutter 애플리케이션을 만드는 방법
- Google 지도 Flutter 플러그인 구성 방법
- 웹 서비스의 위치 데이터를 사용하여 지도에 마커를 추가하는 방법
이 Codelab은 Flutter 앱에 Google 지도를 추가하는 데 중점을 둡니다. 관련 없는 개념과 코드 블록은 자세히 언급되지 않으며 복사하여 붙여넣으면 되도록 제공됩니다.
이 Codelab에서 배우고 싶은 내용은 무엇인가요?
2. Flutter 환경 설정
이 실습을 완료하려면 Flutter SDK 및 편집기라는 두 가지 소프트웨어가 필요합니다. 이 Codelab에서는 Android 스튜디오가 사용된다고 가정하지만, 원하는 편집기를 사용해도 됩니다.
다음 기기 중 하나를 사용하여 이 Codelab을 실행할 수 있습니다.
- 컴퓨터에 연결되어 있으며 개발자 모드로 설정된 실제 기기 (Android 또는 iOS)
- iOS 시뮬레이터 (Xcode 도구 설치 필요)
- Android Emulator (Android 스튜디오에서 설정 필요)
3. 시작하기
Flutter 시작하기
Flutter를 시작하는 가장 쉬운 방법은 flutter 명령줄 도구를 사용하여 간단한 시작 환경을 위한 모든 필수 코드를 만드는 것입니다.
$ flutter create google_maps_in_flutter --platforms android,ios,web
Creating project google_maps_in_flutter...
Running "flutter pub get" in google_maps_in_flutter...           1,612ms
Wrote 80 files.

All done!
In order to run your application, type:

  $ cd google_maps_in_flutter
  $ flutter run

Your application code is in google_maps_in_flutter/lib/main.dart.
Google 지도 Flutter 플러그인을 종속 항목으로 추가
Pub 패키지를 사용하면 Flutter 앱에 기능을 더 쉽게 추가할 수 있습니다. 이 Codelab에서는 프로젝트 디렉터리에서 다음 명령어를 실행하여 Google 지도 Flutter 플러그인을 소개합니다.
$ cd google_maps_in_flutter
$ flutter pub add google_maps_flutter
Resolving dependencies...
  async 2.8.2 (2.9.0 available)
  characters 1.2.0 (1.2.1 available)
  clock 1.1.0 (1.1.1 available)
  fake_async 1.3.0 (1.3.1 available)
+ flutter_plugin_android_lifecycle 2.0.6
+ google_maps_flutter 2.1.8
+ google_maps_flutter_platform_interface 2.2.0
  matcher 0.12.11 (0.12.12 available)
  material_color_utilities 0.1.4 (0.1.5 available)
  meta 1.7.0 (1.8.0 available)
  path 1.8.1 (1.8.2 available)
+ plugin_platform_interface 2.1.2
  source_span 1.8.2 (1.9.0 available)
+ stream_transform 2.0.0
  string_scanner 1.1.0 (1.1.1 available)
  term_glyph 1.2.0 (1.2.1 available)
  test_api 0.4.9 (0.4.12 available)
Changed 5 dependencies!
이 Codelab에서는 웹용 Flutter에서 Google 지도를 사용하는 방법도 다룹니다. 그러나 웹 버전의 플러그인은 아직 제휴되지 않았으므로 프로젝트에도 추가해야 합니다.
$ flutter pub add google_maps_flutter_web
Resolving dependencies...
  async 2.8.2 (2.9.0 available)
  characters 1.2.0 (1.2.1 available)
  clock 1.1.0 (1.1.1 available)
+ csslib 0.17.2
  fake_async 1.3.0 (1.3.1 available)
+ flutter_web_plugins 0.0.0 from sdk flutter
+ google_maps 6.2.0
+ google_maps_flutter_web 0.4.0+1
+ html 0.15.0
+ js 0.6.4
+ js_wrapping 0.7.4
  matcher 0.12.11 (0.12.12 available)
  material_color_utilities 0.1.4 (0.1.5 available)
  meta 1.7.0 (1.8.0 available)
  path 1.8.1 (1.8.2 available)
+ sanitize_html 2.0.0
  source_span 1.8.2 (1.9.0 available)
  string_scanner 1.1.0 (1.1.1 available)
  term_glyph 1.2.0 (1.2.1 available)
  test_api 0.4.9 (0.4.12 available)
Downloading google_maps_flutter_web 0.4.0+1...
Changed 8 dependencies!
iOS 구성 platform
iOS에서 Google 지도 SDK의 최신 버전을 다운로드하려면 iOS 13 이상의 플랫폼 버전이 필요합니다. ios/Podfile을 다음과 같이 수정합니다.
ios/Podfile
# Set platform to 13.0 to enable latest Google Maps SDK
platform :ios, '13.0' # Uncomment and set to 13.

# CocoaPods analytics sends network stats synchronously affecting flutter build latency.
ENV['COCOAPODS_DISABLE_STATS'] = 'true'
Android 구성 minSDK
Android에서 Google Maps SDK를 사용하려면 minSDK를 20으로 설정해야 합니다. android/app/build.gradle을 다음과 같이 수정합니다.
android/app/build.gradle
android {
    defaultConfig {
        // TODO: Specify your own unique Application ID (https://developer.android.com/studio/build/application-id.html).
        applicationId "com.example.google_maps_in_flutter"
        minSdkVersion 20                      // Set to 20
        targetSdkVersion flutter.targetSdkVersion
        versionCode flutterVersionCode.toInteger()
        versionName flutterVersionName
    }
}
4. 앱에 Google 지도 추가하기
API 키에 관한 모든 것
Flutter 앱에서 Google 지도를 사용하려면 API 프로젝트를Google Maps Platform ,Android용 Maps SDK의 API 키 사용 ,iOS용 Maps SDK' API 사용 그리고Maps JavaScript API의 API 키 사용 가 있는지 진단합니다. API 키를 사용하여 Android 및 iOS 애플리케이션을 모두 구성하는 다음 단계를 수행합니다.
Android 앱에 API 키 추가
Android 앱에 API 키를 추가하려면 android/app/src/main에서 AndroidManifest.xml 파일을 수정합니다. application 노드 내 이전 단계에서 만든 API 키를 포함하는 단일 meta-data 항목을 추가합니다.
android/app/src/main/AndroidManifest.xml
<manifest xmlns:android="http://schemas.android.com/apk/res/android"
    package="com.example.google_maps_in_flutter">
    <application
        android:label="google_maps_in_flutter"
        android:icon="@mipmap/ic_launcher">

        <!-- TODO: Add your Google Maps API key here -->
        <meta-data android:name="com.google.android.geo.API_KEY"
               android:value="YOUR-KEY-HERE"/>

        <activity
            android:name=".MainActivity"
            android:launchMode="singleTop"
            android:theme="@style/LaunchTheme"
            android:configChanges="orientation|keyboardHidden|keyboard|screenSize|smallestScreenSize|locale|layoutDirection|fontScale|screenLayout|density|uiMode"
            android:hardwareAccelerated="true"
            android:windowSoftInputMode="adjustResize">
            <meta-data
              android:name="io.flutter.embedding.android.NormalTheme"
              android:resource="@style/NormalTheme"
              />
            <meta-data
              android:name="io.flutter.embedding.android.SplashScreenDrawable"
              android:resource="@drawable/launch_background"
              />
            <intent-filter>
                <action android:name="android.intent.action.MAIN"/>
                <category android:name="android.intent.category.LAUNCHER"/>
            </intent-filter>
        </activity>
        <meta-data
            android:name="flutterEmbedding"
            android:value="2" />
    </application>
</manifest>
iOS 앱에 API 키 추가
API 키를 iOS 앱에 추가하려면 ios/Runner에서 AppDelegate.swift 파일을 수정하세요. Android와 달리 iOS에서 API 키를 추가하려면 Runner 앱의 소스 코드를 변경해야 합니다. AppDelegate는 앱 초기화 프로세스의 일부인 핵심 싱글톤입니다.
이 파일에 두 가지 변경사항을 적용합니다. 먼저 #import 문을 추가하여 Google 지도 헤더를 가져온 다음 GMSServices 싱글톤의 provideAPIKey() 메서드를 호출합니다. 이 API 키를 사용하면 Google 지도에서 지도 타일을 올바르게 제공할 수 있습니다.
ios/Runner/AppDelegate.swift
import UIKit
import Flutter
import GoogleMaps  // Add this import

@UIApplicationMain
@objc class AppDelegate: FlutterAppDelegate {
  override func application(
    _ application: UIApplication,
    didFinishLaunchingWithOptions launchOptions: [UIApplication.LaunchOptionsKey: Any]?
  ) -> Bool {
    GeneratedPluginRegistrant.register(with: self)

    // TODO: Add your Google Maps API key
    GMSServices.provideAPIKey("YOUR-API-KEY")

    return super.application(application, didFinishLaunchingWithOptions: launchOptions)
  }
}
웹 앱에 API 키 추가
웹 앱에 API 키를 추가하려면 web에서 index.html 파일을 수정합니다. API 키와 함께 헤드 섹션에 Maps JavaScript 스크립트에 대한 참조를 추가합니다.
web/index.html
<head>
  <base href="/">

  <meta charset="UTF-8">
  <meta content="IE=Edge" http-equiv="X-UA-Compatible">
  <meta name="description" content="A new Flutter project.">

  <!-- iOS meta tags & icons -->
  <meta name="apple-mobile-web-app-capable" content="yes">
  <meta name="apple-mobile-web-app-status-bar-style" content="black">
  <meta name="apple-mobile-web-app-title" content="google_maps_in_flutter">
  <link rel="apple-touch-icon" href="icons/Icon-192.png">

  <!-- TODO: Add your Google Maps API key here -->
  <script src="https://maps.googleapis.com/maps/api/js?key=YOUR-KEY-HERE"></script>

  <title>google_maps_in_flutter</title>
  <link rel="manifest" href="manifest.json">
</head>
화면에 지도 표시하기
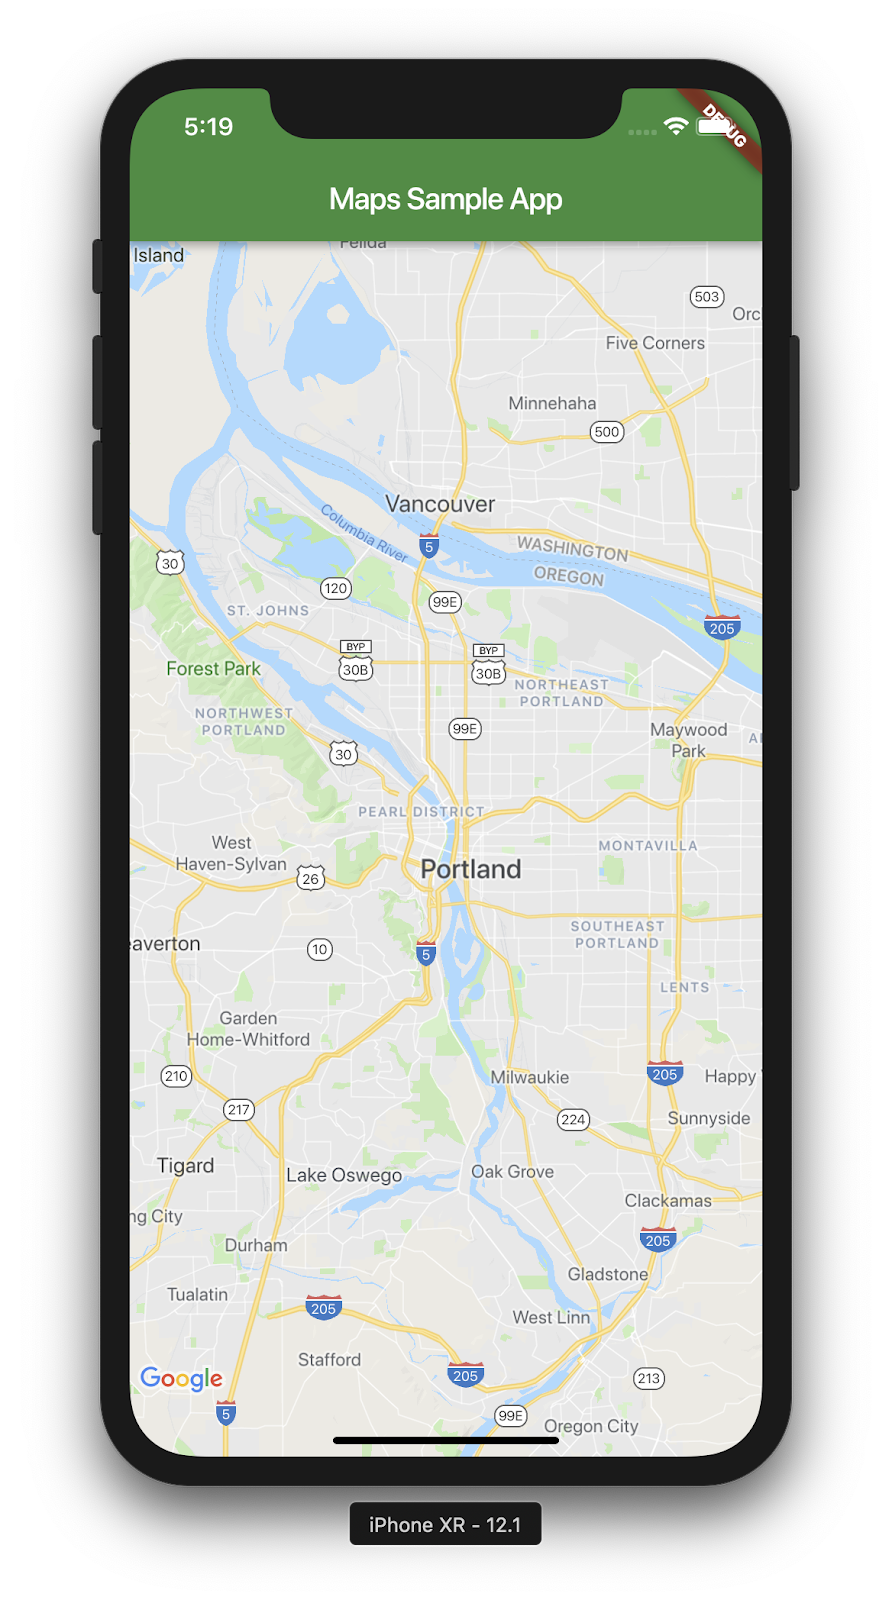
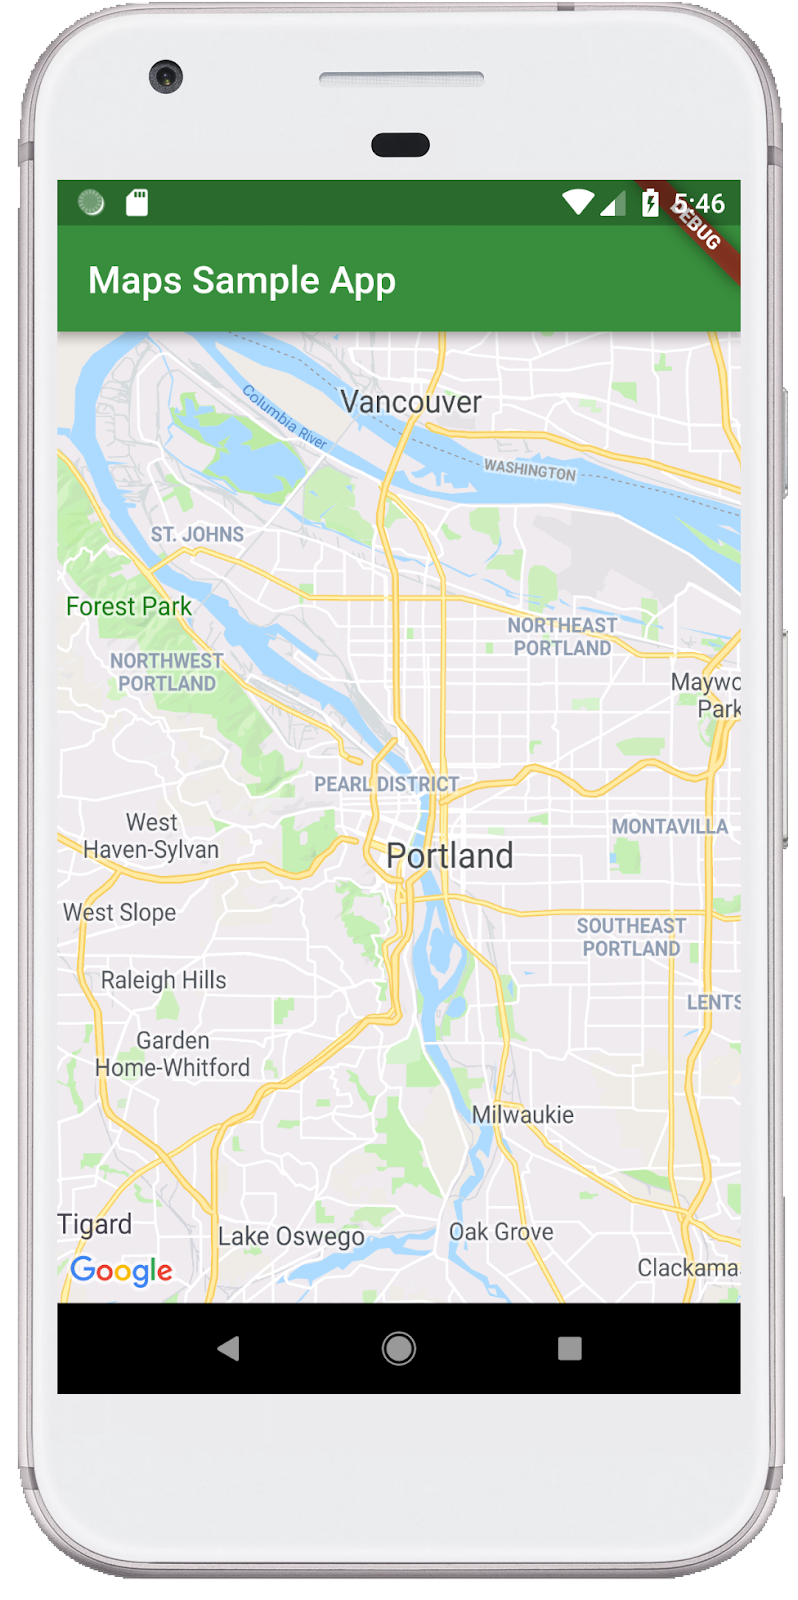
이제 지도를 화면에 표시할 차례입니다. 다음과 같이 lib/main.dart를 업데이트합니다.
lib/main.dart
import 'package:flutter/material.dart';
import 'package:google_maps_flutter/google_maps_flutter.dart';

void main() => runApp(const MyApp());

class MyApp extends StatefulWidget {
  const MyApp({super.key});

  @override
  State<MyApp> createState() => _MyAppState();
}

class _MyAppState extends State<MyApp> {
  late GoogleMapController mapController;

  final LatLng _center = const LatLng(45.521563, -122.677433);

  void _onMapCreated(GoogleMapController controller) {
    mapController = controller;
  }

  @override
  Widget build(BuildContext context) {
    return MaterialApp(
      theme: ThemeData(
        useMaterial3: true,
        colorSchemeSeed: Colors.green[700],
      ),
      home: Scaffold(
        appBar: AppBar(
          title: const Text('Maps Sample App'),
          elevation: 2,
        ),
        body: GoogleMap(
          onMapCreated: _onMapCreated,
          initialCameraPosition: CameraPosition(
            target: _center,
            zoom: 11.0,
          ),
        ),
      ),
    );
  }
}
앱 실행
iOS 또는 Android에서 Flutter 앱을 실행하여 포틀랜드를 중심으로 하는 단일 지도 뷰를 확인합니다. 또는 Android Emulator 또는 iOS 시뮬레이터를 실행합니다. 고향 또는 본인에게 중요한 위치를 나타내도록 지도 센터를 자유롭게 수정하세요.
$ flutter run
|
|
5. Google을 지도에 표시하기
Google은 북미, 중남미, 유럽, 아시아 태평양 지역, 아프리카 및 중동 등 전 세계 각지에 지사를 두고 있습니다. 이러한 지도는 쉽게 사용할 수 있는 API 엔드포인트를 제공하기 때문에 JSON 형식으로 Google 지사의 위치 정보를 제공할 수 있다는 장점이 있습니다. 이 단계에서는 이러한 사무실 위치를 지도에 표시합니다. 이 단계에서는 코드 생성을 사용하여 JSON을 파싱합니다.
다음과 같이 프로젝트에 새 Flutter 종속 항목 세 개를 추가합니다. 먼저 HTTP 요청을 쉽게 수행할 수 있도록 http 패키지를 추가합니다.
$ flutter pub add http
Resolving dependencies...
  async 2.8.1 (2.8.2 available)
+ http 0.13.3
+ http_parser 4.0.0
  matcher 0.12.10 (0.12.11 available)
+ pedantic 1.11.1
  test_api 0.4.2 (0.4.3 available)
Changed 3 dependencies!
다음으로 JSON 문서를 나타내는 객체 구조를 선언하기 위한 json_serializable 및 json_annotation을 추가합니다.
$ flutter pub add json_serializable
Resolving dependencies...
+ _fe_analyzer_shared 25.0.0
+ analyzer 2.2.0
+ args 2.2.0
  async 2.8.1 (2.8.2 available)
+ build 2.1.0
+ build_config 1.0.0
+ checked_yaml 2.0.1
+ cli_util 0.3.3
+ convert 3.0.1
+ crypto 3.0.1
+ dart_style 2.0.3
+ file 6.1.2
+ glob 2.0.1
+ json_annotation 4.1.0
+ json_serializable 5.0.0
+ logging 1.0.1
  matcher 0.12.10 (0.12.11 available)
+ package_config 2.0.0
+ pub_semver 2.0.0
+ pubspec_parse 1.0.0
+ source_gen 1.1.0
+ source_helper 1.2.1
  test_api 0.4.2 (0.4.3 available)
+ watcher 1.0.0
+ yaml 3.1.0
Downloading analyzer 2.2.0...
Downloading _fe_analyzer_shared 25.0.0...
Changed 22 dependencies!
$ flutter pub add json_annotation
Resolving dependencies...
  async 2.8.2 (2.9.0 available)
  characters 1.2.0 (1.2.1 available)
  clock 1.1.0 (1.1.1 available)
  fake_async 1.3.0 (1.3.1 available)
  matcher 0.12.11 (0.12.12 available)
  material_color_utilities 0.1.4 (0.1.5 available)
  meta 1.7.0 (1.8.0 available)
  path 1.8.1 (1.8.2 available)
  source_span 1.8.2 (1.9.0 available)
  string_scanner 1.1.0 (1.1.1 available)
  term_glyph 1.2.0 (1.2.1 available)
  test_api 0.4.9 (0.4.12 available)
Got dependencies!
마지막으로 build_runner를 개발 시간 종속 항목으로 추가합니다. 이 단계 후반부에서 코드 생성에 사용됩니다.
$ flutter pub add --dev build_runner
Resolving dependencies...
  async 2.8.1 (2.8.2 available)
+ build_daemon 3.0.0
+ build_resolvers 2.0.4
+ build_runner 2.1.1
+ build_runner_core 7.1.0
+ built_collection 5.1.0
+ built_value 8.1.2
+ code_builder 4.1.0
+ fixnum 1.0.0
+ frontend_server_client 2.1.2
+ graphs 2.0.0
+ http_multi_server 3.0.1
+ io 1.0.3
+ js 0.6.3
  matcher 0.12.10 (0.12.11 available)
+ mime 1.0.0
+ pool 1.5.0
+ shelf 1.2.0
+ shelf_web_socket 1.0.1
  test_api 0.4.2 (0.4.3 available)
+ timing 1.0.0
+ web_socket_channel 2.1.0
Changed 19 dependencies!
코드 생성으로 JSON 파싱
API 엔드포인트에서 반환된 JSON 데이터는 일반적인 구조를 가지고 있습니다. 코드를 생성하여 데이터를 코드에서 사용할 수 있는 객체로 마샬링할 수 있습니다.
lib/src 디렉터리에서 locations.dart 파일을 만들고 다음과 같이 반환된 JSON 데이터의 구조를 설명합니다.
lib/src/locations.dart
import 'dart:convert';

import 'package:flutter/foundation.dart';
import 'package:flutter/services.dart' show rootBundle;
import 'package:http/http.dart' as http;
import 'package:json_annotation/json_annotation.dart';

part 'locations.g.dart';

@JsonSerializable()
class LatLng {
  LatLng({
    required this.lat,
    required this.lng,
  });

  factory LatLng.fromJson(Map<String, dynamic> json) => _$LatLngFromJson(json);
  Map<String, dynamic> toJson() => _$LatLngToJson(this);

  final double lat;
  final double lng;
}

@JsonSerializable()
class Region {
  Region({
    required this.coords,
    required this.id,
    required this.name,
    required this.zoom,
  });

  factory Region.fromJson(Map<String, dynamic> json) => _$RegionFromJson(json);
  Map<String, dynamic> toJson() => _$RegionToJson(this);

  final LatLng coords;
  final String id;
  final String name;
  final double zoom;
}

@JsonSerializable()
class Office {
  Office({
    required this.address,
    required this.id,
    required this.image,
    required this.lat,
    required this.lng,
    required this.name,
    required this.phone,
    required this.region,
  });

  factory Office.fromJson(Map<String, dynamic> json) => _$OfficeFromJson(json);
  Map<String, dynamic> toJson() => _$OfficeToJson(this);

  final String address;
  final String id;
  final String image;
  final double lat;
  final double lng;
  final String name;
  final String phone;
  final String region;
}

@JsonSerializable()
class Locations {
  Locations({
    required this.offices,
    required this.regions,
  });

  factory Locations.fromJson(Map<String, dynamic> json) =>
      _$LocationsFromJson(json);
  Map<String, dynamic> toJson() => _$LocationsToJson(this);

  final List<Office> offices;
  final List<Region> regions;
}

Future<Locations> getGoogleOffices() async {
  const googleLocationsURL = 'https://about.google/static/data/locations.json';

  // Retrieve the locations of Google offices
  try {
    final response = await http.get(Uri.parse(googleLocationsURL));
    if (response.statusCode == 200) {
      return Locations.fromJson(
          json.decode(response.body) as Map<String, dynamic>);
    }
  } catch (e) {
    if (kDebugMode) {
      print(e);
    }
  }

  // Fallback for when the above HTTP request fails.
  return Locations.fromJson(
    json.decode(
      await rootBundle.loadString('assets/locations.json'),
    ) as Map<String, dynamic>,
  );
}
이 코드를 추가하고 나면 IDE(존재하는 경우)가 존재하지 않는 동위 파일 locations.g.dart.를 참조하므로 빨간색 물결선이 표시됩니다. 생성된 파일은 유형이 지정되지 않은 JSON 구조 및 이름이 지정된 객체 간에 변환합니다. build_runner를 실행하여 만듭니다.
$ flutter pub run build_runner build --delete-conflicting-outputs
[INFO] Generating build script...
[INFO] Generating build script completed, took 357ms

[INFO] Creating build script snapshot......
[INFO] Creating build script snapshot... completed, took 10.5s

[INFO] There was output on stdout while compiling the build script snapshot, run with `--verbose` to see it (you will need to run a `clean` first to re-snapshot).

[INFO] Initializing inputs
[INFO] Building new asset graph...
[INFO] Building new asset graph completed, took 646ms

[INFO] Checking for unexpected pre-existing outputs....
[INFO] Deleting 1 declared outputs which already existed on disk.
[INFO] Checking for unexpected pre-existing outputs. completed, took 3ms

[INFO] Running build...
[INFO] Generating SDK summary...
[INFO] 3.4s elapsed, 0/3 actions completed.
[INFO] Generating SDK summary completed, took 3.4s

[INFO] 4.7s elapsed, 2/3 actions completed.
[INFO] Running build completed, took 4.7s

[INFO] Caching finalized dependency graph...
[INFO] Caching finalized dependency graph completed, took 36ms

[INFO] Succeeded after 4.8s with 2 outputs (7 actions)
이제 코드가 다시 정확하게 분석됩니다. 그런 다음 getGoogleOffices 함수에 사용되는 대체 locations.json 파일을 추가해야 합니다. 이 대체를 포함하는 이유 중 하나는 이 함수에서 로드되는 정적 데이터가 CORS 헤더 없이 제공되므로 웹브라우저에서 로드되지 않기 때문입니다. Android 및 iOS Flutter 앱에는 CORS 헤더가 필요하지 않지만, 모바일 데이터 액세스는 제약이 많은 경우도 있습니다.
브라우저에서 https://about.google/static/data/locations.json으로 이동하여 콘텐츠를 애셋 디렉터리에 저장합니다. 또는 다음과 같이 명령줄을 사용할 수 있습니다.
$ mkdir assets
$ cd assets
$ curl -o locations.json https://about.google/static/data/locations.json
  % Total    % Received % Xferd  Average Speed   Time    Time     Time  Current
                                 Dload  Upload   Total   Spent    Left  Speed
100 30348  100 30348    0     0  75492      0 --:--:-- --:--:-- --:--:-- 75492
이제 애셋 파일을 다운로드했으므로 pubspec.yaml 파일의 Flutter 섹션에 추가합니다.
pubspec.yaml
flutter:
  uses-material-design: true

  assets:
    - assets/locations.json
main.dart 파일을 수정하여 지도 데이터를 요청한 다음 반환된 정보를 사용하여 지도에 사무실을 추가합니다.
lib/main.dart
import 'package:flutter/material.dart';
import 'package:google_maps_flutter/google_maps_flutter.dart';
import 'src/locations.dart' as locations;

void main() {
  runApp(const MyApp());
}

class MyApp extends StatefulWidget {
  const MyApp({super.key});

  @override
  State<MyApp> createState() => _MyAppState();
}

class _MyAppState extends State<MyApp> {
  final Map<String, Marker> _markers = {};
  Future<void> _onMapCreated(GoogleMapController controller) async {
    final googleOffices = await locations.getGoogleOffices();
    setState(() {
      _markers.clear();
      for (final office in googleOffices.offices) {
        final marker = Marker(
          markerId: MarkerId(office.name),
          position: LatLng(office.lat, office.lng),
          infoWindow: InfoWindow(
            title: office.name,
            snippet: office.address,
          ),
        );
        _markers[office.name] = marker;
      }
    });
  }

  @override
  Widget build(BuildContext context) {
    return MaterialApp(
      theme: ThemeData(
        useMaterial3: true,
        colorSchemeSeed: Colors.green[700],
      ),
      home: Scaffold(
        appBar: AppBar(
          title: const Text('Google Office Locations'),
          elevation: 2,
        ),
        body: GoogleMap(
          onMapCreated: _onMapCreated,
          initialCameraPosition: const CameraPosition(
            target: LatLng(0, 0),
            zoom: 2,
          ),
          markers: _markers.values.toSet(),
        ),
      ),
    );
  }
}
이 코드는 다음과 같은 여러 작업을 수행합니다.
_onMapCreated에서는 로드될 때까지await의 이전 단계에서 JSON 파싱 코드를 사용합니다. 그런 다음 반환된 데이터를 사용하여setState()콜백 내에Marker를 만듭니다. 앱이 새 마커를 수신하면 setState가 Flutter에 화면을 다시 그린 후 플래그를 표시하여 사무실 위치가 표시되도록 합니다.- 마커는
GoogleMap위젯과 연결된Map에 저장됩니다. 그러면 마커가 올바른 지도에 연결됩니다. 물론 여러 지도를 사용하고 각각에 다른 마커를 표시할 수도 있습니다.
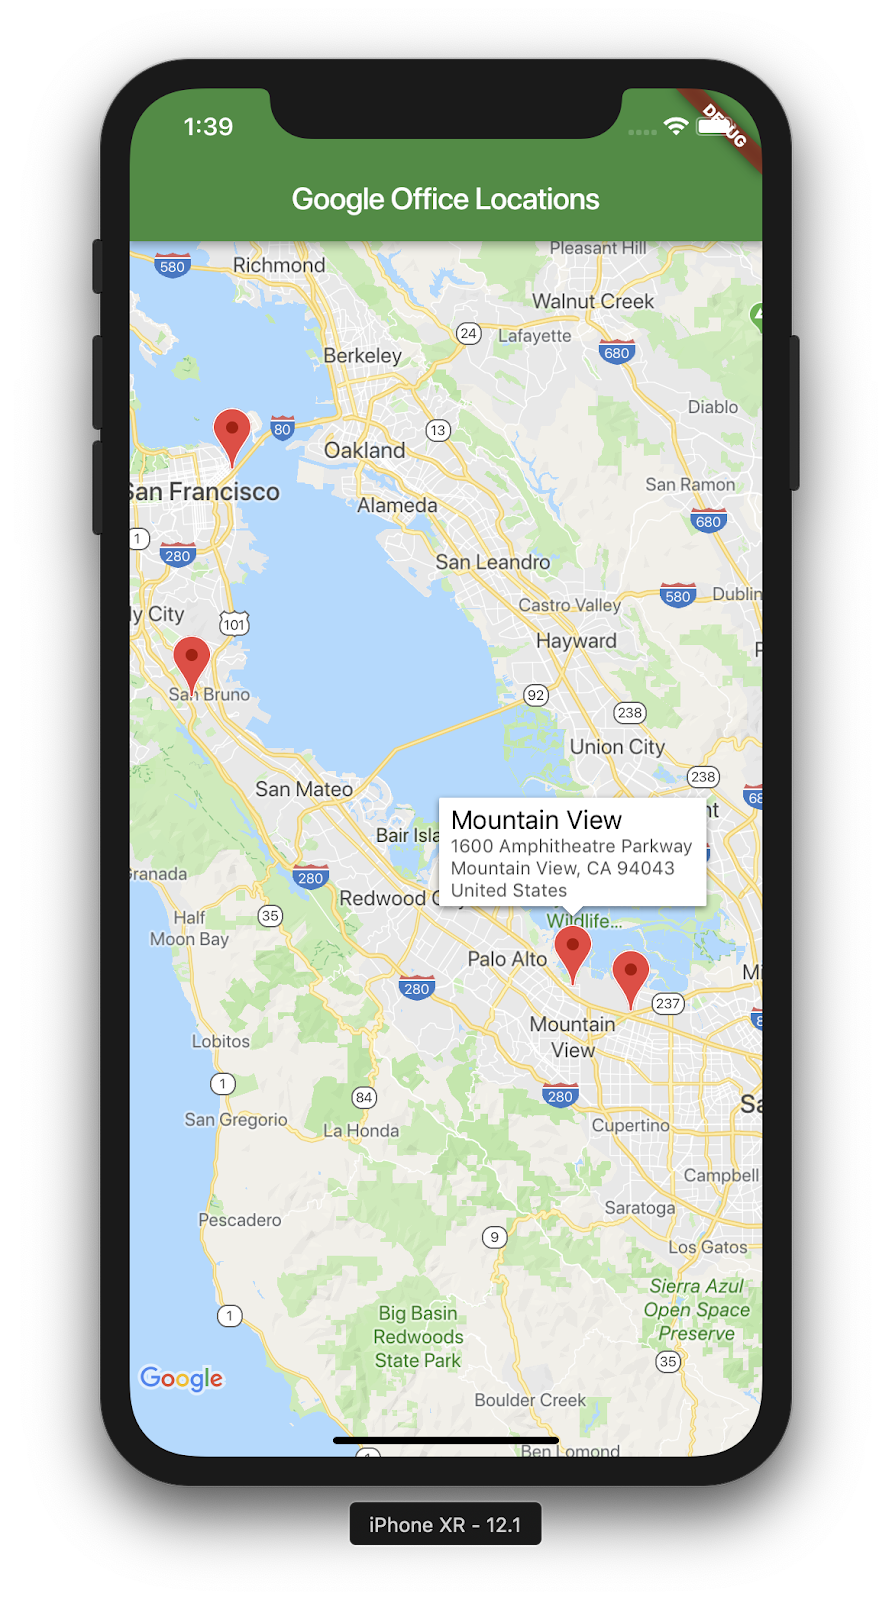
다음은 여러분이 완료한 작업을 보여주는 스크린샷입니다. 이 시점에서 흥미로운 추가 기능을 많이 적용할 수 있습니다. 예를 들어 사용자가 사무실을 클릭할 때 지도를 이동하고 확대/축소하는 사무실의 목록 보기를 추가할 수 있지만, 이 연습은 독자에게 남겨 둡니다.
6. 다음 단계
축하합니다.
Codelab을 완료하고 Google 지도를 통합한 Flutter 앱을 빌드했습니다. JSON 웹 서비스와도 상호작용했습니다.
기타 다음 단계
이 Codelab에서는 지도의 여러 지점을 시각화하는 환경을 빌드했습니다. 이 기능을 기반으로 빌드하여 다양한 사용자 요구를 충족하는 여러 모바일 앱이 있습니다. 더 배우고 싶은 경우에 도움이 될 수 있는 추가 리소스도 있습니다.
- Flutter 및 Google 지도로 모바일 앱 빌드(Cloud Next '19에서 발표)
- Directions API, Distance Matrix API, Places API와 같은 Google 지도 웹 서비스를 만드는 Hadrien Lejard의
google_maps_webservice패키지는 정말 사용하기 쉽습니다. - JSON REST를 통해 API를 사용하는 여러 옵션을 살펴보려면 JSON REST API 작업에 사용할 수 있는 다양한 옵션에 관한 앤드류 브록던의 Medium 게시물을 참고하세요.