
1. 简介
Flutter 是 Google 的移动应用 SDK,旨在以快于以往的速度在 iOS 和 Android 上打造优质的原生体验。
借助 Google 地图 Flutter 插件,您可以基于 Google 地图数据将地图添加到应用中。该插件会自动处理对 Google 地图服务器的访问、地图显示以及对用户手势(例如点击和拖动)的响应。您还可以向地图添加标记。这些对象可提供有关地图位置的更多信息,并允许用户与地图互动。
构建内容
在此 Codelab 中,您将使用 Flutter SDK 构建一个包含 Google 地图的移动应用。您的应用将可以:
|
|
什么是 Flutter?
Flutter 具有以下三项核心功能。
- 开发速度快:借助保留应用状态的热重载,您可以在几毫秒内构建 Android 和 iOS 应用。
- 富有表现力和灵活性:可快速发布旨在为最终用户提供原生体验的功能。
- 在 iOS 和 Android 上都可实现原生性能:Flutter 的微件整合了所有关键平台差异(例如滚动、导航、图标和字体方面的差异),以提供完整的原生性能。
Google 地图具有以下优势:
- 全球覆盖率达到 99%:利用超过 200 个国家和地区的可靠、全面的数据构建应用。
- 每天更新 2,500 万次:可放心使用准确的实时位置信息。
- 月活跃用户数达到 10 亿:以 Google 地图的基础架构为依托,从容扩大规模。
此 Codelab 会逐步引导您在 iOS 版和 Android 版 Flutter 应用中打造 Google 地图体验。
学习内容
- 如何创建新的 Flutter 应用。
- 如何配置 Google 地图 Flutter 插件。
- 如何使用来自网络服务的位置数据,向地图添加标记。
此 Codelab 将重点介绍如何将 Google 地图添加到 Flutter 应用。对于不相关的概念,我们仅会略作介绍,同时我们还会提供代码块供您复制和粘贴。
您想通过此 Codelab 学习哪些内容?
2. 设置您的 Flutter 环境
您需要使用两款软件才能完成此 Codelab:Flutter SDK 和一款编辑器。此 Codelab 假定您使用的是 Android Studio,但您可以使用自己的首选编辑器。
您可以使用以下任意设备运行此 Codelab:
- 连接到计算机并设为开发者模式的实体设备(Android 或 iOS)。
- iOS 模拟器(需要安装 Xcode 工具)。
- Android 模拟器(需要在 Android Studio 中进行设置)。
3. 开始使用
开始使用 Flutter
若要开始使用 Flutter,最简单的方法就是使用 Flutter 命令行工具来创建打造简单入门体验所需的全部代码。
$ flutter create google_maps_in_flutter --platforms android,ios,web
Creating project google_maps_in_flutter...
Running "flutter pub get" in google_maps_in_flutter...           1,612ms
Wrote 80 files.

All done!
In order to run your application, type:

  $ cd google_maps_in_flutter
  $ flutter run

Your application code is in google_maps_in_flutter/lib/main.dart.
添加 Google 地图 Flutter 插件作为依赖项
使用 Pub 软件包可以轻松为 Flutter 应用添加更多功能。在此 Codelab 中,您可以通过从项目目录运行以下命令来引入 Google 地图 Flutter 插件。
$ cd google_maps_in_flutter
$ flutter pub add google_maps_flutter
Resolving dependencies...
  async 2.8.2 (2.9.0 available)
  characters 1.2.0 (1.2.1 available)
  clock 1.1.0 (1.1.1 available)
  fake_async 1.3.0 (1.3.1 available)
+ flutter_plugin_android_lifecycle 2.0.6
+ google_maps_flutter 2.1.8
+ google_maps_flutter_platform_interface 2.2.0
  matcher 0.12.11 (0.12.12 available)
  material_color_utilities 0.1.4 (0.1.5 available)
  meta 1.7.0 (1.8.0 available)
  path 1.8.1 (1.8.2 available)
+ plugin_platform_interface 2.1.2
  source_span 1.8.2 (1.9.0 available)
+ stream_transform 2.0.0
  string_scanner 1.1.0 (1.1.1 available)
  term_glyph 1.2.0 (1.2.1 available)
  test_api 0.4.9 (0.4.12 available)
Changed 5 dependencies!
此外,此 Codelab 还会介绍如何在网页版 Flutter 中使用 Google 地图。不过,该插件的网页版尚未进行联合,因此您还需要将其添加到项目中。
$ flutter pub add google_maps_flutter_web
Resolving dependencies...
  async 2.8.2 (2.9.0 available)
  characters 1.2.0 (1.2.1 available)
  clock 1.1.0 (1.1.1 available)
+ csslib 0.17.2
  fake_async 1.3.0 (1.3.1 available)
+ flutter_web_plugins 0.0.0 from sdk flutter
+ google_maps 6.2.0
+ google_maps_flutter_web 0.4.0+1
+ html 0.15.0
+ js 0.6.4
+ js_wrapping 0.7.4
  matcher 0.12.11 (0.12.12 available)
  material_color_utilities 0.1.4 (0.1.5 available)
  meta 1.7.0 (1.8.0 available)
  path 1.8.1 (1.8.2 available)
+ sanitize_html 2.0.0
  source_span 1.8.2 (1.9.0 available)
  string_scanner 1.1.0 (1.1.1 available)
  term_glyph 1.2.0 (1.2.1 available)
  test_api 0.4.9 (0.4.12 available)
Downloading google_maps_flutter_web 0.4.0+1...
Changed 8 dependencies!
配置 iOS platform
若要获取 iOS 版 Google 地图 SDK 的最新版本,您至少需要使用 iOS 13 版本的平台。请按如下方式修改 ios/Podfile。
ios/Podfile
# Set platform to 13.0 to enable latest Google Maps SDK
platform :ios, '13.0' # Uncomment and set to 13.

# CocoaPods analytics sends network stats synchronously affecting flutter build latency.
ENV['COCOAPODS_DISABLE_STATS'] = 'true'
配置 Android minSDK
若要使用 Android 版 Google 地图 SDK,您需要将 minSDK 设置为 20。请按如下方式修改 android/app/build.gradle。
android/app/build.gradle
android {
    defaultConfig {
        // TODO: Specify your own unique Application ID (https://developer.android.com/studio/build/application-id.html).
        applicationId "com.example.google_maps_in_flutter"
        minSdkVersion 20                      // Set to 20
        targetSdkVersion flutter.targetSdkVersion
        versionCode flutterVersionCode.toInteger()
        versionName flutterVersionName
    }
}
4. 将 Google 地图添加到应用
API 密钥是关键所在
若要在 Flutter 应用中使用 Google 地图,您需要按照 Maps SDK for Android、Maps SDK for iOS 和 Maps JavaScript API 的“使用 API 密钥”部分中的说明,通过 Google Maps Platform 配置 API 项目。有了 API 密钥,您就可以按照以下步骤配置 Android 和 iOS 应用。
为 Android 应用添加 API 密钥
若要向 Android 应用添加 API 密钥,请修改 android/app/src/main 中的 AndroidManifest.xml 文件。在 application 节点内添加一个 meta-data 条目,其中包含上一步中创建的 API 密钥。
android/app/src/main/AndroidManifest.xml
<manifest xmlns:android="http://schemas.android.com/apk/res/android"
    package="com.example.google_maps_in_flutter">
    <application
        android:label="google_maps_in_flutter"
        android:icon="@mipmap/ic_launcher">

        <!-- TODO: Add your Google Maps API key here -->
        <meta-data android:name="com.google.android.geo.API_KEY"
               android:value="YOUR-KEY-HERE"/>

        <activity
            android:name=".MainActivity"
            android:launchMode="singleTop"
            android:theme="@style/LaunchTheme"
            android:configChanges="orientation|keyboardHidden|keyboard|screenSize|smallestScreenSize|locale|layoutDirection|fontScale|screenLayout|density|uiMode"
            android:hardwareAccelerated="true"
            android:windowSoftInputMode="adjustResize">
            <meta-data
              android:name="io.flutter.embedding.android.NormalTheme"
              android:resource="@style/NormalTheme"
              />
            <meta-data
              android:name="io.flutter.embedding.android.SplashScreenDrawable"
              android:resource="@drawable/launch_background"
              />
            <intent-filter>
                <action android:name="android.intent.action.MAIN"/>
                <category android:name="android.intent.category.LAUNCHER"/>
            </intent-filter>
        </activity>
        <meta-data
            android:name="flutterEmbedding"
            android:value="2" />
    </application>
</manifest>
为 iOS 应用添加 API 密钥
若要向 iOS 应用添加 API 密钥,请修改 ios/Runner 中的 AppDelegate.swift 文件。与 Android 不同的是,在 iOS 上添加 API 密钥需要更改 Runner 应用的源代码。AppDelegate 是应用初始化过程中的核心单例。
您需要对此文件进行两项更改。首先,添加 #import 语句以提取 Google 地图标头,然后调用 GMSServices 单例的 provideAPIKey() 方法。通过此 API 密钥,Google 地图就可以正确提供地图图块。
ios/Runner/AppDelegate.swift
import UIKit
import Flutter
import GoogleMaps  // Add this import

@UIApplicationMain
@objc class AppDelegate: FlutterAppDelegate {
  override func application(
    _ application: UIApplication,
    didFinishLaunchingWithOptions launchOptions: [UIApplication.LaunchOptionsKey: Any]?
  ) -> Bool {
    GeneratedPluginRegistrant.register(with: self)

    // TODO: Add your Google Maps API key
    GMSServices.provideAPIKey("YOUR-API-KEY")

    return super.application(application, didFinishLaunchingWithOptions: launchOptions)
  }
}
为 Web 应用添加 API 密钥
若要向 Web 应用添加 API 密钥,请修改 web 中的 index.html 文件。您需要使用 API 密钥,在 head 部分添加对 Maps JavaScript 脚本的引用。
web/index.html
<head>
  <base href="/">

  <meta charset="UTF-8">
  <meta content="IE=Edge" http-equiv="X-UA-Compatible">
  <meta name="description" content="A new Flutter project.">

  <!-- iOS meta tags & icons -->
  <meta name="apple-mobile-web-app-capable" content="yes">
  <meta name="apple-mobile-web-app-status-bar-style" content="black">
  <meta name="apple-mobile-web-app-title" content="google_maps_in_flutter">
  <link rel="apple-touch-icon" href="icons/Icon-192.png">

  <!-- TODO: Add your Google Maps API key here -->
  <script src="https://maps.googleapis.com/maps/api/js?key=YOUR-KEY-HERE"></script>

  <title>google_maps_in_flutter</title>
  <link rel="manifest" href="manifest.json">
</head>
在屏幕上显示地图
现在就可以在屏幕上显示地图了。请按如下方式更新 lib/main.dart。
lib/main.dart
import 'package:flutter/material.dart';
import 'package:google_maps_flutter/google_maps_flutter.dart';

void main() => runApp(const MyApp());

class MyApp extends StatefulWidget {
  const MyApp({super.key});

  @override
  State<MyApp> createState() => _MyAppState();
}

class _MyAppState extends State<MyApp> {
  late GoogleMapController mapController;

  final LatLng _center = const LatLng(45.521563, -122.677433);

  void _onMapCreated(GoogleMapController controller) {
    mapController = controller;
  }

  @override
  Widget build(BuildContext context) {
    return MaterialApp(
      theme: ThemeData(
        useMaterial3: true,
        colorSchemeSeed: Colors.green[700],
      ),
      home: Scaffold(
        appBar: AppBar(
          title: const Text('Maps Sample App'),
          elevation: 2,
        ),
        body: GoogleMap(
          onMapCreated: _onMapCreated,
          initialCameraPosition: CameraPosition(
            target: _center,
            zoom: 11.0,
          ),
        ),
      ),
    );
  }
}
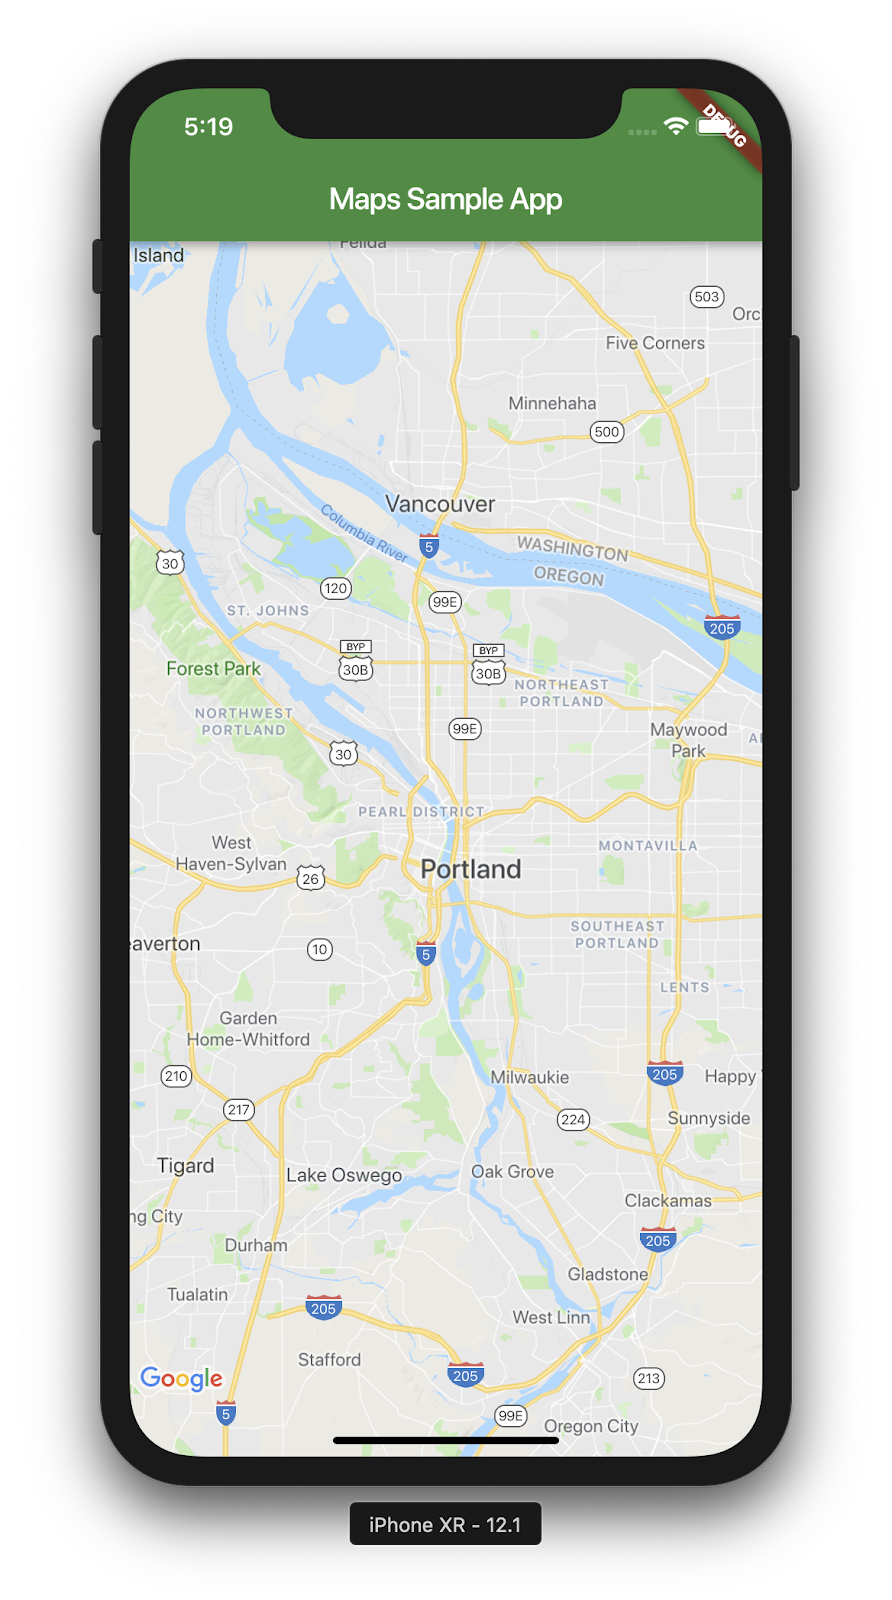
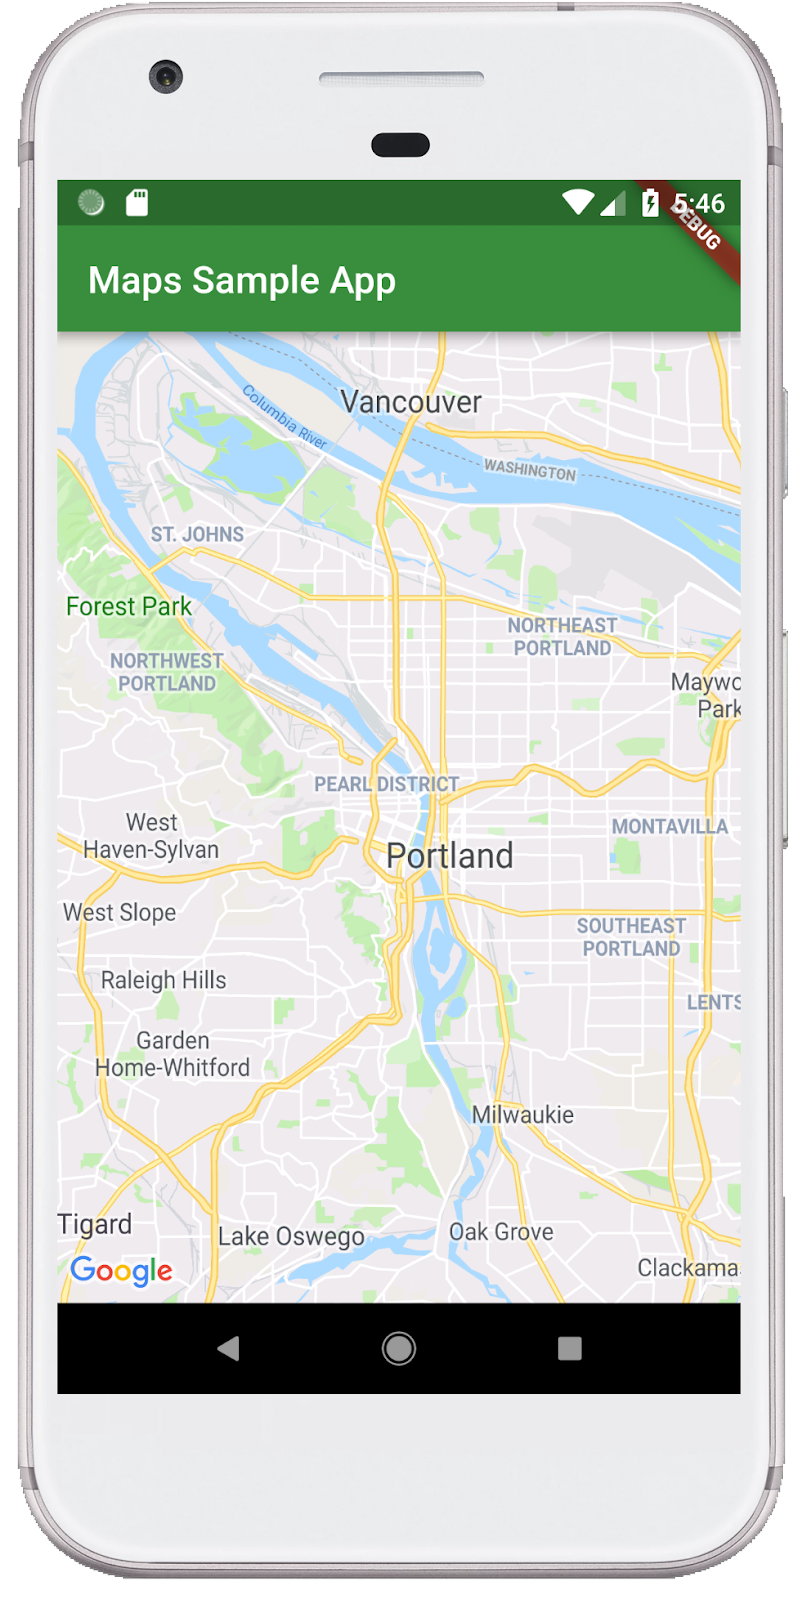
运行应用
在 iOS 或 Android 中运行 Flutter 应用,查看一个以波特兰为中心的地图视图。或者,运行 Android 模拟器或 iOS 模拟器。您可以随意修改地图中心位置,使其表示您的家乡或对您而言重要的地点。
$ flutter run
|
|
5. 将 Google 办公地点添加到地图上
Google 在世界各地设立了众多办事处,包括北美洲、拉丁美洲、欧洲、亚太地区以及非洲和中东地区。如果您研究一番,便会发现这些地图的好处:它们有一个易于使用的 API 端点,用于提供 JSON 格式的办公地点信息。在这一步中,您需要将这些办公地点添加到地图上,然后使用代码生成工具来解析 JSON。
向项目添加三个新的 Flutter 依赖项,如下所示。首先,添加 http 软件包,以便轻松发出 HTTP 请求。
$ flutter pub add http
Resolving dependencies...
  async 2.8.1 (2.8.2 available)
+ http 0.13.3
+ http_parser 4.0.0
  matcher 0.12.10 (0.12.11 available)
+ pedantic 1.11.1
  test_api 0.4.2 (0.4.3 available)
Changed 3 dependencies!
接下来,添加 json_serializable 和 json_annotation 以声明用于表示 JSON 文档的对象结构。
$ flutter pub add json_serializable
Resolving dependencies...
+ _fe_analyzer_shared 25.0.0
+ analyzer 2.2.0
+ args 2.2.0
  async 2.8.1 (2.8.2 available)
+ build 2.1.0
+ build_config 1.0.0
+ checked_yaml 2.0.1
+ cli_util 0.3.3
+ convert 3.0.1
+ crypto 3.0.1
+ dart_style 2.0.3
+ file 6.1.2
+ glob 2.0.1
+ json_annotation 4.1.0
+ json_serializable 5.0.0
+ logging 1.0.1
  matcher 0.12.10 (0.12.11 available)
+ package_config 2.0.0
+ pub_semver 2.0.0
+ pubspec_parse 1.0.0
+ source_gen 1.1.0
+ source_helper 1.2.1
  test_api 0.4.2 (0.4.3 available)
+ watcher 1.0.0
+ yaml 3.1.0
Downloading analyzer 2.2.0...
Downloading _fe_analyzer_shared 25.0.0...
Changed 22 dependencies!
$ flutter pub add json_annotation
Resolving dependencies...
  async 2.8.2 (2.9.0 available)
  characters 1.2.0 (1.2.1 available)
  clock 1.1.0 (1.1.1 available)
  fake_async 1.3.0 (1.3.1 available)
  matcher 0.12.11 (0.12.12 available)
  material_color_utilities 0.1.4 (0.1.5 available)
  meta 1.7.0 (1.8.0 available)
  path 1.8.1 (1.8.2 available)
  source_span 1.8.2 (1.9.0 available)
  string_scanner 1.1.0 (1.1.1 available)
  term_glyph 1.2.0 (1.2.1 available)
  test_api 0.4.9 (0.4.12 available)
Got dependencies!
最后,添加 build_runner 作为开发时间依赖项。在此步骤的后面部分,这将用来生成代码。
$ flutter pub add --dev build_runner
Resolving dependencies...
  async 2.8.1 (2.8.2 available)
+ build_daemon 3.0.0
+ build_resolvers 2.0.4
+ build_runner 2.1.1
+ build_runner_core 7.1.0
+ built_collection 5.1.0
+ built_value 8.1.2
+ code_builder 4.1.0
+ fixnum 1.0.0
+ frontend_server_client 2.1.2
+ graphs 2.0.0
+ http_multi_server 3.0.1
+ io 1.0.3
+ js 0.6.3
  matcher 0.12.10 (0.12.11 available)
+ mime 1.0.0
+ pool 1.5.0
+ shelf 1.2.0
+ shelf_web_socket 1.0.1
  test_api 0.4.2 (0.4.3 available)
+ timing 1.0.0
+ web_socket_channel 2.1.0
Changed 19 dependencies!
使用代码生成工具解析 JSON
您可能会注意到,从 API 端点返回的 JSON 数据具有常规结构。这有助于生成代码,以将相应数据编组到可用于代码的对象中。
在 lib/src 目录中,创建一个 locations.dart 文件并描述返回的 JSON 数据的结构,如下所示:
lib/src/locations.dart
import 'dart:convert';

import 'package:flutter/foundation.dart';
import 'package:flutter/services.dart' show rootBundle;
import 'package:http/http.dart' as http;
import 'package:json_annotation/json_annotation.dart';

part 'locations.g.dart';

@JsonSerializable()
class LatLng {
  LatLng({
    required this.lat,
    required this.lng,
  });

  factory LatLng.fromJson(Map<String, dynamic> json) => _$LatLngFromJson(json);
  Map<String, dynamic> toJson() => _$LatLngToJson(this);

  final double lat;
  final double lng;
}

@JsonSerializable()
class Region {
  Region({
    required this.coords,
    required this.id,
    required this.name,
    required this.zoom,
  });

  factory Region.fromJson(Map<String, dynamic> json) => _$RegionFromJson(json);
  Map<String, dynamic> toJson() => _$RegionToJson(this);

  final LatLng coords;
  final String id;
  final String name;
  final double zoom;
}

@JsonSerializable()
class Office {
  Office({
    required this.address,
    required this.id,
    required this.image,
    required this.lat,
    required this.lng,
    required this.name,
    required this.phone,
    required this.region,
  });

  factory Office.fromJson(Map<String, dynamic> json) => _$OfficeFromJson(json);
  Map<String, dynamic> toJson() => _$OfficeToJson(this);

  final String address;
  final String id;
  final String image;
  final double lat;
  final double lng;
  final String name;
  final String phone;
  final String region;
}

@JsonSerializable()
class Locations {
  Locations({
    required this.offices,
    required this.regions,
  });

  factory Locations.fromJson(Map<String, dynamic> json) =>
      _$LocationsFromJson(json);
  Map<String, dynamic> toJson() => _$LocationsToJson(this);

  final List<Office> offices;
  final List<Region> regions;
}

Future<Locations> getGoogleOffices() async {
  const googleLocationsURL = 'https://about.google/static/data/locations.json';

  // Retrieve the locations of Google offices
  try {
    final response = await http.get(Uri.parse(googleLocationsURL));
    if (response.statusCode == 200) {
      return Locations.fromJson(
          json.decode(response.body) as Map<String, dynamic>);
    }
  } catch (e) {
    if (kDebugMode) {
      print(e);
    }
  }

  // Fallback for when the above HTTP request fails.
  return Locations.fromJson(
    json.decode(
      await rootBundle.loadString('assets/locations.json'),
    ) as Map<String, dynamic>,
  );
}
添加这段代码后,您的集成式开发环境 (IDE)(如果使用的话)应该会显示一些红色波形曲线,这是因为它引用的同级文件 locations.g.dart. 不存在。此生成的文件会在非类型化 JSON 结构和命名对象之间进行转换。您可以通过运行 build_runner 进行创建:
$ flutter pub run build_runner build --delete-conflicting-outputs
[INFO] Generating build script...
[INFO] Generating build script completed, took 357ms

[INFO] Creating build script snapshot......
[INFO] Creating build script snapshot... completed, took 10.5s

[INFO] There was output on stdout while compiling the build script snapshot, run with `--verbose` to see it (you will need to run a `clean` first to re-snapshot).

[INFO] Initializing inputs
[INFO] Building new asset graph...
[INFO] Building new asset graph completed, took 646ms

[INFO] Checking for unexpected pre-existing outputs....
[INFO] Deleting 1 declared outputs which already existed on disk.
[INFO] Checking for unexpected pre-existing outputs. completed, took 3ms

[INFO] Running build...
[INFO] Generating SDK summary...
[INFO] 3.4s elapsed, 0/3 actions completed.
[INFO] Generating SDK summary completed, took 3.4s

[INFO] 4.7s elapsed, 2/3 actions completed.
[INFO] Running build completed, took 4.7s

[INFO] Caching finalized dependency graph...
[INFO] Caching finalized dependency graph completed, took 36ms

[INFO] Succeeded after 4.8s with 2 outputs (7 actions)
现在,您的代码应该可以再次进行彻底的分析。接下来,我们应该添加 getGoogleOffices 函数中使用的后备 location.json 文件。添加此后备文件的一个原因是,此函数中加载的静态数据是在没有跨域资源共享 (CORS) 标头的情况下提供的,因而无法在网络浏览器中加载。Android 版和 iOS 版 Flutter 应用不需要 CORS 标头,但在最好的情况下,移动数据访问可能会过于繁琐。
在浏览器中转到 https://about.google/static/data/locations.json,然后将内容保存到资源目录中。或者,您也可以按如下方式使用命令行。
$ mkdir assets
$ cd assets
$ curl -o locations.json https://about.google/static/data/locations.json
  % Total    % Received % Xferd  Average Speed   Time    Time     Time  Current
                                 Dload  Upload   Total   Spent    Left  Speed
100 30348  100 30348    0     0  75492      0 --:--:-- --:--:-- --:--:-- 75492
现在,您已经下载了资源文件,可以将其添加到 pubspec.yaml 文件的 flutter 部分。
pubspec.yaml
flutter:
  uses-material-design: true

  assets:
    - assets/locations.json
修改 main.dart 文件以请求地图数据,然后使用返回的信息将办事处添加到地图:
lib/main.dart
import 'package:flutter/material.dart';
import 'package:google_maps_flutter/google_maps_flutter.dart';
import 'src/locations.dart' as locations;

void main() {
  runApp(const MyApp());
}

class MyApp extends StatefulWidget {
  const MyApp({super.key});

  @override
  State<MyApp> createState() => _MyAppState();
}

class _MyAppState extends State<MyApp> {
  final Map<String, Marker> _markers = {};
  Future<void> _onMapCreated(GoogleMapController controller) async {
    final googleOffices = await locations.getGoogleOffices();
    setState(() {
      _markers.clear();
      for (final office in googleOffices.offices) {
        final marker = Marker(
          markerId: MarkerId(office.name),
          position: LatLng(office.lat, office.lng),
          infoWindow: InfoWindow(
            title: office.name,
            snippet: office.address,
          ),
        );
        _markers[office.name] = marker;
      }
    });
  }

  @override
  Widget build(BuildContext context) {
    return MaterialApp(
      theme: ThemeData(
        useMaterial3: true,
        colorSchemeSeed: Colors.green[700],
      ),
      home: Scaffold(
        appBar: AppBar(
          title: const Text('Google Office Locations'),
          elevation: 2,
        ),
        body: GoogleMap(
          onMapCreated: _onMapCreated,
          initialCameraPosition: const CameraPosition(
            target: LatLng(0, 0),
            zoom: 2,
          ),
          markers: _markers.values.toSet(),
        ),
      ),
    );
  }
}
这段代码会执行多项操作:
- 在
_onMapCreated中,它会使用上一步中的 JSON 解析代码,一直处于await状态,直到加载完毕。然后,它会使用返回的数据在setState()回调内创建Marker。应用收到新标记后,setState 会标记 Flutter 以重新绘制屏幕,从而显示办公地点。 - 这些标记存储在与
GoogleMap微件相关联的Map中。这样可将标记与正确的地图相关联。当然,您可以拥有多个地图,并在每个地图中显示不同的标记。
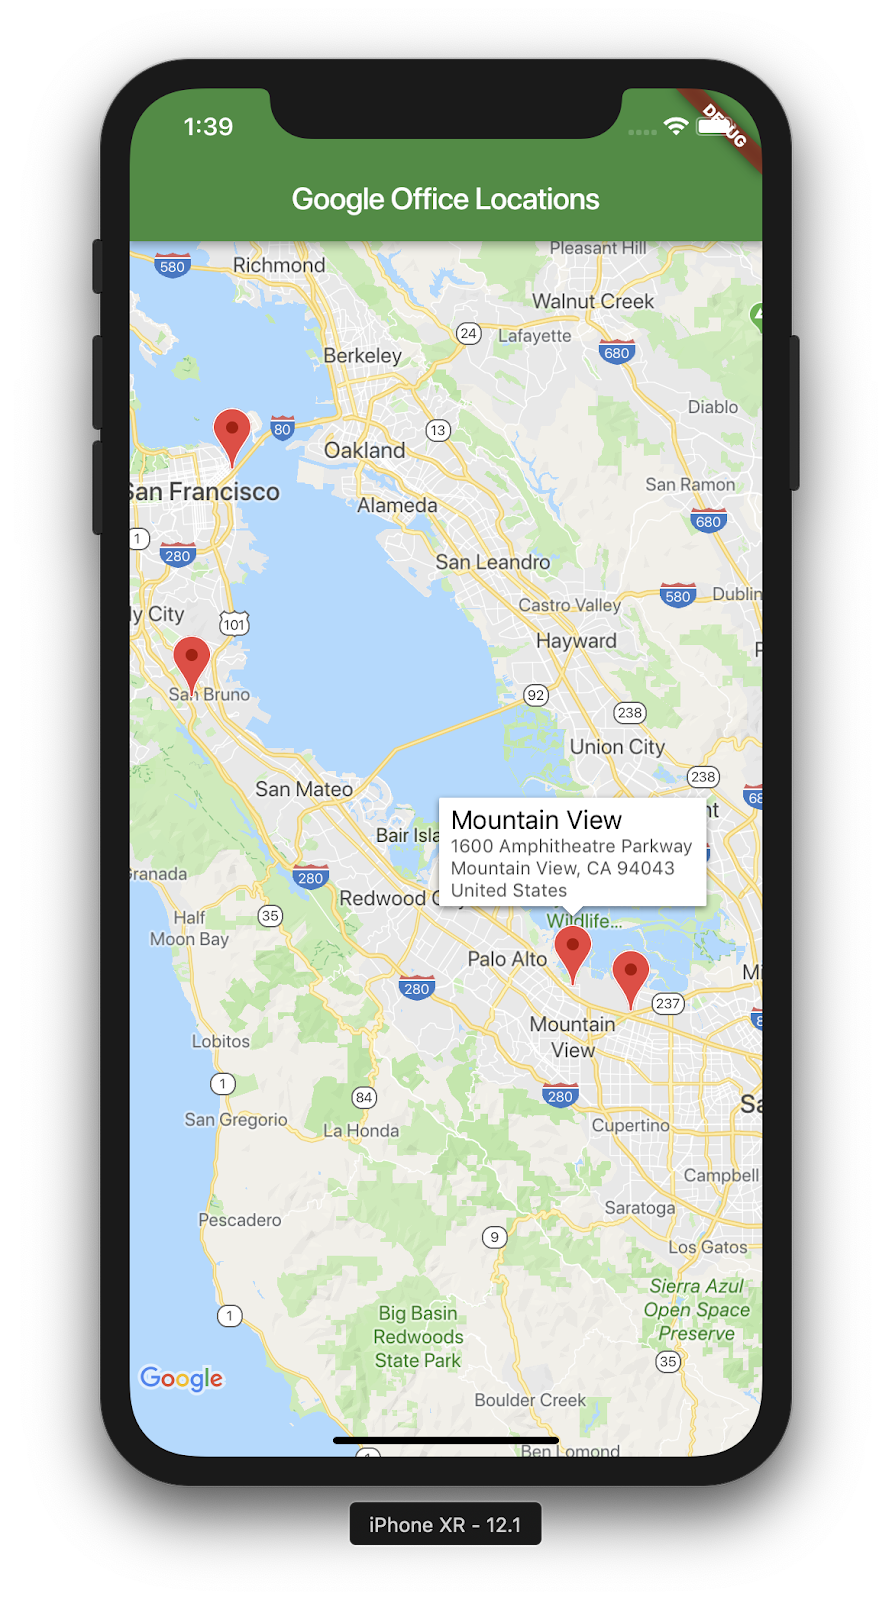
上面的屏幕截图显示了您已完成的内容。此时,您可以添加许多有趣的内容。例如,您可以添加一个办事处列表视图,用于在用户点击某个办事处时移动和缩放地图,不过正如大家所说,这就留给读者自行练习了!
6. 后续步骤
恭喜!
您已完成此 Codelab,并构建了一个包含 Google 地图的 Flutter 应用!此外,您还与 JSON Web 服务进行了互动。
其他后续步骤
此 Codelab 打造了一种在地图上直观呈现多个点的体验。许多移动应用都依靠这种功能来满足众多不同的用户需求。下面提供了一些其他资源,可帮助您在这方面更进一步:
- 使用 Flutter 和 Google 地图构建移动应用(Cloud Next ‘19 大会上发表的一段演讲)
- Hadrien Lejard 的
google_maps_webservice软件包,可让您非常轻松地使用 Google 地图网络服务(如 Directions API、Distance Matrix API 和 Places API)。 - 如果您想要查看通过 JSON REST 使用 API 的不同选项,请参阅 Andrew Brogdon 的 Medium 帖子,了解一系列使用 JSON REST API 的选项。