
1. 시작하기 전에
Google Maps Platform Maps API와 Places API를 사용하여 사용자의 위치를 파악하고 근처에 흥미로운 장소를 표시하는 지역 비즈니스 검색을 구축하는 방법을 알아보세요. 앱은 위치정보, 장소 세부정보, 장소 사진 등을 통합합니다.
기본 요건
- HTML, CSS, 자바스크립트에 대한 기본 지식
- 결제 계정이 있는 프로젝트 (없는 경우 다음 단계의 안내 준수)
- 아래의 사용 설정 단계에서 Maps JavaScript API 및 Places API를 사용 설정해야 합니다.
- 위 프로젝트의 API 키입니다.
Google Maps Platform 시작하기
Google Maps Platform을 처음 사용한다면 Google Maps Platform 시작하기 가이드를 따르거나 Google Maps Platform 시작하기 재생목록을 시청하여 다음 단계를 완료하세요.
- 결제 계정을 만듭니다.
- 프로젝트를 만듭니다.
- 이전 섹션에 표시된 Google Maps Platform API와 SDK를 사용 설정합니다.
- API 키를 생성합니다.
실행할 작업
- Google 지도를 표시하는 웹페이지 빌드
- 사용자 위치를 지도 중앙에 위치
- 주변 장소를 찾고 결과를 클릭 가능한 마커로 표시
- 각 장소에 대한 세부정보 가져오기 및 표시하기
필요한 항목
- Chrome (권장), Firefox, Safari, Internet Explorer와 같은 웹브라우저
- 자주 사용하는 텍스트 또는 코드 편집기
샘플 코드 가져오기
- 명령줄 인터페이스 (MacOS의 경우 터미널, Windows의 경우 Command Prompt)를 열고 다음 명령어를 사용하여 샘플 코드를 다운로드합니다.
git clone https://github.com/googlecodelabs/google-maps-nearby-search-js/
그래도 해결되지 않으면 다음 버튼을 클릭하여 이 Codelab의 모든 코드를 다운로드한 다음 파일의 압축을 풉니다.
- 방금 클론하거나 다운로드한 디렉터리로 변경합니다.
cd google-maps-nearby-search-js
stepN 폴더에는 이 Codelab의 각 단계에 원하는 최종 상태가 포함되어 있습니다. 참고용으로 제공됩니다. 모든 코딩 작업은 work라는 디렉터리에서 진행합니다.
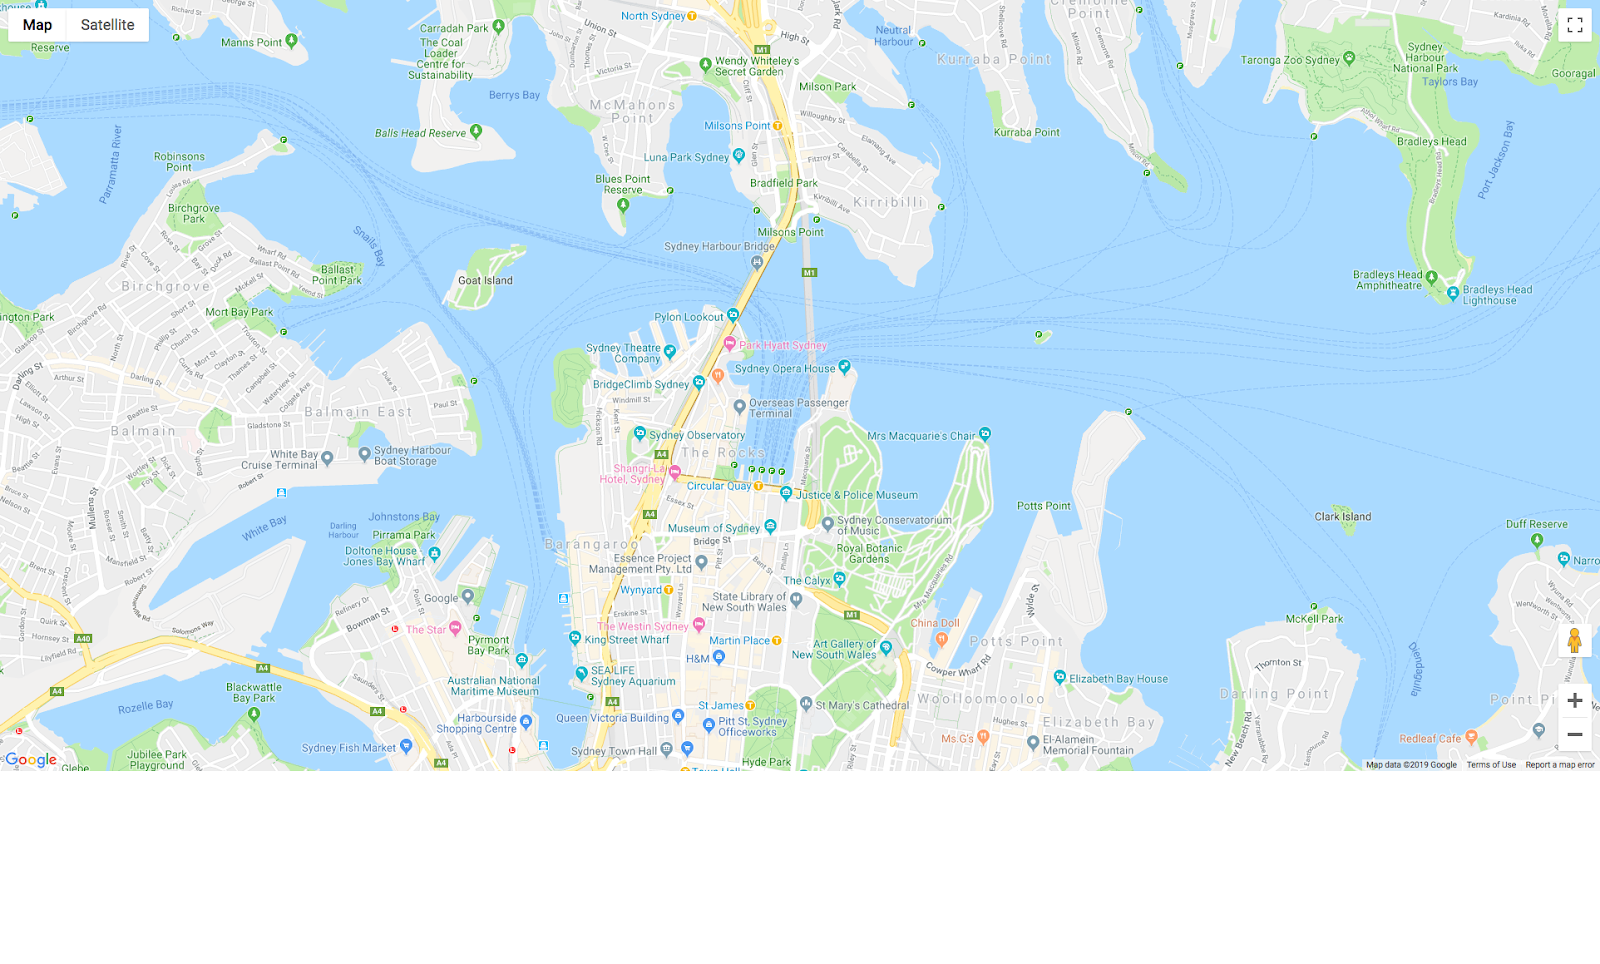
2. 기본 중심을 사용하여 지도 만들기
다음 세 단계를 따라 웹페이지에 Google 지도를 만드세요.
- HTML 페이지 만들기
- 지도 추가
- API 키에 붙여넣기
1. HTML 페이지 만들기
다음은 이 단계에서 생성된 지도입니다. 지도의 중심은 오스트레일리아 시드니에 있는 시드니 오페라 하우스입니다. 사용자가 위치 정보 액세스 권한을 거부하면 지도에서 해당 위치를 기본값으로 설정하고 흥미로운 검색결과를 제공합니다.
- 디렉터리를
work/폴더로 변경합니다. Codelab의 나머지 부분에 걸쳐서work/폴더의 버전을 수정합니다.
cd work
work/디렉터리에서 텍스트 편집기를 사용하여index.html라는 빈 파일을 만듭니다.- 다음 코드를
index.html에 복사합니다.
index.html
<!DOCTYPE html>
<html>

<head>
  <title>Sushi Finder</title>
  <meta name="viewport" content="initial-scale=1.0, user-scalable=no">
  <meta charset="utf-8">
  <style>
    /* Always set the map height explicitly to define the size of the div
     * element that contains the map. */
    #map {
      height: 100%;
      background-color: grey;
    }

    /* Optional: Makes the sample page fill the window. */
    html,
    body {
      height: 100%;
      margin: 0;
      padding: 0;
    }

    /* TODO: Step 4A1: Make a generic sidebar. */
  </style>
</head>

<body>
  <!-- TODO: Step 4A2: Add a generic sidebar -->

  <!-- Map appears here -->
  <div id="map"></div>

  <!-- TODO: Step 1B, Add a map -->
</body>

</html>
- 웹브라우저에서
index.html파일을 엽니다.
open index.html
2. 지도 추가
이 섹션에서는 Maps JavaScript API를 웹페이지에 로드하고 API를 사용하여 웹페이지에 지도를 추가하는 자체 자바스크립트를 작성하는 방법을 설명합니다.
- 이 스크립트 코드를
mapdiv 뒤와 닫기</body>태그 앞에<!-- TODO: Step 1B, Add a map -->를 추가합니다.
step1/index.html
<!-- TODO: Step 1B, Add a map -->
<script>
    /* Note: This example requires that you consent to location sharing when
     * prompted by your browser. If you see the error "Geolocation permission
     * denied.", it means you probably did not give permission for the browser * to locate you. */

    /* TODO: Step 2, Geolocate your user
     * Replace the code from here to the END TODO comment with new code from
     * codelab instructions. */
    let pos;
    let map;
    function initMap() {
        // Set the default location and initialize all variables
        pos = {lat: -33.857, lng: 151.213};
        map = new google.maps.Map(document.getElementById('map'), {
            center: pos,
            zoom: 15
        });
    }
    /* END TODO: Step 2, Geolocate your user */
</script>

<!-- TODO: Step 1C, Get an API key -->
<!-- TODO: Step 3A, Load the Places Library -->
<script async defer src="https://maps.googleapis.com/maps/api/js?key=YOUR_API_KEY&callback=initMap">
</script>
3. API 키에 붙여넣기
<!-- TODO: Step 1C, Get an API key -->이후 줄에서 스크립트 소스 URL의 키 매개변수 값을 복사하여 기본 요건 중에 만든 API 키로 바꿉니다.
step1/index.html
<!-- TODO: Step 1C, Get an API key -->
<!-- TODO: Step 3A, Load the Places Library -->
<script async defer src="https://maps.googleapis.com/maps/api/js?key=YOUR_API_KEY&callback=initMap">
</script>
- 작업 중인 HTML 파일을 저장합니다.
테스트
수정했던 파일의 브라우저 보기를 새로고침합니다. 이제 이전 사각형이 회색 위치에 표시됩니다. 대신 오류 메시지가 표시되면 최종 <script> 태그에서 \'YOUR_API_KEY;\'을 자체 API 키로 대체했는지 확인합니다. API 키가 없는 경우 위의 키를 참조하세요.
전체 샘플 코드
지금까지 이 프로젝트의 전체 코드는 GitHub에서 제공됩니다.
3. 사용자 위치정보 파악
다음으로, Maps JavaScript API와 함께 브라우저의 HTML5 Geolocation 기능을 사용하여 Google 지도에 사용자 또는 기기의 지리적 위치를 표시합니다.
다음은 캘리포니아 주 마운틴뷰에서 탐색 중인 사용자의 지리적 위치를 표시하는 지도의 예입니다.
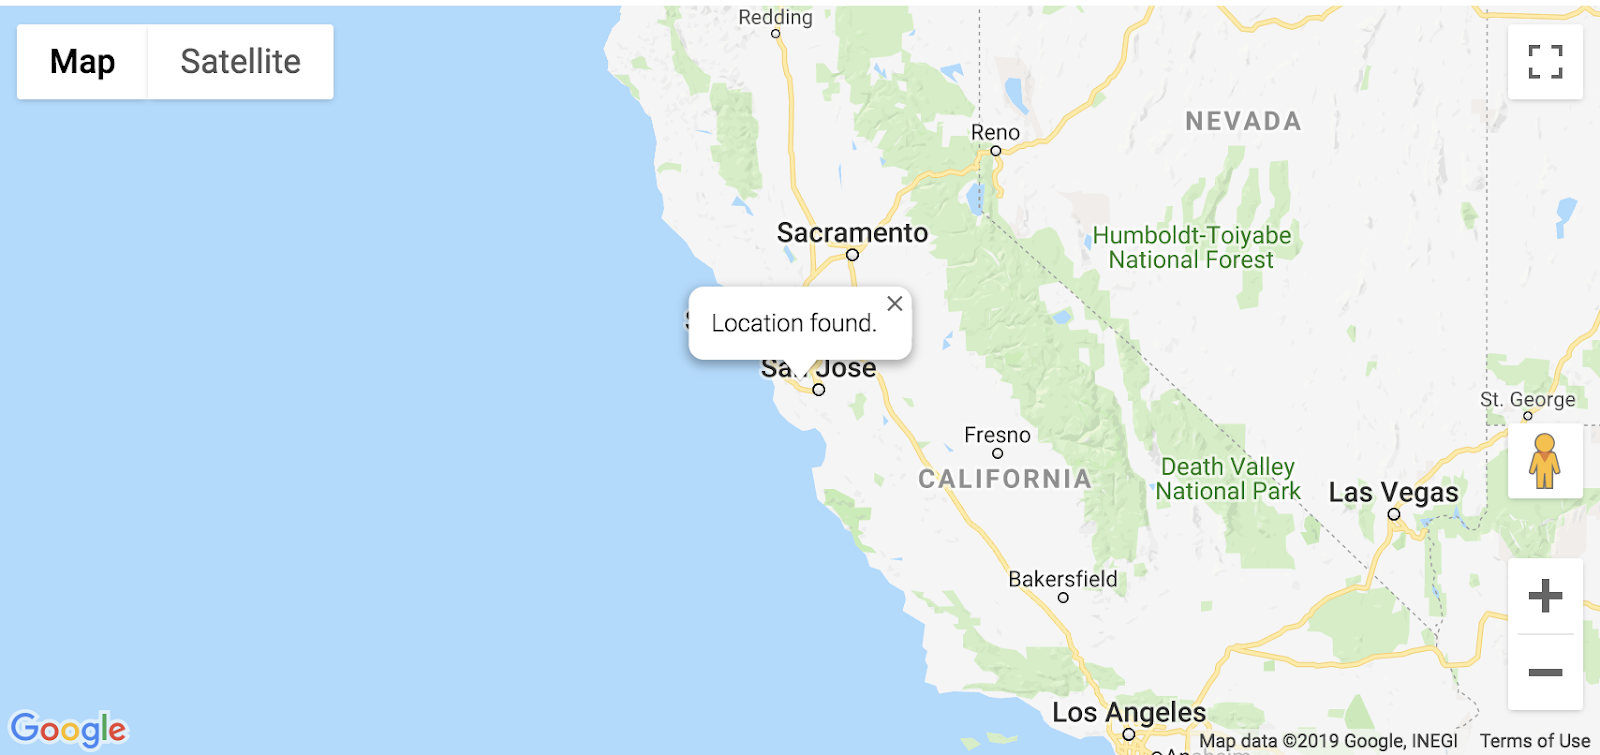
위치정보란 무엇인가요?
Geolocation은 다양한 데이터 수집 메커니즘을 통해 사용자 또는 컴퓨팅 기기의 지리적 위치를 식별하는 것을 의미합니다. 일반적으로 대부분의 Geolocation 서비스는 네트워크 라우팅 주소 또는 내부 GPS 기기를 사용하여 해당 위치를 확인합니다. 이 앱은 웹브라우저의 W3C 위치정보 표준 navigator.geolocation 속성을 사용하여 사용자의 위치를 확인합니다.
사용해 보기
TODO: Step 2, Geolocate your user 및 END TODO: Step 2, Geolocate your user 주석 사이의 코드를 다음 코드로 바꿉니다.
step2/index.html
/* TODO: Step 2, Geolocate your user
    * Replace the code from here to the END TODO comment with this code
    * from codelab instructions. */
let pos;
let map;
let bounds;
let infoWindow;
let currentInfoWindow;
let service;
let infoPane;
function initMap() {
    // Initialize variables
    bounds = new google.maps.LatLngBounds();
    infoWindow = new google.maps.InfoWindow;
    currentInfoWindow = infoWindow;
    /* TODO: Step 4A3: Add a generic sidebar */

    // Try HTML5 geolocation
    if (navigator.geolocation) {
    navigator.geolocation.getCurrentPosition(position => {
        pos = {
        lat: position.coords.latitude,
        lng: position.coords.longitude
        };
        map = new google.maps.Map(document.getElementById('map'), {
        center: pos,
        zoom: 15
        });
        bounds.extend(pos);

        infoWindow.setPosition(pos);
        infoWindow.setContent('Location found.');
        infoWindow.open(map);
        map.setCenter(pos);

        /* TODO: Step 3B2, Call the Places Nearby Search */
    }, () => {
        // Browser supports geolocation, but user has denied permission
        handleLocationError(true, infoWindow);
    });
    } else {
    // Browser doesn't support geolocation
    handleLocationError(false, infoWindow);
    }
}

// Handle a geolocation error
function handleLocationError(browserHasGeolocation, infoWindow) {
    // Set default location to Sydney, Australia
    pos = {lat: -33.856, lng: 151.215};
    map = new google.maps.Map(document.getElementById('map'), {
    center: pos,
    zoom: 15
    });

    // Display an InfoWindow at the map center
    infoWindow.setPosition(pos);
    infoWindow.setContent(browserHasGeolocation ?
    'Geolocation permissions denied. Using default location.' :
    'Error: Your browser doesn\'t support geolocation.');
    infoWindow.open(map);
    currentInfoWindow = infoWindow;

    /* TODO: Step 3B3, Call the Places Nearby Search */
}
/* END TODO: Step 2, Geolocate your user */
/* TODO: Step 3B1, Call the Places Nearby Search */
테스트
- 파일을 저장합니다.
- 페이지를 새로고침합니다.
이제 브라우저에서 앱과 위치를 공유할 수 있도록 권한을 요청해야 합니다.
- 한 번만 Block을 클릭하여 오류가 적절히 처리되고 시드니 중앙에 유지되는지 확인합니다.
- 다시 로드한 다음 허용을 클릭하여 위치정보가 작동하는지 확인하고 지도를 현재 위치로 이동합니다.
전체 샘플 코드
지금까지 이 프로젝트의 전체 코드는 GitHub에서 제공됩니다.
4. 주변 장소 검색
주변 검색을 사용하면 키워드나 입력으로 지정된 영역 내 장소를 검색할 수 있습니다. 주변 검색은 언제나 위치를 포함해야 하며, 다음 두 가지 방법 중 하나로 지정할 수 있습니다.
- 직사각형 검색 영역을 정의하는
LatLngBounds객체 location속성의 조합으로 정의된 원형 영역(원형을LatLng객체로 지정) 및 반경(미터로 측정)
PlacesService 객체의 호출로 Nearby Search를 시작합니다. nearbySearch() 메서드는 PlaceResult 객체의 배열을 반환합니다.
A. 장소 라이브러리 로드
먼저 장소 라이브러리 서비스에 액세스하려면 스크립트 소스 URL을 업데이트하여 libraries 매개변수를 도입하고 places를 값으로 추가합니다.
step3/index.html
<!-- TODO: Step 3A, Load the Places Library -->
<script async defer
    src="https://maps.googleapis.com/maps/api/js?key=YOUR_API_KEY&libraries=places&callback=initMap">
B. Places Nearby Search를 호출하여 응답을 요청합니다.
그런 다음 PlaceSearch 요청을 작성합니다. 최소 필수 필드는 다음과 같습니다.
최소 필수 필드는 다음과 같습니다.
bounds는 직사각형 검색 영역 또는location와radius를 정의하는google.maps.LatLngBounds객체여야 합니다. 전자는google.maps.LatLng객체, 후자는 원을 기준으로 원의 반경을 나타내는 간단한 정수를 사용합니다. 허용되는 최대 반경은 50,000미터입니다.rankBy을DISTANCE로 설정하면 위치를 지정해야 하지만 반경이나 경계는 지정할 수 없습니다.- 이름, 유형, 주소를 포함한 사용 가능한 모든 필드와 일치하는
keyword, 고객 리뷰 및 기타 제3자 콘텐츠(또는 또는type)와 일치하는 결과 한 가지 유형만 지정할 수 있습니다. 둘 이상의 유형을 입력할 경우 첫 번째 뒤에 오는 모든 유형은 무시됩니다. 지원되는 유형 목록을 참조하세요.
이 Codelab에서는 사용자의 현재 위치를 검색 위치로 사용하고 거리를 기준으로 결과의 순위를 지정합니다.
TODO: Step 3B1주석에 다음 코드를 작성하여 검색을 호출하고 응답을 처리합니다.
sushi 키워드는 검색어로 사용되지만 변경할 수 있습니다. createMarkers 함수를 정의하는 코드는 다음 섹션에서 제공합니다.
step3/index.html
/* TODO: Step 3B1, Call the Places Nearby Search */
// Perform a Places Nearby Search Request
function getNearbyPlaces(position) {
    let request = {
    location: position,
    rankBy: google.maps.places.RankBy.DISTANCE,
    keyword: 'sushi'
    };

    service = new google.maps.places.PlacesService(map);
    service.nearbySearch(request, nearbyCallback);
}

// Handle the results (up to 20) of the Nearby Search
function nearbyCallback(results, status) {
    if (status == google.maps.places.PlacesServiceStatus.OK) {
    createMarkers(results);
    }
}

/* TODO: Step 3C, Generate markers for search results */
TODO: Step 3B2주석의initMap함수 끝에 다음 줄을 추가합니다.
/* TODO: Step 3B2, Call the Places Nearby Search */
// Call Places Nearby Search on user's location
getNearbyPlaces(pos);
TODO: Step 3B3주석의handleLocationError함수 끝에 다음 줄을 추가합니다.
/* TODO: Step 3B3, Call the Places Nearby Search */
// Call Places Nearby Search on the default location
getNearbyPlaces(pos);
C. 검색결과에 표시할 마커 생성하기
마커는 지도에서 위치를 식별합니다. 기본적으로, 마커는 표준 이미지를 사용합니다. 마커 이미지 맞춤설정에 대한 자세한 내용은 마커를 참조하세요.
google.maps.Marker 생성자는 단일 Marker options 객체 리터럴을 사용하여 마커의 초기 속성을 지정합니다.
다음 필드는 특히 중요하며, 주로 마커를 생성할 때 설정됩니다.
position(필수)는 마커의 초기 위치를 식별하는LatLng를 지정합니다.map(선택사항)는 마커를 배치할 지도를 지정합니다. 마커를 구성할 때 지도를 지정하지 않으면 마커가 생성되지만, 지도에 연결되거나 표시되지는 않습니다. 나중에 마커의setMap()메서드를 호출하여 마커를 추가할 수도 있습니다.- 주석
TODO: Step 3C뒤에 다음 코드를 추가하여 응답에서 반환된 장소당 하나의 마커에 대한 위치, 지도, 제목을 설정합니다. 또한 지도의 중앙과 모든 마커를 지도에 표시하려면bounds변수의extend메서드를 사용합니다.
step3/index.html
/* TODO: Step 3C, Generate markers for search results */
// Set markers at the location of each place result
function createMarkers(places) {
    places.forEach(place => {
    let marker = new google.maps.Marker({
        position: place.geometry.location,
        map: map,
        title: place.name
    });

    /* TODO: Step 4B: Add click listeners to the markers */

    // Adjust the map bounds to include the location of this marker
    bounds.extend(place.geometry.location);
    });
    /* Once all the markers have been placed, adjust the bounds of the map to
    * show all the markers within the visible area. */
    map.fitBounds(bounds);
}

/* TODO: Step 4C: Show place details in an info window */
테스트
- 페이지를 저장하고 새로고침한 다음 허용을 클릭하여 위치정보 권한을 부여합니다.
지도 중앙 위치 주위에 최대 20개의 빨간색 마커가 표시됩니다.
- 페이지를 다시 새로고침하고 위치정보 권한을 차단합니다.
지도의 기본 중심에 결과가 계속 표시되나요 (샘플의 기본값은 오스트레일리아 시드니에 있나요?)
전체 샘플 코드
지금까지 이 프로젝트의 전체 코드는 GitHub에서 제공됩니다.
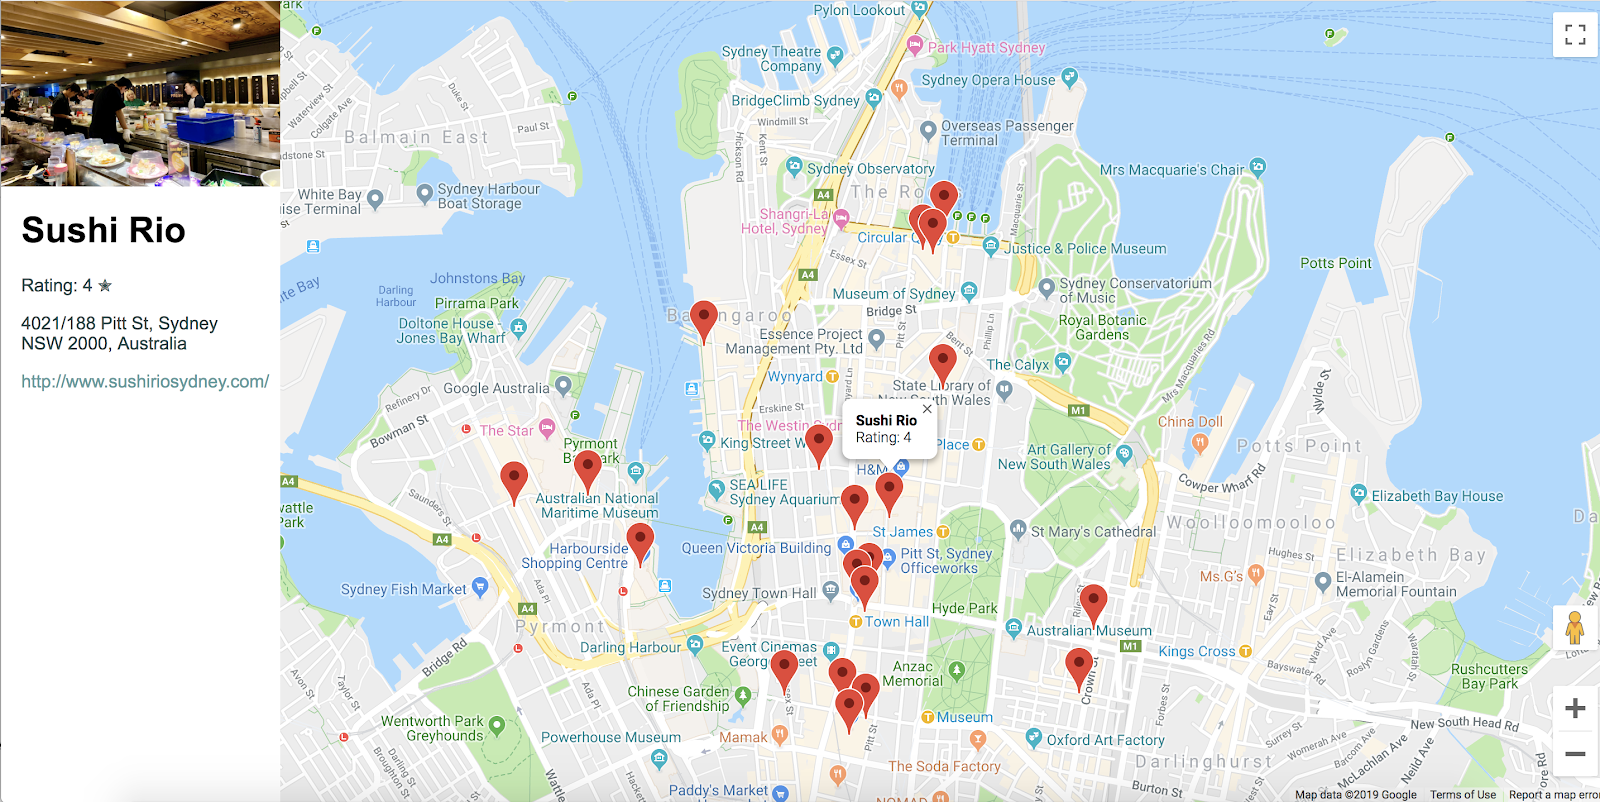
5. 주문형 장소 세부정보 표시
주변 장소 ID가 제공되면 (주변 검색 결과에서 필드 중 하나로 전송) 전체 주소, 전화번호, 사용자 평점, 리뷰 등 해당 장소에 대한 추가 세부정보를 요청할 수 있습니다. 이 Codelab에서는 사용자가 풍부한 장소 세부정보를 표시하는 사이드바를 만들고 마커를 대화형으로 만들어 사용자가 세부정보를 확인할 장소를 선택할 수 있도록 합니다.
A. 일반 사이드바 만들기
Place Details를 표시할 장소가 필요합니다. 따라서 사용자가 마커를 클릭할 때 장소 세부정보를 슬라이드하여 표시하는 데 사용할 수 있는 사이드바용 간단한 코드를 준비했습니다.
TODO: Step 4A1주석 뒤에 다음 코드를style태그에 추가합니다.
step4/index.html
/* TODO: Step 4A1: Make a generic sidebar */
/* Styling for an info pane that slides out from the left.
    * Hidden by default. */
#panel {
    height: 100%;
    width: null;
    background-color: white;
    position: fixed;
    z-index: 1;
    overflow-x: hidden;
    transition: all .2s ease-out;
}

.open {
    width: 250px;
}

/* Styling for place details */
.hero {
    width: 100%;
    height: auto;
    max-height: 166px;
    display: block;
}

.place,
p {
    font-family: 'open sans', arial, sans-serif;
    padding-left: 18px;
    padding-right: 18px;
}

.details {
    color: darkslategrey;
}

a {
    text-decoration: none;
    color: cadetblue;
}
body섹션에서mapdiv 바로 앞에 세부정보 패널을 위한 div를 추가합니다.
<!-- TODO: Step 4A2: Add a generic sidebar -->
<!-- The slide-out panel for showing place details -->
<div id="panel"></div>
initMap()주석의TODO: Step 4A3주석 뒤에 다음과 같이infoPane변수를 초기화합니다.
/* TODO: Step 4A3: Add a generic sidebar */
infoPane = document.getElementById('panel');
B. 마커에 클릭 리스너 추가하기
createMarkers함수에서 각 마커를 만들 때 클릭 리스너를 추가합니다.
클릭 리스너는 마커와 연결된 장소의 세부정보를 가져오고 함수를 호출하여 세부정보를 표시합니다.
- 다음 코드를
createMarkers함수의 코드 주석TODO: Step 4B에 붙여넣습니다.
showDetails 메서드는 다음 섹션에서 구현됩니다.
step4/index.html
/* TODO: Step 4B: Add click listeners to the markers */
// Add click listener to each marker
google.maps.event.addListener(marker, 'click', () => {
    let request = {
    placeId: place.place_id,
    fields: ['name', 'formatted_address', 'geometry', 'rating',
        'website', 'photos']
    };

    /* Only fetch the details of a place when the user clicks on a marker.
    * If we fetch the details for all place results as soon as we get
    * the search response, we will hit API rate limits. */
    service.getDetails(request, (placeResult, status) => {
    showDetails(placeResult, marker, status)
    });
});
addListener 요청에서 placeId 속성은 세부정보 요청에 단일 장소를 지정하고 fields 속성은 장소에 대해 반환하려는 정보의 필드 이름 배열입니다. 요청할 수 있는 필드의 전체 목록은 PlaceResult 인터페이스를 참고하세요.
C. 정보 창에 장소 세부정보 표시
정보 창은 지도의 특정 위치 위에 있는 대화상자에 콘텐츠 (일반적으로 텍스트 또는 이미지)를 표시합니다. 정보 창에는 콘텐츠 영역과 테이퍼형 스템이 있습니다. 스템의 끝은 지도의 지정된 위치와 연결됩니다. 일반적으로 정보 창은 마커에 첨부되지만 정보 창을 특정 위도/경도에 연결할 수도 있습니다.
TODO: Step 4C주석에 다음 코드를 추가하여 비즈니스의 이름과 평점을 표시하는InfoWindow를 만들고 이 창을 마커에 연결합니다.
사이드바에 세부정보를 표시하는 다음 섹션에서 showPanel를 정의합니다.
step4/index.html
/* TODO: Step 4C: Show place details in an info window */
// Builds an InfoWindow to display details above the marker
function showDetails(placeResult, marker, status) {
    if (status == google.maps.places.PlacesServiceStatus.OK) {
    let placeInfowindow = new google.maps.InfoWindow();
    placeInfowindow.setContent('<div><strong>' + placeResult.name +
        '</strong><br>' + 'Rating: ' + placeResult.rating + '</div>');
    placeInfowindow.open(marker.map, marker);
    currentInfoWindow.close();
    currentInfoWindow = placeInfowindow;
    showPanel(placeResult);
    } else {
    console.log('showDetails failed: ' + status);
    }
}

/* TODO: Step 4D: Load place details in a sidebar */
D. 사이드바에 장소 세부정보 로드하기
다른 div를 채우려면 PlaceResult 객체에 반환된 것과 동일한 세부정보를 사용하세요. 이 샘플에서는 infoPane ID가 \'3D;panel"인 div의 임의 변수 이름입니다. 사용자가 새 마커를 클릭하면 사이드바가 닫혀 있고, 세부정보가 이미 열려 있으면 세부정보가 닫힙니다.
TODO: Step 4D주석 뒤에 다음 코드를 추가합니다.
step4/index.html
/* TODO: Step 4D: Load place details in a sidebar */
// Displays place details in a sidebar
function showPanel(placeResult) {
    // If infoPane is already open, close it
    if (infoPane.classList.contains("open")) {
    infoPane.classList.remove("open");
    }

    // Clear the previous details
    while (infoPane.lastChild) {
    infoPane.removeChild(infoPane.lastChild);
    }

    /* TODO: Step 4E: Display a Place Photo with the Place Details */

    // Add place details with text formatting
    let name = document.createElement('h1');
    name.classList.add('place');
    name.textContent = placeResult.name;
    infoPane.appendChild(name);
    if (placeResult.rating != null) {
    let rating = document.createElement('p');
    rating.classList.add('details');
    rating.textContent = `Rating: ${placeResult.rating} \u272e`;
    infoPane.appendChild(rating);
    }
    let address = document.createElement('p');
    address.classList.add('details');
    address.textContent = placeResult.formatted_address;
    infoPane.appendChild(address);
    if (placeResult.website) {
    let websitePara = document.createElement('p');
    let websiteLink = document.createElement('a');
    let websiteUrl = document.createTextNode(placeResult.website);
    websiteLink.appendChild(websiteUrl);
    websiteLink.title = placeResult.website;
    websiteLink.href = placeResult.website;
    websitePara.appendChild(websiteLink);
    infoPane.appendChild(websitePara);
    }

    // Open the infoPane
    infoPane.classList.add("open");
}
E. 장소 세부정보가 포함된 장소 사진 표시
getDetails 결과는 placeId와 연관된 최대 10장의 사진 배열을 반환합니다. 여기에서 사이드바의 장소 이름 위에 첫 번째 사진을 표시합니다.
- 사진을 사이드바 상단에 표시하려면
name요소를 만들기 전에 이 코드를 삽입하세요.
step4/index.html
/* TODO: Step 4E: Display a Place Photo with the Place Details */
// Add the primary photo, if there is one
if (placeResult.photos != null) {
    let firstPhoto = placeResult.photos[0];
    let photo = document.createElement('img');
    photo.classList.add('hero');
    photo.src = firstPhoto.getUrl();
    infoPane.appendChild(photo);
}
테스트
- 브라우저에서 페이지를 저장하고 새로고침하여 위치정보 권한을 허용합니다.
- 마커를 클릭하여 몇 가지 세부정보를 표시하는 마커에서 정보 창이 나타나고 사이드바가 왼쪽에서 슬라이드되어 더 자세한 정보가 표시되는 것을 볼 수 있습니다.
- 위치정보 권한을 새로고침하고 거부해도 검색이 작동하는지 테스트합니다. 다른 검색어의 검색 키워드를 수정하고 해당 검색어에 대한 반환된 결과를 살펴봅니다.
전체 샘플 코드
지금까지 이 프로젝트의 전체 코드는 GitHub에서 제공됩니다.
6. 축하합니다
수고하셨습니다. Places 라이브러리를 포함하여 Maps JavaScript API의 많은 기능을 사용했습니다.
학습한 내용
- google.maps.Map 클래스를 사용하여 지도 만들기
- 사용자의 브라우저를 사용하여 위치정보를 사용하고 지도에 결과 표시
- 지도에 마커를 추가하고 마커의 사용자 클릭 이벤트에 응답
- 사용자가 마커를 클릭할 때 추가 정보를 표시하도록 정보 창을 추가합니다.
- 장소 라이브러리 로드 및 Nearby Search 실행
- 장소 세부정보 및 장소 사진 가져오기 및 표시하기
자세히 알아보기
지도를 더 유용하게 활용하려면 Maps JavaScript API 문서 및 장소 라이브러리 문서를 살펴보세요. 두 문서 모두 가이드, 튜토리얼, API 참조, 추가 코드 샘플, 지원 채널을 포함하고 있습니다. 많이 사용되는 기능으로는 지도로 데이터 가져오기, 지도 스타일 지정 시작, 스트리트 뷰 서비스 등이 있습니다.
다음으로 빌드하려는 Codelab 유형은 무엇인가요?
원하는 Codelab이 위에 나와 있지 않나요? 여기에서 새로운 문제로 요청하세요.