
1. 准备工作
了解如何使用 Google Maps Platform Maps API 和 Places API 构建本地商家搜索,以对用户进行地理定位并显示附近的有趣地点。该应用集成了地理定位、地点详情和地点照片等功能。
前提条件
- 已掌握 HTML、CSS 和 JavaScript 方面的基础知识
- 具有结算帐号的项目(如果您没有结算帐号,请按照下一步中的说明操作)。
- 要完成下面的启用步骤,您需要启用 Maps JavaScript API 和 Places API。
- 上述项目的 API 密钥。
Google Maps Platform 使用入门
如果您之前从未使用过 Google Maps Platform,请参阅 Google Maps Platform 使用入门指南或观看 Google Maps Platform 使用入门播放列表中的视频,完成以下步骤:
- 创建一个结算帐号。
- 创建一个项目。
- 启用所需的 Google Maps Platform API 和 SDK(已在上一节中列出)。
- 生成一个 API 密钥。
您应执行的操作
- 构建显示 Google 地图的网页
- 以用户所在位置为中心显示地图
- 查找附近的地点,并将结果显示为可点击的标记
- 获取并显示每个地点的更多详情
所需条件
- 网络浏览器,例如 Google Chrome(推荐)、Firefox、Safari 或 Internet Explorer
- 您最喜爱的文字或代码编辑器
获取示例代码
- 打开命令行界面(MacOS 上的终端或 Windows 上的命令提示符)并使用以下命令下载示例代码:
git clone https://github.com/googlecodelabs/google-maps-nearby-search-js/
如果这样做不起作用,请点击下方按钮下载此 Codelab 的所有代码,然后解压缩该文件:
- 切换到您刚刚克隆或下载的目录。
cd google-maps-nearby-search-js
stepN 文件夹包含本 Codelab 的每个步骤所需的结束状态。它们仅供参考。在名为 work 的目录中执行所有编码工作。
2. 创建带有默认中心的地图
要在网页上创建 Google 地图,需要执行以下三个步骤:
- 创建 HTML 网页
- 添加地图
- 粘贴您的 API 密钥
1. 创建 HTML 网页
以下是此步骤中创建的地图。该地图的中心位于澳大利亚悉尼的悉尼歌剧院。如果用户拒绝授予获取其位置的权限,地图会默认显示此位置,并且仍会提供有趣的搜索结果。
- 将目录更改为
work/文件夹。在整个 Codelab 的剩余部分中,请在work/文件夹中的版本中进行修改。
cd work
- 在
work/目录中,使用文本编辑器创建名为index.html的空白文件。 - 将以下代码复制到
index.html中。
index.html
<!DOCTYPE html>
<html>

<head>
  <title>Sushi Finder</title>
  <meta name="viewport" content="initial-scale=1.0, user-scalable=no">
  <meta charset="utf-8">
  <style>
    /* Always set the map height explicitly to define the size of the div
     * element that contains the map. */
    #map {
      height: 100%;
      background-color: grey;
    }

    /* Optional: Makes the sample page fill the window. */
    html,
    body {
      height: 100%;
      margin: 0;
      padding: 0;
    }

    /* TODO: Step 4A1: Make a generic sidebar. */
  </style>
</head>

<body>
  <!-- TODO: Step 4A2: Add a generic sidebar -->

  <!-- Map appears here -->
  <div id="map"></div>

  <!-- TODO: Step 1B, Add a map -->
</body>

</html>
- 在网络浏览器中打开
index.html文件。
open index.html
2. 添加地图
本部分介绍了如何将 Maps JavaScript API 加载到网页中,并编写自己的 JavaScript 内容,以便使用 API 向网页添加地图。
- 添加此脚本代码,也就是在
mapdiv 之后、结束</body>标记之前的位置显示<!-- TODO: Step 1B, Add a map -->。
step1/index.html
<!-- TODO: Step 1B, Add a map -->
<script>
    /* Note: This example requires that you consent to location sharing when
     * prompted by your browser. If you see the error "Geolocation permission
     * denied.", it means you probably did not give permission for the browser * to locate you. */

    /* TODO: Step 2, Geolocate your user
     * Replace the code from here to the END TODO comment with new code from
     * codelab instructions. */
    let pos;
    let map;
    function initMap() {
        // Set the default location and initialize all variables
        pos = {lat: -33.857, lng: 151.213};
        map = new google.maps.Map(document.getElementById('map'), {
            center: pos,
            zoom: 15
        });
    }
    /* END TODO: Step 2, Geolocate your user */
</script>

<!-- TODO: Step 1C, Get an API key -->
<!-- TODO: Step 3A, Load the Places Library -->
<script async defer src="https://maps.googleapis.com/maps/api/js?key=YOUR_API_KEY&callback=initMap">
</script>
3.粘贴您的 API 密钥
- 在
<!-- TODO: Step 1C, Get an API key -->后面的行中,复制脚本来源网址中密钥参数的值,并将其替换为在前提条件下创建的 API 密钥。
step1/index.html
<!-- TODO: Step 1C, Get an API key -->
<!-- TODO: Step 3A, Load the Places Library -->
<script async defer src="https://maps.googleapis.com/maps/api/js?key=YOUR_API_KEY&callback=initMap">
</script>
- 保存一直在使用的 HTML 文件。
测试应用
在浏览器上重新加载您当前编辑的文件。现在,您应该会看到之前显示灰色矩形的地图。如果您看到了错误消息,请确保已将最终 <script> 标记中的“YOUR_API_KEY”替换为您自己的 API 密钥。请参阅上文,了解如何获取 API 密钥(如果您还没有)。
完整的示例代码
目前可在 GitHub 上找到此项目的完整代码。
3.对用户进行地理定位
接下来,您想使用浏览器的 HTML5 地理定位功能以及 Maps JavaScript API,在 Google 地图上显示用户或设备的地理位置。
下面的示例显示了您从加利福尼亚州山景城浏览的地理位置信息:
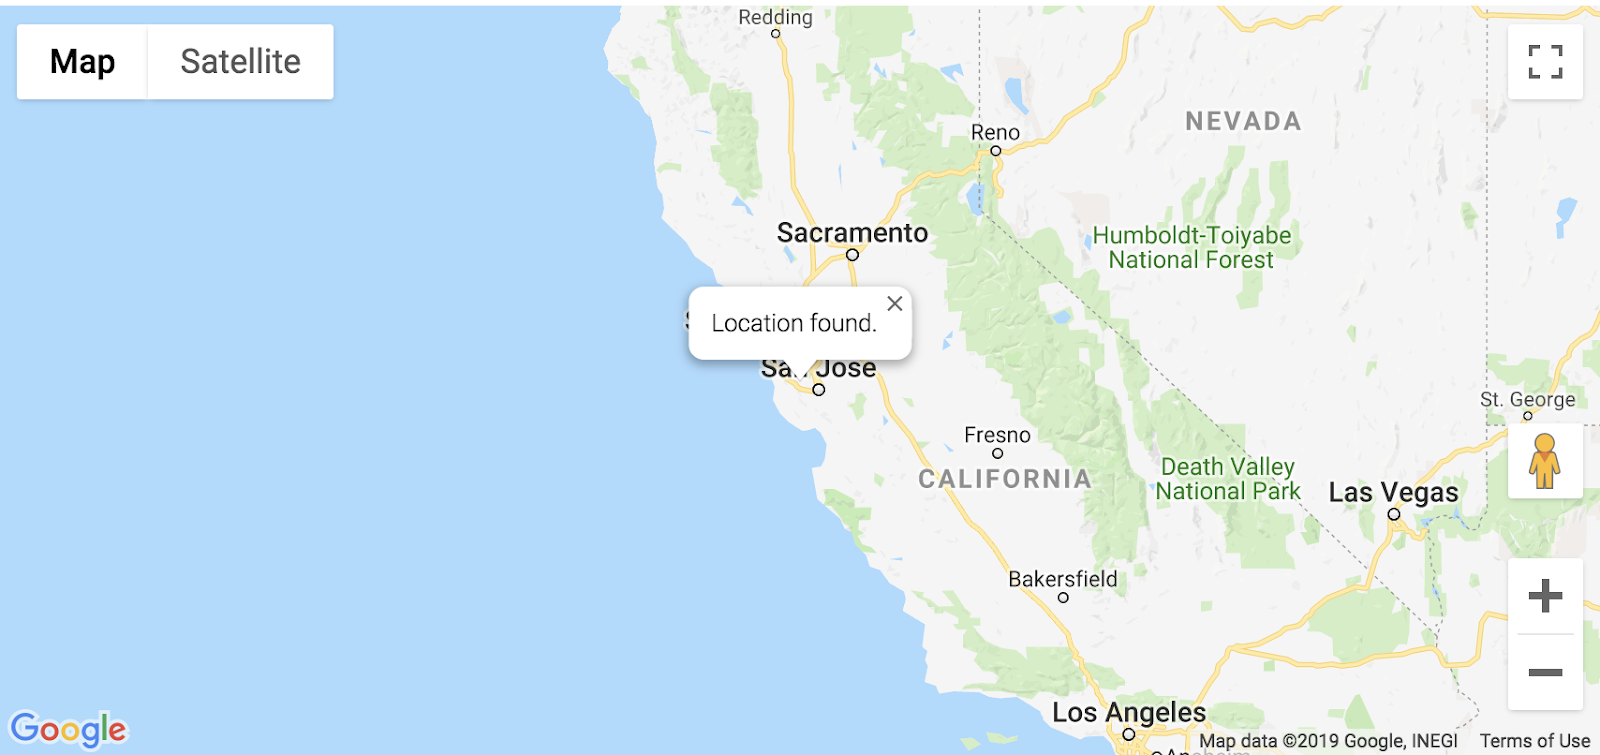
什么是地理定位?
地理定位是指通过各种数据收集机制识别用户或计算设备的地理位置。通常而言,大多数地理定位服务使用网络路由地址或内部 GPS 设备来确定该位置。此应用使用网络浏览器的 W3C Geolocation 标准 navigator.geolocation 属性来确定用户的位置。
自己尝试一下
将注释 TODO: Step 2, Geolocate your user 和 END TODO: Step 2, Geolocate your user 之间的代码替换为以下代码:
step2/index.html
/* TODO: Step 2, Geolocate your user
    * Replace the code from here to the END TODO comment with this code
    * from codelab instructions. */
let pos;
let map;
let bounds;
let infoWindow;
let currentInfoWindow;
let service;
let infoPane;
function initMap() {
    // Initialize variables
    bounds = new google.maps.LatLngBounds();
    infoWindow = new google.maps.InfoWindow;
    currentInfoWindow = infoWindow;
    /* TODO: Step 4A3: Add a generic sidebar */

    // Try HTML5 geolocation
    if (navigator.geolocation) {
    navigator.geolocation.getCurrentPosition(position => {
        pos = {
        lat: position.coords.latitude,
        lng: position.coords.longitude
        };
        map = new google.maps.Map(document.getElementById('map'), {
        center: pos,
        zoom: 15
        });
        bounds.extend(pos);

        infoWindow.setPosition(pos);
        infoWindow.setContent('Location found.');
        infoWindow.open(map);
        map.setCenter(pos);

        /* TODO: Step 3B2, Call the Places Nearby Search */
    }, () => {
        // Browser supports geolocation, but user has denied permission
        handleLocationError(true, infoWindow);
    });
    } else {
    // Browser doesn't support geolocation
    handleLocationError(false, infoWindow);
    }
}

// Handle a geolocation error
function handleLocationError(browserHasGeolocation, infoWindow) {
    // Set default location to Sydney, Australia
    pos = {lat: -33.856, lng: 151.215};
    map = new google.maps.Map(document.getElementById('map'), {
    center: pos,
    zoom: 15
    });

    // Display an InfoWindow at the map center
    infoWindow.setPosition(pos);
    infoWindow.setContent(browserHasGeolocation ?
    'Geolocation permissions denied. Using default location.' :
    'Error: Your browser doesn\'t support geolocation.');
    infoWindow.open(map);
    currentInfoWindow = infoWindow;

    /* TODO: Step 3B3, Call the Places Nearby Search */
}
/* END TODO: Step 2, Geolocate your user */
/* TODO: Step 3B1, Call the Places Nearby Search */
测试应用
- 保存文件。
- 重新加载页面。
浏览器现在应向您请求与该应用共享您的位置信息的权限。
- 点击 Block(屏蔽)一次,看看它能否妥善处理错误,并始终以悉尼为中心。
- 请重新加载并点击允许,查看地理定位能否正常工作并将地图移动到您当前所在的位置。
完整的示例代码
目前可在 GitHub 上找到此项目的完整代码。
4.搜索附近的地点
借助附近地点搜索,您可以按关键字或类型搜索指定区域内的地点。附近地点搜索必须始终包含一个位置,可以通过以下两种方式之一来指定该位置:
- 用于定义矩形搜索区域的
LatLngBounds对象 - 定义为
location属性组合的圆形区域(将圆形的中心指定为LatLng对象)以及半径(以米为单位)。
通过调用 PlacesService nearbySearch() 方法启动附近搜索,该方法会返回 PlaceResult 对象的数组。
A. 加载 Places Library
首先,为了访问地点库服务,请更新脚本来源网址以引入 libraries 参数并添加 places 作为值。
step3/index.html
<!-- TODO: Step 3A, Load the Places Library -->
<script async defer
    src="https://maps.googleapis.com/maps/api/js?key=YOUR_API_KEY&libraries=places&callback=initMap">
B. 调用“附近地点搜索”请求并处理响应
接下来,形成地点搜索请求。至少需要填写以下字段:
至少需要填写以下字段:
bounds- 必须是定义矩形搜索区域的google.maps.LatLngBounds对象,或location和radius;前者接受google.maps.LatLng对象,后者接受表示圆的半径(以米为单位)的简单整数。允许的最大半径为 50,000 米。请注意,当rankBy设置为DISTANCE时,您必须指定位置,但不能指定半径或边界。- 与所有可用字段(包括但不限于名称、类型和地址、客户评价和其他第三方内容)匹配的
keyword,或是type(用于限制结果仅与指定类型匹配的地点)。只能指定一个类型(如果提供了多个类型,则系统会忽略第一个条目之后的所有类型)。请参阅支持的类型列表。
在此 Codelab 中,您将使用用户的当前位置作为搜索的位置,并根据距离对结果进行排名。
- 在注释
TODO: Step 3B1中添加以下内容,以编写两个函数来调用搜索和处理响应。
关键字“sushi”被用作搜索字词,但您可以对其进行更改。下一部分中介绍了用于定义 createMarkers 函数的代码。
step3/index.html
/* TODO: Step 3B1, Call the Places Nearby Search */
// Perform a Places Nearby Search Request
function getNearbyPlaces(position) {
    let request = {
    location: position,
    rankBy: google.maps.places.RankBy.DISTANCE,
    keyword: 'sushi'
    };

    service = new google.maps.places.PlacesService(map);
    service.nearbySearch(request, nearbyCallback);
}

// Handle the results (up to 20) of the Nearby Search
function nearbyCallback(results, status) {
    if (status == google.maps.places.PlacesServiceStatus.OK) {
    createMarkers(results);
    }
}

/* TODO: Step 3C, Generate markers for search results */
- 将下面这行代码添加到
initMap函数末尾的TODO: Step 3B2注释处。
/* TODO: Step 3B2, Call the Places Nearby Search */
// Call Places Nearby Search on user's location
getNearbyPlaces(pos);
- 将下面这行代码添加到
handleLocationError函数末尾的TODO: Step 3B3注释处。
/* TODO: Step 3B3, Call the Places Nearby Search */
// Call Places Nearby Search on the default location
getNearbyPlaces(pos);
C. 生成搜索结果标记
标记用于标识地图上的某个位置。默认情况下,标记使用标准图片。如需了解如何自定义标记图片,请参阅标记。
google.maps.Marker 构造函数接受一个 Marker options 对象常量,用于指定标记的初始属性。
以下字段特别重要,并且在构建标记时通常会进行设置:
position(必需)指定用于标识标记初始位置的LatLng。map(可选)指定要在其中放置标记的地图。如果您在构建标记时未指定地图,则标记会创建,但不会附加到(或显示在)地图上。稍后,您可以通过调用标记的setMap()方法添加该标记。- 在
TODO: Step 3C注释后添加以下代码,以便为响应中返回的每个位置设置一个标记的位置、地图和标题。您还需要使用bounds变量的extend方法,以确保中心和所有标记在地图上可见。
step3/index.html
/* TODO: Step 3C, Generate markers for search results */
// Set markers at the location of each place result
function createMarkers(places) {
    places.forEach(place => {
    let marker = new google.maps.Marker({
        position: place.geometry.location,
        map: map,
        title: place.name
    });

    /* TODO: Step 4B: Add click listeners to the markers */

    // Adjust the map bounds to include the location of this marker
    bounds.extend(place.geometry.location);
    });
    /* Once all the markers have been placed, adjust the bounds of the map to
    * show all the markers within the visible area. */
    map.fitBounds(bounds);
}

/* TODO: Step 4C: Show place details in an info window */
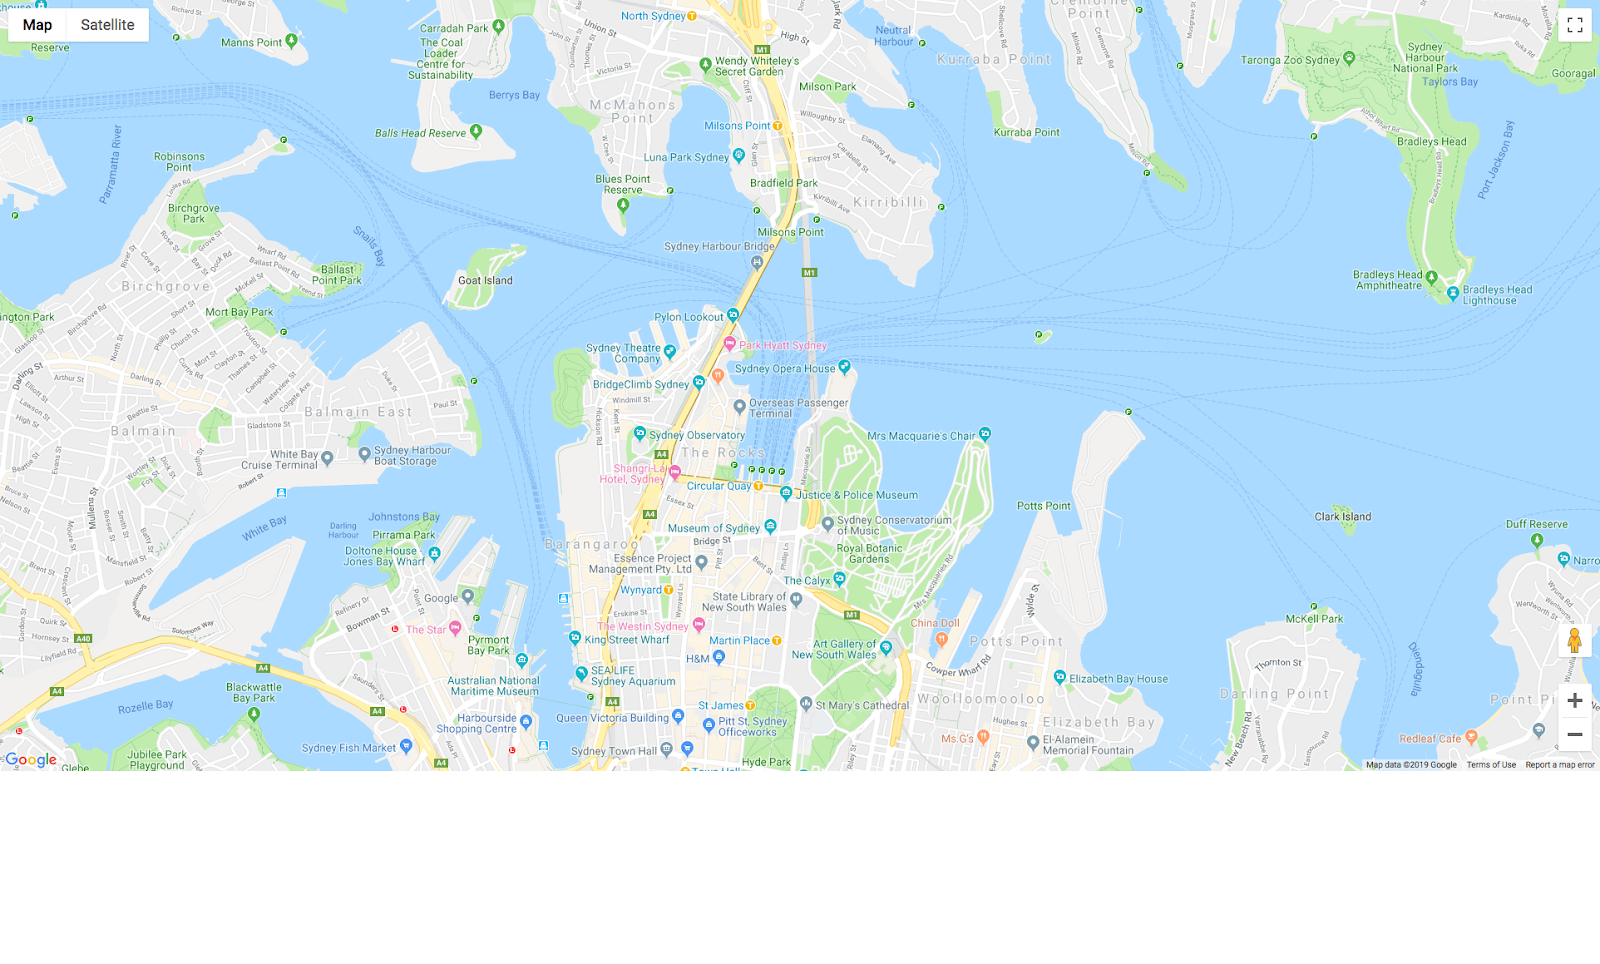
测试应用
- 保存并重新加载页面,然后点击允许以授予地理定位权限。
您应该会在地图中心位置周围看到最多 20 个红色标记。
- 这次请重新加载页面,并屏蔽地理定位权限。
您是否仍会在地图的默认中心获得结果(在示例中,默认中心位于澳大利亚悉尼)?
完整的示例代码
目前可在 GitHub 上找到此项目的完整代码。
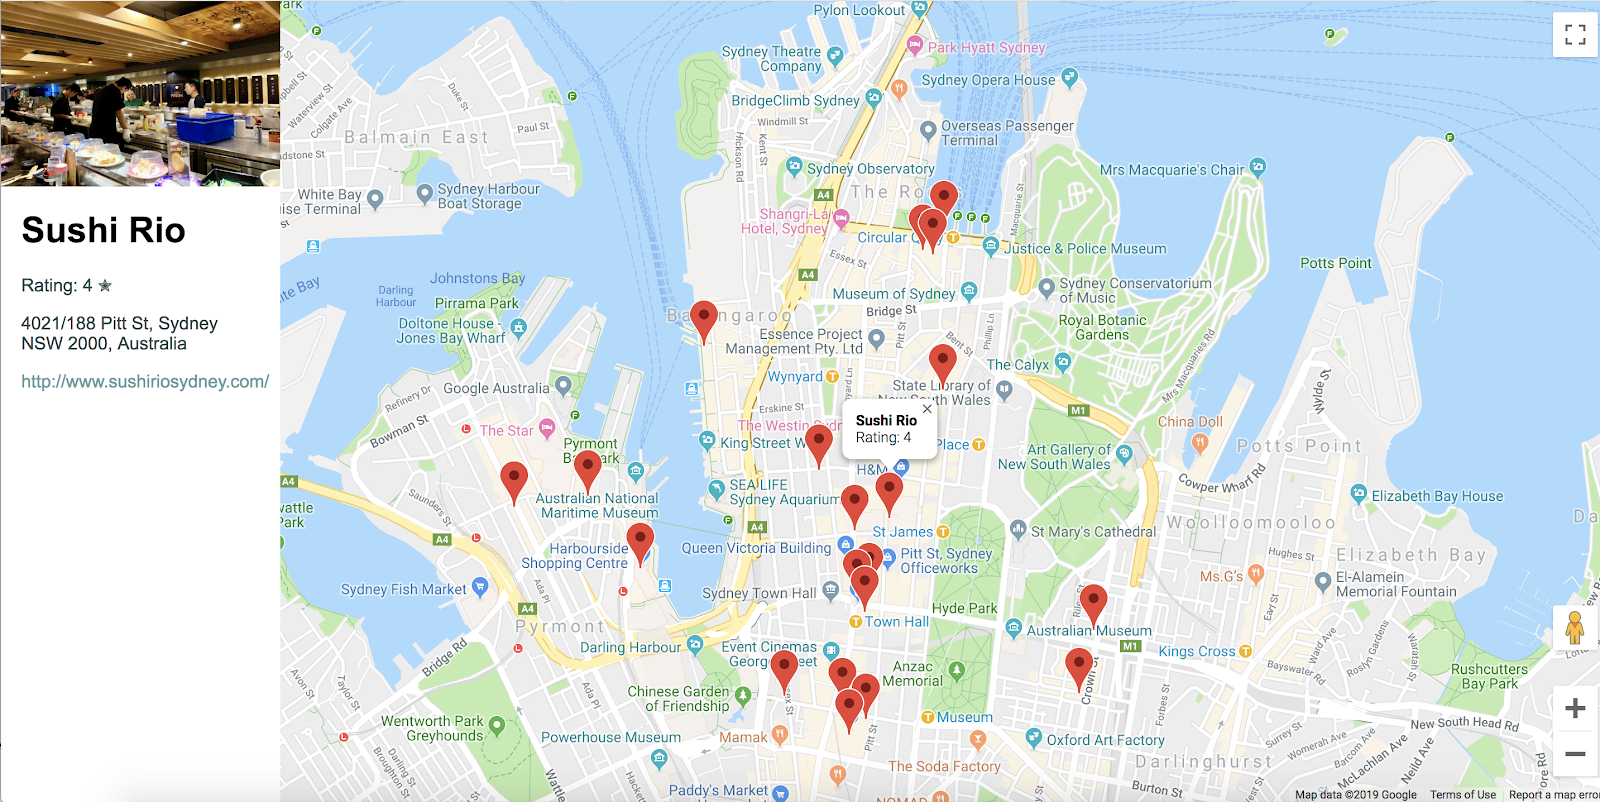
5. 按需显示地点详情
获得地点的地点 ID(作为“附近搜索”的结果中的一个字段提供)后,您可以请求关于地点的更多详情,例如完整地址、电话号码以及用户评分和评价。在此 Codelab 中,您将创建一个边栏以显示丰富的地点详情,并使标记具有互动性,以便用户可以选择地点以查看详情。
A. 制作通用边栏
您需要一个位置才能显示地点详情,所以这里是一些简单的边栏代码,可用于在用户点击标记时滑出和显示地点详情。
- 将以下代码添加到
style标记中的TODO: Step 4A1注释之后:
step4/index.html
/* TODO: Step 4A1: Make a generic sidebar */
/* Styling for an info pane that slides out from the left.
    * Hidden by default. */
#panel {
    height: 100%;
    width: null;
    background-color: white;
    position: fixed;
    z-index: 1;
    overflow-x: hidden;
    transition: all .2s ease-out;
}

.open {
    width: 250px;
}

/* Styling for place details */
.hero {
    width: 100%;
    height: auto;
    max-height: 166px;
    display: block;
}

.place,
p {
    font-family: 'open sans', arial, sans-serif;
    padding-left: 18px;
    padding-right: 18px;
}

.details {
    color: darkslategrey;
}

a {
    text-decoration: none;
    color: cadetblue;
}
- 在
body部分中mapdiv 的前面,添加详细信息面板的 div。
<!-- TODO: Step 4A2: Add a generic sidebar -->
<!-- The slide-out panel for showing place details -->
<div id="panel"></div>
- 在
initMap()函数中的TODO: Step 4A3注释之后,按如下方式初始化infoPane变量:
/* TODO: Step 4A3: Add a generic sidebar */
infoPane = document.getElementById('panel');
B. 向标记添加点击监听器
- 在创建标记时,在
createMarkers函数中为每个标记添加点击监听器。
点击监听器会提取与该标记相关联的地点的详细信息,然后调用函数来显示详情。
- 将以下代码粘贴到
createMarkers函数内的代码注释TODO: Step 4B中。
showDetails 方法会在下一部分实现。
step4/index.html
/* TODO: Step 4B: Add click listeners to the markers */
// Add click listener to each marker
google.maps.event.addListener(marker, 'click', () => {
    let request = {
    placeId: place.place_id,
    fields: ['name', 'formatted_address', 'geometry', 'rating',
        'website', 'photos']
    };

    /* Only fetch the details of a place when the user clicks on a marker.
    * If we fetch the details for all place results as soon as we get
    * the search response, we will hit API rate limits. */
    service.getDetails(request, (placeResult, status) => {
    showDetails(placeResult, marker, status)
    });
});
在 addListener 请求中,placeId 属性用于指定详情请求的单个位置,而 fields 属性是包含您想要返回的地点相关信息的字段名称数组。如需查看您可以请求的字段的完整列表,请参阅 PlaceResult 接口。
C. 在信息窗口中显示地点详情
信息窗口在地图上的指定位置上方显示对话框内容(通常是文本或图片)。信息窗口包含一个内容区域和一条锥形引线。引线的头位于地图的指定位置上。通常,信息窗口附加到标记中,但也可以将信息窗口附加到特定纬度/经度。
- 在注释
TODO: Step 4C中添加以下代码,以创建显示商家名称和评分的InfoWindow,并将此窗口附加到标记上。
您将在下一部分中定义 showPanel,以在边栏中显示详细信息。
step4/index.html
/* TODO: Step 4C: Show place details in an info window */
// Builds an InfoWindow to display details above the marker
function showDetails(placeResult, marker, status) {
    if (status == google.maps.places.PlacesServiceStatus.OK) {
    let placeInfowindow = new google.maps.InfoWindow();
    placeInfowindow.setContent('<div><strong>' + placeResult.name +
        '</strong><br>' + 'Rating: ' + placeResult.rating + '</div>');
    placeInfowindow.open(marker.map, marker);
    currentInfoWindow.close();
    currentInfoWindow = placeInfowindow;
    showPanel(placeResult);
    } else {
    console.log('showDetails failed: ' + status);
    }
}

/* TODO: Step 4D: Load place details in a sidebar */
D. 在边栏中加载地点详情
使用在 PlaceResult 对象中返回的相同详细信息填充另一个 div。在本示例中,使用 infoPane,它是 ID 为“panel”的任意 div 的变量名称。每当用户点击新标记时,此代码即会关闭已打开的边栏,清除旧的详细信息,添加新的详细信息,然后打开边栏。
- 在
TODO: Step 4D注释之后添加以下代码。
step4/index.html
/* TODO: Step 4D: Load place details in a sidebar */
// Displays place details in a sidebar
function showPanel(placeResult) {
    // If infoPane is already open, close it
    if (infoPane.classList.contains("open")) {
    infoPane.classList.remove("open");
    }

    // Clear the previous details
    while (infoPane.lastChild) {
    infoPane.removeChild(infoPane.lastChild);
    }

    /* TODO: Step 4E: Display a Place Photo with the Place Details */

    // Add place details with text formatting
    let name = document.createElement('h1');
    name.classList.add('place');
    name.textContent = placeResult.name;
    infoPane.appendChild(name);
    if (placeResult.rating != null) {
    let rating = document.createElement('p');
    rating.classList.add('details');
    rating.textContent = `Rating: ${placeResult.rating} \u272e`;
    infoPane.appendChild(rating);
    }
    let address = document.createElement('p');
    address.classList.add('details');
    address.textContent = placeResult.formatted_address;
    infoPane.appendChild(address);
    if (placeResult.website) {
    let websitePara = document.createElement('p');
    let websiteLink = document.createElement('a');
    let websiteUrl = document.createTextNode(placeResult.website);
    websiteLink.appendChild(websiteUrl);
    websiteLink.title = placeResult.website;
    websiteLink.href = placeResult.website;
    websitePara.appendChild(websiteLink);
    infoPane.appendChild(websitePara);
    }

    // Open the infoPane
    infoPane.classList.add("open");
}
E. 显示包含地点详情的地点照片
getDetails 结果会返回最多包含 10 张与 placeId 相关联的照片。在这里,在边栏中的“地点名称”上方显示第一张照片。
- 如果您希望照片显示在边栏顶部,请将此代码放置在创建
name元素之前。
step4/index.html
/* TODO: Step 4E: Display a Place Photo with the Place Details */
// Add the primary photo, if there is one
if (placeResult.photos != null) {
    let firstPhoto = placeResult.photos[0];
    let photo = document.createElement('img');
    photo.classList.add('hero');
    photo.src = firstPhoto.getUrl();
    infoPane.appendChild(photo);
}
测试应用
- 在浏览器中保存并重新加载该页面,并授予地理定位权限。
- 点击标记,从标记中弹出信息窗口以显示一些详细信息,而边栏则从左侧滑出以显示更多详情。
- 测试重新加载和拒绝地理定位权限时搜索是否也有效。修改其他查询的搜索关键字并浏览该搜索返回的结果。
完整的示例代码
目前可在 GitHub 上找到此项目的完整代码。
6. 恭喜
恭喜!您使用了 Maps JavaScript API 的许多功能,包括 Places 库。
所学内容
- 使用 google.maps.Map 类创建地图
- 使用用户的浏览器进行地理定位,并在地图上显示结果
- 将标记添加到您的地图并响应用户点击事件
- 添加信息窗口,以便在用户点击标记时显示更多信息
- 加载地点库并执行附近搜索
- 获取并显示地点详情和地点照片
了解详情
如需更深入地利用地图,请浏览 Maps JavaScript API 文档和 Places 库文档,这两个文档都包含指南、教程、API 参考文档、更多代码示例和支持渠道。一些热门功能包括导入地图、开始设置地图样式和街景服务。
您最希望我们接下来构建哪种类型的 Codelab?
上面没有列出您希望了解的 Codelab?没关系,请在此处通过创建新问题的方式申请 Codelab。