
1. はじめに
この Codelab は、ウェブ用の Google でログインボタンの Codelab をベースにしています。そのため、まずそちらを完了してください。
この Codelab では、Google Identity Services JavaScript ライブラリとワンタップ プロンプトを使用して、HTML と JavaScript API を使用して静的ウェブページと動的ウェブページにユーザー ログインを追加します。
また、JWT ID トークンを検証するためのサーバーサイドのログイン エンドポイントも設定します。
学習内容
- サーバーサイドのログイン エンドポイントを設定して ID トークンを検証する方法
- ウェブページに Google One Tap プロンプトを追加する方法
- 静的 HTML 要素として、
- JavaScript を使用して動的に追加します。
- ワンタップ プロンプトの動作
必要なもの
- HTML、CSS、JavaScript、Chrome DevTools(または同等のツール)に関する基本的な知識。
- HTML ファイルと JavaScript ファイルを編集してホストする場所。
- 前の Codelab で取得したクライアント ID。
- 基本的な Python アプリを実行できる環境。
始めましょう!
2. ログイン エンドポイントを設定する
まず、基本的なウェブサーバーとして機能する Python スクリプトを作成し、その実行に必要な Python 環境を設定します。
ローカルで実行すると、スクリプトはランディング ページ、静的 HTML、動的ワンタップ ページをブラウザに提供します。POST リクエストを受け入れ、認証情報パラメータに含まれる JWT をデコードし、Google Identity の OAuth プラットフォームによって発行されたことを検証します。
JWT をデコードして検証すると、スクリプトは index.html ランディング ページにリダイレクトされ、結果が表示されます。
このコードを simple-server.py という名前のファイルにコピーします。
"""Very basic web server to handle GET and POST requests."""
from http.server import SimpleHTTPRequestHandler
import json
import socketserver
from typing import Dict, Optional, Tuple
import urllib.parse
from urllib.parse import parse_qs

from google.auth.transport import requests as google_auth_requests
from google.oauth2 import id_token


""" NOTE: You'll need to change this """
CLIENT_ID = (
    "PUT_YOUR_WEB_CLIENT_ID_HERE"
)

""" these may change for a Cloud IDE, but good as-is for local termainals """
SERVER_ADDRESS = "0.0.0.0"
PORT = 3000
TARGET_HTML_PAGE_URL = f"http://localhost:{PORT}/"
""" and this is the end of constants you might need to change """

HTTP_STATUS_OK = 200
HTTP_STATUS_BAD_REQUEST = 400
HTTP_STATUS_UNAUTHORIZED = 401
HTTP_STATUS_INTERNAL_SERVER_ERROR = 500
HTTP_STATUS_FOUND = 303  # For redirection after decode and verify
OIDC_SERVER = "accounts.google.com"


class OIDCJWTReceiver(SimpleHTTPRequestHandler):
  """Request handler to securely process a Google ID token response."""

  def _validate_csrf(self, request_parameters: Dict) -> Tuple[bool, str]:
    """Validates the g_csrf_token to protect against CSRF attacks."""
    csrf_token_body = request_parameters.get("g_csrf_token")
    if not csrf_token_body:
      return False, "g_csrf_token not found in POST body."

    csrf_token_cookie = None
    cookie_header = self.headers.get("Cookie")
    if cookie_header:
      cookie_pairs = (c.split("=", 1) for c in cookie_header.split(";"))
      cookies = {k.strip(): v.strip() for k, v in cookie_pairs}
      csrf_token_cookie = cookies.get("g_csrf_token")
    if not csrf_token_cookie:
      return False, "g_csrf_token not found in cookie."

    if csrf_token_body != csrf_token_cookie:
      return False, "CSRF token mismatch."

    return True, "CSRF token validated successfully."

  def _parse_and_validate_credential(
      self, request_parameters: Dict
  ) -> Optional[Tuple[Optional[Dict], str]]:
    """Parse POST data, extract, decode and validate user credential."""
    credential = request_parameters.get("credential")
    if not credential:
      return None, "Credential not provided"

    try:
      id_info = id_token.verify_oauth2_token(
          credential, google_auth_requests.Request(), CLIENT_ID
      )
      return id_info, ""
    except ValueError as e:
      return None, f"Error during JWT decode: {e}"
    except Exception as e:
      return None, f"Unexpected error during credential validation: {e}"

  def _redirect_to_html(self, response_data: Dict) -> None:
    """Redirect to the target HTML page with data in the URL fragment."""
    try:
      json_data = json.dumps(response_data)
      encoded_data = urllib.parse.quote(json_data)
      redirect_url = f"http://localhost:{PORT}/#data={encoded_data}"
      self.send_response(HTTP_STATUS_FOUND)
      self.send_header("Location", redirect_url)
      self.send_header("Connection", "close")
      self.end_headers()
    except Exception as e:
      print(f"An error occurred during redirection: {e}")
      self.send_response(HTTP_STATUS_INTERNAL_SERVER_ERROR)
      self.send_header("Content-type", "text/plain")
      self.send_header("Connection", "close")
      self.end_headers()
      self.wfile.write(f"A redirect error occurred: {e}".encode("utf-8"))

  def _send_bad_request(self, message: str) -> None:
    """Sends a 400 Bad Request response."""
    self.send_response(HTTP_STATUS_BAD_REQUEST)
    self.send_header("Content-type", "text/plain")
    self.send_header("Connection", "close")
    self.end_headers()
    self.wfile.write(message.encode("utf-8"))

  def do_POST(self):
    """Handle POST requests for the /user-login path."""
    if self.path != "/user-login":
      self.send_error(404, "File not found")
      return

    try:
      content_length = int(self.headers.get("Content-Length", 0))
      post_data_bytes = self.rfile.read(content_length)
      post_data_str = post_data_bytes.decode("utf-8")
      request_parameters = {
          key: val[0]
          for key, val in parse_qs(post_data_str).items()
          if len(val) == 1
      }

      csrf_valid, csrf_message = self._validate_csrf(request_parameters)
      if not csrf_valid:
        print(f"CSRF verify failure: {csrf_message}")
        self._send_bad_request(f"CSRF verify failure: {csrf_message}")
        return

      decoded_id_token, error_message = self._parse_and_validate_credential(
          request_parameters
      )

      response_data = {}
      if decoded_id_token:
        response_data["status"] = "success"
        response_data["message"] = decoded_id_token
      elif error_message:
        response_data["status"] = "error"
        response_data["message"] = error_message
      else:
        response_data["status"] = "error"
        response_data["message"] = "Unknown error during JWT validation"

      self._redirect_to_html(response_data)

    except Exception as e:
      self._redirect_to_html(
          {"status": "error", "error_message": f"Internal server error: {e}"}
      )


with socketserver.TCPServer(("", PORT), OIDCJWTReceiver) as httpd:
  print(
      f"Serving HTTP on {SERVER_ADDRESS} port"
      f" {PORT} (http://{SERVER_ADDRESS}:{PORT}/)"
  )
  httpd.serve_forever()
ID トークンのオーディエンス(aud)フィールドを使用して、JWT がクライアントに発行されたことを確認するため、Python アプリはどのクライアント ID が使用されているかを知る必要があります。これを行うには、PUT_YOUR_WEB_CLIENT_ID_HERE を、前の「Google でログイン」ボタンの Codelab で使用したクライアント ID に置き換えます。
Python 環境
ウェブサーバー スクリプトを実行する環境をセットアップしましょう。
JWT の検証とデコードを支援するいくつかのパッケージとともに、Python 3.8 以降が必要です。
$ python3 --version
python3 のバージョンが 3.8 より前の場合は、目的のバージョンが見つかるようにシェル PATH を変更するか、システムに新しいバージョンの Python をインストールする必要があります。
次に、JWT のデコードと検証に必要なパッケージを一覧表示する requirements.txt という名前のファイルを作成します。
google-auth
simple-server.py と requirements.txt と同じディレクトリで次のコマンドを実行して、仮想環境を作成し、このアプリ専用のパッケージをインストールします。
$ python3 -m venv env
$ source env/bin/activate
(env) $ pip install -r requirements.txt
サーバーを起動します。すべてが正常に機能している場合は、次のようになります。
(env) $ python3 ./simple-server.py
Serving HTTP on 0.0.0.0 port 3000 (http://0.0.0.0:3000/) ...
クラウドベースの IDE
この Codelab はローカル ターミナルと localhost で実行するように設計されていますが、Replit や Glitch などのプラットフォームでも、変更を加えれば使用できる可能性があります。プラットフォームごとに設定要件と Python 環境のデフォルトが異なるため、TARGET_HTML_PAGE_URL や Python の設定など、いくつかの変更が必要になる可能性があります。
たとえば、Glitch では requirements.txt を追加するだけでなく、start.sh という名前のファイルを作成して Python サーバーを自動的に起動します。
python3 ./simple-server.py
Python スクリプトと HTML ファイルで使用される URL も、Cloud IDE の外部 URL に更新する必要があります。したがって、TARGET_HTML_PAGE_URL = f"https://your-project-name.glitch.me/" のようになります。この Codelab の HTML ファイルもデフォルトで localhost を使用するため、外部 Cloud IDE URL(data-login_uri="https://your-project-name.glitch.me/user-login")で更新する必要があります。
3. ランディング ページを作成する
次に、One Tap でのログインの結果を表示するランディング ページを作成します。このページには、デコードされた JWT ID トークンまたはエラーが表示されます。ページのフォームを使用して、JWT を Python HTTP サーバーのログイン エンドポイントに送信することもできます。このエンドポイントで JWT がデコードされ、検証されます。CSRF ダブル送信 Cookie と POST リクエスト パラメータを使用して、コードラボの gsi/client HTML と JavaScript API の例と同じ user-login サーバー エンドポイントを再利用できるようにします。
ターミナルで、これを index.html という名前のファイルに保存します。
<!doctype html>
<html lang="en">
  <head>
    <meta charset="UTF-8" />
    <meta name="viewport" content="width=device-width, initial-scale=1.0" />
    <title>JWT Verification</title>
    <style>
      body { font-family: sans-serif; margin: 0; }
      .top-nav {
        text-align: center; padding: 15px 0; background-color: #f8f9fa;
        border-bottom: 1px solid #dee2e6; width: 100%;
      }
      .top-nav a {
        margin: 0 15px; text-decoration: none; font-weight: bold;
        color: #007bff; font-size: 1.1em;
      }
      .top-nav a:hover { text-decoration: underline; }
      .page-container { padding: 20px; }
      pre {
        background-color: #f9f9f9; padding: 10px; overflow-x: auto;
        white-space: pre-wrap; word-break: break-all;
      }
      .error { color: red; }
      .success { color: green; }
      #jwt-form { margin-bottom: 20px; flex: 1; }
      fieldset {
        border: 1px solid #ddd; padding: 10px; margin: 0;
        min-width: 0; flex: 1; }
      legend { font-weight: bold; margin-bottom: 5px; }
      textarea { width: 100%; box-sizing: border-box; vertical-align: top; }
      button[type="submit"] { padding: 8px 15px; margin-top: 10px; }
      @media (min-width: 1024px) {
        .main-content { display: flex; gap: 20px; }
        .main-content > #jwt-form,
        .main-content > .result-container {
          flex-basis: 50%; /* Each item takes up 50% of the width */
          margin-bottom: 0; /* Remove bottom margin when side-by-side */
          display: flex; /* Make the result container a flex container */
          flex-direction: column; /* Stack children vertically */
          flex: 1; /* Allows the result container to grow and shrink */
        }
      }
    </style>
  </head>
  <body>
    <nav class="top-nav">
      <a href="static-page.html">One Tap Static Page</a>
      <a href="dynamic-page.html">One Tap Dynamic Page</a>
      <a href="prompt-outcomes.html">Prompt behaviors</a>
    </nav>
    <div class="page-container">
      <h1>JWT Verification</h1>

      <div class="main-content">
        <form id="jwt-form" action="/user-login" method="post">
          <fieldset>
            <legend>Encoded JWT ID Token</legend>
            <textarea id="credential" name="credential" rows="5"
                      cols="50"></textarea>
            <button type="submit">Verify JWT</button>
          </fieldset>
        </form>

        <section class="result-container">
          <fieldset>
            <legend>Decode and verify result</legend>
            <p id="status"></p>
            <pre id="result"></pre>
          </fieldset>
        </section>
      </div>
    </div>
    <script>
      const statusElement = document.getElementById("status");
      const resultElement = document.getElementById("result");

      const handleResponse = (responseData) => {
        const { status, message } = responseData;
        const result = message
          ? status === "success"
            ? JSON.stringify(message, null, 2)
            : message
          : "";

        statusElement.textContent = status;
        resultElement.textContent = result;
        statusElement.className = "";
        if (status === "success") {
          statusElement.classList.add("success");
        } else if (status === "error") {
          statusElement.classList.add("error");
        }
      };

      const getEncodedDataFromHash = (hash) => {
        const urlParams = new URLSearchParams(hash.substring(1));
        return urlParams.get("data");
      };

      const processHashData = (hash) => {
        const encodedData = getEncodedDataFromHash(hash);
        if (encodedData) {
          try {
            const jsonData = JSON.parse(decodeURIComponent(encodedData));
            handleResponse(jsonData);
            history.pushState(
              "",
              document.title,
              window.location.pathname + window.location.search,
            );
          } catch (error) {
            handleResponse({
              status: "error",
              message: "Error parsing data from URL: " + error,
            });
          }
        }
      };

      window.addEventListener("load",
                              () => processHashData(window.location.hash));
      window.addEventListener("hashchange",
                              () => processHashData(window.location.hash));
    </script>

    <script>
      document.addEventListener("DOMContentLoaded", () => {

        const generateRandomString = (length) => {
        const chars = "ABCDEFGHIJKLMNOPQRSTUVWXYZ" +
                      "abcdefghijklmnopqrstuvwxyz" +
                      "0123456789";
          let result = "";
          for (let i = 0; i < length; i++) {
            result += chars.charAt(Math.floor(Math.random() * chars.length));
          }
          return result;
        };

        const csrfToken = generateRandomString(12);
        document.cookie = `g_csrf_token=${csrfToken};path=/;SameSite=Lax`;
        const form = document.getElementById("jwt-form");
        const hiddenInput = document.createElement("input");
        hiddenInput.setAttribute("type", "hidden");
        hiddenInput.setAttribute("name", "g_csrf_token");
        hiddenInput.setAttribute("value", csrfToken);
        form.appendChild(hiddenInput);
      });
    </script>
  </body>
</html>
ウェブサーバーと JWT デコードをテストする
ワンタップを試す前に、サーバー エンドポイント環境が設定され、動作していることを確認します。
ランディング ページ http://localhost:3000/ を参照し、[Verify JWT] ボタンを押します。
次のように表示されます
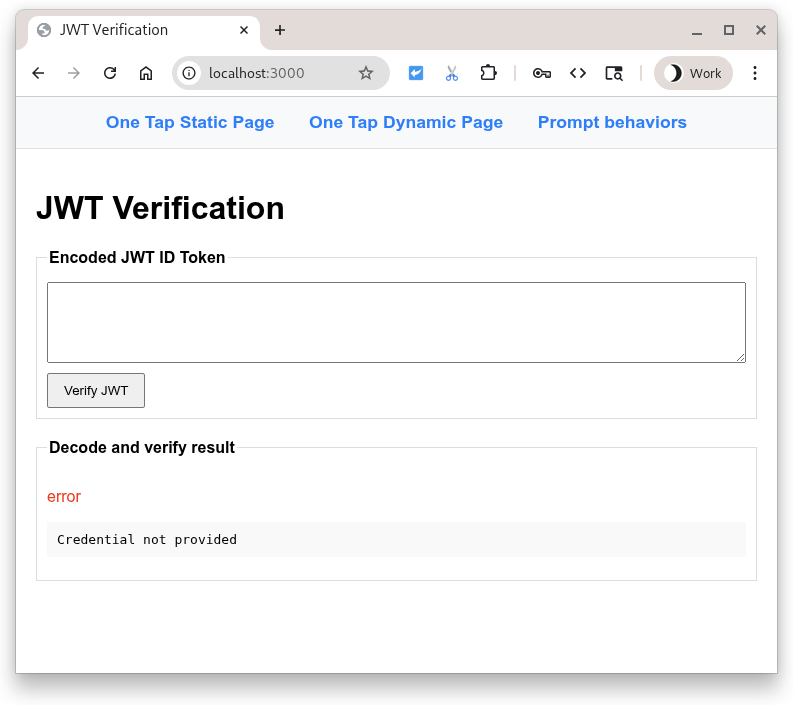
ボタンを押すと、entryfield の内容を含む POST が Python スクリプトに送信されます。スクリプトは、エンコードされた JWT が entryfield に存在することを想定しているため、ペイロードのデコードと検証を試みます。その後、ランディング ページにリダイレクトされ、結果が表示されます。
しかし、JWT がありませんでした。これは失敗したのではないでしょうか?はい、ただし、優雅に!
フィールドが空であるため、エラーが表示されます。次に、エントリ フィールドにテキスト(任意のテキスト)を入力して、ボタンをもう一度押してみましょう。別のデコードエラーで失敗します。
エンコードされた Google 発行の JWT ID トークンを入力フィールドに貼り付けて、Python スクリプトでデコード、検証、表示することもできます。また、https://jwt.io を使用して、エンコードされた JWT を検査することもできます。
4. 静的 HTML ページ
次に、JavaScript を使用せずに HTML ページで動作するようにワンタップを設定します。これは、静的サイトやキャッシュ保存システム、CDN に役立ちます。
まず、次のコードサンプルを static-page.html という名前のファイルに追加します。
<!DOCTYPE html>
<html lang="en">
  <head>
    <script src="https://accounts.google.com/gsi/client" async></script>
    <link rel="icon" href="data:," />
  </head>
  <body>
    <h1>Google One Tap static HTML page</h1>
    <div
      id="g_id_onload"
      data-client_id="PUT_YOUR_WEB_CLIENT_ID_HERE"
      data-ux_mode="redirect"
      data-login_uri="http://localhost:3000/user-login"
    ></div>
  </body>
</html>
次に、static-page.html を開き、PUT_YOUR_WEB_CLIENT_ID_HERE を前の「Google でログイン」ボタンの Codelab で使用したクライアント ID に置き換えます。
このコードで何を行っているのか見ていきましょう。
id が g_id_onload の HTML 要素とそのデータ属性は、Google Identity Services ライブラリ(gsi/client)の構成に使用されます。また、ドキュメントがブラウザに読み込まれると、ワンタップ プロンプトが表示されます。
data-login_uri 属性は、ユーザーがログインした後にブラウザから POST リクエストを受信する URI です。このリクエストには、Google が発行したエンコード済みの JWT が含まれています。
ワンタップ オプションの一覧については、HTML コード ジェネレータと HTML API リファレンスをご覧ください。
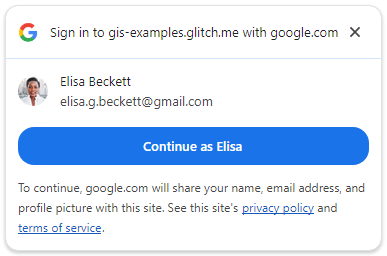
ログイン
http://localhost:3000/static-page.html をクリックします。
ブラウザにワンタップ プロンプトが表示されます。
[として続行] を押してログインします。
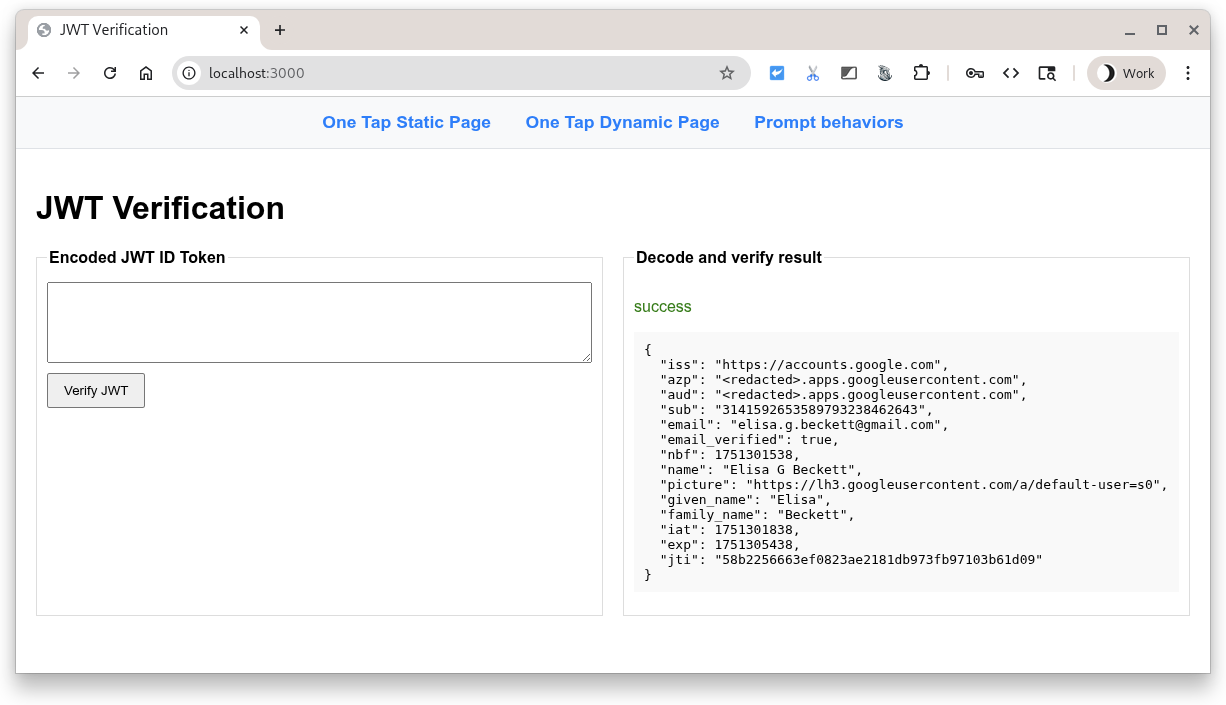
ログイン後、Google は Python サーバーのログイン エンドポイントに POST リクエストを送信します。リクエストには、Google によって署名されたエンコード済みの JWT が含まれています。
サーバーは、Google の公開署名鍵のいずれかを使用して、Google が JWT を作成して署名したことを確認します。次に、オーディエンスをデコードして、クライアント ID と一致するかどうかを確認します。次に、CSRF チェックが行われ、Cookie の値と POST 本文のリクエスト パラメータの値が等しいことが確認されます。そうでない場合は、問題が発生していることを示す確実な兆候です。
最後に、ランディング ページに、検証に成功した JWT が JSON 形式の ID トークン ユーザー認証情報として表示されます。
一般的なエラー
ログインフローが失敗する原因はいくつかあります。一般的な理由は次のとおりです。
data-client_idが欠落しているか、正しくない。この場合、DevTools コンソールにエラーが表示され、ワンタップ プロンプトが機能しません。- URI が正しく入力されていない、ウェブサーバーが起動していない、または間違ったポートでリッスンしているため、
data-login_uriを使用できません。この場合、ワンタップ プロンプトは機能しているように見えますが、認証情報が返されると、DevTools の [ネットワーク] タブにエラーが表示されます。 - ウェブサーバーが使用しているホスト名またはポートが、OAuth クライアント ID の承認済みの JavaScript 生成元にリストされていません。コンソールに「ID アサーション エンドポイントの取得時に 400 HTTP レスポンス コードが返されました。」というメッセージが表示されます。この Codelab の受講中にこのメッセージが表示された場合は、
http://localhost/とhttp://localhost:3000の両方がリストされていることを確認してください。
5. 動的ページ
次に、JavaScript 呼び出しを使用してワンタップを表示します。この例では、ページが読み込まれるたびに常にワンタップが表示されますが、必要に応じてプロンプトを表示することもできます。たとえば、ユーザーのセッションが 28 日以上経過しているかどうかを確認し、ログイン プロンプトを再度表示することが考えられます。
次のコードサンプルを dynamic-page.html という名前のファイルに追加します。
<!DOCTYPE html>
<html lang="en">
  <head>
    <script src="https://accounts.google.com/gsi/client" async></script>
    <link rel="icon" href="data:," />
  </head>
  <body>
    <h1>Google One Tap dynamic page</h1>
    <script>
      const generateRandomString = (length) => {
        const array = new Uint8Array(length / 2);
        window.crypto.getRandomValues(array);
        return Array.from(array, (byte) =>
          byte.toString(16).padStart(2, "0")
        ).join("");
      };

      const setCookie = (name, value) => {
        document.cookie = '${name}=${value};path=/;SameSite=Lax';
      };

      const getCookie = (name) => {
        const nameEQ = name + "=";
        const ca = document.cookie.split(";");
        for (let i = 0; i < ca.length; i++) {
          let c = ca[i];
          while (c.charAt(0) == " ") c = c.substring(1, c.length);
          if (c.indexOf(nameEQ) == 0)
            return c.substring(nameEQ.length, c.length);
        }
        return null;
      };

      function handleResponse(rsp) {
        console.log("ID Token received from Google: ", rsp.credential);
        console.log("Submitting token to server via dynamic form POST.");

        const form = document.createElement("form");
        form.method = "POST";
        form.action = "http://" + window.location.host + "/user-login";

        // Add the credential and CSRF cookie value asa hidden fields
        const hiddenField = document.createElement("input");
        hiddenField.type = "hidden";
        hiddenField.name = "credential";
        hiddenField.value = rsp.credential;
        form.appendChild(hiddenField);

        const csrfToken = getCookie("g_csrf_token");
        if (csrfToken) {
          console.log("Found g_csrf_token cookie, adding to form.");
          const csrfField = document.createElement("input");
          csrfField.type = "hidden";
          csrfField.name = "g_csrf_token";
          csrfField.value = csrfToken;
          form.appendChild(csrfField);
        } else {
          console.warn(
            "Warning: g_csrf_token cookie not found. POSTing without it."
          );
        }

        document.body.appendChild(form);
        form.submit();
      }

      window.onload = function () {
        const csrfToken = generateRandomString(12);
        setCookie("g_csrf_token", csrfToken);
        console.log("CSRF token cookie set on page load:", csrfToken);

        google.accounts.id.initialize({
          client_id: "PUT_YOUR_WEB_CLIENT_ID_HERE",
          ux_mode: "popup",
          callback: handleResponse,
        });

        google.accounts.id.prompt(); // Display the One Tap prompt
      };
    </script>
  </body>
</html>
dynamic-page.html を開き、PUT_YOUR_WEB_CLIENT_ID_HERE を前の「Google でログイン」ボタンの Codelab で使用したクライアント ID に置き換えます。
このコードは HTML と JavaScript が混在しており、次の処理を行います。
google.accounts.id.initialize()を呼び出して Google Identity Services ライブラリ(gsi/client)を構成します。- クロスサイト リクエスト フォージェリ(CSRF)Cookie を生成します。
- コールバック ハンドラを追加して、Google からエンコードされた JWT を受け取り、フォーム POST を使用して Python スクリプト
/user-loginエンドポイントに送信します。 google.accounts.id.prompt()を使用してワンタップ プロンプトを表示します。
ワンタップの設定の一覧については、JavaScript API リファレンスをご覧ください。
ログインしましょう。
ブラウザで http://localhost:3000/dynamic-page.html を開きます。
このページの動作は、静的 HTML のシナリオと同じです。ただし、このページでは、CSRF Cookie を作成し、Google から JWT を受け取って、Python サーバーの user-login エンドポイントに POST する JavaScript コールバック ハンドラを定義します。HTML API はこれらの手順を自動的に実行します。
![Chrome の [ネットワーク] タブ](https://codelabs.developers.google.com/static/codelabs/google-one-tap/img/dynamic-details.png?hl=ja)
6. プロンプトの動作
ボタンとは異なり、プロンプトは常に表示されるわけではないため、ワンタップでいくつかのことを試してみましょう。ブラウザとユーザーによって、非表示、終了、無効化が可能です。
まず、次の内容を prompt-outcomes.html という名前のファイルに保存します。
<!doctype html>
<html lang="en">
  <head>
    <meta charset="UTF-8" />
    <meta name="viewport" content="width=device-width, initial-scale=1.0" />
    <title>Google One Tap Prompt behaviors</title>
    <style>
      body { font-family: sans-serif; padding: 20px; }
      #log {
        border: 1px solid #ccc; background-color: #f0f0f0;
        padding: 15px; margin-top: 20px;
        white-space: pre-wrap; font-family: monospace;
      }
      .success { color: green; }
      .error { color: red; }
      .info { color: blue; }
      .warning { color: orange; }
    </style>
  </head>
  <body>
    <h1>One Tap behaviors</h1>
    <p>Open the developer console to see detailed logs.</p>
    <div id="log">Awaiting events...</div>

    <script src="https://accounts.google.com/gsi/client" async defer></script>

    <script>
      // logging utility to display event and notification info
      const logElement = document.getElementById("log");
      function log(message, type = "info") {
        const timestamp = new Date().toLocaleTimeString();
        logElement.innerHTML +=
          `\n<span class="${type}">[${timestamp}] ${message}</span>`;
        console.log(`[${type.toUpperCase()}] ${message}`);
      }

      function decodeJwt(jwt) {
        try {
          const parts = jwt.split(".");
          if (parts.length !== 3) {
            throw new Error("Invalid JWT structure");
          }
          const base64Url = parts[1];
          const base64 = base64Url.replace(/-/g, "+").replace(/_/g, "/");
          const jsonPayload = decodeURIComponent(
            atob(base64)
              .split("")
              .map(function (c) {
                return "%" + ("00" + c.charCodeAt(0).toString(16)).slice(-2);
              })
              .join(""),
          );
          return JSON.parse(jsonPayload);
        } catch (e) {
          log(`Error decoding JWT: ${e.message}`, "error");
          return null;
        }
      }

      /* Handles the credential response after a user signs in. */
      function handleCredentialResponse(credentialResponse) {
        log("Credential Response received.", "success");

        const credential = credentialResponse.credential;
        log(`Credential JWT: ${credential.substring(0, 30)}...`);

        // For demonstration, we decode the JWT on the client side.
        // REMEMBER: Always verify the token on your backend server!
        const payload = decodeJwt(credential);
        if (payload) {
          log(`Welcome, ${payload.name}! (Email: ${payload.email})`);
          log("Decoded JWT Payload: " + JSON.stringify(payload, null, 2));
        }
      }

      /* Handles notifications about the One-Tap prompt's UI status. */
      function handlePromptMomentNotification(notification) {
        log(`Prompt Moment Notification received.`, "info");

        if (notification.isNotDisplayed()) {
          const reason = notification.getNotDisplayedReason();
          log(`Prompt not displayed. Reason: <strong>${reason}</strong>`,
              "error");
        }
        if (notification.isSkippedMoment()) {
          const reason = notification.getSkippedReason();
          log(`Prompt was skipped. Reason: <strong>${reason}</strong>`,
              "warning");
          if (reason === "auto_cancel") {
            log("may have called prompt() multiple times in a row.");
          } else if (reason === "user_cancel") {
            log("The user manually closed the prompt.");
          }
        }
        if (notification.isDismissedMoment()) {
          const reason = notification.getDismissedReason();
          log(`Prompt dismissed. Reason: <strong>${reason}</strong>`, "info");
          if (reason === "credential_returned") {
            log("Expected, credential sent to the JS handler.");
          } else if (reason === "cancel_called") {
            log("programmatic call to google.accounts.id.cancel().");
          }
        }
      }

      window.onload = function () {
        try {
          google.accounts.id.initialize({
            client_id: "PUT_YOUR_WEB_CLIENT_ID_HERE",
            callback: handleCredentialResponse,
            ux_mode: "popup",
          });

          google.accounts.id.prompt(handlePromptMomentNotification);
          log("One Tap initialized. Waiting for prompt...");
        } catch (e) {
          log(`Initialization Error: ${e.message}`, "error");
        }
      };
    </script>
  </body>
</html>
次に、prompt-outcomes.html を開き、PUT_YOUR_WEB_CLIENT_ID_HERE をクライアント ID に置き換えて、ファイルを保存します。
ブラウザで http://localhost:3000/prompt-outcomes.html を開きます。
ページのクリック数
まず、ワンタップ プロンプトの外側をクリックします。ページとコンソールの両方に「リクエストが中止されました。」というメッセージが記録されます。
ログイン
次に、通常どおりログインします。ユーザー セッションの確立や更新などのトリガーに使用できるロギングと通知の更新が表示されます。
プロンプトを閉じる
ページを再読み込みし、ワンタップが表示されたら、タイトルバーの [X] を押します。このメッセージがコンソールに記録されます。
- 「ユーザーがプロンプトを拒否または閉じた。API 指数関数的クールダウンがトリガーされました。」
テスト中にクールダウンをトリガーします。クールダウン期間中は、ワンタップ プロンプトは表示されません。テスト中は、自動的にリセットされるのを待つよりも、リセットした方がよいでしょう。コーヒーを飲んだり、家に帰って寝たりしたい場合は別ですが。クールダウンをリセットするには:
- ブラウザのアドレスバーの左側にある「サイト情報」アイコンをクリックします。
- [権限をリセット] ボタンを押します。
- ページを再読み込みします。
クールダウンをリセットしてページを再読み込みすると、ワンタップ プロンプトが表示されます。
7. まとめ
この Codelab では、静的 HTML のみを使用して、または JavaScript で動的に、ワンタップを表示する方法など、いくつかのことを学びました。
ローカルテスト用に非常に基本的な Python ウェブサーバーを設定し、ID トークンをデコードして検証するために必要な手順を学びました。
ユーザーがワンタップ プロンプトを操作して閉じる最も一般的な方法を試し、プロンプトの動作をデバッグするために使用できるウェブページを用意している。
お疲れさまでした
さらに、サポートされているさまざまなブラウザで、もう一度 One Tap を使用してみてください。
次のリンクは、次の手順を進めるうえで役立ちます。
- Google Identity Services HTML API
- Google Identity Services JavaScript API
- ウェブサイト向け「Google でログイン」の設定方法
- Google ID トークンを検証する
- Google Cloud プロジェクトの詳細
- Google Identity の認証方法