
1. 소개
이 Codelab은 웹용 Google로 로그인 버튼 Codelab을 기반으로 하므로 먼저 이 Codelab을 완료해야 합니다.
이 Codelab에서는 Google ID 서비스 JavaScript 라이브러리와 원탭 메시지를 사용하여 HTML 및 JavaScript API를 사용하는 정적 및 동적 웹페이지에 사용자 로그인을 추가합니다.
JWT ID 토큰을 확인하기 위한 서버 측 로그인 엔드포인트도 설정합니다.
학습할 내용
- ID 토큰을 확인하기 위해 서버 측 로그인 엔드포인트를 설정하는 방법
- 웹페이지에 Google One Tap 프롬프트를 추가하는 방법
- 정적 HTML 요소로
- JavaScript를 사용하여 동적으로
- 원탭 프롬프트의 작동 방식
필요한 항목
- HTML, CSS, JavaScript, Chrome DevTools (또는 이에 상응하는 도구)에 대한 기본 지식
- HTML 및 JavaScript 파일을 수정하고 호스팅할 수 있는 공간입니다.
- 이전 Codelab에서 획득한 클라이언트 ID
- 기본 Python 앱을 실행할 수 있는 환경
시작해 볼까요?
2. 로그인 엔드포인트 설정
먼저 기본 웹 서버 역할을 하는 Python 스크립트를 만들고 이를 실행하는 데 필요한 Python 환경을 설정합니다.
로컬에서 실행되는 스크립트는 방문 페이지와 정적 HTML, 동적 원탭 페이지를 브라우저에 제공합니다. POST 요청을 수락하고, 사용자 인증 정보 매개변수에 포함된 JWT를 디코딩하고, Google ID의 OAuth 플랫폼에서 발급되었는지 확인합니다.
JWT를 디코딩하고 확인한 후 스크립트는 결과를 표시하기 위해 index.html 방문 페이지로 리디렉션됩니다.
이를 simple-server.py이라는 파일에 복사합니다.
"""Very basic web server to handle GET and POST requests."""
from http.server import SimpleHTTPRequestHandler
import json
import socketserver
from typing import Dict, Optional, Tuple
import urllib.parse
from urllib.parse import parse_qs

from google.auth.transport import requests as google_auth_requests
from google.oauth2 import id_token


""" NOTE: You'll need to change this """
CLIENT_ID = (
    "PUT_YOUR_WEB_CLIENT_ID_HERE"
)

""" these may change for a Cloud IDE, but good as-is for local termainals """
SERVER_ADDRESS = "0.0.0.0"
PORT = 3000
TARGET_HTML_PAGE_URL = f"http://localhost:{PORT}/"
""" and this is the end of constants you might need to change """

HTTP_STATUS_OK = 200
HTTP_STATUS_BAD_REQUEST = 400
HTTP_STATUS_UNAUTHORIZED = 401
HTTP_STATUS_INTERNAL_SERVER_ERROR = 500
HTTP_STATUS_FOUND = 303  # For redirection after decode and verify
OIDC_SERVER = "accounts.google.com"


class OIDCJWTReceiver(SimpleHTTPRequestHandler):
  """Request handler to securely process a Google ID token response."""

  def _validate_csrf(self, request_parameters: Dict) -> Tuple[bool, str]:
    """Validates the g_csrf_token to protect against CSRF attacks."""
    csrf_token_body = request_parameters.get("g_csrf_token")
    if not csrf_token_body:
      return False, "g_csrf_token not found in POST body."

    csrf_token_cookie = None
    cookie_header = self.headers.get("Cookie")
    if cookie_header:
      cookie_pairs = (c.split("=", 1) for c in cookie_header.split(";"))
      cookies = {k.strip(): v.strip() for k, v in cookie_pairs}
      csrf_token_cookie = cookies.get("g_csrf_token")
    if not csrf_token_cookie:
      return False, "g_csrf_token not found in cookie."

    if csrf_token_body != csrf_token_cookie:
      return False, "CSRF token mismatch."

    return True, "CSRF token validated successfully."

  def _parse_and_validate_credential(
      self, request_parameters: Dict
  ) -> Optional[Tuple[Optional[Dict], str]]:
    """Parse POST data, extract, decode and validate user credential."""
    credential = request_parameters.get("credential")
    if not credential:
      return None, "Credential not provided"

    try:
      id_info = id_token.verify_oauth2_token(
          credential, google_auth_requests.Request(), CLIENT_ID
      )
      return id_info, ""
    except ValueError as e:
      return None, f"Error during JWT decode: {e}"
    except Exception as e:
      return None, f"Unexpected error during credential validation: {e}"

  def _redirect_to_html(self, response_data: Dict) -> None:
    """Redirect to the target HTML page with data in the URL fragment."""
    try:
      json_data = json.dumps(response_data)
      encoded_data = urllib.parse.quote(json_data)
      redirect_url = f"http://localhost:{PORT}/#data={encoded_data}"
      self.send_response(HTTP_STATUS_FOUND)
      self.send_header("Location", redirect_url)
      self.send_header("Connection", "close")
      self.end_headers()
    except Exception as e:
      print(f"An error occurred during redirection: {e}")
      self.send_response(HTTP_STATUS_INTERNAL_SERVER_ERROR)
      self.send_header("Content-type", "text/plain")
      self.send_header("Connection", "close")
      self.end_headers()
      self.wfile.write(f"A redirect error occurred: {e}".encode("utf-8"))

  def _send_bad_request(self, message: str) -> None:
    """Sends a 400 Bad Request response."""
    self.send_response(HTTP_STATUS_BAD_REQUEST)
    self.send_header("Content-type", "text/plain")
    self.send_header("Connection", "close")
    self.end_headers()
    self.wfile.write(message.encode("utf-8"))

  def do_POST(self):
    """Handle POST requests for the /user-login path."""
    if self.path != "/user-login":
      self.send_error(404, "File not found")
      return

    try:
      content_length = int(self.headers.get("Content-Length", 0))
      post_data_bytes = self.rfile.read(content_length)
      post_data_str = post_data_bytes.decode("utf-8")
      request_parameters = {
          key: val[0]
          for key, val in parse_qs(post_data_str).items()
          if len(val) == 1
      }

      csrf_valid, csrf_message = self._validate_csrf(request_parameters)
      if not csrf_valid:
        print(f"CSRF verify failure: {csrf_message}")
        self._send_bad_request(f"CSRF verify failure: {csrf_message}")
        return

      decoded_id_token, error_message = self._parse_and_validate_credential(
          request_parameters
      )

      response_data = {}
      if decoded_id_token:
        response_data["status"] = "success"
        response_data["message"] = decoded_id_token
      elif error_message:
        response_data["status"] = "error"
        response_data["message"] = error_message
      else:
        response_data["status"] = "error"
        response_data["message"] = "Unknown error during JWT validation"

      self._redirect_to_html(response_data)

    except Exception as e:
      self._redirect_to_html(
          {"status": "error", "error_message": f"Internal server error: {e}"}
      )


with socketserver.TCPServer(("", PORT), OIDCJWTReceiver) as httpd:
  print(
      f"Serving HTTP on {SERVER_ADDRESS} port"
      f" {PORT} (http://{SERVER_ADDRESS}:{PORT}/)"
  )
  httpd.serve_forever()
ID 토큰의 대상 (aud) 필드를 사용하여 JWT가 클라이언트에 발급되었는지 확인할 것이므로 Python 앱은 사용 중인 클라이언트 ID를 알아야 합니다. 이렇게 하려면 PUT_YOUR_WEB_CLIENT_ID_HERE를 이전 Google 계정으로 로그인 버튼 Codelab에서 사용한 클라이언트 ID로 바꿉니다.
Python 환경
웹 서버 스크립트를 실행할 환경을 설정해 보겠습니다.
JWT 확인 및 디코딩에 도움이 되는 몇 가지 패키지와 함께 Python 3.8 이상이 필요합니다.
$ python3 --version
python3 버전이 3.8 미만인 경우 예상되는 버전을 찾을 수 있도록 셸 PATH를 변경하거나 시스템에 최신 버전의 Python을 설치해야 할 수 있습니다.
다음으로 JWT 디코딩 및 확인에 필요한 패키지를 나열하는 requirements.txt라는 파일을 만듭니다.
google-auth
simple-server.py 및 requirements.txt과 동일한 디렉터리에서 다음 명령어를 실행하여 가상 환경을 만들고 이 앱의 패키지만 설치합니다.
$ python3 -m venv env
$ source env/bin/activate
(env) $ pip install -r requirements.txt
이제 서버를 시작하고 모든 것이 제대로 작동하면 다음과 같이 표시됩니다.
(env) $ python3 ./simple-server.py
Serving HTTP on 0.0.0.0 port 3000 (http://0.0.0.0:3000/) ...
클라우드 기반 IDE
이 Codelab은 로컬 터미널과 localhost에서 실행되도록 설계되었지만, 일부 변경사항을 적용하면 Replit이나 Glitch와 같은 플랫폼에서도 사용할 수 있습니다. 각 플랫폼에는 자체 설정 요구사항과 Python 환경 기본값이 있으므로 TARGET_HTML_PAGE_URL 및 Python 설정과 같은 몇 가지 사항을 변경해야 할 수 있습니다.
예를 들어 Glitch에서는 requirements.txt를 추가하는 동시에 start.sh라는 파일을 만들어 Python 서버를 자동으로 시작합니다.
python3 ./simple-server.py
Python 스크립트와 HTML 파일에서 사용되는 URL도 Cloud IDE의 외부 URL로 업데이트해야 합니다. 따라서 TARGET_HTML_PAGE_URL = f"https://your-project-name.glitch.me/"와 같은 항목이 표시됩니다. 이 Codelab의 HTML 파일도 기본적으로 localhost를 사용하므로 외부 Cloud IDE URL(data-login_uri="https://your-project-name.glitch.me/user-login")로 업데이트해야 합니다.
3. 방문 페이지 만들기
다음으로, 원탭으로 로그인한 결과를 표시하는 방문 페이지를 만듭니다. 페이지에 디코딩된 JWT ID 토큰 또는 오류가 표시됩니다. 페이지의 양식을 사용하여 JWT를 Python HTTP 서버의 로그인 엔드포인트로 전송할 수도 있습니다. 그러면 JWT가 디코딩되고 확인됩니다. CSRF 이중 제출 쿠키와 POST 요청 매개변수를 사용하여 코드랩의 gsi/client HTML 및 JavaScript API 예와 동일한 user-login 서버 엔드포인트를 재사용할 수 있습니다.
터미널에서 다음을 index.html이라는 파일에 저장합니다.
<!doctype html>
<html lang="en">
  <head>
    <meta charset="UTF-8" />
    <meta name="viewport" content="width=device-width, initial-scale=1.0" />
    <title>JWT Verification</title>
    <style>
      body { font-family: sans-serif; margin: 0; }
      .top-nav {
        text-align: center; padding: 15px 0; background-color: #f8f9fa;
        border-bottom: 1px solid #dee2e6; width: 100%;
      }
      .top-nav a {
        margin: 0 15px; text-decoration: none; font-weight: bold;
        color: #007bff; font-size: 1.1em;
      }
      .top-nav a:hover { text-decoration: underline; }
      .page-container { padding: 20px; }
      pre {
        background-color: #f9f9f9; padding: 10px; overflow-x: auto;
        white-space: pre-wrap; word-break: break-all;
      }
      .error { color: red; }
      .success { color: green; }
      #jwt-form { margin-bottom: 20px; flex: 1; }
      fieldset {
        border: 1px solid #ddd; padding: 10px; margin: 0;
        min-width: 0; flex: 1; }
      legend { font-weight: bold; margin-bottom: 5px; }
      textarea { width: 100%; box-sizing: border-box; vertical-align: top; }
      button[type="submit"] { padding: 8px 15px; margin-top: 10px; }
      @media (min-width: 1024px) {
        .main-content { display: flex; gap: 20px; }
        .main-content > #jwt-form,
        .main-content > .result-container {
          flex-basis: 50%; /* Each item takes up 50% of the width */
          margin-bottom: 0; /* Remove bottom margin when side-by-side */
          display: flex; /* Make the result container a flex container */
          flex-direction: column; /* Stack children vertically */
          flex: 1; /* Allows the result container to grow and shrink */
        }
      }
    </style>
  </head>
  <body>
    <nav class="top-nav">
      <a href="static-page.html">One Tap Static Page</a>
      <a href="dynamic-page.html">One Tap Dynamic Page</a>
      <a href="prompt-outcomes.html">Prompt behaviors</a>
    </nav>
    <div class="page-container">
      <h1>JWT Verification</h1>

      <div class="main-content">
        <form id="jwt-form" action="/user-login" method="post">
          <fieldset>
            <legend>Encoded JWT ID Token</legend>
            <textarea id="credential" name="credential" rows="5"
                      cols="50"></textarea>
            <button type="submit">Verify JWT</button>
          </fieldset>
        </form>

        <section class="result-container">
          <fieldset>
            <legend>Decode and verify result</legend>
            <p id="status"></p>
            <pre id="result"></pre>
          </fieldset>
        </section>
      </div>
    </div>
    <script>
      const statusElement = document.getElementById("status");
      const resultElement = document.getElementById("result");

      const handleResponse = (responseData) => {
        const { status, message } = responseData;
        const result = message
          ? status === "success"
            ? JSON.stringify(message, null, 2)
            : message
          : "";

        statusElement.textContent = status;
        resultElement.textContent = result;
        statusElement.className = "";
        if (status === "success") {
          statusElement.classList.add("success");
        } else if (status === "error") {
          statusElement.classList.add("error");
        }
      };

      const getEncodedDataFromHash = (hash) => {
        const urlParams = new URLSearchParams(hash.substring(1));
        return urlParams.get("data");
      };

      const processHashData = (hash) => {
        const encodedData = getEncodedDataFromHash(hash);
        if (encodedData) {
          try {
            const jsonData = JSON.parse(decodeURIComponent(encodedData));
            handleResponse(jsonData);
            history.pushState(
              "",
              document.title,
              window.location.pathname + window.location.search,
            );
          } catch (error) {
            handleResponse({
              status: "error",
              message: "Error parsing data from URL: " + error,
            });
          }
        }
      };

      window.addEventListener("load",
                              () => processHashData(window.location.hash));
      window.addEventListener("hashchange",
                              () => processHashData(window.location.hash));
    </script>

    <script>
      document.addEventListener("DOMContentLoaded", () => {

        const generateRandomString = (length) => {
        const chars = "ABCDEFGHIJKLMNOPQRSTUVWXYZ" +
                      "abcdefghijklmnopqrstuvwxyz" +
                      "0123456789";
          let result = "";
          for (let i = 0; i < length; i++) {
            result += chars.charAt(Math.floor(Math.random() * chars.length));
          }
          return result;
        };

        const csrfToken = generateRandomString(12);
        document.cookie = `g_csrf_token=${csrfToken};path=/;SameSite=Lax`;
        const form = document.getElementById("jwt-form");
        const hiddenInput = document.createElement("input");
        hiddenInput.setAttribute("type", "hidden");
        hiddenInput.setAttribute("name", "g_csrf_token");
        hiddenInput.setAttribute("value", csrfToken);
        form.appendChild(hiddenInput);
      });
    </script>
  </body>
</html>
웹 서버 및 JWT 디코딩 테스트
원탭을 사용하기 전에 서버 엔드포인트 환경이 설정되어 작동하는지 확인합니다.
방문 페이지(http://localhost:3000/)로 이동하여 Verify JWT 버튼을 누릅니다.
다음과 같이 표시됩니다.
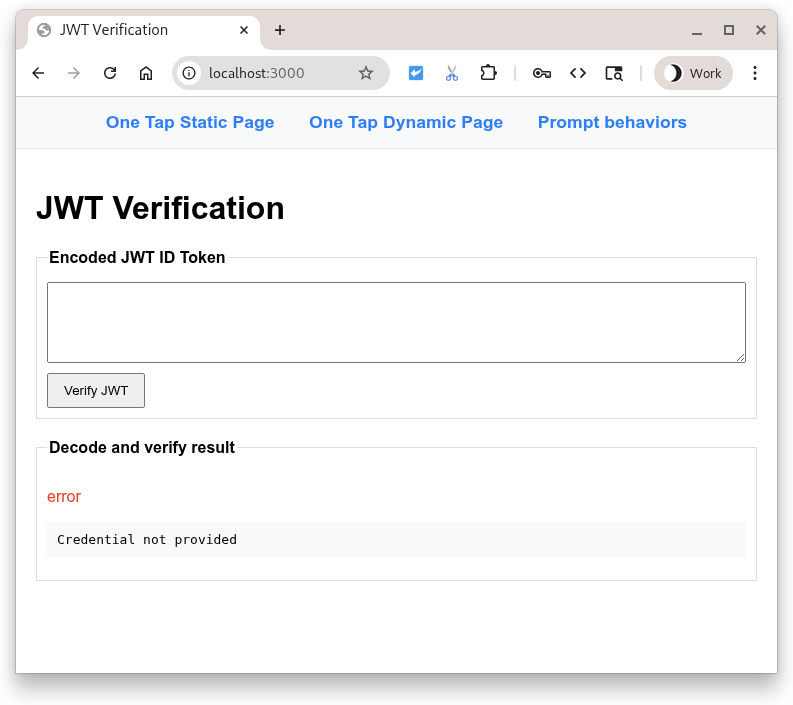
버튼을 누르면 항목 필드의 콘텐츠가 포함된 POST가 Python 스크립트로 전송됩니다. 스크립트는 인코딩된 JWT가 entryfield에 있어야 한다고 예상하므로 페이로드를 디코딩하고 확인하려고 시도합니다. 그런 다음 결과를 표시하기 위해 방문 페이지로 다시 리디렉션됩니다.
잠깐, JWT가 없는데... 이거 실패한 거 아닌가요? 예, 하지만 부드럽게
필드가 비어 있으므로 오류가 표시됩니다. 이제 entryfield에 원하는 텍스트를 입력하고 버튼을 다시 눌러 보세요. 다른 디코딩 오류로 인해 실패합니다.
인코딩된 Google 발급 JWT ID 토큰을 입력란에 붙여넣고 Python 스크립트가 이를 디코딩, 검증, 표시하도록 할 수도 있고 https://jwt.io를 사용하여 인코딩된 JWT를 검사할 수도 있습니다.
4. 정적 HTML 페이지
이제 JavaScript를 사용하지 않고 HTML 페이지에서 작동하도록 원탭을 설정합니다. 이는 정적 사이트나 캐싱 시스템 및 CDN에 유용할 수 있습니다.
먼저 static-page.html라는 파일에 다음 코드 샘플을 추가합니다.
<!DOCTYPE html>
<html lang="en">
  <head>
    <script src="https://accounts.google.com/gsi/client" async></script>
    <link rel="icon" href="data:," />
  </head>
  <body>
    <h1>Google One Tap static HTML page</h1>
    <div
      id="g_id_onload"
      data-client_id="PUT_YOUR_WEB_CLIENT_ID_HERE"
      data-ux_mode="redirect"
      data-login_uri="http://localhost:3000/user-login"
    ></div>
  </body>
</html>
그런 다음 static-page.html를 열고 PUT_YOUR_WEB_CLIENT_ID_HERE를 이전 Google 계정으로 로그인 버튼 Codelab에서 사용한 클라이언트 ID로 바꿉니다.
이 기능은 어떤 역할을 할까요?
id이 g_id_onload인 HTML 요소와 해당 데이터 속성은 Google ID 서비스 라이브러리 (gsi/client)를 구성하는 데 사용됩니다. 또한 문서가 브라우저에 로드될 때 원탭 메시지를 표시합니다.
data-login_uri 속성은 사용자가 로그인한 후 브라우저에서 POST 요청을 수신하는 URI입니다. 이 요청에는 Google에서 발급한 인코딩된 JWT가 포함됩니다.
원탭 옵션의 전체 목록은 HTML 코드 생성기 및 HTML API 참조를 확인하세요.
로그인
http://localhost:3000/static-page.html을 클릭합니다.
브라우저에 원탭 프롬프트가 표시됩니다.
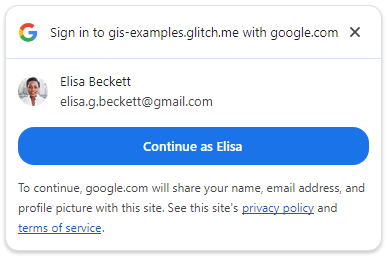
다음 계정으로 계속을 눌러 로그인합니다.
로그인 후 Google은 Python 서버의 로그인 엔드포인트로 POST 요청을 전송합니다. 요청에는 Google에서 서명한 인코딩된 JWT가 포함되어 있습니다.
여기에서 서버는 Google의 공개 서명 키 중 하나를 사용하여 Google이 JWT를 생성하고 서명했는지 확인합니다. 그런 다음 잠재고객이 클라이언트 ID와 일치하는지 디코딩하고 확인합니다. 그런 다음 CSRF 검사를 통해 쿠키 값과 POST 본문의 요청 매개변수 값이 동일한지 확인합니다. 그렇지 않다면 문제가 있다는 확실한 신호입니다.
마지막으로 방문 페이지에 성공적으로 확인된 JWT가 JSON 형식 ID 토큰 사용자 인증 정보로 표시됩니다.

일반적인 오류
로그인 흐름이 실패하는 방법에는 여러 가지가 있습니다. 가장 일반적인 이유는 다음과 같습니다.
data-client_id가 누락되었거나 잘못되었습니다. 이 경우 DevTools 콘솔에 오류가 표시되고 원탭 메시지가 작동하지 않습니다.- 잘못된 URI가 입력되었거나 웹 서버가 시작되지 않았거나 잘못된 포트에서 리슨하고 있어
data-login_uri를 사용할 수 없습니다. 이 경우 원탭 프롬프트는 작동하는 것처럼 보이지만 사용자 인증 정보가 반환될 때 DevTools 네트워크 탭에 오류가 표시됩니다. - 웹 서버에서 사용하는 호스트 이름 또는 포트가 OAuth 클라이언트 ID의 승인된 JavaScript 출처에 나열되어 있지 않습니다. 콘솔에 'ID 어설션 엔드포인트를 가져올 때 400 HTTP 응답 코드가 수신되었습니다.'라는 메시지가 표시됩니다. 이 Codelab 중에 이 메시지가 표시되면
http://localhost/와http://localhost:3000가 모두 나열되어 있는지 확인하세요.
5. 동적 페이지
이제 JavaScript 호출을 사용하여 원탭을 표시합니다. 이 예에서는 페이지가 로드될 때 항상 원탭이 표시되지만 필요할 때만 프롬프트를 표시하도록 선택할 수 있습니다. 예를 들어 사용자의 세션이 28일이 지났는지 확인하고 로그인 메시지를 다시 표시할 수 있습니다.
이 코드 샘플을 dynamic-page.html이라는 파일에 추가합니다.
<!DOCTYPE html>
<html lang="en">
  <head>
    <script src="https://accounts.google.com/gsi/client" async></script>
    <link rel="icon" href="data:," />
  </head>
  <body>
    <h1>Google One Tap dynamic page</h1>
    <script>
      const generateRandomString = (length) => {
        const array = new Uint8Array(length / 2);
        window.crypto.getRandomValues(array);
        return Array.from(array, (byte) =>
          byte.toString(16).padStart(2, "0")
        ).join("");
      };

      const setCookie = (name, value) => {
        document.cookie = '${name}=${value};path=/;SameSite=Lax';
      };

      const getCookie = (name) => {
        const nameEQ = name + "=";
        const ca = document.cookie.split(";");
        for (let i = 0; i < ca.length; i++) {
          let c = ca[i];
          while (c.charAt(0) == " ") c = c.substring(1, c.length);
          if (c.indexOf(nameEQ) == 0)
            return c.substring(nameEQ.length, c.length);
        }
        return null;
      };

      function handleResponse(rsp) {
        console.log("ID Token received from Google: ", rsp.credential);
        console.log("Submitting token to server via dynamic form POST.");

        const form = document.createElement("form");
        form.method = "POST";
        form.action = "http://" + window.location.host + "/user-login";

        // Add the credential and CSRF cookie value asa hidden fields
        const hiddenField = document.createElement("input");
        hiddenField.type = "hidden";
        hiddenField.name = "credential";
        hiddenField.value = rsp.credential;
        form.appendChild(hiddenField);

        const csrfToken = getCookie("g_csrf_token");
        if (csrfToken) {
          console.log("Found g_csrf_token cookie, adding to form.");
          const csrfField = document.createElement("input");
          csrfField.type = "hidden";
          csrfField.name = "g_csrf_token";
          csrfField.value = csrfToken;
          form.appendChild(csrfField);
        } else {
          console.warn(
            "Warning: g_csrf_token cookie not found. POSTing without it."
          );
        }

        document.body.appendChild(form);
        form.submit();
      }

      window.onload = function () {
        const csrfToken = generateRandomString(12);
        setCookie("g_csrf_token", csrfToken);
        console.log("CSRF token cookie set on page load:", csrfToken);

        google.accounts.id.initialize({
          client_id: "PUT_YOUR_WEB_CLIENT_ID_HERE",
          ux_mode: "popup",
          callback: handleResponse,
        });

        google.accounts.id.prompt(); // Display the One Tap prompt
      };
    </script>
  </body>
</html>
dynamic-page.html를 열고 PUT_YOUR_WEB_CLIENT_ID_HERE을 이전 Google 계정으로 로그인 버튼 Codelab에서 사용한 클라이언트 ID로 바꿉니다.
이 코드는 HTML과 JavaScript가 혼합되어 있으며 다음과 같은 여러 작업을 실행합니다.
google.accounts.id.initialize()를 호출하여 Google Identity Services 라이브러리 (gsi/client)를 구성합니다.- 크로스 사이트 요청 위조 (CSRF) 쿠키를 생성합니다.
- Google에서 인코딩된 JWT를 수신하고 폼 POST를 사용하여 Python 스크립트
/user-login엔드포인트에 제출하는 콜백 핸들러를 추가합니다. google.accounts.id.prompt()을 사용하여 원탭 프롬프트를 표시합니다.
원탭 설정의 전체 목록은 JavaScript API 참조에서 확인할 수 있습니다.
로그인해 보겠습니다.
브라우저에서 http://localhost:3000/dynamic-page.html을 엽니다.
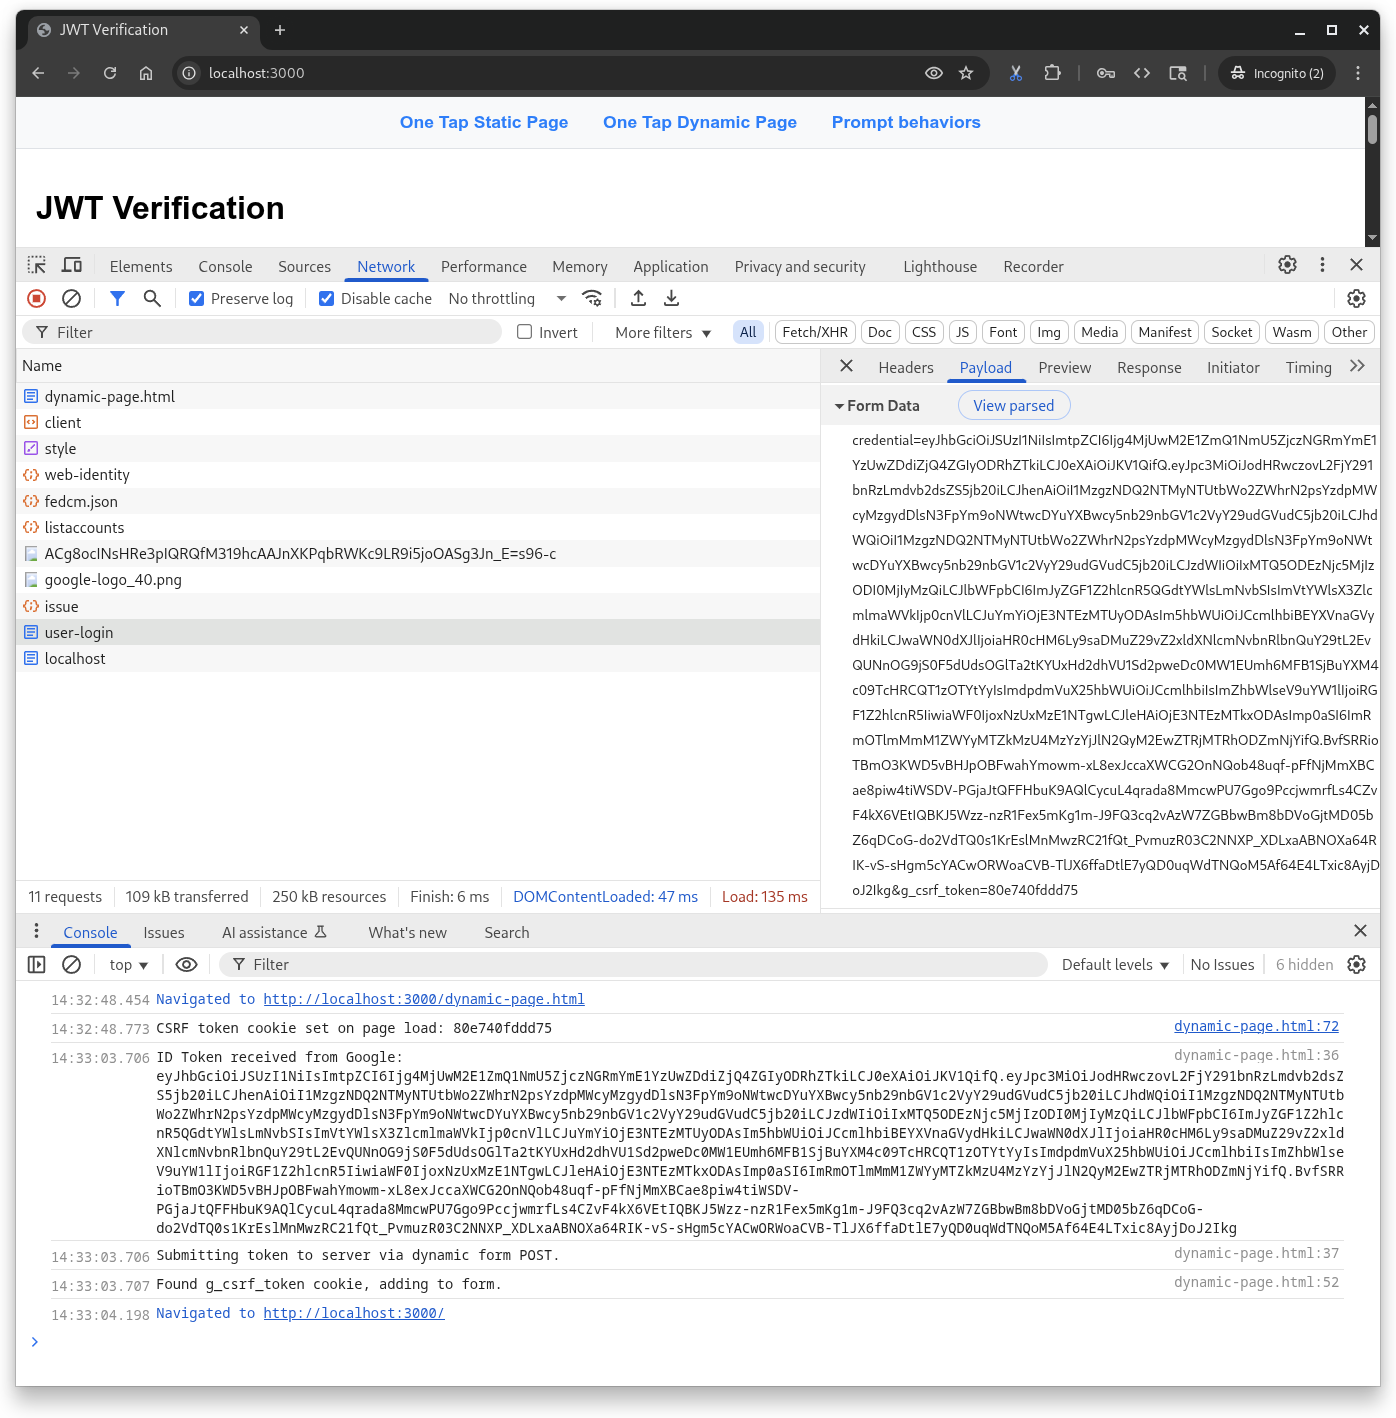
원탭 프롬프트 동작은 정적 HTML 시나리오와 동일하지만 이 페이지는 CSRF 쿠키를 만들고, Google에서 JWT를 수신하고, Python 서버의 user-login 엔드포인트에 게시하는 JavaScript 콜백 핸들러를 정의합니다. HTML API는 이러한 단계를 자동으로 실행합니다.
6. 프롬프트 동작
버튼과 달리 프롬프트는 항상 표시되지 않으므로 원탭으로 몇 가지 작업을 시도해 보겠습니다. 브라우저와 사용자가 닫거나 사용 중지할 수 있습니다.
먼저 다음을 prompt-outcomes.html이라는 파일에 저장합니다.
<!doctype html>
<html lang="en">
  <head>
    <meta charset="UTF-8" />
    <meta name="viewport" content="width=device-width, initial-scale=1.0" />
    <title>Google One Tap Prompt behaviors</title>
    <style>
      body { font-family: sans-serif; padding: 20px; }
      #log {
        border: 1px solid #ccc; background-color: #f0f0f0;
        padding: 15px; margin-top: 20px;
        white-space: pre-wrap; font-family: monospace;
      }
      .success { color: green; }
      .error { color: red; }
      .info { color: blue; }
      .warning { color: orange; }
    </style>
  </head>
  <body>
    <h1>One Tap behaviors</h1>
    <p>Open the developer console to see detailed logs.</p>
    <div id="log">Awaiting events...</div>

    <script src="https://accounts.google.com/gsi/client" async defer></script>

    <script>
      // logging utility to display event and notification info
      const logElement = document.getElementById("log");
      function log(message, type = "info") {
        const timestamp = new Date().toLocaleTimeString();
        logElement.innerHTML +=
          `\n<span class="${type}">[${timestamp}] ${message}</span>`;
        console.log(`[${type.toUpperCase()}] ${message}`);
      }

      function decodeJwt(jwt) {
        try {
          const parts = jwt.split(".");
          if (parts.length !== 3) {
            throw new Error("Invalid JWT structure");
          }
          const base64Url = parts[1];
          const base64 = base64Url.replace(/-/g, "+").replace(/_/g, "/");
          const jsonPayload = decodeURIComponent(
            atob(base64)
              .split("")
              .map(function (c) {
                return "%" + ("00" + c.charCodeAt(0).toString(16)).slice(-2);
              })
              .join(""),
          );
          return JSON.parse(jsonPayload);
        } catch (e) {
          log(`Error decoding JWT: ${e.message}`, "error");
          return null;
        }
      }

      /* Handles the credential response after a user signs in. */
      function handleCredentialResponse(credentialResponse) {
        log("Credential Response received.", "success");

        const credential = credentialResponse.credential;
        log(`Credential JWT: ${credential.substring(0, 30)}...`);

        // For demonstration, we decode the JWT on the client side.
        // REMEMBER: Always verify the token on your backend server!
        const payload = decodeJwt(credential);
        if (payload) {
          log(`Welcome, ${payload.name}! (Email: ${payload.email})`);
          log("Decoded JWT Payload: " + JSON.stringify(payload, null, 2));
        }
      }

      /* Handles notifications about the One-Tap prompt's UI status. */
      function handlePromptMomentNotification(notification) {
        log(`Prompt Moment Notification received.`, "info");

        if (notification.isNotDisplayed()) {
          const reason = notification.getNotDisplayedReason();
          log(`Prompt not displayed. Reason: <strong>${reason}</strong>`,
              "error");
        }
        if (notification.isSkippedMoment()) {
          const reason = notification.getSkippedReason();
          log(`Prompt was skipped. Reason: <strong>${reason}</strong>`,
              "warning");
          if (reason === "auto_cancel") {
            log("may have called prompt() multiple times in a row.");
          } else if (reason === "user_cancel") {
            log("The user manually closed the prompt.");
          }
        }
        if (notification.isDismissedMoment()) {
          const reason = notification.getDismissedReason();
          log(`Prompt dismissed. Reason: <strong>${reason}</strong>`, "info");
          if (reason === "credential_returned") {
            log("Expected, credential sent to the JS handler.");
          } else if (reason === "cancel_called") {
            log("programmatic call to google.accounts.id.cancel().");
          }
        }
      }

      window.onload = function () {
        try {
          google.accounts.id.initialize({
            client_id: "PUT_YOUR_WEB_CLIENT_ID_HERE",
            callback: handleCredentialResponse,
            ux_mode: "popup",
          });

          google.accounts.id.prompt(handlePromptMomentNotification);
          log("One Tap initialized. Waiting for prompt...");
        } catch (e) {
          log(`Initialization Error: ${e.message}`, "error");
        }
      };
    </script>
  </body>
</html>
다음으로 prompt-outcomes.html을 열고 PUT_YOUR_WEB_CLIENT_ID_HERE을 클라이언트 ID로 바꾼 다음 파일을 저장합니다.
브라우저에서 http://localhost:3000/prompt-outcomes.html을 엽니다.
페이지 클릭수
'원탭' 프롬프트 바깥쪽을 아무 곳이나 클릭하여 시작합니다. 페이지와 콘솔 모두에 '요청이 중단되었습니다.'가 로깅됩니다.
로그인
그런 다음 평소와 같이 로그인합니다. 사용자 세션을 설정하거나 새로고침하는 등의 작업을 트리거하는 데 사용할 수 있는 로깅 및 알림 업데이트가 표시됩니다.
프롬프트 닫기
이제 페이지를 새로고침하고 원탭이 표시되면 제목 표시줄의'X'를 누릅니다. 이 메시지는 콘솔에 로깅되어야 합니다.
- '사용자가 프롬프트를 거부하거나 닫았습니다. API 지수 쿨다운이 트리거되었습니다.'
테스트 중에 냉각을 트리거합니다. 대기 기간에는 원탭 프롬프트가 표시되지 않습니다. 테스트 중에는 자동으로 재설정될 때까지 기다리는 대신 재설정하는 것이 좋습니다. 커피를 마시거나 집에 가서 잠을 자고 싶지 않다면 말이죠. 쿨다운을 재설정하려면 다음 단계를 따르세요.
- 브라우저의 주소 표시줄 왼쪽에 있는 '사이트 정보' 아이콘을 클릭합니다.
- '권한 재설정' 버튼을 누르고
- 페이지를 새로고침합니다.
쿨다운을 재설정하고 페이지를 새로고침하면 원탭 메시지가 표시됩니다.
7. 결론
이 Codelab에서는 정적 HTML만 사용하여 또는 JavaScript로 동적으로 원탭을 표시하는 방법과 같은 몇 가지 사항을 알아봤습니다.
로컬 테스트를 위해 매우 기본적인 Python 웹 서버를 설정하고 ID 토큰을 디코딩하고 검증하는 데 필요한 단계를 알아봤습니다.
사용자가 원탭 메시지와 상호작용하고 이를 닫는 가장 일반적인 방법을 살펴봤으며 메시지 동작을 디버깅하는 데 사용할 수 있는 웹페이지가 있습니다.
축하합니다.
추가 점수를 받으려면 지원되는 다양한 브라우저에서 뒤로 돌아가 원탭을 사용해 보세요.
다음 링크가 다음 단계에 도움이 될 수 있습니다.
- Google ID 서비스 HTML API
- Google ID 서비스 JavaScript API
- 웹용 Google 계정으로 로그인 설정 방법
- Google ID 토큰 확인
- Google Cloud 프로젝트 자세히 알아보기
- Google ID 인증 방법