1. 简介
本 Codelab 以适用于 Web 的 Google 登录按钮 Codelab 为基础,因此请务必先完成该 Codelab。
在此 Codelab 中,您将使用 Google Identity Services JavaScript 库和一键式提示,通过 HTML 和 JavaScript API 向静态和动态网页添加用户登录功能。

我们还将设置一个服务器端登录端点来验证 JWT ID 令牌。
学习内容
- 如何设置服务器端登录端点以验证 ID 令牌
- 如何向网页添加 Google One Tap 提示
- 作为静态 HTML 元素,并且
- 使用 JavaScript 动态实现。
- “一键登录”提示的行为方式
所需条件
- 具备 HTML、CSS、JavaScript 和 Chrome 开发者工具(或同等工具)方面的基础知识。
- 用于修改和托管 HTML 及 JavaScript 文件的平台。
- 在上一个 Codelab 中获得的客户端 ID。
- 能够运行基本 Python 应用的环境。
可以开始使用了!
2. 设置登录端点
首先,我们将创建一个充当基本 Web 服务器的 Python 脚本,并设置运行该脚本所需的 Python 环境。
在本地运行该脚本时,它会向浏览器提供着陆页、静态 HTML 和动态一键登录页面。它接受 POST 请求,对凭据参数中包含的 JWT 进行解码,并验证该 JWT 是否由 Google Identity 的 OAuth 平台签发。
在解码并验证 JWT 后,脚本会重定向到 index.html 着陆页以显示结果。
将此内容复制到名为 simple-server.py 的文件中:
"""Very basic web server to handle GET and POST requests."""
from http.server import SimpleHTTPRequestHandler
import json
import socketserver
from typing import Dict, Optional, Tuple
import urllib.parse
from urllib.parse import parse_qs

from google.auth.transport import requests as google_auth_requests
from google.oauth2 import id_token


""" NOTE: You'll need to change this """
CLIENT_ID = (
    "PUT_YOUR_WEB_CLIENT_ID_HERE"
)

""" these may change for a Cloud IDE, but good as-is for local termainals """
SERVER_ADDRESS = "0.0.0.0"
PORT = 3000
TARGET_HTML_PAGE_URL = f"http://localhost:{PORT}/"
""" and this is the end of constants you might need to change """

HTTP_STATUS_OK = 200
HTTP_STATUS_BAD_REQUEST = 400
HTTP_STATUS_UNAUTHORIZED = 401
HTTP_STATUS_INTERNAL_SERVER_ERROR = 500
HTTP_STATUS_FOUND = 303  # For redirection after decode and verify
OIDC_SERVER = "accounts.google.com"


class OIDCJWTReceiver(SimpleHTTPRequestHandler):
  """Request handler to securely process a Google ID token response."""

  def _validate_csrf(self, request_parameters: Dict) -> Tuple[bool, str]:
    """Validates the g_csrf_token to protect against CSRF attacks."""
    csrf_token_body = request_parameters.get("g_csrf_token")
    if not csrf_token_body:
      return False, "g_csrf_token not found in POST body."

    csrf_token_cookie = None
    cookie_header = self.headers.get("Cookie")
    if cookie_header:
      cookie_pairs = (c.split("=", 1) for c in cookie_header.split(";"))
      cookies = {k.strip(): v.strip() for k, v in cookie_pairs}
      csrf_token_cookie = cookies.get("g_csrf_token")
    if not csrf_token_cookie:
      return False, "g_csrf_token not found in cookie."

    if csrf_token_body != csrf_token_cookie:
      return False, "CSRF token mismatch."

    return True, "CSRF token validated successfully."

  def _parse_and_validate_credential(
      self, request_parameters: Dict
  ) -> Optional[Tuple[Optional[Dict], str]]:
    """Parse POST data, extract, decode and validate user credential."""
    credential = request_parameters.get("credential")
    if not credential:
      return None, "Credential not provided"

    try:
      id_info = id_token.verify_oauth2_token(
          credential, google_auth_requests.Request(), CLIENT_ID
      )
      return id_info, ""
    except ValueError as e:
      return None, f"Error during JWT decode: {e}"
    except Exception as e:
      return None, f"Unexpected error during credential validation: {e}"

  def _redirect_to_html(self, response_data: Dict) -> None:
    """Redirect to the target HTML page with data in the URL fragment."""
    try:
      json_data = json.dumps(response_data)
      encoded_data = urllib.parse.quote(json_data)
      redirect_url = f"http://localhost:{PORT}/#data={encoded_data}"
      self.send_response(HTTP_STATUS_FOUND)
      self.send_header("Location", redirect_url)
      self.send_header("Connection", "close")
      self.end_headers()
    except Exception as e:
      print(f"An error occurred during redirection: {e}")
      self.send_response(HTTP_STATUS_INTERNAL_SERVER_ERROR)
      self.send_header("Content-type", "text/plain")
      self.send_header("Connection", "close")
      self.end_headers()
      self.wfile.write(f"A redirect error occurred: {e}".encode("utf-8"))

  def _send_bad_request(self, message: str) -> None:
    """Sends a 400 Bad Request response."""
    self.send_response(HTTP_STATUS_BAD_REQUEST)
    self.send_header("Content-type", "text/plain")
    self.send_header("Connection", "close")
    self.end_headers()
    self.wfile.write(message.encode("utf-8"))

  def do_POST(self):
    """Handle POST requests for the /user-login path."""
    if self.path != "/user-login":
      self.send_error(404, "File not found")
      return

    try:
      content_length = int(self.headers.get("Content-Length", 0))
      post_data_bytes = self.rfile.read(content_length)
      post_data_str = post_data_bytes.decode("utf-8")
      request_parameters = {
          key: val[0]
          for key, val in parse_qs(post_data_str).items()
          if len(val) == 1
      }

      csrf_valid, csrf_message = self._validate_csrf(request_parameters)
      if not csrf_valid:
        print(f"CSRF verify failure: {csrf_message}")
        self._send_bad_request(f"CSRF verify failure: {csrf_message}")
        return

      decoded_id_token, error_message = self._parse_and_validate_credential(
          request_parameters
      )

      response_data = {}
      if decoded_id_token:
        response_data["status"] = "success"
        response_data["message"] = decoded_id_token
      elif error_message:
        response_data["status"] = "error"
        response_data["message"] = error_message
      else:
        response_data["status"] = "error"
        response_data["message"] = "Unknown error during JWT validation"

      self._redirect_to_html(response_data)

    except Exception as e:
      self._redirect_to_html(
          {"status": "error", "error_message": f"Internal server error: {e}"}
      )


with socketserver.TCPServer(("", PORT), OIDCJWTReceiver) as httpd:
  print(
      f"Serving HTTP on {SERVER_ADDRESS} port"
      f" {PORT} (http://{SERVER_ADDRESS}:{PORT}/)"
  )
  httpd.serve_forever()
由于我们将使用 ID 令牌的受众群体 (aud) 字段来验证 JWT 是否已向您的客户端签发,因此您的 Python 应用需要知道正在使用哪个客户端 ID。为此,请将 PUT_YOUR_WEB_CLIENT_ID_HERE 替换为您在上一个“使用 Google 账号登录”Codelab 中使用的客户端 ID。
Python 环境
我们来设置运行 Web 服务器脚本的环境。
您需要 Python 3.8 或更高版本,以及一些有助于进行 JWT 验证和解码的软件包。
$ python3 --version
如果您的 python3 版本低于 3.8,您可能需要更改 shell PATH 以便找到预期版本,或者在系统上安装较新版本的 Python。
接下来,创建一个名为 requirements.txt 的文件,其中列出了我们进行 JWT 解码和验证所需的软件包:
google-auth
在 simple-server.py 和 requirements.txt 所在的同一目录中运行以下命令,以创建虚拟环境并仅为该应用安装软件包:
$ python3 -m venv env
$ source env/bin/activate
(env) $ pip install -r requirements.txt
现在启动服务器,如果一切正常,您会看到以下内容:
(env) $ python3 ./simple-server.py
Serving HTTP on 0.0.0.0 port 3000 (http://0.0.0.0:3000/) ...
基于云的 IDE
此 Codelab 旨在在本地终端和本地主机上运行,但稍作更改后,也可在 Replit 或 Glitch 等平台上使用。每个平台都有自己的设置要求和 Python 环境默认设置,因此您可能需要更改一些内容,例如 TARGET_HTML_PAGE_URL 和 Python 设置。
例如,在 Glitch 上,您仍然需要添加 requirements.txt,但还需要创建一个名为 start.sh 的文件来自动启动 Python 服务器:
python3 ./simple-server.py
Python 脚本和 HTML 文件使用的网址也需要更新为 Cloud IDE 的外部网址。因此,我们会有类似这样的内容:TARGET_HTML_PAGE_URL = f"https://your-project-name.glitch.me/"。由于此 Codelab 中的 HTML 文件也默认使用 localhost,因此您需要使用外部 Cloud IDE 网址(即 data-login_uri="https://your-project-name.glitch.me/user-login")更新这些文件。
3. 创建着陆页
接下来,我们将创建一个着陆页,用于显示通过一键登录功能登录的结果。该页面会显示解码后的 JWT ID 令牌或错误。网页上的表单也可用于将 JWT 发送到 Python HTTP 服务器上的登录端点,在该端点对 JWT 进行解码和验证。它使用 CSRF 双重提交 Cookie 和 POST 请求参数,以便能够重复使用与 Codelab 中的 gsi/client HTML 和 JavaScript API 示例相同的 user-login 服务器端点。
在终端中,将此内容保存到名为 index.html 的文件中:
<!doctype html>
<html lang="en">
  <head>
    <meta charset="UTF-8" />
    <meta name="viewport" content="width=device-width, initial-scale=1.0" />
    <title>JWT Verification</title>
    <style>
      body { font-family: sans-serif; margin: 0; }
      .top-nav {
        text-align: center; padding: 15px 0; background-color: #f8f9fa;
        border-bottom: 1px solid #dee2e6; width: 100%;
      }
      .top-nav a {
        margin: 0 15px; text-decoration: none; font-weight: bold;
        color: #007bff; font-size: 1.1em;
      }
      .top-nav a:hover { text-decoration: underline; }
      .page-container { padding: 20px; }
      pre {
        background-color: #f9f9f9; padding: 10px; overflow-x: auto;
        white-space: pre-wrap; word-break: break-all;
      }
      .error { color: red; }
      .success { color: green; }
      #jwt-form { margin-bottom: 20px; flex: 1; }
      fieldset {
        border: 1px solid #ddd; padding: 10px; margin: 0;
        min-width: 0; flex: 1; }
      legend { font-weight: bold; margin-bottom: 5px; }
      textarea { width: 100%; box-sizing: border-box; vertical-align: top; }
      button[type="submit"] { padding: 8px 15px; margin-top: 10px; }
      @media (min-width: 1024px) {
        .main-content { display: flex; gap: 20px; }
        .main-content > #jwt-form,
        .main-content > .result-container {
          flex-basis: 50%; /* Each item takes up 50% of the width */
          margin-bottom: 0; /* Remove bottom margin when side-by-side */
          display: flex; /* Make the result container a flex container */
          flex-direction: column; /* Stack children vertically */
          flex: 1; /* Allows the result container to grow and shrink */
        }
      }
    </style>
  </head>
  <body>
    <nav class="top-nav">
      <a href="static-page.html">One Tap Static Page</a>
      <a href="dynamic-page.html">One Tap Dynamic Page</a>
      <a href="prompt-outcomes.html">Prompt behaviors</a>
    </nav>
    <div class="page-container">
      <h1>JWT Verification</h1>

      <div class="main-content">
        <form id="jwt-form" action="/user-login" method="post">
          <fieldset>
            <legend>Encoded JWT ID Token</legend>
            <textarea id="credential" name="credential" rows="5"
                      cols="50"></textarea>
            <button type="submit">Verify JWT</button>
          </fieldset>
        </form>

        <section class="result-container">
          <fieldset>
            <legend>Decode and verify result</legend>
            <p id="status"></p>
            <pre id="result"></pre>
          </fieldset>
        </section>
      </div>
    </div>
    <script>
      const statusElement = document.getElementById("status");
      const resultElement = document.getElementById("result");

      const handleResponse = (responseData) => {
        const { status, message } = responseData;
        const result = message
          ? status === "success"
            ? JSON.stringify(message, null, 2)
            : message
          : "";

        statusElement.textContent = status;
        resultElement.textContent = result;
        statusElement.className = "";
        if (status === "success") {
          statusElement.classList.add("success");
        } else if (status === "error") {
          statusElement.classList.add("error");
        }
      };

      const getEncodedDataFromHash = (hash) => {
        const urlParams = new URLSearchParams(hash.substring(1));
        return urlParams.get("data");
      };

      const processHashData = (hash) => {
        const encodedData = getEncodedDataFromHash(hash);
        if (encodedData) {
          try {
            const jsonData = JSON.parse(decodeURIComponent(encodedData));
            handleResponse(jsonData);
            history.pushState(
              "",
              document.title,
              window.location.pathname + window.location.search,
            );
          } catch (error) {
            handleResponse({
              status: "error",
              message: "Error parsing data from URL: " + error,
            });
          }
        }
      };

      window.addEventListener("load",
                              () => processHashData(window.location.hash));
      window.addEventListener("hashchange",
                              () => processHashData(window.location.hash));
    </script>

    <script>
      document.addEventListener("DOMContentLoaded", () => {

        const generateRandomString = (length) => {
        const chars = "ABCDEFGHIJKLMNOPQRSTUVWXYZ" +
                      "abcdefghijklmnopqrstuvwxyz" +
                      "0123456789";
          let result = "";
          for (let i = 0; i < length; i++) {
            result += chars.charAt(Math.floor(Math.random() * chars.length));
          }
          return result;
        };

        const csrfToken = generateRandomString(12);
        document.cookie = `g_csrf_token=${csrfToken};path=/;SameSite=Lax`;
        const form = document.getElementById("jwt-form");
        const hiddenInput = document.createElement("input");
        hiddenInput.setAttribute("type", "hidden");
        hiddenInput.setAttribute("name", "g_csrf_token");
        hiddenInput.setAttribute("value", csrfToken);
        form.appendChild(hiddenInput);
      });
    </script>
  </body>
</html>
测试 Web 服务器和 JWT 解码
在尝试使用一键登录之前,我们先确保服务器端点环境已设置并正常运行。
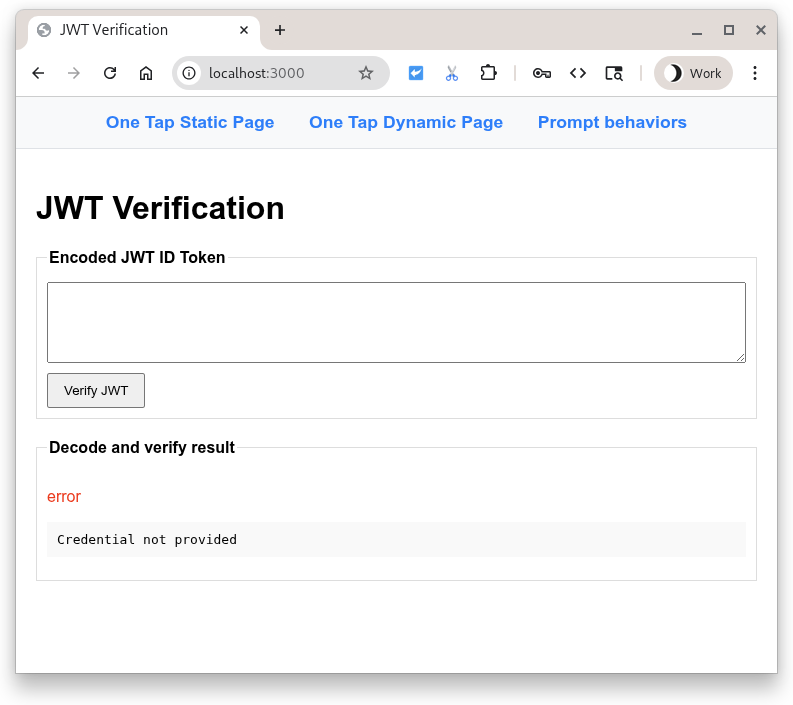
浏览到着陆页 http://localhost:3000/,然后按 Verify JWT 按钮。
您应该会看到以下内容

按此按钮会向 Python 脚本发送包含 entryfield 内容的 POST。脚本预期在 entryfield 中存在编码的 JWT,因此会尝试解码并验证载荷。之后,它会重定向回着陆页以显示结果。
但是等等,没有 JWT,这难道不是失败了吗?是,但要优雅地!
由于该字段为空,因此系统会显示错误。现在,尝试在输入框中输入一些文字(任意文字),然后再次按该按钮。但会因其他解码错误而失败。
您可以将 Google 颁发的已编码 JWT ID 令牌粘贴到输入字段中,然后让 Python 脚本为您解码、验证并显示该令牌…或者,您也可以使用 https://jwt.io 来检查任何已编码的 JWT。
4. 静态 HTML 网页
好的,现在我们将设置“一键登录”,使其在 HTML 网页上运行,而无需使用任何 JavaScript。这对于静态网站或缓存系统和 CDN 很有用。
首先,将以下代码示例添加到名为 static-page.html 的文件中:
<!DOCTYPE html>
<html lang="en">
  <head>
    <script src="https://accounts.google.com/gsi/client" async></script>
    <link rel="icon" href="data:," />
  </head>
  <body>
    <h1>Google One Tap static HTML page</h1>
    <div
      id="g_id_onload"
      data-client_id="PUT_YOUR_WEB_CLIENT_ID_HERE"
      data-ux_mode="redirect"
      data-login_uri="http://localhost:3000/user-login"
    ></div>
  </body>
</html>
接下来,打开 static-page.html,并将 PUT_YOUR_WEB_CLIENT_ID_HERE 替换为您在之前的“使用 Google 账号登录”按钮 Codelab 中使用的客户端 ID。
那么,这有什么用呢?
任何 id 为 g_id_onload 的 HTML 元素及其数据属性都用于配置 Google Identity Services 库 (gsi/client)。当文档在浏览器中加载时,它还会显示一键登录提示。
data-login_uri 属性是用户登录后将接收来自浏览器的 POST 请求的 URI。此请求包含由 Google 签发的编码 JWT。
如需查看一键登录选项的完整列表,请参阅 HTML 代码生成器和 HTML API 参考文档。
登录
点击 http://localhost:3000/static-page.html。
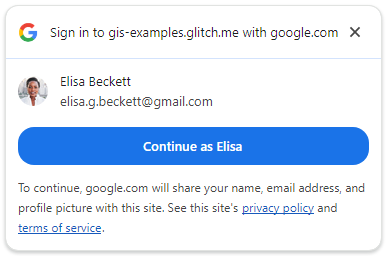
您应该会在浏览器中看到“一键登录”提示。

按以身份继续登录。
登录后,Google 会向 Python 服务器的登录端点发送 POST 请求。请求包含由 Google 签名的已编码 JWT。
然后,服务器使用 Google 的某个公开签名密钥来验证 JWT 是否由 Google 创建和签名。然后,它会解码并验证受众群体是否与您的客户端 ID 相符。接下来,系统会执行 CSRF 检查,以确保 Cookie 值与 POST 正文中的请求参数值相等。如果不是,则表示存在问题。
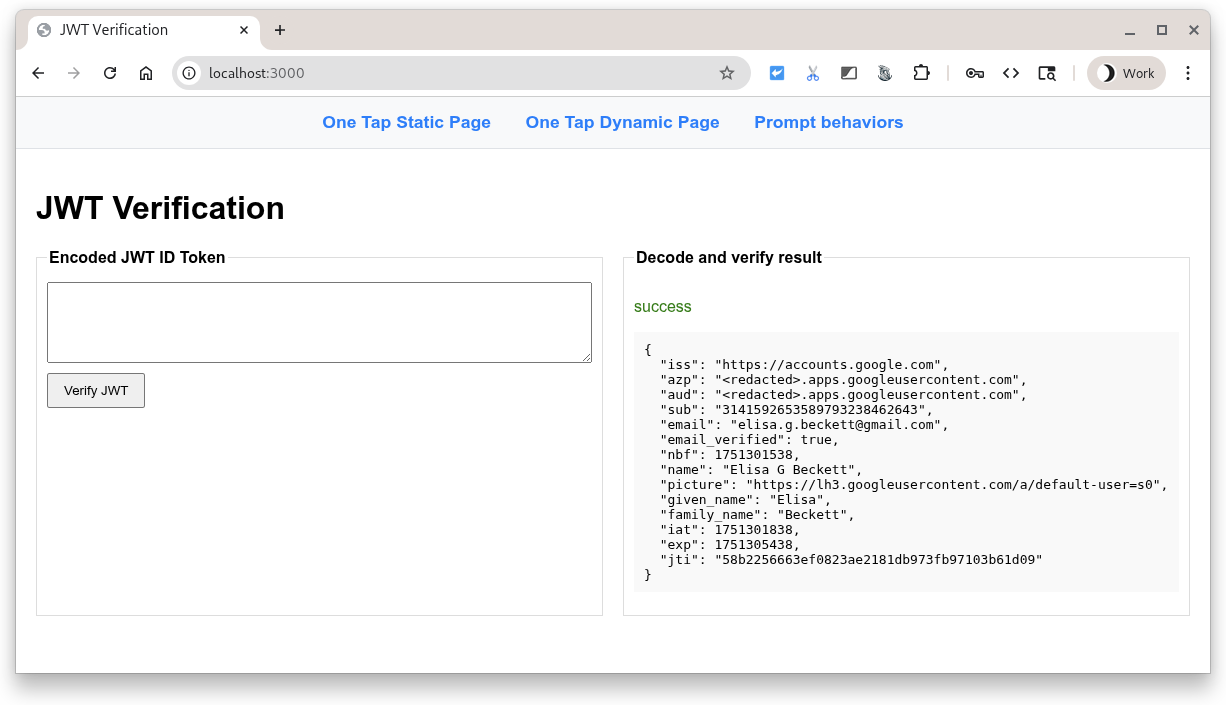
最后,着陆页会以 JSON 格式的 ID 令牌用户凭据显示已成功验证的 JWT。

常见错误
登录流程可能会因多种原因而失败。以下是一些最常见的原因:
data-client_id缺失或不正确,在这种情况下,您会在开发者工具控制台中看到错误,并且一键登录提示不会正常显示。data-login_uri不可用,原因可能是输入的 URI 不正确、Web 服务器未启动或正在监听错误的端口。如果发生这种情况,“一键登录”提示似乎可以正常显示,但在返回凭据时,开发者工具的网络标签页中会显示错误。- 您的 Web 服务器使用的主机名或端口未列在 OAuth 客户端 ID 的已获授权的 JavaScript 源中。您会看到一条控制台消息:“在提取 ID 断言端点时,收到了 400 HTTP 响应代码。”。如果您在本 Codelab 期间看到此消息,请检查是否列出了
http://localhost/和http://localhost:3000。
5. 动态网页
现在,我们将使用 JavaScript 调用来显示一键登录。在此示例中,我们会在网页加载时始终显示一键登录提示,但您也可以选择仅在需要时显示该提示。例如,您可以检查用户的会话是否已超过 28 天,并再次显示登录提示。
将此代码示例添加到名为 dynamic-page.html 的文件中。
<!DOCTYPE html>
<html lang="en">
  <head>
    <script src="https://accounts.google.com/gsi/client" async></script>
    <link rel="icon" href="data:," />
  </head>
  <body>
    <h1>Google One Tap dynamic page</h1>
    <script>
      const generateRandomString = (length) => {
        const array = new Uint8Array(length / 2);
        window.crypto.getRandomValues(array);
        return Array.from(array, (byte) =>
          byte.toString(16).padStart(2, "0")
        ).join("");
      };

      const setCookie = (name, value) => {
        document.cookie = '${name}=${value};path=/;SameSite=Lax';
      };

      const getCookie = (name) => {
        const nameEQ = name + "=";
        const ca = document.cookie.split(";");
        for (let i = 0; i < ca.length; i++) {
          let c = ca[i];
          while (c.charAt(0) == " ") c = c.substring(1, c.length);
          if (c.indexOf(nameEQ) == 0)
            return c.substring(nameEQ.length, c.length);
        }
        return null;
      };

      function handleResponse(rsp) {
        console.log("ID Token received from Google: ", rsp.credential);
        console.log("Submitting token to server via dynamic form POST.");

        const form = document.createElement("form");
        form.method = "POST";
        form.action = "http://" + window.location.host + "/user-login";

        // Add the credential and CSRF cookie value asa hidden fields
        const hiddenField = document.createElement("input");
        hiddenField.type = "hidden";
        hiddenField.name = "credential";
        hiddenField.value = rsp.credential;
        form.appendChild(hiddenField);

        const csrfToken = getCookie("g_csrf_token");
        if (csrfToken) {
          console.log("Found g_csrf_token cookie, adding to form.");
          const csrfField = document.createElement("input");
          csrfField.type = "hidden";
          csrfField.name = "g_csrf_token";
          csrfField.value = csrfToken;
          form.appendChild(csrfField);
        } else {
          console.warn(
            "Warning: g_csrf_token cookie not found. POSTing without it."
          );
        }

        document.body.appendChild(form);
        form.submit();
      }

      window.onload = function () {
        const csrfToken = generateRandomString(12);
        setCookie("g_csrf_token", csrfToken);
        console.log("CSRF token cookie set on page load:", csrfToken);

        google.accounts.id.initialize({
          client_id: "PUT_YOUR_WEB_CLIENT_ID_HERE",
          ux_mode: "popup",
          callback: handleResponse,
        });

        google.accounts.id.prompt(); // Display the One Tap prompt
      };
    </script>
  </body>
</html>
打开 dynamic-page.html,并将 PUT_YOUR_WEB_CLIENT_ID_HERE 替换为您在上一个“使用 Google 账号登录”Codelab 中使用的客户端 ID。
此代码是 HTML 和 JavaScript 的混合体,可执行多项操作:
- 通过调用
google.accounts.id.initialize()配置 Google Identity Services 库 (gsi/client), - 生成跨站请求伪造 (CSRF) Cookie,
- 添加了一个回调处理程序,用于从 Google 接收编码的 JWT,并使用表单 POST 将其提交到我们的 Python 脚本
/user-login端点; - 使用
google.accounts.id.prompt()显示“一键式”提示。
如需查看一键登录设置的完整列表,请参阅 JavaScript API 参考文档。
让我们登录吧!
在浏览器中打开 http://localhost:3000/dynamic-page.html。
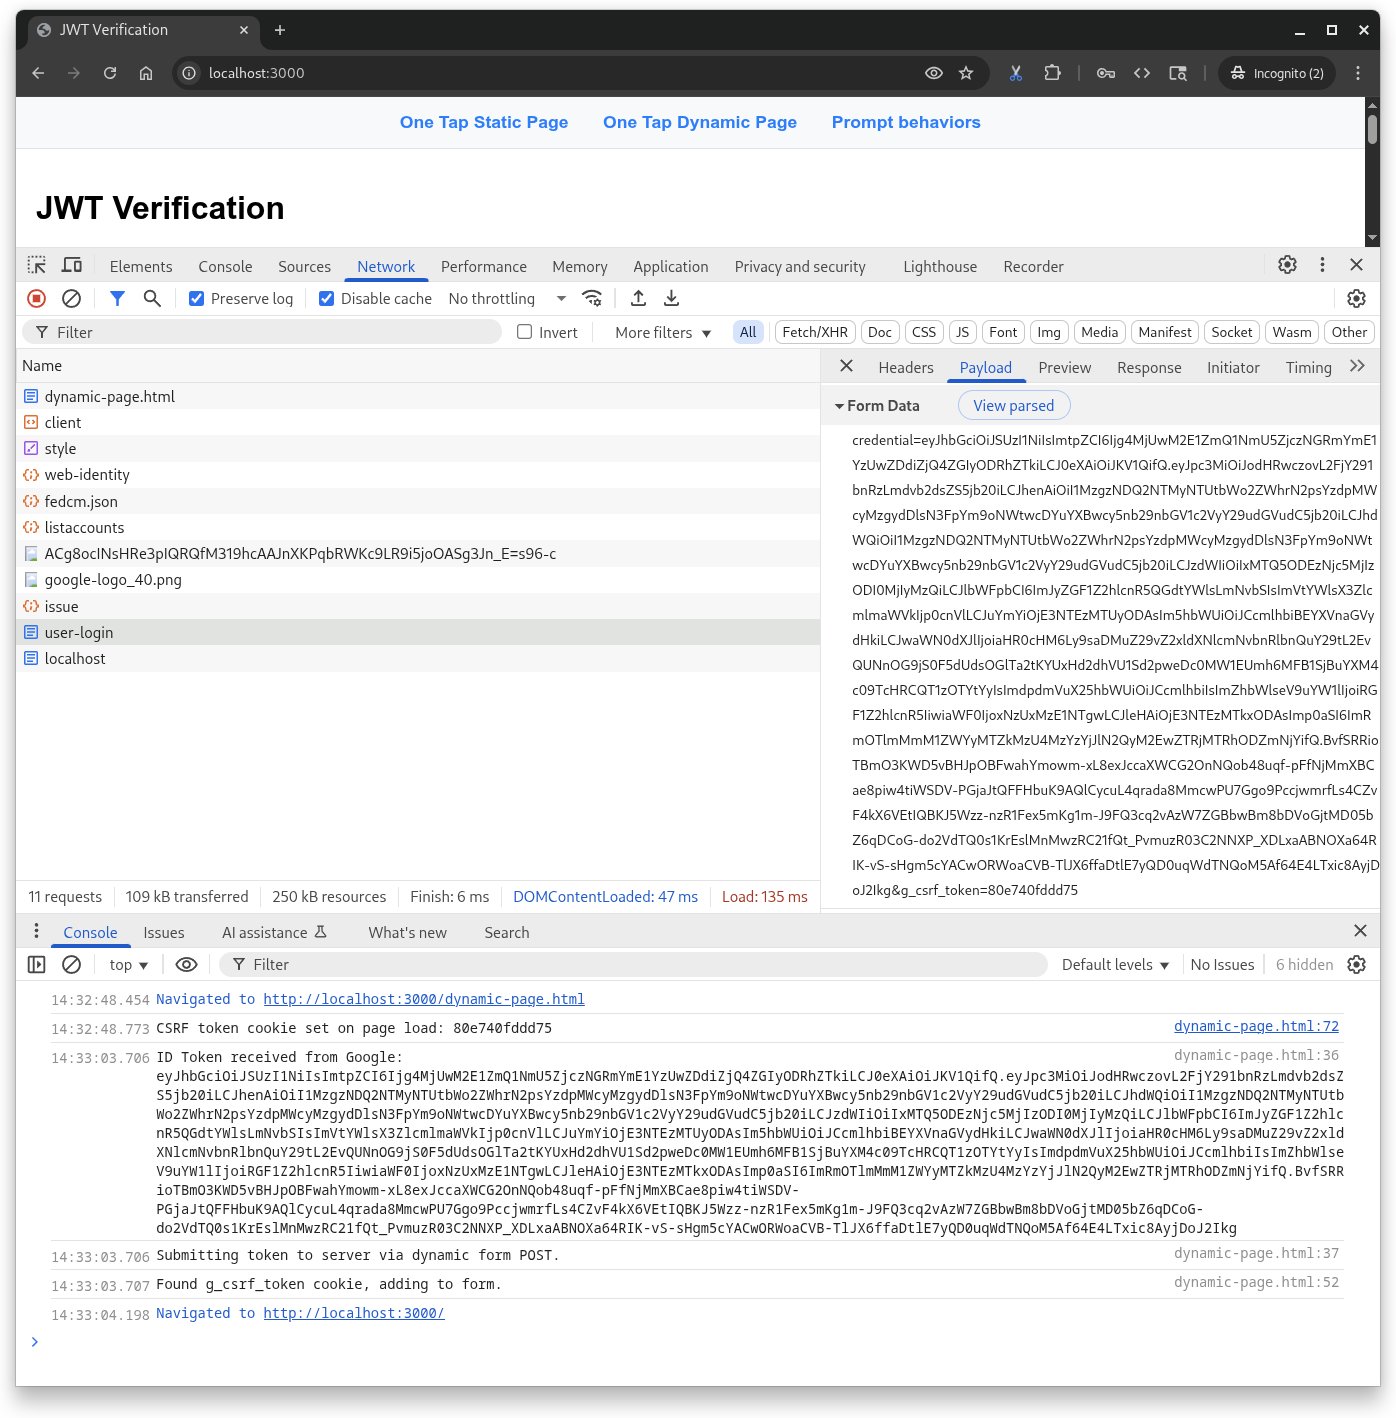
单点登录提示行为与静态 HTML 方案相同,不同之处在于此页面定义了一个 JavaScript 回调处理程序,用于创建 CSRF Cookie、从 Google 接收 JWT 并将其 POST 到 Python 服务器的 user-login 端点。HTML API 会自动为您执行这些步骤。

6. 提示行为
因此,我们来尝试一下单点登录,因为与按钮不同,提示并非始终显示。浏览器和用户可以关闭、关闭或停用该服务。
首先,将此内容保存到名为 prompt-outcomes.html 的文件中:
<!doctype html>
<html lang="en">
  <head>
    <meta charset="UTF-8" />
    <meta name="viewport" content="width=device-width, initial-scale=1.0" />
    <title>Google One Tap Prompt behaviors</title>
    <style>
      body { font-family: sans-serif; padding: 20px; }
      #log {
        border: 1px solid #ccc; background-color: #f0f0f0;
        padding: 15px; margin-top: 20px;
        white-space: pre-wrap; font-family: monospace;
      }
      .success { color: green; }
      .error { color: red; }
      .info { color: blue; }
      .warning { color: orange; }
    </style>
  </head>
  <body>
    <h1>One Tap behaviors</h1>
    <p>Open the developer console to see detailed logs.</p>
    <div id="log">Awaiting events...</div>

    <script src="https://accounts.google.com/gsi/client" async defer></script>

    <script>
      // logging utility to display event and notification info
      const logElement = document.getElementById("log");
      function log(message, type = "info") {
        const timestamp = new Date().toLocaleTimeString();
        logElement.innerHTML +=
          `\n<span class="${type}">[${timestamp}] ${message}</span>`;
        console.log(`[${type.toUpperCase()}] ${message}`);
      }

      function decodeJwt(jwt) {
        try {
          const parts = jwt.split(".");
          if (parts.length !== 3) {
            throw new Error("Invalid JWT structure");
          }
          const base64Url = parts[1];
          const base64 = base64Url.replace(/-/g, "+").replace(/_/g, "/");
          const jsonPayload = decodeURIComponent(
            atob(base64)
              .split("")
              .map(function (c) {
                return "%" + ("00" + c.charCodeAt(0).toString(16)).slice(-2);
              })
              .join(""),
          );
          return JSON.parse(jsonPayload);
        } catch (e) {
          log(`Error decoding JWT: ${e.message}`, "error");
          return null;
        }
      }

      /* Handles the credential response after a user signs in. */
      function handleCredentialResponse(credentialResponse) {
        log("Credential Response received.", "success");

        const credential = credentialResponse.credential;
        log(`Credential JWT: ${credential.substring(0, 30)}...`);

        // For demonstration, we decode the JWT on the client side.
        // REMEMBER: Always verify the token on your backend server!
        const payload = decodeJwt(credential);
        if (payload) {
          log(`Welcome, ${payload.name}! (Email: ${payload.email})`);
          log("Decoded JWT Payload: " + JSON.stringify(payload, null, 2));
        }
      }

      /* Handles notifications about the One-Tap prompt's UI status. */
      function handlePromptMomentNotification(notification) {
        log(`Prompt Moment Notification received.`, "info");

        if (notification.isNotDisplayed()) {
          const reason = notification.getNotDisplayedReason();
          log(`Prompt not displayed. Reason: <strong>${reason}</strong>`,
              "error");
        }
        if (notification.isSkippedMoment()) {
          const reason = notification.getSkippedReason();
          log(`Prompt was skipped. Reason: <strong>${reason}</strong>`,
              "warning");
          if (reason === "auto_cancel") {
            log("may have called prompt() multiple times in a row.");
          } else if (reason === "user_cancel") {
            log("The user manually closed the prompt.");
          }
        }
        if (notification.isDismissedMoment()) {
          const reason = notification.getDismissedReason();
          log(`Prompt dismissed. Reason: <strong>${reason}</strong>`, "info");
          if (reason === "credential_returned") {
            log("Expected, credential sent to the JS handler.");
          } else if (reason === "cancel_called") {
            log("programmatic call to google.accounts.id.cancel().");
          }
        }
      }

      window.onload = function () {
        try {
          google.accounts.id.initialize({
            client_id: "PUT_YOUR_WEB_CLIENT_ID_HERE",
            callback: handleCredentialResponse,
            ux_mode: "popup",
          });

          google.accounts.id.prompt(handlePromptMomentNotification);
          log("One Tap initialized. Waiting for prompt...");
        } catch (e) {
          log(`Initialization Error: ${e.message}`, "error");
        }
      };
    </script>
  </body>
</html>
接下来,打开 prompt-outcomes.html,将 PUT_YOUR_WEB_CLIENT_ID_HERE 替换为您的客户端 ID,然后保存该文件。
在浏览器中,打开 http://localhost:3000/prompt-outcomes.html
页面点击次数
首先,点击“一键式”提示以外的任意位置。您应该会在网页和控制台中看到“The request has been aborted.”的日志。
登录
接下来,只需正常登录即可。您会看到可用于触发某些操作(例如建立或刷新用户会话)的日志记录和通知更新。
关闭提示
现在,重新加载页面,在显示“一键登录”后,按其标题栏中的“X”。此消息应记录到控制台:
- “用户拒绝或关闭了提示。API 指数冷却已触发。”
在测试期间,您将触发降温。在冷却期内,系统不会显示“一键式”提示。在测试期间,您可能需要重置设备,而不是等待设备自动重置,除非您真的想去喝杯咖啡或回家睡个好觉。如需重置冷却时间,请执行以下操作:
- 点击浏览器地址栏左侧的“网站信息”图标,
- 按“重置权限”按钮,然后
- 重新加载页面。
重置冷却时间并重新加载页面后,系统会显示“一键登录”提示。
7. 总结
因此,在此 Codelab 中,您学习了一些内容,例如如何仅使用静态 HTML 或使用 JavaScript 动态显示一键登录。
您设置了一个非常基本的 Python Web 服务器以进行本地测试,并了解了对 ID 令牌进行解码和验证所需的步骤。
您已尝试过用户与“一键登录”提示互动并将其关闭的最常见方式,并且有一个可用于调试提示行为的网页。
恭喜!
如需获得额外学分,请尝试返回并使用 One Tap 在其支持的不同浏览器中进行操作。
以下链接可能有助于您完成后续步骤:
- Google Identity 服务 HTML API
- Google Identity 服务 JavaScript API
- 如何为 Web 版 Google 账号登录功能设置
- 验证 Google ID 令牌
- 详细了解 Google Cloud 项目
- Google Identity 身份验证方法
